#learn to use liquid sculpey
Explore tagged Tumblr posts
Visit Tumblr Blog
Explore Tumblr blogs with no restrictions, modern design and the best experience.
Last Seen Tumblr Blogs


Fun Fact
Tumblr was named as a finalist in Lead411’s New York City Hot 125 in Aug 2010.
Text
Best Tips on How to Store Sculpey Clay for Long-Lasting Usability
#10 things to know about air drying clay#how to clean clay when stik at plastics#how to condition pardo polymer clay#how to make money on etsy#how to recycle air dry clay easy#how to sell on etsy#how to sell on etsy for beginners#how to sell on etsy successfully#introduction to sculpey#learn to use liquid sculpey#liquid sculpey#michaels stores#new to sculpey#recycling symbols on plastics#sculpey#sculpey clay softener#sculpey tips
0 notes
Text
This week I have acquired a dark and terrible new skill
I took this week off to recover from the agonies of slaving for the corporate machine without respite. Since it's me, I couldn't do something normal like "go to the beach" or "travel to Dollywood". Oh no, friends, this week I have dedicated myself to learning a new skill, one that will open up new depths of glorious cosplay depravity: I've learned how to make latex wound prosthetics from scratch.

Step 1: Clay sculpting. Haven't used modeling clay since I was in grade school. Pretty sure my art teacher didn't have this in mind when she taught me how to make Sculpey beads.

Step 2: Plaster of paris poured over the clay, then set for 24 agonizing hours of waiting to find out that the plaster set too quickly and ruined the whole thing, followed by another 24 agonizing hours with a new brand of plaster and a little bit more water in the mix. I still ended up with some bubbles in the mold even with my best attempt, so there's room for improvement for sure, but I eventually got a half-way decent mold.
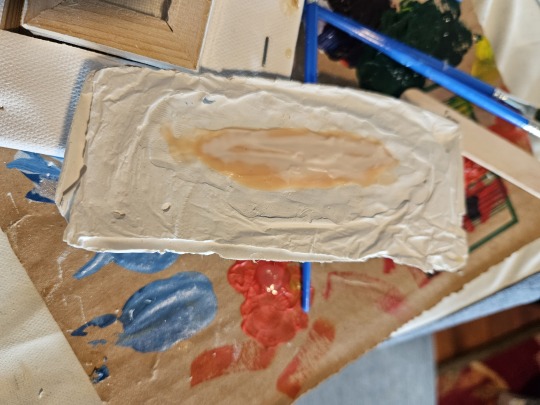
Step 3: Latex goes in the mold. I did this twice as well, experimenting with two different brands of liquid latex. To no great surprise, I liked the expensive Ben Nye product better than the cheaper Monster liquid latex off Amazon. The Monster latex had a TERRIBLE ammonia odor - Ben Nye was a bit less nasty and poured better.

Step 4 (the best step): Paint that nasty scrap of skin. I didn't do any research into the best products for this application, just dug in to what I already had in stock - a combination of SFX body paints and regular makeup products.
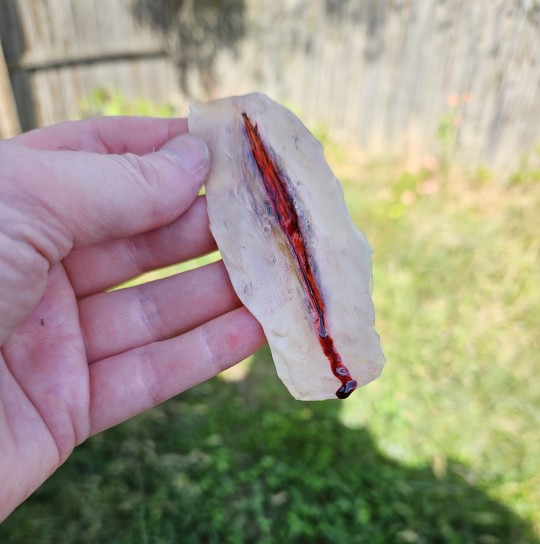
And a little dab of Kryolan SFX blood for that extra ooze.
Ahhhhhhh, friends... there's truly no stopping me now.
8 notes
·
View notes
Text
Gemma Goodridge
We were asked to look at the techniques and art work of Gemma Goodridge, on her website:
I liked Gemma's work, her Bug Race Car was really well made, and I liked seeing how she made it in her portfolio section. The final piece is of really high quality, with great detail on the whole thing, from the wings, to the painted detail on the body of the car, to make it look like a cocoon, and the little pins for controls, on the bugs felt seat. The wooden frame for the canopy, fixed with twine, makes it feel natural, like a bug could have made it themselves.
I also really like her Frog Merchant, Eractus, it was a really high standard. Again, the portfolio section was really well done for this project, giving so much information, including photos on the process of making him a little story about him, which was endearing and his height, at 4ft tall... that is a big sculpture! The little barrow he pulls along, carrying his wares has a great deal of detail, with all the named bottles and even drips from the various potions running down the barrow.
youtube
I really liked this video, it was a decent speed, a decent amount of time, the artist didn't spend too long on one aspect and there were words on the screen as the video went along to assist with what was happening, or what they were using. The model was a really high quality, with a tinfoil base, covered in polymer clay and painted, with a lot of detail added using various tools. They made a nice base for it to stand on and I felt the finished piece was of a very high standard. I really enjoyed watching the video.
youtube
This video was a little too long for me, I found myself getting easily distracted and had to fast forward on some parts due to the artist just showing it at different angles. Having said that, it was good that the artist showed the whole process, which would be helpful to someone just learning. It would be helpful if the artist had listed all the items when showing them, at the beginning of the video, as some people may not know what they were. The model itself was really well made, using polymer clay for the body of the model, painting it with acrylic paint in neutral, earthy colours and I liked the addition of the coral type material. I felt the finished, shiny effect let the design down, it looked much more natural before the artist added the epoxy resin.
youtube
This video was very professionally made, there was lots of explanation and it went along at a good pace. The artist started with a tin foils base, covering it in polymer clay and adding absolutely loads of detail with various tools like a small pearlising tool, and created black toenails from primo sculpey because it is a stronger version, using a medium ball stylus to make the dent to place them in. He covers the clay with a translucent liquid clay and a clay softener to fill in the gaps between the scales instead of him having to poke holes in it, so it looks more natural. He used wire, as a base, to form the arms. legs and fingers. He used tin foil, again, for the head base, creating a face and using a wedge firm detail tool to create indents for the teeth. He made the horns out of the primo sculpey he used for the claws. He used a wooden stick to connect the head to the body, sculping round it, to make a neck. He then used acrylic paints to give his monster colour. I felt I learnt a lot from this video, it was very inspiring and the finished piece was amazing!
youtube
This video, helpfully, had different sections, so the watcher could go to the character they wanted to see made without having to scroll though the whole video. This one is more for artistic detail, for learning how to make the individual characters, more than learning about model making in detail. The first character he made was King Boo, the ghost. He started with translucent Cos Clay, making the mouth, he added pre baked teeth, made from the translucent clay. He uses various tools, including a ball stylus. Then he creates a body and shows clips from a Marion show to see where he got the inspiration from. He mounted the body on a rod, to enable him to work on the model without damaging it. When making the Piranah Plant he uses wire as a base for the stalk and a wire frame for the head/mouth section. He used a roller for 'gnarly texture' and a silicone shaper to create creases and lines on the outside of the plants head/mouth. He uses some plastic to lay the clay on when he makes the leaves, so they are easier to remove, once shaped. He used a metallic base coat to paint, followed by black wash and green wash. He uses a high gloss varnish on the mouth section and used some UHU glue to create some slobber, which was really effective. Later, when making the mushrooms, he uses an Umber wash, made from a mixture of Umber Ink, flower improver and a dab of water, making it think enough to coat the clay without filling up all the cracks. This video moved at a faster pace than the others, I enjoyed watching it as I like Mario.
Jim McKenzie:
0 notes
Text

My progress on this teapot-mobile has slowed to a crawl as I try to repair the surface layer... I suspect that due to the dryness of the clay it wasnt able to properly adhere to the layer below leading to the formation of air bubbles. I had originally planned to use a layer of liquid sculpey before the new layer but then I forgot 😅 lesson learned...
0 notes
Text
I'll help you out! Idk what you made the original antlers with, but i'm gonna assume it was polymer clay.
The biggest thing i can suggest is to sculpt the antlers off of the Critter, with a sewing pin inside the clay. i'd suggest pins with a lil ball at the end, or ones with a little bend in them just so that they don't slip out of the clay. It gives you a base/armature for the antl3r, and also a way to attatch it without having to rely on only glue. When you're happy w your antlers, give them a test run on the position you're thinking of, make a teeny tiny lil mark where the needle sticks into the head, and then add a TINY bit of glue on them when you install them. Too much glue is gonna ruin the flocking, whicj i think you mention that you already redid (and nobody wants to have to reflock something three times)
As for the sizing, i say just try your best. Make sure that your Critter is somewhere near enough to compare the sizes to that, and also to both antlers.
As for anything polymer clay related, remember these few things (that took me too long tk learn):
• make sure you know your clay's baking temp. Not all brands have the same curing temp.
• make the base of your artpiece out of aluminum foil, at least. it cuts down on the weight and amount of clay that you use. For bigger pieces and figurines, i'd suggest also using armature wires (jewelry wire works fine, you don't need specifically "armature wire.")
• make sure that those aluminum bases are SMALLER than the size of the piece you intend to make. Even thin sheets of clay over top can add a lot to the size of your piece.
• bakable polymer clays can be softened with mineral oil. It can be added to help you knead the clay until it's workable, can help you blend uncured clays, and get rid of things like fingerprints if you find that to be an issue. I just recently learned that you can remove fingerprints w rubbing alcohol as well, but idk how it would affect those other things.
• you can cure many polymer clays several times! I use Sculpey clays, and i've made pieces that had me baking the same piece of clay over 10 times and it turned out completely fine! Just make sure that you don't burn your pieces.
• maybe test your brand on how well it handles that before commiting to using that method. i've only ever used Sculpey, so idk how Fimo or Cosclay handles that.
• you can always come back to a piece after it cures and sand it to be smooth. I've never been able to sculpt even sheres without it being lopsided, but sanding can help you get the exact shape that you need.
• combine the curing and sanding methods! If you're making cartoony/stylized pieces, building details on top of smooth surfaces makes the end look really neat.
• if you're having problems with clay pieces sticking to each other, and you don't want to blend the uncured clay, look into liquid polymer clays. Sculpey has something called "Bake and Bond," but i've used regular Liquid Sculpey to connect pieces and that works fine too.
• you can use SOME other materials alongside polymer clays to make a piece. I've seen wood and metal and glass used in pieces: ones that needed those bits baked along w the clay. just make sure that those materials can handle the temperature that your clay cures at before doing that.
• there are a lot of YT tutorials on how to get different effects for things. whatever you can't find for yourself, like say making joints for a doll or something, then try it yourself at a small scale so that you don't waste too much clay OR your main artpiece.
• don't put so much pressure on yourself to making your first clay pieces perfect. we all need practice to make things look good, and starting out means that you don't have that. just bc your first clay piece didn't come out the way you wanted doesn't mean that your tenth piece won't. Keep trying, and keep it easy as you start out with anything that you do.
i think i might have some more tips, but i can't remember them rn, so i'll come back and add if i need to. i hope any of this helped anyone. I'm trying to make art videos with some tips, my YT name is the same as here (Yo-Snap!)
Okay so the deer calico that ive gave antlers for didn't work as well as I thought so I've decided to remove them, It wasn't easy and I had to refur to just change the look completely. However this doesn't mean I haven't gave up on giving this guy antlers, it just mean that I gotta try again. I need to make sure I make the antlers too big nor too small if that makes sense. To the folks, Please feel free to give me ideas or at least tips on how I can do toy customs and restorations better. and while you add it maybe how to make better dolls in polymer clay as well? idk man, Its late at night and I feel like needing tips to get better at other stuff.
that and i felt a little guilty having to ruined the flocking.. poor thing.. i didn't mean harm..
13 notes
·
View notes
Text
Rules: It’s time to love yourselves! Choose your 5 favourite works you created in the past year (fics, art, edits, etc. ) and link them below to reflect on the amazing things you brought into the world. Tag as many writers/artists/etc. as you want (fan or original) so we can spread the love and link each other to awesome works!
I got tagged by @theblueskyphoenix
5.The Louis Senpai Cake
This, is still one of my favorite pieces. Looks NOTHING like what I initially saw, but I was having soooo much fun working on it. I had just bought a ton of clay and I needed SOMETHING to do, so in a fit of inspiration... I made an “aesthetic” cake, inspired by Louis since I wanted to do Beastars fanart but I can’t draw.
This entire thing, even the platter it’s on, is made of polymer clay. It was a really huge experiment as I was using mediums I wasn’t familiar with and doing things I wasn’t even comfortable with. The thing that took the longest, was actually making the antlers, I had three separate pairs until these ones. Then I had to deal with my TLS (translucent liquid sculpey) not being a very good glue initially for these suckers.
I think the thing that was the hardest, was actually though the deer skull I have on top. I made four separate deer skulls, using photo references, simplifying it for the sake of my sanity and it was a real lesson in technique in sculpting. I really enjoy it, so very much.
4. The Virus Shawl
So, I’m cheating a bit, since I made this last year, but it was such a learning curve. I actually made this one, to see how intricate I could go with a design and if you want complex, THIS shawl is the one that’s pretty difficult starting out. A LOT of chaining, a LOT of doubles but the results are so gorgeous. I’ve only ever made two (
3: Old Wounds and It’s Childs Play
So, now we’re talking stories. This is a two for one, since it’s a two parter arc. The first part, I wanted to talk about stuff that, had left it’s mark. Show that, while Eiji and Carmen have a good marriage and a loving family, that things weren’t always rosy. That, Eiji’s profession is actually still at some extent dangerous. Talking about Carmen feeling vulnerable and scared and remembering a time where she was living her worst fear - but having the fortitude to know, that if she objects someone else could be in her position very soon.
It’s Childs Play, continued that, with Eiji’s friends who had been there for him for nearly his entire life, having his back. Doing what they could and then ultimately, making Eiji re-live something and revealing something about himself.
It was very, very intense writing it and it’s still one of my favorite arcs.
2. In All the Waves
So, this actually holds a lot of weight to it. I wanted to show, the passing on of spirits, in a way that didn’t involve violent cleansings, or peril. Because the spirits of Aika and Daisuke weren’t malicious. They were two, perfectly normal people, with a life of their own and murdered for no good reason. They left behind their two sons, who were traumatized by the peril they lived in.
The twins’ arc, I wanted to portray, as best as I could, the effect of trauma and how they learned to live and cope with it. Everything, was about making sure they could grieve and show that, even if it got rough, even if things were hard, their parents weren’t giving up on them.
1.”I got your back”
So, this is the only fanfict on the list. I think that’s perfectly fine, but the rundown of this was... “Can I write a believable OC again for this series?” that didn’t revolve around things I had done before. Creating Cade and Levi, expanding Markus’ family, ect, was SO much fun. This story though, was just.... cozy, in a weird way.
I’ve always loved how Markus’ in game is good with kids. That it’s noted, he’s actually really nice and gentle with them... even the bratty ones. I wanted to show that here as well, since I always pictured Markus was probably from a big family and got that nurturing side from being the eldest sibling. It just so happened, he was the eldest of three in this case.
I also, wanted to show a set of brothers, with drastically different lives. Markus’ the super surgeon, Levi the ever patient psychiatrist... and Cade, who’s still figuring it all out but wants nothing to do with medicine at all. It was a bit tricky, as I never wanted to portray Cade as resenting Markus because of his phobia. He loves his brother, but irrationally does effect things like this. He knows his fears are irrational, but he can’t help it.
Honestly, I don’t know if I’ll ever delve into WHY Cade has things like phobias of blood and needles, but for now, it’s just fun exploring the Vaughn family. Between the TC Manga and my blog, I think I became a bigger Markus stan than I was as a kid. lol
Sooo yeah. Completely outta order, but there ya go.
2 notes
·
View notes
Text
David Neat modelling tips
Patience is key when your doing something really intricate and time consuming, if you want that particular piece done to perfection.
Ingenuity has a helpful way to come up with your own ideas that make your work stand out more than you anticipated, therefore, you may have a better understanding and experience on what you could create in the near future.
Knowledge of Materials is very useful when it comes to planning out the stuff that you need such as wood for flooring, furniture for a base layer for a miniature set designs, plastic for glass/windows and natural materials for soil, ruin effect and rocks.
Art of Simulation is an understandable subject to learn about when talking about the different between realistic and non-realistic, for example, drawing teeth is so much different from how you normally look at them, but sculpting them is makes it look more convincing because it associates to how realism works and it`s more affective.
Foresight lets your mind take over, so you can imagine what you want to create in the future, you can plan it out onto paper, so it can won`t make you forget.
I think that these tips are extremely helpful to follow for beginner or students who wants to look at new information even though they`re familiar with model-making.
The importance of visual research and observation.
Making test trials and keeping samples.
Dealing with the problem of warping.
Creating surfaces with kapa-line foamboard.
Modelling and shaping.
Making relief patterning tools from Super-Sculpey.
Sealing or Strengthening foam surfaces.
Using Polyfilla or texturing media.
Covering with ‘ready-made’ papers.
Creating patterns and printing surfaces.
Using digital images on ‘real space’ models.
Gluing and scattering.
Using thin wood for panelling and floorboards.
Earth, grass, plants and tree foliage.
Making latex shin.
Gluing odd shapes.
Spray-Mounting a template directly onto the workpiece.
Model-Making with liquid.
Creating special texturing tools.
Painting realistic colours
0 notes
Photo


I have been procrastinating posting this for several weeks now, but considering the very special date, I suppose now’s as good a time as any. Yaaaay!
I had finished this at the end of my summer break. I had the vision in my head and as usual, I did it. Ron has always been my favorite character and I always thought he was very undervalued.
I have said before this project that my dress blues figure was the hardest thing I’ve made. I would like to amend that because OH MY GOSH!
For the shape, I did what I had done for Dress Blues. I shaped the wire, then the clay, then the wire mesh, then more clay. The big difference is that I didn't bake the body before starting on the other details.
The sword is my proudest moment because it was the little details that I always love doing. The locket was a little lazy, but it in my defense, there wasn’t a whole lot I could do for the details in question. To get the glass-like color of yellow, I used Sculpey’s Translucent Liquid Bakable Clay with a little bit of yellow food-coloring which looked better than just using yellow clay.
The jeans were the easiest part. I made the color, shaped and textured it, then smudged it up. The boots of all things were not entirely challenging (I mean they were shoes and I hate shoes, but...). Because I had made the sword first, I had to make sure that the height of the hands to the souls of the boots match well enough proportionally to the length of the blade. Which means I had to wait until the sizing was perfect before I could think about baking anything.
The plaid pattern of the flannel shirt and the stripiness of his shirt were very challenging. Of course, I had to make it all horizontal and parallel and I died a little on the inside trying to make that happen. I wanted as few runs to the oven as possible so nothing cracked or broke from overcooking, so I didn’t bake the shirts immediately. I waited till I was done with the face and the hair, which means I had to be careful not to smudge the patterns of the shirts.
The hair was individually textured, and boy, was it a chore. His face was more problematic. I created the eyeballs and put them in sockets to get a more realistic look. I did this about five times, with varying degrees of crooked deformation, before I got something that didn’t look lopsided. The lips were no easier. Faces will always be the most challenging element which is why I practice. If anything else, I’m becoming good at noses.
This statue crosses over a bit into the uncanny valley, but I learned a lot from it. It was a very long lesson but, it Ron Weasley stands tall and proud. This piece will not be in my Etsy sight both because of my pride and because I don’t think it’s good enough to sell. That being said if anybody really wants it, they can message me and I can give them the details.
Thanks for following and thanks for reading this very long winded post. Happy September First! All is well.
#ron weasley#our king#2017#sculpting#sculpture#my work#harry potter#september first#deathly hallows#weasley is our king
0 notes