#how to recycle air dry clay easy
Explore tagged Tumblr posts
Visit Tumblr Blog
Explore Tumblr blogs with no restrictions, modern design and the best experience.
Last Seen Tumblr Blogs


Fun Fact
Tumblr was attacked by a cross-site scripting worm deployed by the Internet troll group GNAA on Dec 3, 2012.
Text
Best Tips on How to Store Sculpey Clay for Long-Lasting Usability
#10 things to know about air drying clay#how to clean clay when stik at plastics#how to condition pardo polymer clay#how to make money on etsy#how to recycle air dry clay easy#how to sell on etsy#how to sell on etsy for beginners#how to sell on etsy successfully#introduction to sculpey#learn to use liquid sculpey#liquid sculpey#michaels stores#new to sculpey#recycling symbols on plastics#sculpey#sculpey clay softener#sculpey tips
0 notes
Text
Exploring Creative Possibilities: Wholesale Air Drying Clay, Paper Mache Boxes, and Polystyrene Sheets
In the world of arts and crafts, sourcing the right materials can make all the difference in bringing creative projects to life. For businesses, educational institutions, or craft enthusiasts looking for bulk materials, finding quality, affordable products at wholesale prices is key. Whether you're working on DIY home decor, school projects, or large-scale creative endeavours, air drying clay, papier Mache boxes, and polystyrene sheets are essential items for a wide range of applications. In this blog, we'll explore the creative potential of each of these materials and how you can make the most of them by purchasing wholesale.

1. Air Drying Clay Wholesale: Versatile and Easy to Use
Air drying clay is a fantastic material for both professional artists and craft lovers. Unlike traditional clay that requires kiln firing, air drying clay naturally hardens when exposed to air, making it a user-friendly option for a wide range of projects. Whether you’re creating intricate sculptures, pottery, or simple DIY crafts, this type of clay offers endless creative possibilities.
Why Choose Air Drying Clay Wholesale?
Cost-Effective: Buying air drying clay wholesale is an excellent way to reduce costs for businesses or schools with large-scale projects.
No Kiln Needed: This clay doesn’t require the use of a kiln or oven to harden, making it perfect for beginners or for use in classrooms.
Customizable: Air drying clay can be painted, sanded, and sealed to create durable, long-lasting pieces.
Projects using air drying clay range from decorative ornaments and functional items like bowls and dishes to personalised sculptures. Purchasing air drying clay in bulk allows for large-scale production and ensures you're always stocked up for the next creative endeavour.
2. Paper Mache Boxes Wholesale: Ideal for Decorative and Functional Uses
Paper mache boxes are another versatile craft material that can be used for a variety of projects. These lightweight and sturdy boxes are perfect for decorating and personalizing, making them ideal for gift packaging, storage, or home decor. With a little creativity, paper mache boxes can be transformed into custom keepsakes, party favors, or stylish storage containers.
Why Choose Paper Mache Boxes Wholesale?
Bulk Availability: Purchasing paper mache boxes wholesale ensures you have enough for events, business promotions, or classroom projects.
Environmentally Friendly: Paper mache is made from recycled paper, making it an eco-friendly choice for crafting.
Easy to Decorate: These boxes are perfect for painting, decoupaging or embellishing with a variety of materials like fabric, glitter, and stickers.
Whether you're running a craft workshop, setting up a creative station at an event, or simply stocking up for future projects, buying paper mache boxes wholesale is a smart and sustainable option.
3. Polystyrene Sheets: A Lightweight and Durable Crafting Material
Polystyrene sheets are often used in construction and packaging, but they are also a valuable resource for creative projects. These lightweight, rigid sheets are easy to cut, shape, and decorate, making them ideal for model building, signage, and various craft applications. Polystyrene sheets are a go-to material for creating dimensional artwork, large displays, and school projects.
Why Choose Polystyrene Sheets?
Lightweight and Durable: Polystyrene sheets are lightweight, making them easy to work with while maintaining durability for both indoor and outdoor projects.
Customizable: Polystyrene can be painted, carved, or even covered with fabric or paper to fit any creative vision.
Affordable: Polystyrene sheets offer a cost-effective option for businesses or individuals looking to create large displays or models without spending too much on materials.
These sheets are also commonly used for making custom signs, architectural models, and even 3D art. With their versatility and ease of use, polystyrene sheets can be a game-changer for crafters and businesses alike.
Conclusion
Whether you're crafting as a hobby or running a business, finding the right materials at affordable prices is crucial. Wholesale options for air drying clay, paper mache boxes, and polystyrene sheets provide significant savings while ensuring you always have what you need for any project. These materials offer limitless creative potential, from sculpting and decorating to model building and packaging.
So, the next time you’re in need of crafting supplies, consider buying wholesale for quality, cost-effective options that inspire creativity on a larger scale.
Looking for wholesale craft supplies? Visit your local supplier or shop online for competitive pricing and a wide range of options to fuel your creativity!
#art and craft supplies australia#wholesale craft suppliers australia#wholesale glitter suppliers#air drying clay wholesale#paper mache boxes wholesale#wholesale polystyrene balls#bulk craft supplies#polystyrene sheets#wood craft supplies australia#craft supplies sydney
0 notes
Text
Ok so I've been reading a LOT of good omens fics lately and something in me just snapped when I had a mental image of Crowley doing pottery and now here I am 3 hours later with the most self indulgent piece of writing I have ever made. Why would Crowley be into pottery? Easy, because I am and I am projecting. Also the first time I've written anything fic-like, and I haven't written anything at all in YEARS. SO you could say its been an odd day. But I loved writing it, and I'm curious if anyone else will enjoy my rambling. Be warned, its all over the place. Without any further ado, here is Crowley Makes a Pot (~3k words)
Crowley Makes a Pot
Pottery is a meditation, to Crowley. It is so human, but an act of creation so divine it feels like holding the universe in his hands again. All that raw potential of the clay, just a special kind of dirt they noticed is all really, one that can become anything. Over and over again -- until you take it to the flame, and it becomes eternal. No pottery is ever forced to become a subpar version of itself before actions become permanent. You can work a lump for as long as you have the patience for it, no matter how slopped with water it becomes, how unable to hold its shape -- given time, it will reform. The opposite is true as well for a forgotten pot, unfinished, unsatisfactory, long dried from the air and brittle as bone -- it can be brought back into life with just the addition of water.
And time, of course. It will break the stiff walls down, moisture seeping in and softening everything. Eventually, it can be molded again into anything else in the world. Take the bits and globs and chunks of previous try’s, lay them all out and let the air and water and time do its work on the earth. You must tend it, tedious though it is, to make sure every point coalesces evenly. Turning and mixing until a semblance of structure is flowing through it, and excess moisture beginning to leave, can be formed into arches, slowly regaining shape.
This process is messy work, and the first few wedges always leave Crowley a bit annoyed, covered in slip, but also alight in a way making a big mess on purpose only can do. Plus, the longer he does it, it'll clean itself up in a sense. One of the nice features of clay. At this point, the addition of hands is necessary -- the heat from the body speeds the drying process as well as warming the clay into an easily workable consistency, and the movement smooths the uneven pieces. Soon, it will come to where Crowley is now. Where in his mind, the meditation begins. A moist, pomegranate sized, dense lump of clay, reworked from his past attempts. He watches, feeling the pockets of air folded into the clay slowly breathe out as his hands deftly push, rotate, push, rotate, over and over and over. Spiral wedging is his preference, the organic, beautiful shape it makes, the dance between the differing pressure and turning of his hands in tandem.
This repetitive motion is the most important. It is the foundation of everything, and will dictate in no uncertain terms how your throwing will be if done improperly. Rushing through, you will plant the seeds of your own destruction into the clay in the form of random pockets of air that will cause bubbles and irregularities and infuriating popping as the clay stretches -- almost always resulting in a thin point that compromises the entire piece. Sometimes small bubbles can still be fixed, but it makes much more sense to be thorough enough to not have to deal with them at all on the wheel.
So wedging. So much wedging, hundreds of rotations for recycled clay like this. Fifty to a hundred would likely be enough for a lump this size, but Crowley is not going to be making the same mistake as his most recent failure. Damn impatience cost him the pot before it even had a fighting chance. So this time, he goes a bit overboard, and besides, it feels good. There is a mild and not unpleasant burn in his forearms from the work, and he feels almost hypnotized by the spiral in the clay as he works it around and around.
Finally, the clay feels ready. It feels smooth, unblemished, bearing no mark of its previous collapses, ready to hold itself up again, to become something new. Bit like the birth of a star, if you stretch the metaphor far enough, and Crowley is. It’s all potential right now, but once it gets spinning, all the elements crashing into each other in steady chaos -- until finally, it reaches balance, and can explode into something bright and beautiful. He slowly works the spiral into itself, until it becomes a solid ball, ready to be thrown.
This part is always good. The satisfaction of a simple first step, a visual and tactile experience to get you into the feel of the clay again before any decisions have to be made. Walking slowly to the wheel with the clay in hand, he lets his mind roll over the possibilities, hands doing the same to the cool surface. You could be anything, he thinks gently at it, heart softening like the wedging had the same effect on it as the clay. Knowing his propensity to be strict and unforgiving with his plants, this may come as a surprise.
Think about it longer, however, and it becomes quite clear. A plant only has one chance on each leaf it unfurls, once it opens, that’s it, and the delicate body can be affected by anything if he doesn’t inspire them to be strong enough to persist. It could fall at any time. Better to stop at the earliest signs. Clay though, it’s different. It’s just potential, giving itself to him relentlessly, without end, without consequence, until he can agree with it that it will be satisfied this way forever. And then, he can make it so. He can take what he’s created and make it stable, solid, so much stronger than it could have been without the heat of the kiln.
The clay will work with him, endlessly, so long as he lets it. When he thinks of the gift that this is, it makes the world soften at the edges. Working with clay is intimate and vast, because it’s just you and the earth and the air and water and fire, together. It’s being able to take the elements of the world into your hands, and shape them into something, with as much room for error and change as you’d like.
Until you add the fire.
He knows the irony of it. But somehow, it doesn’t hurt him in that way. Everything he makes has a choice, careful consideration, multiple opportunities for failure before being gently nestled into a space that will enhance them, make them strong. This flame is not a punishment, it is a gift. It is looking at something you created and saying I want you to persist like this. The way that you are, that I have worked with you in innumerable ways to achieve, is beautiful and ready to be set free into the world of permanence, set free from the cycle of death and rebirth of raw clay. We have spent all these hours together, quietly, in so many different states. I have attended you, and you have given me something to treasure.
Exhaling slowly, he finds himself already seated on the stool in front of the wheel, deliberately placing the bat on the wheel and securing the clay. His thoughts have carried him to this spot, as he finds they often do. A gentle tap of the foot pedal to ensure the wheel is on, wetting his hands generously in the bowl of water next to him brings his mind back to the present. He focuses, steadying himself. Centering, the first part of the pottery process, is the most important. Yes, wedging is the most important as of a few minutes ago, but now, when the clay begins to spin, centering is the most important part. It won’t matter how smooth and air pocket free your clay is from wedging on the wheel -- if it’s not centered, nothing will work, the shape will be uneven, and the clay is likely to collapse or wobble its way off the wheel.
He leans in, getting close and stabilizing his right elbow into his hip as he adds pressure to the lumpy ball, increasing the speed of the wheel. It slaps awkwardly in his wet hands for a moment, until the slow, determined, pressure of his body, and the now fastest pace of the wheel collide onto its form, and smooth it. When you throw, you get to start rough and fast, and Crowley appreciates that about it. As the process goes on, you have to continually slow down, and become ever more precise in your movements and relation to the speed of the wheel. But centering, the beginning, is chaotic and forceful and fast and wonderful.
He fights the off-center wobble of the cylinder, feeling the satisfying grounding he always does. Centering anchors you in place, if you do it right. The wheel is set low, so that sitting close in front of it puts your hips at the same height. This way, you can form connection points all the way from the vast stability of the ground, up through your feet, to your legs and hips, which are always stable in such a low seated position. From there, connecting your elbow into your hip, you can lean forward and place your hand to the clay in its most difficult to control state, and be immovable. Even pounds and pounds of clay at a time can be held in check by thin and unassuming arms in this way. In this merging of earth and water, strength isn't necessary to move mountains, only support.
The addition of water and gentle guidance from the left hand is constant, easing what would quickly become dry and uncomfortable friction between the clay and his hand, as it becomes stable. He applies pressure differently now that it is, gently but firmly coning the clay up into a thin tower, and then pressing it back again into a low lump. Any potential for mistakes in the wedging process are double checked here, as the clay spirals around itself with the added pressure, changing its shape as it’s pressed up and down. The water works its way evenly into the body of the clay, and it softens further.
Centering is done when you can spin the wheel at top speeds, and the clay appears to be immobile. There will be no indication it’s moving, no wobble, just an illusion of stillness. Now is where Crowley has to begin making decisions. The pace of the wheel slows down, and carefully, he presses into the middle of the top, coaxing it open with just a few fingers. At this point, every other thought normally whirling around his head has been spun out of orbit by the centering of the clay, like the excess water and slip into the drip tray around the wheel. He is calm, all attention raptly honed in on the small cylinder in front of him. Every movement must be precise now. His clay is centered, but any irregular pull or accidental catch of a finger could undo that now.
Opening is one of the most satisfying steps to Crowley, it seems laughable, but its the moment he swears he can feel the appreciation of the clay thrum through him, up through his fingertips and hitting deep in his chest. Thank you. It says, thank you for taking your time with me, allowing me to be imperfect, working so closely and patiently to get to the point where I can be unfurled and become something. He presses down until there’s about half an inch to the bottom of the bat, and then eases it into a pull towards his own body. This part is intimate, he feels like he is saying back, there you go, come here, and let’s see what the two of us can accomplish together now. I've got you, you’ve been so good to me.
The clay follows where he beckons, and as the opening in the center grows, forming a crude cup shape, he begins easing the pace of the wheel down a tad more. This is where he can be delicate. Must be, really. It’s a feeling he only lets out here, usually. Sometimes it will slip out around Aziraphale, this carefully hidden delicacy of his, but here is where he lets it truly free. It works well for the craft, as the clay requires not only delicacy in this state, but determined force to rise. Pulling the walls.
He is delicate, but there is a tidal wave of restraint behind it, begging to be unleashed freely. He won’t do that, can’t do that, so it comes out here with a pressure that is perfect for these first few pulls. Slip of leather in his right hand, the fingers of his left deftly finding place on the inside even with the base, he begins. Deliberately, the pressure between his two hands increases on the clay, outside hand hooked just barely lower to make more clay move in these first pulls where the clay is stable and thick enough to withstand it. It feels like a miracle every time, the steady movement making the walls of the cylinder rise higher and higher, reforming rapidly into itself to reach up, stretching thin.
No words are happening in his mind now, and he exalts in it. It’s a feeling he can't describe, making the clay move this way. Ineffable, really. A dance. Lost in the music of the wheels’ low hum, the soft creation under his hands, moving with him. Demons are terrible dancers, but this is instinctual to Crowley now, and all he has to do is let the current of care pull him along with the clay.
Its more than double the height it was when it was first opened, and without hesitation, he moves to widen the base, beginning the shaping process. Its funny every time, the moment of anxiety he sometimes feels when he knows he will eventually have to make decisions about how the pot comes into existence. Always in the transition moments between centering and opening, when he knows the steps that happen the same way each time are coming to an end. He convinces himself he simply won’t know what to do when the time comes, that he hasn’t formulated enough of a plan for anything to be successful. It’s funny, because every time he actually reaches the point where the walls are pulled thin enough to begin to take their own distinct shape, it happens almost without thought.
It is more an extension of himself at this point than a separate entity he has to force into his will. He moves, the clay moves. The collaboration between loose intentions and the particular preferences of this clay in his hands. This pot, it seems, is not concerned with showy curves or dramatic angles. Forming to the gentle pressures of his hands, its form emerges, a low round base, a slight pull in at the top, ending in a gentle flare. It will house an orchid nicely.
His mind in a slight haze as he pulls back from the final adjustment on its shape, he locates his metal rib, ready to begin cleaning it up. Connected as he is to the clay in these moments, they are truly unique. With the piece so thin and full of the water necessary to keep it smooth enough to move, the speed of the wheel has slowed significantly, and with it, Crowley. Now, its time to scrape away the softest and messiest pieces on the surface, and see what clarity lies below.
Gently, he lets the rib connect near the base of the piece, barely touching. It’s not enough to alter its shape, only pull off the slip coating the outside, and he feels it in his mind as well. The haze of such uninterrupted focus peeling off him like this last layer of the clay. He feels much like the pot now looks as the rib feathers carefully off the top of the piece. Made new, smoothed out, ready to settle in this new comfortable shape. A bit of time to firm up again in the world, and then the finishing details of the foot of the pot can be carved out, details that will make this pot who it is. Trimming the foot of a piece can change it entirely, and adds a whole new level of satisfaction to the process for Crowley.
He gets to say, Hello new one, you are soft now and have done so well in your first moments in the world. Take some time. Learn yourself, become comfortable as leather, and then we will trim the pieces of you that you’ve no use for. You will have time to become better, before this becomes permanent. Exhaling slowly, he lets the wheel come to a stop. A beat passes, with the first true lack of movement in the room seeping into him. The nice thing about the nature of clay, is that it will be a few days before he can touch this again. He takes a thin length of wire, presses it onto the bat, and pulls from both ends smoothly across, severing the pot from where it has been connected all this time firmly to the surface.
Without the spinning of the wheel, his thoughts start to gravitate back into his mind, but slowly enough that he new fragile pot is deposited onto a shelf and carefully, loosely covered to firm up slowly. From here, he knows, his thoughts will speed up and up and up again, he will resume his normal pace -- until he can come back and trim it. Then, blessedly, the process of trimming follows a very similar cadence of starting fast and deliberate and hard, before easing down into precision and slowness. It is perfect for him. The gentle necessity of pottery starting with him where he is, and guiding him into a sort of peace he can only find this way, before setting him free again until the next time. Washing the now dry film of clay on his arms off, he grabs his sunglasses from a nearby snake sculpture that had been the first piece he actually fired, he walks out of the quiet studio. Until next time.
#good omens#good omens crowley#if you read this thanks and also sorry#my love for rambling sentences is not something i can temper easily#and my love for pottery is all encompassing#his thoughts about the process are all shameless self projections in my relationship with it
0 notes
Text
Indoor Plants
Add a drain hole about an inch from the container's bottom to cycle your nutrient solution through while keeping a minimum level of solution available to the plants at all times. Look for a humidifier with a humidity gauge on it, allowing you to set the unit to maintain a specific humidity level of your choosing. Some lights are quite inexpensive while others can set a person back quite a bit. In fact, we can face heat problems as well. For more information about indoor plants go to the bloomspace website today.

Be sure, though, if you do try it, that you use a plant you can trust not to have been sprayed with pesticides. House plants should also be repotted when they threaten to tip over (put these into clay pots or use a heavy potting mix). This houseplant is one of the easiest house plants to care for. Tap water comes packed with chlorine which evaporates while the water sits and makes it better for your plants. A green building helps in collecting and purifying the water.
Indoor Plants
With a little time and a minimal investment, you can expand your gardening hobby, grow more plants, and give your green thumb a workout during cooler months! I may see if I can find cilantro. Do not hesitate to change the location of your plants from time to time until you find the perfect spot for them. You almost cannot go wrong in your choice of plants! Styrofoams are non-toxic to plants. They are slow-growing and look particularly good when grouped together. One of the main reasons for this is that they don’t require much fertiliser, meaning all you need is water and someone to look at them once in a while. And they add so much colour to life. It is important to add ingredients that will promote good air circulation, water drainage, and nutrients. If you lay cuttings down horizontally, they will shoot from a number buds. Will it root in temperature about 22C (71 degrees F)? It is built with ninety degrees jewel high quality glass optics with double 15W UV-B tubes to improve development when the plant reaches its flowering section. It should be noted, however, that any plant that is grown from these seeds is not guaranteed to produce high levels of CBD, as it takes many years to create a seed line that produces consistent results.
Grown houseplant, the gardenia is subject to most sickness and pest insects or mites that disturb this type of plant. When Dracaena marginata grows too tall, simply cut off the plant one foot or so below the leaves. Keep the leaves clean with regular wiping with a soaked ball of cotton to keep dust off their pores. I was planning on planting in our garden like vegetables and herbs the fact that these plants are useful. The fact that it is one of the easiest to grow of all houseplants makes it all the more appealing. With the consequences of global warming growing ever more obvious, our influence on the climate and, in turn, the planet, is more of an importance than ever. That means they won't generate any more blossoms. Dracaena marginata removes benzene, formaldehyde, trichloroethylene, xylene, and toluene from the air. Unknown to us, our homes, especially if they are older constructions, harbor several toxins in the air such as benzene, formaldehyde and trichloroethylene. Indoor plants get rid of these toxins and make our houses healthier places to live in. Sunlight is enough to make them grow. Though each of the five houseplants tested — bromeliad, dracaena, spider plant, jade plant, and Caribbean tree cactus — was effective at transmuting at least some of the VOCs, the overall winner in terms of VOC-scrubbing capacity was the bromeliad. To learn how to look after indoor plants follow the link.

You don’t need to have a large garden to be sustainable and recycle your food and other scraps. Garden Planters source unusual outdoor and indoor planters, and other garden related gifts - whatever your taste, be it traditional, modern or just a bit quirky, we will have something for you. Whether you grow Bromeliads indoors or outdoors, you will be rewarded by beautiful flowers. Special material is used for the manufacturing of such strong flowers. I have plenty of new growth, no flowers since I got it about 3 months ago. I have an abundance of succulent tomatoes every year. Garlic is good in containers and mid Oct onward is the time to grow all the way to April. You can purchase it nearly any time of year, and with some care, it can bloom over and over. By growing them indoors, the season for such tender annuals as basil and summer savory can be extended and, of course, they are always within easy reach whenever they are needed.
Indoor Gardening - Fake Plants Don't Count
Sunlight is important for plants as they put it on for photosynthesis to produce food. Hence, all plants require some amount of sunlight and there are no plants that may grow without sunlight. However, you can find definitely plants which need less sunlight in comparison with others. And, fundamental essentials plants that only flourish beautifully indoors. Also, some indoor plants cannot stand direct sunlight.
The psychological benefits they offer far outweigh the cost of maintaining them. In fact, every avid gardener recognizes that maintaining plants, especially flowering ones, can be a stress-free endeavor that lets him as the time away. For him, it is more an interest than the usual stressful effort. Plants within the home are spared from any extreme weather conditions unlike those outside, either in a garden or perhaps the entry. It is therefore preferable that artificial plants for your outdoors supply rather than real ones for these are more effective at withstanding the weather as well as other environmental hazards.
Plants need nutrients. It is just so easy. How do you allow them to have the nutrients they require? First, water you provide them with will contain some nutrients. Providing an excellent balanced soil is also the main equation. It should have good organic material inside the roots are able to use. Fertilizer is the one other area of the puzzle. For indoor plants, there are no natural sources of nutrients. Therefore, you simply must provide a nutritional fertilizer solution often. It will give your plants what they need whilst them healthy. Add good air flow from Dayton blowers and your plants will thrive.

Orchids always apparently prosper in a very draughty spot within my kitchen nevertheless they need to avoid strong sunlight. Ventilate the space during Winter and keep compost moist. You can stand plants like Cymbidium outside in the Summer. Ficus plants will even flourish but don't let the compost dry out and Kentia Palms survive well in hallways where light can be a challenge.
It's almost unbelievable to believe that other pursuits like corn, sugar, tea, and wheat can be grown using this method, but it's possible. They are not usually grown to maturity inside a hydroponic garden, however are taken out of the water and planted within the soil once the tiny plans are large enough to be transplanted. Even trees could be grown with hydroponics , including banana trees and lemon trees. They may be dwarfs if they are grown in the hydroponic garden, but it is possible. Other fruits that might be successfully grown are watermelon, grapes, and berries, including blackberries, blueberries, and raspberries.
To read more on indoor plants go to https://www.lovethegarden.com/plant-category/indoor-plants.
youtube
1 note
·
View note
Text
Diary of a Junebug
Trying out some art kits!
Chocolate seashells I’ve heard of these before but never really got the opportunity to try them out until Rosie brought them to the camp. Since it’s a bit of an advanced craft with all the chocolate and pots and pans required, we bought another kit in case the first attempt failed.
First attempt wasn’t exactly a fail, which is a good thing. But we knew that it could’ve turned out better so we tried again after watching several videos on this kit. And it did turn out better! We can never have too many chocolates so that was also another bonus!
I felt that the seashell molds could’ve been more interesting instead of the generic shapes but that’s just my personal opinion. I wasn’t expecting much from the chocolate so I was pleasantly surprised at how easily it melted and how it tasted. It’s milk chocolate with a hint of dark, making it not too sugary sweet, which is how I like it. From experience the chocolate in these kinds of kits are a bit too sweet for me. One of the issues we had the first time was getting the consistency right so batch one came out a bit lumpy and full of air bubbles in the mold. Batch two succeeded in getting that shiny chocolate appearance on the outside. Overall it was fun and I can’t say no to sweet treats!
Rating: 7/10
Mini bookbinding kit I’m a big fan of bookbinding ever since discovering it a few years ago through a channel called Nathalia’s Bookshelf. Bookbinding takes some practice to get it right and once I finally got the hang of it, I couldn’t stop! I love making all kinds of cool covers, which are made with scrapbook paper, recycled cardboard from boxes, and cool images I found online or made myself. The most relaxing part for me is making the stitches - there’s just something so satisfying about stitching pages together.
I just love bookbinding and anything to do with books in general! So a while ago I found this mini bookbinding kit from Craftycrafty, which was my childhood. They sell the best art kits that are great for beginners. I’ve never seen the bookbinding one so I’m guessing it’s fairly new. The kit has everything you need to make a small coptic stitch book and it looks easy enough! Coptic stitch is my favorite bookbinding method and I haven’t been disappointed by Craftycrafty yet. So I bought a bunch to save for arts and crafts day!
And this is my honest opinion but I’m really happy with the art kit! It’s clearly for beginners so don’t expect a professionally made book on your first try. The kit has everything from paper to an awl to a bone folder to chipboard. Only minor things like the plain cover designs and the paper in general a bit thin and flimsy for my liking. But other than that, it was pretty good and everyone had fun doing it!
Rating: 8/10
Kawaii needle felt kits I always wanted to try needle felting so I was excited to find this big kit! There’s twenty four kits in there, two of each design. There’s kittens, puppies, macaron bears, kawaii stars, birds, foxes, cupcakes, emojis, coffee cups, flowers, blowfish, and ladybugs. All the kits come with everything like melamine foam, wool, gloves, accessories, and needles. I decided to start simple with the kitten kit because the shapes were simple.
I have to say I had a lot of fun making these cute kitties. Took a while to get the round shape right and my first two came out lopsided while third time was the charm. The kit had enough for three kitty heads, which was more than enough. I was afraid that I was going to get impatient but I didn’t - instead I found it to be relaxing and fun!
We have a bunch of kits left over so we’re saving those for a needlefelt themed arts and crafts day since we all enjoyed it so much! Can’t wait to try more needlefelt crafts!
Rating: 10/10
Polymer clay charms Polymer clay charms have become my latest obsession and I’ve been really getting into making charm bracelets. I found this cute kit a while back and wanted to try it for a while. There were some mixed reviews about it as some loved it and others saying that it wasn’t good. So I decided to see for myself how well this kit holds up.
I’ll be honest, as soon as I opened the kit, I had low expectations. The colors of the clay looked dull and when I started working with it, I wasn’t a fan of the texture. I’m not sure if I got a bad batch but some parts of the clay felt dry and crumbly. The package design isn’t the best so I’m guessing that’s why the clay dried out. It also came with dotting tools, which I found a bit flimsy and bulky, so I used my own tools. But even the best tools can’t really do much for crumbly clay.
Overall, it wasn’t too bad. Not something I’d buy again but it’s okay for beginners.
Rating: 5/10
Teddy bears A plushie kit! I haven’t done one in years! Stitches has a bunch of kits left over from the giant teddy bear thing a while ago so we decided to put them to good use! There was a mix of regular teddy bears and patchwork teddy bears. Since it’s been a long time since I’ve made plushies, I chose the plain bear.
It wasn’t anything too special, just like any other plushie kit, but I enjoyed it a lot! Making the teddy bear reminded me how much I love stuffed animals and now i want to make more! I also sewed a little heart pillow with some leftover fabric in my sewing scraps box to add a nice touch. The bear’s name is Honeybee because the color of the fabric reminds me of honey.
Rating: 8/10
#animal crossing#animal crossing pocket camp#acpc#Diary of a Junebug#headcanon ramble#Daphne Primrose
4 notes
·
View notes
Text
What I’ve done
(Last Year)
Around September, I was so excited that I will have the luxury to make my crafting dreams come true. But I realized that I’ve forgot to even how to use the brush, so I decided to remind myself how to paint inside the lines, easy as that. I started to draw folk art flowers, so the exercises would not be boring for me. I have drawn as many flowers as I can, then I’ve painted them.

Then I’ve painted more.
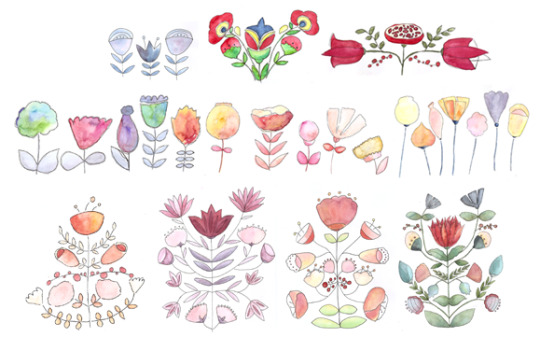
I’ve made some repeated patterns of the flowers.

I always wanted to make illustrated calendars, but I never managed to before. This time I decided to make it happen. I created 12 flower characters, designed the pages, and there, I had my calendar. It was just the beginning of 2018, so I decided to take it as a trial and to release it for 2019.

I’ve bought a cheap sketchbook although I’ve got so many at home, so I decided to make a 100 days 100 drawings challenge for myself, but it lasted 6 days. The paper was not suitable for watercolor, so I didn’t like the result.
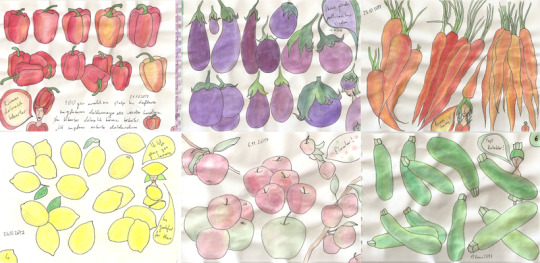
The page with lemons is not crumbled cause I used colored pencils there, but I’m a girl for watercolor. This has been a short attempt, but it has opened new doors for me.
One of my friends have seen my stories and asked me if I can paint big vegetables for their restaurant. I’ve always painted small sized watercolors, so this was definitely a challenge for me.
As I started working, I didn’t want to waste my precious watercolor papers for the sketches, so I found myself sketching in random papers, which I never thought I could paint on before.
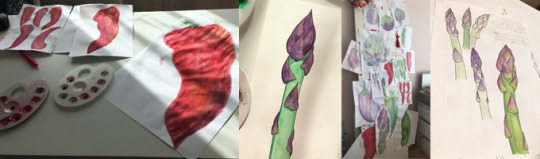
I’ve worked for that project a long time and put all the other self-projects aside. I’m gonna share the details of it in another post. In summary, it was just the motivation I needed to gain the self-discipline I was trying so hard to get.
Meanwhile I was looking for other projects - other than my looong list of projects waiting aside. I’ve heard of Sketchbook Skool in an episode of Your Creative Push (Which is my best friend, and that’s another story.) I’ve read the free book “Start Making Art” there and I got inspired to make a sketchbook of ordinary objects as a daily challenge. That went better, I’ve tried different mediums and different styles. The main point was gaining the habit of drawing every day, even if it’s a little ordinary object.

It sure helped, but the “every day” part faded fast.
Just around that time, I’ve seen a post about Sketchbook Revival. I needed something fun after working on the same painting for hours, so I followed all the workshop and played along.
I’m so happy that I caught it at the time, cause it was a temporarily free online workshop and just what I was looking for. It helped me revive my childish creativity. I have a lot to tell about it, maybe I will write a detailed post later.
I’ve learned how to bind the sketchbooks I’ll use during the event.

These are the pages from the sketchbook dedicated to the workshop.

Also, while I’m listening the introduction parts, I wanted to start sketching right away so I drew the tutors in an accordion sketchbook that I’ve made.

After it was over, I kept the spirit and went on filling the blank pages of the sketchbook.

I painted some random pages, and some other time I was drawing over them. One day I’ve drawn flowers with white pen on a dark background, and I loved it. So it became a thing.

When Sketchbook Revival was finished, someone in the group posted about 30x30 Direct watercolor challenge. I decided to give it a go. It was suggesting to do all the opposites of what I’m used to do. Don’t mix the colors in the palette, do not draw lines. It was really hard for me and I didn’t fall in love with the results. Whatever, I always liked to expand my comfort zone. I’m pleased that I’m reminded about this style.

I was wondering if there was a drawing group in Istanbul, just in that time I came across Urban Sketchers Istanbul and I joined some of the gatherings. Meeting with people for drawing together is a good idea.

Meanwhile I tried different mediums.
There were many bottles of old fabric paint in our home, left by the puppet artist lived there before, so I tried them on a tank-top, that I love to wear now.

One day I got sick and I didn’t have the energy to sit at my desk, so I laid on the sofa and painted this wood panel while watching movies from my laptop.

I like the feeling of painting on wood. Found this one on the street; for a while I’ve become looking for things to paint everywhere.
Like these plates I painted the same day.
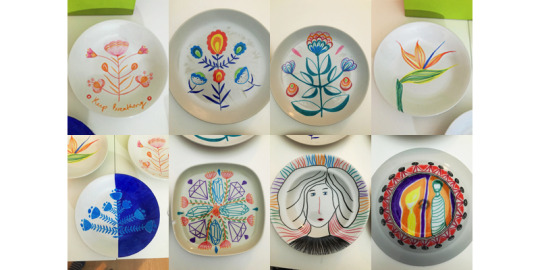
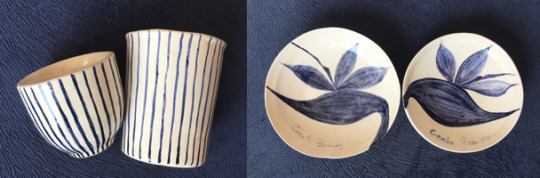
I found out about the porcelain pens by coincidence. There was a workshop while I was looking around my favorite art supply store, they gave me a porcelain cup and I started drawing right away.

I bought all three pen sets and told everyone that I’m looking for their old ceramic stuff.

I was gonna visit my family for the new year and was in search of a present for everyone. Then I thought something handmade could be nice. Here are some of the presents.

I loved the idea of recycling, so I painted on packages. Empty jars, used shampoo bottles, wine bottles.
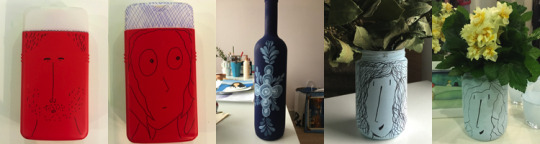
Branded cups, stones.

I’m a fan of anything fabric related so I had to get my hands on some embroidery.

Played with air-dry clay.
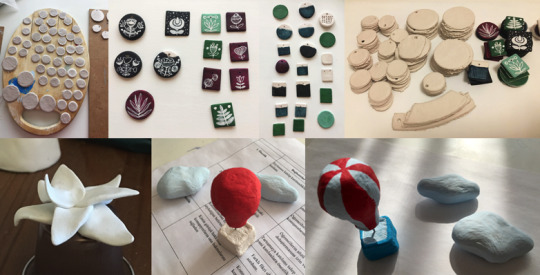
I love playing with clay, so I tried a DIY recipe I found on Pinterest.

I painted on the dried dough with watercolor or acrylic.

Made a ring holder, photo stand, magnets for my mum, a little ship, and I’m so proud of my little brush rests.

Another DIY material I wanted to try for a long time was papier-mâché, and I couldn’t wait any longer, so I tried it in between my holiday. I’m sure gonna use more of this technique this year.

This summer I noticed the tile pieces tumbled in the waves, hiding beneath the sand and stones on the beach. I couldn’t do it every day because I killed my brand new Artline pen for drawing these, but still it’s a good memory.

Ceramics have always been my secret love. I can’t even get near it because I know I’ll want to give up everything and fall right deep into it. But I came across a chance to try and it was as beautiful as I assumed. These are my first ceramics.

I formed the cups, the plates were gifted by my tutor, then I painted my favorite flowers and my life motto “Create Beauty” on them.
Tried Tilt Brush, painting in 3D with virtual reality. It was an amazing experience, I was happy like a child when I tried it, but then I couldn’t think of anything I can draw properly, cause it’s hard when you are not used to. I should try it again with more persistence.

I tried shrink paper but not satisfied yet. This year I’m gonna work on it.

And of course there are other random drawings and paintings in a habit I already had, if you want to see them you can take a look at ozlemoz.tumblr.com or instagram.com/ozlemoz.art
Sure I’ve done many paintings but I think I could have done better. So this year is gonna be all about it.
I’m gonna do as much as I can!
#creativejournal#creativity#productivity#crafts#artmaterials#art#paint#draw#watercolor#folkartflowers#flowers#pattern#calendar#sketch#sketchbook#vegetables#100 days challenge#folk art flowers#self discipline#discipline#sketchbook skool#your creative push#start making art#inspiration#draweveryday#book binding#sketchbook revival#30x30challenge#directwatercolor#urban sketchers
2 notes
·
View notes
Text
How to Choose A Hydroponic System Part II
Raft System

This is a good system for the beginner to choose because it is affordable and efficient. The plants will be put onto polystyrene sheets and then they’ll float over the nutrient solution that you make. The roots of the plants will be exposed so they will get the nutrients and the water that they need. The solution inside of the area will be circulated so that oxygenation occurs. This is another good system to choose if you have a plant that goes through some rapid growth cycles.
Dutch Bucket System

Beginners can use this option, but commercial growers often save it to use it with specific crops. If you are planting a crop that takes longer to grow, such as roses, basil, peppers, and tomatoes, this is the system to choose because it does well with these kinds of plants. This system will need a PVC pipe to use as your drain tube and a large bucket. You will take your premade nutrient solution and place it into your bucket with the help of a dropper. This solution is then drained out with your drainpipe into a prepared reservoir, thanks to the use of gravity. You will then need to set up a pump that will take the nutrient solution and push it back into the bucket, so this cycle is able to complete itself again. This is an efficient method to get your plants watered and happy, but you do need to be careful and set it up right. This system is usually saved for commercial growers who have a lot of plants to take care of at once, but if you have a bit of experience or are ready to do the whole setup, it can be a great way to take care of your plants with hydroponics.
Flood and Drain System

The Ebb and Flow system is also known as the Flood and Drain system. Basically, what this means is that there is a growth tray holding your pots filled with a substrate of some kind. This could be clay pellets, wool or some other medium. There is a timer on the system that will begin at regularly scheduled intervals, which will trigger the start of the pump and fill the reservoir. The reservoir will fill until it can reach the roots of the plants and then drains the water back down when it is finished. The regularly set timers keep the roots of the plants sporadically covered in nutrients and air. Today Ebb and Flow systems are typically found in home gardens for the beginner, also much like the wick system. There are a few drawbacks that make the ebb and flow system less desirable than other systems. The most important is the fact that the roots tend to grow together, which means more work for the owner. They can spend more time than they would like to remove and harvest damaged plants. When you have this problem, the quality and yield of plants in these conditions are usually poor if not addressed. It can manifest in brown and yellow spots on the leaves as well.
Auto Pot Self-Watering System

Many of those who are interested in getting started with hydroponics are short on space and worry that they will not be able to complete this process. While it may take some time to get the Auto pot set up, you will find that it is a passive method to use and it is very good for plants that are slow at growing. This is a newer development so many people are not used to hearing about it, but the system does not take up a lot of space and is easy to use. The nice thing about this process is that it can feed the plant on its own. This is possible thanks to the Smart Valve that can feed all your plants on demand; it will only release the water and nutrient solution when the plants need it, such as when the medium is going dry. This is also a great replication of natural rainfall, so you are getting the very best to your plants.
Drip System The Drip System is the most widely used hydroponic system. It is set-up with a timer, a submerged pump and a grow tray. The timer is set to turn the pump on to allow the nutrient solution to drip off directly onto the plants through a tiny drip line. There are two kinds of Drip Systems: Recovery and Non-Recovery. In a Recovery Drip, the surplus nutrient solution that flows down is collected in a reservoir and re-used. In a Non-Recovery Drip, the nutrient solution that runs off is not collected. The Recovery Drip System is more efficient and less expensive. Apart from being able to re-use the excess nutrient solution, the system does not need precise control for the watering cycles. The timer needs to be more precise in a Non-Recovery Drip System, so the plants get enough of the nutrient solution and there is minimal runoff. The Recovery System requires more maintenance in recycling the solution back to the reservoir and the pH and strength of the nutrient solution needs to be preserved. This requires periodic testing and adjusting so that pH and strength levels do not shift. On the other hand, the Non-Recovery System needs less maintenance, as the solution is not re-used.
Aeroponics Another system that you can use is the Aeroponic system. With this system, the plants get water and nutrients to the roots while they are in mid-air. To use this system, you will need to take the plants and place them into baskets that are on the top of an enclosure. The roots are exposed in this enclosure and then you can spray them with the nutrient solution. This is probably one of the most efficient methods to help take care of your plants. The roots are the only thing that you need to take care of, and they just need the solution that you are using. Anything that they don’t use is will be recycled so it can be reused it later. You will need to be careful about keeping the right amount of humidity around the plants, so they stay hydrated as much as possible. Once you have this part done, you will find that the crops will grow so much faster compared to their counterparts that are grown using soil. In most cases, this process is best for those who are really limited on the amount of space they have, such as being in an apartment. Picking the right system that works for your plants is going to take some research as well as reliance on your personal preferences. Sometimes it has to do with the amount of space that you have in your home. Check out these options to see how easy it is to make your own hydroponic garden without all the hassle while making it still work for your own personal use.
0 notes
Text
21 DIY indoor herbs garden ideas – Ohoh deco@|how to make an indoor herb garden@|https://ohohdeco.com/wp-content/uploads/2020/04/52Bdiy2Bto2Btry2B25232Bindoor2Bherb2Bgarden2BNL.jpg@|21
You don’t need a huge backyard to enjoy gardening. In fact, you can create a green nook even if you live in a small apartment. The easiest way to start is growing an herb garden.
[external_link_head]
It’s simple, the plants grow fast enough and you will always have them on hand to season your dishes.
[ This post probably contains affiliates links, our full disclosure policy is really boring, but you can read it HERE ]
DIY herb garden kit
First, and whatever the planter you choose for your herb garden, you will need seeds and soil. You can get them at your local nursery store or order them online.
I found two great options for online purchase:
This starter herb kit contains 4 different herbs: Basil, Cilantro, Parsley, and Chives. It includes soil pellets, which means you can start growing your plants right away and then transfer them into your DIY herb garden adding extra soil.
This other herb kit is to grow an herbal tea garden. You will receive herb seeds for growing organic tea plants and making your own chamomile tea, mint tea, lavender herbal tea & lemon herbal tea. Sounds wonderful, don’t you think so?
Now that you have your seeds or plants, you are ready to build your herb garden.
A few simple tips to successfully grow an herb garden
Use planters with good drainage and prefer to add organic soil to the planters.
Sow 4 to 6 seeds per scoop, spacing them at least 1/2 in. Cover with a thin layer of soil, tamp lightly, and water gently without digging up the seeds. Keep the soil slightly moist until the seedlings appear.
If you bought plants, take out the herbs and place them in the indoor planter, leaving them a little above the potting soil.
Place your herbs in an area with really good light. It’s very important to have light for them to grow. Water every few days. Don’t overwater, let the soil dry a little between.
Below you will find a selection of the best DIY ideas to create an indoor herb garden. Depending on the space you have available, you can grow your herbs on the window sill, the kitchen counter, or hang the planters on the wall.
Some of the following DIY indoor gardens imply a little woodworking, others use recycled materials. Have a look at those smart and space-saving ideas and find the project that fits your home!
RELATED: 50 easy to make DIY planters
RELATED: Easy way to customize a planter
DIY herb garden planter box
Using a planter box is the simplest solution if you want to place your herbs garden on a windowsill or along your kitchen counter. It’s easy to build and takes up little space. It’s a great way to grow your herbs together.
How to make a box herbs planter // DIY network
[external_link offset=1]
Toolbox planter // The navage patch
Herb garden made with old pallet
DIY Indoor herbs garden stand
Easy to build planter box
No time for DIY? You may like this compact self-watering planter
DIY indoor herb garden with mason jars
Mason jars are cheap and nice to use but don’t have great drainage, to remedy this you can place some small stones in the jar bottom before filling it with the soil. The stone will help to drain water and prevent the roots from rotting.
DIY mason jar vertical garden // Rebecca
DIY mason jar wall planter
Mason jars DIY herbs garden
No time for DIY? You will enjoy this Mason jar herb garden kit
Want to go further? There is plenty of herbs, fruits, and vegetables you can grow indoor. This book helps you take the next step.
DIY indoor herb garden with grow light
If you want your herbs to grow well, it is vital that you place them in a very bright place. If you lack space near the windows, you can use a grow light to compensate for the lack of sunlight.
DIY grow light
DIY indoor garden with grow light
No time to DIY? Try this ready to use grow light stand
DIY hanging herb plant garden
If you live in a small space, a great way to optimize the space and be able to grow a nice indoor garden is placing is along a wall or a window. You will find below some awesome ideas to build hanging herbs display planters of any size.
Copper herb garden // Homemade modern
Indoor hanging herbs planters
DIY shelf for herbs garden
[external_link offset=2]
DIY hanging garden
Simple DIY hanged herbs garden
Macrame wall hanging herbs planters
No time to DIY? You may enjoy this cute wall hanging
Recycled indoor herbs garden
if you are on a budget or like to use recycled materials, you will love these simple and beautiful herbs garden made out of trash. Seriously, how cute are theses tea can planters?
DIY bottle garden // Design*sponge
Make an indoor herbs garden with denim
Tea tin herbs garden
DIY plastic bottle herb garden
Indoor tin can herbs garden
RELATED: Tin can planters
RELATED: DIY Air clay planters
Want to remember it? Save these DIY indoor herb garden ideas on your favorite Pinterest board.
You will find all the tutorials featured in the video on my “Best DIY” page.
Amaryllis
[external_footer]
source https://livingcorner.com.au/21-diy-indoor-herbs-garden-ideas-ohoh-decohow-to-make-an-indoor-herb-gardenhttps-ohohdeco-com-wp-content-uploads-2020-04-52bdiy2bto2btry2b25232bindoor2bherb2bgarden2bnl-jpg21/
0 notes
Link
Best Tile Removal Services and Cost in Lincoln NE |LNK HAULING JUNK & MOVING
More information is at: http://junkremovallincoln.org/tile-removal-services-near-me/
Tile Removal Services near Lincoln NE: Are you looking for the Best Tile Removal Services near Lincoln NE? LNK HAULING JUNK & MOVING, can handle removing your tile surface, no matter the size. Our specialized equipment and decades of hands-on experience, we remove the tile flooring surface and any mortar underneath in the fastest time frame. Cost? Free estimates! Send us a message or call us today. Best Tile Removal Services around Lincoln NE. We serve Lincoln NE and other areas. Get a Free Quote Now!
BEST TILE REMOVAL SERVICES IN LINCOLN NE LINCOLN TILE REMOVAL
Tile Removal
Tile Removal Services near Lincoln NE: Your tile flooring isn’t supposed to last forever, and after decades of regular wear and tear, it may look out of place. Dents, dings, stains and broken tiles take away from the look of your room, and these imperfections are likely to draw the eye of visitors as soon as they enter. LNK HAULING JUNK & MOVING can handle removing your tile surface, no matter the size!
We Are Proud To Remove An Array Of Tile Removal Services Including: ● Ceramic Tile ● Porcelain Tile ● Mexican Tile ● Spanish Tile ● Stone Tile ● Clay Tile ● Marble
What Makes Our Tile Removal Process So Efficient?
Our methods for tile removal service help us keep the process efficient, allowing home and business owners to go on with regular life as fast as possible. By avoiding the use of chemicals, we get rid of the need for drying time while keeping the process eco-friendly. This makes it possible for a flooring installer to come in and place a new surface, such as hardwood, vinyl or carpet, as soon as our work is completed. The entire process of getting a new floor in place can happen in just a few days without any major disruptions to your life. Using our specialized equipment and decades of hands-on experience, we remove the tile flooring surface and any mortar underneath in the fastest time frame.
Commercial Tile Removal
If you are looking for commercial tile removal options, our crews are available to complete flooring removal overnight or during the time your business is typically closed, so you can have a new flooring surface installed as quickly as possible. Using commercial grade flooring removal machines, we can complete even large locations in a short time.
Ceramic Tile Removal
If you are making renovations to your home and are in the market for a new floor, you will need to remove the old one first. This process can be a lengthy and messy one, especially with ceramic tile currently in place. However, if you get help from an experienced ceramic tile removal company, you may find that the process is simpler and quicker than you realized.
LNK HAULING JUNK & MOVING has the experience and tools to help you get your old ceramic tile flooring out of your home and get ready to have a new flooring material, such as carpet, wood or laminate installed. Thanks to our efficient, eco-friendly process, we can have the surface of your floor removed in as little as 24 hours, and your new floor can be ready to install without delays.
Why Remove Ceramic Tile Flooring?
Tile Removal Services near Lincoln NE: Over time, with normal wear and tear, ceramic tile flooring can look less than optimal due to issues like: ● Cracks ● Broken or missing pieces ● Loose tiles ● Stains and fading ● Discolored grout These issues are common with older tile, and can be hard or impossible to fix. The porous nature of tile means that it can absorb stains and make getting rid of them difficult. Cracked or uneven tiles can be hazardous for your family and visitors to walk across. Instead of living with ceramic tile that doesn’t meet your standards, opt for a brand new floor with our help. LNK HAULING JUNK & MOVING can help rid of your old flooring with fast and easy ceramic tile removal.
Our ecofriendly process has been tested over time and works quickly no matter how large the square footage. We have used our ecofriendly ceramic tile removal process in residential and commercial locations all over Lincoln NE, and we can help you, no matter if you have a small home or a large business where you want to get rid of tile flooring. Our crews ensure that every ceramic tile flooring removal job ends with a clean, smooth floor, a neat work site, and a happy customer.
Many homeowners who want to make a change in their home have started ceramic tile removal as a do it yourself effort on their own and ended up turning to the professionals to complete the work due to the fact that this type of work takes a large amount of labor without the right tools to use. In fact, ceramic tile removal work can be some of the most difficult and require the most effort from you without special tools. It takes a backbreaking amount of effort to get the tile and the mortar used to keep it in place away from the concrete subfloor. Once the removal is done, you also have to take care of disposing the waste and cleaning up all the dust. This part of a renovation project is messy and difficult and is best left to a professional ceramic tile removal company.
Our crews are equipped with everything they need to get rid of your old flooring, including: ● Protective gear ● Flooring removal machines ● Hand chisels ● Hammers ● Grinders ● Pulse vacuums ● Air scrubbers ● Generators ● Waste removal trucks
Stone Tile Removal
Made with materials that naturally formed over thousands of years, stone tile is a durable, long term flooring option that can stay in place for decades. With help from an experienced crew, stone tile removal can take as little as 24 hours. LNK HAULING JUNK & MOVING uses specialized equipment to get you state-of-the-art removal!
Process Of Stone Tile Removal
Tile Removal Services near Lincoln NE: Getting your stone tile flooring removed is a simple process that can happen in the time frame you need. For commercial clients, we can work outside of your normal business hours to minimize disruptions to your regular operations. Let our licensed and insured crews show you exactly how simple it can be. If you want to have flooring removed from your home or business, LNK HAULING JUNK & MOVING can help you. Some of the types of stone tile that we can remove from your floor include: ● Travertine ● Marble ● Slate ● Limestone ● Granite Removing a floor surface properly means not only removing every trace of the stone tile, but also getting rid of the compounds used to make the stone floor tiles stick. In many cases, stone tile is installed using a heavy layer of mortar underneath. The installer does this to make the heavy stone tiles stay where they are laid. In order to complete the removal of your floor and leave it ready for installation of a new surface, we make sure this mortar is all gone.
With all the work complete, we clean away dust and debris, put large waste into a truck for recycling and take it away from your property. Once we leave, the process is complete and there is nothing more for you to do except choose your new flooring and have it installed.
Clay Tile Removal
Many homeowners try to take on clay tile removal themselves only to find that the job is much harder than they predicted. Without the proper tools, clay tile removal can take backbreaking work over the course of many days. LNK HAULING JUNK & MOVING can make the entire process of clay tile removal as simple and quick as possible.
Why Is Clay Tile Removal Difficult?
Removing any type of floor can be challenging, but clay tile removal is especially hard because of the composition itself. Made from natural materials and cured by baking at a hard temperature, clay tiles are difficult to break apart. Without using the right kind of tools, breaking the tiles apart or loosening the bond between the clay and mortar can take a toll on you.
The Removal Process
Our process of clay tile removal follows a few simple steps:
● We begin by creating a customized estimate for the work needed at your home or business. In order to make sure the information we give you is accurate, we come to you to assess the area and ensure we get all the information needed to complete your removal. ● When our crews arrive at your home, they lay our protective materials to keep your home from getting damaged. These include reinforced ramps to protect your floors and doorways from damage as we work, plastic sheeting to trap dust in one area for easy removal, and painter’s tape to secure the sheets in place. Once our prep work is done, we can begin working on extracting the clay floor. ● Using state of the art flooring removal equipment, we begin extracting the tiles from the surface. As the tiles get removed, the mortar underneath can start to crack and come apart. In many cases, clay tiles are laid with a thick layer of mortar underneath them to keep them in place, so there can be a considerable amount of work to be done to make sure all of this surface is removed. Thanks to decades of experience with flooring removal, our crews have the right tools to get the mortar off. We use hand tools to chip it away from your concrete subflooring and dust containment units to keep the mess we create in check. ● After the tile and most of the mortar are gone, there can still be a thin layer of mortar that remains on top of the concrete subfloor. This layer has to be removed to allow new flooring to be put in its place. Using grinders, we extract this layer and leave the concrete clean, smooth and flat. ● Once the work is done and the tile and mortar are gone, we clean the work area before we pack and up and complete the job. With a fleet of our own waste disposal trucks, we immediately get rid of any large debris instead of leaving it on your property. Using high powered pulse vacuums, we get rid of any dust left around the area before it has a chance to spread. Finally, we get rid of any dust in the air by using air scrubbers to eliminate the particles.
Marble Tile Removal
While marble tiles are naturally very durable, removing them can be an easy job for an experienced flooring removal service with the right equipment. Once the process of having your marble tile flooring removed is complete, you can choose any new floor you like to be installed in that area. LNK HAULING JUNK & MOVING are your experts for getting the floor you want!
The Marble Tile Removal Process
Tile Removal Services near Lincoln NE: With years of experience in the industry, we have a process in place that ensures every customer gets fast and effective marble removal services. Once we arrive to begin marble tile removal in your home or business location, we start by putting down protective plastic sheets to help contain the dust and debris removal might create. We secure these sheets with painter’s tape, and place aluminum ramps to protect against potential damage.
Next, we use specialized machinery equipped with sharp blades to remove the marble tile surface. This helps us get rid of the tile floor quickly and without creating a large mess, the way that using non specialized tools like jackhammers does. Our crews then get to work with specialized hand tools to get the rest of the marble, including corners and edges.
These tools are outfitted with dust containment units to ensure that the dust created stays in the work area and doesn’t spread across the home. Once all the marble is up, we use hand chisels and hammers to remove the mortar underneath and grind the concrete subfloor to leave it smooth.
Commercial Marble Tile Removal
Our services are also available for commercial locations. Our process for commercial marble flooring removal is largely the same, but requires larger, hydraulically powered machines to handle any amount of square footage. We have successfully removed flooring from retail businesses, industrial locations, hospitals, restaurants and schools.
Are You Looking For Tile Removal In Lincoln NE?
It is important to us that you are getting the best quality floor removal service in the area. Our years of unmatched expertise set our company apart from the rest. Contact us today to get started!
TIPS How to Remove Tile
Remove the Trim Tile Removal Services near Lincoln NE: Remove baseboards or trim work around the room. Taking care when removing the trim work allows it to be reinstalled when a new floor is installed after the tile floor is removed. Remove any appliances or built-in furniture like cabinets, if possible. Cover any vents with painter's removable tape and plastic to prevent dust from entering the ventilation system. Remove the Tile Break up the first tile with the blunt edge of a hammer (image 1), and then use a chisel to pry up the remainder of the first tile. Once this first tile is removed, place the chisel against the bottom edge of adjacent tiles, apply pressure with your hammer and the tiles should pop up easily Remove the Underlayment Once finished with the tile, remove the tile underlayment if it is deteriorating. Using your screw gun, remove any screws that might attach the underlayment to the floor. Pry up the edges of the underlayment with the roofing rake and flat shovel. Clean the Subfloor Once the underlayment is gone, remove any adhesive with the flat edge of the flat shovel or a carpet scraper for large areas and a scraper or chisel and hammer for smaller areas. Clean up any remaining screws and adhesive using a broom and shop vac. The wooden subfloor should be completely smooth before installing a new floor.
COST
Cost to Remove Tile
Tile Removal Services near Lincoln NE: Don’t let your remodeling budget go overboard because hidden surprises understand what the average Cost to Remove Tile is in your zip code by using our easy to use calculator. If you’re looking for 2020 Cost to Remove Tile with labor and haul-away and how much a contractor might be, you’ve come to the right place.
As an experienced licensed home improvement contractor, I know first hand what it should cost for various levels from Basic, Better, and of course the best. The Cost to Remove Tile estimator will provide you with up to date pricing for your area. Simply enter your zip code and the number of needed to remove, next click update and you will see a breakdown on what it should Cost to Remove Tile at your home
Remove Tile – Pricing and Removal Cost Checklist
● Get at least 3-5 estimates before hiring a Demolition, or General Contractor estimates are typically free, unless it’s a small job. ● Expect Tile Removal prices to fluctuate between various Demolition, or General Contractors – each and every company have different operating expenses and overhead. ● Try to get prices in late Fall, early winter you should expect aggressive pricing discounts by waiting for a contractor’s down season. ● Try to budget and additional 7-15% more on top of what our calculator gives out I.e.; difficult configurations, Mechanical area space, the additional complexity of your home will add to the remove Tile costs. ● Remember, there are multiple styled homes in the U.S from: Contemporary, colonial, cape-cod style, ranch, bungalow, Victorian, etc. So keep that in mind and try to budget a little more, before starting your Tile removal project.
Tile Removal Cost
Knowing the tile removal Lincoln NE costs is recommended before starting a tile removal project. While looking at national averages can give a general idea, such numbers usually do not include factors which may affect the final price, such as local labor hourly rates, material costs and any local permits required for the Lincoln NE tile removal project.
As our numbers show in 2020 the average cost that homeowners paid for tile removal in Lincoln NE county is between $1,811.00 and $2,567.00. This Tile Removal Lincoln NE Quote Includes: ● $9.00 to $12.00 per square foot material costs. ● Average labor costs to remove tile in Lincoln NE, Lincoln NE. ● Average costs for materials and equipment for tile removal in Lincoln NE. ● All project costs (surface preparation, components and machinery), and cleanup fees.
This Lincoln NE Tile Removal Estimate Does NOT Include:
● Any permits required for tile removal Lincoln NE projects. ● Inspection and/or Lincoln NE building fees. ● Materials and supply Lincoln NE and Lincoln NE sales taxes. ● Materials and supply Lincoln NE sales taxes. ● Any general contractor fees, if used for the project. Such fees generally add another $262.68-$328.35 to the total.
FREQUENTLY ASKED QUESTIONS
Is professional tile removal in Lincoln NE expensive?
The costs will depend on which company you are going to hire but there are professionals that will perform a tile removal in Lincoln NE for as low as $3 per square foot. Tile removal companies also perform other types of removal jobs including hardwood that is glued to concrete which is a very hard and time-consuming task. Companies offering tile removal in Lincoln NE have equipment that can easily and quietly remove tiles from floorings. The machine is usually battery-powered and will scoop up even the thickest tiles.
What do I have to watch out for with a tile removal in Lincoln NE?
A professional tile removal in Lincoln NE will create a lot of mess and dust so expect to have dust all over your home. It is best if you contain your furniture, doors, drapery, and kitchen cabinets. You can tape your door to ensure that dust won't find its way to adjacent rooms. If you are hiring a reputable tile removal company, they will prepare your home for you before starting the tile removal in Lincoln NE. If the room has large furniture and fixtures that are too heavy to move, they will be wrapped in sheathing. The seams will also be taped.
Who should I hire for a tile removal in Lincoln NE?
You must work with a company that’s specializing in tile removal in Lincoln NE since it is likely that they possess specialty machines that can make the entire process much faster and easier. The company specialists must also be trained in performing removal processes because you wouldn't want any damage done to your home. To know whether you have found the right specialists to hire, talk to their customer service representatives and make sure that you prepare questions. If you are satisfied with their answer and if they can back up their work, then you can trust them to handle the tile removal in Lincoln NE.
Do you protect furniture with plastic sheeting before the floor tile removal?
There is not a flat price per Square foot. Because every tile removal job is different from one another. I get a lot of calls asking about my price per square foot. Tile Removal is not rocket science but is not enchiladas either. If you need to know how much will your floor tile demolition cost, please fill out our quote form, we will get back to you as soon as we can.
Can somebody lay tile over tile?
This is a list of questions that We've been asked so far regarding our floor tile removal services. We tried to answer them the best we can, if after reading all these questions Tile Removal Crew have all the necessary flooring removal tools to get your floor tile demolition complete. All you have to do is relax and let Us do the hard work!
CALL FOR US: ● Tile Removal Services Near Lincoln NE ● Tile Removal Tools ● Tile Removal Machine ● Tile Removal Cost ● How To Remove Tile From Concrete Floor ● Bathroom Tile Removal Tool ● Tile Removal Tool Rental ● Wall Tile Removal Power Tool ● How To Remove Tile Backsplash Lincoln NE ● Tile Removal And Installation Cost ● How Much Does Dustless Tile Removal Cost ● Home Depot Tile Removal Cost ● Tile Removal Company ● Dust ram Tile Removal Cost ● Tile Removal Cost ● Tile Removal Machine ● Cost To Install Tile Lincoln NE
BEST TILE REMOVAL SERVICES IN LINCOLN NE LNK HAULING JUNK & MOVING REQUEST MORE INFORMATION. CONTACT US NOW!
CONTACT US: LNK Hauling Junk & Moving Lincoln`s famous junk removal hauling services! CALL (402) 875 7271 JUNK REMOVAL CALL (402) 881 3135 CLEANING CALL (402) 875 7305 HANDYMAN CALL (402) 590 8095 MOVING Open Monday to Sunday Lincoln Nebraska WEBSITE: https://junkremovallincoln.org http://www.lnkjunkremoval.com/ https://lnk-hauling-junk-and-moving-lincoln.business.site SERVICE AREA: Lincoln Nebraska Metro Area: Bennet Ne, Firth Ne, Hallam Ne, Hickman Ne, Lancaster County, Lincoln Nebraska, Malcolm Ne, Milford Ne, Panama Ne, Seward County, Seward Ne, Staplehurst Ne, Utica Ne, Walton Ne, WAVERLY NE, Lincoln NE | Lincoln NE | Lancaster County NE | Seward County NE | Milford NE | 68501, 68510, 68512, 68514, 68516, 68517, 68520, 68524, 68526, 68529, 68531, 68532, 68542, 68544, 68583, 68588. Omaha-Council Bluffs Metropolitan Area: Downtown Omaha, Central Omaha, Southwest Lincoln and Sarpy County, including the communities of Lincoln, Omaha, Bellevue, Blair, Carter Lake, Elkhorn, Fort Calhoun, Fremont, Gretna, La Vista, Millard, Papillion, Ralston, Springfield, Plattsmouth, Arlington, Ashland, Louisville, Wahoo, Yutan and Waterloo, NE, and Missouri Valley, Avoca, Glenwood, Council Bluffs, IA. Zip codes: 68007, 68010, 68022, 68102, 68104, 68105, 68106, 68107, 68108, 68110, 68111, 68112, 68114, 68116, 68117, 68118, 68122, 68124, 68127, 68130, 68131, 68132, 68134, 68135, 68137, 68142, 68144, 68147, 68152, 68154, 68157, 68164, 68178. #junkremoval #movingservice #cleaning #commercialjunk #residencialjunkremoval #lincoln #nebaraska #handymanservice
0 notes
Link
Best Tile Removal Services and Cost in Albuquerque NM |ABQ HAULING JUNK & MOVING
More information is at: http://albuquerquejunkremovalhaulingmovers.org/tile-removal-services-near-me/
Tile Removal Services near Albuquerque NM: Are you looking for the Best Tile Removal Services near Albuquerque NM? ABQ HAULING JUNK & MOVING, can handle removing your tile surface, no matter the size. Our specialized equipment and decades of hands-on experience, we remove the tile flooring surface and any mortar underneath in the fastest time frame. Cost? Free estimates! Send us a message or call us today. Best Tile Removal Services around Albuquerque NM. We serve Albuquerque NM and other areas. Get a Free Quote Now!
BEST TILE REMOVAL SERVICES IN ALBUQUERQUE NM ALBUQUERQUE TILE REMOVAL
Tile Removal
Tile Removal Services near Albuquerque NM: Your tile flooring isn’t supposed to last forever, and after decades of regular wear and tear, it may look out of place. Dents, dings, stains and broken tiles take away from the look of your room, and these imperfections are likely to draw the eye of visitors as soon as they enter. ABQ HAULING JUNK & MOVING can handle removing your tile surface, no matter the size!
We Are Proud To Remove An Array Of Tile Removal Services Including: ● Ceramic Tile ● Porcelain Tile ● Mexican Tile ● Spanish Tile ● Stone Tile ● Clay Tile ● Marble
What Makes Our Tile Removal Process So Efficient?
Our methods for tile removal service help us keep the process efficient, allowing home and business owners to go on with regular life as fast as possible. By avoiding the use of chemicals, we get rid of the need for drying time while keeping the process eco-friendly. This makes it possible for a flooring installer to come in and place a new surface, such as hardwood, vinyl or carpet, as soon as our work is completed. The entire process of getting a new floor in place can happen in just a few days without any major disruptions to your life. Using our specialized equipment and decades of hands-on experience, we remove the tile flooring surface and any mortar underneath in the fastest time frame.
Commercial Tile Removal
If you are looking for commercial tile removal options, our crews are available to complete flooring removal overnight or during the time your business is typically closed, so you can have a new flooring surface installed as quickly as possible. Using commercial grade flooring removal machines, we can complete even large locations in a short time.
Ceramic Tile Removal
If you are making renovations to your home and are in the market for a new floor, you will need to remove the old one first. This process can be a lengthy and messy one, especially with ceramic tile currently in place. However, if you get help from an experienced ceramic tile removal company, you may find that the process is simpler and quicker than you realized.
ABQ HAULING JUNK & MOVING has the experience and tools to help you get your old ceramic tile flooring out of your home and get ready to have a new flooring material, such as carpet, wood or laminate installed. Thanks to our efficient, eco-friendly process, we can have the surface of your floor removed in as little as 24 hours, and your new floor can be ready to install without delays.
Why Remove Ceramic Tile Flooring?
Tile Removal Services near Albuquerque NM: Over time, with normal wear and tear, ceramic tile flooring can look less than optimal due to issues like: ● Cracks ● Broken or missing pieces ● Loose tiles ● Stains and fading ● Discolored grout These issues are common with older tile, and can be hard or impossible to fix. The porous nature of tile means that it can absorb stains and make getting rid of them difficult. Cracked or uneven tiles can be hazardous for your family and visitors to walk across. Instead of living with ceramic tile that doesn’t meet your standards, opt for a brand new floor with our help. ABQ HAULING JUNK & MOVING can help rid of your old flooring with fast and easy ceramic tile removal.
Our ecofriendly process has been tested over time and works quickly no matter how large the square footage. We have used our ecofriendly ceramic tile removal process in residential and commercial locations all over Albuquerque NM, and we can help you, no matter if you have a small home or a large business where you want to get rid of tile flooring. Our crews ensure that every ceramic tile flooring removal job ends with a clean, smooth floor, a neat work site, and a happy customer.
Many homeowners who want to make a change in their home have started ceramic tile removal as a do it yourself effort on their own and ended up turning to the professionals to complete the work due to the fact that this type of work takes a large amount of labor without the right tools to use. In fact, ceramic tile removal work can be some of the most difficult and require the most effort from you without special tools. It takes a backbreaking amount of effort to get the tile and the mortar used to keep it in place away from the concrete subfloor. Once the removal is done, you also have to take care of disposing the waste and cleaning up all the dust. This part of a renovation project is messy and difficult and is best left to a professional ceramic tile removal company.
Our crews are equipped with everything they need to get rid of your old flooring, including: ● Protective gear ● Flooring removal machines ● Hand chisels ● Hammers ● Grinders ● Pulse vacuums ● Air scrubbers ● Generators ● Waste removal trucks
Stone Tile Removal
Made with materials that naturally formed over thousands of years, stone tile is a durable, long term flooring option that can stay in place for decades. With help from an experienced crew, stone tile removal can take as little as 24 hours. ABQ HAULING JUNK & MOVING uses specialized equipment to get you state-of-the-art removal!
Process Of Stone Tile Removal
Tile Removal Services near Albuquerque NM: Getting your stone tile flooring removed is a simple process that can happen in the time frame you need. For commercial clients, we can work outside of your normal business hours to minimize disruptions to your regular operations. Let our licensed and insured crews show you exactly how simple it can be. If you want to have flooring removed from your home or business, ABQ HAULING JUNK & MOVING can help you. Some of the types of stone tile that we can remove from your floor include: ● Travertine ● Marble ● Slate ● Limestone ● Granite Removing a floor surface properly means not only removing every trace of the stone tile, but also getting rid of the compounds used to make the stone floor tiles stick. In many cases, stone tile is installed using a heavy layer of mortar underneath. The installer does this to make the heavy stone tiles stay where they are laid. In order to complete the removal of your floor and leave it ready for installation of a new surface, we make sure this mortar is all gone.
With all the work complete, we clean away dust and debris, put large waste into a truck for recycling and take it away from your property. Once we leave, the process is complete and there is nothing more for you to do except choose your new flooring and have it installed.
Clay Tile Removal
Many homeowners try to take on clay tile removal themselves only to find that the job is much harder than they predicted. Without the proper tools, clay tile removal can take backbreaking work over the course of many days. ABQ HAULING JUNK & MOVING can make the entire process of clay tile removal as simple and quick as possible.
Why Is Clay Tile Removal Difficult?
Removing any type of floor can be challenging, but clay tile removal is especially hard because of the composition itself. Made from natural materials and cured by baking at a hard temperature, clay tiles are difficult to break apart. Without using the right kind of tools, breaking the tiles apart or loosening the bond between the clay and mortar can take a toll on you.
The Removal Process
Our process of clay tile removal follows a few simple steps:
● We begin by creating a customized estimate for the work needed at your home or business. In order to make sure the information we give you is accurate, we come to you to assess the area and ensure we get all the information needed to complete your removal. ● When our crews arrive at your home, they lay our protective materials to keep your home from getting damaged. These include reinforced ramps to protect your floors and doorways from damage as we work, plastic sheeting to trap dust in one area for easy removal, and painter’s tape to secure the sheets in place. Once our prep work is done, we can begin working on extracting the clay floor. ● Using state of the art flooring removal equipment, we begin extracting the tiles from the surface. As the tiles get removed, the mortar underneath can start to crack and come apart. In many cases, clay tiles are laid with a thick layer of mortar underneath them to keep them in place, so there can be a considerable amount of work to be done to make sure all of this surface is removed. Thanks to decades of experience with flooring removal, our crews have the right tools to get the mortar off. We use hand tools to chip it away from your concrete subflooring and dust containment units to keep the mess we create in check. ● After the tile and most of the mortar are gone, there can still be a thin layer of mortar that remains on top of the concrete subfloor. This layer has to be removed to allow new flooring to be put in its place. Using grinders, we extract this layer and leave the concrete clean, smooth and flat. ● Once the work is done and the tile and mortar are gone, we clean the work area before we pack and up and complete the job. With a fleet of our own waste disposal trucks, we immediately get rid of any large debris instead of leaving it on your property. Using high powered pulse vacuums, we get rid of any dust left around the area before it has a chance to spread. Finally, we get rid of any dust in the air by using air scrubbers to eliminate the particles.
Marble Tile Removal
While marble tiles are naturally very durable, removing them can be an easy job for an experienced flooring removal service with the right equipment. Once the process of having your marble tile flooring removed is complete, you can choose any new floor you like to be installed in that area. ABQ HAULING JUNK & MOVING are your experts for getting the floor you want!
The Marble Tile Removal Process
Tile Removal Services near Albuquerque NM: With years of experience in the industry, we have a process in place that ensures every customer gets fast and effective marble removal services. Once we arrive to begin marble tile removal in your home or business location, we start by putting down protective plastic sheets to help contain the dust and debris removal might create. We secure these sheets with painter’s tape, and place aluminum ramps to protect against potential damage.
Next, we use specialized machinery equipped with sharp blades to remove the marble tile surface. This helps us get rid of the tile floor quickly and without creating a large mess, the way that using non specialized tools like jackhammers does. Our crews then get to work with specialized hand tools to get the rest of the marble, including corners and edges.
These tools are outfitted with dust containment units to ensure that the dust created stays in the work area and doesn’t spread across the home. Once all the marble is up, we use hand chisels and hammers to remove the mortar underneath and grind the concrete subfloor to leave it smooth.
Commercial Marble Tile Removal
Our services are also available for commercial locations. Our process for commercial marble flooring removal is largely the same, but requires larger, hydraulically powered machines to handle any amount of square footage. We have successfully removed flooring from retail businesses, industrial locations, hospitals, restaurants and schools.
Are You Looking For Tile Removal In Albuquerque NM?
It is important to us that you are getting the best quality floor removal service in the area. Our years of unmatched expertise set our company apart from the rest. Contact us today to get started!
TIPS How to Remove Tile
Remove the Trim Tile Removal Services near Albuquerque NM: Remove baseboards or trim work around the room. Taking care when removing the trim work allows it to be reinstalled when a new floor is installed after the tile floor is removed. Remove any appliances or built-in furniture like cabinets, if possible. Cover any vents with painter's removable tape and plastic to prevent dust from entering the ventilation system. Remove the Tile Break up the first tile with the blunt edge of a hammer (image 1), and then use a chisel to pry up the remainder of the first tile. Once this first tile is removed, place the chisel against the bottom edge of adjacent tiles, apply pressure with your hammer and the tiles should pop up easily Remove the Underlayment Once finished with the tile, remove the tile underlayment if it is deteriorating. Using your screw gun, remove any screws that might attach the underlayment to the floor. Pry up the edges of the underlayment with the roofing rake and flat shovel. Clean the Subfloor Once the underlayment is gone, remove any adhesive with the flat edge of the flat shovel or a carpet scraper for large areas and a scraper or chisel and hammer for smaller areas. Clean up any remaining screws and adhesive using a broom and shop vac. The wooden subfloor should be completely smooth before installing a new floor.
COST
Cost to Remove Tile
Tile Removal Services near Albuquerque NM: Don’t let your remodeling budget go overboard because hidden surprises understand what the average Cost to Remove Tile is in your zip code by using our easy to use calculator. If you’re looking for 2020 Cost to Remove Tile with labor and haul-away and how much a contractor might be, you’ve come to the right place.
As an experienced licensed home improvement contractor, I know first hand what it should cost for various levels from Basic, Better, and of course the best. The Cost to Remove Tile estimator will provide you with up to date pricing for your area. Simply enter your zip code and the number of needed to remove, next click update and you will see a breakdown on what it should Cost to Remove Tile at your home
Remove Tile – Pricing and Removal Cost Checklist
● Get at least 3-5 estimates before hiring a Demolition, or General Contractor estimates are typically free, unless it’s a small job. ● Expect Tile Removal prices to fluctuate between various Demolition, or General Contractors – each and every company have different operating expenses and overhead. ● Try to get prices in late Fall, early winter you should expect aggressive pricing discounts by waiting for a contractor’s down season. ● Try to budget and additional 7-15% more on top of what our calculator gives out I.e.; difficult configurations, Mechanical area space, the additional complexity of your home will add to the remove Tile costs. ● Remember, there are multiple styled homes in the U.S from: Contemporary, colonial, cape-cod style, ranch, bungalow, Victorian, etc. So keep that in mind and try to budget a little more, before starting your Tile removal project.
Tile Removal Cost
Knowing the tile removal Albuquerque NM costs is recommended before starting a tile removal project. While looking at national averages can give a general idea, such numbers usually do not include factors which may affect the final price, such as local labor hourly rates, material costs and any local permits required for the Albuquerque NM tile removal project.
As our numbers show in 2020 the average cost that homeowners paid for tile removal in Albuquerque NM county is between $1,811.00 and $2,567.00. This Tile Removal Albuquerque NM Quote Includes: ● $9.00 to $12.00 per square foot material costs. ● Average labor costs to remove tile in Albuquerque NM, Albuquerque NM. ● Average costs for materials and equipment for tile removal in Albuquerque NM. ● All project costs (surface preparation, components and machinery), and cleanup fees.
This Albuquerque NM Tile Removal Estimate Does NOT Include:
● Any permits required for tile removal Albuquerque NM projects. ● Inspection and/or Albuquerque NM building fees. ● Materials and supply Albuquerque NM and Albuquerque NM sales taxes. ● Materials and supply Albuquerque NM sales taxes. ● Any general contractor fees, if used for the project. Such fees generally add another $262.68-$328.35 to the total.
FREQUENTLY ASKED QUESTIONS
Is professional tile removal in Albuquerque NM expensive?
The costs will depend on which company you are going to hire but there are professionals that will perform a tile removal in Albuquerque NM for as low as $3 per square foot. Tile removal companies also perform other types of removal jobs including hardwood that is glued to concrete which is a very hard and time-consuming task. Companies offering tile removal in Albuquerque NM have equipment that can easily and quietly remove tiles from floorings. The machine is usually battery-powered and will scoop up even the thickest tiles.
What do I have to watch out for with a tile removal in Albuquerque NM?
A professional tile removal in Albuquerque NM will create a lot of mess and dust so expect to have dust all over your home. It is best if you contain your furniture, doors, drapery, and kitchen cabinets. You can tape your door to ensure that dust won't find its way to adjacent rooms. If you are hiring a reputable tile removal company, they will prepare your home for you before starting the tile removal in Albuquerque NM. If the room has large furniture and fixtures that are too heavy to move, they will be wrapped in sheathing. The seams will also be taped.
Who should I hire for a tile removal in Albuquerque NM?
You must work with a company that’s specializing in tile removal in Albuquerque NM since it is likely that they possess specialty machines that can make the entire process much faster and easier. The company specialists must also be trained in performing removal processes because you wouldn't want any damage done to your home. To know whether you have found the right specialists to hire, talk to their customer service representatives and make sure that you prepare questions. If you are satisfied with their answer and if they can back up their work, then you can trust them to handle the tile removal in Albuquerque NM.
Do you protect furniture with plastic sheeting before the floor tile removal?
There is not a flat price per Square foot. Because every tile removal job is different from one another. I get a lot of calls asking about my price per square foot. Tile Removal is not rocket science but is not enchiladas either. If you need to know how much will your floor tile demolition cost, please fill out our quote form, we will get back to you as soon as we can.
Can somebody lay tile over tile?
This is a list of questions that We've been asked so far regarding our floor tile removal services. We tried to answer them the best we can, if after reading all these questions Tile Removal Crew have all the necessary flooring removal tools to get your floor tile demolition complete. All you have to do is relax and let Us do the hard work!
CALL FOR US: ● Tile Removal Services Near Albuquerque NM ● Tile Removal Tools ● Tile Removal Machine ● Tile Removal Cost ● How To Remove Tile From Concrete Floor ● Bathroom Tile Removal Tool ● Tile Removal Tool Rental ● Wall Tile Removal Power Tool ● How To Remove Tile Backsplash Albuquerque NM ● Tile Removal And Installation Cost ● How Much Does Dustless Tile Removal Cost ● Home Depot Tile Removal Cost ● Tile Removal Company ● Dust ram Tile Removal Cost ● Tile Removal Cost ● Tile Removal Machine ● Cost To Install Tile Albuquerque NM
BEST TILE REMOVAL SERVICES IN ALBUQUERQUE NM ABQ HAULING JUNK & MOVING REQUEST MORE INFORMATION. CONTACT US NOW!
CONTACT: ABQ Hauling Junk & Moving CALL (505) 225 3810 CLEANING CALL (505) 570 4605 JUNK REMOVAL CALL (505) 850 3570 MOVING Best Junk Removal Hauling Company in Albuquerque NM Open Monday to Sunday 7:00 am – 11:00 pm Located in Albuquerque NM 87120 Website: http://www.albuquerquejunkremovalhaulingmovers.org/ http://www.serviceabq.com/ SERVICE AREA: Albuquerque Metropolitan Area: Bernalillo, Sandoval, Torrance, Valencia Counties NM, Albuquerque, Belen, Moriarty, Rio Communities, Rio Rancho, Bernalillo, Estancia, Mountainair, Peralta, Bosque Farms, Corrales, Cuba, Encino, Jemez Springs, Los Lunas, Los Ranchos de Albuquerque, San Ysidro, Tijeras, Willard, Algodones, Carnuel, Casa Colorada, Cedar Crest, Chilili, Cochiti, El Cerro-Monterey Park, Isleta Village Proper, Jarales, Jemez Pueblo, La Jara, Los Chavez, Los Trujillos-Gabaldon, Manzano, Meadow Lake, North Valley, Paradise Hills, Pena Blanca, Placitas Ponderosa, Pueblo of Sandia Village, Regina, Rio Communities North, Rio Communities, San Felipe Pueblo, Santa Ana Pueblo, Santo Domingo Pueblo, South Valley, Tajique, Tome-Adelino, Torreon (Sandoval County), Torreon (Torrance County), Valencia, Zia Pueblo New Mexico #junkremoval #hauling #moving #trashremoval #cleaning #newmexico #Albuquerque
0 notes
Text
Ajay galar bhopal Simple Organic Gardening Tips From The Pros
Ajay galar Professional tips provider. Gardening is a fantastic stress relieving activity that many people swear by. Making your own organic vegetable garden is a great way to improve your lifestyle, while also producing your own food, saving you money and providing you with quality produce right from your yard. Read on to find out how to have more success at it.
A great first step to having a successful organic garden is to test the acidity of the soil in your garden. The ideal number is 6.5, if your soil is on the low end, it's too acidic and if it's on the high end it's too alkaline. Neither of those situations lends itself to a successful garden. So by purchasing a soil testing kit before planting, you will assure yourself a beautiful organic garden in the summer.
Keep your seeds warm and humid. Most seeds are healthy at a temperature of about seventy degrees. Place your pots next to a heating vent or install an additional heater if needed. You can cover your pots with plastic films so that the seeds can keep their humidity and warmth.
When starting your own organic garden, you should make sure you choose the right medium for growing your plants. Different plants need different mediums. Many of your seedlings should be replotted into a larger container before you put them in your garden. However, some plants, such as melons and cucumbers, must go from their original containers directly into your garden.
Manage your garden hose to prevent frustration. Garden hoses, especially longer or heavy duty ones, can become unwieldy and annoying when you have to drag them around the garden, all twisted up. Invest in a portable hose reel or a stationary one, depending on your garden configuration, to more easily manage your garden hose and make storing it fast and easy.
Ajay galar Professional tips provider. Make sure you consider adequate spacing when planting your garden, so that each plant is given room enough to grow and flourish. Leave a little more space than you think your full grown plant will need to make up for overgrowth. Proper spacing is important not just to accommodate the plants' sizes but also for air circulation. Make sure that you map out your garden layout beforehand and place your seeds with an adequate amount of space in between each.
The best way to water your organic garden is to use a soaker hose. Soaker hoses not only conserve water, but also direct the water exactly where it needs to go, into the dirt, rather than on the leaves and into the air. By watering the leaves, you leave your plants susceptible to fungus growth.
A great tip when starting your own organic garden is to sprinkle milled sphagnum moss on your seeds in order to prevent damping-off. Damping-off is a fungal disease that will cause your seeds and seedlings to rot. If your seeds need light, you should sprinkle this moss before dropping your seeds in the moss.
Making rich, organic compost for your garden doesn't take special equipment. All you really need to do is dump your kitchen scraps, lawn trimmings and leaves in a pile, and let nature take its course. It may take a bit longer, but in the end you'll have a rich, healthy compost.
Composting is a great way to fuel your garden. You can add pretty much anything, like grass clippings, shredded paper, coffee grounds, and much more. Basically, you can use anything that was living at one time (but try to avoid animal products). If you buy some worms and keep the compost bin in a warm, sunny place it will turn into perfectly dark and rich soil in no time.
Ajay galar Professional tips provider. Use untreated wood, stone, or brick to build a raised bed. If you choose wood, it needs to be naturally rot resistant and untreated. Several species of trees yield suitable wood. Locust, cypress, and cedar are among the more commonly used rot resitent woods. Take care to avoid wood that has been chemically treated when your garden will hold vegetables, since unknown substances in the wood can make their way into your future food. If you have built a bed with treated lumber already, use a barrier such as plastic to line the bed.
Choose the correct spot for growing organic vegetables. An organic garden needs to be self-sustaining, with the ability to defend itself from damage. This defense is promoted by four factors: water, sun, soil and air circulation. Choose a sunny spot, preferably with both morning and afternoon sun. In humid areas, morning sun is important to dry dew quickly, avoiding fungus. If your soil is clay or sandy, amend it with peat to improve water retention and drainage.
Keep kitties looking for a bathroom out of your garden with natural deterrents such as black pepper and orange peels. You can also cover the ground around your plants with chicken wire, or purchase a pack of inexpensive wooden chopsticks and poke them in the ground haphazardly. These ideas can protect your vegetables and herbs from being contaminated by toxoplasmosis, a parasite that can be especially harmful to pregnant women.
Employ crop rotation techniques in your organic garden. Typically thought of for large-scale farms, crop rotation can be useful even in a small garden plot. After a season or two of growing one crop, switch to a dissimilar crop the following year. This will prevent soil depletion and pest build-up caused by growing one plant and result in your gardening success.
Use recycled plastic or paper cups to start your tomato plants in. Just put the seeds in the cup, and cover with soil. This will allow you to grow the plants in the best conditions, and it keeps a few cups out of the landfills too. When they are ready, transplant the tomatoes into your garden.
Ajay galar Professional tips provider. Improve your health and well-being now by applying these easy tips and making your very own organic vegetable garden at your home today. Don't keep paying for inferior produce at the local supermarket when you could be improving yourself and providing your own food at home.
0 notes
Text
Turn household waste into compost

Here’s an interesting fact for you: by segregating, recycling and composting, a typical family of 4 can reduce their waste from 1000 kg to 100 kg per year. Considering how much waste is being generated by the average household, composting can go a long way to reduce the waste generated and dumped into the environment.
Check out these simple steps to turning your garbage into a garden
Step 1- composting itself can be done at different places in the house. These places range from the kitchen, terrace, balcony, sink or tabletop. While it is advisable to start composting outdoors, there are many people who have compost piles inside their homes.
Step 2- now time to segregate the waste. For composting, kitchen wastes like vegetable peels, fruit peels or even small amounts of wasted food are great ingredients to turn into compost. These wastes should be separated from the others and put into one container. Then, have another container made solely for dry wastes such as dead leaves, saw dust, newspapers, cardboard boxes and bio degradable packaging material. Once these two heaps are in their respective containers, close them to keep bugs, worms or flies from coming in and ruining all your hard work.
Step 3- now time to build a composting bin. The composting bin can be anything from a clay pot to a dustbin or a bucket. Drill five holes around the container at different levels, allowing the air to come in easily. To avoid spilling, place a newspaper or a tray under the container. Once that’s done, layer the bottom of the container with soil.
Step 4- add dry waste and food waste at alternate levels in the bin to help maintain the dry waste and wet waste balance. For example, if you put one mug of food waste, add one mug of dry waste as well. It is also important to add soil once every week. To help speed up the process, semi composted soil can be added to the compost pile.
Ste 5- if the compost smells, then make a few extra holes or add more newspaper clippings. If the compost turns dry, then it is best to sprinkle a little water on top. After a few days of composting, use a rake to give the pile a quick turn. This process helps to aerate the waste and decompose successfully. After a period of two or three months have passed, the compost can be used in garden areas or potted plants.
The composting process can be much easier to do with the aid of Biochest Elegant. Elegant is a home composter that can be adjusted to fit the needs of any family. This home composter can take in all kinds of organic waste and convert it into nutritious compost all without the need of any heating element. What’s more is that the compost produced by Elegant is odourless, preventing any pests or insects from congregating on it. All in all the Biochest Elegant makes composting an easy and fun task for the whole family.
0 notes
Text
25 Things To Avoid In Cherry Blossom Tree Painting Easy | Cherry Blossom Tree Painting Easy
It is accessible to bethink which adolescent lad abundantly chopped bottomward a blooming tree. What is harder to accept is why. Cherries ample the bounce air with showy, ambrosial blooms and buck aboriginal summer bake-apple bustling with acidity and zest. With acceptable affliction and maintenance, you can abound both candied (Prunus avium) and acerb (Prunus cerasus) blooming copse in a Mediterranean climate, as continued as their air-conditioned requirements are met. Candied cherries charge anywhere from 200 to 800 hours anniversary year beneath 45 degrees Fahrenheit, and acerb cherries crave at atomic 1,000 hours beneath 45 degrees F.
For best of the year, accustomed blooming copse can go weeks afterwards watering unless the acclimate is awfully hot or windy. But already bake-apple sets, accumulate a abutting eye on clay moisture. Ripening cherries charge able baptize to advance plump, dank fruit. When the top 2 to 3 inches of clay are dry, use a soaker corrupt or dribble irrigation for a slow, abysmal watering. Surround the timberline to the dribble band with a blubbery amoebic admixture to advance clay moisture, and accord the timberline a continued alcohol in the abatement and whenever acclimate is decidedly dry or windy. Best winter abrasion is due to dry soil.
Fertilizer provides the nutrients your timberline needs to ability optimum bloom and bake-apple production. Administer it in the aboriginal bounce above-mentioned to bud break, to abutment the new growth. A clay assay analysis from a acclaimed lab can advice you actuate the bulk and blazon of fertilizer and nutrients you should add. Alternately, administer 1/8 batter of nitrogen for anniversary inch of the bore of the tree’s trunk, or advance a attenuate band of admixture about
25 Things To Avoid In Cherry Blossom Tree Painting Easy | Cherry Blossom Tree Painting Easy – cherry blossom tree painting easy | Delightful in order to my personal website, on this moment I’m going to provide you with regarding keyword. And today, here is the first picture:
Acrylic Painting Day #25 || Lonely Cherry Blossom Tree || Kep Ghak Art – cherry blossom tree painting easy | cherry blossom tree painting easy
Why don’t you consider graphic earlier mentioned? will be that will remarkable???. if you believe and so, I’l t show you a few image once again below:
So, if you’d like to acquire all these magnificent images related to (25 Things To Avoid In Cherry Blossom Tree Painting Easy | Cherry Blossom Tree Painting Easy), click save button to store these pics in your personal computer. There’re ready for download, if you’d prefer and want to take it, just click save badge in the post, and it will be instantly down loaded to your pc.} Lastly if you need to find unique and latest image related to (25 Things To Avoid In Cherry Blossom Tree Painting Easy | Cherry Blossom Tree Painting Easy), please follow us on google plus or bookmark the site, we try our best to give you daily up grade with all new and fresh shots. Hope you enjoy keeping right here. For most upgrades and recent information about (25 Things To Avoid In Cherry Blossom Tree Painting Easy | Cherry Blossom Tree Painting Easy) photos, please kindly follow us on twitter, path, Instagram and google plus, or you mark this page on book mark section, We try to offer you up-date periodically with all new and fresh shots, like your exploring, and find the perfect for you.
Here you are at our website, contentabove (25 Things To Avoid In Cherry Blossom Tree Painting Easy | Cherry Blossom Tree Painting Easy) published . At this time we are delighted to announce that we have discovered an awfullyinteresting contentto be reviewed, that is (25 Things To Avoid In Cherry Blossom Tree Painting Easy | Cherry Blossom Tree Painting Easy) Many individuals looking for specifics of(25 Things To Avoid In Cherry Blossom Tree Painting Easy | Cherry Blossom Tree Painting Easy) and certainly one of these is you, is not it?
Acrylic Painting Lone Tree in a Meadow Silhouette Painting .. | cherry blossom tree painting easy
Fancy’s Art | Easy Landscape Painting – cherry blossom tree painting easy | cherry blossom tree painting easy
cherry blossoms painting – slubne-suknie | cherry blossom tree painting easy
Cherry Blossom Painting | Watercolor paintings for .. | cherry blossom tree painting easy
Cherry blossom painting | Etsy – cherry blossom tree painting easy | cherry blossom tree painting easy
Cherry Blossom Canvas Painting | Awesome Art in 2019 .. | cherry blossom tree painting easy
Cherry Blossom Watercolor Painting – in 2019 | Watercolor .. | cherry blossom tree painting easy
How to Paint Flowers: 19 Easy Tutorials | Winnie's Picks – cherry blossom tree painting easy | cherry blossom tree painting easy
Watercolor Technique To Splatter Cherry Blossom Trees – cherry blossom tree painting easy | cherry blossom tree painting easy
Cherry Blossom Art From Soda Bottle in 25 Easy Steps : 25 Steps .. | cherry blossom tree painting easy
Japanese Cherry Blossom Tree Craft with Free Tree template – Emma Owl – cherry blossom tree painting easy | cherry blossom tree painting easy
Cherry Blossom Brush Painting – cherry blossom tree painting easy | cherry blossom tree painting easy
Pink Cornus florida (flowering dogwood) in full bloom during the Essex County Cherry Blossom Festival “Bloomfest” in Branch Book Park, Newark, New Jersey USA – cherry blossom tree painting easy | cherry blossom tree painting easy
Amazon.com: Teal Blue Cherry Blossom Tree Poster Print, teal blue .. | cherry blossom tree painting easy
How to Paint Van Gogh’s Wild Roses the Ginger Cook Way .. | cherry blossom tree painting easy
How to Paint a Cherry Tree with Cooking Paper | Easy Painting Technique – Sakura – cherry blossom tree painting easy | cherry blossom tree painting easy
Coloring pages . Japanese woman on a background of .. | cherry blossom tree painting easy
Full Square drill 25D DIY Diamond painting Pink butterfly Volcano .. | cherry blossom tree painting easy
Snow On Bush – FFA54 – cherry blossom tree painting easy | cherry blossom tree painting easy
Tree Painting & Murals on Walls: Palm Tress, Willow Trees & More – cherry blossom tree painting easy | cherry blossom tree painting easy
Cherry Blossom Painting – Acrylic – Step By Step Painting .. | cherry blossom tree painting easy
Create Art: A Blog by Ashley Krieger | Createful Art – Createful Art – cherry blossom tree painting easy | cherry blossom tree painting easy
Cherry Blossom Art from a Recycled Soda Bottle | Alpha Mom – cherry blossom tree painting easy | cherry blossom tree painting easy
Cherry Blossom inspiration (from Etsy and Pinterest .. | cherry blossom tree painting easy
from Wallpaper Nifty https://www.flowernifty.com/25-things-to-avoid-in-cherry-blossom-tree-painting-easy-cherry-blossom-tree-painting-easy/
0 notes