#learn 3ds max online
Explore tagged Tumblr posts
Visit Tumblr Blog
Explore Tumblr blogs with no restrictions, modern design and the best experience.
Last Seen Tumblr Blogs


Fun Fact
Tumblr.com rank in the US is 25.
Text
youtube
In this tutorial, we will create a parametric infinite cube table and we will see how to keep some of its parameters parametric, meaning that, after making the main geometry, we can go back and change things in it. After extracting the necessary segments from a base chamfered box(used as a path), we will use Loft to make the main shape using a custom rectangle as a profile.
#3dsmax#3ds max tutorials#autodesk#autodesk 3dsmax#learn 3dsmax#3dsmax modeling#3dsmax furniture modeling#3dsmax parametric#parametric in 3dsmax#3dsmax online course#3dsmax online training#3dsmax how to#3dsmax loft#Youtube
3 notes
·
View notes
Note
Shaders!
How did you get into making shaders? I've done a lot of modeling and texturing, and while I've hacked together code for other things, I've never tried making shaders and it seems like something that would be really fun. I'd love to know how to get started making things like your raymarching shader. Do you do it within your modeling program or in an engine like unity/unreal? My modeling program of choice is 3ds max and I am not exactly sure if it supports making custom shaders
i think at some point i was just like, i wanna make cool sparkly rocks!!! so i slowly taught myself to make shaders in unity (since i was already learning unity for school). nowadays unity and most other programs have node-based shaders, which work just as well, but i find myself being a lot faster and more organized with just writing them in hlsl (the shader language unity uses)!!
a lot of the things i learn just end up as a result of little journeys - raymarching is a great example, i learned about it by watching a bunch of graphics gdc talks, and stumbled on it in a talk on how they rendered clouds in horizon zero dawn. i cant seem to find the talk it might be vaulted but this paper goes over basically everything from the talk. so i just started implementing the things from the talk!! or at least thats what i wanted to do. i got very stuck very fast and although i looked up a bunch of different tutorials on raymarching, i couldnt crack through it
so i took a break!! until a year later when i knew more and was like, i wanna try again! so i did and that time i got it working. this was my first little raymarching shader :)
anyways hope this helps a bit.. hard to put into words Exactly how i learned but it was mostly just, looking up resources online of cool things i wanted to do, googling whenever i got stuck, putting it down when i hit walls and tried again later, etc... lots of experimenting and failing and trying again !!!!
bit of an old post but here's one specifically for unity shader resources, but most of the fundamentals between programs are the same
90 notes
·
View notes
Note
Hello friend! I just wanted to start by saying I absolutely adore your CC - you have nailed the maxis style perfectly! Do you mind sharing how you learnt to make CC? If you have any good tutorials, perhaps you could link them? Tysm! <3
Hi! Thank you so much! For creating cc you have to be familiar with a 3D sofware such as Blender, Maya, 3D Studio Max. For making the objects you can find tutorials for these softwares on Youtube. I personally use Blender because it's free but has a lot of features. For putting it together and to be able to put your 3D meshes into the game you'll need Sims 4 Studio. You can download it from their forum and everything I know (which isn't a whole lot but I'm still learning) about Sims 4 Studio is from their forum. Honestly if you have a problem you face you search for it there and someone probably have already answered it. So all in all, if you have experience in 3D modeling you can start with these tutorials here: https://sims4studio.com/thread/662/index-studio-tutorials-online-manual Hope you start it! Let me know how it goes or if you need any help!
7 notes
·
View notes
Note
do you have any advice or good resources you know of to self-teach low poly art? ive started trying to learn through blockbench first but it has definitely been a bit of a challenge to navigate. it doesnt have to be specific to blockbench, but maybe you could share some of the things you did when you got started too?
i wish i could give more advice, but i'm not a methodical person at all... my way of learning is just obsessively attempting it, only stopping to search for help with specific issues i encounter. this means i progress fast in the areas that interest me but my general knowledge is pretty patchy.
but, if you have the patience, i guess i really suggest you either find an online course or watch introduction/"basics of" videos first. also maybe start by doing basic pieces, adding one new technique max every time. unless you are really prepared to deal with frustration... in my experience, the 3D art learning process is extremely frustrating and there's always something going wrong without you even understanding why. looking back, i'm very happy i didn't give up on it.
i don't know about blockbench but at least for blender there is a huge community and for every problem i have i find either the same question online, a video on it, or someone helps me in discord.
i could make up some more advice like "do practice exercises" or whatever but it's not something i have personally done... i think it's more important for you to try to understand how you usually learn things and what you enjoy doing too. if you can make the process enjoyable for yourself, you're more likely to stick to it.
oh and at least for me, it's more fun when i have friends who are learning the same thing too... if you don't have them there's also the other way around with trying to connect with others already in the community
good luck :)
38 notes
·
View notes
Text
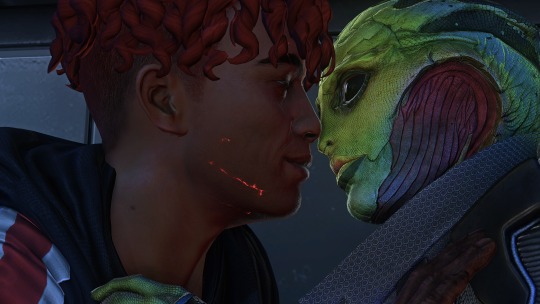
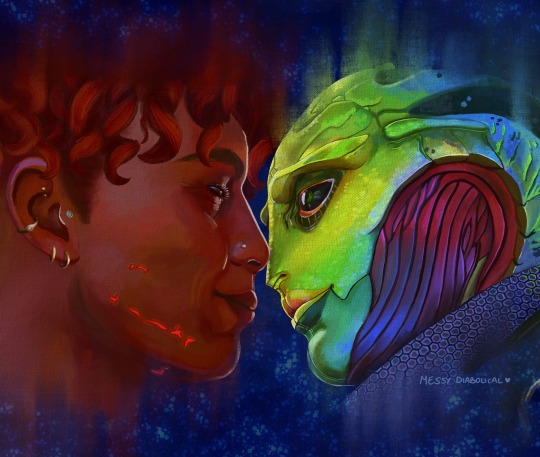
@dandenbo asked me for the art asks: 🎠What is a typical 'workflow' for a piece from idea to finished? It turns out to be a long answer so here's its own post, under the cut to save your dash! How I go from screenshot to painting: (This is not intended to be a 'this is how you do it!' kind of guide. I absolutely don't do an optimal route, this is just how I go about painting and what works for me! I've done a workflow for a screenshot to painting as I do a few different things but this is one I could explain somewhat coherently. My comics tend to be created pretty chaotically lol)
1) I take an ungodly amount of screenshots while playing. Also pester friends for their screenshots or stalk the group discord for interesting shots.
2) Go through all those screenshots cursing why I took so many, looking for those great moments that I want to paint. I’m particularly looking for nice poses/captivating moments, dynamic lighting or interesting expressions, and they don’t need to have all 3 as we can fix some of that in the next step. Here’s the screenshot I chose for my Keahi x Thane piece:
It was a cute, soft moment between them and I liked the highlight at the edge of their profiles. 3) Refine the screenshot. I don’t use anything fancy for this. I game on windows PC, so I open up the screenshot with windows photo editor. I crop the image, play around with saturation, exposure, contrast, just basic editing until it looks tastier. For this piece I wanted it to be hyper colourful and vibrant, leaning towards warmer tones.

4) Decide what I will change, then gather references for those changes. In this case I was fortunate that not a lot needed changing. I knew I wanted to move Thane’s eye position to looking at Keahi rather than the way he is slightly off focus, do a more realistic ear with earrings for Keahi, make Thane a little more smiley and lower his eyelid and give Keahi nicer eyelashes. I keep a whole bunch of art guides and tutorials on my PC so I grabbed the necessary ones and sent them to my ipad ready to have on hand for the sketch stage. I have Thane’s character model in XNApose, so I can check things like his eyelid specifically in that (this is actually for a different project but shows you what I mean)

If I was going to change up the lighting/shading I would also gather references for that. For example sometimes i’ll take screenshots of lighting schemes I love from films/tv shows (think the strong teal and orange scheme in Mad Max or the neons of Blade Runner). Or for precise shadows, I can again use XNApose. I also have a little 3d printed Thane head I can shine a torch at and take photos of to get shadow ideas. For humans there’s lots of reference to be found with online searches, I find pinterest more useful than google for this. For specific expressions or body parts, i’ll just take photos of myself (hand poses, smiling from the right angle etc.) My camera roll is an interesting place. I have drawn drell frills on my neck and on my chest before to see how the lines would fold at certain angles. 5) Setting up a canvas I work in procreate. For a piece like this I try to go pretty big, say 5000 x 4000 pixels, then i’ll crop down later as needed. 300 DPI. As I work, I’ll make duplicates and continue on the copy each fresh session. When i’m finished I make a backup save of the PNG and .procreate files on an SSD. I immediately turn the background colour down to a more muted colour to not burn my retinas. If i’m using a textured background like an oil board i’ll insert it, and any overlays like canvas effects. Set up my layers from the start basically for easy toggling throughout. I try to be good and label things to make life easier, it doesn’t always happen though. I don't wear a digital glove or use paper effect screens but I do have a bottle of screen cleaner and a microfibre cloth handy at all times. 6) Sketch. I’m still very much learning to draw. I tried for a long time to do the classic ‘ball for a head, draw the planes/lines etc. It was a constant struggle and never clicked for me, the ball especially always made things much worse, turning a circle into a 3d image in my head just does not happen. I find it better to just start drawing and work things out as I go (I use procreates reference window to see my screenshot). So I’ll have my sketch in one canvas, and i’ll also have a second canvas with the photo ref on it at the same size, and if I feel like something is really wonky and off i’ll test my lines over the photo to see what’s gone wrong, then go back to the sketch and correct the areas that revealed. Sometimes I’ll use the grid feature if i’m getting stuck. Here's a few of the sketch stages:


Here I tried out the lines on the photo and noticed that Thane’s frills were a little too far to the left, and Keahi’s eyebrow needed to arch down towards the nose.In the next pass I correct these:

Also, and I know i’m gonna get side eye from some people for this but I really could not care less to be honest. On some pieces i’ll just trace the screenshot. Sometime I just want to get to painting, am not in the mood or mindspace for a learning experience, and this is a hobby. It’s my screenshot, no one is getting ripped off. My latest Javik piece was done this way 🤷♂️ 6) Painting. I’ll start by blocking in the background and the portrait flats, usually on separate layers. I try to have an idea of the background colour from the start as this can effect the whole piece overall, but sometimes you just gotta change it as you go so having it on a different layer makes this much easier.
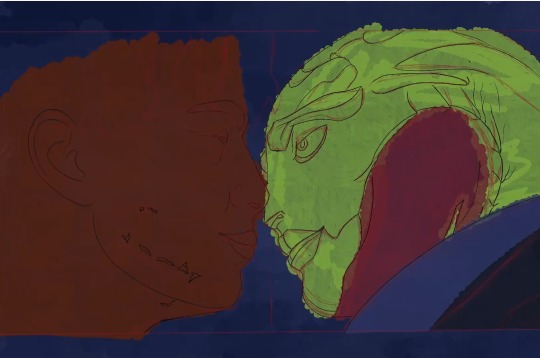
The painting itself I’ll lay down wider areas of colours, then start going in and refining bit by bit, I tend to work on one area at a time, and sometimes I’ll get pretty well rendered on a small area before moving on, other times work on a wider area. It really depends on my mood and what i’m vibing with that day. Like you can see here I’ve done some general messy colouring all over Keahi, but done a lot of refinement on the eyeball:
7) Finshing the piece, uploading and testing: When I’m sick of rendering the painting and don’t think I can add anything more to it without gnawing my own wrist off, it is time to finish up! I make sure I toggle all the layers I want on, add a top signature layer (lol I lie I forget this all the damn time). Then i’ll upload the piece to my google drive and open it up on my big 4k monitor on my PC, and on my phone, and see how it looks (my ipad is a 9.7inch air). I find that once off my ipad, it often looks a little less saturated and contrasting as it does in procreate. So I might go back and change the levels if it’s too big a difference until it looks decent across devices (it’ll never look perfect on them all though, just gotta find that happy medium).
8) Posting online I really don’t have any strict steps for this. I know some people go for optimal posting times, and will make multiple copies of their pieces in different sizes to fit better on different sites (damn you instagram and your need for everything to be square). I… do not do any of this lol. I post when I’m done whatever time or day that is. I do tend to reblog/retweet etc before I go to bed, as I live in the UK and that will at least be getting into evening time in US. I reblog my own stuff a fair bit.
16 notes
·
View notes
Text
3ds Max Models: Unlocking Your Creativity in 3D Design
Are you ready to dive into the world of 3D modeling? Autodesk 3ds Max is an exceptional tool that empowers artists and designers to create stunning, detailed 3D models that bring ideas to life. Whether you're looking for free 3D models, 3ds Max files, or want to convert Max to OBJ, 3ds Max has you covered. In this blog post, we'll explore the benefits of using 3ds Max models, tips for beginners, and how to stand out in the competitive industry.
Why Choose 3ds Max for Your Modeling Projects?
Versatility and Power
3ds Max is renowned for its versatility. Whether you're creating architectural visualizations, character models, 3D furniture models, or intricate product designs, its robust features cater to every need. The software offers a vast library of tools, including polygon modeling, spline-based modeling, and parametric design, allowing you to work in a way that suits your style. With 3ds Max, you can create low-poly models for game assets or high-poly, detailed models for renderings and animation.
High-Quality Output
One of the standout features of 3ds Max is its ability to produce high-quality renders. With advanced lighting, shading options, and PBR materials, your 3D models can achieve photorealistic results that captivate audiences. This quality is essential when presenting your work to clients or showcasing it in portfolios. 3ds Max also supports a wide range of file formats, making it easy to import and export your 3D assets for use in other 3D applications.
Tips for Creating Impressive 3ds Max Models
Start with Simple Shapes
As a beginner, focus on creating basic shapes. Understanding how to manipulate primitives will build your foundation for more complex 3D models. Experiment with the intuitive 3ds Max interface to get a feel for the tools and workflow.
Utilize Reference Images
Gather reference images for your models. This practice helps maintain accuracy and proportion, ensuring your creations look realistic. You can find free 3D models on sites like Free3D.com, CGTrader, and TurboSquid to use as references or starting points.
Experiment with Texturing
Textures can dramatically enhance the appearance of your models. Spend time learning about UV mapping and material settings to add depth and detail. The PBR 1884 Pack on Free3D.com offers a great collection of high-quality PBR materials to experiment with.
Leverage the Community
Join online forums and communities dedicated to 3ds Max. Engaging with other users can provide valuable insights, tips, and inspiration. You can also find free 3ds Max models, 3ds Max files, and modeling services shared by the community.
Standing Out in the Industry
In today's competitive market, having exceptional skills is crucial. Here's how you can differentiate yourself:
Build a Diverse Portfolio
Showcase a range of 3D models that highlight your versatility. Include different styles, techniques, and types of projects like 3D furniture models, animated models, game assets, and 3D scenes. A well-rounded portfolio can attract potential clients and employers. Consider the poly count and optimize your models for their intended use.
Stay Updated with Trends
The 3D design industry is constantly evolving. Keep an eye on emerging trends, tools, and techniques. Participating in workshops and online courses can keep your skills sharp and relevant. Stay up to date with the latest features in 3ds Max and explore new file formats and 3D applications.
Network and Collaborate
Connect with other professionals in the field. Collaborating on projects can lead to new opportunities and insights, helping you grow as a designer. Engage with the 3ds Max community, share your work, and learn from others to expand your knowledge and network.
Conclusion
Embarking on your journey with 3ds Max models can be incredibly rewarding. The software offers countless possibilities for creativity and expression. Whether you're looking for free 3D models, 3ds Max files, or want to convert Max to OBJ, 3ds Max has the tools you need. By honing your skills, embracing new techniques, and building a strong portfolio, you can stand out in the industry and make your mark in the world of 3D design.
Ready to unleash your creativity? Start exploring 3ds Max today and watch as your ideas come to life! Download 3ds Max and access a wealth of free 3D models, 3ds Max files, and resources to kickstart your 3D modeling journey.
2 notes
·
View notes
Text
Mastering Self-Taught 3D Modeling: A Comprehensive Guide
Learning 3D modeling independently can be an immensely rewarding endeavor. Below, you'll find a step-by-step guide to embark on this creative journey successfully:
Define Your Objectives: Begin by clarifying your reasons for learning 3D modeling. Are you interested in game design, animation, architecture, or another specific application? Establishing clear goals will help you stay motivated and focused.
Select Suitable Software: Numerous 3D modeling software options are available, ranging from free to paid. Popular choices include Blender (free and open-source), Autodesk Maya, 3ds Max, Cinema 4D, and ZBrush. Choose software that aligns with your goals and budget.
Grasp the Basics: Start with the fundamentals. Familiarize yourself with the software's user interface, navigation, and basic tools. Most software packages offer introductory tutorials and documentation to facilitate your initial steps.
Access Online Courses and Tutorials: A wealth of online courses and tutorials awaits you on platforms like YouTube, Udemy, Coursera, and Khan Academy. Seek out beginner-level courses that cover the basics of 3D modeling. Follow along and practice consistently.
Regular Practice: Improvement in 3D modeling is directly linked to practice. Dedicate time to create simple objects, experiment with tools, and gradually advance to more intricate projects. Steadfast practice is key.
Study Anatomy and Reference Materials: For those interested in character modeling or organic shapes, in-depth knowledge of anatomy and reference materials is invaluable. This understanding enhances the realism of your creations.
Master Texturing and Materials: Explore texturing techniques and materials. Proficiency in applying textures, shaders, and materials to your 3D models is essential for achieving realistic renders.
Delve into Specializations: 3D modeling encompasses a wide array of specializations, such as character modeling, architectural visualization, product design, and more. Explore various areas to discover your passion.
Engage in Online Communities: Connect with fellow 3D artists and enthusiasts through forums, social media, and 3D modeling communities. Sharing your work, seeking advice, and receiving feedback can be immensely beneficial.
Develop a Portfolio: As your skills evolve, start crafting a portfolio showcasing your finest work. A well-structured portfolio is essential if you aim to pursue a career or freelance opportunities in 3D modeling.
Stay Current: The 3D modeling field is in constant flux. Stay informed about the latest trends, techniques, and software updates by following industry news, blogs, and online courses.
Consider Advanced Training: If you're committed to a career in 3D modeling, contemplate advanced training or pursuing a degree in computer graphics, animation, or a related field. Such education can broaden your horizons.
Innovate and Experiment: Dare to innovate and experiment. Push the boundaries of your creative abilities, and don't be disheartened by setbacks. Learning from your mistakes is an invaluable part of your journey.
Cultivate Patience and Perseverance: Mastering 3D modeling is a gradual process, and each individual progresses at their own pace. The key is to maintain patience, practice consistently, and persist through challenges. Remember that setbacks are a natural part of the learning process.
Recommended Article:
3D Jewelry Rendering For Online Store
Embarking on the path of self-taught 3D modeling can be challenging, but with dedication and the guidance provided above, you can make remarkable progress and achieve your artistic and career goals.
#3dfurniturerendering#3dproduct#3dproductrendering#3dproductvisualization#3dproductvideo#3danimationvideo#3dfurniturerenderingservices#3dproductanimation#3djewelryrenderingservices#3dproductrenderingservices
2 notes
·
View notes
Text
Announcing software training programs for Architects, Interior Designers & Civil Engineers.
Learn 3DS Max+ VRay and generate high quality renders for interiors and exteriors.
3DS Max is the most prominent and widely used software by Architectural & Interior Design professionals. You can generate realistic renders and animations very easily. Whereas, vray is the most widely used plugin used for rendering. It is a very powerful tool to provide premium quality materials and lightings.
✅ Certified Training Program ✅ Learn from experts ✅ 3D Modelling ✅ Premium Materials and Lighting ✅ Walkthroughs ✅ Online live sessions ✅ Best professional course curriculum
Website-: www.caddcrafter.com
Unleash your potential with quality training by Cadd Crafter
Schedule your free demo session now.
#3dsmax#vray#renderlovers#architec#delhiinteriors#delhiarchitects#civilengineer#walkthroughs#interiordesign#interiorarchitecture#houseinterior#buildingexterior#facadeengineering#rendering3d#vraylight#vrayrendering#vraymaterial#buildingdesign#livingroomrenovation#archistudent#interiorstudent#roomstyling#archisoftware#caddcrafter
3 notes
·
View notes
Text
Video Game Writing
51st Post! Our 50th post was the Star Wars one and I didn’t notice. My exams are officially over, and you know what that means. I have 0 knowledge of anything that is not programming that I will need to make a game, and it has been literally years since I last touched Unity.
So, here’s a checklist of things I’ll need to learn:
Unity: I have 3 options for 3D game dev, namely Unity, Unreal Engine and Godot. I could go into detail on why I chose Unity, but that would be boring, so in short, Unity is easy to use and uses C# and is popular with indie devs, UE is more complex, uses C++ and in popular with AAA games, Godot is free and open-source, but it less popular and has much less resources on the internet, and uses C# or GDScript, a Python based custom language. I would use Godot were it not for the fact I have little experience, so I’ll need tutorials and such, and I have experience with Unity.
Music: Ah, the bane of my existence. Okay, I’m overplaying it, composing doesn’t really come easy to me. I can play the keyboard a little, and am decent at playing by ear, but beyond that, no ability at all, and with the theme, that’s gonna be a problem. Hopefully I’ll get everything figured out by then. Sound design too, but I’ll probably be using online libraries or something, creating my own sounds could be a little complicated, but might have to do for certain stuff.
Art: Art is important in games, but not as much as music for mine. I will probably have to use low-poly models and flat textures and stuff. It’s not going to be pretty, but that’s not the focus, as is the case for most indie games.
Writing, our topic of the day. Now, there’s a huge difference between screenwriting or novel writing and video game writing. I, admittedly, haven’t played too many story driven games, so my experience is a little limited, but bear with me. Video games are an interactive medium, so there’s the intricacies that come with that. Okay, let me walk you through this with examples.
Undertale
For once, I think I’ll (painfully) skip Undertale.
Subnautica
Subnautica is mainly a survival-exploration game, and the story is pretty secondary, but I wanna cover all bases. The story is pretty Robinson Crusoey. The protagonist, Ryley Robinson, is a janitor on a spaceship which was attempting a slingshot maneuver with the planet 4546B but it crash landed and the crew escaped in Lifepods. By the time Ryley wakes up, the rest of the crew is dead, and Ryley just happens to land in the only Safe Shallows. The rest of the story is Ryley exploring the Aurora, finding rocket blueprints because Alterra (the company behind the spaceship) does not care enough to rescue him, because greedy corporation, and escaping. When Ryley returns home, he has a debt of 1 trillion credits because every resource he uses from the planet is apparently owned by Alterra. This is an example of a story where the protagonist doesn’t matter much and it’s pretty much the player playing. I will elaborate later.
Alan Wake and Control
Alan Wake and Control are games by Finnish studio Remedy Entertainment. Creators of games like Max Payne and Quantum Break, they’re known for narrative driven video games. Alan Wake’s story is split into episodes, a sound decision imo considering the storytelling style.. There are “Previously On…” sections for each episode so people who left off somewhere in between are not completely lost, but the game is relatively short, so I don’t think it was that necessary. I don’t want to spoil too much, so I’ll only get into the premise and a bit of the beginning for each game.
Alan Wake is a bestselling author going through a writer’s block. He and his wife, who has a fear of the dark, go to Bright Falls for a vacation. His wife disappeared/is kidnapped and Alan thinks she fell into the lake on which their cottage is on and jumps in, and it fades to black. Alan wakes up and he’s somehow crashed a car. He goes into the town to get help and has to fight through people covered in a weird dark mist. Oh right, he had a dream in the prologue section that taught him how to fight them, which is by shining a light on them for some time until the mist is gone and bam-bam. On the way he also finds manuscripts laying around the path which appear to be telling the future. I’m sure you can piece together what is going on with what I’ve told you so far.
Alan Wake’s story is simple, but gripping, which is probably the best kind of story. I probably would have finished it in one sitting were I not terrible at combat. It takes a pretty common fear and turns it into a villain (huh, I see the Stephen King inspiration now). The idea of the story being deterministic and physically pre-written is pretty novel. There are also these random TV sets lying around, which play this show called “Night Springs”. Night Springs appears to be a TV Show that tackles supernatural topics. They talk about the Many-Worlds interpretation, and the episode where they do is uh disturbing to say the least, as is the case with most of them, I guess, and a man who killed someone who seems to have identical fingerprints, which I think is referenced in a quest in Control? I can’t find anyone who also thought so, so I might be tinfoil hatting. The other collectible is uh… coffee thermoses..? They appear to have no significance, is it a lazy addition to pad out playtime? I have no idea. It’s referenced however in Control, with a document by the FBC saying that Alan Wake was seen collecting them and they seem to always dispense “refreshing and strong” coffee no matter what was poured in. I don’t think Alan drank any of it because he can’t run. Seriously. He is winded after no less than four seconds. Seriously dude, I know you’re a writer and all, but I haven’t run a meter in 3 years and I can run for longer.
Okay, that went on for long enough, so let’s move onto Control. Control is a new weird action adventure game also developed by Remedy. Jesse Faden is from a town called Ordinary (I know, ironic) where an Altered World Event or AWE for short occurred and she was separated from her brother, Dylan. Aided by this supernatural entity residing in her mind, she spends the rest of her life investigating what had happened to try and find her brother, and she’s led to the Federal Bureau of Control, deciding to take up the job of the janitor’s assistant. Things don’t go exactly to plan and she ends up Director. And as it turns out, that a resonance-based life form is infesting people and making them do their bidding. The rest of the game is Jesse exploring the Oldest House, the name for the FBC’s headquarters, assisting the Bureau while trying to find her brother. Control has a weird system for collectibles. There are documents, split into Research, Case Files and Correspondence. Most of them are in various levels of censorship, ranging from

Whatever this is to

This.
The censorship is perplexing in most cases, like in the former, like what the heck happened there that almost everything had to be censored, and in the latter one, the words seem obvious, but is it actually what I think it is or is it somehow more sinister..?
Control is heavily inspired by the SCP (Special Containment Procedures; backronym: Secure. Contain. Protect) Foundation uh mythos? The SCP Foundation deals with containing and documenting paranatural objects, locations, even individuals. The FBC also does that, they send out operatives to locate Altered Objects or Objects of Powers(OoPs). Altered Objects are just plain supernatural objects. OoPs however, can allow a parautilitarian to bind with it and gain powers, like Jesse does. This is one place I think Control excels at. Control does not spoon feed you the info for each AO, and you have to go searching for the documents on it.
Ah, damn, I don’t have the time to go into the rest of the things I wanted to talk about, so I’m going to put this on the back burner. The next few are going to be pretty low effort :P since you know, travelling laptopless. Ciao!
2 notes
·
View notes
Text
Mastering 3D Modeling Games A Comprehensive Guide for Beginners

The gaming industry has evolved significantly over the years, and one of the most critical aspects of modern game development is 3D modeling. Whether you're an aspiring 3D artist or a beginner looking to break into the field, mastering 3D modeling games is a vital step. This comprehensive guide will walk you through the essentials of creating stunning game assets and immersive 3D game environments.
Understanding 3D Modeling Games
In gaming, these models are used to design characters, props, environments, and other visual elements. High-quality 3D modeling enhances gameplay by making worlds feel realistic and engaging.
Some popular software tools for 3D modeling in games include:
Blender: A free, open-source tool packed with powerful features.
Autodesk Maya: A favorite among professionals for its versatility.
ZBrush: Ideal for sculpting detailed characters and intricate designs.
3ds Max: Perfect for creating detailed game environments.
Key Elements of 3D Game Modeling
To create outstanding 3D models games, focus on the following core aspects:
Modeling Techniques: There are two primary methods for creating 3D models—polygonal modeling and sculpting. Beginners often start with polygonal modeling to understand shapes and proportions, while sculpting is used for adding fine details.
Texturing and UV Mapping: Textures bring life to your 3D models. UV mapping is the process of unwrapping a 3D model's surface for applying textures accurately. Learning tools like Substance Painter can significantly improve your texturing workflow.
Optimization: Unlike pre-rendered 3D art, game models need to run in real-time. This means optimizing models to balance quality and performance. Techniques like reducing polygon counts and using efficient textures are crucial.
Lighting and Rendering: Lighting plays a vital role in creating mood and realism in 3D game environments. Tools like Unreal Engine and Unity allow artists to test and tweak lighting setups directly in-game.
Creating Game Assets
Game assets are individual components like props, weapons, vehicles, and characters. As a beginner, start small by modeling simple objects before moving on to complex assets. Here are a few tips:
Start with Reference Images: Gather visual references to guide your modeling process.
Understand Proportions: Ensure that your models are scaled correctly to fit within the game world.
Iterate and Improve: Game assets often go through several iterations. Use feedback to refine your work.
Designing 3D Game Environments
3D Game environments set the stage for the action. They’re often vast and intricate, requiring careful planning and execution. Follow these steps to design immersive 3D game environments:
Concept and Layout: Start with a 2D concept or sketch. Use it to block out the environment in 3D.
Modular Design: Create reusable assets like walls, doors, and props to save time and maintain consistency.
Detailing and Texturing: Add details like foliage, weather effects, and realistic textures to enhance immersion.
Playtesting: Ensure your environment supports the gameplay mechanics and feels natural for players.
Tips for Beginners
Learn the Basics: Invest time in understanding foundational concepts like geometry, topology, and textures.
Practice Regularly: Consistency is key. Create simple models daily to build your skills.
Explore Tutorials: Platforms like YouTube and online courses offer invaluable learning resources.
Join Communities: Engage with 3D modeling forums and social media groups to share your work and receive feedback.
Conclusion
Mastering 3D modeling games requires time, dedication, and practice. By focusing on creating high-quality game assets and immersive 3D game environments, you can build a strong foundation for a successful career in the gaming industry. Embrace the process, experiment with tools, and continuously improve your craft to bring your creative visions to life.
0 notes
Text
Interior Design Course Duration
Interior design is a field that blends creativity, technical knowledge, and a keen understanding of aesthetics to transform spaces. Aspiring designers often wonder about the time it takes to complete an interior design course and start their journey in this exciting career. If you're exploring options for an Interior Design Course in Kolkata, this article will guide you through the details, including course duration and what you can expect.
How Long Does an Interior Design Course Take?
The duration of an interior design course can vary significantly depending on the type of program, its level, and the institution offering it. Here's a breakdown of the typical durations:
Certificate Courses:
Duration: 3 to 6 months
These are short-term courses ideal for beginners who want a quick introduction to interior design. They cover fundamental topics such as space planning, color theory, and basic software skills.
Diploma Courses:
Duration: 1 to 2 years
Diploma programs offer a deeper dive into the subject, including modules on furniture design, lighting, and advanced software tools like AutoCAD and 3D Max. A diploma in interior design provides practical knowledge and prepares students for entry-level roles.
Undergraduate Degree (Bachelor’s):
Duration: 3 to 4 years
A bachelor’s degree in interior design is a comprehensive program that combines theoretical knowledge with practical training. Students learn about architecture, sustainability, materials, and advanced design techniques. This degree is ideal for those aiming for a professional career in interior design.
Postgraduate Degree (Master’s):
Duration: 2 years
For those seeking specialization, a master’s degree offers advanced knowledge in areas like luxury design, heritage interiors, or sustainable practices. It’s suitable for individuals aiming for leadership roles or academic careers.
Online and Part-Time Courses:
Duration: Flexible
Online courses and part-time programs are designed for working professionals or those who prefer self-paced learning. The duration can range from a few months to a couple of years, depending on the structure and content of the course.
Why Choose an Interior Design Course in Kolkata?
Kolkata is emerging as a hub for creative education, making it an excellent place to pursue an Interior Design Course in Kolkata. Here’s why:
Rich Cultural Heritage: Kolkata’s blend of traditional and modern architecture provides a unique learning environment for aspiring interior designers.
Reputed Institutions: The city hosts several renowned institutions offering specialized programs in interior design.
Affordable Living and Education: Compared to other metropolitan cities, Kolkata offers quality education at a relatively lower cost.
Industry Exposure: Being a growing market for real estate and commercial spaces, Kolkata offers ample opportunities for internships and industry exposure.
What Do Interior Design Courses Cover?
An Interior Design Course in Kolkata typically covers:
Design Principles: Understanding balance, proportion, harmony, and emphasis in space design.
Software Training: Learning tools like AutoCAD, SketchUp, and 3D rendering software.
Material Knowledge: Exploring various materials like wood, glass, metal, and fabrics.
Lighting Design: Techniques for creating functional and aesthetic lighting solutions.
Portfolio Development: Building a professional portfolio to showcase your skills to potential employers or clients.
Career Opportunities After Completing an Interior Design Course
Upon completing an interior design course, you can explore various career paths, such as:
Residential Interior Designer: Specializing in designing homes.
Commercial Designer: Focusing on spaces like offices, retail stores, and restaurants.
Furniture Designer: Creating custom furniture pieces.
Exhibition Designer: Designing layouts for exhibitions and events.
Freelancer or Entrepreneur: Starting your own design firm or consultancy.
Conclusion
Choosing the right interior design course and understanding its duration are critical steps in building a successful career in this field. Whether you opt for a short-term certification or a comprehensive degree program, Kolkata offers a range of options to match your goals. Enrolling in an Interior Design Course in Kolkata not only equips you with essential skills but also immerses you in a culturally rich and vibrant learning environment. Take the first step today and embark on a journey to transform spaces and lives!
0 notes
Text
youtube
In this tutorial, we will learn about a new Compound Object called ShapeMerge. This object will help you to imprint/Stamp a 2D shape onto a surface, also to cut out the 2D shape from that surface, also, you can invert the cutout operation. This is a useful tool if you like to create a road on a land/landscape or cut out a text, or any other closed shape pattern from a surface.
#3dsmax#3ds max tutorials#3ds max#3ds max compound objects#3dsmax shapemerge#autodesk#autodesk 3dsmax#3dsmax modeling#3dsmax how to#3ds max expert#learn 3ds max#3d tutorials#3ds max course online#Youtube
3 notes
·
View notes
Text
New year, new games

... even though most of these games aren't new, and I've already started them.
In the past year, I've gotten a bit more into PC gaming, and now, I'm starting to try out more VR as well, so the first row is dedicated to that. There are way more games than would fit into this graphic, but I decided I wanted to collect some big/important games I wanted to focus on in some way. These are games I consider "must play", but at the same time, they require some time and effort.
First row (PC)
Quantum Break: I loved Alan Wake, and since Remedy games seem to be connected in some way, I want to play this as well. I've also started replaying Max Payne 1+3, not for this reason, but they're also Remedy games. Also have the final Alan Wake 2 DLC, as well as the co-op game that's coming this year.
Red Dead Redemption 2: Didn't like it when it came out, but what I've learned about it since has made me appreciate and give the game a second chance. I want to beat it before GTA VI comes out, as this will probably rival this in quality. I also consider finally playing the GTA VI DLC, but I'm not sure about that yet.
Half-Life Alyx: One of the biggest reasons I got a new PC+VR, and so far it's great. This and Batman are my VR games I want to beat this year.
Second row (PS5)
God of War Ragnarök: I was hesitant when it came out because many people said that it played like the first game (plus I didn't have a PS5 back then). Now, enough time has passed however, and I'm enjoying it so far. I don't want to rush through it, even though it's a long game, so not sure if I beat it this year.
Silent Hill 2 Remake: I've been waiting for this a long time, and so far it hasn't disappointed. Just need the right mood to play it, and I don't want to wait too long for that.
Final Fantasy VII Rebirth: Another loooong game, with many things to explore. Not sure if I beat it this year, but it's one game I definitely want to play more of.
Third row (Most anticipated)
Hyper Light Breaker: There are a lot of indie games I'm looking forward to this year, but this was on last year's list already. Drifter is one of my favorite games and I doubt this will be as good, but Heart Machine hasn't disappointed me yet. Hope it's good.
Switch 2: Where is it? What games will be on it? I'm hoping for a new 3D Mario like Odyssey. Ocarina of Time Remake. Mario Kart 9. Needless to say, Metroid Prime 4 is one of my most anticipated games of the year. Maybe, I'll get DKC Returns at some point as well.
GTA VI: This is the big one. Even though it's sad Rockstar hasn't done much since GTA V, this will be one of the biggest games of all time. If RDR2 is any indicator, this should be huge. Also, I hope they make Online more interesting.
Fourth row (retro games)
There is no fourth row, but I feel like I should have one with retro games I want to play/replay. Some titles include The Godfather, Tony Hawk, Castlevania DS, Boku no Natsuyasumi, Gex Trilogy, Donkey Kong Land, ...?
Honorable mentions
Other games I want to play/finish: Black Mesa, Bakeru, Astro Bot, Space Marine 2, Penny's Big Breakaway, Indiana Jones, Elden Ring?!
1 note
·
View note
Text
3ds Max training is essential for anyone looking to master this powerful 3D modeling, animation, and rendering software.

Industry-Standard Software: 3ds Max is widely used in various industries, including film, gaming, architecture, and advertising. Learning 3ds Max can significantly enhance your career prospects. Comprehensive Skill Development: 3ds Max training covers a wide range of skills, from basic modeling and animation to advanced rendering and visual effects.
Hands-on Experience: Most training programs include practical exercises and projects, allowing you to apply your knowledge and develop real-world skills.
Expert Guidance: 3ds Max training is often conducted by experienced professionals who can provide valuable insights and guidance.
Networking Opportunities: Training programs can connect you with other aspiring 3ds Max users, fostering collaboration and networking opportunities.
Finding the Right 3ds Max Training: When choosing a 3ds Max Course in Jaipur, consider the following factors:
Your Learning Style: Determine whether you prefer self-paced online courses, instructor-led classroom training, or a combination of both.
Your Career Goals: Choose a training program that aligns with your specific career aspirations, such as game development, visual effects, or architectural visualization.
Course Curriculum: Ensure the training program covers the specific areas of 3ds Max you want to learn, such as modeling, animation, rendering, or scripting.
Instructor Expertise: Look for training programs led by experienced 3ds Max professionals with industry knowledge.
Cost and Duration: Consider the cost and duration of the training program, as well as any additional expenses such as software licenses or certification fees. By carefully selecting a 3ds Max Training program that meets your needs and goals, you can gain the skills and knowledge necessary to succeed in this exciting and dynamic field.
0 notes
Text
Explore the World of 3D Animation Design
3D animation has become a vital part of modern entertainment, education, and digital marketing. From blockbuster movies to video games, and even virtual reality experiences, 3D animation plays a significant role in bringing ideas to life. Whether you're a creative enthusiast or someone looking to develop skills for a career in this field, understanding 3D animation design can open doors to exciting opportunities.
Understanding 3D Animation
3D animation is the process of creating moving images in a three-dimensional space. Unlike traditional 2D animation, 3D animation allows for more depth, realism, and movement, which makes it ideal for modern visual storytelling. The process involves designing characters, environments, and objects in a digital format, followed by animating them to create a lifelike movement.
In 3D animation, artists use specialized software to model objects and characters in 3D space, then apply textures and lighting to give them a realistic look. Once the models are created, animators bring them to life by manipulating these models over time, creating movements and actions. This makes 3D animation not only a technical skill but also an art form that requires creativity and attention to detail.
The Importance of 3D Animation in Today's World
The demand for skilled 3D animators is growing across various industries. Animation is widely used in film production, gaming, advertising, and even in architectural design and education. With the rise of online platforms and virtual reality, the need for 3D design and animation has skyrocketed.
In the entertainment industry, 3D animation is used for creating breathtaking visuals in movies, television shows, and video games. It is also crucial in the creation of animated films and special effects that captivate audiences worldwide. The gaming industry, in particular, relies heavily on 3D animation to create immersive environments and realistic characters.
Learning 3D Animation
If you're interested in entering the world of 3D animation design, taking an animation course can provide you with the necessary skills and knowledge to start your journey. A well-structured course will cover the fundamentals of animation, including 3D modeling, texturing, rigging, lighting, and rendering. These courses typically offer hands-on training in popular animation software such as Blender, Maya, or 3ds Max, which are industry standards.
Animation classes provide an opportunity for students to work on practical projects, allowing them to apply the concepts they've learned in a real-world context. They also give aspiring animators the chance to develop their own unique style and gain feedback from experienced professionals.
The Benefits of Taking Animation Courses
Taking animation courses offers several advantages for anyone serious about building a career in this field. First, it provides structured learning, ensuring that students cover all aspects of 3D animation design. Whether you're a beginner or looking to refine your skills, courses are designed to meet various levels of experience.
Additionally, learning animation from experts in the field can help you stay up-to-date with the latest trends and technologies. You'll gain exposure to new tools and techniques, which can significantly enhance your creative abilities.
Career Opportunities in 3D Animation Design
With the growing demand for 3D animation in different industries, there are various career opportunities available for skilled animators. Graduates can pursue roles as 3D modelers, animators, texture artists, or visual effects artists. Additionally, 3D animation skills are highly sought after in fields such as product design, medical visualization, and virtual reality development.
Many industries also hire animators for marketing and advertising purposes, creating animations that engage customers and promote products in a creative way. With the right training, the career prospects in 3D animation are vast and varied.
Conclusion
The world of 3D animation design is both exciting and full of potential. With the right skills, anyone can step into this dynamic field and make a mark. Whether you're interested in animation as a hobby or planning to turn it into a profession, pursuing animation courses in Udaipur can provide you with the foundation needed for success. In a rapidly evolving industry, taking animation classes can help you stay ahead of the curve and create work that inspires and captivates audiences.
0 notes
Text
This particular assignment is one I've been looking forward to for a while. 3D is something I've wanted to (and tried) learn to implant into my art for a long time now, especially as I feel it will help me to feel more comfortable with environments. Several years ago I started learning blender through youtube tutorials (starting of course with blender guru's donut) and Udemy courses to help with my concept art. Every time I would start to get comfortable with the software when some horrible part of my brain would convince me I was taking time away from making portfolio pieces so I could apply for open positions. So I'd revert to just using digital painting, which would move slowly thanks to my full time job, then by the time I got back to blender I'd basically need to relearn the basics. So I'm happy to have an assignment specifically telling me and my internal voice of self doubt that I HAVE to be learning 3D (3rd or maybe 4th time's the charm).


The fist thing I did was basically just play around inside blender seeing what I could remember myself. I also pulled up some of my old Blender files and tried to replicate things I'de done in them. Using basic meshes, the A.N.T. addon, nodes, modifiers and other techniques that I was able to scrape some rust off I set up a few basic scenes (apparently I only save the 2 above though).


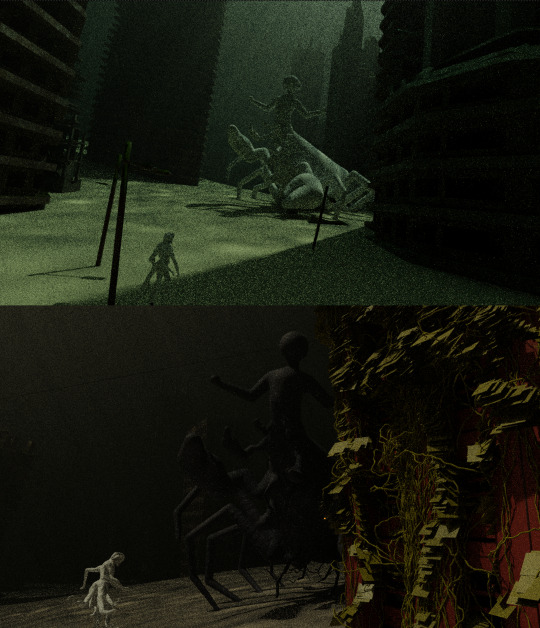
Something I had played with before that I wanted to play around with was was creating underwater scenes as it allows you to work on creating interesting lighting situations and volumes. I also thought a sunken city might make for a fun bases for an environment piece. So I followed the Max Hay tutorial (https://www.youtube.com/watch?v=IX2gOPm5YIA&t=76s) Leo had suggested in class to pull in a section of NYC to start, and used A.N.T. to create a plane with hight variations that would allow some buildings to look more buried than others. I actually originally tried using my old neighborhood on Boston, but it lacked the verticality of NYC which really helps to sell "city." Then I followed a tutorial by CG Geek (https://www.youtube.com/watch?v=sxWJqMJdL04) to learn how to ad caustics and make the scene look like it was underwater. Then I decided I needed the buildings to look more run down, so I found some post apocalyptic models online and started adding them in one by one until I started wondering if I could distribute them like sprinkles on a donut and went back to Blender Guru (https://www.youtube.com/watch?v=TLrA6eJOfqk&list=PLjEaoINr3zgEPv5y--4MKpciLaoQYZB1Z&index=6, https://www.youtube.com/watch?v=EWTOy5-e4Ns&list=PLjEaoINr3zgEPv5y--4MKpciLaoQYZB1Z&index=7).


During my tutorial with Neal brought up the point that depending how deep I intended the city to be it might make more sense for there to be less light. So after I played around with the density of of the volume nodes being used, and tried to scale down the caustics to make the whole scene look less like it was a toy in a tub. I also spent some time moving around the model trying to find interesting angles, as it's something I've been trying to work on through the semester. On Neals recommendation I also started watching Nautilus on Prime, to see how they handle light underwater, and take a look at some of their creature designs.


Next I wanted to make sure I spent some of my time learning ZBrush so I started following a beginner's tutorial (https://www.youtube.com/watch?v=GzDIxMnZ_Po) demonstrating how to sculpt a demon's bust. While following the tutorial I took liberties, trying to make it my own and come up with something that would fit within the city I was working on. Then I continued pushing the bust further after the tutorial was done. It's a small thing but coming around to the idea of working on my own piece during a tutorial is enormously helpful for me. One of the reasons I always pulled myself away from learning 3D in the past is that I followed lessons so closely that I knew I wasn't making anything original and shouldn't use it for my portfolio.


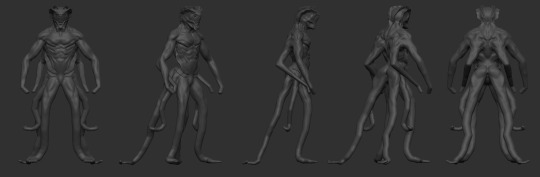
Now that I had a bust for a character I was starting to like I needed to learn how to make a body. So with the help of yet another tutorial I learned how to make one using zspheres (https://www.youtube.com/watch?v=j3W3cX9hvyA&t=3s). I figured out how to merge the two models myself, and based on some issues I had as I modeled the torso I'll probably need to better learn how to do it in the future.
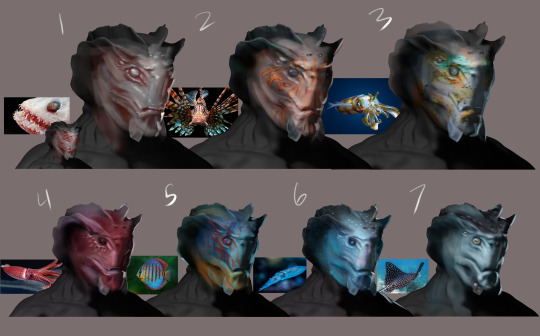
After I had the model where I liked it (which might be further than is really necessary for concept art, but was helpful for learning), I worked on some different color schemes for the character based on various fish that I sound interesting. Initially I tried using a layer set to color blend mode, then gradient maps, but neither really worked the way I hoped. So I ended up using screen blend mode and doing a quick paintover for each, which is why I just did the face, as it saved time and doing more wasn't strictly necessary.
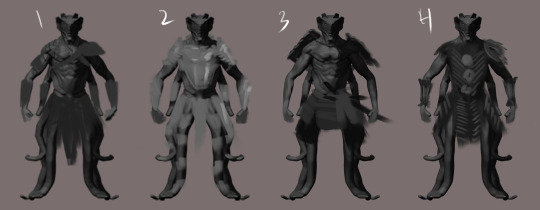
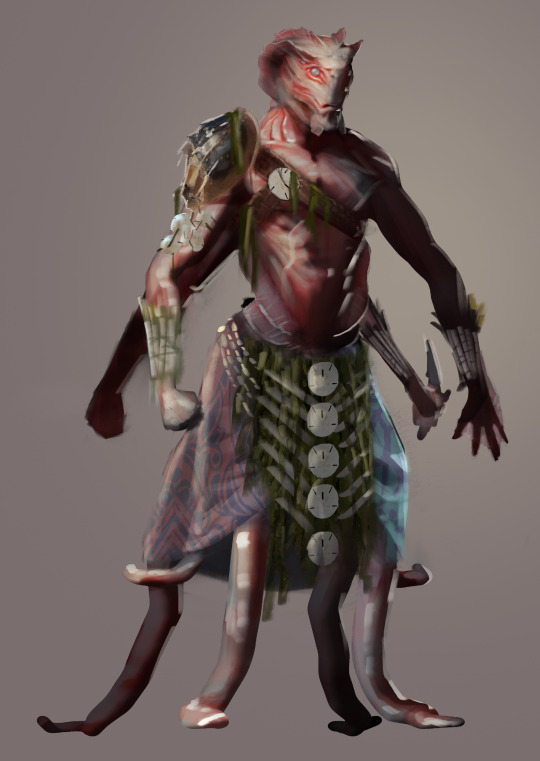
My personal favorite of the colorways was 1 and friends, family and Neal al confirmed it was one of the strongest. While working on the character model I started figuring out that my concept was basically an underwater soulslike (like One Crab's Treasure, but with a tone closer to a FromSoft game). So the undead quality of 1 felt appropriate. While playing with a few armor designs I quickly settled on the idea of doing something inspired by a combination of pacific islands, and the Lost Boy armor from Hook (a staple for any 90s kid). I then proceeded to continue the paintover adding some small elements of photobashing, and ended up with something i'm rather happy with.
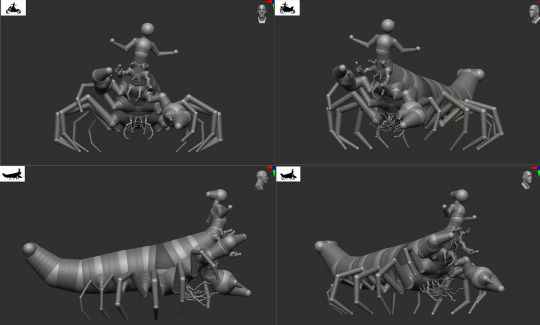
I had decided previously in the project that I wanted to have some large creature looming in the background of the city. In fact that and the city where originally meant to be the whole idea, and I just happened to make a character i liked while following that beginner ZBrush tutorial, and decided to work on that and include it. I just out to make this one a silhouette really, as I was planning to just have it faintly in the background, so I just plotted it out in zspheres. I was originally thinking of a swimming leviathan like creature but played around with something lobster-like and found i liked it. Inspired by The One Reborn from Bloodborne which I recently watched a series of streams of (FromSoft games are too hard for me), I decided to have a humanoid figure coming out of the top, which also solidified the idea for me that this was a boss in the game. I then figured out how to get ZBrush models into Blender and set up some scenes for them.

At this point I was short on time but still wanted to try making a more dynamic scene, and set about reposing the PC. I originally tried a technique using masking and rotation I saw Leo demonstrate while sitting in on his undergrad 3D class, but the sphere that controls rotation and movement was always offset from the selected body part and would couse it to move unpredictably. Leo did address this in that class, but I could not for the life of me remember how. So I looked up how to pose using zspheres (https://www.youtube.com/watch?v=irnuxmVuF1Y&t=904s) and rather liked that way of doing it. I did not get very far with the paintover of this scene, but it was definitely worth learning how to rig models with zpheres.
3D Assets Used:
Korboleevd. (2022). Post-war Building | 3D model. [online] Available at: https://www.cgtrader.com/free-3d-models/exterior/house/post-war-building.
Korboleevd. (2021). Post Apocalyptic Skyscraper | 3D model. [online] CGTrader. Available at: https://www.cgtrader.com/free-3d-models/exterior/skyscraper/post-apocalyptic-skyscraper
Mike1501. (2021). Abandoned Destroyed House overgrown with Evy | 3D model. [online] CGTrader. Available at: https://www.cgtrader.com/free-3d-models/architectural/other/abandoned-destroyed-house-overgrown-with-evy
tobiasherbers2 (2021). Ruined buildings pack - Free download | 3D model. [online] CGTrader. Available at: https://www.cgtrader.com/free-3d-models/exterior/skyscraper/ruined-buildings-pack-free-download
Photobashing Images:
Kübelbeck, A. (2007). Sandollar skelett. [Photo] Available at: https://commons.wikimedia.org/wiki/File:Sanddollar_skelett.jpg.
rejectedbythissite (2016). Bags Close Up Template Jute - Free photo on Pixabay. [online] Pixabay.com. Available at: https://pixabay.com/photos/bags-close-up-template-jute-sack-1688588/
James, s (2011). Seaweed. [Photo] Available at: https://www.flickr.com/photos/59489479@N08/5438906299.
Plant Image Library (2016). Limulus polyphemus. [Photo] Available at: https://commons.wikimedia.org/wiki/File:Limulus_polyphemus_(Atlantic_Horseshoe_Crab)_(27256381030).jpg.
Seacoast Sage (n.d.). Vibrant fabric pattern with intricate colorful designs. Available at: https://freerangestock.com/sample/182793/vibrant-fabric-pattern-with-intricate-colorful-designs.jpg.
References and Inspiration:
Manta Ray Advocates Hawaii. (2024). A Guide to the Different Types of Rays in Hawaii - Manta Ray Advocates Hawaii. [online] Available at: https://mantarayadvocates.com/types-of-rays/.
Healley, B. (n.d.). Highfin Lizard fish are deep-sea predators with mouths full of long sharp teeth. Available at: https://images.foxweather.com/static.foxweather.com/www.foxweather.com/content/uploads/2022/12/668/376/liz1.jpeg?ve=1&tl=1.
Young, R. (n.d.). Squid. Available at: https://images.theconversation.com/files/262841/original/file-20190308-150693-xpab44.jpg?ixlib=rb-4.1.0&rect=7%2C142%2C1192%2C595&q=45&auto=format&w=1356&h=668&fit=crop.
Swelluk.com. (2022). Available at: https://www.swelluk.com/wp-content/uploads/colourfultrop.jpg [Accessed 12 Jan. 2025].
Reddit.com. (2021). Reddit - Dive into anything. [online] Available at: https://www.reddit.com/r/squid/comments/r4rmru/i_am_back_and_got_some_more_time_so_as_a_starter/
Diveivanov (2018). Bigfin reef squid - night dive in Bali. Available at: https://www.shutterstock.com/image-photo/bigfin-reef-squid-night-dive-bali-1159192150
NOAA (2015). Lionfish. Available at: https://www.flickr.com/photos/myfwcmedia/18465854673.
Divernet.com. (2025). Available at: https://divernet.com/wp-content/uploads/2023/04/Snailfish-CARD-768x425.jpeg
Wp.com. (2025). Available at: https://i0.wp.com/thestorymonster.com/wp-content/uploads/2023/10/Jasen-Fisher-Bogdan-Georghe-Rene-Gonzalez-Jr.-Raushan-Hammond-James-Madio-Adam-McNatt-Isaiah-Robinson-Ahmad-Stoner-Thomas-Tulak-and-Alex-Zuckerman-in-Hook-1991.png?resize=720%2C387&ssl=1
0 notes