#3d game environments
Explore tagged Tumblr posts
Visit Tumblr Blog
Explore Tumblr blogs with no restrictions, modern design and the best experience.
Last Seen Tumblr Blogs


Fun Fact
Average visit duration of Tumblr.com is 10 mins and 25 secs.
Text
How to Structure a 3D Modeling Games Workflow for Indie Game Projects

In today's competitive world of 3D modeling games, indie developers must not only craft stunning visuals but also manage efficient workflows. Without a clear process, even small indie projects can face costly delays and quality issues. Whether you’re building detailed 3D game assets, expansive 3D game environments, or lifelike props 3D models, having a solid workflow is essential.
In this guide, we’ll break down how to structure an efficient 3D modeling workflow for indie game projects, helping you create professional results without the big studio budget.
1. Pre-Production: Plan Before You Model
Before diving into any 3D environment modeling or asset creation, it's crucial to lay a strong foundation.
Key Steps:
Concept Art: Sketch or source concept art for every 3D game asset you need.
Asset List: Make a detailed inventory. Identify if you need a car 3D model, characters, weapons, or environment props.
Style Guide: Define a visual style.
Scope Management: Prioritize assets based on gameplay importance to avoid overwhelming your small team.
Without a clear plan, you risk wasting time reworking assets that don't fit the game’s style or functionality.
2. Blockout Stage: The First 3D Pass
Why Blockouts Matter:
Quickly visualize the 3D game environment layout.
Test gameplay mechanics in the actual environment.
For example, before building a detailed props 3D model, create simple geometric shapes representing items like barrels, crates, or vehicles.
3. High-Poly and Low-Poly Modeling: Balancing Detail and Performance
High-Poly Creation
Begin by sculpting or modeling a detailed high-poly version of your asset. Use techniques like:
Subdivision modeling for smooth surfaces.
Boolean operations for intricate mechanical designs.
Crease settings to define sharp edges in Hard Surface Modeling.
Whether it’s a futuristic weapon or realistic 3D vehicle modeling, high-poly versions capture the fine details that will later be baked into textures.
Low-Poly Optimization
After the high-poly is complete, create a low-poly model optimized for game engines. Indie games often must balance visual quality with performance, especially when targeting platforms like mobile or VR.
Low-poly modeling is particularly important for 3D game environments, where hundreds of models may be visible at once.
4. UV Unwrapping and Baking: Preparing for Textures
Once your low-poly models are done, it’s time to unwrap UVs properly.
Tips for UV Unwrapping:
Minimize seams where possible.
Optimize space usage in the UV layout.
Maintain consistent texel density across assets.
This is where all your detailed 3D hard surface modeling or organic sculpting really shines, giving the illusion of high detail on low-poly geometry.
5. Texturing: Bringing Models to Life
Texturing is where the magic happens in 3D modeling games. With a good texture, even a simple props 3D model can feel rich and detailed.
Best Practices:
Use PBR (Physically Based Rendering) workflows for realism.
Consistent material values are important across 3D game assets.
Create smart material templates if you have lots of similar assets, like urban props or 3D vehicle models.
Tools like Substance Painter allow you to create layered, detailed textures quickly, making them indispensable for indie teams.
6. Integration and Testing in the Game Engine
Once the models are textured and polished, it's time to bring them into the game engine. Integration Steps:
Set up materials correctly in the engine.
Test lighting and shader settings.
Verify collision meshes for gameplay interaction.
Testing your 3D game environment at this stage is crucial. It's where you’ll catch issues like lightmap errors, wrong scale, or incorrect physics setups.
For instance, a detailed car 3D model might look great in Blender but could behave strangely if the collision mesh isn’t set correctly when driven in the engine.
7. Feedback Loop: Review and Improve
No 3D modeling games project is perfect on the first try.
Look out for:
Scale inconsistencies between props and environment pieces.
Texture resolution mismatches.
Performance drops due to poorly optimized assets.
Iterate based on feedback to polish the visuals without sacrificing performance.
8. Asset Organization and Version Control
As you build more 3D game assets, asset management becomes critical.
Asset Management Tips:
Name files clearly and consistently.
Group assets into folders by type (Characters, Vehicles, Environment Props).
Use version control software like Git or Perforce to track changes.
A clear organizational system saves countless hours and avoids losing valuable work.
9. Specialization Tips: Hard Surface, Vehicles, and Props
Depending on your game, you might need to focus more heavily on specific asset types:
Hard Surface Modeling
Essential for sci-fi, military, or tech-heavy games.
Car and Vehicle Modeling
Good vehicles add instant appeal and immersion, especially in racing or open-world games.
Props Modeling
Even small props 3D models like lanterns, crates, and barrels, add to world-building.
Use storytelling elements in props to add depth to your 3D game environments.
Conclusion
Structuring an efficient 3D modeling workflow is essential for indie developers aiming to create competitive 3D modeling games.
Whether you’re crafting immersive 3D game environments, creating stunning 3D game assets, or designing hyper-realistic car 3D models, following a structured workflow ensures you stay productive and maintain high quality.
With the right planning, tools, and feedback loops, even a small indie team can deliver visual experiences that rival larger studios. Happy modeling!
#3d game assets#3d game environments#3d modeling services#hard surface modeling#props 3d model#3d vehicle modeling#3d modeling games
0 notes
Text
How Layering and Blending in Photoshop Elevates Architectural 3D Modeling Presentations
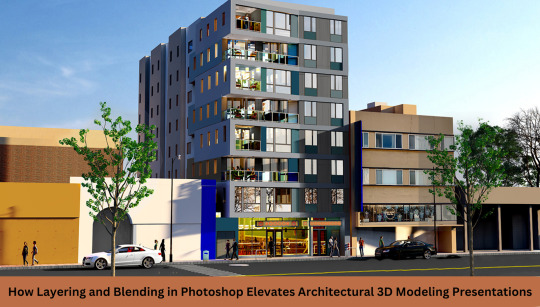
In the fast-paced world of architectural visualization, creating captivating, photorealistic presentations has become essential for success. Whether it's a client pitch, design review, or marketing showcase, the clarity and emotional impact of the visuals can make or break a project. Among the many tools available to professionals today, Photoshop remains a cornerstone, especially when it comes to layering and blending techniques that refine and elevate architectural presentations to new levels of realism and professionalism.
Why Photoshop Still Reigns in Architecture Visualization
While 3D software like SketchUp, Revit, and 3ds Max dominate the modeling stage, Photoshop plays a pivotal role in post-production. When combined with architectural rendering services, Photoshop helps convert raw renders into polished artworks that impress clients and stakeholders alike.
Leading architectural rendering companies often integrate Photoshop into their workflow to ensure every detail—from lighting to landscaping—is presented in the most visually compelling way possible.
The Power of Layering in Architectural Post-Production
Layering is at the heart of Photoshop's magic. It allows architects and designers to separate visual elements—sky, shadows, vegetation, textures, reflections—giving them total control over every aspect of the image.
Key Benefits of Layering:
Flexible lighting and color corrections: Easily adjust mood, time of day, or material hues to better align with project goals.
Enhanced detailing: Overlay high-res textures or people cutouts to boost realism in 3D architectural visualization services.
For instance, when working on interior design rendering services, layering allows designers to experiment with different wall colors, furniture placements, and lighting moods without having to rerender the entire scene.
How Blending Techniques Add Realism and Depth
Used creatively, these techniques can turn a flat render into a vibrant, lifelike image.
Common Blending Modes in Architectural Visualization:
Multiply: Enhances shadows and adds depth, particularly useful in 3D exterior rendering services.
Overlay/Soft Light: Perfect for boosting contrast and enhancing sunlight or ambient light effects.
Using these blending techniques, professionals can fine-tune atmospherics, bring materials to life, and even simulate seasonal variations, adding narrative depth to the image.
Bringing Plans to Life with Photoshop Enhancements
While 3D models and walkthroughs do much of the heavy lifting, floor plans and diagrams still play a crucial role in architectural presentations. Photoshop helps transform flat drawings into visually engaging documents.
Applications Include:
Architectural floor plan rendering: Add color coding, furniture layouts, and material indications.
Golf Course Master Plans or Site Plans: Layered greenery, elevation shading, and path highlights improve readability and impact.
Animation Frames and Storytelling: Photoshop’s Role
Even in dynamic formats like Architecture 3D animation or Architectural 3D walkthrough, Photoshop assists during the pre-visualization or frame-polishing stages. By refining key frames or correcting render inconsistencies, professionals ensure their animation sequences maintain consistent quality and tone.
Photoshop as a Strategic Advantage
In an increasingly competitive market, offering compelling visuals is no longer optional. Clients demand immersive storytelling and flawless execution—outcomes that only top-tier architectural rendering services and expert Photoshop post-production can deliver.
For studios or freelancers offering 3D architectural visualization services, mastering Photoshop's blending and layering tools isn't just a nice-to-have; it's a must-have skill that sets professionals apart in client presentations and project bidding.
Conclusion
Photoshop’s layering and blending features play a transformative role in architectural presentations. From boosting realism in architectural 3D modeling to polishing 3D floor plan services, these tools empower professionals to deliver visuals that resonate emotionally and intellectually. Whether you're part of an architectural rendering company or a solo artist specializing in interior design rendering services, knowing how to maximize Photoshop post-processing can significantly enhance your deliverables and impress even the most discerning clients.
#3d modeling games#3d game environments#architectural 3d walkthrough#3d architectural visualization services#3d exterior rendering services
0 notes
Text


Alien: Isolation - Environments by Gerard Muntés
#cassette futurism#alien franchise#alien isolation#cybercore aesthetic#space aesthetic#scifi aesthetic#futuristic aesthetic#sci fi aesthetic#tech aesthetic#spaceship#spacecraft#outer space#space#3d render#3d art#3d artist#game environments#design
320 notes
·
View notes
Text
twilight train
#i feel the need to improve old maps and environments#will take awhile but i’ll feel much better about this project#gif#game dev#3d art#oc
802 notes
·
View notes
Text
Been making some good progress lately, despite mostly focusing on my job and my health. The controls have improved a crazy amount, but there's still some kinks to work out
59 notes
·
View notes
Text


Rothwild Slaughterhouse | The Knife of Dunwall
#dishonored#dishonored 1#the knife of dunwall#gamingedit#gamingscenery#gif#dishonorededit#aesthetic#rothwild slaughterhouse#dunwall#3d environment#gaming screenshot#gameplay#dishonored series#dishonored gameplay#misc dishonored
34 notes
·
View notes
Text

Dyskrasias 64.
You agree.
#yoccu art#dyskrasias#dyskrasias art#Castrel#if I ever learn Blender I’m making low poly Castrel real#This is actually how I would imagine the ideal Dyskrasias video game to look#very n64 era…just lends itself well to minimalism in the environment I think#and I like this kinda chibi model look…I think it’s possible to have her look like this and still be an emotionally evocative experience#chewing the bars of my cage I want a 3D model of her sooooooo bad
28 notes
·
View notes
Text
god rain world is awesome. shout out to rain world.
#i lvoe reain wold . if i could marry the game i would#and i also love joar's general style of like anything. his games his art his designs#have u ever scrolled thru joar's twitter? u should its awesome !!#i love strange environments and sometimes cute sometimes terrifying creatures!!!!#i love the way he does 3D and 2D i love the designs he makes for shit i love airframe ultra i love the signal videos i lo-#.............ok this just sounds like im ultra glazing this guy now#i will NOT form a parasocial relationship with this stranger#i just love the stuff he does#i dont rlly know much about joar himself tbh#rain world#text post
54 notes
·
View notes
Text

I think the Australian-ness of Samurai Unicorn is often lost in the PSX/Cyberpunk art setting... So we have doubled our efforts and are determined to make sure a very specific type of 90s Australiana is represented.
#samurai unicorn#cyberpunk#ps1 graphics#indie games#psx#low poly#indie dev#game dev#90s vibes#environment art#level design#3d model#prop design
165 notes
·
View notes
Photo


John T. A. Haddock
Mid Environment Artist
artstation
More from «Artstation» here
#Game Art#noai#lighting#game art#red dead redemption#cottage#Props#house#john_haddock#artstation#environment#Art Blast#John T. A. Haddock#atmosphere#digital 3d art#drawing#Games and Real-Time 3D Environment Art#art#game environment#artist#unreal engine#Lighting#architecture#medieval#River House
15 notes
·
View notes
Text
(( in case anyone wanders where i vanish, im still DEEP in the gamedev life my frens


#designing a UI#FAR from finished#ive drawn a bunch of backgrounds - but need to redo them in a more pixely style#its all inspired by pc98 games#i scrapped everything i did to remake (again LMAO)#i also made a triple triad rip off to play in game! lmao its v basic rn and missing skins/ui etc but the foundations are down#BIG WIP like im focusing on basics rn#ive even reworked the character designs and stuff#changed story slightly#gonna add a BUNCHA mini games just simple cute ones#for fun#.ooc#.tbd#the pre rendered style BGS were a trip to draw cause i hate environments but i 3d modeled them first which helped a bunch#ive been doing a lot of drawing courses but still dont see much improvement s'all good tho
19 notes
·
View notes
Text
How to Build a Library of Modular 3D Props for Game Environments

In the rapidly growing world of 3D modeling games, developers constantly seek ways to streamline their workflow, save time, and maintain consistency in visuals. One of the most efficient ways to do this is by building a library of modular 3D props for use in 3D game environments. Whether you're an indie developer or part of a large game studio, modularity in 3D game assets enhances creativity and speeds up level design without compromising quality.
In this guide, we'll walk you through creating your reusable library of modular props — from planning and asset creation to integration in 3D game environments.
Why Modular Props Matter in 3D Modeling Games
Think of them like LEGO blocks for game designers — from crates and barrels to walls and fences, each piece can be mixed and matched to build a wide range of environments.
Using modular assets in 3D environment modeling offers several advantages:
Efficiency: No need to model every prop from scratch.
Consistency: Ensures visual coherence across levels.
Optimization: Fewer unique assets reduce memory usage.
Scalability: Makes it easier to scale game worlds or create downloadable content (DLC).
Step 1: Define Your Game's Environment Style
Before diving into the modeling process, it's essential to determine the aesthetic and genre of your game. Are you building a sci-fi world, a medieval fantasy realm, or a modern urban setting?
Your game’s environment style will dictate the look and feel of your 3D game assets, as well as the technical requirements for poly count, texture resolution, and shading techniques. For example:
Sci-Fi: Emphasize clean panels, vents, and glowing elements.
Fantasy: Focus on organic curves and hand-crafted textures.
Urban: Utilize realistic props 3D model references like benches, traffic lights, and car 3D models.
Step 2: Plan Your Modular Kit
A good modular kit should cover all the basic building blocks required to create a complete 3D game environment.
Walls, floors, and ceilings
Doors and windows
Furniture
Structural elements (beams, stairs)
Decorative props (props 3D model like crates, barrels, posters)
Vehicles (3D vehicle modeling assets like cars, trucks, or drones)
Each asset should adhere to a unified grid system, such as 1x1 meter units, to ensure seamless snapping during level design. Don’t forget to establish naming conventions and folder structures for easy management.
Step 3: Master Hard Surface Modeling Techniques
Most modular props fall under the category of Hard Surface Modeling, which focuses on mechanical and man-made objects with clean lines and defined edges. This technique is especially useful for assets like walls, pipes, machinery, and 3D vehicle models.
Key tips for 3D hard surface modeling:
Start with primitives: Use boxes, cylinders, and planes to block out basic shapes.
Use Boolean operations wisely: They’re great for cutting holes or adding detail, but may require cleanup.
Step 4: Create and Optimize Props
Once the base models are ready, move on to texturing and optimization. For performance, make sure your textures follow the power-of-two rule (e.g., 512x512, 1024x1024).
Optimize your props 3D model by:
Reducing poly count without sacrificing silhouette
Combining meshes where possible
Removing hidden faces
Creating LOD (Level of Detail) versions for distant rendering
These optimizations ensure smooth performance even in large-scale 3D game environments.
Step 5: Assemble Your Environment
With your modular kit complete, start assembling your 3D game environment in your preferred game engine — Unreal Engine, Unity, or Godot. The modular approach allows for rapid prototyping and layout changes without rebuilding entire levels.
Use terrain tools and lighting systems to enhance the mood and depth of the scene. And don’t forget to test your environment on multiple devices for performance consistency.
Step 6: Incorporate Specialized Assets
While modular assets are versatile, certain props like vehicles may require specialized attention. A car 3D model, for instance, involves more detailed 3D vehicle modeling, including wheels, interiors, and possibly rigging for animation.
To integrate these into a modular setup:
Keep the scale consistent with other assets
Separate movable parts (e.g., doors, wheels)
Use unique textures or decals for variety
Include them as "hero assets" to break visual repetition
Even though 3D vehicle modeling may not be modular in the strictest sense, it complements the environment by adding realism and interactivity.
Step 7: Organize and Maintain Your Asset Library
Keep your 3D game assets well-organized in categorized folders, labeled with clear names and version numbers. Consider using asset management tools or plugins for version control and collaboration.
For example, you can separate folders like:
/Modular_Walls/
/Furniture/
/Vehicles/
/Textures/
/Blueprints/ (for prefab assemblies)
Regularly update your library with new 3D modeling games assets and improvements. Over time, this library will become your go-to resource for rapid environment design and prototyping.
Final Thoughts
Building a library of modular props is an investment that pays off tremendously in game development. Whether you're focusing on 3D environment modeling, 3D hard surface modeling, or detailed 3D vehicle modeling, modularity enhances your creative flexibility and development speed.
With consistent standards, thoughtful planning, and efficient modeling, you’ll have a powerful asset library ready to bring your game world to life.
#3D hard surface modeling#3d game environments#3d modeling services#3d game assets#3d vehicle modeling#props 3d model#3d modeling games
0 notes
Text
How Can Golf Graphic Design Improve a Course's Visual Appeal?

Golf Graphic Design Improves a Course's Visual Appeal, Know How
Why 3D Golf Course Model Is Great for Golfers
Golf is a game that mixes physical skill with smart thinking. To play well, you need to know the course. For a long time, golfers just used simple maps and books with distances. But now, technology is changing how we see the game. A 3D Golf Course Model gives you a whole new way to understand and enjoy playing golf. It's like having a video game version of the golf course right there with you.
Seeing Every Part of the Course in 3D
Imagine being able to look at every hole, every green (the short grass around the hole), and every hazard (like sand and water) from any angle you want. That's what a Golf Course 3D model lets you do. It's not just a flat picture like a map; it's a real-looking, three-dimensional view of the entire course. This makes it much easier to understand how the course is laid out compared to a regular map. You can see if the ground goes up or down (Golf Modeling helps create this), how deep the sand traps are, and what the grassy areas called fairways look like from above. Reports on golf technology show that many golfers find these Custom Golf Course Map 3D views significantly improve their understanding of course design.
Planning Your Shots More Carefully
With a 3D Golf Course Model, you can plan each shot more precisely. You can see exactly how far it is to those tricky sand traps or ponds. You can also figure out the best way to aim to get to the green. This helps you make smarter choices about which club to use and where to hit the ball. You can even use the model to think about your strategy for each hole before you even start playing. This ability to strategize beforehand is a major benefit highlighted in golfer surveys about using 3D course models.
Understanding How the Holes Fit Together With Golf Course Layouts
Golf Course Layouts can sometimes be complicated. A 3D model makes it much simpler to see how all the 18 holes (or sometimes 9) are arranged on the land. You can see how one hole leads to the next and plan your overall approach to playing the entire course. This gives you a better feel for the flow of the game.
Getting to Know the Greens with a Golf Green Map
Putting, hitting the ball the last little bit into the hole, is super important in golf. A Golf Green Map that's part of a 3D model gives you a close-up view of all the little hills and slopes on the green. This helps you figure out which way the ball will roll when you putt. You can plan your putts more accurately and hopefully make more of them!
Making Your Own Notes with a Custom Golf Course Map
Some golf courses offer a special feature in their 3D model called a Custom Golf Course Map. This lets you add your own notes and markings to the map. You can mark how far it is to your favorite spots, highlight areas you need to be careful of, or even write down your strategy for each hole. This makes the model even more helpful and personal to you.
Making the Course Look Great
The way a 3D Golf Course Model looks is thanks to Golf Graphic Design. People who do this make sure the model is not only accurate but also looks really good. They choose the right colors for the grass and water, add realistic-looking trees and sand, and use lighting to make it feel like you're really there. High-quality Golf Graphic Design makes the model enjoyable to use and helps you appreciate the beauty of the golf course.
Showing Off the Club with a Golf Club 3D Model
For the people who run golf clubs, having a golf Club 3D Model is a fantastic way to show off their course to potential new members. People can take a virtual tour of the entire property, seeing the course, the clubhouse, and other facilities. This can help attract new members and give them a great first impression.
Creating the Model with Golf Course Mapping
The process of making a Golf Club 3D Model is called Golf Course Mapping. This involves using special technology, like drones and GPS, to get very precise information about every part of the course. This ensures that the 3D model is a very accurate picture of the real course.
Improving Your Game with Golf Modeling
Golf Modeling is the general term for creating these 3D versions of golf courses. It's a tool that can be used for many things, like helping golfers learn the course, planning tournaments, and even designing new golf courses. By using a Golf Course 3D model, golfers can improve their understanding of the game and have a better time on the course.
Adding Extra Information with Golf Course Illustrations
Sometimes, Golf Course Illustrations are added to a 3D model. These can point out important features, like the best way to play a tricky hole, where all the sand traps and water hazards are, or even some interesting facts about the course. These illustrations add even more detail and make the model more helpful and fun to explore.
In simple terms, a 3D Golf Course Model gives golfers a much better way to see and understand a golf course than old-fashioned maps. It helps you plan your shots, learn the Golf Course Layouts easily, and even get a better feel for the greens with a Golf Green Map. Whether you're just starting out or you've been playing for years, a Golf Course 3D model can help you enjoy the game more and maybe even lower your score! And for golf clubs, a good Golf Club 3D Model is a powerful way to attract new members. Thanks to accurate models that are getting better and better, making Golf Modeling an exciting part of the future of golf.
0 notes
Text


[UE4] Alien: Isolation (Fan Art) - Nostromo Corridor by Kenan Wilsher
#cassette futurism#cybercore aesthetic#space aesthetic#scifi aesthetic#futuristic aesthetic#sci fi aesthetic#tech aesthetic#aesthetics#spaceship#spacecraft#outer space#alien franchise#space age#alien isolation#3d artwork#3d art#3d artist#3d render#game environment#gaming environments#design
27 notes
·
View notes
Text
Lowkey hate the possibility of ff9 getting a remake after ff7 😭 og 7-10 are incredible the way they are (and super charming at that), I just don't see the point??
If any ff should receive a remake next it's 100% ff6, despite being a great game I feel like that's the only ff that was actually limited by its technology and goddammit there were themes that just weren't dug into deeply enough!!!
#not to say ff6 isnt fine the way it is#its just lacking somethings? and its capable of so much more that wasnt explored enough in the og#the main thing on my mind is terra and celes and how little their stories actually had to do with each other#or well its more accurate to say their stories do have a lot to do with each other but its like the game doesnt acknowledge that enough#with the technological im just thinking about how magical it would be to explore its world and how devastating it would be to see it in ruin#pixel games dont usually hamper my ability to appreciate the environments and ff6 did great regardless but oiuughhh just imagine it in 3d#deadass the only ff where im longing for a remake#unless. actually a 2 remake would be super cool but thats so not happening lmao#final fantasy vi#that said if 9 does get a remake i will cave tf in and play it
44 notes
·
View notes
Text
Added loops to my game about going really fast
#indie games#game dev#game design#environment art#unrealengine#3d art#indie dev#indiegames#solodev#character design#indiegame#indiegamedev#indiegameart#indiegamecommunity#indiedev#gamedev#devlog
51 notes
·
View notes