#kobracast
Explore tagged Tumblr posts
Text
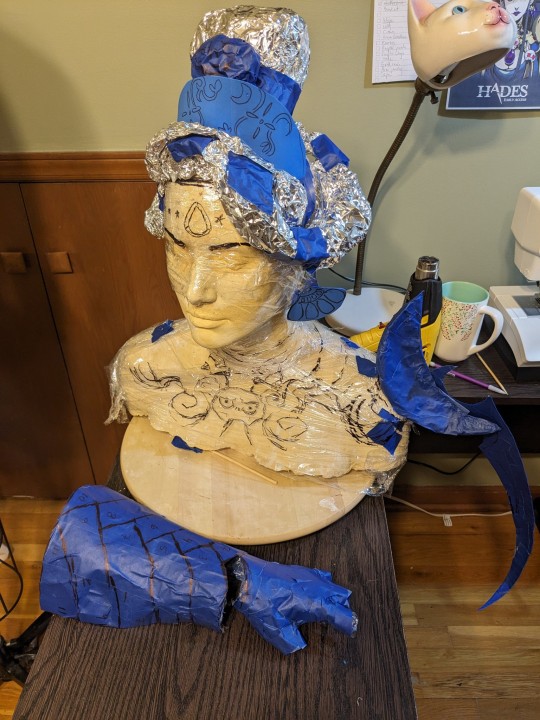
More Nyx progress today! I detached her head wings from the head cast and added some parting lines with more foil. My hope is to use expanding foam to create a mold/shell, then split it apart along the parting lines and remove enough of the foil/tape sculpt to stick a couple layers of kobracast and more expanding foam inside to make a much lighter and resilient duplicate. I've made a lot of wig accessories with expanding foam but this is my first time using it as a mold - a lot of the other mold materials I have access to would be too heavy/expensive and might distort the sculpt if I layered them on too thick. I underestimated the amount of foam I need but it's not the worst thing in the world to let it cure for a day or two before I go to the store and buy more.

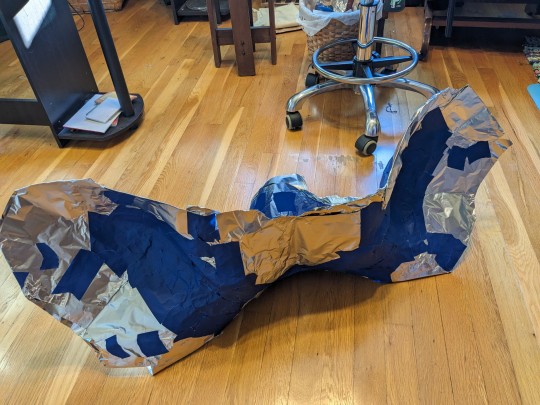
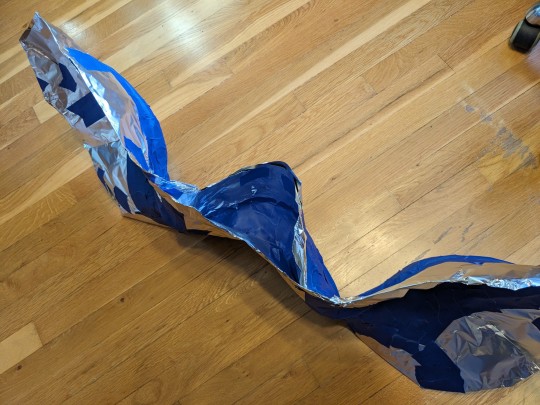
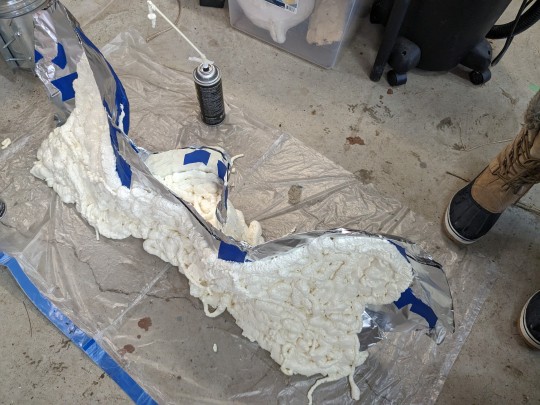
I also refined her top knot and shoulder moon a little bit, and started roughing out templates for her left glove and itty bitty bat wing. I'd like to make the base of her top knot out of expanding foam as well, as long as the thing I'm doing with the head wings pans out.
11 notes
·
View notes
Note
I want to dress up as the swan from the movie The Other Sister or as one of the birds from Henny Penny episode from Golden Girls. The problem is, I have no idea how to even start making either. How were they able to get the shape for the body and be able to get in and out of it?
(Full disclosure, I haven't actually seen either of these, so I'm basing my recommendations on what screenshots I could pull up with an image search on airport wi-fi.)
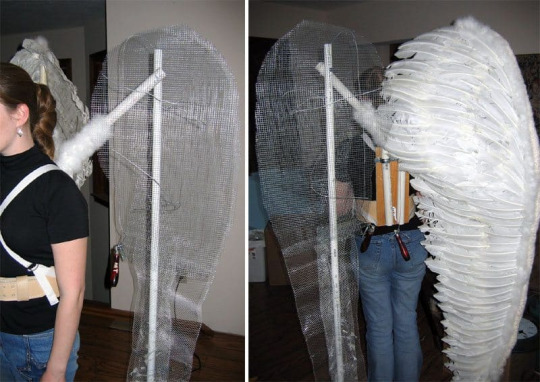
There are actually a lot of options for creating a shaped body structure, depending on your budget and skill level. The lowest-budget option would be a shapeable wire mesh like hardware cloth, sculptural armature mesh, or even chicken wire (you'll want to wear heavy-duty leather work gloves to work with any of these; cut wire edges are sharp!). Use heavy gauge wire or another rigid material to create a structural frame (around the edge, and to support the weight of the body), then cover that with the more flexible mesh so you can shape the "skin" however you want. You can then cover the mesh with fabric, fusible felt, or thin EVA foam and attach the surface treatment (feathers, etc.) to that layer.
Going back about 15 years 😅 this is how I made my Archangel Michael wings, shown below as a WIP. The wire mesh pockets fit over the articulated PVC frame, with heavier (~10 ga.) wire ribs supporting the bell shape. These wings were much simpler and didn't require compound curves like the swan body would, but the principle is the same.
If your budget is a bit higher, you could also consider materials such as Worbla's Kobracast Art, FossShape, or Celastic, which can be heat-formed and fused to fabric to create a seamless structure that needs no covering. These materials are a bit more sophisticated and look more professional, but they can be quite expensive over large areas, so they are more commonly used for costumes that need to be able to travel and remain durable (e.g. for theatre or a cosplay competition) rather than a one-off costume (e.g. for a Halloween party). You know best what your budget and costume purpose are, so choose whichever material best suits your needs and skills!
As for getting into/out of it... The Other Sister is actually a pretty simple design, as far as that goes. It's a one-piece step-in costume -- the actor's legs go through a hole in the bottom, and then it's pulled up around her hips as a single unit. It's supported by suspenders that (probably) attach to structural crossbars inside the frame, maybe with an additional stay somewhere to keep it from rotating around the actor's body. The Golden Girls one is more complicated, as it was made long enough ago that it would have used more traditional methods and materials. It's likely built with a combination of boning, buckram, steel wire, and padded fabric rolls attached to a boned corset/bustier for support (similar to the support structures for things like Vegas showgirl backpieces). There's probably a base garment that the various parts of the outer costume attach to. That's not to say you couldn't simplify it in your version, though! Lots of new materials have been invented in the past 40 years, so we have more versatile (and lighter weight) options now.
If you want to go really hog wild with this concept, you might also want to look up some tutorials for Gwendolyn from Odin Sphere. I've seen some phenomenal swan-body shapes come out of that cosplay community! And for additional structural support recommendations and patterning guidance, the fursuit/mascot building communities also have a lot of great resources and tutorials.
Good luck! :)
5 notes
·
View notes
Video
youtube
kobraCast Tutorial
Tutorial by: Thermo Cosplay Tutorial Link: https://www.youtube.com/watch?v=K6QYT-lmKMs
74 notes
·
View notes
Photo

More from the wonderful world of #thermoplastics. It's #KobraCast! Sounds like a @pokemon, right??? #antlers #cosplay #costuming #costumedesign #costume #costumedesigner (during #gaypride #weekend ) (at Manhattan Wardrobe Supply)
#cosplay#gaypride#costumedesign#weekend#thermoplastics#costume#costumedesigner#costuming#antlers#kobracast
1 note
·
View note
Photo


Started with the pattern of my plague doctor mask.
IT LOOKS LIKE KEVIN!!
Maybe I have to change the pattern a little
2 notes
·
View notes
Video
youtube
Kimidori Cosplay | Worbla's Kobracast Art & Bunny Ears Tutorial
3 notes
·
View notes
Note
What did you use to sculpt Skekmal's head and generally his armor? I want to try doing a skeksis cosplay as well, but just can't seem to figure out what materials to use. (Your work is absolutely stunning btw, big fan
Hello! :) And thank you so muchThe head I started with normal $4 clay from an art store. You need around 3-4kg for a full head in my experience. I then let that dry out and covered the whole thing first in Kobracast and then in Worbla. I have several tutorials for my SkekMal cosplay on my https://www.patreon.com/Chaozrael :)I know other people have done it with silicone casts!Worbla is also perfect for the armor. You can heat that up, pull it in shape to resemble the bone structure armor and then let it get cool/hard in that state :)I got some tutorials about painting realistic bone there as well.
I also take commissions if thats an option for you, but feel free to ask questions about your own projects :) (That goes for everyone!)
5 notes
·
View notes
Photo

We had four super productive hours today! We finished the fitting for the cat masks and added noses from #worblasdecoart Then we proceeded to make patterns for the fur. With these masks on. While listening to the musical Cats. Are mummy horror movies still a thing? Since we will need our whole head being covered in fur, we made caps (just like the wig caps we presented earlier) and made patterns of these, too. Today we did not use silicone on the masks, since we want them to be totally covered in fur anyway. With the helo of our patterns we cut out fur for the face (a bit larger than the original pattern) and glued it to our masks, using pattex. Then chin ist still separated from the other parts so we can be able to talk later. On a side note, we both had to cough up a lot fur balls today... Later our furry faces will be glued on with mastix :-) But for now we still need to shave and trimm them. Meow! #cats #cosplay #fur #pussinboots #mask #KobraCast #worbla #crafting #face
0 notes
Photo

______Best of Progress 2016_______ So ich möchte euch noch meine Progress Bilder von 2016 zeigen ich habe einige Sachen gebastelt die ich euch noch mal zeigen möchte. Cosplay: Moth (Own Character) Material: #Worbla #Worblafinestart #Kobracast Worbla findet ihr bei @mycostumes.de oder @cast4art #costumes #Cosplayphoto #Cosplayer #cosplay #cosplays #cosplay2016 #owndesgin #Owncharakter #owncharacter #Worbla #worblafinestart #Motte #Moth
#owndesgin#cosplay#owncharakter#moth#owncharacter#cosplay2016#costumes#motte#cosplayphoto#cosplays#worblafinestart#kobracast#worbla#cosplayer
0 notes
Photo

💜🔥Happy weekend! • I’m going to start sharing some of my backlog of Spyro WIP✨ • First is my headdress design that I didn’t get around to making last year but it was a main part of my original design so I had to make it happen for the @ultimatecosplaychampionship! • I drew out how I wanted it to look and made a pattern in Illustrator from my digital drawing. It took a couple of printouts to perfect the size but once I got it I cut out all the pieces, planned the layers, and then traced and cut those out of high density foam from @tntcosplaysupply! • Next came the contact cement and the dremel. I spent a LOT of time dremeling the spike inlays into their beveled shapes and getting the main crown smooth. It was worth it though. This is also where I planned how to attach to the wig and I contact cemented some chicago screws into the bottom of the crown to be attached later. I then did two layers of Flexbond and a few light layers of plastidip. • For attachment I decided to use a strip of Veraform on the inside of the wig. It���s very similar to Kobracast, it’s a thermoplastic mesh, but this one is lighter weight and has large holes I could use to fit the chicago screws through! It was perfect for securing the headdress to my wig. I was able to wear my horn headband underneath that, too. • I tested many kinds of paints, as I wanted a specific kind of gold and sheen. I ended up using @jacquardproducts Lumiere paints in Bright Gold & Sunset Gold, just like on my corset. Holy Dragons, did I get some major shine with those! They’re incredible. The Bright Gold matched all my chain maille. • I’m very happy with how this came out! I’ll post about the horns in a separate explanation soon 💛🔥💜 • • #spyro #spyrothedragon #spyrocosplay #dragon #dragoncosplay #ultimateonlinecosplaychampionship #ultimatecosplaychampionship #medieval #medievalfantasy #medievalcostume #cosplay #cosplaywip #originaldesign #foamarmor #foam #wip #foamsmith https://www.instagram.com/p/COmBRESDuIW/?igshid=t78day1ip7gy
#spyro#spyrothedragon#spyrocosplay#dragon#dragoncosplay#ultimateonlinecosplaychampionship#ultimatecosplaychampionship#medieval#medievalfantasy#medievalcostume#cosplay#cosplaywip#originaldesign#foamarmor#foam#wip#foamsmith
0 notes
Text
thejediviking replied to your photoset: My corset finally came in for my updated faun...
Cool!! What are the horns made off?
I had several pairs of deer antlers from my uncle lying around the garage, so I got a roll of KOBRACAST, picked out a pair that weren’t too big and I molded it to the antlers themselves and then just cut them out, melting the seam together afterwards. I then covered them in wood glue, i let some of it run down the antlers and dry up in small drops to make up the bumpy texture at the base of them. When the glue dried, I used sandpaper and ran it up and down the length of the antler, scratching up the glue to give it a bit of a used texture overall. I used a sponge and light brown paint to give the base some colour and to fade out into the lighter colour of the glue, which I was lucky was close to the same colour as actual antlers. So they’re completely hollow and plastic. Making them very light but also durable. Then I used some more KOBRACAST to make a sort of shell on the inside of the wig mesh, reinforcing it, and then screwed the antlers into it, so that I don’t have to worry about the antlers being displaced. The wig and antlers are all one piece.
3 notes
·
View notes
Note
Do you happen to have a wig that has a really good grip?? I really want a new wig for my Handmaid cosplay (from Homestuck) but it needs to be able to stay on with my horns

The majority of our wigs have the same structure so they would all have same outcome in regards to grip. It’s a matter of *how* you attach the horns to your wig makes all the difference.
Here’s a photo of our staff member, Tiff who’s wearing our Hera in Black with pretty big horns attached to them! She used a combination of Worbla and Kobracast to attach the horns to her wig. It’s totally possible to attach horns to our wigs and have it stay. It just depends on what you use to attach them. And of course, the lighter the horns are the better.You can also sew in wig combs inside for extra precaution. :)Good luck!
5 notes
·
View notes
Note
Hi I was hoping you could help me find a tutorial (or at least point me towards supplies I could use) bc I've come up empty so far. I'm going to be cosplaying Iron Bull from Dragon Age and I wanted to make some fairly large horns. However, I'm going to be wearing a wig and I don't want a headband pressing it down. I was hoping you knew of a tutorial that could give me the support I need while staying hidden under a wig. I'd also like to avoid Worbla or Kobracast if possible. Thank you!
Hello! I’d recommend a method like this:
https://m.youtube.com/watch?v=ydpCuCYH9TM
Where you wear a headband under the wig and have the horns be detachable, so you can slide them on over the wig. If you wanted to avoid thermoplastics in general and not just Worbla or Kobracast, you could probably use this same method with a thick headband instead.
I hope this helps!
- Mod Sky
7 notes
·
View notes
Photo


The two masks I started making last weekeend.
One for my Plague Doctor and the other is for a future secret project
0 notes
Link
Need to make large horns or other big props but worried about weight? KobraCast is a thermoplastic like Worbla and Wonderflex, but is much lighter in weight. If you need to make something big, KobraCast may be the way to go, as it's almost half the weight of Worbla.
For reference, a 7x12cm piece of Wonderflex is 9 grams. Worbla is 11 grams. And KobraCast is 6 grams.
(In larger scale: One jumbo sheet of Worbla at 1m x 1.5m or Wonderflex 1m x 1.4m is approx 4 lbs. KobraCast is approx 380 grams for 1 meter by .5 meters, or for the same surface area as a jumbo Worbla, 2.4 pounds.) Skymone Cosplay's tutorial linked above shows how to use Kobracast for making horns over an insulation foam base. Also check out Lightning Cosplay's video showing how you can use Kobracast to cover actual horns to create perfect, lightweight replicas. Unlike Worbla and Wonderflex, KobraCast won't stick to your base form and is very easy to remove.
198 notes
·
View notes
Photo

______Best of Progress 2016_______ So ich möchte euch noch meine Progress Bilder von 2016 zeigen ich habe einige Sachen gebastelt die ich euch noch mal zeigen möchte. Cosplay: Moth (Own Character) Material: #Worbla #Worblafinestart #Kobracast Worbla findet ihr bei @mycostumes.de oder @cast4art #costumes #Cosplayphoto #Cosplayer #cosplay #cosplays #cosplay2016 #owndesgin #Owncharakter #owncharacter #Worbla #worblafinestart #Motte #Moth
#owndesgin#cosplay#owncharakter#moth#owncharacter#cosplay2016#costumes#motte#cosplayphoto#cosplays#worblafinestart#kobracast#worbla#cosplayer
0 notes