#keyboard shortcuts windows 10
Explore tagged Tumblr posts
Text
youtube
20 Most Useful Keyboard Shortcuts I Use Every Day (Windows)
In this video, I’ll show you the keyboard shortcuts I use personally every day on Windows to save time and make navigating Windows easier.
#free education#education#youtube#educate yourselves#educate yourself#tips and tricks#technology#windows tips#microsoft windows#windows 11#operating system#windows 10#microsoft#computer#20 Most Useful Keyboard Shortcuts#keyboard shortcuts#education for all#learning#Youtube
7 notes
·
View notes
Text
Helpful Windows 10 Shortcuts you should know
General CTRL + C: Copy CTRL + V: Paste CTRL + X: Clip CTRL + ALT + DELETE: Open Task Manager WINDOWS + SHIFT + S: Open Snipping Tool WINDOWS + PRNTSCRN: Take Screenshot (Saved under My Computer -> Pictures -> Captures)
In text Left Arrow/Right Arrow: Maneuver cursor between letters Up Arrow/Down Arrow: Maneuver cursor between lines CTRL + Left Arrow/Right Arrow: Jump to next word in line CTRL + UP Arrow/Down Arrow: Jump to next word in above/below line SHIFT + Arrows: Select SHIFT + CTRL + Arrows: Jump and select
In folders/On desktop Arrows: Select nearest object F2 (When an object is selected): Rename Object
#computer#pc#windows#windows 10#pc tips#computer tips#windows tips#windows 10 tip#shortcuts#keyboard shortcuts
0 notes
Text

The Artisul team was kind enough to send me their Artisul D16 display tablet to review! Timelapse and review can be found under the read more.
I have been using the same model of display tablet for over 10 years now (a Wacom Cintiq 22HD) and feel like I might be set in my ways, so getting the chance to try a different brand of display tablet was also a new experience for me!
The Unboxing
The tablet arrived in high-quality packaging with enough protection that none of the components get scratched or banged up in the shipping process. I was pleasantly surprised that additionally to the tablet, pen, stand, cables and nibs it also included a smudge guard glove and a pen case.
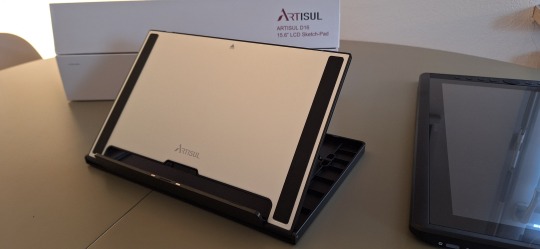
The stand is very light-weight and I was at first worried that it would not be able to hold up the tablet safely, but it held up really well. I appreciated that it offered steeper levels of inclination for the tablet, since I have seen plenty other display tablets who don’t offer that level of ergonomics for artists. My only gripe is that you can’t anchor the tablet to the stand. It will rest on the stand and can be easily taken on or off, but that also means that you can bump into it and dislodge it from the stand if you aren’t careful. It would require significant force, but as a cat owner, I know that a scenario like that is more likely than I’d like.
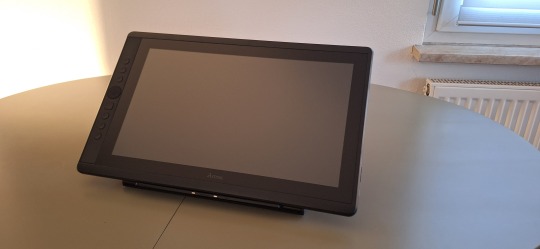
Another thing I noticed is how light the tablet is in comparison to my Cintiq. Granted, my Cintiq is larger (22 inches vs the 15.8 inches of the Artisul D16), but the Artisul D16 comes in at about 1.5kg of weight. While I don’t consider display tablets that require a PC and an outlet to work really portable, it would be a lot easier to move with the Artisul D16 from one space to another. In comparison, my Cintiq weighs in at a proud 8.5kg, making it a chore to move around. I have it hooked up to a monitor stand to be able to move it more easily across my desk.
The Setup
The setup of the tablet was quick as well, with only minor hiccups. The drivers installed quickly and basic setup was done in a matter of minutes. That doesn’t mean it came without issues: the cursor vanished as soon as I hovered over the driver window, making it a guessing game where I would be clicking and the pen calibration refused to work on the tablet screen and instead always defaulted to my regular screen. I ended up using the out of the box pen calibration for my test drawing which worked well enough.
The tablet comes with customizable hot-keys that you can reassign in the driver software. I did not end up using the hot-keys, since I use a Razer Tartarus for all my shortcuts, but I did play around with them to get a feel for them. The zoom wheel had a very satisfying haptic feel to it which I really enjoyed, and as far as I could tell, you can map a lot of shortcuts to the buttons, including with modifier keys like ctrl, shift, alt and the win key. I noticed that there was no option to map numpad keys to these buttons, but I was informed by my stream viewers that very few people have a full size keyboard with a numpad anymore.
The pen comes with two buttons as well. Unlike the hot-keys on the side of the tablet, these are barely customizable. I was only able to assign mouse clicks to them (right, left, scroll wheel click, etc) and no other hotkeys. I have the alt key mapped to my pen button on my Cintiq, enabling me to color pick with a single click of the pen. The other button is mapped to the tablet menu for easy display switches. Not having this level of customization was a bit of a bummer, but I just ended up mapping the alt key to a new button on my Razer Tartarus and moved on.
The pen had a very similar size to my Wacom pen, but was significantly lighter. It also rattled slightly when shook, but after inspection this was just the buttons clicking against the outer case and no internal issues. The pen is made from one material, a smooth plastic finish. I would have liked for there to be a rubber-like material at the grip like on the Wacom pen for better handling, but it still worked fine without it.
Despite not being able to calibrate the pen for the display tablet, the cursor offset was minimal. It took me a while at the beginning to get used to the slight difference to my current tablet, but it was easy to get used to it and I was able to smoothly ink and color with the tablet. The screen surface was very smooth, reminding me more of an iPad surface. The included smudge guard glove helped mitigate any slipping or sliding this might have caused, enabling me to draw smoothly. Like with the cursor offset, it took me a while to get used to the different pressure sensitivity of the tablet, but I adapted quickly.
So what do I think of it?
Overall, drawing felt different on this tablet, but I can easily see myself getting used to the quirks of the tablet with time. Most of the issues I had were QoL things I am used to from my existing tablet.
But I think that’s where the most important argument for the tablet comes in: the price.
I love my Cintiq. I can do professional grade work on it and I rebought the same model after my old one got screen issues, I liked it that much. But it also costs more than a 1000 € still, even after being on the market for over 10 years (I bought it for about 1.500 € refurbished in 2014, for reference). The Artisul D16 on the other hand runs you a bit more than 200€. That is a significant price difference! I often get asked by aspiring artists what tools I use and while I am always honest with them, I also preface it by saying that they should not invest in a Cintiq if they are just starting out. They are high quality professional tools and have a price point that reflects that. You do not need these expensive tools to create art. You can get great results on a lot cheaper alternatives! I do this for a living so I can justify paying extra for the QoL upgrades the Cintiq offers me, but I have no illusion that they are an accessible tool for most people.
I can recommend the Artisul D16 as a beginner screen tablet for people who are just getting into art or want to try a display tablet for once. I wouldn’t give up my Cintiq for it, but I can appreciate the value it offers for the competitive price point. If you want to get an Artisul D16 for yourself, you can click this link to check out their shop!
AMAZON.US: https://www.amazon.com/dp/B07TQLGC81
AMAZON.JP: https://www.amazon.co.jp/dp/B07T6ZT84V
AMAZON.MX: https://www.amazon.com.mx/dp/B07T6ZT84V
Once again thank you to the Artisul team for giving me the opportunity to review their display tablet!
94 notes
·
View notes
Text
YouTube Downloads through VLC: Step by Step
So this guide to easily downloading off YouTube is super helpful, but there's enough important information hidden in the reblogs that (with the permission of OP @queriesntheories ) I'm doing a more step-by-step version.
Please note: these downloads will be in YouTube quality. My test video download is coming through at 360p, even though the video I'm starting from is set to 720p. They're legible, but they won't look great on a TV. For high visual quality, you'll want to seek out other methods.
This guide is written for Windows 10, since that's what I can test on. It's been tested on Firefox, Chrome, and Edge (which is a Chromium browser, so the method should work in other Chromium browsers too). So far, I haven't tracked down a way to use this download method on mobile.
BASIC KNOWLEDGE:
I'll try to make this pretty beginner-friendly, but I am going to assume that you know how to right-click, double-click, navigate right-click menus, click-and-drag, use keyboard shortcuts that are given to you (for example, how to use Ctrl+A), and get the URL for any YouTube video you want to download.
You'll also need to download and install one or more programs off the internet using .exe files, if you don't have these programs already. Please make sure you know how to use your firewall and antivirus to keep your computer safe, and google any names you don't recognize before allowing permission for each file. You can also hover your mouse over each link in this post to make sure it goes where I'm saying it will go.
YOU WILL NEED:
A computer where you have admin permissions. This is usually a computer you own or have the main login on. Sadly, a shared computer like the ones at universities and libraries will not work for this.
Enough space on your computer to install the programs listed below, if you don't have them already, and some space to save your downloaded files to. The files are pretty small because of the low video quality.
A simple text editing program. Notepad is the one that usually comes with Windows. If it lets you change fonts, it's too fancy. A notepad designed specifically to edit program code without messing it up is Notepad++, which you can download here.
A web browser. I use Firefox, which you can get here. Chrome or other Chrome-based browsers should also work. I haven't tested in Safari.
An Internet connection fast enough to load YouTube. A little buffering is fine. The downloads will happen much faster than streaming the entire video, unless your internet is very slow.
VLC Media Player, which you can get here. It's a free player for music and videos, available on Windows, Android, and iOS, and it can play almost any format of video or audio file that exists. We'll be using it for one of the central steps in this process.
If you want just the audio from a YouTube video, you'll need to download the video and then use a different program to copy the audio into its own file. At the end of this post, I'll have instructions for that, using a free sound editor called Audacity.
SETUP TO DOWNLOAD:
The first time you do this, you'll need to set VLC up so it can do what you want. This is where we need Notepad and admin permissions. You shouldn't need to repeat this process unless you're reinstalling VLC.
If VLC is open, close it.
In your computer's file system (File Explorer on Windows), go to C:\Program Files\VideoLAN\VLC\lua\playlist
If you're not familiar with File Explorer, you'll start by clicking where the left side shows (C:). Then in the big main window, you'll double-click each folder that you see in the file path, in order - so in this case, when you're in C: you need to look for Program Files. (There will be two of them. You want the one without the x86 at the end.) Then inside Program Files you're looking for VideoLAN, and so forth through the whole path.
Once you're inside the "playlist" folder, you'll see a lot of files ending in .luac - they're in alphabetical order. The one you want to edit is youtube.luac which is probably at the bottom.
You can't edit youtube.luac while it's in this folder. Click and drag it out of the playlist folder to somewhere else you can find it - your desktop, for instance. Your computer will ask for admin permission to move the file. Click the "Continue" button with the blue and yellow shield.
Now that the file is moved, double-click on it. The Microsoft Store will want you to search for a program to open the .luac file type with. Don't go to the Microsoft Store, just click on the blue "More apps" below that option, and you'll get a list that should include your notepad program. Click on it and click OK.
The file that opens up will be absolutely full of gibberish-looking code. That's fine. Use Ctrl+A to select everything inside the file, then Backspace or Delete to delete it. Don't close the file yet.
In your web browser, go to https://github.com/videolan/vlc/blob/master/share/lua/playlist/youtube.lua
Click in the part of the Github page that has a bunch of mostly blue code in it. Use Ctrl+A to select all of that code, Ctrl+C to copy it, then come back into your empty youtube.luac file and use Ctrl+P to paste the whole chunk of code into the file.
Save the youtube.luac file (Ctrl+S or File > Save in the upper left corner of the notepad program), then close the notepad program.
Drag youtube.luac back into the folder it came from. The computer will ask for admin permission again. Give it permission.
Now you can close Github and Notepad. You're ready to start downloading!
HOW TO DOWNLOAD:
First, get your YouTube link. It should look something like this: https://www.youtube.com/watch?v=abc123DEF45 If it's longer, you can delete any extra stuff after that first set of letters and numbers, but you don't have to.
Now open VLC. Go to Media > Open Network Stream and paste your YouTube link into the box that comes up. Click Play. Wait until the video starts to play, then you can pause it if you want so it's not distracting you during the next part.
(If nothing happens, you probably forgot to put youtube.luac back. coughs)
In VLC, go to Tools > Codec Information. At the bottom of the pop-up box you'll see a long string of gibberish in a box labeled Location. Click in the Location box. It won't look like it clicked properly, but when you press Ctrl+A, it should select all. Use Ctrl+C to copy it.
In your web browser, paste the entire string of gibberish and hit Enter. Your same YouTube video should come up, but without any of the YouTube interface around it. This is where the video actually lives on YouTube's servers. YouTube really, really doesn't like to show this address to humans, which is why we needed VLC to be like "hi I'm just a little video player" and get it for us.
Because, if you're looking at the place where the video actually lives, you can just right-click-download it, and YouTube can't stop you.
Right-click on your video. Choose "Save Video As". Choose where to save it to - I use my computer's built-in Music or Videos folders.
Give it a name other than "videoplayback" so you can tell it apart from your other downloads.
The "Save As Type" dropdown under the Name field will probably default to MP4. This is a good versatile video format that most video players can read. If you need a different format, you can convert the download later. (That's a whole other post topic.)
Click Save, and your video will start downloading! It may take a few minutes to fully download, depending on your video length and internet speed. Once the download finishes, congratulations! You have successfully downloaded a YouTube video!
If you'd like to convert your video into a (usually smaller) audio file, so you can put it on a music player, it's time to install and set up Audacity.
INSTALLING AUDACITY (first time setup for audio file conversion):
You can get Audacity here. If you're following along on Windows 10, choose the "64-bit installer (recommended)". Run the installer, but don't open Audacity at the end, or if it does open, close it again.
On that same Audacity download page, scroll down past the installers to the "Additional resources". You'll see a box with a "Link to FFmpeg library". This is where you'll get the add-on program that will let Audacity open your downloaded YouTube video, so you can tell it to make an audio-only file. The link will take you to this page on the Audacity support wiki, which will always have the most up-to-date information on how to install the file you need here.
From that wiki page, follow the link to the actual FFmpeg library. If you're not using an adblocker, be careful not to click on any of the ads showing you download buttons. The link you want is bold blue text under "FFmpeg Installer for Audacity 3.2 and later", and looks something like this: "FFmpeg_5.0.0_for_Audacity_on_Windows_x86.exe". Download and install it. Without this, Audacity won't be able to open MP4 files downloaded from YouTube.
CONVERTING TO AUDIO:
Make sure you know where to find your downloaded MP4 video file. This file won't go away when you "convert" it - you'll just be copying the audio into a different file.
Open up Audacity.
Go to File > Open and choose your video file.
You'll get one of those soundwave file displays you see in recording booths and so forth. Audacity is a good solid choice if you want to teach yourself to edit soundwave files, but that's not what we're here for right now.
Go to File > Export Audio. The File Name will populate to match the video's filename, but you can edit it if you want.
Click the Browse button next to the Folder box, and choose where to save your new audio file to. I use my computer's Music folder.
You can click on the Format dropdown and choose an audio file type. If you're not sure which one you want, MP3 is the most common and versatile.
If you'd like your music player to know the artist, album, and so forth for your audio track, you can edit that later in File Manager, or you can put the information in with the Edit Metadata button here. You can leave any of the slots blank, for instance if you don't have a track number because it's a YouTube video.
Once everything is set up, click Export, and your new audio file will be created. Go forth and listen!
#reference#vlc media player#youtube downloader#youtube#uh what other tags should i use idk#how to internet#long post
178 notes
·
View notes
Text

a very foking detailed GIF tutorial you asked for and how I color my gifs
However, I color them individually, so there will be explanation of tools I choose instead of showing what settings I used for this specific gif in this tutorial.
I will go through entire process of how I create gifs, the process of gifmaking can be different for others and there is no obligation of how to create a gif. Basically, do it however you like and enjoy the process.
this is part I, part II is here\in reblogs.
First, you will need to prepare everything, you choose the moment you want to gif and make screencaps. I use mpv player to create them, here is a great tutorial on how to install it. So I won't go over it, just follow it and or use another player which allows to make screencaps, such as kmplayer.
Once you make screencaps go to photoshop - file - scripts - load files into stack - browse - select screencaps and upload them.
At this point I will also add that I use keyboard shortcuts a lot, you can set them up to your preference, that is much easier for me and might be for you too, and I am so used to them that I forget where are some settings. You can do it from edit - keyboard shortcuts, you may set up anything there.
You will have all screencaps uploaded into one file. Once I have it I change canvas/image size, I also remove 10 pixels from each side, because I hate that some files have that weird black line which looks awful on gifs. But that's up to you. Use proper dimensions for tumblr, that is important since your gifs will look 'not good' when you upload them. I will go with 540x500px this time. (correct dimensions for tumblr are 540px for big gifs, 268px for two gifs along each other and 177-178-177px for the three gifs together)
Go to images - image size (crtl+alt+i) and change the size.
After that I make animation, because without it we would not be able to convert all the screencaps into smart filters. Go to windows - timeline
you will have something like this by default

click on create frame animation - then on 4 horizontal lines which will open menu - make frames from layers

click on convert to video timeline (that 3 horizontal lines and 1 vertical line or whatever it is, right under the first layer) you will get something like this.

now, this will be animated. If you choose convert to video timeline right away it will not be animated.
Now, select all the layers - filters - convert to smart filters
You will have something like this, and if you play it - it will be animated anyway. That way you can edit ALL the screencaps at once.

I usually start with sharpening, settings may change according to the files I have, for some you will need more sharpening, for some less. I go with filters - sharpen - smart sharpen and usually that's enough
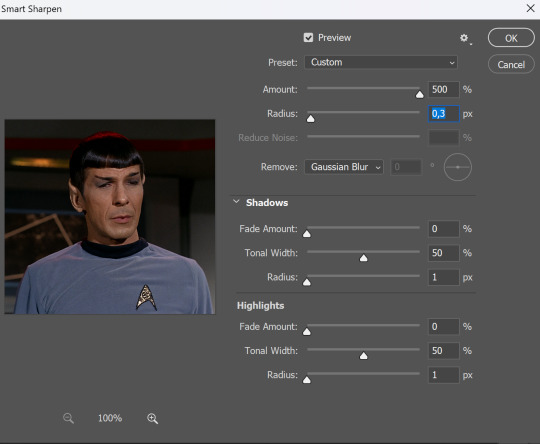
but I sometimes add more sharpening, just change radius to 0,2. So, repeat the action.
You will have it like this
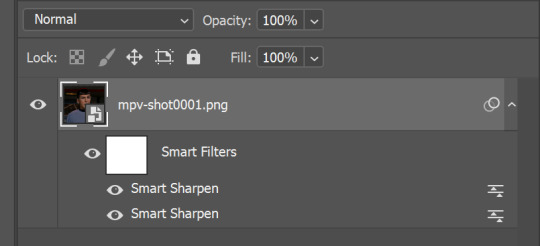
and at any point of making gif you will be able to change settings for it, if after coloring it will look not as good as you wanted to.
I will not go into a lot of details about coloring for this gif, because does not matter how good the coloring on this gif will be, it won't work as good on another gif.
There is no right way to start coloring, you may start with curves, levels or selective colors depending on the screencaps you want to edit.
Well, this time I did start with layer - new adjustment layer - curves. (yeah, i guess by the end of the day we all do lmao) (Always use 'layer - new adjustment layer'. That's the only thing I suggest to remember when you color. ) Just to brighten gif a little bit, but you also can change colors with it.
those are not settings I used for this gif!
Curves have option to edit colors, just press RGB and you will see options for RED, GREEN, BLUE. Upper slider adds the said color, the slider at the bottom removes it. That's a great tool if you have a very red\yellow\blue\green scene, with those settings and moving sliders here and there you will be able to add the color you want, for red scene I suggest to use more green and blue, as well as for yellows but with less green. Just move them to see what fits your gif better.


there are also eyedrop tools which will help you to edit picture, with the first one you need to find the darkest part of your gif and click, it will adjust your picture according to it. If there's too much red, it will make it bluer, etc. The middle one is the one I use the most out of them, cos it changes the midtones, it's great if you have very yellow picture, just press the yellow part and it will make it bluer\greenish, depends on the picture, and then you can adjust it to make it look better. And the last one you can use to lighten picture as well, just find the brightest part of the picture and press it. It will adjust other colors accordingly.
I like to play with settings, I could add more darkness to the gif by levels, by selective colors making dark colors even darker, but sometimes I just use layer - new adjustment layer - black & white. Putting it on soft light blending mode and changing opacity. Idk, I like the effect :D Also, by using these, you will be able to darken part or lighten specific colors
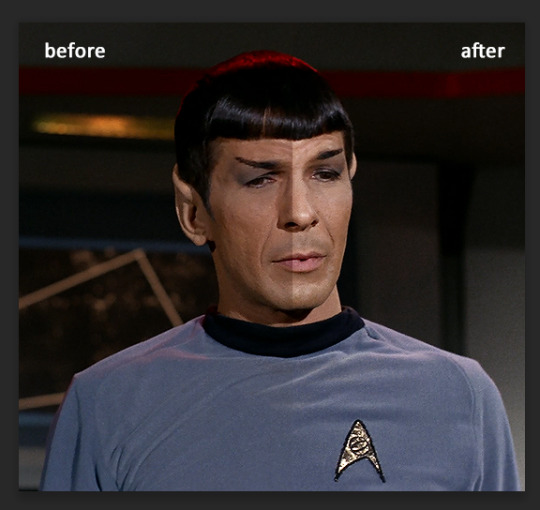
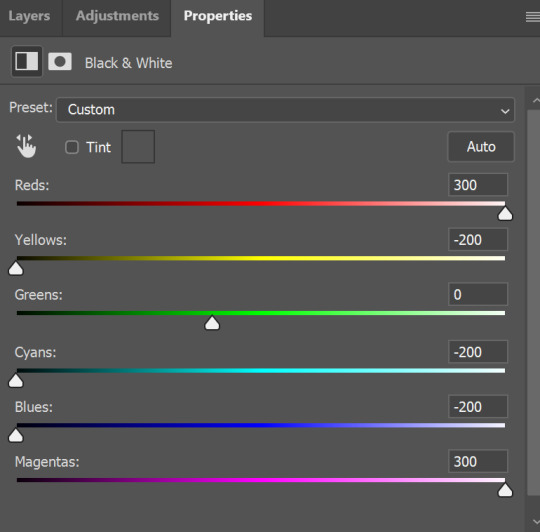
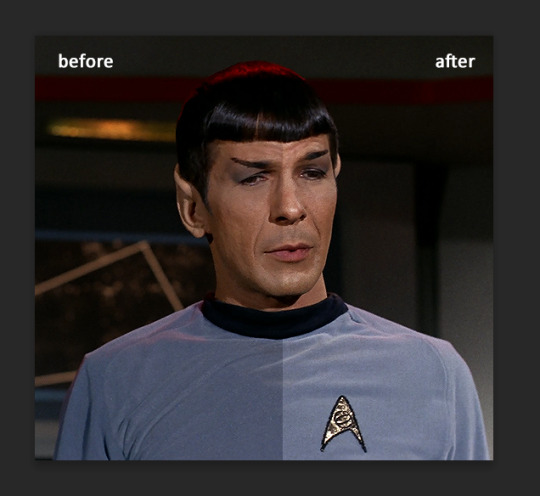
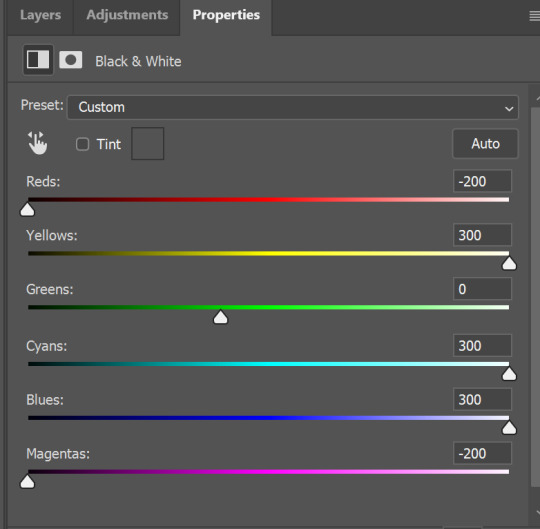
so yeah, play around and figure out what is the best way for you.
after that I used layer - new adjustment layer - selective colors. I think this is one of my favorite tools out there, I love it, I usually end up with 30 selective color layers if I make a super complex gif :D
You can change colors with it, make them more vibrant, or less.

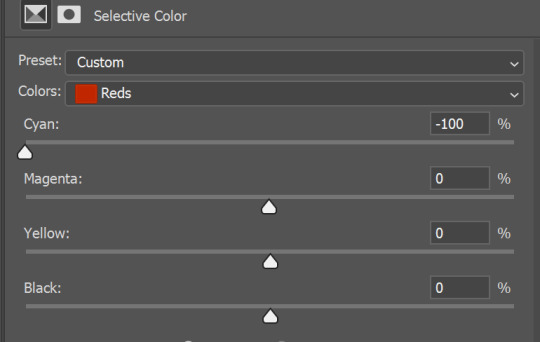
for each color you will have 'cyan, magenta, yellow and black' and by dragging sliders you can change colors, make them darker or lighter for the lovers of those paster gifs :D
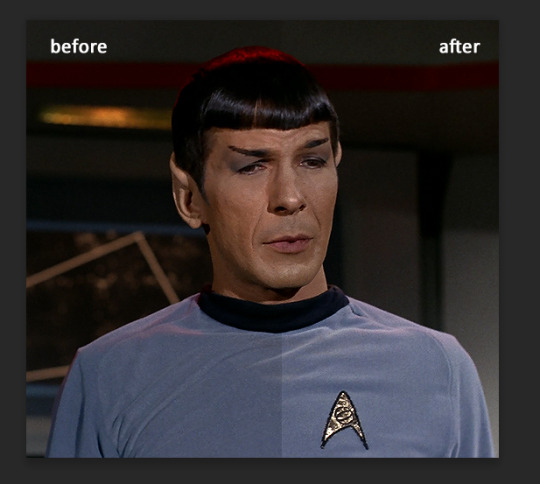
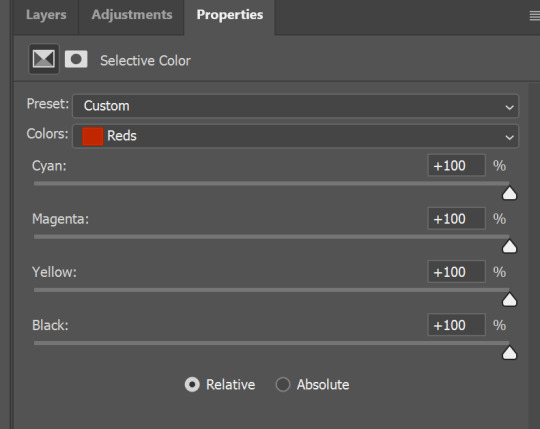
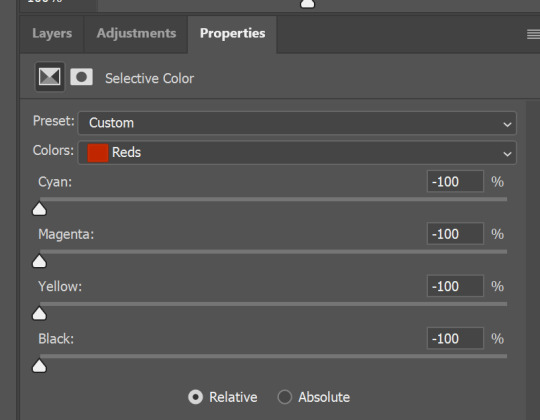

But don't worry, that's not where I will go with the gif, so it will look better, i promise.
You know how much I love making blue even more blue. So I go with more selective color layers to enhance it.
You do not have to use just one, and you won't be able to make it with just one sometimes. So add as many as you like to get the result you want.
next is one of my favorites - layers - adjustment layers - levels
with it you can darken colors or lighten them, there's also auto, as well as on curves, which will find the most suitable settings for your picture.
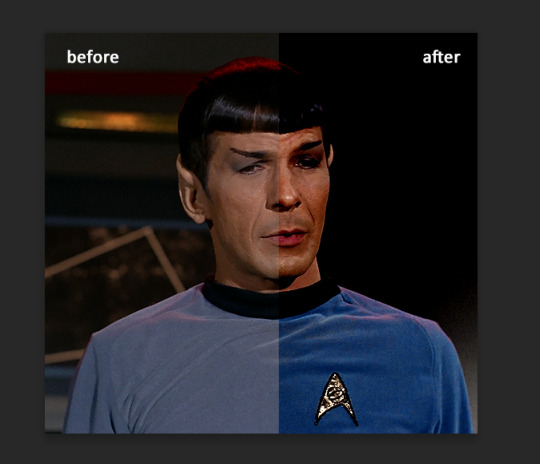
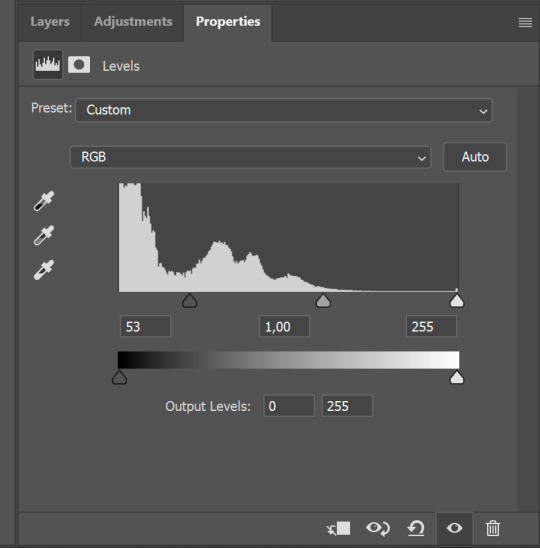

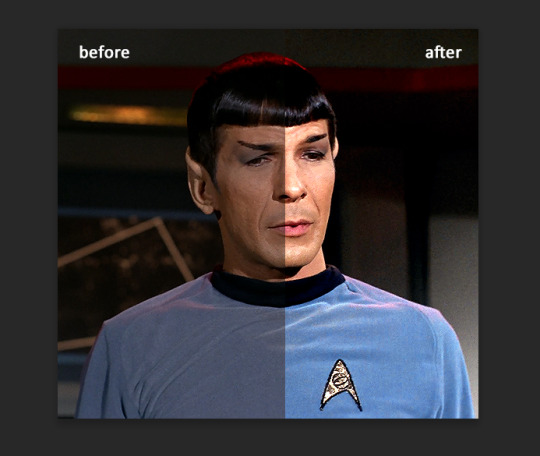
I hardly ever change the middle slider, cos
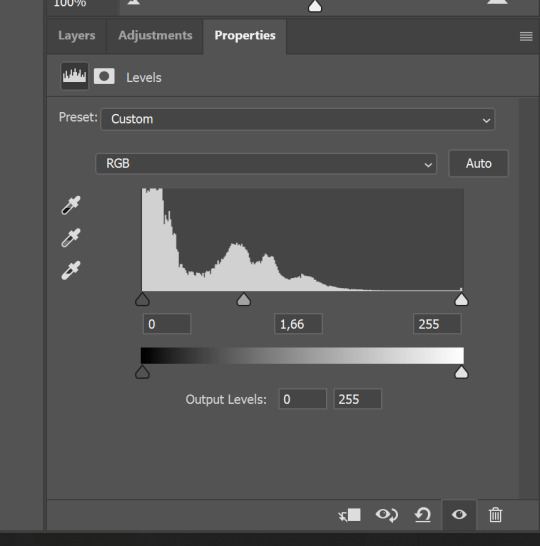
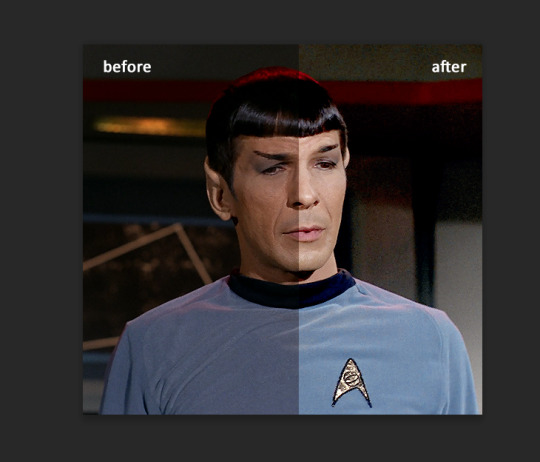
nope.
so, we are at this part of the gif by dragging sliders.
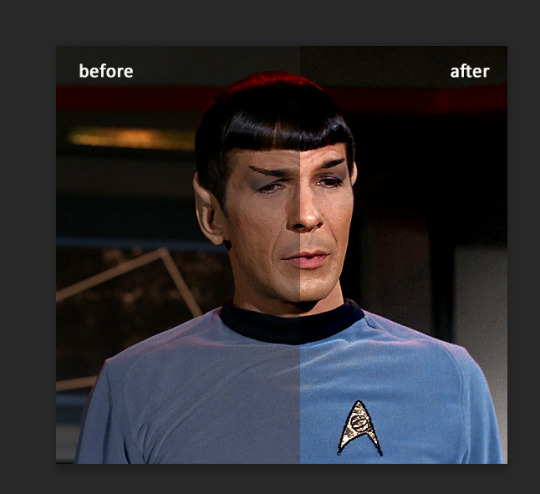
next one I used is layers - adjustment layers - color balance. right now I will stop adding directory, this tutorial is already long enough, so most of the things are there in layers - adjustment layers.
Absolutely love it, most of settings do the same things but a little differently, this one changes colors but also entire picture, not just part of it. You have shadows, midtones and highlights
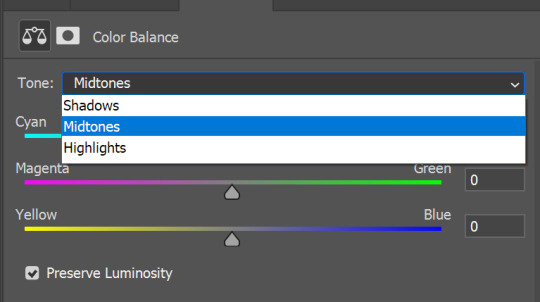
Each of them is really great when you have a yellow\red\blue\green picture to edit. And each of them has 3 sliders cyan\magenta\yellow.
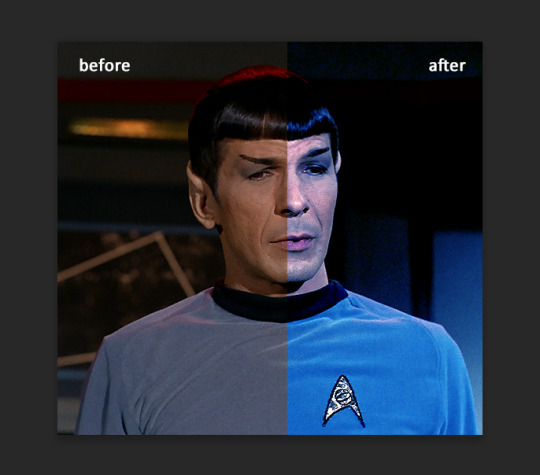
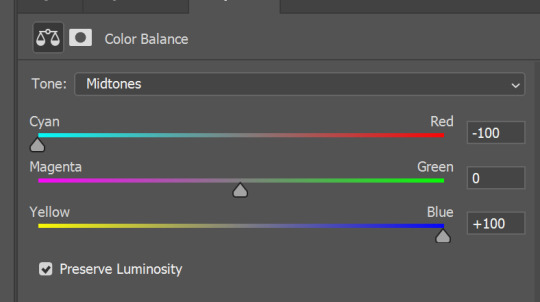
You see, if you drags sliders the other way it will make picture more yellow.
END OF PART I
since tumblr

129 notes
·
View notes
Text
Windows PowerToys, an open source app that adds many quality-of-life utilities, just got a major update.
"Keyboard Manager can now map shortcuts to start applications and supports shortcuts with chords.
The Color Picker has a new look that matches Fluent design sign throughout Windows.
You can now use Peek to preview drives."
Amongst other features.
If you're a power user and use Windows 10 or 11 for whatever reason, we would recommend using Windows Power Toys !
It's what we use to transcribe text from images, color pick our screen, change accents in text, and a bunch other stuff.
Source:
Github:
Microsoft store:
39 notes
·
View notes
Text
Holy shit my keyboard was glitching and opening shortcuts instead of letters and it everything i looked up was like "find the solution in 10 obscure sub menus" "download this extension from the windows website" "restart your computer" (which i didnt wanna do because its a pain in the ass to set back up) and then some rando savior on reddit was like "just do ctrl alt delete" AND IT WORKEDDDDDDDD
7 notes
·
View notes
Text
I just learned that pressing the Windows key + . (dot) opens a small window with a selection of emoticons and other characters on PC. Why did nobody tell me this before?
And it's also other symbols, signs or special characters (like this ©®℗™℃℉) that usually need a code or a keyboard shortcut. You can even type in what you are looking for because it has a little search function built in as well. So if I want a black heart, I type in "heart" and it's right there. 🖤
To me, this seems so incredibly useful. I don't need the emoticons that much, but for the symbols and special characters it is, definitely. Do you have any idea how many times I literally had to google the codes for special characters? So much wasted time. And it was always right there in front of me? (well, since Windows 10, but still) Are you telling me that I could have made my life easier for almost 10 (!!!) years and I just didn't know? I'm kind of pissed right now ngl…
It even has basic ASCII emoticons like, come on… {{{(>_<)}}}
It saves so much time. 🐱👤
#useful#helpful#knowledge#learning#for future reference#useful information#good to know#useful stuff#resource#seriously#i didn't know that#thoughts
3 notes
·
View notes
Text
TUMBLR TIPS – GOING BACK IN TIME (ON YOUR DASHBOARD)
Say you've been scrolling your dashboard on Tumblr, and stop at a particular point. You go to bed, and the next day you want to get back to scrolling from where you left off.
If you copied the URL, you can just paste it back in your address bar, and you will be taken to the same spot in the chronology.
But what if you forgot to copy the URL? Well there's a way to go back in time.
If you click on the Home icon, you'll be taken to the latest post on the dashboard. The URL in the address bar is always:
https: //www.tumblr.com/dashboard
Hit the right arrow on your keyboard. This is the shortcut to take you to the previous page. (For a handy list of this and other keyboard shortcuts, make sure you're in Dashboard View – the usual view when you open Tumblr – and then click on the keyboard icon at the bottom right of the webpage.) Alternatively, scroll to the bottom of the page and click on the button that says 'Next' to go to the previous page.
The URL should look like some version of this:
https: //www.tumblr.com/dashboard?max_post_id=731568565951643648
On my dashboard, this URL is for a webpage with the latest post timestamped 9:15AM 19 October 2023. (If you cut and paste this URL into the address bar in another window or tab, Tumblr will bring you back to the same webpage showing that post on the dashboard.)
The long number at the end of the URL (731568565951643648) indicates that webpage's place in your dashboard chronology. (Google reads this number out to me as "731 quadrillion 468 trillion 565 billion 951 million six hundred and forty-three thousand six hundred and forty-eight.") The bigger the number, the later the date.
If you make this number smaller, Tumblr will take you back to an earlier point on the dashboard.
Changing the digits toward the end of the number doesn't do much. You need to change the first few digits to make things really move.
Using the above URL as an example, if I type directly into the address bar and change:
731568565951643648
to
731468565951643648
Tumblr brings me to an earlier point in the chronology (more than 24 hours back), to a webpage whose latest post is timestamped 6:45AM on 18 October 2023. (In case you can't see the difference in the numbers above – I changed the fourth digit to a smaller one, replacing the '5' with '4' so '7315…..etc.' becomes '7314…..etc.')
Making the number even smaller takes you further back. For example, changing '7315…..etc.' to '6315…..etc.' takes me to a webpage with the latest post timestamped 2:18PM 10 October 2020.
And so on and so forth. You can actually jump backwards decades this way (I tried).
So if you can remember the approximate time you stopped scrolling the night before, change one of the first few digits in the number of the URL and Tumblr will show you a view of the dashboard closer to the last post you read. Once you get close, use the right arrow to move backward page by page.
One drawback though, is that you can't scroll forward after you've located the post you want. If you want to scroll forward from the located post, this is what I do:
First find the webpage of your dashboard containing the post you want (i.e., the last post you viewed) by following the instructions above and jumping back in time.
Then open a duplicate of this webpage on a second tab (right-click the mouse, and select 'Duplicate').
On this duplicate webpage, make the URL number larger to jump forward in time (say to post 'X').
Still on the second tab, use the right arrow (or the 'Next' button at the bottom of the page) to scroll backward to the last post that you viewed.
You can now scroll forward (on this second tab) as far as post 'X'.
Repeat the process to scroll forward beyond post 'X'.
Hope this information is useful!
(N.B. This is only for Tumblr on desktop – no idea if any of this has relevance to the app, because I don't use it. And Tumblr is constantly updating itself, so this info is only current as at 19 October 2023, and may change moving forward beyond that.)
13 notes
·
View notes
Note
hi! first of all, i want to say that i love your gifs so much, you always make such beautiful things. i recently started giffing, and i was wondering if you have any tips about settings or process you usually use in your coloring psds? i'm struggling on what steps i should follow :(
hello ! thank you for taking the time to say this !
i usually never know what to say off the top of my head because i am generally chaotic & do things by whim and instinct rather than any real process, but !!! luckily, i was just talking to a friend about it recently so here's what i got.
photoshop settings- i've mentioned this in my main blog before, if you're not already doing this, load all your giffing steps into an action. if you don’t know how to make an action this handy tutorial tells you how. - change your most used commands into easily reachable keyboard shortcuts on the keyboard. for example, assuming you're right handed, your right hand will be cropping and colouring so you could switch command + (w) to open file>export>save for web to see your saving settings / command + ( ` ) to select the next tab. (i'm on a mac so imagine i used windows alternatives ) by using your left hand.
gif saving settings you might have your favourite go-to settings i.e. selective/pattern & bicubic etc. but just like not all sharpenings are created equal, different gif save settings work better for different sharpening styles. try different combis, the results may surprise you. for example, i used to swear by selective pattern+bicubic sharper when saving gifs, but i switched my sharpening style, and started going for a smoother, cleaner, glowier look, and realised after a lot of trial and error that adaptive/diffusion + bicubic smoother works best for the high value sharpening+gaussian blur settings i'm using to create what i want. the big lesson here is don't be afraid to strip everything down and go back to basics sometimes, it's tedious, but it usually pays off. i tried to find the post that taught me this for you and i can't but this one is an alternative !
colouring - the main things you'll be doing to colour a gif are (i don't always follow these in order but usually i do): a) brighten ( i.e. curves, levels, brightness, i used to add a white balance filter but stopped doing that years ago ) b) deepen ( these would be your contrast/gamma correction & offset on exposure adjustment layer/left arrow thingy of the levels adjustment layer ) c) colour correct, the hardest part ! it's like doing makeup. you'll end up using probably everything, colour balance, curves in the rgb setting (i need to learn to get comfy with this bc i'm not yet, but! soon.), selective colour my bff, hue/saturation & vibrance. there are great tutorials out there, but my most recent game-changer is i've finally figured out how to use the channel mixer adjustment. it helps to focus on a neutral colour in the background of your gif when it has an awful orange/green/whatever filter when using channel mixer (like a white wall or blue sky that has turned gross looking bc of the film's base filter), then adjust and play around until it turns into the colour it's supposed to be. then it will be easier to pile on layers over to colour your fc. i am ofc still learning, i have no idea how colour lookup works (i've read tutorials and still don't understand jvhakjx). d) final adjustments. this is when after the above, you decide whether you want to stylise your colouring, make it more vibrant, less vibrant, give it a tint, brighten again or enhance certain colours before saving! - a great way i got the hang of colourings is to open up colouring psds other people have made and toggle each adjustment layer on and off to see what difference they make to the base, you'll start to understand what the purpose of each thing is and why the layers are in that specific order.
last but not least, it took me 10 years to make gifs the way i do now ! my early gifs were all experimental, i went through so many phases (some i'm quite ashamed of, like the low vibrance/high saturation + high brightness trick i used to abuse. why did i do that.), and i did in fact master each adjustment layer (by this i mean learn to use them to their best potential) one by one. don't get discouraged, be patient with yourself and don't be afraid to try things !
11 notes
·
View notes
Text
Porting Models from Dragon Age: Inquisition to Dragon Age: Origins or Dragon Age 2
Part 2b - Into Origins
Tools needed: Blender 2.49b Blender ImportExport Script GDApp The DAO Toolset OR pyGFF and TlkEdit
Make sure you have the ImportExport script installed correctly (all the files dumped into the same folder as Blender.exe), and open DragonAge_tools.blend. (Blender uses a lot of shortcut keys, so if you're unfamiliar, you might find it useful to go through a Blender tutorial)
By default, Blender will open with 4 windows: a 3D viewer in the top left, a buttons window in the bottom left, and two text windows on the right. In the upper left, use the File menu to import your DAI obj(s), setting 'Clamp_Scale' to 0. (if you haven't yet extracted your model from DAI, see Part 1 of this series)
Then right-click in the upper text window, and hit 'execute script'. Select 'MSH Tool' and browse to wherever you've extracted Origins mesh files.
Select a mesh that's similar to the one you're porting, and click 'Load MSH'.
Click 'Import as mesh'.
You'll need to adjust the Inquisition mesh to roughly the same proportions and pose as the Origins mesh. This is something that takes practice, and a lot of trial and error.
A couple little tips for armor/clothing: -Do all your adjustments in Edit Mode. -First scale (S) the entire mesh on the Z-axis so the neckline roughly lines up. -Then scale and skew (Ctrl+S) so that the fingers match up. You might need to adjust the arms separately from the rest of the body for this. -Skewing works from your viewing position, so to skew on the Y-axis, for instance, you must be viewing your model from the side. -In general, you want to make the major joint areas (shoulders, elbows, knees, hips) line up as best as you can. -Rotating a group of vertices around a single vertex can be very effective: Select that vertex, then do Shift+S, Cursor to Selection. Change the pivot point by clicking on the pivot box (two to the right of the 3D mode selection) and choose '3D cursor'. Box-select the vertices you want to rotate with B. (if you miss some, hitting B again won't remove the ones you've already selected; it will allow you to add more. Also, hitting B and drawing the box with the right mouse button removes enclosed vertices.) -I usually alternate the pivot point between '3D Cursor' and 'Median Point' a lot. -You can rotate around a specific axis and to an exact degree with keyboard inputs. For instance "R, X, 10" will rotate your selection on the X-axis by 10 degrees. This is especially useful when you're trying to keep limbs symmetrical. -'Shrink along normals' (Alt+s) is another very useful function for widening/slimming cylindrical areas, like arms & legs. -Check the model from all sides before moving to the next phase! It's always annoying to find out later that a few random vertices are sticking out weird, and got badly weighted as a result.
Once your mesh is adequately adjusted, it's time to add some weights.
Switch back to Object Mode, and select the DAO mesh, then your DAI mesh.
Find and click the 'Scripts' button in the upper right window. Click on 'Object', then 'Bone Weight Copy'.
Change the quality to 3 or 4, and hit OK. (if you're making LODs, using a quality of 1 is fine)
Wait. And wait. And wait. Seriously, this can take several minutes. You can tell it's working by the red to green progress bar at the top. If nothing happens, you likely didn't select both meshes, or both meshes already have weights.
Eventually, the weight copy will finish, and you can check how it did. Move the DAO mesh off to one side, select the DAI mesh, and then change the 3D viewer to Weight Paint mode.
Hit F9 to change the Buttons window to the Editing tab. Use the Vertex Groups box to go through the bones one-by-one, and make sure they all look reasonable. (unfortunately, they're numbered, not named, so that makes things trickier)

Mostly, you want to check that certain areas aren't trying to move when they shouldn't. Common culprits are the elbows getting a bit of weight from the chest bone(s) and vice-versa, or adjacent fingertips getting weight from each other. This is another one of those 'trial and error' things. You might find it helpful to switch back and forth between the DAO mesh and DAI mesh, going through the bones at the same time for comparison.
The weight paint brush can be used to subtract unwanted weights, or add weights where needed. You'll have to play around with the brush settings to your liking (I suggest starting with both weight and opacity at 1/2).
You can also switch the 3D window back to Edit mode, select vertices that shouldn't belong to the selected bone, and then click the 'Remove' button under the Vertex Groups box. MAKE SURE NOT TO HIT 'DELETE'. That can seriously mess things up.
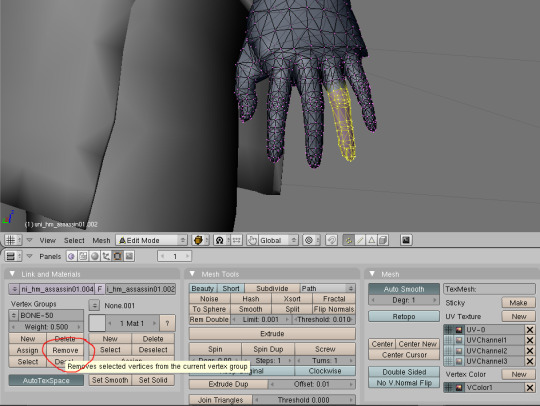
Once you're done playing with the weights, it's time to get ready for export.
Minimize Blender, and put a copy of the vanilla mesh you used for weighting in a new folder. (the export script works by overwriting the info in a vanilla file. Don't want to mess with the original!) Also copy over the corresponding mmh & phy while you're at it.
Go back to Blender, execute the DragonAge_Tools script again, and hit the MSH Tool button. 'Browse' to your copied vanilla msh, and load it.
Instead of importing this time, you're going to make sure your ported mesh is selected in the 3D window, and then click the yellow-outlined 'Replace' button in the script window.
Then make sure the submesh (also called a "chunk") you want to replace is selected (for armor and clothing, there'll probably only be one, but with hairstyles you'll want to replace 'HairM2'), and click 'Replace chunk'.

Click 'Save filename' to confirm.
If the replacement failed, the most likely cause is that you have unweighted vertices. Finding them is frustrating, and I'm sorry. There's no easy way in Blender 2.49; the quickest way is to save your file, and reopen it in a newer version of Blender that has a "Select Unweighted Verts" function. Moving it to a new version of Blender, however, has a chance of scrambling your UV map.
Now you'll want to minimize Blender, and navigate to your overwritten vanilla msh. Unless you're making a replacer, rename the files to something unique.
It needs to start with a race/gender code (hm = "human male", hf = "human_female", and so on), and end with "_0". See Bioware's naming conventions for reference.
Open up all three files with either the DAO Toolset or pyGFF. Rename each instance of the vanilla file name with the new file name. (no need for the filepath like in DA2, thank goodness) If you're using pyGFF, you'll need to make sure to hit 'Save' in the bottom left after every change.
In the MMH, also expand MMH_CHILDREN, GOB, MMH_CHILDREN, and then the bottom list, *mshh. MMH_MATERIAL_OBJECT refers to the mao, you'll need to replace the vanilla with a custom mao (more on that in a bit).
If you want, you can also change the chunk name under MMH_MESH_GROUP_NAME to match the new file name. If you do, make sure to change it in the msh as well. (there's a rare glitch where if you change between two pieces of equipment with the same mmh_mesh_group_name, the mesh will not change, leading to vanilla items appearing with custom models or vice-versa. It doesn't happen consistently, but it can happen) Also in the mmh, you may want to activate some lighting options: CAST_RUNTIME_SHADOW should be active by default; if it's not, change the 0 to 1. You can also activate CAST_BAKED_SHADOW, RECEIVE_BAKED_SHADOW, and RECEIVE_RUNTIME_SHADOW in the same way, but these are less noticeable if they're inactive.
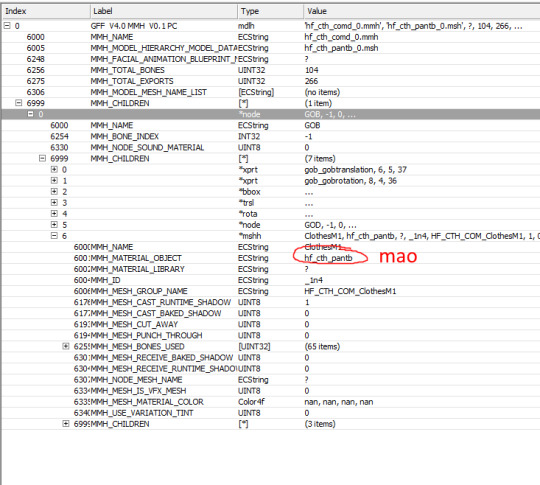
Save your files.
Making a .mao file:
My tutorial for converting DAI textures to DAO using Paint.NET can be found here. If you prefer to use GIMP or Photoshop, I recommend these tutorials: magpie's for GIMP sapphim's for Photoshop
If all you want for now is quick placeholder textures, simply extract the DAI textures as .dds files. Use a text editor to open up a vanilla .mao of the same basic appearance (color & material matters most) and replace the vanilla texture names with those from DAI. Save the new mao with a name matching your model.
Put your msh, msh, phy, mao, and textures in the DAO override folder. If you're making a replacer, testing is as simple as opening up your game and equipping the right item.
If putting in a new unique model, you'll have to tell the game how to find it. Extract the variations GDA matching the item type (armor_heavy_variation for heavy chestpieces, clothing_variation for clothing & robes, etc).
Open up the GDA with GDApp, and delete all lines except one, which you'll use as a template (so don't use line 0).
Change the 'ID' entry to something (hopefully) unique.
Thanks to a weird quirk of UTIs, the highest number you can use is 256. If you already have a lot of equipment mods, you may want to look through the Item Variation ID spreadsheet (NexusMods, Google Sheets) to avoid GDA conflicts. The item variation GDA tells the game what mmh to look for. The modeltype, modelsubtype, and modelvariation columns are combined together, along with the race/gender code, to form the model's mmh (the final "_0" is ignored for this): hf_cth_comd_0 = (human female)_(clothing)_(commoner)(d) = (race/gender code)_(modeltype)_(modelsubtype)(modelvariation)
If you've named your mmh a bit different than the Bioware convention, that's fine, as long as you can break it up into those GDA columns. I don't think there is a character limit.

Now save your GDA, keeping the original file name but adding a unique suffix (for example "armor_variation_medium_edit.gda"). The file name cannot be longer than 32 characters, including ".gda".
Put your new GDA in the override as well, and open up the toolset.
Open up a local copy of the same type of item, click on Item Variation, and look for your new model. If it doesn't show up, the most likely cause is that your GDA is missing or its name is too long.
Change the item to your new model for viewing. If your model is not for human males, you'll need to change the race & gender at the bottom. For testing, I recommend now exporting the item (Tools, Export, Export without dependent resources), and consoling yourself the item in-game if you don't already have it. (model swaps like this are not baked into the save, so you don't have to worry about permanently messing up things)
If you're NOT using the Toolset, you'll have to change the item variation in an extracted UTI with TlkEdit, and then console yourself the item for testing.
If something doesn't quite look right, go back to Blender and experiment. You'll need follow the process for overwriting a vanilla mesh every time you edit, but you shouldn't need to redo the mmh & phy.
Common problems: -- Distorted/noodly body parts: used a mmh that didn't match the msh -- Model is mint green and t-posing: can't find the mao -- Textures are gray and/or shiny: can't find texture(s) -- Game crashes: bad msh export. Try exporting again, or compare it to a vanilla msh for errors -- Invisible model: wrong msh name in the mmh, or mismatched chunk names between the msh & mmh -- Won't tint: the chunk names in the mmh MUST be BootsM1, GlovesM1, ArmorM1, HelmetM1, ClothesM1, or RobeM1. Chunk names must also be consistent for all different race/gender variations of the same model, and any LODs.
The next tutorial will cover porting static meshes for either game, since it's the same process/tools for both.
4 notes
·
View notes
Text
I SWEAR
MICROSOFT ENGINEERS WHO MADE WINDOWS 10 AND 11 ARE THE WORST
WHY THE FUCK DO I HAVE TO GO THROUGH A DOZEN FUCKING HOOPS JUST TO DISABLE TWO FUCKING KEYBOARD SHORTCUTS YOU FUCKING MORONS
I SHOULDNT HAVE TO USE A FUCKING REGISTRY EDITOR JUST TO DISBLE A FUCKING SHORTCUT YOU IDIOTIC DUMBASS OPERATING SYSTEM
(I spent an hour with this fucking thing tryna get rid of the CTRL+WIN+D shortcut)
Edit: I just got it to fuck off
I'm almost crying happy because I fucking hate this pos
2 notes
·
View notes
Text
a complaint i have about computers is i am autistic enough that i have Ideas about the Possibilities but i am not currently capable of spending five hours or however long teaching myself all the necessary skills that are currently required to actually act out any of my ideas. like, this keyboard doesn't have screen brightness keys; two of the F keys are currently bound to things i am never gonna use in my life; i would like to rebind them to be screen brightness. i feel like i shld just be able to go into my laptop's settings and get a key binding menu like video games have. i cannot. i google 'windows 10 screen brightness keyboard shortcut' and i get a load of articles explaining how i can press win + A to open the action menu where there's a slider. opening the action menu turns off my laptop's built-in anti blue-light filter for some reason, and also why do i need to use my mouse. let me rebind the keys. let me set whatever keyboard shortcuts i want. does doing absolutely everything via the keyboard not bring everyone joy???
#yelling at clouds#i get the usefulness of a mouse okay i do not like navigating my whole screen via the keyboard#but like. switching tabs? closing windows? making posts?#i LOVE keyboard shortcuts let me MAKE THEM#if there is a way to do this that doesn't require me understanding things. do tell me.#i will download specific software but only if it gives me a keybinding menu like video game controllers have. nothing more complex yknow
9 notes
·
View notes
Text
Bassfusion - DJ Noir LIVE @ Furzona - 09-10-2023
played a 3 hour set on Sunday because I haven't played in 2 weeks. also, keyboard shortcuts are stupid. be sure you've got the correct window focused before you start typing, lovelies!
4 notes
·
View notes
Text
How to re-map the pedals on an Olympus RS-31H transcription foot switch to correspond to specific keyboard shortcuts on Windows 10:
* download the foot pedal "Configuration Tool" ("FTSW-toolWindows.zip") on the Olympus website and use it to set the pedal to "keyboard mode".
* download Windows PowerToys, open the Keyboard Manager, and click "Remap a key." In the "Remap keys" dialog, click "+" and then "Type," then press down on a pedal.
* If it's correctly capturing input, you should see "Key Pressed: [whatever the pedal was mapped to in the Olympus config tool]" - "Next Track" or "Play/Pause Media" or whatever
#note to self#why is the vocabulary on peripherals of this nature so fragmented and hard-to-research and why are these tools so poorly-documented
3 notes
·
View notes
Text
I have had the pleasure of teaching gen Z co-workers on how to do certain processes/use certain technology and this absolutely tracks. 95% of the time, it's really not the case that they're lazy, or don't want to learn. It's mainly the case that they haven't either been taught it, or their "technology environment" hasn't involved having to use various desktop systems that many businesses use, or that even late millennials like me use. I was lucky in that I grew up messing around with, and using, a lot of the tools necessary for me to do my old job reasonably well.
- Want to make a god-awful Sonic the Hedgehog sprite-comic to impress your 10 year old class-mates because you think it makes them laugh? Get good at using Microsoft Publisher, sprite editing using Microsoft Paint, GIMP , and "surfing the web" on that new-fangled Google thing to find all the fan-forums where people are ripping sprites.
- Want to calculate the best trade routes in an online 18th century trading MMO? Want to calculate the right formula to make that Garry's mod automated rocket launching system? Excel/LibreOffice Spreadsheets. Spreadsheets for days, and you can use the formula system to MASS PRODUCE the numbers. It's like goddamn magic, (except when you mass produce the errors, and your whole model falls apart). - Want to print a giant geological map? Get used to the nightmare that is a large A0 plotter, learning about trim and bleed sizes and essential maintenance. Get ready to cry at the price of an ink cartridge. Get ready to scream as the several-foot long map is printed at an A3 size, on an A0 page, because you forgot to adjust one of the two sets of internal Windows vs printer driver settings.
Even using a desktop computer. You might have guessed I'm a massive computer nerd. It makes it so much easier to do a wide variety of jobs knowing how to use shortcuts, having a high wpm keyboard typing speed and being able to automate parts using auto-hotkeys and other programming tricks. The Gen-Z workers I had to teach often had less experience with desktop computing, and are mainly mobile-native. It's no surprise they aren't familiar with these systems which many I knew grew up with, and use as readily as breathing in some cases. But they did learn - and they did pick it up when they tried, and failed, to use them over and over again. Just as I did growing up in lower-stakes situations. Computing and IT classes, in my opinion, MASSIVELY waste the time of children as they are often (at least in the UK) viewed as non-important by schools and parents attempting to game the University selection system. This is typically picked up on by the kids as well, who then use them as an excuse to mess around (Though sometimes learning key skills in the process, such as running N64 emulators!). While I did learn to use practical computer skills, such as Microsoft Office, during my early education, most of what I know is self taught. I enjoyed it - and made practical use of it. What happens to the people who didn't? Gen-Z. And then we pillory them for it. Computing should be given the respect it deserves in the curriculum - both for the functional, practical, elements and for the sheer, utter, magic of the machine itself.
seriously, though. i work in higher education, and part of my job is students sending me transcripts. you'd think the ones who have the least idea how to actually do that would be the older ones, and while sure, they definitely struggle with it, i see it most with the younger students. the teens to early 20s crowd.
very, astonishingly often, they don't know how to work with .pdf documents. i get garbage phone screenshots, sometimes inserted into an excel or word file for who knows what reason, but most often it's just a raw .jpg or other image file.
they definitely either don't know how to use a scanner, don't have access to one, or don't even know where they might go for that (staples and other office supply stores sometimes still have these services, but public libraries always have your back, kids.) so when they have a paper transcript and need to send me a copy electronically, it's just terrible photos at bad angles full of thumbs and text-obscuring shadows.
mind bogglingly frequently, i get cell phone photos of computer screens. they don't know how to take a screenshot on a computer. they don't know the function of the Print Screen button on the keyboard. they don't know how to right click a web page, hit "print", and choose "save as PDF" to produce a full and unbroken capture of the entirety of a webpage.
sometimes they'll just copy the text of a transcript and paste it right into the message of an email. that's if they figure out the difference between the body text portion of the email and the subject line, because quite frankly they often don't.
these are people who in most cases have done at least some college work already, but they have absolutely no clue how to utilize the attachment function in an email, and for some reason they don't consider they could google very quickly for instructions or even videos.
i am not taking a shit on gen z/gen alpha here, i'm really not.
what i am is aghast that they've been so massively failed on so many levels. the education system assumed they were "native" to technology and needed to be taught nothing. their parents assumed the same, or assumed the schools would teach them, or don't know how themselves and are too intimidated to figure it out and teach their kids these skills at home.
they spend hours a day on instagram and tiktok and youtube and etc, so they surely know (this is ridiculous to assume!!!) how to draft a formal email and format the text and what part goes where and what all those damn little symbols means, right? SURELY they're already familiar with every file type under the sun and know how to make use of whatever's salient in a pinch, right???
THEY MUST CERTAINLY know, innately, as one knows how to inhale, how to type in business formatting and formal communication style, how to present themselves in a way that gets them taken seriously by formal institutions, how to appear and be competent in basic/standard digital skills. SURELY. Of course. RIGHT!!!!
it's MADDENING, it's insane, and it's frustrating from the receiving end, but even more frustrating knowing they're stumbling blind out there in the digital spaces of grown-up matters, being dismissed, being considered less intelligent, being talked down to, because every adult and system responsible for them just
ASSUMED they should "just know" or "just figure out" these important things no one ever bothered to teach them, or half the time even introduce the concepts of before asking them to do it, on the spot, with high educational or professional stakes.
kids shouldn't have to supplement their own education like this and get sneered and scoffed at if they don't.
24K notes
·
View notes