#it also keeps recording me clicking the tabs button (bottom left) as me clicking the back button (bottom right) & exiting the app altogether
Explore tagged Tumblr posts
Visit Tumblr Blog
Explore Tumblr blogs with no restrictions, modern design and the best experience.
Last Seen Tumblr Blogs


Fun Fact
When “GIF” was named word of the year in 2012, Oxford Dictionaries U.S.A. credited Tumblr for pushing the word.
Text
my phone is so fucking stupid. every time i plug in or unplug my headphones it restarts the tumblr app specifically
#how the fuck does that even happen#it literally does this for no other app. none. just tumblr#it also keeps recording me clicking the tabs button (bottom left) as me clicking the back button (bottom right) & exiting the app altogether#stupidest phone on the fucking planet istg#maybe i should switch back to my old one#i didnt even WANT a new phone. they just gave me a new one#oh also sometimes the keyboard is NOT like. synced up or whatever#i will be clicking the buttons but it thinks everything is slightly to the left abs ai ur qukk kiij kujw rgua#fuck modern technology tbh
1 note
·
View note
Text
These are good resources for people who are interested in saving clips from their favorite streams and streamers!
Whether you want to download things for your own records or because you'd like to share them online, it's nice to know how to do it, especially when so many streams become lost media once they're deleted off Twitch.
Here are a few programs that I use when clipping things for Royal Archivist!
—
Twitch's built-in download feature
If you're downloading your own clip, this is the easiest method to use
First, navigate to your clips page.
To do this, click on your Twitch icon and go to "Creator Dashboard." There will be a row of icons on your left - click the fifth button from the top (the one above the settings icon) and click on the link that says "Clips."
At the top of the page, click on "Clips I've Created" and you should see a list of every clip you've ever made (regardless of whether or not you've published them, the clips are there!)
Click on the share button, and the list shown in the photo below will pop up.
After you click on the "Download" button, a new tab will open up with the clip (which will autoplay, so heads up if you have your volume turned up high!)
Right click on the video and click "Save Video As"

That's all there is to it! Please keep in mind that Twitch's download function only works for clips you've made! You cannot use it to download VODs, or other people's clips.
Open Video Downloader

If you've ever wanted to download any kind of video, I'm sure you've heard of Youtube-dl. There are different versions of this program, but some of them are a bit finicky and if things stop working, it can be difficult and frustrating trying to figure out what went wrong and how to fix it — which is why I recommend this program.
Open Video Downloader, aka youtube-dl-gui, is one of the best video downloaders I've ever used. It's basically Youtube-dl with a Graphical User Interface (GUI) that makes the program very easy for anyone to use.
Pros:
No coding knowledge required! VERY user-friendly.
The creator fixes user issues very quickly! Whenever the program experiences a problem, a new update is released within 24 hours.
It can download videos from pretty much all major social media platforms, including Youtube, Twitter, Tumblr, Twitch clips, Instagram, and more. (You'll need to do a roundabout cookie-saving process for Instagram though. If you have any questions about that, feel free to DM me!)
Cons:
You can't adjust the length of what you want to download. If you want to download a 2 minute section from a 5 hour Youtube VOD, you'll have to download the entire video.
On rare occasions, I've had issues where it cannot download an unlisted Youtube video. There are sometimes ways to get around this, but it's a pain and usually not worth the effort.
How to use it:
Download the latest version of the program from GitHub. Scroll all the way down to "Assets" and select the version that's right for your computer. (For example, I use Windows, so I would download the .exe file).
Once you've installed it, you can start downloading things! For this example, let's say I want to download Quackity's "Welcome to the QSMP" video. All I need to do is copy the link and paste it into the white box at the top of the program.
Once that's done, you should see the video pop up in your download queue. You can queue multiple videos to download at once (you can also download entire playlists too). When you're ready, click the green download button on the bottom right (as shown in the picture below) or if you only want to download one specific video from your queue, click the download button (circled in red) next to the video.
You can adjust the quality of the video you want to download, and in theory you can choose whether to download just the audio or just the video of a video, but personally that's never worked for me. That might just be a me issue though.
If you'd like to change where your videos are saved to, click the Folder button (circled in yellow) and choose a download destination. If nothing is chosen, it will default to your Downloads folder.

There are ways you can customize this program, but like I said earlier, this program is very very easy to use and does not require any tinkering whatsoever. You open it, download what you want, then close it. Nice and simple!
Twitch Downloader

Twitch Downloader is by far the BEST Twitch download program I have ever used. I've used several different ones, some which have broken because of Twitch's updates, others which have fallen into disrepair because their creator no longer updates the program, but this one has been working consistently for me for a little over a year now. I've kept it very close to my chest because I'm terrified it'll stop working one day, but it's better to share resources than horde them out of fear.
Pros:
HD quality for all downloads! Whatever quality the stream was, that's the quality the download will be (unless you adjust anything in the settings).
The best feature of this program is you can adjust how much you want to clip! Only want a 30 second clip from a 6 hour VOD? You can specify the section you want to download so long as you know the timestamps where you want the clip to start and where you want it to end.
You can download entire VODs.
When saving the file, it will automatically enter the original name of the stream and the stream date. (You can change this, but it's very handy when you're downloading an entire VOD and not a section of one).
It will automatically prompt you to update it when a new version has been released. (But you can opt out if you want to, for whatever reason).
There are a lot of other features available, however, I've never tried any of them so I can't say how well they work. The Github page has a lot of examples and a Q&A section though, so check that out if you're curious!
Cons:
Sometimes when you click "Get Info" it won't immediately load the VOD. This is pretty easy to solve by just restarting the program, so it's not a huge issue imo.
You can't preview clips before you download them, so you need to know the exact timestamps you want.
You can't download VODs that are privated or no longer on Twitch.
How to use:
Download Twitch Downloader from Github and install the version that works for your computer. (In this case, I would download the GUI Windows-x64.zip version. Make sure you're downloading the GUI version if you want a user-friendly version of this program).
Enter the URL of the VOD you'd like to download.
You can adjust the quality of the video and the length. If nothing is specified in the "Crop Video" section, it will download the entire VOD.
Once you're ready, click the "Download" button and you're good to go!

Other Recommendations
I'd recommend making a folder on your computer for clips. I find it very helpful to name all my files with this method: [Stream date] Streamer name - Something that helps me remember what this clip is about / something that will help me find it later, or a quote.
Example: [2-6-24] Mike - I hate capitalism
If you've got a significant amount of clips on your computer, I'd recommend backing them up and/or saving them to an external harddrive! (This is something I still need to do actually orz)
That's about it! I apologize if I've missed any steps, but hopefully everything is more or less easy enough for folks to understand! I'm someone who does not like downloading random programs onto my computer and I'm very paranoid about cyber security, but I've used these programs for over a year now, and they're very reliable and trustworthy. 10/10, I recommend both of them.
Lastly: if anyone has a recommendation for good Youtube clip downloaders, please please please let me know. I haven't found any good programs that let me specify how much of a Youtube video I'd like to download, and I am suffering. Help your friendly neighborhood Archivist so I can share more clips from the early days of QSMP.
how to clip (redneck ash atthebell edition aka not the most efficient necessarily)
my best methods for clipping & posting to tumblr
tl;dr use clipr for downloading clips from twitch, other methods vary by mileage
Keep reading
#mod talk#community resources#Resources#Resource#Clipping#Videos#FAQ#Oof that was a doozy to write but I wanted to make sure it was easy to understand how to use things
234 notes
·
View notes
Note
Hi Nia! You're gifs are so pretty! Is it possible for you to show how you get your WandaVision gifs too look so clear and hd? And how do you do your colorings too? (specifically the wanda maximoff in episode 3 gifset ITS GORGEOUS) I'm new to giffing and all the tutorials are kind of old. It's okay if you don't want to though! I understand it may be time consuming.
omg no! never feel intimidated to ask!! i don���t mind at all!
so, i’m going to show you how i made and coloured this gif
mostly bc it’s the only gif in that set w text and i’m going to share my text settings too!
tutorial is below :)
WHAT KIND OF VIDEOS ARE BEST?
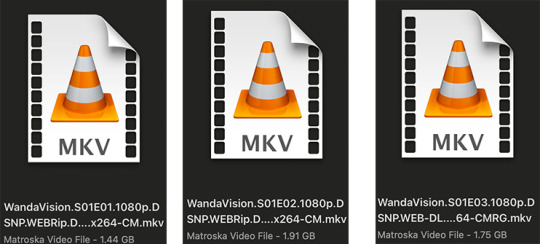
.mkv files (the bigger the better BUT i usually think anything above 5 gb is excessive and unnecessary for an episode of television BUT for a movie worth it) itunes downloads (logolesspro on twitter, hd-source on tumblr, live-action-raws on tumblr have some DEPENDING on what you’re looking for) (also, there’s a chance that if you search "show/movie hd download tumblr” you’ll find a tumblr with its itunes download available)
THAT IS IT NO OTHER TYPE OF FILES MAKE YOUR GIFS LOOK GOOD
- my suggestion is always if its new (like just came out the past month) t*rrent it! it’ll be downloaded quickly and .mkv files look the best! BUT if not check the sources above see who has the BIGGEST file if they even have what you’re looking for and then if not then you look to t*rrenting!!
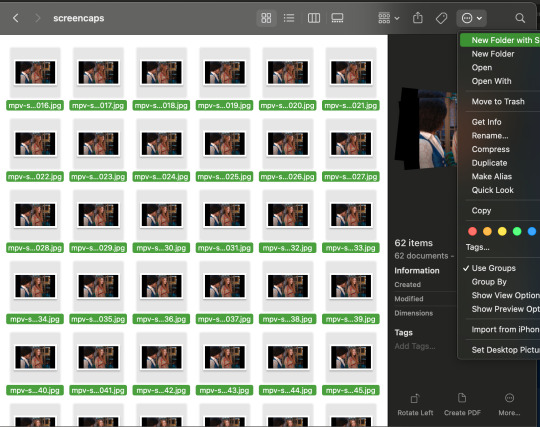
here are the wandavision files i use so you can see!!
SCREENCAPPING
-if you have windows use potplayer! i have a mac so i can’t show you how to use it and it’s not available for me :( HOWEVER back when i had a windows potplayer was the best method in screencapping!!
-I HAVE A MAC! so i use mpv!! (go to mpv.io and follow the directions) BUT DON’T DOWNLOAD THE LATEST ONE (it has a bug that skips frames) try each before the latest one bc from what i heard different ones work differently for everyone!! and i don’t know which one i use (yikes!) THERE ISN’T THAT MANY I PROMISE AND IT’S WORTH IT BC MPV IS THE BEST (i used to use adapter but they didn’t take impressive screencaps in my opinion and it was evident in my gifs you can see it too! )
create a folder for your screencaps! and make sure to rmb the directory order! now we want to create a text file on our built in textedit app on mac! type up all this down below (i like jpg but you can replace jpg w png if you want) AND SAVE THE FILE AS mpv.conf THIS IS IMPORTANT SO DON’T FORGET IT! save it somewhere you’ll find easily and NEVER delete it until you don’t use mpv anymore
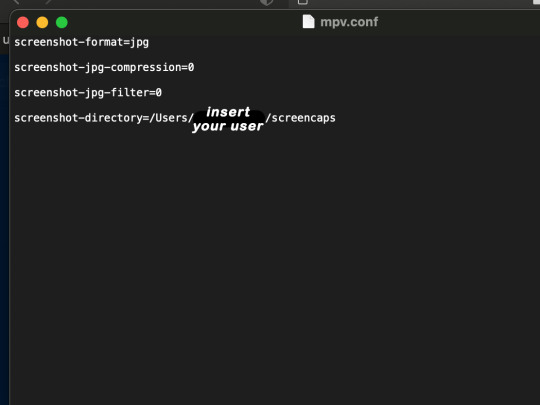
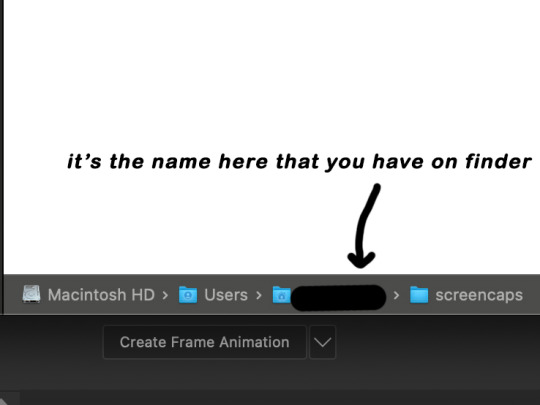
just in case you don’t know what to insert after, go to your screencaps folder
now you want to open mpv and go to the corner towards mpv -> preferences and they’ll tell you that there is no .conf file SO GO LOOK FOR THE TEXT FILE WE JUST MADE AND DRAG IT TO THE FOLDER THEY OPENED FOR US AFTER SAYING THERE IS NO .CONF FILE
(i learned all this from @kylos tutorial!! so if any of what i just said about setting up mpv makes NO SENSE to you check out their tutorial at kylos(.)tumblr(.)com/post/178497909311)
now we can screencap!
so let’s find the scene we want RIGHT BEFORE and MAKE SURE SUBTITLES ARE OFF
i pause and then press (option/alt + s) and then SCREENCAPS ARE BEING TAKEN!! and to end the screencaps being taken you once again press (option/alt + s)!!
now we want to delete the excess frames! and put it all into one folder!! DO NOT DELETE FRAMES IN THE MIDDLE OF WHAT YOU WANT TO GIF!! WHEN YOU SKIP FRAMES IT WILL BE NOTICEABLE!!

MAKING THE GIF
this method isn’t used that much BUT I LOVE IT so this is how i put my frames in! first i check to see the size of my frames: 1920 x 1080

so i create a NEW file on photoshop with those dimensions w these settings
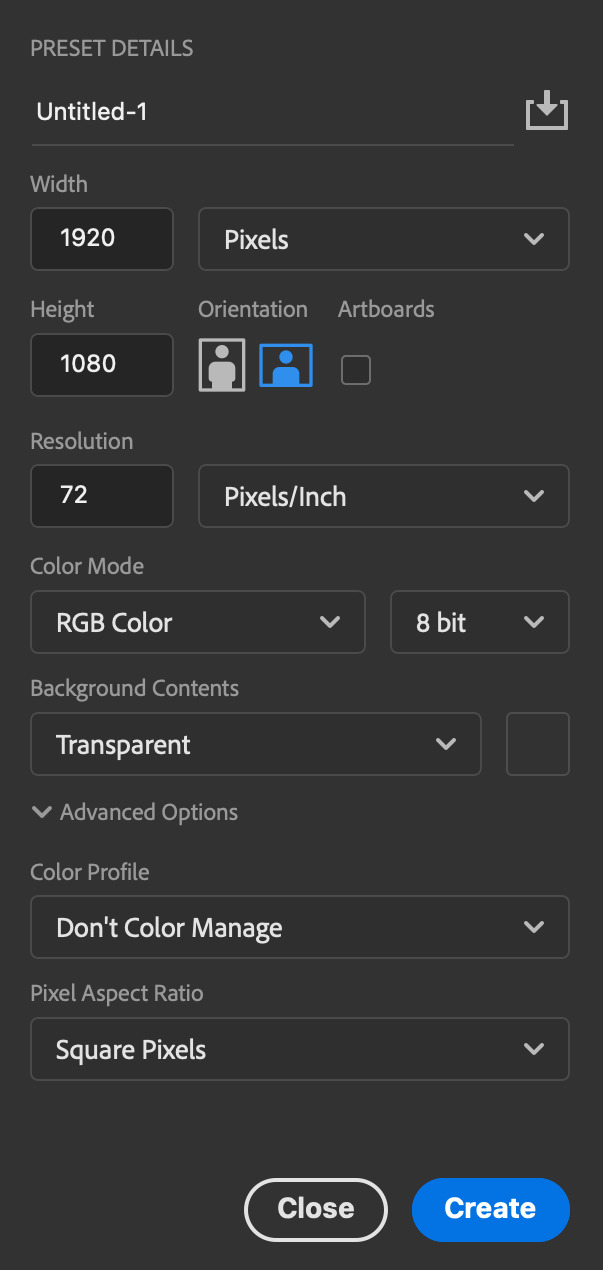
now i set my tool on photoshop to path selection tool bc if you have it set on smth like move tool or crop tool at the end you might end up moving or cropping frames you don’t want to!

ok so now we select ALL our frames and drag it on top of our new file on photoshop and the MOMENT we see our first frame in photoshop JUST KEEP CLICKING ENTER until all the frames are loaded!!

you can do file -> scripts -> load files into stack but it is WAYYY slower in my opinion!
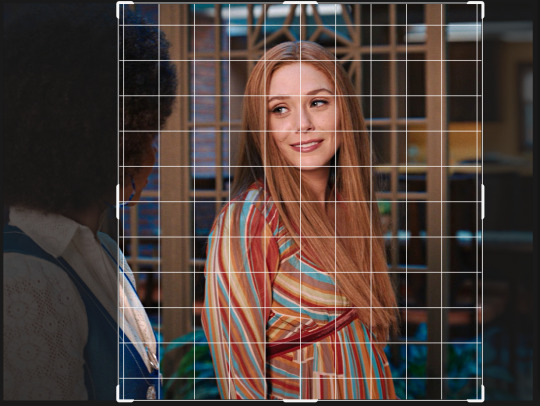
now i crop out the excess BUT i don’t resize the gif yet! the dimensions wandavision is filmed in is 4:3 so i go to crop and set the settings to this:

MAKE SURE IT’S ON RATIO SO WE’RE PRESERVING THE ORIGINAL SIZE JUST CUTTING OFF THE BLACK EDGES!! We are going from 1920 x 1080 to 1440 x 1080 this is the dimensions after i cropped

WE ARE KEEPING THE QUALITY BY NOT CHANGING THE DIMENSIONS OF ANYTHING INSIDE !!
now we want to go to actions and create an action!! open up actions w one of these two depending on what your dash looks like!!


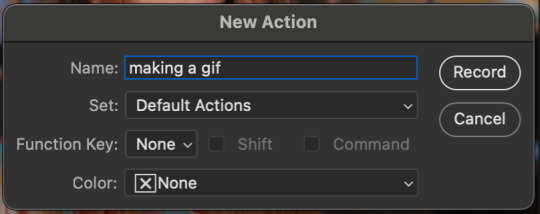
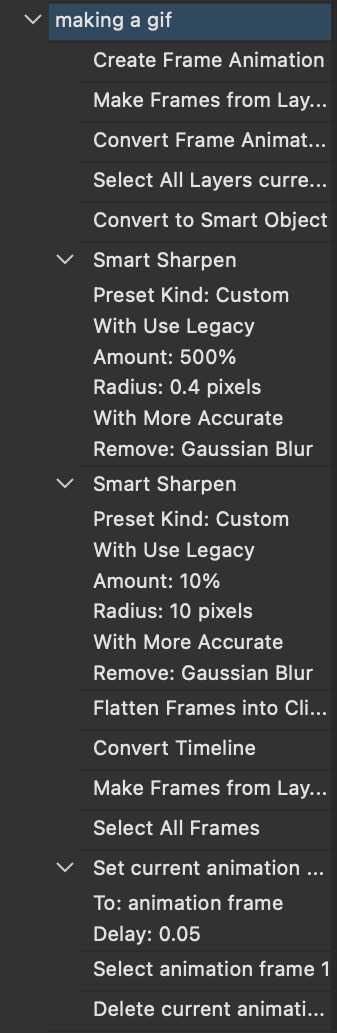
so we create an action with this button on the bottom of actions and we’re gonna title it making a gif and hit record!!

NOW LET’S GOOOOO!!
1. make sure you have timeline on your dash!

2. create frame animation (if you see create video timeline just click the arrow next to the button to see your other option which is frame animation!!)

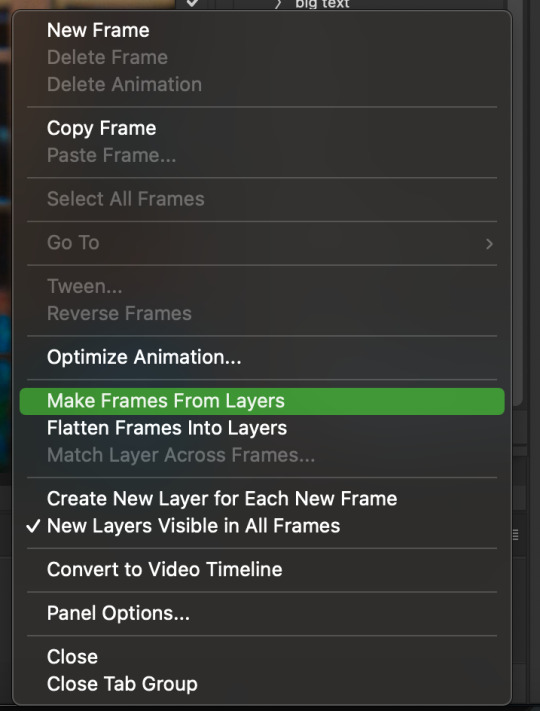
3. now let’s meet our best friend!! the little bar in the top right corner that has all the commands for making our gifs and MAKE FRAMES FROM LAYERS
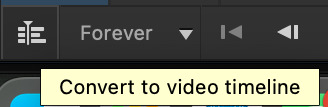
4. WE HAVE TO SHARPEN OUR GIFS NOW BUT TO DO THAT WE NEED TO CONVERT TO A SMART OBJECT SO NOW WE ARE GOING TO CONVERT TO VIDEO TIMELINE there are two ways: the button in the bottom left corner or the button in the top right corner w all the other commands!
5. select -> all layers DON’T MANUALLY SELECT THEM ALL BC THE ACTION WILL ONLY SELECT THAT SAME NUMBER OF FRAMES SO IF THERE ARE MORE FRAMES YOU WON’T GET THEM IN THE SMART OBJECT!!

6. filter -> convert for smart filters
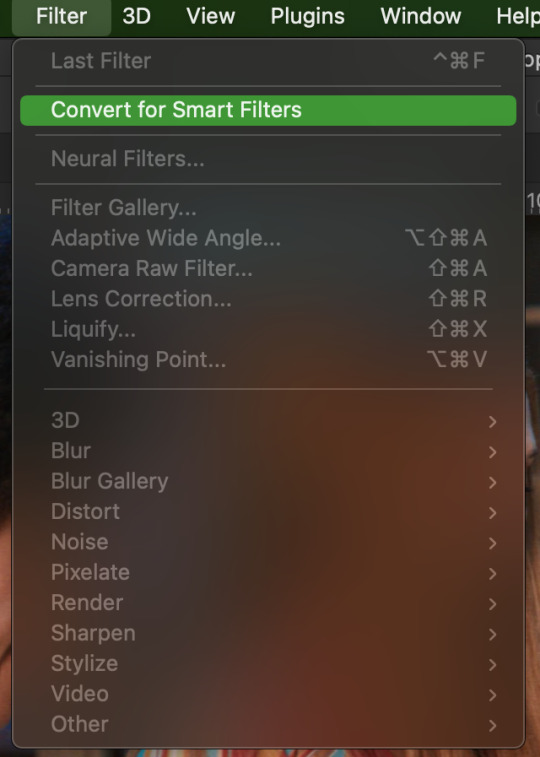
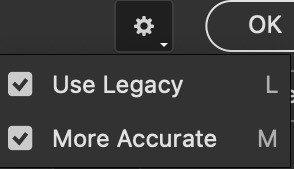
7. NOW WE SHARPEN!! (filter -> sharpen -> smart sharpen) i sharpen twice!! first, make sure we are on legacy w more accurate and remove gaussian blue! the first sharpening will be 500% with 0.4 px radius. NOW SHARPEN AGAIN (filter -> sharpen -> smart sharpen) also w legacy, more accurate and remove gaussian blur BUT this time 10% with a 10.0 px radius!


8. it’s hd now!! so let’s flatten frames into clips!! go to the top right magic button again!! and you should see a pop up saying layers are being made
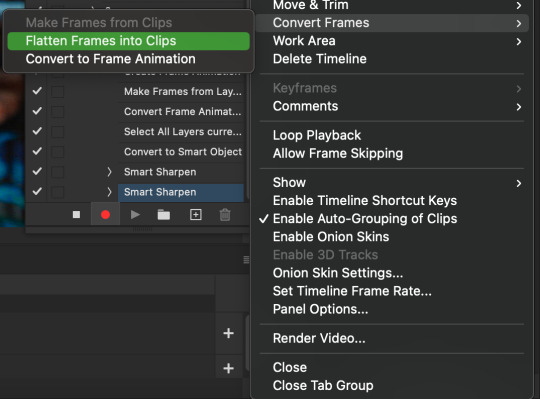

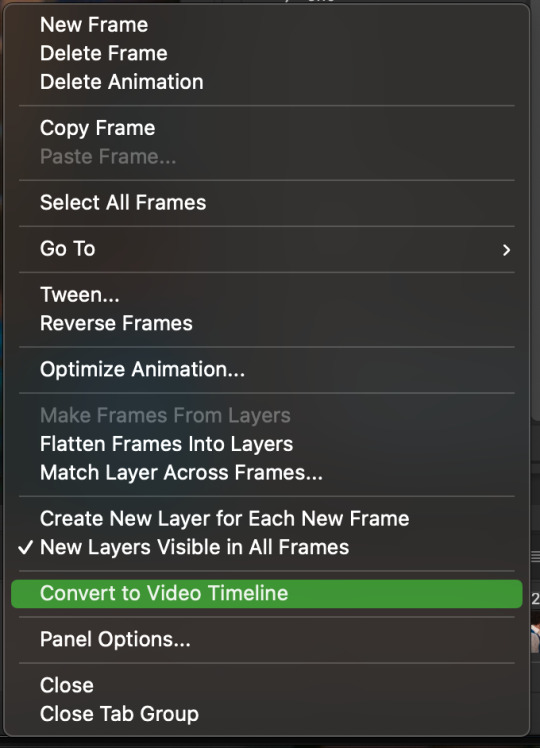
9. now we convert back to frame animation w either the bottom left button or our magic top right command center!
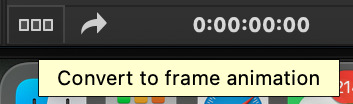

10. make frames from layers

11. select all frames w our magic command button
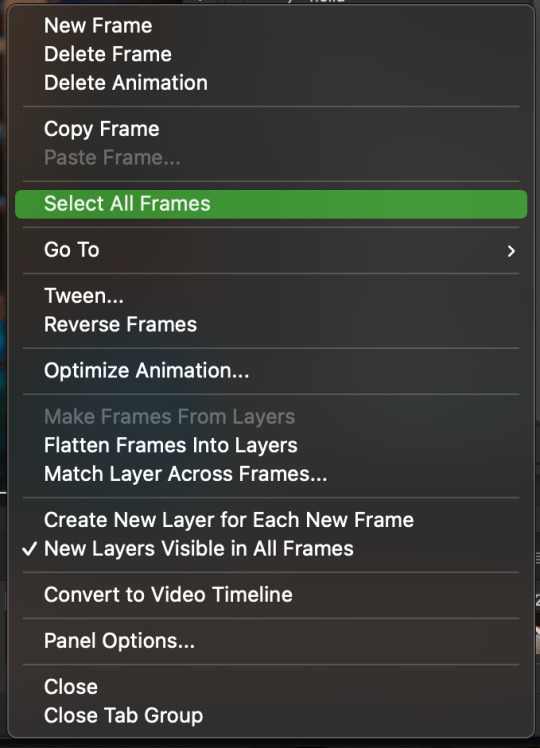
12. set the animation delay to 0.05 THAT IS THE BEST ONE ALWAYS ALWAYS ALWAYS only use 0.06 when the character is moving really fast in the video itself and it makes the gif itself look awkward BUT NEVER GO ABOVE 0.06 it’ll look slow and laggy and we don’t want that and don’t go below 0.05 bc then it’ll be tooo fast and we don’t want that either!


13. now delete the very first frame on the timeline bc it is an oversharpened duplicate of the second frame! end the recording w this button!

this is what your action should look like expanded! if you made mistakes on the way and it shows up you can just click the specific step and press the trash can on the action tab to delete in from the order!!
NOW AFTER LOADING YOUR FRAMES AND CROPPING THE EDGES OF YOUR FRAMES IF YOU NEED TO JUST PLAY THE ACTION AND THEN YOUR GIF WILL BE MADE FOR YOU!!!!
now i delete some unnecessary frames in the beginning and end and this is what my gif looks like (the size was 46 mb and the limit is 10 mb so the dimensions of the gif are 540 x 405 to get it to 5 mb BUT I HAVEN’T CROPPED IT YET SO THIS IS ME CROPPING JUST TO SHOW YOU WHAT IT LOOKS LIKE)

CROPPING THE GIF
in my opinion if you want your gif to look hd you shouldn’t crop before you sharpen!! i believe that if you crop before you sharpen you don’t allow photoshop to sharpen all the pixels whereas if you crop beforehand there is less to work with!!
dimensions is all up to you!! just make sure to go by tumblr rules!! 540 is the max width and if you want to make two gifs per row then my suggested width is 268 and for three gifs per row my suggested is 177 px! Just have the right width and the length can be whatever you want!!
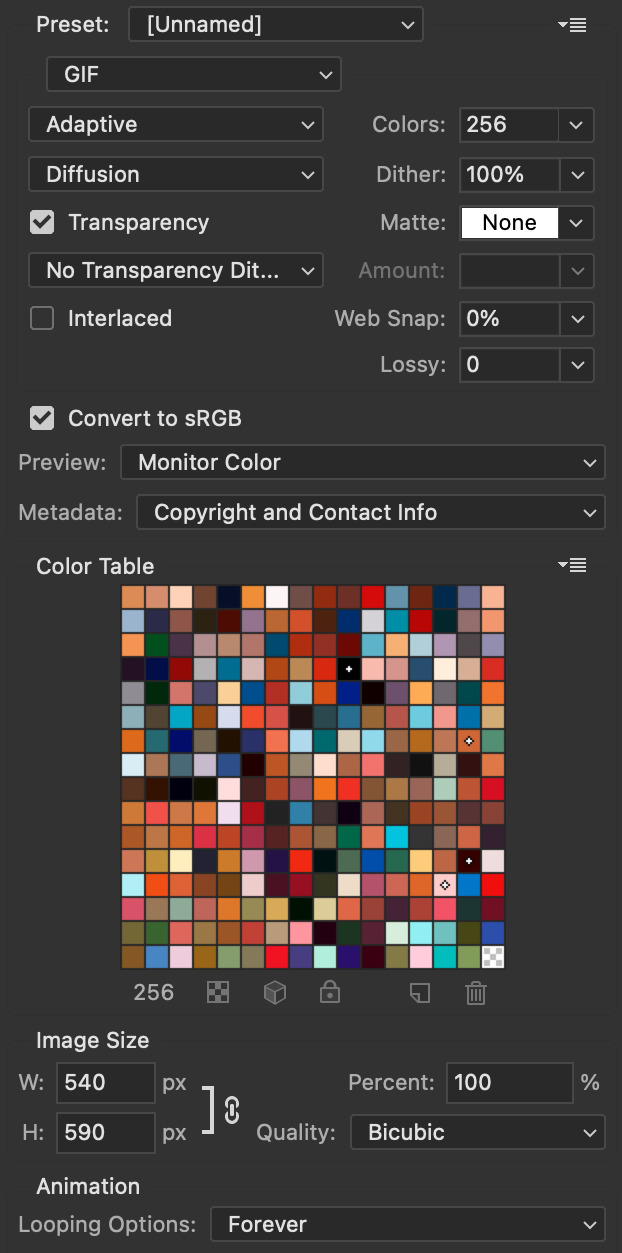
now i’m going to crop my gif to 540 by 590!!

NOW THIS IS WHAT MY GIF LOOKS LIKE!
COLOURING BASICS
let me show you the best adjustment tools in my opinion and a brief explanation for what they do!!
brightness/contrast: pretty simple increase/decrease the brightness/contrast BUT one of my techniques for when i first start colouring a gif is i select all my frames and do nothing to the settings of the adjustment but i set the layer to screen LIKE THIS

curves: ik others use curves to change brightness/contrast w the squiggly thing BUT i like it to set a white point and black point, this is also a technique i use when i first start colouring a gif when screen doesn’t look good for me SO you use white point to select a pixel on the gif to set as the lightest color on the gif (setting the white point) and you use black point to select a pixel on the gif to set as the darkest colour on the gif (setting the black point) usually the white point makes it TOO bright and that’s why we use the black point to counter it and same goes for when i use screen with brightness/contrast, it gets too bright so i use black point to counter it below is the button for white point and the button for black point, respectively they are shaped as color picker tools


vibrance: generally, i never use this except for color p*rn sets but they work really well in making colors seem more strong
hue/saturation: like vibrance, i never use this except for color p*rn sets but this adjustment is to help change the colors or hue of a color for example: turn blue into purple or turn a blue into a little lighter shade of blue
color balance: I ALWAYS USE THIS!! except for in black and white gifs BUT THIS IS MY GO TO AND IF I DON’T USE IT MY GIFS ARE JUST BLAND i feel like color balance is what essentially balances the colors on your gif and adds dimension to it, it makes your gif go from looking way too yellow to a more golden neutral look and it is an essential adjustment in my opinion
channel mixer: i rarely use channel mixer BUT it is so so useful when you are working w a dark scene just play w the settings and all of a sudden all the blue in a dark scene will be a little more yellow and red and your scene will kind of just look brighter and more visible
selective color: THIS IS ALSO AN ESSENTIAL this helps SPECIFIC colors pop you’re working on a scene where there is too much red on someones face you use this tool to remove the magentaness from the yellow section OR when you feel someones face is TOO yellow and needs more blush you add more magenta in the yellow section of selective color
gradiant map: gradiant map is perfect when you’re lazy if you feel like your gif looks more neutral and you want some red in it but you don’t want to mess with any other adjustments just set a red to black gradiant on soft overlay with a very low opacity and BOOM slightly red but not too much red added!
NOW TO COLOR THE GIF!
today i have decided to start with a brightness layer set on screen
and this is what we got!

now that’s a little to bright and washed out in my opinion SOOOO to counteract it, i’m going to use my black point tool in curves and i’m going to select this point on the gif (it’s better to choose smth in the background and not smth that’s paid attention to such as monica’s hair or either of their eyelashes)

now my gif looks like this! the base color is complete!

now i think i need to balance all this yellow and red! SOOOO WE GONNA USE COLOR BALANCE!!
i think the best way to use color balance is to keep swinging the balancer until you see what you like and then keep going midtones i think i want more red and i don’t want a cyan midtone and then for shadows i think i want more cyan to counter the redness of the gif but highlights i don’t touch that much NOW HERE ARE MY SETTINGS SO YOU CAN SEE

and this is what my gif looks like

now you can stop here if you want but in my opinion i think the gif looks a lil too dead still SO IMMA USE SELECTIVE COLOR
i think there needs to be a lot lot more RED so i amp up the yellow magenta and black in the red! but i also think the yellows need to be LESS RED so i remove magenta from the yellow! and bc there’s some cyan and blue bc of monica and the flowers in the background im going to make the cyans more cyan and the blues a lil more black! i’m going to remove some yellows from the magenta!! and i add more black to the neutrals and black!! i think it’s always important to add more black to neutral and black bc it adds more depth to the gif by not just making it a bunch of bright colors and having dark colors to contrast to!! my settings are below!

and the result!

now let’s see everything together!

and the before and after!

I HOPE MY COLOURING EXPLANATION MADE SENSE!! if not you can always ask me more questions i don’t mind!!
ADDING SUBTITLES
we want to grab the text tool!
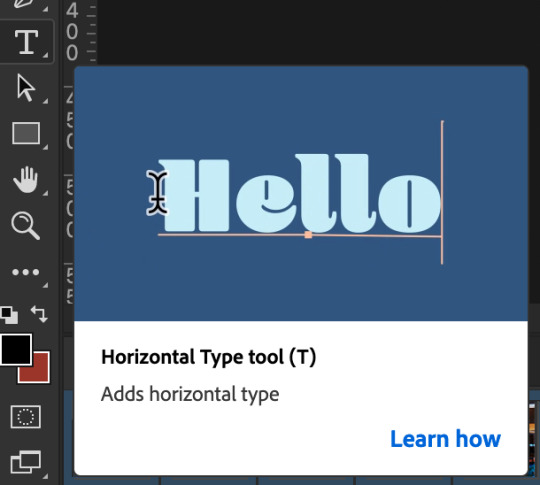
make a text box from anywhere in the middle from the left to right edge. this is so we can make sure our text is centered and will be in the same place for when we have sets w more than one gif w text!

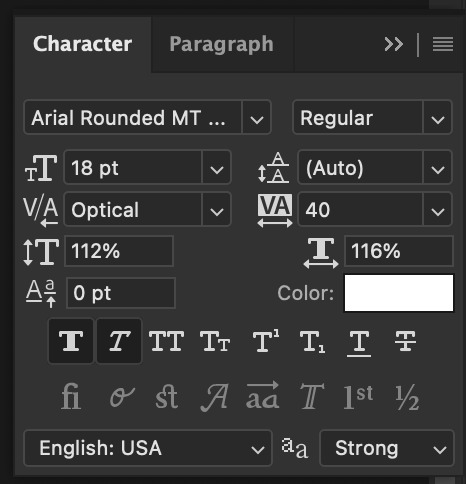
type your text out and make sure you highlight the whole text so that all the settings apply to EACH character! you can find the alignments (for center) in the paragraph tab!

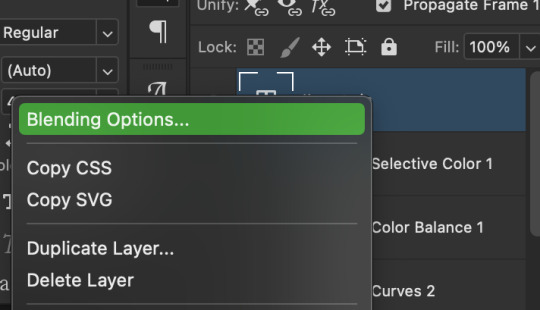
now lets right click on the text layer and go to blending options! add stroke and drop shadow!


now drag it to the desired height you would like and make sure to keep it in mind for when you have more than one subtitled gif in a set!
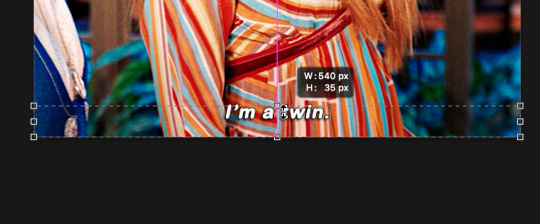
NOW TO MAKE SURE THE TEXT STAYS IN PLACE AND THE BLENDING STAYS YOU HAVE TO CONVERT TO SMART OBJECT!!

if you want to only have the text applied to certain frames instead of all frames, select the frames you don’t want by clicking the first frame in ur don’t want section ON THE TIMELINE and WHILST HOLDING SHIFT click the last frame of ur don’t want section and then toggle the eye switch next to the text layer
now you see the text

now you don’t

tip: use opacity to fade the text in and out!
the text is going to be on all my frames so i don’t need to toggle the eye but i just wanted to show you just in case!!
now here’s my FINAL RESULT

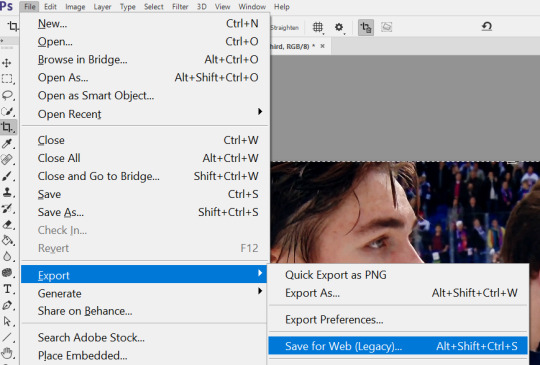
save for web (file -> export -> save for web)
your gifs have to always be under 10 mb! so, if your WAYYY overboard YOU HAVE TO DELETE FRAMES! or you can divide the gif in two and have two gifs instead of one! however, if you plan on going the deleting frames route MAKE SURE YOU DELETE FROM THE BEGINNING OR END OF YOUR SELECTION i promise you that most of us won’t notice that your characters dialogue is being cut off BUT WE WILL NOTICE IF FRAMES ARE BEING SKIPPED so, don’t delete frames in the middle of ur gif!! idc how little you do it IT WILL RUIN YOUR GIF AND I SAY THIS FROM EXPERIENCE i would delete every fifth frame to cut down my gifs and that may seem like not that big of a deal BUT IT IS my gif looked choppy and poor so it is way better to cut from the end/beginning of the gif
ANOTHER LAST PIECE OF ADVICE in the bottom left of when the save for web menu shows up THERE’S A PREVIEW BUTTON click on it! it’ll show you your gif on your default browser and show you what it’ll look like once uploaded! this is perfect to check the speed of ur gif and the colouring and to notice if there’s a problem with your subtitles or maybe there’s an obvious jump in frames you never noticed before!! i always use preview bc the built-in photoshop viewer of ur gif shows the colors differently and the speed is NEVER ACURRATE!
I USED THESE SAVE SETTINGS!! many say to use selective pattern but i DISAGREE and i think these save settings are the ✨ best ✨
OK NOW THAT IS THE END OF THIS VERY LONG GIF TUTORIAL!! I HOPE THIS IS WHAT YOU WANTED!! IF YOU HAVE ANY QUESTIONS DON’T BE AFRAID TO ASK I SINCERELY DON’T MIND!! JUST DON’T BE RUDE OR ANYTHING BC PPL HAVE BEEN RECENTLY :(
I WISH YOU ALL THE LUCK AND FUN IN YOUR GIFFING ADVENTURES !!
#tutorials#asks#sourceblog#allresources#completeresources#itsphotoshop#dailyresources#resourcemarket#chaoticresources#onlyresources#hisources#sibylresources#dailypsd
418 notes
·
View notes
Video
youtube
tree Explains Things 01: SnapMotion
In this tutorial I talk about using SnapMotion to create caps from video clips for the purpose of making gifs. (I recommend viewing this on YouTube for better quality and a larger video size.)
Please note that I'm not affiliated with SnapMotion or its creator in any way and there's nothing in it for me if you choose to purchase SnapMotion for yourself. Obviously, I recommend it, but do investigate your options, as there may be something out there that's better suited to you.
(This transcript is approximately 60% accurate to the tutorial and 40% me condensing my waffle into more sensible narration.)
--
SnapMotion is a Mac OS X program available to buy at the App Store. (As far as I'm aware, there are no releases for any other operating system.) It's fairly inexpensive: AUD $7.99 when I bought it two years ago. (In the video I said $12, from memory, but then I looked up the receipt email to confirm and found myself $4.01 wrong.) Considering that I've made thousands and thousands of caps in the couple of years I've been using it, I've definitely gotten my money's worth.
SnapMotion has two modes: what I call photo mode and then batch mode. Photo mode is good for one or two caps, but to extract caps in bulk you'll be using batch mode. (Something I forgot to mention in the video is that dragging your file to the SnapMotion icon will open it in photo mode by default. In order to access batch mode, you have to open the program and select it.)
Selecting Show Batch Mode takes you to the batch mode work space. Here you can drag and drop your clip or click the plus sign to add it. Once you've loaded a clip, select it in order to access the Add Batch Tasks menu.
One of the things that I particularly like about this program is that all the information you need about the file is clearly set out. In particular, it shows you how many frames per second you're working with. This is important because the fps rate determines how many frames you want to extract from a clip.
--
Why? Because math.
All the sources I've worked with have an fps rate of either 24 or 60. That number tells you how many individual images are contained in one second of video. Obviously, there's a considerable difference between 24 and 60, and that affects how many frames you choose to extract.
I've found I get the best results by extracting every other frame from 24 fps sources and every fifth frame from 60 fps sources. So:
24 fps = 2 (or 1/2 ← why does Tumblr do that?? I hate that!) 60 fps = 5 (or 1/5)
(That gives you roughly 12 caps per second for both sources. I say 'roughly' because, as you can see on my screen, the fps rate is rounded to the nearest whole number. 24 fps is actually 23.7 fps, so that missing .03 can have a cumulative effect.)
I find this is the best compromise between having smooth, natural looking motion in your gifs and keeping your file size within Tumblr's constraints. (I'll talk more about that in the next tutorial.)
--
Tools
The green bar is obviously your clip timeline. The cursor defaults to being in the centre for some reason. You have start and end caps (or whatever you call them) that define the start and end points of your extraction. The left and right arrow|bar buttons move your cursor to the start or end cap respectively, and between them is the play button. To the left are the transformation options. I've never used them, so I don't know what they do. (If you decide to experiment, please report back about your results!) To the right of that is the volume icon, which allows you to hear sound from your clip during playback. I don't find it useful, so I don't bother. The tortoise icon allows you to adjust the speed of your playback (left is slower, right is faster in case that’s not obvious). The arrowheads on the far right move your playback cursor to the start and end caps respectively.
Add Batch Tasks
This is where you specify the parameters for the batch.
Mode: there are four options. I primarily use Every X Frames. As this is a 24 fps source, I want to extract every 2 frames, so I use the value 2. When I type my value in and then press tab, the bottom of the panel shows the number of frames that will be generated from my selection. If I process this selection, SnapMotion will create twenty-five images. But because I moved the start and end caps earlier, and I actually want to extract frames from the whole clip, I need to adjust them. When I tab through my X value again, I see an updated number of generated frames.
I always include the Starting and Ending frames because I trim my clips to the exact frames I want (unless I'm being lazy).
Max size: This refers to the width of the image in pixels. (Technically, it refers to the maximum size of the largest dimension, but since video sources are universally landscape oriented, for our purposes this number will always refer to the width.) The default setting is 4,000 pixels and since the source clip is 1920 pixels wide my caps are going to remain 1920 pixels wide. However, if you know what width you want your eventual gif to be and you don't want to go through the extra step of resizing it in Photoshop, you can use this setting to do that for you. For example, if you want your gif to be 540 pixels wide you would enter 540 in this field. When you process this batch, SnapMotion will resize each frame it extracts to a width of 540 pixels with a proportional height. (Yeah, I said width at first and then I had trouble getting out the word height. Talking is hard!)
I don't use this feature simply because sometimes I change my mind, and I would have to rerun the batch if I did. (This isn't a big deal for a single shot like this, but if you're working with a whole scene that contains hundreds of frames, it's a hassle.) I also reuse caps sometimes. As you probably know, if you follow my Longmire gifs, sometimes I do a full scene using small gifs and then I go back and do large versions of some of the Vic shots. (Because I love her so.) And sometimes I make other graphics. In those situations, I want the image at its original size, so that I can resize or crop it the way I want.
Format: I prefer PNG.
Override: this tells the program what to do when a file with the same name already exists in the destination folder. The options are Replace existing files or Use alternative name. They're probably fairly self-explanatory (but just in case, I included a note).
Errors: I don't think I've ever had an error in this program. You can choose to generate a log file with each batch, but I kept getting logs that said "no errors" every time I ran one and it was annoying having to constantly delete them, so I switched to No error handling.
Headline/Credit: I believe this is like watermarking your images. If you want to watermark your gifs (I honestly don't see the point but some people do it), I think it'd be a lot easier to do it in Photoshop (or whatever program you use for image editing).
Export: this is where you specify the destination for your extracted image files. Click Choose to open the menu from here. Alternatively, when you're ready to process a batch, click the red button (aka the "Do the Thing" button according to me when I recorded this), and if there is no destination already specified, it will prompt you for a location.
Once you've clicked the Do the Thing button (yeah, I'm just leaning into it now), SnapMotion will display Task Added. If you look at the top of the window, you'll see a progress bar showing the percentage of completion as it processes.
When the images are fully exported, you'll see All Tasks Done and also an alert if you've selected that in your preferences (which I haven't gotten to yet but it's coming up). If you go to the destination folder, you'll find all the images that have been extracted. That's it!
--
I want to address the syntax for how files are named because I found the options very confusing to begin with. The default syntax made no sense to me and it took me a while to configure something that did. File names are defined in the program preferences, so go to the SnapMotion menu, select Preferences, then select the Batch tab.
Number of concurrent snaps: how many frames should be extracted at the same time. This has an impact on your RAM usage and also impacts how long it takes a batch to run.
Alert users with: this is where you choose whether or not you want a notification outside the program. It's useful if you're running a larger batch in the background and therefore don't see the All Tasks Done message.
Output name format: these are the elements I use:
<movie_name> = the title of your clip file
hyphen
<time_seconds> = the actual second position of the frame within the clip; for example, a frame that was extracted at 14s would be numbered beginning with 14. This parameter converts durations of 1 minute+ into seconds, e.g. 60, 61, etc.
<frame _index> = the running number of the frames extracted in the batch, beginning at 1. The position of this number depends on the total number of frames you're extracting. From 1 to 99 frames, the number will be 01; from 100 to 999 frames, the number will be 001. I've never extracted more than 1,000 frames, but I assume in that situation you'd begin with 0001.
If I were extracting 40 frames from my clip beginning at 14s, then the numerical portion of my file names would start at 1401. If I were extracting 120 frames, then the numerical portion of my file names would start at 14001.
<image_extension> = the file format you've specified
So, my file names are constructed like this:
<movie_name>-<time_seconds><frame _index>.<image_extension>
And the files from the batch I've just run look like this if you separate the elements:
1x05_2206 - 0 01 . png
In this batch, the seconds run from 0 to 3 and there are 34 frames in total. The first number column represents <time_seconds>, while columns two and three combined represent <frame_index>. You can see that the numbers in columns two and three are sequential from 1-34, whereas the numbers in column one aren't. That's because I've extracted multiple frames per second. Caps 1-7 were extracted from the first second of the clip, caps 8-18 from the second, caps 19-31 from the third, and caps 32-34 from the fraction of the fourth second.
This naming system is what works for me, but you should experiment with the options so that you can construct file names that work best for you.
--
The last couple of things:
You can import multiple clips either individually or at the same time.
You can delete a clip by selecting it and clicking the minus button.
--
And that's SnapMotion!
If anything is unclear or I've omitted something that you wanted to know about, please let me know. Thanks for watching and listening (and reading). Next up, I’ll be explaining the process of importing your caps into Photoshop and creating your gif file.
2 notes
·
View notes
Text
Gif Tutorial
I was recently asked for some tips for making gifs, so I thought I’d make a tutorial show how I make mine. I’m using Photoshop CC 2017 for this, but I think the steps should work for most versions of Photoshop. I previously used CS6 Extended but this version has disappeared from my laptop and left me with basic CS6 which I wasn’t able to gif with.
I download my video clips from Youtube or screen record from documentaries/other sources online.
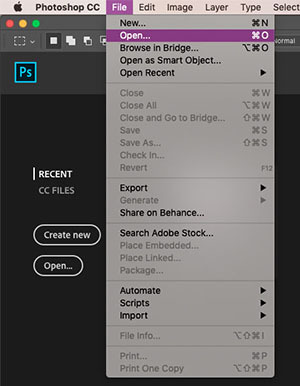
1. First open your Photoshop program and go to File > Open and open the video clip that you have saved.
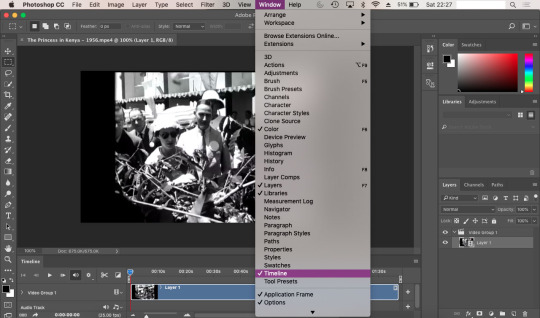
2. Once you’ve opened your video, you need to make sure the timeline window is open, to do this go to Window > Timeline. If you want to use the clip you’re using to make a single gif, rather than taking clips from a full video, then skip to step 5.
3. To save separate clips from a long video you need to adjust the dials below the time markers. To avoid having a gif that’s too large to upload to tumblr and also too long, I suggest keeping your clips to no more than 6 seconds (this may depend on your clip). You can zoom in closer to the time markers to see a more accurate time including seconds by using the slider tool at the bottom of the timeline window. Sliding towards the smaller mountain zooms out (showing the full clip length as in the screenshot), the bigger mountain zoom in, allowing you to see the seconds and create a more accurate clipping. Use the play button to the left of the window to play through your clip and adjust the dials as you wish.

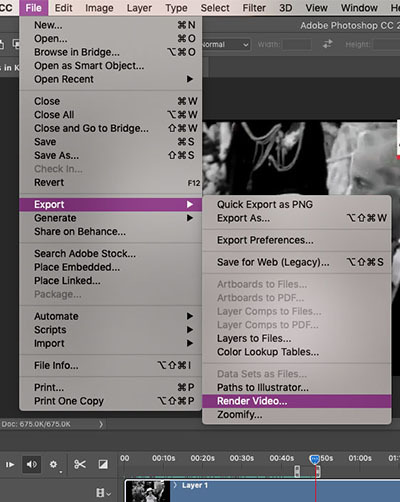
4. Once you’ve selected the clip you want to use, it’s time to save them. Go to File > Export > Render Video. A new window will open, where you can rename the clip and select a folder to save them to. You can ignore the other options.
You can go back and repeat step 3 and 4 as many times as you like to save the clips you want to gif. Tumblr has a limit of 10 images/gifs per post, but some tutorial and resource pages will show you how to put two gifs on to one canvas so you can upload more than 10 at a time.
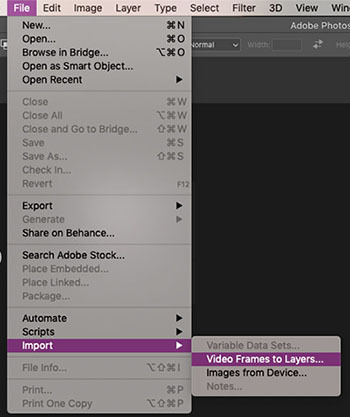
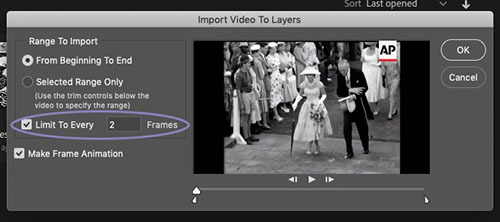
5. To start giffing, you need to import those clips you just saved. File > Import > Video Frames to Layers. As mentioned in step 2, if your video clip is short already then you don’t need to go through steps 3-4. Once the next window opens, you need to make sure that ‘Limit to Every 2 frames’ is ticked.
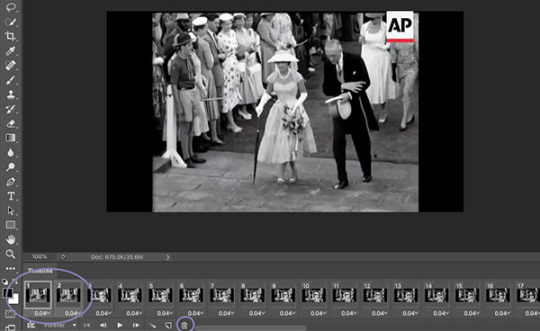
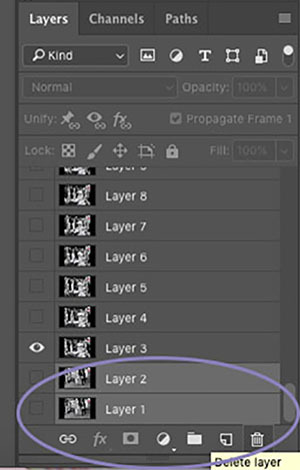
6. When I created my clip using step 3, there were some frames left over from the previous shot which I don’t want in my gif. To get rid of these, just select the frames you don’t want and you can either press the delete/backspace button on your keyboard, or click on the little bin icon. Now that you’ve deleted these frames from the timeline, you need to do the same in the layers window. Be sure not to delete the frame with the eye icon as this is now the first frame of your gif. You may need to have a scroll to the last frames in your clip, to check there aren’t any other excess frames you don’t want. If so, just follow these same steps.
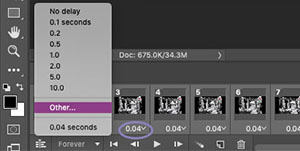
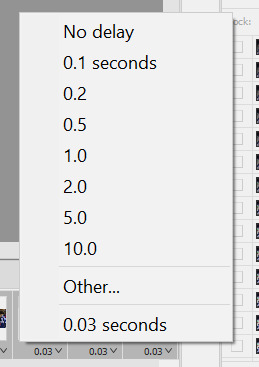
7. Next up we’re going to set the time delay between frames. This will determine how fast or slow your finished gif loops. To do this, you need to select all of the frames on your timeline, and click on the arrow next to the number shown (typically defaults at 0.04). The seconds shown in the list will make your gif run super slow - this is the delay between each frame, so if you select 5.0 there will be a five second delay between one frame and another. So, to choose your own time, select ‘Other’. For me, unless my chosen clip is super short where I might want it to loop a lot more slowly, I try to have my gifs play in as close to ‘real time’ as I can. I set my delay at 0.06 seconds and adjust it later on if needed. You can always press the play button and see how your gif runs, but this isn’t usually an accurate playback speed.
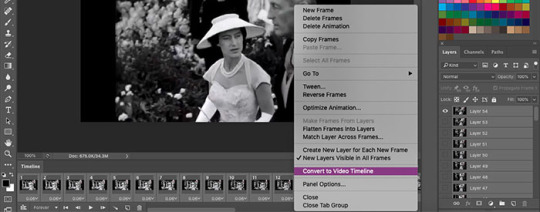
8. Once you’ve done this, you need to highlight all of the frames in the timeline window and all of the layers in the layer window. Next, click on the button that looks like three lines, on the right side of the timeline window and select ‘Convert to Video Timeline’. Then, in the layers window, right click one of the layers and select ‘Convert to Smart Object’. This will compress all of the layers into one, but will still be playable.
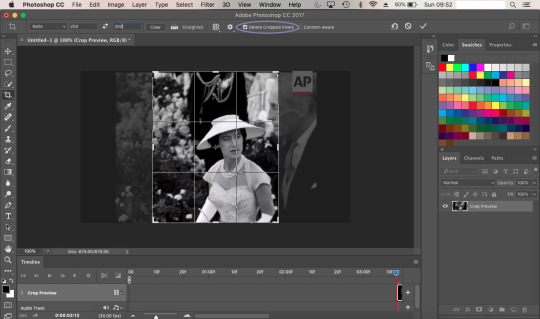
9. Now we’re going to crop your gif. First, you might want an idea of how what kind of layout you want for your gifs - this will depend on how many gifs per set you want. If you’re just making one gif, then set your crop with to 500px and your height to whatever works best (250, 300, 500 etc). Two gifs per set (if you want them side by side) need a width of 245px, three gifs side by side need a width of 160px. Before you crop, you should make sure that on the top bar ‘Delete Cropped Pixels’ is unticked. This will allow you to move your frame and re-crop the area.
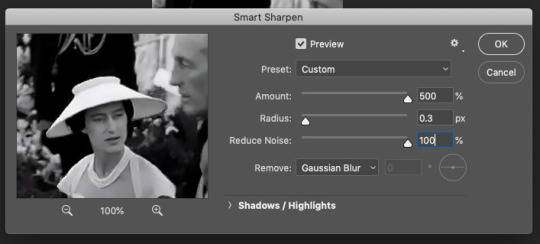
10. Once you’re happy with your cropped area, it’s time to make some adjustments. For my gif, I want it to have a width of 245px and a height of 300px. To change the size of your image you need to go to the top menu bar and select Image > Image Size. Make sure the measurements are set to pixels. Next we need to sharpen the image, so we go to Filter > Sharpen > Smart Sharpen. I always have mine set to 500% for the Amount, 0.3px for the Radius. In CS6, Smart Sharpen didn’t have an option to reduce noise, so I just set this to 100% as this seemed to work best for the quality. It helps if you have Preview ticked, so you can see how the adjustments affect your image.
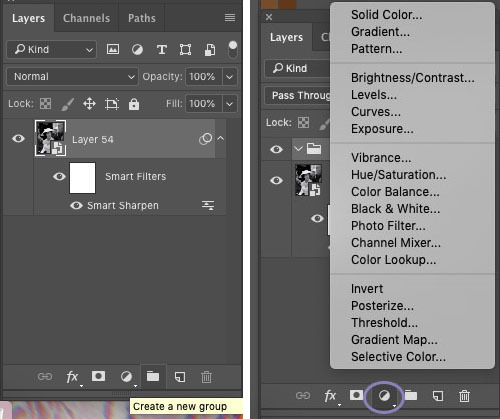
11. Now it’s time to start applying filters! To keep everything together in one place, you’ll want to create a new group so click on the little folder icon at the bottom of the layers window. Then click on the round icon to the left of it - here are your adjustment options. Have a play around with these and see which ones work best for you. Click on the eye symbol next to the adjustment layer will turn the layer visibility off, so you can see the effect it has on your image and see if you need to make any changes.
I tend to edit all of my gifs in the same style, the only difference being the options I use for black and white gifs, and those for colour. My basic go-to adjustments are Brightness/Contrast, Levels, Selective Colour (W/N/B for B&W, all colours for coloured gifs). To create a level tone for my B&W gifs, I apply a Gradient Map, fading from black into a very light grey. Colour gifs - I play around with Vibrance, Hue/Saturation and Colour Balance. It doesn’t hurt to play through your gif while you’re editing, to see if the settings your using work for all frames and not just the cover.
12. Once you’re happy with your gif, we need to save that masterpiece. Go to File > Export > Save for Web (Legacy). Some version of PS might just say ‘Save for Web’. In the next window, the only thing you need to do is select ‘Forever’ in the Looping Options drop down menu. Here, you can also check the size of your gif and make sure it’s below the 3MB limit. If it’s over, then you may need to go back and cut the length of your clip a little by adjusting the sliders in the same way as in step 3. If it’s a tiny bit over the limit, shaving a second or two off of your clip should be enough. If it’s over by a lot then you may need to split your gif into two. Again, following step 3, you can simply adjust the sliders to split the timeline into two sections. Once you’ve done this try saving again and check the size. When you’re happy, all you need to do is click Save and you’re done! You’ll need to do this for every clip you want to gif. The more you gif, the easier it’ll become and you’ll find your own rhythm where it may take only a few minutes to make one gif.
As mentioned earlier, if your final gif playback is too fast/slow all you need to do is drag and drop the finished gif back into PS and adjust the time delay as per step 7. You can change this and save it again as many times as you like until it’s right for you.

** TIP ** Never close your tab window until you’re 100% happy with your gif, to the point that you’ve uploaded it. If you’ve noticed a mistake or a problem with your gif this allows you to go back and edit it without having to start over again. Also you can save your work in progress as a PDF at anytime. Trust me, there’s been many a time where I’ve closed my window and had to start again if there’s been a mistake.
23 notes
·
View notes
Text
gif tutorial
alright so i was asked for a tutorial on how i make my gifs, so here it is!! this one will focus mostly on how i make my live game gifs for baseball or hockey. as far as what i use, i use either obs studio or the xbox screenrecord function on my laptop for recording game clips. then i use photoshop, currently ps cc 2017, to actually make my gifs.

how i made this gif from this gifset. this will be split into parts to make it easier if you only want to know about certain elements of the process!
screen recording:
i’m going to focus on obs studio, as it’s what i use more often, and as far as i know, anyone can download it, but i have no idea what’s up with the xbox software i use, lmao.
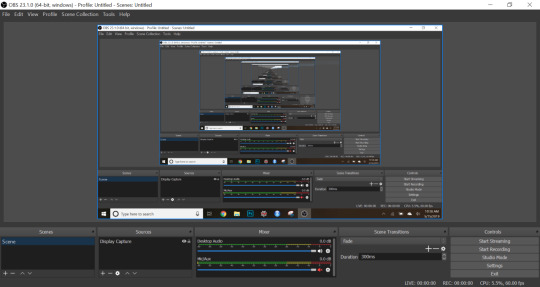
this is what it looks like when i open it. currently, i use the display capture setting as my source, and i will show you how to add that, along with some other settings i use and shortcuts.
alright so at the bottom of the window, there’s the source panel, it looks like this:
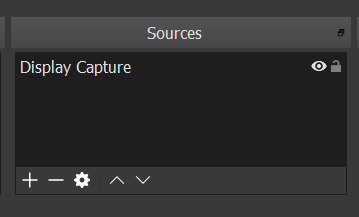
i already have a source added, the display capture. this means that it will record whatever i’m displaying on my screen currently, which is how i like it, as it makes it easy to know what i’m recording. i’ve never messed around with it much, to see what the other options do, because i’m lazy and this does what i need.
to add the source, click on the little plus icon at the bottom of the sources panel. a menu will pop up, and you can select any capture option, and as you can see above, i use display capture.
moving to the right, there’s the audio panel:
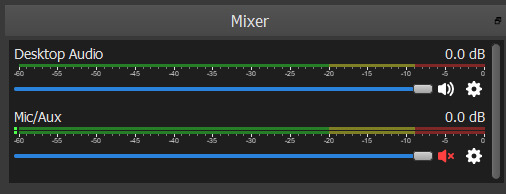
my personal preference is to keep the desktop audio on, and turn the mic/aux audio off. this way if i need the clip later, especially if it’s a video of something especially cute or whatever, i’ll have it and be able to use it. if you have the mic/aux on, it will record whatever sounds you’re making on top of the desktop audio, leading to weird noises mixed in with the video audio.
and finally, moving to the right again, there’s the controls panel:
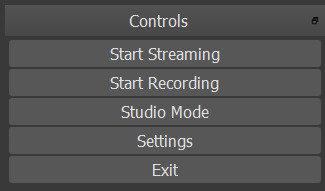
this is pretty self explanatory, here is where you can start/stop a recording, access the settings, or exit the program. i don’t use these start/stop buttons, but that’s because of a shortcut i will show in a second.
this is pretty much everything i deal with on the main page. there’s a ton of other options/information/things, but i haven’t messed around with them too much, so i’m not sure what a lot of them do.
next i’ll show the setting i change/use. this is what the setting page looks like when you open it using the button on the control panel:
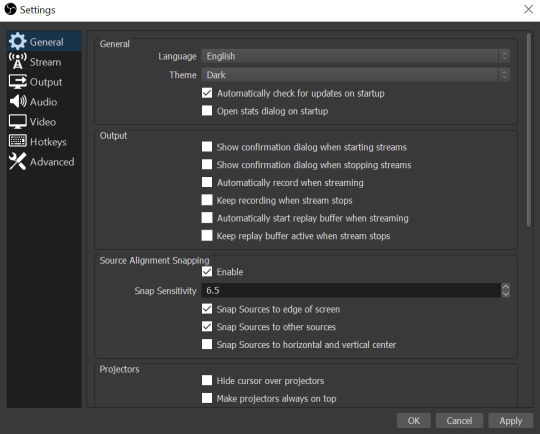
now i ignore most of the tabs on the left, because i’m only using obs for screenrecording, and not for livestreaming. i do change things under ‘output’ and ‘hotkeys’.
output:
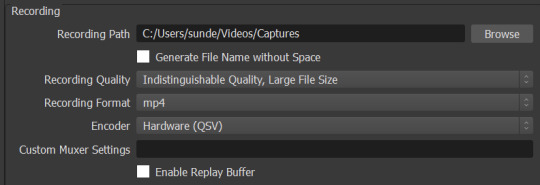
here i’ve changed the recording path to go to a specific folder rather than the general one it will send it to. during the hockey season, when i’m possibly making gifs for 3 games at a time i change that folder to one for whatever the date is. during baseball season, i’m less likely to be doing as much so i put it in a general folder that i sort out later.
i don’t remember what the automatic settings are for recording format, but i believe i had to change it to mp4, which is what i need/use for my method of making gifs.
hotkeys:
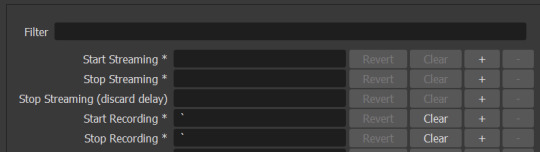
this is just a little short cut, but i added these hotkeys so i can start and stop recordings without needing to flip to the software, as long as it’s going in the background. i chose this key because it’s one i don’t need in my everyday life, thus minimizing the risk that i’ll ever accidentally record anything i don’t need, which isn’t a big deal, but can be annoying.
advanced:

this isn’t really a setting change, but this is how i have my filenames formatted, at least until i manually change this if i want to, but i believe its the default and it’s honestly really helpful to keep the videos straight when you’re a disorganized mess like me.
i think that’s everything for the screenrecording part of the process. if you have any questions, just ask!
photoshop:
alright so i use the import frames to layers method to make gifs, it’s just how i learned initially, so i’m pretty stuck in my ways.
opening ps:
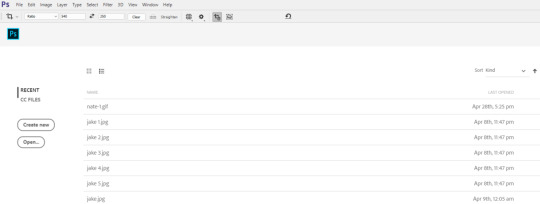
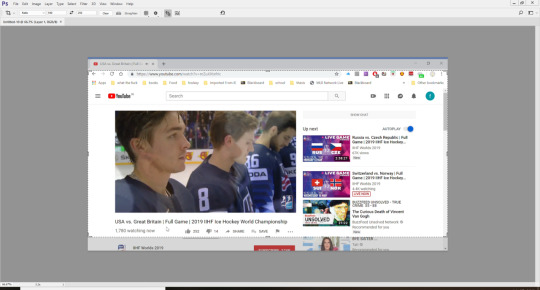
this is what my screen looks like when i open photoshop. i have mine set to the lighter setting bc i like how it looks brighter, but its just a personal preference.
importing clips:
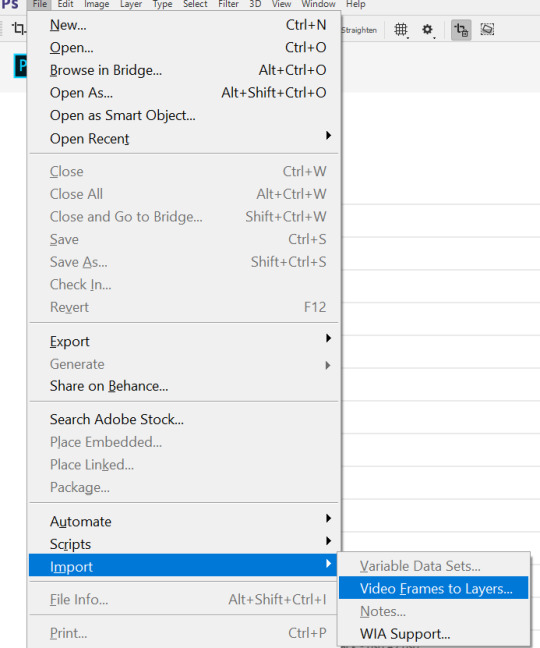
select import and then video frames to layers. it will open your files.
selecting video:
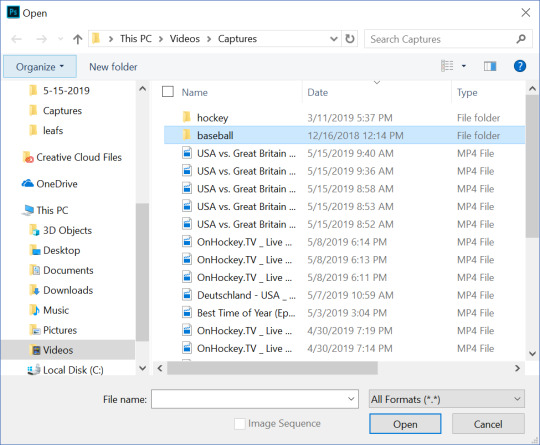
alright, so you can see the mess of videos i have, unsorted right now, lmao. anyway navigate to and select the video you want, and hit open.
selecting frames:
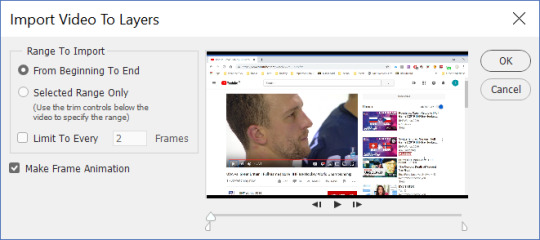
this window will pop up after it loads, and here is where you select the frames you want to include in the gif. in order to do so, you slide the two sliders to frame either side of the clip. as far as the limit to every ___ frames, i try to not use it, or i use every 2 frames, just depending on the clip.
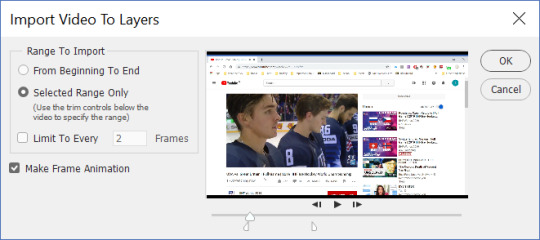
now i have the clip i want, so i hit ok, and let ps do its thing.
process:
alright so after the frames are loaded, there’s multiple things i do to prepare my gifs. i have to crop them, remove extra frames (delete with the little trash can at the bottom left), change the time delay, and then do the actual editing of the gif. also, i use the motion preset layout, which can be found on the drop down menu in the top right corner.
cropping:

these are the dimensions i use for most of my gifs. i range between 250-300 depending on the video, but 540 is almost always there, due to tumblr’s dimensions for photos/gifs. 268 x 268 is what i use for square gifs.
the cropping button is found on the left side menu, and it looks like that little symbol on the far left of the picture above.
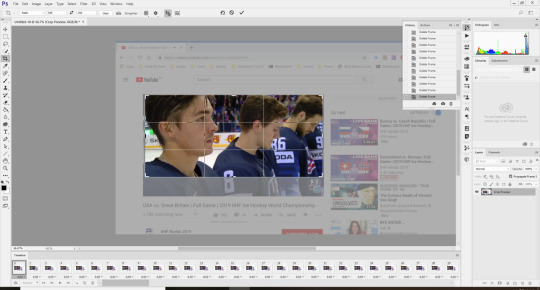
once i have the area i want selected, i doubleclick and it crops the frames.
time delay:
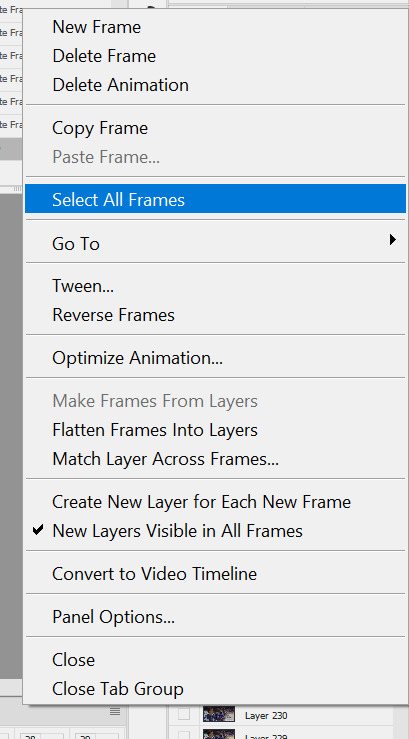
to change the time delay, click the little symbol you can kind of see in the photo above, with the four or so lines. it’s above the frames along the bottom of the screen, at the right. when the menu pops up, click select all frames, so you can change the timing for all the frames. once all the frames are selected, click one of the little carrots next to the numbers at the bottom of the frames, as seen in the picture below.
now you choose the time delay you want. when im not skipping any frames, i run between 0.05 to 0.06. if i am skipping, it’s between 0.08 to 0.1. just kind of play with it, til you find what works for you.
editing:
i always sharpen my gifs, it’s the best way to make your gifs look as nice as possible. to do so i use a sharpening action, found here. there is also a tutorial here for loading and using the action, which is much better than anything i could say, so use that!! i literally ALWAYS use this action/method, i love it so much. also, that blog is a goldmine for gif/edit help.
coloring:
alright, honestly im not going to be any help here, im so bad at coloring. at this point i have the same kind of things i do depending on where the game im makes gifs for is, since 81 and 41 games(ish) are in the same place for my teams during their seasons and then i just kind of make it up as i go. for actual help, i recommend the blog w the tutorial from above, just looking around there, or messing around in photoshop itself.
exporting:
follow these steps to save for tumblr. once the window opens and is ready, change the width to 540 for the best results for tumblr.
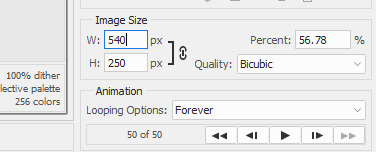
make sure the gif is under 3mb, otherwise tumblr won’t play it and it will look like a photo. then just post! and be happy!! send any questions my way, always happy to help :-)
#here it is!#its so long dksfjsdkljf#hope it helps!#im always here to answer questions too!!#danhalen#tutorials#a
16 notes
·
View notes
Text
lyndsey’s first ever gif tutorial!!!
hello world, it’s me, lynds! by request, I’m gonna walk you through how I make my gifs! I’m going to just show a basic gif tutorial (like the one below). This tutorial will walk through the steps of getting the footage, creating the gif, editing it with some minimal coloring, and then exporting! :) let me know if you have any questions, I hope you enjoy!

I use the following programs:
Photoshop CS6 (mac download tutorial)
QuickTime Player
let’s get started!!!
step one: find what you want to gif
For me, my first stop is almost always netflix. I make supernatural gifs, and I am lucky enough to have 13 seasons right at my fingertips. But Lyndsey, how do you get netflix video onto your laptop?! Well, that’s where QuickTime Player comes into play. For purposes of this tutorial, I’m going to gif a nice little family hug from episode 12x22. So first step, find the part you want to gif and pause the video about 10 seconds before you would want your gif to start, and make it full screen . Like so:
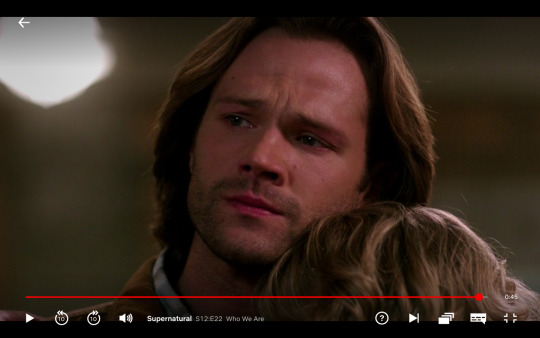
It’s important to start the recording before the actual first gif frame because you want all the extra things to go away (the play button, the rating that pops up in the right corner, etc) before you get to the actual moment you want to gif.
step two: begin recording
Open up QuickTime Player. On mac, it should pop up in your toolbar. A quick trick I use is to do a spotlight search (Command + Spacebar) and search for Quicktime Player. This will begin to run the program. Two finger click on the icon, and a small menu will pop up. It should look like this

Select New Screen Recording. A box should pop up on your screen that looks like this:
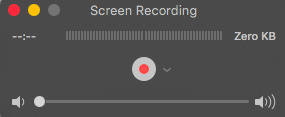
Click the red record button. Another box will appear that looks like this:

Click anywhere on your screen and boom! Your laptop is recording your entire screen! Now you can swipe over to your browser tab and it will continue recording your show as you watch! Make sure you move your mouse so all those annoying menus and things go away and it’s just the show on your screen.
Once you have finished recording the whole part you want to gif (make sure it’s short!!), swipe back over and open the menu again. It will have changed slightly to look like this:
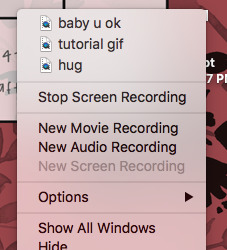
Click on Stop Screen Recording. A box will appear where you can play the video you just recorded. Now, click the red x to exit the window that just appeared (trust me on this one) and it will bring up a new box like so:

Title your clip whatever you like and save it wherever! Now you have your clip! Hoorah for you, you’re doing great!!!
step three: getting it into photoshop
Now we’re ready to make our actual gif! Yay! Open up photoshop and then click on File -> Import -> Video Frames to Layers like so:

A new window will pop up where you can browse through your files. Go find the video clip you just recorded and select it. Now, your screen should look like this:

I always select the “Limit to Every 2 Frames” option to fit more content into my gif. I also toggle until I find only the part I want to gif (since we had to record a little extra to get to rid of the menu bars and such. Do this by dragging the small, dark pieces below the gray line until the image you’re looking for pops up on the little mini screen. Make sure to do both sides! Then, press okay!
step four: finding duplicate frames
No technology is perfect, but photoshop is far from it. Often, there are duplicate frames in gifs, which makes them look choppy and sad :( So, after completing step three your screen should look like this:

All the little boxes at the bottom are frames, while the list on the side are the layers. We’ll worry about the layers later. For now, click through each individual frame one by one, and if you find a duplicate, delete it (click the little trashcan below all the frames)!
tip: I’m not sure if this is universal, but in my program, every fifth frame is a duplicate. idk why. but, I can go through and delete frames until one of the duplicates are on a multiple of 5 (i.e, frame 15 and 16 are the same) and then I select all the ‘5′ frames (Hit command and click frame 15, then frame 20, then frame 25 and so on and so forth). It minimizes the constant clicking. But, this might be confusing to some, so if it doesn’t make sense, just click through and delete the duplicates!
step five: cropping
Now that all those pesky frames are gone, it’s time to crop! Select the crop tool from the side toolbar (it’s selected in the next frame) and drag until you’re satisfied with what you have!
tip: for individual gifs, it doesn’t matter too much, but if you’re doing gifsets, they need to all be the same size. I recommend using one of the preset ratios, which you can find if you click on “unconstrained” in the top left hand corner
Now, it looks like this! Double click and it will crop the image to the selected size!

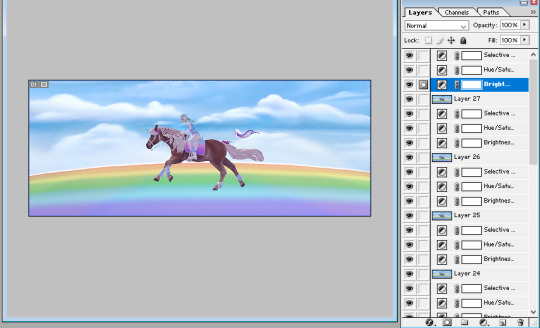
step six: coloring
Now comes the fun part! Coloring/Adjustments! For me, I usually up the brightness, lower the contrast and lower the saturation. I will post the settings I used below:


Make sure these layers are above all your other ones (you can drag them up to change the order). This is totally up to you! Click the buttons and mess around, see what they all do! You can always delete the layer you created and your gif will go back to normal :)
step seven: frames per second
The final step before export for me is to change the frames per second. By default, mine go to .02 seconds, which is much too fast. The frame rate is shown at the bottom of the frames. I usually set my gifs to .07 seconds. The easiest way to that is to select all frames, by clicking on the small menu on your timeline (the little three lines with the arrow in the top right corner)

And then select “select all frames” from the menu. This will highlight all your frames! Next, click on one of the arrows (next to the timestamp) on any of your frames. A window will appear like so:
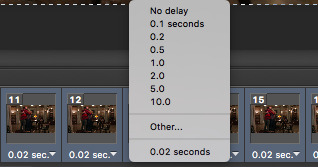
Click on “other...” and type in “.07″

Now we’re ready for export! Woo hoo!!
step eight: export
This is the most tedious, and my least favorite part of gifing. Sigh. Anyways, first you will go back to file and open the menu, then select “Save for Web”

The next page it will bring you to is very important:

The most important part of this window is the GIF size, shown here:

Tumblr has a gif size of 3M, so obviously this gif is way too big. Never fear! It’s time to change the image size. If you just change the width, it will keep your gif in proportion and minimize the size. I changed my width to 475px, and now we are at 2.763M, which means we’re good to go for tumblr!

Now, it’s time to save! it will automatically save as a .gif file, and you’re golden! time to upload your beautiful creation to tumblr!

I hope you found this helpful, please like it or reblog it if it helped, mainly so I don’t feel like I did all this for nothing haha. Happy gifing everyone!!! -lynds
#here you go beans!#hope this makes sense#please feel free to ask questions if you have them!!!#gif tutorial#my gifs
41 notes
·
View notes
Note
do you have a tutorial on how you make your gif sets? they’re so pretty! the last time i tried, either the quality was too low or the frames were jumpy.
Thank you so much for the ask! I apologize for the delay in response. It took me a while to format this in a coherent way. ;-; I don't have a proper tutorial posted anywhere at the moment, but I can do my best to explain how I make my gif sets. ^-^; (I feel like I should add a disclaimer here that my method of making gifs is excruciatingly tedious. >.< I also use some pretty dated programs. There are much faster and easier ways to make and edit gifs, but I've gotten so used to my method and my programs that I just follow the same process for all the gifs I make.)
First, I record the shots I want in game with Bandicam, although any recording software that's compatible with SSO (or whatever game you may be recording in) should work just fine.
After closing out of the game, I open the recordings in my video editor. I use Movie Studio Platinum 14, but any video editor that allows you to pause and skip frame-by-frame will do. This is where it starts to get tedious. xD I open my dirt-ancient version of photoshop (which includes ImageReady--more on that later) and in the video editor, I pick a spot in the recording that I like. I try to narrow it down to a minimum of about 25 frames, and a maximum of about 45 frames. 20 frames or less will often make the gif loop look kinda choppy and short, and tumblr has gif size limits so I try to avoid going over 45 frames if I can help it. I then copy-paste each frame from the video editor onto a separate layer in photoshop. Once I have all the frames I want, I crop and resize the photoshop file to fit tumblr specs (540px wide, in this example). At this point in time, the file usually looks something like this.

Once that's done, I close my video editor to spare my poor computer, and then I start adding editing layers in photoshop. You need an exact copy of each edit layer per "frame" layer, so I just duplicate each edit layer and then drag 'n drop it into the same order for the layer below it. This can easily get out of hand, so I try to keep my edit layers to 4 or less per "frame" layer. If done correctly, every layer will look like this.

After that, I start merging all the edit layers with their respective "frame" layers, starting with the bottom one. In the above example, I started with the Curves layer (lots of ctrl + E ensues) and merged them all down onto their frame layer. After that, it looked like this.
Repeat the same thing for all of your edit layers in order. In the example, the next layer merged down would be Brightness/Contrast, then Hue/Saturation, then Selective Color last of all. If you have a lot of frames (35+) and more than 2 editing layers per frame, this process may take awhile. When that's finally done, the layers should all look like this again, but instead with the improved look of the editing layers you merged into each frame.

At this point, it's time to move the file over into ImageReady. I click on this icon while the WIP gif file is still open in photoshop. (ImageReady will automatically open the file in another tab, which is convenient if you need to delete frames or smooth out a loop.)

Once ImageReady is open, I click on the double arrows in the top right corner of the animation window (it usually pops up in the bottom of the window by default). This opens a drop-down style menu, and I then press “Make frames from layers”.
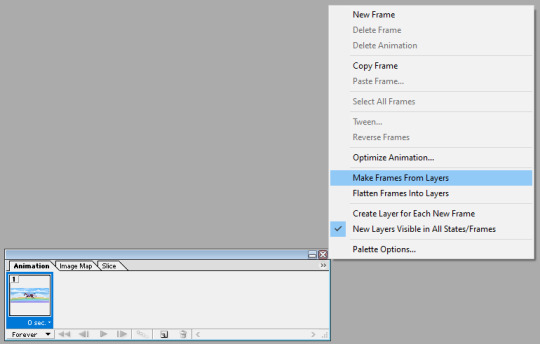
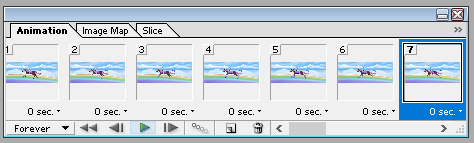
By default, mine is set to loop forever with a 0 second delay between frames, but you can adjust this if you’re going for a different effect with your gifs. Once I’ve made all the layers into separate frames, I hit the play button and watch the gif loop a few times to check for any mistakes I may have missed.
If everything looks all right, I then go up to the “File” tab in the upper left corner of ImageReady and select “Save Optimized As”. This should let you save the file as a gif.

With that, I call the process “done”, and move on to the next gif in the set. xD Keep in mind, when switching between photoshop and ImageReady, you may want to ctrl + Z or “undo update from ImageReady” if you’ve been looping the gif, otherwise it tends to mess up the layers a bit. Aaaaaand that’s how I make gifs. c’x Sorry for the long-winded explanation, but hopefully it’ll be helpful!
0 notes
Text
Keep Up
It’s been awhile since I’ve written these little families. Just sat down and wrote what came to mind. I hope you like it.

Even though no one was talking directly to her about it, Molly could sense things were changing. She was no longer the center of her parent's universe since she now had a sibling, a baby brother with wispy blond hairs on his head that her mother referred to exclusively as 'spun gold'. The lazy days at home in their London loft were becoming busier and the schedule had shifted from routine to packed. The afternoons where her dad would bundle her up in blue knit cardigan, Burberry as chosen by her mum, and walk with her to Regent's Park with their golden retriever had become less and less. It was something she could on happening before dinner every day and now it was a surprise, her father poking his head into her bedroom to interrupt her playing with the offer. He used to do it to give her mom a break, leave her alone with Connor or to nap, but now he was doing it for his own gain. He wanted private time with Molly, yearning for closeness, as their quiet life was headed to an end.
Fashion Week in London was a few months away and it collided with the album release for Ashton's band, the first record they had put out in years, the last one coming out right after Emmeline was born. He was going to be occupied with press before embarking on an exhausting tour while his wife was tending to her own new collection. Molly didn't know what changes were coming or what her life was supposed to be, she could just sense a shift in the apartment. The fact that many of their things were being packed up and her parents were always having their own conversations right above her frizzy head of hair was giving it away.
She was laying on her belly, legs folded in the air behind her, and playing with a container of plastic fish toys on the floor of Simone's home office. Molly had no interest in gemstones and shiny objects. She liked to create make believe worlds inside jungles and underneath seas. She always wanted to feel the texture of things whether slimy, rough, or smooth. Molly was not a pristine porcelain doll of a little girl. She was a concoction of her mother's focus and poise and her father's curiosity and edge. The only thing they both gifted her with was creativity which she had coursing through her veins constantly, even when she slept. As she played on the floor, giving the fish voices under her breath, her mother was clicking around on her laptop, deep in her work.
“Your mum's on her way.” Ashton appeared in the doorway, shaking his phone face first towards his wife. Simone's mother had texted them both, but Ashton knew that Simone would be concentrating on work too much to notice any buzzing or beeping from her phone by her side. She could tune out anything except the high pitch screams of her newborn.
“Great.” Simone said automatically before glancing at the time. “She's early. We weren't going to-” She peeled her eyes off of the e-mail she was proofreading and brought them to Ashton with alarm.
“I know.” Coyly, he admitted and then pointed out Molly on the floor between them with a cock of his head. “I wanted a little more time.” He was leaving in a few days, off to California to start press ahead of the first single's release. When he first found himself falling in love and finding more in his life that held promise outside of parties, music, and models, Ashton started to find it hard to go back to his hectic life as a rockstar. When Molly was first born, she was raised by a village of crew and band members, it was simple to stuff her in a Baby Bjorn and wander around the world. Now, he had a firm family and Simone wasn't taking any time off, Ashton felt like he was tearing in two. He was going back to his first love, music, that he had taken a needed rest from, but he was also leaving part of himself behind.
Molly was three and talking to her toy fish, unaware that feet away from her, her father was breaking in two.
Understanding, Simone nodded. She pushed herself away from the glass desk and folded her hands over her lap, watching Ashton as he gazed down at Molly with heavy and evident sadness in his eyes. He was horrible at goodbyes, something that before his daughter he had been almost too good at.
“I can let my mum in. I'll handle Connor.” He was asleep, but nobody knew how long that would last. He had a set of lungs on him that Ashton was very proud of. The boy didn't keep quiet for very long for anyone, but Simone's parents.
Ashton nodded at Molly and then smacked his hands together, swinging his arms in front of him, for her attention.
“Do you want to go to the park with me?” He asked, trying to be casual and not give her any indication to how emotionally conflicted he currently was.
Feverishly, Molly nodded right away and then climbed up onto her feet. She was ready to go, a thin lipped smile spreading across her face like nutella over fresh toast.
“Put your toys away, okay?” Out of habit, his hand wrestled softly through his mess of hair. “I'll be at the door with your boots and jacket.” He told her without letting her go, his large hand still over the top her head.
“You, me, and dad. We're going to have a little date after, okay?” Simone informed her from her desk, rolling the chair close to the edge again. “So, after the park you'll come back, we'll brush our teeth and hair, we'll go out.” Simone and Ashton had not had isolated time with Molly since Connor was born, but it had been Ashton's idea to do something small and special with her before he left. They were just going to go have pizza together at a little hole in the wall spot Simone loved in Maida Vale where they lived, but to Molly it was as fancy and wonderful as a five-star Grammy's after-party.
With all the excitement she could muster, Molly bounced around as she collected her toys in their proper pail. She tidied up as fast as she could and met her dad at the front door. Just as promised, he was ready to go with her little Burberry coat open in both hands and her red rubber wellies right by her mother's.
“I didn't run because Connor is sleeping.” With a finger in front of her mouth, Molly proudly whispered to her dad. Her tongue slightly tripped over her words, but she spoke well for a toddler. Ashton had to credit that all to Simone who had always spoken to Molly as if she was a petite adult even when she was first born. Ashton had been the one who rubbed his nose into her belly and spoke to her like he didn't know how to pronounce the sound of the letter 'R' or as if he had been raised around Sesame Street.
“That's very nice of you. You're a nice big sister.” He assured her as she turned around and slid her arms clumsily into her coat.
Molly ran out into the hall and carelessly for the elevator doors, Ashton staying back and locking the flat door behind him. Even though Simone was home, he was protective and didn't leave anything to chance. He had cameras in certain rooms of their place that both he and his wife could check on from their phones. It wasn't because they didn't trust one another and needed to keep tabs on their private lives, but it was out of Ashton's need to be the great protector of his family. When he was away, he hated feeling helpless. He wanted to know what was going on. It was something of a life jacket for him.
“Molly, wait!” He called at her from the door, sensing without looking that she was reaching up to stab the elevator call button. Molly was incredibly well-behaved. She had always followed the rules set out for her without any problem, but she was like any little kid when it came to elevator buttons. She just had to touch them.
Once they were leaving their guarded building, Ashton opened up his hand and Molly instinctively put hers inside of it. His own hand practically engulfed all of her fingers, but Molly didn't notice. She was too busy counting the red buses that passed them as Ashton led her down the same walk they always took. He pointed out the streets to her as they passed each block, asking her to guess. He wanted to know that if they were ever separated, Molly would be able to make her own way home. Blomfield Road came before Randolph Mews then Clarendon Gardens and then Clifton Gardens.
They arrived at the park later than usual. They didn't bring their dog to pull on them and eagerly lead the way. Ashton also paid more attention on quizzing Molly on their surroundings than he usually did on keeping her focused on walking at a regular pace. This time, they walked was as if they were both her size.
Usually, Molly charged through the gates of the park, finally allowed to let go of a parent’s hand, but this time, she squeezed Ashton's hand tighter and didn't let go. Ashton decided not to question it though and just kept strolling with her, on their way to the lake or the playground, taking in the greenery quietly.
“Daddy?” With her head tilted all the way back, Molly looked up and interrupted the soft breeze between them. She could barely feel it while it was right in Ashton's face.
“Hm?” Looking down, Ashton let her know she had his attention before looking forward down the path again.
“Why do you have to...go?” Her bottom lip made her question sound like it splattered as it came out, but Molly's eyes squinted as she asked him sincerely. Ashton thought she was sizing him up, but in reality nobody had deduced that she needed glasses yet.
Ashton was stunned silent though and let out a disappointed sigh that deflated his chest. He tightened his jaw as he wrestled with the truth. Molly was too intuitive to not pick up on what was going on. She heard all the adults around her yammering about the upcoming tour, peppering both her parents with questions about their conflicting schedules. She knew change was afoot whether or not anyone consulted with her about it.
“Well, Molls, my job involves a lot of travelling.” He decided to say, thinking it was a truth that she could comprehend. “I took a little break so I could be at home with you, and mum, and your brother, but I have to go back.”
“When do I... see... you now?” Confused, she kept interviewing.
He wanted to tell her that she could see him whenever she damn well pleased. Ashton strived to be a much better father than he had had. Even though Molly could call and Skype him whenever she wanted to, it didn't feel like enough. Ashton knew that he wasn't going to actually be there to tuck her in, answer her a hundred questions about trees, human bones, and hammerhead sharks, and he wouldn't get to see her growing like a weed right before his eyes. She wouldn't be able to crawl all over him when they were playing on the floor together and she would hear his voice only through the radio or computer now.
“Mum and I have sorted it out. You're going to come visit lots and we're going to take a trip to see Nana Anne in a little bit.” Ashton had been a nightmare for his managers, refusing to go longer than two and a half weeks without a weekend break for him and Simone to meet up, for real chunks of time to catch his breath and be more than just a drummer.
“I'll miss you.” Sounding as sad as his face looked, Molly confidently told him. She knew some things to be facts. Fish swam, birds flew, dolphins were carnivores, and she was going to miss her father.
It was a verbal nudge in the ribs for Ashton and he stopped right away. Rubbing his lips together to hold back another weighted sigh, Ashton bent down to his knees and brought Molly in with both hands, one of his over each of hers. His fingers held her in place tightly and he gave himself a few seconds to just take her in. Each time he blinked, it was a mental snapshot of her soft features. She was never going to be this little again. He wanted to tell her that he would miss her as well, that he didn't want to leave, that he wished he could fold her like a t-shirt and take her along with him, but before Ashton could sort out his words he noticed her bottom lip begin to warble and her nose squish up. She was on the verge of tears.
With both hands, he pulled her in close and then allowed her fingers to wiggle free so she could wrap them around his neck. Once Molly had the toggles of her peacoat against his sweater clad chest, she crying into his neck. Ashton held the back of her head with a firm hand and breathed her in, her organic shampoo and skin a familiar and comforting scent. He closed his eyes and listened to her cry, feeling like a forlorn jerk.
“It's okay, baby.” He assured her with voice like velvet even if his throat was tightening and beginning to feel like linen inside. He rose from the knees and carried her, letting her sob into his shoulder as he kept them going down their usual path. Molly wasn't the temper tantrum type. He knew she would calm down eventually. When he was feeling as heartbroken as he currently was, he couldn't tell her to not feel all her emotions. This was going to be something she had to learn to handle for the rest of her life. Some people had routine and solidarity, the Irwin family had distance.
52 notes
·
View notes
Text
Sms On Macbook

Messages User Guide
How To Activate Sms On Macbook
Sms From Mac
Iphone Messages On Macbook
You can send messages to one person or a group of people (that meets these requirements). Messages can include text, photos, videos, audio messages, animated effects, Memoji stickers, and more. If you’re using macOS 10.15 or later, iOS 13 or later, or iPadOS 13 or later, you can send messages to businesses.
How To Activate Sms On Macbook
Apr 12, 2021 Whether you use Apple or Android, you can send and receive text messages on a Mac, Windows PC, or Chromebook. Keep reading to determine which option works best for you. How to send texts via the.
Note: Before you can send messages, you need to set up your Mac to send messages.
How to set up iMessage on Mac. Launch Messages from your desktop, dock, or Applications folder. By default, the Messages app will use your Apple ID to log you in. In case that doesn't happen, enter your Apple ID email address and password. Click on Messages in the Menu bar; Click on Preferences. Click on the iMessage tab.
While many Mac users already enjoy getting and sending iMessages on their MacBooks and iMac, it's easy to add SMS messaging to your Apple computer. This adds a ton of convenience to your messaging.
SMS Software is an easy-to-use decision-making tool to help you capture the most out of every acre. Choose seed based on historic yield performance; Create planter performance reports.
Ever since iOS 7, Apple has provided a Text Message Forwarding service that can push SMS messages received through your iPhone's cellular network to your other Apple devices.
Ask Siri. Say something like:
“Message Mom that I’ll be late”
“Reply that’s great news”
Learn how to ask Siri.
Send messages to one or more people
In the Messages app on your Mac, click the Compose button to start a new message (or use the Touch Bar).
Type a name, an email address, or a phone number in the To field for every person you want to send a message to. As you type, Messages suggests matching addresses from your Contacts app or from people you’ve previously sent messages to.
You can also click the Add button to the right of the To field. Apache httpclient ssl. Click a contact in the list, then click the email address or phone number.
If you’re restricted to sending and receiving messages with only certain people, an hourglass icon appears next to those people you can’t send messages to.
Enter your message in the field at the bottom of the window. You can include any of the following:
Text: Type text in the message field. You can use typing suggestions, if available.
Tip: Press Option-Return to insert a line break in a message.
Audio messages: Click the Record Audio button to send an audio message.
Emoji: Click the Emoji Picker button (or use the Touch Bar) to add emoji to your message. If you add three or fewer emoji, they appear as large emoji.
Photos: Click the Apps button , then select the Photos button . See Send photos from your library.
Memoji Stickers: Click the Apps button , then select the Memoji Stickers button . See Use Memoji stickers and #images.
#images: Click the Apps button , then select the #images button . See Use Memoji stickers and #images.
Note: Sending images and GIFs isn’t available in all countries or regions.
Message effects: Click the Apps button , then select the Message Effects button . See Use message effects.
Files or web links: Drag or copy and paste files or web links.
Press Return on your keyboard or click the Send button to send the message.
When a message contains a request to do something at a particular time or a request where you provide an answer, you can create a reminder. For example, if someone sends a message such as:
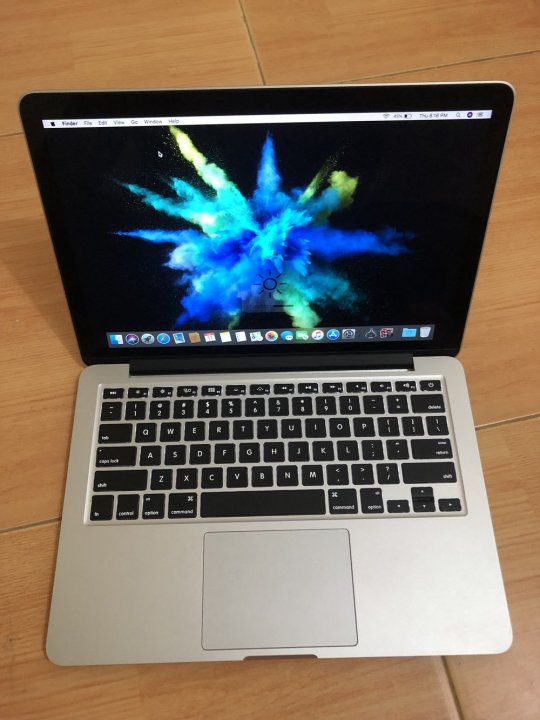
“Call me at 6:00 PM”: Control-click the underlined text and choose Create Reminder.
Compatibility and installation steps. Apple offers a way for users to run applications that are no native to M1 chips, by using their new translation feature called “Rosetta 2”. You can install Sophos Home on M1 devices by following this article Support for macOS 11 - Big Sur. Preparation steps In the Apple DEP web portal, create a virtual MDM server and link it to Sophos Mobile. In Sophos Mobile, create one or more DEP profiles that. Sophos apple. Click Start Settings Control Panel. Click 'Add/Remove Programs'. The 'Currently installed programs' list in the 'Add or Remove Programs' tool lists all of the Windows-compatible programs that have an uninstall program or feature. Remove a controlled application using a specific application uninstaller. Download apps by Sophos, including Sophos Intercept X for Mobile, Sophos Mobile Control, Sophos Secure Workspace, and many more. Global Nav Open Menu Global Nav Close Menu Apple. Sophos Home for Mac Antivirus - Free Download. Includes a 30 day trial of Sophos Home for Mac Premium, with advanced ransomware scanning in real time. Download Free Mac Antivirus Scanner & Malware Removal.
“Can you get milk tomorrow?”: After you reply “Yes” (or something similar), a suggested reminder appears in the Reminders app under Siri Suggestions.
See Add, change, or delete reminders.
Use mentions in conversations
With macOS Big Sur, you can mention other people in a conversation to call their attention to a specific message. Depending on their settings, this notifies them even if they have muted the conversation.
Mentions are available when you use iMessage.
In the Messages app on your Mac, select a conversation.
To search for contacts and content in conversations, click in the Search field in the top-left corner and enter what you’re looking for. Or, choose from the suggested contacts, links, photos, and more.
If you’re restricted to sending and receiving messages with only certain people, an hourglass icon appears next to those people you can’t send messages to.
Begin typing a contact’s name in the message field at the bottom of the window.
After you type the person’s name, it becomes dim—click it, then select the contact’s name when it appears.
You can also mention a contact in Messages by typing @ followed by the contact’s name.
To change your notification preferences when you’re mentioned in Messages, go to Messages > Preferences, click General, then select (or deselect) “Notify me when my name is mentioned.” See Manage notifications from Messages.
Reply to a specific message in a conversation
With macOS Big Sur, you can reply to a specific message in a conversation inline to improve clarity and help keep conversations organized.

Inline replies are available when you use iMessage.
In the Messages app on your Mac, select a conversation.
To search for contacts and content in conversations, click in the Search field in the top-left corner and enter what you’re looking for. Or, choose from the suggested contacts, links, photos, and more.
If you’re restricted to sending and receiving messages with only certain people, an hourglass icon appears next to those people you can’t send messages to.
Control-click the message or attachment, then choose Reply or press Command-R (or use the Touch Bar).
Enter your message in the field at the bottom of the window, then press Return on your keyboard or click the Send button .
Forward a message or attachment
You can forward a message (or an attachment such as a photo or video) from a conversation.
In the Messages app on your Mac, select a conversation.
To search for contacts and content in conversations, click in the Search field in the top-left corner and enter what you’re looking for. Or, choose from the suggested contacts, links, photos, and more.
If you’re restricted to sending and receiving messages with only certain people, an hourglass icon appears next to those people you can’t send messages to.
Control-click the message or attachment, then choose Forward.
Add a recipient, then press Return.
The message or attachment is sent.
You can’t forward a message to someone who’s restricted by communication limits in Screen Time.
Send messages to a business
If you’re using macOS 10.15 or later, iOS 13 or later, or iPadOS 13 or later, you can send messages to some businesses. Business Chat helps you get answers to questions, resolve issues, get advice on what to buy, make purchases with Apple Pay, and more.
On your Mac, search for the business you want to chat with using Maps or open an email from the business.
See Find a location in Maps.
To start a conversation, click Message in the Map Info screen or click a link from the email.
If this is the first time you’ve messaged this business, a new conversation is created. Otherwise, you can continue your conversation.
You can’t send a message to a business that’s restricted by communication limits in Screen Time.
Enter your message in the field at the bottom of the window, then press Return. You can include any of the same content as you can when you send messages to people.
Note: Business chat messages you send appear in dark gray, to distinguish them from iMessage messages (in blue) and SMS or MMS text messages (in green).
Sms From Mac
See the Apple Support article How to use Business Chat.
Your Mac can receive and send SMS and MMS text messages through your iPhone when you set up text message forwarding. For example, if a friend sends you a text message from a phone other than iPhone, the message appears on your Mac and iPhone in Messages.
Note: To receive and send SMS and MMS messages on your Mac, your iPhone must have iOS 8.1 or later, and your iPhone and Mac must be signed in to iMessage using the same Apple ID. Additionally, you must set up your iPhone.
Iphone Messages On Macbook
See alsoManage a group conversation in Messages on MacMake a video call using Messages on MacBlock messages in Messages on MacSchedule downtime in Screen Time on MacApple Support article: Use Messages with your Mac
0 notes
Text
Supplementary materials for KWLUG LMMS Presentation
I gave a presentation at KWLUG this month about LMMS. Here’s a link to the KWLUG site which embeds the recording: https://kwlug.org/node/1250
This post includes supplementary materials.
First, here’s a link to download the slides: https://drive.google.com/file/d/1r5367PwFZ5y1ZHrW4dJ9Xo-64-xhc22S/view?usp=sharing
Second, here’s an annotated project file for the song that I demonstrated called Lazy Days. This should work with LMMS 1.2.2. I’ve licensed it under CC-BY 4.0, so have fun with it: https://drive.google.com/file/d/17fka1JCFu2qTXbBhXLA8zQm_OibTPnU5/view?usp=sharing
Finally, what follows is the text of the script I was reading. It’s not a 1:1 transcription due to ad-libbing and general waffling but it’s pretty close. I refer to the slides a lot so you might want to keep those open in another tab. The scripted portion goes from the start of the presentation to the beginning of the demo...
The Script
Hey so, I’m Michael Hitchens. I’m a Software Developer by day but hobby musician by night. I sing, play the piano and (really, only recently) is when I’ve started to compose. Composition has been one of those areas that bounced off me for a while until, one day, it just clicked. (This was my quarantine hobby btw) So I’m hoping that, if you’re in the same predicament, then this talk can maybe help it click for you too.
Now, while this is a talk primarily about the program LMMS, I do need to cover some groundwork as well, just to get the most out of the program.
What is LMMS?
LMMS is a digital audio workstation (shortened D-A-W, or more commonly pronounced “daw” (like in “dawn”)). The jargon means that this program was designed to assist in making music, in much the same way that CAD programs assist in designing objects.
On the slides I’ve included a link to the docs because, even though they’re a bit out of date in places, they’re actually pretty well written. Most of my demo is based around them.
There’s also this sharing platform. Now, I haven’t used it but it does look cool. Although it also looks relatively unmaintained and, based on the GitHub issues that I’ve read, it might not be the pinnacle of secure database design. Just be warned.
Digital Audio Workstations
If LMMS is a DAW, then no really what is a DAW? DAWs are a lot like non-linear video editors. You can record and produce multiple bits of audio then mix and match and layer and rework and filter all to your heart’s content, and all without leaving the DAW.
The modern DAW is decades in the making. It’s the culmination of music industry tech and secrets. What if I told you that you could have all the power in this room-sized mixer in your laptop? And more? Oh year and this is just a mixer! DAWs are also a synthesizer, a sequencer, a, a rhythm machine, a recorder, an amp, a cabinet? It’s incredible
Now, the history of audio recording at large (which I’ve entirely left out of this presentation because 40 minutes tic toc) is important in-so-far as you realize that DAWs still crib the aesthetic and mimic the functionality of the analogue systems from days of yore. For example, let’s look at these illustrative LMMS screenshots. The mixer on the bottom-left uses sliders but the instrument volume control on the top-left uses knobs. Why? Well because that’s what they look like on a real mixing board. Why do the synthesizer interfaces on the right all use knobs? Because that’s what eurorack synthesizers look like. Understanding these traditions and embracing them can explain some headscratchers. (For the record, this is one of the reasons that DAWs in general bounced off me for a while)
Other modern DAWS include:
Cubase
GarageBand
Logic Pro
Ableton Live
FL Studio
Pro Tools
(my personal favourite) Reaper
There’s probably a bunch of others I’m missing but they’re all similar at this point. You pick one, you learn it, you use it ‘til you die. These are first-rate packages but they’re also inaccessible mainly due to their high price tags. These things cost up to a thousand dollars. (I’m fudging the numbers here a bit for effect, aside from the Apple products there’s a whole bunch of tiering and stuff they do. Like I got Reaper for $60) On top of that, they have an incredibly steep learning curve. That’s not to say LMMS is a cake walk in comparison, but it does get a hell of a lot more complicated.
(For the record, if I had a Mac, I would totally use GarageBand. It’s actually really really good. The interface is easy to understand and the preset synthesizers and drums sound amazing.)
LMMS is a lot like other DAWs but I’ve found that it has several glaring limitations:
There is no mic recording. There’s no way to hit a record button and record a mic directly into LMMS. Every mainstream DAW has this ability and its clearly missing here
You can import and play samples, but they’re hard to manipulate. They feel much more like discrete static objects rather than pools of PCM data that you can mix and match and blend with other samples. Again, every other mainstream DAW does this well
So that’s not to say LMMS isn’t good, you just have to realize what it’s good for:
Synthesized
MIDI-based
Judicious use of samples (e.g. drums)
(slightly) more intuitive interface
Drag ‘n drop, works out of the box
Music Notation and Music Theory
Two more topics before I get to LMMS.
As much as I want to go over the fine details of the harmonic stylings of 18th century dead white dudes, there’s too much to cover in a 40 minute presentation. I will cover a few fundamentals though because it will give us a convenient and widely used way to communicate about a rather abstract idea. But it is gonna be pretty technical and it’s gonna go pretty fast, so strap in.
The classical way of conveying music information is on a staff, shown here, but I’m not going to go into that too much because LMMS doesn’t directly use it. If you want something tailored to music notation, use MuseScore instead.
However, it uses a similar concept called the piano roll, the image on the right. These two images are equivalent.
Music (as it’s valued by our culture) is a collection of notes (labelled here) on two axes: time and pitch. (Think of it like a 2D graph.)
The Y axis consists of notes from a piano arranged from low (bassy, gravelly, earthy, etc) to high (harsh, shrill, piercing). Humans hear from around 20Hz to 20000hz. (The distance between each note is consistently a semitone, you can look this up later). You can describe these notes by their frequency (for example 440hz) but its more common to use note name (for example A4). (Also something to look up later, valid note names are ABCDEFG, then it repeats. It’s modular arithmetic!)
On the X dimension, notes are read over time from left to right. The basic unit of time is a beat, commonly delineated with vertical bars (which I’ve exaggerated in red here). How fast a “beat” is depends on the tempo. This is measured in beats per minute or BPM. 120 BPM is fairly common, which is nice because it neatly divides into 2 beats a second, or 500ms per beat. To stay on beat, musicians use a metronome. The metronome produces a tone each beat which the musician anticipates or reacts to when performing. The duration of the note can be a beat, a fraction of a beat, or multiple beats.
Beats can then be grouped into bars. How many beats per bar is determined by the time signature. Common time, or 4/4 puts 4 beats per bar. Bars can then be grouped into phrases, and phrases grouped into sections and sections can be grouped into songs.
Independent of bars, we can consider other groupings of notes. On the pitch dimension, notes that play simultaneously are called chords or harmony. This is a C major chord.
MIDI
Close to the heart of the modern DAWs is MIDI, the musical instrument digital interface. You’re probably already familiar with it, a lot of retro DOS games have a MIDI soundtrack. The interface describes note pitch and duration, then its up to an interpreter like your old SoundBlaster to figure out how to turn the D4 its being told to play into a signal that goes to your speakers. My musical keyboard (the Casio CTK-3000, don’t buy it) speaks MIDI out, which I can hook up as an input to my computer over USB and use my computer as a synthesizer. More importantly, I can record the notes for later use. For some (like me) this is a more intuitive interface for inputting musical ideas. However, DAWs do typically have a way to input notes using mouse+keyboard, using the piano roll interface.
We use MIDI because it’s compact and easy to manipulate in fine detail, unlike RAW audio from a microphone which is bulky and takes a lot of computation to do the most basic processing (though the tech is getting better just not widely accessible, see the product Melodyne).
I gloss over the spec details because the minutiae of the protocol framing and messaging are really not that important to us. All we really need to know is that it’s the format used to record my piano.
(At this point I switched to a live demo, for which I had no script.)
0 notes
Text
Download Songs From Spotify Android Free

How to Download Music from Spotify Free to Android Phones
Step 1: Download, Install and Launch NoteBurner Spotify Music Converter.
Step 2: Add Spotify songs or playlists to the Program.
Step 3: Choose Output Format and Customize Output Path.
Step 4: Download Music from Spotify Free to Local Computer.
How do I download music to my phone from Spotify?
Method 1 On Mobile
This section includes online methods that make it possible to download songs from Spotify to mp3, free or paid. Soptdl is a website that can help you convert songs from Spotify to MP3 with no download. And it says €36 for the 12 Months Membership. Also, there are no restrictions on the number of song downloads per month. Additionally, as Spotify to mp3 converter android, Prof. DRM is amazing software that allows music enthusiasts to get their beloved music in DRM free music in common format like the popular MP3. This could be a Spotify ripper Android app that can completely remove the DRM protection from music. Spotify Downloader Tool # 1 – KeepVid Music. According to KeepVid Music’s official website, it is an excellent music tool that can play music for free on your personal computer (PC), iPhone, Android Phone, or any other device. As mentioned, Spotify does not allow users to download music in MP3, no matter you have a free account or premium subscription. And Spotify to MP3 converter Android apps apparently include various shortcomings. So, we shared the best way to convert Spotify to MP3, AnyMP4 Screen Recorder.
Make sure you have a Spotify Premium subscription. Downloading songs for offline use is only possible if you have a Spotify Premium subscription.
Open Spotify.
Tap Your Library.
Tap Playlists.
Select a playlist.
Tap the grey “Download”
Listen to Spotify music offline.
How do I download mp3 from Spotify to my android?
Tutorial on How to Download Spotify Music to Android Music Player
Step 1: Import Tracks or Playlist from Spotify to Spotify Music Converter for Windows. Launch NoteBurner Spotify Music converter.
Step 2: Choose Output Formats.
Step 3: Start Downloading.
Step 4: Transfer Spotify Songs to Your Android Phone.
How do I transfer music from Spotify to Samsung?
Click “Devices” from Spotify desktop app, and select “Samsung Galaxy S8” from the list, then click on “Sync ‘device’s name’ with Spotify”. Step 4. Click on the playlists you want to sync to Samsung, or you can choose “Sync all music to this device” or “Manually choose playlists” to start the synchronization.
How do I convert Spotify to mp3 on Android?
Step 1: Visit www.getjar.com on your Android and click “Quick download” at the bottom, then enter 924986 to download and install Spotify Downloader on your Android phone. Step 2: Enter your Spotify user account name, and then click on the playlist to select the tracks and click on “Start”.
How do I transfer music from Spotify to Samsung music?
Solution 1: Transfer Music from Spotify to Galaxy S8 via Spotify
Step 1: If you haven’t already, download the Spotify app on your PC.
Step 2: Login Spotify app.
Step 3: Connect your Galaxy S8 to computer through a USB cable or Wi-Fi.
Step 4: If you haven’t already, Download Spotify for your Galaxy S8.
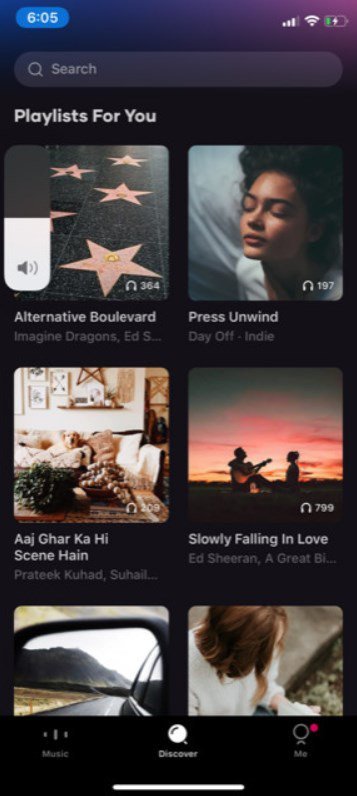
Where are Spotify songs stored on Android?
4. Lastly, log in to the Spotify app on your phone and start saving your playlist offline. Using the file manager you will see that the offline music will now be saved in your external SD card (in the folder “Android -> data -> com.spotify.music -> files”).
How do I transfer music from Spotify to my android?
Download Songs From Spotify Android Free Download
All you have to do is sync your Spotify account to your Android device and you can listen to your favorite tracks offline.
Step 1 If you haven’t already, download the Spotify app on your PC.
Step 2 Login Spotify app.
Step 3 Connect your Android device to your computer through a USB cable or Wi-Fi.
How do I download music from Spotify to my mp3 player?
Part 1: Convert Spotify Music Files to MP3 Spotify premium free iphone without jailbreak ios.
Step 2 Add Spotify Songs to Sidify. Launch Sidify Music Converter for Spotify, meanwhile Spotify will be opened automatically.
Step 3Choose MP3 as Output Format. Click the setting button on the top-right and choose MP3 as the output format.
Step 4Start Conversion.
How do you transfer music from Spotify to music player?
Tutorial on How to Transfer Spotify Music to Shuttle Music Player
Step 1: Import Tracks or Playlist from Spotify to Spotify Music Converter for Windows. Launch Spotify Music converter for Windows.
Step 2: Choose Output Formats. Click the Setting button on the top-right to choose output format.
Step 3: Start Downloading.
Can I transfer music from Spotify to my phone?
After your music is finished downloading, go to the Spotify app on your phone or tablet and tap the settings wheel in the top-right corner of Your Library. Turn the toggle button for Offline Mode on, and your music will be available to listen to offline. The only downside of downloading onto your phone is storage.
Download Songs From Spotify Android Free Music
How do I download music from Spotify to my SD card?
Method One to Download Spotify Music to SD Card
Launch Spotify on your Phone, tap Your Library.
Tap Settings .
Tap Storage.
Tap where you want to save your offline tracks.
Tap OK.
Step 1: Import Tracks or Playlist from Spotify to Spotify Music Converter for Windows.
Step 2: Choose Output Formats.
Step 3: Start Downloading.
Can you download Spotify on Android?
Spotify linux. Spotify music app on Android gives you access to millions of songs whenever and wherever you want, which could be the best way to listen to music on mobile or tablet. Most importantly, Spotify is now free on your Android phone and tablet and play any song, artist, album, or playlist in shuffle mode.
How do I convert Spotify to mp3 for free?
Only three steps can get you how to convert Spotify to mp3.
Start the converter and run Spotify. Download, install and launch DRmare on PC.
Add Spotify songs and playlists to converter. Option 1: Drag songs from Spotify to this software.
Set converted format as MP3.
Convert Spotify to MP3.
View downloaded song history.
How do I convert Spotify playlist to mp3?
Please make sure you have installed Spotify app on your computer.
How to Get Spotify Premium Free on iOS (without Jailbreak) You can update to Premium plan to get. I received and email on June 9th to tell me that I could get two months free premium if I joined up. I clicked the link in the email and I signed up on Monday the 11th. However it is only telling me that I am getting one month free, why is this? I only decided to join because I was getting two months free so this is quite a disappointment to me. Spotify premium two months free. Offer not available if you’ve previously tried Spotify Premium. Offer valid thru 9/30/2020 and provides 6 months Spotify Premium free from redemption date. After trial ends, you will automatically remain a Spotify Premium subscriber and your credit card will be charged monthly at the then-current Spotify Premium price. To cancel anytime go here. Free Month Of Spotify Premium Valid for new Premium users only. Normally $9.99 per month, for a limited time get your first month for free. 6-month trial of Spotify Premium Open the Spotify app preloaded on your Samsung Galaxy Note20 5G or Note20 5G Ultra, Galaxy S20 5G, S20+ 5G, S20 Ultra 5G, Galaxy Z Flip, Galaxy A51, or Galaxy A71 5G. Log in or create an account, and tap the ‘Premium’ tab on the bottom of your screen to learn how you could get your first six months of Spotify Premium for free.
Step 1 Run Ondesoft Spotify to MP3 Converter. Download, install and run Ondesoft Spotify to MP3 Converter on your Mac or Windows.
Step 2 Drag&drop Spotify songs, albums or playlists.
Step 3 Choose output format (optional)
Step 4 Click Convert button.
How do you sync Spotify to Android?
Re: Playing local files on an Android phone
Using the desktop app, add Local Files you want to sync to a playlist.
Log into Spotify on your Android using the same WiFi network as your desktop.
Tap the menu button ( ).
Tap Your Music.
Tap Playlists.
Tap the playlist containing the local files from your computer.
How do I get music on Samsung music app?
Google Play™ Music – Android™ – Add a Song to a Music Playlist
From a Home screen, navigate: Apps icon > (Google) > Play Music .
Tap the Menu icon (upper-left).
Tap Music Library .
From the Songs tab, tap the Menu icon (located next to the preferred song).
Tap Add to playlist.
Tap a playlist.
How do I put music on my Samsung music?
Music player: Samsung Galaxy S8
From the Home screen, swipe up on an empty spot to open the Apps tray.
Tap the Google folder.
Tap Play Music.
Tap the Menu icon (top left) and choose from the following: Listen Now. My Library. Playlists. Instant Mixes. Shop.
Follow additional prompts, tabs, and settings in each section above to locate and play music.
Is Spotify free on Samsung music?
The free Premium subscription is only available in the US. Spotify is expanding its partnership with Samsung today by announcing that its music app will now come preinstalled on “millions of new Samsung mobile devices globally,” including the just-launched Galaxy S10 lineup.
Can you keep downloaded music from Spotify?
No, one of the key features of Spotify Premium is the ability to download music for offline listening, so once canceled subscription, you’ll still be on Premium for the remainder of the month you’ve paid for, but after that it will revert back to Free. You retain all offline music, but don’t have access to stream.
Where are Spotify music files stored?
Spotify downloads are not saved as MP3 files, instead they are encrypted files stored in the Spotify cache location. C:Users<username>AppDataLocalSpotifyStorage is the default location.
How do I download Spotify songs to my phone for free?
For Mac users, please turn to Download Spotify Music with Spotify Free Mac for the detailed steps.
Step 1: Download, Install and Launch NoteBurner Spotify Music Converter.
Step 2: Add Spotify songs or playlists to the Program.
Step 3: Customize Output Settings.
Step 4: Download music from Spotify without Premium.
How do you download free music from Spotify on Android?
How to Download Music from Spotify Free to Android Phones
Step 1: Download, Install and Launch NoteBurner Spotify Music Converter.
Step 2: Add Spotify songs or playlists to the Program.
Step 3: Choose Output Format and Customize Output Path.
Step 4: Download Music from Spotify Free to Local Computer.
How do I transfer Spotify music to Google Play for free?
See this video to import your playlist one platform to another. Spotify hack apk no root download.
Just download.
Open and select your platform that you import to (select Spotify and then Google Music).
Then sign in your Gmail account to set up.
After setup then you will see songs are tranferred Spotify to google Music.
Then finish. Now enjoy.
Can I download music from Spotify to my phone?
Spotify does make it possible to download music offline, though. On any album or playlist page, you can enable the Download option so you can listen while not connected to a network.
How do I download music from Spotify to mp3 on Android?
Get Ready: Free download and install Sidify Music Converter for Spotify.
Step 1 Drag and drop Music from Spotify to Sidify.
Step 2 Choose Output Format as MP3.
Step 3 Start Downloading and Converting Spotify Music.
Step 4 Find the Well-downloaded Music Files.
Step 5 Sync the Converted Spotify Music to Android device.
Can you convert Spotify music to mp3?
Launch the program and Spotify will be opened automatically. Just click “Add” button and then drag and drop any music file or playlist from Spotify to Sidify Music converter. Check the music that you need to convert and then press “OK”. If you need to download Spotify music to MP3, please choose MP3 as output format.
How do I rip downloaded songs from Spotify?
You can read the step-by-step guide from the following steps.
Step 1: Tools You Need. You need to download a MP3 Extractor for Spotify to help you extract MP3 files from Spotify tracks.
Step 2: Add Spotify Songs or Playlists.
Step 3: Set the Output Format as MP3.
Step 4: Get MP3 Files.
How do I add music from Spotify to my Samsung?
Click “Add Files” to import songs from Spotify. You can directly drag songs, playlists or albums from Spotify program or copy and paste the song link. Go to “Options” > “Advanced” to select the output format (MP3, M4A, WAV, FLAC) for your Spotify songs which is going to be sync to Samsung.
How do I download local files from Spotify to my phone?
For: Premium
Import your local files to Spotify using the desktop app (see “Desktop” instructions above).
Add the files to a playlist.
Log in on your mobile or tablet using the same WiFi network as your desktop app.
Select the playlist containing the local files.
Switch on Download.
Photo in the article by “Pexels” https://www.pexels.com/photo/woman-in-white-jacket-holding-silver-iphone-196654/
Related posts:
Question: How To Add Local Files To Spotify Android?
Question: How To Download Music To Your Android?
Quick Answer: How To Download Youtube Music To Android?
Question: How To Turn Off Shuffle Play On Spotify Android?
Question: How To Download Music From Spotify To Android Phone?
Where Does Spotify Store Offline Music Android?
0 notes
Text
Task 3 - Producing the Animations
Since I have the most experience with Unity I used it as the game engine of my choice for interactive animation. At first, I though that I could directly transfer the AI character files into Unity, I found that unlike Photoshop there is no concise method unless the character is frame by frame or a single image. So, to fix this problem I opened Photoshop files with transparent background and started using CTRL + C and CTRL + V to transfer each individual piece into Photoshop, to retain as much resolution as possible I made pasted images Smart Objects so that I could resize the character and not loose resolution.
At first, I though a normal Psd file would work and I had even imported it into Unity, it is only later that I found out that it needed to be a PSB file. After changing the file type I then imported it. I selected the file in the Assets folder and after making sure the settings were as they were supposed to be, Multiple and having Character Rig selected I went into Sprite Editor > Skinning Editor. From there I used Create Bones to make the main bones of the character, it took me a while to get used to this editor since I either was unable to delete bones which I made by mistake or because I did not understand how to limit the influence of bones I was moving parts during testing that I didn’t want to. It was only after getting use to understanding and what the Bone Influence (adding and removing which bones would influence that part of the character), Auto Weights and Weights Brush that I was able to create a good rig.

From there I went into the Scene tab to see how it would look. I selected the Cute Character (2) object in the list went to Add Component > IK Manager 2D. I then created a Limb Solver, renamed is Arm_R_Solver, dragged the HandR to the Effector tab > clicked on Create Target and then checked the Flip box. I repeated this process for the Left Arm and the Ponytail. I created a limb solver for the right leg and named it Leg_R_Solver, I dragged the FootR into the Effector and then clicked Create Target, I repeated this process for the left leg. I then used the Move tool to pull the effector circles away from the rig, I moved the circles to just above the move tool.
To start the animation I selected the Cute Character (2) object and went to the Animation tab at the bottom and clicked Create Animation, I created a folder for Animations only and named it Skip_anim. I selected the red button in the Animation section and started to move the rig in different positions across the timeline, once I completed the rig I switched the red button off. I would then go to the drop down next to the name of the animation then click Create New Clip to make the next sequence, I did this with every animation of this character. To determine how I would place the character I would use the basic poses sheet that I created that depicted all the poses of each character and their animation states as a guide.

When creating character rigs I still had a lot of trouble, mostly due to how the placed limbs in the psb file would not be placed in that perfect manner that allowed for smoother-looking animation, mostly this was because of my personal idea of what I wanted them to look like. I also found that this could also be due to how the bones themselves were placed in the Skinning Editor so I would also start to get into the habit of constantly reviewing the basic movements with Preview Pose to see if the movement is as smooth as I wanted it, if not I would use Edit Bones to move the pivot into a different position.
Sneaky Character Rigged Animation Demonstration:
https://youtu.be/GSGiOwOf_GU
When it came to certain rigs, namely the Lizard and Sneaky characters, I actually had a bit of issues when it came to them in two areas, namely the rigging and the solvers. When it came to the rig it took me an especially long time to find a way to make the character’s extra features move in the manner I was aiming for, especially for the Sneaky character. The trouble was in rigging the Sneaky Character’s trench coat tails, when animating I wanted to make it so that the tails could flap and move so that I could implement the Principle of Secondary Action. It took a while to not only find the perfect placement of the base bone’s pivot but also to see how many bones would be needed so that when moving the tails it would have a nice and varied movements. The same problem came about when I was creating the tail bones for the Lizard character. I had to experiment quite a bit to find out how many bones where needed to get the best and more fluid movements.
The second issue I came across concerned the rigs solvers of both characters, namely the one for the Lizard Character’s tail and the Sneaky Character’s trench coat tails. Using the normal Limb solvers on these parts made the entirety of the rig warped and even turned it upside down. I did come across the solution, after much experimentation, which was to basically use a different type of Solver. For the entirety of the characters I had been using the Limb Solver, so I tried to use a different Solver, that of the Chain Solver.
I went to the IK Manager > Add Solver > Chain, in the chain solver menu I selected the bone that was the tip of the tail and dragged it to the Effector tab. I then put in the number 6 in the Chain Length, this would be telling the Unity system that this Solver would effect 6 bones in total, the connection was visually confirmed to me when the black circles in the bones I wanted to move turned green. To confirm this I clicked Create Target, once I was able to test that this method did in fact work with no negative repercussions to the rest of the rig I renamed the solver Tail_Solver.
I went into the project which hosted the Sneaky Character and tried to see if implementing the Chain Solver will also work on the trench coat tails. Like the Lizard, I dragged the end bone of the tail into the Effector and made the Chain Length 3, since there were 3 bones only Influencing the right trench coat tail. I clicked Create Target and tested out the new solver, when I saw that it worked I renamed it TrenchR_Solver. I repeated this process for the TrenchL_Solver.

I did come across a very persistent problem, that of updating the psb file in Unity. When I tried to do so, by moving the sprite’s parts in different positions, I always came to the same conclusion, the sprite in the game would be irreversibly messed up and miss different pieces. This led to me deleting the psb file in Unity, updating the original and then putting the original back in Unity. Curiously, I discovered a sort of loophole to this issue. When animating the Lizard character, I discovered that the back leg was in front of the tail, when it should be behind. So, reluctantly I opened the psb file in Unity and moved the layers around until the left leg was behind the tail. It updated in Unity and to my surprise just fixed the issue without messing the sprite, this showed me that moving the layers around is acceptable and will not mess with the rigging or the sprite.
Before I had started the Lizard and Sneaky character animations I came across a little fact, that it is better that the animations of characters are made in the same sport, with only little deviations for specific animations like jumping and such. At this point I had already finished the animations of the Cute and Hot-headed characters, so I was quite ironically amused by this.
So, I started and finished the animation sequences for both the Sneaky and Lizard characters, keeping this in mind. Once I had completed them I went back to the Cute and Hot-Headed Characters animation’s and fixed them so that all the character’s movements would take place at the same point.

Fixing Framework Placement:
https://youtu.be/KqJ-f_-ExOU
Animation Reels of All Characters
https://youtu.be/b0db6IP2mwg - Sneaky Character
https://youtu.be/fZHxMfjRg_c - Lizard Character
https://youtu.be/AIw6jzPvwJA - Hot-Headed Character
https://youtu.be/KxKoHYKhf4g - Cute Character
Since I managed to finish all animations of the different characters before the deadline, I moved on to creating the animations that I wanted to try. These were the spin animations for the cute character and the hot-headed character. I first started off by going into the individual Illustrator files and creating the frame-by-frame animations of the characters. Once complete I transferred each frame into individual PSB files as Smart Objects, this is so that I would be able to transfer the files into Unity with ease, also if I wanted to alter the frames in the future this would be easier.


I first tried to use the Sprite Swap feature but after looking at it I found that it is more focused on allowing a developer to implement the same rig and animations on different sprites that look and act similar to the original with minor differences, like different coloured scarfs or weapons. As such I tried a different method. I hid the rigged Cute character GameObject Sprite, dragged and dropped the first frame of the spin animation and renamed it Cute (FbF).
Selecting the Cute (FbF) GameObject I created an animation project and named it Spin_state.anim. I then selected all the frames and dragged it into the timeline. Hitting the record button I watched the reruns of the animation and placed the keyframes at different points so that the animation would not only last longer but also be fast at certain points, namely the spin itself. Once done, I hid the Cute (FbF) GameObject and revealed the rigged sprite object. I repeated this process with the Hot-Headed characters frame-by-frame animation.
Frame-by-Frame Animation Reels & Process
https://youtu.be/yc8cJ-KdHnA - Hot-Headed Character Frame-by-Frame Process
https://youtu.be/TjpwJdKtPeo - Cute Character Reel
0 notes
Text
90 Days of Ableton: Day 0 & 1
I downloaded Ableton in the late evening on May 10th, so I’m going to call May 11th, my first full day with the software, Day 1.
May 10th was Day 0.
I did spend a couple hours on Day 0 trying to get comfortable with the program. I’ve never used a full DAW before - I’ve only noodled around with free web apps like Soundation.
So I had a basic sense of how to add instruments or channels, how to create and edit clips, and how to create notes with the draw mode/pen tool.
I decided to start by making something slow & chill.
I had a basic structure already in mind:
Start with one nice chord pattern with a little texture, a few passing notes, to make it interesting: 2, 4, or 8 measures long, as an introduction. Play it by itself.
Then, after 2-4 measures, layer it with beats.
Then layer it with more filled-out chords.
Then layer it with melodic lines. Make the melody another repeating loop, 2-4 measures long.
After the melody plays a couple times, start to tweak things. Change some of the moving notes, make sequences go up instead of down, or down instead of up.
Then add a few more percussive elements, transitions, and little instrumental call-outs to give it some life.
Every 2-4 measures, add a new instrument or effect without breaking the underlying pattern. Familiar foundation + novelty = brain takes interest.
Once the pattern repeats enough that you get tired of it, it’s time for a B section!
Now start removing instruments. Allow the more recent elements to play, or play with variations, and switch up the basic loops you started with. (i.e. change the bassline, change the chords, change the beats - you want complementary, but different.)
Preserve some elements, change others. Keep it on a 2, 4, or 8 measure cycle. You want new things to happen every 2 measures.
Re-introduce elements you haven’t heard in a while on top of new ones for a satisfying climax.
As for an outro? I basically just let the B section play out, and then I went back to the chords from the intro but I gave them to a different instrument, and I silenced everything else...dropped out the bass, the percussion, everything except a little ambiance. It worked, even though it was abrupt.
By the end of Day 1, I felt I had something cohesive and more-or-less “finished,” though it was very unrefined.
I lowered some of the track volumes (bass, shamisen, soft horn, bottle blower) but not all of them (I’m writing this from the perspective of Day 3 so now I know that the mixer in the red is something to correct), I didn’t do any panning, I didn’t double any instruments. I didn’t do anything with gates or envelopes or pitch shifting.
It’s basically a compilation of sounds and a nice tune but it’s not edited, mastered, or mixed in any significant way.
What I Started With:
Ableton Live 10 Trial (free)
a pretty chord riff: mine was inspired by an old j-rock song ain’t afraid to die by dir en grey
(I figured out the exact notes of the chords (I have a good ear but I do not have perfect pitch, people) with this synthesia video breakdown of the song.)
a few general ideas for how to structure it (listed above)
a few general ideas for organizing my workstation
basic background in music performance/theory (I know that not all aspiring music producers may have this, and I am lucky to; but it’s also likely that many musicians are drawn to this work)
What I Learned:
ONE. I’m not sure why the basic template, when you open a new live set, is two Midi tracks and two Audio tracks. The first habit I started was deleting one Midi and one Audio track, silencing the two remaining, and using them as temporary storage tracks to hold midi & audio samples/clips that I wanted to use but hadn’t assigned to an instrument. Nobody told me to do that. It just made sense to me and maybe in the future I’ll find out that it’s actually a bad idea, but it works right now.
TWO. The basic trial version of Ableton supposedly doesn’t have as much extra content (sounds, samples, instruments) as the full one, but it’s still pretty loaded. [Disclaimer: Nobody is paying me to say this.] A really huge amount of time was just taken up with me sorting through all the stuff that came pre-installed, listening to samples, and selecting what might sound good in the context of my own song. (HOWEVER - I did want more orchestral instrument options. Not enough brass and winds, and the strings could definitely be improved...)
THREE. It’s really easy to get distracted by other cool sounds. I ended up saving a bunch of specific samples to my user library (or creating a new live set to play around with it a little bit) because hearing certain unrelated sounds inevitably triggered new musical ideas that weren’t appropriate for the current composition.
FOUR. If I didn’t have a specific idea for a song in my head (which I did), it would have been so much harder and taken so much longer to create something cohesive. Going in with 1. a basic chord progression and 2. a couple basic melodic “cues” that I lifted from the lead vocals in the original song made it MUCH easier to fill in everything else around it. I deliberately took inspiration from another song because I wanted to focus on creating something pretty that would teach me how to use the software without getting too bogged down in composition.
FIVE. It was easy to get distracted and to flounder until I “landed” on exactly the sound I needed, or the sound I didn’t know I needed until I heard it. Example: I didn’t plan out a shamisen track, but once I saw the shamisen instrument in my library, I knew I was gonna have a good time with it. Or the chimes. As soon as I heard the chimes, I knew exactly where to put them and I didn’t swerve.
SIX. One of the most time-consuming things was just locking in the actual notes. I was used to the draw tool in another program that streamlined drawing notes, but I felt like it was clunkier and slower-going in Ableton because there were so many more refined options.
As a result, I learned/realized that I could use my computer keyboard in lieu of a Midi keyboard (which I don’t own), so I ended up composing that way. When there were tempo or rhythmic issues, I fixed them by ear, manually re-positioning notes...(I can only assume there’s a shortcut I don’t know about yet because if it’s not clear I’m a total noob) and zooming in closer for more refined adjustments.
SEVEN. Zooming! I learned a few basic keyboard shortcuts which helped SO much. On a PC:
ctrl+alt gives you a grabby hand and if you hold those down while you click with the mouse you can move all around the track without accidentally clicking or highlighting or deleting anything
ctrl + mouse scroll wheel (or + / - buttons) lets you zoom in and out, in the track itself and in the midi note editor.
EIGHT. One of those “learning by doing” things - day 0 & 1 were just immersing myself in the system and figuring out how to actually do the thing I needed. Some of my early questions:
why is my master track mixer red when everything else is green? (answer: you need to lower individual track volumes well below 0, like at least -8 to -12.)
how do I make the display go left-right with a timeline instead of up-down? (answer: tab button to switch between views)
how do I make this note sound less harsh? (answer: probably has something to do with the velocity? and/or the attack?)
how do I make this sound linger instead of clip off suddenly? (answer: hold the note until the end of the phrase, or lengthen the clip to draw it out - yeah I’m not touching reverb yet)
how do I lengthen or shorten clips? (answer: there’s a function with ctrl + E to slice something if you want to chop it up, but otherwise just grabbing it by the edge and dragging left or right will work. note this is for the clip...not the music/notes.)
how do I make the instrument panel come up and how do I hear it and how do I use my keyboard as a midi controller?
answer:
Select your instrument from the library sidebar and drag it to the place under the other tracks where it says “drop files and devices here”
Then, double click on that track
This should create a new “clip” which you can expand or move around to a different place in the timeline.
There’s a little keyboard along the left side of the “midi clip editor” which pops up at the bottom of the screen when you create a new clip. Click the headphone icon above the keyboard (which lets you hear yourself play it) AND press the M button on your keyboard to turn the Computer Midi Keyboard on and off. (You should see it light up in the top right corner, near the CPU load meter.)
Then, you should be able to use your keyboard to play notes - a s d f g h j k as the basic notes of the c major scale (i.e. white keys from C - C; easy to remember since f and g correspond to actual F and G) and W E T Y U as black keys.
To actually record what you’re playing, hit the record button. Personally I recommend setting the metronome (upper left corner) to count off one bar before the recording starts.
I will share my finished “song” from the end of Day One, but before I do, in the next post I’m going to break down what happened on Day Two to show you how I improved even further upon my work.
Then you can hear the two side by side, really proving how much progress one person can make in a single day!
#90daysofableton#abletonlive#learning ableton#sound production#music composition#dir en grey#chillwave#digital audio workstation#DAW#composing chillwave
0 notes
Photo
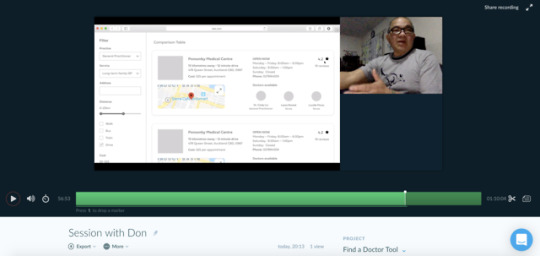
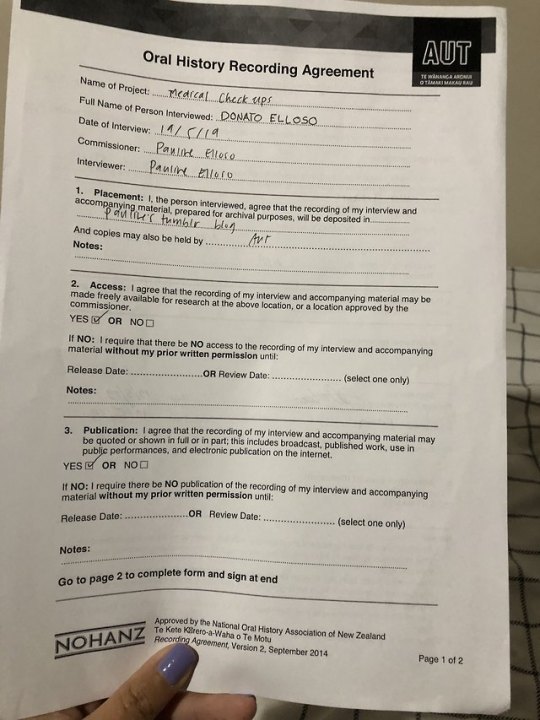
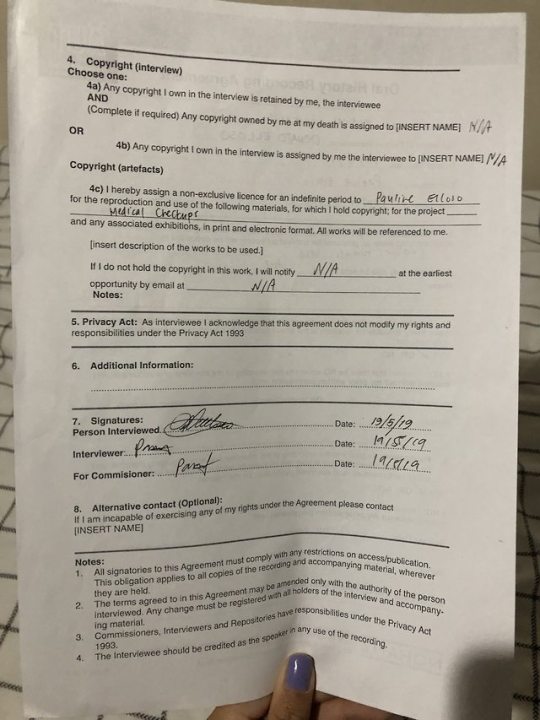
User Test #7 with Donato (59 y/o, technician for Chorus)
Icebreaker
Q: Can you tell me a little bit about yourself? Such as, what’s your occupation, what are your hobbies?
A: I work for Chorus, I’m doing fibre and copper installations. My hobbies are listening to music, breeding fish, cycling and singing.
Q: Tell me about what comes to mind when I mention the word “doctor”
A: Medical checkups, someone’s sick or a master in a certain field
Q: Do you currently have a GP? If so, are you satisfied with the cost and distance to get there? If not, have you ever thought of switching to a more suitable one for your needs?
A: I have a GP at Waitakere Union Health. I’m happy to go there and it costs me nothing. I wouldn’t say I’m getting enough care but it’s well above my expectation. They constantly monitor my heart condition, physical wellbeing and they keep in touch with me from to time with regards to my laboratory checkup - from blood tests and yeah. I’m happy with where I am because if I switch to another GP there wouldn’t be any differences with the analysis, they’d just get my medical records passed to them, follow the same routine that I’m having now. It would be the same procedures and diagnoses.
Key Takeaways
Homepage:
“A General Practitioner would always monitor me”
“Address? Would that be the GP’s address?”
“I wouldn’t mind driving to the GP cause I drive”
Started talking about own situation with own GP, brought up some interesting insights about decision making - how he wouldn’t switch to a GP where he’d have to pay like $30 and get the same services when he gets them for free now
“This would be good for people who aren’t happy with the GP’s they have. Seeing reviews made by others would be a bonus so they have an idea of what would suit them. Most people review a certain service, product or person on the internet nowadays. Right now with doctors it goes around by word of mouth, but if there’s a website it’d be much easier cause nowadays everything’s done on the internet”
This section got a bit tangential as he said he wouldn’t drive 12km for a GP.
“I got confused with your question” At this point I had to rephrase the task and started talking in our language, explain the idea further e.g. what the distance and cost sliders are for, insisting he clicks around
Talks about when finding a GP you usually look for someone you feel at ease with, some GP’s go the extra mile like give you advice on things you could do without extra cost. Most GP’s nowadays just ask about how you’re feeling, blah, blah - some recommend you to specialists once you’re diagnosed e.g. with a heart problem you have to see a cardiologist (I was relating this back to other users’ suggestions of including what the doctor specialises in on the website so this was good insight)
Wasn’t clear to him that address field is for typing in your own address, thinking you type in the GP’s address
Pointed out that max distance of 40km would be too far, would be in like Manukau going to Papakura, “I don’t think I’d be driving that far for a normal consultation. I mean think of the traffic, time consumed and petrol. You have to take leave from work, and if you had an appointment in the morning or afternoon you could miss it. So the nearer the better. If it’s walking distance then even better. It depends on the person.”
*started clicking around, went through GUI’s from left to right rather than top to bottom
I had to probe for him to click Search after applying those, he asked about the address again - at this point I was thinking the impression that the fields aren’t all filled in makes it seem like it’s not yet done and can’t move forward
I ask: “What’s next?”
“What’s next? Then I have to search”
Results page:
“The first thing I saw is the star, I’m normally used to reading reviews like Trademe or if I want to buy or know about a product or service. The more positive reviews the better. It’s like word of mouth, someone I know giving me advice. Some reviews can be biased or manufactured though like for example if a friend of a doctor reviewed them, then it wouldn’t be totally reliable. So my next determinant would be the distance, but then I’d think if it’s in the city where would I find parking? Whereas if I go to Grey Lynn for an extra 2 minute drive, it’d be easier cause Auckland CBD would only have parking for staff.”
“Parking is a must e.g. in town there are only a few like Victoria, SkyCity, Civic, Wilson is expensive which costs would go on top of your appointment fee so adding this would be a great solution”
“If I’m budget conscious I would choose the cheapest one”
Clinic info page:
“The map stood out to me first cause clicking on the map would give me an idea where to go, where I’d park or my travel time, I have to add time for finding parking you know? Circling around the area and walking since I drove all the way to that place, I’d still be walking a bit - so why would I choose it?”
“Cost is cheap, phone number, appointment time, normal business hours, they have 1 GP, 2 nurses"
Asked how to scroll with the Mac which made me think, I don’t know anyone who’s older that uses a Mac which might affect how they perceive the prototype if they’re testing on one
“Dr Mckay’s the expert”
Doctor info:
“Would I go to them straight away? I’m used to shopping around, it’s what Kiwis do even for services which means finding other options. So I would compare her with other GP profiles. I don’t just jump to the availability and compare it with my schedule.”
“Languages - added value since language barriers exist. If they can’t understand clearly the way you talk.. I would prefer to see someone who speaks the same language as me.”
“Nothing I’d add”
Changing filter parameters:
“I would expect the page to refresh if I change what’s on the filter automatically rather than going two pages back”
Sort by feature:
Noticed sort right away and assumed rearranging the list should be done through it
“That helps a lot for someone comparing options. I’d rather use the drop down than the three big options at the top to organise them. I use it a lot on Trade me e.g. cheapest, closing soon”
Comparison table feature:
How I said the scenario here was a bit confusing
The idea of adding to a comparison table was initially confusing so I had to intervene and probe
Clicked add to button and immediately went up to the (1) comparison table tab
“Having a comparison table would be beneficial for the user”
“It’s easier to do, more user friendly to have a comparison table that’s one click away”
“the term comparison table makes sense, I can’t think of what else to call it”
“I’m more than happy to use it”
Reflections
Q: How would you describe the prototype to friends?
A: If a friend asked me to recommend a reliable GP I’d suggest for them to go on this website ... tangent “Everything is computerised nowadays. You have to have at least some sort of grasp on how websites work since it’s a huge part of our daily lives. The older generation who have limited knowledge on how this works would be lost. You wouldn’t recommend this website to seniors who have no idea how to use a computer, you’d struggle to recommend it really. They’re probably just get information by word of mouth and you have to explain it well.. some get grumpy over not knowing how to use something and saying they don’t need it in the first place. It’s not an excuse to be too old, everyone’s capable of learning. Patience is key when explaining stuff to grumpy old people. You have to find a strategy to convince them to use your product or service, saying it in a nice way without insulting or touching their ego... It’s hard to change behaviour cause most [old] people don’t like change. Everything changes and you have to cope with it.”
Q: Is it something you would use?
A: Yes. It’s convenient, user-friendly.
Card sorting
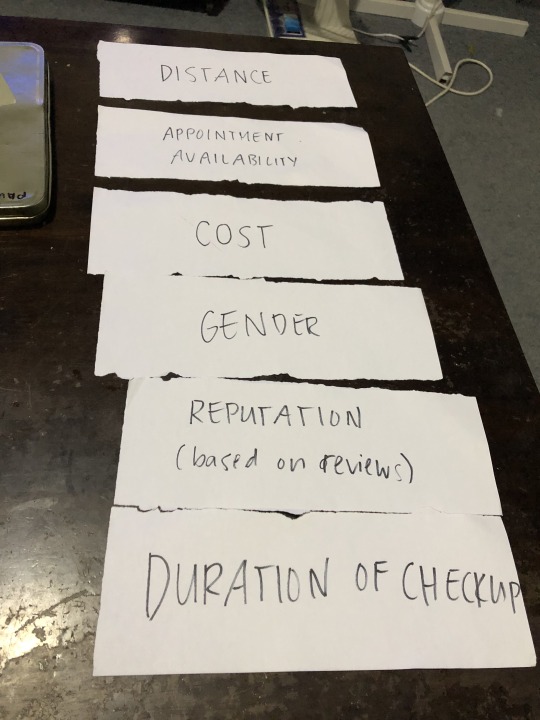
Distance - Cause time is important to me e.g. if I got half the day off to go to my GP I’d need to utilise that time wisely. Most GP’s are closed on weekends and holidays. I work on weekdays so my first basis would be the distance. I work in the field so I’m everywhere but even if I worked in an office and I had to travel from Massey to Greenlane it’s quite far, my boss only gave me half day o
Appointment availability - Say I’m only available from 12-3 and there’s no GP available in that time so what’s the use? So I think it’s more important
Cost - If I’m on a budget e.g. I’m paying insurance, mortgage.. For someone who’s paying too many bills, cost would be a big factor especially if you’re just earning wage. Comparing $25 and $40, the extra $20 could be spent on petrol instead
Gender - I’m more at ease asking questions from a man, having a man to man talk I can open up anything under the sun
Reputation -
Duration - Doesn’t matter that much as long as I was able to express what I’m feeling, how long it’s been going on etc. regardless if they’re a specialist that’s what they ask and it’s up to you to explain it further. Some doctors also get irritated about appointments that go overtime cause they have other patients to see. And [I think] they’d wanna see more patients to get more money. Getting to that profession costed them a lot so they have to get something out of what they shed off while studying unless the doctor is already well-off and genuinely want to help.
Reaction words
User friendly - Because I have a bit of an idea how computers work, clicking and switching between options was easy
Annoying - First impression *scratches head* if you don’t understand what you see and just cause it’s foreign and intimidating.. If you’re using a new website you’re obviously gonna have averted feelings.. Older people tend to just let someone else do it for them, especially if they’re busy
Convenient - As soon as I grasped the idea I found it valuable
Efficient - Synonymous to convenient, like this would be beneficial and it’s easy
Valuable - I thought this website would have value
Behaviour
has a good knowledge of technology, uses phone and laptop everyday for various things like work, buying and selling and social media
Very detailed and expressive
Likes to give examples
Because of this he tends to really put himself in the situation instead of seeing information as placeholders e.g. I wouldn’t drive to Auckland CBD Medical Centre cause parking would be a nightmare but he brought up a really good point that it would be good to include parking information
Can go off on a tangent
Used fingers to point at things on the website instead of using the trackpad
Would attempt to touch screen and scroll down with fingers
0 notes
Text
Mac Versus PC – Here’s Why I Still Loathe Windows After 20 Years
After two decades of experience with both Mac and PC computers, I still love the Mac OS, and I still utterly loathe Windows. Admittedly, I am no computer expert. But, hear me out. If you’re an artist, this might resonate with you.
Sand Dunes, Death Valley 2005. First Processed in Photoshop CS2, re-processed ~15 years later in Lightroom CC
I built my first PC in high school, it was a Windows XP (or Windows 2000?) machine. My father took me to the local electronics superstore and we picked out the motherboard, etc. I loved the sense of pride when it first turned on, I loved making upgrades, it was fun, at first.
After the tragic “bricking” (electronic death) of that PC, due to viruses or malware or something, (curse you, Napster/LimeWire/Kazaa!) …I got into photography and bought my first Mac. I “went legit” and paid for authentic copies of Adobe Photoshop 6, 7, Creative Suite, and beyond…. (And, yes, I paid for music on iTunes!)
Fast-forward a couple of decades, and I’ve gone back and forth between Mac and PC a few times. As a post-production manager/specialist and private workflow consultant, I have to stay up-to-date on both operating systems for my work.
Shop the Best Computers For Photography Editing: (Adorama) (B&H) (Amazon)
Sony RX100 VII, 2019 Adobe Lightroom Classic
I’d estimate that my time has been split 70/30 or 80/20 between Mac/PC. Whenever I use a PC more routinely than a Mac, though, I have the exact same experience…
With each new version of Windows, my initial reaction is “oh, this isn’t so bad!” After all, I just need a few photo and video editing programs, and they’re virtually identical on both operating systems. As someone who reviews cameras for a living, re-wiring my brain quickly to jive with a few different keyboard shortcuts and Finder VS Explorer comes very easy.
Then, like clockwork, Windows begins to sabotage our relationship. Things get way too complicated, and in a totally new way each time. Each time, I quickly remember why I love my Apple machines. They just work. They’re simple, they run smoothly day in and day out, they’re just idiot-proof. I realize that makes me the idiot, and I’m OK with it; I spent all my energy mastering camera interfaces and customizations, apparently, and I have no patience left for confusing computer problems.
[RELATED READING: The Best Lightroom Keyboard Shortcuts | Quick Reference Guide]
Yosemite, 2017. Nikon D750, Adobe Lightroom “Classic”
Today’s story is just one example of why, personally, as a simple-minded creative person I will probably never truly enjoy the Windows user experience like I do the Apple “sphere”. It’s probably not even a good example, there’s probably a really easy explanation for this problem, but after hours of searching the internet and asking all my PC wizard friends, I still couldn’t fix things, so here it is…
DISCLAIMER: We all have our different computer-related experience & track record. Some people have had numerous Macs crash or die on them. I’ve heard the reports of how overall quality control has declined in recent years. All I am doing today is telling my story. You’re welcome to tell your own story in a comment!
Windows PC Display Calibration Profile
Like any responsible photographer should, I attempt to calibrate my latest new PC display. It’s a 4K HDR laptop display, so the slightly older calibration device was barely up to the task. The default calibration options were very wrong for such an exotic display, and I had to re-calibrate multiple times with a lot of trial-and-error, before getting it right. To be fair, I’m not faulting Windows for this complication at all; it was an older model X-Rite device, and my Apple displays were never 4K HDR with 100% RGB! Moving on…
Even when accurately calibrated, however, Adobe applications still displayed images quite differently from Windows Explorer and other applications. (Kudos to Google Chrome for coming the closest to matching Adobe, though!)
I was confused. I hadn’t encountered this problem on a Mac in 10-15 years. And, the difference was significant enough that if I edited my images “to taste” in Adobe, they didn’t just look slightly different everywhere else, they looked horribly over-cooked.
So, I decided to dive down the rabbit hole, and see if there was a deeper level at which I needed to change a color space/display setting, or designate the new calibration profile, in order for Windows to stop over-cooking colors and contrast so much.
Also, by the way, the calibration profile keeps un-setting itself, every time the computer sleeps, even though X-Rite says it has applied it at the system-wide level. So I have to re-apply the display calibration profile every single time I wake the computer. Another reason to dive deeper and check the system-level settings. Which brings us to the present. Let’s try and figure this out together…
First, unlike on a Mac where display settings are all handled in one place through the OS preferences, on this particular Windows PC each hardware manufacturer has its own little add-on programs besides Windows’ own settings. So, I check those first – Acer has one, Intel has one, NVIDIA has one, and of course there’s one more GeForce…thing. None of them seem to have any control over the actual display profile. (Despite one of them actually having a seemingly useless option deceptively named, “Select profile”…)
So, I’m four applications (each with numerous settings) into my hunt, and I haven’t even found anywhere to force my computer to use the same display profile. Only Adobe applications seem to automatically use the X-Rite-generated display profile.
So, into Windows Display settings we go. Let’s count how many layers there are…
This is the 2nd level of the 1st settings window, where the “Color profile” setting keeps undoing itself despite double-checking in the calibration software that the profile should be saved at a system-wide/admin level. So, we’d better go down to the bottom of this window and click “Advanced display settings”…
Layer 3 – Nothing useful here; we need to click “Display adapter properties for Display 1” and go even deeper…
A whole new (2nd) window pops up. This isn’t very useful either, but I do see a tab called “Color Management”, and that sounds a little more promising!
…Sadly, the “Color Management” tab just shows a “Color Management…” button. I guess I better click it! (Depending on how you count, we are 2 windows or 5 layers deep at this point.)
Now we’re getting somewhere! 3 windows (6 layers) into the bowels of Windows settings, I finally find somewhere to set a default display device profile. Except, it’s already set to the CUSTOM profile, even though I’m definitely having the color/contrast discrepancy problems I described. What’s going on? Well, there is another “Advanced” tab in this window; let’s see where that leads…
Is this the culprit? I finally found a “Device profile” setting that I can change from the factory profile to the custom profile! (Layer 7)
…Unfortunately, changing this setting didn’t seem to help. In the lower corner of the window, however, we see a button for “Change system defaults…”
We get an identical window, except this is named “Color Management – System Defaults”. Unfortunately, the CUSTOM profile is still set as the default. Maybe there’s another “Advanced” tab? Yes, there is. At this point, (4 windows, 8 layers) I feel like I’m in a horror house of mirrors…
Finally, when I can go no further, (layer 9!) I found a “Device profile” option that was set to sRGB, even though this is an AdobeRGB display. Let’s try setting this last option to the CUSTOM profile, and see what happens.
…Surprise, surprise: colors and contrast are, in fact, a little bit closer in Adobe applications and other Windows programs. Still, they’re off by a tiny little bit. It’s a margin of error that I’m willing to accept, though, so let’s call it “good enough”, and get on with our lives!
[Related Reading: Datacolor Launches SpyderX Tool Kits for Digital Photographers for Ultimate Color Calibration]
The real question is, surely after going deeper than Indiana Jones into the bowels of my computer for just one final setting, the computer should remember this display profile at the main level, even if I let it go to sleep, or do a full restart?
…Of course not. There’s that factory calibration again! Apparently, I’ll have to re-enable my calibration profile every single time I sit down at my computer. (Unless some Windows genius comments below and tells me what I’m doing wrong!)
Conclusion: Why, Windows, WHY?
Honestly, to be totally fair, I bet the real problem is ME. I’m sure there’s a totally simple solution to this problem, and if I’m lucky you’ll be polite with your comments even though I deserve to be ashamed of my failure. I probably made some rookie mistake.
But, I did try very hard to find a solution. I spent hours reading everything I could find on Windows display calibration and profile settings. I could only conclude that having colors match in all apps may just not be possible, period, when using an HDR-capable 100% AdobeRGB display. Maybe I’m wrong, and I missed a setting in one of those other proprietary apps.
Adobe Lightroom, Visual Flow “Pastel” preset for correcting green-tinted scenes (Click here to learn more!)
Either way, my point is this: With all the Apple computers I ever owned, at least it was never NINE LAYERS of complicated. (Not to mention the additional apps for managing individual pieces of hardware, as is Windows’ custom…) I don’t care how computer-savvy you are, nine layers of settings is about 6-7 layers too many.
With a Mac, setting up a calibration, or getting it to “stick”, was never a problem. Whenever I got a new Mac, or did a hard drive upgrade and full OS refresh, it was always effortless: install the software, perform the calibration, and tell the program to make the new profile universal. Done!
I might have missed something obvious, but I still can’t get past the fact that there are eight layers, or four different windows of display settings, plus those four aftermarket programs related to the display and graphics. That’s ridiculous. Why, Windows, Why? Is this really necessary?
Why Artists Like (Or Dislike) Mac: The Simplicity
I just need a computer that works. I need a computer that only has one or two levels of complexity, because I’d rather be back outdoors taking more pictures, not “managing” my computer. I know plenty of photographers that have no problems managing their PCs. They’re also very inspiring, creative artists! I guess everybody is a little different.
I understand that PCs, on average, are an incredible value. And, make no mistake, all the PCs I’ve ever used have been awesome computers overall, including this latest one. They’re powerful, fast machines that really let me blast through a batch of high-megapixel photos, even stitching 300-megapixel raw panoramas with ease! So, if you need the best value, a PC is a great choice, even if you might experience a little bit more frustration.
My point is, if you appreciate simplicity, or if you absolutely require it in order to maintain your sanity, that’s OK! We may pride ourselves in being camera masters, or Photoshop masters, but it’s OK to make certain technology-related decisions that help keep our blood pressure down. For me, that means I’ll likely forever reside in the Mac OS camp. I don’t care about brand name status symbols, or sexy outward appeal, I just want a computer that works as smoothly as possible, for as many years as possible. How about you?
Source link
Tags: 20, Heres, Loathe, Mac, PC, Windows, years
from WordPress https://ift.tt/3br3CEI via IFTTT
0 notes