#iso recommended cable
Explore tagged Tumblr posts
Visit Tumblr Blog
Explore Tumblr blogs with no restrictions, modern design and the best experience.
Last Seen Tumblr Blogs


Fun Fact
Hackers stole 65M passwords from Tumblr in 2013.
Text
What Are Cable Glands and Types of Cable Glands?
Forcenewz gives all details about cable ties. The Cable glands are one of the most helpful parts of electronic systems that use to attach electrical wires to equipment securely. Here we share 5 Types of Cable Glands 1. voltage relief on the cable gland, 2. Cable gland for several tracks, 3. Threaded, 4. Threaded metric, 5. NPT. Visit today!

#cable glands#cable ties#electrical equipment#industrial cable glands#iso recommended cable#types of cable glands
0 notes
Note
You are the mutual I know who uses linux, and I have a half-broken dinosaur of a laptop I want to see if linux would make usable again.
Its 8+ years old, cannot connect to the internet for a reason that may be software related or might not(its a mystery), and has other various issues.
My use of it would Primarily be as a on-the-go text & html editor and if I can get the internet running on it then also firefox as well. Maybe some offline emulation of some older games or a simple linux supported drawing program but that isnt essential.
The question is Thus: If I download a linux mint installer and copy to a flashdrive(presuming you can download the file without it starting to set up the OS instantly), is that all thats necessary to upload linux mint onto a laptop that has no internet capabilities?
Also which version of linux mint should I use? I see there are several. This laptop 3 years ago ran windows 10 ok enough to boot up chrome and use the internet, but now it takes like 15 mins to finish loading enough that you can open programs, as a metric.
Thanks and hope you have a nice day!
Yes, most linux distros will run on a machine that age, and with a surprising degree of vitality. Game emulation should work just fine, unless the computer was very low power even for 2015.
On a mech that old, I'd suggest just checking if the tiny wire for the wifi card has popped loose over time. They are snap-on wire heads that don't lock, so especially with laptops, disconnections like that happen.
Your wifi card should look a lot like this:

I've circled the two tiny ports, and drawn arrows to identify which cables. The whole wifi card will be about an inch across, and is the ONLY thing that uses those kind of wires, so it's very identifiable.
Linux mint is designed to install offline, and includes a wide variety of open source and generic drivers for just.... so much hardware. When you begin installation, it will ask you if you want to use, "third party, private and proprietary drivers." If you say yes, it will want an internet connection to download those drivers. If you say no, it will install entirely offline without issue.
As for which version: the only difference is the visuals. I, personally, like XFCE because it has very minimal visual noise. Everything is simple rectangles with sharp corners and clear boundaries. This lack of visual flair also means it uses the least resources to run the OS, leaving more hardware power available for actual tasks. However, it's a very intimidating desktop. If you liked Windows XP but haven't enjoyed much since, grab XFCE.
If you are a Mac/apple user, I actually recommend Kubuntu instead of Mint, because it has the most similar interface visually and will cause the least transition pains. Kubuntu has equally if not even more robust hardware support to Mint, as both of them are built on top of the Ubuntu framework.
For everyone else, I suggest starting with Mint Cinnamon. I have actually, with no reservations, had way better results teaching confused retirees to run Cinnamon than Windows or Mac. It's a very user friendly interface.
The start bar search, for example, literally just shows results for files/programs installed to your computer, none of this bs about integrated web searching.
As for installation tools:
You must burn the ISO file to the flashdrive as a bootable disk, rather than simply copying the file to it. I'm sure you know that; it's the same for installing windows. But! People often forget that detail and wonder why their computer keeps booting to windows instead of the installation media.
I personally use LiLiUSB because I'm stuck mentally in the year 2014 which is when it stopped updating. For a more sane approach, try Balena Etcher. Or whatever bootable drive software you like; it doesn't really matter. You just need to make the drive bootable before installation.
47 notes
·
View notes
Photo

How to take a photo like this:
You will need
- A camera that can shoot RAW and take exposures longer than 30 seconds in manual mode OR a cable/remote release for your camera and the ability to time the exposure yourself
- A reasonably fast lens, call it f/2.8 or faster. Remember, f/4 is 2x the exposure time of f/2.8 and f/5.6 is 4x the exposure time. So pick fast glass if you can!
- Some photo editor that handles your camera’s raw files
- A solid tripod
- An overcast night
- A place with very little light pollution
- (Optional) your partner to help you be brave in the dark and/or kisses
Now follow these steps
0. Shoot RAW! The processing your camera does on jpeg shots will probably ruin super long exposures, so RAW is recommended. If you’re unfamiliar with editing raws , shoot RAW + JPEG. Then you’ll at least have the RAW files later if you pick up raw editing.
1. Take your camera and tripod to a very dark spot to take your photo. Avoid light pollution. Look at the horizon, if you see light patches, face some other direction. Those light patches will blow out in a super long exposure.
2. Pick a subject that is interesting because of its perspective or geometry. Remember, the light will be very flat so the composition needs to be interesting!
3. Set up your tripod & pop your camera on these. For extra stability, don’t extend the last leg section of your tripod.
4. Turn on your camera and set a shutter delay. Usually 2 or 10 seconds. This will help with any shake your introduce by pressing the shutter. Initial shake matters less for very long exposures, but best to avoid it you can. Optional with a cable release.
5. Turn off Long Exposure Noise Reduction in your camera. I know this sounds backwards, but with the setting on your camera will take a second exposure of the same length as your shot and combine the two exposures to reduce noise. If you’re doing an 8 minute exposure, that means you’ll need to wait 16 minutes total between shots. There is plenty of good noise reduction software these days. Do it in post instead!
6. Set your camera to manual focus. If your subject is very dark, your camera typically cannot see it. You’ll need to estimate how far away it is and check your camera’s distance scale to ensure focus is correct.
HACK: If you think manual focus can go kick rocks, use a flashlight or headlamp to illuminate your subject, focus on it, then set your camera to manual focus to keep that focus. Turn off the flashlight or headlamp.
7. Set your camera to manual mode. Most cameras will only let you set very long shutter speeds in manual mode (this is due to limitations of camera meters). We’ll mostly be fiddling with shutter speed and ISO since our aperture will be set wide open.
NOTE: Check Aperture Priority mode first. Set your aperture to f/2.8 or as wide open as your lens goes. ISO to Auto or the max setting you’re happy with the results from (ISO 6400 for my Fuji cameras). If your camera gives you a shutter speed that isn’t completely maxed out (usually 30 or 60 seconds), then it isn’t dark enough. Find somewhere darker.
8. Start from ISO 800 and a shutter speed of at least 2 minutes. Take your first test shot. Usually this comes out seriously underexposed, but it can give you can idea where to go. Plus, waiting longer than 2 minutes is annoying.
- if you’re using a cable release, set your camera to Bulb mode and time your exposure time as desired.
- if your test shot is over exposed, lower the ISO a stop or two and try again
- if your test shot is under exposed, you’ve hit the jackpot. Start increasing your exposure time for some sick, awesome pics.
If the exposure times are excruciating, your can bump your ISO too. However, high ISO noise gets worse with longer exposures. So your image will look considerably worse at higher ISOs. Therefore, longer exposure times and faster lenses are preferred when possible.
Watch out for moving stuff. At super long exposure times, any movement matters. If it’s windy, the motion can ruin a photo. A little bit of motion can add some painterly vibes to the photo.
9. Editing! Your camera probably got the night time white balance wrong, so you’ll probably need to fiddle with it for your photo to look how you want. Other settings are up to you!
I hope you enjoyed this excruciating long explanation on how to take a night time super long exposures. Good luck out there!

What’s up late night folks? Here’s an eerie shot I took down a pitch black road in the middle of the night
#if you’re shooting film set up the shot as normal but then#lock your cable release in place#set an alarm to wake up before morning blue hour#go the fuck to bed#then close the shutter when you wake up#shoutout to reciprocity failure you’re a real one#at least you don’t have to calculate it
126K notes
·
View notes
Text
The Ultimate Guide to Structured Cabling Systems
Introduction
Structured cabling systems form the backbone of modern communication networks, providing a standardized and efficient way to manage data, voice, and video transmissions. This guide covers the fundamentals, benefits, components, installation best practices, and industry standards of structured cabling systems.
What is a Structured Cabling System?
A structured cabling system (SCS) is a comprehensive network of cabling and associated hardware that provides a universal infrastructure for various communication technologies. It supports multiple hardware systems and applications such as computers, telephones, and security devices, ensuring a seamless and scalable network environment.
Benefits of Structured Cabling Systems
Scalability - Easily accommodates growing network demands.
Cost-Effectiveness - Reduces maintenance and operational costs.
Flexibility - Supports multiple applications and technologies.
Improved Performance - Ensures high-speed data transmission with minimal interference.
Simplified Management - Centralized system makes troubleshooting and maintenance easier.
Enhanced Security - Provides a controlled and protected infrastructure.
Components of a Structured Cabling System
A structured cabling system consists of six main components:
Entrance Facilities - The point where external cabling connects to the building's network.
Equipment Room - Centralized space for network and telecommunications equipment.
Telecommunications Room (TR) - Houses connectivity equipment such as patch panels and network switches.
Backbone Cabling - Connects different TRs, equipment rooms, and entrance facilities.
Horizontal Cabling - Connects workstations and end-user devices to the TR.
Work Area Components - Includes cables, connectors, and outlets at the end-user level.

Industry Standards and Compliance
Structured cabling systems adhere to various industry standards, including:
TIA/EIA-568 - Telecommunications Cabling Standards
ISO/IEC 11801 - International Cabling Standards
BICSI Standards - Best practices for cabling installation and maintenance
NEC (National Electrical Code) - Electrical safety regulations
Installation Best Practices
To ensure an efficient and reliable structured cabling system, follow these best practices:
Plan for Future Growth - Design the system with scalability in mind.
Use High-Quality Components - Ensure all cables, connectors, and hardware meet industry standards.
Follow Labeling and Documentation Procedures - Maintain accurate records for easy management and troubleshooting.
Ensure Proper Cable Management - Use cable trays, racks, and pathways to organize cables neatly.
Adhere to Distance Limitations - Follow maximum cable length recommendations for optimal performance.
Test and Certify the System - Perform thorough testing to ensure compliance with performance standards.
Conclusion
A well-designed structured cabling system is essential for a reliable, scalable, and efficient communication network. A network cabling contractor ensures proper installation by adhering to industry standards, implementing best practices, and planning for future expansion. Businesses can optimize their infrastructure and ensure seamless connectivity by leveraging professional expertise. Whether setting up a new network or upgrading an existing one, investing in a structured cabling system is a strategic decision that yields long-term benefits.
1 note
·
View note
Text
Cable Ties: Small Product, Big Impact on Industrial Safety
When it comes to industrial safety and organization, small tools often make the biggest difference. One such unsung hero is the SS cable tie—a simple yet powerful solution that ensures secure fastening, bundling, and organization in various industries. If you're looking for a reliable SS cable tie manufacturer in India, this guide will help you understand why these ties are a game-changer.
Why SS Cable Ties Matter?
Cable ties are essential for industries such as automotive, construction, aerospace, marine, and electrical applications. Stainless steel (SS) cable ties, in particular, offer several advantages over their plastic counterparts:
Extreme Durability – Understand harsh environmental conditions, including extreme temperatures and chemical exposure.
Fire Resistance – Unlike plastic ties, SS cable ties do not melt under high heat.
Corrosion Resistance – Ideal for use in humid and corrosive environments.
Heavy-Duty Strength – Perfect for securing heavy cables, pipes, and machinery parts.
Applications of SS Cable Ties
Whether you're securing electrical wiring or managing industrial hoses, SS cable ties play a crucial role in safety and efficiency. Some key applications include:
Electrical & Communication Networks – Keeps cables organized and secure.
Oil & Gas Industry – Withstands extreme environmental stress.
Shipbuilding & Marine Applications – Rust and corrosion-resistant for long-term use.
Automotive & Aerospace – Holds components firmly in place under high vibration.
Finding the Best SS Cable Tie Manufacturer in India
With the growing demand for high-quality cable ties, many manufacturers in India are offering top-notch SS cable ties. However, choosing the right supplier ensures durability, quality, and cost-effectiveness. Look for:
High-Grade Stainless Steel – Preferably SS304 or SS316 for superior performance.
ISO Certifications – Ensure compliance with safety and quality standards.
Variety in Size & Coating Options – Different applications require different tensile strengths and coatings.
Customization & Bulk Supply – Ideal for industries with large-scale operations.
Leading SS Cable Tie Manufacturers in India
India is home to several reputed manufacturers specializing in stainless steel cable ties. Many offer international-grade quality at competitive prices, ensuring reliability and longevity. Before making a purchase, check customer reviews, product specifications, and after-sales support.
Conclusion
A small tool like an SS cable tie can make a big impact on industrial safety and organization. If you're in need of high-quality SS cable ties, choosing a trusted SS cable tie manufacturer in India ensures durability, strength, and cost-efficiency for your projects. Investing in the right cable ties today can prevent future hazards and enhance operational efficiency!
Looking for recommendations? Do your research and pick a supplier that meets all your requirements!

0 notes
Photo

NEC LCD1970VX-BK-2 19 Inch LCD Monitor (Used) NEC has long made some of the top business monitors on the market and the LCD1970VX continues the tradition. This 19" LCD panel has a 1280x1024 optimum resolution for stunning clarity and detail. Its 800:1 contrast ratio and 300cd/m² brightness rating deliver an excellent picture even in an office lighting situation. The VESA standard mounting interface lets you mount the monitor on the wall of your office or cubicle. If you want to keep the monitor on your desk, the stand has tilt, swivel, height, and pivot adjustments. The pivot adjustment is great for when you are writing or editing long documents since more of the document shows on the screen at once. Once you have the monitor hooked up to your computer further setup is automatic. The No Touch Auto Adjust automatically optimizes settings at power on. In corporate environments, the NaViSet utility lets administrators remotely monitor and control display settings over the network. Specifications: Brand: NEC Display Solutions Model: LCD1970VX-BK-2 Cabinet Color: Black Display Screen Size: 19" Widescreen: No Recommended Resolution: 1280 x 1024 Viewing Angle: 176° (H) / 170° (V) Pixel Pitch: 0.294mm Brightness: 300 cd/m2 Contrast Ratio: 800:1 Response Time: 5 ms Horizontal Refresh Rate: 31.5 - 81 kHz ( Analog/Digital) Vertical Refresh Rate: 56-75 Hz Display Type: SXGA Connectivity Input Video Compatibility: Analog RGB, Digital Connectors: D-Sub, DVI-D D-Sub: 1 DVI: 1 HDMI: No Power Complies with VESA DPMS power management Power Supply: AC 100-120V/AC 220-240V Power Consumption: 36W Convenience User Controls: OSM User Controls Regulatory Approvals: ISO 13406-2 Class II Stand Adjustments: Height, Pivot, Swivel, Tilt Built-in TV Tuner: No Built-in Speakers: No HDCP Support: No Features: Plug and Play (VESA DDC 1/2B) VESA Hole Configuration Specifications: 100mm x 100mm Windows: Works with Windows Vista Dimensions & Weight Dimensions (H x W x D) 16.2" x 15.2"-19.5" x 8.7" Weight 15.4 lbs. Power cable, D-Sub, DVI-D cables not included
0 notes
Text
Lockout Tagout Kits: Ensuring Workplace Safety in UAE
Introduction
Safety in the workplace is paramount, especially in industries that involve machinery, electrical systems, and hazardous equipment. A Lockout Tagout (LOTO) kit is an essential tool for safeguarding workers from accidental energy release during maintenance and servicing. In the UAE, where industrial safety standards are rigorously upheld, LOTO kits are vital in promoting compliance and preventing workplace accidents.
This blog explores the components, benefits, and applications of Lockout Tagout kits, highlighting their importance in the UAE’s industrial landscape.
What is a Lockout Tagout Kit?
A Lockout Tagout kit is a comprehensive set of devices designed to isolate energy sources and prevent the accidental start-up of equipment during maintenance. These kits include various lockout devices, tags, and tools tailored to meet the specific safety needs of different industries.
Key Components of a Lockout Tagout Kit
Padlocks: Durable safety padlocks to secure lockout devices.
Tags: Clearly labeled tags to warn employees of ongoing maintenance.
Valve Lockouts: Secure valves to prevent energy release.
Electrical Lockouts: Isolate circuit breakers and plugs.
Cable Lockouts: Versatile devices for securing multiple energy points.
Hasps: Allow multiple workers to lock out a single energy source.
Carrying Case: Convenient storage for all tools in the kit.
Importance of Lockout Tagout Kits
Industries in the UAE, including oil and gas, construction, and manufacturing, operate under strict safety regulations. LOTO kits play a crucial role in ensuring compliance with these standards while enhancing worker safety.
Accident Prevention: Mitigates risks associated with unexpected energy releases.
Regulatory Compliance: Helps businesses adhere to UAE workplace safety laws.
Enhanced Productivity: Ensures a safer environment, reducing downtime caused by accidents.
Employee Confidence: Promotes a culture of safety, boosting worker morale.
Applications of Lockout Tagout Kit
LOTO kits are indispensable in various sectors:
Electrical Maintenance: Lockout devices secure circuit breakers, switches, and plugs during repair.
Industrial Machinery: Prevent accidental start-up of heavy equipment.
Pipelines and Valves: Valve lockouts isolate hazardous materials in chemical or oil processing plants.
Construction Sites: Ensure safe maintenance of cranes, elevators, and other machinery.
Features of High-Quality Lockout Tagout Kit
Durable Materials: Resistant to harsh environments and extreme temperatures.
Versatility: Includes a wide range of devices for different energy sources.
Compliance Ready: Meets international and UAE-specific safety standards.
Portability: Compact and easy-to-carry cases for on-the-go usage.
Why Choose a Lockout Tagout Kit for Your Workplace?
Investing in a LOTO kit is not just a regulatory requirement but also a proactive measure for workplace safety. Key benefits include:
Cost Efficiency: Prevents financial losses from accidents and legal fines.
Time-Saving: Streamlines the lockout/tagout process during maintenance.
Customizability: Kits can be tailored to fit the specific needs of your industry.
The Role of LOTO Kits in the UAE’s Safety Standards
The UAE’s commitment to workplace safety is evident in its adherence to international standards such as ISO 45001 and the Occupational Safety and Health Administration (OSHA) guidelines. LOTO kits help businesses comply with these regulations, fostering a safer working environment.
In high-risk industries like oil and gas, where energy isolation is critical, the use of lock out tag out UAE is not just recommended but essential.
How to Choose the Right LOTO Kit
Assess Workplace Needs: Identify the types of energy sources and equipment in use.
Ensure Compliance: Select kits that meet UAE and international safety standards.
Check Durability: Opt for kits with robust materials suitable for your environment.
Consider Portability: Choose a kit that is easy to carry and store.
Conclusion
Lockout Tagout kits are indispensable for ensuring workplace safety and regulatory compliance in the UAE. They protect workers, reduce the risk of accidents, and create a culture of safety that is crucial for any business.
By investing in high-quality LOTO kits, UAE industries can not only safeguard their workforce but also enhance productivity and maintain their reputation for excellence in workplace safety.
#lock out kit#loto kit supplier#scaffolding tag#butterfly valve#abb distributors uae#miniature circuit breaker#emergency stop switch#lockout tagout#padlocks dubai#lockout tagout locks#padlock supplier#uae#dubai#abudhabi#safety tag#mcb uae#lockout station
0 notes
Text
Knowing How To Choose The Best-Quality Copper Battery Lugs
In the electrical industrial settings, battery cable lugs may be considered as small components, but they play an essential function. Their job is to maintain an efficient and secure connection between terminal and equipment, and choosing high-quality cables from dependable companies like Apple International will always be a good step. Their dependable high-grade copper battery lugs will ensure safety and performance in any electrical or other power distribution systems.
The company’s copper battery terminal connectors can excellently conduct electricity and are widely used in automotive electrical applications. These cable terminals are fit for both outdoor and indoor use.
Factors you should base your choice on
The company provides several types of copper battery cable ends, including tubular lugs, crimping-type copper tubular ends, transformer copper terminal ends, and several other products. However, it would be best to know which type of copper lugs you are searching for before visiting their website. The factors you should keep in mind while choosing your required copper battery terminal connectors are given below:
Calculate the highest level of current the cable needs to carry and choose the lugs that can handle it without overheating. You can find their maximum current rating in the product description.
Find out the voltage level of the electrical system where you will put the company’s copper battery lugs to work. The company offers a diverse range of battery cables for different voltage requirements.
You will need to know the lug size of the copper battery terminal connectors before anything else. You can calculate it by using the cable size, diameter, and the size of the conductor. The company clearly mentions the inner diameter of the battery lugs where you can insert the cable. Incidentally, you have to check that the conductor diameter of the cable is at least 1.8 mm or 0.07 inches less than the inner diameter measurements to ensure easy cable insertion.
Environmental factors also play an important role in the choice of copper battery cable ends. You have to take factors like temperature, exposure to chemicals, humidity, and others into account when determining the place where the cable lugs will be fitted. Experts recommend using tinned copper lugs in corrosive conditions while using bare copper lugs in places with high temperatures. Tinned copper lugs could develop whiskers at higher temperatures.
The company manufactures different types of cable lugs, such as solder lugs, crimp lugs, and compression lugs. You will need to choose the cable lug according to your installation process and particular application.
The company uses high-grade copper and other needed materials to ensure the highest performance according to the project.
Signing off
Apple International prepares its diverse ranges of copper battery lugs in an ISO 14001 and ISO 9001–certified facility. They are equipped to manufacture and supply different components made from particular metal compositions and comply with strict quality requirements. You can buy from them without any stress as all their products comply stringently with the applicable EN, BS, and EC standards.
Source: https://blogsgod.com/knowing-how-to-choose-the-best-quality-copper-battery-lugs/
0 notes
Text
Yolobox Ulta Wins Our Trust!
New Post has been published on https://thedigitalinsider.com/yolobox-ulta-wins-our-trust/
Yolobox Ulta Wins Our Trust!

In this article by Zoe Chow for YoloLiv, the author shares the story of Mauricio Rojas, an experienced live streamer who transitioned from doubt to full endorsement of the YoloBox Ultra. With over 14 years of experience in live streaming, Mauricio was initially hesitant about adopting a compact, all-in-one device like the YoloBox Ultra. His previous setups, which involved multiple pieces of equipment such as computers, capture cards, switchers, and audio interfaces, often led to costly and time-consuming configuration challenges. Given his high standards for streaming equipment, Mauricio was unsure whether the YoloBox Ultra could deliver the performance he needed for professional-grade live streaming.


After observing the YoloBox Ultra for several years, Mauricio decided to give it a try. After conducting approximately 25 live streams, he was impressed by the device’s reliability, which allowed him to focus more on creating quality content than dealing with technical problems. Mauricio highlighted several features of the YoloBox Ultra that stood out, including the device’s multiple HDMI inputs, internet connectivity options, local recording with ISO capabilities, and its user-friendly interface. Not only did the YoloBox Ultra maintain high-quality video and audio, but it also proved to be a versatile tool for live streaming, exceeding Mauricio’s expectations in terms of both performance and convenience.
Mauricio shared practical tips for maximizing the YoloBox Ultra’s capabilities for successful live streaming. These tips include pre-connecting all audio and video equipment before powering up the YoloBox, using high-quality cables, and minimizing the use of adapters or extenders to avoid signal disruptions. He also recommends using a high-speed memory card, such as the SanDisk XCI Ultra 64GB, for optimal recording performance. Additionally, Mauricio advises using external hard drives, like the SanDisk SSD portable USB-C, for recording streams while being mindful of system resources to avoid overloading the device.

In conclusion, Mauricio Rojas’ experience with the YoloBox Ultra highlights its effectiveness as an all-in-one live streaming solution. By consolidating multiple essential functions into a single device, the YoloBox Ultra simplifies the live streaming process, allowing creators to focus on delivering content and engaging with their audience. For live streamers looking to streamline their setups and boost streaming performance, the YoloBox Ultra is an invaluable tool that enhances the overall streaming experience.
Read the full article by Zoe Chow for YoloLiv HERE
Learn more about YoloLiv below:
#Article#audio#author#cables#Capture#computers#connectivity#content#creators#equipment#Experienced#Features#focus#Full#functions#hdmi#Internet#ISO#it#Learn#LED#memory#One#performance#Pieces#portable#process#Read#Recording#reliability
0 notes
Text
Custom U Clamps & U Bolts: Precision Fasteners for Reliable Connections Across Industries
This article helps in understanding U clamps and U bolts as, they get their name from their U shape, which is perfect for holding cylindrical objects. A U clamp or U bolt typically secures pipes, tubes, and cables. These components are often complemented by shim washers, stainless steel shims, or even precut shims for added stability.

What’s the Difference?
U Clamps: Typically used for lighter applications, they hold items in place securely but aren’t designed to bear heavy loads.
U Bolts: Usually more robust and threaded on both ends, these can handle heavier weights and hold items like pipes or machinery in place, even in challenging environments.
Selecting the right U clamp manufacturer or U bolt supplier is crucial. Here’s what to look for:
Experience in Your IndustryA manufacturer with experience in your sector understands the unique demands and can recommend the best materials, coatings, and designs for your project. Shim manufacturers in India and washer manufacturers are excellent choices for precision fasteners, especially if you need a custom stud bolt or anchor bolt manufacturer.
Quality Assurance and ComplianceEnsure the manufacturer follows ISO or other quality standards. Reliable manufacturers also provide quality assurance, ensuring each custom U bolt or clamp meets specifications.
Material and Finish OptionsLook for a manufacturer offering materials such as stainless steel, brass, and galvanized steel, as well as coatings like zinc or powder coatings for corrosion resistance. Manufacturers of brass shim sheets or u bolts manufacturers often offer additional customization options.
Production Capacity and Lead TimeWhether you need a batch of 10 or 10,000, a quality manufacturer can accommodate your demands. Ask about lead times and availability to avoid project delays.
Competitive Pricing and Customer SupportWhile cost matters, so does service. A reputable manufacturer provides transparent pricing, clear communication, and after-sales support to ensure satisfaction.
Finding the right custom U clamp and U bolt solution means considering the specific needs of your industry, application requirements, and the capabilities of your chosen manufacturer. Custom U clamps and U bolts enhance performance, improve stability, and extend the longevity of your projects, making them invaluable in sectors where precision and durability are non-negotiable.
This guide will equip you with the knowledge to take your garment construction skills to the next level and create clothes that look and feel truly professional.
Link
Custom U Clamps & U Bolts: Precision Fasteners for Reliable Connections Across Industries
#CustomUClamps#UBolts#PrecisionFasteners#ReliableConnections#IndustrialFasteners#EngineeringSolutions#StrongAndSecure#MetalFabrication#ConstructionTools#CustomFasteners#IndustrialSupplies#HeavyDutyHardware#ManufacturingExcellence#BoltsAndClamps#FasteningSolutions
0 notes
Text
Telecommunications Protocols: Open Systems Interconnection (OSI) Model
Usually, the analysis of communication protocol stacks begins, relatively reasonably, by considering the seven-layer Open System Interconnection model (seven-layer model or just OSI model or OSI), which the International Organization for Standardization ISO developed jointly with the telecommunications division of the International Telecommunication Union (ITU-T). The OSI model is still an excellent tool for learning the fundamentals of telecommunications network architecture, although it has not gained the popularity its creators hoped for.
The main feature of the OSI model is its openness. This means that an appropriate standardized set of protocols guarantees the possibility of interoperability between equipment from different manufacturers, which is vital not only for equipment and software manufacturers but also for telecom operators, service providers, and users since it dramatically simplifies the procedure for equipping networks.
The OSI model was developed in the 1970s based on experience gained in creating computer networks, mainly global ones. Therefore, its application area, strictly speaking, is packet data networks.
Interestingly enough, global data networks came earlier than local ones. This is explained by the history of the development of computers (computing machines), the first stage of which is associated with mainframes. These vast machines were costly and served many users, who were granted access only for a certain period. Long-distance communication channels were needed to organize such access. In the first stage, the role of such data transmission media was played by analog modems operating over voice-frequency channels (touch-tone) of analog transmission systems (Analog Data Transmission Systems, or ADTS), and the first data transmission protocols were modem protocols of physical levels that ITU-T has standardized in a series of Type V recommendations.
Since the touch-tone ADTS channel is very narrow, with a width of 300 to 3200 Hz, in addition to multi-position modulation methods for data transmission, additional efficient algorithms for using the frequency band were required, particularly data signal compression algorithms. The critical issue with modem data transmission over ADTS channels was the number of errors since touch-tone channels were initially designed only to transmit telephone signals. Therefore, the third group of V-series protocols contains, among other things, error correction protocols.
In terms of error correction, communication systems are divided into systems with and without retransmission of corrupted data elements. In transmission systems over electrical cables subject to external interference and containing many intermediate amplifiers or regenerators, the probability of errors in the data signals is very high. Therefore, the channels of these systems usually retransmit corrupt message fragments. Naturally, this method significantly reduces the data efficiency of channels.
The situation turned around with the transition to optical cables, which are well-protected from external interference and contain a small number of intermediate amplifiers and repeaters. This significantly reduced the number of errors, so it was possible to eliminate error correction at the physical layer and, if necessary, perform it at higher protocol levels.
The active development of local networks began with the advent of mini, micro, and, finally, personal computers (PCs). Thus, telephone networks first formed local ones, and only then, with technological progress, intercity ones; data transmission networks, on the contrary, evolved from global down to local.
The creation of the seven-layer OSI model was based on the following principles:
There should not be too many layers so that the design and implementation of the network are not overly complex. There should not be too few levels so that the functions performed by the levels do not turn out to be overly complex
The functioning of each level is transparent to other levels
The tasks performed by each level must be clearly delineated
The next level is created only when a new level of abstraction is needed
It is clear that solving such a problem successfully takes not only a lot of experience and knowledge but also a particular artistic approach.
Each layer of the OSI model interacts with three others: it provides services to an upper one, uses the services of a lower one, and accesses an equal (peer) layer of another computer system. More formally, a service architecture contains three essential elements: the Service User, the Service Provider, and the Service Access Point (SAP).
In this context, a service user is an OSI model layer receiving services from an adjacent OSI model layer. The service provider is the layer of the OSI model that provides services. Finally, SAP is an element of the OSI model through which one OSI layer can request a service from another OSI model layer. Simply put, SAP is nothing more than a service delivery protocol.
For example, the link layer of system A is a user of physical layer services, a service provider for the network layer of this system, and exchanges information with the link layer of system B.
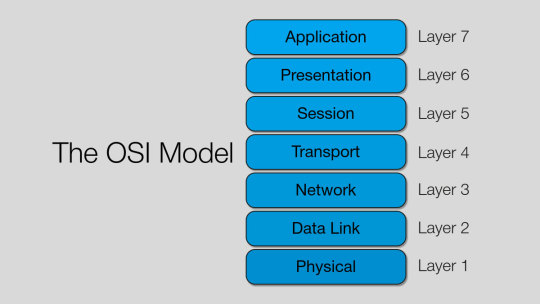
OSI Layers and Layer Groups
Each layer of the OSI model performs specific functions necessary for the system's proper functioning. Let's list the seven layers of the OSI model from top to bottom and describe their main functions.
Implementations of the four upper layers of the OSI model (application, presentation, session, and transport) can be found in every peripheral device; the three lower layers (network, data link, and physical) are present at all intermediate (transit) connection points between endpoints.
Therefore, all the OSI model layers can be divided into two functionally different groups: the upper and lower layers. The first—also called 'Host Layers' or 'end-end'—are responsible for the operation of applications and are implemented only in software products. The second—'Media Layers' or 'chained'—transmits data. Moreover, the physical and data link layers contain software and hardware components.
A common feature of the three lower levels is that they can support any type of data (including service data) generated by the four upper levels. In other words, the lower levels are utterly indifferent to the data they transmit and are solely concerned with delivering it from one point to another.
Host Layers OSI
In this part, we will talk about the four upper levels that ensure the operation of network applications.
The Application Layer provides services directly to the user's apps. It forms a set of open and standard application programming interfaces (APIs). Implementing the application layer might be complex because many applications use its services. Examples of OSI application layer protocols are distributed directory services by the ITU-T X.500 recommendation and its "lightweight" version (Lightweight Directory Access Protocol, LDAP), as well as remote procedure calls (RPC). The latter is a very efficient way to distribute computing power between the client and the server.
The Presentation Layer performs general data transformation. One of the services at this level is encryption, which ensures information security. In particular, Web server software includes encryption protocols to protect customers' financial information. Another example of a presentation-level service is compression, which reduces the amount of data sent between two computers. Thus, many virtual private network (VPN) implementations use tunneling protocols, where a packet of one protocol is placed inside another packet. The tunneling mechanism requires adding significant service information to the transmitted data, which can be easily compressed. Therefore, VPNs usually include a compression algorithm.
Another typical operation of the presentation level is transcoding, which is less complex than encrypting/decrypting or compressing/decompressing. An example of transcoding is the conversion of ASCII codes to EBCDIC and back according to specific tables. Still, such simple transcoding operations are only sometimes possible. Therefore, the International Organization for Standardization (ISO) has developed a special Abstract Syntax Notation program version 1 (ASN.1), which helps programs running on different machines and written in different programming languages to exchange data.
The Session Layer provides additional services to the transport layer if the connection session is established first. In addition to managing data back and forth, the most important functions of this layer are starting and terminating the session and syncing data. Session layer services are unused if the connection does not need to be established.
The Transport Layer performs error-free, message-oriented end-to-end transmission, and it must support this function regardless of the reliability of the underlying layer. The underlying layer is especially unreliable during packet transmission in connectionless communication. In this case, the transport layer must be 'smart' enough to compensate for the weaknesses of the underlying layer. Due to its greater reliability, the transport layer can be less complex in a connection-oriented packet network. Finally, the underlying service can be highly robust, connection-oriented with channel switching, and have a reliable link-layer protocol. In this case, the transport layer does not need to do anything to ensure consistently high transmission quality. Thus, the complexity of the transport layer is inversely proportional to the reliability of the underlying layers. To perform its main task—error-free delivery of messages—the transport layer provides the functions of addressing, opening, and closing connections, assigning priority to data, monitoring and error correction, data flow control, failure recovery, and multiplexing.
Continued in the next Around Cable category post.
0 notes
Text
Alexa Training Notes
O'Connor Fluid Head:
Red button/switches lock or unlock
We only have 1 O'Connor head
Pan Handle on first
2 Plates then big plate go on. Bottom Dovetail plate, Bridge plate (one with rod holes), Wedge plate.
Camera Balance - unlock from plate and move forward or backwards based on which way is heavier. Use counter weight to get more precise balance, normally around 31-32.

Alexa:
Small Silver plate for Handheld and big one for studio mode (tripod)
Black level on Alexa plate locks it in place
Support the underneath and top handle when moving.
Viewfinder has to be taken off and on for test. Put each element of viewfinder on individually. Viewfinder eye piece last - store safety as its delicate.
Theres a small back support that attaches to the back bottom of the camera so you can rest it somewhere and it's stable.
Lock tripod before removing or putting camera on.
Use Arri website to practice using the menu system
If unsure about colour/white balance, stop the lens down to check more accurately.
3 types of frame rate: Monitor (what's show on the monitor), Project (the overall FPS of the film) and Camera (Singular shots FPS, for example if you had a single slow motion scene).
Timecode's : Record Run - the recording device runs timecode only when the camera is recording. Free Run - the recording device runs timecode continuously whether you are shooting or not.
800 Native ISO - ISO is called ASA (American standards association)
RAW and 3.2K need external recorder
At 11.9V, its recommended thats when you should change the battery
Tighten on the back of the plate
Handheld hand grip connects through a 3 pin cable
The shoulder mount connects to the bottom just by sticking, almost like Velcro and needs to be taken off each time you stop using it.
Book out a second smaller tripod to have the camera rest on in between handheld takes.

Matte Box/Follow focus
15mm rods for handheld and 19mm rods for Tripod
Matte box flaps are broken
If not using filters, you don't need to use the Donut ring on the matt box
Donut unscrews to change size for the zoom or prime lenses.
Put both follow focus turning wheels on - one on each side

0 notes
Text
Marel
Hello everyone,
I recently had the pleasure of experiencing the exceptional services provided by MAREL d.o.o., and I felt compelled to share my positive experience. Founded in 1994, MAREL d.o.o. Is a true expert in power cable accessories, offering an extensive range, including lugs, joints, LV network components, and LV ABC accessories up to 1kV.
Quality is clearly a top priority for them, from meticulously sourcing high-quality materials to the final assembly stage, which is reinforced by mandatory factory testing. It's reassuring to know that they take their commitment to quality seriously.

What truly sets MAREL d.o.o. Apart, in my opinion, is their dynamic approach. They place a strong emphasis on innovation, cutting-edge product design, and the efficient streamlining of production processes. I also appreciate their active involvement in energy exhibitions and their dedication to research, development, marketing, sales, and top-notch technical support. This all results in products that are not only of the highest quality but also weather-resistant and incredibly easy to install.
I was pleased to learn that MAREL d.o.o. Adheres to IMS standards, including ISO 9001:2015 for Quality Management Systems, ISO *******:2015 for Environmental Management Systems, and ISO *******:2018 for Occupational Health and Safety. It's clear that they take their responsibilities seriously and have put the necessary measures in place to ensure top-notch quality.
Their 2000-square-meter facility is truly impressive, housing specialized units such as a non-ferrous metals foundry with a cutting-edge forge, a state-of-the-art plant for thermoplastic molding, a pressing plant with a maintenance section, a mechanical metal processing plant with an advanced tool room, an assembly and packaging unit, and a dedicated laboratory for comprehensive factory tests and rigorous process control.
In conclusion, MAREL d.o.o. Has indeed set the industry standard when it comes to cable accessories. I can wholeheartedly recommend their services and products, and I'm confident you'll be as impressed as I am with their commitment to quality and excellence.
Warm regards,
1 note
·
View note
Text
Instructions for Installing the HP Desk Jet 1005AU All-In-One Printer
To install the HP Desk Jet 1005AU All-in-One Printer, please follow these step-by-step instructions:
1) Unbox the Printer:
Remove all the packaging materials and tape from the printer.
Take out the power cord, ink cartridges, and any other included accessories.
2) Prepare the Printer:
Place the printer on a flat and stable surface near your computer.
Connect one end of the power cord to the rear of the printer and the other end to a power outlet.
Power on the printer using the power button located on the front panel.
3) Install Ink Cartridges:
Open the ink cartridge access door located on the front or top of the printer.
Wait for the ink cartridge carriage to move to the center of the printer.
Take out the new ink cartridges from their packaging.
Remove the protective tape from the cartridges, being careful not to touch the copper-colored contacts or ink nozzles.
Insert the cartridges into their corresponding slots. The color cartridge usually goes into the left slot, and the black cartridge into the right slot.
Push the cartridges gently until they click into place.
Close the ink cartridge access door.
4) Load Paper:
Slide out the paper input tray located at the bottom/front of the printer.
Adjust the paper width guides to fit the size of the paper you are using.
Place a stack of paper into the input tray, making sure it is aligned properly.
Push the input tray back into the printer until it clicks into place.
5) Connect to Computer:
Ensure that your computer is turned on and connected to the internet. Use the USB cable provided with the printer to connect it to your computer. Plug one end into the USB port on the back of the printer, and the other end into an available USB port on your computer If you prefer to set up the printer wirelessly, refer to the wireless setup instructions provided by HP or consult the printer's manual.
6) Install Printer Software:
Visit the official HP support website (www.hp.com) using a web browser on your computer.
Search for the HP Desk Jet 1005AU printer model and navigate to the support page.
Locate the "Drivers" or "Software" section and download the latest printer software and drivers compatible with your computer's operating system.
Once the download is complete, run the installation file and follow the on-screen prompts to install the printer software.
7) Complete the Setup:
During the installation process, you may be prompted to choose between a USB or wireless connection. Select the appropriate option based on your preferred connection method.
Follow the instructions provided by the installation wizard to complete the setup process.
If prompted, select the recommended settings for printing, such as paper size and print quality.
8) Test and Print:
After the installation is complete, the printer should be ready to use.
Print a test page to ensure that the printer is functioning correctly.
Open a document or image on your computer and select "Print." Choose the HP Desk Jet 1005AU as the designated printer and adjust any print settings as needed.
Click "Print" to start the printing process. The printer should begin printing the document or image.
Specifications of HP Desk Jet 1005AU?
1) Printer Type: All-in-One (Print, Copy, Scan)
2) Printing Technology: Inkjet
3) Print Resolution:
Black: Up to 1200 x 1200 rendered dpi
Color: Up to 4800 x 1200 optimized dpi color (when printing from a computer on selected HP photo papers and 1200 input dpi)
4) Print Speed:
Black (ISO): Up to 7.5 pages per minute (ppm)
Color (ISO): Up to 5.5 ppm
5) Maximum Print Area: 8.5 x 14 inches (216 x 356 mm)
6) Duplex Printing: Manual (driver support provided)
7) Scanner Type: Flatbed
8) Scan Resolution: Up to 1200 dpi
9) Copy Resolution: Up to 600 x 300 dpi (black text and graphics)
10) Maximum Number of Copies: Up to 9 copies
11) Paper Handling:
Input Capacity: Up to 60 sheets
Output Capacity: Up to 25 sheets
Media Types Supported: Plain paper, photo paper, brochure paper, envelopes, Other specialty inkjet papers
Media Sizes Supported: Letter, legal, 4 x 6 in, 5 x 7 in, 8 x 10 in, No. 10 envelopes
12 Connectivity:
USB: Hi-Speed USB 2.
Wireless: Wi-Fi 802.11b/g/n
12) Mobile Printing Capability: HP Smart app, Apple Air Print, Wi-Fi Direct Printing
Operating Systems Compatibility: Windows and mac OS
Dimensions (W x D x H): 16.73 x 21.56 x 9.79 inches (425 x 547 x 249 mm)
Weight: 7.55 lbs (3.43 kg)
How to install 123.hp.com/dj1005AU on an HP Desk Jet 1005AU?
To install the 123.hp.com/dj2652 software on your HP Desk Jet 1005AU printer, please follow these steps:
1) Ensure that your printer is set up and connected to your computer or network. Refer to the previous instructions I provided for installing the printer hardware and connecting it to your computer.
2) Open a web browser on your computer and go to the website "123.hp.com/dj1005AU".
3) On the website, click on the "Download" or "Install" button to start the software download process. The website may automatically detect your operating system and provide you with the appropriate software options.
4) If prompted, save the downloaded file to a location on your computer where you can easily find it, such as the desktop or downloads folder.
5) Once the download is complete, locate the downloaded file and double-click on it to run the installation process.
6) Follow the on-screen instructions provided by the installation wizard to install the software on your computer. Make sure to carefully read each prompt and select the appropriate options.
7) During the installation, you may be asked to choose between a USB or wireless connection. Select the connection method that matches your printer's setup.
8) If prompted, connect your printer to your computer using a USB cable. The installation software will detect the printer and establish the connection.
9) Once the installation is complete, the software should recognize your HP Desk Jet 1005AU printer and provide you with options to customize settings, such as print quality and paper size.
10) Follow any additional on-screen instructions to complete the setup process.
How to set up an HP Desk Jet 1005AU
1) Unbox the Printer:
Remove all packaging materials and tape from the printer.
Take out the power cord, ink cartridges, and any other included accessories.
2) Prepare the Printer:
Place the printer on a flat and stable surface near an electrical outlet.
Connect one end of the power cord to the back of the printer and the other end to a power outlet.
Press the power button to turn on the printer.
3) Install Ink Cartridges:
Open the ink cartridge access door located on the front or top of the printer.
Wait for the ink cartridge carriage to move to the center of the printer.
Take the new ink cartridges out of their packaging.
Remove the protective tape from the cartridges, being careful not to touch the copper-colored contacts or ink nozzles.
Insert the cartridges into their corresponding slots. The color cartridge usually goes into the left slot, and the black cartridge into the right slot.
Push the cartridges gently until they click into place.
Close the ink cartridge access door.
4) Load Paper:
Slide out the paper input tray located at the bottom/front of the printer.
Adjust the paper width guides to fit the size of the paper you're using.
Insert a stack of paper into the input tray, aligning it with the guides.
Slide the paper guides snugly against the paper, but do not force it too tightly.
Push the input tray back into the printer until it clicks into place.
5) Connect to Wi-Fi:
On the printer's control panel, press the Wireless button or navigate to the network settings menu.
Select your Wi-Fi network from the available list.
Enter the password for your Wi-Fi network using the printer's control panel or on-screen keyboard.
Wait for the printer to connect to your Wi-Fi network. The wireless light on the printer should become solid.
6) Install Printer Software:
Visit the official HP support website (www.hp.com) using a web browser on your computer.
Search for the HP Desk Jet 1005AU printer model and navigate to the support page.
Locate the "Drivers" or "Software" section and download the latest printer software and drivers compatible with your computer's operating system.
Once the download is complete, run the installation file and follow the on-screen prompts to install the printer software.
7) Complete the Setup:
During the installation process, you may be prompted to choose between a USB or wireless connection. Select the wireless connection option if you haven't connected the printer via USB.
Follow the instructions provided by the installation wizard to complete the setup process.
If prompted, select the recommended settings for printing, such as paper size and print quality.
8) Test and Print:
After the installation is complete, the printer should be ready to use.
Print a test page to ensure that the printer is functioning correctly.
Open a document or image on your computer and select "Print." Choose the HP Desk Jet 2652 as the designated printer and adjust any print settings as needed.
Click "Print" to start the printing process. The printer should begin printing the document or image.
Conclusion HP Desk Jet 1005AU
The HP Desk Jet 1005AU is an all-in-one printer that offers printing, copying, and scanning capabilities. It utilizes inkjet printing technology and provides a maximum print resolution of up to 1200 x 1200 rendered dpi for black prints and 4800 x 1200 optimized dpi for color prints.
With a printing speed of up to 7.5 pages per minute for black prints and 5.5 pages per minute for color prints, the Desk Jet 2652 is suitable for home or small office use. It supports various media types such as plain paper, photo paper, brochure paper, and envelopes, with a maximum paper size of 8.5 x 14 inches (216 x 356 mm).
The printer includes a flatbed scanner with a maximum scan resolution of up to 1200 dpi, allowing you to digitize documents and images. It also offers copying functionality with a maximum copy resolution of 600 x 300 dpi for black text and graphics.
Contact Us: +1-800-673-8163
Website:-https://www.expertprintersolutions.com/
0 notes
Text
Seascapes and Wildflowers in San Francisco
Join Chris Crosby and Bruce Getty, for a sunset workshop in San Francisco! Learn how capture the best results in difficult lighting conditions at sunset through proper exposure, solid compositions, long exposure, exposure blending, use of filters and more. See more below
There are two sessions available. Choose one or take both!
April 15th at Marshall’s Beach (Seascape)
April 16th at Golden Gate Bridge (Wildflowers)
Overview
During this workshop, Bruce Getty and Chris Crosby will guide you to some of the most interesting areas surrounding the Golden Gate Bridge in San Francisco, some well known and some hidden gems. Beautiful wave action, blooming wildflowers and the Golden Gate Bridge are just a few of the incredible opportunities for translating emotion and vision through our photographic medium. We are dedicated to providing the best instruction on all aspects of the art of landscape photography. Whether you are just beginning or are a seasoned pro, we are ready to help you move forward with your photography.
Curriculum
Curriculum will be catered to each individual’s skill level and may vary from student to student. Below you’ll find some common topics based upon different skill levels.
BEGINNER-INTERMEDIATE
Fundamentals are essential in the development of any skill, photography is no different. Below you’ll find some sample topics to help you develop yours:
Shooting in Manual Mode
Understand The Exposure Triangle and how each affects the image (aperture, ISO, shutter speed)
How to Meter and Expose for best results
Using light for better captures
Compositions made simple and easy
Understanding and using camera settings and menu options
ND’s, Polarizer and Grads - Which to use and when to use it
Tips and Tricks for easier workflows and shooting experience in the field
INTERMEDIATE - ADVANCED
Those who have a greater understanding of their cameras will get some more advanced shooting techniques to focus on light, location and making good decisions to make the most of the variables. Some advanced topics are listed below:
Exposure bracketing and blending
Focus stacking for depth of field and sharpness
Creative blending to bring the vision to life
Composing for interest, depth and focus
Physical Requirements
Since this is an infield workshop, some walking will be involved. Most locations are not far from parking areas, however, students need to be ready to be able to walk/hike to get to shooting area and good compositions.
Things To Bring
Equipment:
DSLR / Mirrorless camera and lenses
Wide Angle Lens – 12-24mm
Mid to Long Range Zoom – 24-70, 70-200, 100-400
A sturdy Tripod for wave and wind stability
Filters - Neutral Density Filters and CPL
Remote / cable camera shutter
Several memory cards
Spare camera batteries
Head torch (for any night or low light walking and shooting)
Rain cover for camera and camera bag can come in handy in some rare cases of water splash, rain or high wind!
Small Camping Chair or Stool for comfort if standing for long periods is an issue
Clothing Items:
Many layers – As the afternoons wear on it can get quite chilly and a jacket is recommended
Comfortable walking shoes or Hiking Shoes/Boots are recommended for wildflowers
Water Shoes are recommended for seascape session. Be prepared to get your feet wet to get the shot.
Food:
Food, Water, and all other essentials. No Food or water will be provided before, during or after the workshop. Plan ahead and have water and snack on hand to keep your energy up.
Payment, Fees and Terms
COST: The cost of the workshop is $200 for each session and must be paid in full to reserve your spot in the workshop
PAYMENT: Payment(s) can be made using the Add To Cart button of this web page using a credit card via PayPal and Stripe. If you would like to pay by another method, please reach out to Chris.
CANCELLATIONS: Cancellations require us to re-open enrollment and/or to engage in additional promotional efforts to fill the workshop on a short notice, therefore, our policy is that there will be no refunds of the payment within 30 days of the workshop date. All refunds are subject to a 6% processing fee. We highly recommend that you obtain travel/cancellation insurance for all workshops to protect yourself against unusual circumstances.
SUMMARY
Your satisfaction, enjoyment and educational experience is important to us. The goal of this workshop is to allow you to further understand your camera, composition and artistic expression while using the amazing landscapes around the Golden Gate Bridge. We want to ensure that everyone comes away with great instruction as well as a great experience in nature. Most importantly, we are going to have fun! Having fun is a critical part of any good photography adventure. When you have fun, your mind is free to expand and learn!
Transportation
No Transportation will be provided to, from or during the workshop. All attendees are responsible for arranging their own transportation to and from as well as any parking fees that might be required.
0 notes
Text
What Are Cable Glands and Types of Cable Glands?
Cable Gland is used to attach electrical wires safely and in the market many names of Cable Glands like Connection for cables, Fitting cables, Alleviation from cable strain, and Cord hold. Five types of cable glands 1. Voltage relief, 2. Several tracks, 3. Threaded, 4. Gland in metric, 5. NPT. Contact us for more details!

#Cable Glands#cable gland#scable ties#electrical equipment#industrial cable glands#iso recommended cable#types of cable glands
0 notes