#igpu
Explore tagged Tumblr posts
Visit Tumblr Blog
Explore Tumblr blogs with no restrictions, modern design and the best experience.
Last Seen Tumblr Blogs


Fun Fact
In 2020, Tumblr had 29.4 million users in the US.
Text
AMD Ryzen 8000 Series USB-C 40 Gbps GIGABYTE AORUS

The AMD Ryzen 8000 Series Processing Units: Featuring USB-C 40 Gbps Performance with GIGABYTE AORUS
GIGABYTE Technology is a precedent in the constantly changing world of technology. It has been making waves with the launch of the inaugural the motherboard in memory made particularly capable of handling the native USB-C 40 Gbps signal whenever combined with the AMD Ryzen 8000 series CPUs. That innovative breakthrough not solely puts GIGABYTE AORUS at the leading edge of creativity yet also sets higher standards for chipset performance and efficiency.
Better Cost-Performance Ratio: Boosting the Fun Factor in Games
1. Ultra Durable PCIe UD Slot X with PCIe 5.0 x16 Slot:
With its seamless, one-piece construction that is firmly attached to a specialized backplate, GIGABYTE’s PCIe UD Slot X redefines durability and achieves an unheard-of 58KG load-bearing capability. With its unmatched stability guaranteed by outstanding engineering, this motherboard lays the groundwork for withstanding the demands of high-performance computing.
2. Enhanced Performance of AMD Radeon 780M/760M/740M iGPU for 1080p Gaming:
The motherboard maximizes iGPU performance by using the enormous potential of the AMD Ryzen 8000 series CPUs, providing a remarkable 1080p gaming experience. GIGABYTE’s dedication to provide an excellent gaming platform is clear; the company caters to players who want the best possible performance and visuals.
New DIY-Friendly Features: Making the Building Process Simplified
M.2 Click-EZ-Latch and M.2 EZ-Latch Plus:
The days of laborious installations are long gone. In order to offer an effortless DIY qualifications, GIGABYTE AORUS supplies a screwless design for M.2 and M.2 heatsinks. In alongside shortening the constructing process, this fan-friendly method highlights GIGABYTE’s commitment to provide an easy-to-use and joyful user experience.
Sensor Panel Link: The motherboard has a Sensor Panel Link with integrated displays to meet the requirements of contemporary case designs. This clever innovation makes complex wire routing unnecessary, resulting in a smooth and attractive installation process. By anticipating and satisfying the changing needs of the user community, GIGABYTE maintains its leadership position.
User-focused, intuitive UX including a fast access feature:
With an emphasis on user experience, GIGABYTE AORUS has a user-friendly interface with a Quick Access feature for simple navigation. This deliberate design decision guarantees that customers may fully use the motherboard’s capabilities without needless hassles, irrespective of their level of technical expertise.
White Aesthetic Design is Trending Right Now: Where Form Meets Function
According to current fashion, the motherboard has a clean white aesthetic style that is carried over to the accessories and BIOS. In addition to effectiveness, GIGABYTE AORUS gives customers an aesthetically appealing performance that appeals to those who appreciate contemporary looks than the technology sector is beginning to admire.
“Not at this point are very pleased to provide a motherboard with this release which accommodates the most recent generation of AMD Ryzen 8000 series CPUs as well as encounters modern features that will satisfy your customer satisfaction evolving requirements.
“The arrangement represents a considerable advancement when it comes of functioning, straightforward employ, as well as visual appeal,” said Michael Hsu, the executive director of the GIGABYTE Channeling Answers Products Branch.
Increasing AMD AGESA 1.1.0.1 Release BIOS Compatibility
Apart from introducing the innovative motherboard, GIGABYTE also improves compatibility with AMD Ryzen 8000 series CPUs by releasing the most recent AMD AGESA 1.1.0.1 Release BIOS. The X670, B650, and A620 motherboards are now more compatible thanks to this upgrade, which guarantees customers can easily incorporate the newest features and processing power developments.
With GIGABYTE’s BIOS, Q-Flash, or Q-Flash Plus technology, users can easily upgrade the BIOS, remaining up to date with the latest advancements in technology and optimizing the capabilities of their computers.
In the end, GIGABYTE AORUS Reconsiders Wonderfulness
In conclusion, the GIGABYTE AORUS is a monument to creativity and superior motherboard design. GIGABYTE’s leadership in the market is further cemented by its native USB-C 40 Gbps compatibility for AMD Ryzen 8000 series CPUs, excellent cost-performance characteristics, and dedication to user-friendly design.
Read more on Govindhtech.com
#AMDRyzen8000Series#USBC40Gbps#GIGABYTE#AORUS#motherboard#AMDRadeon780M#iGPU#GIGABYTEAORUS#AMDAGESA#technews#technology#govindhtech
4 notes
·
View notes
Text
Microsoft Elimina Trei Generații de Procesoare Intel din Lista de Compatibilitate pentru Windows 11 24H2: Explicații și Implicații
Microsoft a actualizat recent lista oficială de compatibilitate pentru Windows 11 24H2, iar surprinzător, trei generații de procesoare Intel au fost eliminate: Intel 10th Gen (Comet Lake, Ice Lake U/Y), Intel 9th Gen (Coffee Lake Refresh) și Intel 8th Gen (Coffee Lake). Această mișcare a stârnit numeroase discuții în comunitatea tech, având în vedere că multe dintre aceste procesoare sunt încă…
#10th gen#8th gen#9th gen#actualizare#Coffee Lake#Coffee Lake Refresh#Comet Lake#compatibilitate#compatibilitate procesoare#compatibility#drivere#drivers#hardware optimization#hardware vechi#Ice Lake#iGPU#Intel processors#legacy support#microsoft#OEM system#old hardware#optimizare hardware#performance#performanță#procesoare Intel#processor compatibility#sistem OEM#suport legacy#update#users
0 notes
Text
Intel Meteor LakeアーキテクチャCPU/SoC(Core Ultra 7 155H)のiGPU性能は注目しておくべき
近い将来のDell XPS 13(XPS 13 9340)に搭載されるであろう、"Meteor Lake"アーキテクチャを採用したCore Ultra 7 155Hの別ベンチ結果を示した記事を紹介いたします。iGPUの性能は注目したいポイントですが、CPU性能はやはり謎?な結果と言えるでしょうか。
0 notes
Link
Productivity approximately doubles FSR 3 technology has entered the market, and formally it is only supported by video cards from the Radeon RX 5000 if we talk about AMD cards. But the iGPUs in modern Ryzen APUs belong to the RX 7000 line, that is, they are suitable for the conditions. The author of the zWORMz Gaming channel tested the operation of FSR 3 on the Radeon 780M as part of the Ryzen 7 7840HS. Let us remind you that this iGPU is used in many of the latest portable game consoles. [caption id="attachment_63219" align="aligncenter" width="780"] iGPU Radeon 780M[/caption] Frame generation in FSR 3 on iGPU Radeon 780M. Testing was carried out on the game Forspoken. By default, the Radeon 780M in Full HD at minimum settings provides about 30 fps. Enabling FSR 3 in Quality mode without generating frames results in a performance increase of approximately 40 fps. Adding frame generation to this allows the graphics core to provide the coveted 60 fps. If you set the FSR mode to Ultra Performance, you can achieve performance of 80-90 fps, although the image quality, of course, will suffer significantly. https://youtu.be/xpVTHxMUFZM Thus, for portable game consoles, FSR 3 with frame generation could be a small revolution. In addition, on small screens, the deterioration of the picture when activating FSR 3 is not so noticeable if it occurs in a particular game.
#AMD_Radeon#computer_hardware#Gaming_Graphics#graphics_processing_unit#graphics_technology#iGPU#integrated_graphics#Radeon_780M
0 notes
Text
AMD's Ryzen AI Max+ 395 Claims Up to 68% Better Performance
In the ever-evolving world of technology, where performance metrics and market share often dictate the direction of innovation, AMD has consistently been considered the underdog, especially in the graphics processing unit (GPU) market against giants like Nvidia. However, AMD’s latest move with the introduction of the Ryzen AI Max+ 395 processor could herald a significant shift, particularly in…
#AI Performance in Laptops#AMD Competitive Edge#AMD Performance Benchmarks#AMD vs Nvidia#AMD vs Nvidia 2025#Consumer Choice in Laptops#DLSS vs FSR#Future Tech Trends#Gaming Laptop Market#Gaming Laptop Performance#Handheld Gaming#Laptop GPU Performance#Laptop GPU Revolution#Nvidia Pricing Strategy#Productivity Benchmark#Radeon 8060S iGPU#RDNA 3.5 Architecture#Ryzen AI Max#Ryzen AI Max+ 395#Upscaling Technology#Zen 5 Architecture
0 notes
Text
Glowing disapproval of how annoying setup is for windows handheld once again
how can you make a handheld software dashboard for your device but not have it to driver installation lol!!
#I know the SD defaults to 1 dedicated gig for igpu processing#but that’s a very easy thing to increase and I think it may automatically allocate more as it needs?#vs the controls still deactivating when you tab out of a game#anyway Lenovo cured my desire to try other devices and I’m not a desperate 20 year old who wills make any pc work for me#I’m too busy for that now
0 notes
Text
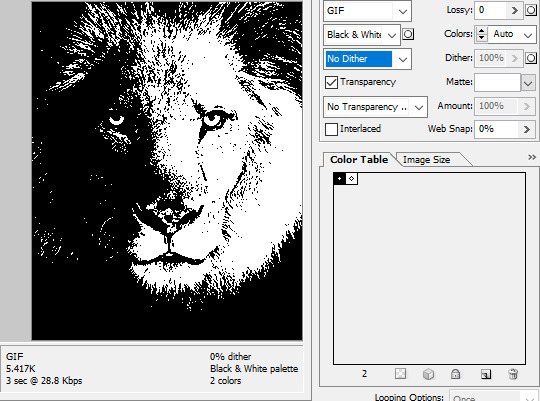
Tidbit: The “Posterization” Effect of Panels Due to the Consequences of GIF Color Quantization (and Increased Contrast (And Also The Tangential Matter of Dithering))

There’s this misconception that the color banding and patterned dithering found in panels is an entirely deliberate, calculated effect Hussie manipulated the image into looking with some specific filter, but this isn’t the case, exactly. It wasn’t so much a conscious decision he took but rather an unavoidable consequence of the medium he partook in: digital art in an age where bandwidth and storage was at a premium.
Not to delve too deeply into the history and technicalities of it, but the long and the short of it is back in the early nineties to late aughts (and even a bit further into the 10s), transferring and storing data over the web was not as fast, plentiful, and affordable as it is now. Filesize was a much more important consideration than the fidelity of an image when displaying it on the web. Especially so when you’re a hobbyist on a budget and paying for your own webhosting, or using a free service with a modest upload limit (even per file!). Besides, what good would it be to post your images online if it takes ages to load them over people's dial-up Internet? Don't even get me STARTED on the meager memory and power the average iGPU had to work with, too.

The original comic strip's resolution was a little more than halved and saved as a GIF rather than a large PNG. That's about an 82.13% reduction in filesize!
So in the early days it was very common for people to take their scans, photographs, and digital drawings and scale them down and publish them as smaller lossily compressed JPEGs or lossless GIFs, the latter of which came at the cost of color range. But it had a wider range of browser support and the feature to be used for animations compared to its successor format, PNG ("PNG's not GIF").
You'd've been hard-pressed to find Hussie use any PNGs himself then. In fact, I think literally the only times he's ever personally employed them and not delegate the artwork to a member of the art team were some of the tiny shrunken down text of a character talking far in the distance and a few select little icons.
PNGs support semi-transparency unlike GIFs, which is why Hussie used them to preserve the anti-aliasing on the text without having to add an opaque background color.
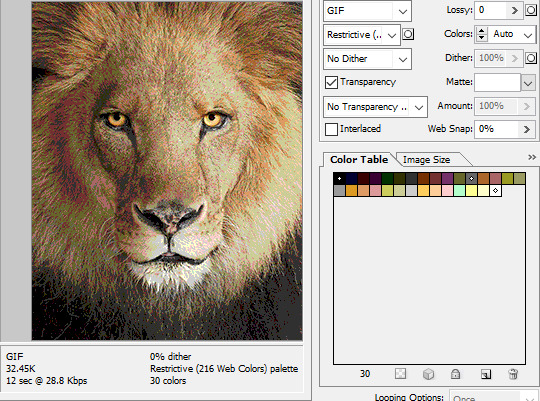
While PNGs can utilize over 16 million colors in a single image, GIFs have a hard limit of 256 colors per frame. For reference, this small image alone has 604 colors:

For those who can't do the math, 256 is a pretty damn small number.
Smaller still were the palettes in a great deal of MSPA's panels early on in its run. Amazingly, a GIF such as this only uses 7 colors (8 if you count the alpha (which it is)).


Not that they were always strictly so low; occasionally some in the later acts of Homestuck had pretty high counts. This panel uses all 256 spots available, in fact.


If he had lowered the number any smaller, the quality would have been god-awful.
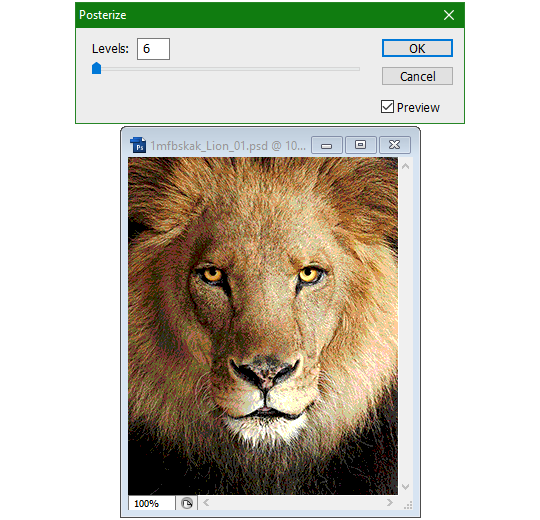
To the untrained eye, these bands of color below may seem to be the result of a posterization filter (an effect that reduces smooth areas of color into fewer harsh solid regions), but it's really because the image was exported as a GIF with no dithering applied.


Dithering, to the uninitiated, is how these colors are arranged together to compensate for the paltry palette, producing illusory additional colors. There are three algorithms in Photoshop for this: Diffusion, Pattern, and Noise.

Above is the original image and below is the image reduced to a completely binary 1-bit black and white color palette, to make the effect of each dithering algorithm more obvious.

Diffusion seemingly displaces the pixels around randomly, but it uses error diffusion to calculate what color each pixel should be. In other words, math bullshit. The Floyd-Steinberg algorithm is one such implementation of it, and is usually what this type of error diffusion dithering is called in other software, or some misnomer-ed variation thereof.
The usage of Pattern may hearken back to retro video game graphics for you, as older consoles also suffered from color palette limitations. Sometimes called Ordered dithering because of the orderly patterns it produces. At least, I assumed so. Its etymological roots probably stem from more math bullshit again.
True to its name, Noise is noisy. It’s visually similar to Diffusion dithering, except much more random looking. At least, when binarized like this. Truth be told, I can’t tell the difference between the two at all when using a fuller color table on an image with a lot of detail. It was mainly intended to be used when exporting individual slices of an image that was to be “stitched” back together on a webpage, to mitigate visible seams in the dithering around the edges.
To sate your curiosity, here's how the image looks with no dithering at all:
People easily confuse an undithered gif as being the result of posterization, and you couldn't fault them for thinking so. They look almost entirely the same!

Although I was already aware of this fact when I was much younger, I'm guilty of posterizing myself while editing images back then. Figured I may as well reduce the color count beforehand to help keep the exported GIF looking as intended. I view this as a complete waste of time now, though, and amateurish. Takes away a bit of the authenticity of MSPA art, how the colors and details are so variable between panels. As for WHY they were so variable to begin with, choosing the settings to save the image as requires a judicious examination on a case-by-case basis. In other words, just playing around with the settings until it looks decent.
It's the process of striking a fine balance between an acceptable file size and a "meh, good enough" visual quality that I mentioned earlier. How many colors can you take away until it starts to look shit? Which dithering algorithm helps make it look not as shit while not totally ruining the compression efficacy?
Take, for example, this panel from Problem Sleuth. It has 16 colors, an average amount for the comic, and uses Diffusion dithering. Filesize: 34.5 KB.

Then there's this panel right afterwards. It has 8 colors (again, technically 7 + alpha channel since it's an animated gif), and uses Noise dithering this time. Filesize: 34.0 KB.
The more colors and animation frames there are, and the more complicated dithering there is, the bigger the file size is going to be. Despite the second panel having half the color count of the first, the heavily noisy dithering alone was enough to inflate the file size back up. On top of that, there's extra image information layered in for the animation, leaving only a mere 0.5 kilobyte difference between the two panels.
So why would Hussie pick the algorithm that compresses worse than the other? The answer: diffusion causes the dithering to jitter around between frames of animation. Recall its description from before, how it functions on nerd shit like math calculations. The way it calculates what each pixel's color will be is decided by the pixels' colors surrounding it, to put it simply. Any difference in the placement of pixels will cause these cascading changes in the dithering like the butterfly effect.

Diffusion dithering, 16 colors. Filesize: 25.2 KB
This isn't the case with Noise or Pattern dithering, since their algorithms use either a texture or a definite array of numbers (more boring nerd shit).

Noise dithering, 16 colors. Filesize: 31.9 KB

Pattern dithering, 16 colors. Filesize: 23.1 KB
There's a lot more I'd like to talk about, like the different color reduction algorithms, which dither algorithms generally compress better in what cases, and the upward and downward trends of each one’s use over the course of a comic, but since this isn’t a deep dive on GIF optimization, I might save that for another time. This post is already reaching further past the original scope it was meant to cover, and less than 10 images can be uploaded before hitting the limit, which is NOWHERE near enough for me. I should really reevaluate my definition of the word “tidbit”… Anyway, just know that this post suffers from sample selection bias, so while the panels above came from an early section of Problem Sleuth that generally had static panels with diffusion dithering and animated panels with noise dithering, there certainly were animated panels with diffusion later on despite the dither-jittering.
Alright, time to shotgun through the rest of this post, screw segueing. Increasing the contrast almost entirely with “Use Legacy” enabled spreads the tones of the image out evenly, causing the shadows and highlights to clip into pure black and white. The midtones become purely saturated colors. Using the Levels adjustment filter instead, moving both shadow and highlight input level sliders towards the middle also accomplishes the same thing, because, you know, linear readjustment. I'm really resisting the urge to go off on another tangent about color channels and the RGB additive color model.
Anyway, there aren't any examples in MSPA that are quite this extreme (at least in color, but I'll save that for a later post), but an image sufficiently high in contrast can be mistaken for being posterized at a glance. Hence the Guy Fieri banner. In preparation for this post, I was attempting to make a pixel-perfect recreation of that panel but hit a wall trying to figure out which and how many filters were used and what each one's settings were, so I sought the wisdom of those in the official Photoshop Discord server. The very first suggestion I got was a posterization filter, by someone who was a supposed senior professional and server moderator, no less. Fucking dipshit, there's too much detail preserved for it to be posterization. Dude totally dissed me and my efforts too, so fuck that moron. I spit on his name and curse his children, and his children's children. The philistines I have to put up with...
In the end, the bloody Guy Fieri recreation proved to be too much for me to get right. I got sort of close at times, but no cigar. These were some of the closest I could manage:

You might be left befuddled after all this, struggling to remember what the point of the blogpost even was. I had meant for it to be a clarification of GIFs and an argument against using the posterization filter, thinking it was never used in MSPA, but while gathering reference images, I found a panel from the Felt intermission that actually WAS posterized! So I’ll eat crow on this one... Whatever, it’s literally the ONE TIME ever.

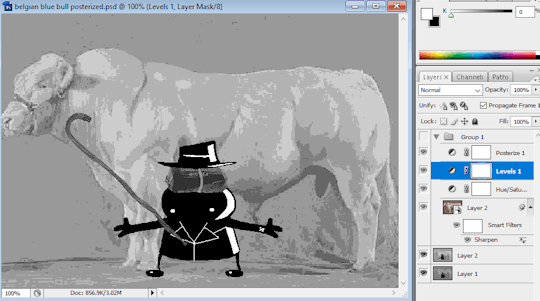

I can tell it's posterization and not gif color quantization because of the pattern dithering and decently preserved details on the bomb and bull penis cane. There would have had to have been no dithering and way fewer colors than the 32, most of which were allotted to the bomb and cane. You can't really selectively choose what gets dithered or more colors like this otherwise.
Thank you for reading if you've gotten this far. That all might have been a lot to take in at once, so if you're still unclear about something, please don't hesitate to leave a question! And as always, here are the PSDs used in this post that are free to peruse.
366 notes
·
View notes
Text
okay, since yall know distros much better than i do and im stumped, i need yall to help me pick a distro for my netbook
the specs are:
CPU: Intel Atom N270 (single-core @ 1.6GHz, 32-bit)
RAM: 1GB DDR2 800MHz SDRAM
Storage: 200GB 7200RPM HDD
GPU: Intel GMA 950 (Lakeport iGPU, uses shared memory, max 224MB)
Display: 1024x600
WiFi only (i think whatever handles the ethernet died)
11 notes
·
View notes
Text
My mom's laptop is old and can't run Windows 11.
I ran a few DEs past her and KDE Plasma passed the vibe check if that helps.
(Joke poll aside, this is somewhat of a genuine question. A lot of the beginner-friendly distros I can think of off the top of my head don't have KDE as an option. [I'll admit the only beginner-friendly distro I really know is Linux Mint, but a lot of the other ones I've heard of don't have KDE either. {Elementary OS, PopOS, etc.} She also outright said no to Cinnamon.])
Maybe OpenSUSE Slowroll? Debian stable?
She doesn't actually use her laptop that often so I don't think the actual distro will matter that much. She certainly doesn't care about the latest features.
But as an OpenSUSE Tumbleweed enjoyer, I know that libzypp doesn't (didn't?) play nicely with Discover for some updates. It'd probably be fine with any more traditionally package managed distro though.
But Debian Bookworm doesn't have KDE 6...
Even still, I'll probably just go with Debian stable unless any of you have a better idea.
Some specs below the cut if it matters to y'all
The laptop is a Dell XPS L702X
It has a 2 core 4 thread Intel(R) Core(TM) i5-2450M CPU @ 2.50GHz
It has 8 GiB of fully replaceable ram. (4 DDR3 SODIMMs. 2 Currently populated) (We are considering upgrading it.)
It has a dedicated Nvidia GeForce GT 550M
But the cpu also has an iGPU. It doesn't identify itself as anything in particular.
For wifi, it has an Intel(R) Centrino(R) Advanced-N 6230 (Since it's Intel I don't think it'll be an issue, but ya never know. It didn't work in Clonezilla, but that might not even consider WiFi.)
It has a 500 GB SSD and a 500 GB hard drive. Both are supposedly healthy according to SMART.
I've already cloned everything with Clonezilla. (All the specs except the wifi are from the Clonezilla image.)
I don't think these specs matter too much. Windows 10 runs... fine. (I don't think the Nvidia drivers are even installed?) I can't imagine any particular Linux distro will run any worse. It's mostly needed for taxes and stuff anyway.
(As I was checking what the wifi card was, windows gave an ad notification for Flight Sim 2024. I don't think this laptop could even install it. Staying on Windows 10 isn't really an option.)
8 notes
·
View notes
Text
I hadn't used my 2011 MacBook Pro in a few months because the battery died, and my cat chewed through the cable. I bought a replacement cable for Christmas and booted it up. For some reason, after sitting OFF for a few months, Zorin OS shit the bed and kept throwing update errors at me. So I relented and re-installed it from scratch. I decided to leave the dGPU active this time, to just see, and... somehow everything worked worse on the more powerful AMD dGPU???
Night Light wouldn't work, and the UI was so laggy it wasn't even funny. Not to mention how hot the machine would get at idle. It wasn't fun. I couldn't watch YouTube; I couldn't use LibreOffice; I could even swap desktops with the three-finger GNOME gesture without the entire system lagging. As a last ditch attempt, I used a GRUB Edit to deactivate the AMD dGPU.
And now... everything* is perfect. The laptop is quick and snappy, it uses, like, 2GB less of RAM for some reason, and Night Light even works. The thermal issues are also gone. Somehow, with a less powerful Intel iGPU... Zorin OS runs better now.
Idk. Linux is weird. At least it works. I'm not fucking around with it anymore.
*For some reason sleep doesn't work properly anymore. When I shut the lid, the display turns off, but when I open it back up, I'm not prompted with a password screen. Idk, and idc. I'm not bothering with it. Nobody's gonna snoop through my shit, anyway.
9 notes
·
View notes
Text
okay I genuinely need help.
how in the fuck do I fix my ivy bridge cpu artifacting on X11. Wayland fixes this issue but there is a whole different ballgame of problems that get introduced and I just don't want to use bullshit software.
I know there is a way to fix this because when I used ubuntu way back when on X11 this didn't happen so what optimization do I have to do to make my iGPU stop shitting itself
and if you already didn't get it I am NOT using wayland just to fix this issue I do NOT use bullshit software.
#linuxposting#linux#arch linux#x11#I hate wayland with a burning passion#and I am glad that an x11 dev has finally restarted developing for x11 again#I hope that wayland dies#wayland is NOT the future#wayland is just here to make competition for x11#because competition breeds greatness
5 notes
·
View notes
Text
AMD RDNA 3 vs. Intel Arc iGPUs : Gaming supremacy

When compared to AMD RDNA 3, Intel Arc iGPUs on Meteor Lake CPUs
Since AMD began providing its APUs with powerful integrated graphics, Intel’s advantage in the iGPU market has steadily decreased. AMD’s hold on the market was solidified at the time by the Vega iGPU family, but with RDNA, the red team opened up a whole new range of products that offered small PCs and handhelds with top-notch graphics performance. As for Intel’s Iris Xe solutions, its graphics performance was lacking and will now be greatly improved with the release of the Intel Arc iGPUs in the Core Ultra line. To provide competitive gaming performance.
Under the code name “Xe-LPG,” three different Arc Alchemist iGPU configurations are installed in Intel Core Ultra “Meteor Lake” CPUs.
There are three different configurations available: eight, seven, and four cores. When utilizing faster memory, like LPDDR5X, the GPUs can overclock to 2350 MHz (Core Ultra 9 185H) and provide a significant boost in performance. Along with other things, these GPUs support AV1, XeSS (DP4a), and DX12 Ultimate.
All things considered, these Intel Arc iGPUs are a crucial part of Chipzilla’s most recent CPUs. Since They have already seen synthetic benchmarks for the Intel Arc iGPU, today’s news focuses exclusively on gaming benchmarks. Golden Pig Upgrade (Bilibili) carried out the tests, which comprised testing a variety of games at both high and low settings and 1080p resolution.
The highest configurations of the AMD RDNA 3 and Intel Arc iGPUs seem to be quite competitive with each other, winning an identical amount of games at low 1080p resolution.
The Arc iGPU of the Core Ultra 7 155H outperforms in 7 out of 8 games evaluated in the 1080p High testing. Even yet, the RDNA 3 graphics solution trails behind the Core Ultra 5 125H. Additionally, the analysis demonstrates that the Meteor Lake CPUs are now nearly as fast as the discrete GTX 1650 Max-Q GPUs and far quicker than NVIDIA’s MX solutions.
Because of the 100 MHz clock speed differential, the Core Ultra 9 185H’s iGP clearly performs better than the Core Ultra 7 155H. The LPDDR5X-7467 memory is used in the results, which explains why the RDNA 3 GPUs do not scale as well as the faster Meteor Lake Arc iGPUs.
Although having quicker RAM is usually desired, it should be remembered that these computers are always more expensive. The Meteor Lake laptops are priced in a very expensive sector based on their prior prices. Consequently, it is important to recognize that AMD has a price edge with its Ryzen 7040/8040 range of laptops. The power efficiency performance data is the last one. It demonstrates that while AMD is superior at lower TDPs below 25W, Core Ultra 100H CPUs outperform AMD Ryzen 7040 “Phoenix” CPUs in the graphics domain at 28W TDPs.
With TDP ratings of 9–15W, Intel also offers the more power-efficient Core Ultra 100U processors, which would be a better option for entry-level and mobile gadgets that are anticipated to enter the market in the upcoming months.
The Intel Core Ultra Arc iGPU outperforms AMD’s RDNA 3 iGPUs in gaming, according to tests published by a number of tech sites. Tests conducted by Dave2D, HardwareCanucks, and Jarrod’s Tech all demonstrate competitive placement versus AMD’s RDNA 3 GPUs and considerable performance increases over prior generation Iris/UHD GPU systems. These figures also provide insight into AMD’s possible decision to maintain the same specifications and clock rates in its RDNA 3 GPUs for the Ryzen 8040 “Hawk Point” update.
AMD can likely provide a performance bump in places where they are not as strong as they could be, or when the Intel Arc iGPUs is only marginally faster, via driver upgrades. Although Intel has also issued a new driver, should anticipate more advancements on the driver front from both sides as competition in the Intel Arc iGPUs market is expected to resume.
This will be particularly important for the next generation of gaming handhelds that utilize these Intel Arc iGPUs solutions, which are built on the AMD RDNA 3 and Intel Arc architectures. When tiny PCs are released, it will be fascinating to observe the full potential of Intel Arc iGPUs, as these chips can scale up to 115W (Core Ultra 9 185H) and have unlimited access to greater power, which can result in notable performance boosts and excellent overclocking capabilities. The Core Ultra iGPU department has more enhancements in store as additional devices and solutions become available, so these performance figures are only a taste of what’s to come.
Read more on Govindhtech.com
1 note
·
View note
Note
So my hope, eventually, is to have my own purpose-built computer which is an expandable skeleton and will more-or-less never need to be entirely tossed out, only supplanted/upgraded Ship of Theseus style.
However, Microsoft is getting a bit too uppity for my tastes, and I hope to mainly run Linux on that eventual computer.
However, I'm also a gaming man, and I recognize that, in many cases, Linux kinda sucks for games, or, at least, that's what I've heard. Emulation is also a pain I'd rather not deal with (both of Windows and of games themselves), and so, for games that don't support Linux, I'd like to have the option of having Windows on the same machine, so that I can run Linux most of the time, but switch to Windows whenever I wanna play games.
My question is how realistic is that? I know that machines with multiple OS's exist, and you can choose which one you want at boot, but I'm hoping for this to be an extremely fancy computer, connected to a lot of extremely fancy computer peripherals. Would switching OS's without power cycling the machine screw with the other hardware? Is it even possible, or would you need to power cycle it in any case? Is there any way to build this hypothetical computer, or am I asking too much/investing too much effort? Would it be easier/better to just build a really good Windows machine and a really good Linux machine?
So the use case you're talking about is pretty popular among a certain kinds of Tech Nerd, and most of them solve it with iommu GPU Passthrough and a windows VM on Linux. I knew a few people doing this back in like 2018 and while it's a little fidgety it's fairly reliable.
You can't share GPU's the way you can share CPU and Memory. Not on consumer hardware, anyway. So if you want to run a VM with windows with a gaming GPU, it needs its own entire GPU just for that.
The basic layout is this: Build a normal high end system with a lot of extra resources, say, 32+GB of RAM, 10+ CPU cores, a couple terabytes of storage, and two separate GPU's. Run Linux on the system, as your host, and only use one of the GPU's. Create a VM on the host under qemu and hand it 16GB of RAM, 6 cores, a terabyte or two of storage, and use iommu to pass it the other GPU. Now use software like LookingGlass to capture the framebuffer directly off the Windows GPU and forward it to your Linux GPU, so that you can display your windows system inside Linux seamlessly.
Now, you do need two GPU's, so it can get expensive. A lot of people choose to run one higher end GPU for windows and a basic GPU for Linux, but that's up to your use case. You can run two identical GPU's if you wish.
The main place this kind of thing is being tinkered with is the Level1Techs forum, Wendell is a big advocate of GPU virtualization and so has aggregated a lot of information and people with relevance here. He also makes a lot of video stuff on IOMMU.
youtube
So I have to have two whole GPU's?
Kind of. There ARE ways to live-reset a running GPU which allows you to do tricks where you can swap a single GPU between the host and the VM without rebooting, but it's extremely dubious and flaky. Virtualized GPU partitioning exists but only on extremely expensive server GPU's aimed at virtualization servers for enterprise so it's well outside of our price range.
If you're interested in single-GPU, there is ongoing work getting it to run on consumer hardware on the Level1Techs forum and he's even running some kind of Hackathon on it, but even the people having success with this have pretty unreliable systems.
https://forum.level1techs.com/t/vfio-passthrough-in-2023-call-to-arms/199671
This setup works fine maybe 25% of the time. I can always start the VM just fine, my linux desktop stays active and any software launched after the VM gets the GPU will render on the iGPU without issues. However I suffer from the reset bug, and 75% of the time shutting down the VM won’t return the GPU to Linux and I have to reboot to fix that.
I'm quite satisfied with this setup.
Is this a good idea
It depends on what you need and how willing you are to switch between the host and VM. A LOT more things run smoothly on Linux these days. Wendell started tinkering with IOMMU back in like 2015, and I started gaming on Linux back in 2016. If you had native software, great! Without that, well, good luck with anything less than five years old.
I played Burnout Paradise and even Subnautica on my 750Ti laptop on plain old Wine, and then DXVK came out in 2018 and the world got flipped turned upside down and I have video of me running Warframe on Linux with that same mediocre system a few weeks before Proton hit the scene and we got flipped turned... right way up? Now with Proton I would say most things run pretty well under a mixture of automatic steam stuff and scripts off lutris and homemade WINEPREFIXes.
That said, if you want everything to Just Work, it's hard to beat a VM. I'm not sure how competitive games run, but for everything else a VM is going to be more reliable than WINE.
30 notes
·
View notes
Text

Things might be slower than usual this week as I didn't have power for ~18 hours after the yesterday's missile strikes and today's not looking much better than that (estimated recovery time has already been re-scheduled from 6PM to midnight).
Also taking this opportunity to continue setting up work stuffs on Debian since Windows tried to immediately install an update when I connected the laptop to a power bank.
I have this certain suspicion that SteamDeck might be better at being a work laptop than this laptop (similar CPU, better iGPU, lower power consumption), but with a single port and a little screen a dock seems semi-obligatory.
4 notes
·
View notes
Text
"fashionable"ness aside mini pcs are actually really good for what they are and can be so cheap compared to similar tiers of desktops. theyre less serviceable and top out at less power but you can get an entire home server or portable/compact browsing/document editing machine for $30-100 that will be crazy more energy efficient and take up the same space as a mousepad.
theyre usually made to be 'thin clients' that you see on the back of a monitor in a receptionists office type scenario, where the computer needs to do almost no real work but needs to be snappy at accessing the web and internal servers. this is also basically the same use case as chromebooks, theyre cheap and light and efficient because theyre perfectly built to be able to do anything from a browser depending on a remote server, like social media or google docs editing or video conferencing. so theyre pretty bad for a lot of types of use! but theyre also reallly good for the kind theyre designed for and its one of those things that you know whether thats you or not. i wish they had been so accessible like 8 years ago, my family spent $200 on a personal computer for me and it was an i3 igpu fleet desktop and it was a turd
2 notes
·
View notes
Text
My brow-burning adventure on how to make my game smoother in terms of jagged lines
Here's Tony. On the first pic, it was taken by the in-game's native screenshot hotkey (pressing C). The second pic was taken via an external program (windows game bar).


PAUSE. Lana why are you using the Windows Game Bar for screenshots? You see, I'm using AMD Adrenalin for the anti-aliasing as well as capping my game to 60 FPS (which is already capped by smooth patch but you can never be too sure!). Apparently, there was supposed to be a media record tab, but it's not appearing on mine. I searched how to enable it, but all I could see was disable this thing in BIOS, or clean registries, or disabling iGPU, which I didn't want to do since it's a lot of work (and I'm scared to fuck my computer up). Anyways, the windows game bar does the work, managing to capture AMD's post processing.
Why not use reshade? I'm afraid installing reshade in my TS3 game could be taxing on my laptop. I do have it on TS4, but with how TS3 runs, my laptop could be burnt into a crisp (knock on wood).
Continuing on, I searched and apparently, the reason my screenshots were dark was because the brightness filter doesn't carry over the screenshots done by an external source when on full screen. It only retains the brightness in the shots when using the shortcut C.

Figure 1. This shot was taken by pressing the shortcut in-game. Of course, the anti-aliasing done by AMD wasn't captured here.

Figure 2. Shot through windows game bar. With AMD anti-aliasing. It's darker.
Why not just use the in-game Edge Smoothing? Because even if set high, I could still see jagged lines. It bothers me, so I went and used AMD Adrenalin.
To make my shots as-is from the game, I made my game windowed, and along with Lazy Duchess' TS3 smooth patch (the version 1.x.x), made it windowed full screen borderless.
So now, I present to you, the fruit of my labor of staying up until 2AM last night (please click the picture to see the difference!):


Final notes: Although there are still teeny tiny details that aren't smoothed, that I can tolerate. It's not as noticeable as setting your edge smoothing in-game to the highest setting.
Hooray for Lana!
7 notes
·
View notes