#if i post the full screencap or just crop everything else out
Explore tagged Tumblr posts
Visit Tumblr Blog
Explore Tumblr blogs with no restrictions, modern design and the best experience.
Last Seen Tumblr Blogs


Fun Fact
Tumblr is available in 18 languages.
Text
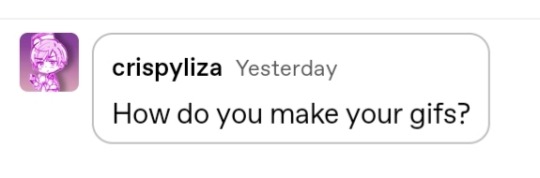
Hello @crispyliza !! So I'm replying in a separate post because this is too long for a reply on the post. Hope you don't mind. I also think it might benefit others who have asked me in the past and those wishing to start gif making. Especially with whumptober just around the corner.
So here's a full look at how I make my gifs. This got very long so I put it under a read more
A quick thing before I start: I use windows and google chrome. If you're a mac or firefox user I'm not sure of this will work for you in terms of programs. The techniques I use in photoshop should though.
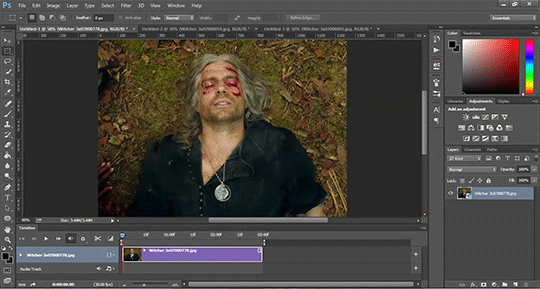
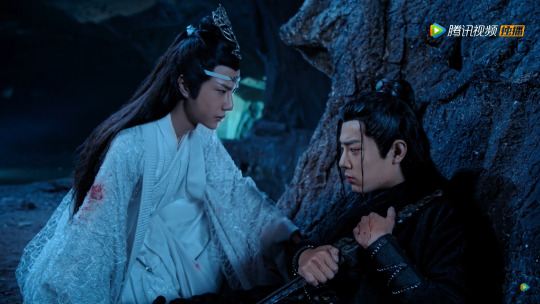
Okay for this demonstration I'm going to show you how I made the gifs for this gifset
To start we need a video. I don't torrent because my internet connection will cut out a random which makes using vpns rather pointless. I've tried. My internet would cut out halfway through a torrent download and then my internet provider was notified to what I was doing. It was just not great. So I found a new way to download videos off the internet! You can use torrents though. If you've got a vpn, go for it.
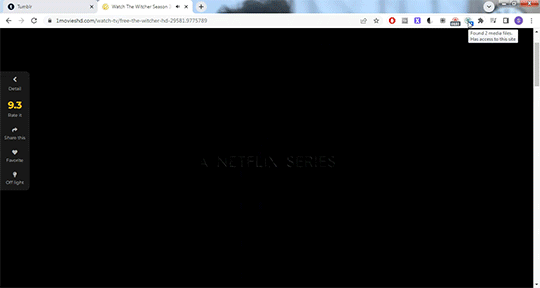
There are several streaming sites that I go to to get my videos. 1movies, and bstsrs are my go to right now since soap2day is gone (rip i miss you).
Now there are three ways I can get a video depending on what website I'm using. Bstsrs is the easiest because they have a whole bunch of links available. I always go with mixdrop because it has an easy to use built in download button. Unfortunately this site doesn't have movies. Just tv shows and sometimes it's not the best quality or there aren't links available. That's when I go to 1movies. Once you've found your video I use the chrome extension Cococut to download it. Click the extension button to open, then the download button. Then you just have to wait until the video is rendered. Click save. Wait until its downloaded.
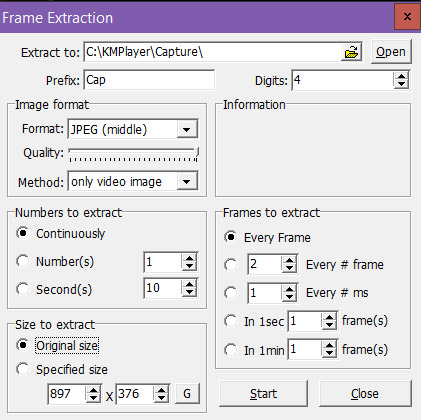
Okay we now have our video! The next step is to turn the scene you want to gif into frames. For this we're gonna need KMPlayer. This video player makes it really easy to turn scenes into frames/screencaps. Open your video. Find the the scene you want and pause the video. Type control-g to open this screen:
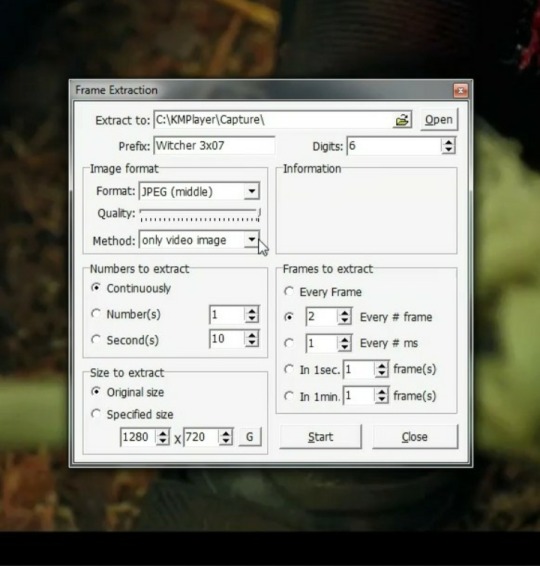
Here you choose the destination you want your frames to be saved. Decide what to name your frames and match up your settings with mine. You want to continuously extract frames, original size, and I stick with every 2 frames. Then, and this is important, choose video images only.
Now click start then start playing your video until the scene you want to gif is done. When you've got everything you wanted, pause the video. Hit ctrl-g again to reopen that screen and click stop. You now have all the frames you need so go ahead and exit out of KMPlayer. You don't need it again unless you need to redo frames or get the dialogue or something.
Next up we are gonna open Photoshop. I use Photoshop CC 2014.
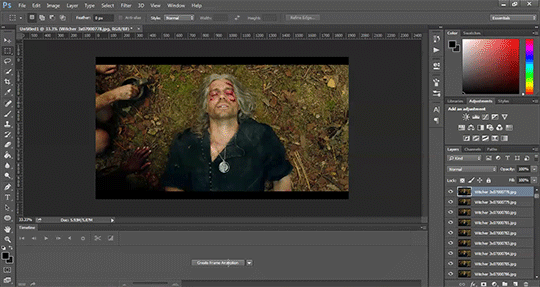
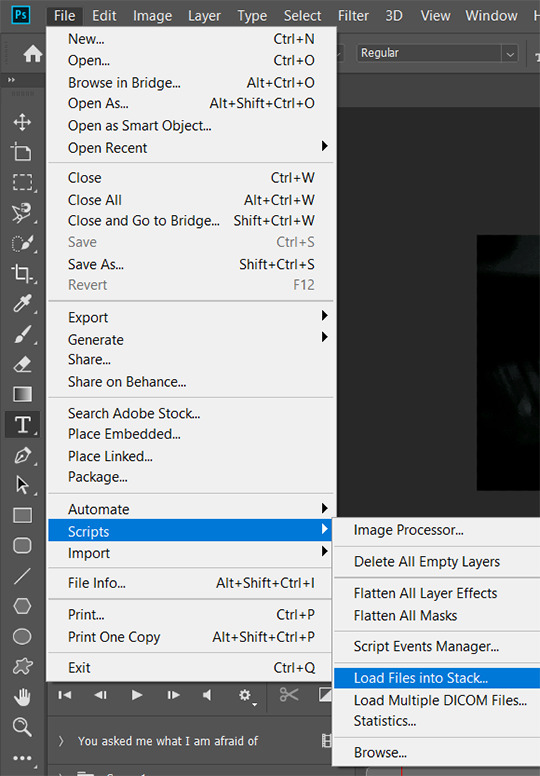
Click on File -> Scripts -> Load files into stack -> Browse.
Go wherever you saved your frames and select the ones you need. Click okay and let the frames load completely before doing any thing else. Depending on how many you've selected this could take a while.
Once all of your frames are loaded, click "Create Frame Animation". Next click the little arrow button on right followed by "Make Frames From Layers" so we have all of our frames laid out. Now we need to reverse the frames because they're backwards so click that little button again and then click "Reverse Frames"

Okay you've got your frames loaded and all set to go. Time for all the cropping, resizing, setting the speed, and editing.
First thing I do is set the speed because otherwise I forget and it's important to do and a pain in the ass to do after all the editing is done. So do it first and get it out of the way. Select all of your frames. Click the little button beneath a frame where it says 0.0 and pick your time. I usually go for .1 seconds but .05 is also a popular speed. Just test one out and see which one you like best for your gif. You can hit the play button at any time to test your gif.
To set speed:
After this I do one of two things. Either I go into cropping and resizing or I separate frames. Depends on how many frames I uploaded. If I uploaded all the frames needed for an entire gifset this is the part where I separate them out onto individual gifs. So let's do that.
Originally I was just gonna do one gif but I have 115 frames uploaded which is waaaay too many for just one gif. I like to keep my gifs between 30 and 80 frames. So I'm going to split this into 3 gifs I think. It'll make a nice balanced gifset.
Select the frames you want for the first gif and copy them using the copy frames option in the same menu as the make frames from layers menu. Open a new document with the same dimensions as your current document. Click "Create Frame Animation" and paste the frames over the selected frame. Make sure that first frame is the same speed as all the other frames. Repeat until you have your desired gifs.
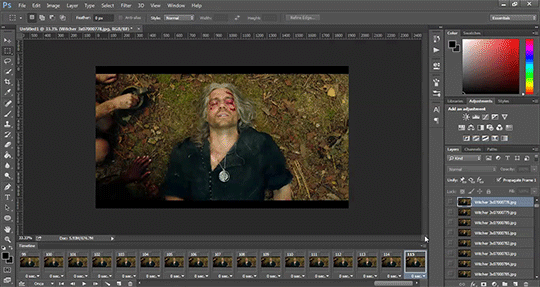
Next up I crop and resize. For this gif I'm going to first crop out the black bars above and below the image because we don't want that in the gif. Use the select tool to pick what you want to keep then "Image" then "Crop".

Now I could leave it as it but I think for this gifset I'm gonna focus more on Geralt so I'm going to crop it in a bit more.
Once cropping is all set i'm going to resize the gif to tumblr dimensions. Click "Image" then "Image Size" and change the width to 540px. The height can be anything and best not to mess with it so your gif keeps it's proportions. 540px is the width of a tumblr post and I plan on making these gifs stacked one on one.
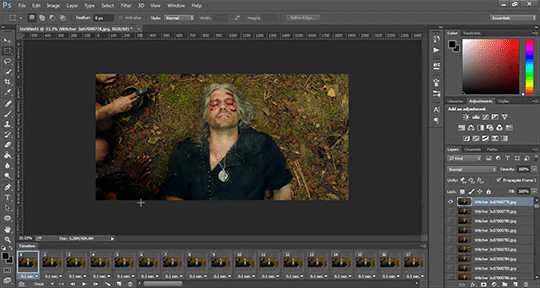
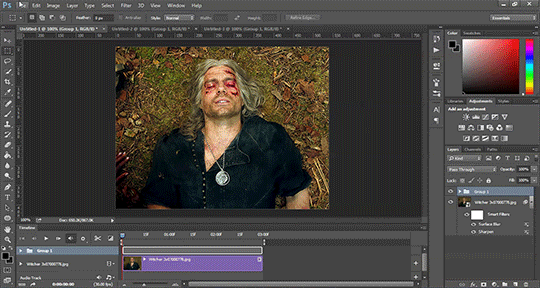
Okay the gifs are all cropped and sized. Now it's time to do some editing. Go back to your first gif. We'll do all the work on this first gif and apply the same things to the other ones later because the scenes are the same. If they were different each gif would be colored and edited individually. First thing to do is turn it from frame animation to timeline. Timeline mode makes applying things like sharpening and brightness much easier and smoother.
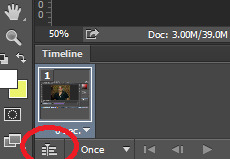
So just click this button in the bottom left corner to go into timeline mode. Next up select all your layers. They're on the right side. Make sure you've selected ALL of them. Then click on "Filter" -> "Convert for Smart Filters" THIS IS AN IMPORTANT STEP! We can't edit until this is done.
This button to switch from frames to timeline:
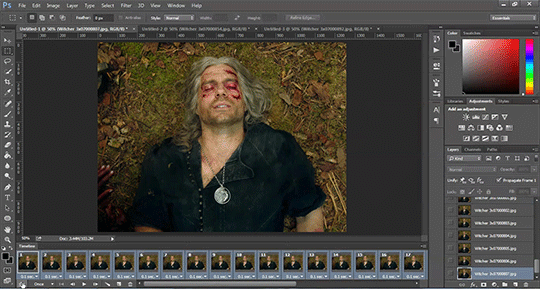
First thing I do is sharpen. You can use one of the presets or try to do manually do it with smart sharpen. I use the preset labelled "sharpen" because I'm lazy and this one does a fine job for my gifs. I also add a layer of surface blur to smooth things out. Just a small touch. Like barely any blur but I think it smooths noise a bit and makes it look better.
Next up: Editing!! This step is going to be different for each and every gif you make. It all depends on the colors in the scene your giffing so you're gonna have to do a lot of experimenting to get the right look you want. Personally that's what I like about it. Makes it fun.
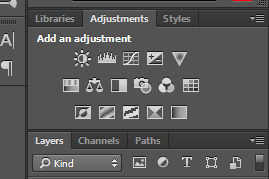
All your adjustments can be found found on the right side of the screen:
I almost always start with the "Levels" layer to brighten up the image because as we all know, every freaking whump scene is sooo dark. So with levels you just slide the little arrows around until you get a look you like.
Then I add a layer of "Curves". I love curves. With curves you can select the whitest white and the darkest black and the middle tone to change the brightness and colors of your gif. Or you can use this part and just brighten or darken a specific part. It's really versatile and i love it. It does take some practice and experimenting though.
Now a layer of "Contrast" and a layer of "Vibrance".
After this it's all about the selective colors, photo filters, and color balance to work on the colors and brightness. For this gif I'm only doing a tiny bit of editing cause I like the coloring but sometimes I'll have multiple layers of these to create a good coloring.
Once you're satisfied with how your gif looks it's time to save it!
Click "File" -> "Save for Web" and wait until it's all loaded. Important thing too look at here is the size of the gif. You can't upload any gif that is larger than 10mbs so make sure it's under that. Sometimes even 9.8 is too big because tumblr is a butt. I go for anything below 9.8. If your gif is too big try resizing it or removing a few frames. Make sure you gif is set to loop forever. Otherwise it'll just stop after a little bit. Don't forget to change this!
Here are the rest of my settings:
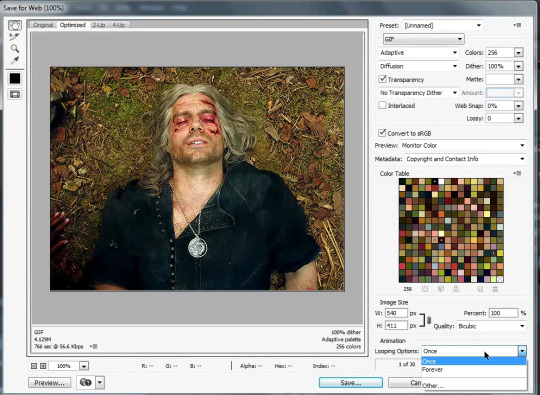
After that you can click save.
And that's it! You've made a gif! Congrats! If you have any questions or want clarification feel free to message me :)
32 notes
·
View notes
Text
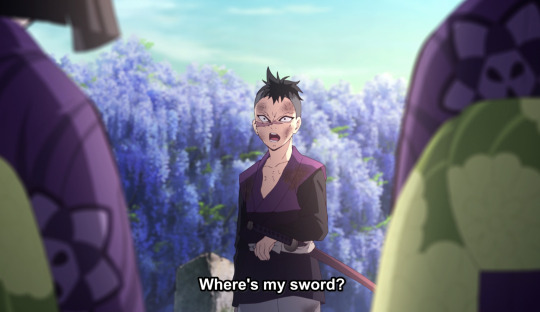
#episode 5#anime#kny#genya shinazugawa#shinazugawa genya#kimetsu no yaiba#genya caps#i literally only watch subs so idk if itll look better if like#if i post the full screencap or just crop everything else out
40 notes
·
View notes
Text
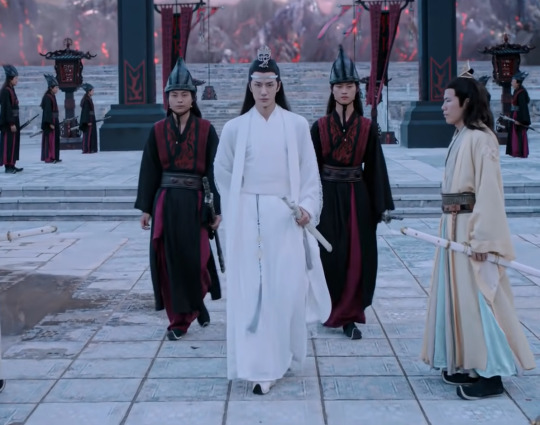
Lan Wangji: Armored in Silk and Lace
AKA Lan Wangji’s costumes in the Untamed, part 3/9
Today it’s time to discuss the outfit that’s definitely in contention for the title of Most Extra™. As usual, I’ll talk of the costume both in terms of what it consists of and how it ties to what’s going on in the plot.
Lan Wangji wears this outfit during the evil summer school in episodes 11 to 14, and is furious for about 90 % of the time. He also confesses his love, only for Wei Wuxian to pass out without actually hearing it, so things are going just great for him all in all.
The Costume
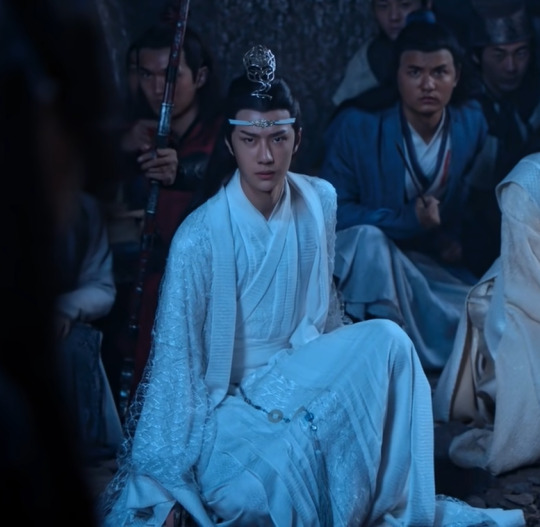
This was a fun one to analyze, because it looks fairly simple at a first glance, the silhouette is much like his first outfit, but when you start to really look at it, you’ll spot a lot of detail going on. Also for some reason getting good screencaps of this one was a nightmare, but I think you’ll get the gist even with what I got.
This outfit is notable for a couple of reasons; it’s his first completely white outfit (excluding the forehead ribbon and waist ornament, those are the same as always), his other fully white outfit is the next one. It’s also the first time there’s no cloud embroidery anywhere, the other time is the outfit he wears when they go to the temple in the end. I’ll talk of the in-universe reasons in the context section, but the fully white look is a very wise choice also from the costuming perspective.

As you can see above, the silhouette is once more a formal one, with the wide sleeves and the robe falling freely over sash. The color is pure white, as opposed to Nie Huaisang’s off-white in comparison, but you might go back and look at the first outfit for example, and notice the white here seems warmer than in any of his other white outfits. Usually, while the white fabric in LWJ’s costumes is always pure white rather than a tint of any kind, it takes a little of the blue hue from the inner robes. It obviously doesn’t happen here, and the fabrics used are also somewhat less shiny than in his other costumes, which helps it reflect the warm tones back (as opposed to the next, also all white outfit, which is made of shinier fabrics).
From costuming perspective the choice makes sense, because this outfit is worn outdoors under sunlight, in Qishan with its reddish light, and in the cave in firelight, all of which are environments where the full white works at least as well (natural sunlight) or better (Qishan and the cave) than with the blue underlayer. The textures of the fabric also look great especially in the dim light of the cave.

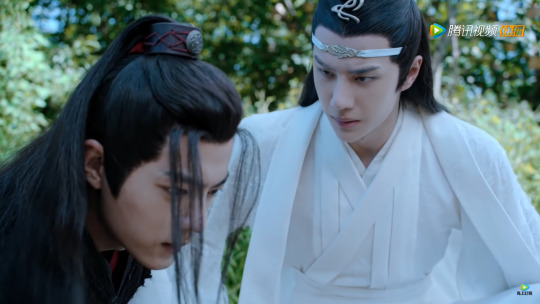
Now let’s get to the details! The most obvious thing is of course the lace overlay on the outer robe which is not only gorgeous, but a relevant factor in consideration whether this is the Most Extra™ outfit. I also love the texture of the fabric on the lapels and sleeve ends, with the same fabric also used in the layer below. In the title I called this outfit his armor, and it is so for him psychologically, which I’ll talk about later, but it’s also reflected in the very structured cut of the second robe, which has much starker pleating than his outfits usually do. There’s also a bit of lace in the panel on the front, and the sash is similarly criss-crossed as it was with his previous blue outfit.
I had to settle for a screencap of him crouching to get even a half decent look of the bottom of his robes, because mostly you can’t see half of the detailing. First, there is the panel of lace that continues all the way down in front, and you can also see the pressed pleating. Also, if you look at his right knee (resting on the ground), you can see yet another fabric that has a sort of circular texture going on (may have to zoom in on this one), again something that you’re likely to miss on the screen, but must have been great for Wang Yibo to know that every bit of the costume was as elaborate as LWJ’s should be.
And finally, my favorite detail and the one that in my book yields the title Most Extra™ for this outfit, the boots! Sorry about the awkward cropping, I didn’t want to have the leg wound visible, since that’s potentially a less than great surprise in a costume post, and this was pretty much the only scene where you could get a good look at the boots.

I mentioned in part 1 that it's a hell of a power move from the Lan Sect to have white boots in general, but look at these. Boots made of white brocade? Truly incredible, and obviously used here since we get a good look at them by virtue of LWJ’s leg wound. Once again I applaud the costuming department for commitment.
The Context
LWJ is back in white, which broadly means that he feels drawn to his duty to his sect more keenly, and in this case I’d argue it’s mixed with mourning for the burned Cloud Recesses and the loss of his home, hence the all white outfit. He’s also terribly vulnerable and alone when we first see him in Qishan, he’s escorted in by the Wens rather than arriving with an entourage like the others, he’s been questioned and beaten for who knows how long by that point, he’s injured and has to use his spiritual energy just to walk upright, and he’s worried about his family. Of course, he’s not going to let the Wens see it’s getting to him, and his outfit is one of the few things he can control, so he does, to a degree at least.
The lack of cloud embroidery might in-universe be because he was not allowed to have it, considering the embroidery acts as a talisman that can protect the wearer from some forms of harm (remember how in episode one the puppets didn’t like them).
They may be made of silk and lace, but his robes are his armor right then, the very formality and how impeccable they are despite everything is giving out the signal that even in these circumstances he’s still the Second Jade of Lan. It’s costing him though, and he again has drawn a wall around himself and doesn’t spare a glance at the others, including WWX, he’s laser focused on Wen Chao with all the fury he has. Of course, the day ends absolutely miserably with them having to relinquish their swords just to add insult to injury, and giving him even less things he has control over. (This is not a weapon design post, but Bichen is really pretty.)

There is a huge difference in the way he now interacts with WWX compared to where they left off in Qinghe, even taking into account that LWJ didn’t actually let WWX see quite how much he’d softened toward him, but now the barrier is fully up again, and WWX is doing his best to batter it down once more. He can of course see it’s different compared to how their early interactions were, now LWJ isn’t annoyed at him but just ignores him, likely at least partly out of necessity because he has no energy for anything else, but also because he’s so aware of representing his sect in this dangerous time, and he can’t afford to be distracted. WWX of course finds out only later what has happened since their parting, and then understands better why LWJ behaved as he did.
Of course, LWJ might be on his last legs and tied by his duty, but the fact he cares about WWX hasn’t changed, and while he can ignore both the questioning and the antics, he won’t just stand by and let him be hurt. This, of course, is a mutual feeling for the two of them, as we see later during the walk toward the cave. In fact, they’re on something of a mirrored journey right here, having to think of their duties toward their sects, but when push comes to shove, they will always help each other.
When they're left behind in the cave there is a brief lull in the push and pull conflict going on in both their hearts, and for a bit they can just focus on surviving together. WWX pulling LWJ’s ribbon off is a neat symbol for it, as if removing the duty for a bit, and the conversation following is fully personal even though their worry for their families is there at the back of their minds at all times.
There’s also the only moment of peace for LWJ while wearing this outfit; when he falls asleep and WWX gently covers him with his robes, and later in the morning puts his ribbon back on. LWJ really had no defence against falling in love with WWX, when assaulted both by the fact WWX isn’t at all bothered by the icy aloofness he portrays, and the casual caring acts.

After the relatively calm night it’s back to no fun times to be had, with WWX nearly dying in the aftermath of the battle. Here we get perhaps the most pointed example of how LWJ is at this point in his life pulled into two directions. He sings the song he composed and named after the two of them to WWX, even saying the name aloud and practically confessing to his feelings, and then leaving without waiting for WWX to wake up when they’re saved, because he knows that since he can, he needs to return to his family and see what they can salvage of their home. A “fun” thing for him to contemplate, by the way, is whether things would have gone differently when they reunited in episode 20 if he’d stayed at least to see WWX back awake. Who knows.
Next time we’ll have another fully white outfit and LWJ not having a particularly good time wearing it. Hopefully there’ll be plenty of scenes from which to get good screencaps, it feels like struggling with both the angst and difficulty of capturing should be too much to ask. 😅
(You can find the rest of this series via “lwj costume series” tag below, or through my blog contents page. I’d link for ease of access but the links make it disappear from tags, so. 😒)
72 notes
·
View notes
Text
Beginner Friendly Gif Tutorial (Part 1): The Screencap Method
This was requested by a anon earlier this week and, while I don’t think I do anything terrible unique with my gifs, I will do my best to explain my process. I’m going to be posting this tutorial in two parts, as it got super long 😅 and I think things will be easier to keep track of this way.
This first post is going to be focusing on how I set up my gifs (loading files into stack, cropping, converting to smart object, and sharpening). I use the screencap method 85% of the time, so that is what I’ll be focusing on here. I’ll be talking about my approach to coloring in the second post.
Please like or reblog if this tutorial helps you!!
So, before you can actually make a gif, you need to have the right tools. For me, these tools are:
KMPlayer (for screencaps)
Photoshop CC (for everything else)
If you’ve made gifs before or looked at other tutorials, you are probably aware that there are two ways of getting started. Some people use the “video frames to layers” option in Photoshop, while others use the “load files into stack” option. The former requires video in a format Photoshop can read. The latter requires an external program such as KMPlayer capable of screencapping the moment you want. I use both methods, although I use load files into stack more frequently. Because of this and the fact that load files into stack is a bit more complicated, that is what I’ll be explaining today.
Step 1: Screencapping
For load files into stack, you need to first open your video in KMPlayer and screencap the moment you want to gif. These are the settings I use:
With your screencaps in hand, you can hop over to Photoshop.
Step 2: Creating Your Timeline
In Photoshop, you need to open the menu and select “load files into stack”:
Once you do that, this box will appear:
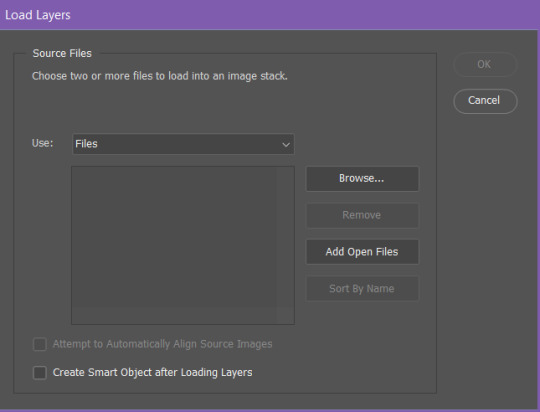
You need to click browse and then select all the screen caps you want to use.
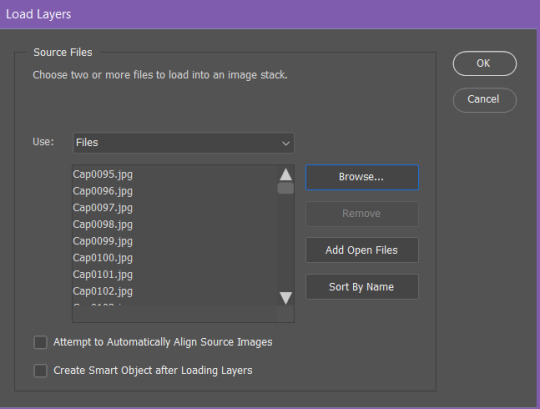
Once you have all the caps you want to use, click “ok.” (I don’t recommend loading more than 100 to 150 at once, as the process is not the fastest. However, I have loaded more than 400 screencaps at once, so, depending on what you’re doing, the wait can be worth it).
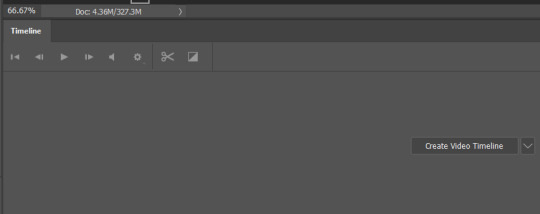
Once your screencaps have loaded, you’ll see something like this on the side of your screen:

Now you need to select all layers by scrolling down to the bottom, holding down shift, and selecting the last layer. Then (and you will need the timeline window showing for this), you need to click “create video timeline”.
Once you’ve done that, your timeline should look something like this:
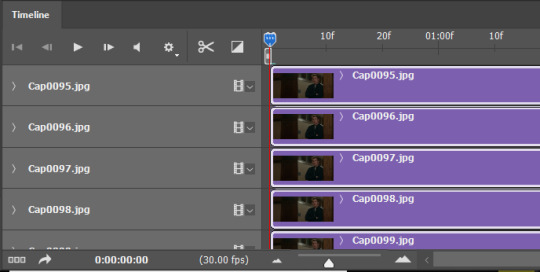
Next, you need to select those three little boxes on the bottom left. That’s convert to frame animation. You should end up with this:

Now, you need to go over to the right side of the timeline, click the three little lines, and then select “make frames from layers” from the menu that pops up:

You will end up with this:
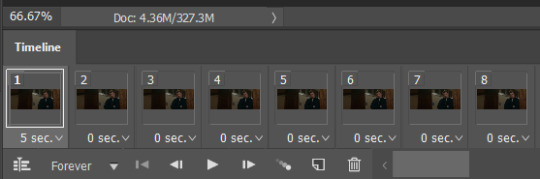
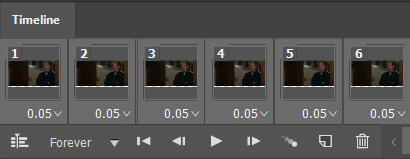
It might look we’re ready to go, but, there are a few more things that we need to do before we can really get down to business. First, you need to select all frames and set the frame delay:
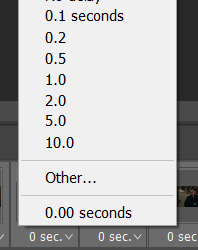
Click “other” and set the frame delay to .05:

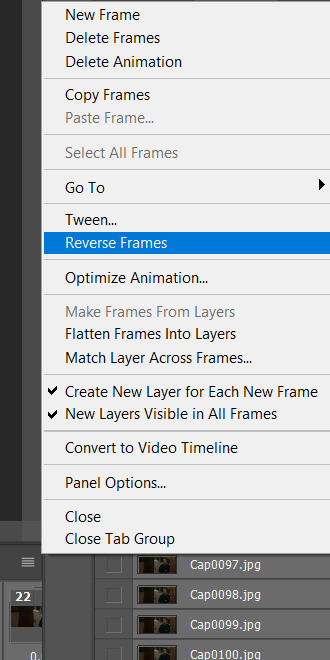
Now (and this is the last thing we need to do before we get to the business of actually making our gif), we have to reverse the frames. When you use the load files into stack method, your frames are loaded in reverse order. So, before we start cropping and coloring, we need to fix that.
In order to fix that, you need to head back to that little menu on the right side of the timeline bar and click “reverse frames”:
Once that is done, your gif is ready to be cropped and resized!
Step 3: Cropping and Resizing
When making gifs for Tumblr, you want to make sure you are using the correct widths:
540px for full width gifs
268px for 2 per row gifs
177/178/177px for 3 per row gifs
Gifs that are not wide enough will look fuzzier and lower quality once stretched on Tumblr and gifs that are too wide will make it harder to stay under the 3mb size limit.
Beyond that, you can really size things how you wish. Very big and tall gifs, very short and skinny gifs, etc. It just depends on what you’re trying to do and what dimensions will best serve that. The larger your dimensions (particularly if you’re giffing a scene with a lot of movement), the less frames you will be able to fit under the 3mb mark.
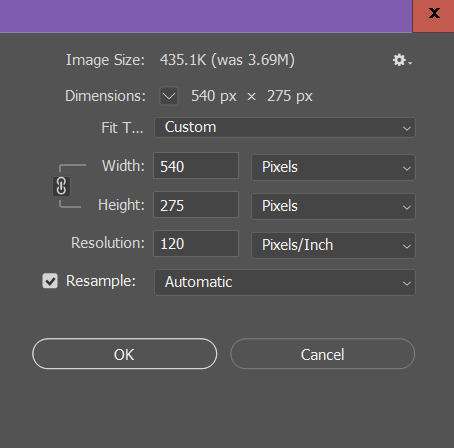
For this gif, I’m going with 540px x 275 px.

With your dimensions entered, a cropping box will have appeared on your image and you can drag it or shrink it as you wish.

I like where Steve is positioned in the frame, so I’m just going to leave it as is and click the checkbox.
After my frames have been cropped, I like to click on “image” and then select the “canvas size option” in order to smooth out the edges:
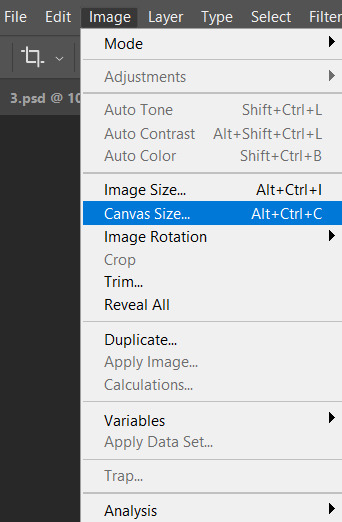
I remove 2 px from both the height and the width to help smooth out the edges. Click okay and then click proceed:

Now, we can FINALLY resize things for Tumblr. Go back to the image menu at the top, click “image size”, enter your width (the height should automatically change with it), and then click OK:
Step 4: Convert to Smart Object
With things now resized and ready to go, click select all layers again, and then click “convert to video timeline” (the little symbol on the bottom left of the timeline):
This will give you something that looks like this:

From here, you need to go to the filter menu and click “convert for smart filters”:

With that done, you’ll have something that looks like this:

Step 5: Sharpening
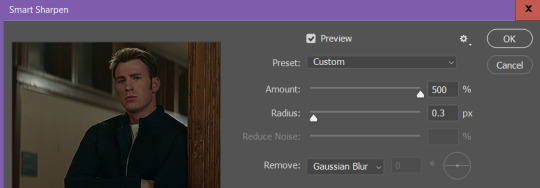
Because we’ve converted our file to a smart object, we can sharpen everything all at once. Go up to the filter’s menu and select smart sharpen:

These are my settings:
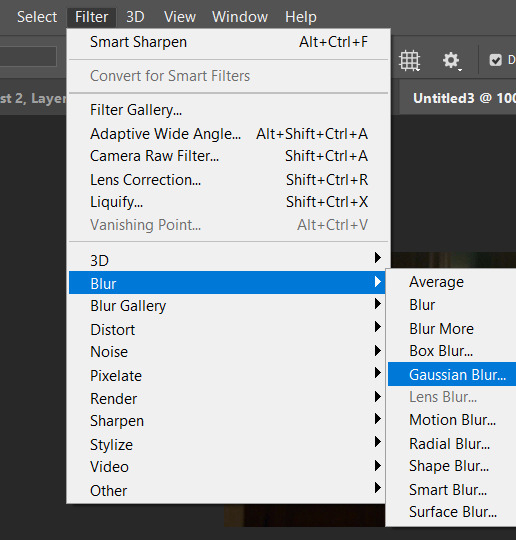
After this, I add a bit of Gaussian Blur, so you will need to head back up to the filter menu:
These are my settings:
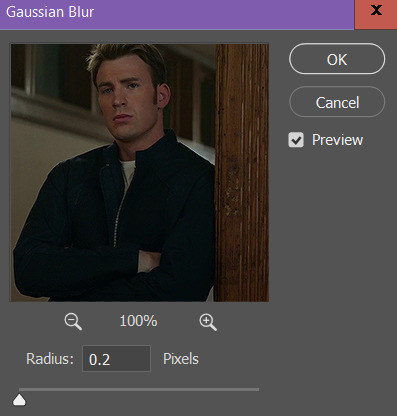
(.3 is a more common setting and I use it sometimes, but I have generally found that I like .2 a bit better for some reason).
So, at this point, you have the basics of how to physically set up your gif and can basically color things however you want. If you already have a method of coloring you like (or aren’t terribly interested in how I color my gifs), feel free to skip the second half of this tutorial 👍🏽!!
P.S. if you are going to regularly gif and plan to use the screencap method, I highly recommend creating your own Photoshop actions to automate and speed up these steps.
#tutorial#gif tutorial#photoshop help#gif making#content creation#elysia makes stuff#(this took a lot of time so i think it counts)
182 notes
·
View notes