#i2c protocol
Explore tagged Tumblr posts
Text
How i2C protocol works....
#mobicationhub #mobicationhub9509959090 #Protocol #reelsfypシ #i2c #institute #phonerepair #mobilerepaircoursejaipur #mobilerepairing #working #1monthcours #laptop
#i2c protocol#i2c protocol tutorial#protocol#spi protocol#communication protocols#i2c protocol vs spi protocol#communication protocol#how i2c protocol works#i2c protocol - inter integrated circuit protocol#i2c communication protocol#i2c protocol working#serial communication protocol#inter integrated circuit protocol#inter-integrated circuit protocol#i2c bus protocol#i3c protocol#what is i2c protocol#basics of i2c protocol#spi protocol tutorial
0 notes
Text
https://www.futureelectronics.com/p/semiconductors--comm-products--i2c/pca9515adp-118-nxp-5973557
I2C CAN Bus Module, I2C adapter, I2C devices, Serial Peripheral Interface
PCA9515A Series 3.6 V 5 mA 400 kHz 6 pF Surface Mount I2C-bus Repeater - SOIC-8
#Comm Products I2C#PCA9515ADP#118#NXP#I2C CAN Bus Module#I2C adapter#I2C devices#Serial Peripheral Interface#I2C Level Converter#i2c protocol#spi protocol#uart protocol#i2c communication#i2c protocol in embedded system#I2C-bus Repeater
1 note
·
View note
Text

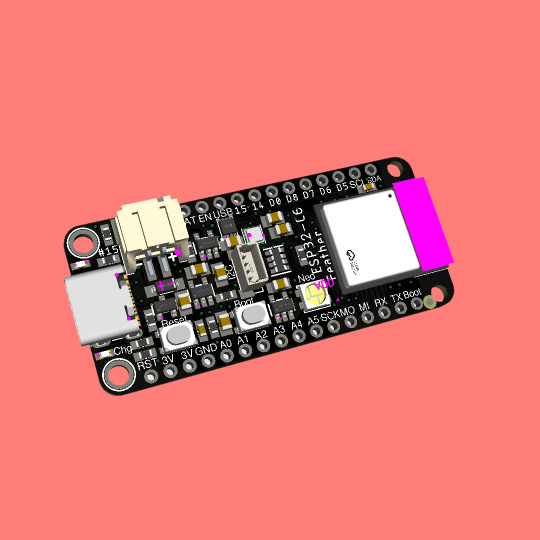
Coming soon - This ESP32-C6 feather is a Matter of fact
ESP32-C6 (https://www.adafruit.com/product/5672) is Espressif’s first Wi-Fi 6 SoC integrating 2.4 GHz Wi-Fi 6, Bluetooth 5 (LE) and the 802.15.4 protocol. It brings the goodness you know from the low-cost C3 series (https://www.adafruit.com/product/5337) and improves it with Zigbee/802.15.4 at 2.4Ghz. That means it could make for great Matter (https://csa-iot.org/all-solutions/matter/) development hardware!
We took our Feather ESP32-S2 (https://www.adafruit.com/product/5000) and swapped out the 'S2 for a C6. Plus some re-routing and here's what we've got: a C6 Feather with lots of GPIO, lipoly charging and monitoring with the MAX17048, (https://www.adafruit.com/product/5580) NeoPixel, I2C Stemma QT port, and a second low-quiescent LDO for disabling the I2C and NeoPixel when we want ultra-low power usage. We also tossed a BME280 (https://www.adafruit.com/product/2652) on there, so you could use it immediately as a low power temp/hum/pressure sensor.
#esp32-c6#wifi-6#bluetooth-5#zigbee#matter-protocol#feather-board#gpio#lipoly-charging#i2c-stemma-qt#bme280-sensor
4 notes
·
View notes
Text

Comparing I2C and CAN Bus Protocols in Embedded Systems
Learn the key differences between I2C and CAN protocols for embedded systems. This beginner-to-intermediate guide compares data rate, bus length, fault tolerance, and power consumption using STM32, Arduino, and Raspberry Pi.
0 notes
Text
https://www.futureelectronics.com/p/semiconductors--comm-products--i2c/pca9532pw-112-nxp-3036484
I2C communication protocol, liquid crystal displays, clock line
PCA9532 Series 5.5 V 350 uA 400kHz SMT 16-bit I2C-bus LED Dimmer - TSSOP-24
#Comm Products#I2C#PCA9532PW#112#NXP#I2C communication protocol#liquid crystal displays#clock line#Bus interface connection protocol#Inter-integrated Circuit#I2C-Bus#I2C circuit diagram#i2c protocol programming#Inter-Integrated Circuit
1 note
·
View note
Text
https://www.futureelectronics.com/p/semiconductors--comm-products--i2c/pca9515adp-118-nxp-7183946
What is I2C communication, serial communication bus, I2C logic
PCA9515A Series 3.6 V 5 mA 400 kHz 6 pF I2C-bus Repeater - SOIC-8
#NXP#PCA9515ADP#118#Comm Products#I2C#What is I2C communication#serial communication bus#I2C logic#Surface Mount I2C bus repeaters#Wire Interface Bus#USB to I2C converter#Encoder motor driver#i2c communication protocol#I2C bus switches
1 note
·
View note
Text
https://www.futureelectronics.com/p/semiconductors--comm-products--i2c/pca9532pw-118-nxp-5033862
I2c bus, Embedded communication, Isolated CAN Transceiver ICs
PCA9532 Series 5.5 V 350 uA 400kHz SMT 16-bit I2C-bus LED Dimmer - TSSOP-24
#NXP#PCA9532PW#118#Comm Products#I2C#Ethernet MAC controller#communication protocol#i2c module#bus#Embedded communication#Isolated CAN Transceiver ICs#High-Speed CAN Transceiver#CAN transceiver#SPI bus#CAN bus lines
1 note
·
View note
Text
https://www.futureelectronics.com/p/semiconductors--comm-products--i2c/pca9515adp-118-nxp-5973557
I2c bus, I2c communication protocol, Inter-Integrated Circuit, spi interface
PCA9515A Series 3.6 V 5 mA 400 kHz 6 pF Surface Mount I2C-bus Repeater - SOIC-8
#Comm Products#I2C#PCA9515ADP#118#NXP#What is I2C communication#High Speed CAN#i2c pins#digital integrated circuits#I2c bus#I2c communication protocol#Inter-Integrated Circuit#spi interface#expanders#I2C bus repeaters
1 note
·
View note
Text
https://www.futureelectronics.com/p/semiconductors--memory--RAM--eeprom--i2c-interface-protocol/cat24c64wi-gt3-onsemi-8463176
Random Access Memory, what is an EEPROM, programmable EEPROM manufacturers, ROM
CAT24C64 Series 64 Kb (8K X 8) 1.8 - 5.5 V I2C CMOS Serial EEPROM - SOIC-8
#RAM#EEPROM#I2C Interface Protocol#CAT24C64WI-GT3#onsemi#Random Access Memory#programmable EEPROM manufacturers#ROM#EEPROM microchip programming#EEPROM memory chip#flash EEPROM#electrically erasable programmable read only memory
1 note
·
View note
Note
WARNING: LONG ASK INCOMING
For hobby electronics there’s two major kinds of processors: Microcomputers and Microcontrollers. Microcomputers are small full computer systems like the Raspberry Pi, they typically run a general-purpose OS (typically some flavor of Linux) and are useful for the kinds of projects that require basically a full computer to function, but not necessarily individual sensors. They’re a great place to start for people who don’t know a whole ton about programming or working with individual components because they typically can output a true GUI to a screen and have the capabilities of a regular desktop computer. They have a main processor, true RAM, and either large on-board storage space or a way to read a storage device, like an SD card.
Microcontrollers are less complicated (component wise) than microcomputers, but as a result are more difficult for total beginners to begin working with. They’re typically primarily a SoC (System on a Chip) processor without discrete RAM modules and a very small EEPROM (on-ship storage space) and need to have components wired and configured to them to be able to do much more than being a fancy calculator. They’re used for when you need something to carry out electronic functions or get sensor readings, but not necessarily a full operating system, so they’re best suited for small/integrated applications. Your helmet uses a microcontroller to control the LEDs you used in the Cunt Machine post.
I build high-power model rockets as a hobby and with my university team, so I work with both kinds of processor as part of designing payload systems. I typically prefer microcontrollers in these as most of what we do doesn’t need an actual OS to run, and they’re smaller/lighter than microcomputers. One of the advantages of a microcontroller is that it runs a Real-Time OS (RTOS) which forgoes all the user-friendliness of things like windows and linux to instead be the bare minimum backend necessary to run code uploaded into the processor.
The main advantage of using a microcontroller is really that they’re typically a lot cheaper than microcomputers are and are plenty powerful for really embedded applications. They also make other parts of whatever system is being built cheaper/easier to integrate because they require less overhead to function - the raspberry pi needs a minimum of 5 volts of power to work, while a chip like an ESP32-PICO can run at 1.8V.
The main way you make sensors/buttons/peripherals work with a microcontroller is via digital communication busses. There’s a few protocols, the most common being I2C, SPI, and UART. I’ll talk about I2C since that’s generally the most common. With I2C each component is assigned a 2-byte “address” that they’re identified by. When the controller sends a request signal on the I2C data bus, every sensor along the line will return their own signal, marked with their address so that they can be identified. It allows for a large number of devices to be put on the same lines and you can daisy-chain them through each other to the microcontroller.
I’ll be honest I really can’t think of a good way to say much more on the subject as like a starting message because I’ve been working with computers so long all the tech stuff for me is second nature, but if you have any questions ask away I can probably answer them or google them.
.
#AAAAAAAAAAAAAAAAAAAA TY INFORMATION#no yeah this is either really beginner friendly or. friendly to how much i have learned so far#tysm!!!! your insight is consistently so helpful <3#ask#lobsterbitches
27 notes
·
View notes
Text
5 Common Mistakes in Battery Management Systems

There are a few common issues related to the time of adoption and usage of BMS that may affect longevity, safety, and efficiency of a battery pack. Here are five typical errors to avoid:
1. Inadequate Thermal Management
Mistake: Failing to adequately check and regulate the battery cells' temperature.
Consequence: Overheating brought on by poor thermal management might result in thermal runaway, lower battery efficiency, or a noticeably shorter battery life.
Solution: Make sure the Battery Management Systems (BMS) has several sensors for complete temperature monitoring, and when needed, combine it with an active heating or cooling system.
2. Ignoring Cell Balancing
Mistake: Not implementing cell balance in the battery pack or configuring it incorrectly.
Consequence: Ineffective cell balancing can cause individual cells to overcharge or undercharge, which can diminish the battery's total capacity and cause uneven wear and possibly damage to individual cells.
Solution: To ensure consistent charge levels in every cell, use a BMS with either passive or active cell balancing.
3. Overlooking BMS Compatibility
Mistake: Using a BMS that isn't entirely compatible with the battery chemistry or the battery pack's particular setup.
Consequence: Incompatibility can result in improper voltage limits, inappropriate protection, and even unsafe operating conditions.
Solution: Make the BMS specifically designed for the type of battery chemistry used (Lead Acid, Lithium-ion, etc.) and the type of battery pack layout series/parallel arrangement.
4. Inadequate Fault Detection and Diagnostics
Mistake: Not providing enough fault detection and diagnostic tools for the BMS.
Consequence: Faults like short circuits, cell failures, or wiring faults could go unreported without adequate fault detection, resulting in battery damage or dangerous situations.
Solution: Select a BMS (Battery Management Systems) that has advanced diagnostic and fault detection, data logging, real-time warning capability, and communications of problems with other systems or operators
5. Underestimating the Importance of Communication Protocols
Mistake: Integrating a BMS (Battery Management Systems) with other system components without using the proper communication standards.
Consequence: Inaccurate battery status reporting and other inefficiencies can result from poor communication, as might a complete system failure if vital information is not accurately exchanged with controllers or displays.
Solution: The BMS should be able to converse with and connect to the rest of the system: other vehicle control units, chargers, and user interfaces using the necessary protocols: CAN bus, I2C, etc.
Staying away from these common mistakes while selecting and setting a BMS enables you to ensure that your battery pack can serve for as long a time as possible safely and efficiently.
Lithion Power is a manufacturer of high-end Battery Management Systems that can realize maximum performance from any given battery while ensuring safety. BMS developed for electric vehicle applications, energy storage, and portable electronics are highly critical-they offer monitoring and protection with precision to extend the life of the battery and enhance its reliability.
2 notes
·
View notes
Text
We're vibin' with Claude 3.7 and writing uBlox drivers 😎🤖🛰️
Heeeey, we're just having a super chill vibe here at the desk of Ladyada—writing a driver for the uBlox M8Q
https://blog.adafruit.com/2024/09/10/a-mini-gps-from-ublox-with-i2c-and-uart
, which has both I2C and UART interfaces. As expected, it can do everyday NMEA output, but it can also do UBX, a "compressed" protocol for advanced data reads and writes over I2C/UART—or even SPI on some other chips.
However, the UBX protocol is a hugely complex driver to implement, with dozens of commands and hundreds of flags. But why stress when you can viiiibe? We're using this beast of a spec as an excuse to try out the new Claude 3.7, which is doing great at chomping through the UBX documentation roughage and giving us some nice code on the other side. Within an hour, we're able to connect and switch to UBX mode by sending a well-formed message and receiving an ACK.
What we like about coding with a good LLM is that it does the work we sometimes get lazy over, like handling various error conditions, timeouts, and verbose error messages.
13 notes
·
View notes
Text
Understanding the Functionality of Samsung Refrigerator PCB Main Assembly

Samsung refrigerators have become essential appliances in modern households, offering innovative features and advanced technologies to ensure food preservation and convenience. The (Printed Circuit Board) PCB Main Assembly serves as the brain of the refrigerator, coordinating various functions and ensuring optimal performance.
Components of the Refrigerator PCB Main Assembly
The Refrigerator PCB Main Assembly consists of several essential components, each playing a crucial role in the refrigerator's operation.
Microcontroller: It is the central processing unit (CPU) and the computer performs programmed instructions to coordinate communication between the components.
Sensors: The ambient parameters (temperature, humidity, door status) supply critical information for regulation.
Relays: You control the flow of electricity to the compressor, fan motors, and defrost heater.
Capacitors: It will help you store the electrical energy and help to regulate voltage, and guarantee that the PCB is operating reliably.
Resistors: Protect sensitive components from harm by limiting the flow of electricity across certain circuits.
Diodes: Allow current to flow exclusively in one direction to avoid reverse polarity and safeguard components from damage.
Connectors: Facilitate electrical connections between the PCB and other refrigerator components to ensure seamless integration.
Working Principle PCB Main Assembly
The PCB Main Assembly operates on a set of programmed instructions that determine its behavior depending on sensor input and user command. The micro controller continuously monitors sensor input such as the reading of the temperature from the refrigerator compartment, and freezer. The microcontroller controls the transition of the compressor on, or off or the speed of the fan and also the defrost cycles based on the sensor data as to how to keep the temperature and humidity at the optimal level. In addition to the other refrigerator components, for example, display panel and user interface, the PCB Main Assembly provides feedback and enables users’’ interaction. The PCB Main Assembly incorporates safety features of overload protection and temperature sensors to protect the refrigerator from damage and to protect the user.
Communication Protocols
Data can be communicated to other components through microcontrollers by communication protocols like UART (Universal Asynchronous Receiver Transmitter), SPI (Serial Peripheral Interface), and I2C (Inter Integrated Circuit).
UART is used to transfer real-time data from a microcontroller to external devices like display panels and temperature sensors.
There is a power of communication SPI and I2C for the communication of integrated circuits associated with the PCB Main Assembly for efficient data transfer and synchronization between components.
Troubleshooting and Maintenance
Common issues with the Samsung Refrigerator PCB Main Assembly include sensor failures, relay malfunctions, and power supply issues, which can affect the refrigerator's performance.
To solve PCB Main Assembly problems, we can use diagnostic methods, like running self-tests and checking the error code.
The assembly can stay longer depending on the main, such as cleaning dust and debris from the PCB and securing appropriate ventilation.
The PCB Main Assembly is an important component of the Samsung refrigerator systems since it organizes several functions to contribute to the overall efficiency of the refrigerator and food preservation. Fore-knowledge of the PCB Main Assembly and the way it is constructed can assist users in likely managing problems in their fridges.
2 notes
·
View notes
Text
GY-511 module includes a 3-axis accelerometer and a 3-axis magnetometer. This sensor can measure the linear acceleration at full scales of ± 2 g / ± 4 g / ± 8 g / ± 16 g and magnetic fields at full scales of ± 1.3 / ± 1.9 / ± 2.5 / ± 4.0 / ± 4.7 / ± 5.6 / ± 8.1 Gauss. When you place this module in a magnetic field, according to the Lorentz law, a current is induced in its microscopic coil. The compass module converts this current to the differential voltage for each coordinate direction by calculating these voltages, you can calculate the magnetic field in each direction and obtain the geographic position. It communicates using I2C communication protocol and the voltage level required to power this device is 3V-5V. You can use it in DIY GPS system, accelerometer data acquisition system to be used in Vehicles etc.
3 notes
·
View notes
Text
Launch Your Career with Embedded Courses That Offer 100% Placement Support
In today’s technology-driven world, embedded systems are everywhere — from smartphones and home appliances to cars and industrial machines. As industries evolve, the demand for skilled embedded engineers is higher than ever. But here’s the question every student asks: “Will I get a good job after completing a course?”
At Technoscripts the best Embedded Institute in Pune, the answer is a big YES! Their embedded courses are not only designed to build strong technical skills but also to ensure students step confidently into their careers with excellent placement support.
Why Embedded Systems is a Career Game-Changer
Imagine creating the software that runs a smart TV or programming the microcontroller of an electric car. Embedded systems are the invisible force behind all smart devices. Industries like automotive, healthcare, robotics, and IoT are constantly hiring talented embedded engineers to innovate and design smarter solutions.
But to break into this exciting field, you need more than just basic knowledge. You need hands-on skills, industry exposure, and placement opportunities — exactly what Technoscripts provides.
Technoscripts Embedded Course with Placement Support
Technoscripts Embedded Institute has been a trusted name in embedded systems training for years. Their programs are designed to take students from beginner to industry-ready professionals. Here’s what makes their courses stand out:
Comprehensive Curriculum: Covers Embedded C programming, microcontrollers (like ARM, PIC, AVR), real-time operating systems (RTOS), communication protocols (UART, SPI, I2C, CAN), and IoT integration.
100% Practical Training: Students work on live projects and get real-world experience with hardware and software tools.
Soft Skills and Interview Preparation: Beyond technical training, students are guided in resume building, mock interviews, and communication skills to ace interviews.
Placement Assistance: Technoscripts has tie-ups with top companies in the embedded and automotive sector. Their dedicated placement team ensures students get connected to hiring partners and land jobs successfully.
Who Can Join These Courses?
📌 Fresh Graduates (BE/B.Tech in ECE, EEE, CSE, IT, etc.) looking to kickstart their careers. 📌 Working Professionals who want to upskill or switch to the embedded domain. 📌 Anyone passionate about technology and eager to work in a high-demand field.
Success Stories Speak for Themselves
Many Technoscripts alumni are now working with leading MNCs and startups in roles like Embedded Developer, Firmware Engineer, and IoT Specialist. With the institute’s blend of technical expertise and placement support, students have successfully transitioned from classroom learning to professional workspaces.
Why Choose Technoscripts Embedded Institute?
✨ Experienced Trainers: Learn from professionals with years of industry experience. ✨ Industry-Relevant Tools: Exposure to advanced tools and technologies used in real projects. ✨ Placement Track Record: A strong history of placing students in reputed companies.
Your Future Starts Here
An embedded course is not just about learning — it’s about building a career. And with Technoscripts Embedded Institute, you’re not only trained for the job market but are also guided to secure your dream job.
Ready to take the first step towards your embedded career?Join an Embedded Course in Pune with Placement and gear up for a future filled with opportunities.
Because the right training with the right guidance is all you need to succeed.
0 notes
Text
[IOTE2025 Shenzhen Exhibitor] SHANGHAI RSID SOLUTIONS will be exhibited at IOTE International Internet of Things Exhibition
With the rapid development of artificial intelligence (AI) and Internet of Things (IoT) technologies, the integration of the two is becoming increasingly close, which is profoundly affecting the technological innovation of all walks of life. AGIC + IOTE 2025 will present an unprecedented AI and IoT professional exhibition event, with the exhibition scale expanded to 80,000 square meters, focusing on the cutting-edge progress and practical applications of "AI+IoT" technology, and in-depth discussion of how these technologies will reshape our future world. It is expected that more than 1,000 industry pioneers will participate to exhibit their innovative achievements in smart city construction, Industry 4.0, smart home life, smart logistics systems, smart devices and digital ecological solutions.
SHANGHAI RSID SOLUTIONS CO., LTD will participate in this exhibition. Let us learn about what wonderful displays they will bring to the exhibition.
Exhibitor Introduction

SHANGHAI RSID SOLUTIONS CO., LTD
Booth number: 9B31-2
August 27-29, 2025
Shenzhen World Convention and Exhibition Center (Bao'an New Hall)
Company Profile
Shanghai RSID SOLUTIONS Co., Ltd., headquartered in Shanghai, is a professional one-stop equipment supplier specializing in card manufacturing and application solutions. The company is dedicated to providing complete solutions for smart card and RFID production, personalization, and more. With more than 20 years of industry experience and the trust of many users, our company aims to become the most professional international supplier in China. Through our global network, we offer tailored pre-sales and after-sales services to meet diverse customer needs. Whether you are a card manufacturer, personalization center, or card issuer, we provide reliable services and abundant resources to support your business.
Product Recommendation

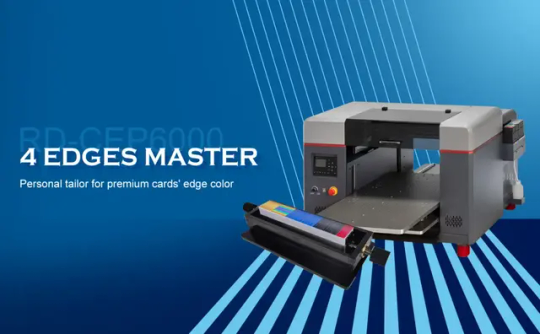
4 edges master is engineered exclusively for high-efficiency, vibrant color edge printing on cards consumping low. Fearturing 4 removable card jigs, each with a 400-card capacity, it can achieve automatically four edges printing in a single pass, reaching speeds to 4000 UPH. Adapting CMYKW printing creates colorful and up to 1440 dpi images, beyond traditional colored core laminating process. It’s also a cost-effective alternative gold/silver stamping to stimulate gold/silver color. What’s more, its material versatility extends to metal, glass, wood, and silicone surfaces. New templates can be inverted within seconds for quick job changes. Environmentally friendly UV inks ensure toxin-free, virtually odorless printing. The printer obtains sufficient certifications including CE, FCC, RoHS, REACH, and HC for guaranteed compliance and safety.

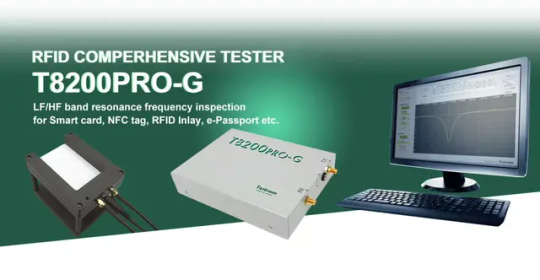
Efficient & Precise:
Automatically saves test results and waveforms with pass/fail judgment. Short test time (typically 0.5s).
Flexible Operation:
Supports three control modes: Manual, Digital I/O (DIO), and external software control (via Windows registry).
Multi-format Output:
Generates log files (TXT), waveform images (JPEG), and data files (CSV) for analysis and archiving.
Portable & Reliable:
USB bus-powered with compact dimensions (125×165×40mm). Ideal for lab and field applications.

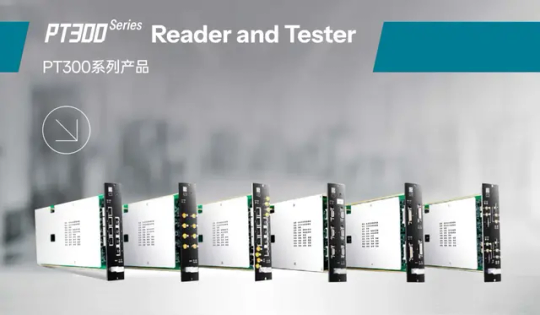
PT300 : Next-Gen Industrial-Grade Reader/Writer, Supporting parallel testing for high efficiency.
Comprehensive Product Line:
Covers contact/contactless/dual interface reading/writing & electrical testing. Compatible with smart cards, modules, semiconductor chips, and products.
Exceptional Performance:
Contact interface: 1.2~5.5V wide voltage range | 2A high-current output
Contactless interface: 5~25dBm adjustable RF power | parameter testing (capacitance/Q-value)
Modular Flexibility:
Modular design for chassis compatibility and seamless expansion.
Protocol Compatibility:
Supports ISO7816, ISO14443, I2C, SPI, and Class D high-end requirements.
Applicable scenarios:
Industrial manufacturing, laboratory testing and R&D fields. It is on par with international brand readers in terms of high speed, high precision and high compatibility.
At present, industry trends are changing rapidly, and it is crucial to seize opportunities and seek cooperation. Here, we sincerely invite you to participate in the IOTE 2025, the 24th International Internet of Things Exhibition, Shenzhen Station, held at the Shenzhen World Convention and Exhibition Center (Bao'an New Hall) from August 27 to 29, 2025. At that time, you are welcome to discuss the cutting-edge trends and development directions of the industry with us, explore cooperation opportunities, and look forward to your visit!
0 notes