#i'll add them to the post so if you have the tools you can download them ;D
Explore tagged Tumblr posts
Visit Tumblr Blog
Explore Tumblr blogs with no restrictions, modern design and the best experience.
Last Seen Tumblr Blogs


Fun Fact
Tumblr has been providing a Korean-language service since 2013.
Text
Seofon helping you to calm down via Breathing Exercises ASMR
#eheh my friend Vampy Fang (from 'almost every silly raid descriptions i've posted' fame) went to record this for me#TAKE THAT SIETE ANON#also he sent me the individual voice files for each of the breathing lines#i'll add them to the post so if you have the tools you can download them ;D#ichatalks about gbf#ichablogging gbf#ichablogging eternals
27 notes
·
View notes
Text

::Download:: (Google Drive - Free)
I don't believe these were adopted when CMar's modding tools were, so I've updated CMar's sliders to be compatible with the latest patch.
Please note that with any sliders there will be potential issues like vanishing hands (occasionally), conflicts etc and these are often inavoidable. I have playtested these in my own game.If you come across any major issues caused by these, please let me know. If they conflict with another slider you use that uses the same hotspot, you'll need to either combine them yourself or make a choice.
I'll try to keep these updated at the same time as my own sliders, but if I'm on holiday and EA blows things up again, it'll need to wait.
I have renumbered these following updating them, so please delete old versions.
Instructions for each slider from CMar's posts are as follows: Pointed Ear Sliders Adds pointed ears to the standard CAS main ear sliders. Compatible with Basegame. I've constructed this so it should have no conflicts with Get To Work and Vampires, although it doesn't combine well with the alien pointed ears and (I assume) the vampire ears. Should not conflict with Khitsule's Pointy Ears Unlocked mod. WILL conflict with any other mod overriding the macro mode ears HotSpotControl. Instructions:
Put the package in your Mods folder as usual.
In CAS, select the ear for editing. Do not go into Micro mode.
From the SIDE view of the ear, you can pull a point up and/or back.
From the FRONT and BACK views of the ears, you can still use the ear size and ears out/in sliders, and the Micro mode is unchanged.
Enhanced Butt Sliders Adds more morphs to the EA butt slider, allowing adjustment of butt height and shape. Affects male and female, teen through elder, both frames. The effect is more noticeable in females for reasons that should be obvious. Changes in height of the derrière may cause distortion in some full skirts but it should be minimal. Changes in shape may slightly distort the patterns in some clothing. Will conflict with any other mod that replaces resources 8B18FF6E_00000000_000000000000274B and/or 8B18FF6E_00000000_0000000000002619, the male and female butt Hot Spot Controls. I don't know of any such mods at this time. cmar_EnhancedButtSlidersV3 adds the height adjustment from the side view and shape adjustments from the rear view. From the rear the up-down slider changes the width of the top part of the butt, and the left-right slider changes the width of the bottom part. The height and standard size adjustments are available from the side view.
Breast Separation Sliders This slider replaces breast size with breast separation from the front view. The size can still be adjusted from the side view. There may be some distortion of necklines and straps at the extremes of the slider, depending on the clothing. Will conflict with any other mod replacing the female frame chest HotSpotControl: 0x8B18FF6E-0x00000000-0x00000000000023B7
Enhanced Leg Sliders Added sliders for thighs and lower legs. Affects teen - elder, male and female, both frames. Thigh, all views:
Up: upper thigh thick
Down: upper thigh thin
Lower leg, front and back:
Up: bow legs
Down: knock knees
Lower leg, side view:
Up: calf definition
1K notes
·
View notes
Text

Merry Christmas Everyone!!
I've been pretty quiet on here, but that doesn't mean I've stopped simming! First up I'd like to say thanks (and sorry!) to all the lovely people who've sent me messages :) I'm gonna try my best to reply to everyone asap!
For christmas I wanted to share something special - so here is the public release of the first version of my Decorating Tools mod (or S3DT)
Quick Description - This mod adds hotkeys to the game to allow you to move objects up/down, left/right and rotate in all directions, similar to T.O.O.L for TS4 PDF Guide included below!
To my wonderful patrons - thank you for your support <3 I feel bad that real life has gotten in the way of me delivering more content to you all, so I'll likely be closing it soon! If it's possible, I'll also refund the last couple of months due to my inactivity. Anyone who wants to can still donate to my Ko-Fi
MOD INSTRUCTIONS AND DOWNLOAD BELOW THE CUT


This version is compatible with icarusallsorts' Transmogrifier Mod, and until I can figure out how to script it better, my mod actually REQUIRES it in order for them to be compatible together.
*** EDIT - For some, you might need to use CTRL + SHIFT + Click to bring up object menus! ***
If you would like a version that does not require the Transmogrifier (but is therefore incompatible) send me a message!
FUTURE PLANS: - Adapting movement depending on camera direction - Adding a UI interface for interactions and manual rotations etc. - Scaling interactions with hotkeys
Don't be afraid to reply to this post, send me an ask or a private message if you have any questions or problems. I'm also in the Creator's Cave discord, so feel free to @ me there too :) And please tag me or use the tag #S3DT if you come up with any cool ways to use this mod!
EDIT: DOWNLOAD S3DT V.1.2
VIEW PDF GUIDE
Thank you to @greenplumbboblover for her help with pesky matrix44's, granthes and Misukisu for laying the groundwork for this mod, and @puddingface1902 for his super helpful videos!
@pis3update
2K notes
·
View notes
Text
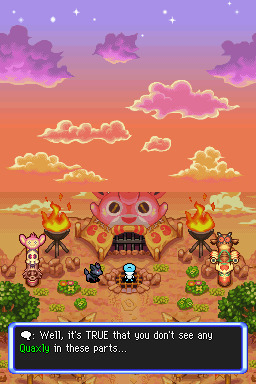
It's been a lot of work over a lot of time but I think I can finally share this...
PMD:EoS, but with all of the starters!
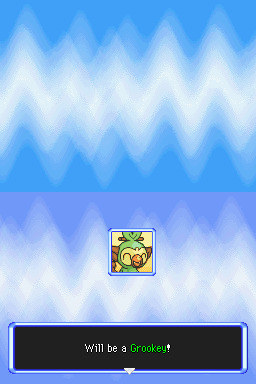
...Including Grookey, finally!!!!! 🥳

Introducing PMD: Expanded Sky!
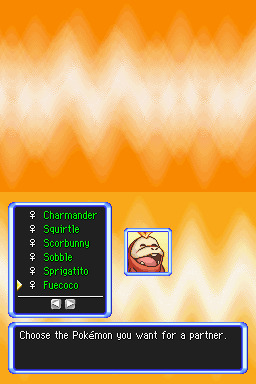
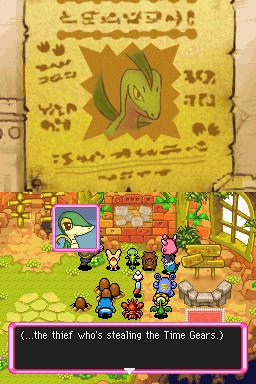
This is a public mod available to download now! It adds in all starters from unova all the way to paldea, as well as zorua, axew and rockruff, and allows evolving eevee into sylveon.
Speaking of which, fairy type has been patched into the game! Disarming voice replaces milk drink and moonblast replaces judgement, which was unused.
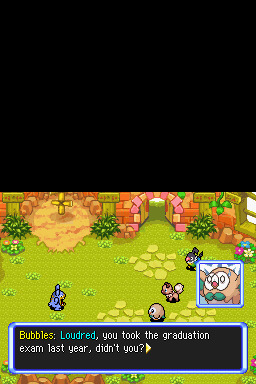
Some non-traditional starters are no longer available as hero options in this due to lack of space, but are still available as partners. (Skitty can be chosen as a hero in version 1.0.0 only, so download that version instead of the latest if you wanna use her! Riolu and Shinx are available in version 1.2.1 and below)
If one of your faves was taken off the hero roster (eg vulpix, skitty, riolu, munchlax, etc), I have a tutorial here on how to quickly edit the patched file to put them back in :)
Several regional variants have been added! Alolan Raichu, Alolan Marowak and Hisuian Typhlosion are now available as potential evolutions for their respective base stages.
Partners across both rescue team and all three versions of explorers are available too, including Cubone, Munchlax, Machop, Vulpix, Riolu, etc
Sprites and portraits are courtesy of the brilliant PMD Sprite Repository and the many incredible artists who contribute to it!
Credits for all improvement patches, sprites and portraits are included in the download, as well as an explanation on how to patch the game and the full starter list.
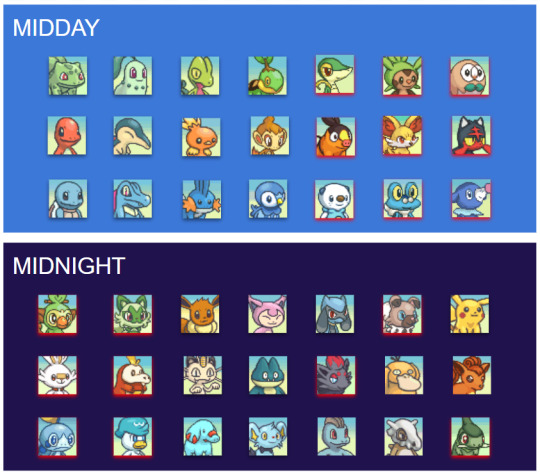
The mod is split in two versions to accommodate all the partners - MIDDAY version and MIDNIGHT version. The download includes both, as well as the tool required to patch your game! You'll need a clean US copy of pmd eos at hand.
A full list of moves learned by newly added Pokémon can be found here, as well as info on how to evolve them and their IQ groups.


If you run into any issues, feel free to drop me an ask or DM and I'll see how I can help/what I need to fix!

You can find the download for this rom hack here!
Edits/updates noted under the cut:
(27/04/23)
The overall mod now has a name - expanded sky! Reflected earlier on in the post.
I've been informed that the included patching tool (XDelta) doesn't work on mac, and after some digging around and discussions in dms we found this tool works for Mac instead.
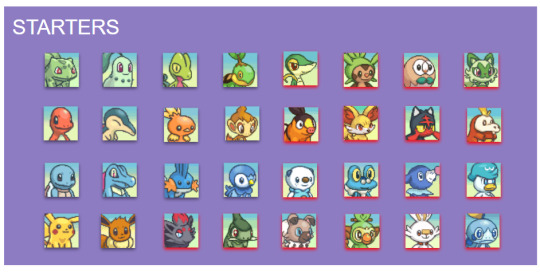
Added graphics to the post displaying which heroes and partners are part of the hack.
(11/05/23)
Added link to learnset compilation for all new pokémon.
(17/05/23) Version 1.1.0 has been released!
Sobble is now a starter, replacing Skitty (Skitty is still accessible by downloading v1.0.0 on the download page). Sobble is also now a partner in MIDNIGHT.
Zorua/Zoroark's moveset has been tweaked slightly
Base forms of all new starters can now be found in Oran Forest, and can be recruitable in the post-game. The new fire starters can also be found in Giant Volcano.
Extra portraits and sprites were added for Cubone, Psyduck and Machop. Like the rest of the new assets in this mod, these were imported from the PMD Sprite Repository, and credits are on the title screen and in the readme.txt.
Extra credits + more in-depth instructions for patching the game included in the readme.txt.
(18/05/23)
Added a link to a tutorial on swapping out heroes for others already existing in the game.
(22/05/23) - Version 1.1.1 has been released!
Fixed genders for female starter options on the quiz. Updated Fuecoco to use new portraits and sprites. (Credits to Garbage)
(23/05/23) - Version 1.1.2 has been released!
Female starters from gens 5-9 can now evolve correctly (save for starters who don't have evolutions in the game yet - these are listed in the text file in the download)
Rockruff can now evolve, and Midnight Lycanroc's evolution method has been fixed to use the Lunar Ribbon as intended.
(15/06/23) - Version 1.2.1 has been released!
In 1.2.0, a second version of the mod was included in the zip compatible with melon emulator, and potentially others that were having issues with saving.
Fairy gummis were also made available as mission rewards and shop items.
There's a couple more things that can be seen in the changelog including bugfixes, but the main other thing promised was that Froakie and Litten can now evolve directly into Greninja and Incineroar. Due to an evolution flag not being set this ended up untrue, but has been fixed in 1.2.1.
This post claimed dazzling gleam is in the game, but it should've said disarming voice.
🆕 (10/03/24) - Version 1.3.0 has been released!
Dusk Lycanroc, Drizzile, Inteleon, Grookey, Axew and Fraxure have been added, as well as Alolan Raichu, Alolan Marowak an Hisuian Typhlosion.
Axew replaces Shinx in the hero roster, and Grookey replaces Riolu. Additional portraits and sprites added for starter evolutions, including vanilla starters. Sleep animations have been copied over to EventSleep/Laying/Wake animations if missing.
Greninja erroneously had the same moveset as Froakie. This has now been fixed.
Credits are no longer displayed on the title screen.
Sprite, portrait and patch credits can now be viewed by talking to a Cyndaquil NPC on the crossroads.
Evolution help can also be accessed by talking to this same NPC.
🆕 (23/05/24) - Version 1.3.1 has been released!
The uhh. Grovyle problem. Yeah. That should be fixed.
(Grovyle was missing several sprites as a side effect of trying to add new ones, due to his unique setup in the vanilla game as such an important npc. His sprites should now be reverted to a functional state, rather than leaving him to walk fowards on the spot all the time).
An issue present from the start that caused the game to freeze while advancing floors in dungeons occasionally should now be resolved.
#pokemon#pmd#eos#pmd eos#rom hacks#I'VE BEEN WORKING ON THIS FOR SO LONG... REALLY HOPE U GUYS LIKE IT#pmd expanded sky
4K notes
·
View notes
Text
The Permanent Fix For Counter Texture Glitch
A while ago I posted this tutorial for fixing the counter texture glitch. But it was not perfect and couldn't fix each and every cc counter out there.
I've finally found a fix for that too. Problem was corrupt TXTC resources that needed to be replaced. Now you can download every cc counter that comes in sims3pack and extract them into package and never have the annoying counter texture glitch ever again. Bad news is you have to do it all yourself. But don't worry! it's not that difficult and I've come with pictures.
What you'll need: s3pe, s3oc and texture tweaker 3 - and optionally Sims3Pack Multi Installer or s3ce. The download link for TT3 is in the 3rd post and there's a tutorial here. If you don't have them already, go download them. You can NOT use TSRW for this tutorial since TSRW itself is the problem. :)
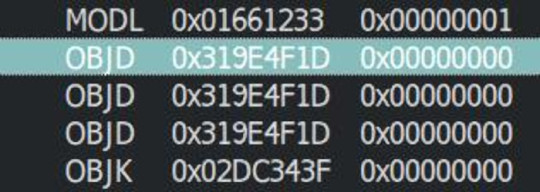
First extract the package from the sims3pack using either Multi Installer/Extractor or s3ce. After you have your package file, open it up in s3pe. In my example, I'm using Gosik's New Vintage Kitchen Counter 1. Select the first OBJD resource in the resource list.
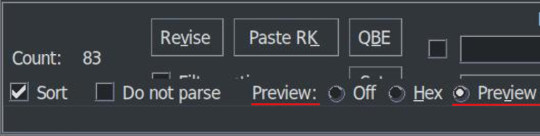
Also make sure you have Preview selected at the bottom of the program window in s3pe.
On the right side, you will see the preview of the resource in text. Scroll down until you see the InstanceName.
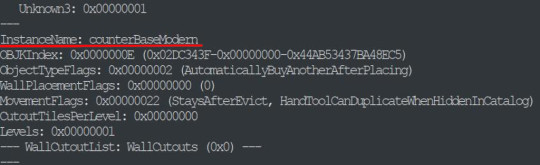
It's usually counterBaseModern but not always. This is the instance name of the object that this counter is cloned from. In modular objects like counters there are multiple objects. Four counters they are base, top and corner. Keep that in mind for now.
Take a note of or copy the instance name and open s3oc. First, Go to Settings -> Game Folders and make sure game folders are detected. If not, add them manually. You can also define your creator name under the Settings menu. Now, go to Tools -> Search.
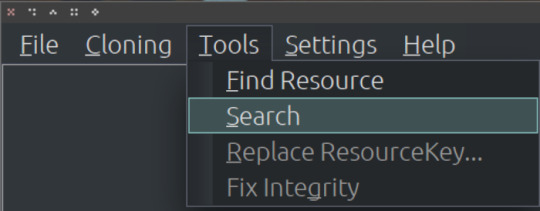
Paste the instance name in the search bar; select Resource Name and hit Search.
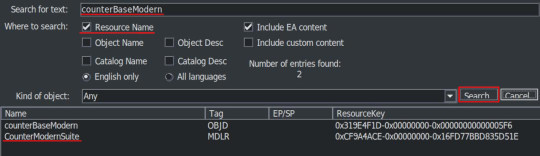
You will have two results: counterBaseModern and CounterModernSuite. I suggest that you clone the suite because it's the modular object that contains all the parts of a counter: base, top and corner. If not, you have to clone every part individually which are counterBaseModern, counterTopModern and counterCornerModern.
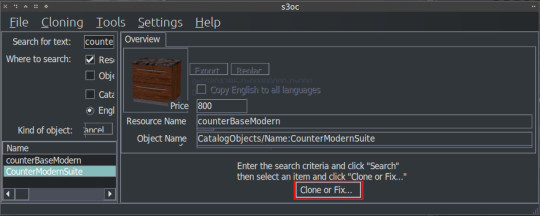
Cloning the Suite makes the process a lot quicker so I'll continue from there. Click on the CounterModernSuite and hit Clone or Fix at the right side.
That will open the cloning interface. Make sure you UNCHECK the Renumber/rename internally. We do NOT want to renumber. Then hit Start.
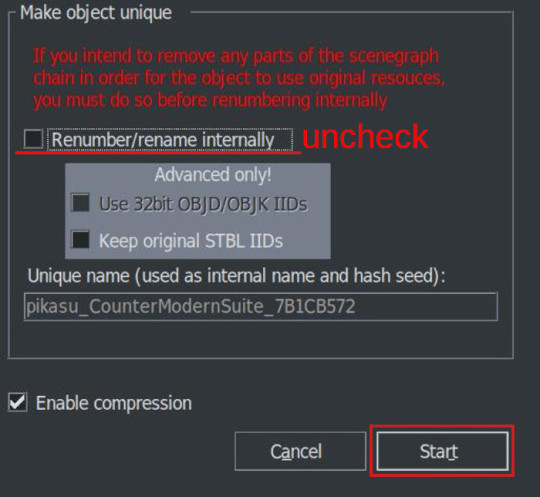
It will ask where you want to save your new package and if you already have a creator name defined earlier it will add it to the package name. If not, it may or may not ask for your creator name. Honestly, I can't remember and I don't think it matters. Anyway, chose a folder - preferably a work folder you created earlier - and keep the name it suggests. It will inform you when it's done.
We cloned our package. Now we need to export the necessary TXTC resources from it. We need the Diffusemap TXTC resource for each part. Start another instance of s3pe and open the package file you've just created which should be something like this: creatorname_CounterModernSuite_someAlphaNumericals.
You'll notice that there are 6 TXTC resources in the resource list. Check the resource names and the Group IDs. You need the DiffuseMap for base, top and corner parts. Click on the resource, then right click and Export.
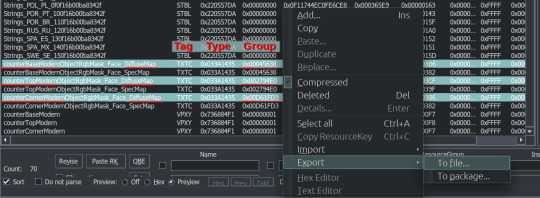
You can export them all at once or create a folder for each if you don't want to get confused. Notice that they all have different Group IDs and names. As we move to the next part keep that in mind.
After exporting, you can close this package. We'll go back to the package we want to fix, in this case, Gosik's New Vintage Kitchen Counter 1. Open the package again or switch to it if it's open in s3pe.
Select the first TXTC resource which is most likely is the DiffuseMap for the base part. Unfortunately, most cc doesn't have a _KEY resource so they don't have resource names. Group ID's come in handy here. For this counter suite Group IDs for parts are like this:
base -> 0x00045638; top -> 0x002794E0; corner -> 0x00D661FD3
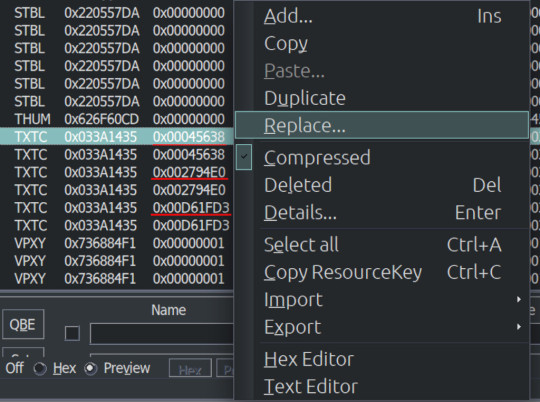
But there are 2 TXTC resources for each Group ID. One of them is SpecMap which is not corrupted. The corrupted one will have a preview like this:
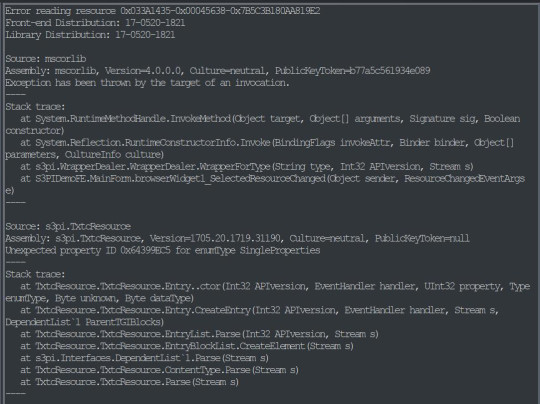
This is simply s3pe telling you it's having an 'Error reading the resource'. My interpretation: The resource is corrupted. So combine this with the right Group ID and right click on the resource and choose Replace. Do not use Import! You need to Replace the resource without changing its instance number. Choose the right resource you exported earlier. Again check the name and Group ID. it should be something like: S3_033A1435_00045638_A85033BB5A059932_counterBaseModernObjectRgbMask_Face_DiffuseMap%%+TXTC
This is for the base object. For top and corner parts, repeat the replacing step with the right resources.
After you replace all the corrupted resources, s3pe will no longer give an error reading those resources when you click on them. And neither will TT3. You will now save your package and close s3pe. A reminder: If the TXTC resources are not corrupted in CC package, skip all and continue as below.
After that you will open your package in TT3 and follow the tutorial here. But a brief rundown would be: select each 'Normal Object' one by one and switch to CASt presets tab after each selection. In this tab, all you have to do is uncheck and then recheck the box next to PatternA and hit Commit. Do it for every preset. Repeat it for every object in the package. Save. Close. Done. :)
For island counters, process is the same but with 4 parts. Base, EndW, EndE and Corner. Also this works for other modular objects like cabinets and sectional sofas.
One last clarification: If the object is cloned from another counter suite, the Group IDs that we used will be different. Also some CC will have Group IDs different from the main object it's cloned from. If that happens, you may need to have a leap of faith.
Usually the order from top to bottom is base, top, corner (counters) and base, endW, endE, corner (islands), starting with the first TXTC resource. So in theory, if you select the corrupt resources from top to bottom, you can replace with that order without the Group IDs.
That's it. I don't think anyone will bother with this. But If you have questions, ask away.
214 notes
·
View notes
Text
How to Download Our Life: Beginnings and Always Mods
(a step-by-step guide!)
If you've ever wanted to download extra content for OLBA but were unsure how or where to even start, this post will hopefully explain everything you need to know!
What you will need:
Our Life: Beginnings and Always
RPA extractor
Latest version of Python
RPA repack tool
1. Finding mods.
As far as I'm aware, there are very few people who make OLBA mods, but if you do happen to come across someone who makes mods/script edits and would like to download them, you'll likely end up with files with the end extension ".rpy" or ".rpyc" Because the software used to make OLBA is Ren'py, these are ren'py script files that basically contain the script that runs the mod and official script files. (Note: Some mods that don't just simply add onto/edit/add more scenes may also include other important resource files (images, sounds etc...) and might be formatted in a ".zip" file. I'll cover how to unzip and use those as well.)
2. Find your game files.
First of all, before you do anything with your .zip or .rpy/.rpyc file(s) you're going to need to find your copy of your OLBA game's files. For Steam, you should be able to open the Steam app on your computer, navigate to your library, right-click your copy of OLBA, select "properties", navigate to the "Installed Files" tab, and click the "Browse" button.
For a direct download of the game such as from Itch.io, you should just be able to navigate to wherever you downloaded your game and find the same results. You should see your game files now like the picture below.
3. Finding/extracting the RPA file.
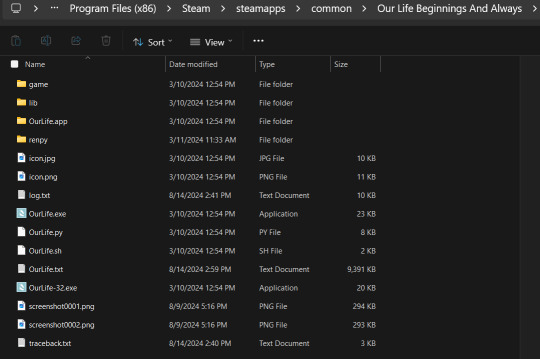
Now, you are going to want to navigate to the "game" folder inside the OLBA folder. Here you should find these files:
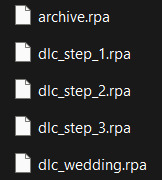
(Note: depending on whether you have the DLC or not, you may or may not have the DLC files. I do not have the Baxter or Derek DLC so I don't have those files here.) These files are basically all the .rpy/rpyc files, along with images, sounds and all other resources for the game, compressed into single files. So, in order to add our modded files, we will need to extract whichever RPA file pertains to the mod. For example, archive.rpa contains all the scripts, etc from the main game. The rest should just be DLC, so if you have a mod that only affects the main game, you will only need to extract that file. The same works if it is a mod that only affects a DLC; you will only need to extract that respective DLC file.
To do this, you can either download this RPA extractor or find your own and follow its steps. For this tutorial, we will be following the steps of the RPA extractor provided. Once you have downloaded the RPA extractor, drag the .RPA file you want to extract out of the OLBA folder, into a new folder, then drag and drop it onto the RPA extractor icon (shown below)
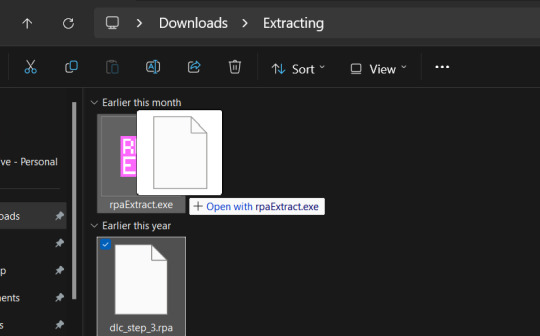
This should open a new Command window where the .rpa file will be extracted. You should end with something like this:
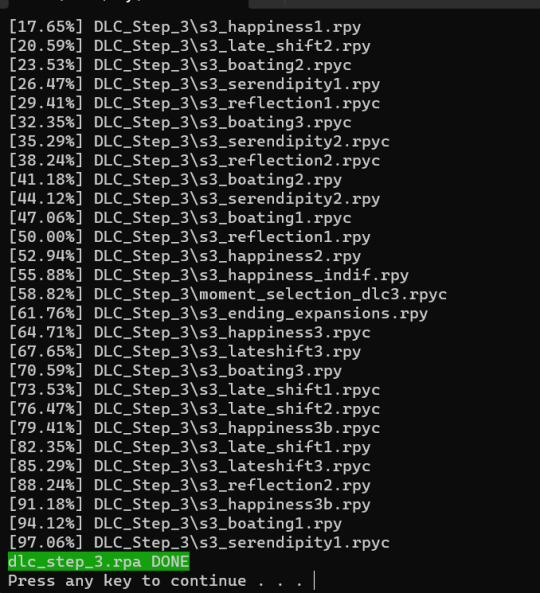
(for this example I extracted the step 3 DLC RPA file)
Now you should have a new folder containing all the .rpy and resource files you need.
4. What to do with modded .rpy/.rpyc and/or .zip files?
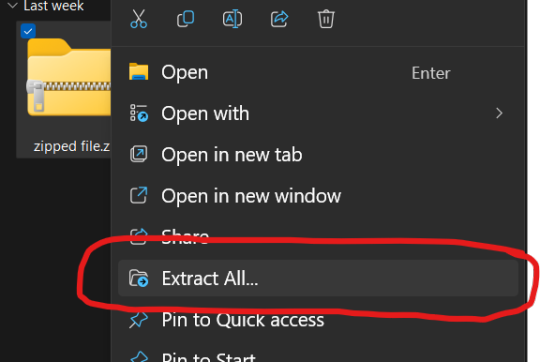
If the mod you downloaded just came with the files not zipped, you can skip this first part. Otherwise, you will need to unzip this zipped folder. To do this, you can either just right-click the zipped file and click "Extract All" and "Extract" when a new window pops up.
Alternatively, you can use a program such as 7-zip, which may help extract speeds for large files. Now, you should have, or already have your modded .rpa files on hand (finally!) Normally, if these files are editing preexisting material from the game or adding new scenes, at least one file, if not all of them will have the SAME EXACT file name as an already existing file. In this case, BEFORE YOU DO ANYTHING go into the folder(s) you got earlier by extracting the .rpa file(s) and look for the file(s) with the same name(s) as your modded .rpy/.rpyc file(s) and either make a copy or move them somewhere safe in case something is wrong with your modded files/you no longer want the modded files, you can put the original files back in. Once you have done this, you are going to drag the modded files directly into the folder(s) you got earlier by extracting the .rpa file(s). MAKE SURE YOU PUT THEM IN THE CORRECT FOLDERS AND EITHER OVERWRITE THE ORIGINAL FILES OR MAKE SURE THEY HAVE BEEN REMOVED.

If there are any other files, such as sounds or images or .rpy/rpyc files, feel free to just make another folder to put these in.
5. Repacking the RPA file.
Now these next steps can get really complicated, so I'll break them down into smaller steps. 1.) Download the RPA repack tool (make sure to unzip it) and the latest version of Python if you haven't already.
2.) Inside the unzipped "rpa-master" folder you'll find another folder of the same name. Inside this folder all you need is the "rpatool" file. Take this file and move it into a new folder completely outside of the "rpa-master" folder, name this folder whatever you want, it doesn't matter. (EXAMPLE BELOW)
3.) Now take the folder(s) you got from extracting the .rpa file earlier or created and put them in this new folder. (EXAMPLE BELOW)
4.) Type "cmd" into the path while in the folder with both of these.
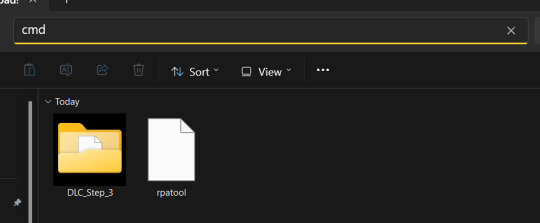
5.) Now, a command prompt window should pop up, type in this:
py rpatool -c
followed by the name of the .rpa file you want to make and the name of the folder(s) you are repacking separated by a space for each. (EXAMPLE BELOW)
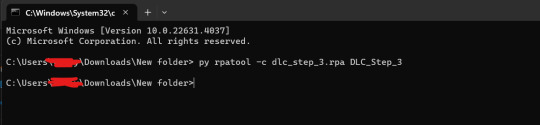
6.) Depending on the size of your file it might take some time, but once you see the .rpa file appear in the folder, you're all done! It should look something like this:
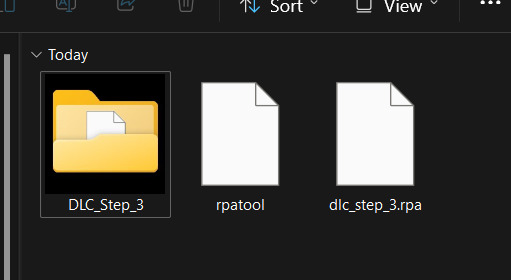
Now, all that's left to do is put that .rpa file into the game folder with the rest of the .rpa files !! After that you can test it out and your mods should now work!
As always if you have any questions or need help doing this yourself, feel free to contact me or submit an ask!
58 notes
·
View notes
Text
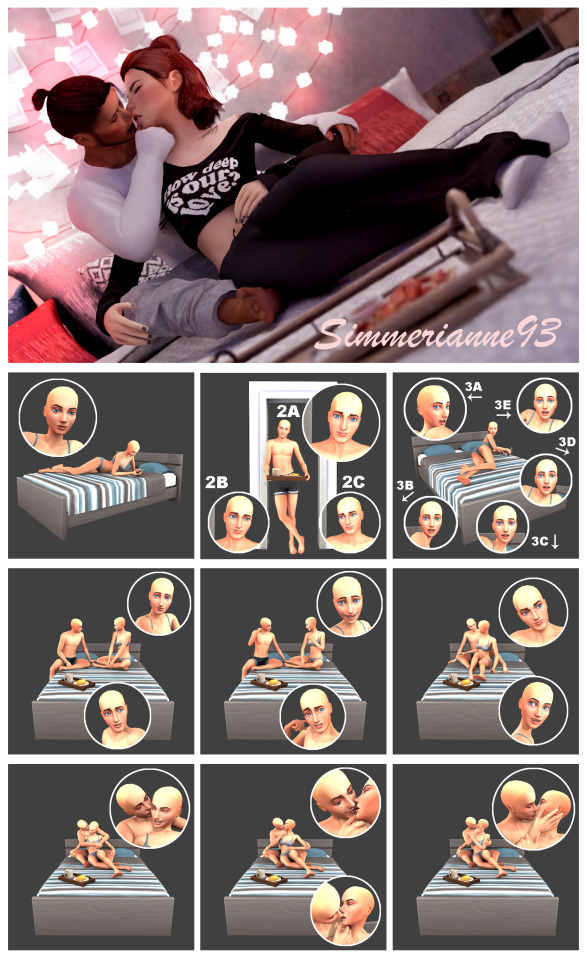
[Simmerianne93]Couple_poses_25
Hello!! How are you??!
I hope everything is good for you.
You have no Idea how much I have been struggling with these poses... well... not the poses itself, but the object for them...
I was having problems with the texture that was not showing correctly ingame and I had to work on it an entire week to make it works.... I was sooo reliefe when I found the solution some days ago... And I have to say that I really hate making objects for the game haha But I really needed the object for these poses... and even when it is not perfect, I'm pleased to, at least, say that I could made it.
See... I made these poses to use them in blender, but then I decided to make them for the game. The thing is... In blender I can use any object as a tray for the pose, 'cause there are no restrictions on objects and placing them... but in game I needed the actual accessory... and that is what took me longer....
For the accessory ingame I used a plate of pancakes and the tray with a book from one of the kits that released recently.... (When I saw that tray, I was so happy 'cause I needed a tray and they gave me one, and it was perfect.... well, almost perfect....) I have to thanks JochiTec for helping me changing the book of the original tray to the plate of pancakes, cause I had no idea how to make it work (He is a great creator with some great items so, go check their things on curseforge).... and Siboulette, for helping me with the solution for the texture problem (I think you all know her but if you don't, go check her things right here, she is an amazing creator).
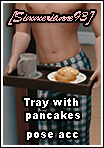
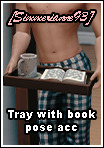
I made two different accessories for the pose. One is the tray with a plate of pancakes and the other is the original tray with a book from the "Book Nook Kit", in case you want to use the pose with the book, wich is weird but it can happend...
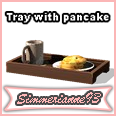
I made an object clutter version with all the swatches for the pancake accessory too, in case you want to place the tray in other surfaces out of the pose itself.
In the other hand, when I was making the poses, I decided to add a bed version of one of the poses from my "Couple_poses_23"... I thought it could be very helpful for those who can't or don't use the "tool" mod by twisted mexi and want their pixels to cuddle with that pose in bed, so I hope you enjoy the pose in bed too xp... and that your sims have a delicious breakfast.
Since I could't post these poses last week as I wanted, I'm delayed with the next poses, so there are some that I will be posting the first days of September. But there will be no more delays on those posts 'cause for the other poses that are coming there are no stupid inexistent objects or accessories to make (I'm done with that for some weeks x_x... seriously....).
Anyway... Without anything else to say, I'll leave you with the posepack description:
----------
What is on it?
9 couple poses (made with a female rig and a male rig) + 3 solo poses with different versions (two made with a female rig and one made with a male rig) + 2 all in one.
What do you need?
Andrew's pose player
Teleport any sim by Scumbumbo.
[Simmerianne93]Traywithpancake_poseacc or [Simmerianne93]Traywithbook_poseacc
A double bed.
Redhead iphone 11_R or Moc iphone 11.
Optional: Draughty Doors by quiddity-jones.
Optional: [Simmerianne93]Traywithpancake_object B&B object as clutter.
Instructions on the original post.
——
TOU
Do not claim my creations as your own.
Do not re-upload or modify my creations.
Do not make money of my creations.
Do not include my creations in Mods folders to download.
Please follow my Term Of Use.
——
Download it now here — [Early access until September 19th, 2023]
——————
If you want to support me: Patreon | Ko-fi
For more poses: Pinterest | ��Wix
My socials: Twitter | Instagram
——————
I really hope you like them and I will say on advance: Thank you so much for use them.
@ts4-poses @emilyccfinds
#ts4#thesims4#sims4#thesims#ts4poses#thesims4poses#sims4poses#posesforsims#poses#sims#soloposes#coupleposes#duoposes#sims4cc#creator content#creatorcontent#simmerianne93#simscc#download#earlyaccess#accposes#hugposes#kissingposes#kissposes#breakfastposes
330 notes
·
View notes
Note
Hello!! So i’ve been desperate in trying to find Lackadaisy’s font for my own character sheet but I don’t know where else I could find it(without losing money on it😭)so may i ask where did you find yours for Ari’s character sheet🥹🙏
i wish i could help, but the only time i've actually used a font was for the description part of the sheet (which is just good ol' Arial if i'm not mistaken, any program with a text tool should have it)
everything else i just write myself since i don't know where to download them either 🥲 i've been told the font used for the name is called Binner, though
if anyone has tips they can share please do, i'll reblog them/add them to this post! ✨
#sorry i can't help more!! i'm not very tech-savvy and i use a really old version of SAI :'^)#asks#anonymous
23 notes
·
View notes
Note
hellooooooooo i love all of your renders and posts you're so talented oml. may i ask for a tut on how you did the smoke in this post? tysm ily :D
Hey, thank you so much ahhh!!! That means so much to me!! ILY! 😘
In truth, my method for smoke is not sophisticated at all... It's actually laughable how simple/easy my process is for this, I'll admit 😅
There is a way to do it right in blender, but for this particular trick I don't use blender (mostly because I've never been able to get it to work right, user error I'm sure haha). But if that's what you're looking for, there's an (untested) tutorial here!
I personally use photoshop for my smoke, and, I admit, brushes!
This tutorial assumes you have a basic knowledge of photoshop, but if you don't or if any of this is confusing feel free to send me an ask and I'll be glad to help!
A while back I scoured the internet for free cigarette smoke brushes and amassed a small collection of them. Unfortunately none of mine are marked with a name or anything so I can't link to specific ones, but here are a few I've found for this tut:
Click with caution! I use ad blockers and these sites are fine for me but as always be careful!
Brusheezy free smoke brushes 15
Brusheezy free smoke brushes 12
Resource boy 200+ free smoke brushes
If you're using photoshop, make sure the brushes are in .abr format!
Once downloaded (& unzipped), if you double click the .abr file it should automatically install and open your photoshop if it's not open already.
I've pulled one of my renders of Ariss (pre-smoke) into photoshop, so let's make some smoke.

Step 1: Create a new Layer!
Make sure you are working on a new, empty layer! This will be important in later steps!

Step 2: Add smoke using your smoke brushes
On the new layer, select the smoke brush you want to use, and make sure your color is set to white/off white/grey.
Hover over your image and select where you want your smoke to be. I was unable to take a screenshot of this process, but I put my smoke here:

Step 3: Adjust opacity/shading

You should have a layer for your smoke now. Double click it and the layer style window should pop up.

In this step... honestly go ham. If you follow exactly what I'm doing, it won't look the same because of differences in our base image (color, brightness, saturation, etc). But I usually adjust:
Blend mode
Opacity
Color overlay
Outer glow
If your smoke isn't on a separate layer, any adjustment you make here will be on the main layer, which we don't want!
I've adjusted mine, & ended up with this:


Step 4: Move & adjust your smoke
Because your smoke is on a separate layer, now you can move and adjust it.

This is all up to your preference! I typically just move, adjust, and edit the layer style until I get something I want.
Sometimes I'll also blur the smoke, which you can do by selecting filter -> blur -> gaussian blur, just make sure you're on your smoke layer!

You'll know you did it right when you get this window showing the transparency instead of your image, & if the smoke blurs when you adjust the radius!

& that's it!
There's a way to also use the standard brush tool and "path blur", which I've used before but don't usually like the result of it.
But if you'd prefer to try that, here's a tutorial for it!
#thank you so much for the ask and the love!#ts4 tutorial#ts4 edit tutorial#sims 4 tutorial#sims 4 edit tutorial#sims tutorial#sims edit tutorial#ts4#sims 4#sims#ts4 editing tips#sims 4 editing tips#sims editing tips#salemsims tutorials#I hope this helps#if not lmk!#& I'll try to clarify
18 notes
·
View notes
Text
blender tool: batch thumbnail renderer
i did a blender/python thing! i've seen some people posting about the hassle of taking thumbnails for pose packs and thought I'd put this up - I wrote a simple script a while back to take thumbnails for my blender pose library (those are up to 256x256 pixels, much bigger than the thumbs exported from S4S) but I imagine it would work for posemakers as well.
what this does: it automates the pose/render/save cycle. add your character to the scene, set up your camera, add your poses to a collection, and hit the button - it will put the character in each pose, render, save, and then move on to the next so you don't have to do it manually. this is especially useful for things like emotions packs where the camera does not need to be adjusted between poses.


what this doesn't do: you still have to position the camera and configure render settings, import your model, and add your poses to the scene. the camera does not move between renders, so if some poses are out of frame or otherwise don't work with the camera settings, you have to fix that manually.
i got kinda anxious about posting this and let it sit in my drafts for way too long - I used generic blender rather than sims-specific tutorials and worry I did things inefficiently or improperly, but it works for me, I use it often, and it saves me a lot of time, so I'll put it up. I welcome any criticism or advice people have for me.
i've uploaded a sample scene I used to get those renders of L, as well as the script itself in case you want to import it into your own scenes instead. the sample camera is set to produce 500x500 pixel thumbnails with an orthographic camera, rendered with Cycles, but you can set up the camera/renderer however you'd like.
download sample scene (includes script & instructions)
download script only
download instructions only (just a .txt file with everything below, but without pictures)
i'm going to work with the sample scene for these instructions, but this should work in any scene with a character mesh, an active camera, and a pose collection.
import your model. you need the mesh. this does not have to be in its own collection, as long as it isn't in the poses collection. set your active camera up to have the render settings/framing/zoom that you want. this will be used for every single thumbnail and cannot be adjusted in between renders.

2. you need the rigs from the poses. for .blend poses exported from S4S, drag them into the scene, open "Object" and then select rig.

make sure the rigs are going into your 'poses' collection - the collection doesn't have to be called 'poses' but it does need to contain ONLY pose rigs. name them whatever you'd like the thumbnails to be saved as.

3. head over to the scripting tab. if the script "export_thumbs.py" isn't open, hit the folder button to find it.

4. in the outliner, click on both the pose collection and the character mesh (note - NOT the character rig, you want the one with the inverted triangle and the wrench). you should see both icons selected.

5. hit the "run script" button at the top of the scripting tab.

at this point, if all went correctly, blender should appear to freeze (because it's doing stuff!) but you will notice a folder called "renders" appear in the directory with this blender file. Inside the renders folder, there will be another folder with the name of whatever character mesh you used - this allows you to run the script with multiple character meshes without overwriting files, as long as the meshes have different names. one by one, your thumbnails should show up here.
once the script has gone through every pose, blender will become usable again, and you should have a directory full of thumbnails. hooray!

note: every pose in a collection will render with the same camera settings. if you need to change the camera, for example because you have both standing and sitting poses, you can divide the poses into different collections. you have to run this script for each collection of poses you want to render - it will not automatically go through every collection in your outliner - so this gives you the opportunity to adjust the camera between batches. because thumbnails are named after the pose names, overwriting shouldn't be an issue.
please let me know if you have any problems with this! It's possible the scene may cause issues in older versions of blender - it was saved with 4.1 - but if it doesn't work, the script itself works with versions at least as old as 3.3.
#ts4 blender#ts4 render#ts4 edit#ts4 tools#ts4 blender tool#ts4#sims 4 render#sims 4 poses#ts4 poses
7 notes
·
View notes
Text
Pencil/2D Animation Resources Masterpost
5/10/24:
Hello, I broke into my old account so I could make a little masterpost of resources I come across for learning pencil/2D animation. (Free or affordable classes, places to get tools, videos to give insider insight, etc.) I may not be able to get everything included, so if you think of something, you can reach out and suggest things to add! I will be updating this over time, with notes on when it was last recently updated. And maybe I'll end up giving the old blog a refresh too. I likely won't be making new masterposts outside of this one any time soon, nor updating any old ones. It's been SEVERAL years, and the internet is a different place. I would assume most of the old links are out of date by now, unfortunately. I hope that this list is helpful to you as well, and if I'm incorrect in anything I list, I'm learning too! So please be patient with me and feel free to reach out with a correction. It's not finished yet, but Tumblr deletes my posts before I finish them, so I'm starting with posting the skeleton and slowly updating this)
Find a Community to Learn From!
(recommended groups to lurk/join/make connections and ask questions)
What Tools Do I Need?
PDF Guide to Animation Desks, as written by David Nethry
(next line)
Where Do I Get Tools?
(Places where you can buy art supplies, software, etc)
Cartoon Supplies
(Online seller who carries Ingram Bond paper, lightboxes, storyboard pads, blank cels, etc. See also: Lightfoot LTD, which is identical in every way to Cartoon Supplies and for the life of me I'm not sure the difference, though both are equally recommended along side each other.)
Jet Pens
(Ah... I love window-shopping this site. If you love stationary like I do, you'll be on this site for hours adding things to your cart... and inevitably removing them because it's not feasible to spend hundreds on pens and sticky-note pads.)
Dickblick
(I've found they have good prices on name brands, but I haven't purchased from them yet. Often, I'm too overwhelmed by all the choices.)
Improve Your Art/Learn the Basics!
(anatomy classes, starter tools, etc)
Aaron Blaise (Co-Director of Brother Bear)'s Online Classes
He runs very good deals on the classes occasional, but you can also do a year's access to all classes and keep what you download, which is very useful! They're short, quick lessons, and tend to veer into more "helpful tips" than teaching, from what I've personally noticed, but it's well worth the price if you get them at a good deal!
Inside Look at the Industry -- aka: the Special Features:
(behind the scenes stuff, etc)
Books are more useful than you might think!
(Richard Williams Animator's Survival Toolkit, etc) (check out gently used copies of these books on Thriftbooks for a good deal!)
Nifty Free Resources
(Things like height charts, references, color wheels, blog posts, videos, etc)
What Artists Can Learn From Aladdin's Incredible Color by J. Holt [VIDEO]
(spacing for formatting)
The Art of Color Theory: Guide for Animators, Designers, and Artists (Animator Artist Life)
(space for formatting)
Free software!
GIMP
(A classic, GIMP is an old friend of mine. The first software I downloaded for art, I used to use it almost entirely to create animated GIFs for the Warrior Cat forums. Ah, how time has passed. Nowadays I can't even remember how to animate a GIF on there, but such is life. I still use it to this day for digital art, even having Corel Painter. Before GIMP, I animated the old fashioned way -- MS paint and Windows Movie Maker. With determination, I scripted and animated a handful of Warrior Cat characters frame by frame. Each frame of Hollyleaf or whoever it was blinking was the likely source of death for our old computer, may she rest in peace.)
Storyboarder
(Storyboarder is a free software with which you can use to create professional and clean storyboards. It also provides printable storyboard templates so you can do you work traditionally and re-upload it easily into the software! It also works with Wacom tablets. Check it out! It's actually super cool.)
Pencil 2D
(A free, open source software. Simplistic design, switch between raster and vector, and best of all, again, it's free. I haven't used this one much yet, but I've seen it positively talked about by many! I'll update with more research when I have the chance.)
Krita
(I haven't used this one yet, so I can't speak on it either! But it's going on the list so I can come back and research it later. My poor laptop is not going to handle this many downloads lol.)
OpenToonz
(I also haven't tried this, but see above, haha.)
Blender - Grease Pencil
(Blender is well known for 3D animation, but they added a 2D feature called Grease Pencil as well.)
WriterDuet
(Free for up to 3 projects, very simple, but upgrades to a $10 a month plan, which is... eh, I'll keep my Scrivener for now. I used to write scripts in Microsoft Word or the Notepad on PC back in the day, I don't think I personally need the fancy features.)
Trelby
(A free screenwriting software, very basic and simple, good for beginners.)
Keep an eye out for
(Humblebundle occasionally does software deals -- a good art bundle at a discount can give you an easy start!)
#animation#wip#animation resources#art resources#free software#software resources#art tools#animation tools#how to#how to art#how to animate#animators on tumblr#2d animator#animation masterpost#masterpost#masterposts
20 notes
·
View notes
Text
@levemetal Hope you don't mind my bringing this out to its own post - I saw your tags and wanted to try to help!
So, ripping models is going to be a different process depending on how the game was made; what console it was on, what game engine its built in... There's no one-size-fits-all process, and it's going to require some baseline tech-savvy-ness.
But given that these tags were regarding Grima; I'll tell you more or less how I get models out of Fire Emblem Awakening.
A Ramble-y Overview of Fire Emblem Awakening Model Ripping:
Step 0: Gather your Tools
There's a lot of tools floating around intended to help with 3DS model ripping. Some are very pleasant to use and others are janky, so brace yourself.
For this, you will need:
Citra emulator (for extracting game files)
Paragon (for figuring out where models you want are)
FEAT (for decompressing game files)
SPICA (for exporting models + textures to usable formats)
Blender (for actually working with the models) (or whatever 3d modelling program you like; I only know blender though)
Step 1: Get a ROM of Awakening
Legally obtain one, of course. Assuming you have the game cartridge the 3DS hacking community can help you more with that. Definitely do not download any game roms from any online websites, why, that would be piracy!
Step 2: Extract the Game Files
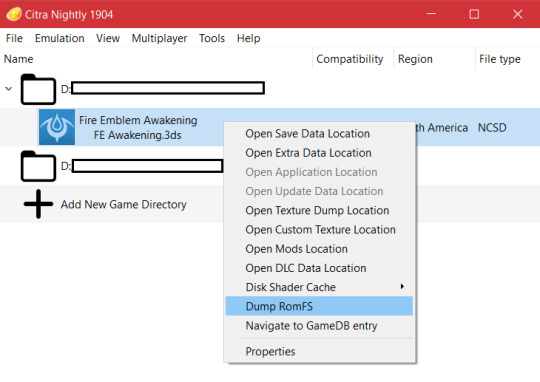
Open up Citra, add a game directory and tell it where your rom is.
Right click the rom and select "Dump RomFS" to get Citra to start extracting all the game files. This will take a while. Wait for it to be done.
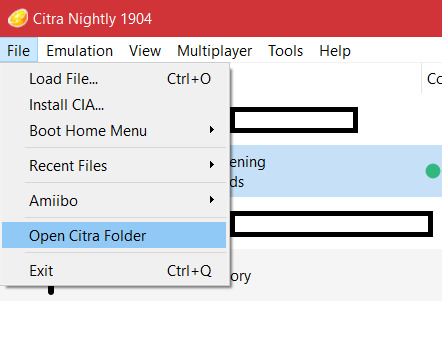
Once its done dumping the files, you're going to want to go to File > Open Citra folder. From there, navigate into "dump", then "romfs", then click the big nonsense folder name - that nonsense is Awakening's game ID, so, this folder is Awakening's game files.
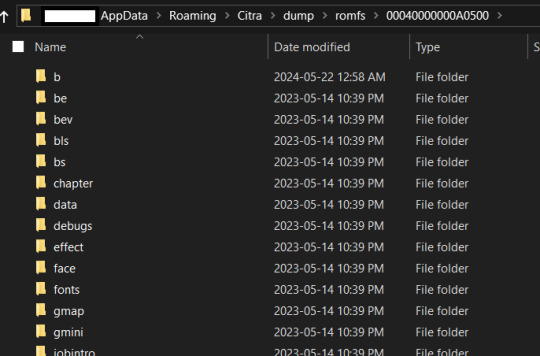
All the models you could ever wish for are in here!!! We just need to actually find them now.
Step 3: Figure out which model(s) you want.
Time to go open up Paragon. This is technically a tool for creating mods of several fire emblem games, but we're not going to mod anything, we're just going to use it to figure out what models belong to which characters.
The github page has instructions on it, but basically you want to open up Paragon and start a new project for FE13. Create some random output folder for it and direct it to that, we don't care. But the "Extracted RomFS Directory" should be the citra folder I just told you how to get to.
Once you have the project open, there will be a lot of buttons and things. Don't worry about all this. The only two you care about right now are "Asset Definitions" and "Presets".

(Ignore the font; I changed paragon's font to awakening's font because i'm a nerd)
Most of the human characters are easiest to find in "Asset Definitions"; some under their english name, others (like Chrom) under their english base class' name.
Grima, though, you can find in "Presets" by searching for "boss".
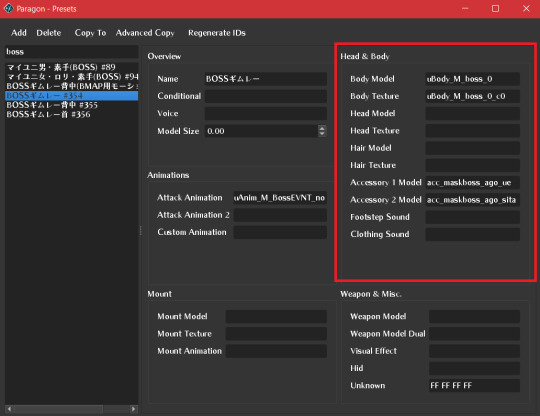
This entry specifically is the one pertaining to grima's full body model. There's a lot of info here, but the highlighted panel on the right is the information you need; this is telling you the names of the files containing Grima's models and textures!
For human characters, typically the head and body fields will be filled in, and possibly the hair for characters with long hair. some have accessories, some don't.
This complexity is why we use paragon to check instead of checking every single model file manually like fools. (it's me, i'm fools)
Keep this window open for reference at the side for the next step.
Step 4: Go Get the Models
Make a folder somewhere on your computer to keep this character's models.
Then, go back to that Citra folder we opened up earlier.
Awakening's assets are split up into several folders. The folder you want is "b", which has most of the character and weapon models and textures. (This organization scheme is Not consistent between Awakening and the other 3DS fire emblems, watch out.)
In here, find the files paragon is telling you belong to this character, and copy them into your dedicated folder for this model ripping project.
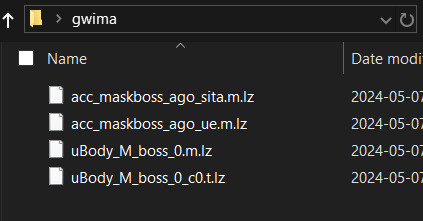
Wow, look at all those files we can't use. Time to make them usable.
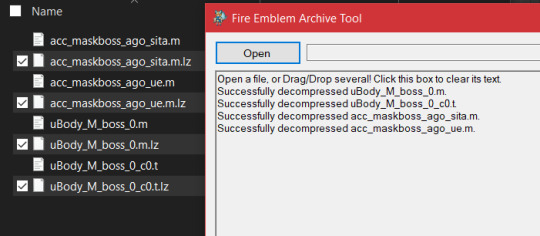
Step 5: Decompress the Files
Open up FEAT. Drag all those files onto the FEAT window. It will decompress them; there will be a copy of each file without the .lz file extension. You did it! They're decompressed!
Step 6: Extract the Models and Textures
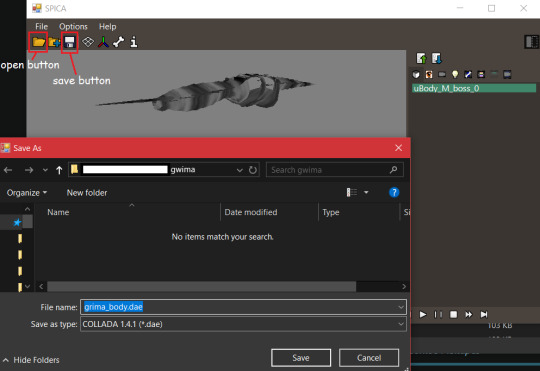
Open up SPICA.
Click the little Folder button in the top left to open a file. Navigate to this folder you have your decompressed files in. Click on one of the decompressed files.
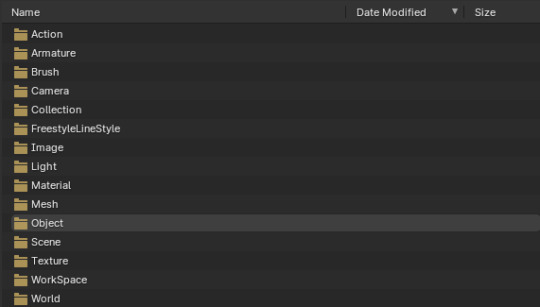
For MODELS, as in the .m files, you are going to click the Save button. Save each model as a .dae file, and give each a name that will make it clear which model this is - the body, the head, a specific accessory, whatever. (you can choose .smd instead if you want, but you will need a blender addon for importing smd files if you do.)
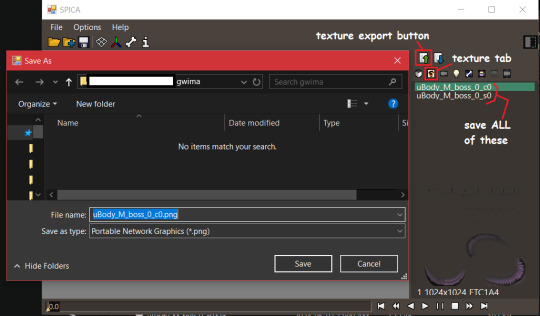
For TEXTURES, which are the .t files, there is an extra step. In the panel on the right, there is a small anime eye. That is the textures tab. Click on it, and the panel will change to a list of textures that are in that file. You should export all of them by using the special texture export button. DO NOT CHANGE THE NAMES the texture names are important.
Step 7: Blender Time
Tragically this is the most annoying part, and I can't even give you very detailed instructions off the top of my head because the exact steps are so tailored to each specific character.
Open up Blender. Go to File > Import > Collada (.dae) and import the character's component models one by one.
Each individual file will come with its own armature for posing! If you want to have a functional, posable model, you are going to have to join them together yourself. Normally this means taking a component armature, positioning it properly in relation to the body, parenting the component meshes to the body armature, joining the component armature to the body armature, and then taking whatever root bone the component had and setting it's parent bone to the right bone from the body armature. If you just joined a character's head on the body, take the root bone from the head armature and set its parent to the head bone from the body armature. Stuff like that.
Some of the weight painting may be broken, so when you pose joints on the armature some things will move incorrectly. I do not know how to get SPICA not to do that, and I haven't found any other 3DS model exporter that works with awakening that doesn't do that. Try exporting as an SMD instead. If neither dae format nor smd format works right, You're going to have to go in and re-do the broken weight painting manually. There is no shortcut to this. I am sorry.
You will also notice everymodel is split up into several meshes. If you need the character to be one singular manifold mesh, you're going to have to edit it to be that way yourself, in a way that does not destroy the UV maps. There is no shortcut to this. I am sorry.
Also: If it's Grima, be aware that their model is like 3000 blender units long. You will want to scale all their armatures down to 0.1 or something, because Blender does NOT play nice with stuff that big.
Anyway, textures.
In Awakening, a texture name ending in c0 is the base colours. A texture name ending in s0 is a specular map.
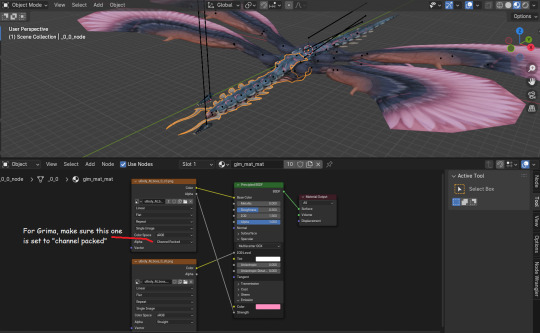
If the base colour file looks mostly transparent, that's because it's channel packed; the color and alpha channels contain two different textures. In Grima's case, the color channel is their actual colors, and the alpha channel appears to be an emission map.
So, go on into the shader editor, click on each mesh to open its material, and plug the textures into the right spots on basic shader node provided. Make sure to set the Alpha mode of the channel packed textures to say "Channel Packed". And you're good to go! You can see what the character looks like now!
If parts of textures should be transparent but aren't (like grima's eyes and wing feathers) you're going to have to figure out a solution for that yourself. I manually made my own alpha map for grima's eyes and wings, and it was Annoying but it was the only solution I could find.
Congratulations, you've done it!
You have successfully ripped a model from Awakening. Now go on and modify it however you need to; make better shaders for it, clean up the mesh and unwrap its UVs again for free plushie patterns, do silly posing shenanigans with it. Whatever your heart desires.
Good luck, dear reader, for you will probably need it.
#let me know if you ever make any plushies with this knowledge i'm so curious actually#fe awakening#i really ought to make a more comprehensive guide to this#it took me so long to compile these tools and methods from random forum posts from 7+ years ago and shit
9 notes
·
View notes
Note
Hi, I love your banners on your posts like the ones on your lepacy posts. How do you make them? 🤍
Thank you!! That's so sweet <3
It's actually very simple!
What you do is that you load up your editing program of choice. I use Gimp. (:
Then I create an image where the dimensions are so that it's a lot wider than it's tall. How tall depends on how thick you want the banner to be. I tend to prefer them on the skinnier side so they don't take up that much space in the post.

There's no particular reason why this image is 1920x200. It was 1920 pixels wide when I created it and I just adjusted height accordingly. You'll of course want the image on the bigger side so it doesn't turn out pixely and blurry.

I like my banners to have white backgrounds, but you really can do any colour you want, or even transparent.
Then you just type out what you want the banner to say, pick a font and colour, and resize the text so it fills the image the way you want.
Programs come with a lot of fonts, but it's also possible to download new ones. I have a tag for it on my cc finds blog.
I usually want the text to almost touch the top and bottom. In my opinion it looks the best because there's a gap between pictures on tumblr - a gutter, I think it's called? - but it's entirely up to you how you want it.

Gimp also has this tool that alligns your layers for you, so I like to use it to make sure the text is in the middle of the banner.


Love this thing. Lifesaver fr.
At this point the banner is almost done. You could call it here and export it, but I prefer to add a drop shadow to make the text pop. Even if the shadow is light, it really helps in my opinion.

There's a lot of possible customization to be done with the drop shadow, but I have a few presets I've made that I usually like to use. Of course, my PC conked out this summer and I had to reinstall everything, so I'll have to make new ones now. /:
Here's an example of the settings I've done for this banner's shadow.

Here you see one banner with a drop shadow, and one without


You'll see it on p much all of my banners:
It's subtle, but I quite like what the shadow adds. It's of course, optional and can be as dark and strong as you want it to be.
Depending on the font, you'll have to adjust the placing of the shadow, but that's easy to do.


If you have any other questions, don't hesitete to ask (:
I tend to like shadows with harder edges for text, but it's up to you how the show looks on your banner.
And that's it! Only takes a few minutes. Sometimes deciding on colour and font can be a bit time consuming, but the rest of the process is relatively quick.
3 notes
·
View notes
Note
Okay I'm sorry to bug you but I'm so stupid. How are you guys making the yumeship things? Like the background and stuff is there a program y'all are using to get it? I've been trying on my phone and I don't know how y'all get them so perfect looking 😭 please explain it like I'm 5. If that's too much work, feel free to ignore this/delete this no hard feelings I'm just incredibly dumb 🥲😅
No worries at all!
I do it on my computer in my drawing software. If you don't have one, you can probably achieve just about everything that needs doing using this free software:
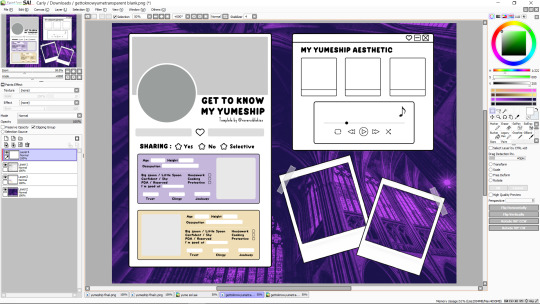
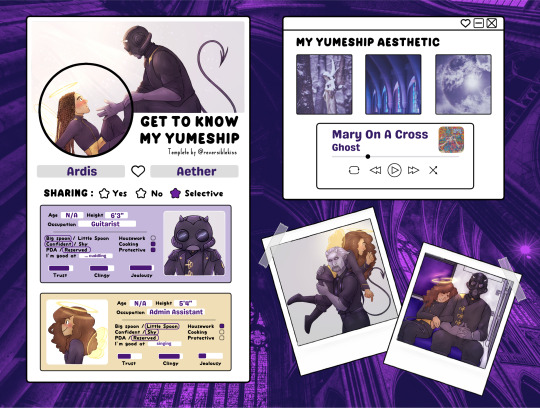
I'll break it down step by step how I made mine below the cut. there are lots of pictues. i hope this makes sense. we'll be recreating my Aether/Ardis one for this tutorial.
here is what we are going to do today
So step 1 is to download the template
I like using the transparent version because I find it easiest to edit for my purposes, but feel free to use the other ones as well if there's one you prefer. you'll just skip the first couple steps of this tutorial. Open it up in your software. I'm using Paint Tool SAI. It should look like this.
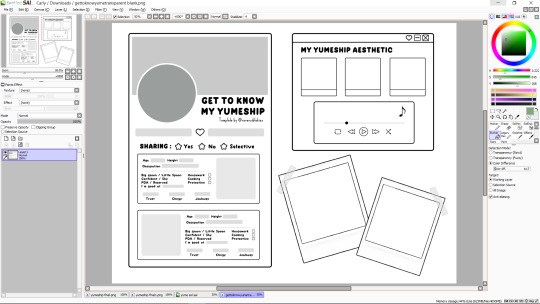
First, I'll drag in the background that I want and put it on a layer underneath the template. It will look something like this (you can also use a flat color, whatever you want)

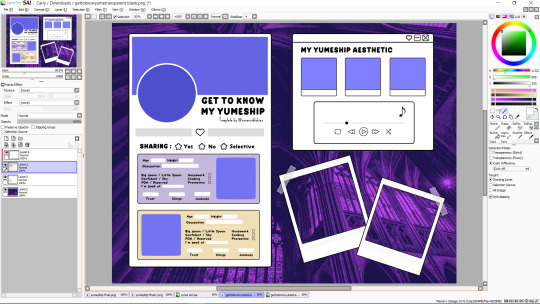
Now I want to fill in the big boxes so that I can actually read the text, so I'll go back to the template layer and magic wand select the main bit of empty space (blue shows what's selected),
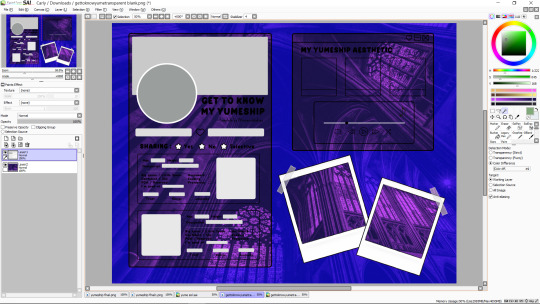
then invert it (there is probably a button for this on your software)
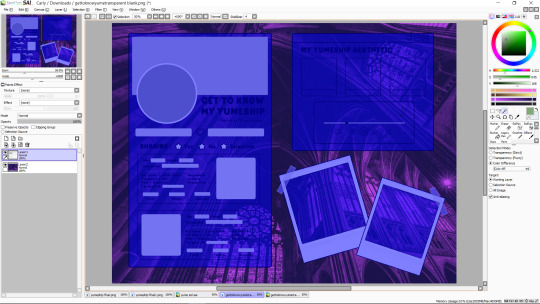
now I'll make another layer under the template and bucket fill what i want to be white

you can color in extra things you want to change the color of on this layer too, or just leave it as-is. I'm going to spruce it up a bit, though.
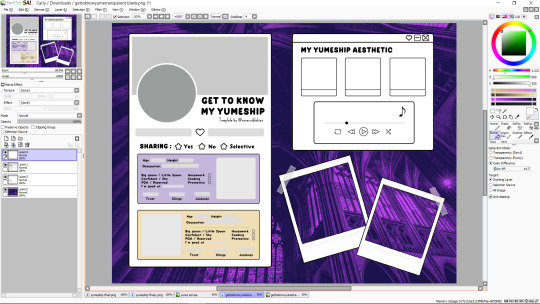
ok great. now i'm going to change the grey text boxes to be white because the light grey clashes with my pastels. this may not be necessary for yours. you can bucket fill those too on the main template, but I'm going to use what's called a clipping layer on SAI, which basically means that it's a layer that only draws on top of things that already exist in the layer under it (this may or may not exist in the software you're using, but do whatever works for you). so i'm going to make a new clipping layer over the template and color white over all the grey parts.
much better. it's time to cut out where we want our pictures to go. I find it easiest to work when I treat all the boxes like picture frames, kinda like how the ones in the bottom right are. there are other ways to do this, but this is my prefered method. so we're going to go to our template layer and magic wand select everywhere we want a picture to go (once again now highlighted in blue)
and delete those from both our template layer and our white layer. it should look like this now
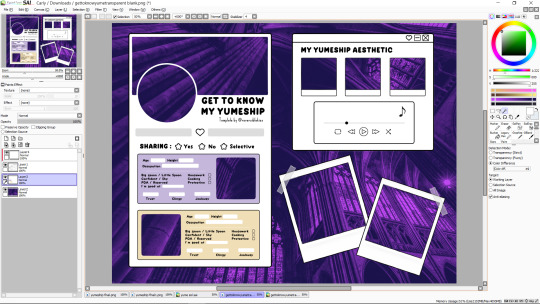
so now all you do is drag in your pictures so that they're underneath your template, erasing any parts that stick out
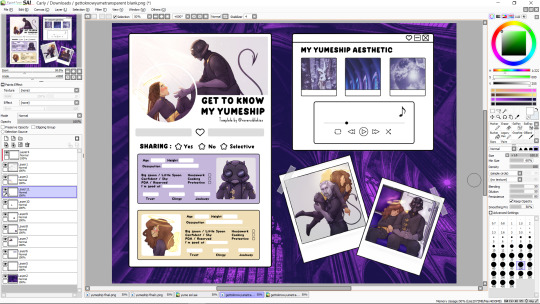
and then you just add text and little rectangles and whatnot! (I added mine in a different program because my art software doesn't have a text feature)
I made a couple other adjustments to mine (black circle around the one photo, getting rid of the line at the bottom of the aesthetic trio) by just editing the template layer.
and that's it! all done! does that make sense? i hope that makes sense. if i skipped over anything vital or if that makes no sense, let me know.
19 notes
·
View notes
Text
replies about my save file (loooong post ahead)

It works for trees too! Be sure you're replacing the debug tree and not the Lot tree (i made this mistake initially too lol). There's a checkbox near the search bar in S4S to filter debug items. The tree names you're looking for are "treeGD_cherry_01" and "treeGD_cherry_02"
Some objects are tricky though. I still can't for the life of me find the concrete posts next to the canal where Eliza and Bob live 😭 if someone knows where they're hiding pls lmk
As for the placement of items, it isn't exclusive to CAW at all! The CAW mod right now just adds new features (like a preset tool), hidden debug items, and a much more intuitive interface (you can move objects around the world with WASD instead of clicking, for example). But everything I'm doing can definitely be achieved with TOOL! In fact I was planning on using TOOL only until the CAW mod was updated recently to work in existing save files.
The only problem you encounter with TOOL is that some areas in the world, like roads, aren't clickable, which means you end up fiddling around with XY coordinates and struggling to see past your current lot. To solve this I made a little mod to expand the clickable area. It's not my idea, a creator named Alexcroft came up with it, but his version no longer worked (and was only for Brindleton Bay and Sulani I believe) so I edited the BG files myself
I'll be uploading the mod with my save file of course (so off-lot areas will still be clickable/completely accessible) but if you want it now just send me another ask! (I don't want it buried in this long post lol) The only problem I've noticed so far is sims route a lot more 'freely', meaning they'll stray from the sidewalk and walk/bike in the middle of roads. I haven't gotten any glitches or last exceptions yet though, so I'm willing to share!

Definitely! TwistedMexi is amazing, there's going to be an exporter for completed worlds as well as an official exchange to download them. You can read all about CAW here. As of now Crest Harbor is only a save file and not a proper custom world, but I'll be exporting it the instant CAW is finished.

This is so sweet 🥹 That is exactly my intention, to have gameplay and functionality in every corner of the world!
I have been thinking about the townies/lore, and I've decided to go for a very small town, quiet drama, everyone-knows-everyone-else's-business vibe. It's one of the things I love about the insular worlds of TS3. For one of the big expensive Victorians I'm going to build, I've decided to make a 'perfect' and very wealthy family. except the kids are rebellious kleptomaniacs, the politician dad is actually in the criminal career with a basement bunker and listening device, and the serial romantic, yoga instructor soccer mom is having a torrid affair with half the people in her class
Of course not every family will be like this lol, but you get the idea. I know people like to have their own sims (rightly so!) but I do want a lively backdrop for them to live against :)
(your english is perfect by the way!!!)
I know! I've figured out how to change the icon itself, I just can't figure out how to make the files reference *only* my copied world instead of Willow Creek too. They have identical icons right now and it's kind of jarring. Probably something I'm missing. If all else fails I'll probably just replace Willow Creek altogether. She's had 9 years anyway her time is up

very pleased i've got you a t a l k i n' :) The CAW is in alpha right now, but lot editing is coming! TwistedMexi has a proof of concept showing that it's possible, he just hasn't implemented it yet. The difficulty I think is in making it user-friendly. All the lots in my save file are the same size as Willow Creek's though, since it's just a copy of that world. You can *technically* edit lot sizes by editing the game files but it's glitchy and I know I'd just break my game messing around with it
yep, good eye! it's foundry cove on the Garden Essence lot. i did add a bunch of objects in the neighbourhood though
38 notes
·
View notes
Text
My DA:O Modlist
(this post is likely to keep changing. I don't imagine if anyone's looking at it, but in case you are and it's been less than a month since it was posted)
It is 2024, and I'm starting a new game of Origins after almost 8 years, and I'm starting from scratch on mods. A good part of this is just for future me to look back on, tbh, to stop me from looking at all these redundant mods I've been combing through just because "well, I remember I used to use that." It's messy and I'll clean it up as I go, I hope. I'll be using Kinlochhold's list (who I'll be referring to as "kh" if it's necessary to do so later on) as a jumping off point. Historically, my intentions have been to fix things and add mostly-lore-friendly stuff (I'll be trying to adhere to the visual style for hair and things - probably) as well as trying to keep from making the game too easy (via either avoiding certain tweaks or trying to add difficulty-increasing mods - though if anyone ever creates a "skip the wilds" mod, I'm jumping on that one cuz early-game nightmare mode is hell).
I'm noting things I would not even start the game without installing with 2 asterisks.
Tools: **Not a mod but LAA patch to allow the game to use more than 2gb of memory and the unencrypted game exe to allow LAA to work.
**DAO Modmanager - I tried the DAUpdater that comes with the game this time around, and it was not being friendly, so here we go. For installing .dazips.
DragonAge Face Replacer - I haven't tried this yet, got it from kh's list. For, uh, replacing your face. And also you can extract the morphs from your saves, which sounds cool.
CharGenMorph Compiler - was gonna do stuff manually, but I'm burned out rn, so screw that. Be smart and not stubborn, folks.
Fixes: **Qwinn's Ultimate Dragon Age Origins Fixpack - Renders most dialogue fixes redundant (or incompatible). Fixes, not tweaks. It fixes and restores content that the author believes was meant to be in the game but was cut for time, etc vs because it was intentionally cut content. Does not include DLC fixes. **Dragon Age Rules Fixpack - A modular combination of gameplay bug fixes and annoyance/QoL tweaks. Renders the "helmet hack" and "party command - unlock" mods unnecessary (along with many other fix mods). Includes auto-looting. I've deleted a few tweaks (XP on all deaths and VFX tweaks) but may add them back in if those effects start to bug me, lol. I also deleted the autoloot tweak (kept autoloot kills but not the basic autoloot) bc I wasn't sure it was working correctly.
Golem Registry and Shapers Life Reward Fix - fixes no-reward bug.
UI:
**FtG UI Mod - Doesn't change much in terms of overall UI usage, but it is good for such an old game as it allows you to have the menus change size for higher resolutions so you can read them as well as allowing you to change the placement of the subtitles More Detailed Tooltips - Extension of Detailed Tooltips, which gives in-depth info on what abilities actually *do.* Includes DLC. Note: Not installing the fixpack included in the description as comments have noted incompatibilities with QUDAOF.
FtG Quickbar - Can't remember if this is what I used to use or not. Shows all 50 quickbar slots at once. Is stated to be compatible with other UI mods.
Easier to Read Font for DAO - Enchantment for your eyes? Enchantment for your eyes! How do you not download something after reading that? Makes the over-stylized font simplified while still fitting in theme-wise. Specifies compatibility with FtG UI. I chose the serif version.
Gameplay: Advanced Tactics - Fixes some party AI bugs and gives extra options for the tactics system.
**Advanced Party - I always used to race to the mage tower even if it didn't make sense for my character to do so because I didn't want Wynne auto-leveling. This lets you level up abilities manually so you can roleplay without worrying about it ruining things.
**Two Specializations Sten - Gives Sten a second specialization point so that he gets two specializations like everyone else.
Quality of Life, etc: Camp Storage Chest - Puts a chest in camp to get rid of the need for the one at Warden's Keep. Keeps the limit on storage capacity (bc otherwise I'd keep everything I'd ever found).
**No Ladder Comments - "CAN I GET YOU A LADDER SO YOU CAN-" NO. For the love of all that is holy, please stop. A mod to keep you sane (removes this line from the game). I refuse to use the violent voice without this mod installed.
Lore Fixes, etc: (I have not installed any of the lore fixes but the codex one yet cuz I was just eager to start the game) Accurate Codex History of Ferelden Chapter 2 - Changes this codex entry to align with the events from the novel TSM Connor Epilogue Fix at Dragon Age: Origins - mods and community (nexusmods.com)
TSM Elfy Ghost Boy at Dragon Age: Origins - mods and community (nexusmods.com)
TSM WTF Lyrium Dust at Dragon Age: Origins - mods and community (nexusmods.com)
Misc: Non Alcohol Oghren Gifts at Dragon Age: Origins - mods and community (nexusmods.com)
TSM Better Bannhammer - Teagan tweaks and fixes at Dragon Age: Origins - mods and community (nexusmods.com)
maybe list:
Auto Swap Quick Slot Bar at Dragon Age: Origins - mods and community (nexusmods.com)
Statistic Fix - Bosses Killed at Dragon Age: Origins - mods and community (nexusmods.com)
Second Drain life bug fix at Dragon Age: Origins - mods and community (nexusmods.com) - gets rid of a duplicate skill that doesn't do anything (need to see if this even is a problem first)
Less barking dog at Dragon Age: Origins - mods and community (nexusmods.com) - May end up needing this
will probably install later (after remembering what the original looks like)
2 notes
·
View notes