#i tried to record it but it was like 200 pixels in the video
Explore tagged Tumblr posts
Visit Tumblr Blog
Explore Tumblr blogs with no restrictions, modern design and the best experience.
Last Seen Tumblr Blogs


Fun Fact
Hackers stole 65M passwords from Tumblr in 2013.
Text
i was going to upload a video of me running around as the rat but i need to wait for the folders contents to finish being moved out so its hopefully a actually visible resolution
#leaf's posts#i tried to record it but it was like 200 pixels in the video#it was so shit#im hoping if i empty the folder its saved into it will record higher quality
2 notes
·
View notes
Text
.gif tutorial - editing video directly in PSCC
Here's a tutorial for my method of making .gifs by dropping a .mp4 video clip directly into photoshop.
This technique doesn't require previous screen capping or importing. All you need is an .mp4 video clip and photoshop. Here's the .gif I'll be making:


Now with a Video version of this tutorial!
While you can drop whole movies into PS, I find it easier to work with shorter clips. VLC player is capable of recording smaller clips of larger videos, so try recording the scene(s) you want into clips a few minutes long. Videos just have to be a compatible codec, of which .mp4 is one. Since that's the only filetype I've used, I'm not sure of the others. I know .mkv and .webm won't work. Try a conversion program to turn an incompatible filetype into mp4.
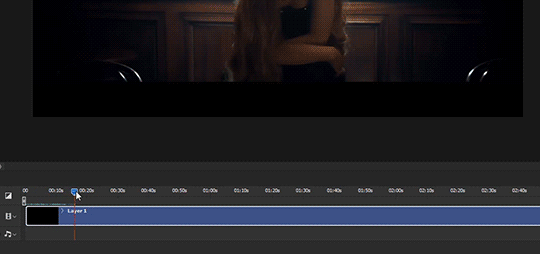
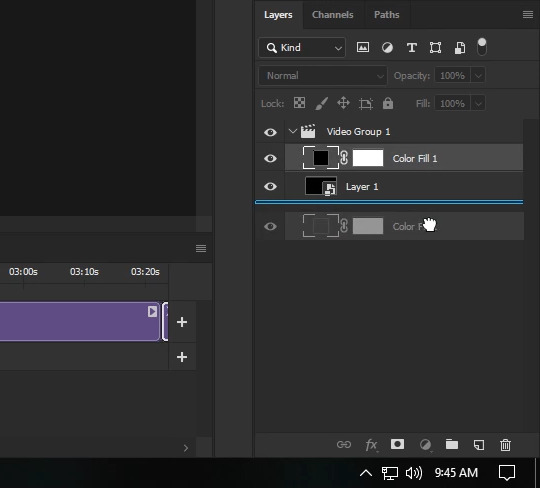
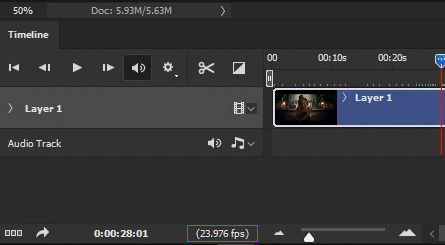
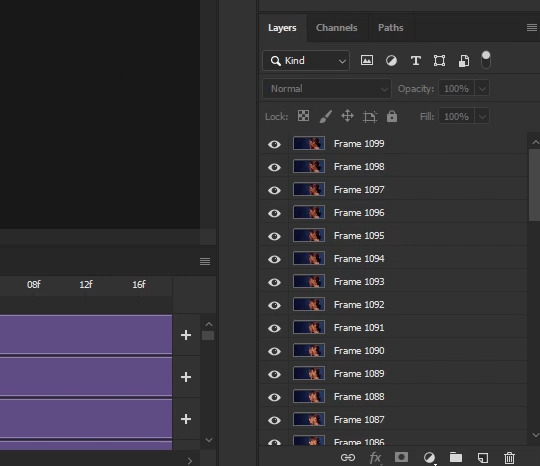
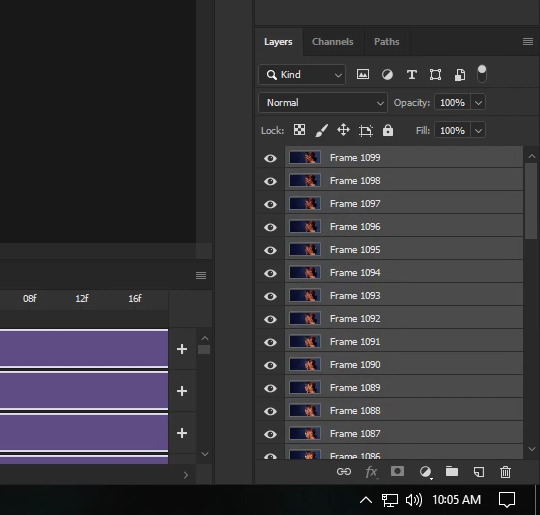
As with any .gif you're making, you'll need your Timeline window open. You can find it under Window >> Timeline. Here's a quick rundown of the relevant parts:

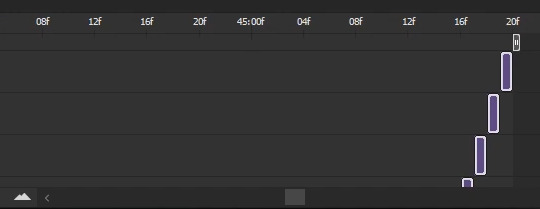
Once you've dragged your video clip into photoshop (see above gif), a blue box will appear in your timeline, along with an arrow pointing to a redline called the playhead. You navigate through a video's frames by clicking the arrow portion of the playhead and holding as you drag it back and forth across the blue box representing your video.
This process is called scrubbing (don't ask me why).
The first thing you'll want to do is turn the video in your timeline into a Smart Object. You can either click on it in the timeline or in the layers palette to select it. Once it's highlighted, use the standard method to turn it to a smart object (Layer >> Smart Objects >> Convert to Smart Object). I like to do a Save As... (File >> Save As...) at this point to create a new .psd file. DON'T SAVE OVER YOUR ORIGINAL VIDEO FILE. Make sure to do Save As....
It's important to note that the .psd you save won't contain the video itself. Instead, a symlink is created, which is basically an embedded link to the original video file. What this means is that if the video you dropped into photoshop is ever moved or deleted, it'll break your .psd file. Make sure not to muck about with the video file as long as you want to be able to work on your .psd
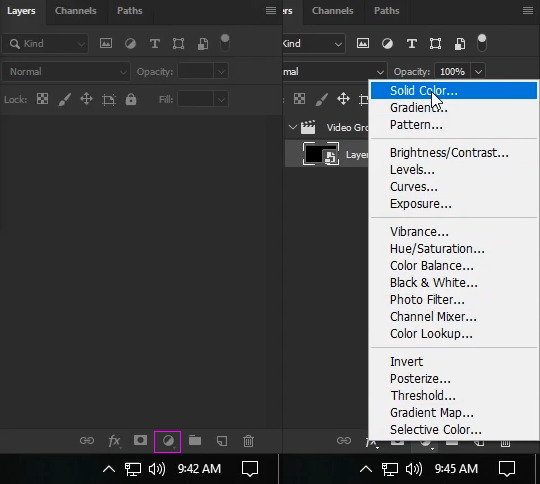
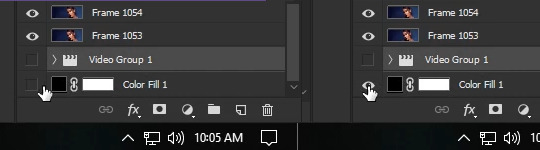
Because resizing/cropping/transforming can make some odd transparency issues on the borders of gifs, I like to place a Solid Color layer of pure black (#000000) at the bottom of the layer palette. So, in the Layers palette, select Create new fill or adjustment layer and select Solid Color at the top of the pop up menu:
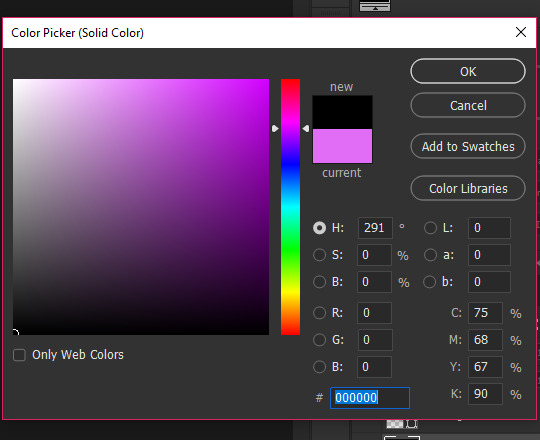
Choose solid black either by entering 000000 in the # field or by using the color picker to pick black from the bottom.
Drag this new fill layer to the bottom of your layers.
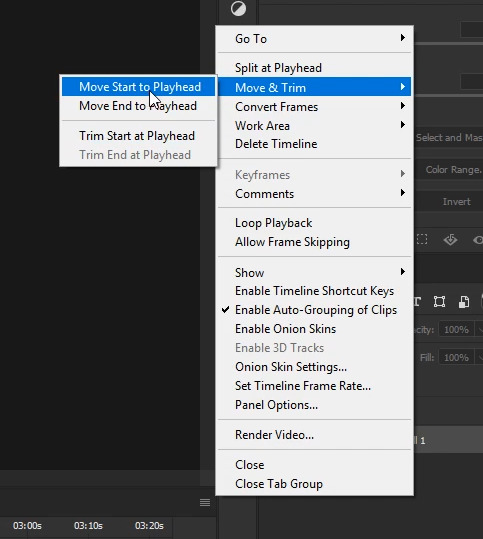
Now the Color Fill object has to be moved in the Timeline so that it stretches across the entire area taken up by the video clip. Your playhead should be at the beginning of the timeline:

If it's not, click on the arrow and drag it there. Make sure your Color Fill layer is selected in the Layers Palette. Then, click on the Timeline's menu and choose Move & Trim >> Move Start to Playhead:
Your Color Fill object should now be at the start of your timeline. Hover over the object's right edge until the mouse turns into a double arrow icon:

Holding down the mouse, drag the Color Fill object to the end of the work area (the whole of the video object's length). It should snap to the end when you reach it automatically.

Next, scrub to a still image that represents your gif for you to look at as you work on cropping/coloring.
Next you'll want to resize your smart object to gif size. For this .gif, it'll be 540 x 200, so I've set the crop tool's settings to W x H x Resolution: 540px and 200px.

I liked to keep Delete Cropped Pixels unselected so I can move the image around after the cropping. Go ahead and adjust the crop to where you're happy and press enter to crop the image.

You can now start applying filters, masks, color adjustments, text as you normally would. For me, I like to begin by sharpening my resized image. I find Smart Sharpen works best for videos/gifs, because it applies as a filter to the smart object, meaning you can access and adjust the controls at anytime. To use Smart Sharpen, go to Filter >> Sharpen >> Smart Sharpen... In the control panel, apply the following settings:
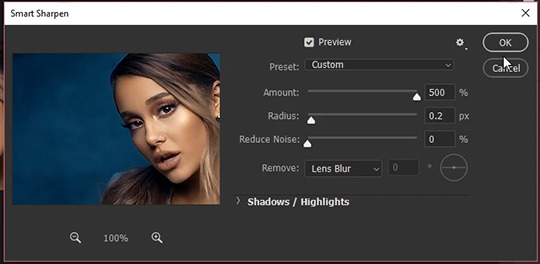
Amount: 500 Radius: 0.2 Reduce Noise: 0 Remove: Lens Blur Don't worry about the extreme sharpening that takes place from the high amount, because we'll adjust that in the next step. For now, just click Okay.
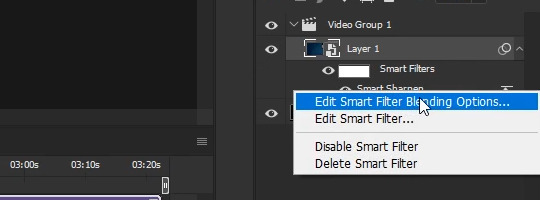
In the Layers Palette, you'll see the Smart Sharpen filter has been applied to the Smart Object. Right click on the new filter listing and click on Edit Smart Filter Blending Options...
In the new control panel that pops up, turn down the opacity to something that suits your taste. Something between 15% to 30% usually works fairly well. For this video, I've chosen 25%.
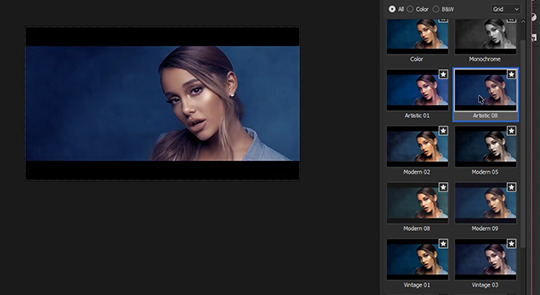
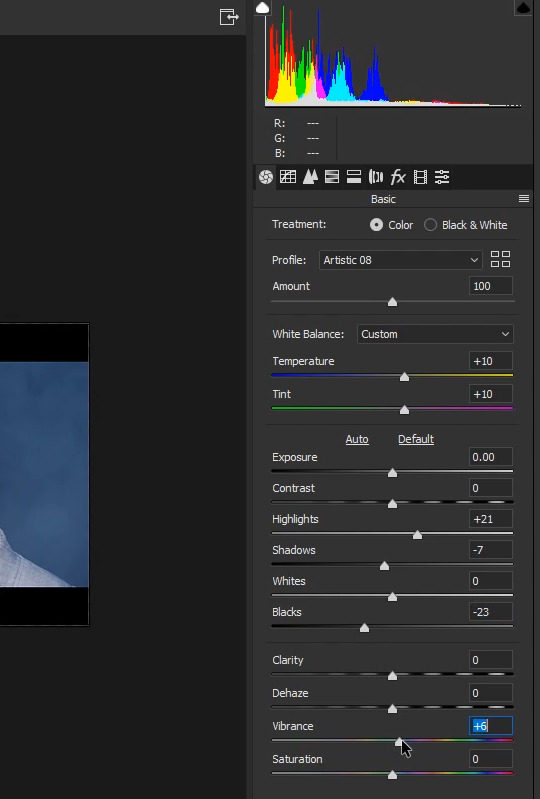
Now to move on to color adjustments and my favorite filter, the Camera Raw filter (Filter >> Camera Raw Filter... or Shift + Ctrl + A). In the Camera Raw control window, I start out by going through Adobe's preset profiles to see if I like the look of any of them. For this video, Artistic 8 deepened the blues and brought out a lovely bronze, so I've selected it and closed the profile section.
Still in the Camera Raw window, you can further adjust the color temperature and tint. Temperature: +10 Tint: +10
Change the image's constrast by adjusting the highlights, shadows, whites, blacks sliders directly: Highlights: +21 Shadows: -7 Blacks: -23
Finally, kick up the Vibrance. Vibrance: +6
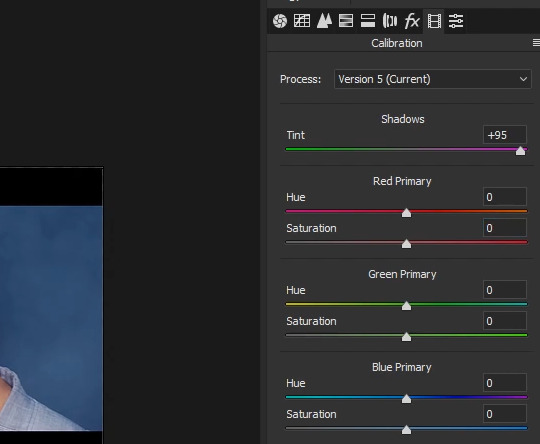
I also went to the Calibration tab (looks like a film strip) and added more magenta to the Shadows' Tint. Tint: +95
I'm happy with these setting so I won't be using any more camera raw settings, but play around and see what you come up with!
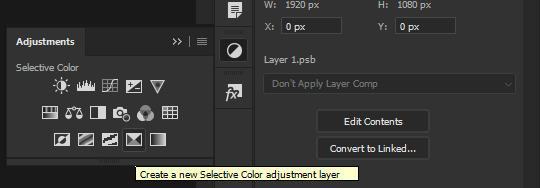
Now, if you want to apply more color adjustments outside Camera Raw, you certainly can. I've chosen to apply a Selective Color Layer to the video to make the bronze pop a bit more. Go to your Adjustments window and apply a new Selective Color Layer.
.
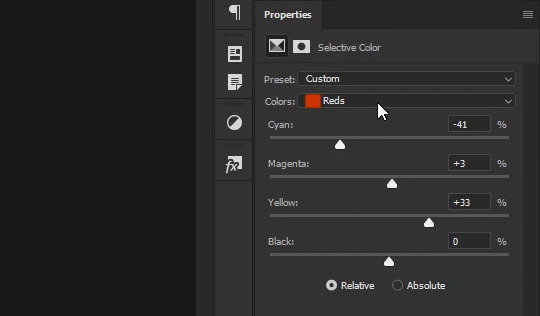
With Reds selected in the Colors dropdown menu, I've applied the following settings: Cyan: -41 Magenta: +3 Yellow: +33 Black: 0
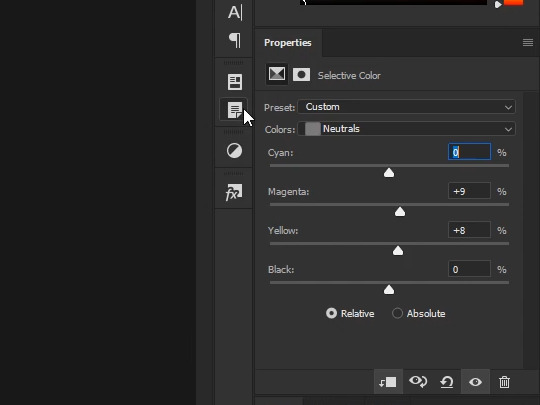
Switching to Neutrals in the Colors dropdown menu, I've made the following slight adjustments: Cyan: 0 Magenta: +9 Yellow: +8 Black: 0
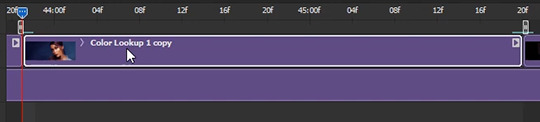
Next I opened up the Adjustments palette again and applied a Color Lookup layer:

Previewing several layers from the 3DLUT File dropdown menu, I selected Fuji REALA 500D Kodak 2393 (by Adobe).cube color table for the kick in contrast. I found it much too strong an effect, however, so in the Layers pallette I turned down the Opacity to 23%.
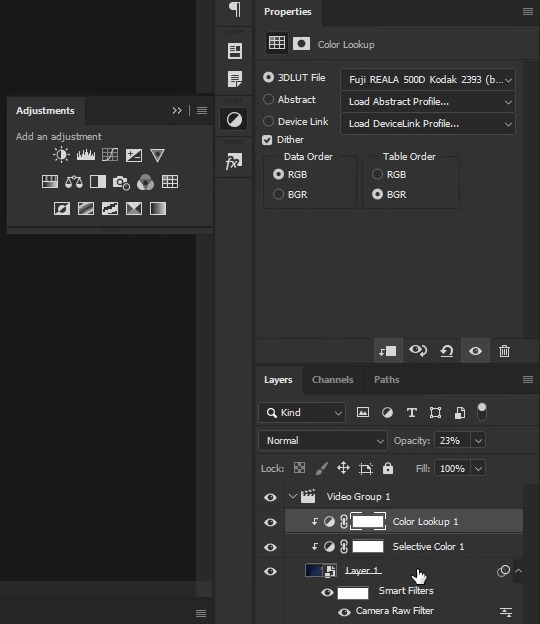
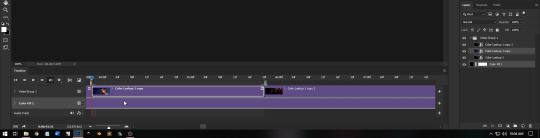
The next steps are easiest to do with a single Smart Object for your video. Since I was done with my color adjustments, from the Layers Window I selected the original Smart Object, held down the Shift key and selected the Color Lookup Layer (which layed above the Selective Color adjustment layer). This selected all three layers. Next, I turned them into a new Smart Object (Layer >> Smart Objects >> Convert to Smart Object...). Now everything is contained in a single object both in the Timeline and the Layers window.
Now, if you've tried scrubbing through the video, you've probably discovered that the once smooth and quick back and forth you were able to achieve with your original video file is now choppy and slow. The reason for this is that photoshop has to recalculate every frame of the video and apply your color filters. This is a pain, and really slows down the gif making process. What you need to do is get back to the original video that doesn't have any adjustment layers or filters applied to it. To do that, return to your layers window and double click on your Smart Object's thumbnail. This will open up your original Smart Object and the two color Adjustment Layers you just applied in a new window. However, if you try scrubbing, you'll have the same choppy loading effect as before, because the color adjustments are still being calculate for each frame. What you have to do is go to your original Smart Object in the Layers Window and double click on it one more time. In the new window that pops up, you'll see your original video file, at it's original size. When you scrub through this timeline, you'll be able to do so at the smooth, quick pace you were before all your color adjustments. This and the tabbed window containing your single Smart Object resized video will be the two windows you click between, so go ahead and close the middle tab window with the color adjustment layers. You won't be needing that one open any longer.
As an aside note, make sure the FPS (framerate) listed in the small info section in your timeline is the same for each smart object window as it is on your original video.
If the framerates don't match, you won't be scrubbing through the same frames. Meaning that when you stop at a certain time on both timelines, they won't be stopping at the same place. This usually happens when you create a new window and drop your video file wrapped in a Smart Object into it, instead of just cropping your Smart Object. (Why do this? Sometimes it's easier to resize it via the transform controls with the image size already set, i've done this moving from full size to a 268px width before.) Anyhow, the good news is that the fix is very simple! Just make a note of the fps in your original video file (the one with the blue box, not the purple!) and in every mismatched Smart Object window, go to your Timeline's menu, select Set Timeline Frame Rate..., and enter in the original video's fps in the custom field (or select it from the dropdown menu if it's available). Voila! Problem fixed. But, like I said, this is only a problem if you drag and drop the Smart Object into a new window. If you want to avoid the hassel all together, just crop or do an Image Resize in your original window, as I've done in this tutorial.
Now for turning your Smart Object into a gif! In your Original Video window, scrub through the Timeline and find the point you want your gif to start at. For this gif, I've chosen to start my gif at timestamp 0:00:43:21.
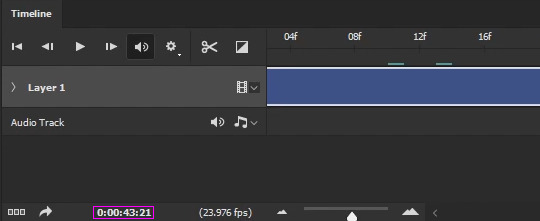
Go ahead and double click on the timestamp highlighted in the image above (careful not to "slide" the time ahead or behind with the mouse) and in the Set Current Time control window that pops up, highlight and copy (Ctrl + C) the time.

Exit the window by pressing Cancel or Esc. Return to your Smart Object's window (with the color adjustments) and double click on the timestamp here and in the control window, highlight the time and paste (Ctrl + V) the time into it and click OK. Your playhead should then jump to the same frame (after a moment to load) you stopped at in your original video.
Now you want to mark this spot for yourself to easily return to. In the timeline, you'll see there are gray "brackets" that encompass the whole of your Smart Object/Video. These "brackets" are the work area.

These brackets can be moved and repositioned to shorten your work area. This is an excellent way to mark the area of your gif. There are two ways to move the brackets. First, you can grab the left bracket, hold down the mouse, and slide it over to the playhead (it'll snap to it once you're close enough). However, the easier way is to right-click on the blue arrow part of the playhead and choose Set Start of Work Area.
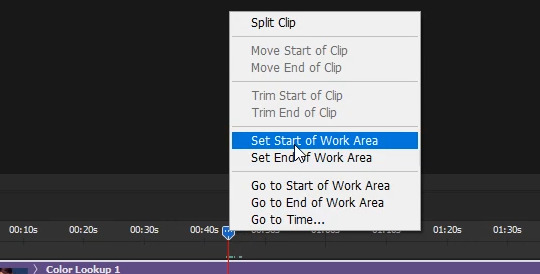
The left bracket will then automatically move to your playhead.

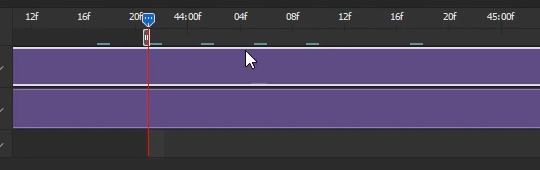
Repeat this process to find your ending point, but picking Set End of Work Area instead of Start. NOTE: If you look very closely at the red line beneath the playhead when you're zoomed in to your timeline, you'll notice a light grey box to it's right:
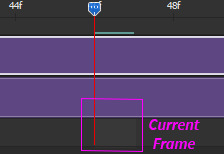
This is highlighting the current frame. You'll want to make sure the highlighted image is the frame AFTER your final frame!. The end of the work area and the playhead snap just to the left of the highlighted frame. The actual frame will be left out out of the work area/split. So if you want your gif to end on the image before, you need to highlight the next image. I know it sounds wonky, but once you've made a few gifs using this method, you'll see what I'm talking about.
Next step is to split the object so you can select Just the section you want to turn into the gif. Having already set your work area makes this easy. Right click on you playhead's blue arrow and select Go to Start of Work Area
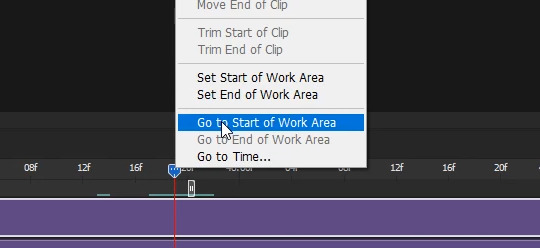
And your playhead will jump to the start of your work area, and where you want your gif to start:
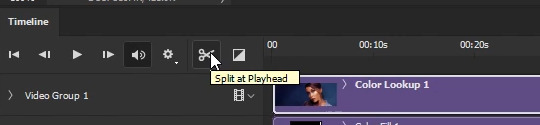
Once you have the playhead positioned where you want your gif to start, select the Split at Playhead button (the scissors) to split the object at the playhead (red line):
You'll notice your object has split into two objects:
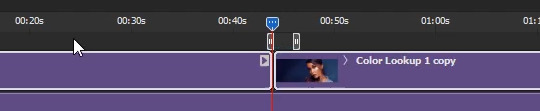
Note: This is why you want all your color adjustments made before you start splitting your gif(s), because your color adjustment layers are still applied to both objects. You don't have to copy/paste any filters/adjustment layers.
Repeat the previous steps, except this time, for the End. (Go to End of Work Area) Note: Sometimes the playhead stops a frame before the End of your Work Area. I don't know why (bug?), so zoom in on your timeline and make sure that read line is bunched up to the End of Work Area "bracket" before you slice. When you're done, you should have the section you want to turn into a gif seperated out from the rest of the object:
Your prepwork is done! Now to make the actual gif!
It's always a good idea to make a Snapshot at this point! That way you'll have a prepped state ready to revert to if you mess up going forward. You can find the snapshot button in the History window (Window >> History):
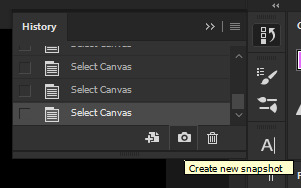
If you ever mess up, just scroll up to the thumbnail at the top section of the list and click it.
Either from your Timeline or your Layer Palette, select the Object you just sliced out (the one you want to turn into a gif), then press and hold Ctrl and select the black color fill layer beneath it, so that both objects are selected.
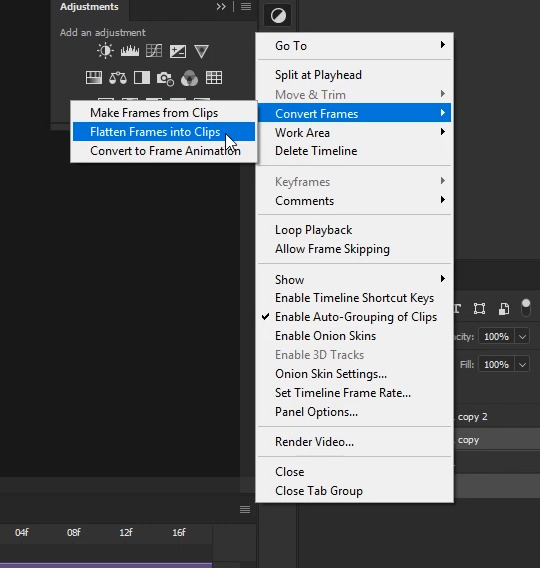
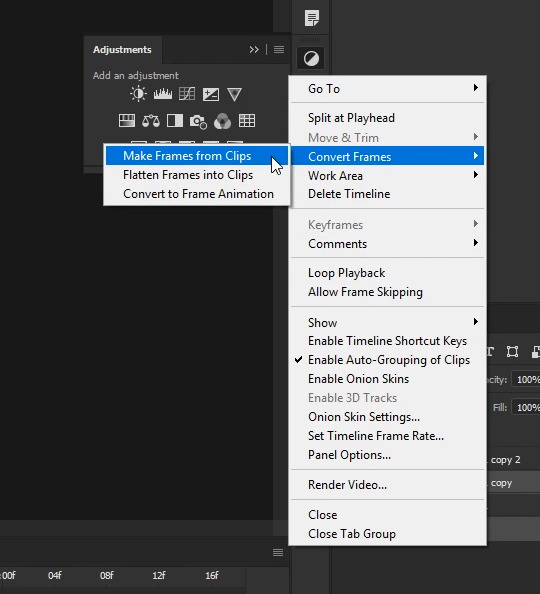
With both objects selected, go to the Timeline's menu and select Convert Frames >> Flatten Frames into Clips:
Depending on your graphic card and how big your selection and image sizes are, this will take some time. The faster your card/narrower your selection/smaller your image, the faster it will render. Photoshop is taking every flame and placing it onto it's own layer. When it's finished, your Layer Palette will be filled with new layers... and you might notice it looks similar to how it looks when you're working in a frame timeline. This is no accident.
Scroll all the way to the bottom of your Layer Palette and make sure your black Colorfill layer is visible (click on the visibility area until the eye shows up).
Then, click on the first new layer and select it. Holding down Shift, scroll allll the way to the top, and select the topmost layer. All the new layers should now be highlighted in both your Layers Palette and your Timeline.
With all the new layers selected and the Colorfill layer visible, go back to the Timeline's menu and select Convert Frames >> Make Frames from Clips:
This shortens the layers into milisecond clips.
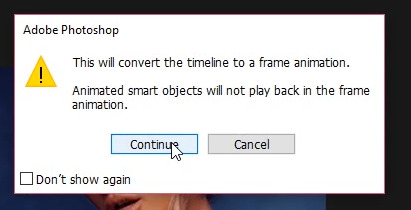
Now, with the layers still selected, go back to the Timeline menu one more time and select Convert Frames >> Convert to Frame Animation:

A new warning window will pop up saying "This will convert the timeline to a frame animation". Go ahead and click continue:
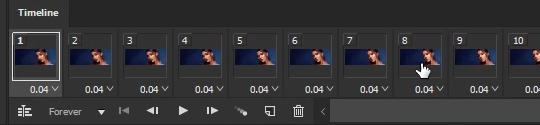
At this point, things should look very familiar.
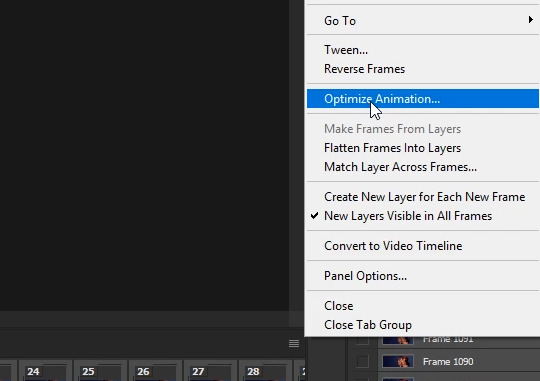
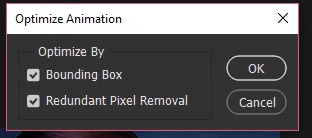
You'll do all the usual steps for saving a gif at this point, EXCEPT you don't have to worry about duplicate/skipped frames. Photoshop hasn't skipped or doubled any frames that weren't recorded that way in the video. Your gif may still be too long to fall under 3mb, but how you trim it down is up to you. In my case, this gif is at the right length, so I go ahead and optimize all the frames by going to the Timeline's menu and selecting Select All Frames. Then from the Timeline Menu again selecting Optimize Animation...:
In the control window that pops up, I've left everything selected and just clicked on OK.
Next, with all the frames still selected, click on the pop up menu of one of the frames (the little down arrow in the lower right corner) and choose Other...:
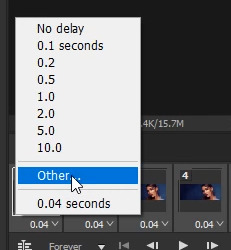
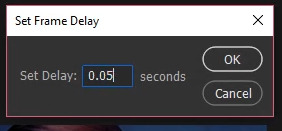
In the pop up window I changed the Delay of 0.04 to 0.05
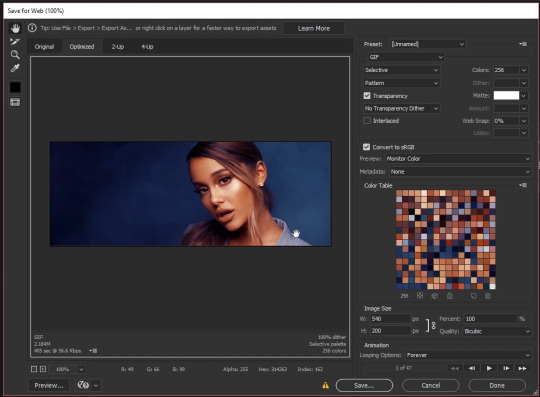
Now it's just a matter of saving the gif. Pressing Ctrl + Shift + Alt + S or you can go File >> Export >> Save for Web (Legacy) to bring up the Save for Web dialogue box. From there, I make sure the memory comes under 3mb. I like to save with the Selective and Pattern profiles with as high a Colors setting as I can manage, which is the full 256 for this gif. From there, it's just a matter previewing the animation to make sure it looks alright and then saving.
And that's it! That's how I make all my gifs. You'll notice I can go to my history window, undo all the frame conversions or click on my snapshot, and still go to any point in the video to make another gif. Which is usually how I make my gif sets in one go.
I hope this long tutorial was helpful! Please reblog or give a like if it was. If you're interested in how I add text, or use keyframes to manipulate positions/sizes/"camera"/styles/etc, let me know you'd like tutorials on all that too! If there's enough interest I'll be sure to do more.
Happy giffing!
126 notes
·
View notes
Text
What are the things you may need to know about xa 2 Xperia?
I picked up the XA 2 ultra even though it's a 2018 phone, but I have an aged over time what about the updates what about the device has it gotten better over one year.
Let's find out the shout out to my man I take you out guy AKA 2 phones so free guy right he'd be reviewing the XE to all. She'd love the phone, so I picked this without mid two hundred bucks, and I'm getting my thoughts about this device how has it aged over time.
Sit back and relax and get your popcorn ready and let's talk about the x8 to ultra right now let's go [Music] what's up guys this is Eric back with another video.
Using the Sony x8 to ultra was a Jew to use with its vast 6 inches 16 by nine aspect ratio would good software and stuff like that which I'm going to talk about in this video.
Let's go to get into it let's talk about the specs the Sony x8 to ultra has a large six-inch 1080p IPS LCD with the Snapdragon 630 processor willful gigs of ram 32 gigs of internal storage complemented by SD card support.
pair a Smartphone with web Whatsapp desktop
What are the camera features?
but check this out on the rear we got a 23 megapixel camera that can record up to 4k 30 and 1080p 60 and in the front we have a dual camera setup which consists of 16 megapixel camera with optical image stabilization
if you looking to download video star application then please visit the official website below.
https://www.videostarapk.info/
an 8 megapixel camera also Thank You Sony for the United States.
We now get a fingerprint scanner on the rear this phone has a massive 3580 milli amp battery with quick charge three dots oh and lastly the price.
The price here guys the amount you can pick this phone up mid 200 bucks which is great this device is running Android 8.0 which is not a good thing.
And I'm going to talk about it later on in this video ok so I'm outside, and I want you all guys to see the viewing angles here I got the device at full brightness, and I wish you all got to know the viewing angles here which you can you got a little glare here.
But overall you can see that the device when they come down to viewing angles is pretty good and as you can see getting out the glaring kind of turning the sideways there that the viewing angles on this device are pretty right.
I want to talk to you guys out about the battery life on here 3580 milliamp battery with the 630 processor with a 1080p display even though it's the 6-inch display I'm getting an excellent better experience I mean seven eight nine hours all screen time for light use.
The standby time on here is perfect so you will get through a full day of battery life what the x8 to ultra and which is a good thing.
Finger print feature and facts
Because I slam some of the previous devices for miserable battery life but this device you've got an excellent better experience.
When they come down to better life again, yo uses may vary if you use it extremely hard what full brightness all day then you won't get that type of battery life.
But if you go medium brightness and using it pretty heavy you definitely would get through the day what the XA to ultra also let's talk about the fingerprint scanner, and now it's not the fastest fingerprint scanner, but it does the job and to me.
I think suddenly have stepped up because if you looked at the previous models in the US they did not have fingerprint scanners enabled but here and this generation they enabled the fingerprint scanner.
Thank God that we got a fingerprint scanner and a back of this device but overall wow this phone heavy, bulky looks proper dedicated camera button Booya, and it gets the job done.
Will you press it BAM ready to go that's what I'm talking about up next let's talk about the performance of the Sony x8 to ultra this device running at Snapdragon 630 processor with full gigs of RAM this device?
Have android 8.0 with Sony's skin on top of Android so now as far as performance it's very snappy you can run all the apps and games which is nice.
It looks really good with that huge 60 of 16 by 9 aspect ratio display also playing games on this phone there's a breeze I have no hiccups and don't stutter and playing games on this phone, but please remember this phone has a Snapdragon 630 processor so playing high-end games can be done but at mid-range settings.
Hardware and software updates
So let's talk about the cameras on this device, and as you know Sony's supply camera lenses to a lot of manufacturers, so we do pop this phone, this device has a 23 megapixel on the rear and two cameras up front which consists of 16 megapixels with optical image stabilization. this the best model to listen music long hours, for that you need to install premium music app like Pandora Premium Apk.
And an 8-megapixel camera and I tell you this phone can run 4k 30 1080p 60 which is a good thing so let me show you guys some footage with this camera.
So here it is I have the sony - ultra, and I got the Google picture for reference here, and I want to walk here so you all guys can see the difference between a high-end camera supposed to be on the pixel and a mid-range 200 red $200 camera which is on the Sony.
youtube
Let's go to the walk, and I'm shooting this at 1080p 30 frames per second, and you'll be the judge for yourself when looking at these cameras I'm going to go audio from side to side.
So y'all guys can hear the sound on both of these cameras so let's get into some color here and I'ma have a full comparison with multiple devices coming soon.
But I want to give you a quick video on the Google pixel 3 and if Sony xz2 ultra. That is all right, so this is the front-facing camera of the Sony x8 - all trip all this camera looks pretty good now this is a 16-megapixel optical image stabilization camera also it has a wide-angle lens in the front and the flash.
Final conclusion about Xperia ultra
I am impressed looking at the front facing camera, but you let me know about the audio. And as I walked and again it has optical image stabilization in the front-facing camera so I'm doing this here and I want you all guys to look at the background there see how to distinguish the difference between me and the environment as it does some focusing.
So it's thought to focus more on the meet and blurring out the background and as I move the camera tried to distinguish.
And the white balance kicking in and stuff like that so that's important that's one of the reasons why I do these a camera comparison the camera reviews and things like that so you can see the difference in rear cameras and front cameras.
This is only a sample I got full camera reviews coming up, but it's device mint 200 bucks front-facing camera looks good it looks perfect I'm impressed, so I enjoy using the x8 too.
But it's a few things that kind of disappointed me with this phone the first thing is the operating system justify says where the android 8.0 listen we are in 2019, and this phone is a year old now.
#xperia ultra#sony Xperia ultra#sony#Xperia ultra review#wa web#whatsapp web#gb whatsapp#og whatsapp#pandora apk#whatsapp plus apk
1 note
·
View note
Text
A Look at What’s New in Chrome DevTools in 2020
I’m excited to share some of the newer features in Chrome DevTools with you. There’s a brief introduction below, and then we’ll cover many of the new DevTools features. We’ll also look at what’s happening in some other browsers. I keep up with this stuff, as I create Dev Tips, the largest collection of DevTools tips you’ll find online!
It’s a good idea to find out what’s changed in DevTools because it’s constantly evolving and new features are specifically designed to help and improve our development and debugging experience.
Let’s jump into the latest and greatest. While the public stable version of Chrome does have most of these features, I’m using Chrome Canary as I like to stay on the bleeding edge.
Lighthouse
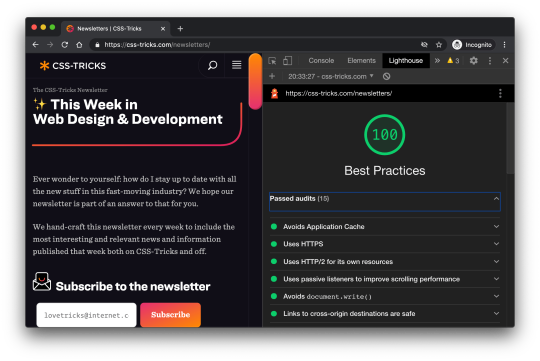
Lighthouse is an open source tool for auditing web pages, typically around performance, SEO, accessibility and such. For a while now, Lighthouse has been bundled as part of DevTools meaning you can find it in a panel named… Lighthouse!
Well done, Mr. Coyier. 🏆
I really like Lighthouse because it’s one of easiest parts of DevTools to use. Click “Generate report” and you immediately get human-readable notes for your webpage, such as:
Document uses legible font sizes 100% legible text
Or:
Avoid an excessive DOM size (1,189 elements)
Almost every single audit links to developer documentation that explains how the audit may fail, and what you can do to improve it.
The best way to get started with Lighthouse is to run audits on your own websites:
Open up DevTools and navigate to the Lighthouse panel when you are on one of your sites
Select the items you want to audit (Best practices is a good starting point)
Click Generate report
Click on any passed/failed audits to investigate the findings
Even though Lighthouse has been part of DevTools for a while now (since 2017!), it still deserves a significant mention because of the user-facing features it continues to ship, such as:
An audit that checks that anchor elements resolve to their URLs (Fun fact: I worked on this!)
An audit that checks whether the Largest Contentful Paint metic is fast enough
An audit to warn you of unused JavaScript
A better “Inspect Element”
This is a subtle and, in some ways, very small feature, but it can have profound effects on how we treat web accessibility.
Here’s how it works. When you use Inspect Element — what is arguably the most common use of DevTools — you now get a tooltip with additional information on accessibility.
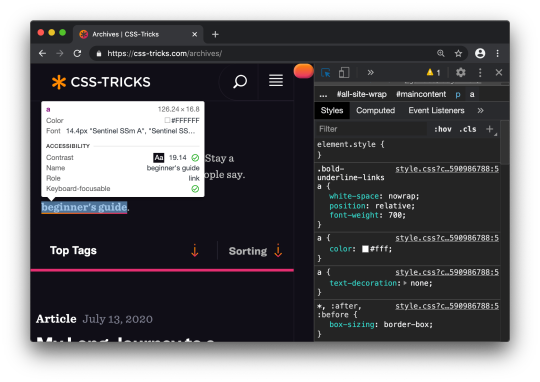
Accessibility is baked right in!
The reason I say this can have a profound impact is because DevTools has had accessibility features for quite some time now, but how many of us actually use them? Including this information on a commonly used feature like Inspect Element will gives it a lot more visibility and makes it a lot more accessible.
The tooltip includes:
the contrast ratio of the text (how well, or how poorly, does the foreground text contrast with the background color)
the text representation
the ARIA role
whether or not the inspected element is keyboard-focusable
To try this out, right-click (or Cmd + Shift + C) on an element and select Inspect to view it in DevTools.
I made a 14-minute video on Accessibility debugging with Chrome DevTools which covers some of this in more detail.
Emulate vision deficiencies
Exactly as it says on the tin, you can use Chrome DevTools to emulate vision impairments. For example, we can view a site through the lens of blurred vision.

That’s a challenge to read!
How can you do this in DevTools? Like this:
Open DevTools (right click and “Inspect” or Cmd + Shift + C).
Open the DevTools Command menu (Cmd + Shift + P on Mac, Ctrl + Shift + P on Windows).
Select Show Rendering in the Command menu.
Select a deficiency in the Rendering pane.
We used blurred vision as an example, but DevTools has other options, including: protanopia, deuteranopia, tritanopia, and achromatopsia.
Like with any tool of this nature, it’s designed to be a complement to our (hopefully) existing accessibility skills. In other words, it’s not instructional, but rather, influential on the designs and user experiences we create.
Here are a couple of extra resources on low vision accessibility and emulation:
Accessibility Requirements for People with Low Vision (W3C)
Improve page accessibility by emulating vision deficiencies
Get timing on performance
The Performance Panel in DevTools can sometimes look like a confusing mish-mash of shapes and colors.

This update to it is great because it does a better job surfacing meaningful performance metrics.

What we want to look at are those extra timing rectangles shown in the “Timings” in the Performance Panel recording. This highlights:
DOMContentLoaded: The event which triggers when the initial HTML loads
First Paint: When the browser first paints pixels to the screen
First Contentful Paint: The point at which the browser draws content from the DOM which indicates to the user that content is loading
Onload: When the page and all of its resources have finished loading
Largest Contentful Paint: The largest image or text element, which is rendered in the viewport
As a bonus, if you find the Largest Contentful Paint event in a Performance Panel recording, you can click on it to get additional information.

Nice work, CSS-Tricks! The Largest Contentful Paint happens early on in the page load.
While there is a lot of golden information here, the “Related Node” is potentially the most useful item because it specifies exactly which element contributed to the LCP event.
To try this feature out:
Open up DevTools and navigate to the Performance panel
Click “Start profiling and reload page”
Observe the timing metrics in the Timings section of a recording
Click the individual metrics to see what additional information you get
Monitor performance
If you want to quickly get started using DevTools to analyze performance and you’ve already tried Lighthouse, then I recommend the Performance Monitor feature. This is sort of like having WebPageTest.org right at your fingertips with things like CPU usage.

Here’s how to access it:
Open DevTools
Open up the Command menu (Cmd + Shift + P on Mac, Ctrl + Shift + P on Windows)
Select “Show performance monitor” from the Command menu
Interact and navigate around the website
Observe the results
The Performance Monitor can give you interesting metrics, however, unlike Lighthouse, it’s for you to figure out how to interpret them and take action. No suggestions are provided. It’s up to you to study that CPU usage chart and ask whether something like 90% is an acceptable level for your site (it probably isn’t).
The Performance Monitor has an interactive legend, where you can toggle metrics on and off, such as:
CPU usage
JS heap size
DOM Nodes
JS event listeners
Documents
Document Frames
Layouts / sec
Style recalcs / sec
CSS overview and local overrides
CSS-Tricks has already covered these features, so go and check them out!
CSS Overview: A handy DevTools panel that gives a bunch of interesting stats on the CSS your page is using
Local Overrides: A powerful feature that lets you override production websites with your local resources, so you can easily preview changes
So, what about DevTool in other browsers?
I’m sure you noticed that I’ve been using Chrome throughout this article. It’s the browser I use personally. That said, it’s worth considering that:
Firefox DevTools is looking pretty great right now
With Microsoft Edge extending from Chromium, it too will benefit from these DevTools features
As evident on the Safari Technology Preview Release Notes (search for Web Inspector on that page), Safari DevTools has come a long way
In other words, keep an eye out because this is a quickly evolving space!
Conclusion
We covered a lot in a short amount of space!
Lighthouse: A panel that provides tips and suggestions for performance, accessibility, SEO and best practices.
Inspect Element: An enhancement to the Inspect Element feature that provides accessibility information to the Inspect Element tooltip
Emulate vision deficiencies: A feature in the Rendering Pane to view a page through the lens of low vision.
Performance Panel Timings: Additional metrics in the Performance panel recording, showing user-orientated stats, like Largest Contentful Paint
Performance Monitor – A real-time visualization of performance metrics for the current website, such as CPU usage and DOM size
Please check out my mailing list, Dev Tips, if you want to stay keep up with the latest updates and get over 200 web development tips! I also have a premium video course over at ModernDevTools.com. And, I tend to post loads of bonus web development resources on Twitter.
The post A Look at What’s New in Chrome DevTools in 2020 appeared first on CSS-Tricks.
You can support CSS-Tricks by being an MVP Supporter.
A Look at What’s New in Chrome DevTools in 2020 published first on https://deskbysnafu.tumblr.com/
0 notes
Photo


Last week, Discovery Channel’s annual Violence-in-the-Natural-World-a-Palooza, also known as Shark Week, made it into mainstream news coverage. And not because scientists discovered that Greenland sharks are the longest-living vertebrates with lifespans of up to 400 years. Not because of a recent book uncovering the history of a secret U.S. Navy project that tried to train sharks to deliver bombs. Never mind that people keep finding two-headed sharks all over the world and no one knows why. Nope. Everyone got riled up because Discovery (sort of) said that 23-time gold medal Olympian Michael Phelps would (maybe) race against a Great White Shark. And because he (mostly) didn’t.
In the episode “Phelps vs. Shark: Great Gold vs. Great White,” Phelps hangs out in a boat with some scientists as they record a Great White’s swimming speed. Then, wearing a bunch of specially designed gear, he races in the ocean against… a superimposed, CGI shark. Spoiler alert: Phelps loses by two seconds. Theoretically. You know – against an imaginary shark. A shark made of pixels and dreams.
The ratings, though: very real. Discovery reported that their viewership hit new records, with over 15 million people tuning in to watch Michael Phelps lose to a fake-news fish.

To be fair, both the network and Phelps argue that they made it clear in all the promo for the episode that the record-setting swimmer wouldn’t be in the water with an actual, physical shark. And for the most part, that argument checks out – even if the initial promo from Discovery claimed, “The world’s most decorated athlete takes on the ocean’s most efficient predator: Phelps V Shark – the race is on!” Which, sure, if you’re not thinking carefully about the raging liability issues, might lead you to believe that Nat-Geo-With-More-Shouting would put a Great White Man in a pool with a literal monster.
But come on, y’all. We are now solidly in Act Two (Rising Action) of the Post-Truth Apocalypse. This is no time for uncritical skimming. We are living under a president who made 492 false or misleading claims during his first 100 days in office. Our Commander in Chief retweeted a video of himself punching CNN in the superimposed face and once claimed that Barack Obama literally founded ISIS. The way we’re running through Communications Directors, you’d think all their last names were Stark. Y’all. Y’ALL. We have got to start reading between the headlines. Truth is weird these days. The resistance can not be caught out here unquestioningly marveling at corporate claims about the Herculean feats of cis straight white men.

So just to set the record straight, no, Michael Phelps did not race a shark. (Also, since we’ve all apparently got vacation passes to Gullible-Gullible Island, maybe this is a good time to reiterate that climate change is not a hoax invented by China, and that it is not a felony to “leak” a financial disclosure form, the first clue being that it has “disclosure,” i.e., a fancy word for “tell somebody about it” in the name of the form.)
Let’s be clear. It is a really good thing that Michael Phelps went head-to-head with Bruce from Finding Nemo instead of an actual Great White Shark. A gentle reminder that this is an animal with five rows of serrated teeth and a bite force ten times stronger than a lion.

Michael Phelps has a lot of medals, but last time I checked, he can’t smell blood from three miles away or use electromagnetic fields to track down prey. Pretty sure he doesn’t normally throw back 200-pound fur seals like they’re goddamn gummy vitamins.
That shark would have gone Kobayashi on Michael Phelps faster than you could say “soggy hot dog.” That shark’s teeth would have gone through on Phelps’ charming underbite like a Ginsu knife through a tomato made of butter. So generally speaking, if you like keeping money, I’d advise you to place your bets on Team Shark.
Hooked on this article? Finish reading here! [x]
43 notes
·
View notes
Note
How do you make your gifs? They're really nice
Thank you so much! I’m sorry for the late reply.
I wasn’t too sure if you had wanted a step-by-step process or not, but here it is anyway. I’ll try to keep it short & sweet! (=゚ω゚)ノ
1. I use Photoshop CC 2017, but any photoshop program can get the job done. To record/trim the scenes I want to make gifs of, I use windows movie maker (Before I used videopad editor; but it’s not free). To download episodes, I use Ohyraws or nyaa.se.
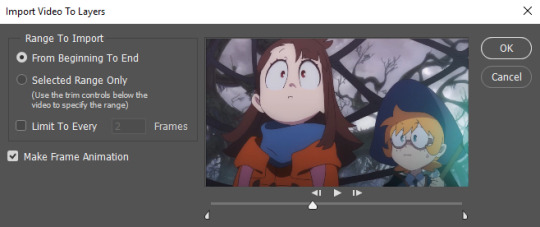
2. Once I have the scenes I want to use, I open up Photoshop and go to File>Import>Video Frames to Layers. Something that I do differently (I assume) than most gifmakers is import all frames. It’s a bit tedious at first but you slowly get used to it.
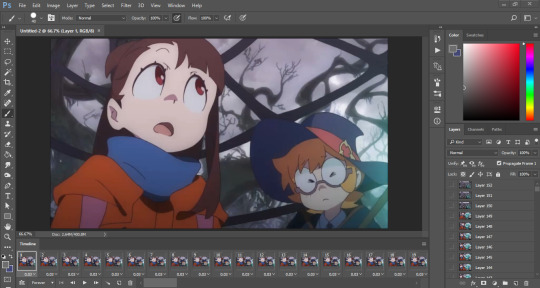
3. After importing the frames, go to Window>Workspace>Essentials and then make sure that the timeline is open as well. Your layout should look something like this:
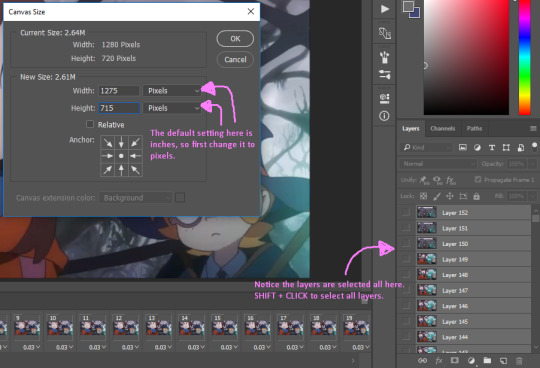
4. Then start by going to the layers panel and selecting all of the layers. When they’re all selected, go to Image>Canvas Size and trim the width and height about 5 pixels on both X and Y. This cuts off the nasty edges of the video material, so I always do this to be safe. Resize the image to 540px afterwards. It’s a good idea to save at this point and make a PSD, so if you’ve improved later, you can go back and remake it if you wanted to.
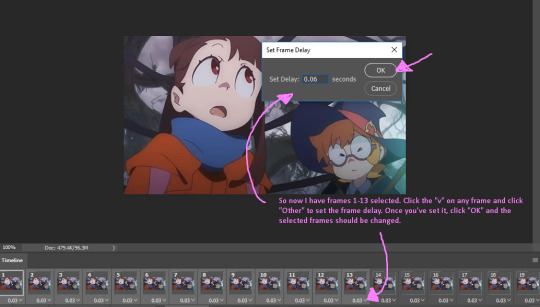
5. If you start to play through the frames at first, it’s very slow and choppy. This part is where you start deleting frames to get your content under the size limit (IT’S 3MB NOW I’M SO HAPPY)! It’s a matter of trial and error (probably not the best way to put it), but if you delete too many frames the gif starts to become choppier. There is also a time limit for every individual frame, and (0.06-0.10) is probably the average speed that you should put into each frame. A quick way to change multiple frame speeds at a time is to select them using the SHIFT + L mouse, or CTRL + L mouse, and then choose “Other” and type in the desired time allotted, which will change the frames that you have selected. Here’s a visual:
6. After you’ve gone through step 4, make sure to reselect all of the layers in the layers panel and then on the timeline panel, go to >Convert to Video Timeline. I would suggest not playing through the frames after this because it may slow down/crash your computer and not play as smoothly, (at least it does for me).

7. After converting it to a video timeline, go to Filter>Convert to Smart Filters.

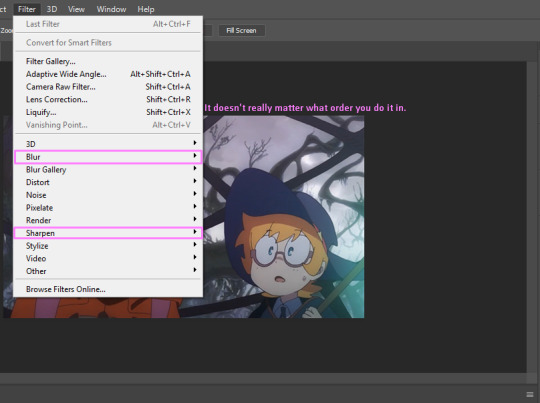
7. And then Filter>Blur>Surface Blur. This lowers the detail in the gif which in turn, lowers the file size. Try not to go above radius 3 and threshold 6. After surface blurring, try Filter>Sharpen>Smart Sharpen. Be careful and try not to oversharpen the gif. I usually don’t go over 200, and I keep the radius at (0.3), and I usually play around with the reduce noise setting a lot.
8. After blurring and sharpening, this is where some tweaking comes in. If you play with the hue/saturation, curves, levels, brightness/contrast, and selective color, then you can make the gif prettier and lower the size. You can use PSDs that other gifmakers have made as well.
Note: Darker colors don’t take up as much MB as brighter colors.

9. Once you are satisfied with the result, press (SHIFT + CTRL + ALT + S) altogether and a window will pop up. It takes a while to load the finalized version of your gif, so be patient. Once it has loaded, you should probably check the file size at the bottom left corner. Is it under 3MB? If it’s not, I suggest editing the colors in the top right corner. I don’t usually go under 175 for that. If the file size still isn’t under 3MB, you may have to CTRL + Z a lot of stuff and backtrack to see if you can spare any more frames or darken your colors.
Note: If you were to upload a gif any where else, I’m sure the file size can be much larger than 3MB. Personally I’ve never tried it, but just a heads up!
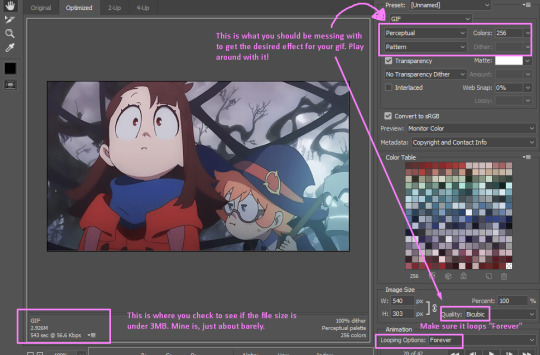
10. I suggest either using Pattern or Diffusion, and then Perceptual. Try to play around with the settings to get the best end result. Afterwards if you are finally satisfied with the gif you’ve made, go ahead and save it! You’re finally done and ready to upload it to tumblr!
#shiintan#asks#my posts#if anyone needs help with this I'll be happy to lend a hand#i'm not good at explaining stuff#gif tutorial#long post#also if i didn't answer your question correctly shiintan then feel free to ask again
51 notes
·
View notes
Text
SimpliSafe Video Doorbell Pro Review
Overall Rating
3/5
Human detection
Doorbell notifications
Monitoring starts at $24.99/mo.
Visit SimpliSafe
See Pricing
Bottom Line: The SimpliSafe Doorbell Is a Decent Budget Doorbell
Visit SimpliSafe
At $169, the SimpliSafe Video Doorbell Pro has a lower price tag than the average doorbell camera (around $200), but it doesn’t come with as many features as more expensive devices. It’s a good option if you already have a SimpliSafe security system, but it has too many hiccups for us to put it at the top of our list for video doorbells overall.
The SimpliSafe app lets you monitor your doorbell for free, but for video recordings, you’ll need a cloud storage plan. While SimpliSafe doesn’t offer the unlimited cameras plan that we see from other companies like Ring, 10 cameras is probably plenty of coverage for most SimpliSafe users.
SimpliSafe also offers professional monitoring for its security system customers, and with the Interactive Monitoring Plan, you can monitor your SimpliSafe Video Doorbell camera with the security system.
SimpliSafe Video Doorbell Pros and Cons
Pros
User-friendly app
Human motion detection
Affordable cloud storage
Compatibility with most wiring
Cons
Audio delays
So-so night vision
Limited features
SimpliSafe Doorbell Camera Pricing
Base Equipment Cost Monthly Cost Requires SimpliSafe Security System Monitoring Type Mobile App Access Cameras Covered Base Equipment Needed Learn More
Self-Monitoring Single Camera Recording Cloud Storage Multi-Camera Recording Cloud Storage Interactive Monitoring Plan $169 $169 $169 $365 Free $4.99 $9.99 $24.99 x No x No x No ✓ Yes Self Self Self Professional ✓ Yes ✓ Yes ✓ Yes ✓ Yes Unlimited 1 10 10 1 SimpliSafe Video Doorbell 1 SimpliSafe Video Doorbell 1 SimpliSafe Video Doorbell 1 SimpliSafe Video Doorbell, 1 keypad, 1 base unit, 1 motion sensor, 1 contact sensor Visit SimpliSafe Visit SimpliSafe Visit SimpliSafe Visit SimpliSafe
{ "@context": "http://schema.org", "@type": "Table", "about": "" }
Data effective 11/22/2019. Offers and availability subject to change.
Tech and Equipment
The SimpliSafe Video Doorbell Pro has a 1080p resolution, making it sharper than the 720p of SimpliSafe’s SimpliCam. It has a 162-degree field of view, pushing it just over Nest Hello’s 160-degree coverage, although you probably won’t notice the 2-degree difference.
The SimpliSafe’s doorbell wiring goes through your existing doorbell, so it can use your existing chimes and their power source. If you don’t have existing wiring, you’ll need to call an electrician or pick a different doorbell camera. The camera part of the device works with a battery that can be removed and recharged with a USB power cable.
We like that the SimpliSafe Video Doorbell Pro comes with two additional faceplates to better match your décor, and the angle adjustment wedge is also a nice touch for those of us with angled siding.
What’s in the Box
SimpliSafe Camera Doorbell
Installation guide
2 alternate faceplates (mint green, black)
Angled base
Mini screwdriver
Screws
Connectivity and Video Quality
I was able to access my live video feed from the SimpliSafe Video Doorbell on the first try about 75% of the time. The other 25% of the time I got “Unable to load video” messages that invited me to try again.
Usually after one or two tries, I could connect to the live feed. I noticed these same results both when I was at home and when I was away. When I was connected to the live feed, the audio would frequently cut out, which indicated that there were some connection hiccups.
The video quality was mostly clear, but when there was a lot of movement on the screen, it would get pixelated and the movement would look jerky. There was also often a delay of up to five seconds between what was really happening and what I was viewing on my screen. I just didn’t feel like I could quite trust the doorbell camera to show me what’s happening in real time.
SimpliSafe Video Doorbell Pro Features
Motion Detection
The motion sensor on the front of the camera will send a notification to your phone if someone is approaching your door. You can crank up the motion sensor’s sensitivity to high if you want an earlier warning, or if you’re getting too many alerts, you can lower the sensitivity or turn off motion notifications altogether.
We kept the sensitivity on medium and, like Goldilocks’s porridge, it was just right. We liked that we only got a handful of false alarms from things like cars, squirrels, or waving flags.
Doorbell Ring Notifications
The SimpliSafe app alerts you when someone pushes the doorbell button. Because you hook the doorbell into your original chime, your doorbell chime inside your home will ring as well, but it turned our existing chime from a two-toned “ding-dong” to just a single “ding.”
Two-Way Audio
The greatest benefit of the best smart doorbells is the ability to answer your door when you’re not at home with two-way audio. SimpliSafe’s two-way audio relies on a walkie-talkie-style press-to-talk operation, but the transmission delay of several seconds makes it nearly impossible to carry on a conversation. It’s fine for telling a door-to-door salesman to scram, but don’t expect to be able to chat with visitors.
Night Vision
SimpliSafe’s night vision works well in close range when someone is right up on your porch, but we found that it gets blurry once someone is more than about six feet away from the camera. It also doesn’t handle the glare from bright lights well at night.
Zoom
Technically, there’s no optical zoom on the SimpliSafe doorbell camera, but when you turn your phone to landscape mode and pinch the screen, you can zoom in on the picture. Because the doorbell is located to the side of your door, you can’t tilt it left or right, so people walking up to your door are always off to one side in the picture.
Installation and Setup
If you’re comfortable with using a screwdriver and you know how to work your circuit breaker, installing the SimpliSafe Doorbell Camera is pretty straightforward.
I was a little intimidated by the process, but I realized it was ike cooking using an unfamiliar recipe: I might not be able to throw it together as quickly or easily as an experienced chef, but as long as I follow the instructions and take it one step at a time, the outcome is the same.
I did run into some installation snags, though. After getting everything hooked up and restoring power to the circuit, the doorbell wouldn’t ring when I pressed the button. After troubleshooting with some SimpliSafe installation videos on YouTube, I learned that sometimes it just takes a few minutes before the doorbell starts working.
Once the doorbell was installed and functional, it took only about two minutes to get it linked to my Wi-Fi network and the SimpliSafe app so I could access the camera and its settings from my smartphone.
SimpliSafe Customer Service
SimpliSafe’s customer service hours aren’t 24/7 like other companies, but there is an online support center you can access anytime to get your questions answered. SimpliSafe’s customer reviews are mixed, and most complaints center on technical difficulties and billing issues. Still, the company earns an A+ rating from the Better Business Bureau.1
SimpliSafe Video Doorbell Pro Versus the Competition
Price Smart Home Integration Resolution Field of Vision Cloud Storage for One Camera Learn More
SimpliSafe Video Doorbell Pro Nest Hello Video Doorbell Ring Video Doorbell 2 $169 $229 $199 x No ✓ Yes ✓ Yes 1080p 1080p 1080p 162 degrees 160 degrees 160 degrees 30 days for $4.99/mo. 5 days for $5/mo. 60 days for $3/mo Visit SimpliSafe Visit Kohl's Visit Ring
{ "@context": "http://schema.org", "@type": "Table", "about": "" }
Data effective 11/22/2019. Offers and availability subject to change.
The SimpliSafe Video Doorbell Pro is less expensive than both Nest Hello and Ring 2, but it lacks the smart home integration of the other two—it will connect only with your SimpliSafe security system.
Nest’s and Ring’s higher price tags also include tech like open talk channels that work more like phones than walkie-talkies, and both doorbell cams have added features like facial recognition and motion zone settings that SimpliSafe lacks.
When it comes to cloud storage, SimpliSafe has a pretty good deal with 30 days for a $5 monthly fee, but Ring has an even better one, with a full 60 days for only $3 per month. As for Nest, it’s important to note that even though Nest’s plan is only 5 days of storage, it offers continuous video recording—while both Ring’s and SimpliSafe’s cloud storage video recording plans are for doorbell and motion events only.
Conclusion
If you already have a SimpliSafe security system and you want to jump on the video doorbell bandwagon, the SimpliSafe Video Doorbell Pro is an affordable option that will play nicely with your existing system. But keep in mind that it won’t have as many features as pricier brands, and you’ll experience more video and audio delays than you might with a higher-end product.
Visit SimpliSafe
SimpliSafe Video Doorbell Pro FAQs
How does the SimpliSafe Video Doorbell Pro work with the SimpliSafe security system?
The SimpliSafe mobile app lets you sync all your SimpliSafe security cameras—including your doorbell cam—to your security system sensors. So if an entry sensor on a door or window gets triggered, all your connected cameras will start recording. This allows you to track any intruder through your home and get valuable footage for law enforcement.
What items are included in a basic SimpliSafe security system package?
A basic SimpliSafe package costs around $200 and contains a base unit, keypad, contact sensor, and motion detector. You can have your security system professionally monitored, or you can monitor it yourself.
SimpliSafe also has a build-your-own-system option where you can add on other items like additional door or window sensors, a key fob, and cameras.
How We Reviewed the SimpliSafe Video Doorbell Pro
We installed our SimpliSafe Video Doorbell Pro to an existing doorbell location at a private residence and tested it over the course of several days. While testing it, we used both normal everyday use and our own testing scenarios to evaluate its features and video quality. For monitoring, we used the SimpliSafe app on an iPhone 6. To learn more about the SafeWise product testing process, check our full methodology.
Related Pages on SafeWise
SimpliSafe Home Security Review
The Best Smart Video Doorbells of 2019
The Ring Doorbell Pro Review
Sources:
Better Business Bureau, “SimpliSafe Business Profile“
The post SimpliSafe Video Doorbell Pro Review appeared first on SafeWise.
Article source here: SimpliSafe Video Doorbell Pro Review
0 notes
Text
D7200 vs D7500: Is It Worth the Upgrade?
Nikon’s recently announced D7500 has a peculiar mix of features from the D7200, the high-end D500, and the less expensive D5600. In some important ways it improves over its predecessor, in others it seems to be taking a step back. How much difference do these changes make, and which camera makes more sense for you? Let’s take a look.
To begin with, this chart shows the main features of both cameras, with the better features highlighted in green, though in some cases “better” is subjective.
[table id=98 /]
The Body
From the front, changes don’t appear to be dramatic. The microphones have been moved from the top to either side of the lens mount, and Nikon opted for D5600-style strap loops.
While many of the features of the D7500 have been upgraded to match the D500, the body is now more like that of the less expensive D5600. Having eschewed the magnesium alloy back and top plates found in the rest of the D7000 series, the D7500’s unified frame and body are made entirely of plastics. This makes the D7500 lighter than previous models, and perhaps easier to weather-seal (sealing is very thorough on this model).
Weather sealing (in yellow) on the D7500 and D7200. Both are well sealed.
Along with the new body material are a variety of changes in design and layout, some minor (like the change in strap connectors and the location of the microphones), and some major, like the adoption of a new battery (EN-EL15a) and the loss of an SD card slot (down from 2 slots in the D7200 to just a lone slot).
Minor changes are visible on the camera tops: the dedicated metering mode button has been replaced with an ISO button, and the microphones have been moved to the front of the body. The top LCD is also smaller.
And, of course, the D7500 is the first in the series to include an articulated, touch-enabled LCD. This LCD is a case of “one step forward, one step back”, though; I had expected the D7500 to get the D500’s nice 2,359,000 pixel screen, but instead it’s been saddled with a 3.2″ 922,000 pixel LCD that has lower pixel density than the 3″ screen in the original D7000[1. The D7000 had a 921,000 pixel LCD, essentially the same, but it was a smaller screen at only 3.0″, making the pixel density greater]. The top LCD is also smaller.
The tilting screen of the D7500 can not be rotated to face forward, like that on the D5600.
Aside from the presence of the new tilt screen, the back of the D7500 is mostly unchanged from the D7200. The positions of the right info button and the live-view switch have been flipped.
The Sensors
Some people were surprised to discover that the D7500’s sensor has lower resolution (20.9 megapixels) than that of the older D7200 (24.3 megapixels). There are a few reasons why Nikon made this choice. (Click Headings to Expand)
[accordion] [item title=”Low-Light Performance”]
First, and most importantly, is Nikon’s concentration on high-ISO performance with the D7500. More pixels on a sensor means smaller pixels. Smaller pixels collect less light, but the sensor’s electronics still generate background noise. This results in a worse signal to noise ratio (like a quiet voice talking in the car over the road noise), and thus, more digital noise in the image that results, especially at high ISOs (where the sensor tries to get by with even less light). The D7500 has fewer ‘pixels’ on its sensor, so they’re larger. As a result, the D7500 has a top native ISO of 51200, compared to the 25600 of the D7200: a full f-stop of difference. We’ve found that the D500 (which has the same sensor as the D7500) does not quite have a full f-stop of improvement in quality over the D7200 at high ISO. At ISO6400, the D7200’s noise is slightly better controlled (finer and smoother) than the D500’s is at ISO12800, though the difference is minimal, and the D500 has better contrast in the comparison. At one stop apart, they’re roughly comparable.
[/item] [item title=”Shooting Action”]Second, Nikon wanted to improve high-speed shooting performance to compete with cameras like the Canon 7D Mark II, which can shoot 10 frames per second. These frame rates produces a lot of data for any camera to deal with. At higher resolutions, cameras produce larger files, which are harder to move quickly through the data pipeline to storage on the SD card. A lower resolution sensor’s smaller files are easier for the camera to deal with at high speeds. These smaller files make it possible for the D7500 to shoot 8fps and get the data stored onto an SD card.
Nikon’s Expeed 5 processor is found in the D7500
[/item] [item title=”Minor Difference in Resolution”]
And finally, for most photographers, the difference in resolution between 21 and 24 megapixels just isn’t very significant in real-world use. Remember that most of us use computer monitors that are no larger than 4K resolution (about 8 megapixels), but the vast majority use full HD (1080p is just 2 megapixels), and very few photographers print these days. And if you’re resizing an image from 21 megapixels down to 10% of its original size, all of the fine differences in detail will be thrown out anyway. But if you do print? Then you’ll have to print LARGE to be able to see these differences… probably 16 x 24 inches or perhaps larger, and the differences even then will be minor. And that’s assuming that you are able to capture a difference to begin with. Only the sharpest lenses have high enough resolution to make a difference, and even then, only when shot from a tripod at the lens’ sharpest apertures, with no vibrations from the wind, ground, shutter, etc. A full frame sensor with the same pixel density of the D7500’s 20.9 megapixel sensor would hold 46.5 megapixels, and Nikon has already admitted that not many lenses can meet the demands of the D810’s 36 megapixel sensor.
[/item] [/accordion]
Who will benefit from the higher resolution of the D7200? Landscape photographers often shoot in a manner that could make use of it, and so do some commercial/studio photographers and fine-art photographers. But journalists, event photographers, sports photographers, and hobbyists generally do not.
Speed & Action Performance
The D7200 was Nikon’s best APS-C camera for shooting action until the release of the D500, and while the D7500 does not match the D500, it certainly closes the gap. The D7200 can shoot at 6 frames per second, but if you’re shooting RAW, it can only shoot 18 shots in a row (3 seconds) before the buffer is full and it needs a break to write to the SD card. The D7500 improves on both metrics, shooting at 8 frames per second for bursts of 50 frames in a row (just over 6 seconds). The D500 takes that a step further, shooting 10 frames per second for up to 200 compressed RAW shots, but only when using an XQD card.
Of course, if you’re willing to shoot JPG, then the D7200 has no problem, as it is able to shoot bursts of at least 100 shots in that format.
The Nikon D7200 and D7500 both share the same AF point layout and autofocus module.
The autofocus system in the D7500 has not been changed; it uses the same 51-point (15-cross type) system as the D7200, while the D500’s system has a total of 153 AF points. However, Nikon claims that the same system in the D7500 will perform better than it does in the D7200 because of the new processor in the camera. This seems very unlikely to be a significant difference.
How important is this difference? Journalists, action photographers, event photographers, wildlife photographers, and anyone else who needs to capture images in copious quantities very quickly might find the extra two frames per second helpful, though casual action photographers will probably not need it. Portrait, landscape, product and commercial photographers? Probably not. Similarly, very few photographer (even those who shoot action) shoot bursts of more than 10-15 frames. The ability to do so will be important for the most dedicated action photographers (who should probably be looking at the D500 anyway), but probably not many others[7. When I was studying photojournalism in college in the mid 1990s, we were all still using film. Bursts of more than a few seconds could finish off an entire roll of film. Somehow, even the people who were lucky enough to be shooting Michael Jordan and Ken Griffey Jr. managed to produce amazing images with bursts of just 5 or 6 frames at a time]. You’ll know from your shooting style whether this will be important for you.
Video
It is tempting to just say “The Nikon D7500 can shoot 4K video and the D7200 can’t” and leave it at that. While the fact is true, there are some ugly details: I’ve said this all about the Nikon D500, and I’ll say it again for the D7500.
The D7500 shoots Full HD video much as you would expect, using the full width of the frame to capture 16:9, 1920 x 1080 video. You also have the option of capturing that video from a 1.3x cropped section of the sensor (which is, of course, already 1.5x cropped compared to an FX sensor).
However, when the D7500 captures 4K video, you are forced to use a cropped section of the sensor that is even smaller than the 1.3x cropped section that is optional at 1080p. It can be seen in our graphic, below:
4K Recording Area: The central rectangle is the only recording area available when shooting at 4K resolution. When shooting HD and Full HD, the full width and 1.3x crop areas are available.
This may be perfectly acceptable for those who only shoot telephoto video; it provides remarkably high resolution video and a roughly 1.5x crop, making a 200mm lens perform like a 450mm lens (1.5x crop + 1.5x crop). However, for those times when you want to shoot wide angle, you’ll need to use an ultra-wide angle lens just to get close; while a 16mm lens might normally give you a full-frame 24mm lens’s field of view, you’ll need an 11mm lens to get something almost equivalent if you’re shooting 4k.
So, if you’re looking for a camera just to shoot 4K video, the D7500 is hardly ideal.
However, if you’re mostly shooting 1080p or 720p, then the D7500 has one more trick up its sleeve: digital image stabilization, which can be used in conjunction with optical image stabilization. You will lose a little bit of the frame, but the sensor has plenty of resolution to spare, so there’s no loss in resolution, and the addition of digital stabilization goes a long way towards giving you smooth, jitter-free video. Like the D500, the D7500 will have electronic aperture control while shooting video, as well as exposure smoothing capabilities when moving from dark to bright areas (using auto ISO and electronic aperture control).
The Nikon D7200, unfortunately, does not have electronic aperture control, nor digital image stabilization. It does, however, have 1.3x crop mode, like the D500, and both can output video to an external recorder.
Flash
The WRR10 Flash controller connects to a side port of the camera… where you’d normally hold it. Most radio flash controllers connect to the flash hotshoe.
The Nikon D7200 does not support the new Nikon radio-controller (WR-R10/WR-A10) and SB-5000 flash system, which can control up to 18 speedlights. However, there are countless 3rd party radio-triggering systems already available on the market, from pro-level Pocket Wizards and the popular Yongnuo TTL models, Nissin Air 1 Commander and the Phottix Odin, so this should be only a minor consideration for most people.
Conclusions
The new features of the Nikon D7500 will primarily benefit photographers who shoot events and long bursts of action, particularly those who shoot them in low light with high ISO. Those photographers will get better performance with the D7500: better speed and less digital noise. This comes at the cost of slightly lower resolution. Photographers who wish to shoot 4K video and/or use a swivel screen may also find reason to choose the D7500.
However, if you normally shoot at low ISO, and if your primary interest is not fast moving action, then the D7200 will give you equally good results, and in some cases, it may give you better image quality. If you shoot with impeccable technique[8. This means shooting from a tripod, with mirror lock up, and a cable release or timer] with a top quality lens set in its sharpest aperture range, the D7200’s sensor is capable of capturing more detail than the D7500’s.
You Should Buy the Nikon D7500 If…
you plan to shoot a lot of action like: sports, news events, weddings, wildlife
you plan to shoot events in a dark setting: concerts, clubs, weddings, wildlife
you need to shoot 4K video, especially telephoto, or digitally stabilized HD Video
you want to use Nikon’s SB-5000 flashes and radio trigger system
you want a touch-screen and/or articulated rear LCD
You Should Buy the Nikon D7200 If…
you shoot landscapes or other detail oriented genres at low ISOs, including: studio portraits, product images, still-life works
you shoot action photography but don’t need a full 10 frames per second (the D7200 is a very capable action camera)
you shoot long events (or spend a long time in the field) and want better battery life
you want to save money on the body to buy better lenses (which is what I always recommend)
If you do decide to buy either one and have found this article helpful, please support us by purchasing your camera from any of the links found in this text, or from the stores listed here: Amazon.com or B&H Photo.
Buy the Nikon D7200: From Amazon.com | From B&H Photo | From Adorama Buy the Nikon D7500 : From Amazon.com | From B&H Photo | From Adorama
Questions? Comments?
I’ve attempted to concentrate on the most important differences between these cameras in practical use for photographers who shoot RAW files, but there are other minor differences. They may or may not be relevant to the way you shoot. However, if you still have any questions about which camera you should buy, please feel free to ask me in the comments section below! I’ll answer as quickly as I can.
Nikon D7500 vs D7200: What's the Difference? D7200 vs D7500: Is It Worth the Upgrade? Nikon's recently announced D7500 has a peculiar mix of features from the D7200, the high-end D500, and the less expensive D5600.
0 notes