#how to set up my cricut explore air 2
Explore tagged Tumblr posts
Visit Tumblr Blog
Explore Tumblr blogs with no restrictions, modern design and the best experience.
Last Seen Tumblr Blogs


Fun Fact
The Tumblr office adopted Tommy, an 11-year-old Pomeranian.
Text
How to Setup Cricut Explore Air 2: Ultimate Guide
If you are looking for the answer to how to setup Cricut Explore Air 2, then you have come to the right place. This blog will help you understand the complete guide to performing the machine setup on a computer and smartphone. I have been working with Cricut cutting machines for a long time now. Also, I have trained zillions of crafters just getting started with their Cricut machine.
In addition, I have shared the comprehensive setup guide for people using the Explore Air 2 machine in this blog. There are several steps to set up the machine. So, get through the whole connection to complete your Cricut cutting machine setup hassle-free.
Steps to Connect Cricut Explore Air 2 to Your Device
If you want to know how to setup Cricut Explore Air 2, you must first complete the Bluetooth/USB connection process. Here is a step-by-step guide to doing it.
Computer
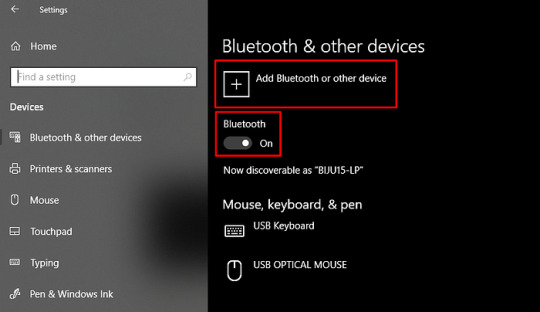
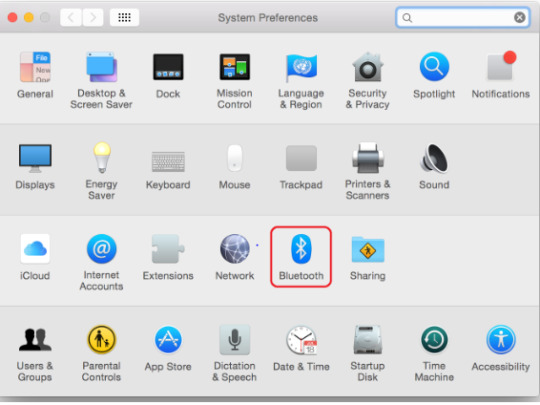
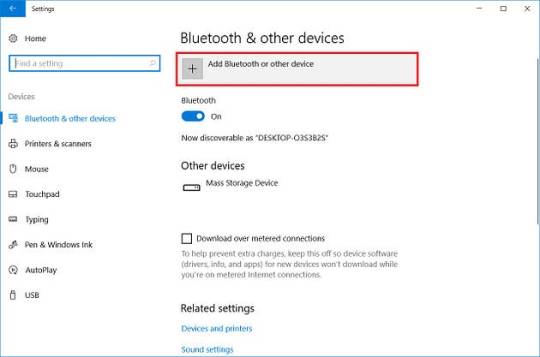
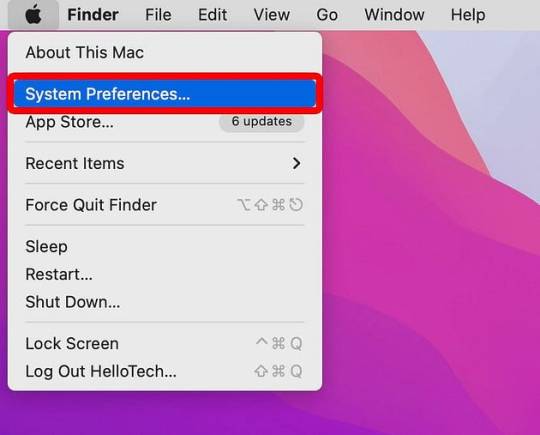
On your computer device, access the Devices windows. (On Mac devices, open the System Preferences window and choose the Bluetooth button.)

After that, check if the Bluetooth option is On. If not, then click on its toggle.
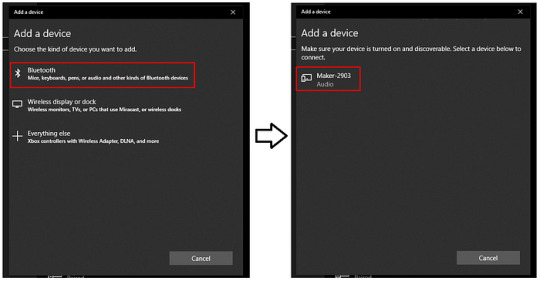
Next, select the option Add Bluetooth or another device.

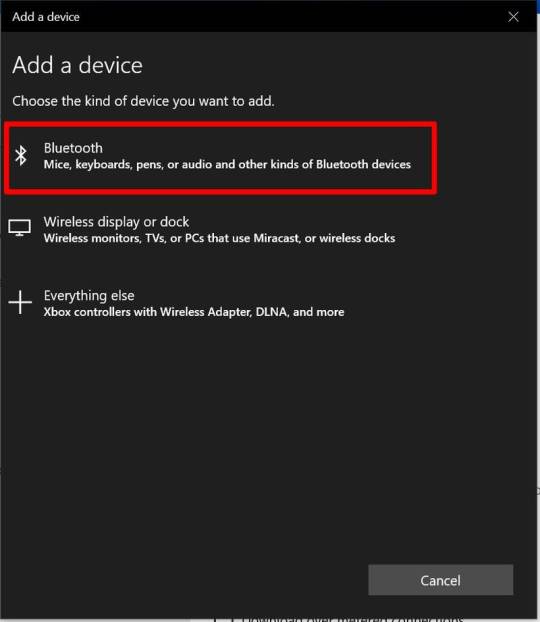
Once a new page appears on the screen, then click on the Bluetooth option to initiate the scan.
Click on your Explore Air 2 machine name when it appears on the screen.

Lastly, wait for the Bluetooth connection process to complete between both devices.
Smartphone
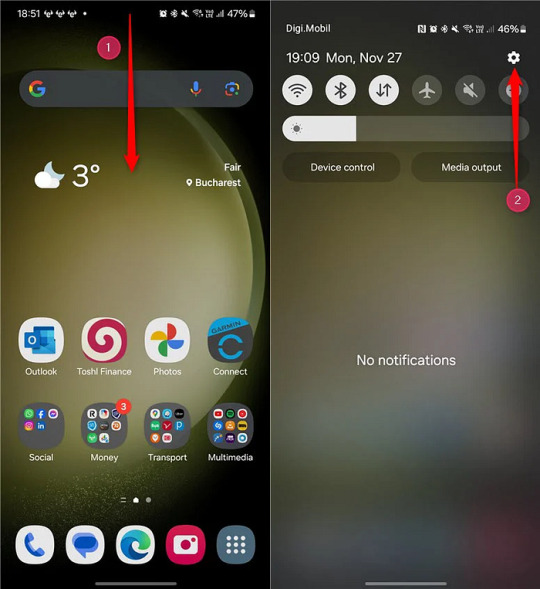
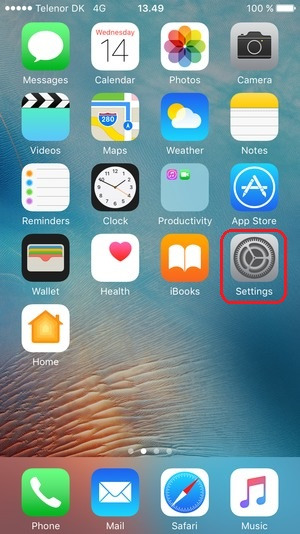
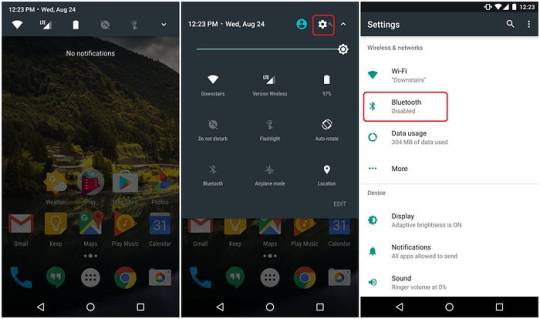
On your smartphone device, tap on the Settings option.

After that, please move to the Bluetooth toggle and turn it on.
Now, your phone will start searching for your nearby Bluetooth devices.
When the machine displays the name of your Cricut Explore Air 2, click on it.
Finally, the connection process between your phone and the Cricut machine will be complete.
Apart from the Bluetooth connection, you can use the provided USB cable with the machine box to pair the Cricut machine to a PC or mobile device.
Downloading Cricut Software to Complete the Machine Setup
To complete the process of how to setup Cricut Explore Air 2, you need to download the Design Space app on your computer or smartphone. Take a look at the below steps to learn the process thoroughly.
Computer
Begin by browsing the official Cricut website and access the Apps window.
Once you see the Cricut Design Space option for your respective operating system, click on the Download option.
If the Download button is grayed out, then you have to choose the terms and conditions checkbox.
When the downloading process begins, the display will change a bit.
After the download process is complete, double-click on the downloaded file in the browser.

Also, you can go to the Downloads folder on your device to open the downloaded Cricut setup file.

Afterward, follow the on-display instructions to finish the Cricut app installation. For Mac computers, drag and drop the Cricut icon to the Applications folder to begin the installation.
Once the installation process is complete, open the file and sign in to the Cricut account. (You can create a new account if you do not have one yet.)

Furthermore, click on the Machine Setup option on the display to start the Cricut Explore Air 2 scan.
Choose your Cricut cutting machine when you see the machine model name show up on the screen.
Finally, your Explore Air 2 machine setup process will be complete.
Smartphone
For the first step, open the App Store or Play Store, depending on which OS you are using.

After that, tap on the search box on the top to get the result of the Cricut app product.
Once the Cricut Design Space app icon appears on your smartphone display, tap on it.
Now, choose the Download/Get option to start the app download.

Then, wait for the download to complete and launch the app.
Next, enter the account login credentials of the existing Cricut account. (create a new account if you do not have one.)
Moreover, tap on the Machine Setup option to move forward.
Your phone will search for the Explore cutting machine and show it on the screen.
Tap on the machine name, and the machine setup process will be complete.
If you still want more help with how to setup Cricut Explore Air 2, then you can contact the customer support team. The team can help you resolve your issue and provide pinpoint guidance to complete the setup process.
Frequently Asked Questions
How to Set up My Cricut Explore Air 2 on an iOS Device?
These are the steps you can follow to complete the Explore Air 2 machine setup on iOS.
For the first step, unpack your brand-new Cricut machine and connect it to a socket.
After that, turn the machine on and print your iPhone/iPad closure to your device.
And then establish a connection between both machines using Bluetooth/USB.
Now, download and install the Cricut Design app from the app store.
Open the app and sign in to your account when the Cricut app download is complete.
Afterward, follow the on-display procedure to complete the machine setup process.
Why Can’t I Setup My Cricut Explore Machine?
If you are unable to set up your Cricut Explore cutting machine, there could be plenty of reasons. Let’s look at some primary causes.
The Cricut machine and PC/phone are not within the connection range.
You have an outdated Cricut app on your device.
Your device is not compatible with the Cricut Explore machine.
There is some software glitch in either of your devices.
You are following the wrong steps to set up your Cricut machine.
Using the corrupt Cricut file to set up the Cricut Explore machine.
Your device has a network problem and many more.
What Are the Things to Know Before Completing the Cricut Explore Setup?
If you are planning to use the Cricut Explore or any other cutting machine, then it is vital to know some points. First, you have to download the Cricut app for setup. As a result, you should check the system requirements of the app before downloading it. Also, it would be best to get your hands on the essential supplies and materials beforehand to start creating DIY crafts. Also, you must know the complete process to connect the machine and your device via USB or Bluetooth. Also, you can connect with customer support to learn how to setup Cricut Explore Air 2.
0 notes
Text
How to Connect Cricut Explore Air 2 via Bluetooth: Easy Steps
Do you want to learn how to connect Cricut Explore Air 2 via Bluetooth? If yes, then you are at the right place. Here, I am going to write about everything related to connecting the machine and the other things to finish setting up the machine so you can use it.
Cricut Explore Air 2 is an amazing machine. It is a mid-range cutting machine that is great for small and large projects. The best thing about the machine is that it has different colors, so you can pick a color of your choice.
To set up the machine, you need to connect it to a device. You can use a phone or computer, but we will discuss connecting it to a desktop. We will discuss how to connect it to a Windows or Mac computer. We will also see how to download the Design Space app on the computer to use the machine on it.
How to Connect Cricut Explore Air 2 via Bluetooth to Windows?
If you want to set up your machine on your computer and you have a Windows PC, then that's great news for you! You can easily pair it with your machine and do the other things necessary for the setup. Before connecting, you must check the compatibility of your device with the machine, and you will be good to go.
This is how you can connect your machine to a Windows computer via Bluetooth:
How to Connect Cricut Explore Air 2 via Bluetooth to Mac?
Similarly, you can connect a machine to a Mac operating system. To connect your Mac to your machine, you need to follow these steps.
How to Download Cricut Design Space on Computer?
Once you learn to connect your cutting machine to a Windows and Mac using Bluetooth, you should download the app to your computer. The process of getting the software on both computers is pretty much the same, so I am going to write about just a Mac computer. After that, you can download it on Windows as well.
Here is how you can download the Design Space app on Mac.
Conclusion
In this blog, you learned how to connect Cricut Explore Air 2 via Bluetooth. Here, you learned how to connect a machine to a Mac and Windows computer. But just connecting your device to your machine is not enough. To finish the setup and get the machine ready, you need to download the Design Space app from your computer. Once you download it, you will be able to log in and start working on Cricut.
FAQs
Why Is My Cricut Explore Air 2 Not Connecting via Bluetooth?
If your machine is unable to connect to your device, then there are a few problems with the device. One of these issues could be that you have not turned on either the machine or Bluetooth on your device. To fix the problem, make sure you have done both of them. After that, you must make sure that your device and the machine do not exceed the maximum permissible distance of 10-15. Exceeding the maximum permissible distance can prevent the machine and your device from connecting.
Can I Connect Cricut Explore Air 2 via USB?
Yes, you can connect your cutting machine with the help of USB. Like most of the machines, the Cricut Explore Air 2 has both Bluetooth and USB connection options. Although Bluetooth is a wireless connection and gives you much more flexibility, you can still use a USB cable. It will be better to use a USB connection when you are looking for a stable connection. When you don't have to move the machine and your device and do not need to disconnect it often, you can go for a USB one.
How Can I Set Up My Cricut Explore Air 2 on My Phone?
If you want to set up your machine on your phone, then make sure that you are using either an Android or an iPhone. In either case, follow these steps for the setup.
Visit: cricut.com/setup www.cricut.com/setup login
Source: https://cricricutdesigncut.wordpress.com/2025/02/06/how-to-connect-cricut-explore-air-2-via-bluetooth-easy-steps/
#design space setup#digital design#cricut.com/setup#cricut.com/setup mac#cricut.com/setup explore air 2 setup#cricut.com/setup windows#www.cricut.com/setup login#www.cricut.com setup login#www.cricut.com/seup#www.cricut.com/setup\cricut explore air 2 setup#www.cricut.com setup#cricut design space#cricut explore air 2#cricut explore air 2 setup#cricut.com setup mac
0 notes
Text
How to Connect Cricut Explore Air 2 Bluetooth to Computer?
In this post, I will explain how to connect Cricut Explore Air 2 Bluetooth. Whether you are a Windows or Mac user, this blog will help you connect your machine and device easily.
When I got my crafting machine for the first time, I was a little overwhelmed, as I didn’t know how to connect it to my computer. But one of my friends, John, who is a professional crafter, helped me with this. Since then, I have been setting up my machine without anyone’s support. Now, I want to help you in the same way, as this is a beginner-friendly blog specially curated for novice crafters.
In this blog, I will explain how to connect your machine to the computer of your choice. Before that, I will also explain the system requirements for both Windows and Mac. Let’s start!
System Requirements for Connecting Cricut to Your Computer
Before you learn how to connect Cricut Explore Air 2 Bluetooth, you must review the system specs. This is very important before you set up your machine.
For Windows
For macOS
How to Connect Cricut Explore Air 2 Bluetooth to Windows?
I will show you how to establish a connection between your machine and Windows PC. Although the following steps can be used for another Cricut model, here I am specifically explaining it for the Explore model. Let’s take a look at the below steps:
How to Connect Cricut Explore Air 2 Bluetooth to MacBook?
On a MacBook, you can connect the machine using Bluetooth wirelessly. After this connection, you can set up your machine with your Mac and start using it. Let’s have a look at the following steps to connect:
Final Words
In this blog, I have explained how to connect Cricut Explore Air 2 Bluetooth on Windows PC and Mac. Following the above methods will help you connect your machine easily to your system via Bluetooth. Although I could connect my machine via a USB cable, I prefer a wireless connection. With a wireless connection, you don’t need to manage those tedious wires or cords.
FAQs
Question 1: Why is Cricut Explore Air 2 not connecting to Bluetooth?
Answer: There could be multiple reasons why your machine is not connecting to your Bluetooth. Below, I’ve mentioned the reasons:
Question 2: Why is my Cricut Explore Air 2 not working?
Answer: If your machine is not working properly, then the reasons could be as follows:
Question 3: How can I reset my Cricut Bluetooth?
Answer: In order to reset the machine’s Bluetooth, you will need to walk through the following steps:
Visit: install cricut design space app
Source: https://cricutcreate.blogspot.com/2024/09/how-to-connect-cricut-explore-air-2.html
#cricut design space app#cricut explore air 2#cricut setup#cricut new machine setup#cricut design space#cricut venture#cricut joy xtra#cricutprojects#cricut setup for pc#cricut design space software#install cricut design space#install cricut design space app#install cricut explore air 2#cricut.com/setup#www.cricut.com setup login#www.cricut.com/setup#www.cricut.com/setup login#install cricut
0 notes
Text
How to Set Up Cricut Explore Air 2 on Laptop: Get Started Now!
Are you here to learn how to set up Cricut Explore Air 2 on laptop? If so, you are in the right place! In this blog, I will teach you the simplest method to set up your Cricut machine. By learning with my method, you can master setting up a Cricut cutting machine.
Do you know a secret? By learning this method, you can set up any Cricut machine, no matter which model you are using, as the steps for setting up the machine are the same for each model.
Through this post, you will first learn how to check system compatibility and then set up the Cricut machine on a Mac laptop. Yes, this write-up is mainly for Mac users who want to set up their Cricut on their MacBook. Let’s get started.
Step 1: Check MacBook Compatibility
Before you know how to set up Cricut Explore Air 2 on laptop, you must know your system requirements for your Mac. It will help you run the Cricut software smoothly without any hassle. Let’s see and check the system requirements for Mac given below:
macOS 11 or later
CPU 1.83 GHz
2 GB free disk space
USB port in laptop or Bluetooth built-in
Display resolutions should be 1024px x 768px
Step 2: Download Cricut Design Space App
Once you have checked the system requirements, you have to download the Cricut Design Space. Here’s how you can download the app on your Mac laptop or computer:
Open the internet browser on your MacBook and go to design.cricut.com.
Then, mark the checkbox to accept Cricut’s Terms of Use and Privacy Policy.
After that, you have to select the Download button and wait until it completes the download.
Next, you have to install the Cricut Design Space now.
To install it, you need to open the Downloads folder where your Cricut was downloaded. The file has been saved as a .dmg file.
Double-click on the .dmg file to open it and install it on Mac.
Also, you have to drag the Cricut logo icon to the Applications folder icon to finish the installation.
Once you have installed, you will need to sign up or sign in using your Cricut ID.
Step 3: Setup Your Cricut Product
Below, I will guide you on how to set up Cricut Explore Air 2 on laptop. Go through each step carefully and get started with your machine as soon as possible. Let’s get into it:
Navigate to the search bar on your taskbar and hit on the Windows logo icon.
Then, enter Cricut Design Space and hit Enter to open the app.
Once you have opened the Cricut app, you will want to select the option Product Setup.
Afterward, you will have to create a Cricut ID or log in if you have already done so.
Next, you will find the next screen where you should choose a Smart Cutting Machine.

Now, choose the Cricut machine model.
Finally, you need to follow the remaining steps.
Step 4: Connect Cricut to Your Laptop via Bluetooth
Wait, although the third step discusses how to set up Cricut Explore Air 2 on laptop, the set up will not be done yet. After finishing the above steps, you have to set up Cricut Explore Air 2 Bluetooth on Mac by following the steps in the section below:
Power on your Mac and also turn on your Cricut product.
Then, you need to go to your Mac’s Apple menu.
Afterward, proceed ahead to select System Settings.
After that, you need to look into the Bluetooth option.

Now, turn on the Bluetooth.
Afterward, you need to wait until you find a Cricut machine in the available list.
Once your Mac’s Bluetooth detects the machine, you have to click on it and hit Pair.
FAQs
Question 1: Why is my Cricut Explore Air 2 not connecting to my laptop?
Answer: There could be several possible reasons for this issue. However, if this occurs again and again, then check the following points:
Check your Bluetooth, see if your Cricut is switched on, and keep your laptop and Cricut nearby each other.
Confirm if there is a physical barrier. If the device is already connected to your Bluetooth, you need to disconnect it.
Unpair and re-pair: You have to unpair the Cricut machine and then pair it again to resolve the issue.
Question 2: How to connect my Cricut Explore Air 2 to Mac via USB?
Answer: In order to connect, you have to connect your Cricut to your Mac using a USB cord. Take a cord and insert it right into your Cricut’s USB port and then insert the other end to your Mac’s USB port. Once connected, you have to follow the rest of the steps on your Mac to set up your Cricut Explore machine easily and quickly.
Question 3: Is Cricut machine setup same for all devices?
Answer: Setting up a Cricut machine can vary from device to device. For example, connecting Cricut to different devices using Bluetooth is very different for each device. Similarly, when you download the Cricut Design Space on these devices, the steps are quite different from each other. So, make sure you follow the steps for the mentioned device.
Final Words
In this blog, you have understood how to set up Cricut Explore Air 2 on laptop such as a Mac computer. The steps can be daunting for beginners, but I would suggest there is nothing to worry about, as all the steps are easy to understand and follow. With this guide, you will be able to complete the Cricut Explore setup in no time. All you need is the right guide or tutorial, and this one is the best for you!
Source: how to set up Cricut Explore Air 2 on laptop?
Visit here to know More: Cricut.com/setup
Pinterest
0 notes
Text
How to Print and Cut on Cricut: Ultimate Guide
Print and Cut is a versatile tool for enhancing your Cricut projects. With the help of this feature, you can create bookmarks, greeting cards, printed stickers, and many more. To explore these possibilities, knowing how to use Print and Cut on Cricut is essential. If you are not familiar with it and want to use this tool, continue reading the write-up for a full guide.
The Print and Cut tool in the Design Space app requires an inkjet printer. Make sure that your printer is compatible with your operating system; for example, if you are using a mobile with the Cricut app, choose a compatible printer that can add to your mobile wirelessly. This setup process ensures smooth work and allows you to print directly from the app for your DIY projects.
Tools and Supplies for Your Cricut Project
Before you learn how to Print and Cut on Cricut, it is crucial to know about the materials required to use this tool effectively. Here are all the items you will need: sticker paper, standard paper, holographic, sticker paper, magnetic paper, printable vinyl, a4 cardstock, and medium-colored paper.
Important Note: After collecting all the supplies, start by setting up your Cricut machine. Connect it to a power source, turn it on, and then connect it to your device. Download the Cricut Design app, and you are ready to start. Ensure your printer is also connected for Print and Cut projects.
How to Print and Cut on Cricut: 4 Easy Steps
Once you know about the materials and gather all the tools for your projects, you are set to begin.
Step 1: Choose a Design in the Cricut App
To start a Print and Cut project, your first step is selecting a design. Cricut provides access to a vast gallery where you can find thousands of pre-made options. Just browse through and pick one that suits your project.
Apart from picking the designs from the app, you can also import designs from external sources. Whether it’s from other design apps like Canva, your computer’s library, or the internet, uploading these designs to Cricut Design Space is easy.
Step 2: Print Using the Compatible Printer
When your design is complete, you can print it using your printer. Make sure that the printer is connected to a power source and linked to your device. After adjusting the design to your desired size and shape in the Cricut software, click on “Make It.” Before that, you have to load the printable material into the printer’s paper tray. Then, upon clicking “Make It,” the printer will automatically start printing the design onto the material.
Step 3: Start Cutting With Your Cricut Machine
After finishing the printing, you can cut the printed material using your Cricut machine. Place the material on a cutting mat and insert it into the machine. Start the cutting process, which will be completed quickly. When you complete the cutting, remove the material from your machine.
Step 4: Finish Your Project
Lastly, remove the material from your Cricut machine and use a weeding tool to peel away any unwanted remnants of the design. Your project is now complete, thanks to the Print and Cut tool.
Conclusion
Now that you have finished reading the blog, you have learned everything about how to Print and Cut on Cricut. You can now easily work on any project like this. Simply gather your supplies and set up your Cricut machine. When you set up the machine, choose or upload a design in the Cricut Design Space app. After that, use the Print and Cut feature in the app, and your project will be ready quickly.
FAQs
Can I Use Print and Cut on My Android Phone?
No, you cannot use the Print and Cut tool on the Cricut Design Space app if you are using an Android mobile device. This feature is only available for iPhone smartphones. Fortunately, you can also use it on Windows and Mac computers.
What Cricut Machine Can I Use for Print and Cut?
You can use most Cricut machines with the Print and Cut feature, such as the Cricut Maker, Maker 3, Explore Air 2, Explore 3, and Venture machines. Just note that the Print and Cut tool does not work with the Cricut Joy machine.
What Printer Is Good for Using the Print and Cut Tool?
You need an inkjet printer to print with the Cricut Print and Cut tool. Some of the brands like Canon, Brother, Epson, and HP are suitable choices. Make sure to use an inkjet printer, as other types of models won’t work with this Cricut feature.
Visit: install cricut design space app
Source: https://designspace-cric
#cricut.com/setup#install cricut explore air 2#cricut setup#cricut.com/setup mac#cricut design space#cricut new machine setup#www.cricut.com/setup login
0 notes
Text
How to Use My Cricut Explore Air 2: A Complete Guide
When we are beginners to something, we are always worried about it. When I first bought my Cricut machine, I was concerned about how to use my Cricut Explore Air 2. If you have also bought your first Cricut product and want to learn how to use it, I would advise reading this blog, and then you will be able to use your Cricut machine.
When you buy a Cricut machine, there are a few things you need to do before you can start using it. You must first prepare the machine for use, or in other words, you have to set up the machine. To use a Cricut Explore Air 2, you will need to download the Cricut app on a device. With the help of the app, you can easily use the machine.
Introduction to Cricut Explore Air 2
Cricut Explore Air 2 is an excellent machine for making crafts. It can cut over 100 materials. It is versatile and the best in its price range. The machine is known for its precise cutting. Unlike its old Cricut models, it has a Smart Dial, so it can choose the material itself while cutting it.
This Cricut cutting machine has built-in Bluetooth connectivity, so you will not need to buy an external Bluetooth adapter. Its speed is adjustable for writing and cutting, so you do not have to worry about it. The machine is available in multiple colors, so you can pick a color you like.
After buying a Cricut product, when you open the box, these are the items you get inside the box:
The Explore Air 2 machine
A power adapter
A USB cable
Fine-point blade
Blade housing (Pre-installed)
Pen and other accessories.
A welcome book
Quick start book
A cutting mat
Materials for your test cut.
How to Set up Cricut Explore Air 2?
When I look to learn how to use my Cricut Explore Air 2, the first thing I am concerned about is how to set it up. Similarly, to use your Cricut machine, you first have to unbox the machine, check for the item, and then set up the machine for use. To learn the procedure to set the machine up, you need to follow these steps:
First, plug the Explore Air 2 machine into an electric socket using the power adapter.
After that, turn the machine on by pressing the power button.
Now, connect the machine to your operating device with the help of a USB cord or Bluetooth.
Next, you need to download the Cricut Design Space app on your device.
Follow the app instructions and sign in with a Cricut ID.
Your setup has been completed soon after the log-in.
Now, you can go on to use the Cricut machine and create beautiful DIY projects.
How to Connect Cricut Explore Air 2?
When you have learned the process of setting up the Cricut cutting machine, you should connect it to your device. To connect Cricut products, you can use both a computer and a phone. For connection, you can use either a USB cord or Bluetooth. Here, I am writing the wireless procedure.
Option 1: With Bluetooth
To connect your computer to Cricut, you should be following this procedure:
First, give the machine a power supply and turn it on. Keep the device and the machine within 10-15 feet.
Now, open your computer and go to Settings. There, select the Devices option.
Next, open Bluetooth and make sure you have turned it on.
Then, click on Add Bluetooth or other device.
After that, select the Bluetooth option.
Also, you will see the Cricut model has appeared along with the other nearby devices.
Lastly, click on the machine, and it will connect to the computer.
Option 2: Via a USB Cable
A USB is very simple and easy as compared to a Bluetooth connection. You can simply connect them like this:
First, get the machine and your device ready for the connection.
Then, take the USB cable and connect it to your computer.
Also, connect the other end to your Cricut cutting machine.
Now, the USB connection is complete.
Your Cricut setup is not complete even after you connect it to your computer. To use a Cricut machine, you will have to download the Cricut Design app to your device. To download it, head over tocrictut.com/setup. When you have downloaded the app, sign in with your account. Once you have signed in, you are ready to use Cricut and work on your projects.
How to Use My Cricut Explore Air 2?
Once you log in with a Cricut ID on the Cricut Design Space app, you can start using the machine. The software has thousands of images, fonts, and pre-created projects that you can use for your crafts. You can also customize these designs however you want.
This is how you can use the Explore Air 2 machine:
Open the app on your device and select a design. You can edit the shape & size of the image. You can also upload a design if you want.
Then, follow the instructions on the screen and click on Make It.
Next, put the material on a Cricut mat and place it inside the machine. Check whether the fine-point blade is installed. Press the Load/Unload button.
After that, open the Design Space app again and tap the Go button.
The cutting process will begin. When it is completed, press the Unload button.
Remove the mat, pick a design up, and use it on your project.
Conclusion
How to use my Cricut Explore Air 2 would have been solved by now if you had read the blog. Using a Cricut machine has a procedure, and if you follow it well, you will be able to use it effectively. In this guide, I wrote everything regarding the Cricut setup and using it. When you purchase the machine, you first install it and connect it to your device. To use the Cricut cutting machine, you need to download the Cricut Design Space software. After installing it on your device, you can start crafting with your Cricut.
FAQs
What Are the System Requirements for Cricut Explore Air 2?
To use a Cricut Explore machine, you will need to download Cricut software on your phone or computer. Your computer needs to have some features to run the device. It should have 4GB RAM and 2GB disk space. Bluetooth or USB connectivity is a must to connect your Cricut machine. You need to have a 1024 x 768-pixel resolution. The device has to have a speed of 2-3 Mbps to download and upload the images.
Can I Use My Own Designs on Cricut Explore Air 2?
Yes, you can! To use your own designs or just to use a Cricut machine, you will have to install the Cricut Design Space app on your device. Usually, you pick or select a design from the app, edit it however you want, and then cut it on the machine. But if you want, you can even upload a design or an image to the Cricut app. Similarly, you can customize the design as well. Finally, you can cut it using the uploaded design.
What Are Some Things I Can Do With Cricut Explore Air 2?
With the help of Cricut Explore Air 2, you can do a lot of things. You can cut over a hundred materials and make amazing projects. Also, you can use over 370 fonts and create beautiful handwritten notes. You can create other things, like greeting cards, stickers, decals, bookmarks, keychains, tote bags, phone covers, and many more. You can create these things for yourself and can gift them to your friends and family members as well.
Source :- https://cricutnewmachinesetup6.wordpress.com/2024/06/21/how-to-use-my-cricut-explore-air-2-a-complete-guide/
0 notes
Text
How to Connect Bluetooth to Cricut Explore Air 2: Full Guide
How to connect Bluetooth to Cricut Explore Air 2? — Is that what you were looking for? Kudos to you! You have landed on the right page. This write-up focuses on establishing a connection between Cricut and computer/mobile devices using Bluetooth.
When I started crafting with Cricut, I was a little overwhelmed as I didn’t know where to start. Thanks to Cricut’s easy manual, it saved me a lot of time. Yet, I had to rely on various tutorials on the internet. Anyway, companies try their best to make their manual easier, but still sometimes it’s not easy for users to get everything on their own. Hence, that’s when this blog comes into a play.
However, crafting experts like me can’t sit alone doing their own crafting. It really doesn’t interest me🥴. I believe “The secret to growth is helping others grow.” Hence, I want to teach the best to all my novice crafters. So, let’s connect the Cricut machine to a device without any further ado!
How to Connect Bluetooth to Cricut Explore Air 2 (Desktop)?
Whether it is a Mac or Windows computer, you need to make sure you have built-in Bluetooth. Having a system with Bluetooth is a must to establish a connection via Bluetooth. To connect, follow the steps described below:
For Windows
You have to begin by turning on the Cricut machine.
Then, ensure you have placed your Cricut Explore 10 to 15 feet from your PC.
Now, you should hit the Windows logo + I keys on the keyboard, and it will open your PC’s Settings.
After that, click on Devices.

Next, you need to check if your Bluetooth is turned on. If not, you have to turn it on.
As you have turned on Bluetooth, hit Add Bluetooth or other device.
Also, you will receive a pop-up to add a device.
There, you need to select Bluetooth.
After that, wait and let your PC’s Bluetooth detect your Cricut model.
Now, you have to pair it with your Windows PC.
For macOS
The first and second steps will be the same as Windows (See above steps for Windows computer).
After that, press the power button on your Mac and turn it on.
Then, you have to head to your Apple menu.
Now, you should choose System Preferences.
Next, you will need to search for the Bluetooth choice.
Also, you should ensure that your Mac’s Bluetooth is turned on.
If it is on, choose the Cricut machine from the list.
How to Connect Bluetooth to Cricut Explore Air 2 (Mobile)?
Mobile phones are also compatible with Cricut machines. Hence, you can easily connect your Cricut to your mobile device. Whether Android or iOS, both devices are easily connected; let’s follow the steps I have explained below.
For Android
On Android, look for phone Settings.
On settings, head to the Bluetooth option.
Now, you will need to turn on your Bluetooth.
Once it is turned on, you have to wait.
Wait until your phone’s Bluetooth discovers nearby Cricut Explore Air 2.
Once the Cricut Explore Air 2 name is visible in the list, select it to pair it.
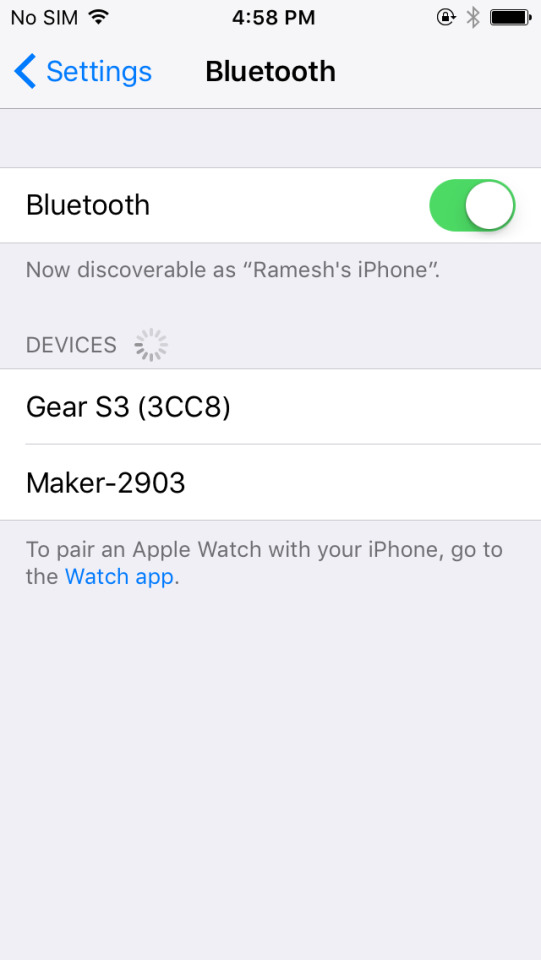
For iPhone/iPad
On an iPhone or iPad, look for the Settings.
Once you’ve found the Settings app, you have to launch it.
Then, you need to search for the Bluetooth option.
Now, enable your Bluetooth by clicking on the toggle button.
After that, you will need to wait.
Next, let your iPhone or iPad search for your Cricut Explore Air 2.
Once it is detected, you will need to click on it to pair.

By now, you must have understood how to connect Bluetooth to Cricut Explore Air 2. You can connect to any device you want, from a computer to a mobile phone.
FAQs
Question 1: Which software do I need to connect my Cricut to device?
Answer: There is nothing to do with Cricut software if you want to connect your Cricut to your computer or mobile device. However, you will need to download the Cricut Design Space later to setup your Cricut cutting machine. Besides design creation or setup, you will not need Cricut software for any reason.
Question 2: Can I only connect my Cricut via Bluetooth?
Answer: No! You can insert your USB cable into the Cricut machine’s USB port to connect it to your desktop. However, you can’t use USB when you want to connect your Cricut to your smartphone. For this, Bluetooth is compulsory, as the smartphone does not have bigger USB ports like the one your desktop has.
Question 3: Why do I need to connect Cricut to any device?
Answer: In order to setup your Cricut machine, you will need to connect it to your computer or smartphone using USB or Bluetooth. Without connecting, your computer can’t communicate with your Cricut, making it impossible for you to send your design to the machine for cutting. In short, you have to connect Cricut to your devices because you want your design to be sent from your device to your Cricut for further operations.
Final Words
Throughout this blog, I have highlighted how to connect Bluetooth to Cricut Explore Air 2 on a Windows, MacBook, or smartphone (Android or iOS). Connection is important if you want to setup your Cricut machine. Without Cricut setup, you can’t perform any other operations easily on your cutting machine, meaning a single cut is impossible without it. Get ready with your Cricut and connect it to your device via Bluetooth in no time.
Read more: cricut setup for pc
install cricut design space app
Cricut New Machine Setup
Source: How to Connect Bluetooth to Cricut Explore Air 2
#How to Connect Bluetooth to Cricut Explore Air 2#Cricut New Machine Setup#install cricut design space app#cricut.com/setup#cricut setup for pc
0 notes
Text
Cricut Explore Air 2 Connect to Computer: A Stepwise Guide
Hey crafters, are you here to learn the Cricut Explore Air 2 connect to Computer? Here, you will get what you are looking for. Chill and relax; I am going to teach you everything that you need to know to establish the connection between your Cricut and computer.
But hold on! Do you want to connect your Cricut machine to Windows or Mac? Don’t worry, I will teach you both. All you need to do is make sure that your computer meets all the system requirements. For this, you can navigate to Cricut’s official website, where they have mentioned every requirement for Mac and Windows computers.
I am a professional crafter with years of experience. My years of hard work have taught me so much, and now I am excited to share all this with you. Let’s get started!
Cricut Explore Air 2 Connect to Computer (Windows)
Connect your Cricut cutting machine to your computer if you are a Windows user. You can connect it to them easily. Take your Windows computer out. No matter which brand of computer you are using, it should have a compatible or latest operating system. To know the system requirements, you can visit Cricut’s official site. Now, let’s learn how to connect Cricut Explore Air 2 Bluetooth.
Place your PC near your Cricut Explore machine. Make sure your PC has Windows 10 or later version.
After that, you need to look for a flat surface.
Once you find a suitable place, such as a table and floor, you can place the Cricut Explore without exceeding its maximum range, which is 10–15 feet.
Once everything is set up, you need to move to the Settings section.
For Settings, you have to navigate to your taskbar and connect to the Start menu.
From the Start menu, you will need to hit the gear icon, Settings.


Then, turn on the Bluetooth by simply clicking on the toggle button.
Now, select Add Bluetooth or other device.
Here, your Cricut will be detected by your Windows computer.
Once detected, click your Cricut model to pair.
Cricut Explore Air 2 Connect to Computer (macOS)
If you are a Mac user, then you have to follow the steps below. The following steps are for only Mac users; make sure you follow them one by one. After that, you will need to start setting up your Mac. Let’s first learn how to connect Cricut Explore Air 2 Bluetooth.
Choose the right place, such as a flat table.
After that, you need to place your Cricut on it.
Have a minimum gap of about 10 feet between your Cricut and Mac computer.
Then, you should find the Apple menu on your Mac and click on it.
After that, you will need to click the System Preferences.

Once you find it, you will need to turn on the Bluetooth.
Finally, you have to click on your Cricut model from the available list.
When you have followed all the above steps, you will find your Cricut connected to your computer.
Cricut Explore Air 2 Connect to Computer via USB
Don’t want to connect to Bluetooth? Don’t worry; I’ve got another option, i.e., you need to connect it to your simply via a USB cable.
First, you will need to turn on the Cricut product by pressing its power button.
Then, switch on your Mac or Windows.
Once you have turned on both devices, take your USB cable and insert it into them.
First, take one small side and insert it into the back of your machine.
After that, you need to take the bigger side and plug it into your CPU or laptop’s USB port.
Use the one’s end of your USB cable and plug it inside your desktop’s USB port.
Finally, you have connected your Cricut to your computer via a USB cord.
FAQs
Question 1: Can I connect my Dell Vostro 3568 model to Cricut?
Answer: Yes, absolutely; you can connect this Dell Vostro 3568 model hassle-free. Cricut machines are compatible with most popular brands like HP, Asus, Dell, and others. However, you should know that Cricut doesn’t support Google Chromebook or Unix/Linux. Besides Mac, Cricut only supports the Windows operating system. Hence, any laptop with a Windows operating system will be perfect for using Cricut.
Question 2: Should I use the Cricut app to connect my Cricut?
Answer: Yes, you have to use the Cricut software to connect your Cricut machine. There are two possible connections that you can establish on your Cricut: the first is via USB cable, and the second is Bluetooth. If you choose to connect your Cricut via Bluetooth, you don’t need to worry about anything, as it is reliable and frees you from clumsy wire. However, most people also prefer a USB connection, as it is easier than a Bluetooth connection.
Question 3: Is a Bluetooth must for Cricut Explore Air 2?
Answer: No, it’s not! Besides Bluetooth, you can also connect your Cricut using your USB connection. You will find a USB connection easier than the Bluetooth. However, Cricut recommends that if you are using Maker 3 or Explore 3 with a Windows computer + AMD Ryzen, then you have to use a Bluetooth connection. But, this is not the case with the Cricut Explore Air 2 model.
Source: Cricut Explore Air 2 Connect to Computer
Visit here For More Information: cricut.com/setup
Pinterest
#Cricut Explore Air 2 Connect to Computer#how to connect Cricut Explore Air 2 Bluetooth#cricut.com/setup#Cricut Explore Air 2
0 notes
Text
How to Connect Cricut to App: A Stepwise Setup Guide
So, here you will learn how to connect Cricut to app. Right? But before I dive further into this blog, I would like to clarify one thing. This blog talks about how to connect your Cricut machine to an app (Cricut Design Space), but I don’t think it is the same as connecting Cricut to your computer or mobile phone.
Connecting a Cricut to an app and connecting Cricut to a compatible device are two different things. Don’t get confused! The question is, if both are different, then what are we going to learn from this blog? In this blog, I will teach you how to connect a Cricut machine to an app. However, it is also called a Cricut setup. We will be learning about machine setup on Windows computers. Let’s dive into it without any further ado!
Step 1: Unboxing a Cricut Product
Okay, so to get to the exciting part of the Cricut machine setup, we will first need to unbox the machine. However, if you have already unboxed it, enjoy🥳and move to the second step in order to learn how to connect Cricut to app.
Here, let me share my experience of unboxing my Cricut.
I opened the box’s lid and saw a matted folder over the top surface of the Cricut machine. Here I am, actually, opening my Cricut Explore Air 2 machine. It came with a blue LightGrip mat. Those who got the Cricut Maker machine then will receive a green StandardGrip mat.
The list is long; let me show you what else I got with my Cricut Explore:
Step 2: Open Your Cricut Cutting Machine
To open the Cricut machine, I pressed the Open button (on the left side). As I pressed the button, the rest of the doors opened on their own. Here, Cricut Maker users need to lift the top lid. After that, the front door will open on its own (automatically).
Note: Do not open the doors that open automatically. Just wait and let them open slowly on their own.
When your Cricut is opened, you need to remove the foam and other tape on the side.
Step 3: Plug Into a Cricut Machine
Plugging the power cable into the Cricut cutting machine is the first step in learning how to connect Cricut to app. Now, it’s time to turn it on. Yes! So, let’s grab the power cords that come with our Cricut machine.
You can just plug the main plug into the wall outlet and insert the other into the back of your Cricut machine. But, here, you have to plug in the machine; you don’t need to turn it on the machine here. We’ll do it later.
As the machine is turned on, you need to move to the next step, where we will start setting up our machine.
Step 4: Pair Cricut to a Computer via Bluetooth
I have connected my Cricut using a USB cable, too. Currently, I am using a Bluetooth wireless connection. So, let me show you how to connect Cricut to PC via Bluetooth:
Now, let’s download a Cricut app so that you can understand how to connect Cricut to app, i.e., how to setup Cricut.
Step 5: Download Cricut Design Space
The machine setup requires software called the Cricut Design app. To download the software, you need to go through the steps given below:
Next, follow the prompts until your installation is done. Once done, move to the last steps to learn how to connect Cricut to app.
Step 6: Finish the Cricut Setup
Launch the Cricut Design Space software, and you will see the option to select your Cricut cutting machine on the app. Select the type of machine you want to setup. Next, sign in to your Cricut account. If you don’t have an account, sign up to create one.
Once you have created an account, you need to sign in and then start connecting your Cricut to your app. Although you will get screen prompts to setup the machine, I will explain it briefly.
First, turn on the machine by pressing the power button, and then you need to connect your machine. After that, your setup is done!
HURRAY!!!!!!!!! 😍 YOU DID IT!
FAQs
Question 1: Can I connect my Cricut to an app on my mobile phone?
Answer: Yes, absolutely! Connecting Cricut to the app or setting it up is the same. For this, you will need a Cricut app that you can download from an online app store where you can download the app. For example, if you want to install the Cricut software on iOS, then you can get the application from the App Store, and for Android, you need to go to the Google Play Store. In short, you can easily connect your Cricut machine to an app.
Question 2: Is Cricut machine setup difficult or time-consuming?
Answer: Setting up the Cricut machine is easy and not that time-consuming if you have the right software. The simple-to-use interface of Cricut Design Space will walk you through the easy directions to setup the Cricut cutting machine, which will take you a few minutes. So, install the right software on a compatible device, and then you will be ready to go.
Question 3: Is Bluetooth compulsory for Cricut machine setup?
Answer: No, it is not necessary if your Cricut has a USB cable. Except for the Cricut Joy machine, all the Cricut models have USB ports so that they can be connected via USB cords, too. However, for Cricut Joy users, Bluetooth is compulsory when setting up the machine. In short, Bluetooth is compulsory only for machines for which Bluetooth is not available.
Source: https://desincricut.wordpress.com/2024/04/16/how-to-connect-cricut-to-app-a-stepwise-setup-guide/
#cricut.com/setup#cricut.com setup download#cricut.com setup#cricut.com setup mac#cricut.com setup windows#cricut.com/create#cricut.com sign in#cricut.com/register#cricut.com design space#www.cricut.com setup mac#install cricut printer#install cricut design space app#install cricut explore air 2#cricut explore air 2#cricut create connect to computer#connecting cricut maker to computer#cricut com setup#cricut setup#setting up my cricut maker#setting up your cricut maker#cricut new product setup#cricut design space app#cricut design space#cricut new machine setup#cricut software app#cricut explore 3#cricut account on setup#cricut setup on account#cricut
0 notes
Text
Cricut Explore Air 2 Program Download on Computer and Phone
Are you looking for a guide on Cricut Explore Air 2 program download? If so, you are in the right place! Recently, I had my PC repaired. Suddenly, it came up with an error, so I had to switch to my Android phone to use my Cricut program. Thanks to Cricut, their Cricut software is compatible with various platforms, one of which is the Android device. Yes, you heard it right! I have been using my Cricut software on Android for a few weeks. You can also use it hassle-free. All you need to do is download the software and get used to it.
In this blog, I will explain an important topic: Cricut Design Space download for Windows 10 and Android phones. Are you excited to learn? If yes, let’s get started! But before that, let me show you the system requirements needed to run the software smoothly on devices. Let’s dive in!
System Requirements for Using Cricut Explore Air 2 Program
When I first went to download the Cricut app on my PC, I first checked all the requirements that my computer should have. If you don’t know, Cricut has set some criteria for the computer, meaning you can’t use the oldest version of the system to run the Design Space app.
However, to use this software, you will need a specific operating system version. Besides, there is also a requirement for hardware. Let’s have a look at them before moving to the Cricut Explore Air 2 program download.
For Windows
Operating System: Windows 10 or later (64-bit)
Disk: 2 GB free
Connectivity: A USB port or Bluetooth
RAM: Minimum 4 GB
CPU: Intel Dual Core or equivalent to AMD processor
Display: Minimum 1024px x 768px screen resolution
For Android
Operating System: Android 6.0 or higher
Supported Device: Mobile and tablets only (Chromebooks not supported)
Compatible Devices
Google: Pixel series
LG: G, K, or V series
Samsung: Galaxy S, Galaxy Note, Galaxy Tab A, Galaxy Tab S series
Motorola: Droid G, Z, E, Turbo or Moto series
Note: Performance varies depending on your chipset, processor speed, and manufacturer.
Cricut Explore Air 2 Program Download on Windows
Let me take you to the detailed steps below to download the Cricut software on your PC. But wait! Have you checked the PC requirements above? If not, please check the requirements before downloading the software. If you have checked it already, you need to go through the steps below:
Open an internet browser and go to Cricut’s official site, design.cricut.com.
Then, select a checkbox to accept Cricut’s Terms & Policy.
After that, a download button will appear and be activated. As a result, you can now hit it to download the Cricut app on your Windows 10.
When downloading is done, you should check the file where you downloaded it. It is likely to be available in your Downloads folder.
Double-tap on the file that you have downloaded before and begin your app installation.
At this time, your computer may ask for your permission, such as whether you want this app to make changes to your device. Click Yes and move ahead.
When the installation is done, you should register for a Cricut account.
Here, you need to use a Cricut ID and password.
Finally, you might have understood the Cricut Design Space download for Windows 10.
Cricut Explore Air 2 Program Download on Android
For Android users, following the steps below will be the easiest way to download the Cricut app. But make sure you have also checked the compatible devices to use the Cricut software on them. Let’s dive in:
Navigate to your phone’s home screen and launch the Google Play Store.
Go to the search bar and type “Cricut Design Space.”
Now, select the Design Space software, which is visible in the results below.
Then, hit the blue Install button to download the app.
After that, your app will appear on your home screen.
Launch the app and create a Cricut account. If you have one, just sign in to use Cricut.
By now, you might have understood the Cricut Explore Air 2 program download, like how to download it on a Windows 10 computer and Android phone. The steps explained above are simple and beginner-friendly.
Final Words
In this blog, I explained how to download Cricut Design Space on Windows and Android devices. Beginners or pro crafters who want to download or re-download the software on their computers can follow this simple guide. The blog has two main topics: system requirements and how to download the software on a compatible device. As a professional crafter, I have set up the Cricut machine many times. So, these are the simplest steps that I can explain to you.
FAQs
Question 1: How to create a new Cricut account?
Answer: If you just want to get started with your Cricut machine, you will need an account. The Cricut account is a must-have for every Cricut user. Let’s see the steps below to create one for you:
Open your internet browser and move to cricut.com/setup.
Now, hit the Create Cricut ID.
Next, enter the email address.
Then, enter your password.
Afterward, fill in your full name.
Once done, choose your country and region.
Thereon, follow the simple instructions on your display and finish the sign-in process.
Question 2: Can I use my Cricut Explore Air 2 program on an iOS device?
Answer: Yes, you can! Whether you call it the Cricut Explore Air 2 program or Cricut Design Space, the software can be used on iOS devices. To use it, launch the App Store and download the Cricut app. After that, install the software on your device and explore its incredible features.
Question 3: How to install Cricut Explore Air 2 program on a Mac?
Answer: To install the Cricut app on your MacBook, follow the steps below:
Visit design.cricut.com and download the app.
Then, go to your Downloads folder to find the .dmg file.
Now, double-click on the .dmg file.
On the next screen, drag the Cricut icon to the Applications folder.
Then, the installation will start.
Your Cricut app will be added to your desktop in your Applications folder.
design.cricut.com/setup
cricut log in
help cricut com
how to use cricut design space
Source :- https://cricutexploreesetup.wordpress.com/2024/04/12/cricut-explore-air-2-program-download-on-computer-and-phone/
0 notes
Text
How to Connect a Cricut Explore Air 2 to Computer/Phone?
Hey, my lovely readers, I have some information for you all. I finally completed my art collection a few days back by adding my favorite crafting machine. Yes, you guessed it right! I bought the Cricut Explore Air 2 along with its bundle and supplies. You know how much I love this Cricut model because of its high-tech technology and ability to cut at least 100+ materials easily.
Ever since I added Explore Air 2 to my collection, I have been jumping around my house with excitement to get started with the machine. The most important thing I need to do to use this machine is connect it to other compatible devices. If you are curious about how to connect a Cricut Explore Air 2, then you should check out this blog.
How to Connect a Cricut Explore Air 2 to Windows?
You all know how much I love crafting, so I am excited to learn about connecting this Cricut machine to Windows. Below are the steps that will assist you in connecting both the devices easily without any hurdles:
Start the method by placing your Explore Air 2 on a flat surface.
Now, place both devices at a distance of 10–15 ft and turn it on.
Next, open the Start menu and tick the Devices option.

Following this, check that the Bluetooth is on and proceed to Add Bluetooth or other device option.
If the Bluetooth is off, drag the toggle to the right side, and it will open.
After doing that, you need to wait until the scanning process begins.
Select the Cricut model from the list, and the connection process will start.

Finally, your machine is connected to Windows on the Cricut Design Space page.
This section might have helped you understand how to connect the Cricut Explore Air 2 to Windows. If you are an Android user, you are most welcome to look at the next part of the blog.
How to Connect a Cricut Explore Air 2 to Android Devices?
After connecting this Cricut model to a Windows computer, it’s time to change your way and learn about connecting Explore Air 2 to Android devices. If you are getting confused about how to connect them, then go through the below steps:
Repeat the first and second steps that you did while connecting the computer.
Further, open the Settings tab and tick the Bluetooth icon.
Now, check that your device’s Bluetooth is on; if it isn’t, turn it on.
After a few seconds, you will see Available Devices on your screen.
Next, tap on your Cricut model, and your connection will be complete.
You can easily do it if you are an iOS user and want to connect with this cutting machine. To do so, you must pay attention to the section below.
How to Connect a Cricut Explore Air 2 to iOS Smartphones?
The details below will make connecting the Cricut Explore Air 2 machine to iOS devices more effortless and will help you make more future projects.
The first and second steps of connecting both devices are the same.
Now, navigate to Settings and enable Bluetooth on your device.

If the Bluetooth is off, turn it on, and a list will appear on your screen.
Now, tick on your Cricut model name and hold on until the connection process is ongoing.
After a few minutes, open the Cricut Design Space app, and your machine will be displayed as connected.
With the help of this blog, connecting this ultimate DIY cutting machine with PCs and smartphones seems less difficult and a child’s play. You can now start making crafts at any time of the day.
Frequently Asked Questions
Question: How Do I Set up My Cricut Explore Air 2 on PCs?
Answer: To set up the Cricut Explore product on PCs, you need to follow the steps shared below:
Begin by plugging in your Cricut cutting machine and powering it on.
After that, pair it up with your PC via Bluetooth or USB cable.
Next, download and install the Cricut Design Space app on your device.
When the app is installed, create your account and follow the instructions.
After completing the setup, you must perform a test cut on the material.
Question: What Projects Can I Make With Cricut Explore Air 2?
Answer: To do specific projects with Cricut Explore Air 2, ensure your device comes with the Cricut Design Space app and runs smoothly. Then, connect your cutting machine to PCs and smartphones and start making the project. Some of the projects that you can make from this machine are:
Birthday cards
T-shirts
Gift tags
Leather earrings
Wreath
Ornaments
Question: How Can I Connect Cricut Explore Air 2 to My Mac?
Answer: With the help of the below steps, you can easily connect your Explore Air 2 to Mac:
Check that your Explore Air 2 is on and placed within 10–15 ft from Mac.
Now, move to Settings and turn on your Bluetooth (if it is off).
After that, tap on your model name from the list present on your screen.
Open Cricut Design Space and check whether a connection has been built or not.
Source: Cricut Explore Air 2
Visit here For More Information: You tube
Pinterest
#Cricut Explore Air 2#Cricut.com/setup#cricut explore 3#cricut maker bundle#Cricut Design Space#design space cricut#ipl2024
0 notes
Text
Cricut Explore Air 2 Bluetooth Setup for Computers and Mobile
For Cricut enthusiasts, Explore Air 2 is a worthwhile machine to step into the crafting realm and make eye-catching DIY projects. Offering multiple device compatibility allows crafters to create pro-level crafts, from customized hoodies to door signs and banners. Plus, before creating any projects, it is necessary to perform the Cricut Explore Air 2 Bluetooth setup on a mobile or computer.
But most new crafters don’t know the procedure. In this blog, I will explain the proven and simple methods to complete the connection process on Windows, Mac, iOS, and Android to streamline the process for you.
Cricut Explore Air 2 Setup on Computer via Bluetooth
The following methods will allow you to complete the Bluetooth connection process of your Explore Air 2 machine on a Windows and Mac computer.
Windows
Mac
After that, to complete the setup process for your crafting machine, download the Design Space app. You can download the software from the official brand website to your device.
Cricut Explore Air 2 Bluetooth on Smartphone
The follow-up methods will allow you to complete the Bluetooth connection of your Explore Air 2 machine to an Android and iOS device.
iOS
Android
Note: Once the Cricut Explore Air 2 Bluetooth connection is complete, you can go to the App Store or Play Store to install the Design Space app. With the help of the app, you can complete the setup procedure and start using the machine to make beautiful crafts.
Final Words
In this blog, we have discussed comprehensive methods for connecting the Explore Air 2 machine to Windows, Android, Mac, and Android devices. These methods can help you complete the wireless setup on your respective OS device. Make sure to follow either of these methods carefully to complete your device setup without any trouble. However, if you need more help with the connection process or are unable to connect the device, then try to get your hands on more comprehensive guides and resources.
Frequently Asked Questions
Can I Use Cricut Explore Air 2 Without the Bluetooth Connection?
The Explore Air 2 machine comes with the Bluetooth connectivity option that allows the users to enjoy wireless crafting. In addition, users can connect the machine with a USB cable too. However, while connecting your machine using the USB cable, ensure that the cable is not damaged and insert it properly in the correct port.
Why Is My Cricut Explore Air 2 Not Connecting to Bluetooth?
The following could be the top reasons your machine is not connecting to a Bluetooth device.
You should look for these points in your device and then take the right steps to fix the issue.
How to Set up a Cricut Explore Air 2 Machine?
The follow-up steps will help you connect your Explore machine.
Visit: cricut.com/setup www.cricut.com/setup login
Source: https://cricricutdesigncut.wordpress.com/2025/01/21/cricut-explore-air-2-bluetooth-setup-for-computers-and-mobile/
#design space setup#digital design#cricut.com/setup#www.cricut.com/setup login#cricut.com setup mac#cricut design space setup#cricut design space#cricut design space app#cricut design space download#cricut design space software#cricut design space login#design.cricut.com/setup
0 notes
Text
How to Connect Cricut Explore Air 2 to iPhone: Full Guide
Hey, Cricut enthusiasts! Do you know how to connect Cricut Explore Air 2 to iPhone? No? That’s all right! I am here to teach you everything from system requirements to simple and quick steps to connect your Cricut Explore model to your iPhone.
Last year, I got my first iPhone 15, and being the DIY enthusiast that I am, I wanted to use my Cricut using my new iPhone😁. Seriously, I have been crazy about iPhones ever since I got them. But what did I do to use my Cricut with my iPhone? Do we need to connect it to Cricut? If so, then how can we do that? Don’t worry. I have answered all these questions in this blog. So, what are you waiting for? Dive deeper into this blog and connect your iPhone and Cricut together in no time! Let’s get started!
System Requirements for iPhone to Connect to Your Cricut Machine
Now, let’s learn to connect Cricut Explore Air 2 to iPhone. But wait! Have we done everything required? Well, no! I need to tell you the system requirements for the Cricut Design app.
This Cricut software runs on compatible devices only. For this, you should know the basic needs we need in our devices. Since we are going to connect our Cricut to an iPhone, we will only check the requirements for this device.
Operating System: iOS 15 or later
Internet: Minimum 2 -3 Mbps for download & upload
Offline Feature: Cricut can work offline on iOS devices
Compatible Devices: iOS 17, iOS 16, or iOS 15
Now that you have understood the basic requirements, you need to look into your iPhone. Now, let’s dive into the steps to connect your Cricut Explore Air 2 to your iPhone 15.
Connect Cricut Explore Air 2 to iPhone via Bluetooth
Since I got my new iPhone 15 machine, I have wanted to connect it to my Cricut machine so that I can use it easily. For this, I had to connect my Cricut to my iPhone. Below, I have described the steps completely in stepwise:
In the beginning, navigate to your iPhone 15 smartphone.
After that, you have to open the Settings app.

Now, it’s time to turn on the Bluetooth. To do this, you can go to the toggle button and enable it from there.
Afterward, you will need to wait for a while.
Then, let your iPhone 15 find your Cricut cutting machine.
Once your mobile phone has detected your Cricut machine, click on it to pair.
Now, you have learned to connect Cricut Explore Air 2 to iPhone. Since you have connected it with an iPhone, I will walk you through the steps to teach you the uses of this machine. Let’s jump into it.
How to Use Cricut Explore Air 2: 3 Easy Steps
As I have taught you to establish a connection between your Cricut and iPhone, let’s learn to use this machine.
After connecting to Cricut, I will move to the next step, i.e., downloading and installing a Cricut application on my iPhone. Below, I have described the simple steps for the same:
Step 1: Download the Cricut Software
First, you need to use the App Store on your iPhone device.
After that, go to the search bar and type Cricut Design Space.
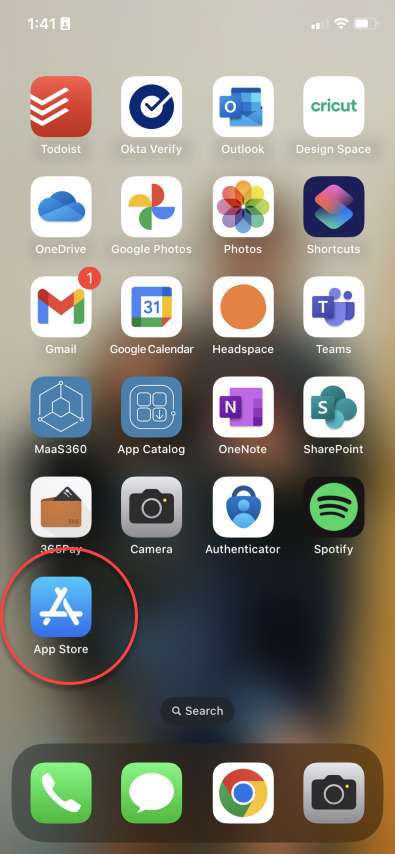
Then, you will need to find and select the Cricut software from the shown results.
Next, tap the Get tab to install the Cricut app on your iPhone.
Once you have downloaded the app, you can launch the software to setup the machine.
Step 2: Setup a Cricut Cutting Machine
Setup is necessary for the new cutting machine. Let’s see how to setup a Cricut before using it:
Once you have paired up and downloaded the Cricut, you need to launch the Design Space app on your iPhone.
You need to sign in to the Cricut account by following the instructions on the display.
Following this, select the Cricut model from the given list.
You need to complete the setup by following the on-screen commands.
After completing the setup, you have to perform a test cut, which we will learn about in the next step.
Step 3: Perform a Test Cut on Cricut
By performing a test cut, you will learn how to use a Cricut machine. Let’s dive into it:
First, put the materials on your cutting mat.
Second, you will need to load the mat into the machine.
Select the material that you are using in the Cricut software.
Then, you need to click on the Make It button.
Now, select the tab Test Cut.
You will notice that your machine has cut a small square in the corner.
In the last step, unload the mat from the machine.
Congrats! You have learned how to use a Cricut Explore machine. I also taught you how to connect Cricut Explore Air 2 to iPhone in simple steps.
FAQs
Question 1: Why is my Cricut Explore Air 2 not connecting to Bluetooth?
Answer: Below are the reasons why a Cricut Explore machine is not connecting to your Bluetooth:
The Cricut is not turned on or placed too far away from the computer/mobile.
The Windows Firewall or antivirus software interrupts the device.
The software on the Explore Air 2 is outdated.
The computer doesn’t meet the minimum system needs for Bluetooth connectivity.
Question 2: Why do I need to connect my Cricut to my iPhone?
Answer: You will need to connect your Cricut to your iPhone because you will want to set it up. Crafters who have bought a new Cricut machine need to setup the machine. You will need to connect the machine first for setup. Only then can you begin the setup procedure.
Question 3: What do I need to connect my Cricut Explore Air 2?
Answer: In order to connect your Cricut Explore Air 2, you will need to have a Bluetooth connection or USB cord. You will also need the Cricut software: Cricut Design Space. It is necessary to download this to a device. Whether you are using a desktop or phone, you can easily download this software on those devices.
Source: Connect Cricut Explore Air 2 to iPhone
Visit here For More Information: Cricut.com/setup
You tube
Pinterest
0 notes
Text
How to Create Wall Arts With Silhouette Cameo for Home?
You have come to the right blog if you want to make Silhouette Cameo wall art for your home. My name is Manny Koshbin, and I have been working as a professional crafter for 2 years. Also, I help crafters learn and create projects through my blogs. As a result, I have curated it to provide all the fundamental guides to making wall art hassle-free.
In this blog, I will share a step-by-step guide to creating a wall art project with the Silhouette Cameo machine. Also, you learn the process of setting up the machine and supply requirements. So, keep reading this blog till the end to gain in-depth knowledge of the full procedure.
The Process to Setup a Silhouette Cameo on Your Device
If you want to learn the process of creating Silhouette Cameo wall art for your home, you have to set up the machine first. I am sharing the guide below for setting up Silhouette Cameo 4. You can use this guide to set up the Cameo machine you are using.
Step 1: Register Your Cameo Machine
Step 2: Downloading and Installing the Silhouette Studio App
Step 3: Connect the Cameo Machine
Tools and Supplies You Need for Making a Wall Art
To make this Silhouette Cameo wall art for your home, you have to gather some essential supplies. Below are the supplies that you will need to complete this project.
The Process of Creating a Silhouette Cameo Wall Art
If your Cameo machine setup process is complete and you have all the essential supplies for this machine, then move forward with the process to complete your art project. These are the steps you need to follow.
Step 1: Create a Design on the Silhouette Software
Step 2: Cut the Design on Your Cameo Cutting Machine
Step 3: Complete Your Design
FAQs
How Do You Make Silhouette Wall Art as a Beginner?
To create the wall art with the Silhouette machine then follow the below guide.
What Do You Need to Make Silhouette Art?
These are the supplies you should have to make the SilhouetteCameo wall artproject.
● Any Silhouette Cameo cutting machine
● Silhouette Studio software
● Silhouette Adhesive Stencil Material
● Transfer paper
● A piece of plywood to create your art
● Weeding tools
● Scissors, and others.
However, the supplies can change depending on the type, size, shape, and other aspects of the projects.
Which Silhouette Cameo Is Best for Making Wall Art?
All the Silhouette Cameo machines are suitable for creating any type of wall art design. However, if you are looking for more profound results while creating the project, then you can go for the Silhouette Cameo 4. Plus, this machine comes with a plethora of amazing features and premium results while making projects. Also, it can help you create pro-level projects even if you are a complete beginner.
Visit: cricut.com/setup cricut setup explore air 2 cricut.com setup mac design.cricut.com/setup cricut design space setup
Source: https://mannyexplore.com/silhouette-designs/how-to-create-wall-arts-with-silhouette-cameo-for-home
#Arts With Silhouette Cameo#cricut.com/setup#cricut.com/setup login#cricut maker 3 bundle#cricut project ideas#cricut explore 3#cricut design space download#cricut software app#cricut.com setup#cricut.com setup mac#design.cricut.com/setup#cricut.com setup download#cricut.com design space#cricut.com/register#cricut.com sign in#cricut design space setup#install cricut design space app#cricut create connect to computer#cricut new product setup#setting up your cricut maker#cricut explore air 2#cricut setup explore air 2 setup#install cricut explore air 2#cricut setup new device#cricut install setup#cricut setup maker#cricut setup
0 notes
Text
How to Connect Bluetooth to Cricut Explore Air 2: Full Guide
How to connect Bluetooth to Cricut Explore Air 2? – Is that what you were looking for? Kudos to you! You have landed on the right page. This write-up focuses on establishing a connection between Cricut and computer/mobile devices using Bluetooth.
When I started crafting with Cricut, I was a little overwhelmed as I didn’t know where to start. Thanks to Cricut’s easy manual, it saved me a lot of time. Yet, I had to rely on various tutorials on the internet. Anyway, companies try their best to make their manual easier, but still sometimes it’s not easy for users to get everything on their own. Hence, that’s when this blog comes into a play.
How to Connect Bluetooth to Cricut Explore Air 2 (Desktop)?
Whether it is a Mac or Windows computer, you need to make sure you have built-in Bluetooth. Having a system with Bluetooth is a must to establish a connection via Bluetooth. To connect, follow the steps described below:
For Windows
You have to begin by turning on the Cricut machine.
Then, ensure you have placed your Cricut Explore 10 to 15 feet from your PC.
Now, you should hit the Windows logo + I keys on the keyboard, and it will open your PC’s Settings.
After that, click on Devices.
Next, you need to check if your Bluetooth is turned on. If not, you have to turn it on.
As you have turned on Bluetooth, hit Add Bluetooth or other device.
Also, you will receive a pop-up to add a device.
There, you need to select Bluetooth.
After that, wait and let your PC’s Bluetooth detect your Cricut model.
Now, you have to pair it with your Windows PC.
For macOS
The first and second steps will be the same as Windows (See above steps for Windows computer).
After that, press the power button on your Mac and turn it on.
Then, you have to head to your Apple menu.
Now, you should choose System Preferences.
Next, you will need to search for the Bluetooth choice.
Also, you should ensure that your Mac’s Bluetooth is turned on.
If it is on, choose the Cricut machine from the list.
How to Connect Bluetooth to Cricut Explore Air 2 (Mobile)?
Mobile phones are also compatible with Cricut machines. Hence, you can easily connect your Cricut to your mobile device. Whether Android or iOS, both devices are easily connected; let’s follow the steps I have explained below.
For Android
On Android, look for phone Settings.
On settings, head to the Bluetooth option.
Now, you will need to turn on your Bluetooth.
Once it is turned on, you have to wait.
Wait until your phone’s Bluetooth discovers nearby Cricut Explore Air 2.
Once the Cricut Explore Air 2 name is visible in the list, select it to pair it.
For iPhone/iPad
On an iPhone or iPad, look for the Settings.
Once you’ve found the Settings app, you have to launch it.
Then, you need to search for the Bluetooth option.
Now, enable your Bluetooth by clicking on the toggle button.
After that, you will need to wait.
Next, let your iPhone or iPad search for your Cricut Explore Air 2.
Once it is detected, you will need to click on it to pair.
By now, you must have understood how to connect Bluetooth to Cricut Explore Air 2. You can connect to any device you want, from a computer to a mobile phone.
FAQs
Question 1: Which software do I need to connect my Cricut to device?
Answer: There is nothing to do with Cricut software if you want to connect your Cricut to your computer or mobile device. However, you will need to download the Cricut Design Space later to setup your Cricut cutting machine. Besides design creation or setup, you will not need Cricut software for any reason.
Question 2: Can I only connect my Cricut via Bluetooth?
Answer: No! You can insert your USB cable into the Cricut machine’s USB port to connect it to your desktop. However, you can’t use USB when you want to connect your Cricut to your smartphone. For this, Bluetooth is compulsory, as the smartphone does not have bigger USB ports like the one your desktop has.
Question 3: Why do I need to connect Cricut to any device?
Answer: In order to setup your Cricut machine, you will need to connect it to your computer or smartphone using USB or Bluetooth. Without connecting, your computer can’t communicate with your Cricut, making it impossible for you to send your design to the machine for cutting. In short, you have to connect Cricut to your devices because you want your design to be sent from your device to your Cricut for further operations.
Final Words
Throughout this blog, I have highlighted how to connect Bluetooth to Cricut Explore Air 2 on a Windows, MacBook, or smartphone (Android or iOS). Connection is important if you want to setup your Cricut machine. Without Cricut setup, you can’t perform any other operations easily on your cutting machine, meaning a single cut is impossible without it. Get ready with your Cricut and connect it to your device via Bluetooth in no time.
cricut design space app
cricut design space setup
cricut design space download
cricut design space login
Source :- https://cricutie.wordpress.com/2024/05/30/how-to-connect-bluetooth-to-cricut-explore-air-2-full-guide/
0 notes
Text
How to Use Vinyl on Cricut: Create DIY Projects With Me!
Do you want to learn how to use vinyl on Cricut? It’s good to start learning something new. And I can walk you through all the steps included in using vinyl on your Cricut. With vinyl, you can create a beautiful project with your Cricut machine anytime.
I’m a Cricut enthusiast and work full-time to make the best pieces of craft. As much as I have used Cricut, I have closely observed how it works. With this guide, I want to share my learnings with all my readers who are interested in crafting and want to create something.
Do you know what vinyl is? These are flexible materials that are used to transfer designs onto your materials. You can use them to create personalized projects. Let’s get started with this blog post to learn the procedure closely.
What Tools and Supplies Do You Need?
Before you get started with the guide, you’ll have to gather up some necessary materials. Once you’re ready with these materials, you can start with a further guide to create a beautiful craft. Let’s see the list of materials here.
● Cricut machine
● Weeding tool
● Brayer
● Cricut StandardGrip mat
● Scraper
● Transfer tape
● Adhesive vinyl
Finally, you can start with the process and create the best piece of craft with your one and only Cricut machine.
How to Use Vinyl on Cricut to Make a Personalized Craft?
In this section, I’ll tell you some basic steps to get started. Once you have learned the steps clearly, you can experiment with your material and make a similar one. So, without further delay, let’s jump to the final process and learn how to use vinyl on Cricut for beginners.
Step 1: Create a Design in Cricut Design Space
To start, you’ll need to launch your Cricut Design Space software and hit the New Project option. Now, you’ll need to add an image or a text that you want as a final outcome. As Design Space offers you a huge library of images and pre-made designs, it’s quite easy to design anything. Also, you can upload an external file to Canvas.
You can explore all the features of the Design Space. Once you’re satisfied with the design, hit the green “Continue” button.
Step 2: Load Your Vinyl on the Cricut Mat
In this step, you need to place the Cricut StandardGrip mat on a clean, flat surface. Also, take off the plastic covers from the sheet. Now, load the vinyl on your mat, aligning the vinyl with the Cricut mat’s grid lines. Once the vinyl is fixed in place, smooth it down with a scraper tool.
This step will remove all the air bubbles between your Cricut mat and the vinyl.
Moving forward, load your mat into the Cricut machine. Plus, align the edges of your mat with the grid lines. Finally, hit the Load button to load your mat into the machine.
Step 3: Select the Material
I hope you’re learning how to use vinyl on Cricut well with this guide. Moving forward with the next step, choose a material to be cut. For instance, which type of material vinyl you are using - Temporary, permanent or anything else.
To do this, continue with the on-screen prompts to select the Base Material. After that, select the vinyl settings from the options. In case you don’t see your material on the list, hit Browse All Materials to check out the full list.
After selecting the right material, just hit the Go button to start the cutting process.
Step 4: Weed Out Excess Vinyl
Once you get your cut vinyl, it’s time to hit the Load button to unload your Cricut mat. Now, you’ll get the vinyl in the shape you wanted. Remove the excess of vinyl from it using a weeding tool. This tool will remove all the tiny leftovers gracefully leaving the original design untouched.
This method is crucial to give a good finishing to your final project. Once you’re ready with the further steps. Let’s check all of them.
Step 5: Prepare Your Blank
You’ve come here after a long way. So, now you need to prepare the surface of your project with a rubbing alcohol and cotton. This step removes all the dirt, dust and lint from the surface leaving a smooth surface for final vinyl transfer.
Here, I’m using a mug. Let’s wipe it with alcohol and cotton. Let it dry, and continue with the vinyl transfer.
Step 6: Apply Transfer Tape to Your Vinyl
In this step, cut a transfer tape slightly larger than your vinyl design. Next, peel off the paper backing from the transfer tape. Then, apply the transfer tape on your vinyl design in alignment with the grid lines to keep the design straight.
After that, burnish the transfer tape on your vinyl using a scraper tool. This step will help you transfer your vinyl design smoothly.
Step 7: Peel off the Transfer Tape
In this step, carefully peel off the transfer tape from your vinyl’s backing. Ensure that the transfer tape is lifting away smoothly from the backing paper. If it doesn’t happen, you may need to burnish the transfer tape once again.
Step 8: Apply Your Vinyl Design to the Final Project
It’s the final step for transferring your vinyl to the final project. Check if your design is aligned properly on your transfer tape. Once the design is in the correct position, press the vinyl to stick it to the final project. Also, you can use a scraper to burnish the design. Apply the scraper tool all over the vinyl design.
Step 9: Take off Your Transfer Tape
You know how to use vinyl on Cricut. Now, in the final step, just gently peel off the transfer tape away from your project. Ensure that you pull it away at an angle of 45 degrees. Then, the transfer tape will be removed, and the design will be left.
After that, your personalized project is over. Moreover, you need to wait for 24 hours before washing it.
FAQs
How to Place Permanent Vinyl on a Cricut Mat?
Check out the steps below to place a permanent vinyl on your cutting mat:
Getting started with placing the vinyl on a Cricut StandardGrip mat.
Design your project on Cricut Design Space and load it into the machine.
Hit the Go button and finish the vinyl loading.
What Kinds of Vinyl Are Available for Cricut?
There are mainly two types of vinyl- Adhesive and Heat Transfer Vinyl. The adhesive vinyl comes for standard projects that only need transfer of vinyl to the project’s surface. On the other hand, a heat transfer vinyl is suitable for the iron-on projects that demands application of heat to transfer design.
Which Vinyl Should I Use for My Cricut Projects?
Well, it completely depends on the type of your project. If you need a temporary project, you should use removable vinyl that can be removed when you don’t need it anymore. On the other hand, if you want a more professional-looking and high-quality project, you should go with a permanent vinyl type.
Read more: install cricut design space app
cricut.com/setup mac
Cricut Design Space
Cricut.com setup windows
Source: how to use vinyl on Cricut
#how to use vinyl on Cricut#Cricut.com setup windows#Cricut Design Space#cricut.com/setup mac#cricut explore 3#www.cricut.com setup login#cricut explore air 2#cricut.com/setup
0 notes