#Cricut Easy press
Explore tagged Tumblr posts
Text
How to Connect Cricut to Phone: Full Guide for Android & iOS

A smartphone with iOS or Android is compatible with the Cricut Design Space app. To use your mobile with Cricut, you will have to connect it to the machine. You have two connection options: Bluetooth or USB. While Bluetooth is a wireless and flexible option preferred by many users, this write-up will focus on connecting using Bluetooth.
How to Set up a Cricut Machine on Mobile Devices?
Before learning how to connect a machine to a phone, you must know the procedure to set up the machine on your mobile device. Here is the procedure for the machine setup:
In the beginning, turn on your machine after plugging it into a power socket.
Then, connect your phone to the machine using USB or Bluetooth.
Now, download the Design Space app on your device.
When the app is installed on your device, sign in with your username and password.
After that, open the app and then select Machine Setup.
Also, you have to select the machine model and follow the instructions on your screen.
The machine setup will be complete by now, and you will be asked for a test cut.
How to Connect Cricut to Phone (Android)?
If you do not have a computer but want to use a Cricut machine, you can simply do it on your Android or iOS phone. If you are using an Android phone, you will have to connect it to your machine. To connect them via Bluetooth, you will have to follow these steps:
To get started, turn on your machine by pressing the power button.

Second, keep the machine and the device within 10–15 feet.
Now, open Settings and then go to Bluetooth.
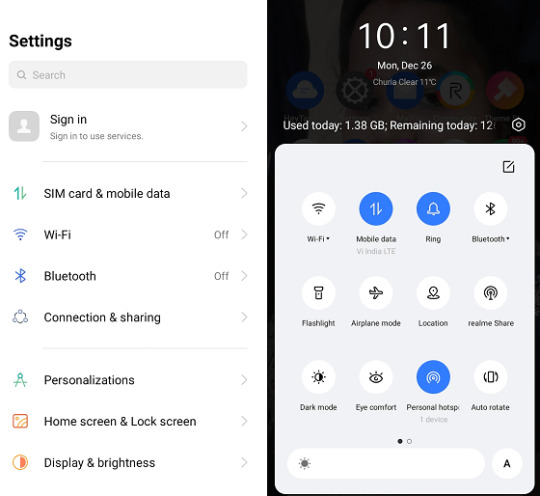
Turn Bluetooth ON if it is not turned on, and then wait until the device searches for your machine.
Upon seeing your machine, you have to tap on it, and the machine will connect to the phone soon.
If the pairing requires a password, you have to type 0000 as a password.
After that, you will see that the pairing is complete.
How to Connect Cricut to Phone (iPhone or iPad)?
In case you have an iPhone or iPad, you can connect it to your machine. iOS devices use the same procedure for connecting to their machine as Android phones. Here, you can see how to connect your machine to your device.
Just like with an Android phone, you have to turn on the machine and then keep it within 10–15 feet.
Then, go to the Bluetooth settings in your phone and turn it on.
Once Bluetooth is turned on, the iPhone will start searching for nearby devices to connect.

When you see the machine, you have to click on it, and it will connect to your iPhone.
Again, if the device asks you for a Bluetooth PIN, you have to type 0000.
How to Connect Cricut to Phone With USB?
If you do not want to use Bluetooth to connect your device and Cricut machine, you can opt for a USB connection. Connecting your Android or iOS device through USB is easy. See how you can do it.
Initially, you should prepare the machine for the setup and then turn it on.
Once the machine is on and your phone is ready, you have to take a cable.
Then, you should plug the cable into the machine from one side and then plug it into the phone from the other side.
Now, the USB cable connection is complete.
Conclusion
Now that you have read the blog to the end, you have learned how to connect Cricut to phone. This is very important to start creating your projects, as without connecting it to your device, you will not be able to use it. In the blog, I have written about both wired and wireless connections. Once you connect both devices, you must download the Cricut Design Space app. It will help you start working on your crafting projects.
FAQs
What Is the Cricut Bluetooth PIN?
When you connect the Cricut machine to the device, sometimes you have to enter the password. This mostly happens when you connect your machine to the device for the first time. If you face the same problem while trying to connect, you don’t have to worry. You just have to enter “0000,” and your mobile device will be added to the machine.
Can I Connect Cricut to a Bluetooth Computer?
Yes, of course you can! Cricut works with both a phone and a computer, so if you want to use a Cricut machine with a computer, you can do it. You can connect it to your machine using the same method: a USB or Bluetooth connection. Plus, you can use a Windows or Mac desktop to connect and work on your projects. But remember, a Chromebook computer does not work with Cricut Design Space.
Do I Need Bluetooth for Cricut?
Not necessarily! If your device or Cricut machine has Bluetooth, you can use it to connect with each other. But if one or both of them does not have Bluetooth, then you can use a USB cable to connect them. Some old Cricut models do not have the Bluetooth option, but a USB cable connection will help you. You can also use an external Bluetooth for those machines. However, if you are using Cricut Joy, then you will require a Bluetooth device as it does not have a USB option.
Source: how to connect Cricut to phone
Cricut.com/setup
Pinterest
0 notes
Text
How to Setup Cricut Maker 3: Full Guide for Beginners
Are you a beginner looking to start with a Cricut machine? Are you wondering how to setup Cricut Maker 3? If yes, then you have reached the right place. As a longtime Cricut user, I have been using the Cricut Maker 3 machine really well. Here, I am going to provide all the necessary details and tutorials to guide you in setting up your own Cricut cutting machine.
The Cricut Maker 3 is a third-generation crafting machine and one of the latest models. It is known for its power and is capable of cutting over 300 different materials, such as paper, cardstock, leather, plastic, fabric, vinyl, iron-on vinyl, metal, and more. To begin setting up, you have first to unbox the machine and then follow the steps below.
Unboxing the Cricut Maker 3 Product
As a beginner, after buying the machine to learn how to setup Cricut Maker 3, the first thing you have to do is unbox it, check for the items, and make sure nothing is missing. Once checked, you can prepare it for the setup. When you buy the Cricut machine, these are the tools and supplies you will get in the box. You should keep them all in a good place so nothing gets lost and you can find them easily when you need them to use.
Note: When you buy the machine, you should know one thing: a few items will not be in the box. Cricut used to provide these materials in the previous ones. These tools are a mat, pen, rotary blade, and others. While using the Cricut Maker 3 machine, you will have to know what extra tools you will need, and you will have to buy those things separately.
How to Setup Cricut Maker 3 to Get Started Easily?
Once you have unboxed, you can proceed to see the setup you have to do. The process for the Cricut product is as follows. You will need to do it properly and in the right order. The machine setup will be done, and you will be able to work on it.
How to Connect Cricut Maker 3 to Your Computer?
In order to learn how to setup Cricut Maker 3, the next step is that you have to connect the Cricut machine to your computer, you can use wireless Bluetooth or a wired USB cable connection for pairing. The process for connecting your Cricut to your desktop via Bluetooth is here.
How to Download Cricut Design Space?
Moving forward in learning how to setup Cricut Maker 3, now you have to download the Cricut Design Space app on your computer. You may find it a little difficult if you are doing it, but trust me, it is very easy, and here is how you can do it.
Conclusion
In short, learning how to setup Cricut Maker 3 is an easy task, but you should have the proper guidelines for it. In this blog, I have given you all the details you need for your Cricut Maker 3 setup. The first thing you have to do is unbox the machine and prepare for the setup. Once the machine is prepared, you should connect it to your computer. The final step in the setup is to download the Cricut Design Space app. Once you have downloaded and logged in with an account, you can start working on projects.
FAQs
Can I Make Stickers With Cricut Maker 3?
Yes, you can! Cricut Maker 3 is a versatile tool that can cut all the materials you can on a Cricut machine. It is a powerful machine; you can even cut materials like metal and leather. To make stickers, you need to cut papers or cardstock on the Cricut machine. The Cricut Maker 3 can easily cut these materials, allowing you to make stickers.
Can I Use Ink With My Cricut Maker 3?
Yes, for sure! Infusible ink is a material that you can cut on the Cricut machine, and then you can use that design on a mug to make a unique design with the help of the Cricut Mug Press. Infusible ink can be cut on any Cricut machine. Even the older models cut the design to the infusible. If you want to use the ink with the Cricut Maker 3, you can do it without any problem.
What Software Is Good for Cricut Maker 3?
Cricut has two software applications, both compatible with all Cricut machines. The first is the Cricut Design Space app, which is free. You can download this app on your device, connect it to the Cricut Maker 3, and use it just like any other Cricut machine. The other app, Cricut Access, is also available for the Maker 3 machine. However, it is a premium app and requires a subscription.
Visit: cricut.com/setup
Source: https://cricricutdesigncut.wordpress.com/2024/07/20/how-to-setup-cricut-maker-3-full-guide-for-beginners/
#design space setup#cricut.com/setup explore air 2 setup#cricut.com/setup#cricut venture#cricut easy press#cricut design space#cricut new machine setup#cricut setup#www.cricut.com/seup#digital design#www.cricut.com/setup login#setup cricut design space setup#cricut design space setupp#cricut design space login#design space cricut#design.cricut.com#design.cricut.com/setup
0 notes
Text
How to Use a Cricut Mug Press: A Step-by-Step Guide
When I first bought my Cricut Mug Press, I was quite nervous about learning how to use a Cricut Mug Press. It took some time to read many articles and gather all the essential information. Now that I have gained experience using it, I want to share all the basic instructions for using this Cricut machine. If you are uncertain about using it, make sure to read this post to the end.
The Cricut Mug Press is a small yet impressive tool that transforms plain mugs into stylish designer pieces. Despite its compact size, it is incredibly capable and essential for crafting custom mugs for personal use or as gifts for loved ones. So, let’s start with the materials you will need for your project.
Tools and Supplies You Need to Create a Personalized Mug
Before learning how to use a Cricut Mug Press, it is important to know the necessary materials you are going to need. Here is a detailed list:
Cricut cutting machine: You will have to use this machine to cut designs from the infusible ink sheet. Suitable Cricut models are Cricut Maker 3, Explore 3, or Joy.
Cricut Mug Press: This is the machine used to transfer the infusible ink design onto your mug.
Sublimation mug: Specific mugs made for the Mug Press machine are necessary because they fit perfectly and ensure the best results. Using other mugs of different shapes and sizes may not fit or work well with the machine.
Infusible ink sheet: This material is basic as it is where you will cut your designs, which will later be transferred onto the mug using heat in the machine.
Heat-resistant tape: It is essential for securing the infusible ink sheet onto the mug during the pressing process.
Lint roller: Used to ensure the surface of the mug is clean and free of debris before applying the infusible ink design.
Weeding tools: These are used to remove excess or unwanted material from the design before transferring it to the mug.
Once you have assembled all these supplies and tools, ensure your setup is ready. Connect your Cricut machine to power and turn it on. Establish a connection between the machine and your device using Bluetooth or USB. Download the Design Space app on your device and log in with your account. This setup is essential before proceeding with the Mug Press.
Before beginning to use the Mug Press, ensure it is on and heating up properly. Following these steps ensures you are ready to create custom mugs with your Cricut machine.
How to Use a Cricut Mug Press in 4 Simple Steps?
When you have assembled all the necessary tools and completed the setup, you can start working on your project. Here are the 4 steps you need to follow to use the Mug Press:
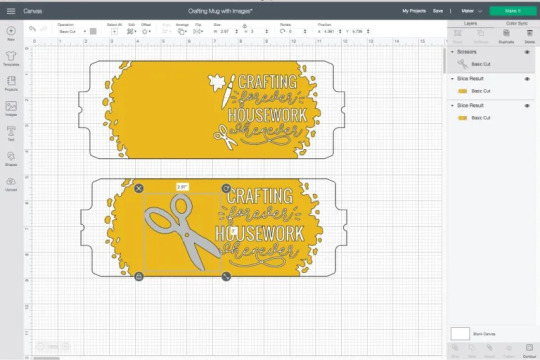
Step 1: Create a Design on Cricut Software
Step 2: Cut and Weed Out the Excess Material

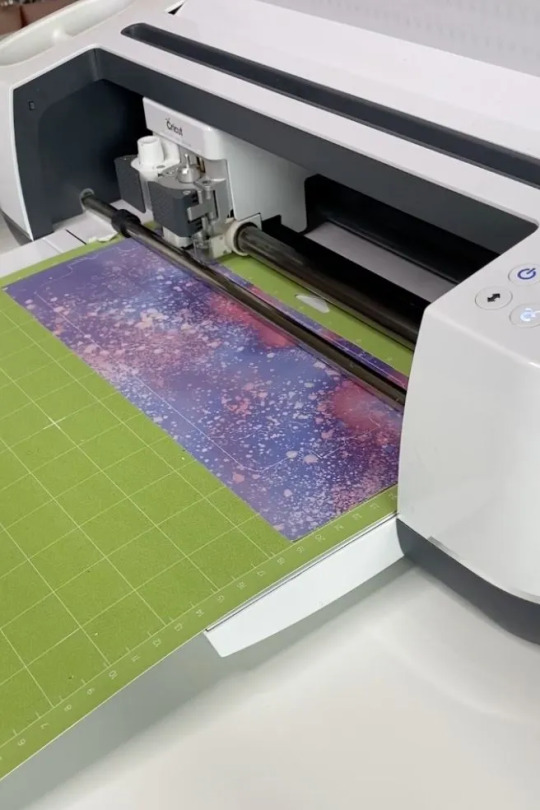
After completing the design, insert the material into the machine and press the Load button. The design will be cut quickly. Once the cutting is done, unload the material and use a weeding tool to peel away any unwanted parts from the design.
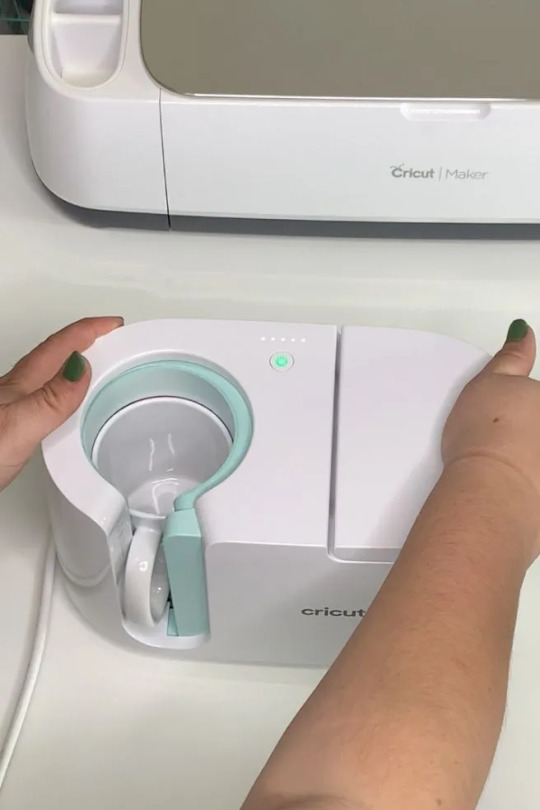
Step 3: Transfer the Design to Your Mug

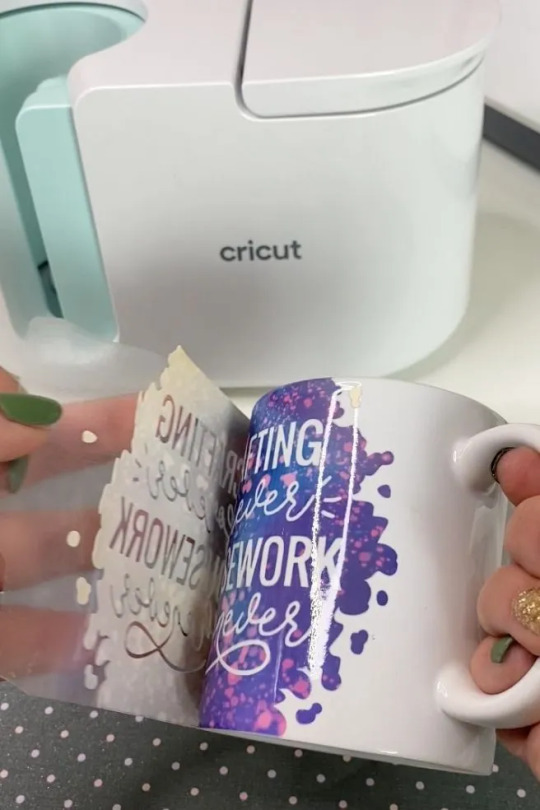
Step 4: Reveal the Final Result
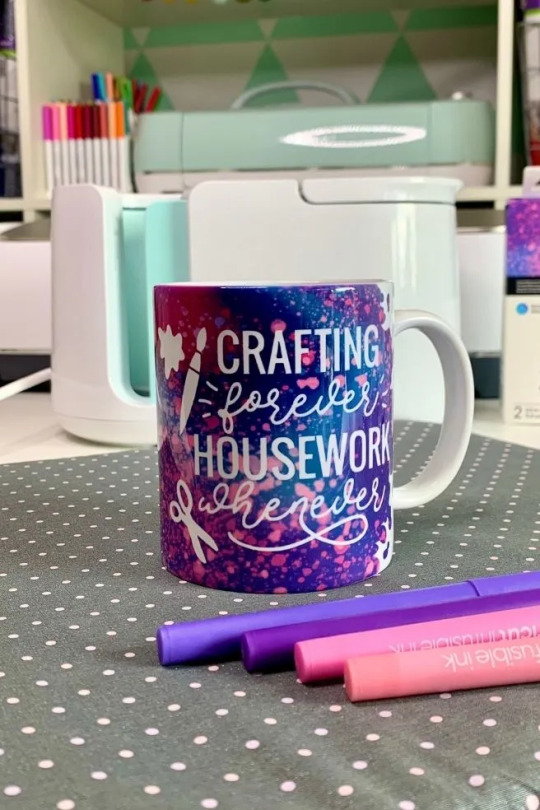
When the pressing is complete, carefully remove the mug from the machine, handling it by the handle to avoid burns. Allow the mug to cool for 20–30 minutes. During this time, it’s important to avoid touching the heated areas to prevent injury. Once the mug has cooled down completely, it will be ready for use, showing your newly transferred design beautifully.
Conclusion
In short, learning how to use a Cricut Mug Press is quite easy. As you can see, the process is simple. First, gather all the necessary tools and accessories and set them up. Once the setup is done, create a design on the Design Space app, cut it on the Cricut cutting machine, and press the design onto the mug using the Mug Press machine. Once the pressing is finished, you will have a beautiful mug ready to use however you like.
FAQs
What Are the Supplies Required for Cricut Mug Press?
To work with a Cricut machine and create designer mugs, you will need some essential supplies:
Cricut cutting machine
Cricut Mug Press
Infusible Ink
Heat-resistant tape
Weeding tool
Lint roller
Sublimation Ink
These tools are important to prepare and execute projects with Cricut effectively.
Do I Need a Computer to Use Cricut Mug Press?
No, not necessarily! You can download the Cricut Design Space app on your computer or any device. If you don’t have a computer, you can use your Android or iOS mobile instead. However, using a computer for the app allows you to work on projects more effectively. Just ensure your computer runs on either Windows or macOS, as Chromebooks do not support the software.
Can I Use Any Mug in Cricut Mug Press?
No, you cannot! The mug used in the Cricut Mug Press must meet specific criteria. It should have a maximum height of 4.72 inches and a diameter between 3.2 to 3.4 inches, with a capacity of 10 to 16 ounces (295 to 450 ml). Also, the mug’s surface should be plain; textured or rough mug surfaces are not suitable for the machine. Ideally, the mug should be white for best results.
Source: how to use a Cricut Mug Press
Visit here to Know More: Cricut Easy Press
Pinterest
0 notes
Text
How to Use Cricut Easy Press: A Guide for Iron-on Transfers

The Cricut Easy Press is great for use with traditional heat transfer vinyl. To use this machine, you will need other Cricut machines as well because you can only transfer a design after you’ve made the cut, and for that, you need a Cricut cutting machine. So, let’s discuss the difference between Easy Press and Easy Press 2.
Differences Between Cricut Easy Press and Easy Press 2
The Cricut Easy Press is a first-generation heat press machine that was launched in 2017. Cricut has since launched several other heat press machines. The Easy Press 2 is one of the most important among them. It comes with many updates, but Easy Press has its advantages.
Here are the main differences between the Easy Press and Easy Press 2.
The Cricut Easy Press comes only in one size: a standard size of 9 x 9. Whereas Cricut Easy Press 2 has 3 different sizes. One of them is 9 x 9, which is the same as Easy Press, and the others are 6 x 7 and 12 x 10.
The Easy Press 2 includes a higher temperature capacity, which reaches up to 400°F
The Easy Press 2 heats up 25% faster than the Easy Press.
Easy Press 2 has better edge-to-edge heating, which spreads on the material all over around.
The Easy Press can remember the temperature settings from the last use. Something you could not do in the Easy Press.
Why Do You Need a Cricut Easy Press?
Before you learn how to use Cricut Easy Press, you should know why you need an Easy Press. If you understand its uses, you also know that it is a heat transfer machine, and the same can be done by an electric iron. However, an electric iron will not provide the things that an Easy Press machine will. Here are the reasons why you need Easy Press.
Heat Dispersion
Regular household irons are not made for even dispersion of heat. In iron, heat is focused in the center, but as it moves away from the center, the heat decreases. In the Easy Press machine, the heat temperature is distributed evenly, which is good for the heat transfer of a material.
Temperature and Control Ability

Various materials have many heat transfer needs, so you need a completely different temperature for iron-on than you do for iron-on vinyl. The machine is great at understanding the temperature requirement of a material and can process the exact amount of heat it requires. Also, its heat pressure is easy to control, and it will be good for you if you use it.
Flat and Stable Surface
An Easy Press machine works best when it is used on a flat surface. Therefore, it is highly recommended that a flat surface be used for the heat press. It will help prevent material damage. The Easy Press is a powerful machine that takes care of the material when using it on a surface.
How to Use Cricut Easy Press: 3 Easy Steps
Now, I am going to tell you how to use Cricut Easy Press and print beautiful designs on shirts, t-shirts, and other fabrics:
Step 1: Choose and Cut Your Design
First, you have to choose a design on your Cricut Design Space app. You can select a pre-made design or create a design of your own. Then, the design is cut using a Cricut cutting machine. After that, you can go to use the Easy Press machine.
Step 2: Prepare Cricut Easy Press and Tools
Once you have the design cut out, you can use the Easy Press machine. Before using it, you will need to prepare it. You should place the base material on the mat and heat the machine. Next, adjust the temperature according to the material. You should use the buttons to increase and decrease the temperature. When the heat press is ready, the light turns green, and the machine will beep.
Step 3: Apply Heat and Peel
Once the machine beeps, you can place the design on your fabric along with the mat and apply heat from the heat press machine. You have to keep pressing for about 10 seconds, and then you can release the machine. Now, wait until the material cools down, and then you can peel off the protective sheet and reveal the design. Your beautiful design is done.
Conclusion
Now, you have learned how to use Cricut Easy Press to create beautiful designs on your favorite fabrics and more. Using the heat press machine is easy, and you can do it in a few quick and easy steps. To use the Easy Press machine, you must first cut out a design on the Cricut cutting machine and then prepare the Easy Press machine. After you prepare the machine, you can put the design on your fabric and apply heat to it. After the temperature decreases, peel the protective sheet down, and your design is ready.
FAQs
What Can I Make with My Cricut Easy Press?
The Easy Press machine is useful for all Cricut users. With the help of this machine, you can create multiple things on your own. It will help you make beautiful projects like shirts, coasters, masks, wooden signs, banners, belts, etc. With this heat press machine, you can apply pressure on almost any material cut on a Cricut machine and then stick it where you want.
Do I Need a Cutting Mat for Cricut Easy Press?
Yes, you do! To use the Cricut Easy Press machine, you must use a Cricut mat. If you apply heat to your material, your design may get messed up. The heat of the machine can burn the design, material, or even your fabric. It is this mat that protects them from the high temperatures produced by the machine. The mat is made of a heat-resistant cover, so using the Easy Press is a must.
Do I need a Cricut Easy Press, or can I use an iron?
To be honest, if you just need to use Easy Press once in a while, you can do without the machine. You can use a regular household iron, and your work will be done. But using a regular iron has its risks. It will not give you your desired results. The outcome may not be what you expect. The design may not last long. So, if you want a good and clean finish for your designs on your materials, you must buy an Easy Press machine.
Source: how to use Cricut easy press
Visit here For More Information: Cricut.com/setup
Pinterest
0 notes
Text
Cricut Easy Press 2 Setup: Quick and Easy Instructions
In my previous blog, one of my readers left a comment asking me to teach about the Cricut EasyPress 2 setup. It will be a little tricky for me because it’s been a while since I have used this machine. With this Cricut product, you can create amazing iron-on projects such as tote bags, pillows, aprons, and so much more. In addition, this Cricut machine comes with the speed of a heat press and the convenience of a household iron.
Before using this Cricut product to make DIY projects, you must set it up on a computer. Plus, you will register this Cricut Easy Press model through Cricut Design Space. If you don’t want to miss the golden chance to grab the content about the machine setup and registration procedure, then read this blog.
Cricut Easy Press 2 Setup on Your Computer
If you want to learn the Cricut machine setup process on PCs, this blog section benefits you. It will share all the details that will make it easy to set up the devices. To execute the process in a proper format, take a look at the steps given below:
In the opening step of the process, download and install Cricut Design Space on your computer.

Next, you must sign in or create your Cricut ID to use the app.

Then, go back to the Cricut app main page and select the Menu bar on the left-hand side.
After that, click the New Product Setup button under the Canvas dropbox.
Following this, tap the Cricut Heat Press and then Cricut EasyPress 2.
In this step of the Cricut EasyPress 2 setup, plug the power cable into the wall socket.

Also, ensure the socket is working and not too far from the Heat Press.
At this point, plug the cord’s small end into the EasyPress 2 USB port and the large end into the computer USB port.

Now, finish the rest of the process by following the instructions displayed on your system screen.
After successfully setting up both devices, you need to register your Cricut Heat Press by following the instructions below.
How Do I Register My Cricut EasyPress 2 Machine?
In addition to the Cricut EasyPress 2 setup guide, let’s study in depth the method for setting up this product through the Cricut Design app.
First, switch on your desktop or mobile devices and open Cricut Design Space.
Second, download the Cricut app and follow the instructions present on your screen.

Third, choose New Product Setup by opening the app on your device.
Now, go through the on-screen guidelines to complete the remaining setup process.
Finally, your Cricut EasyPress 2 will instantly register when the setup is concluded.
You can create different heat-transfer projects after successfully registering this Cricut Heat Press model.
How to Adjust Cricut EasyPress 2 Temperature?
In case there comes the point where you want to change the product heating temperature, then take the help of the info given below:
Commence the process by powering on this Cricut EasyPress version.
Now, click the temperature button for a few seconds to turn it on.
Afterward, adjust the Cricut product temperature using the (+) or (-) button.

Then, change the temperature from *C to *F by holding the temperature button for a few seconds.
At this time, set your machine’s time by clicking the clock icon and setting the time using the (+ or -) sign.

Now, the orange light will display that your Cricut EasyPress 2 is heating up.
Also, the green light will display that the press has reached the set temperature.
If you see a red light, it clearly indicates that an error was made while adjusting the temperature.
Finally, your Cricut EasyPress 2 is all set to be used for crafting numerous personalized projects.
Overall, this Cricut product is one of a kind among its series. Undoubtedly, if you are a beginner, you might face difficulty in the beginning, but once the Cricut EasyPress 2 setup is done, everything will instantly get sorted out.
Frequently Asked Questions
Question: How to Update Cricut EasyPress 2 Firmware?
Answer: To update your Cricut EasyPress 2 firmware, check out the following steps:
Open the Cricut New Product Setup page.
On the page, select Cricut Heat Press and then Cricut EasyPress 2.
Now, sign in to your Cricut account and follow the on-screen instructions.
Afterward, hit the Update option, and the press will update the firmware.
Finally, tick the Done option and start crafting various projects.
Question: How to Access Cricut EasyPress 2 Heat Guide?
Answer: To get access to your Cricut EasyPress 2 Heat Guide, read this method:
The procedure will start by opening the official site of Cricut Design Space.
Now, start looking for the Heat Guide and then open it.
Afterward, choose the Heat Transfer material & Base material from the section.
Also, choose the Cricut cutting mat and then click the Apply button.
At last, select the temperature & timing depending on the material.
Question: Does Cricut EasyPress 2 Support the Cricut Heat App?
Answer: No, Cricut Easy Press 2 doesn’t support the Cricut Heat app for any reason. This model doesn’t have built-in Bluetooth connectivity, which is why it doesn’t scan the Heat app. On the other hand, you can easily connect the app with Cricut Easy Press 3, which has Bluetooth and various other features.
read more: cricut.com/setup mac
install cricut design space app
Cricut Design Space
Cricut New Machine Setup
Source: cricut easy press 2 setup
0 notes
Text
Cricut Easy Press Set up Guide for Optimal Results

In addition to producing crafting machines, Cricut.com/setup Inc. also develops a variety of Heat Presses for DIYers worldwide. It’s pretty evident that before creating custom-made projects, all users need to be aware of the proper Cricut Easy Press set up process. As a professional crafter, I prefer Cricut EasyPress 3 when making any iron-on projects.
Cricut EasyPress 3 perfectly combines heat press speed and iron convenience. It is three times faster than other models and operates with the Cricut Heat app. This EasyPress model is ideal for DIY projects like bandanas, coasters, cosmetic bags, and T-shirts. All users must set up their Cricut machines on a device and then create projects. This blog provides details on how to set up, activate, and craft with this Cricut Heat Press model.
Cricut Easy Press Set up on Your Mobile Device
Finishing the Cricut Easy Press 3 setup with mobile devices is a challenging task. But it can be done by referring to the steps shared in the below pointers:
Start the process by going to your device’s Settings app and enabling its Bluetooth feature.
After enabling Bluetooth, connect your Heat Press’s power cord to the nearby wall socket and turn it on.
Next, open your Cricut Heat app and sign in by entering your login details inside the specific section.
Following this, tick the Set up New Heat Press and follow the on-screen instructions appearing on the screen.
If your Cricut EasyPress 3 is enabled, it will appear under the My Presses section.
Now, the app will notify you about the successful connection, and you will see the press name on your Bluetooth list.
Finally, you can start making new iron-on projects by wirelessly giving commands to the heat press.
How Do I Activate My Cricut EasyPress 3?
After successfully finishing up the Cricut Easy Press set up with smartphones, it’s time to step forward and activate the press. Carefully consider the below steps to activate the Cricut EasyPress 3:
First, download and install the Cricut Heat app on your Android/iOS devices and create your account.
After that, sign in with your Design Space account and start unboxing the press from its packages.
Now, plug your Cricut EasyPress 3 into the compatible wall socket and press the power button to switch it on.
Following this, you will notice the word APP flashing on the screen, meaning your press needs to be connected to the device.
Next, go to your Cricut Heat app and choose the Set Up option to start the activation process.
After that, choose Cricut EasyPress 3 from the list and hit the Connect button.
At this point, the Cricut Heat app will display connecting to Cricut EasyPress 3 with the Bluetooth logo.
Now, the app will confirm the details, select the Terms & Conditions box, and tick the Activate option.
At last, when the process ends, you will get the success message that the devices are ready to be used.
How to Use Cricut EasyPress 3?
With the completion of the Cricut Easy Press set up and activation process, let’s discuss how you can make crafts from this Heat Press:
Begin the process by pressing the Temperature button and adjusting the value with the plus (+) or minus (-) buttons.
To change the temperature from Fahrenheit to Celcius, press the Temperature button until you see the change from *F to *C.
Following this, tick the time button and then adjust the timing with (+) or (-) buttons.
Now, you will notice an orange light, which means that your Cricut Heat Press is heating up, and a green light, which means that the temperature has been reached.
Lastly, select the Go button to start the countdown. If you are using Cricut EasyPress 3, the app will show the countdown.
Conclusion
In conclusion, regarding the Cricut Easy Press set up blog, you must’ve understood that Cricut EasyPress 3 is the smartest heat press with the ability to do various do-it-yourself iron-on projects. No doubt, it’s compulsory for all the users to finish the connection and activation process before starting any project. They can buy this Cricut Heat Press from Cricut’s official website (design.cricut.com), Amazon, or Walmart at a discounted price range.
Frequently Asked Questions
How to Use Cricut EasyPress 3 With the Cricut Heat App?
Have a look at the below steps and get to learn a project that you can make out of Cricut EasyPress 3 with the Heat app:
First, plug in the heat press power cord into the wall outlet and open the Cricut Heat app.
Now, choose Cricut EasyPress 3 under My Presses and tick Start New Project.
Next, you need to select the material & base material and tick the Next option.
Finally, tap the Send Settings to EasyPress and follow the instructions to finish the process.
How Do I Update My Cricut EasyPress 3 Firmware?
The Cricut EasyPress 3 firmware will be updated through the Heat app by referring to the steps given below:
First, you need to plug in the power cable inside the wall socket and press the power button.
After doing that, you need to check whether your Heat Press is paired with the Heat app or not.
Finally, select Cricut EasyPress 3 under the My Presses section, and it will update the firmware directly.
How to Adjust Cricut EasyPress 3 Temperature With Heat App?
Have a look at the below steps and get to know about the steps needed to be taken while adjusting the temperature with the Cricut Heat app:
Begin the process by turning on your Cricut EasyPress 3 and choosing your Heat Press model.
After doing that, select your transfer material & base material and tick the Next option.
Now, press the Send Settings to EasyPress, and the app will display the temperature settings.
For more information visit: Cricut.com/create Cricut Design Space Download Cricut New Machine Setup
Source: Cricut Easy Press Set up
#cricut easy press set up#cricut design space download#cricut design space login#design.cricut.com#Cricut New Machine Setup#cricut.com/create#Cricut maker setup
1 note
·
View note
Text
CÓMO FUNCIONA LA LOKLIK CRAFTER. Trucos y consejos. Unboxing
View On WordPress
#cricut#diy#easy press#error loklik#firmware loklik#how to use#loklik#loklik crafter#manualidades#vinilo textil
0 notes
Text
Listen to your elders
So last week I posted abut the importance of downloading your fic. And then three days later AO3 went down for 24 hours. No one was more weirded out by this than I was. But while y’all were acting like the library at Alexandria was on fire I was reading my download fic and editing chapter eight of Buck, Rogers, and the 21st Century. And also thinking about what I could do to be helpful when the crisis was actually over.
So first off, I’m going to repeat that if you’re going to bookmark a fic, you really need to also download the fic and back it up in a safe place. I just do it automatically now and it’s a good habit to get into.
But let’s talk about some other scenarios. Last October I lost power for over a week after hurricane Ian. Apart from not having internet or A/C I did find plenty to do, I collect books so I had plenty to read, but maybe, unlike me, your favorite comfort reads aren’t sitting on a bookshelf. So let’s do something about that, shall we?
In olden times many long years ago around 1995 we printed off a lot of fic. It was mostly SOP to print a fic you planned to reread and stick it in a three ring binder. And that’s totally valid today too, but you can also make a very nice paperback with a minimum amount of skill and materials.
Let’s start with the download; Go to Ao3 and select your fic, we’ll be working with one of mine. This method works best with one shots, long fic tends to need a more complicated approach. Get yourself an HTML download

Open up the HTML download and select all then copy paste into any word processor. Set the page to landscape and two columns, then change the font to something you find easy to read, this is your book, no judgement. This is all you have to do for layout but I like to play a little bit. I move all the meta, summary, notes to the end and pick out a fun font for the title:
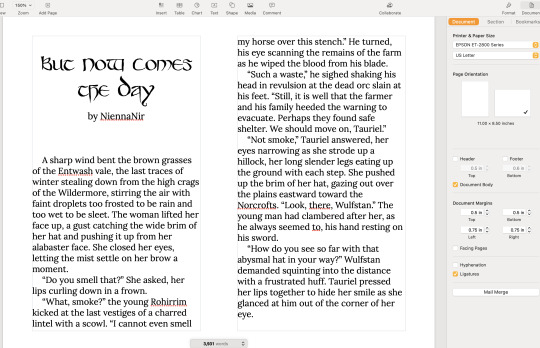
No time like the present to do a quick proofread. Congratulations, you’ve just created your first typeset. On to the fun part.
Now you’re going to need some materials: 8.5x11in paper ruler one sheet of 12x12 medium card stock (60-80lb) scissors pencil pen or fine tip marker sheet of wax paper white glue two binder clips 2 heavy books or 1 brick butter knife
You’ll also need a printer, if you’re in the US there is almost a 100% chance your local library has a printer you can use if you don’t have your own. None of these materials are expensive and you can literally use cheap copy paper and Elmers glue.
Print your text block, one page per side. Fold the first page in half so that the blank side is inside and the printed side out:
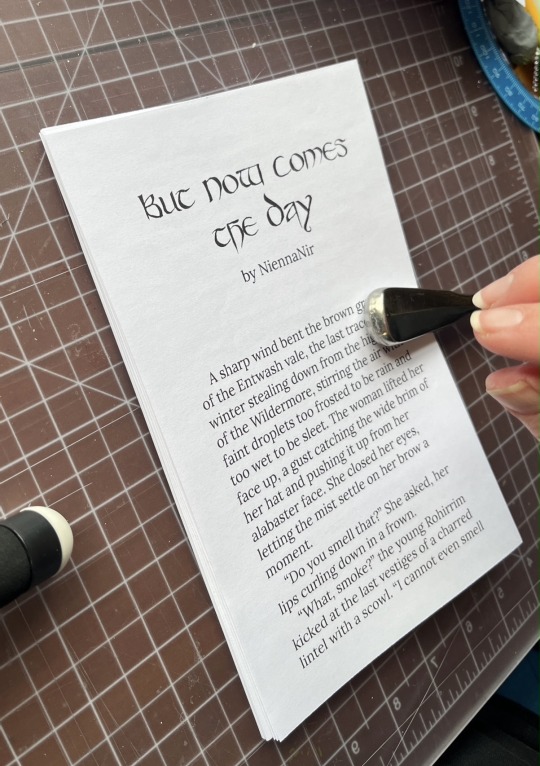
use the butter knife to crease the edge. Repeat on all the sheets. When you’ve finished, stack them up with the raw edge on the left and the folded edge on the right. I used standard copy paper, because you’re only printing on one side there’s no bleed to worry about. Take the text block and line everything up. Use the binder clips to hold the raw edge in place.
Wrap the text block in the wax paper so that the raw edge and binder clips are facing out. I’m going to use my home built book press but you don’t need one, a brick or a couple of books or anything else heavy will work fine.
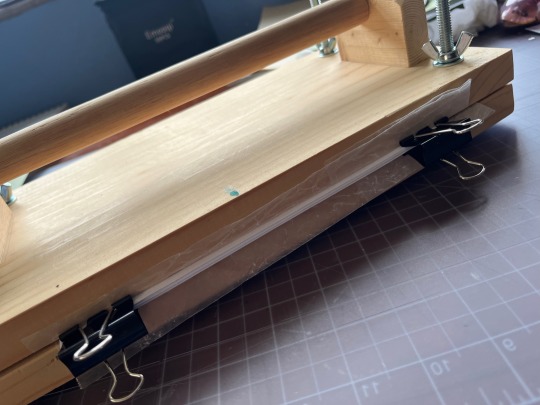
Once the text block is anchored down, take off he binder clips and get out the glue.
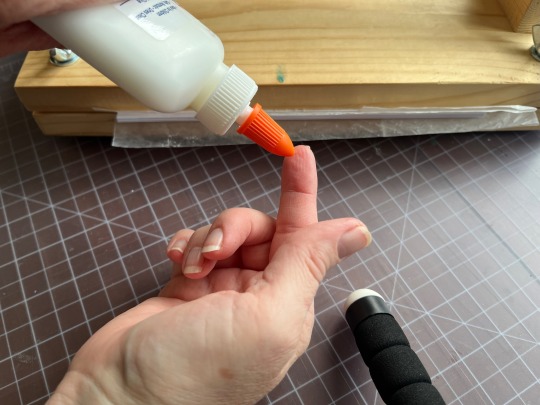
You can use a brush but you don’t need one, smear some glue on that raw edge.
Go make a margarita, watch The Mandalorian, call your mother. Don’t come back for at least an hour
In an hour smear some more glue on there and shift your brick forward so that the whole book is covered. This keeps the paper from warping. While glue part 2 is drying we’ll do the cover. Get out your 12x12 cardstock
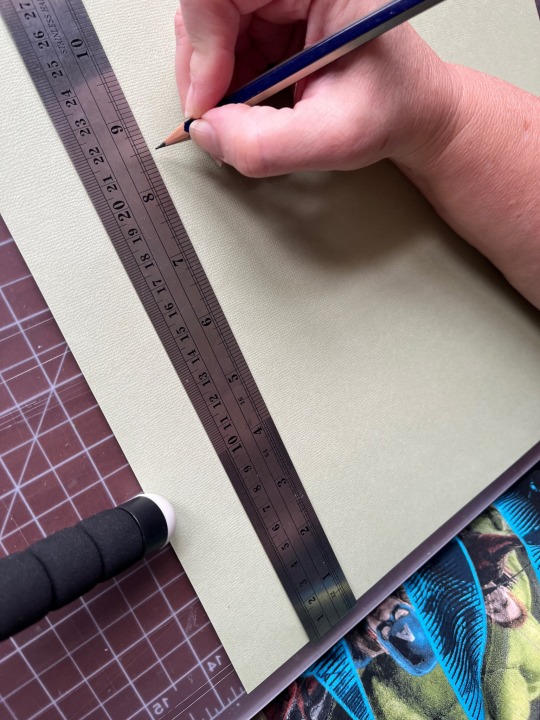
Mark the cardstock off at 8.5 inches and cut it. Measure in 5.5 inches from the left and put in a score line with the butter knife (the back edge not the sharp edge)
Carefully fold the score line, this is your front cover. You have some options for the cover title, you can use a cutting machine like a cricut if you have one, you can print out a title on the computer and use carbon paper to transfer the text to the cardstock. I was in a mood so I just freehanded that beoch. Pencil first then in pen.
Take your text block out from under your brick. Line it up against the score mark and mark the second score on the other side of the spine
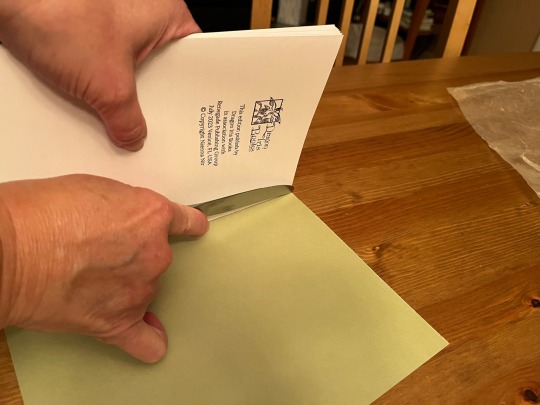
Fold the score and glue the textblock into the cover at the spine. Once the glue dries up mark the back cover with the pencil and then trim the back cover to fit with your scissors.
Voila:
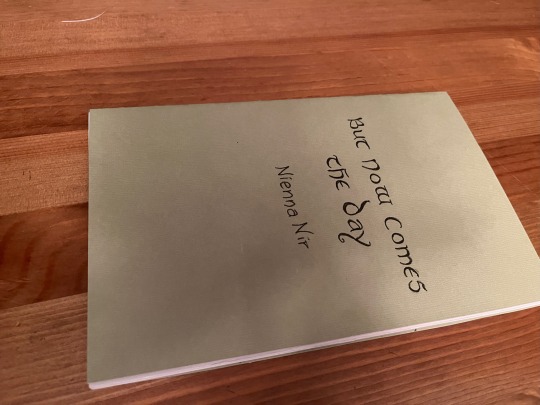
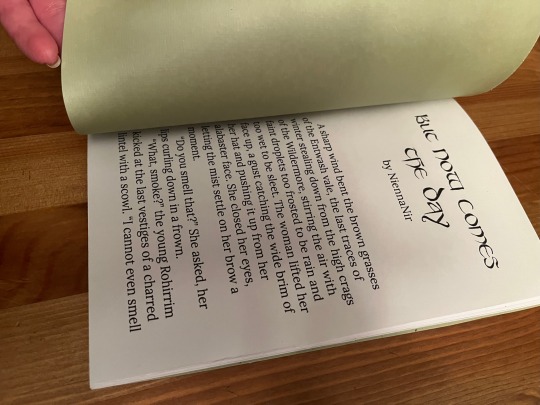
I’m going to put this baby on the shelf next to the Silmarillion.
The whole process, not counting drying time, took less than an hour.
If you want to make a book of a longer fic, I recommend Renegade Publishing, they have a ton of resources for fan-binders.
21K notes
·
View notes
Text
Cricut Easy Press Black Friday: Top 2023 Deals
Who doesn’t love saving money? So, if you are a crafter, then get ready to save big during the Cricut Easy Press Black Friday sale. In this upcoming sale, you can get any Cricut heat press machine for almost half its original price. For a Cricut crafter, there could be no better deal than this. Here, you will learn about the various Cricut heat press machines and the chances of getting a discount on that machine. Get ready to add a new member to your Cricut tools. So, keep reading to explore the products and then grab the best deals in the upcoming Cricut Black Friday sale of 2023!
1. Cricut EasyPress Mini

Also, EasyPress Mini comes with Auto shut-off features that ensure the full safety of users, which is hard to find in regular irons. Next, the device works perfectly for projects like infusible ink and iron-on. This is the best option to get the Cricut Easy Press Black Friday deal.
2. Cricut EasyPress 2

Plus, the machine comes with a smart design handle to use the machine, place on the product without any guesswork, and apply even pressure on the whole product. Cricut EasyPress 2 is the ultimate companion for crafters who aim to achieve pro-level results.
With the Cricut Easy Press Black Friday deal, you can get this machine at a lower cost than its actual price.
3. Cricut EasyPress 3

In addition, create the project quickly by selecting the project and materials in the Cricut Heat App. It works with the HTV, infusible ink, and iron on projects of prominent brands. Take your crafting endeavor to the next level by working on projects like curtains, banners, blankets, tablecloths, and others. You can also get this Cricut Easy Press on Black Friday sale to use the machine for commercial use.
Conclusion
Many people eagerly wait for the Black Friday sale to get their essential products while saving extra money. Also, the Cricut Easy Press Black Friday sale seems like a festival for DIY crafters who want to get perfect crafting machines but are on a budget. If you are also planning to get an easy press machine, then getting one can be a prudent decision on this sale. So, after reading about these heat press devices, make up your mind about which suits your crafting needs. On the sale, you get these machines at a minimum 60% discount.
Frequently Asked Questions
When is the Black Friday Sale in 2023?
The Black Friday sale in 2023 takes place on Friday, November 24. On this sale, highly lucrative deals are available on various products. On this sale, customers get from firms like Target, Walmart, and Amazon. The sale starts early after Thanksgiving and gives a 60–70% discount on products of the major brands.
What is the Cricut Easy Press Black Friday Sale?
On Black Friday sales, various e-commerce firms like Amazon, Walmart, and Target offer huge discounts on multiple products. Also, if you are a crafter, then getting the Cricut Easy Press machines on Black Friday can be a good deal and help you save money. In this sale, these devices are available for less than their actual price.
Do Cricut Sales Start during Black Friday?
Yes, you can get the Cricut products on this Black Friday sale to buy the machine at a cheaper price. These Cricut machines get a huge discount, so it is the best way to add the machines to your crafting tools during the sale. Also, the sale goes live in various countries, but not all. However, in the US, the sale starts on Friday, November 24, so get your Cricut machine in the sale to begin making pro-level DIY projects.
Visit: Cricut design space
how to setup cricut explore
cricut.com/setup mac
cricut.com/setup
install cricut design space app
Source: Cricut Easy Press Black Friday
#Cricut design space#cricut design space login#cricut design space app#cricut design space for mac#cricut design space setup#cricut.com/setup mac#cricut design space download#cricut.com/create#cricut explore air 2#how to setup cricut explore#cricut.com sign in#Cricut Easy Press Black Friday
0 notes
Text
0 notes
Text
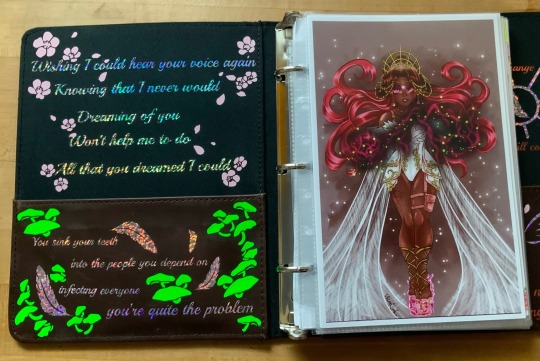
The first batch of pictures for Amoré's character journal are here! Also I have been so super sick that I've literally had nothing to do but to work on this for like almost 2 weeks so...
The cover to cover tour officially starts here. All I can say about the front & back is that I lament my lack of experience with my Cricut when I made these decals. I only had 2 "fun" colors to work with at the time & I was still getting comfortable drawing in Procreate, so my silhouette art leaves a lot to be desired compared to some stuff I've made recently. I also found it's incredibly easy to burn this leather book.
But she's volume one, everything with her is a learning experience, & I realized as much as it helps to have a mini heat press for tight corners & small spaces, the cloth barrier they suggest you use between the vinyl & the iron tends to make things harder to press on this scale. So instead I gotta quickly tap straight on the transfer film & hope I don't burn anything around it :(´◦ω◦`):゚゚
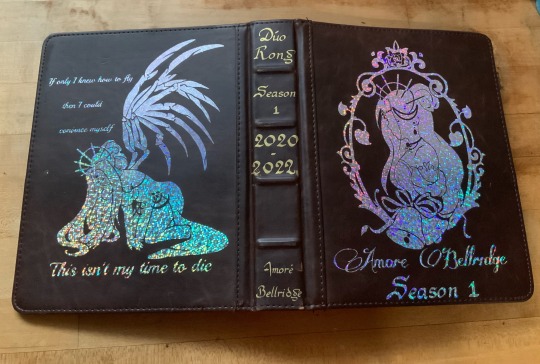
So at the risk of thoroughly exposing my inner theater kid, Amoré set the precedent with how I went forward creating campaign characters. I started off collecting 5 songs to make a mini story arc (almost like a show choir set list 🙃) that helps me figure out an outline for the kind of story I wanna give them.
Somehow Amoré ended up with a truly horrendous blend of rock & theatre. Absolutely incredibe. No wonder she's always such a dramatic bitch.
It was a lot easier to go in & add little decals around these lyrics. I'm definitely cursed with the Too Much™ gene, but I enjoy the little pops of color they give ✨ plus it justifies me hoarding all these vinyl scraps printing stuff this small lol.
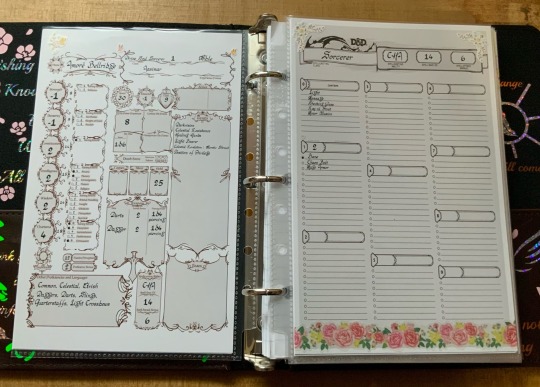
Stat sheet!
In all honesty, as my first character I had no fucking clue what I was doing when I placed these & if I could go back & change one thing I'd probably swap her Intelligence & her Wisdom. She’s definitely more people smart than book smart.
But everything else is...very accurate. She has all the upper body strength of a chicken nugget. Plus on top of the (already) negative I traded disadvantage on everything DEX for magic crystal shoes that can be periodically harvested. Just a way for her to carry around the family fortune without actually having to return to the vault✨
For something that started so average, her CON became a monster & always comes in clutch for her alcohol tolerance. I've played variations of her across a few different one shots & I always manage to roll well for anything alcohol related. The dice do respect a bit 🤣
Spells on the other hand, I floundered with a lot at first because we’re not a combat heavy game, but then I found Chaos Bolt & that was that. It’s essentially Amoré in spell form & I’ve had a ton of fun with it over the years. Also Mage Armor cuz my girl is SO DISTRESSINGLY SQUISHY.
Cantrips were more or less a bit of a toss up. Message was fun for the sheer idea of her using it to talk shit during social events without being caught. But aside from Light serving fun backstory purposes the other 3 are kinda just what looked fun ¯\_(ツ)_/¯ unless you count the idea that she would absolutely delight in zapping handshakes.
From there, I wanted to extend the world map made by our wonderful DM @cappierong into a full scroll. Ya know, for the aesthetic ✨

Our campaign started in Civania, where Amoré's main Estate is. I just wanted a quick mock up to reference, so I edited a preexisting picture I found that checked all the boxes (large, on a plateau, accessible only by bridge) and then absolutely smothered it in flowers.
But anyways... This is primarily where Diana & Amoré grew up together in their decade of backstory ✨
There was probably waaaay to much back & forth trying to keep the continuity between stuff I've already drawn & this big reference. But I think it turned out pretty ok? Not like if I make a mistake anyone will really know lol.
Scaling was also another big issue I had, & I moments where I thought something was too big I just kinda handwaved it away like "ehhhhh she's from a stupid rich family." But now I have a NEED to draw baby Diana & Amoré around like, the statue gardens or something cuz I feel like certain parts of this place are definitely ominous 👀 especially for children...

And lastly we have the back cover & the High Noble political relationship map! I normally have this closer to the front but for layout purposes it'll be here. I kinda feel like I need to do more for the decoration of it but I can’t think of anything else to add at the moment.
Sam if u read that no you didn't.

But now! Other than a family portrait that I've always wanted to draw, I think I'm ready to move onto the art for Season 1 : Arc 2. It's a pretty hefty amount of art in comparison to others, so I gotta get busy. Especially since I think I'm gonna have to draw a few comics *sobs*
If you made it this far, thanks so much for reading! I'm always excited to talk out our little idiots so thanks for indulging me ❀(*´▽`*)❀
#duo rong#dungeons and dragons#dnd character scrapbook#duo chronicles#amore bellridge#diana blackthorn if you squint#dnd#dnd character#dnd pc#dnd oc#character creation#character study(?)#dnd backstory#season 1#dnd art#dnd campaign#campaign art
42 notes
·
View notes
Text
How to Set Up Cricut Explore Air 2 on Laptop: Get Started Now!
Are you here to learn how to set up Cricut Explore Air 2 on laptop? If so, you are in the right place! In this blog, I will teach you the simplest method to set up your Cricut machine. By learning with my method, you can master setting up a Cricut cutting machine.
Do you know a secret? By learning this method, you can set up any Cricut machine, no matter which model you are using, as the steps for setting up the machine are the same for each model.
Through this post, you will first learn how to check system compatibility and then set up the Cricut machine on a Mac laptop. Yes, this write-up is mainly for Mac users who want to set up their Cricut on their MacBook. Let’s get started.
Step 1: Check MacBook Compatibility
Before you know how to set up Cricut Explore Air 2 on laptop, you must know your system requirements for your Mac. It will help you run the Cricut software smoothly without any hassle. Let’s see and check the system requirements for Mac given below:
macOS 11 or later
CPU 1.83 GHz
2 GB free disk space
USB port in laptop or Bluetooth built-in
Display resolutions should be 1024px x 768px
Step 2: Download Cricut Design Space App
Once you have checked the system requirements, you have to download the Cricut Design Space. Here’s how you can download the app on your Mac laptop or computer:
Open the internet browser on your MacBook and go to design.cricut.com.
Then, mark the checkbox to accept Cricut’s Terms of Use and Privacy Policy.
After that, you have to select the Download button and wait until it completes the download.
Next, you have to install the Cricut Design Space now.
To install it, you need to open the Downloads folder where your Cricut was downloaded. The file has been saved as a .dmg file.
Double-click on the .dmg file to open it and install it on Mac.
Also, you have to drag the Cricut logo icon to the Applications folder icon to finish the installation.
Once you have installed, you will need to sign up or sign in using your Cricut ID.
Step 3: Setup Your Cricut Product
Below, I will guide you on how to set up Cricut Explore Air 2 on laptop. Go through each step carefully and get started with your machine as soon as possible. Let’s get into it:
Navigate to the search bar on your taskbar and hit on the Windows logo icon.
Then, enter Cricut Design Space and hit Enter to open the app.
Once you have opened the Cricut app, you will want to select the option Product Setup.
Afterward, you will have to create a Cricut ID or log in if you have already done so.
Next, you will find the next screen where you should choose a Smart Cutting Machine.

Now, choose the Cricut machine model.
Finally, you need to follow the remaining steps.
Step 4: Connect Cricut to Your Laptop via Bluetooth
Wait, although the third step discusses how to set up Cricut Explore Air 2 on laptop, the set up will not be done yet. After finishing the above steps, you have to set up Cricut Explore Air 2 Bluetooth on Mac by following the steps in the section below:
Power on your Mac and also turn on your Cricut product.
Then, you need to go to your Mac’s Apple menu.
Afterward, proceed ahead to select System Settings.
After that, you need to look into the Bluetooth option.

Now, turn on the Bluetooth.
Afterward, you need to wait until you find a Cricut machine in the available list.
Once your Mac’s Bluetooth detects the machine, you have to click on it and hit Pair.
FAQs
Question 1: Why is my Cricut Explore Air 2 not connecting to my laptop?
Answer: There could be several possible reasons for this issue. However, if this occurs again and again, then check the following points:
Check your Bluetooth, see if your Cricut is switched on, and keep your laptop and Cricut nearby each other.
Confirm if there is a physical barrier. If the device is already connected to your Bluetooth, you need to disconnect it.
Unpair and re-pair: You have to unpair the Cricut machine and then pair it again to resolve the issue.
Question 2: How to connect my Cricut Explore Air 2 to Mac via USB?
Answer: In order to connect, you have to connect your Cricut to your Mac using a USB cord. Take a cord and insert it right into your Cricut’s USB port and then insert the other end to your Mac’s USB port. Once connected, you have to follow the rest of the steps on your Mac to set up your Cricut Explore machine easily and quickly.
Question 3: Is Cricut machine setup same for all devices?
Answer: Setting up a Cricut machine can vary from device to device. For example, connecting Cricut to different devices using Bluetooth is very different for each device. Similarly, when you download the Cricut Design Space on these devices, the steps are quite different from each other. So, make sure you follow the steps for the mentioned device.
Final Words
In this blog, you have understood how to set up Cricut Explore Air 2 on laptop such as a Mac computer. The steps can be daunting for beginners, but I would suggest there is nothing to worry about, as all the steps are easy to understand and follow. With this guide, you will be able to complete the Cricut Explore setup in no time. All you need is the right guide or tutorial, and this one is the best for you!
Source: how to set up Cricut Explore Air 2 on laptop?
Visit here to know More: Cricut.com/setup
Pinterest
0 notes
Text
How to Use Cricut Mat: A Complete Guide for Perfect Cuts
Do you sometimes wonder how to use Cricut mat? What is a Cricut mat, and do you need it for all of your DIY projects? If you’ve had these questions before starting a craft—don’t worry. You can find the answers to all these questions here by reading this post till the end.
I have been using Cricut for more than five years now, and I have all the info about which Cricut machines and projects require a mat and which mat is suitable for each project. There are also materials that do not need a cutting mat and can be cut on the machine without one. Here, you will learn about all these things. So, let’s begin with the blog!
How Necessary Is a Cricut Mat?
It is important to know how necessary a mat is before learning how to use Cricut mat. A cutting mat is a crucial tool for Cricut machines, whether for cutting or design transfer. Cricut mats are especially important for older machines that don’t handle cut-on materials as smoothly.
A mat ensures smooth and precise cutting, and with the help of the Cricut machine, you get the best results. However, you don’t need a mat for all kinds of materials. For example, if you are using smart materials like infusible ink, you can cut them on your machine without a mat. These materials are best cut on newer machines like Cricut Maker 3, Explore 3, and Joy Xtra.
Different Types of Cricut Mat
When learning how to use Cricut mat, you must know that Cricut offers a variety of mats that you can use according to the requirements of your materials. You should be very sure about the mat you choose for your material. If you choose a thick mat, it will give you trouble in weeding the design. If you choose a thin mat, it will not hold the material properly and won’t give you a good cut. So you should choose the mat very carefully. Here are all those materials and their uses:
1. StandardGrip Mat
This is a basic mat and the most used for any Cricut project. You can use it for almost all kinds of iron-on vinyl materials. With a StandardGrip mat, you can use materials like cardstock, embossed cardstock, and patterned paper. It comes in four different types of sizes.
2. LightGrip Mat
This is a blue-colored cutting mat, which means it has the least adhesive on it and is much less sticky. A LightGrip mat is used for light materials such as tissue paper, printer paper, thin cardstock, washi tape, wrapping paper, and vellum.
3. StrongGrip Mat
For stronger materials, you should use a StrongGrip mat. You can also use it for fabric projects if you do not have a fabric mat. This cutting mat is good with heavy materials like thick cardstock, poster board, chipboard, magnet material, and basswood.
4. FabricGrip Mat
As the name suggests, it is specially designed for fabric materials. It has 2 different sizes: 12 x 12” and 12 x 24”. A FabricGrip mat is used with materials such as fabric, bonded fabric, felt, and crepe paper.
How to Use Cricut Mat: Quick and Easy Steps
To use your Cricut cutting mats, you should follow these steps:
Loading a Mat
Loading and unloading your Cricut mat takes steps to ensure that your materials remain intact:
After placing your material on the cutting mat, you should load it under the two guide tabs of the Cricut machine. Next, hold the mat and then press the Load button on the machine. As you press it, you will see the roller bar begin to move, loading the mat into your machine.
Unloading a Mat
Once the cutting is done, unload the material from the cutting mat. After that, take care not to tear or curl the material during this process. For materials like paper and vinyl, roll the mat over gently and weed from the back of the material. Also, avoid applying too much pressure to the mat to prevent damaging the design and the mat itself.
Conclusion
In the blog, you learned how to use Cricut mat and other important things. Now you know the significance of a mat and when it is essential for certain DIY projects. Some Cricut machines and materials don’t require a mat. Besides cutting materials, mats are also used to transfer designs onto fabrics or surfaces. Heat transfer mats are needed to use heat press machines.
FAQs
Why Do I Need a Cricut Mat?
A Cricut mat performs many essential functions with your Cricut machine. It provides a stable surface for placing materials before inserting them into the machine, ensuring precise and smooth cuts. By holding materials in place, the mat prevents shifting during cutting, which is crucial for achieving designs accurately. Also, the mat makes it easy to transfer materials onto various surfaces, improving versatility in project applications.
Can I Use Cricut Without a Mat?
In many cases, yes! A Cricut mat is necessary to hold materials with older Cricut machines lacking smooth surfaces or advanced features. Trying to cut materials without a mat can damage your design and compromise the quality of the final product. However, smart materials made for use with newer Cricut machines may not require a mat that offers flexibility depending on the material and machine’s abilities.
How Can I Use a Cricut Mat?
Using a Cricut mat is simple: start by selecting a design in the Cricut Design Space app. Next, place your chosen material on the mat, ensuring it stickers properly. After that, insert the loaded mat into the machine, following the machine’s steps. Start the cutting process using the Cricut software, and once the cutting is done, unload the mat from your machine. Lastly, remove your material from the cutting mat, taking care to maintain your cut designs.
Visit: cricut.com/setup
Source: https://cricricutdesigncut.wordpress.com/2024/07/18/how-to-use-cricut-mat-a-complete-guide-for-perfect-cuts/
#design space setup#cricut.com/setup#cricut design space#www.cricut.com/setup login#cricut easy press#cricut setup#digital design#cricut venture#cricut.com/setup mac#cricut design space online#cricut design space app#cricut design space setup#how to use Cricut mat#design.cricut.com download#cricut setup for pc#install cricut explore air 2#install cricut explore air 2 '#cricut setup explore air 2 setup#cricut setup on computer#cricut setup create account#cricut setup maker
0 notes
Text
Experiments with Edge Decoration
So, I try to learn something new with every project. And one thing I find quite interesting is decoration of the Fore Edge. I did some experiments on books I got from a public book shelf (a public place, in my case an old phone booth, that gets used to distribute used books) that I wanted to bring back if the result was pretty enough (it was not, sadly).
Here are the results:
First I tried to coat the edge with vinyl. I've seen videos of this, so it is probably possible. It failed horribly. This book is now forever sealed shut (and also trashed). I like this idea, because I think you can get cool effects with it. But I have to revise this at a later time...

After that, I tried marbling it. This was my test subject:


These are in the same order I did them. I didn't use enough color in the beginning. I was quite pleased with the last one.
I had a lot of problems with the paint, though. It was kinda like laquer and didn't really want to mix and also didn't stick well to the paper.
My setup:

I still used this in a real project and am reasonably pleased with it.
I also learned that I should probably use different paint. So I will try this one again.
After that I tried to transfer a pattern with heat transfer ink and my Cricut. That works well on fabric. Not so much on paper, sadly. Would have been cool.

Then I tried monocoloring with different types of paint:


The red is oil color, which was very thick and flaked off. The orange is acryl and worked quite well. The black is drawing ink and a little to wet for this purpose. Green is Liquid Water Color, also a little too wet. Blue is Gouache, which behaved similar to the oil color.
(Disclaimer: I have no idea how different colors work or are to be handled. Please excuse any major errors.)
All in all the acryl worked best. I also had a lot of colors from my sister, so I started experimenting with that.


I really liked the color, but again the pages stick together quite badly. So I tried again and this time, immediately after finishing I took the book out of the press and paged through it. That helped a lot.


I used this technique for my next project. It's quite easy and works well, but it's also a little limited. I will continue with other ideas, I think.
10 notes
·
View notes
Text
My feet, my back, my ADHD attacks...
It has been a productive few days, but ADHD strikes again, and I have a plethora of random things accomplished since last post. I am le tired....
Firstly, I cranked out and submitted my essay that was due on Friday, so a majority of that day was spent deep in case law and interpretations of the Supreme Court in the 60s about porn.
But otherwise, I tried out printing my HTV. I finangled out my SVE/PNG, and got a good print. Ish.


As you can see, I mis-aligned the vinyl, and the little cricut legs chewed up the very edge of the vinyl. Thankfully didn't mess up the actual design, but important to know in the future.
So I got to peeling.

Oh boy, is this a PITA. Its my first real print, so still learning, but man, was weeding (pulling out unwanted bits). I quickly found out the width of the design really dictated how well it'll come out.
Did not bode well for the letters.
I also found out that its easier to have predetermined sections, so you're not accidentally pulling up a part you're not working on. Most do this in cricut's design center, or whatever they use, but I just cut it out with a razor after the fact.

To save printing time, I had moved the spine segments to the blank space in the design. After the name I started segmenting the weeding.
But by the time I finished with the spine sections, I was done. Every other bit of writing didn't come out to a point that it would have been possible to weed. IDK if it was the font, or the size, or the technique in printing, but they all died and I just gave up immediately on the summary. The design also was destroyed! I guess line work isn't easy. I'll maybe try an offset version for the Lionheart's designs, because it did NOT like the thin line of the book+cuffs.

The filigree and title came out nicely, and Lionheart's design is much thicker than this one. I'll also go back through them and ensure the small bits are thicker than what was on The Perfect Match version.

Here is a good comparison to having uploaded my PDF directly to design space and uploading it as an SVE. Significant difference!
Next, I went to iron my work.
I only had a normal iron, so I googled how to apply using that, and got it set up.


I arranged the HTVs as I wanted them on the book, except the spine which I'll wait to apply until after I reprint the words. I used a piece of parchment paper to act as a barrier in case there was something on my iron that I didn't want to use. I used the corner of my bed for firm-squishyness, set my timer, and pressed away.
For 2 minutes a section.
For those who don't know, you're supposed to do 20 seconds. I did 120 seconds. I'm amazed I didn't ruin it entirely. Some sections came up (which I learned is a thing if you under AND over press) but it's close enough.
One thing I didn't anticipate is the fact, as I used a lasor printer, the ink semi-transfer itself within the book.

This is the worst I noticed with a quick flip through, but some of the ink transferred to adjacent pages. Good to know for future use!

Looks pretty good! I am happy with how it came out, besides the mentioned issues. I'll re-do the words and try to get those later.
Also accomplished this weekend was my bookpress!

I got myself a small slab of monkeypod wood, since it's endemic to the area and cheaper/better than a wood slab I'd get from a box store. Of course, I'm pretty sure the seller shorted me. He showed me the slab being 16inches across, but when I got home, my measurements were only 15. So I think his measurement is off at the start--and how can you plan to check for that at the time? Whatever. I wanted to keep the raw edge for the bottom piece, but the top will be smaller in all dimensions so will be square. In the picture is a majority of the supplies you'll need. Notice, I said majority, because I forgot several things, then realized I needed several things, and those things matured to more things and long story short, I went to Home Depot like 6 times the last few days.
In my defense, I had already gotten a Dewalt 780 miter saw from my Lexis school points, so that can't be blamed on my bookbinding hobby. Though that probably contributed, since I knew I'd get it and therefore more inclined to do other woodworking.

I didn't really have a table to use for the chopping of the block without covering my garage in sawdust, so I set this in my driveway. I am very enthused with my new saw, and my husband lent me his knee pads. Maybe I'll get one of those skeletal miter saw stands. While I'm in the military, I don't think I'll be able to get a full hobby/woodwork set up until I leave the service. So maybe a decade from now.

But here is its, the slab cut into one 11x11 piece, the other is 11x15-ish depending on the part (as the piece is not smoothly the same size, being a raw edge). I spent so long sanding. I didn't have a planer, and the flat face was very rough from the construction saw that made the slice from the log. Probably two hours sanding just those two tiny boards. And I still didn't get them all 100% flat. Close enough, pretty sure it won't cause an issue when pressing as I'll be using a bookboard anyway.
The screw is set to arrive tomorrow, Monday, and it should fit just into the cross joint. Truly, an cheap and easy way to get a very nice bookpress. Can be even cheaper/easier than what I have if you just use some Ross cutting boards.


I know I want the board to be nestled between the legs of the press, so I had to cut 1/2 holes on the side. The space between the legs is just about 10" so a 1/2 inch 1/2 hole in the middle. I didn't have any fancy tool for this, so I used a Jigsaw and hope. It was... mostly a success, just don't look to close at them, please.

I then made sure the legs were perfectly straight compared to the cross section. I'm debating whether I want to put some locktight on the threads. I'll try it out and see.
Next was finishing the wood slabs!


I managed to use more of that massive beeswax slab my husband brought, and I feel it made the boards so very lovely. Really matured the color. I made the finish with 2-1 ratio by weight of beeswax to boiled linseed oil. It was a bit stiff IMO, so maybe I'll go back and add more linseed. But for now, worked nicely. I did bake my wood slabs until they were warm to the touch and then rub the wax in then. Made application significantly easier, lol! Dunno if it was a good idea but eh. It worked. And killed any potential bug or fungus. There is a bit of spalting in this wood, which is visually lovely, but not supposed to be in the wood.
Tomorrow, after class, I'll polish the boards and assemble! Then maybe finally go back to the Lionheart bookbind, and glue up the spine for rounding.
Till next time!
4 notes
·
View notes
Text
How to Activate Cricut Easy Press 3: A Comprehensive Guide
Do you want to make heat-transfer projects but don’t know how to activate Cricut Easy Press 3? Don’t panic—I will be your guardian for this guide. In addition to developing crafting machines, Cricut has introduced various heat press models to its customers. My favorite is Cricut EasyPress 3, which is designed to achieve next-level heat transfer results long after multiple washes.
Also, this Cricut model has press speed, an iron feature, and built-in Bluetooth technology. Cricut EasyPress 3 is compatible with iOS and Android devices and needs to be set up by crafters to create various projects. Moreover, you can connect this machine to your smartphone wirelessly. From now on, this blog will teach you how to activate and pair devices to help you make DIY projects.
How to Pair Cricut Easy Press 3 to Smartphones?
Subsequently, this Cricut heat press has Bluetooth Low Energy technology (BLE), allowing mobile devices to pair while using the Cricut Heat app. Take a look at the below steps to learn about the wireless pairing process between this Cricut machine and smartphones:
First, you must check that your device’s Bluetooth is on to make it discoverable.
If the Bluetooth is off, turn it on and pair it with your machine.
Now, open the Cricut Heat app and sign in by following the on-screen guidelines.
If you have activated your machine, it will appear in the My Presses section.
Also, if you have numerous presses activated, then choose one to connect.
Afterward, if you still need to activate this machine, tap the Set up New Press.
Here, your app will display your device as connected, and the machine is listed in your device’s Bluetooth section.
Finally, when you turn off the press, the Bluetooth automatically disconnects.
Wasn’t considering this method for wirelessly pairing this Cricut machine with mobile devices easy? This method allows you to operate EasyPress 3 as your choice and transfer the design to the chosen blank.
How to Activate Cricut EasyPress 3?
This section of the blog outlines the steps needed to activate this Cricut product on smartphones. This Cricut heat press uses Bluetooth Lite technology to activate with other devices. With the help of these steps, you will get the answers to activate Cricut EasyPress 3 on mobile devices:
Begin the process by opening the App Store or Google Play Store and installing the Cricut Design app.

Now, sign in or create your Cricut account by entering the required details.

Afterward, start unpacking your Cricut machine and remove other items.
Following this, plug the press into a nearby wall socket and turn it on.
At this time, you will notice the word APP appearing on your device screen.
Equally important, pair your device wirelessly and check that both devices are within 7 feet of each other.
Next, open the Cricut Heat app and tick the Set Up option.
Equally important, choose the model from the list on your screen and click the Continue option.
Now, you are supposed to wait till the connection between the devices is going on.
After a few minutes, tap the Terms & Conditions checkbox and click Activate.
In the end, you will see a message sharing that your wireless activation process has been done.
Wasn’t this segment on how to activate Cricut Easy Press 3 helpful for you? By utilizing these steps, you will be able to activate this Cricut product in the future while creating any HTV projects on the blanks.
How to Adjust Cricut EasyPress 3 Settings Using Cricut Heat App?
With the help of the installed Cricut Heat app on your phone, you can easily modify this Cricut product time & temp settings. Below are the steps you need to take to adjust the Cricut EasyPress 3 settings:
Let’s begin by plugging the machine wire into the wall socket.
Afterward, hold the power button for a few seconds and switch on your Cricut EasyPress 3.
Launch the Cricut Heat app and open the My Heat Presses dropbox.
Under the dropbox, choose Cricut EasyPress 3 and then Start New Project.
Now, choose the Transfer Material > Base Material and the surface you will use.

Following this, click the Next button at the bottom of the app.
Once you have selected it, tap Send Settings to EasyPress, which isvisible inside the blue box.

Now, you must stay calm until the press reaches the decided temperature.
Final Words
Consequently, this how to activate Cricut Easy Press 3 guide assists you with the content you need to take while performing the activation and pairing process. You must activate your EasyPress 3 and pair it with your iOS and Android devices. Moreover, you need to be very cautious throughout the entire method. Afterward, you will be able to create several projects, such as tote bags, aprons, wine bags, and more.
Frequently Asked Questions
Question: How Can I Adjust My Cricut EasyPress 3 Temperature Manually?
Answer: Check out the below steps to manually adjust your Cricut machine’s temperature:
First, switch on your Cricut machine and use the + or – button to increase or decrease the temperature.
Second, change the temp to Celcius by holding the Temperature button for a few seconds.
Click the Time button and adjust the timing depending on the material type.
Question: How to Update Cricut EasyPress 3 Firmware?
Answer: You can update your Cricut EasyPress 3 firmware through the Cricut Heat app available on your mobile devices. Take a look at the pointers given below to learn about the process:
Start by plugging your Cricut heat into the nearby wall pocket.
Now, tick the power button and turn it on.
Afterward, check that your Cricut EasyPress 3 is connected to your mobile devices.
Then, you need to sign in and select your model from the My Presses section.
Lastly, the Cricut product firmware will start updating automatically.
Question: How Can I Activate My Cricut EasyPress 3 on Phone?
Answer: Check out the below steps for wirelessly activating Cricut EasyPress 3 on smartphones:
First, you are supposed to install the Cricut app on your device and sign in.
Second, plug the machine into the wall socket and turn it on.
After that, open the app on your mobile device and tick the Set Up option.
Now, choose the model from the list and wait a few minutes.
At last, click the Activate option, and the activation will come to an end.
Read more: cricut.com/setup mac
install cricut design space app
Cricut Design Space
Source: how to activate cricut easy press 3
#how to activate cricut easy press 3#Cricut Design Space#install cricut design space app#install cricut explore air 2#cricut explore 3#cricut.com/setup#cricut new machine setup#cricut.com/setup mac
0 notes