#how to make garlic roti at home
Text
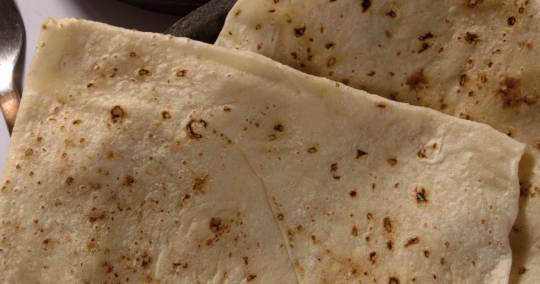
Watch: How To Make Yummy Chilli Garlic Roomali Roti
Roomali roti is a soft roti that is deliciously delicate and the right kind of chewy. This roti, which is literally as thin as a handkerchief, is a lovely accompaniment to gravies like Butter Chicken and Paneer Makhani. Roomali roti is typically plain in its flavour, but who says you can’t take it to the next level? Chef Saransh Goila has come up with a quick recipe for Chilli Garlic Roomali…
View On WordPress
#chef recipes#chef saransh goila#chilli garlic roomali rotu recipe#dinner recipe ideas#easy roomali roti recipe#flavoured roomali roti recipe#garlic roti recipe#how to make garlic roti at home#indian food#roomali roti recipe#thin roti recipe
0 notes
Text
Is Red Rajma Good For Health?
Red kidney beans, or Red rajma, are a popular and widely used ingredients in kitchen all around the world. But what exactly makes these beans unique? Why Himalayan Monal Red Rajma is a unique ingredient in terms of flavor and nutritional value. Continue reading to learn about the many advantages of Red Rajma and why you should include it in your diet?
What is Red Rajma?
Red kidney beans, also known as Red Rajma, are a well-liked and frequently utilized food in kitchens throughout. This Red Rajma can easily be seen in Indian kitchens & Red Rajma, Rajma or Kidney Beans, these things are not different, these are one thing, their name is different.
However, what makes these Red Rajma special? Why Himalayan Monal are excited to talk about the flavor and nutritional benefits of Red Rajma, which make it a special ingredient. Learn about the various benefits of Red Rajma and why you should include it into your diet by reading on?
Nutritional Benefits of Red Rajma
In addition to being a tasty side dish, Red Rajma is loaded with Nutrients that promote General Health. Here is Red Rajma’s Nutritional benefits.
High in Protein: The plant-based protein included in Himalayan Monal’s Red Rajma is great for building and repairing muscles as well as general bodily functions. About 15 grams of protein may be found in one bowl of cooked Red Rajma.
Rich in Dietary Fiber: The Red Rajma are rich in dietary fiber, which promotes a sensation of fullness and helps with digestion and healthy bowel motions. It also helps with Weight Control.
Supports Heart Health: Red Rajma contains soluble fiber and Anti-Oxidants, such as Flavonoids (Flavonoids are a class of plant compounds found in many fruits, vegetables, flowers, herbs, and spices. They are responsible for the vibrant colors of many plants, and have many biological functions, including), which help lower cholesterol levels and reduce the risk of Heart Disease.
Good Source of Iron: They contain a lot of Iron, which is necessary for the Synthesis of Hemoglobin and the prevention of Anemia. Iron is essential for transporting Oxygen and producing Energy in the body.
Contains Essential Vitamins: These Red Rajma are an excellent source of (Vitamins-B), especially Folate (Vitamin B9), which is necessary for DNA Synthesis, Cell Division, and General Metabolic Health.
Regulates Blood Sugar Levels: Red Rajma is a healthy option for persons with Diabetes or those trying to control their Blood Sugar because of its High Fiber content and Complex Carbs, which assist to regulate Blood Sugar Levels.
Diabetic patients can also take it with Doctor's consultation.
Delicious Recipes with Red Rajma.
Are you prepared to serve Red Rajma with your meal?
How to make Red Rajma at home:
1. Red Rajma
Ingredients
• 1 Bowl Red Rajma (soaked overnight)
• 1 Large Onion, finely chopped
• 2 Tomatoes, pureed
• 1 Tablespoon ginger-garlic paste
• Spices (cumin, coriander, turmeric, garam masala)
• Salt according to your taste
Instructions
• Pressure-cooked Red Rajma till it became soft.
• Heat some oil in a pan and fry Onions until they get Golden Brown. When aromatic, add the Ginger-Garlic paste and simmer.
• Stir in the Pureed Tomatoes and Spices, cooking until the Oil Separates.
• Add cooked Red Rajma and simmer for 10-15 minutes. seasoning and serve with Rice or Chapati (Roti).
2. Red Rajma Salad
Ingredients
1 Cup boiled Red Rajma
1 Cucumber, diced
1 Bell Pepper, diced
1 Small Red Onion, finely chopped
Fresh Coriander Leafs, chopped
Lemon juice and olive oil for dressing
Red Rajma salad's strong protein and fiber levels make it a great option for who’s trying to lose weight. While the fiber helps you feel fuller for longer and decreases the chance of overeating, the protein aids in the growth and repair of muscle tissue.
Red Rajma salad's is low in calorie density also makes it a filling yet light option that's ideal for sticking to a calorie deficit. Packed with complex Carbs, it gives long-lasting energy that is essential for both hard exercise and Recuperation (The process of healing and restoring your body after exercise, which is important for building muscle and improving your performance).
Instructions
Combine all vegetables and Red Rajma in a large bowl.
Drizzle with lemon juice and olive oil, then toss to mix.
Garnish with fresh Coriander Leafs and serve chilled.
Why Choose Himalayan Monal’s Red Rajma?
Himalayan Monal, we take pride in offering the highest quality Red Rajma. Our Red Rajma are grown organically in Uttarakhand Region’s without the use of any chemicals or harmful fertilizers. We use environment friendly fertilizers which has no impact on your health or we are maintain care of proper Hygiene while Pakaging.
Choosing Himalayan Monal means supporting sustainable farming practices and enjoying Red Rajma that are both Nutritious and Delicious.
Conclusion
Red Rajma from Himalayan Monal
[1]l is a Nutrient-dense powerhouse that improves your meals and your overall health. Whether you're preparing a light salad or a Red Rajma, our Red Rajma will improve your cooking taste & boost your overall health.
Ready to try Himalayan Monal Red Rajma?
Visit our online store to purchase and explore our range of high-quality Products.
Click on this link to visit our Website for shop now - Shop - Page 2 - Himalayan Monal
Don’t forget to subscribe our YouTube channel for more recipes. Follow this link to do visit our YouTube channel - Himalayan Monal Agro
And for Healthy tips and for Exclusive Offers. Do follow our @himalayanmonalagro Instagram page.
Click on this link to visit our Instagram page - Himalayan Monal™ (@himalayanmonalagro) • Instagram photos and videos
[1] Himalayan Red Rajma Dal (500GM) / पहाड़ी लाल राजमा
#himalayanmonals#himalayanmonalagro#himalaynanmonal#redrajma#redkidneybeans#benefits of red kidney beans#kidney beans#himalayan monoal red kidney beans
0 notes
Text
If you’re a foodie who loves to explore new and exciting flavours, then Indian street food should definitely be on your list of must-try cuisines. Bursting with aromatic spices, bold flavours, and mouthwatering textures.Indian street food is an experience that you won’t soon forget. And if you’re lucky enough to have an EggHolic restaurant near you, you’re in for an even bigger treat.At EggHolic, we’re passionate about bringing the best of Indian street food to our customers. From crispy samosas to savoury bhel puri, our menu is filled with classic dishes that are sure to satisfy your cravings.
But we’re not content to simply offer traditional dishes – we’re always looking for new and exciting ways to showcase the rich flavours of Indian cuisine.
In this blog post, we’ll take you on a culinary journey through some of the best Indian street food near you, and we’ll show you how EggHolic is putting its own unique spin on these classic dishes. Whether you’re a longtime fan of Indian cuisine or you’re just discovering the delicious world of street food, this is a journey you won’t want to miss.
So grab a napkin and get ready to dig in – we’re about to explore the mouthwatering world of Indian street food together.
HAVE THE FINEST INDIAN STREET FOOD NEAR ME
If you’re a foodie looking to have the finest Indian street food near you, you’re in luck! India is famous for its diverse and flavorful street food, and there are many restaurants and food trucks across the country that offers delicious and authentic street food experiences. EggHolic is an authentic Indian restaurant that brings you the truest taste of the Indian subcontinent.
Here are some of the dishes that you can give a try:
Egg Curry
Egg curry is a well-known dish in several world cuisines, notably Indian cuisine. It typically includes boiled or fried eggs cooked in a savoury sauce made from a mixture of spices. The recipe can be customized by using different spice blends and adding vegetables such as tomatoes, potatoes, or spinach.
In Indian cuisine, egg curry is typically prepared with a tomato gravy base and seasoned with cumin, coriander, turmeric, and garam masala. Additional ingredients like ginger, garlic, and chilli peppers enhance the dish’s bold and piquant flavour. Ican be accompanied by various dishes, such as rice, roti, or naan bread, making it a fulfilling and enjoyable meal that is perfect for vegetarians or individuals searching for high-protein meals.
Egg Lapeti
Egg Lapeti is a type of Indian burrito that uses a thin omelette as a wrap instead of a tortilla. The omelette is partly cooked and filled with shredded boiled eggs, cheese, and occasionally other ingredients like onions, peppers, or herbs.
The filling is then rolled up inside the omelette, resulting in a tasty and satisfying breakfast or snack. Egg Lapeti is a well-known street food in some areas of India and can also be made at home with minimal ingredients. You can enjoy this delicious Indian dish in the convenience of your own home by ordering it from our website.
Pani Puri
Pani Puri is a popular street food snack in India and other parts of South Asia. Also known as golgappa or phuchka, it consists of small, crispy, hollow balls made from semolina or wheat flour, which are filled with a mixture of mashed potatoes, onions, chickpeas, and spices.
The balls are then pierced with a small hole and filled with a tangy and spicy tamarind or mint water, known as “pani” in Hindi. The filled Pani Puri is then consumed whole in one bite, creating a burst of flavours and textures in the mouth.
Pani Puri is often served as a refreshing and flavorful snack during hot summer days and is a popular Indian street food that can be found in almost every part of India.
Dahi Puri
Dahi puri is a popular Indian street food that originates from the western Indian state of Maharashtra. It is a type of chaat, which is a savoury snack typically made with a variety of ingredients such as fried dough, vegetables, and spices.
Dahi puri is made by filling small, crispy, hollow puri shells with a mixture of boiled potatoes, chickpeas, onions, and a tangy tamarind chutney. The puri shells are then topped with a dollop of smooth and creamy yogurt, which gives the dish its name “dahi” puri (dahi means yogurt in Hindi).
Finally, the dish is garnished with a sprinkle of spices such as cumin powder, chaat masala, and chilli powder, as well as fresh coriander leaves.
The combination of sweet and tangy chutney, spicy chili powder, and cool yogurt creates a unique flavor profile that is both refreshing and satisfying. Dahi puri is often enjoyed as a light snack or appetizer, and is a popular dish at Indian festivals and gatherings.
FRANCHISING WITH EGGHOLIC: THE AUTHENTIC RESTAURANT NEAR ME
EggHolic is also offering franchising opportunities. This can be a great opportunity for entrepreneurs and food enthusiasts who are interested in starting their own business while also being a part of a well-established brand.
By franchising with EggHolic, entrepreneurs can benefit from the brand’s reputation for quality and innovation, as well as their proven business model. They can also tap into EggHolic’s extensive support system, which includes training, marketing, and operational support.
Moreover, franchising with EggHolic can be a lucrative opportunity since the demand for street food and egg-based dishes is constantly on the rise. With EggHolic’s menu of unique and flavorful dishes, franchisees can offer customers an exciting and delicious dining experience that sets them apart from the competition.
Overall, franchising with EggHolic can be a fantastic opportunity for entrepreneurs who are passionate about food and are looking to start their own businesses with the support of a well-established brand.
Conclusion,
In conclusion, exploring the best Indian street food near me with EggHolic has been a truly delightful culinary journey. From the mouth-watering omelette sandwiches to the crispy egg rolls and delicious egg biryanis, EggHolic has proven to be a top-notch destination for egg lovers and street food enthusiasts alike.
The diverse range of egg-based dishes offered by EggHolic highlights the versatility and creativity of Indian street food. With its bold flavours, unique textures, and affordable prices, it’s no wonder that EggHolic has become a favourite among locals and tourists alike.
Through this culinary journey, we’ve discovered that Indian street food is much more than just a quick bite to eat. It’s a reflection of the country’s rich cultural heritage and diverse culinary traditions. And with EggHolic’s commitment to quality and innovation, we can’t wait to see what other delicious creations they have in store for us in the future.
So, if you’re looking to satisfy your cravings for authentic Indian street food, be sure to visit EggHolic and embark on your own culinary journey. You won’t be disappointed!
#Indian Street Food#Indian street food near me#Traditional dishes#Indian cuisine#EggHolic#Egg Curry#Egg Lapeti#Pani Puri#Dahi Puri#Authentic Indian Restaurant#Authentic Indian Street Food
0 notes
Text
Happily stuck at home with Stock At Home PH

I looove food kits. It is perhaps one of the few good things that happened during the pandemic. I love how restaurants and home businesses adapted to serve us great quality food and at the same time it gives us freedom to customize each dish to our liking.
Ever since I watched Mark Weins slurp down an entire bowl of Khao Soi Gai a few years ago, I’ve been on the look out for this classic Thai dish in Manila. A few months ago, the search officially ended when veteran food stylist Sharlene Tan-Aspe of Stock At Home PH shared their Khao Soi Gai kit with me. And on a cool night like this, I can only think of the warmth from this hearty Thai favorite.

First of all, that broth — oh baby, that broth! So light yet so sharp and packed with flavor (I think the chicken base makes it lighter compared to, say, tonkotsu ramen). It’s got a subtle heat to it, just enough to fight off the “umay” factor most curries have. It makes you want to eat more. It’s rich and earthy, spicy but not too overwhelming, the coconutty curry broth comes alive with a squeeze or two of fresh lime and makes it sing. Try it without the lime first so you can appreciate the difference.
Another good thing is that you get to cook the egg noodles that comes with the kit, so you can choose the firmness (3-4 minutes in boiling water is recommended for al dente). The crispy fried noodles complement the chewy egg noodles for added texture. I honestly could eat a bag of their crispy fried noodles as a snack. Petition to sell the crispy noodles in bags.
Each Khao Soi Gai kit also comes with lime, pickled mustard greens, shallots, and their Nam Prik Pao or Thai chili paste (use it sparingly as the broth is already spicy on its own). breaks through the richness and keeps you coming back for more.

This is Khao Soi Neua, the beef version of Khao Soi Gai with a richer, more robust broth. The beef chunks are incredibly tender, almost melting into the broth, effortlessly breaking apart in your mouth. The richness of the broth lessens the heat (compared to Khao Soi Gai), so feel free to add as much Nam Prik Pao as you want.
Each Khao Soi Neua kit comes with crispy noodles, pickled mustard greens, shallots, Nam Prik Pao (Thai chili paste), and the all-important lime wedge. The kit makes two generous bowls. It doesn’t come with eggs, but who’s going to stop you from adding it?

The rainy season calls for a hearty bowl of good ol’ Arroz Caldo and Stock At Home PH's take on this classic Pinoy comfort food sticks to its true form but with a crunchy twist: Shredded chicken meat has been fried ‘til crisp and golden instead of being traditionally boiled. The result? Arroz Caldo with more interesting textures but with the same nostalgic flavors.
The Arroz Caldo kit is available in two sizes and comes complete with crispy garlic, spring onions, hard-boiled eggs, and even calamansi.

Stock at Home PH’s Butter Chicken tastes the way I always imagined butter chicken would taste: Spicy but not hot (it has a lot of spices but not a lot of heat), complex yet warm and inviting. The various spices have come together and gotten to know each other so well, creating a harmonious sauce that’s flavorful, smooth, and simply delicious.
Each tub is good for 3-4 persons (or 2-3 Chings) and it’s freezer-friendly! So you can have it any time you have a butter chicken emergency, like I do every week. The kit comes with your choice of roti or basmati rice.

Stock At Home knows comfort food so well and it’s evident in their Cheesy Chicken Parmigiana, one of the newest additions to their portfolio of homemade goodies.
It’s a complete meal that comes with crispy fried chicken pieces in a bed of marinara sauce and topped with cheese and fresh basil, buttered noodles, and more marinara sauce. The noodles are well cooked and still flavorful without overpowering the chicken parm. The marinara’s savory tanginess cuts through the richness of the fried chicken and buttered noodles, giving each bite more umami.

Merienda, anyone?
Aside from full meals, Stock At Home also takes merienda very seriously.
Their Chicken Pot Pie comes in a freezer- and microwave-friendly plastic container, but if you want to get that slightly golden and charred topping, pop it in an oven-safe container and heat it up for a few minutes. The mashed potato top is so creamy and the chicken filling is flavorful and light.

Try to stop snacking on Stock At Home’s Spinach Dip with Whole Wheat Melba Toast, I dare you. It's almost impossible. If you run out of melba toast, it still works well with crackers.

And check out these bite-sized Portuguese Egg Tarts (Pastéis de Nata)! Flaky crust, creamy filling, not too sweet, and just the right amount of bitterness from the charred tops. Don’t forget the coffee!
Keep supporting small businesses, so they can make more amazing products that we can all enjoy. Order through @StockAtHomePH or @TheSevenPantry on Instagram.
0 notes
Text
Chole Masala Packet: SDS
Introduction:
Chole Masala, also known as Chana Masala, is a popular North Indian dish made with chickpeas (chole) cooked in a spicy and flavorful gravy. To make this dish convenient for everyone, Chole Masala packets are widely available in the market. These packets contain a pre-mixed blend of spices that simplify the cooking process, allowing you to prepare delicious Chole Masala at home quickly and easily.
Contents of a Chole Masala Packet:
A typical Chole Masala packet contains a variety of spices and ingredients that are essential for creating the rich and aromatic flavor of Chole Masala. While the exact blend may vary by brand, common ingredients include:
1. Coriander Powder: Adds a mild, earthy flavor to the dish.
2. Cumin Powder: Provides a warm, nutty taste.
3. Turmeric Powder: Gives a vibrant color and subtle flavor.
4. Red Chili Powder: Adds heat and spiciness.
5. Garam Masala: A blend of ground spices that enhances the overall flavor.
6. Amchur (Dried Mango Powder): Imparts a tangy taste.
7. Black Salt: Adds a unique, slightly tangy flavor.
8. Cinnamon: Adds warmth and sweetness.
9. Cloves: Impart a strong, aromatic flavor.
10. Bay Leaves: Enhance the depth of flavor.
11. Asafoetida (Hing): Adds a unique umami flavor.
Benefits of Using a Chole Masala Packet:
1. Convenience: Simplifies the cooking process by providing a pre-mixed blend of spices.
2. Consistency: Ensures a consistent flavor in every batch of Chole Masala.
3. Time-Saving: Reduces preparation time by eliminating the need to measure and mix individual spices.
4. Authenticity: Helps recreate the traditional taste of Chole Masala at home.
How to Use a Chole Masala Packet:
1. Soak and Cook Chickpeas: Soak chickpeas overnight and cook them until tender.
2. Prepare the Base: Sauté onions, tomatoes, ginger, and garlic in oil until they turn golden brown.
3. Add Spices: Add the contents of the Chole Masala packet to the sautéed mixture and cook for a few minutes to release the flavors.
4. Combine Chickpeas: Add the cooked chickpeas to the spice mixture and mix well.
5. Simmer: Allow the mixture to simmer for 15-20 minutes, letting the flavors meld together.
6. Garnish and Serve: Garnish with fresh coriander leaves and serve hot with rice or Indian bread like naan or roti.
Conclusion:
Chole Masala packets are a convenient and efficient way to prepare a flavorful and authentic Chole Masala dish at home. With a carefully selected blend of spices, these packets ensure that you can enjoy the rich taste of this traditional North Indian delicacy without the hassle of measuring and mixing individual spices. Whether you are an experienced cook or a beginner, a Chole Masala packet can help you create a delicious and satisfying meal with ease.
#recipe#indian recipe#spices#sds masala#food#foodie#indian spices#Chole masala packet#chana masala packet
0 notes
Text
Transforming home cooking with roti maker
In the world where time is of the essence, the quest for convenience never ceases. Enter the automatic roti maker machine, a marvel of culinary technology designed to streamline the age-old process of making rotis, unleavened Indian flatbreads. Gone all the days of laboriously kneading dough, rolling it out and painstakingly cooking each roti on a hot griddle. With the touch of a button, these automated wonders can churn out perfectly round, evenly cooked rotis in a manner of minutes.one of the key benefits of automatic roti makers is their consistency.
Unlike human hands, which may vary in strength and dexterity, these machines produce uniform rotis every time. This consistency is particularly valuable in commercial settings such as restaurants or catering businesses, where efficiency and quality are paramount. Moreover, automatic roti makers save precious time and effort, especially for busy households or individuals with hectic schedules. With the push of a few buttons, fresh rotis can be prepared effortlessly, allowing families to enjoy wholesome homemade meals without the hassle. However, like any technological innovation, automatic roti makers have their limitations. Some models have their limitations. Some models may struggle with certain types of dough or require periodic maintenance to ensure optimal performance. Additionally, pursuits argue that the art of making rotis by hand should not be entirely replaced by automation, as it is an integral part of cultural heritage and tradition.
The fully automatic roti maker stands as a bacon of convenience, revolutionizing the traditional process of roti making. Let us delve into the step-by-step journey of how this ingenious device transforms raw dough into piping hot, perfectly cooked rotis with unparalled ease. The journey begins with the preparation of the dough. Whether it’s a homemade recipe or store-bought dough, ensuring the right consistency is crucial. Once the dough is ready, it’s divided into small, manageable portions into small, manageable portions, ready to be transformed into delectable rotis. With the dough at the ready, it’s time to introduce it to the automatic roti maker.
The machine typically features a chamber where the dough balls are placed, awaiting their turn to undergo the magical transformation. Carefully load each portion of dough into the designated compartment, ensuring for optimal results. Like a conductor orchestrating a symphony, the user adjusts the settings on the automatic roti maker to suit their preferences. Parameters such as thickness, diameter and cooking time can often be customized to achieve the desired outcome. Whether it’s a soft, fluffy roti or crisp, golden-brown variants, the machine can be tailored to cater to individual tastes. With settings dialed in, it’s time for the real magic to unfold.
The automatic roti maker springs into action, gently pressing down on each dough ball to flatten it into a unform disc. Simultaneously, the cooking mechanism kicks into gear, applying just the right amount of heat to transform the raw dough into a tantalizing roti. As the roti cooks, it’s carefully monitored to ensure even browning and perfect doneness. With a gentle hum, the fully automatic roti maker signals the completion of its culinary masterpiece. The freshly cooked rotis emerge from the machine, warm and inviting, ready to be savored. Carefully remove roti from the machine, taking care not to disturb its delicate texture. Whether enjoyed hot off the press or stacked high for later consumption, the fruits of the automatic roti maker’s labor are bound to delight taste buds and tantalize the sense.Here are additional aspects you can explore like variety of rotis, discuss the versatility of roti makers in creating various types of rotis beyond the traditional plain roti.
This could include options like stuffed rotis (such as aloo parantha or paneer parantha), flavored rotis (like garlic or methi) or even dessert rotis (such as sweet rotis with jaggery and nuts). Nutritional benefits, highlight the nutritional advantages of using a roti maker such as the ability to control the ingredients and avoid excessive oil or butter typically used in pan-frying rotis. Emphasize how roti maker can contribute to healthier eating habits by promoting the consumption of whole grains and reducing unnecessary fats.
User friendly design, explore the user-friendly design elements of roti maker such as intuitive controls, safety features and ergonomic handles. Explain how manufactures prioritize ese of use and safety to ensure that even novice cooks can operate a chapati making machine with confidence. Cultural significance, touch upon the cultural significance of rotis in various cuisines, particularly in south Asian and middle eastern cultures where they are a staple food. Explain how roti makers help preserve culinary traditions while adapting to modern lifestyles, making it easier for people to continue enjoying this beloved food. Therefore, buying roti maker makes life easier and amazingly convenient.
0 notes
Text
Mastering the Art of Chicken Butter Masala: A Culinary Journey
Introduction:
Embark on a flavorful culinary adventure with Chicken Butter Masala, a beloved Indian dish known for its rich, creamy texture and aromatic spices. Commonly found on the menus of Indian restaurants worldwide, Chicken Butter Masala, also known as Butter Chicken, has captured the hearts and taste buds of food enthusiasts everywhere. In this article, we'll delve into the origins, ingredients, and cooking techniques of Chicken Butter Masala, exploring how to recreate this iconic dish at home and elevate your culinary skills.

Unraveling the Origins:
Chicken Butter Masala traces its roots back to the city of Delhi, India, where it was invented in the 1950s by Kundan Lal Gujral, the founder of the iconic Moti Mahal restaurant. Originally created as a way to repurpose leftover tandoori chicken, Chicken Butter Masala has since become a culinary sensation, cherished for its velvety smooth texture and indulgent flavor profile.
The Secret to Perfect Chicken Butter Masala:
At the heart of Chicken Butter Masala is the luscious, creamy tomato-based sauce that coats tender pieces of chicken. The key to achieving the perfect balance of flavors lies in the careful selection and preparation of ingredients. Here's what you'll need:Chicken: Use boneless, skinless chicken thighs or breasts for tender and juicy results. Yogurt: Marinate the chicken in a mixture of yogurt, ginger-garlic paste, and spices to tenderize and infuse it with flavor. Tomatoes: Simmer ripe tomatoes until soft, then blend into a smooth puree to form the base of the sauce. Butter and Cream: Add richness and creaminess to the sauce with generous amounts of butter and cream. Aromatic Spices: Infuse the sauce with warm, fragrant spices like cumin, coriander, garam masala, and kasuri methi (dried fenugreek leaves). Cashew Paste: Thicken the sauce and add a nutty richness with a paste made from soaked cashews.
Cooking Techniques:
To make Chicken Butter Masala, start by marinating the chicken in a mixture of yogurt and spices, then grill or roast until cooked through. Meanwhile, prepare the sauce by sautéing onions, ginger, and garlic in butter until golden brown. Add the tomato puree, spices, and cashew paste, then simmer until thick and creamy. Finally, add the cooked chicken to the sauce and simmer until heated through. Finish with a drizzle of cream and garnish with fresh cilantro before serving.
Tips for Success:Use ripe, juicy tomatoes for the best flavor and texture in the sauce. Adjust the amount of chili powder and garam masala according to your taste preferences. For a dairy-free version, substitute coconut milk for cream and oil for butter. Serve Chicken Butter Masala with naan, rice, or roti for a complete meal.
Conclusion:
In conclusion, Chicken Butter Masala is a classic Indian dish that embodies the rich culinary heritage of India. With its velvety smooth texture, aromatic spices, and indulgent flavors, this iconic dish has earned its place as a favorite among food lovers around the world. By mastering the art of Chicken Butter Masala, you can elevate your home cooking and delight your family and friends with a taste of authentic Indian cuisine. So gather your ingredients, fire up the stove, and get ready to savor the irresistible flavors of Chicken Butter Masala.
0 notes
Text
Dal Dhokli Recipe
A traditional Gujarati dish made from wheat flour and toor dal. this is a matka recipe served alone without rice or roti as both are used in its plan. By the way, you can also serve it with roti or rice dal dhokli recipe
There are many recipes of dal which are made in different ways. In any case, those dishes are generally not served alone. They are also served with roti or dal. however, this dal dhokla recipe stands out from the rest as it is made of wheat and pulses, and will keep you full even if you don't serve it with anything else.
I use the leftover dal and roti every day to make dal dhokli recipe. I use whatever is available at home rather than using a recipe book. however in this recipe i have added raw roti to the boiling dal curry in gujarati style. For this recipe, I have also prepared dal in Gujarati style.
furthermore, i would like to add some tips, ideas and variations to this dal dhokli recipe. Thin dhoklis take longer time to cook in dal, so keep them thin. If the dal is not cooked as expected, then there is a problem in processing it. Then put the thin prepared dhoklis one by one in the dal. When the dal starts boiling, the dhoklis will stick to each other and lumps will be formed. Due to the wheat and lentils, the curry thickens when it cools. So if you wish to serve it later, you should add more water and make it intense.
Ingredients for Gujarati Dal Dhokli Recipe:-
For lentils-
½ cup toor dal
1½ cups water
1 tsp oil
2 tbsp peanuts
For tempering of lentils-
1 tbsp desi ghee
1 tsp mustard
½ tsp cumin
1 dry chili, broken
pinch asafoetida
few curry leaves
1 tomato finely chopped
1 tsp ginger garlic paste
1½ cups water
¼ tsp turmeric
¾ tsp Kashmiri red chili powder
¼ tsp cumin powder
½ tsp coriander powder
¼ tsp garam masala
small piece jaggery
¾ tsp salt
1 tsp lemon juice
2 tbsp coriander, finely chopped
For Dhokli-
1 cup wheat flour
¼ tsp turmeric
½ tsp Kashmiri red chili powder
¼ tsp ajwain
½ tsp salt
2 tsp oil
½ cup water
How To Make Gujarati Dal Dhokli Recipe:
Make lentils-
1. To begin making the Dal Dhokli recipe, we have to first boil the Dal.
2. For that we have to take tur dal and wash it thoroughly.
3. Wash the dal till the water becomes completely clear. Because there is polish on the lentils. Due to which the taste is affected.
4. Now put the dal in the pressure cooker. A big bowl has to be kept in the dal itself and peanuts are also to be kept in it.
5. Now add 1½ cups of water to it and add salt, oil.
6. Now close the lid of the cooker and take 4-5 whistles.
7. Now the pressure of the cooker has to be released on its own. Meanwhile, considering the time, you have to prepare the ingredients for the tempering of the lentils.
8. When the pressure of the dal is released, mash the dal with a masher.
Fry the lentils-
9. To fry the lentils, you have to take a big pan or pan. Pour desi ghee in the pan and let it heat up.
10. Now mustard, cumin, dry broken red chili and asafoetida have to be put in hot ghee and crackled.
11. After this we have to put curry leaves in it and fry it.
12. Now add tomato and ginger garlic paste and fry till the tomatoes become soft.
13. When the tomatoes become soft, add turmeric, chili powder, cumin powder, coriander powder and garam masala and fry.
14. When the spices are ready to be roasted, add the cooked tur dal to it and also add 1½ cups more.
15. Now put boiled moong pods in it and also add some jaggery and salt in it.
16. Now let it cook.
17. Now this much your dal is cooking, so you have to prepare the dough for dhokli.
Make Dhokli-
18. To make Dhokli, we have to take wheat flour in a plate or bowl.
19. Add turmeric, Kashmiri red chili powder, carom seeds, salt and oil to the flour.
20. Now the flour, oil and spices have to be mixed well. When everything goes well.
21. Then you have to make a tight dough by adding water. So that it can easily be spread.
22. Now a dough has to be made with the dough. And now the dough has to be rolled like roti.
23. But it has to be prepared by making thick sized mercury from bread.
24. Now we have to cut the mercury in any shape. Now when the dal starts boiling, you have to put the chopped dhokli in the boiling dal.
25. Now cover and cook the dal for 10-15 minutes until the dhoklis are cooked.
26. When the dal dhokli is cooked well and ready, add coriander leaves to it and it is ready to eat. You can enjoy it with rice.
For more information visit the link: https://cookingkhajana.in/dal-dhokli-recipe/
0 notes
Text
How to Make Buff Curry with Century Meat Masala?
Nepali foods have an authentic flavor that makes you eat more. Buff curry is a Nepali popular side dish that is served with rice or roti.
Making a delicious buff curry is an art. When you Google buff curry, you will find many methods to prepare the buff curry. And every buff curry recipe you try in your home will have a different taste from the previous buff curry you prepared. The taste may vary because of the masala used and the method of cooking.
You will find the simplest to complex methods of making buff curry. This buff curry recipe is quite simple and has not used any fancy ingredients. You can prepare buff curry from all the ingredients available in your kitchen cabinet.
This recipe uses Century meat masala to make an authentic and aromatic buff curry that makes everyone praise your cooking skills. You can buy Century meat masala from the nearby store or online store.
Steps to prepare buff curry with Century meat masala
Ingredients:
Buffalo meat
Onion
Tomato puree
Ginger garlic paste
Mustard oil
Salt
Masala: Turmeric, coriander powder, garam masala, Century meat masala, red chili powder
Spices: Black peppercorn, cumin seeds, cinnamon stick, black cardamom, bay leaves
Prepare tomato puree
Step 1:
You will need four medium-size tomatoes to make tomato puree. Gently drain them to remove dirt.
Step 2:
Roughly chop the tomatoes.
Step 3:
Put the pieces of tomatoes in the blender. Blend them to get it in liquid form.
Step 4:
Pour the tomato puree into the bowl.
Tomato puree is ready. You will need to add tomato puree in the upcoming steps, if you don’t have time to make tomato puree, you can also use hot tomato sauce. You will need around three to four tablespoons of hot tomato sauce.
For More Details Click Here
0 notes
Text
Creamy Paneer Tikka Masala with Spices and Herbs
Paneer tikka masala is a flavorful vegetarian dish originating in the Indian subcontinent. It is a popular North Indian cuisine that has gained worldwide popularity for its aromatic spices and creamy texture. This dish is made with marinated paneer, which is a type of Indian cheese, that is grilled and then cooked in a rich and creamy tomato-based gravy. The combination of tender paneer and aromatic spices makes this dish a must-try for all foodies. In this recipe, I will share with you step-by-step instructions on how to make this delicious paneer tikka masala at home.
Ingredients:
Ingredient
Quantity
Paneer
500 gm
Hung Curd
1 cup
Ginger Garlic Paste
2 tbsp
Red Chili Powder
1 tsp
Turmeric Powder
1 tsp
Garam Masala Powder
1 tsp
Cumin Powder
1 tsp
Coriander Powder
1 tsp
Lemon Juice
2 tbsp
Salt
As per taste
Vegetable Oil
2 tbsp
Onion (Chopped)
1 large
Tomato (Chopped)
2 medium
Cashew Nuts
1/4 cup
Heavy Cream
1/2 cup
Kasuri Methi (Dried Fenugreek Leaves)
1 tsp
Water
As required
Coriander Leaves (Chopped)
For garnishing
Instructions:
Cut the paneer into cubes and keep it aside.
Take hung curd, ginger-garlic paste, red chili powder, turmeric powder, garam masala powder, cumin powder, coriander powder, lemon juice, and salt in a mixing bowl. Mix everything well.
Add paneer cubes to the mixing bowl and gently coat them with the marinade. Keep it aside for 30 minutes.
Heat a grill pan on medium heat and brush it with vegetable oil. Place the marinated paneer cubes on the pan and grill them until golden brown from all sides. Keep it aside.
In a pan, heat 1 tbsp of oil and sauté chopped onions until translucent. Add chopped tomatoes, cashew nuts, and some water. Cook it for 10-15 minutes on low flame until everything becomes soft and mushy.
Once the mixture cools down, transfer it to a blender and blend it into a smooth paste.
In the same pan, heat 1 tbsp of oil and add the prepared tomato-onion paste to it. Cook it for 5-7 minutes on medium flame.
Add kasuri methi and heavy cream to the pan and mix everything well. Cook it for another 2-3 minutes.
Add the grilled paneer cubes to the pan and mix them gently with the gravy. Cook it for another 5-7 minutes.
Garnish it with chopped coriander leaves and serve it hot with naan, roti, or rice.
Read the full article
0 notes
Text
How about some Creamy Saucey Malai Kofta for Dinner?
Make your boring daily dinner a sizzling hit and make your heart fly away with Malai Kofta. Yes, a crispy and hot paneer dumplings served with a creamy and saucy gravy that goes well with naan, chapati, or roti are always a winning dish. I can get your thoughts, it is not that difficult. You can make this dish easily with the available ingredients at home. Com'on, let us see how to make the tantalising dish along with edible oil manufacturers.
Ingredients
Grated paneer, 1 cup
Medium-sized boiled potato - 200 grams
Red chilli powder - ¼ tsp
Garam masala - ¼ tsp
Milk powder - 2 tbsp
Corn flour - 2 tbsp
Oil - for frying
For gravy
Onion paste - ½ cup
Ginger garlic paste - 2 tbsp
Fennel powder - ¼ tsp
Oil - 3 tbsp
Tomato puree - 1 cup
Coriander powder - 1 tsp
Cumin powder - ¼ tsp
Cashew paste - 7
Salt
Water
Kasuri Methi - 1 tsp
Cream - 2 tbsp
Method
In a bowl, mash the boiled potato and add the grated paneer, garam masala powder, chilli powder, and salt. Combine well.
Divide the mixture into equal portions and shape them into medium-sized balls.
Take the kofta, flatten it in your hand, and stuff it with a few cashews and raisins. Reshape the kofta and seal the edges properly.
Refrigerate the kofta for 30 minutes or set it aside at room temperature.
In a kadai, heat 3 tbsp of oil and add the cardamom, mace strands, green cardamoms, cinnamon, bay leaf, and cloves.
Once it splatters, add in the onion paste and sauté it over low-medium heat till it's browned.
Once it browns, add in the ginger-garlic paste and sauté it till the raw aroma of the paste goes away.
Add in the tomato puree and sauté it for 7 minutes over low-medium heat.
Now add the ground spices and mix well.
Add in the cashew paste and mix well. Add water as required and combine thoroughly.
Once it boils, add in the kasuri methi.
Switch off the flame and add a tablespoon of fresh cream.
Set it aside.
In another pan, add oil and fry the koftas till golden brown.
Add the koftas to the gravy and serve it.
Yummy and delicious Malai Kofta is ready!!
About Sundew Sunflower Oil:
Tamil Naadu Edible Oils is one of the leading refined sunflower oil manufacturers that produces premium-quality oil for cooking. As one of the best cooking oil manufacturers in Tamil Nadu, TNEO is committed to delivering quality oil that is affordable as well as light in texture. The refined oil from TNEO is fortified with vitamins and essential fatty acids, making it an ideal choice for all age groups. The oil is versatile and enhances the taste of every dish and every cuisine effortlessly. Choose sundew from TNEO—the best edible oil manufacturers in Tamil Nadu—to make tasty dishes.
0 notes
Text
What is Hemp Seeds?
Introduction
Hemp Seeds
The Nutritious Superfood You Should Be Aware of
Hemp Seeds are quickly becoming well-known in the superfood industry for their remarkable health advantages and adaptability. However, what are hemp s
eeds precisely, and why should you be aware of them? Everything you need to know about why our Himalayan Monal Hemp Seeds are more beneficial—will be revealed in this thorough guide.
Hemp Seed, the hemp plant, yields edible seeds that a
re known as Hemp Seeds. Hemp Seeds have very little THC(tetrahydrocannabinol), which makes them completely safe and lawful to eat. When their outer shell is removed, these little, nutty-flavored seeds—which have a soft, chewy texture.
Health Benefits of Hemp Seeds
Incorporating Hemp Seeds into your diet can pro
vide numerous health advantages.
High-quality protein: Offers every one of the nine necessary amino acids, making it a complete protein that is acceptable for vegans and vegetarians.
Rich in Essential Fatty Acids: Contains a good ratio of Omega-3 to Omega-6 fatty acids, which lowers inflammation and promotes heart health.
Good Source of Fibre: When eaten with the shell, this food supports digestive health and helps to ensure regular bowel movements.
Full of Minerals and Vitamins: Packed with iron, magnesium, phosphorus, potassium, Vitamin E, and other nutrients that promote general health and wellness. Provides antioxidants such as Vitamin E, which aid in combating oxidative stress and decreasing inflammation within the body.
Promotes Heart Health: Rich in fiber, Antioxidants, and Omega-3 fatty acids, it helps lower blood pressure and cholesterol.
Promotes Heart Health: Rich in fiber, Antioxidants, and Omega-3 fatty acids, it helps lower blood pressure and cholesterol.
Promotes Muscle Health: High-quality protein is good for post-workout recovery and muscle building since it promotes muscle growth and repair.
How to Use Hemp Seeds in Your Daily Diet?
Smoothies: Mix a couple of tablespoons of Hemp Seeds into your morning smoothie. Together with protein and good fats, they combine nicely and add a nutty flavor.
Yogurt Topping: To add extra protein and a crispy texture to your yogurt, sprinkle hemp seeds on top. They go nicely with granola and fruit.
Salads: Add a few hemp seeds to your greens. They also impart a healthy dose of Omega-3 fatty acids and a delicious crunch.
Baking: Add hemp seeds to baked products such as bread, cookies, or muffins. They can be added as a topping or combined with the batter.
Oatmeal: Add hemp seeds to your oatmeal or porridge for extra protein and a nutty flavour. They improve the overall texture and mix together nicely.
Soups & Stews: Right before serving, sprinkle hemp seeds over soups and stews. They add nutritious value and create a pleasing contrast to the texture of the soup.
Homemade Granola: Add Hemp Seeds to your energy bars or homemade granola. They are a fantastic source of protein and good fats that will prolong feelings of fullness
Hemp Seed Milk: Prepare Hemp milk at home with Hemp Seeds. Hemp Seeds can be blended with water and strained to make a dairy-free milk substitute that is creamy.
Recipe for Pahari Hemp Seeds Himalayan Hemp Seed Chutney
This chutney made with Himalayan Monal Hemp Seeds, sometimes called "Pahari Hemp Seed Chutney," is a tasty and wholesome side dish that goes well with a range of meals. It is a remarkable complement to your meals because of its nutrient-dense profile and rich, nutty flavour. This chutney is very simple to make and goes well with rice and roti as a topping, dip, or spread.
Ingredients
1/2 cup Pahari hemp seeds
1/2 cup fresh coriander leaves
1/4 cup fresh mint leaves
2-3 green chilies (adjust to taste)
1 small onion, roughly chopped
1-2 cloves garlic
1 tablespoon lemon juice
1/2 teaspoon cumin seeds
1/4 teaspoon turmeric powder
Salt to taste
1 tablespoon oil (preferably olive oil or coconut oil)
Conclusion
A tasty way to include Hemp Seeds' health benefits in your diet is with this Pahari Hemp Seed Chutney. It is a flexible complement to your meals because of its bright flavour and nutritious nature. Take pleasure in the distinct flavour of the Himalayan Monal Hemp Seeds with this simple and nutritious meal.
0 notes
Text
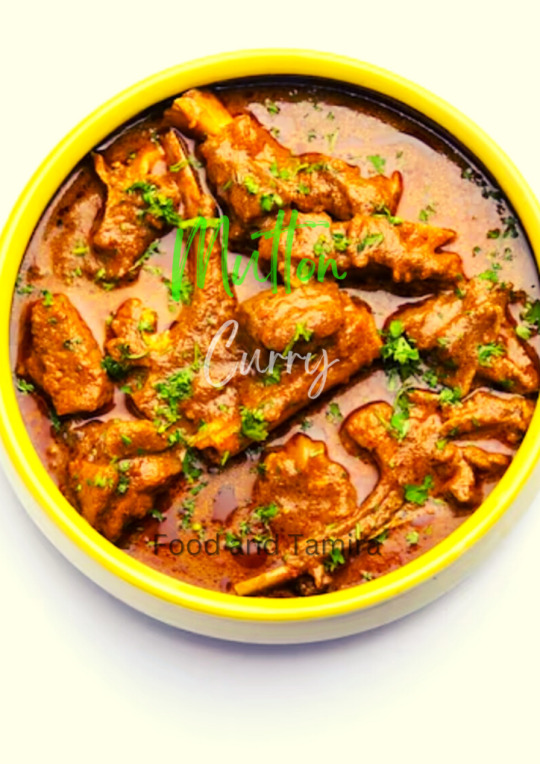
Mutton curry Recipe| Bengali style mutton curry Recipe
Mutton curry .freepik.com
Introduction of Mutton Curry
Mutton is the king of meat. Mutton is the favorite of almost all people. Mutton is very tasty from chicken.Mutton curry is a popular dish in many parts of the world, it's famous of South Asia, the Middle East, and Africa.In hotels or restaurants, all the big non-veg dishes are made with mutton.Mutton is a favorite dish of people of all ages.Many dishes are prepared with mutton, like mutton curry, mutton biryani, mutton kosha etc.Today's article is how to make restaurant-style mutton curry at home.
Ingredients needed step by step instructions:
- Mutton = 500 gm
- onion sliced = 3 medium
- onion paste = 2 big
- garlic paste = 50 gm of garlic
- Ginger paste = 50 gm of ginger
- Green chilli = 25 gm
- curd = 50 gm
- taurmaric powder= 2 tbsp
- Red chilli powder = 2/3 tbsp
- cumin powder= 2/4 tbsp
- coriander powder = 2/3 tbsp
- Salt = to taste
- Mustard oil / refined oil = 4/6 tbsp
- Fennel seed paste = 20 gm
- corn flour slurry= 3/4 tbsp
- Garam masala = 2 tbsp
Preparation and cooking process:
- First wash the mutton pieces thoroughly in water.
- Then paste onion, ginger, chili, garlic together.
- Make a paste of fennel seeds.
- Onions should be cut into small pieces.
Cooking process :
- Now heat the oil in a pan. After that fry the onions and brown them.
- Now add fried onion, curd, salt, turmeric powder, chili powder, cumin powder, coriander powder, paste spices ( onion,garlic, ginger,chili ) and marinate to the mutton.
- Rest it for 30 minutes.
- This time the marinated mutton should be boiled through the pressure coker.need 4/5 whistler.
- Now heat the pan again and pour the boiled mutton into the pan. Stir well for 5/10 minutes.Its depend on mutton pieces.If the mutton pieces is small then it gets cooked quickly.
- Now add garam masala and kasmiri Red chilli powder to the mutton and stir well for 2 minutes.
- After frying a little, when you see water coming out of the mutton, then pour the water and boiled it for 4/5 minutes.
- If the water starts to drip a little, add the corn flour slurry.Because if flour slurry is added, the mutton gravy is a little thick.
- After that Add fennel paste after boiling for 4/5 minutes.
- Now Give it a little shake. Now your mutton curry is ready.
Cooking and Preparation Time:
preparation time is 30 minutes and cooking time is 35 to 40 minutes.
Tips and Tricks for Mutton Curry Variations and Substitutions Serve Suggestions Conclusion:
Tips :
- Mutton curry with mustard oil is good for the test.
- While making mutton curry, the mutton pieces are cooked quickly if cut into small pieces.
- If the mutton is cooked in a pressure cooker while making mutton curry, the mutton is cooked quickly. Gas is less wasted.
- Fresh mutton should always be used.
- Mutton curry is good when add curd.
Tricks:
- If the mutton is not cooked while making the mutton curry, cut a piece of papaya and you will see that the mutton is cooked.
- You can add potatoes to the mutton curry. It will be good to eat.
- To get better gravy has to be added corn flour.
- Add fennel seed paste to enhance the flavor of mutton curry.
Mutton Curry Variations:
The exact recipe for mutton curry can vary widely depending on the region and the preferences of the cook example like Indian style mutton curry, Pakistani mutton curry,bengali style mutton curry,Caribbean-style mutton curry,Middle Eastern-style mutton curry etc.
Serving process:
Mutton curry is very famous dish in India. Mutton can be cooked in different ways.Mutton curry likes to eat with rice, roti, laccha paratha etc.Many people also eat biryani, kulcha with it.Mutton curry is served in various ceremonies these days.In many places, mutton curry is made in clay pots. And it is very good on taste.
FAQ:
Q.What is mutton curry?
A. Mutton curry is a dish made with pieces of goat meat .cooked with a blend of aromatic spices.
Q.What is the difference between mutton curry and lamb curry?
A. Mutton curry is made with goat meat .lamb meat made with sheep meat.mutton curry is delicious than lamb curry.
Q.What are the common spices used in mutton curry?
A.cumin, coriander, turmeric, chili powder, garam masala, and ginger-garlic paste.
Q.What are some popular side dishes that go well with mutton curry?
A.Mutton curry is served with rice or Indian bread, such as naan, roti, paratha.
What is the nutritional value of mutton curry?
A.Mutton curry is a good source of protein, iron, and other nutrients.
Read the full article
0 notes
Text
Authentic Matar Paneer Recipe: How to Cook Delicious North Indian Curry at Home.
Hey guys here is the home way to cook matar panner... please try this recipe and do share your feedbacks.
Matar Paneer is the most common and most popular North Indian Dish. This north Indian dish is made with peas and paneer, a type of Indian cheese. One can enjoy this flavorful vegetarian dish with naan, roti, or rice.
Here’s How to make it
Ingredients:
1 cup Cubed paneer.
1 cup frozen peas
1 Chopped onion.
2 chopped tomatoes.
1 tablespoon ginger, grated
1 tablespoon garlic, minced
1 green…

View On WordPress
1 note
·
View note
Text
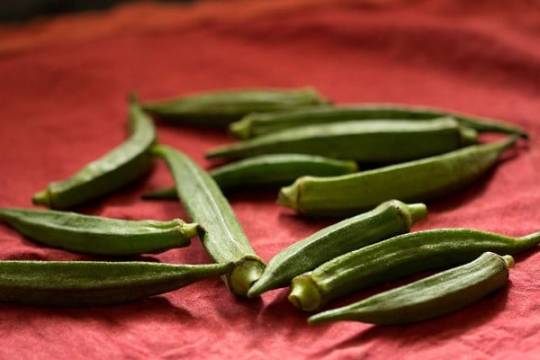
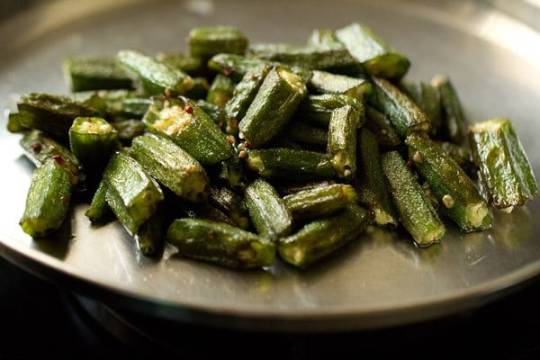
Ladies Finger Curry | Bhindi Curry » Dassana's Veg Recipes


Ladies Finger Curry also called Bhindi Curry in Hindi is a tangy and spiced recipe of sautéed okra in an onion, tomato, spices, yogurt curry base. The recipe is gluten-free. Serve this tasty Indian okra curry with flatbreads like chapati, roti or naan. It also pairs well with steamed rice or jeera rice.

About Ladies Finger Curry
This recipe gets its name as Okra is also called Ladies Finger in English. In Hindi, okra is referred to as ‘Bhindi’. This is a really good home cooked delicious curry made with fresh and tender okra pods.
I have kept the ingredients basic and not added stuff like cashews, poppy seeds, melon seeds, cream etc to thicken the curry. So anyone having Indian spices and ingredients at home can easily make this delicious Bhindi Curry.
Bhindi is a family favorite. Hence there are many recipes posted with okra on the blog. I have already posted a semi-dry North Indian, Punjabi style recipe of Bhindi Masala which is another gem made from okra.
Usually I make a dry or semi dry curry with okra. We have had bhindi curry a couple of times in restaurants. So I tried to make a restaurant version minus the cream or khoya (evaporated milk solids). The recipe was a success and it tasted awesome.
Since okra and tomatoes are two of the hero ingredients, make sure to use tender okra pods and sweet tasting tomatoes that are not very tangy or overly sour.
While writing this post, I still remember the flavors and taste of this Ladies Finger Curry. It was damn good. I love cooking more than being a foodie.
But for a reason, this okra curry was an exception. It reminded me of the flavor and taste of a Ladies Finger Curry I had many years back in Mumbai. The tanginess of the tomatoes complements the light sweetness of okra very well.
This Okra Curry pairs well with soft phulka, chapati or paratha. This mildly spiced okra curry also goes well with steamed rice.
Step-by-Step Guide
How to make Ladies Finger Curry
Preparation
1. First rinse 250 grams okra (ladies finger) very well in running water a few times. Then drain them completely in a strainer or colander.

2. Wipe each okra with a kitchen napkin. There should be no moisture on them. You can also allow them to dry naturally at room temperature, by spreading them on a large plate or tray.
3. Chop the bhindi into 1 to 1.5 inch pieces. Keep aside. Do check for worms or black spots as you chop them. Discard the okra pieces if you spot any of these.

4. In a grinder or blender jar, take the following ingredients:
- ¾ cup roughly chopped ripe red tomatoes
- 1 inch peeled and chopped ginger
- 4 to 5 chopped garlic cloves
- 1 or 2 green chilies, chopped or 1 teaspoon, chopped
Remember to use ripe red tomatoes which are a bit sweet and less sour or tangy.
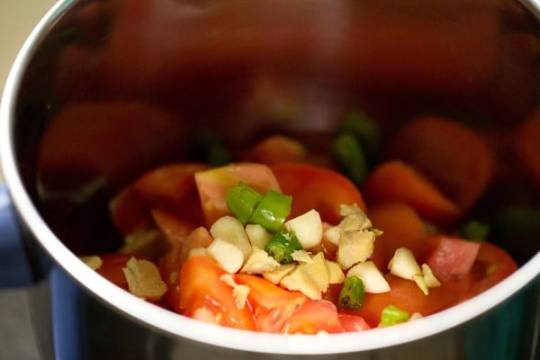
5. Add 2 tablespoon fresh full fat curd (yogurt) along with 2 cloves, 1 green cardamom, ½ inch cinnamon and 1 single and thin strand of mace.
Mace is optional and can be omitted.

6. Without adding water, grind or blend to a fine and smooth paste. Keep aside covered.

Sauté Ladies Finger
7. Heat 2 tablespoons oil in a heavy kadai (wok) or frying pan. Add the chopped okra and sauté them on a low heat.

8. Stirring often, sauté them till they are almost cooked, shrunken in size and lightly browned from the sides.

9. When done remove the sautéed okra and place them in a plate or tray.
Make Ladies Finger Curry
10. In the same kadai or pan, further add 2 tablespoon oil. Add tej patta (Indian bay leaf) and fry for about 5 to 7 seconds on low heat.

11. Add the ½ cup finely chopped onions.

12. Stir to mix.
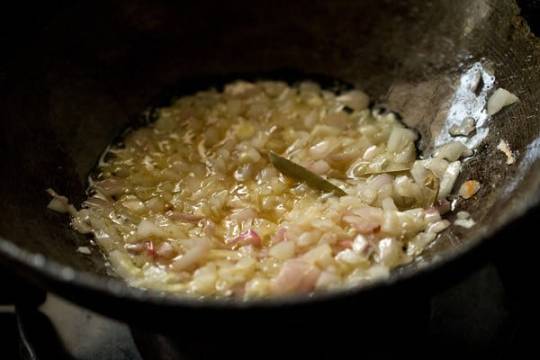
13. Sauté the onions on low to medium heat till they start to turn light golden.
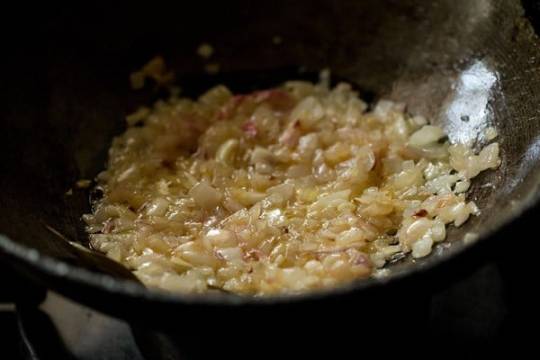
14. Lower the heat and add the ground spices listed below:
- ¼ teaspoon turmeric powder
- ½ teaspoon red chilli powder or cayenne pepper
- ½ teaspoon coriander powder
- ½ teaspoon cumin powder

15. Stir the spice powders quickly. You can also switch off the stove top while adding and mixing spices powders, so that they don’t get burned.

16. Add the prepared ground tomato-yogurt-spices paste that we made before.
Read the full article
0 notes
Text
Asexual Desi in the United States (POC Profiles)
Hey there! Thanks so much for making space for this! I’m a second-generation immigrant, born to two South Indian (Hindu, Tamil, Brahmin) immigrants. I grew up in a part of the United States that had a large Asian American population, but not a huge South Asian population – at least, not until later.
Beauty Standards
Skin color and colorism have been discussed a lot already, so let’s talk about hair! My hair has always been very thick and curly. When I was little, my mom would cut it super short – but then at some point, I put my foot down and insisted on growing it out. From then on, until I learned to do/experiment with my hair myself, my dad would spend half an hour each morning just braiding my hair. For most of elementary school, I was the only non-White kid who had hair like this, and as a result, it became incredibly important to me to straighten my hair at every possible opportunity.
To add to this: in the 90s and early 2000s, one popular perception I was raised on was that curly hair = unclean and unprofessional, at least in the U.S. Unfortunately, I internalized that a little too hard, to the point that, even when naturally curly hair has become more widely accepted, I still struggle to feel comfortable and confident in my appearance when I don’t take that extra time to straighten my hair. I’m working on it, but progress is slow!
Food
I was raised vegetarian (not very strictly) in a region and at a time when vegetarian/vegan options were not super commonplace. I didn’t have a “lunchbox story” because my mother had cousins that also grew up in the U.S. who advised her to send me to school with sandwiches and pasta salads for lunch – though I do remember another Indian classmate who brought roti sabji to school once and the other kids gave him shit for it.
In hindsight, the “Indian” food I used to eat at home was actually a mishmash of cuisines from both North and South India. Dals, roti, and yogurt rice were super common (yogurt rice is currently one of my top comfort foods!), and my mom got into a habit of making a vegetable side dish with every meal (cauliflower, potatoes, and cabbage were especially common). Every so often, we’d also eat dosa with chutneys and sambar – though the amount of time and assembly required meant that we reserved this for special occasions. I also grew up eating eggs, though my parents never did (they’ll eat desserts with eggs baked into them, though). On the day of each new moon since my grandfather died, my parents have also insisted on eating only sattvic foods (though loosely interpreted to mean: just no garlic or onions), though they never insisted that I follow this as well.
I can’t stand most Indian sweets, except for gulab jamun and jalebi. Almost everything else makes me gag. When I was a kid, I figured I would one day acquire a taste for them, but somehow that never happened…? For the most part, my family’s accepted this as a weird quirk of mine, but over the years, there have been some aunties and uncles who said this made me whitewashed and “too American.”
My family also celebrates primarily with food! Birthdays, holidays both American and Indian, even Mother’s Day and Father’s Day meant either going out to eat or cooking a special (frequently non-Indian) meal.
Language
So fun fact: I forgot how to speak my native language! Yes, it haunts me to this day.
Initially, I grew up speaking both Tamil and English. I was also a terribly shy and quiet kid – so when I was in kindergarten, and I was spacing out a lot and not following directions properly, my teacher saw me speaking in Tamil to my grandparents when they came to pick me up at the end of the day, and assumed that I couldn’t speak English. I’m my parents’ first child, and they hadn’t been in the U.S. for very long before they had me – so when my kindergarten teacher brought this up with them, they panicked and insisted on speaking only English at home, just to stamp out any doubt that I wasn’t fluent in the language. (Another fun fact: I had a half-White friend then who also didn’t say a word her first day of kindergarten! Her parents were advised to take her for counseling and speech therapy.)
I don’t blame my parents for this at all – they were first-time parents with a young kid in a new-ish country; how were they supposed to know how to handle pushy, racist teachers? They just wanted me to do well in school, and they did the best they could with what little they knew of how to navigate the system.
Eventually, I reached a point where I could no longer speak Tamil, though I could still understand it. Right now, I can comfortably watch Tamil movies without subtitles and understand all the family gossip, but that’s about the extent of my knowledge of the language. It’s a point of insecurity for me – when so much of culture and identity is supposed to be tied up in language, I can’t help but feel like I screwed up somewhere. I’ve met a small handful of other Desi peers in similar situations, but it still feels incredibly isolating.
Identity issues
My name’s not difficult to say, exactly – but it’s not super intuitive for people unfamiliar with Indian names to get right away. Naturally, when I was younger and living in an area less densely populated by other South Asians, this meant that people were less likely to make an effort to say my name right.
For pretty much my entire life, I’ve had a “preferred mispronunciation” of my name – not the way my name is actually supposed to be pronounced, but if you’re going to mess it up, then I’d prefer that you mess it up in this particular way. Almost every Desi kid I went to elementary, middle, and high school with had a preferred mispronunciation; the only people who didn’t have one were people with really easy to pronounce names like “Neesha.” Heck, we referred to each other by preferred mispronunciations, even though we all knew perfectly well how to properly say each other’s names properly!
Come college, I decided to try introducing myself to people with my name as it’s actually pronounced. It was a strange experience, because I didn’t anticipate how exhausting it would be to have to break down that pronunciation over and over again because it was still difficult for people unfamiliar with Indian names to get it right away. To complicate things even further, I still went by my preferred mispronunciation academically and professionally.
This is by no means a universal opinion, and I don’t intend to speak for anyone but myself here, but: I don’t hate my preferred mispronunciation of my name? At this point, it’s just as much a part of me as the actual pronunciation of my name.
Dating and Relationships
Most of my relatives were connected with their spouses through arranged marriages. They would be introduced through their parents, and then they would spend several months texting, emailing, and talking to each other before announcing to the family that they’d agreed to marry each other. There are some exceptions to this, however: my parents and a few other aunts and uncles met for the first time just days before their wedding; on the flip side, I also have some aunts and uncles who had love marriages. The impression I got was that my parents would generally be okay with me dating and marrying a non-Indian person, but I’d have a fight on my hands with my extended family – though they, too, would eventually come around.
I didn’t know I was asexual until I was in my twenties. Until then, I’d assumed that I was just doing what was expected of me, as a “good Indian girl” – I didn’t date anyone when I was in high school, though I had a few crushes here and there; I dated a White boy when I was in college, and then another Southeast Asian boy after I graduated, but neither relationship lasted for very long. It wasn’t until I was in my early twenties that I got to a point where I was comfortable and confident in my sexuality, where I could say things like: “I could die a virgin and have zero regrets,” and: “I could never get married, never have kids, and I would be totally fine” without feeling like I was doing something wrong.
… and then came my mid-20s. By the time I was done with grad school, my family – both parents and extended – started clamping down hard on the fact that I was still single, that I hadn’t expressed that much interest in dating. They felt personally responsible, assuming that they’d somehow given me the impression that because they wouldn’t have approved of me dating when I was younger, that somehow convinced me to never try in the first place. It has been intensely uncomfortable to dance around this topic, and pretend I’m just delaying this part of my life until I pass xyz milestones.
Realistically speaking: I don’t think I could ever use the word “asexual” to describe myself to anyone in my family, even my parents. My parents at least are pretty open-minded, and they’re making a strong effort to wrap their heads around LGBTQ+ issues, but they’re not there yet. This is not a conversation I’m ready to have with them. A part of me has resigned myself to having to lie about this part of myself when the day comes where my family deems me “too old” to still be single, and… I’m sorry, this is not terribly optimistic. I don’t have an answer for this part yet.
Things I’d like to see more/less of
Just more Desi characters in stories that aren’t inherently about them being Desi! Y'all have no idea how excited I was to see a character named Jeevan Choudhary at the core of a post-apocalyptic story like Station Eleven, playing a pivotal role that isn’t necessarily contingent on him being Desi.
I’d also love to see more loving, supportive Desi parents! It’s so common to see strict parents who want their children to follow a certain path, who then serve as obstacles for those children to overcome as they pursue their dreams – both in Western and Indian media! It would be nice to see the opposite, for once.
I’d also love to see more sci-fi/fantasy stories centered on Desi protagonists – and not as “the smart one” in the group.
Read more POC Profiles here
#POC Profiles#Desi#Indian#South Indian#Tamil#Brahmin#Hair#Beauty Standards#Eurocentric beauty standards#food#Indian Food#South Asian Food#Languages#identity issues#arranged marriage#asexual#asexuality#submission#Desi representation
800 notes
·
View notes
Last Seen Blogs


mybagicha
MyBagicha.info

salaficentre
Salafi Centre of Manchester

santastokes
hohoho

santanarohana
Sem título