#how to change router password linksys
Explore tagged Tumblr posts
Visit Tumblr Blog
Explore Tumblr blogs with no restrictions, modern design and the best experience.
Last Seen Tumblr Blogs


Fun Fact
28.6 is the average number of monthly visits per US mobile user.
Text
Quick And Easy Setup Process For All Linksys Extenders
Do you want to enjoy full connectivity throughout your home or office space but your router isn't allowing you to do so? If yes, then it is a clear indication to buy a Wi-Fi range extender. A good quality Wi-Fi range extender will remove all your connectivity issues and will provide you with full signals, fast internet speed and seamless connectivity. One of the best networking brands that makes high-performing range extenders is Linksys. They have vast options for every need, so you can select the one that fits your preferences, budget and network needs. So, if you choose to buy from them, here's the common easy and simple setup process for you to get started. We will provide three options for the setup process, so you can choose the one, which is easier and more convenient for you.
Before you begin, the first and foremost step which is common for all methods is to place the range extender in a central location of your home which should be near to your existing router. Connect the router and extender with the help of an Ethernet cable. Plug the range extender into an electrical outlet with the provided power adaptor and switch on the entire setup. Wait for a few minutes, so that all the devices are stable and ready for further setup. Now let's see the different methods.
Method 1: Setup With Linksys App
✓ First open the Wi-Fi settings of your device, and connect to the extender's wifi network.
✓ The next step is to download and install the Linksys App. If you are an Android user then download from the Play Store and if you are an iOS user then download from the App Store.
✓ Open the app, create your Linksys account or if you already use the app then login using the set username and password.
✓ Once you log in just follow the instructions to set up and configure the extender. The app will guide you through selecting your Wi-Fi network and entering the necessary details.
And that's all for the app-based setup. Wasn't it super easy and quick?
Method 2: Web Browser Based Setup
We will use extender.linksys.com for this setup method.
✓ Choose any device, and go to its Wi-Fi settings. In the list of all the available networks look for a network named Linksys, upon finding click on Connect. If there is no name as such then refresh the page and the name will appear automatically.
✓ Now, on the same device open a browser. You can use any browser like Google Chrome, Edge, Safari or any other of your choice.
✓ In the address bar of the browser enter extender.linksys.com and press enter. This will take you to the login page. If extender.linksys.com doesn't work then try adding http:// in front or you can also use the default IP address which is 192.168.1.1.
✓ Once you enter the login page, you have to enter the default login details. The username and password are both admin or sometimes it's admin for username and password for password. So if one doesn't work try the other combination. For accurate details always check the user manual that came along with your specific Linksys Extender model.
✓ Once you log in successfully, you have to select the name of your current network whose reach you want to extend and enter its password. Now the screen will guide you to complete the whole process, so keep following all the instructions carefully.
✓ Once done, you can now change the extender's settings as per your wish.
That's all for web browser-based setup. We hope you found it easy and straightforward.
Method 3: WPS Method
One of the easiest and quickest methods to set up Linksys Extenders is using the WPS method. So here's how you can perform this method:
✓ Firstly you need to ensure that your router supports WPS (Wi-Fi Protected Setup).
✓ Now, locate the WPS button on your router and press it. Usually, the WPS button can be found by moving the router upside down.
✓ Within two minutes, press the WPS button on your Linksys Extender.
✓ As soon as you press the button on the extender the light on it will start blinking to indicate that it is connecting to the router. Once it stabilizes, it means the setup is successfully done.
Bonus Points To Enhance The Working Of Your Linksys Extenders
Choose a less crowded Wi-Fi channel by visiting the settings of your extender for a better experience.
Regularly check for firmware updates, if found install them immediately for improved performance and better security.
Make sure the place where you have kept the range extender doesn't have any electronic devices or any metal objects as it can disturb the signals of your extender.
Consider changing the default username and password to something difficult and unique so that your network is protected from hackers.
Use Qos settings for Prioritizing bandwidth for critical applications.
1 note
·
View note
Text
https://linksyssvelop.com/
How to login to linksys velop?
To access the Linksys Velop Login page, open the web browser and type the linksyssmartwifi.com web address in the browser bar. Now, enter the default admin details on the login window. Hereon, you will reach the smart home dashboard of the router and configure the basic settings like SSID name and password change. For more information, approach us here!
0 notes
Text
what is vpn passthrough linksys
🔒🌍✨ Get 3 Months FREE VPN - Secure & Private Internet Access Worldwide! Click Here ✨🌍🔒
what is vpn passthrough linksys
VPN passthrough functionality
VPN passthrough functionality is a crucial feature for routers in today's interconnected world. It enables VPN (Virtual Private Network) traffic to pass through the router seamlessly, facilitating secure communication between devices on a network and external VPN servers.
Essentially, VPN passthrough allows devices connected to a router to establish VPN connections without any hindrance. This feature is particularly important for users who rely on VPNs to encrypt their internet traffic for enhanced privacy and security.
Here's how VPN passthrough works: When a device within a network initiates a VPN connection, the VPN passthrough feature on the router recognizes the VPN protocol being used (such as PPTP, L2TP, or IPSec) and allows the encrypted VPN packets to traverse the router's NAT (Network Address Translation) without interference. This means that the router doesn't block or restrict VPN traffic, ensuring that the encrypted data reaches its destination securely.
Without VPN passthrough functionality, routers may inadvertently block VPN traffic or fail to properly handle VPN connections, leading to connection errors or dropped packets. This can be frustrating for users who rely on VPNs for accessing geo-restricted content, maintaining anonymity online, or securing sensitive data.
In summary, VPN passthrough is a vital feature for routers that enables seamless communication between devices and VPN servers. By allowing VPN traffic to traverse the router without impediment, VPN passthrough ensures that users can enjoy the benefits of VPNs without encountering connectivity issues.
Linksys router configuration
Sure! Here is the requested article:
Setting up and configuring your Linksys router is essential to ensure a smooth and secure internet connection in your home or office. Follow these step-by-step instructions to configure your Linksys router effectively.
Connect your Linksys router: Begin by unplugging your modem and then connecting the Ethernet cable from the modem to the WAN port on your Linksys router. Power on the modem, router, and computer.
Access the router interface: Open a web browser on your computer and enter the IP address of your Linksys router (usually 192.168.1.1 or 192.168.0.1) in the address bar. Log in using the default username and password provided in the router’s manual.
Configure basic settings: Once logged in, you can customize the wireless network name (SSID) and password under the Wireless settings. Ensure you choose a strong password to secure your network from unauthorized access.
Set up security features: Enable WPA2 encryption to protect your network from security breaches. You can also set up a guest network to provide internet access to visitors without compromising the main network.
Update firmware: Check for firmware updates regularly on the Linksys support website and install them to ensure optimal performance and security for your router.
Save settings: After making changes, don’t forget to save the settings to apply them. Reboot the router to finalize the configuration.
By following these simple steps, you can successfully configure your Linksys router and enjoy a reliable internet connection throughout your home or office.
I hope you find this article informative and helpful. Let me know if you need more information.
VPN tunneling protocols
VPN tunneling protocols are essential components of Virtual Private Networks (VPNs), playing a crucial role in ensuring secure and private online communication. These protocols establish a secure connection between a user's device and the VPN server by encapsulating the data transferred through the tunnel.
One of the most popular VPN tunneling protocols is the Point-to-Point Tunneling Protocol (PPTP). PPTP is widely supported across various platforms and devices, offering fast connection speeds. However, its security features have been questioned, making it less favored compared to other protocols.
Another commonly used protocol is the Layer 2 Tunneling Protocol (L2TP). L2TP is often combined with IPsec (Internet Protocol Security) to enhance its security features. This protocol is highly secure, making it a preferred choice for many users concerned about their online privacy.
Internet Key Exchange version 2 (IKEv2) is another robust VPN tunneling protocol known for its stability and ability to quickly re-establish a VPN connection when a device switches networks. This makes it ideal for users who frequently move between different Wi-Fi networks or switch between mobile data and Wi-Fi.
OpenVPN is an open-source VPN protocol that offers high levels of security and is known for its reliability. It supports various encryption algorithms, making it a versatile option for users looking for a highly secure VPN connection.
In conclusion, choosing the right VPN tunneling protocol is crucial for ensuring a secure and private online browsing experience. Users should consider their security and speed requirements when selecting a protocol that best suits their needs.
Network security features
Title: Enhancing Digital Defense: Key Network Security Features Explained
In today's hyper-connected digital landscape, network security stands as a paramount concern for individuals and organizations alike. With cyber threats evolving in sophistication and frequency, it's crucial to understand the essential features that fortify network defenses. Here are some key network security features elucidated:
Firewalls: Acting as the frontline defense, firewalls monitor and control incoming and outgoing network traffic based on predetermined security rules. They serve as a barrier between trusted internal networks and untrusted external networks, safeguarding against unauthorized access and malicious activities.
Intrusion Detection and Prevention Systems (IDPS): IDPS continuously monitor network traffic, identifying and responding to potential security threats in real-time. These systems detect anomalies, such as unusual traffic patterns or known attack signatures, and take proactive measures to thwart attacks before they cause harm.
Virtual Private Networks (VPNs): VPNs establish secure, encrypted connections over public networks, such as the internet, enabling users to access private networks remotely. By encrypting data during transmission, VPNs ensure confidentiality and integrity, protecting sensitive information from interception or tampering by unauthorized parties.
Access Control Lists (ACLs): ACLs dictate what network resources users are authorized to access and what actions they can perform. By implementing granular access controls based on user identities, roles, and permissions, ACLs minimize the risk of unauthorized access and insider threats.
Encryption: Encryption scrambles data into a ciphertext format, rendering it unreadable to anyone without the appropriate decryption key. By encrypting sensitive information both in transit and at rest, organizations mitigate the risk of data breaches and maintain data confidentiality.
Security Information and Event Management (SIEM): SIEM systems aggregate and analyze security event data from various sources across the network, providing insights into potential security incidents and facilitating rapid response and remediation efforts.
By incorporating these essential network security features into their infrastructure, organizations can bolster their defenses against cyber threats and safeguard their valuable assets and information in an increasingly digital world.
Virtual Private Network (VPN) setup
Title: A Comprehensive Guide to Setting Up Your Virtual Private Network (VPN)
In an era where online privacy and security are paramount, setting up a Virtual Private Network (VPN) has become essential for individuals and businesses alike. A VPN encrypts your internet connection, ensuring that your online activities remain private and secure from prying eyes.
Setting up a VPN is a relatively straightforward process, and here’s a step-by-step guide to help you get started:
Choose a VPN Service Provider: Begin by selecting a reputable VPN service provider that meets your needs in terms of security, speed, and geographical coverage. Consider factors such as server locations, encryption protocols, and pricing plans before making your decision.
Sign Up and Download the VPN Client: Once you’ve chosen a VPN provider, sign up for an account and download the VPN client software onto your device. Most VPN providers offer applications for various operating systems, including Windows, macOS, iOS, and Android.
Install and Configure the VPN Client: Follow the installation instructions provided by your VPN provider to install the client software on your device. Once installed, launch the application and log in using your account credentials.
Connect to a VPN Server: After logging in, you’ll be presented with a list of VPN servers located in different regions around the world. Choose a server location based on your specific needs, such as bypassing geo-restrictions or optimizing for speed.
Enjoy Secure Browsing: Once connected to a VPN server, your internet connection is encrypted, ensuring that your online activities remain private and secure. You can now browse the web, stream content, and access online services with peace of mind.
By following these simple steps, you can set up a VPN and enjoy a safer and more secure online experience. Remember to choose a reliable VPN provider and regularly update your VPN client for the best possible protection.
0 notes
Text
does linksys router ea3500 supports vpn
🔒🌍✨ Get 3 Months FREE VPN - Secure & Private Internet Access Worldwide! Click Here ✨🌍🔒
does linksys router ea3500 supports vpn
Linksys EA3500 VPN compatibility
The Linksys EA3500 is a popular router known for its robust features and reliable performance. However, when it comes to VPN compatibility, there are some considerations to keep in mind.
Firstly, the Linksys EA3500 does not natively support VPN functionality out of the box. This means that you cannot directly configure a VPN connection on the router itself. However, this doesn't necessarily mean that you can't use a VPN with the EA3500.
One option is to set up a VPN connection on individual devices that connect to the EA3500. Many VPN providers offer software or apps that allow you to easily configure a VPN connection on your computer, smartphone, or other devices. Once configured, all internet traffic from that device will be encrypted and routed through the VPN server, regardless of whether it's connected to the EA3500 or another network.
Another option is to use a VPN-enabled router in conjunction with the EA3500. These routers come pre-configured with VPN support and can be connected to the EA3500 to extend its functionality. By connecting a VPN-enabled router to the EA3500, you can ensure that all devices connected to the EA3500 are protected by the VPN, without needing to configure each device individually.
It's important to note that not all VPN services are compatible with all routers, so you'll need to check with your VPN provider to ensure compatibility with the Linksys EA3500. Additionally, setting up a VPN connection may require some technical know-how, so be prepared to follow instructions provided by your VPN provider or seek assistance if needed.
In conclusion, while the Linksys EA3500 itself does not support VPN functionality, there are ways to use a VPN with this router either by configuring VPN connections on individual devices or by using a VPN-enabled router in conjunction with the EA3500.
VPN setup on Linksys EA3500
Setting up a VPN (Virtual Private Network) on your Linksys EA3500 router can provide enhanced security and privacy for your internet connection. By encrypting your data and routing it through a remote server, VPNs help protect your online activities from prying eyes and potential hackers. Here's a step-by-step guide to setting up a VPN on your Linksys EA3500:
Choose a VPN Service: Before you begin, you'll need to sign up for a VPN service. There are many options available, so be sure to choose one that offers reliable performance and supports router configurations.
Access Router Settings: Open your web browser and enter the router's IP address (usually 192.168.1.1) into the address bar. Log in using your router's username and password.
Navigate to VPN Settings: Once logged in, locate the "VPN" or "PPTP" (Point-to-Point Tunneling Protocol) section in the router settings. This may be found under the "Security" or "Advanced" tab.
Enter VPN Information: Enter the VPN server information provided by your VPN service provider. This typically includes the server address, username, and password.
Configure Connection Settings: Choose the desired VPN protocol (usually PPTP or OpenVPN) and any other connection settings recommended by your VPN provider. These settings may vary depending on the VPN service you're using.
Save and Apply Settings: After entering the VPN information and configuring the connection settings, save your changes and apply them to activate the VPN on your router.
Test the Connection: Once the settings are saved, test the VPN connection to ensure it's working properly. You can do this by connecting a device to your network and accessing the internet to verify that your traffic is being routed through the VPN server.
By following these steps, you can easily set up a VPN on your Linksys EA3500 router and enjoy the added security and privacy benefits it provides for all your internet-connected devices.
Linksys EA3500 VPN support
The Linksys EA3500 is a popular router known for its robust features and reliable performance. Among its many functionalities, one key aspect that users often inquire about is its VPN support.
The Linksys EA3500 router does indeed support VPN (Virtual Private Network) connections, providing users with an added layer of security and privacy for their internet activities. By utilizing a VPN connection, users can encrypt their internet traffic and mask their IP address, ensuring that their online activities remain private and protected from prying eyes.
Setting up a VPN on the Linksys EA3500 is a relatively straightforward process. Users have the option to configure the router to work with various VPN protocols, including PPTP, L2TP, and OpenVPN. Depending on their specific needs and preferences, users can choose the protocol that best suits their requirements for speed, security, and compatibility with their devices.
Once configured, the Linksys EA3500 router can route all internet traffic through the VPN connection, providing a secure tunnel for data transmission. This is particularly useful for users who frequently connect to public Wi-Fi networks or access sensitive information online, such as online banking or corporate networks.
Additionally, the Linksys Smart Wi-Fi interface makes it easy for users to manage their VPN settings and monitor their connection status. Through the intuitive web-based interface or mobile app, users can quickly enable or disable the VPN, change protocols, and view detailed logs of their VPN activity.
In conclusion, the Linksys EA3500 router offers robust VPN support, allowing users to enhance their online security and privacy with ease. Whether for personal use or business purposes, leveraging the VPN capabilities of the Linksys EA3500 can provide peace of mind knowing that your internet connection is secure and protected.
Virtual Private Network with Linksys EA3500
A Virtual Private Network (VPN) offers a secure way to browse the internet, protecting your online activities from prying eyes. When used in conjunction with a router like the Linksys EA3500, you can ensure that all devices connected to it benefit from the VPN's enhanced security features.
The Linksys EA3500 is a reliable router known for its fast speeds and stable connection. By setting up a VPN on this router, you can encrypt your internet traffic, making it nearly impossible for hackers or other malicious entities to intercept your data. This is particularly important when using public Wi-Fi networks, where cyber threats are more prevalent.
Setting up a VPN on the Linksys EA3500 is a straightforward process that can usually be done through the router's settings menu. Once configured, all devices connected to the router, such as laptops, smartphones, and smart TVs, will automatically benefit from the VPN's protection.
In addition to enhanced security and privacy, using a VPN with the Linksys EA3500 can also allow you to bypass geographical restrictions and access content that may be blocked in your region. This is especially useful for streaming services, online gaming, and accessing websites that may be censored in certain countries.
Overall, combining a VPN with the Linksys EA3500 router is a smart way to ensure that your online activities remain private and secure. By investing in both technologies, you can enjoy a more seamless and worry-free internet browsing experience.
Linksys EA3500 VPN configuration
The Linksys EA3500 is a popular router model that offers users the ability to set up a Virtual Private Network (VPN) for added security and privacy. Configuring a VPN on the Linksys EA3500 is a straightforward process that can be done by following a few simple steps.
To set up a VPN on your Linksys EA3500, start by accessing the router's settings through a web browser. Enter the router's IP address in the browser's address bar and log in using the administrator credentials. Once you are logged in, navigate to the VPN section in the router settings.
Next, choose the type of VPN connection you want to set up, such as PPTP, L2TP, or OpenVPN. Enter the required information such as the VPN server address, username, and password provided by your VPN service provider. Save the settings and enable the VPN connection.
It is important to note that not all VPN services are supported by the Linksys EA3500, so make sure to check the compatibility of your VPN service with the router. Additionally, configuring a VPN may affect the router's performance, so it is recommended to use a VPN service that offers fast and reliable connections.
By setting up a VPN on your Linksys EA3500, you can encrypt your internet connection and protect your online activities from prying eyes. Whether you want to secure your connection while browsing the web or access geo-restricted content, configuring a VPN on your Linksys EA3500 can enhance your online experience.
0 notes
Text
can you use xfinity router to connect to vpn
🔒🌍✨ Get 3 Months FREE VPN - Secure & Private Internet Access Worldwide! Click Here ✨🌍🔒
can you use xfinity router to connect to vpn
Xfinity router VPN compatibility
Title: Ensuring VPN Compatibility with Xfinity Routers: A Comprehensive Guide
In today's digital age, protecting your online privacy and security is paramount. Virtual Private Networks (VPNs) offer a reliable solution by encrypting your internet connection and shielding your data from prying eyes. However, ensuring VPN compatibility with your router is crucial for seamless protection across all your devices. For Xfinity subscribers, understanding how to integrate VPNs with their routers is essential.
Xfinity routers, provided by Comcast, serve as the gateway to the internet for millions of users. While these routers offer advanced features and reliable connectivity, not all of them natively support VPNs. Fortunately, there are several methods to establish VPN compatibility with Xfinity routers.
One option is to utilize a VPN-compatible router that can replace the default Xfinity router. These third-party routers come pre-configured with VPN support, allowing for straightforward setup and usage. Brands like Asus, Netgear, and Linksys offer a wide range of VPN-capable routers suitable for various needs and budgets.
Alternatively, users can opt for VPN-enabled firmware, such as DD-WRT or Tomato, to enhance their existing Xfinity router's capabilities. By flashing compatible firmware onto the device, users can unlock advanced features, including VPN integration. However, it's essential to research compatibility and follow installation instructions carefully to avoid any issues.
Additionally, Xfinity subscribers can leverage VPN applications directly on their devices, bypassing the need for router-level integration. While this approach offers flexibility, it may not provide comprehensive protection for devices connected to the same network.
In conclusion, ensuring VPN compatibility with Xfinity routers is achievable through various methods, including third-party routers, firmware modifications, and device-level VPN applications. By taking proactive steps to secure their internet connection, users can safeguard their online privacy and enjoy peace of mind in an increasingly interconnected world.
VPN setup on Xfinity router
Setting up a VPN on your Xfinity router can enhance your online privacy and security, allowing you to browse the internet anonymously and protect your data from potential threats. While Xfinity routers do not natively support VPN configurations, you can still set up a VPN by using compatible third-party firmware such as DD-WRT or Tomato.
Before you begin, ensure that your Xfinity router is compatible with the selected third-party firmware. Then, follow these general steps to set up a VPN on your Xfinity router:
Research and Choose Compatible Firmware: Visit the DD-WRT or Tomato firmware websites to check if they support your specific Xfinity router model. Download the appropriate firmware for your router.
Flash the Router: Flashing your router with the third-party firmware requires careful attention to avoid damaging the device. Follow the instructions provided by the firmware manufacturer to flash your Xfinity router properly.
Access Router Settings: Once the router is flashed with the new firmware, access the router's settings through a web browser. Enter the default IP address (usually 192.168.1.1) in the address bar and log in with the default username and password (typically "admin" for both).
Configure VPN Settings: Navigate to the VPN settings section within the router's firmware interface. Enter the details provided by your VPN service provider, including the VPN server address, username, and password.
Enable VPN Connection: After configuring the VPN settings, save the changes and enable the VPN connection on your Xfinity router. Reboot the router to apply the changes effectively.
Verify Connection: Once the router restarts, verify that the VPN connection is established successfully by checking your IP address using online tools or accessing geo-restricted content.
By following these steps, you can set up a VPN on your Xfinity router, ensuring enhanced security and privacy for all devices connected to your home network. Remember to choose a reliable VPN service provider and regularly update your router firmware to maintain optimal performance and security.
Xfinity router VPN configuration
Setting up a VPN (Virtual Private Network) on your Xfinity router can add an extra layer of security and privacy to your internet connection. By encrypting your traffic and masking your IP address, a VPN helps protect your sensitive data from potential cyber threats and surveillance.
To configure a VPN on your Xfinity router, you first need to choose a VPN service provider. Make sure the VPN service is compatible with router configurations and offers robust encryption protocols. Once you have selected a VPN service, follow these steps to set it up on your Xfinity router:
Access your Xfinity router settings by entering the router's IP address in a web browser (usually 10.0.0.1 or 192.168.1.1) and log in using your admin credentials.
Locate the VPN settings in the router dashboard. This may vary depending on the router model, so refer to the user manual for specific instructions.
Enter the VPN configuration details provided by your VPN service provider. This typically includes the VPN server address, username, password, and any other required information.
Choose the VPN protocol to use (such as OpenVPN or PPTP) and configure additional settings as per your VPN provider's recommendations.
Save the changes and restart your router to apply the VPN configuration.
Once the setup is complete, all devices connected to your Xfinity network will benefit from the VPN protection. Remember to test the VPN connection to ensure everything is working correctly.
By configuring a VPN on your Xfinity router, you can enhance your online security and safeguard your privacy while browsing the web.
Using VPN with Xfinity router
Using a VPN with an Xfinity router can offer an added layer of security and privacy for your online activities. A VPN, or Virtual Private Network, encrypts your internet connection and routes it through a server, hiding your IP address and online actions from potential hackers, third parties, or even your Internet Service Provider (ISP) like Xfinity.
Xfinity routers are commonly used for home internet connections, and while they offer built-in security features, using a VPN can enhance your protection further. By connecting to a VPN server, you can ensure that your data is secure, especially when using public Wi-Fi networks or when accessing sensitive information online.
Additionally, using a VPN with an Xfinity router can help you bypass geo-restrictions and access content that may be blocked in your region. This can be particularly useful when streaming content from different countries or accessing websites that are not available in your location.
Setting up a VPN with an Xfinity router may vary depending on the VPN service provider and the specific router model. It usually involves installing the VPN software on your device and configuring the VPN settings on your router. Some VPN providers offer pre-configured routers that make the setup process easier.
Overall, using a VPN with an Xfinity router can provide you with increased security, privacy, and online freedom. Whether you are concerned about your online privacy or looking to access geo-restricted content, incorporating a VPN into your Xfinity router setup can be a beneficial choice.
Xfinity router VPN connectivity
Title: Enhancing Privacy and Security with Xfinity Router VPN Connectivity
In today's digital landscape, safeguarding our online activities is paramount. With the increasing concerns about privacy and security breaches, individuals are seeking robust solutions to protect their sensitive information. Xfinity, a leading provider of internet services, offers a comprehensive solution through its router VPN connectivity feature.
Xfinity router VPN connectivity enables users to establish a secure and encrypted connection to the internet, regardless of their location. By utilizing Virtual Private Network (VPN) technology, users can safeguard their data from prying eyes and potential cyber threats. This is particularly crucial when accessing the internet from public Wi-Fi networks, where the risk of data interception is heightened.
One of the primary advantages of Xfinity router VPN connectivity is its simplicity and ease of use. With just a few clicks, users can activate the VPN feature directly from their Xfinity router settings, without the need for additional software or configurations. This seamless integration ensures that users can enjoy enhanced privacy and security without compromising on convenience.
Moreover, Xfinity router VPN connectivity offers versatility by allowing users to choose their preferred VPN service provider. Whether opting for a reputable third-party VPN service or utilizing Xfinity's recommended partners, users have the flexibility to tailor their VPN experience according to their specific needs and preferences.
By encrypting internet traffic and masking IP addresses, Xfinity router VPN connectivity effectively shields users from potential threats such as hackers, identity thieves, and data snoopers. Additionally, it empowers users to bypass geo-restrictions and access region-locked content with ease.
In conclusion, Xfinity router VPN connectivity serves as a valuable tool for individuals looking to bolster their online privacy and security. With its user-friendly interface, compatibility with various VPN providers, and robust encryption capabilities, it provides a comprehensive solution for safeguarding sensitive information in today's digital age.
0 notes
Text
How do devices reconnect after changing the Myrouter.local Wi-Fi password?
After the setup process, users are highly recommended to change the Wireless settings of a Linksys router. The Wireless settings consist of the Network name and Wifi password that a user requires to connect to the main network of a router. You need to keep one thing in mind as soon as you change the Wifi password of the router, all devices will get automatically disconnected from the myrouter.local network. To connect to your network again, users have to type the new Wifi password in the required field.
0 notes
Text
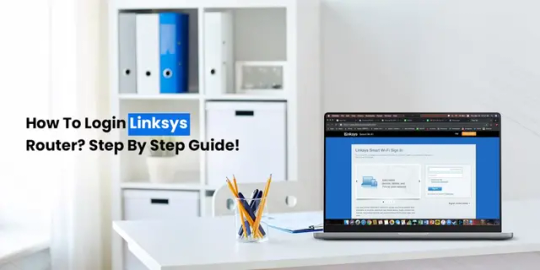
Step-by-Step Guide for How To Login to Linksys Router?
The Linksys router comes with advanced features that enhance your home's network coverage and eliminate dead zones. Additionally, these are easy to connect with the primary router unit and its web interface is so simple that anyone can access it with accurate details. Similarly, if you buy a brand new Linksys router, then you must understand how to login Linksys router web interface.
Moreover, there are two primary methods that you can use to access the login page of your Linksys router. One is through the web address and another is using the Linksys smart app. Consequently, the web address method primarily easy to log in to Linksys router to enjoy a secure and lag-free network. In this brief post, we will explain the complete steps for accessing the admin panel through a web address.
Prerequisites for Linksys router login
Before you dig deep into the process of Linksys router login, you need to gather a few of the necessary things, such as:
Linksys WiFi router
Reliable network connection
Ethernet cable
Web address
Admin credentials
Computer/Laptop
How To Login to Linksys Router?
Additionally, if you want to make the most of your router, then login to its admin panel is necessary. In this section, we explore the complete steps to carry out the Linksys router login process. Let’s begin here:
Initially, power on your router.
Next, connect the router network to the computer.
After that, open the web browser and then type linksyssmartwifi.com web address.
Now, a login window pops up here.
Enter the default admin credentials.
Next, you visit the smart dashboard of the router.
Hereon, go to the advanced settings and change the SSID name and password to secure your network.
Finally, you can access your router network.
On the whole, the above-mentioned information will surely help you understand the process for how to login Linksys router admin portal. To carry out an error-free process, follow the given steps carefully. If need more information, stay tuned with us!
0 notes
Text
linksys extender setup
The Linksys Wifi Extender Setup is necessary to users in the modern world. Users today use expert, high-frequency WiFi routers to meet their daily Internet requirements.
However, routers show that there is little to no internet in multiple areas of the home or office. Dead points or network zones are the names for these specific areas. Instead of purchasing a new router, experts suggest using a Linksys Extender setup to resolve the problem.
How to setup linksys wifi extender?
Users must interact during setup, as implied by the names. The steps listed below should be executed in order to set up a Linksys WiFi Extender:
Connect the Linksys WiFi Range Extender to the power switch.
To connect your Linksys wifi range extender to your router or WiFi setting, use an Ethernet cable.
Open a browser and enter the IP address of the regular Linksys WiFi Extender or visit extender.linksys.com.
When you visit extender.linksys.com, you will be prompted for your Linksys Extender login details.
After entering the correct data, click the "Login" button.
Follow the instructions displayed on the screen.
Click "Edit" to make changes after you're done.
Note:Contact our team of experts or go to the official website, extender.linksys.com, if you need any help with your Linksys wifi extender.
Linksys Velop setup
Linksys Velop mesh networking devices can be set up in a manner resembling that of a typical wireless router. To get started, each Velop mesh network requires a primary computer or router. This main computer is designed to link to the modem of your Internet service provider.
The Linksys Velop Setup App can be installed by any wifi device.
At this point, connect the Linksys Velop to the power outlet.
On your smartphone, launch the app, and then follow the on-screen directions.
Make a Linksys Smart Wi-Fi account to have access to the Linksys Velop Mesh Range Extender setup page.
Select your current wifi network after logging in.
The current WiFi network will now be accessible to your Linksys New Velop.
Visit extender.linksys.com to complete the configuration.
Setup a Linksys Extender at extender.linksys.com
To access the Linksys extender setup user interface, go to extender.linksys.com and provide the proper login information, including your username and password. After successfully logging in, you can start adjusting the extender's basic and advanced settings.
To access extender.linksys.com's setup page:
To turn on the Linksys extender, go to extender.linksys.com.
Connecting the extender to the computer takes an Ethernet cable.
Look in the manual for the default login details.
Look at the tag on the extender to get the model number.
Be careful not to scratch the extension or other devices when opening it.
The extra length ought to be near the power supply.
Always use the most recent web browser version to view the New Extender Setup.
How do I login and log in to extender.linksys.com?
The first step in activating a Linksys wifi booster is to log into the Linksys Wi-Fi Extender Setup webpage. In order to finish this step, you must type the default address extender.linksys.com into the address bar of any device connected to your home Wi-Fi network's updated browser. The default login link you are using takes you to the setup page for the new extender. This page from Linksys contains setup instructions for range extenders. You'll be ready to start customising your new Wi-Fi extender after you've established the connection.
Now let's talk about how to get to the extender.linksys.com website.
Turn on your Linksys extender and wait for the power light to grow bright before continuing.
Connect a device to your Linksys WiFi extender, such as a laptop, desktop, smartphone, or tablet.
Your username and password are now required on a page.
After inputting your information, you will be able to visit the Linksys wifi extender page.
1 note
·
View note
Text
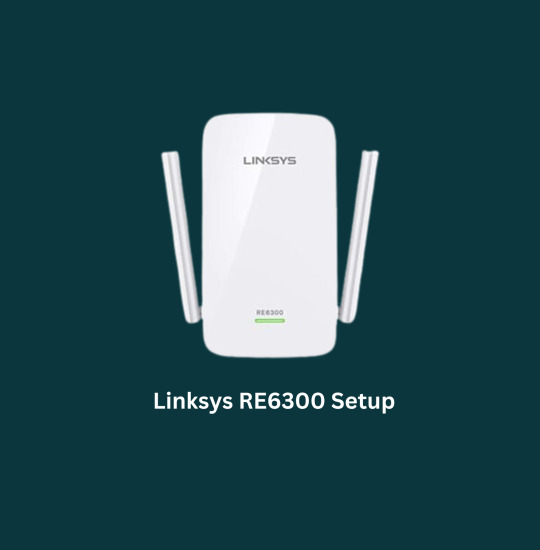
How to Install and Configure Linksys RE6300 for Optimal Performance
An existing Wi-Fi network's coverage and signal strength can be improved with the Linksys RE6300 extender. It is frequently used to extend the range of the wireless network to regions with weak or no signal and to eliminate Wi-Fi dead zones in residential or small office settings.
The RE6300 has dual-band connectivity and supports both 2.4 GHz and 5 GHz wireless frequencies. It is compatible with the majority of common Wi-Fi routers.
The Linksys RE6300 Extender Setup is done by connecting it to the current Wi-Fi network and setting it up using a web-based interface or a mobile app. You can set up your linksys extender with two ways: the first is manual method and second is WPS method.
Manual Setup Process for Linksys RE6300 Extender
The term "manual setup" describes the process of configuring and setting up a device or system utilizing manual procedures, often without depending on automated or wizard-based installations. To adapt the equipment or system to particular needs, it entails manually inputting or selecting a variety of settings, parameters, and configurations.
The quick procedures for manual Linksys RE6300 extender setup are as follows:
Wait for the extender's power light to turn solid after plugging it in.
Join the extender's default Wi-Fi network with your computer or mobile device.
Search extender.linksys.com or 192.168.1.1 on your web browser.
For the extender, create an admin password.
Choose the Wi-Fi network associated with your main router, then type the password.
The SSID of the expanded network can either be changed or left alone.
The extended Wi-Fi network should have a password.
Examine the settings, then use them.
Wait for the extender's restart.
The extended Wi-Fi network should be connected to your devices.
All done! The Linksys RE6300 extender has been manually configured. If you’re facing any issue related to the linksys extender setup then don’t hesitate to contact our technical experts via toll free no. 1-800-983-6723.
Setting up Linksys RE6300 Extender via WPS Method
WPS (Wi-Fi Protected Setup) is a streamlined process that eliminates the need to manually enter the network name (SSID) and password when connecting devices to a secure wireless network. By just pressing the WPS button on both the extender and the router, suitable devices, such as the Linksys RE6300 extender, can be quickly and easily configured.
The quick methods for the Linksys RE6300 extender setup using WPS are as follows:
Make sure the extender is plugged in and turned on.
The WPS button should be on the front or side of the extension.
Until the WPS LED begins blinking, press and hold the WPS button on the extension.
Find the WPS button on your primary router during the next two minutes.
The router's WPS button should be pressed and held.
Watch for the WPS LED to turn solid on the extender, which denotes a successful connection.
If necessary, repeat the procedure for any more extenders.
Make sure that the extender is within signal range of the primary router before moving it to the desired location.
Using the same SSID and password as your primary device, connect your devices to the additional Wi-Fi network.
The Linksys RE6300 extender setup using the WPS technique is now complete. The range of your primary router's Wi-Fi is currently being extended by the extender.
Common Issues During Linksys RE6300 Setup
The following are some typical problems that users may run into when configuring the Linksys RE6300 extender:
Failure of the connection: Difficulty connecting the extender to the primary router.
Dead Zones or Weak Signals: Poor Wi-Fi signal coverage or weak Wi-Fi signal extension.
Incorrect Placement: Placing the extension in the wrong spot, resulting in insufficient coverage.
Mistakes in configuring settings like SSIDs, passwords, or security settings are referred to as configuration errors.
Issues brought on by obsolete or incompatible firmware versions are referred to as firmware compatibility.
Issues with WPS setup, including failure to successfully connect the extender and the router using WPS.
Reset issues: Issues with returning the extension to its default settings.
Issues with particular devices or operating systems in terms of compatibility.
Performance problems brought on by high network traffic or interference are known as network congestion.
Limited Range: The extender's inability to provide the specified coverage range.
Users may make sure that the Linksys RE6300 extender setup goes smoothly and successfully by resolving these typical concerns.
Troubleshooting Steps for Linksys RE6300 Extender Setup Issues
Here are some procedures for troubleshooting the Linksys RE6300 extender's typical setup issues:
Power-cycle the extension by unplugging it, giving it a brief moment to cool off, and then plugging it back in. Additionally, restart your router.
Proper Location: Make sure the extender is situated away from obstacles and inside the main router's signal range.
Verify Connections Check to make sure the extension, router, and modem are all connected securely with cables and other hardware.
Extender reset: To reset the extender to its factory default settings, press and hold the Reset button for roughly 10 seconds.
Update firmware by downloading it from the Linksys support website for your extender. To update it, adhere to the directions.
Check Network Settings: Make sure the extender's SSID, passwords, and security settings correspond to those on your primary router.
0 notes
Link
Every Linksys router, wired or wireless, has an internal web server for modification and configuration. A Linksys router login is required to access the internet web server. So, before configuring your router, you must first log in to your Linksys router. Prior to Linksys router setup, you need to review the following:
The Linksys device must be hardwired to your PC.
A solid connection is required to access the Linksys router’s internet page.
Hardwired connections are more reliable. So go for a wired connection.
Before starting the Linksys router login, make sure your router is powered up.
Use the admin password to log into your Linksys router.
The default password and username for most Linksys routers are on the product label.
#default linksys password#default password linksys router#how do i log in to my router#how to change router password linksys#wifi smart#wifi router linksys#smart wi fi wifi login#extender.linksys.com#linksys extender setup#linksys wifi extender login
0 notes
Text
How to login Linksys Velop Router?
To access the Linksys Velop Router Login page, open the web browser and enter the linksyssmartwifi.com web address in the browser bar. Now, enter the default admin credentials on the login window. Here, you will reach the home dashboard and configure the basic settings like SSID name and password change. For more information regarding the same, get in touch with us!
1 note
·
View note
Text
How to Login Linksys Velop
If you looking for login solution, do the following steps and try to Login Linksys velop as soon as
possible.
Initially, you need to connect your PC into the network, which has to be the same network the
Linksys router is on.
Furthermore, turn on your device, open the web browser and enter IP address ‘192.168.1.1’ into
the address bar. After this, a box will appear on the screen and provoking you to enter your
“username” and “password” in order to do Linksys Velop login.
Moreover, enter your username in the ‘Username’ empty field. By default, the username field
needs to be left blank, but in case, you have to change your username, then you have to enter
that username.
After that, enter your password in ‘Password’ field, which by default is ‘Password’ only, but if
you have changed it, then enter that you have changed.
In last, click ‘Login’ and you will be able to efficiently do Velop login.
When you are positively login after that you are able to do Linksys Velop Setup process. For more
information Contact us on 877-372-5666.
#How to Login Linksys Velop#If you looking for login solution#do the following steps and try to Login Linksys velop as soon as#possible.# Initially#you need to connect your PC into the network#which has to be the same network the#Linksys router is on.# Furthermore#turn on your device#open the web browser and enter IP address ‘192.168.1.1’ into#the address bar. After this#a box will appear on the screen and provoking you to enter your#“username” and “password” in order to do Linksys Velop login.# Moreover#enter your username in the ‘Username’ empty field. By default#the username field#needs to be left blank#but in case#you have to change your username#then you have to enter#that username.# After that#enter your password in ‘Password’ field#which by default is ‘Password’ only#but if#you have changed it#then enter that you have changed.# In last#click ‘Login’ and you will be able to efficiently do Velop login.
0 notes
Text
can you install a vpn on your rotter
🔒🌍✨ Get 3 Months FREE VPN - Secure & Private Internet Access Worldwide! Click Here ✨🌍🔒
can you install a vpn on your rotter
VPN installation on router
Title: Streamline Your Security: A Guide to VPN Installation on Your Router
In today's digital landscape, ensuring online privacy and security is paramount. Virtual Private Networks (VPNs) offer a powerful solution, encrypting your internet connection and masking your IP address. While installing a VPN on individual devices is common practice, configuring it at the router level can provide comprehensive protection for all devices connected to your network. Here's a step-by-step guide on how to set up a VPN on your router:
Choose a VPN Provider: Select a reputable VPN service provider that offers router compatibility and robust security features. Look for providers with user-friendly interfaces and excellent customer support.
Verify Router Compatibility: Not all routers support VPN installations. Check your router's specifications or contact the manufacturer to ensure compatibility. Popular router brands like Asus, Netgear, and Linksys often have models that support VPN configurations.
Access Router Settings: Log in to your router's admin panel using a web browser and the router's IP address. This information is typically found on the router itself or in the user manual. Enter your username and password to access the settings.
Install VPN Firmware: Some VPN providers offer custom firmware for certain router models, simplifying the installation process. Follow the instructions provided by your VPN provider to flash your router with the custom firmware.
Configure VPN Settings: Once the firmware is installed, navigate to the VPN settings section on your router's admin panel. Enter the VPN server information provided by your VPN provider, including the server address, username, and password.
Test the Connection: After configuring the VPN settings, save the changes and restart your router. Connect a device to your network and verify that the VPN is working correctly by checking your IP address and running a DNS leak test.
By installing a VPN on your router, you can safeguard your entire network, including smartphones, tablets, smart TVs, and IoT devices, with just a single setup. Take control of your online privacy and security today with a VPN-enabled router.
Router VPN setup guide
Title: A Comprehensive Router VPN Setup Guide: Safeguarding Your Online Privacy
In an age where cybersecurity threats loom large and privacy concerns are paramount, setting up a VPN (Virtual Private Network) on your router is a smart move to ensure your online activities remain secure and private. By encrypting your internet connection, a VPN shields your data from prying eyes, whether you're browsing, streaming, or conducting sensitive transactions. Below is a step-by-step guide to help you set up a VPN on your router effectively.
Choose a Compatible Router: Not all routers support VPN configurations. Check if your router model is compatible with VPN services. Popular options include Asus, Linksys, Netgear, and TP-Link routers, among others.
Select a VPN Provider: Research and choose a reliable VPN provider that offers router compatibility. Ensure they provide detailed setup instructions and robust security features.
Access Router Settings: Log in to your router's admin panel using a web browser. Typically, you'll enter the router's IP address (e.g., 192.168.1.1) in the address bar and log in with your credentials.
Enable VPN Client Support: Navigate to the VPN or WAN settings section in your router's dashboard. Enable VPN client support and enter the VPN provider's details, including server addresses, protocols (e.g., OpenVPN), and login credentials.
Configure VPN Settings: Customize VPN settings according to your preferences, such as encryption levels and VPN protocols. These settings may vary depending on your VPN provider's recommendations.
Test Your Connection: After configuring the VPN settings, test your connection to ensure everything is working correctly. Verify your IP address and check for any DNS leaks using online tools.
Connect Devices to VPN: Once the setup is complete, connect your devices to the VPN-enabled router. All internet traffic from these devices will now be encrypted and routed through the VPN server.
By following these steps, you can establish a secure VPN connection on your router, safeguarding your online privacy and enhancing your digital security. Remember to regularly update your router firmware and VPN software for optimal performance and protection against emerging threats.
Installing VPN on router tutorial
A VPN (Virtual Private Network) is a tool that helps secure and encrypt your internet connection, providing you with online privacy and anonymity. By installing a VPN on your router, you can protect all devices connected to your network, including smartphones, laptops, smart TVs, and more.
To install a VPN on your router, follow these steps:
Choose a compatible VPN service that offers router support. Not all VPN providers support router installations, so make sure to select one that does.
Access your router's settings by typing its IP address into your web browser. The IP address is typically found on the back of your router or in the user manual.
Log in to your router using the administrator credentials. This information is also usually located on the router or in the manual.
Locate the VPN section in your router settings. This can vary depending on the router model, but it is often found under the "Advanced" or "Security" tab.
Enter the VPN configuration details provided by your VPN service, including the server address, username, and password.
Save the settings and connect to the VPN server. Your router is now configured to use the VPN, encrypting all incoming and outgoing internet traffic.
By installing a VPN on your router, you can protect your entire network from cyber threats and enjoy a secure and private internet experience on all your devices.
How to set up VPN on router
Setting up a VPN on your router can provide secure and encrypted internet access for all devices connected to your home network. This added layer of security protects your online privacy and data from potential cyber threats. Here's a step-by-step guide on how to set up a VPN on your router:
Choose a VPN service: First, you need to select a reliable VPN service provider that offers router support. Ensure the VPN service is compatible with your router model.
Access your router settings: Open a web browser on a device connected to your router and type in the router's IP address to access its settings. You may need to enter a username and password to log in.
Install VPN firmware: Some routers support VPN installation using custom firmware such as DD-WRT or Tomato. Follow the instructions provided by your VPN service on how to install the firmware on your router.
Configure VPN settings: Once the firmware is installed, access the VPN settings on your router and enter the connection details provided by your VPN service, including server address, username, and password.
Connect to the VPN: Save the settings on your router and establish a connection to the VPN server. Once connected, all devices on your home network will be protected by the VPN.
Test the connection: Verify the VPN connection by visiting a website that shows your IP address. It should display the VPN server's IP address instead of your actual IP.
Setting up a VPN on your router enhances your online security and privacy, ensuring a safe browsing experience for all devices connected to your network.
VPN configuration for router
Title: Secure Your Entire Network: A Guide to VPN Configuration for Your Router
In today's digital landscape, safeguarding your online privacy and security is paramount. With cyber threats on the rise, individuals and businesses alike are turning to Virtual Private Networks (VPNs) as a crucial tool for protecting their sensitive data. While VPNs are commonly used on individual devices, configuring your router to use a VPN extends those benefits to your entire network, ensuring comprehensive protection for all connected devices.
Setting up a VPN on your router offers several advantages. Firstly, it encrypts all data traffic passing through your network, shielding it from prying eyes and potential hackers. This encryption is particularly vital when accessing public Wi-Fi networks, which are notorious for their lack of security. Additionally, a router-level VPN setup enables you to bypass geographical restrictions and access region-locked content on all devices connected to your network.
The process of configuring a VPN on your router may vary depending on the make and model of your device. However, the general steps remain consistent. Begin by selecting a reputable VPN service provider that offers router support and follow their instructions for setting up your router. This typically involves accessing your router's admin panel, entering the VPN credentials provided by your provider, and configuring the appropriate settings.
Once your VPN is successfully configured on your router, all devices connected to your network will benefit from its protection automatically. This includes smartphones, tablets, computers, smart TVs, and any other internet-enabled devices. You can rest assured knowing that your entire network is secured against online threats and your privacy remains intact.
In conclusion, configuring a VPN on your router is a proactive measure to safeguard your digital life. By encrypting all data traffic and providing access to region-restricted content, a router-level VPN setup ensures comprehensive protection for your entire network. Take control of your online security today by implementing a VPN configuration for your router.
0 notes
Text
How do I check if my Linksys router is working?
If you are passing through difficult times to connect to the internet using your router, then you have launched on the right website. Your Linksys Velop tri-band router is the center of all internet-related activity. If you are messing up with a fast, reliable, and strong connection, it's always better to check your router and its settings. You should work on the following suggestions given in this article to test whether your Linksys Velop tri-band device is the cause of your connection woes. The underlying solution on this page will surely troubleshoot it. You can get back online as quickly as possible.

Linksys Velop tri-band router obvious stuff
Before moving ahead to the more complicated techniques, let's try a few simple and easy fixes. Sometimes a simple and easy technique will be enough to resolve your troubles. You can also restore your internet connection.
1. Switch off and switch on the router
First of all, switch off your Linksys Velop tri-band device and wait for a few minutes. After a few minutes, turn the device on and check whether the internet connection is back up and running.
2. Check whether there is an issue with the ISP
Using the status page of your internet service provider, you can access the entire information about your router. If you are unaware of your ISP, try Google the name of your service provider. Visit the search bar of Google and type in a phrase such as 'Service Status' or 'Outage map'.
3. Try connecting using a different device

If you are experiencing any issues with a single configuration device, the possibility is that the problem may lie with your configuration device, like a computer, PC, or laptop, not the internet connection. It is a good way to test your connection using at least two-three internet-enabled devices. If this device manages to connect without any issue, then your router might not have any fault.
4. Connect to the Ethernet cable
While struggling to get the internet connection for your Linksys Velop tri-band device, connecting your computer directly to the LAN port of your router will surely provide you positive results. Moreover, many factors may interrupt a WIFI connection, including physical barriers, such as heavy electronic gadgets, fridge, AC, microwave, oven, thick walls, etc. Removing physical barriers will help you resolve your Linksys router setup issues with the internet connection.
5. Try a Different Ethernet cable
If still, you are getting Linksys router setup internet connection issues, try replacing your existing Ethernet cable. Sometimes rats damage the cables thus resulting in a lost internet connection problem. In this situation, try to replace your damaged Ethernet cable and get a new one. Also, check that the cable is firmly connected to the router, modem, and computer.
6. Linksys Router setup- Change the WIFI connection

However, you are managing to communicate to the network over WIFI, getting slow performance, then check your WIFI channel may be busy with traffic due to overuse in your locality. If so, then manually change your WIFI network channel through the settings of your Linksys Velop support. Grabbing your Linksys Velop tri-band router's settings will require an IP address of your router. Usually, most of the routers use the following IP addresses to get on the default login page:
192.168.1.1, 192.168.0.1, 1.0.0.0.1, 192.168.1.2.254, or similar. Enter these details into your browser and click the enter switch on your keyboard. You will be prompted for the default login name and password. As in most cases, it is the phrase ADMIN and PASSWORD. If you have not changed the default login credentials, then the phrases ADMIN and PASSWORD will surely work.
7. Reset your Linksys Velop Tri-Band

Resetting your Linksys router to factory default configuration is the more radical step up from power cycling or rebooting your router. Reset will restore all the default configuration settings of your device. The reset steps may vary depending on the model number of your Linksys Velop tri-band device. Commonly, most of the WIFI devices have the same reset process, which is by pressing the hard reset button on it. Pick a reset pin or a refill of a pen, and then press the reset button located inside a tiny hole. Keep on pressing and holding the reset button for about twenty seconds, and then release. After reset, check whether your device has connected to the network or not.
8. Linksys Velop support- Firmware Update
Another solution for this problem is updating the firmware of your device. An older or expired version of the firmware may cause an internet connection issue in your device. You can find the firmware update option under the settings of your device. Go to the settings section, check for the firmware update, and then update the firmware of your Linksys Velop tri-band device.
#Linksys Router login#Linksys Velop Login#Linksys Velop App#Linksys Router Setup#linksys velop tri-band#linksys velop ac2200#linksys velop ac4600#linksys velop support#linksys velop setup#velop setup
1 note
·
View note
Text
How to Setup Linksys AC3200 Dual Band Wireless and Ethernet Router Manually (WRT3200ACM)
Before we start with Linksys W3200ACM setup, confirm that your Internet modem is functioning properly. Connect the computer on to the web modem with the cable and confirm that Internet is functioning through the modem.
Step 1: Make connections
1. Connect the Internet modem to the Internet/WAN port of Linksys router.
2. Connect your main computer to one of the Ethernet ports on the router. There are 4 Ethernet ports on the router. Connect the computer to the other of the 4 ports. As well as so now your modem and computer, both are connected to the new Linksys router.
3. Plug in the power cable.
4. Check the light status. You must see Power light, Wireless, Internet and one among the Ethernet light where you’ve got main computer connected.
Step 2: Open the setup page of the Linksys router
On your main computer, open the Internet browser. Hence you may not be able to go on the internet now. In the address bar, type 192.168.1.1. As well as this is the default IP address of Linksys WRT3200ACM router. They will ask you for password to login to the setup page. The default password is “admin”. If you probably did setup the device within the past then you would possibly have changed the password. As well as you may have the old password then try that. Hence if password is not working at all then reset the device and try the default password “admin”. Read more…..

#linksys router login#linksys router page#linksys router setup#linksys router#Linksys AC3200 Dual Band Wireless#Linksys WRT3200ACM router
1 note
·
View note
Link
Having an open wireless network is a security risk as it may allow anyone close enough to your router (e.g., a neighbor or someone war driving) to access your network. To make your home wireless network more secure, consider the below suggestions.
Tip
The steps below require access to the router setup, and we also recommend configuring wireless security over a computer with a wired connection to the router if possible. For help entering the router setup, see: How to access a home network router setup or console.
Note
Because all routers are different we cannot provide specific steps for every router. Check your router's documentation for exact instructions.
Close the network
If you have never been prompted for a key, password, or passphrase when connecting to your wireless network, it is an unsecured network. In other words, if anyone is close enough to your router, they could connect to your network. To enable security, open your router setup screen and look for a Wireless Security section. The picture shown here is an example of a Linksys router set up in the Wireless Security section.
Select the wireless security method of either WEP, WPA, or WPA2 (we suggest WPA or WPA2, which is mentioned further down on this page). The, enter a passphrase to generate the keys. After enabling security on the router, any wireless device must have the key to connect to your network.
Change default password
Make sure the router password is not using the default password. If the default password is used, it can be easily guessed and give someone access to your router. With access to the router setup, a person could change your router settings, including viewing any security keys.
If available use WPA, not WEP
Many routers today offer two or three different security schemes: WEP, WPA, and WPA2. We recommend WPA or WPA2 security since it is more secure than WEP. However, for compatibility with some older devices, such as gaming consoles, TiVo, and other network devices, WEP may be the only security option possible to use. Using WEP is still better than no security at all.
Disable remote administration
When enabled, remote administration allows anyone close enough to your router to view or change your router settings. If you never plan on remotely administrating your network (e.g., wirelessly connecting to the router), we recommend disabling remote administration. With routers that support this option, it is often disabled through the Administration section.
When disabled, the router settings can still be changed using any computer that is directly connected to the router using a network cable.
Change the default SSID name
The SSID is the name that identifies your wireless router. By default, many routers use the name of the router as the default SSID. For example, Linksys routers use 'Linksys' as the SSID. Using a default SSID is a security risk, because it identifies the brand of the router. It would help an attacker find a way to exploit vulnerabilities in the device.
Tip
When naming the router, do not use your family's name or any other personally identifiable information. For example, if the SSID contains your family's last name, it can be identified by any neighbor that knows you.
Enable router firewall
Many routers also have a firewall that can be enabled. If available, we also suggest enabling this feature, as it helps add an extra layer of security to your network.
Disable SSID broadcast
To help make finding your wireless network easier, wireless routers broadcast your SSID, which means anyone looking for a wireless router could see your SSID. To help make it more difficult for someone to find your network when browsing for a wireless network, you can disable the SSID broadcast feature. However, when disabling the SSID broadcast, it requires you manually enter your router's unique SSID when connecting any new device to your network.
Enable wireless MAC filter
The wireless MAC filter feature only allows a wireless device to connect to your router if the MAC Address is entered into the filter list. Doing MAC filtering can make connecting new devices to your network more difficult, but improves the overall security of your wireless network.
Tip
A quick and easy way to set this up is to connect any wireless device you want on your network to your router before enabling the wireless MAC filter. After each device has connected, access the router setup and open the DHCP client table, often found in the Status or Local Network section. Each device that has connected to your router can be copied into a Notepad, then pasted into the wireless MAC filter section of the router Security section.
1 note
·
View note