#how lucky I am to have a home a library and a garden
Explore tagged Tumblr posts
Visit Tumblr Blog
Explore Tumblr blogs with no restrictions, modern design and the best experience.
Last Seen Tumblr Blogs


Fun Fact
Tumblr’s reach among the 26-to-35-year-olds in the US is 11%.
Text
the house of snow (20) ✧ coriolanus snow
the house of snow ✧ a royal coryo au | pinterest board| ao3
pairing: king!coriolanus snow x fem!reader
series summary: the king of panem is in search of a bride. and, for reasons you can never understand, coriolanus snow has set his sights on you. it would never be a happy marriage, you’re sure of that. but none of that matters, because when snow decides he wants something, he will do everything in his power to ensure it is his.
chapter summary: the ton learns of how its king adores the queen.
word count: 1,992
series warnings?: 18+ MINORS DNI, royal au, regency au, arranged marriage, rivals to lovers, obsessive!coryo, jealous!coryo, protective!coryo, eventual smut, eventual pregnancy, more tags to be added later
chapter warnings?: implied smut, fluff, pet name (petal), not proofread


When you first learned of Coryo’s intent to marry you, you had expected a life as Queen would be spent focusing on building a robust social life—planning and attending balls, organizing dinners, entertaining the rest of the ton, overseeing the social season. In your downtime, you would read in the library or stroll the gardens. Forever stuck in a loveless, unsatisfying marriage. Coryo, however, defied your expectations at every turn. Not only was his love true, but he wanted you to rule by his side. He didn’t wish for you to be a mere figurehead—he wanted you to be Queen in every sense of the word.
You quite liked it, if you were honest. You liked sitting at the desk with him, flitting through papers, sorting out the important needs of Panem. You liked being able to tell him your thoughts and know that they were being heard. You had heard too many horrible stories of men belittling their wives, thinking themselves better when they received the very same education. There men in this Capitol that got off on treating their wives as second-class citizens. You were forever grateful that your Coryo was not one such man.
And, of course, you and Coryo got up to plenty of revelry in that very office.
Coryo pressed a kiss to your shoulder as he helped you back into your dress. Though it would be easier to merely push up your skirts and settle between your legs, Coryo insisted on seeing all of you. You were his beautiful wife, he’d say, and he would never deprive himself of admiring such grand beauty.
“We need to add social engagements to our calendar,” you said, carding your fingers through his hair. He nipped at your neck.
“I prefer monopolizing your time. Those people do not deserve you in all your brilliance.”
“We rule those people, and we should try to remain in their good graces,” you countered. Coryo conceded by placing a kiss against the same spot he bit. “Just a few balls, perhaps a luncheon or two with the Electors and their families.”
“Very well. Let me know which ones you have a preference toward, and I shall make the arrangements.”
It was ordinarily the woman’s work to deal with social engagements. A smile tugged at your lips. For Coryo to so easily take on the task, without you even indicating for him to do so, warmed your heart. How did you ever get so lucky? How did you ever think poorly of him? “My mother is throwing a ball this week. I suppose we should attend, at least to keep up appearances with my family,” you said with a roll of the eyes. “The ton would not take kindly to a woman who forsakes her family for the Crown. They would spread rumors that I am a power-hungry wench, intent on making you my little puppet.”
Coryo barked out a laugh. “If only they knew how much power you hold.”
“Oh yes, I do quite well at tugging at your strings.”
“You may tug on them for however long you like.”
Though your dress had just been pulled back on, it soon found itself pooled on the floor moments later.

Thought it had been your suggestion, you dreaded the idea of returning to your family’s home—if you could call it that anymore. After having been away from them for the last month, you came to realize you were scarcely more than a pawn to them. If your father wanted you to be well-cared for, he could have allowed Coryo to court you when he came into money again. The Snow family was not a family known to squander their wealth. Had it not been for the war, they still would have been living off of their fortune for generations to come. And your mother…The way she pushed you to act like someone you were not in hopes that it further along Coryo’s proposal…It just made you sick. You once thought that they cared for you, in their own strange ways, but now you weren’t for certain.
Coryo watched as your lady’s maid pinned back your hair in preparation for your mother’s ball. You were tempted to tell her to stop, that you would no longer be attending, but you also wished to show them, show the entire ton, that you had their King wrapped around your finger. For every thing that they chastised you for, Coryo loved. Nay, he adored. You were certain there was very little you could do that would be wrong in his eyes.
“You are exquisite,” he said, coming to your side as your lady’s maid stepped away from her elaborate creation. He leaned down, pressed a kiss at the junction where your shoulder met your neck. “The ton will have never seen a more beautiful Queen.”
“You shouldn’t let me stray far from your side then,” you teased as you rose from your seat. You turned so you faced your husband and looped your arms around his shoulders. “The ton can so easily devolve into animals when they see something shiny and new.”
“Oh, trust, my petal, I do not intend for you to ever leave my side.” Coryo kissed your forehead. “I already nearly lost you once when I was least expecting it. I won’t allow it to happen again.”
Your heart clenched. It had been so long since Sejanus was mentioned. You nearly forgot about him entirely. For him to have been so close to both you and Coryo, it didn’t feel so strange for him to not be around anymore. What would have happened if he didn’t come to convince you to run away with him? Would you all still be close? Or would he have still tried?
You hoped Sejanus fared well with the Peacekeepers. Despite what he attempted, the friend he was willing to hurt, Sejanus was a kind and gentle man. Coryo had told you little about his time in service with the Peacekeepers, but you knew enough to be certain that Sejanus would emerge a changed man. You only wished that he was still kind.
“And you should not worry about such a thing,” you said. “I am yours just as you are mine.”
Coryo hummed, and pulled you in for another kiss. You let him, letting your worries melt away.
The worries did not stay away for long, unfortunately. As your carriage rolled up to your parent’s home, your heart thump’d, thump’d, thump’d in your chest. You hated having to let go of Coryo when the carriage came to a stop. At least it didn’t last long, for Coryo soon was helping you out and your hands were reconnected.
Like when you arrived at the palace, Coryo let you take the lead. But, unlike at the palace, those who bore witness to this soon began to whisper. You expected as much. The tradition of the no one walking ahead of the King was one long upheld. No one ever dreamed of stepping into his path. You swallowed, lifted your head high and squared your shoulders. This was going to be a long, arduous night, but you were not going to let the gossip of the ton ruin your evening.
Your mother’s eyes were on you the second you stepped foot in the ballroom. You took a breath and turned away from her gaze. Coryo stepped beside you and took your hand. “Come,” he said, “let’s take a turn about the room.”
You nodded.
Her eyes never left you, though. You moved your hand to hold onto Coryo’s arm, hoping for him to steady you. He looked at you curiously, but said nothing. At least you were distracted by the ton as they flitted around you and your husband. They were so eager for the approval of the King and Queen. It was almost laughable.
Finally, though, you couldn’t take it anymore as your father joined your mother’s side.
“We should go say something,” you whispered to Coryo as another young lady sunk into a low curtsy in front of you. “Appearances and all that.”
“Are you certain? I believe we will be quite fine if we continue to ignore them.”
You stifled a laugh. “Perhaps. Think of it this way, though—if we speak to them now, we can ignore them the rest of the ball.”
“Very well. Lead the way, petal.”
Your heart thump’d harder as you crossed the room to your parents. You didn’t have the first clue what you were going to say to them. What they would say to you. They had enough tact, you were sure, to not incite an outright fight with the King and Queen. But they had enough audacity to insult their daughter. They did it as easily as breathing.
“Mama, Papa,” you greeted when you reached them. Neither dropped into a bow or curtsy. Your lip curled at the disrespect. It did not matter that you were their daughter—there was still social etiquette to be followed. “The ball has been lovely so far.”
If they were going to stoop so low, you would not meet them at their level.
“It could be lovelier if there wasn’t so much…whispering among the ton,” your mother said.
From the corner of your eye, you watched as Coryo’s hands clenched and unclenched. You gave his arm a squeeze, but that did not stop him from saying, “The ton is full of idle gossip. It always has been.”
The warning in his tone did not stop your mother from continuing it, “Still, it is improper for a wife to lead the King.”
You ground your teeth together. Is that all you were to her now? A wife to the King? Oh, if only she knew the true influence you had. If only she knew how highly your Coryo regarded you. She may be trapped in a loveless marriage—and you would forever pity her for that—but that did not mean she could dismiss your marriage so easily.
“Queen,” Coryo corrected. “Lesser kings have killed for lesser slights against their queens. I would tread carefully if I were you.”
Your father looked between your mother and Coryo. In an attempt to diffuse the situation, he tried, “What my wife means to say is, we would hate for the Crown to be ruined by such silly gossip.”
“The Crown could not be ruined by such things,” Coryo dismissed with a wave of his hand. “What would damage the sanctity of the Crown is to allow such disrespect to go by unchecked.”
“Of course,” your father said. “We did not mean to—”
“I am tired of this conversation,” you announced. You turned into Coryo and smiled up at him. “Would you like to dance?”
Your mother guffawed. “Women do not ask—”
“Whatever you wish, my Queen,” Coryo said. He kissed you softly, snorting a laugh as your mother continued to blubber in the background. “I would dance with you forever if you should ask for it.”
Coryo led you out to the middle of the dance floor, ignoring your mother’s antics and prying eyes of the ton. He took one hand in his, letting the other settle on your waist. Your free hand came to rest on his shoulder and the band began to play. As he twirled you around the room, everyone seemed to melt away.
Good. The ton could spread rumors and stories all they like. Your parents could look down on you if they so pleased. But none of that would change the fact that your Coryo looked at you like you were the most brilliant diamond ever mined. None of that would change the fact that, in a society where loveless marriages were commonplace, you found the very thing you dreamed of since you were a girl.
“I love you, my King,” you said.
“And I you, my Queen.”

#the house of snow: a royal coryo au#coriolanus snow imagine#coriolanus snow x reader#coriolanus snow x fem!reader#coriolanus snow x female reader#coriolanus snow x you#coriolanus snow x y/n#coriolanus snow fanfic#coriolanus snow fan fic#coriolanus snow fanfiction#coriolanus snow fan fiction#coriolanus snow fic#starrywrites#starryevermore
147 notes
·
View notes
Note
Hi ! May I request a romantic Jojo matchup ? Thank you so much!
I'm a short, 25+ y/o person with a reserved personality. I have been called "quiet" a lot throughout my life even my voice is pretty soft. I can be pretty clueless or oblivious at times. Still, with my most trusted person I am very open and expressive.
My main hobby is reading followed by drawing. I absolutely adore reading and collecting books and manga but the thing is that I only love to read romance and erotica lol. I also love libraries and hope to build a collection of my own. I am still learning to draw as it's a creative outlet for me.
I really love having routines for myself like makeup skincare shower all that. My biggest problem is time management but that's why I try to keep the routines. I am definitely an introvert and prefer to stay home but I love a partner who is more extraverted and will take me out of my shell. I love spending time with my loved ones it's my biggest love language. I'm a big foodie too it's lovely to share a meal with loved ones.
My fashion sense is very dressy and I will find excuses to wear skirts even in the winter. I love spring and summer the most just because I get to wear so many dresses and skirts!
Despite my deep insecurities and anxiety, I always have a growth mindset and want to improve myself. My confidence has not been the best but I try to keep getting better at it. I try not to be a cry baby but I get pretty emotional and nostalgic haha.
Thank you again!! 🩷
hiii, i think you have a personality that a lot of jojo chars could get along with, but I think the best matches would be yasuho, johnny, rohan, and bruno <3 and you're absolutely more than welcome ^^

Johnny Joestar 🤍
Johnny understands quiet. He doesn’t expect you to be loud, and in fact, finds comfort in how peaceful you are.
He’d be surprisingly curious about the books you love. You reading erotica would confuse him at first (“Wait, you actually read this?”) but he’d get flustered and eventually ask for recommendations.
He’d admire your drawing skills and routines more than he lets on. He notices the effort you put into your skincare, your outfits, your little rituals- and it softens him.
He’s not great at time management either, so you two would definitely bond over trying to stick to schedules and laughing about how bad you are at it together.
He’d love that you enjoy staying home. You’d have long, quiet afternoons on the porch, watching the breeze and tracing shapes in your sketchbook together.
He loves how affectionate and warm you are with people you trust. Once he’s in your heart, he clings to that closeness and gives it back tenfold.
He wouldn't always know how to handle your expressive moments at first, but he’d try so hard- and his slow emotional openness would mirror your own.
Yasuho Hirose 💖
Yasuho is a ray of sunshine and loves the way you quietly shine in your own corner. She sees you as a hidden garden she’s lucky enough to explore.
She’d constantly hype you up about your fashion and routines- texting you “OMG you look like a fairy today” and begging you to do her makeup too.
She’s super into manga and books too and would absolutely go crazy over your collection. She’d want to borrow your romance novels and return them with notes.
You’d probably start drawing together just for fun- doodling each other in cute outfits, exchanging characters based on each other, and maybe even working on a little webtoon or comic together.
She’d encourage you to come out with her but always respect your need for recharge time. Think: cute bubble tea dates, fabric shopping, or library hopping.
She shares your foodie joy and loves going to new places just to try something delicious. She takes pictures of your food because it “looks aesthetic when you eat it.”
She’s deeply affectionate, emotionally honest, and always reminds you how special you are, especially when you’re being too hard on yourself.
Rohan Kishibe 🌸
Rohan is fascinated by your quiet nature. You don’t clamor for attention like others do, and that’s exactly why you stay in his mind.
He loves watching you read romance and erotica and acts totally above it… but sneaks peeks over your shoulder and absolutely reads your collection when you’re not home.
He tries to act unimpressed by your skincare and makeup routines, but notices every change and always makes oddly specific comments like, “You’re wearing the shimmer today. I prefer that. It suits your bone structure.”
You are the only person he lets into his studio while he’s working. The quiet hum of you drawing beside him is his favorite background noise.
He pretends to roll his eyes when you dress up just to stay home but secretly he thinks it’s adorable and starts sketching outfits based on you.
He doesn’t “do” dates often but will plan ones that stimulate both your minds- like rare bookstore hunts, weird museums, or sketching strangers in cafés.
Very subtly encourages you to express yourself more… but in your own way. He never pushes, he just listens so closely when you speak.
Bruno Bucciarati 💙
Bruno instantly notices your softness, but instead of trying to change you, he creates safe space for you to open up on your own time.
He finds your skincare and fashion routines deeply admirable. He’s refined himself and really respects people who take pride in their appearance.
He loves your romantic reading tastes. He’d offer to read with you, but you might catch him blushing when you hand him one of your spicy books.
He'd encourage you to draw with him in the mornings after breakfast, bringing you a cup of tea and telling you how beautiful your sketchbook is- even when you're critical of it.
He’d always be the one to get you out of the house gently- inviting you on calm walks along the coast, or treating you to sweet, sunlit cafés in Naples.
A total foodie like you. He takes meals very seriously and would make sure you’re always well-fed with delicious, lovingly prepared food. Sharing meals = his love language too.
Bruno would learn every detail of your routines, your preferences, and your comforts- then quietly accommodate them, like keeping your favorite bubble bath ready or warming your scarf in winter.
#jojo's bizarre adventure#matchups#yasuho x reader#yasuho hirose#johnny joestar x reader#johnny joestar#bruno bucciarati x reader#bruno bucciarati#rohan x reader#kishibe rohan
14 notes
·
View notes
Text

Coming back to myself
Dear cozy readers, I meant to send out this letter last week—but honestly, I was exhausted. Holidays are funny: they’re supposed to be relaxing but they sometimes feel like performance art with elaborate dinners, perfect church outfits…after a whole weekend, you just become too tired to even answer an email. Now that it’s all over, I find myself appreciating my quiet routine again and even spending some time refining my daily habits to be more consistent, more intentional, and more me. 📖 Soft Reading: “My life is mine? I can't believe it!” – Rosie Pink on Substack Have you ever read something and thought, “Wow, is this writer literally me?” This Substack post was that for me. Even as someone who thrives on independence and loves solo adventures, I still need the reminder: my life is mine. This quote especially made an impact: "There are so many things I’ve wanted to do that I’ve gone and done, and they’ve affirmed the faith I have in myself, reminded me that I do have autonomy, and made my life feel endlessly exciting and expansive." 🌎 Mindful Pastimes: Taking a mental health day Last week, I took a day off work and drove to Boston on a nice sunny day. I used to live there, and still waffle between being happy with my new life but missing my life before. And it turned out to be one of the most peaceful days I've had in a long time. I went to all my favorite places: my former go-to bookstores, the Esplanade, the Public Gardens. I felt at home, but I have to admit that being a tourist in my former city actually made me appreciate it more; and I couldn’t wait to get back to my actual home to relax and reminisce. 📱 Wholesome Scrolling: Fabienne Delacroix on Instagram Lately, I’ve been thinking all about my favorite European cities (old architecture + walkability + democracy = my dream). Fabienne Delacroix’s paintings of Paris are little portals into that dream: cobblestone streets, iconic corners and landmarks, and Haussmann-style buildings. Is it wholesome scrolling, or just jealousy because I’m not there? Honestly, it’s both. 📺 Calm Viewing: Conclave (2024) Did you think this newsletter would mention a movie about a pope dying? Me neither! Conclave follows the secretive, ritual-heavy process of selecting a new pope after the previous one passes (very timely). It’s not traditionally cozy, but it is fascinating—and honestly, pretty camp. If you like a little drama and intensity with your calm, this is worth a watch. 🍇 Simple Bites: DIY sour grapes One of the easiest, weirdly satisfying treats: frozen sour grapes. They’re like nature’s Sour Patch Kids. Perfect for holiday gatherings, giving your kids or little cousins an interesting snack, or just keeping in your freezer when you’re craving something sour. I used this recipe from Bon Appétit and everyone at Easter was either oddly intrigued or utterly obsessed. 🧺 Comfort Items: Author-signed books from independent bookstores Saturday was Independent Bookstore Day! I’m trying to be more mindful about spending lately, but I wanted to celebrate by supporting small businesses. I use my library for 90% of my reading needs, but treating myself to something signed feels meaningful and memorable. 💭 Warm Thoughts: “How lucky am I to be as insignificant as I am.” — Unknown I found this quote in a wholesome little webcomic once (and can’t find it anymore, sadly). But it’s stayed with me. In a world spinning with noise, war, injustice, and change, sometimes the smallness of our own individual lives is actually a blessing. Take care, and I hope you remember that your life is yours 🌿
#cozywithannanewsletter#cozywithanna#cozy#cozy vibes#slow life#slow living#cozy aesthetic#cozycore#soft spaces#hygge#soft living#soft life#soft aesthetic#softcore#hygge aesthetic#substack#boston#paris#conclave#conclave 2024#recipe#recipes#independent bookstore day#bookstores
5 notes
·
View notes
Photo

Organic gardens are as good for the earth as they are for its lucky inhabitants. The secret to growing a healthy, lush garden all begins with a single seed. This guide covers all the basics for starting seeds so that you can revel in your gardening wizardry this spring. Are you planning to start a garden this year? Congratulations! It’s a big deal! Whether you are a seasoned gardener or a beginner, growing a garden is good for everybody. It feeds the soul and the soil and can even feed your family. Starting a garden off right with healthy seeds sets the roots for how the garden will grow for the rest of the year. Sure, you can help manage sick plants and dried-out leaves, but starting seeds with good intentions and mad skills will make the rest of the year’s jobs a whole lot easier. Some of you may think I’m crazy, but I believe that how you care for seedlings will be reflected in the plant that grows and the fruit that ripens. The garden is resting now. Perhaps even covered by a blanket of snow. Now, there is ample time to slow down, plan, and nurture the very best plants to grace your garden beds. Let’s get this gardening season started with this guide on starting seeds. Experienced gardeners can save the seeds from their plants to use the next year. The 10 Steps for Starting Seeds “I made this!” I gloat while serving up a dish made entirely of food that I grew in my garden. Well, “gloat” is probably not the right word. I prance around like the fantastical wizard I am, cheering about my mad skills in making real food from tiny seeds. It took me months. I had some fatalities. But overall, it’s fairly simple to grow from seeds. And more importantly, it’s awesome. Here are some basics for how to start seeds at home. Make sure to label your seeds so you know exactly what they all are. Trust me, you will forget. 1. Choose Your Seeds Starting seeds in the spring (or even winter) is one of the best ways to save money. While you could buy a pack of snapdragons at the garden centre to fill your containers, why not start them from seed at a fraction of the price? You also get way more varieties when you go the seed route. This list covers my favourite annual flowers to grow from seed, while this list covers some of my go-to perennial flowers. Keep in mind that starting perennials from seed is often more difficult and time-consuming, so it is better suited for those with a few gardening seasons under their belt. Seed companies in your area should sell the right seeds for your climate but do make sure that you pick the right plants for your experience level. If you’re a seedling yourself when it comes to propagation, don’t bother starting watermelons in Northern Ontario. Many seed companies will also list a difficulty rating that will help to guide you. You might even be able to find some seeds in a seed library. 2. Read the Packet If you want the best possible start for your seeds, your best bet is to read the packet. Most seed packets will list everything you need to know to start the seeds and their special requirements, like how deep to plant the seed, how much light they need, how long they’ll take to germinate, soil temperatures required, etc. I cover all the basics of reading a seed packet in this post if you want to ensure you’re buying the right seeds and those that will actually thrive in your garden. 3. Choose a Container You can start seeds in just about anything you can find around the house that will create a mini-greenhouse, or you can buy all sorts of interesting setups to best suit your needs. Greenhouse Kits Many different greenhouse kits are available now. Most will have a plastic tray with a clear plastic greenhouse dome. Some come with a soilless mixture for starting seeds, like peat pellets that expand to a mini seed pot when soaked in water. Others may have coconut fibre pots that you can transplant right along with your seedling. Others may even have a heat mat that gently warms soil to improve germination. The beauty of these kits is that you can start a large number of seeds individually in one tray (up to 72) and many are made for small spaces like windowsills. The drawback is that the seedlings will need to be replanted, either in the garden or a larger pot, in a few weeks. Leaving seedlings in small pots with no nutrition will cause unwanted stress to the plants. Seed Starting Trays Garden retailers will sell many different types of professional-grade seed-starting trays, domes, and inserts with features like root training, moisture control, automatic watering, and grow lights. Certainly, many of these features have value in starting the year’s plants off on the right foot and can be used over and over. Household Items An inexpensive and creative way to start seeds is to use household items as seed containers. Lining a seed tray with pots made from toilet paper tubes, newspaper, or egg cartons will cost nothing At times, your family may think you’ve gone mad, given how excited you will become when you get to take home the plastic cake dome from the party. But come on, that’ll make a really great greenhouse dome, right? Search for biodegradable paper products you can plant right in the ground or food-safe plastic containers that you can use as mini-greenhouses for your containers if you are on a budget. Paper egg cartons are one of my favourite inexpensive household items to use as a seed starting container. 4. Growing Medium You can buy a pre-made seed starter soil, or you can make your own with a mix. I make my own mix using a peat-moss alternative, sterilized compost, perlite, and vermiculite. This mixture is light and holds moisture well, so it is wonderful for helping seeds germinate. All growing mediums will need some time to absorb water, so add moisture and let it soak in for an hour before planting. Be sure to use a sterile mix if you are starting seeds indoors. Soil or compost from the garden will bring in all sorts of critters, like soil gnats, which will drive you freakin’ crazy as you run around your propagation trays like a mad person swatting and squashing an endless supply of teeny tiny flies. Seed starting mix needs to be sterile. 5. Water Your Seeds Germination will be best in a moist environment for most seeds, so keeping the soil damp and a greenhouse dome on top will keep the right amount of humidity for optimal germination. Keep the soil from drying out by checking it daily. Water gently, from the bottom where possible, so as to not damage the seedlings about to emerge. When learning how to start seeds, having just the right amount of water is important. You never want the seeds to dry out, nor do you want the soil to be soggy. Make sure to vent your container regularly to prevent fungal growth. 6. Get the Right Lighting Seeds won’t need light until they emerge from the surface of the soil, but then they will need strong sunlight for most of the day to prevent them from becoming leggy (overly tall and spindly = weak). You can supplement a lack of sunlight with fluorescent lighting, either by buying a set of grow lights made for seed starting or by making your own with fluorescent shop lights. You don’t need fancy lights to help your plants grow. This was my DIY set-up! 7. Treat Damping Off “Damping off” is a term for a fungal growth that looks like fuzzy hairs on the seedling stem. This fungal growth will kill the seedling, so it’s bad, really bad. To prevent damping off, occasionally spray the greenhouse dome with a bottle of 3% food-grade hydrogen peroxide and vent it on a regular basis to regulate humidity. I also recommend watering with my chamomile fungicide spray. Chamomile naturally prevents diseases such as damping off. It’s almost impossible to get rid of damping off, so prevention is best. 8. Thin Your Seedlings Generally, the seed instructions will suggest that you plant 2-3 seeds per pot and thin out all but the strongest. This seems to be the thing that some gardeners have the hardest time with. If three strong tomato seedlings have popped up in one tiny peat pot, then the gardener rushes off to get tweezers to separate out the three wee plants and re-pots them all. More inexperienced gardeners will damage each plant, giving none a strong chance at survival, so it’s best that you grab a clean pair of scissors, snip all but the strongest seedling in each pot and be done with it. Choose the strongest seeding and snip any remaining seedlings in the same container. 9. Hardening Off As the seedlings grow into plants and the date to plant outside gets near, it’s time to start hardening them off or toughening them for their natural environment. I like to start by opening a window a few hours a day so they get a breeze. Then, start moving the trays outside, out of direct sunlight, for a few hours. Start at one hour and gradually increase to a full day outside. By the time your plant date has arrived, you can safely transfer your tough little soldiers directly into the ground, with some delicious compost and a thorough watering, to brave the elements on their own. Seedlings are used to indoor conditions, so make sure to gradually transition them to outside. 10. Set Your Expectations Starting seeds is such an interesting and magical process, especially for children, so it’s the perfect activity to do as a family this coming spring. The months that you’ve spent germinating and raising seedlings will be a series of trial and error, so expect some loss. Not every seed will germinate, not every seedling will survive being transplanted, and not every kind of plant will do well in your garden. The gains will be clear when you have piles of leafy greens taking up every inch of your windowsills, bursting to get outside. Starting the plants off yourself ensures that you are in charge of the health of the plant and can control what goes into it. And the satisfaction you’ll feel from starting your own seeds is tremendous. My kiddo loves starting seeds with me and planting them in the garden. FAQ About Starting Seeds Should you cover seeds with plastic? Yes. This helps to keep the moisture in and increase temperatures. It essentially acts as a mini greenhouse.Cover your seeds with a clear plastic container (I like salad boxes) right after you’ve planted and watered your plants. Every day, vent the dome and clean it with food-grade hydrogen peroxide to prevent damping off. Leave the dome on until the seedlings reach it. Do seedlings need sunlight to survive? Yes. Seeds don’t need sunlight until they’ve germinated (sprouted above the soil). Prior to this, the seed carries all the energy the plant will need to sprout. But once it has germinated, the seedling will need lots of sunlight to grow well. Otherwise, they get leggy and weak trying to reach for more sun.Consider using a grow light if you can’t get enough sunlight in a windowsill for your seedlings. More Tips for How to Care for Seedlings Source link
#GARDEN_TOOLS#FREQUENTLY_ASKED_QUESTIONS#GARDENING_TIPS#GUIDE#MONTH_FEBRUARY_WEEK_1#SEED#SEED_STARTING#SEEDS#STARTING#STEPBYSTEP
2 notes
·
View notes
Note
Chapter 6 time~!
Nozel's aura was brilliantly captured! There was the art at the end of the previous chapter but this prose description makes it better!
Okay about this confrontation... At first, I thought that Helena squaring up against Nozel only to immediately stand down when he points out her faux pas of undermining him in front of his squad was rushed. But then I re-read the scene and was like "wait yeah. It works actually. Helena is socially adept and since she's not nearly as proud as the Silvas (she has a little pride, just not as much as our favorite dysfunctional siblings), she would be able to bring herself to step down in this specific scenario.
Helena then gets her chance to blow up with range once in the privacy of her guest room at least! The pillow scream... Girl! 😫 (Might just be me but I find screaming into pillows makes me stress worse, might have something to do with running out of air while my mouth and nose are covered. But at least it works for Helena.)
Helena's back and forth thoughts are funny. I don't know why. "I lowkey insulted him" but then "he straight up insulted me" but also "oof, I went to his base without permission." Not emotionally constipated the way some canon characters are. Maybe emotional indigestion? Upset tummy for the heart. ... No that sounds silly.
Man, Helena is lucky that her stuff wasn't moved from where she left them. If this wasn't a cool down chapter, that stuff would be gone and she would have to tear the castle inside out to find them again. And for the sketchbook. I don't remember if she left it open but if not, um, yikes. Don't know how she's able to brush off the thought of someone looking into her private property and seeing her art, but if it was me and my little writing journal, I'd honestly just go back to my home country. That's how touchy and embarrassed I am of my own creative work. (You shudder at the thought of your family reading your stuff and yet you post online for strangers? Soda, make it make sense.)
Hours later? The same spot?! Oooooh, I hope Helena was doing regular back stretches during the scene break or it's gonna be a back back for her./lh
“I knew I’d find you here,” Nozel said "No you didn't, you just searched literally every other room in the castle until the library was the last place left," I snarkily remarked in a weird attempt to make a joke out of his arrival.
When Nozel comes to talk, it feels less like Nozel being the bigger person in the situation, and more like him establishing a baseline of respect. More professional in line with his role as captain (which Helena kinda points out) then a personal exchange... Nozel was thinking "Do not show emotional vulnerability. Do not show emotions, period. Don't show anything except the aura of authority." Also, I'm seeing that this will be the starting point of Helena calling Nozel "captain" as a tease.
Aw, I like the detail about the way the Silva siblings interact at the table. Solid and Nebra telling stories (they may not be nice to Noelle but they are the bold/outgoing type so being prone to regaling their missions to others feels fitting) and Nozel being the big brother and keeping the details firmly in reality when need be.
Man, you're being a lot nicer to the Silva garden than I've been. I've never written about it but the thoughts in my brain tend to characterize it as beautiful but sterile because none of the Silvas were invested in the garden and thus the castle as a whole didn't do much with it. It's only until after Helia (or Briar) enters the family that the garden gets revived and the Silva siblings also show more active interest. But you make it out to be elegantly maintained with a refined charm that Helena appreciates.
And now we have the set up for chapter seven. A banquet. Lots of eating and talking and mostly talking because fictional politics~! 😆
Overall, a good chapter with resolution from last chapter's cliffhanger, slowly calming the sour impressions between Nozel and Helena, and generally just cooling down from the action before we pick up for a big event.
Hi!
Thank you! I really tried with that description. Well the art was more of a joke, because my friend said that he's as scary as the Groke from moomins... So many things start from jokes 😂
Yup it really works well, that she realises she was at fault here. Especially since she wouldn't want anyone undermining her authority. Helena sticks closely by the rule don't act towards others the way you wouldn't want them to act towards you.
She was still very frustrated and yeah the pillow scream. She was taught as a part of Royal upbringing to control herself, but since she's an emotional person she needs to blow off the steam from time to time.
Chapter six was the moment for me when Helena started "feeling" much more like Helena. Aka she started being funny, those back and forth thoughts are an example. But yes she's connected with her feelings. Helena is not the one to be stuck in denial for a long time, she'd rather confront most her problems (contrary to some other characters...).
She probably didn't leave the sketchbook open. And the thing about that library no one really goes there. Just servants come from time to time to clean up. Well no one except for Nozel.
So you might have not noticed since you were surprised, but he actually knew that he would find her there. There was this one moment I think in chapter 4, I would need to look back, when she's sitting in the library and someone tries to open the door, but then leaves. And in the last chapter Nebra and Solid mentioned that he likes to work there. I suppose the library was one of my first headcanons for Nozel, that he needs a quiet place to himself.
And back to the previous comment, yeah there were certainly some stretches 😂 I just wasn't bothered to write that.
You're completely right Nozel is certainly not the bigger person in this situation. Helena isn't either. They're both quite petty actually. It was just establishing some rules in order to live "peacefully" and not rub the other the wrong way.
But yes this is also the moment when Helena starts feeling more comfortable and she begins to joke. Captain started as a normal "captain" later it changed a bit more into an authority kink 😂
Yay I'm so happy you enjoyed the fact that the dinner conversations are happeining. I actually genuinely worried at first that people would be mean saying ohhh they're too big assholes to act this way, but I thought they cared about one another and in BC we simply saw Noelle's perspective, who they bullied. Since Helena is "on their level" with her Royal status and they established the connection through Acier, she kind of started becoming "one of their own" so as you pointed out, as the more outgoing types they start babbling. I mean Solid has to brag. And yes Nozel won't tell stories, but specifying details is alright. Watching over the young ones.
So for the Silva gardens I headcanon that Acier used to adore them. We saw her pregnant self sitting on the porch and overlooking them. So naturally I assumed that Nozel would make sure to assign staff to maintain them. They are still "pristine", "geometrical" and "sophisticated". There is not much life or color or life to them, but they're pretty and Helena can appreciate them. Besides more than the gardens themselves she enjoys the emotions they give her. Helena herself may not be the gardener. She actually doesn't like getting dirty. However the Drazel familia has close ties to the nature. In the first chapter I described briefly the extent of their gardens, but they are a special place.
And let's not forget the siblings don't bother with taking care of the gardens.
Thank you! Hah I honestly would disagree with calling this slowly considering my normal "slow burn" approach, but I was very impatient with getting to the "good part" aka merging with the BC story line. So the scenes in these chapters are quite short compared to how I write now and a lot of time passes in between, when not much changes except the siblings and Helena getting used to one another.
Thank you for your comment 💕 They made my day ^^
3 notes
·
View notes
Photo

Organic gardens are as good for the earth as they are for its lucky inhabitants. The secret to growing a healthy, lush garden all begins with a single seed. This guide covers all the basics for starting seeds so that you can revel in your gardening wizardry this spring. Are you planning to start a garden this year? Congratulations! It’s a big deal! Whether you are a seasoned gardener or a beginner, growing a garden is good for everybody. It feeds the soul and the soil and can even feed your family. Starting a garden off right with healthy seeds sets the roots for how the garden will grow for the rest of the year. Sure, you can help manage sick plants and dried-out leaves, but starting seeds with good intentions and mad skills will make the rest of the year’s jobs a whole lot easier. Some of you may think I’m crazy, but I believe that how you care for seedlings will be reflected in the plant that grows and the fruit that ripens. The garden is resting now. Perhaps even covered by a blanket of snow. Now, there is ample time to slow down, plan, and nurture the very best plants to grace your garden beds. Let’s get this gardening season started with this guide on starting seeds. Experienced gardeners can save the seeds from their plants to use the next year. The 10 Steps for Starting Seeds “I made this!” I gloat while serving up a dish made entirely of food that I grew in my garden. Well, “gloat” is probably not the right word. I prance around like the fantastical wizard I am, cheering about my mad skills in making real food from tiny seeds. It took me months. I had some fatalities. But overall, it’s fairly simple to grow from seeds. And more importantly, it’s awesome. Here are some basics for how to start seeds at home. Make sure to label your seeds so you know exactly what they all are. Trust me, you will forget. 1. Choose Your Seeds Starting seeds in the spring (or even winter) is one of the best ways to save money. While you could buy a pack of snapdragons at the garden centre to fill your containers, why not start them from seed at a fraction of the price? You also get way more varieties when you go the seed route. This list covers my favourite annual flowers to grow from seed, while this list covers some of my go-to perennial flowers. Keep in mind that starting perennials from seed is often more difficult and time-consuming, so it is better suited for those with a few gardening seasons under their belt. Seed companies in your area should sell the right seeds for your climate but do make sure that you pick the right plants for your experience level. If you’re a seedling yourself when it comes to propagation, don’t bother starting watermelons in Northern Ontario. Many seed companies will also list a difficulty rating that will help to guide you. You might even be able to find some seeds in a seed library. 2. Read the Packet If you want the best possible start for your seeds, your best bet is to read the packet. Most seed packets will list everything you need to know to start the seeds and their special requirements, like how deep to plant the seed, how much light they need, how long they’ll take to germinate, soil temperatures required, etc. I cover all the basics of reading a seed packet in this post if you want to ensure you’re buying the right seeds and those that will actually thrive in your garden. 3. Choose a Container You can start seeds in just about anything you can find around the house that will create a mini-greenhouse, or you can buy all sorts of interesting setups to best suit your needs. Greenhouse Kits Many different greenhouse kits are available now. Most will have a plastic tray with a clear plastic greenhouse dome. Some come with a soilless mixture for starting seeds, like peat pellets that expand to a mini seed pot when soaked in water. Others may have coconut fibre pots that you can transplant right along with your seedling. Others may even have a heat mat that gently warms soil to improve germination. The beauty of these kits is that you can start a large number of seeds individually in one tray (up to 72) and many are made for small spaces like windowsills. The drawback is that the seedlings will need to be replanted, either in the garden or a larger pot, in a few weeks. Leaving seedlings in small pots with no nutrition will cause unwanted stress to the plants. Seed Starting Trays Garden retailers will sell many different types of professional-grade seed-starting trays, domes, and inserts with features like root training, moisture control, automatic watering, and grow lights. Certainly, many of these features have value in starting the year’s plants off on the right foot and can be used over and over. Household Items An inexpensive and creative way to start seeds is to use household items as seed containers. Lining a seed tray with pots made from toilet paper tubes, newspaper, or egg cartons will cost nothing At times, your family may think you’ve gone mad, given how excited you will become when you get to take home the plastic cake dome from the party. But come on, that’ll make a really great greenhouse dome, right? Search for biodegradable paper products you can plant right in the ground or food-safe plastic containers that you can use as mini-greenhouses for your containers if you are on a budget. Paper egg cartons are one of my favourite inexpensive household items to use as a seed starting container. 4. Growing Medium You can buy a pre-made seed starter soil, or you can make your own with a mix. I make my own mix using a peat-moss alternative, sterilized compost, perlite, and vermiculite. This mixture is light and holds moisture well, so it is wonderful for helping seeds germinate. All growing mediums will need some time to absorb water, so add moisture and let it soak in for an hour before planting. Be sure to use a sterile mix if you are starting seeds indoors. Soil or compost from the garden will bring in all sorts of critters, like soil gnats, which will drive you freakin’ crazy as you run around your propagation trays like a mad person swatting and squashing an endless supply of teeny tiny flies. Seed starting mix needs to be sterile. 5. Water Your Seeds Germination will be best in a moist environment for most seeds, so keeping the soil damp and a greenhouse dome on top will keep the right amount of humidity for optimal germination. Keep the soil from drying out by checking it daily. Water gently, from the bottom where possible, so as to not damage the seedlings about to emerge. When learning how to start seeds, having just the right amount of water is important. You never want the seeds to dry out, nor do you want the soil to be soggy. Make sure to vent your container regularly to prevent fungal growth. 6. Get the Right Lighting Seeds won’t need light until they emerge from the surface of the soil, but then they will need strong sunlight for most of the day to prevent them from becoming leggy (overly tall and spindly = weak). You can supplement a lack of sunlight with fluorescent lighting, either by buying a set of grow lights made for seed starting or by making your own with fluorescent shop lights. You don’t need fancy lights to help your plants grow. This was my DIY set-up! 7. Treat Damping Off “Damping off” is a term for a fungal growth that looks like fuzzy hairs on the seedling stem. This fungal growth will kill the seedling, so it’s bad, really bad. To prevent damping off, occasionally spray the greenhouse dome with a bottle of 3% food-grade hydrogen peroxide and vent it on a regular basis to regulate humidity. I also recommend watering with my chamomile fungicide spray. Chamomile naturally prevents diseases such as damping off. It’s almost impossible to get rid of damping off, so prevention is best. 8. Thin Your Seedlings Generally, the seed instructions will suggest that you plant 2-3 seeds per pot and thin out all but the strongest. This seems to be the thing that some gardeners have the hardest time with. If three strong tomato seedlings have popped up in one tiny peat pot, then the gardener rushes off to get tweezers to separate out the three wee plants and re-pots them all. More inexperienced gardeners will damage each plant, giving none a strong chance at survival, so it’s best that you grab a clean pair of scissors, snip all but the strongest seedling in each pot and be done with it. Choose the strongest seeding and snip any remaining seedlings in the same container. 9. Hardening Off As the seedlings grow into plants and the date to plant outside gets near, it’s time to start hardening them off or toughening them for their natural environment. I like to start by opening a window a few hours a day so they get a breeze. Then, start moving the trays outside, out of direct sunlight, for a few hours. Start at one hour and gradually increase to a full day outside. By the time your plant date has arrived, you can safely transfer your tough little soldiers directly into the ground, with some delicious compost and a thorough watering, to brave the elements on their own. Seedlings are used to indoor conditions, so make sure to gradually transition them to outside. 10. Set Your Expectations Starting seeds is such an interesting and magical process, especially for children, so it’s the perfect activity to do as a family this coming spring. The months that you’ve spent germinating and raising seedlings will be a series of trial and error, so expect some loss. Not every seed will germinate, not every seedling will survive being transplanted, and not every kind of plant will do well in your garden. The gains will be clear when you have piles of leafy greens taking up every inch of your windowsills, bursting to get outside. Starting the plants off yourself ensures that you are in charge of the health of the plant and can control what goes into it. And the satisfaction you’ll feel from starting your own seeds is tremendous. My kiddo loves starting seeds with me and planting them in the garden. FAQ About Starting Seeds Should you cover seeds with plastic? Yes. This helps to keep the moisture in and increase temperatures. It essentially acts as a mini greenhouse.Cover your seeds with a clear plastic container (I like salad boxes) right after you’ve planted and watered your plants. Every day, vent the dome and clean it with food-grade hydrogen peroxide to prevent damping off. Leave the dome on until the seedlings reach it. Do seedlings need sunlight to survive? Yes. Seeds don’t need sunlight until they’ve germinated (sprouted above the soil). Prior to this, the seed carries all the energy the plant will need to sprout. But once it has germinated, the seedling will need lots of sunlight to grow well. Otherwise, they get leggy and weak trying to reach for more sun.Consider using a grow light if you can’t get enough sunlight in a windowsill for your seedlings. More Tips for How to Care for Seedlings Source link
#GARDEN_TOOLS#FREQUENTLY_ASKED_QUESTIONS#GARDENING_TIPS#GUIDE#MONTH_FEBRUARY_WEEK_1#SEED#SEED_STARTING#SEEDS#STARTING#STEPBYSTEP
0 notes
Photo

Organic gardens are as good for the earth as they are for its lucky inhabitants. The secret to growing a healthy, lush garden all begins with a single seed. This guide covers all the basics for starting seeds so that you can revel in your gardening wizardry this spring. Are you planning to start a garden this year? Congratulations! It’s a big deal! Whether you are a seasoned gardener or a beginner, growing a garden is good for everybody. It feeds the soul and the soil and can even feed your family. Starting a garden off right with healthy seeds sets the roots for how the garden will grow for the rest of the year. Sure, you can help manage sick plants and dried-out leaves, but starting seeds with good intentions and mad skills will make the rest of the year’s jobs a whole lot easier. Some of you may think I’m crazy, but I believe that how you care for seedlings will be reflected in the plant that grows and the fruit that ripens. The garden is resting now. Perhaps even covered by a blanket of snow. Now, there is ample time to slow down, plan, and nurture the very best plants to grace your garden beds. Let’s get this gardening season started with this guide on starting seeds. Experienced gardeners can save the seeds from their plants to use the next year. The 10 Steps for Starting Seeds “I made this!” I gloat while serving up a dish made entirely of food that I grew in my garden. Well, “gloat” is probably not the right word. I prance around like the fantastical wizard I am, cheering about my mad skills in making real food from tiny seeds. It took me months. I had some fatalities. But overall, it’s fairly simple to grow from seeds. And more importantly, it’s awesome. Here are some basics for how to start seeds at home. Make sure to label your seeds so you know exactly what they all are. Trust me, you will forget. 1. Choose Your Seeds Starting seeds in the spring (or even winter) is one of the best ways to save money. While you could buy a pack of snapdragons at the garden centre to fill your containers, why not start them from seed at a fraction of the price? You also get way more varieties when you go the seed route. This list covers my favourite annual flowers to grow from seed, while this list covers some of my go-to perennial flowers. Keep in mind that starting perennials from seed is often more difficult and time-consuming, so it is better suited for those with a few gardening seasons under their belt. Seed companies in your area should sell the right seeds for your climate but do make sure that you pick the right plants for your experience level. If you’re a seedling yourself when it comes to propagation, don’t bother starting watermelons in Northern Ontario. Many seed companies will also list a difficulty rating that will help to guide you. You might even be able to find some seeds in a seed library. 2. Read the Packet If you want the best possible start for your seeds, your best bet is to read the packet. Most seed packets will list everything you need to know to start the seeds and their special requirements, like how deep to plant the seed, how much light they need, how long they’ll take to germinate, soil temperatures required, etc. I cover all the basics of reading a seed packet in this post if you want to ensure you’re buying the right seeds and those that will actually thrive in your garden. 3. Choose a Container You can start seeds in just about anything you can find around the house that will create a mini-greenhouse, or you can buy all sorts of interesting setups to best suit your needs. Greenhouse Kits Many different greenhouse kits are available now. Most will have a plastic tray with a clear plastic greenhouse dome. Some come with a soilless mixture for starting seeds, like peat pellets that expand to a mini seed pot when soaked in water. Others may have coconut fibre pots that you can transplant right along with your seedling. Others may even have a heat mat that gently warms soil to improve germination. The beauty of these kits is that you can start a large number of seeds individually in one tray (up to 72) and many are made for small spaces like windowsills. The drawback is that the seedlings will need to be replanted, either in the garden or a larger pot, in a few weeks. Leaving seedlings in small pots with no nutrition will cause unwanted stress to the plants. Seed Starting Trays Garden retailers will sell many different types of professional-grade seed-starting trays, domes, and inserts with features like root training, moisture control, automatic watering, and grow lights. Certainly, many of these features have value in starting the year’s plants off on the right foot and can be used over and over. Household Items An inexpensive and creative way to start seeds is to use household items as seed containers. Lining a seed tray with pots made from toilet paper tubes, newspaper, or egg cartons will cost nothing At times, your family may think you’ve gone mad, given how excited you will become when you get to take home the plastic cake dome from the party. But come on, that’ll make a really great greenhouse dome, right? Search for biodegradable paper products you can plant right in the ground or food-safe plastic containers that you can use as mini-greenhouses for your containers if you are on a budget. Paper egg cartons are one of my favourite inexpensive household items to use as a seed starting container. 4. Growing Medium You can buy a pre-made seed starter soil, or you can make your own with a mix. I make my own mix using a peat-moss alternative, sterilized compost, perlite, and vermiculite. This mixture is light and holds moisture well, so it is wonderful for helping seeds germinate. All growing mediums will need some time to absorb water, so add moisture and let it soak in for an hour before planting. Be sure to use a sterile mix if you are starting seeds indoors. Soil or compost from the garden will bring in all sorts of critters, like soil gnats, which will drive you freakin’ crazy as you run around your propagation trays like a mad person swatting and squashing an endless supply of teeny tiny flies. Seed starting mix needs to be sterile. 5. Water Your Seeds Germination will be best in a moist environment for most seeds, so keeping the soil damp and a greenhouse dome on top will keep the right amount of humidity for optimal germination. Keep the soil from drying out by checking it daily. Water gently, from the bottom where possible, so as to not damage the seedlings about to emerge. When learning how to start seeds, having just the right amount of water is important. You never want the seeds to dry out, nor do you want the soil to be soggy. Make sure to vent your container regularly to prevent fungal growth. 6. Get the Right Lighting Seeds won’t need light until they emerge from the surface of the soil, but then they will need strong sunlight for most of the day to prevent them from becoming leggy (overly tall and spindly = weak). You can supplement a lack of sunlight with fluorescent lighting, either by buying a set of grow lights made for seed starting or by making your own with fluorescent shop lights. You don’t need fancy lights to help your plants grow. This was my DIY set-up! 7. Treat Damping Off “Damping off” is a term for a fungal growth that looks like fuzzy hairs on the seedling stem. This fungal growth will kill the seedling, so it’s bad, really bad. To prevent damping off, occasionally spray the greenhouse dome with a bottle of 3% food-grade hydrogen peroxide and vent it on a regular basis to regulate humidity. I also recommend watering with my chamomile fungicide spray. Chamomile naturally prevents diseases such as damping off. It’s almost impossible to get rid of damping off, so prevention is best. 8. Thin Your Seedlings Generally, the seed instructions will suggest that you plant 2-3 seeds per pot and thin out all but the strongest. This seems to be the thing that some gardeners have the hardest time with. If three strong tomato seedlings have popped up in one tiny peat pot, then the gardener rushes off to get tweezers to separate out the three wee plants and re-pots them all. More inexperienced gardeners will damage each plant, giving none a strong chance at survival, so it’s best that you grab a clean pair of scissors, snip all but the strongest seedling in each pot and be done with it. Choose the strongest seeding and snip any remaining seedlings in the same container. 9. Hardening Off As the seedlings grow into plants and the date to plant outside gets near, it’s time to start hardening them off or toughening them for their natural environment. I like to start by opening a window a few hours a day so they get a breeze. Then, start moving the trays outside, out of direct sunlight, for a few hours. Start at one hour and gradually increase to a full day outside. By the time your plant date has arrived, you can safely transfer your tough little soldiers directly into the ground, with some delicious compost and a thorough watering, to brave the elements on their own. Seedlings are used to indoor conditions, so make sure to gradually transition them to outside. 10. Set Your Expectations Starting seeds is such an interesting and magical process, especially for children, so it’s the perfect activity to do as a family this coming spring. The months that you’ve spent germinating and raising seedlings will be a series of trial and error, so expect some loss. Not every seed will germinate, not every seedling will survive being transplanted, and not every kind of plant will do well in your garden. The gains will be clear when you have piles of leafy greens taking up every inch of your windowsills, bursting to get outside. Starting the plants off yourself ensures that you are in charge of the health of the plant and can control what goes into it. And the satisfaction you’ll feel from starting your own seeds is tremendous. My kiddo loves starting seeds with me and planting them in the garden. FAQ About Starting Seeds Should you cover seeds with plastic? Yes. This helps to keep the moisture in and increase temperatures. It essentially acts as a mini greenhouse.Cover your seeds with a clear plastic container (I like salad boxes) right after you’ve planted and watered your plants. Every day, vent the dome and clean it with food-grade hydrogen peroxide to prevent damping off. Leave the dome on until the seedlings reach it. Do seedlings need sunlight to survive? Yes. Seeds don’t need sunlight until they’ve germinated (sprouted above the soil). Prior to this, the seed carries all the energy the plant will need to sprout. But once it has germinated, the seedling will need lots of sunlight to grow well. Otherwise, they get leggy and weak trying to reach for more sun.Consider using a grow light if you can’t get enough sunlight in a windowsill for your seedlings. More Tips for How to Care for Seedlings Source link
#GARDEN_TOOLS#FREQUENTLY_ASKED_QUESTIONS#GARDENING_TIPS#GUIDE#MONTH_FEBRUARY_WEEK_1#SEED#SEED_STARTING#SEEDS#STARTING#STEPBYSTEP
1 note
·
View note
Photo
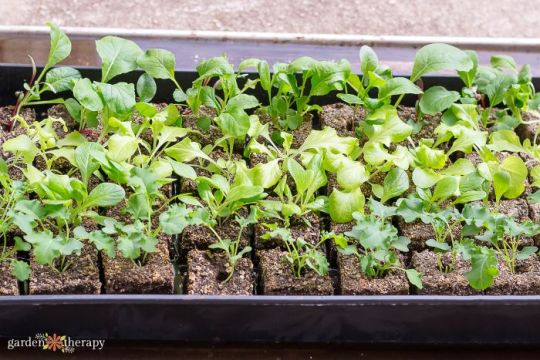
Organic gardens are as good for the earth as they are for its lucky inhabitants. The secret to growing a healthy, lush garden all begins with a single seed. This guide covers all the basics for starting seeds so that you can revel in your gardening wizardry this spring. Are you planning to start a garden this year? Congratulations! It’s a big deal! Whether you are a seasoned gardener or a beginner, growing a garden is good for everybody. It feeds the soul and the soil and can even feed your family. Starting a garden off right with healthy seeds sets the roots for how the garden will grow for the rest of the year. Sure, you can help manage sick plants and dried-out leaves, but starting seeds with good intentions and mad skills will make the rest of the year’s jobs a whole lot easier. Some of you may think I’m crazy, but I believe that how you care for seedlings will be reflected in the plant that grows and the fruit that ripens. The garden is resting now. Perhaps even covered by a blanket of snow. Now, there is ample time to slow down, plan, and nurture the very best plants to grace your garden beds. Let’s get this gardening season started with this guide on starting seeds. Experienced gardeners can save the seeds from their plants to use the next year. The 10 Steps for Starting Seeds “I made this!” I gloat while serving up a dish made entirely of food that I grew in my garden. Well, “gloat” is probably not the right word. I prance around like the fantastical wizard I am, cheering about my mad skills in making real food from tiny seeds. It took me months. I had some fatalities. But overall, it’s fairly simple to grow from seeds. And more importantly, it’s awesome. Here are some basics for how to start seeds at home. Make sure to label your seeds so you know exactly what they all are. Trust me, you will forget. 1. Choose Your Seeds Starting seeds in the spring (or even winter) is one of the best ways to save money. While you could buy a pack of snapdragons at the garden centre to fill your containers, why not start them from seed at a fraction of the price? You also get way more varieties when you go the seed route. This list covers my favourite annual flowers to grow from seed, while this list covers some of my go-to perennial flowers. Keep in mind that starting perennials from seed is often more difficult and time-consuming, so it is better suited for those with a few gardening seasons under their belt. Seed companies in your area should sell the right seeds for your climate but do make sure that you pick the right plants for your experience level. If you’re a seedling yourself when it comes to propagation, don’t bother starting watermelons in Northern Ontario. Many seed companies will also list a difficulty rating that will help to guide you. You might even be able to find some seeds in a seed library. 2. Read the Packet If you want the best possible start for your seeds, your best bet is to read the packet. Most seed packets will list everything you need to know to start the seeds and their special requirements, like how deep to plant the seed, how much light they need, how long they’ll take to germinate, soil temperatures required, etc. I cover all the basics of reading a seed packet in this post if you want to ensure you’re buying the right seeds and those that will actually thrive in your garden. 3. Choose a Container You can start seeds in just about anything you can find around the house that will create a mini-greenhouse, or you can buy all sorts of interesting setups to best suit your needs. Greenhouse Kits Many different greenhouse kits are available now. Most will have a plastic tray with a clear plastic greenhouse dome. Some come with a soilless mixture for starting seeds, like peat pellets that expand to a mini seed pot when soaked in water. Others may have coconut fibre pots that you can transplant right along with your seedling. Others may even have a heat mat that gently warms soil to improve germination. The beauty of these kits is that you can start a large number of seeds individually in one tray (up to 72) and many are made for small spaces like windowsills. The drawback is that the seedlings will need to be replanted, either in the garden or a larger pot, in a few weeks. Leaving seedlings in small pots with no nutrition will cause unwanted stress to the plants. Seed Starting Trays Garden retailers will sell many different types of professional-grade seed-starting trays, domes, and inserts with features like root training, moisture control, automatic watering, and grow lights. Certainly, many of these features have value in starting the year’s plants off on the right foot and can be used over and over. Household Items An inexpensive and creative way to start seeds is to use household items as seed containers. Lining a seed tray with pots made from toilet paper tubes, newspaper, or egg cartons will cost nothing At times, your family may think you’ve gone mad, given how excited you will become when you get to take home the plastic cake dome from the party. But come on, that’ll make a really great greenhouse dome, right? Search for biodegradable paper products you can plant right in the ground or food-safe plastic containers that you can use as mini-greenhouses for your containers if you are on a budget. Paper egg cartons are one of my favourite inexpensive household items to use as a seed starting container. 4. Growing Medium You can buy a pre-made seed starter soil, or you can make your own with a mix. I make my own mix using a peat-moss alternative, sterilized compost, perlite, and vermiculite. This mixture is light and holds moisture well, so it is wonderful for helping seeds germinate. All growing mediums will need some time to absorb water, so add moisture and let it soak in for an hour before planting. Be sure to use a sterile mix if you are starting seeds indoors. Soil or compost from the garden will bring in all sorts of critters, like soil gnats, which will drive you freakin’ crazy as you run around your propagation trays like a mad person swatting and squashing an endless supply of teeny tiny flies. Seed starting mix needs to be sterile. 5. Water Your Seeds Germination will be best in a moist environment for most seeds, so keeping the soil damp and a greenhouse dome on top will keep the right amount of humidity for optimal germination. Keep the soil from drying out by checking it daily. Water gently, from the bottom where possible, so as to not damage the seedlings about to emerge. When learning how to start seeds, having just the right amount of water is important. You never want the seeds to dry out, nor do you want the soil to be soggy. Make sure to vent your container regularly to prevent fungal growth. 6. Get the Right Lighting Seeds won’t need light until they emerge from the surface of the soil, but then they will need strong sunlight for most of the day to prevent them from becoming leggy (overly tall and spindly = weak). You can supplement a lack of sunlight with fluorescent lighting, either by buying a set of grow lights made for seed starting or by making your own with fluorescent shop lights. You don’t need fancy lights to help your plants grow. This was my DIY set-up! 7. Treat Damping Off “Damping off” is a term for a fungal growth that looks like fuzzy hairs on the seedling stem. This fungal growth will kill the seedling, so it’s bad, really bad. To prevent damping off, occasionally spray the greenhouse dome with a bottle of 3% food-grade hydrogen peroxide and vent it on a regular basis to regulate humidity. I also recommend watering with my chamomile fungicide spray. Chamomile naturally prevents diseases such as damping off. It’s almost impossible to get rid of damping off, so prevention is best. 8. Thin Your Seedlings Generally, the seed instructions will suggest that you plant 2-3 seeds per pot and thin out all but the strongest. This seems to be the thing that some gardeners have the hardest time with. If three strong tomato seedlings have popped up in one tiny peat pot, then the gardener rushes off to get tweezers to separate out the three wee plants and re-pots them all. More inexperienced gardeners will damage each plant, giving none a strong chance at survival, so it’s best that you grab a clean pair of scissors, snip all but the strongest seedling in each pot and be done with it. Choose the strongest seeding and snip any remaining seedlings in the same container. 9. Hardening Off As the seedlings grow into plants and the date to plant outside gets near, it’s time to start hardening them off or toughening them for their natural environment. I like to start by opening a window a few hours a day so they get a breeze. Then, start moving the trays outside, out of direct sunlight, for a few hours. Start at one hour and gradually increase to a full day outside. By the time your plant date has arrived, you can safely transfer your tough little soldiers directly into the ground, with some delicious compost and a thorough watering, to brave the elements on their own. Seedlings are used to indoor conditions, so make sure to gradually transition them to outside. 10. Set Your Expectations Starting seeds is such an interesting and magical process, especially for children, so it’s the perfect activity to do as a family this coming spring. The months that you’ve spent germinating and raising seedlings will be a series of trial and error, so expect some loss. Not every seed will germinate, not every seedling will survive being transplanted, and not every kind of plant will do well in your garden. The gains will be clear when you have piles of leafy greens taking up every inch of your windowsills, bursting to get outside. Starting the plants off yourself ensures that you are in charge of the health of the plant and can control what goes into it. And the satisfaction you’ll feel from starting your own seeds is tremendous. My kiddo loves starting seeds with me and planting them in the garden. FAQ About Starting Seeds Should you cover seeds with plastic? Yes. This helps to keep the moisture in and increase temperatures. It essentially acts as a mini greenhouse.Cover your seeds with a clear plastic container (I like salad boxes) right after you’ve planted and watered your plants. Every day, vent the dome and clean it with food-grade hydrogen peroxide to prevent damping off. Leave the dome on until the seedlings reach it. Do seedlings need sunlight to survive? Yes. Seeds don’t need sunlight until they’ve germinated (sprouted above the soil). Prior to this, the seed carries all the energy the plant will need to sprout. But once it has germinated, the seedling will need lots of sunlight to grow well. Otherwise, they get leggy and weak trying to reach for more sun.Consider using a grow light if you can’t get enough sunlight in a windowsill for your seedlings. More Tips for How to Care for Seedlings Source link
#GARDEN_TOOLS#FREQUENTLY_ASKED_QUESTIONS#GARDENING_TIPS#GUIDE#MONTH_FEBRUARY_WEEK_1#SEED#SEED_STARTING#SEEDS#STARTING#STEPBYSTEP
0 notes
Photo

Organic gardens are as good for the earth as they are for its lucky inhabitants. The secret to growing a healthy, lush garden all begins with a single seed. This guide covers all the basics for starting seeds so that you can revel in your gardening wizardry this spring. Are you planning to start a garden this year? Congratulations! It’s a big deal! Whether you are a seasoned gardener or a beginner, growing a garden is good for everybody. It feeds the soul and the soil and can even feed your family. Starting a garden off right with healthy seeds sets the roots for how the garden will grow for the rest of the year. Sure, you can help manage sick plants and dried-out leaves, but starting seeds with good intentions and mad skills will make the rest of the year’s jobs a whole lot easier. Some of you may think I’m crazy, but I believe that how you care for seedlings will be reflected in the plant that grows and the fruit that ripens. The garden is resting now. Perhaps even covered by a blanket of snow. Now, there is ample time to slow down, plan, and nurture the very best plants to grace your garden beds. Let’s get this gardening season started with this guide on starting seeds. Experienced gardeners can save the seeds from their plants to use the next year. The 10 Steps for Starting Seeds “I made this!” I gloat while serving up a dish made entirely of food that I grew in my garden. Well, “gloat” is probably not the right word. I prance around like the fantastical wizard I am, cheering about my mad skills in making real food from tiny seeds. It took me months. I had some fatalities. But overall, it’s fairly simple to grow from seeds. And more importantly, it’s awesome. Here are some basics for how to start seeds at home. Make sure to label your seeds so you know exactly what they all are. Trust me, you will forget. 1. Choose Your Seeds Starting seeds in the spring (or even winter) is one of the best ways to save money. While you could buy a pack of snapdragons at the garden centre to fill your containers, why not start them from seed at a fraction of the price? You also get way more varieties when you go the seed route. This list covers my favourite annual flowers to grow from seed, while this list covers some of my go-to perennial flowers. Keep in mind that starting perennials from seed is often more difficult and time-consuming, so it is better suited for those with a few gardening seasons under their belt. Seed companies in your area should sell the right seeds for your climate but do make sure that you pick the right plants for your experience level. If you’re a seedling yourself when it comes to propagation, don’t bother starting watermelons in Northern Ontario. Many seed companies will also list a difficulty rating that will help to guide you. You might even be able to find some seeds in a seed library. 2. Read the Packet If you want the best possible start for your seeds, your best bet is to read the packet. Most seed packets will list everything you need to know to start the seeds and their special requirements, like how deep to plant the seed, how much light they need, how long they’ll take to germinate, soil temperatures required, etc. I cover all the basics of reading a seed packet in this post if you want to ensure you’re buying the right seeds and those that will actually thrive in your garden. 3. Choose a Container You can start seeds in just about anything you can find around the house that will create a mini-greenhouse, or you can buy all sorts of interesting setups to best suit your needs. Greenhouse Kits Many different greenhouse kits are available now. Most will have a plastic tray with a clear plastic greenhouse dome. Some come with a soilless mixture for starting seeds, like peat pellets that expand to a mini seed pot when soaked in water. Others may have coconut fibre pots that you can transplant right along with your seedling. Others may even have a heat mat that gently warms soil to improve germination. The beauty of these kits is that you can start a large number of seeds individually in one tray (up to 72) and many are made for small spaces like windowsills. The drawback is that the seedlings will need to be replanted, either in the garden or a larger pot, in a few weeks. Leaving seedlings in small pots with no nutrition will cause unwanted stress to the plants. Seed Starting Trays Garden retailers will sell many different types of professional-grade seed-starting trays, domes, and inserts with features like root training, moisture control, automatic watering, and grow lights. Certainly, many of these features have value in starting the year’s plants off on the right foot and can be used over and over. Household Items An inexpensive and creative way to start seeds is to use household items as seed containers. Lining a seed tray with pots made from toilet paper tubes, newspaper, or egg cartons will cost nothing At times, your family may think you’ve gone mad, given how excited you will become when you get to take home the plastic cake dome from the party. But come on, that’ll make a really great greenhouse dome, right? Search for biodegradable paper products you can plant right in the ground or food-safe plastic containers that you can use as mini-greenhouses for your containers if you are on a budget. Paper egg cartons are one of my favourite inexpensive household items to use as a seed starting container. 4. Growing Medium You can buy a pre-made seed starter soil, or you can make your own with a mix. I make my own mix using a peat-moss alternative, sterilized compost, perlite, and vermiculite. This mixture is light and holds moisture well, so it is wonderful for helping seeds germinate. All growing mediums will need some time to absorb water, so add moisture and let it soak in for an hour before planting. Be sure to use a sterile mix if you are starting seeds indoors. Soil or compost from the garden will bring in all sorts of critters, like soil gnats, which will drive you freakin’ crazy as you run around your propagation trays like a mad person swatting and squashing an endless supply of teeny tiny flies. Seed starting mix needs to be sterile. 5. Water Your Seeds Germination will be best in a moist environment for most seeds, so keeping the soil damp and a greenhouse dome on top will keep the right amount of humidity for optimal germination. Keep the soil from drying out by checking it daily. Water gently, from the bottom where possible, so as to not damage the seedlings about to emerge. When learning how to start seeds, having just the right amount of water is important. You never want the seeds to dry out, nor do you want the soil to be soggy. Make sure to vent your container regularly to prevent fungal growth. 6. Get the Right Lighting Seeds won’t need light until they emerge from the surface of the soil, but then they will need strong sunlight for most of the day to prevent them from becoming leggy (overly tall and spindly = weak). You can supplement a lack of sunlight with fluorescent lighting, either by buying a set of grow lights made for seed starting or by making your own with fluorescent shop lights. You don’t need fancy lights to help your plants grow. This was my DIY set-up! 7. Treat Damping Off “Damping off” is a term for a fungal growth that looks like fuzzy hairs on the seedling stem. This fungal growth will kill the seedling, so it’s bad, really bad. To prevent damping off, occasionally spray the greenhouse dome with a bottle of 3% food-grade hydrogen peroxide and vent it on a regular basis to regulate humidity. I also recommend watering with my chamomile fungicide spray. Chamomile naturally prevents diseases such as damping off. It’s almost impossible to get rid of damping off, so prevention is best. 8. Thin Your Seedlings Generally, the seed instructions will suggest that you plant 2-3 seeds per pot and thin out all but the strongest. This seems to be the thing that some gardeners have the hardest time with. If three strong tomato seedlings have popped up in one tiny peat pot, then the gardener rushes off to get tweezers to separate out the three wee plants and re-pots them all. More inexperienced gardeners will damage each plant, giving none a strong chance at survival, so it’s best that you grab a clean pair of scissors, snip all but the strongest seedling in each pot and be done with it. Choose the strongest seeding and snip any remaining seedlings in the same container. 9. Hardening Off As the seedlings grow into plants and the date to plant outside gets near, it’s time to start hardening them off or toughening them for their natural environment. I like to start by opening a window a few hours a day so they get a breeze. Then, start moving the trays outside, out of direct sunlight, for a few hours. Start at one hour and gradually increase to a full day outside. By the time your plant date has arrived, you can safely transfer your tough little soldiers directly into the ground, with some delicious compost and a thorough watering, to brave the elements on their own. Seedlings are used to indoor conditions, so make sure to gradually transition them to outside. 10. Set Your Expectations Starting seeds is such an interesting and magical process, especially for children, so it’s the perfect activity to do as a family this coming spring. The months that you’ve spent germinating and raising seedlings will be a series of trial and error, so expect some loss. Not every seed will germinate, not every seedling will survive being transplanted, and not every kind of plant will do well in your garden. The gains will be clear when you have piles of leafy greens taking up every inch of your windowsills, bursting to get outside. Starting the plants off yourself ensures that you are in charge of the health of the plant and can control what goes into it. And the satisfaction you’ll feel from starting your own seeds is tremendous. My kiddo loves starting seeds with me and planting them in the garden. FAQ About Starting Seeds Should you cover seeds with plastic? Yes. This helps to keep the moisture in and increase temperatures. It essentially acts as a mini greenhouse.Cover your seeds with a clear plastic container (I like salad boxes) right after you’ve planted and watered your plants. Every day, vent the dome and clean it with food-grade hydrogen peroxide to prevent damping off. Leave the dome on until the seedlings reach it. Do seedlings need sunlight to survive? Yes. Seeds don’t need sunlight until they’ve germinated (sprouted above the soil). Prior to this, the seed carries all the energy the plant will need to sprout. But once it has germinated, the seedling will need lots of sunlight to grow well. Otherwise, they get leggy and weak trying to reach for more sun.Consider using a grow light if you can’t get enough sunlight in a windowsill for your seedlings. More Tips for How to Care for Seedlings Source link
#GARDEN_TOOLS#FREQUENTLY_ASKED_QUESTIONS#GARDENING_TIPS#GUIDE#MONTH_FEBRUARY_WEEK_1#SEED#SEED_STARTING#SEEDS#STARTING#STEPBYSTEP
0 notes
Text


'if i wasn't wise after everything i've experienced, i'd be a bit concerned, to be honest,' everyone had their share of ups and downs, and garthy couldn't say they were any different. they were lucky enough not to have hit rock bottom in their life, so far, and they'd managed to learn from their mistakes instead of allowing them to define who garthy was. that was an achievement in and of itself. but not everyone could be so forgiving of themselves, and garthy wouldn't deny how hard it was to do so, sometimes. the aasimar readied their drinks, something that would give sandra lynn some energy back, some health and, hopefully, some courage, too. garthy passed a golden chalice toward her, holding their own up in a cheers before they took a drink, licking the access from their lips as they sat back down.
thinking back through their history, garthy understood why someone might be curious about how they had arrived on a literal floating pirate city, breaking curses and dealing in luxury goods and magical items. they allowed themself to think over their answer, for a moment, giving sandra lynn a knowing look before they placed their cup down. 'leviathan has always been my home. however, i started out as an urchin on the streets - just a child trying to survive by stealing watches and pick pocketing any coins i could find. not exactly the high life, lovey, as i'm sure you can imagine,'
garthy gave a thoughtful smile as they leaned their chin on their knuckles. 'a very stern and straightforward woman found me and took me in. molded me into the pirate i am today. and i couldn't be more grateful to her for that,' garthy thought about ayda, how she had raised them before dying, and how garthy had to taken care of the reincarnated teenager, now living in the library here on leviathan. eyes met sandra lynn's after a moment. 'i ended up in the golden gardens when travelers realized how useful i was. the position of power came much later, but i have to admit - i do adore it,' grin flashed her way, garthy taking another drink from their chalice. 'and how might you have come in possession of so many children, darling? i can't imagine it's easy, taking care of all of them. i could barely handle one,'


somehow, it sounds even more absurd coming from garthy's mouth and before she knows it, sandra lynn is letting out a decidedly indelicate snort. 'yeah,' comes the admission, followed by a peal of laughter. the wood elf pinches the bridge of her nose, a little ashamed for letting herself laugh, but unable to help it. 'no, no, don't apologize, it's... it's pretty funny.' she sighs. 'i think it's good for fig, though, believe it or not. to have us both here. it got kind of rocky between her and gilear, and then it got rocky with her and me, and... it's nice for her to have both her parents again, even if we're not...' sandra lynn shakes herself out of it. but this is maybe a little much to be putting on garthy. '...anyway.'
'you're very wise, you know that?' genuine admiration leaves the tiniest gleam in her eye. in the back of her mind, though, she wonders if she'll ever be able to say the same for herself. maybe that time won't ever come–– and maybe there's a way to be okay with that. she smiles when they duck into her line of sight, albeit a little sheepishly. 'well, a girl certainly can't say no to that. dealer's choice.' as garthy goes about preparing, sandra lynn decides she's had about enough of talking about herself. there's no promising garthy will let that stand, but a little variety in the conversation seems in order. 'so how'd you wind up with this place, anyway?'
6 notes
·
View notes