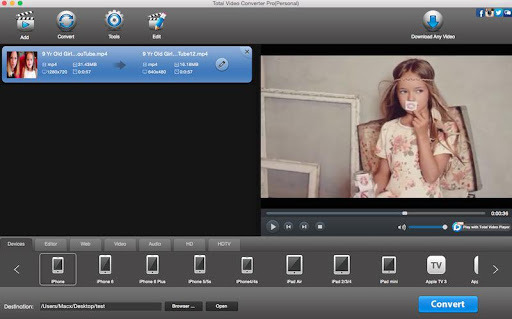
#how do i edit a video in photos mac?
Explore tagged Tumblr posts
Visit Tumblr Blog
Explore Tumblr blogs with no restrictions, modern design and the best experience.
Last Seen Tumblr Blogs


Fun Fact
Tumblr has 16.74 million mobile monthly users in the US.
Text
Weekly Workout
A good jock workouts hard.
A good jock eats right.
A good jock obeys coach.
I want to continue talking about communication. I wanted to add something I hadn't really through about. Last week I mostly talked about how often, needing to be on the same page but this week I was talking with my Jockslave and we ended up talking about text vs calls.
He prefers texts, which seems to fit his limited schedule better and he asked why I favor calls (video or voice).
We hadn't talked about it before, but it did help make sure we understood each other better and that's really the point. We both still have our preferences, and they aren't the same but we know so we can set expectations and take steps to plan.
I will slowly training him to enjoy video calls, but it will take time, training, and positive reinforcement, which should be fun for us both.
A good goal once might say.
Goals
We’ve seen more than a few jocks stop checking in but hopefully they're still following their goals. But with over a month in it means it's also time to think and reflect if you want to change or adjust your goal. I am thinking about tweaking my writing goal, but we'll see.
Both @caged-macs, @Costasso, and my soldier and marines are being good boys and giving their best.
*For me, I made my stretches this week. For my writing I was bouncing between a few things and ended up writing prompts for 25+ photos this week, better than last week. my 100cals was done (I did it a in moment the weather got a little better, and did it in 7:27 this week.
sirjocktrainer-100cal in 5 min, 5 days of stretches 2000 words write/edit
caged-macs-workouts 4 times a week
boy-s37- 85% meal diet compliance Perform 100 pushups per day Achieve chest growth 40 inches
orcaazure- Total of 5 workouts a week Stick to my meal plan 5 out of 7 days a week bicep measures goal 42 shoulders measure goal 25
donsleep-compliance with my meal plan Doing strength training 5 days a week
Costas-Drop 50 pounds 100 pushups in 2 minutes Free of sugar for 6 months
14 notes
·
View notes
Text

A quick method to deal with blurry action shots that have Hannibal's quintessential dim lighting + green color grading combo.
Here's the example I'll be using:

Don't get me wrong, I love the look of Hannibal, but the average person doesn't scroll tumblr with their screen brightness on max. Plus, night light filters and blue light glasses add even more yellow to an already heavily filtered show. If you want people to see your gif clearly, you have to edit it at least a little. Especially for extreme shots like this lol.
What I use: macOS 15.1.1 Elmedia Player 8.18 dupeGuru 4.3.1 Topaz Photo AI 3.2.0 Photoshop 25.11.0 LuLu 2.6.3 (optional, but it's nice to block outgoing connections from pirated programs)
Step One: Take Screenshots
Open your video file (1080p preferred) in Elmedia Player and navigate to the first frame of your gif. Hit "Playback > Record a Series of Screenshots" and let it run until you have all the frames you want. Unfortunately for mac users, we have a problem where a lot of duplicate screenshots are taken (like every third screenshot is a duplicate... it's so annoying). To save time later, I use dupeGuru to clean out as many duplicates as I can.
Open dupeGuru and add whatever folder you saved your screenshots to.

Scan the folder, then hit "Mark > Mark All" (you can see here that the program only caught one duplicate, which means more work later. it's not a perfect program -_-)

Hit "Actions > Send Marked to Recycle Bin..." to remove the duplicates from the folder

Step Two: Denoise
At this stage the screenshots are so dark that the noise isn't obvious, but it'll be more noticeable after brightening and sharpening. Here's the difference this step makes later:

Upload all your screenshots to Topaz Photo AI and add a Denoise layer. I normally go with the automatic settings.

Hit "Select All," "Apply > Current Settings," then export all your images. This can take a while depending on how many images you have.

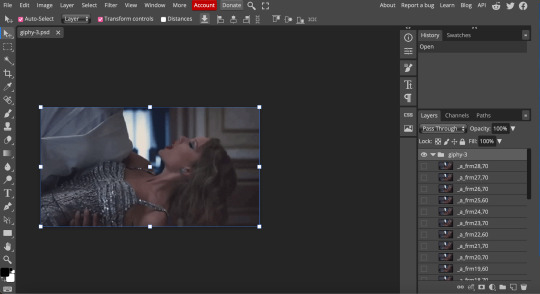
Step Three: Create Frame Animation in Photoshop
If you've read any other gif-making tutorials this part should be familiar, so I'm gonna skim over it.
"File > Scripts > Load Files into Stack"
"Browse..." and select your Topaz output files
"Sort by Name" so they load in the correct order
"Ok"
Once all the layers have loaded, hit "Create Frame Animation" in the Timeline window
Under the Timeline window options menu, hit "Make Frames from Layers," then "Reverse Frames"
This is probably when you want to go through frame-by-frame and delete any remaining duplicates. It's very annoying to have to redo this step if you want to go back and edit your crop size later. (Not that I would know... 🤡)
Step Four: Crop + Resize
Crop, then "Image > Image Size" to adjust the width of your gif. You'll most likely want to use one of the common tumblr image dimensions:
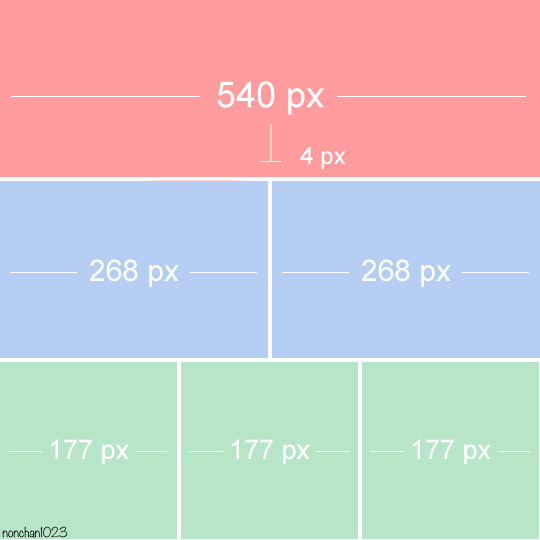
Keep in mind that tumblr's gif size limit is 10 MB. But it's honestly best to keep it under 9.5 MB if you want the gif to load smoothly. A 540x540 px gif can have 40-60 frames while a smaller gif can be longer.
Make sure to add +2 px to whichever width you choose (so 542 px, 270 px, etc), since we'll be adjusting the canvas size later to get rid of transparent border anomalies.
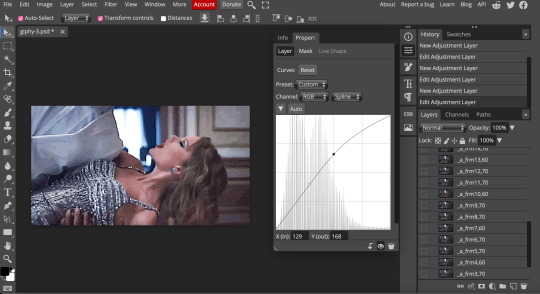
Step Five: Color
The more common order of operations is to sharpen before coloring, but for dark scenes like this, it's kinda silly to sharpen when you can barely see what you're doing, so I like to color first.
Select all your frame layers and make a new group, just to keep them separate from your adjustment layers.
I always start by testing out the Auto Color Correction Options in a Curves adjustment layer. To access them, opt + click on the Auto button. This opens a window with four options.
I like to use a combination of "Enhance Per Channel Contrast" and "Find Dark & Light Colors," though either option can be used to adjust color balance. The important part is selecting "Snap Neutral Midtones" and picking a midtone that brings your gif as close as possible to the desired color balance.

If changing the midtone doesn't affect the color balance, brighten the gif first and try again.
For this gif, "Enhance Per Channel Contrast" removed the bulk of the green filter:

It's still pretty dark, so I brightened up the gif with some more Curves layers:

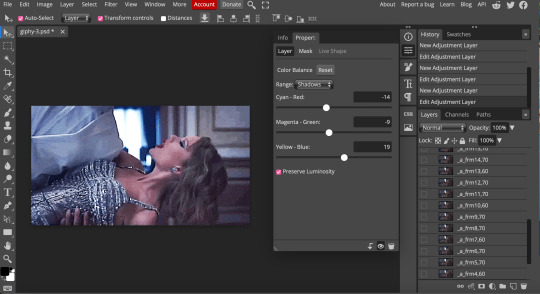
There's still a lot of purple/blue in Dolarhyde's black leather jacket, so I added another Curves layer and used "Find Dark & Light Colors" to improve the blackpoint:

Now we can up the contrast a little:

Nice! Good enough to move onto sharpening!
SIDE NOTE: The reason I use these Color Correction Options is because simply brightening leaves you with purple/blue shadows and sickly green over-exposed highlights that take ages to color correct. You can see the difference here:

(If you've ever wondered why so many Hannibal gifs have blue shadows, this is why.)
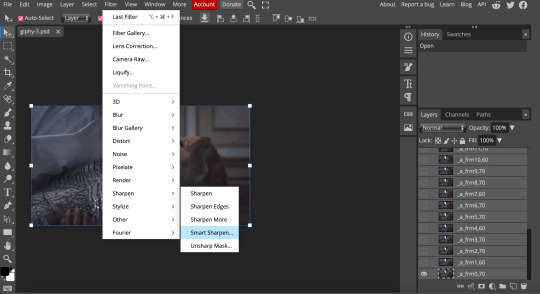
Step Six: Sharpen
This is where you'll want to start implementing actions, which are pre-recorded series of adjustments that you can perform with the click of a button. I mainly use three actions (download here, open the Actions window in PS, open the Action options menu, and click "Load Actions...").
The "frame animation to smart object" action converts the gif to a video timeline so we can apply smart filters.
The "legacy sharpening + high pass" action applies my standard sharpening filters. Not every gif will need the high pass filter, so feel free to change its opacity or delete it altogether. You can also tweak the smart sharpen filters by right clicking them and selecting "Edit Smart Filter..."

3. Once you're happy with the sharpness, the "convert to frame timeline" action turns the gif back into a frame animation. I use a 0.05 s frame delay for most gifs (equivalent to 20 fps; 24 fps is standard for tv/movies). I normally use 0.07-0.08 seconds for action shots, so the gif doesn't whip around so fast. Over 0.1 seconds, it starts to look like stop motion, so I try to avoid that.
Step Seven: Final Adjustments
This is where I fine-tune the colors, mostly using Hue/Saturation layers.
If I use a Color Balance layer, I only make very small adjustments and try to counterbalance them in the other tonal ranges (e.i. adjustments to the Highlights spill over to the Midtones, so I make the opposite adjustments to the Midtones to fix it). But most of the time, I'd rather play around with Curves or Hue/Saturation to fix stuff like that.
Hue/Saturation gives you more control by allowing you to select the exact color range you want to affect. For this gif, I used Hue/Saturation to get rid of the purple introduced around the highlights in Will's hair by the high pass filter.
The eyedropper tool allows you to select the exact color you want to include in the range. Then you can move the bars around until all the colors you don't want to affect are excluded.

Once you have your range selected, you can bring the saturation all the way down and set it to whatever lightness you prefer:

I also reduced cyan's saturation so that Will's shirt wouldn't look quite so blue.

[You could do a lot more to make the colors prettier... but there are other tutorials online for that. 😅]
Step Eight: Export
Once you're happy with your final product, go to "File > Export > Save for Web (Legacy)..."
These are my settings:

You can use Diffusion instead of Pattern if you want. Diffusion is probably better for mobile gif compression, but I like the way Pattern looks on desktop, especially for gifs with smooth gradients. It's a personal preference thing.
Hit "Save..." and you're all done!

This isn't gonna win any gif-making awards, but at least you can see what's happening and the colors don't look wonky. And for Hannibal, I call that a win! 🥲👍
22 notes
·
View notes
Text

lovely anons have been requesting a gif tutorial, and while there's plenty photoshop ones out there I think there's only a couple photopea ones (if you dont know photo pea is like an internet photoshop basically) so I thought I'd make a little tutorial on how I do my gifs!
first you're gonna want to use any gif making platform to actually turn your video clip into a gif. I personally use giphy but I know there's a bunch of other platforms for this. then you're just going to open the gif in photo pea either by clicking "open from computer" on the home page or dragging it in from finder (Mac) or files.
IF YOU'RE MAKING A GIFSET: the first thing I do is make sure all of my gifs are the same number of frames. its important to do this if you want all of your gifs to restart at the same time! to do this I just go to the side where all the frames are listed - this one has 29 frames (note: it says 28 on the top frame, but the very first frame is listed as 0, so always add 1 to the top number to know now many frames there are). what I do is find the gif with the least amount of frames and then make all the gifs the same number - depending on what part of the gif I want to keep/delete I'll delete frames from the beginning, end, or both which usually requires some basic math
next, I click on the top frame, press shift, and then press on the bottom frame to select all (unfortunately there's no keyboard shortcut for this I don't think). then I'll click filter -> sharpen -> smart sharpen that way I can freely customize the sharpness of each gif depending on it's original quality. usually I do 200% at 0.5 pixels but I'll adjust if necessary.
now comes the actual coloring of the gif! all of these will be adjustment layers (layer -> new adjustment layer).
first I'll select the brightness/contrast layer and play around with those settings until it looks good to me.
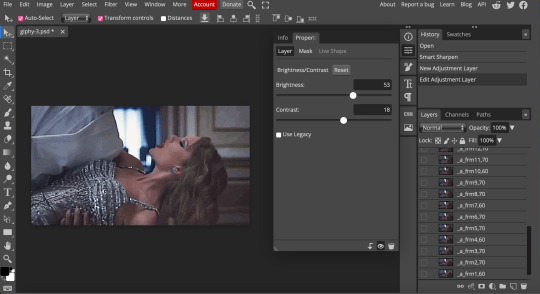
next, I'll play around with the levels and curves layers until it looks how I want it.

sometimes I'll stop here if it looks good, sometimes I'll play around with the saturation adjustment layer, or in this case I'll edit the color balance to deepen some of the shades that aren't popping out how I want.
IF YOU'RE MAKING A GIFSET: the easiest thing I've figured out for coloring multiple gifs to save time is duplicating these adjustment layers to each gif in the set (layer -> duplicate layer into; it'll prompt you to select the psd you want to add the layers to). when I do this I turn off the visibility for each one and one by one turn them back on (starting with brightness/contrast) and adjust them if necessary.
if I'm not adding text this is where I'll end, but sometimes I like to add texts to more of my creative gifts. usually I'll follow a tutorial (@usergif resource directory has a bunch of good tutorials that can be adapted to photo pea, or I'll just look them up on Tumblr itself). sometimes I like to do things a little simpler, which is what I'll show here.
you're going to click on the T towards the bottom on the left sidebar, type put your text, change your font (photopea has a ton and I'm not too picky but you can download fonts from the internet and upload them), as well as color and size (don't forget to select all of the text when you do this!!) then click on the cursor icon to move the text to your desired placement.
then click on the layer in the right sidebar and select blending options.
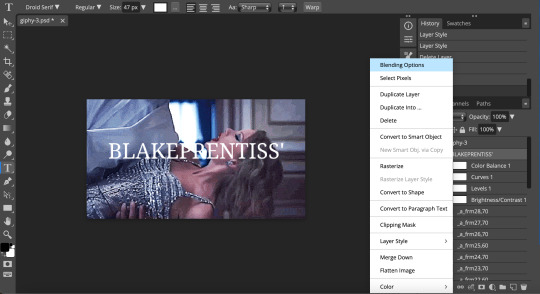
I'm going to add a stroke of 1px in black to my text and position it to the center. I do this on every text I add to gifs (even if the text is black, which I ended up changing this one to) to add some extra size/detail.
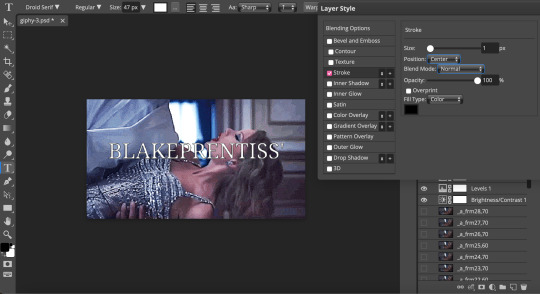
you're more than happy to stop here, but I like to play around with some of the other blending options until I'm satisfied. sometimes I'll lower the fill to 0-30%, or in this case, I changed the blending option to overlay to get the desired effect. (both under blending options)
I followed the same steps with my second row of text, except I changed the font and then warped the text a bit after placing it where I wanted by T -> warp -> arch and changing the settings.

and you're done! file -> export as -> gif to save it! I also like to do this periodically throughout the process to make sure the gif is giffing if you know what I mean

#gif tutorial#photopeablr#photopea#photopea gif tutorial#mine*#tutorial*#tutorial#gif making tutorial#gif making
34 notes
·
View notes
Note
Hey, can I ask you how do you make your gifs?
It took a lot of trial and error, but here is what I have learned(so far cause I'm very much still going through it):
1. Photoshop vs Photopea
To make your gifs you can either use Photoshop or Photopea. I started off with Photpea because it’s cloud-based and doesn’t take up any space on your computer, but I've since moved onto Photoshop. Most of the tutorials you’ll find will use photoshop. So if you need help or want to learn a new skill it will be much easier to find that help if you are using Photoshop.
Photoshop
👆🏽They have ones out there for mac if you search for them on here, but I happen to have a Windows PC so this is the one I use🤷🏽♀️
Photopea
2. Downloading videos
I get most of my videos from either YouTube or torrent sites which have a wide selection of shows and movies for you to download.
Watch So Much
👆🏽Is my favorite torrent site. You can also stream shows and movies on their site well.
YTS
👆🏽Is another torrent site I use, but they only have movies on there.
Qbittorrent
👆🏽Lets you download torrents. I should note that If you torrent you'll need a VPN. Literally do not try and download any content from HBO or Disney without a VPN, because at least here in America, they will email you threatening to disconnect your internet😅
For VPN’s do not use the free ones. They don’t work. I’ve personally used NordVPN, but there are other ones out there like Surfshark, or ProtonVPN.
4k downloader
👆🏽Lets you download most things off of YouTube(as well as a couple other sites like TikTok). I say most things because they will not let you download those free movies(ex. Twilight) YouTube itself uploads onto its platform.
Occasionally someone will upload an old movie onto a private channel which you can download with no problems, but anything new or recent you won’t find on there.
You do not have to use a VPN to download videos from YouTube.
3. Resources:
Whatever you're trying to gif will probably be on the long side. So you're either going to need to trim it down to make a 2-3 second clip that you can then use to make your gif, or you can screencap your video.
Screencaping allows you to take a shot of each individual frame* which you can then use to make your gifs out of.
*I like to use anywhere between 40-90 frames per gif.
VLC
👆🏽This is a video player that lets you play your videos and create screencaps from them.
👆🏽This is a great post on how to screencap using VLC.
KMPlayer
👆🏽Is another video player/screencapping software, but I found their interface to be overly complicated
Clipchamp
👆🏽This lets you trim down your videos to create those 2-3-second clips. There are better video editing tools out there(like DaVinci Resolve), but if you have Windows for what it's worth, it’s simple and gets the job done 🤷🏽♀️
rPiracy
👆🏽Has links for torrents and things of that nature.
👆🏽This is a great post on how to make a basic gif using Photoshop.
👆🏽This is a great post on how to make a basic gif using Photopea.
👆🏽This user has a lot of tutorials so when you're ready to move onto more complicated gif making, use them as a resource.
4. Lastly, have patience with yourself.
GIF making is time-consuming and as I stated it takes practice. So don't sweat it too much and have fun🎉

6 notes
·
View notes
Text
SRWE TUTORIAL
I was going to create a video but realized I don't have the time to sit down and edit an entire video, so I will post it on here.
Before we get started, I highly recommend you read this from picture amoebae before doing anything because how your photos turn out depends on your level of graphics card, and it will also lead you to a download page of SRWE or you could click here.
SIDENOTE: This only works on a windows computer. Not Mac.
STEP 1: Click on the first file that you see. Once you download that file, make sure to unzip it and slap it anywhere that you want. I highly recommend on your desktop.

STEP 2: Once you unzip your folder. Click on the program.

It should look like this when you first open it.

STEP 4: Minimize the program than open up your game like you normally would. I am going to use Mae as my Guinea pig. Pose your sim how you normally would, make sure that you have the camera on them or wherever you want it. Than bring back up the program that you minimized.

Step 5: Click on select run program, a menu should pop up. Click on TS4_x64.exe - it should be the first thing that you see. Than click open.

Step 6: Once you have clicked open. Than you are going to want to check all three boxes on the left side.

Step 7: In the first box that you seen in the middle, you are going to want to change the width and height to 5000 or whatever your comfortable with, and depending on what your desktop or laptop could handle. I personally size my photos to 5000. Once you have set the width and height, click on set. don't freak out when your screen gets out of control. It should look like that.

Step 8: Where it says align window, click on H.Center. This should center towards your sim. Once you have done that, minimize the SRWE and take your photo how you normally would in-game. Which is by clicking the C button, and you should find the photo in your screenshot folder. I should also mention to release your mouse from the screen, so it doesn't move around and put your photo out of shot.
It should look like this.

Now when you want escape the after math, double click on the top of your game. I highly recommend you to be in window mode when using SRWE.

And your game should look like this again.

If you want to put your sim in a different pose, just repeat the process all over again by resizing than clicking C. Some people use prnt-screen but I much prefer the old fashion way.
#srwe tutorial#the sims 4#sims 4#sims#ts4#simblr#ts4 tutorial#for those who have been wanting to take better quality photos in-game
18 notes
·
View notes
Text
WIP GAME !!!!
Rules: In a new post, post the names of all the files in your WIP folder, regardless of how non-descriptive or ridiculous. Let people send you an ask with the title that most intrigues them, and then post a little snippet of it or tell them something about it! And then tag as many people as you have WIPs.
(i was tagged by beloved mutual @pimpedoutgreenears )
i have 250+ wips so i’m going to break this down a LOT and not including many 💀
i’ll be tagging anyone who wants to join in, as well as: @cowardlybean , @scrunkle , @ctpalt, @cupofd1rt , @choofs (no pressure to anyone to do it lol)
this will be Long so it’s under the cut
MP100
-teruki moving
-fox curse serirei
-ritsu and that maid dress (calfhooves inspired me to finally start writing that one forever ago)
-shou and his family
-shou being invisible
-college ritshou
-fem ritshou
-shou unintentionally joining the kageyamas vacation
-i beat the shit out of reigen
-ritshou fake dating
-runaway
-multi-dimensional/universe shit
-hockey
-‘stray cat’ shou ; ‘house cat’ ritsu
-yuritshou again
-ritshou live together
-terumob transgender agenda (all girls school)
-fist fighting and kissing
-terumob furries
-unconventional love
-graffiti taggers ritshou
-sick fic pt2
-terumob and psychic powers
-lab baby shou PTSD
-shou star and tree metaphors
-ritsu melts
-shou like. dying
-reigen and shou funny familial relationship
-shou is bad at emotions and feelings
Bungo Stray Dogs
-lab baby escapee skk fic
-ranpoe angst
-ranpoe and eyelashes
-skk runaway
-skk and sea monsters
-summer camp
-highschool au
-skk highschool au version 2
-skk highschool au version 3
-chuuya and carnage
-mamas boy (chuuya and verlaine au)
-truth or dare (girl skk)
-ooc double black and humanity
-skk highschool au version 4
-dazai and The Horrors
-cryptids au
-halloween through the years
-summer camp au (again lol)
-ranpo and dazai pm au
-dazai gets braces
-ghostbuster au
-chuuya getting an education in the pm
-skk graffiti taggers au (again)
-girl scouts au
-kyousano and skk older sister + their younger brother
-wierd twist on a spider-man au
-teen skk + jealous dazai
-lonely summers
-chuuya “i’m back in the fucking building again” nakahara
-skk taking care of eachother
-skk yuri
-skk yuri and anatomy
-
MCYT/DSMP
-necromancer crimeboys version 1
- version 2
-crow crimeboys
-c!tommy 🤝 a pearl (mitski)
-lab baby c!tommy
-lab baby brothers c!crimeboys
-horror summer camp au
-accidently adopting a raccoon shapeshifter
-vigilante fic
-the forest is breathing
-unreliable narrator depressed wilbur
-pirate crimeboys
-the undead’s guide to feeling alive
-c!beeduo traditional enderian wedding
-night in the woods au (wilbur is mae)
-subway masks
-wilbur and tommy sons of the sun and moon respectively
-nasicaä crimeboys au
-crimeboys over the garden wall au
-cryptids au
-crimeboys binary stars
-chainsaw man au
-wilbur buries himself
-skater and rollerblader rivalry lmao
-los compensinos inspired 2
- horror fic 2
-cranboo time traveler au
-crimeboys cryptids au version 2?
-ode to a moon
IT
-losers club friends giving
-richie and bev dye hair
-losers college au (winter edition)
- summer camp au (it haunts me)
-loser adults are losers and have video calls
-reddie in eddie’s attic
-losers go trick or treating
-eddie takes care of richie
-richie and Big Dog
-bev accidental wingman of the century
-reddie romcon irony angst
-camcorder findings
-whale city 👍
-youtube video transcript
-pharmacy photo developing
-mama tozier being the best
-richie and stan’s kids
-mac n cheese
-mama tozier being the best again
-werewolf x witch
-loser kids
-violence
Persona 5
-hockey kid akechi
-magical girl au
-foster care
MISC
-life happenings (Night In The Woods)
-sunnflower runaway (Omori)
-bad ending 2.0 (Omori)
-sickfic (hirano to kagiura)
-langa being left handed (SK8)
-renga being dumbly in love (SK8)
-pearlina (splatoon)
6 notes
·
View notes
Text
How to burn MP4 to DVD to play on TV on Mac/Windows?
In this article, you will learn about all MP4 tips and how to convert and burn MP4 onto DVD disc for play on TV.
Part 1. What is MP4 and how to play MP4 on computer?
MP4 refers to a movie or video clip that uses MPEG-4 compression, a standard developed by the Moving Picture Experts Group (MPEG). It’s commonly used for sharing video files on the Internet. MP4 files are supported by many video programs and various hardware devices, including the Apple iPhone/iPad/iPod and Microsoft Zune portable media player. To watch MP4 videos on computer, QuickTime Media Player and Windows Media Player works perfectly on Mac and Windows.
Part 2. Will my DVD player play MP4 videos?
It all depends. If it’s an average DVD player then it won’t do – DVD operates from the MPEG-2 files, you would have to get DVD authoring software to burn MP4 to DVD and then you can watch MP4 files on home DVD player. If you are not sure, check your DVD specs to see if your DVD player supports reading MP4 files or not.
Part 3. How to burn MP4 to DVD that can be played on TV?
Could someone just give me a step by step guide as to how to burn MP4 movie file to DVD to play on DVD player? I’ve tried Nero and DVD Santa but for some reason they won’t recognize the movie file. I want these MP4 videos viewable on a TV, not just only computers.
If you’ve done some investigation into this and reading solutions, you will find that many DVD burning software like Nero actually doesn’t support burning MP4 files. And I assure you that this doesn’t require any new hardware or something. To play MP4 files on normal DVD player, the simplest solution is to just launch a MP4 friendly program that convert and burn MP4 to DVD and live with that. One program that does this speedily, and with minimal fuss, is DVD Creator, and that worked out great.
Tips:
Below is the step-by-step guide on how to burn MP4 files to DVD using DVD Creator. Don’t worry, just follow on-screen instructions you will find it’s pretty simple. Always remember the rules and simple steps: Import, Edit and Burn.
Step 1 Add MP4 Files to MP4 to DVD Converter
Once installed the tool, open it. By clicking on “+” button to find and add your MP4 files you want to burn onto DVD. Both video and photo files are supported with this DVD Creator.
Step 2 Edit Videos/Slideshows If Necessary (Optional)
Though what you need is to burn MP4 to DVD, you may wanna do some editing before burning. Cool, you can edit both videos and photo slideshows. Simply highlight a file and click “Edit” to enter the edit interface.
Step 3 Customize DVD Settings

Step 4 Burn MP4 to DVD

A couple of minutes or hours later depending on the size of your video and Voila you are all done! That’s it, burning MP4 to DVD is this simple and now go and play MP4 files on your DVD player. Have fun.
Free Download
Free Download
More at:
How to burn MP4 to DVD to play on TV on Mac/Windows? How to burn AVI to DVD for viewing on DVD player? Free DVD Burning Software Download for Windows/Mac How do I burn movies to DVD free? How to burn DVD from iPad Air videos for DVD player? How to burn videos from iPhone to DVD for DVD player playback?
0 notes
Text
In this article, you will learn about all MP4 tips and how to convert and burn MP4 onto DVD disc for play on TV.
Part 1. What is MP4 and how to play MP4 on computer?
MP4 refers to a movie or video clip that uses MPEG-4 compression, a standard developed by the Moving Picture Experts Group (MPEG). It’s commonly used for sharing video files on the Internet. MP4 files are supported by many video programs and various hardware devices, including the Apple iPhone/iPad/iPod and Microsoft Zune portable media player. To watch MP4 videos on computer, QuickTime Media Player and Windows Media Player works perfectly on Mac and Windows.
Part 2. Will my DVD player play MP4 videos?
It all depends. If it’s an average DVD player then it won’t do – DVD operates from the MPEG-2 files, you would have to get DVD authoring software to burn MP4 to DVD and then you can watch MP4 files on home DVD player. If you are not sure, check your DVD specs to see if your DVD player supports reading MP4 files or not.
Part 3. How to burn MP4 to DVD that can be played on TV?
Could someone just give me a step by step guide as to how to burn MP4 movie file to DVD to play on DVD player? I’ve tried Nero and DVD Santa but for some reason they won’t recognize the movie file. I want these MP4 videos viewable on a TV, not just only computers.
If you’ve done some investigation into this and reading solutions, you will find that many DVD burning software like Nero actually doesn’t support burning MP4 files. And I assure you that this doesn’t require any new hardware or something. To play MP4 files on normal DVD player, the simplest solution is to just launch a MP4 friendly program that convert and burn MP4 to DVD and live with that. One program that does this speedily, and with minimal fuss, is DVD Creator, and that worked out great.
Tips:
Below is the step-by-step guide on how to burn MP4 files to DVD using DVD Creator. Don’t worry, just follow on-screen instructions you will find it’s pretty simple. Always remember the rules and simple steps: Import, Edit and Burn.
Step 1 Add MP4 Files to MP4 to DVD Converter
Once installed the tool, open it. By clicking on “+” button to find and add your MP4 files you want to burn onto DVD. Both video and photo files are supported with this DVD Creator.
Step 2 Edit Videos/Slideshows If Necessary (Optional)
Though what you need is to burn MP4 to DVD, you may wanna do some editing before burning. Cool, you can edit both videos and photo slideshows. Simply highlight a file and click “Edit” to enter the edit interface.
Step 3 Customize DVD Settings

Step 4 Burn MP4 to DVD

A couple of minutes or hours later depending on the size of your video and Voila you are all done! That’s it, burning MP4 to DVD is this simple and now go and play MP4 files on your DVD player. Have fun.
Free Download
Free Download
More at:
How to burn MP4 to DVD to play on TV on Mac/Windows? How to burn AVI to DVD for viewing on DVD player? Free DVD Burning Software Download for Windows/Mac How do I burn movies to DVD free? How to burn DVD from iPad Air videos for DVD player? How to burn videos from iPhone to DVD for DVD player playback?
1 note
·
View note
Text
base distro MacOS (for my sins)
browsing on desktop Firefox
listening to music Apple Music (its how I ripped public library CDs)
watching video files (or streaming video ig) VLC (Youtube)
text editing Kate
code editing also Kate
mobile OS iOS
mobile browser Firefox
chatting on desktop [I'm not social enough to do this]
chatting on mobile SMS
custom system font [Whatever apple's default is, Ysabeau on Firefox]
IRL navigation Google Maps
notes and/or to-do more often than not physical pen and scrap paper
ebook/pdf reading Preview.app
bonus option for hobbies OpenEmu, Transmission
image editing [I don't edit my photos]
email Gmail (for my sins)
rss Feedly.com
file sync/sharing Dropbox and Google Drive
terminal muxer [I can't remember what this is]
home automation I am ideologically opposed to the so-called "Internet of Things"
git hosting (or svc if ur a boomer lol) [I don't understand git]
any miscellaneous tool you can't live without yt-dlp, get_iplayer
unrelated to the other questions what's the name of the plushie that's nearest to you rn my security blanket
screenshots [I have to google what it is for mac every time]
i know you nerds have lots of opinions on this
what software do you use ask game
base distro
browsing on desktop
listening to music
watching video files (or streaming video ig)
text editing
code editing
mobile OS
mobile browser
chatting on desktop
chatting on mobile
custom system font
IRL navigation
notes and/or to-do
ebook/pdf reading
bonus option for hobbies
image editing
email
rss
file sync/sharing
terminal muxer
home automation
git hosting (or svc if ur a boomer lol)
any miscellaneous tool you can't live without
unrelated to the other questions what's the name of the plushie that's nearest to you rn
screenshots
284 notes
·
View notes
Text
How to extract audio from video in editing apps?
This guide will show you how to take the sound from a video and use it by itself. First, we’ll explain how to do it in any video editor, and then we’ll give specific steps for the most common ones.
3 Steps to Extract Audio from a Video
Extracting audio from the video is actually quite easy. The specific steps depend on the software you’re using, but the basic process is the same
Step 1: Open the Video
Open or import the video into your preferred editing software(I prefer Audacity). Make sure to choose a tool that’s compatible with your video format.
Step 2: Extract the Audio
Next, save the video file as an audio file. In some editing software, you’ll need to select Save as audio file. Others may have a simple Extract audio button.
Step 3: Save the Audio File
Finally, choose a format for your audio. Most audio files are MP3 or WAV. MP3 is smaller and accepted in more places, but WAV files sound better. Once you choose a format, choose a location on your device to save it.
The Best Audio Extractors and How to Use Them
Now that you understand how the process works to extract audio from a video, let’s walk through the process in several of the most common video editing apps.

1. Adobe Premiere Pro
Adobe Premiere Pro is like a super cool video editing tool that filmmakers, TV people, and folks who make stuff online use. It’s packed with awesome tools to make videos look amazing, with special effects and all kinds of neat stuff to make top-notch videos.
Compatibility: Mac, Windows
Price: $35.99/month
How to extract audio from a video in Premiere Pro
Open Premiere Pro.
Click on “New Project.”
Name your project and save it.
Choose “Select File.”
Click “Import from Media Browser.”
Under “Audio Options,” select “Extract Audio.”
2. CapCut
CapCut is like a super handy app for editing videos, and the best part? It’s totally free! You can use it on your computer or phone, no matter if you’re using a Mac, Windows, iPhone, or Android. With CapCut, you can do all sorts of cool stuff like cutting, reversing, adding music or cool effects, and then share your awesome videos with everyone!
Compatibility: Online, Mac, Windows, iPhone, Android
Price: Free
How to extract audio from a video in CapCut
Open CapCut in Chrome.
Click on the “+” to start a new project.
Choose “Upload.”
Find your video file.
Click on the “+” in the corner to add it to your timeline.
Right-click on your video in the timeline.
Select “Separate Audio.”
3. Windows Movie Maker
Windows Movie Maker used to be a simple video editing tool made by Microsoft. It was great for beginners who wanted to make and edit videos easily. With features like trimming, adding transitions between scenes, and cool effects, it was a fun way to get started with video editing. However, it’s not available anymore, but it was a popular choice back in the day!.
Compatibility: Windows
Price: Free
How to save audio from a video in Windows Movie Maker
Open Windows Movie Maker
Choose Add Video and Photos
Choose File > Save Movie > Audio Only
Choose a file format for your audio
In my full Blog, I have included many more tools which are free and has mobile apps. Click to read my full Blog on How to extract audio from video in editing apps
0 notes
Text
My next computing setup
The idea of trying to paint the full picture of my computing needs exhausts me for some unknown reason. Even this short post has been a chore. But I thought it important to get some of my thoughts down because it helps me to clarify my own thinking and will hopefully help me make some decisions. And I would love it if you commented via my website, on Mastodon or Micro.blog or email or USPS.
The main issue is that it just so happens that I find myself at a time where I have a 5+ year old Intel-based MacBook Pro, an 8 year old iPad Pro, and a 4+ year old iPhone 12 Pro Max.
All of these devices are currently working fine, their software is up-to-date, and except for the MacBook Pro – their batteries are in very good shape. (The MacBook Pro has never had great battery life.)
One could say that I do not need to upgrade any of these devices just yet. I could likely hold out another year. But Apple has made it plain that the M-series chipset has their full attention. There are apps from the App Store that will not run on my Intel-based Mac (the iOS/iPad OS apps). The upcoming Apple Intelligence features will not be available for any of my current devices.
To add to the incentive, I’ve had a good year financially. I could use an expense or two to write-off before the end of the year. In fact, based on my math, I think I’ll want a fairly big expense if possible. (Try as I might, I’m having a hard time understanding exactly how much I should be trying to write-off.)
So, let’s just say that I’ve decided I should upgrade one or all of my computing devices before the end of the year. What should I buy?
I work at my desk about 98% of the time. In over 20-years of using a laptop as my primary computing device, I can count on one hand the number of times I’ve used it on my lap. I have had years of more mobile work – going into coworking spaces or working both at home and an office – and years where I’m only at home. Currently I work almost exclusively in my home office connected to a display.
My main computing tasks are programming, graphic, video, and photo editing, and most recently running local LLMs.
I’m wrestling with the following questions:
Since I work from home, should I switch to a desktop computer?
For the few times per year that I travel, should I keep my current MacBook Pro or should I trade up to an M-series laptop for compatibility reasons? This way I’d have both a desktop and laptop computer.
For years I’ve not had enough internal storage to have my ever growing photo library (~1TB as of this writing) on-device, should I finally buy more enough to do so?
Am I kidding myself that I feel like I need to max out whatever device I buy for what I do day-to-day? Perhaps I only need a relatively inexpensive laptop and I’d be fine?
My strategy when buying new work hardware is to buy as much computing power as I can reasonably afford and then don’t think about it for about 5 years. This strategy works and it helps me mentally when I consider the price tag.
For instance, if I price out a maxed out Mac Studio today (with an M3 chipset, not an M4 like I would likely wait for) it comes to around $8000+ USD. Which, likely seems like a lot of money to many but it really isn’t. I use my computer for 12-hours a day nearly every workday. Over a 5 year period it is only $1,600 a year. Or $6 per workday. Ask any business owner if $1,600 a year in expenses is a lot – I assure you that being a computer programmer is likely the least expensive profession known to humankind. For context my 16-inch Intel-based MacBook Pro was about $4200 USD.
But then $8000+ wouldn’t be my only expense. A new iPhone 16 Pro Max and iPad Pro would bump it up to well over $10000 USD. Still, in my opinion, not a lot over a 5 year time span.
Stay with me here.
But then I circle back to the last of my six questions above; do I really need this much compute? Or can I get away with far less? Should I just buy a used M3-based laptop and see if that would be plenty? Should I keep what I currently have until they don’t work at all? Should I go all-out?
I have no idea!
I’m leaving the comments open on this post because I genuinely wonder what all of you think I should do.
0 notes
Text
A good jock workouts hard.
A good jock eats right.
A good jock obeys coach.
We're still talking about communication this week.
A few things to help make communication easier, set expectations. if one person wants to message all day and the other only wants a video call in the evening both guys are going to be unhappy.
So talk about how you will communicate with each other. Even with guys in my timezone I try and be clear I can't message during the day. My phone doesn't even get messages while I'm at work so if one of my jocks or pups send a message at 7:30 in the morning I won't see it until after 3-4 in the afternoon.
Talk about that and find out if that's cool for both of you. Some guys want more contact and there are lots of guys who can give it. You have to make sure whatever you're doing works for you both.
Goals
We've reach the point where following your goal means it wasn't just a cool idea but something you have to really want to keep working on.
Over this week I've had updates from @orcaazure and @Costasso they are good jocks. The rest of you check in (if you did with a different name, let me know)
*For me, I made 4 of the five stretches this week. For my writing I was bouncing between a few things and ended up writing prompts for 20+ photos in my Tumblr queue but those are short so it wasn't likely the full 2000 but better than last week. my 100cals was done (I did it a in moment the weather got a little better, and did it in 6:40, best time this year.
sirjocktrainer-100cal in 5 min, 5 days of stretches 2000 words write/edit
caged-macs-workouts 4 times a week
boy-s37- 85% meal diet compliance Perform 100 pushups per day Achieve chest growth 40 inches
orcaazure- Total of 5 workouts a week Stick to my meal plan 5 out of 7 days a week bicep measures goal 42 shoulders measure goal 25
donsleep-compliance with my meal plan Doing strength training 5 days a week
Costas-Drop 50 pounds 100 pushups in 2 minutes Free of sugar for 6 months
18 notes
·
View notes
Note
can you share how you make gifs? mine always look terrible
yeah of course! my process probably isn’t the most efficient and i’m still learning but it works for me ig. i use différent apps based on if i’m using my phone or computer, but the steps are the same.
i’ll record the clip i want to gif and edit it in my photos app to enhance the colours and make it sharper if it looks dull. if it’s a clip on ice or an interview, i usually i fiddle with the brightness, shadows, contrast, saturation, warmth, tint and sharpness. but if it’s from a produced(?) video i sometimes won’t do anything if it looks like it’s already been colour corrected and graded.
next i export it to capcut on my phone or imovie on my mac to edit the length and slow or speed up parts if needed. i usually slow it down a little if the clip i’m using is too short or i want the focus to be on a certain section. then i save it and import it to adobe express on my phone or photopea on my mac. from there i just save it as a gif and size it down if the file is too big for tumblr.
here’s an example:

so this one i made on my phone with adobe express. i edited this one so that the whites looked whiter and so there was more contrast. i also lowered the temperature so the ice didn’t look as yellow and adjusted the tint to neutralize any green. there is also a little quirk with adobe express where it makes the gif a little grainy? like along the boards and on the graphic in the corner, there’s little dots. but it usually is only really noticeable with small file sizes.
i hope this helped!
#i also hope this made sense !#i would’ve included the non edited clip for comparison but i think i deleted it#asks
0 notes
Note
speaking of cameras! what is your best recommendation for someone with no official experience in photography who wants a nice camera that can be taken easily around for vacations (the beach, different cities) and for photos of friends/loved ones? so nothing overly complicated, and nothing too fancy. i get so caught up in reading reviews and then idk which one is the "right" one. i really want to buy something good but not more fancy/complicated than what i need. also for some context, i don't want to edit anything and the computer i have is a mac book laptop. idk if that factors into it. thank you soooo much for any recs you can give!
i'm gonna preface this by saying that i'm not an expert on digital cameras, but honestly, i think most cameras nowadays, especially once you get into the high hundreds-thousands euro range are quite good. i think it comes down to what you need. for example, do you want to be able to change lenses or do you want a fixed lens? do you want to also do video? how much money are you willing to spend? should it be small or can it be bigger? do you want a viewfinder or is a screen enough? more than model, i think you need to figure out what you want out of a camera! for example, i knew i wanted something compact but capable, where i can change lenses, and i liked the film camera look of fujifilm, so that narrowed it down for me.
i would definitely suggest an interchangeable lens system if you might wanna branch out in the future and get more creative with photography. first, because you can then try out different focal lengths, and also get more creative with larger apertures on higher resolution cameras. some that seem good (and are not too expensive) are the canon m50, the sony a6000 line, nikon z30, sony zv-e10 and the fujifilm xt30. you could also look into micro four thirds cameras by olympus or lumix (smaller sensor than most common changeable lens cameras, but i've heard good things and they're much smaller usually). you could also always look for slightly older models if you want to save money, as cameras from the past couple of years will still be more than enough for casual shooting. what i would suggest though is no longer buying a dslr, but going for a mirrorless system; they're smaller, lighter and you can see in camera what your picture will look like as you take it.
however, these can sometimes be more expensive, usually bigger, and lenses are also an extra investment. if you want something with a fixed lens and that is just for snapshots of family and vacation, i would look for a compact camera. i'm not an expert here and i'm more familiar with premium models such as the fujifilm x100v or the ricoh gr iii, which are between 1000-1500€, so a big investment for casual shooting. from the little research i just did, there seem to be some good cameras out there from sony and canon, especially. one thing i would say is that idk how capable regular compact cameras are and whether they're going to be a significant improvement over a phone camera.
my biggest suggestion is to go to a camera store and try cameras out! see what feels best in your hands, what makes sense to you and which you find the easiest to handle. you can then also see if the image quality is what you want. cameras are such a tactile thing where, at least for me, i can usually tell the minute i hold one in my hands if it's for me or not.
i hope this helps in some way, but if you have more questions, let me know!
0 notes
Text
Reviews on Movavi
The basic performance and operation are also bad and the license fee is not worth it. Fader console with twelve motorized precision faders with call, solo, mute and automation controls as well as an LED display for the status of each channel. Thanks to support for collaborative projects in Dolby Vision and HDR10 +, every user has access to all required SDR and HDR elements. 500 royalty-free Blackmagic Design Foley sound effects compatible with the new Foley sampler in DaVinci Resolve are available for download. GPU-accelerated scopes display more details, work faster, and offer dozens of advanced new options for technical monitoring. We offer free trial versions of our programs to check their functionality before you make a purchase decision. We apologize for the inconvenience. We offer free trial versions of our programs to test their functionality before you make a purchase decision. Install Windows using an ISO image file, DVD disc or USB stick with the installation files for Windows. If you want to be automatically logged on to Windows when you start Windows, select the option "Activate automatic login" and enter the administrator password. Whether you want to cut out objects, create masks or apply adjustments in a targeted manner, all desired image areas can be selected quickly and precisely - even individual strands of hair. Effects such as blurring, illumination, distortion and perspective corrections can all be used as non-destructive live filter layers. You can erase, mask, rearrange the effects and change their settings at any time. Creative professionals have been waiting for these options for a long time.
And new GPU-accelerated scopes offer more options for technical monitoring than ever before.
Make sure that the Windows firewall is switched off.
There you will find settings, view modes, device management, configuration etc.
Deleting the part of this sequence that is no longer required also takes more than 7 seconds.
With the powerful playback -Engine cuts and trims incredibly quickly, even with computationally intensive formats like H.264 and RAW.
ul> Save and transfer photos and videos easily, even without iCloud or iTunes. Access the photos on your computer via USB or WiFi. Your memories are now safe on your Mac or PC. To add a virtual machine in Parallels Desktop, you can also simply drag a Parallels .pvm file into the Control Center. Turn on your Mac and Windows PC and sign in.
Send price proposal
But even with the various free programs, you can get quite far - with corresponding effort even further than with some paid software. For a long time, Avidemux was reserved exclusively for Linux users - but now the editing software is also available for the other major platforms. The open source tool more info here comes with a huge selection of tools that are useful for Cutting, editing and embellishing videos and film projects help. Since it combines code from many different open source sources, the software supports countless file formats in import and export and can deal with many different codecs by default. They are made from the highest quality materials. With the DaVinci Resolve control panels, you can intuitively access every section of the screen. The map window shows the location where your pictures were taken using embedded latitude and longitude information. This allows you to create groups of files by region for processing. You can also drag and drop pictures onto the map and geotag them. Affinity Photo's HDR algorithm creates incredibly natural images that reveal the full dynamic range of your shots. You can even work natively with the complete 32-bit image or use the extensive tone mapping to adapt the display exactly to your needs. The modern algorithm for refining selection areas allows you a level of precision that you would previously have believed impossible.
1 note
·
View note
Text
Step-by-step instructions for video and photo software
Optimized memory management
However, have you assessed the risks and possible consequences? I have prepared a short list of problems that you can warn of. I bought the Movavi Video Converter 2020 program last year. Although it is partly faulty (partly restart required), I was able to use the program for my applications, most recently on 12/31/19. Please note that our support team can help resolve most issues, users downvi . Please update your review by providing the ticket ID you received from our support team so we can resolve this issue as soon as possible. In view of these problems, the program is completely unsuitable because it takes far too long to cut. Developed specifically for compatibility with the latest computer technology, it is currently the only app with a full range of tools for photo editing on macOS, Windows and iOS. You can transfer your data from a Windows PC to an external storage device, e.g. You can then connect the device to your Mac and import Windows and your data into Parallels Desktop. Double-click the install icon and follow the on-screen instructions to activate and register your license key. For more information, see our tutorial videos, FAQs, etc. Please update your review by providing the ticket ID issued by technical support so that we can resolve this situation. High-resolution screen with HDMI and SDI inputs for viewing channel controls, level meters, video and more. HEIF photo files and HEVC videos can be imported, edited and shared on both Windows and macOS. Record a background comment or the sound of your guitar or synthesizer. Use finished video clips, backgrounds, music and sound from the video editor library. Experiment with chroma key, slow motion, reverse function and other visual tricks. Almost everyone can implement their ideas - even if only with their smartphone - and make film creations accessible to the public. It is hardly surprising that corresponding software has also become a whole lot more user-friendly - and that starts with the (sometimes non-existent) price. AviDemux is a tool for converting, decoding, encoding and cropping video files. The program is very similar to VirtualDub. The range of functions is limited to tools for simple video editing and a timeline is missing.
You must exit the current help page to view this member's profile.
View multiple folders at once or use combinations of metadata fields to search with the Easy Select indicators at the same time .
Now select a video with a double click that you would like to trim.
The Video Editor is characterized by a modern user interface, which includes
Membership Levels
You can adjust the results as you wish. Slide shows and collages from your photos and videos are created automatically and presented to you on the home screen. The start screen informs you about inspiring content, help articles and tutorials so that you can start editing your videos straight away. Here you will also find out everything about new functions. Here you can express your opinion on the article "It's so easy to shorten videos in the Photos app on Mac". In the current version, Filmora9 offers more than 800 video effects such as filters, transitions, overlays, texts, elements and 3D luts, which you can add to your video with just one click. You can provide suitable background music with royalty-free songs from the audio library. In addition to tools for simple editing such as video editing, Filmora9 also includes more professional functions such as Install Windows using an ISO image file, DVD disc or USB stick with the installation files for Windows. If you want to be automatically logged on to Windows when you start Windows, select the option "Activate automatic login" and enter the administrator password.
A few years ago, people snipped and stuck to actual film reels in the same way; this task also made the leap into digital and virtual in the 80s and 90s. All of this also resulted in horrendous prices for said software, which often amounted to many thousands of dollars. Since then, however, several years and decades have passed and both industries and customs have changed. Recording films, editing videos, editing clips and publishing finished projects has not only been for professionals for a while, thanks to YouTube and others.
1 note
·
View note