#holiday sewing
Text

Cow sewing time!
Pink with polka dots was not the most commonly picked option but my grandma really liked the idea of a pink polka dotted cow so that’s what I’m going with lol
#sewing wip#cow plushie wip#the cutting mat is deceptive I did not use my rotary cutter#I just needed a flat surface so I could trace pattern pieces lol#also I found a pattern for a praying mantis!!!#I want to make it so bad!!! but I need to finish this cow first#and also I should maybe slow my roll on purchasing patterns for a bit. spread out my pattern purchases#…but praying mantis though?? and that pattern designer has a really really cute werewolf pattern#I want to make the werewolf for my nibling for the holidays#but I have to check with my friend if he still likes werewolves#kids change interests as they get older and that is totally fine but also I want to check before I sew the present lol#also a giant whale shark pattern. gotta make that.
103 notes
·
View notes
Text
I dont think I ever submitted these thrift finds from a few months ago


If anyone could tell me what the thing in the 7th image is I'd love to know.
125 notes
·
View notes
Text
Shameless holiday Etsy store plug!
It's that time of year again! Crafters, if you're looking for leather thimbles, I got you.
I've never been able to use metal thimbles and it was always a source of frustration because needles start to hurt your finger pretty quickly. A couple of years ago I learned how to make leather thimbles and it changed my sewing and embroidery game entirely. When I got a stack of leather offcuts, though, I ended up with way more material than I needed, so I started making extras and selling them. I started having fun with the kinds of leather I worked with and incorporating fun, colorful designs, and now I stock all sorts in my Etsy store:
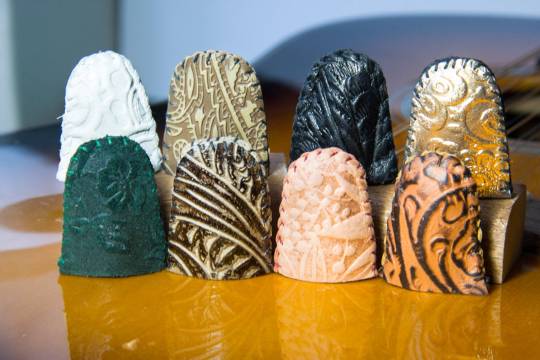
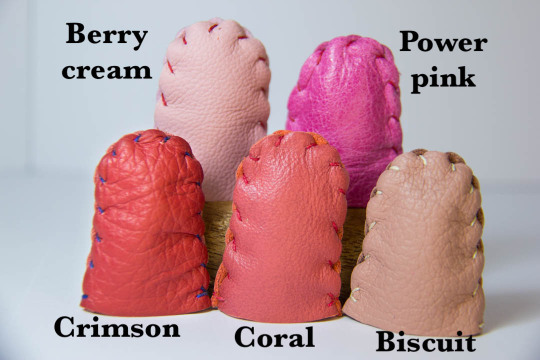
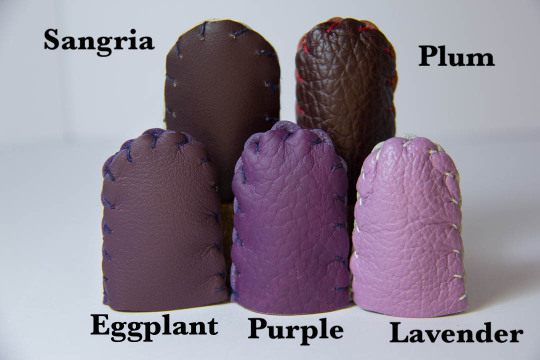

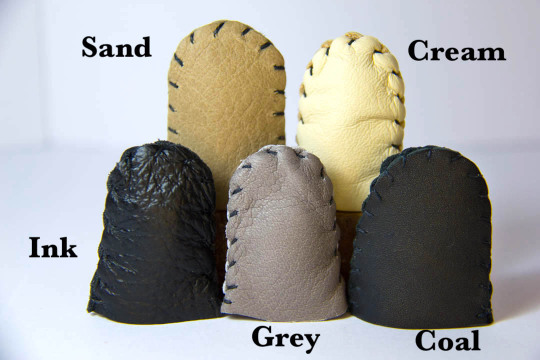
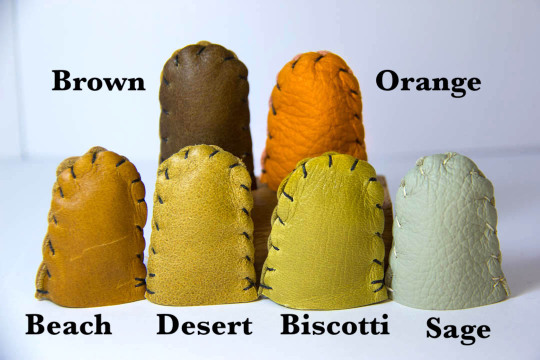
I only use reclaimed leather scraps from other Etsy sellers who I've built personal relationships with, several of whom also use reclaimed leather before selling their own offcuts to me. Each thimble comes wrapped in tissue paper, packing slips are printed on recycled paper, and shipped in unbleached envelopes with labels made from recycled materials.
Whether these are your thing or not, I hope you'll keep independent artisans in mind when you're buying gifts this season! They work hard, are underpaid, and need your support more than corporations.
(Also, if you see an Etsy ad on google or in the ad space of a website, don't click on it! Search for the Etsy store's name through Etsy instead. When you make a purchase after clicking an advertising link, Etsy takes a percentage and keeps doing so every time you go back to that store. Etsy already takes 25%-33% of sellers' profits in fees, don't help them take more! Links like the above that are embedded in an individual person's post are fine, just look out for ads on the side or bottom of websites, blogs, and social media pages, as well as google ads.)
#crafting#etsy#thimbles#sewing#embroidery#historical sewing#gift ideas#holiday gifts#tis the season#knitting#quilting
1K notes
·
View notes
Text
As we approach the marathon crafting that is Right Before The Holidays, this is your annual reminder to please remember to take frequent stretch, water, and food breaks to keep yourself well friends 💕
1K notes
·
View notes
Text
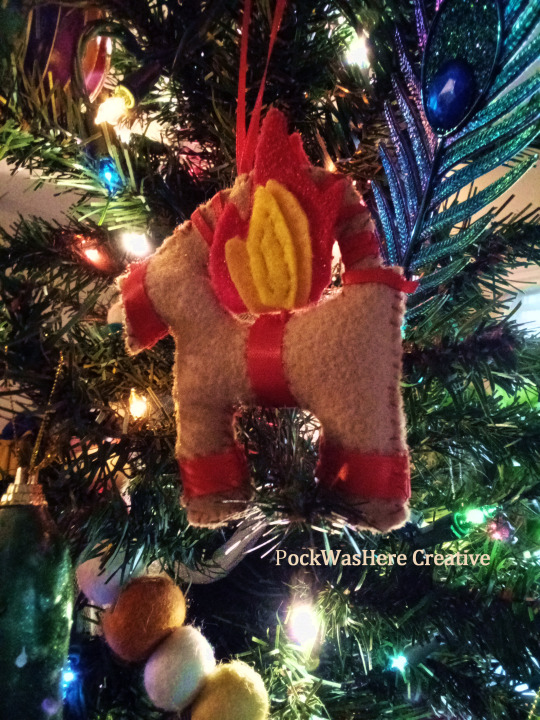
Flaming Gavle Goat Ornament Tutorial
You Will Need:
Craft felt in light brown or 'straw' color of choice, red, yellow and orange
Red ribbon in 2 widths
Thread- I used red and yellow; brown, orange or white would give different effects
scissors
Needle for hand sewing
pins or quilter's clips
polyfill stuffing or fabric scraps
a poking implement
a lighter or Fray check glue
paper and pencil
patience / approx 2 hours to waste making a meme for the holidays
To start, I drew a rectangle approx 3.25 in wide by 4 in high and sketched out a geometric goat shape. You could go a bit larger, but if you go much smaller it will be difficult to stuff. Remember that the sewing and stuffing will eat up some of your edges.
Cut out your goat template and trace it on your light brown felt. I used chalk, marker may work depending on how neatly you cut.
(I'll add a nice vectored template to this tutorial later, but I'll have to fight with the scanner first. )
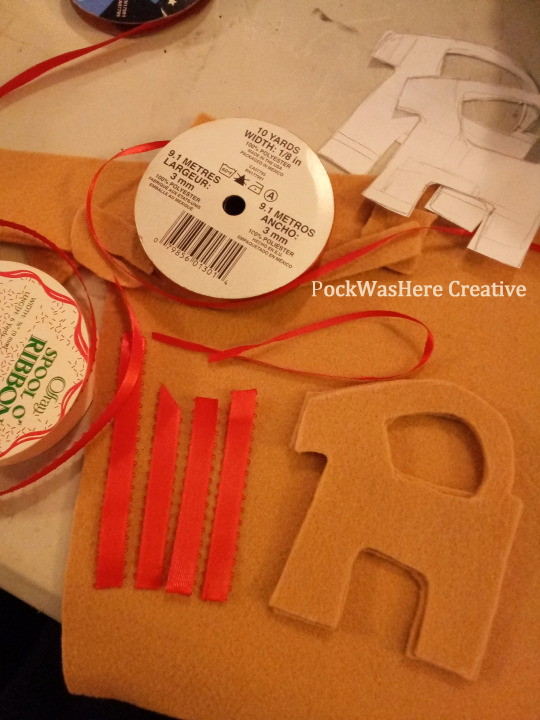
Cut 2 of your goat. It doesn't matter if they're not exactly the same, as you can fudge the edges a little when you sew. If your felt has a front and back you can tell apart, you'll need to pick a "right" side of the fabric and mirror one of the goat base pieces.
I cut my ribbon decorations in advance, wrapping it around the stacked bases to check the length - remember you'll be stuffing this later so you may need to add a tiny bit more to accomodate.
Out of the wider ribbon, you'll need one for each leg, one for the tummy and one for the bridle. The thin ribbon will be to hang the ornament with and to wrap the horns- I did not pre-measure the horn wrapping because I wasn't sure how long it would need to be. Finish the cut edges of the ribbon as you like- I used a lighter to heat seal them but fray check or white glue will work. Glue will be more difficult to sew through.
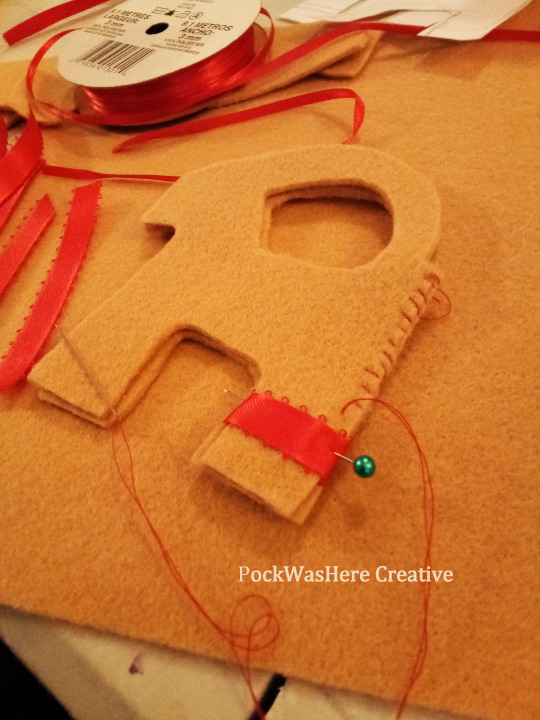
Start sewing the goat bases together. I used red thread and a basic whip stitch, but you could get a couple different effects by using white or brown thread, or by sewing a blanket stitch.
Here's where I made life difficult for myself- stop when you get to the legs and wrap the ribbon in place, tucking the ends in between the layers. This secures them and hides the edges but is fiddly to pin and sew. You can also wait until you have sewn most of the way around and tack or glue the ribbons on top if you're less fussy about the ends showing.
Continue sewing around the legs and body, catching the ribbons in your stitches and repeating for the bridle ribbon. Stop at the base of the horns so you have room to stuff.
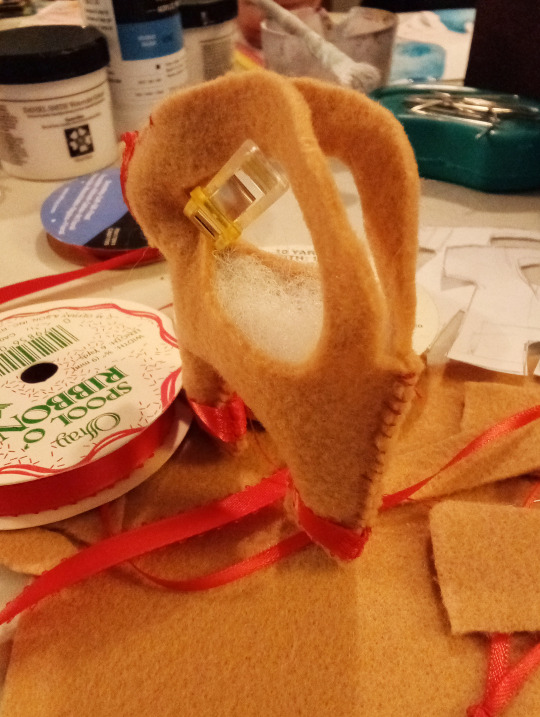
I'm working with modern plastic materials, so sadly (or not) this goat isn't terribly flammable, just meltable. If you want to be eco friendly you can stuff him with scrap fabrics. I'm using polyfill.
Use a chopstick, paintbrush handle or empty mechanical pencil to poke your stuffing into place. Smaller lumps of fluff are better and more maneuverable.
For firmer limbs stuff chopped up bits of your felt into the legs and head and follow it up with the polyfill.
My original plan for the removable flame was to do clever things with magnets, so if you want to give that a try this would be the point to toss one in before you close up the body. I was on a roll and didn't remember until I was working on the horns. ¯\_(ツ)_/¯

Remember you still need to put the tummy ribbon on and curse your clumsy giant fingers!! Getting everything situated and laying nicely may take a couple attempts. Once you've stabbed yourself with the pins a couple times, sew up the inner curve from the base of the horns on the neck to where the horns meet up again on the butt.
Be careful of where your thread tail goes and the direction of your stitches, it's easy to accidentally loop around the whole body or catch the horns.
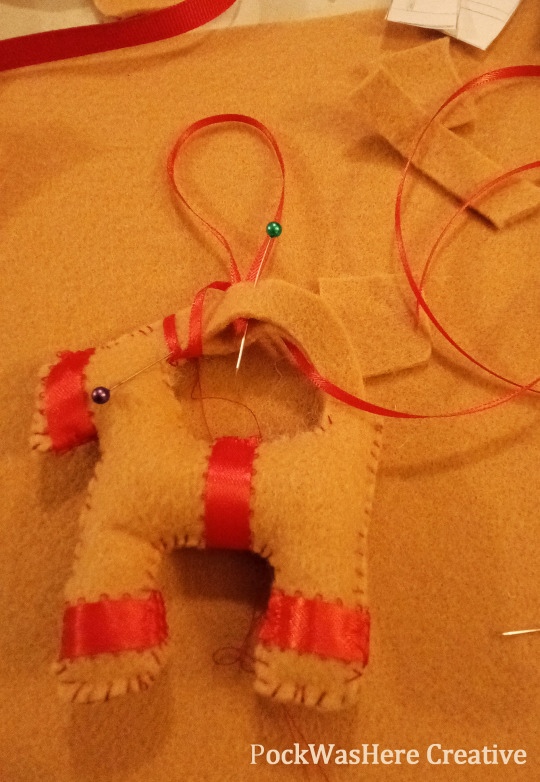
There should still be a bitty opening at the base of the horns and at the butt (giggle here), if you flattened your stuffing during the last step and need to poke a teensy bit more in.
Tie your length of hanging ribbon into a loop and set aside.
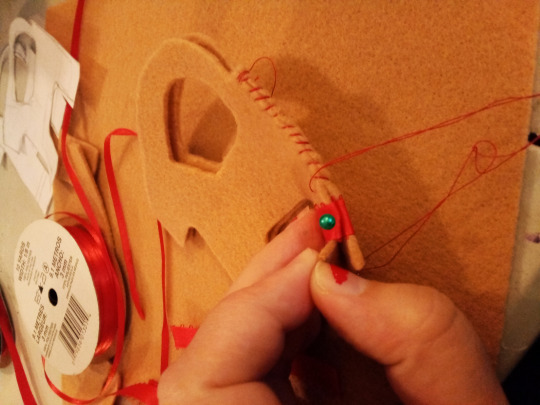
This is another step where my need to hide the edges made life stupid and fiddly. Tuck the edge of a length of the thin ribbon between the layers on the bottom of the horns and wrap it around, and tack in place with a couple stitches. Loop it a couple of times until you get to the point you want to hang the ornament: I chose dead center, you may want him at a jaunty angle.
Fiddle with bendy felt, slippery ribbon and pins until your hanging ribbon's knot is sandwiched between the 2 layers of the horns and continue wrapping with the loose long piece, securing with pins or clips as needed and hopefully not making a big tangled mess of ribbon.

When you get to the end wrap it around a couple times and cut off any extra length, seal your ribbon and pin or clip into place.
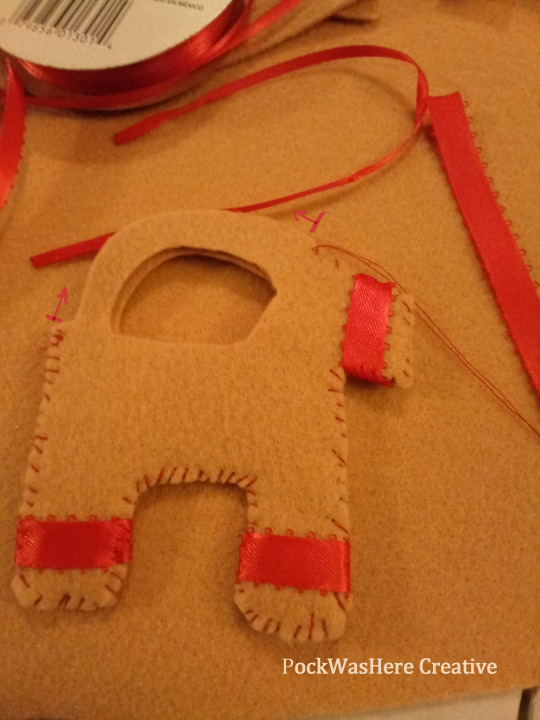
Sew along remaining curves of the horn, making sure not to yank the hanging ribbon out of place and to catch the wrapping ribbon as you go. Accept there's no good way to tuck in this !$@!%%^$ slippery 1/8th BS ribbon and tack the butt end down with a few extra stitches.
Alternately, tack the hanging ribbon in place between the layers, sew the edges and then wrap and secure the horn ribbon with stitches or glue at either end. You could also skip sewing the edges of the horns together before wrapping them, but it will be more sturdy and secure with them sewn.

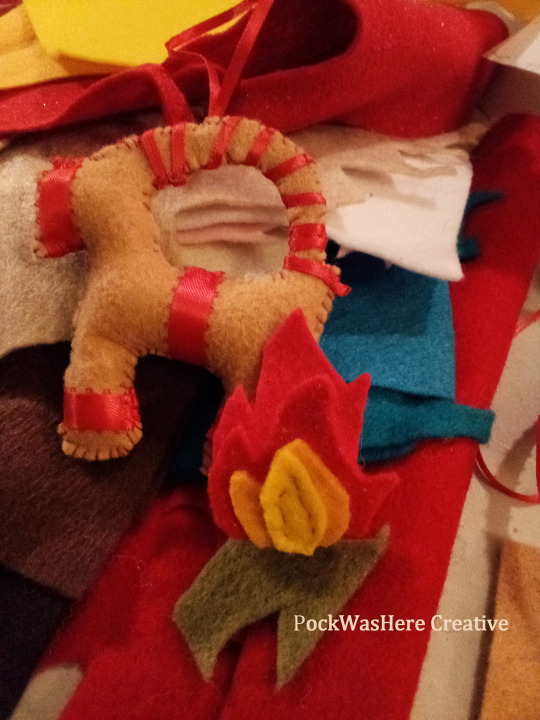
The fun part! fold some paper in half and draw your flames on the fold. Mine were a little over 2 in tall, and they should be a little smaller than the back of your goat at the base in order to fit in place. Cut out your fire and use it as a template for your felt.
The base layer will need to be on cut on the fold but the rest can be separate. Use as many or as few layers and colors as you like, it doesn't have to match exactly on both sides. You'll be folding this up so that you have 2 decorative sides facing out and a plain inside, so you'll be making two mirrored flames while it's still flat: one pointing up and one pointing down. Sew or glue the layers together.
I used a hidden stitch about a third of the way up from the bottom on the inside of the flame to pinch the sides together and pull it up into a V shape. This can be tucked up into the gap between the body and the horns and will hold itself in place pretty well if you have thick felt.
For more security/ shaping you could sew a loop of craft wire or an opened paperclip to the back side of the flame, or as previously mentioned do clever things with magnets.

Hang him on the tree with or without flames and enjoy!
Options for enjoying your handcrafted goat:
Pin the Flame on the Goat: Hide goat ornament on tree and give your participant (s) the flame (s), first to put them together wins.
Art Imitates Goat: Keep the flames to the side until/ if the real goat burns, and then apply to ornament. Celebrate with hot cocoa or warm winter drink of choice.
Voodoo Goat: Real Gavlebocken hasn't burned yet? Summon the flames by setting your ornament on felt fire! Celebrate with hot cocoa or warm winter drink of choice.
#holiday craft#gavle goat#gavlebocken#christmas ornament#tutorial#hand sewing#also please show me your goats if you make one!
1K notes
·
View notes
Text


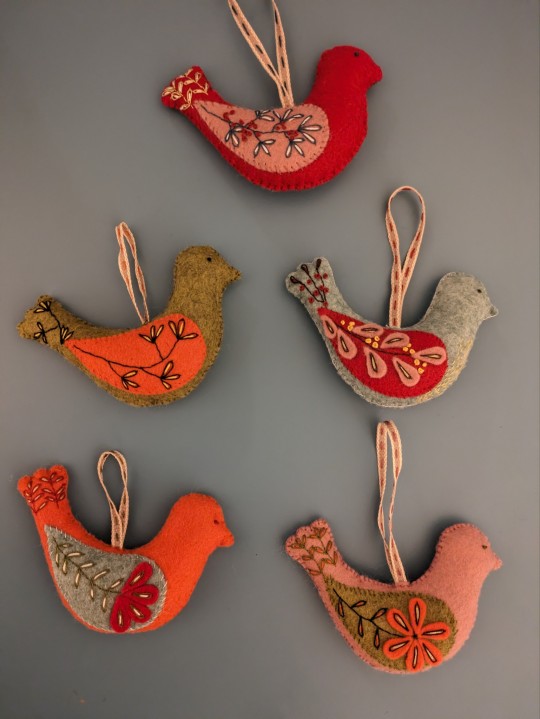

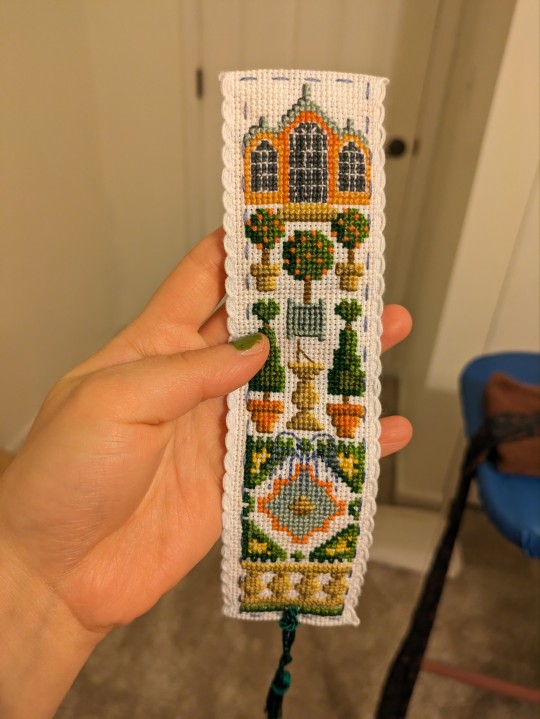
Handmade gifts for loved ones for Christmas this year 🪡
#handmade#homemade#sewing#embroidery#embroidered#folk#folk art#cross stitch#stitches#sew#art#bookmark#christmas#holidays#ornaments#gift#gifts
120 notes
·
View notes
Text

Time to hide our Fabric Scissors!!
#crafts#gifts#decor#holiday#christmas#quilting#sewing#quilters of tumblr#briar rose quilts#scissors#fabric#hiding
98 notes
·
View notes
Text
Kid-friendly holiday crafts !! 🐣
I've created a list of all the crafts i want to do this year for the holidays. Most of them are kid-friendly as well and especially fun to do with regressors 💕
I've also included difficulty ratings of one to three stars. If a craft is more difficult littles might need some extra help to make them !
Homemade Gift Wrapping
Difficulty: 🌟
Such a cute and easy way to make Christmas more creative !! And a good way to use the cute paper and stickers I've been hoarding all year because I don't know what to do with them 😖

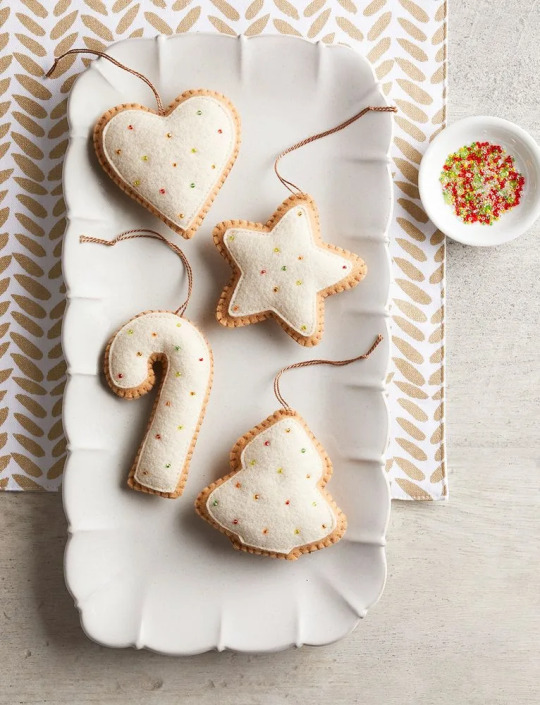
Felt Christmas Cookie Ornaments
Difficulty: 🌟🌟🌟
These ones are a little tricky but they're so cute, I love the colourful beads on them that look like sprinkles !! And a Christmas tree would look so good with lots of these hanging up🎄
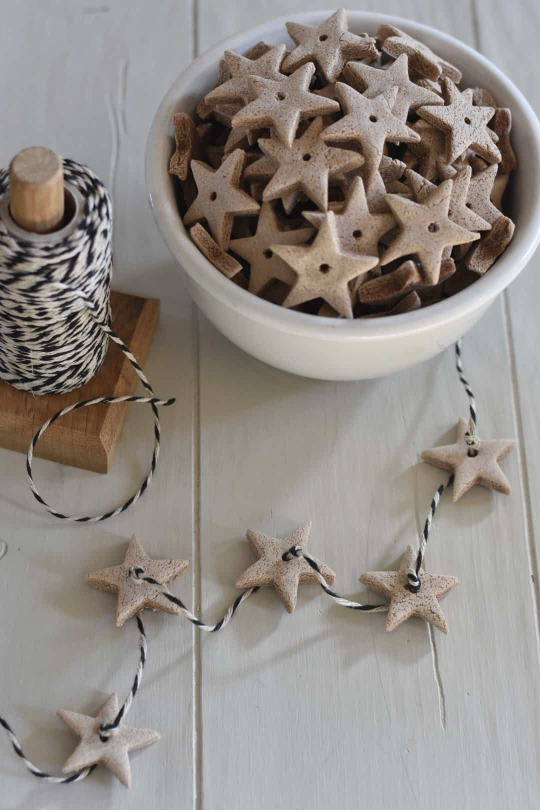
Scented Salt Dough Ornaments
Difficulty: 🌟
I only gave these a one star difficulty because they're very easy to make. But keep in mind that they do use the oven ! Other than that, they're cute and smell nice, it's like the best of both worlds 😆

Christmas Bunting
Difficulty: 🌟🌟
I love bunting, not only Christmas themed, but all year round !! It's my favourite wall decoration and makes my room feel like I'm having a party every day 🎉

I also found some other bunting patterns in different shapes, these ones are more holiday themed ! But that means that they're a little more difficult to make. Here's the links for star and Christmas tree patterns.
Difficulty: 🌟🌟🌟

And also, another one because I just love bunting. This one's Christmas tree shaped but is much easier because it doesn't require any sewing !
Difficulty: 🌟
Gingerbread House Gift Wrapping/Advent Calendar
Difficulty: 🌟
These ones are very similar so I grouped them together. Decorating brown paper bags with white markers to make little gingerbread houses ! Which you can use for wrapping presents but also to make a whole village for an advent calendar 🏡

Fabric Paperchains
Difficulty: 🌟🌟🌟
I love paperchains but they always tear when I try to make them. These one's won't though and because they have velcro you can mix and match the patterns when you get bored of them 💭

Gingerbread House Card
Difficulty: 🌟
You can probably tell I love gingerbread houses. I just think they're so cute and Christmassy ! And it would be so fun to make these cards but also everyone would be so happy to receive such a cute card ! 🌈

And that's all !! I might update this post as I see more crafts during the month but I think this is a good list to start off with. Also if anyone does any of these please post a picture ! I'd love to see them 🥰💖
#sfw agere#agere#sfw age regression#sfw regression#age regression#agere little#agere aesthetic#agere caregiver#crafts#arts and crafts#christmas#holidays#holiday crafts#christmas crafts#sewing
76 notes
·
View notes
Text
a sewing machine and a stand mixer are both horses. to me.
53 notes
·
View notes
Text

Along with mushrooms, I’ve also been making strawberry and Christmas tree ornaments! The trees get a vintage button for a topper🤩🎄🍓
47 notes
·
View notes
Text
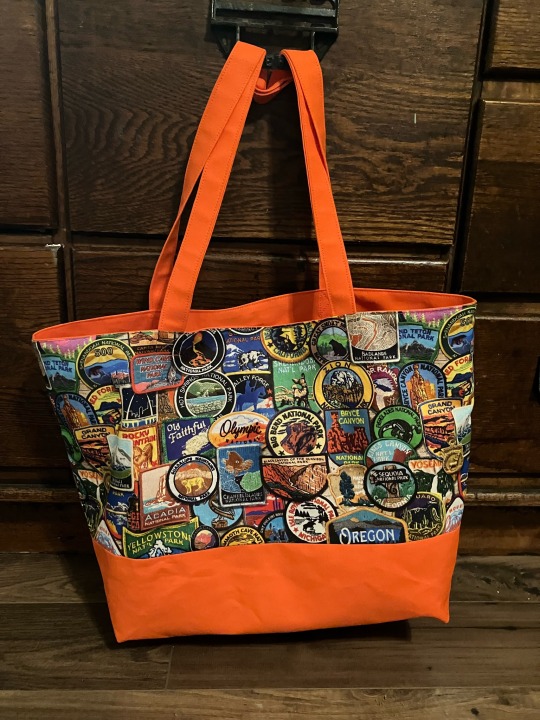

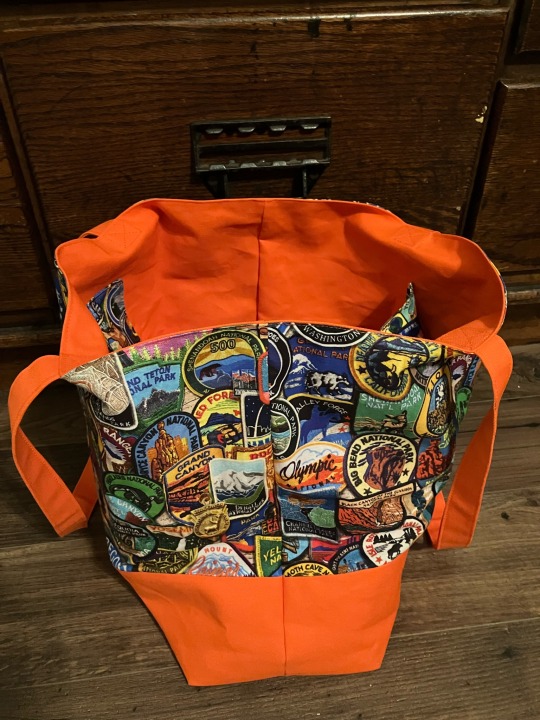
The orange canvas and national parks tote for my uncle is done!!
I’ll take photos with better lighting tomorrow when the sun is up again, but I’m so happy with how this turned out. I made the bag pattern myself, because I couldn’t find one the size I wanted, and it’s got two patch pockets on the inside because I bought way too much national parks fabric and because pockets are useful
#sewing#handmade#orange and national parks#canvas tote bag#reusable shopping bag#this thing is sturdy as heck#I’ve also discovered I love sewing canvas!#and it only took two hours and fifteen minutes!#and part of that was me figuring out what I was doing#I think my relatives are all getting totes for the holidays this year
119 notes
·
View notes
Text


Some shifty clothing at work today!
#submission#thrifting#shiftythrifting#clothes#shirts#vests#oddly personal#holidays#halloween#sequins sewed to shit
251 notes
·
View notes
Photo
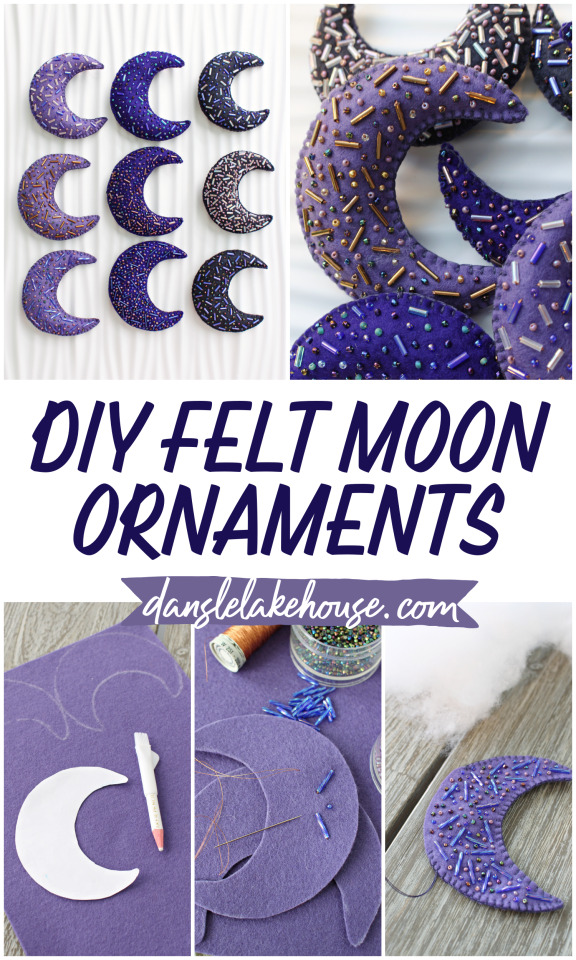


DIY Felt Moon Ornament
✖✖✖✖✖✖✖✖
sew-much-to-do: a visual collection of sewing tutorials/patterns, knitting, diy, crafts, recipes, etc.
#DIY#sew#sewing#easy#simple#moon#celestial#project#ornament#christmas#holiday#festive#sparkle#bead#tutorial#craft#decor#decorate#witch#witchy#magic#wizard
293 notes
·
View notes
Note
Hello! I'm a huge admirer of your work, you're amazingly skilled and I would love to follow one of your sew-alongs one day.
The only problem is, I'm terrible at sewing - I can't cut a straight line to save myself; I measure a million times and always end up short; all the different terms even in "beginner" patterns are confusing and overwhelming. But I really want to learn, and the few things I've managed to make, even though they look like trash, have made me feel accomplished. Any beginner projects you'd recommend and/or novice sewing advice for someone without a crafty bone in their body?
Thank you and can't wait to see what you make next!
What a lovely message to wake up to, thank you!!
Anon, I'm going to go and find the first apron I made just for you. it is terrible in both design and execution but it accomplished its goal of existing in a fit enough state to encourage me to continue sewing.
It sounds like your projects do that too, so you're already doing awesome!
One isn't born with crafty bones, one creates them in hellish experiments bathed in blood and lost scissors.
That said, there's lots of ways to make the experiments less hellish. As with most things, money or help from someone with experience can make things much easier.
Can't cut straight? If you've got the disposable income, get yourself a quilter's cutting mat and a rotary cutter, or at least a clear ruler like this:
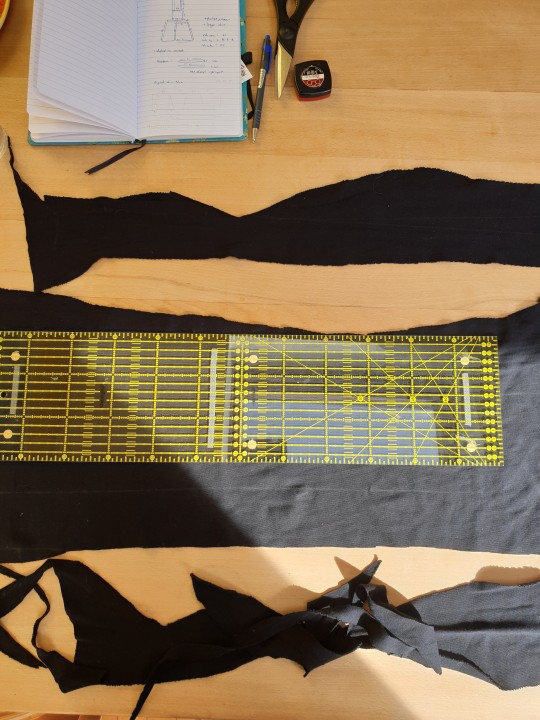
Picking your battles also helps. Using fabric with a clear grain that doesn't fray too much as you start out will prevent a lot of headaches, as will sharp scissors and a good chalk marker.
Depending on what your interests are, these are things I would call good ultimate beginners projects: pillow covers, aprons, gathered skirts, straight capes.
But ultimately, the best beginners project is whatever you would be happy pouring the hours and effort in, even if the project won't turn out perfect. It's really about gathering experience and if you get that by stitching random squares together or attempting a ballgown for your dog, that's the way to go!
Anyway, your message came at a good time. I've been musing on doing a sewalong for true beginners, since my previous ones were more for people new to historical sewing than new to sewing in general.
Not quite sure what, though...
Maybe a cloak?
#a talia original#asked and answered#this got a little long sorry#talking about sewing#thank you though this was such a lovely message to get#and patterns are confusing#this is an unfortunate fact#readers if you've got ideas for sewalongs do send me an ask#I've got some holiday coming up in January where it might be nice to sew together
29 notes
·
View notes
Text


A little baby bokoblin from Zelda I made for fun
#my art#handmade#plushies#sewing#handmade plush#my cats#i have been a bit exhausted after the holidays so i wanted to make something fun to get out of artblock#i really love him#zelda breath of the wild#tloz breath of the wild#botw
17 notes
·
View notes
Text
important seasonal question:

20 notes
·
View notes
Last Seen Blogs

melihoera
screaming into the void

floridakilosv
Starlet

ryoumcn-blog
TWO-FACED (ap)

abhisaini
Abhi Saini
the-vegas-sunlight
GET A JOB PAL 💥