Art, Photography, Design and Illustration Commissions and Shop Redbubble Prints
Don't wanna be here? Send us removal request.
Text

My first SVSSS fanart.
dress reference | dressing gown reference
Do not repost or edit without permission and credit.
#Own art#fanart#luo bingmei#luo binghe#scum villain#SVSSS#the lace gauntlets are not the same era as the dress#but i think bingbing would feel pretty in them#re the poll on my main blog... i'll probably draw lesbingqui too
30 notes
·
View notes
Text

Commission for @mistr3ssquickly
I love me an art reference, this was so much fun to do.
15 notes
·
View notes
Text

Commission for @mistr3ssquickly
I love me an art reference, this was so much fun to do.
15 notes
·
View notes
Text


Do you want cool stuff? Do you want to give yourself or other people cool handmade stuff for Nondenominational MidWinter Holiday ? Now you can!
All of my work is OOAK and handmade using found and reclaimed objects- if something is calling out to you, please listen. I'd love to make you something custom, too!
December is already tomorrow, don't wait until your gift giving winter holiday is tomorrow too!
(currently limited to US only. Please reach out Via Ko-fi or tumblr if you would like to discuss int'l shipping.)
199 notes
·
View notes
Text
1 little ~ 2 little~ 22 empty ninja skins ~🎵
0 notes
Text

i lied the compliments are very nice too and im in love with you
92K notes
·
View notes
Text
By Chinese zodiac I'm year of the rabbit, by the western I'm an Aries: therefore I'm designing a cute bunnyram!


Happy New Year!
3 notes
·
View notes
Text
Got a Cricut Joy for wintermas and promptly used it to make my own face

Bonus: Cricket meets the Cricut

9 notes
·
View notes
Text

Cats With My Glasses Off
7 notes
·
View notes
Text
Oh hey btw: If you're starting your second draft of something and you're having a hard time editing out the useless fluff that doesn't lead the story anywhere, consider changing tactics: Condense, don't cut.
"Kill your darlings" is bullshit, you shouldn't throw out things that spark joy, just put them into good use or somewhere they're not in the way. Combine scenes, characters and locations. You've got two beloved but unimportant background characters with only a vague scraping role in the story? Combine them. Have just one, who now has the traits, speaking lines and the role of both of them.
You've got a Super Important But Boring scene, and a scene that doesn't progress the story but was basically just you indulging in describing a wonderful location? Combine them. Have the characters have that Super Important Conversation in the pretty rose garden or the lovely bookshop you wanted to include.
You've got two really cool locations that are in the same city but both only show up once, and it feels like a waste to indulge in describing them in detail? Combine them. The smoky tavern and the smoky witch's brew shop are now working out of the same building - the witch and the tavern keeper are now married.
If you feel like you have too much description or too many characters, don't throw anything out before you've checked if you have an empty shelf to put them in. Give the Cool Character Description to a previously nondescript character who only shows up to tell the protagonist the One Important Thing. Make the Cool Location You Described For Three Pages But Which Only Shows Up Once show up again later.
10K notes
·
View notes
Text

Template! for you!
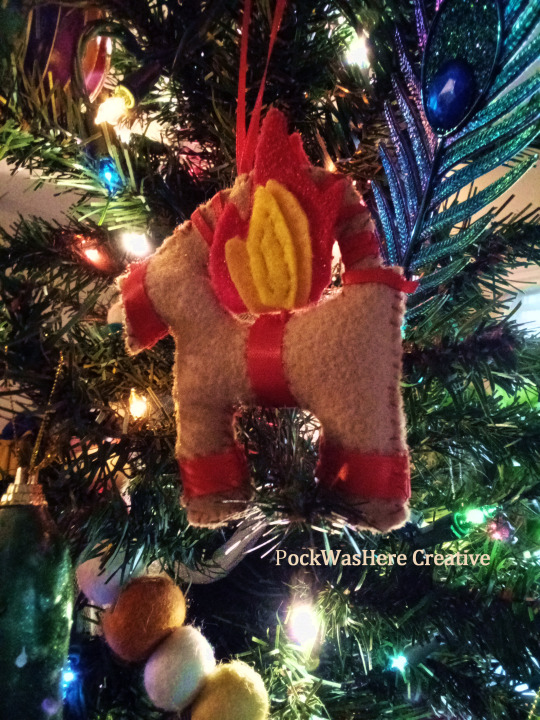
Flaming Gavle Goat Ornament Tutorial
You Will Need:
Craft felt in light brown or 'straw' color of choice, red, yellow and orange
Red ribbon in 2 widths
Thread- I used red and yellow; brown, orange or white would give different effects
scissors
Needle for hand sewing
pins or quilter's clips
polyfill stuffing or fabric scraps
a poking implement
a lighter or Fray check glue
paper and pencil
patience / approx 2 hours to waste making a meme for the holidays
To start, I drew a rectangle approx 3.25 in wide by 4 in high and sketched out a geometric goat shape. You could go a bit larger, but if you go much smaller it will be difficult to stuff. Remember that the sewing and stuffing will eat up some of your edges.
Cut out your goat template and trace it on your light brown felt. I used chalk, marker may work depending on how neatly you cut.
(I'll add a nice vectored template to this tutorial later, but I'll have to fight with the scanner first. )
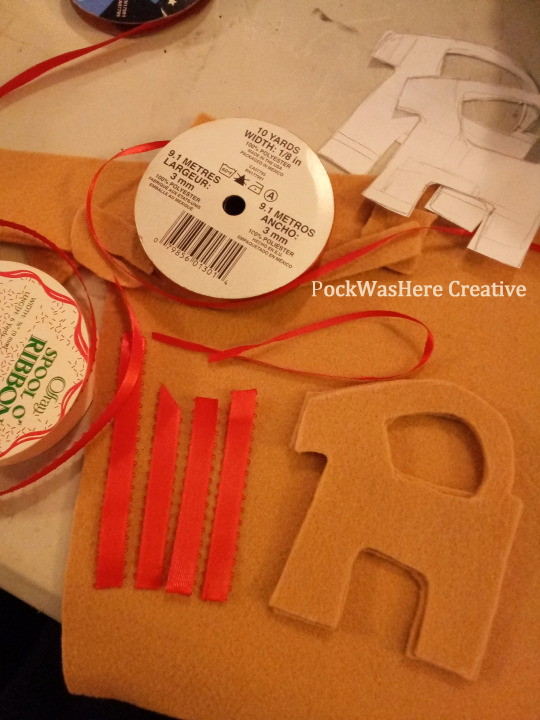
Cut 2 of your goat. It doesn't matter if they're not exactly the same, as you can fudge the edges a little when you sew. If your felt has a front and back you can tell apart, you'll need to pick a "right" side of the fabric and mirror one of the goat base pieces.
I cut my ribbon decorations in advance, wrapping it around the stacked bases to check the length - remember you'll be stuffing this later so you may need to add a tiny bit more to accomodate.
Out of the wider ribbon, you'll need one for each leg, one for the tummy and one for the bridle. The thin ribbon will be to hang the ornament with and to wrap the horns- I did not pre-measure the horn wrapping because I wasn't sure how long it would need to be. Finish the cut edges of the ribbon as you like- I used a lighter to heat seal them but fray check or white glue will work. Glue will be more difficult to sew through.
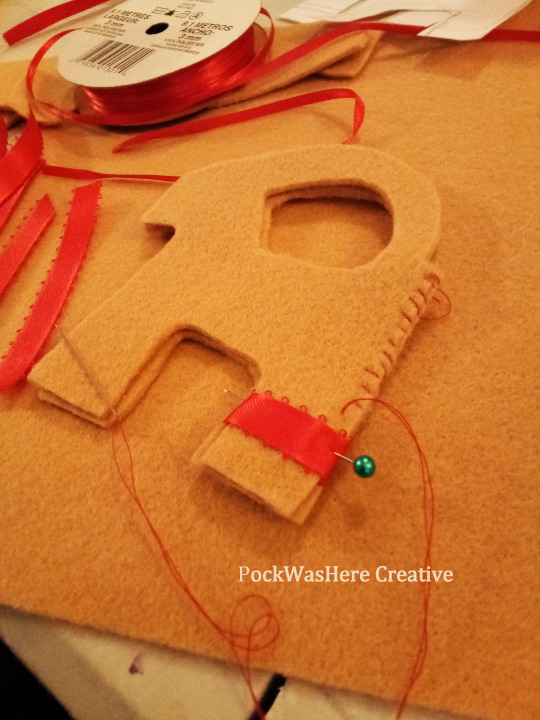
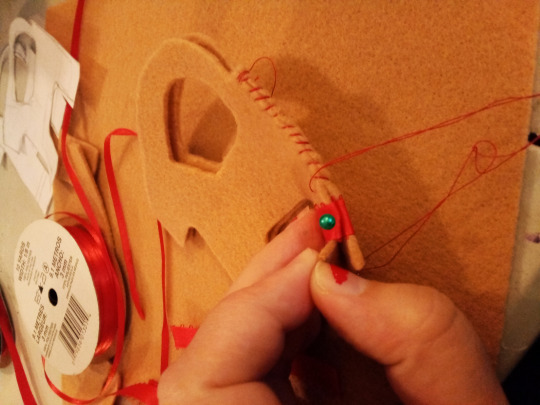
Start sewing the goat bases together. I used red thread and a basic whip stitch, but you could get a couple different effects by using white or brown thread, or by sewing a blanket stitch.
Here's where I made life difficult for myself- stop when you get to the legs and wrap the ribbon in place, tucking the ends in between the layers. This secures them and hides the edges but is fiddly to pin and sew. You can also wait until you have sewn most of the way around and tack or glue the ribbons on top if you're less fussy about the ends showing.
Continue sewing around the legs and body, catching the ribbons in your stitches and repeating for the bridle ribbon. Stop at the base of the horns so you have room to stuff.
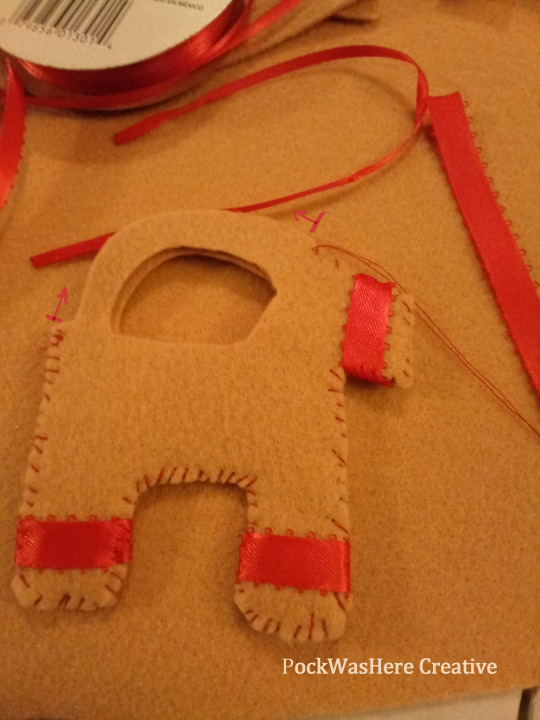
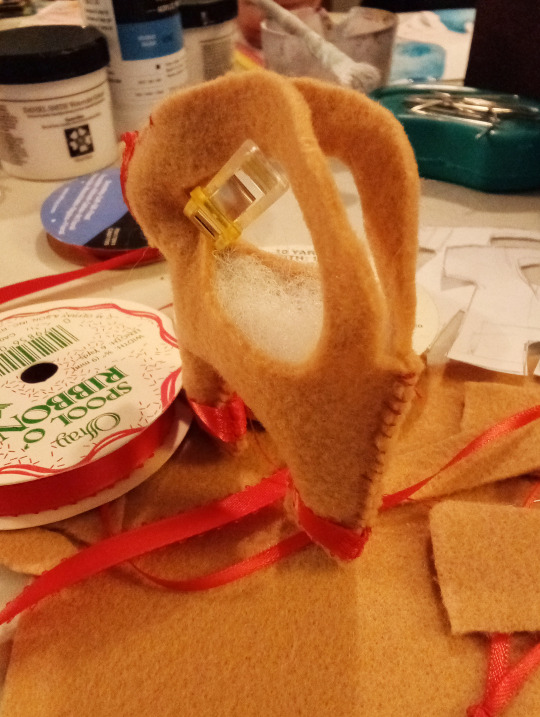
I'm working with modern plastic materials, so sadly (or not) this goat isn't terribly flammable, just meltable. If you want to be eco friendly you can stuff him with scrap fabrics. I'm using polyfill.
Use a chopstick, paintbrush handle or empty mechanical pencil to poke your stuffing into place. Smaller lumps of fluff are better and more maneuverable.
For firmer limbs stuff chopped up bits of your felt into the legs and head and follow it up with the polyfill.
My original plan for the removable flame was to do clever things with magnets, so if you want to give that a try this would be the point to toss one in before you close up the body. I was on a roll and didn't remember until I was working on the horns. ¯\_(ツ)_/¯

Remember you still need to put the tummy ribbon on and curse your clumsy giant fingers!! Getting everything situated and laying nicely may take a couple attempts. Once you've stabbed yourself with the pins a couple times, sew up the inner curve from the base of the horns on the neck to where the horns meet up again on the butt.
Be careful of where your thread tail goes and the direction of your stitches, it's easy to accidentally loop around the whole body or catch the horns.
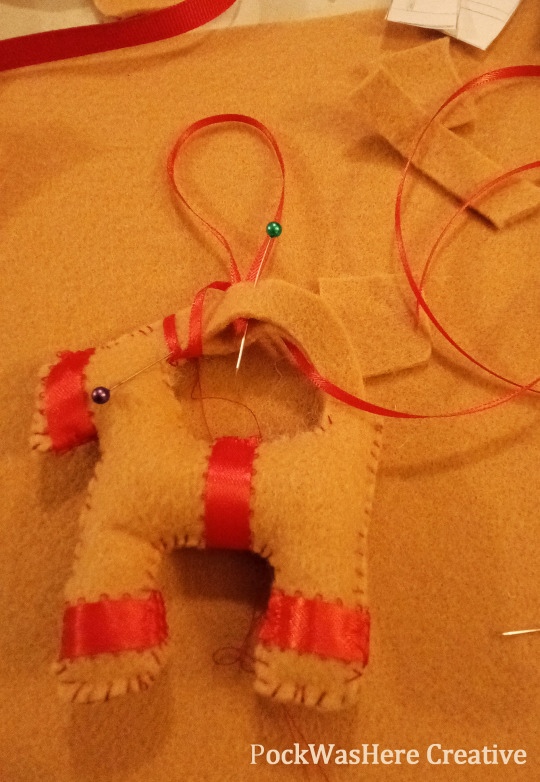
There should still be a bitty opening at the base of the horns and at the butt (giggle here), if you flattened your stuffing during the last step and need to poke a teensy bit more in.
Tie your length of hanging ribbon into a loop and set aside.
This is another step where my need to hide the edges made life stupid and fiddly. Tuck the edge of a length of the thin ribbon between the layers on the bottom of the horns and wrap it around, and tack in place with a couple stitches. Loop it a couple of times until you get to the point you want to hang the ornament: I chose dead center, you may want him at a jaunty angle.
Fiddle with bendy felt, slippery ribbon and pins until your hanging ribbon's knot is sandwiched between the 2 layers of the horns and continue wrapping with the loose long piece, securing with pins or clips as needed and hopefully not making a big tangled mess of ribbon.

When you get to the end wrap it around a couple times and cut off any extra length, seal your ribbon and pin or clip into place.
Sew along remaining curves of the horn, making sure not to yank the hanging ribbon out of place and to catch the wrapping ribbon as you go. Accept there's no good way to tuck in this !$@!%%^$ slippery 1/8th BS ribbon and tack the butt end down with a few extra stitches.
Alternately, tack the hanging ribbon in place between the layers, sew the edges and then wrap and secure the horn ribbon with stitches or glue at either end. You could also skip sewing the edges of the horns together before wrapping them, but it will be more sturdy and secure with them sewn.

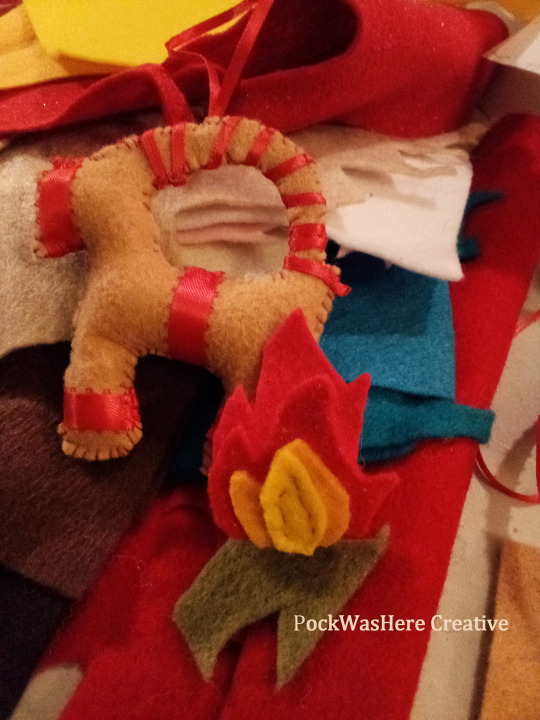
The fun part! fold some paper in half and draw your flames on the fold. Mine were a little over 2 in tall, and they should be a little smaller than the back of your goat at the base in order to fit in place. Cut out your fire and use it as a template for your felt.
The base layer will need to be on cut on the fold but the rest can be separate. Use as many or as few layers and colors as you like, it doesn't have to match exactly on both sides. You'll be folding this up so that you have 2 decorative sides facing out and a plain inside, so you'll be making two mirrored flames while it's still flat: one pointing up and one pointing down. Sew or glue the layers together.
I used a hidden stitch about a third of the way up from the bottom on the inside of the flame to pinch the sides together and pull it up into a V shape. This can be tucked up into the gap between the body and the horns and will hold itself in place pretty well if you have thick felt.
For more security/ shaping you could sew a loop of craft wire or an opened paperclip to the back side of the flame, or as previously mentioned do clever things with magnets.

Hang him on the tree with or without flames and enjoy!
Options for enjoying your handcrafted goat:
Pin the Flame on the Goat: Hide goat ornament on tree and give your participant (s) the flame (s), first to put them together wins.
Art Imitates Goat: Keep the flames to the side until/ if the real goat burns, and then apply to ornament. Celebrate with hot cocoa or warm winter drink of choice.
Voodoo Goat: Real Gavlebocken hasn't burned yet? Summon the flames by setting your ornament on felt fire! Celebrate with hot cocoa or warm winter drink of choice.
2K notes
·
View notes
Text
Flaming Gavle Goat Ornament Tutorial

You Will Need:
Craft felt in light brown or 'straw' color of choice, red, yellow and orange
Red ribbon in 2 widths
Thread- I used red and yellow; brown, orange or white would give different effects
scissors
Needle for hand sewing
pins or quilter's clips
polyfill stuffing or fabric scraps
a poking implement
a lighter or Fray check glue
paper and pencil
patience / approx 2 hours to waste making a meme for the holidays
To start, I drew a rectangle approx 3.25 in wide by 4 in high and sketched out a geometric goat shape. You could go a bit larger, but if you go much smaller it will be difficult to stuff. Remember that the sewing and stuffing will eat up some of your edges.
Cut out your goat template and trace it on your light brown felt. I used chalk, marker may work depending on how neatly you cut.
(I'll add a nice vectored template to this tutorial later, but I'll have to fight with the scanner first. )

Cut 2 of your goat. It doesn't matter if they're not exactly the same, as you can fudge the edges a little when you sew. If your felt has a front and back you can tell apart, you'll need to pick a "right" side of the fabric and mirror one of the goat base pieces.
I cut my ribbon decorations in advance, wrapping it around the stacked bases to check the length - remember you'll be stuffing this later so you may need to add a tiny bit more to accomodate.
Out of the wider ribbon, you'll need one for each leg, one for the tummy and one for the bridle. The thin ribbon will be to hang the ornament with and to wrap the horns- I did not pre-measure the horn wrapping because I wasn't sure how long it would need to be. Finish the cut edges of the ribbon as you like- I used a lighter to heat seal them but fray check or white glue will work. Glue will be more difficult to sew through.


Start sewing the goat bases together. I used red thread and a basic whip stitch, but you could get a couple different effects by using white or brown thread, or by sewing a blanket stitch.
Here's where I made life difficult for myself- stop when you get to the legs and wrap the ribbon in place, tucking the ends in between the layers. This secures them and hides the edges but is fiddly to pin and sew. You can also wait until you have sewn most of the way around and tack or glue the ribbons on top if you're less fussy about the ends showing.
Continue sewing around the legs and body, catching the ribbons in your stitches and repeating for the bridle ribbon. Stop at the base of the horns so you have room to stuff.


I'm working with modern plastic materials, so sadly (or not) this goat isn't terribly flammable, just meltable. If you want to be eco friendly you can stuff him with scrap fabrics. I'm using polyfill.
Use a chopstick, paintbrush handle or empty mechanical pencil to poke your stuffing into place. Smaller lumps of fluff are better and more maneuverable.
For firmer limbs stuff chopped up bits of your felt into the legs and head and follow it up with the polyfill.
My original plan for the removable flame was to do clever things with magnets, so if you want to give that a try this would be the point to toss one in before you close up the body. I was on a roll and didn't remember until I was working on the horns. ¯\_(ツ)_/¯

Remember you still need to put the tummy ribbon on and curse your clumsy giant fingers!! Getting everything situated and laying nicely may take a couple attempts. Once you've stabbed yourself with the pins a couple times, sew up the inner curve from the base of the horns on the neck to where the horns meet up again on the butt.
Be careful of where your thread tail goes and the direction of your stitches, it's easy to accidentally loop around the whole body or catch the horns.

There should still be a bitty opening at the base of the horns and at the butt (giggle here), if you flattened your stuffing during the last step and need to poke a teensy bit more in.
Tie your length of hanging ribbon into a loop and set aside.
This is another step where my need to hide the edges made life stupid and fiddly. Tuck the edge of a length of the thin ribbon between the layers on the bottom of the horns and wrap it around, and tack in place with a couple stitches. Loop it a couple of times until you get to the point you want to hang the ornament: I chose dead center, you may want him at a jaunty angle.
Fiddle with bendy felt, slippery ribbon and pins until your hanging ribbon's knot is sandwiched between the 2 layers of the horns and continue wrapping with the loose long piece, securing with pins or clips as needed and hopefully not making a big tangled mess of ribbon.

When you get to the end wrap it around a couple times and cut off any extra length, seal your ribbon and pin or clip into place.
Sew along remaining curves of the horn, making sure not to yank the hanging ribbon out of place and to catch the wrapping ribbon as you go. Accept there's no good way to tuck in this !$@!%%^$ slippery 1/8th BS ribbon and tack the butt end down with a few extra stitches.
Alternately, tack the hanging ribbon in place between the layers, sew the edges and then wrap and secure the horn ribbon with stitches or glue at either end. You could also skip sewing the edges of the horns together before wrapping them, but it will be more sturdy and secure with them sewn.


The fun part! fold some paper in half and draw your flames on the fold. Mine were a little over 2 in tall, and they should be a little smaller than the back of your goat at the base in order to fit in place. Cut out your fire and use it as a template for your felt.
The base layer will need to be on cut on the fold but the rest can be separate. Use as many or as few layers and colors as you like, it doesn't have to match exactly on both sides. You'll be folding this up so that you have 2 decorative sides facing out and a plain inside, so you'll be making two mirrored flames while it's still flat: one pointing up and one pointing down. Sew or glue the layers together.
I used a hidden stitch about a third of the way up from the bottom on the inside of the flame to pinch the sides together and pull it up into a V shape. This can be tucked up into the gap between the body and the horns and will hold itself in place pretty well if you have thick felt.
For more security/ shaping you could sew a loop of craft wire or an opened paperclip to the back side of the flame, or as previously mentioned do clever things with magnets.

Hang him on the tree with or without flames and enjoy!
Options for enjoying your handcrafted goat:
Pin the Flame on the Goat: Hide goat ornament on tree and give your participant (s) the flame (s), first to put them together wins.
Art Imitates Goat: Keep the flames to the side until/ if the real goat burns, and then apply to ornament. Celebrate with hot cocoa or warm winter drink of choice.
Voodoo Goat: Real Gavlebocken hasn't burned yet? Summon the flames by setting your ornament on felt fire! Celebrate with hot cocoa or warm winter drink of choice.
#holiday craft#gavle goat#gavlebocken#christmas ornament#tutorial#hand sewing#also please show me your goats if you make one!
2K notes
·
View notes
Text

still from a video i made for my publisher: how to draw CREATURES
426 notes
·
View notes


