#hibiscus flower diy
Explore tagged Tumblr posts
Visit Tumblr Blog
Explore Tumblr blogs with no restrictions, modern design and the best experience.
Last Seen Tumblr Blogs


Fun Fact
After the announcement of the deal with Yahoo!, there were 170K signatures of unhappy Tumblr users petitioning to prevent the sale in 2013.
Text
youtube
If you work with felt or wool or any other natural fibres, you may be wondering how you can dye them without introducing chemicals and difficult processes. Well, look no further than SOLAR DYEING!
Process:
- Pretreat fibre (aka mordant) with alum to make the color stick
- Put wet fibres in a sealable glass jar with fresh or dried plant material
- Leave in the sun for 2-3 weeks (depending on how much sun your jars get you can go shorter or longer!)
- Rinse out your fibres
Check out the video to see these plants in action:
- Marigold
- Red Clover
- Golden Rod
- Hibiscus
- Purple Loosestrife
- Curly Dock
- Red Hopi Amaranth
- Stinging Nettle
The results may just surprise you...!
Subscribe for new crafty videos every Wednesday!
► http://bit.ly/subdanodoesthings
Find more on Insta and tag me with #DanoDoesThings!
► Instagram: https://www.instagram.com/danodoesthi...
Welcome to Dano Does Things! A place to learn, have fun, and do something creative every week.
My name is Danielle or Dano for short. I am a thirty-one-year-old lady living in Canada who has a passion for creation. Every Wednesday, I tackle new arts and crafts projects, trying to learn and get better every time, while celebrating my mistakes and tackling challenges head-on.
Have an idea for something I should try next? Leave a comment or send me an e-mail! I'd be happy to hear from you.
► E-mail: [email protected]
Music
All music is from Epidemic Sound.
► So Dull - Smartface
► Bojack (Instrumental) - Pandaraps
#Dano Does Things#solarpunk#solar dye#natural dye#how to#how to dye#how to solar dye#diy#do it yourself#flowers#plants#marigold#red clover#golden rod#Hibiscus#Purple Loosestrife#Curly Dock#Red Hopi Amaranth#Stinging Nettle#Youtube
51 notes
·
View notes
Text

A little clay piece!
#clay#clay art#clay ashtray#ashtray#diy#diy projects#diy art#small artist#my art#artists on tumblr#artistic#flowers#flower#hibiscus#pink
2 notes
·
View notes
Text
youtube
DIY Hibiscus Paper Mastery | The Art Of Making Hibiscus Paper Flowers || Aklima Crafts And Journals
#hibiscuspaperflowers #aklimacraftsandjournals #aklimacrafts #aklima #aklimajournals #painterly #easytutorial #paperflowerart #handmade #diy #craftingmastery #hibiscuscraft #diyartistry #diyhibiscuspaper #creativeblooms #craftingexcellence #paperflowertutorial #artisticjourney #floralcrafting #hibiscuspapermastery #trending #trendingvideo #paperblooms #diyhibiscus #paperflowers #floralcraft #craftycommunity #handmadeflowers #tropicalvibes #creativehomedecor #bloomwithme #subscribe #subscribetomychannel #thanksforwatching
#handcrafted flowers unveiled#paper flower mastery aklima crafts and journals#arts and crafts#diy#youtube#master the art of handcrafted flowers#ペーパークラフト#diy hibiscus paper mastery#the art of making hibiscus paper flowers#aklima crafts and journals#aklima crafts#aklima journals#paper flower making aklima crafts and journals#hibiscus paper mastery#hibiscus paper flowers mastery#hibiscus paper flower#art of hibiscus paper flowers#origami hibiscus flower 大紅花摺紙#гибискус#origami hibiscus#hibiscus origami#paper flower mastery#origami joba flower#diy joba flower making#paper craft hibiscus#paper flowers#hibiscus flower diy#origami flower hibiscus#hibiscus flower craft with paper#paper flower hibiscus
0 notes
Note
Hello Kriim! How are you?
(For DL)
Sun, Moon do you have favorite flowers? If so, could you please tell us the names?
(if you can't answer this then no problem! Have a great time! ❤️)
Aaaaaaaa still not the best, but I'm not complaining cuz it could be worse. Tryna keep my mood on. I made some fall DIY decoration yesterday, we have a bowl full of gummies. We're not fan of hard candies 😄
Mmmh... hibiscus. Reserved and cynical, but it's also symbolises the passion and fiery nature. A but of a reminder to my inner struggles and desire to simply enjoy life.
Exactly like you, my love.
Mine is... Iris for a good reason. It stands out not only for its beauty - khhehehe- but in Greek mythology She was a messenger of the gods, forming a bridge between heaven and earth. I'm a narcissistic asshole haha! Olllright, I gotta go baby. Showtime soon. *kiss him on the face*
*whispers with a small smile when Moon leaves the room* He's also sensitive and reflective on the inside, resonates perfectly with this flower. Iris is a sophisticated yet mysterious flower... just like him. My sushi..
36 notes
·
View notes
Text
How to DIY energy drinks for cheap
First, required reading: link to article
Energy drinks have a few vital components:
>sweetener
>flavor
>water
>caffeine
>bubbles (i never do that and don't know how)
Here are some of my favorite things to use:
>granulated sugar (sweetener)
>stevia leaf or granulated artificial sweetener (sweetener)
>kool aid (flavor, sweetener)
>loose-leaf herbs (flavor) (try hibiscus petal, chicory, even lemongrass and mint can be nice)
>lemon juice (flavor, preservative)
>kool aid (easiest flavor/sweetener combo)
Supplies you might need:
>kettle or pot for heating water
>tea strainer ball to keep your leaves out of the final product
>a nice ragu jar or old Gatorade bottle for pre-made stuff
>funnel for pourin
>ladle for scooping liquid into the funnel
Kaffn-8 or any other such liquid caffeine product will do you for caffeine. That brand is super easy and convenient. Kaffn-8 is my favorite for the quality and ease in dosing, as well as the value (15 bucks has lasted me 2 months of daily use).
I like to make a sugar-flavor concentrate, then assemble each glass as I need it. Sugar tastes better when melted with heat than when dissolved without heat, even once chilled. This also allows me to tweak caffeine content. Here is how to make it:
Fill tea ball with herbs (use about a handful or 1/2 cup for every quart of water, you're making it strong)
Heat water and pop the tea ball in
Simmer or keep hot for 10 min
Remove tea ball and turn off heat
While hot, add as much sugar as you had herbs, and mix until melted.
Mix in as much lemon juice (or other assorted acid or preservative) as you can stand. The more preservative, the longer it'll keep
Allow to cool enough to handle
Jar it up, put it in the fridge for later use. You can and should re-use all manner of bottle, just be wary of melting anything plastic or burning your hands w hot water.
A note: the smaller your batches, the less you waste. But high concentrations of acid and sugar keep it good for up to a month in the fridge.
To use: mix water in a cup with your syrup, tweaking concentrations until it tastes good. Add caffeine, measuring your dose carefully.
Then, do bubble magic to add carbonation if you can do that. Maybe you found a soda stream somewhere. If you don't have bubbles, you'll just have to enjoy your energy drinks flat.
And, you're all done!
Now, where to get everything:
(Grow your own herbs if you are mega brave. Mints are nearly indestructible little plants.)
Lemon juice, dollar store. Quality is the same, you've just got to shake it up.
if its a foreign grocer, they likely have herbs cheap. If its a Mexican grocery, they 100% have the best herbs. (Aguasfrescas drink mixes are cheap and THE BOMB, and hibiscus flower always comes in mega bulk) .
Herbalist and spiritual shops have herbs too, and are likely to have tea balls. Branch out! Catnip has been my favorite oddball herb.
Farmers markets also have some (like three if you're lucky) herbs, and you may have to dry them yourself. Since it's punk to reach out to your community, ask around at the farmers market to see if you can get any herb or dried flavorant that's on your mind- small businesses love consumer feedback! You just might have to wait for the plant to grow, heh, but if you're friendly then you'll make friends. Some examples: ask the jam bottler for dried fruit peels, the farmer for mugwort
I get my artificial sweeteners on closeout, my stevia from herbal shops, and my sugar at Walmart (bite me, its cheap and I'm poor).
Kaffn-8 can only be found online, as far as I'm aware. I promise I'm not sponsored, just a grateful caffeine addict.
Do Google your herbs for drug interactions if you take meds. Healthline has good info on herbs. Dried grapefruit rind can mess with my psych meds, for example.
Again, be careful about caffeine. Always dose your caffeine. Having high levels of caffeine on tap is a bit of a big responsibility: I know I nearly bit the dirt from the all-you-can-eat espresso bar at my college. Immaturity could kill you, caffeine is a drug. Count doses, never go above 500 a day, try not to go more than 200 in the same hour.
Now take that money you've saved and give it to a charity to blow a very mean raspberry at nestle. Or, yknow, feed yourself. Its a tough world.
80 notes
·
View notes
Text
Salt of the World
Salt is a classic representation of Earth. In rituals, it is often associated with protection or cleansing.
House witches sprinkle salt in doorways or the corner of rooms to protect your home.
Use salt water to purify crystals, wash your floors or in a spray bottle to cleanse your space.

Table Salt:
One of the most common types of salt, this is what you’ll typically find inside a salt shaker. Table salt is generally mined from underground deposits, dissolved in water, and purified to remove any trace minerals before being re-hydrated to form the final product. This process creates an even, fine-grained texture and clean, consistent taste.
**Ionized salt vs non-ionized - Iodized salt is simply table salt that’s been treated with sodium iodide. It was developed in the 1920s to prevent iodine deficiency, a condition that can cause thyroid issues. Some chefs do note a slight chemical aftertaste from the added iodine.
Kosher Salt:
A great alternative to traditional table salt, kosher salt offers a flakier, coarser texture and clean, bright flavor. This additive-free salt variety gets its name because it’s used during the process of koshering meat. Because of its larger grains, kosher salt takes slightly longer to dissolve than table salt, which means that it offers enhanced texture when used to season meats and vegetables.
Fleur de Sel:
Fleur de sel is a French phrase meaning “flower of salt.” It’s used to describe a uniquely delicate salt variety from the coast of Brittany, where the crystals are hand-harvested from the surface of saltwater ponds. This production method means that fleur de sel is lower in sodium and higher in mineral content than most salts, so it offers a lightly briny flavor.
Epsom Salts:
Epsom salt is also known as magnesium sulfate. It’s a chemical compound made up of magnesium, sulfur, and oxygen. Despite its name, Epsom salt is a completely different compound than table salt. It was most likely termed “salt” because of its chemical structure.

::Rock Salts::
Sea salt:
Sea salt is made by evaporating seawater to produce large, irregular crystals or flakes that can come in a variety of colors. Because it’s less processed than table salt, sea salt offers a more complex mineral flavor profile, which is strongly influenced by its geographic origin. Highly versatile in the kitchen, sea salt can range in texture from fine flakes to coarse crystals, and in flavor from briny to lightly sweet.
Himalayan Salt:
It’s easy to spot Himalayan salt; this variety is noteworthy for its striking, salmon-pink hue. Recognized as the world’s purest salt, Himalayan salt is mined high in the mountains of Pakistan. Rich in minerals, it offers a complex flavor and large, hard grains (put the crystals in a grinder for best results in the kitchen). Because it’s dried at high temperatures, Himalayan salt is exceptionally strong and stable; it can be carved into boards, bowls and other cookware.
Hawaiian Salt:
Another region known for its colorful salt is Hawaii, which produces a red sea salt known as alaea salt. Alaea salt is made by combining Hawaiian sea salt with red volcanic clay. Popular in Hawaiian cooking, this salt is relatively low in sodium and derives a mild flavor from the mineral-rich clay. Thanks to its eye-catching color, it makes an exceptional finishing salt. It’s also one of the key ingredients in my Slow Cooker Kalua Pork.
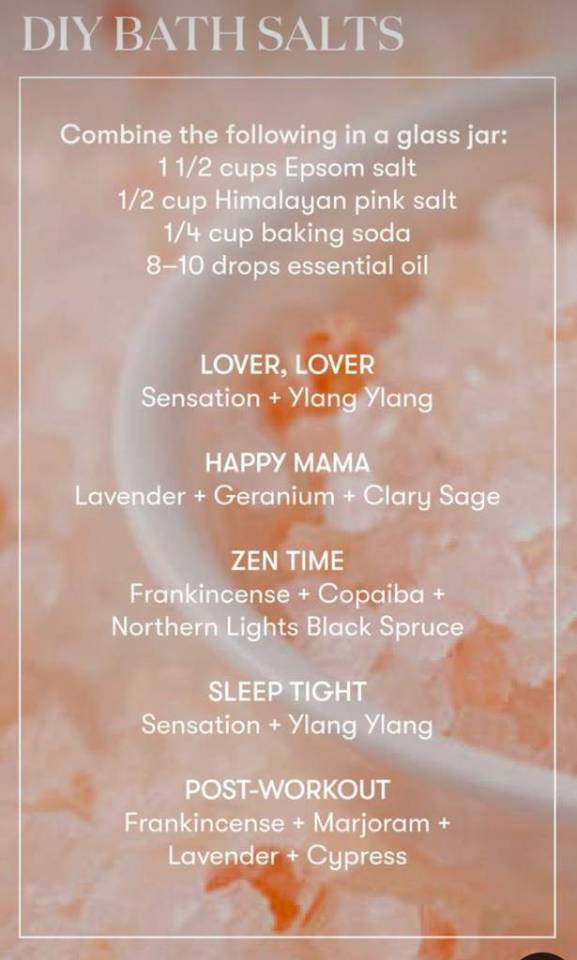
::DIY Ritual Salts::
White Salt: Any household salt +
Eggs shells (cascarilla powder)
Jasmine flowers
White rice
Red Salt: Himalayan or Hawaiian salt + dried flowers or peppers picked to suit your intention
Rose
Hibiscus
Pink Peppercorns
Cayenne
Chipotle
Adobo
Black Salt: Salt of your choice +
Ash
Peppercorns
Chasteberry
Purple Salt: Salt of your choice + dried flowers based on your intention
Lavender
Violets
Echinacea
Iris
Green Salt: Household salt of your choice + any assortment of dried herbs or plants based on your intention, such as:
Rosemary
Basil
Sage
Thyme
Oregano
Parsley
Pine

#witch#kitchen witch#pagan#witch blog#herbs#kitchen witchery#witchcraft#green witch#hearth witch#herbal magick#witchy#witch aesthetic#baby witch#witchy vibes#witches#earth witch#forest witch#cottage witch#hedge witch#lunar witch#pagan witch#nature witch#witch community#witch core#witch history#witch familiars#kitchen witchcraft#witchblr#witchcore#witch tips
65 notes
·
View notes
Text

Here it is folks, the long-awaited Genshin Impact Birthday Cake Breakdown, Episode 3: Sumeru Cake!
Details below the cut!
For a filling between the two layers, I’d recommend a Swiss meringue, stabilized whipped cream or another kind of frosting flavored with Saffron, Caramel, Coco, Vanilla, Tahini, or another nut/seed butter. If you want to try something a little different, you could try making an Iranian/Persian Halva (comparable in consistency to a fairly dry fudge) to add in a thin layer between the cakes, with or without additional frosting layered in.
Jumping right into it, the cake has inclusions that appear to be a nut of some sort and judging by the color and theme I believe that Pistachio would be an appropriate choice, though Almond is one of the few nuts canonically in Genshin Impact (according to the english translation) so that would also work. Cardamom, Rosewater, or Orange would be an excellent flavor accompaniment, especially since pistachio doesn’t have a super strong flavor on its own if you choose to go that route. If you use almonds, use blanched and halved ones, if you use pistachios make sure they're shelled and broken into pieces.
In the countries/regions of the world that Suemru is analogous to I found one kind of cake that stood out to me: Basbousa (also known as Revani, Namoura, Shamali, or Harissa) a kind of cake typically made with Semolina and yogurt that is then soaked in syrup, it can even be made with almond, coconut, or pistachio included in the batter. But if you’re feeling less adventurous, or simply want a consistency that is more expected of a western-style layer cake, then I do encourage you to at least find a recipe that includes your nut of choice in the ingredient list.
If the type of cake you choose allows for it, a syrup soak could enhance the flavors of the cake and keep it moist since it’s not frosted all the way around. Any of the flavors I suggest for other parts of the cake would be suitable for this, especially Rose, Citrus, and Cardamom.
Swiss meringue, stabilized whipped cream, or any other kind of frosting would be just fine for the piped star dots on the top, and the ring of dots around the filling as long as it has the correct consistency to make large full blobs.
Now for the decorations.
The berries on the side would likely be easiest to craft with fondant (which you can diy with marshmallows), but you could take that extra step to make the berries shiny by brushing them with egg whites or vodka and letting them dry. They also bear a resemblance to Goji berries, Cape Gooseberries, and Strawberries if you squint, so you could use some of those to decorate the cake instead. And though they do look quite a bit like tomatoes, I do not suggest putting tomatoes on your cake.
The Sumeru roses do not seem to have a real world counterpart, though Columbine, Dendrobium Orchid, Lisianthus, and Rose of Sharon flowers seem passably similar. Gum paste or fondant may be your best bet here otherwise. Crocus, Hibiscus, and Lily flower tutorials in your chosen medium would likely help you to best put together an accurate looking Sumeru Rose. If you plan to use real flowers, always check to make sure they’re not toxic before putting them anywhere near food.
The musical score and bird standing up in the back could easily be done with fondant or gumpaste adhered to dowels or skewers to keep it upright, but Chocolate would be an elegant option as well. The technique used in this video would work to create the large shapes and the bird, and this one would be suitable for the music notes and the treble cleff.
The leaf behind everything is large enough that fondant or gum paste might be too heavy without substantial support, so I would recommend using Wafer Paper/Rice Paper. This video should help in the creation of a big leaf (https://www.youtube.com/watch?v=mOI-I0IhUHY), though it may still need some support to stay in place. Synthetic lilypads and monstera leaves are available for purchase online and in some craft stores if you would like a simpler but inedible option.
That's a wrap! Good luck, and if you try to bake it be sure to share your efforts with me, I'd love to see!
The Aranara heads and hats would also be easiest to accomplish with fondant or gum paste, though it could be possible to make the heads themselves out of buttercream like the frogs in this tutorial, or to make them like cake pops. The hats would be doable if you follow a morning glory or leaf tutorial for fondant or gum paste, use whichever substance you’ve already used for the other elements. Just don’t forget the glasses, tiny leaves, and the little bow!
Finally, there appear to be blanched almonds, small pistachios, pine nuts, or lotus seeds placed around the edge of the frosting on the top, and scattered flower petals and more crushed nuts. Rose, violet, pansies, or edible orchids would work here, though I'd recommend orchids if you can get your hands on them.
#lynx thinks#genshin impact#genshin impact cake breakdown#genshin impact birthday cake#these always take a load of research ;w;
3 notes
·
View notes
Text
Nails and tips
Hi girls, I just did my nails and I wanted to share some tips to make your nails cleaner, prettier and easier to make! I'm going to specify nails done with nail polish, in other post I will make tips for gel nails.
First of all the brand of nail polish is a very important facto, in my case I use essence's ones, they need two layers if you want a perfect result, a recomendation, if you want a more intense color I recommend aplying a white first layer and for more duration applying an last layer of transparent nail polish will make them smooth and shining.
For the maintenance of the nail I suggest if you are not having any desing putting a transparent layer of nail polish so the nail have a protective layer and it don't brakes easily, also applying oil for nails and cuticles, you can find them in any shephora and it will helps not only to mantein your nail healthy, also to remove press on nails without destroying your nails.
Where I find stickers and decoration for my nails?? In many places you can find decorations, in my opinion in shein you have many types of decorations like stickers or 3D decorations, I preffer stickers as they are easier to wear and to place correctly in the nail without any other materials, here I have some low cost examples because we are pretty girls without money :(

And finally how I have my nails right now, I did them yesterday, I hope you like my examples and this post and you find it interesting!! also i'm gonna uploatsome links to stickers;) XOXO


#flowers#pink#cute nails#tips#pretty nails#cool#coquette#girl diary#girl tips#barbie#shein#style#2000s style#nail art#tumbr girl
4 notes
·
View notes
Text
For dry & brittle hair:
To keep your Dry hair hydrated follow these tips.
ALOEVERA: It helps to keep your hair hydrated. Use once in a week, to get smooth finish.
OIL: Oil your hair and spread it evenly to the tips.
SHAMPOO: Avoid using more shampoo, try to use less .
PROTEIN & IRON: Eat protein and iron rich foods. Eggs, Spinach,Nuts,legumes,soy products. Chia seeds have Omega 3 fatty acids.
HEAT PRODUCTS: Avoid them completely.
THYROID: Check your thyroid levels.
DIY: Banana hair mask, Curd, Hibiscus leaves and flowers mask.
Keep yourself hydrated.
Try to braid your hair and avoid high ponytails.
3 notes
·
View notes
Text
How to Create a Beautiful Tropical Garden in Your Tampa Yard
Creating a tropical garden in your Tampa yard is not just about planting some flowers and calling it a day. It's an art form, a lifestyle, and an invitation to enjoy the beautiful Florida weather year-round. In this comprehensive guide, we'll explore everything you need to know about transforming your outdoor space into a lush, vibrant tropical paradise that reflects your personality and invites nature right to your doorstep.
Table of Contents Introduction Understanding the Tropical Climate in Tampa 2.1 Temperature and Humidity 2.2 Rainfall Patterns Choosing the Right Location for Your Tropical Garden 3.1 Sunlight Requirements 3.2 Soil Quality and Drainage Selecting Tropical Plants for Your Garden 4.1 Palms: The Icons of Tropical Landscaping 4.2 Flowering Plants: Colorful Blooms for Every Season 4.3 Foliage Plants: Lush Greens That Inspire Serenity Design Principles for a Tropical Garden 5.1 Layering: Creating Depth with Height Variation 5.2 Color Schemes: Harmonizing Shades for Visual Impact Water Features: Adding Tranquility to Your Garden Incorporating Hardscapes in Your Design 7.1 Paths and Patios: Functional Yet Aesthetic Elements 7.2 Garden Furniture: Comfort Meets Style Maintenance Tips for a Thriving Tropical Garden Sustainable Gardening Practices for Tropical Gardens Common Pests and Diseases: Prevention and Treatment Strategies Seasonal Care for Your Tropical Paradise How to Create a Beautiful Tropical Garden in Your Tampa Yard Inspiration from Local Botanical Gardens in Tampa Using Edibles in Your Tropical Garden Design Creating Privacy with Plants Lighting Ideas for Evening Ambiance DIY Projects for Personal Touches Community Resources and Classes FAQs about Building a Tropical Garden in Tampa Conclusion Introduction
Imagine stepping into your backyard, where the air is thick with the residential pressure washing tampa scent of hibiscus, palm fronds sway gently under the warm sun, and vibrant colors burst from every corner of your tropical garden oasis—sounds dreamy, right? Well, creating such an enchanting space is entirely possible, even if you're starting with just bare soil.
In this article titled “How to Create a Beautiful Tropical Garden in Your Tampa Yard,” we will delve deep into every aspect of designing and maintaining your very own slice of paradise right at home.
Understanding the Tropical Climate in Tampa Temperature and Humidity
Before diving headfirst into plant selections
youtube

0 notes
Text
A Thoughtful Valentine’s Day Gift: The Warmth of Tea with Tea and Twigs

Valentine’s Day is a time to celebrate love, warmth, and togetherness. While chocolates and flowers are traditional gifts, a more thoughtful and intimate way to express love is through something that provides comfort and relaxation. This year, surprise your loved ones with Tea and Twigs’ premium tea collection, a gift that embodies warmth, care, and well-being.
Why Tea Makes the Perfect Valentine’s Gift?
Tea is more than just a beverage; it is an experience of warmth, serenity, and health. Gifting tea reflects thoughtfulness and a deep understanding of your loved one’s preferences. Whether for a tea enthusiast, a health-conscious partner, or someone who enjoys cozy moments, tea is a delightful and meaningful gift.
Benefits of Gifting Tea from “Tea and Twigs”
Tea and Twigs offers a carefully curated selection of high-quality, handcrafted teas that enhance every sip with purity and flavour. Here’s why they make an ideal Valentine’s Day gift:
Rich in Antioxidants – Supports overall health, boosts immunity, and reduces stress.
Enhances Relaxation – Herbal and floral teas promote calmness and help unwind after a long day.
Perfect for Cozy Conversations – A warm cup of tea is the perfect companion for meaningful moments together.
Wide Variety of Flavours – From floral blends to classic green teas, there’s a flavour for every taste.
Sustainable and Natural – Free from artificial flavours and crafted with love and care.
Best Tea and Twigs Teas for Valentine’s Gifting
1. Chamomile Herbal Tea – A Gift of Relaxation
Chamomile tea is known for its soothing and calming properties, making it the perfect bedtime beverage. It helps in reducing stress and promotes restful sleep, making it a thoughtful gift for a partner who deserves relaxation.
2. Hibiscus Ginger Tea – A Blend of Love and Spice
Hibiscus and ginger make a refreshing combination that is both flavorful and beneficial for heart health. This vibrant red tea is a great symbol of love and warmth, ideal for Valentine’s celebrations.
3. Society Masala Chai – Classic and Comforting
For those who love traditional flavors, masala chai is a perfect pick. Packed with warming spices like cinnamon, cardamom, and ginger, it brings nostalgia and comfort in every sip.
4. Peppermint Green Tea – Refreshing and Energizing
Peppermint green tea is a refreshing and invigorating drink that promotes digestion and revitalizes energy. A great choice for those who love a refreshing yet healthy beverage.
5. Premium Green Tea – A Gift of Wellness
Green tea is a timeless classic known for its numerous health benefits, including metabolism boost and detoxification. It is a thoughtful gift for health-conscious loved ones.
Creative Valentine’s Gift Ideas with Tea and Twigs
Instead of gifting just a pack of tea, here are some creative ways to present it beautifully:
Tea Gift Hampers – Curate a beautiful hamper with assorted teas, honey, artisanal cookies, and a handwritten note.
Personalized Tea Mugs – Pair a pack of their favourite tea with a customized mug for a personal touch.
Evening Tea Date Setup – Plan a cozy tea date with fairy lights, books, and a warm pot of tea.
DIY Tea Blends – Create a special blend by mixing different herbal ingredients for a unique tea experience.
Tea and Self-Care Kit – Combine tea with scented candles, bath salts, and chocolates for a complete relaxation package.
A Gift That Lasts Beyond Valentine’s Day
Unlike perishable gifts, tea offers a lasting experience. Every cup brewed will remind your loved ones of your thoughtful gesture. Whether shared over conversations, enjoyed in peaceful solitude, or sipped during cozy evenings, tea adds a touch of warmth and love to daily life.
Conclusion
This Valentine’s Day, step away from conventional gifts and embrace something truly special. Tea and Twigs’ premium tea collection is more than just a beverage—it’s an experience of care, love, and togetherness. Whether you choose a relaxing herbal infusion, a warming masala chai, or a revitalizing green tea, your gift will bring joy, health, and cherished moments.
Surprise your loved ones with a warm, flavorful, and heartfelt gift. Celebrate love with the goodness of tea from Tea and Twigs.
#ValentinesDayGift#TeaLovers#BrewedWithLove#TeaAndTwigs#WellnessGift#SipTheLove#HealthyGifting#WarmthInEverySip#SelfCare#TeaTime
1 note
·
View note
Text
Summer Nail Art Ideas to Brighten Up Your Look
Summer is the season of color, creativity, and fun, and your nails can be the perfect accessory to showcase your style!
Whether you’re hitting the beach, going to festivals, or enjoying warm days out, a bright, cheerful nail design can add a pop of joy to any outfit. Here are some trendy summer nail art ideas to inspire your next DIY nail session or salon visit.

1. Tropical Paradise
Nothing says summer quite like tropical patterns. Think palm trees, exotic flowers, and fruity designs in vibrant colors like pink, yellow, orange, and green. You can go for a full-on tropical theme across all nails, or opt for accent nails with a few small elements, like palm leaves on two or three fingers, for a stylish touch.
DIY Tip: Use a thin nail art brush to create palm leaves or hibiscus flowers. Start with a base color like coral or teal, and add the leaf or flower design in white or black for contrast.
2. Nautical Blues
For a seaside-inspired look, mix navy, white, and a touch of gold. You can go for classic stripes, tiny anchors, or even seashells for a chic, nautical feel. This design pairs perfectly with summer whites, blue denim, or beachwear.
DIY Tip: Tape off sections of your nail to create even stripes, and use a dotting tool to add small anchor details. Finish with a shiny top coat to keep the look fresh.
3. Pastel Ombre
Pastels are timeless, especially in soft shades like mint, lavender, and peach. Create a gradient effect by blending two pastel shades together for each nail. This look is ideal if you prefer something subtle but summery.
DIY Tip: Use a makeup sponge to apply the ombre effect by dabbing two colors onto the sponge and pressing it onto the nail. Finish with a top coat to smooth out the blend.
4. Fruit-Inspired Fun
From watermelon slices to pineapple designs, fruit-themed nails bring a playful vibe to your manicure. Go bold with multiple fruit designs across your nails or stick with just one fruity accent nail.
DIY Tip: Start with a bright base coat in pink, yellow, or green, then use a thin brush or nail art pen to draw seeds, leaves, or slices. For a quick option, look for fruity nail stickers that are easy to apply and look just as cute.
5. Abstract Art
Abstract designs are a top trend this season and allow for a lot of personal creativity. Play with different shapes, squiggles, and color splashes in shades like bright pink, coral, and turquoise. This design is perfect if you’re looking for something fun yet sophisticated.
DIY Tip: Use a nail art brush to paint irregular shapes or squiggles across each nail. Mix and match colors and shapes on each finger for an artsy, unique vibe.
6. Glitter Gradient
For a touch of glam, try a glitter gradient. Start with a solid pastel or bright color, then add a glitter polish over the tips for a shimmering, eye-catching look. This is perfect for summer nights or festivals.
DIY Tip: Apply the glitter polish on the tips first and gradually brush down towards the middle of the nail, adding extra layers for a denser look at the top.
7. Minimalist Summer
If you prefer a clean, minimalist style, opt for a nude or light pink base and add tiny accents like hearts, dots, or stripes in a summer color like yellow or blue. This subtle, chic look goes with everything and is ideal for those who prefer understated nail art.
DIY Tip: Use a dotting tool or toothpick for tiny designs. To create uniform lines, try using nail striping tape for even, thin stripes.
8. Bold Neon
Neon nails are bold, bright, and perfect for summer vibes. Choose shades like electric yellow, hot pink, or bright green for a solid, all-over neon look, or add accent details in neon over a more neutral base.
DIY Tip: For a long-lasting look, make sure to use a good base coat to prevent staining from neon pigments. You can even combine two neon colors in an ombre or gradient design for added effect.
9. Sunset Gradients
Inspired by beautiful summer sunsets, this look features gradients in colors like pink, orange, and purple that blend seamlessly into each other. You can create a sunset effect on all nails or use it as a background for palm tree or beach-themed accents.
DIY Tip: Start with the lightest color on the base and blend into darker shades. A makeup sponge works well to create a smooth transition between the colors.
10. Aeropuffing Delicate Florals
For those looking to add depth to their floral designs, aeropuffing is a great technique. Aeropuffing can create soft, subtle floral looks with a realistic 3D effect that’s perfect for summer.
DIY Tip: Invest in an aeropuffing kit and use pastel colors for your flowers. Gently build up the design to create a gradient within each petal, then finish with a glossy top coat.
Final Tips for Summer Nail Art
Use a Strong Base Coat: Bright summer colors can sometimes stain your nails, so start with a quality base coat.
Top Coat for Longevity: To keep your designs fresh, use a top coat to prevent chipping and protect the details.
Experiment with Nail Stickers or Stamps: These can add intricate details with minimal effort, especially if you’re short on time.
Hydrate and Protect: Summer can dry out your nails, so use cuticle oil regularly and keep your hands moisturized.
This summer, have fun with your nail designs, and don’t be afraid to go bold and colorful! Whether you prefer DIY or a professional touch, these ideas will keep your nails looking summer-ready all season long.
0 notes
Text
Staying hydrated is essential for maintaining good health, and what better way to do that than with delicious and nutritious hydrating drinks? Whether you're looking to quench your thirst after a workout, refresh on a hot day, or simply boost your hydration levels, hydrating drinks offer the perfect combination of taste and wellness benefits.
Why Hydration is Important
Hydration plays a vital role in keeping your body functioning properly. Every cell, tissue, and organ in the body relies on water to carry out essential functions such as regulating temperature, maintaining blood flow, and aiding digestion. Dehydration can lead to various issues, including fatigue, headaches, and decreased cognitive performance. That's why incorporating hydrating drinks into your daily routine is crucial for maintaining energy and vitality.
Top Hydrating Drinks to Keep You Refreshed
There are many different beverages that can help keep you hydrated, but some stand out for their exceptional benefits. Here are a few of the best hydrating drinks to add to your diet:
Coconut Water Coconut water is one of the most naturally hydrating drinks available. Packed with electrolytes like potassium and magnesium, it helps replenish lost fluids and provides a refreshing burst of natural sweetness. Whether you're recovering from a workout or spending time outdoors, coconut water is a fantastic way to stay hydrated.
Infused Water If plain water feels too boring, infused water is a creative way to boost hydration while adding flavor. Simply add slices of fruits, vegetables, or herbs like lemon, cucumber, or mint to your water for a refreshing and nutrient-rich drink. Infused water is not only delicious but also packed with antioxidants and vitamins from the added ingredients.
Aloe Vera Juice Aloe vera juice is known for its hydrating properties and can be an excellent addition to your diet. Rich in vitamins and minerals, it helps keep your body hydrated and promotes healthy skin. Aloe vera juice also supports digestion, making it a popular choice for those looking for a nutritious, hydrating beverage.
Herbal Teas Herbal teas, such as chamomile, mint, and hibiscus, are not only calming but also hydrating. These caffeine-free teas provide a soothing way to stay hydrated while enjoying the natural flavors of herbs and flowers. Drinking herbal teas throughout the day can help you maintain hydration without the added sugars or calories found in some beverages.
Smoothies Smoothies made with fresh fruits, vegetables, and yogurt are another excellent hydrating option. The water content from fruits and vegetables, combined with yogurt's creamy texture, creates a nourishing and filling drink. Try blending ingredients like watermelon, spinach, and cucumber for a hydrating smoothie that's also packed with vitamins.
DIY Hydrating Drink Recipe: Watermelon Mint Cooler
One of the most refreshing and hydrating drinks you can make at home is a Watermelon Mint Cooler. This drink is packed with water-rich fruits and herbs that help quench your thirst and provide a boost of essential nutrients.
Ingredients:
2 cups of fresh watermelon chunks
1 tablespoon of fresh lime juice
A handful of fresh mint leaves
Ice cubes
A splash of sparkling water (optional)
Instructions:
Add the watermelon chunks, fresh lime juice, and mint leaves to a blender.
Blend until smooth.
Pour the mixture into a glass filled with ice cubes.
Top with sparkling water for a fizzy twist, or enjoy it as is.
Garnish with a sprig of mint and a lime wedge for an extra touch of freshness.
This simple and delicious drink is perfect for hot summer days or when you're looking for a quick and hydrating refreshment. The high water content in watermelon, combined with the cooling effect of mint, makes this drink an excellent choice for staying hydrated.
B Natural: Fresh and Natural Hydration
When it comes to hydrating drinks, B Natural is a brand that stands out for its commitment to offering high-quality beverages that are as close to nature as possible. Known for its range of fresh and natural juices, B Natural provides delicious options that are both refreshing and packed with nutrients. From tender coconut water to fruit juices, B Natural ensures that you get the best of nature in every sip.
If you're looking for a convenient and nutritious way to stay hydrated, B Natural's range of juices and beverages is the perfect solution. With no added preservatives or artificial flavors, B Natural offers a healthy way to enjoy hydrating drinks that not only taste great but also support your overall wellness.
0 notes
Text
Transform Your Backyard into a Tropical Oasis with a DIY Stock Tank Pool!
If you're dreaming of a tropical paradise in your own backyard but don’t want to break the bank with a traditional pool, a DIY stock tank pool is the perfect solution! With some creativity and a few enhancements, you can transform this affordable alternative into a stunning, refreshing oasis. Here's how to turn a simple stock tank pool into a beautiful backyard retreat that feels like a mini tropical resort.
1. Choose the Right Stock Tank
The foundation of your tropical oasis starts with picking the right stock tank. These galvanized metal tanks come in various sizes, typically ranging from 100 to 500 gallons, depending on the space you have and the number of people who will be using it. Popular sizes include 8-foot round tanks and rectangular tanks.
Consider:
Round Tanks: Provide a classic pool-like feel and are easier to set up.
Rectangular Tanks: Better for narrow spaces or if you want more of a lounging pool feel.
2. Location, Location, Location
Pick a spot in your yard that receives plenty of sunlight, which not only helps warm the water but also adds to that tropical vibe. Ensure the area is level, and if possible, place your pool near plants or a garden to enhance the lush atmosphere.
3. Add a Filtration System
Although stock tanks are small, adding a filtration pump will keep your water fresh and clean. Opt for a pump designed for above-ground pools, and make sure it’s the right size for your tank. This will help maintain crystal-clear water and reduce the frequency of water changes.
4. Tropical Landscaping
To bring in the tropical feel, surround your stock tank pool with lush greenery and tropical plants. Consider adding plants like:
Palm trees (small potted varieties work well)
Bird of paradise
Ferns
Banana plants
Hibiscus flowers
Use large potted plants around the perimeter of your pool or create a natural garden border with these tropical species. You can even add tall bamboo or grasses for privacy and a more secluded vibe.
5. Deck It Out
Adding a simple wooden or composite deck around your stock tank pool can instantly elevate the look. You can build a partial or full deck for lounging and easy access to the pool. Decking not only makes your pool more functional but also gives it a polished, resort-style feel.
DIY Deck Ideas:
Use pallet wood for a budget-friendly option.
Build a wrap-around deck for a seamless transition into your backyard space.
Add built-in seating or a sunbathing platform on the deck for a cozy touch.
6. Install a Pool Cover or Shade
To keep your pool protected from debris, consider adding a pool cover. Additionally, install a shade sail, pergola, or large umbrella to provide relief from the sun, especially if you live in a hot climate. This adds an extra layer of comfort and style to your tropical pool retreat.
7. Tropical Pool Accessories
Enhance the tropical vibe by adding fun, colorful pool accessories:
Tropical-themed pool floats like flamingos, palm leaves, or pineapples.
Outdoor string lights or tiki torches for a magical evening ambiance.
Beach-inspired towels or outdoor pillows in bright, tropical colors like turquoise, coral, or yellow.
Install an umbrella holder or attach a thatched umbrella for shade and a beachy look.
8. Upgrade with a Water Feature
For a true tropical oasis experience, consider adding a water fountain or small waterfall feature to your stock tank pool. You can find affordable water pumps that create a peaceful, soothing sound, mimicking the feel of a resort.
9. Install Solar Lights
Lighting can make a big difference in your backyard atmosphere. Solar-powered garden lights around the pool’s perimeter, or along the pathway leading to it, provide a soft glow at night. For a tropical twist, consider bamboo torches or floating pool lights to create a relaxing, vacation-like vibe in the evenings.
10. Keep the Water Refreshing
On hot summer days, keeping your stock tank pool cool can be a challenge. Consider adding:
Insulation under the tank or on its sides to keep the water from overheating.
A fountain attachment or sprinkler to aerate and cool the water naturally.
Pool chillers if you want a more high-tech solution for cooling the water on extremely hot days.
11. Accessorize with a Poolside Bar
What’s a tropical oasis without a poolside bar? Add a small bar cart or table nearby to serve tropical drinks like iced tea, mojitos, or pineapple smoothies. Keep it stocked with fresh fruits, colorful straws, and maybe even a blender for those poolside daiquiris!
12. Maintain Your Tropical Paradise
To keep your stock tank pool oasis looking pristine, regular maintenance is key. Clean the pool with a pool skimmer net and use a manual vacuum to keep the bottom free of debris. Maintain proper water chemistry by testing chlorine and pH levels regularly, ensuring your tropical retreat remains inviting and refreshing.
Conclusion:
By combining smart design elements, lush landscaping, and tropical-inspired décor, you can transform an ordinary stock tank swimming pool into a stunning tropical oasis that brings resort-style relaxation to your backyard. With a little creativity, your DIY stock tank pool will be the ultimate retreat for cooling off, unwinding, and enjoying tropical vibes all summer long!
0 notes
Text
Modern Flower Bouquets for Special Occasions: Ideas for Weddings, Birthdays, and More

Flowers have long been used to celebrate special occasions, from love to marking milestones. Modern flower bouquets have become the popular preference in the modern world of floral design, their new aesthetics and inventive arrangements the reflection of today's taste. Modern flower arrangements can add much-needed colors and unique textures to any wedding, birthday party, or other special occasion. Here are various ideas on how to make use of flower bouquets in special celebrations.
1. Modern Bouquets for Weddings
Modern bouquets bring a new refreshing look to wedding flowers. Weddings probably are the most important occasion in which flowers play the most vital role. Such occasions require bold color palettes. A few suggestions are:
a. Bold Color Palettes
Gone are those days when pastels ruled the bride. A modern bride seeks bold, vibrant colors that can help state something so loudly. Think of deep tones of emerald green, richly colored burgundy, sapphire blue, fuchsia, or orange. A bouquet consisting of dahlias, peonies, and orchids in these colors is a visual impact buster.
b. Unique Textures
Adding varied textures can give a wedding bouquet texture. Softer petals are paired with spiky elements, such as thistles or waxy leaves from succulents, to create depth and interest in your bouquet. For example, contrast is achieved through roses, ranunculus, and anemones combined with some eucalyptus and berries.
c. Minimalist Designs
Getting quite popular are minimalist bouquets for modern and elegant looks. Their focus is actually on a few key flowers with complementation from the greenery. A contemporary wedding can be so simply designed through elegant understated looks created through simple arrangements of white calla lilies paired with soft greenery, such as olive branches.
d. Personalized Touches
To make the wedding bouquet truly yours is by including personal touches that speak for your story. For example, you may include flowers that are important to you, such as those your grandmother loved the most or those from your childhood home. Alternatively, you can add some ribbons or charms and tell the history of your journey together.
2. Birthday Bouquets
There are birthday moments too where the modern flower arrangements can be the center of attention. Here are a few tips on how to create lively and vibrant arrangements for birthdays:
a. Bright and Cheerful Blooms
For the birthday, there have to be bouquets that reflect warmth and bliss. Bright flowers like gerbera daisies, sunflowers, and tulips must be included in the bouquet. Along with strong foliage or using brightly colored vases, it brings out the festive piece highly.
b. Themed Bouquets
Maybe you can create bouquets based on the interest of the birthday person or the party theme of the birthday person. For example, if the party theme is tropical-themed, add the flowers that are for ornamental use in the bouquet like hibiscus and birds of paradise combined with lush greenery. That way, it will become part of the decoration and the actual centerpiece of the event.
c. Bouquet as a Gift
A bouquet can become a very thoughtful present. Try presenting the modern bouquet, which is covered with stylish paper, or put it in an elegant vase. Adding a personal note or card makes a gift more distinctive. A good example may be the small potted plant with a succulent and the bouquet, whereby you encourage a more long-lasting gift.
d. DIY Birthday Bouquets
If you get creative, you may want to come up with a homemade bouquet with a personally touched element. Get the favorite flowers and greenery of the birthday person and arrange them in the best way to showcase that person's personality. You can find online tutorials for it, which will make it fun and memorable.
3. Bouquets for Anniversaries
If anniversaries are a beautiful occasion to celebrate love, then bouquets of modern flowers can add just the finishing touches. Here are some ideas:
a. Romantic Color Schemes
Deep red, soft pink, and creamy white are the best kinds of flowers that should be chosen while celebrating an anniversary. Red roses, white lilies, and pink peonies can perfectly create an arrangement of flowers that speak of romance.
b. Incorporating Memories
Just as weddings deserve personal touches, anniversaries do too. You can opt for the flowers that escorted you on your first day or those special to both of you. For instance, if you carried peonies in your wedding bouquet, this remains a breathtaking flower to incorporate into your anniversary flower arrangement.
c. Long-Lasting Blooms
To mark anniversaries, you can go for long-lasting flowers that may last for weeks. Those flowers known to last longer in keeping freshness are orchids and chrysanthemums. By mixing these with season blooms, a wonderful bouquet is achieved, both a marvelously looking and long-lasting true manifestation of how long-lasting your love.
d. Surprise Bouquets
Surprise your sweetheart with the bouquet sent to their workplace or home. A lovely arrangement brightens up their day and makes your anniversary feel even more special. Make this surprise much sweeter by adding a heartfelt note that lets them know how much you love them.
4. Bouquets for Graduations
Graduation is worth marking the event, and modern flower bouquets can make the day even more significant. Here's how to include them in the celebrations:
a. School Colors
You can make a bouquet using the school colors of the graduates. For instance, this can add a personal and even playful touch to the arrangement. If school colors are blue and gold, you may use blue hydrangeas and yellow lilies as part of the bouquet.
b. Inspirational Themes
For accomplishments, consider sprays that symbolize inspiration and aspiration. Add flowers symbolizing success, like sunflowers that symbolize adoration and loyalty. Attach meaningful quotes or messages on a card to the bouquet as a reinforcement of encouragement in the future.
c. Group Bouquets
If you are celebrating a group of graduates, consider making a larger bouquet or several smaller bouquets to be shared. This can make for a great photo display and can be a fun way to celebrate together.
d. Graduation Party Centerpieces
Modern flower arrangements can make beautiful centerpieces for graduation parties. Choose those that fit in well with the general theme of decor in the event. Wildflowers in mason jars can work well as a perfect ambiance for casual meetings, whereas more elegant glasses vases are better suited for formal events.
5. Bouquets for Baby Showers
Welcoming a new life is, in itself, a reason to celebrate. And, while modern flower arrangements are not merely a beautiful gift, they are even better to adorn a baby shower. Here's how you could put them together:
a. Soft Color Palettes
Soft pastel colors are recommended for baby showers. It produces a sense of calm and warmth. Blush pink, baby blue, and light lavender will create beautiful arrangements in bouquets. Nothing better than placing peonies, hydrangeas, and tulips in those shades.
b. Themed Arrangements
Incorporate different colors and, if preferred, flowers that correspond with the gender of the baby, which is already known, or go for neutral colors and elements. If it is a boy, then those blue and green flowers can combine well. On the other hand, pink and white portray a baby girl. Bright yellows and greens give a great bouquet when going for a non-gendered approach.
c. Playful Additions
Add whimsy to your bouquets, such as with stuffed animals and baby-themed decorations. It can add that playfulness to the arrangement, so they are not only perfect for a happy celebration full of laughter.
d. Practical Bouquets
One should consider making bouquets that can be distributed as a party favor, perhaps small potted plants or flowers that guests may take home. This not only beautifies the area but also leaves guests with a memorable experience of the celebration.
Conclusion
Modern flower bouquets are capable of enriching any occasion by delivering beauty, symbolic meanings, and personality to make celebrations unforgettable. Of course, your floral arrangements may convey the uniqueness of the event and the people it represents--that could be a wedding, birthday, anniversary, graduation, and maybe a baby shower. Adding bold colors, unique textures, and personalized elements enhances the creation of breathtakingly beautiful floral displays. The next time you celebrate an occasion, do not forget how the latest flower arrangements will be able to modernize your celebration and have it in your memory for a long time.
0 notes
Text
🖌️ DIY Food Coloring: Easy Homemade Recipes 🌈

Looking for a fun and natural way to add color to your dishes? 🌿 In this guide, you'll discover simple ways to make your own food coloring at home using everyday kitchen ingredients. Say goodbye to artificial additives and hello to a rainbow of vibrant, natural hues! 🌈🍴
🥕 Why Make Your Own Food Coloring? 🍓
Making your own natural food dyes is both rewarding and practical. By choosing homemade, plant-based food colorants, you control the ingredients, helping you avoid artificial additives that could be unhealthy. 🥦
💚 Benefits of Homemade Food Dyes
Vibrant Colors: Enhance your dishes with natural, bright hues.
Customizable Shades: Tailor colors to your specific needs.
Peace of Mind: Know exactly what's in your food! 🧁
"Homemade food dyes not only provide stunning colors but also help you avoid the potential health risks of artificial additives."
🧪 Understanding the Basics of DIY Food Coloring 🎨
Creating your own food coloring is fun and rewarding. Here’s what you need to know before getting started:
🌱 Why Choose Natural Food Coloring?
Natural food coloring is a healthier alternative to artificial dyes, often petroleum-based. With natural ingredients, you avoid the risks associated with artificial options, while also enjoying unique, natural tints. 🌻
🍲 Essential Tools and Ingredients
Tools: Blender, fine mesh strainer, small saucepans, airtight containers.
Ingredients: Fruits, veggies, and spices like turmeric, beets, spinach, and blueberries.
🥗 Creating Vibrant Colors from Fruits and Vegetables 🍇
Making food coloring from fruits and veggies is easier than you think! 🌽
Fruits: Blend or juice, then strain for colors like deep red (beets) or bright red (pomegranates). 🍒
Vegetables: Cook and blend for colors like orange (carrots) or green (spinach). 🥕
Combining Ingredients: Mix different juices for unique shades. 🎨
🍵 Powder vs. Liquid: Which Base to Use? 🥄
You can choose between powdered and liquid food coloring:
Powdered Food Coloring: Easy to store with a long shelf life.
Liquid Food Dyes: Perfect for rich hues and intense colors.
🥣 Step-by-Step Recipes for Homemade Food Coloring 🥄
Red/Pink: Use beets or hibiscus powder.
Yellow/Orange: Try turmeric or annatto seeds.
Green/Blue: Spinach for green, butterfly pea flowers for blue.
Purple/Black: Red cabbage for purple, activated charcoal for black.
🎂 Tips for Using Homemade Food Coloring in Baking 🍪
In Frosting and Icing: Start with a small amount and add gradually.
In Baked Goods: Mix the dye into wet ingredients for even color.
Storage: Keep dyes in sealed containers and refrigerate when necessary.
🛠️ Troubleshooting Common Issues 🚨
Color Fading: Store in airtight containers away from sunlight.
Unwanted Flavors: Use mild-tasting ingredients.
Texture Problems: Adjust the amount of liquid or switch to powdered dye.
🎉 Conclusion 🎉
Making your own food coloring is not just healthier but also adds a personal touch to your cooking. With simple ingredients like fruits and veggies, you can create vibrant, natural colors free from artificial additives. So next time you need to color your food, try making it yourself! 🌱✨
For more information in the field of health and well-being consult my blog : https://www.biohealthly.com/
#DIYFoodColoring#NaturalDyes#HealthyCooking#HomemadeColoring#EatTheRainbow#FoodFun#HealthyLiving#CleanEating
0 notes