#handmadebjdclothes
Explore tagged Tumblr posts
Visit Tumblr Blog
Explore Tumblr blogs with no restrictions, modern design and the best experience.
Last Seen Tumblr Blogs


Fun Fact
Tumblr is used by 21% of adults online aged 18-29 years.
Photo
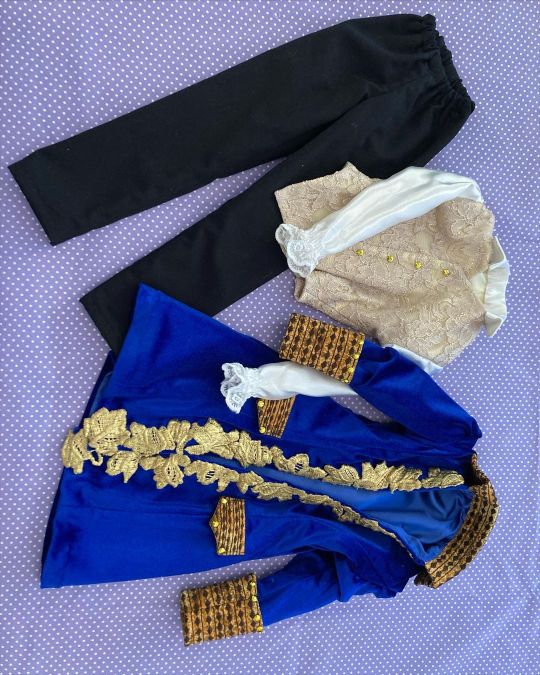
The #beast outfit from #onceuponatime ❤️ #handmadedollclothes for #bjddoll #dollset #dolloutfit #dollsclothes #handmadedollclothes #bjdclothes #bjdfashion #handmadebjdclothes #sewing #bjdseamstress #sewingfordolls #sewingforbjd #dollsseamstress #dollcommission #ooakdoll #stregacorvina (presso Magie di stoffa by StregaCorvina) https://www.instagram.com/p/CbPedW7LxAW/?utm_medium=tumblr
#beast#onceuponatime#handmadedollclothes#bjddoll#dollset#dolloutfit#dollsclothes#bjdclothes#bjdfashion#handmadebjdclothes#sewing#bjdseamstress#sewingfordolls#sewingforbjd#dollsseamstress#dollcommission#ooakdoll#stregacorvina
2 notes
·
View notes
Photo

Gaming Miku? Yes please 🤩🤩🤩 #snowmiku #dollfashion #dollfiedream #volksdoll #bjd #hatsunemiku #miku ##handmadebjdclothes #dollsofinstagram (at Genoa City, Wisconsin) https://www.instagram.com/p/CHv7FwHjI_m/?igshid=gmwy4zt6vfu5
#snowmiku#dollfashion#dollfiedream#volksdoll#bjd#hatsunemiku#miku#handmadebjdclothes#dollsofinstagram
2 notes
·
View notes
Photo

💕🖤💕🖤💕 . . . #monstrodesigns #bjd #bjddoll #bjdclothes #kawaii #pinkjacket #heartprint #pinkaesthetic #kawaiioutfit #minifee #slimmsd #msd #polkadots #handmadebjdclothes #dollartist #bjdstagram #instadoll #balljointeddoll #dollhobby #love https://www.instagram.com/p/B1MifucAhcX/?igshid=1vj8hoyq629cj
#monstrodesigns#bjd#bjddoll#bjdclothes#kawaii#pinkjacket#heartprint#pinkaesthetic#kawaiioutfit#minifee#slimmsd#msd#polkadots#handmadebjdclothes#dollartist#bjdstagram#instadoll#balljointeddoll#dollhobby#love
1 note
·
View note
Photo

Hi Irrealdollies! 💕 ✨ Ris Ras opened a preorder for Engendrito and Enoki/Annic/Blythe size today 🥳💕 (these pictures belong to her). I am totally in love with these perfectly made little treasures 😍 if you want to order yours check http://www.risrasatelier.com and you will not regret 👌✨ (and you will be supporting an small business!) By the way, we are working on Nora orders, as always we will do our best to have them ready as soon as possible, but we need time to do it properly so we appreciate your patience in advance 🥰 Can't wait for December! I love the Christmas season, and you? Or maybe do you celebrate another festivity? Have a happy weekend! Laura #irrealdoll #irrealdollnia #risras #risrasatelier #bjdhandmade #handmadebjdclothes https://www.instagram.com/p/CIJRrrkhbl9/?igshid=15wrf8xmk9k2q
0 notes
Photo

Unicorn sweater and frilly skirt! 🎠 Available on Etsy~ ✨ #bjd #bjdclothes #bjdclothing #bjdsales #bjdsale #bjdclothesforsale #handmadebjdclothes #abjd #bjdhandmade #bjdfashion #bjdoutfit #bjdsewing #unicorn #pony #cutebjd #kawaiibjd
#bjdsales#bjdoutfit#bjd#bjdsewing#handmadebjdclothes#cutebjd#bjdsale#bjdhandmade#bjdclothes#kawaiibjd#bjdfashion#bjdclothesforsale#unicorn#pony#abjd#bjdclothing
0 notes
Text
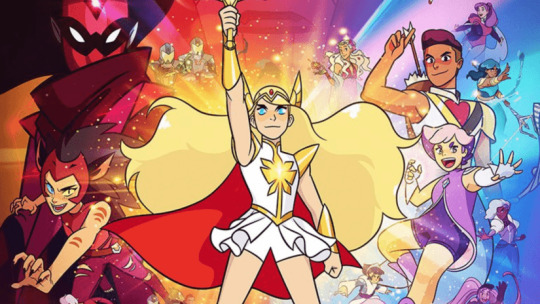
She-ra!! (part 1)
Good morning! As you may have noticed, I decided to add a new entry on my journal routine: every Tuesday I will show you a single set, not a collection.
And from the title, you can easily tell what is the topic of this new entry, She-ra! This weekend I bing watched the 5# season on Netflix and I was so ispired to do a Bjd version! I will miss this show soooo much now that is gone, I really want more episodes...
I have to say that it has been a very long time since I fell so in love with a tv show, even if I wasn’t a big fan of the 80s version (I have seen it when I was a child but I don’t remember much) I think it is so full of positive messages and representation, we needed a show like this from a long time, especially if we consider it is a show for young people.
I will not write a full review here as there is plenty around the web, but I really suggest you to check out the show!
The animation is just average-good, modern anime get us used to excellent quality levels, but every character is so well characterized (well, the main ones, the background cast are just...background unfortunately) and as I said it is full of positive messages and LGBT representations that are still lacking in most tv shows, most of all the ones for young peoples... in conclusion, it is not the BEST show ever but a very interesting example in the wide world of the tv shows! How I wish a show like this when I was a teenager!
Going back to the costume, I will not spoiler you the new costume of this latest season (even if you probably have seen it in the Netflix thumbnail as I did) and also because I do not like it very much, I decided to make the first one, very different from the 80s one but very fitting for this new teen reboot!
I was already studing this costume when the first season aired because I was thinking of cosplaying She-ra in some conventions (as right now I have almost the same bodytype), I am still thinking about it... never say never...
Let’s start talking about the...
- Materials
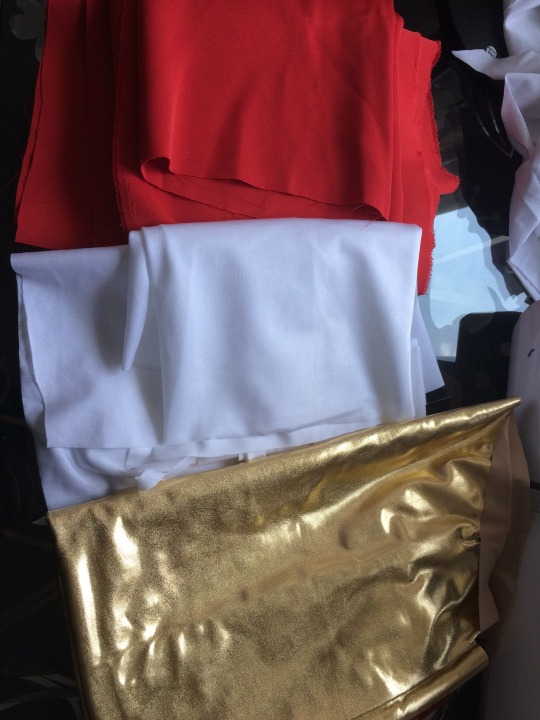
I chosed white spandex for the main part of the costume: the top and the shorts, golden spandex for the details (with some foam structure inside to keep the shape) and red cady fabric for the cape - I have already used this fabric for a Thor cape some times ago and even if it is a bit pricey compared to my usual materials but it is really worth the price! It has the perfect flow and the look...speaks for itself! -
For the chest and the tiara’s gems I will use some glass gems I bought from Aliexpress some time ago, painted with different nailpolish; for the shoes, the armbands and the tiara I will use foam and fabrics...I am still thinking about making the sword or not...we’ll see....
- Step 1: patterns
I decided to use the patterns I did for the pajamas set with a few alterations.
For the top I used the t-shirt base without the sleeves (I am still thinking about making a binder - a sport bra to compress the chest, often used for female cosplayers to do male characters - because these dolls have sooo much breast compared to the original character...)

For the shorts I used the pattern for the pajama pants, already altered to make some leggins a while ago (I will show you their set in a few weeks)

When the She-ra set will be done you will find the PDF pattern pieces, including accessories, in my Etsy shop. Done with the bases, last’s start with the...
- Step 2: shorts
I decided to start from the shorts because I tought they will be the quickest piece, so after cutting the white spandex base I started to handmade sew the golden stripes on the sides...you will see A LOT of handsewing in this project!
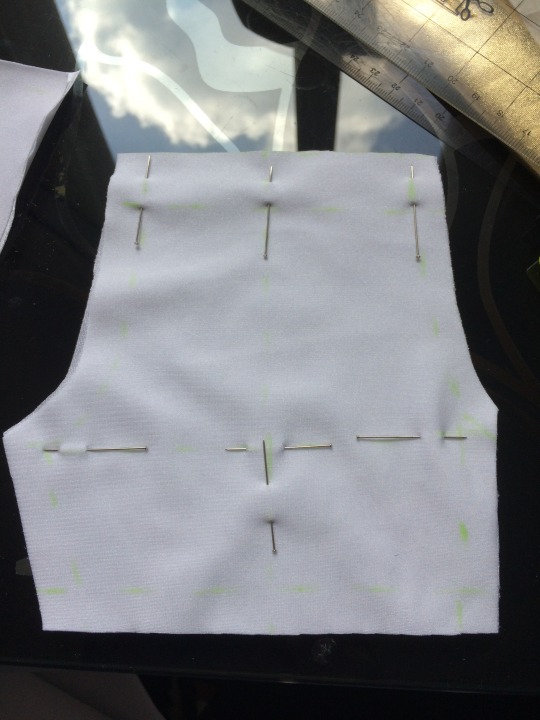
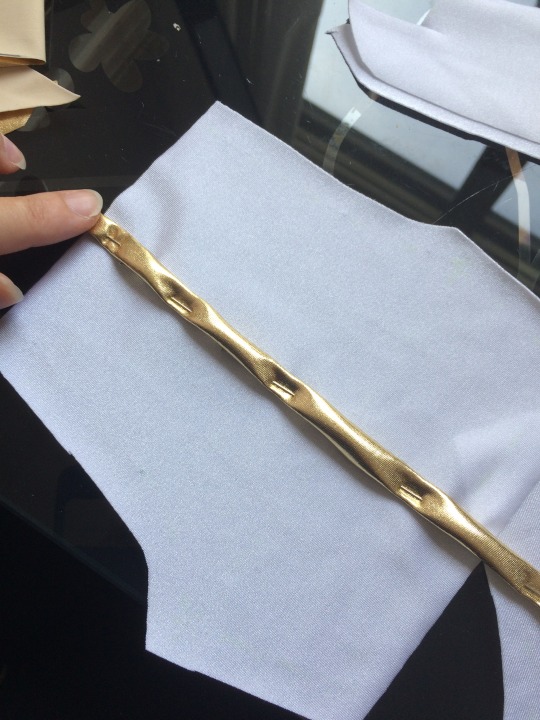

Before joining the two parts I decided to give the stripes a good press and I fitted them on my model doll to check the lenghts.
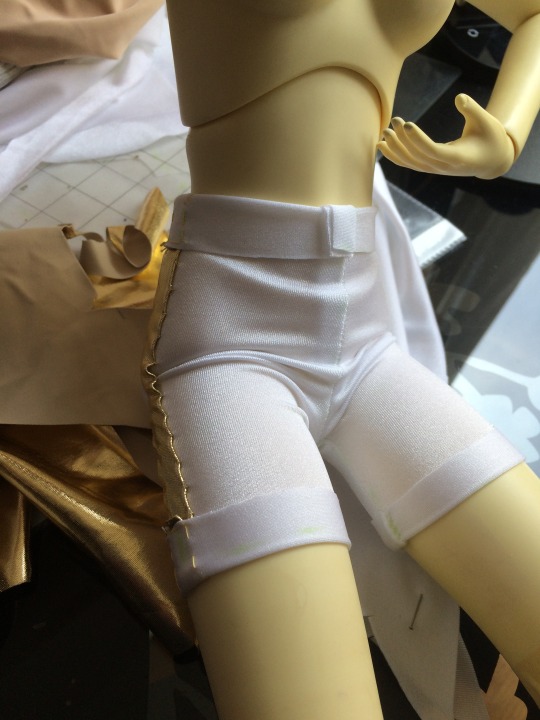
After I decided the hem lenghts I sewn waist and legs with a very tiny zig zag stitch on my machine and i noticed that the spandex elasticity was enough to not use an elastic band on the waist.


(After seeing them with the top on I then decided to shorten them for the second time because I didn’t like the final lenght) With the shorts done, it was time for the...
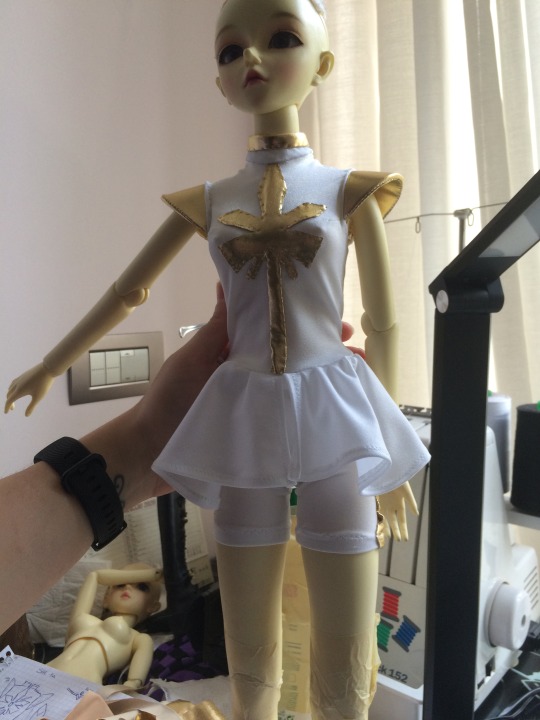
- Step 3: top
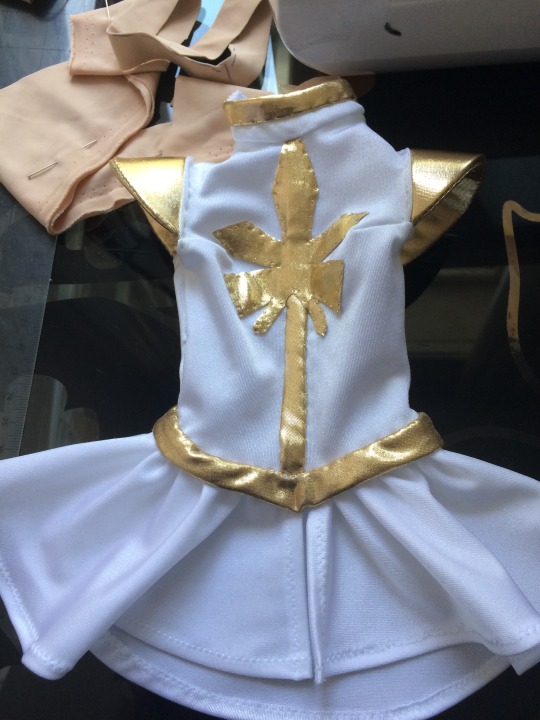
I made the base in white spandex but before joining the pieces I decided to do the crest on the front.

As you can see in the pictures, at the beginning I was going for a single piece, a top with a flared bottom, but in the end I decided to redo this part because I didn’t like the “skirt”.


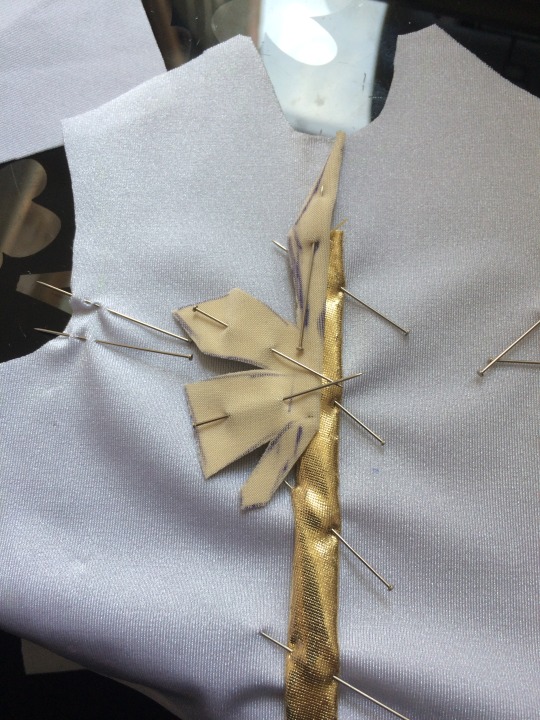
I decided also to add two little darts on the bust because these dolls have really too much breast! As everythig is soo small in this project it was almost all handsewn, so I decided to discard my initial idea to make the crest with foam covered in golden spandex and I went for a golden spandex cut-out, handsewn obviously.
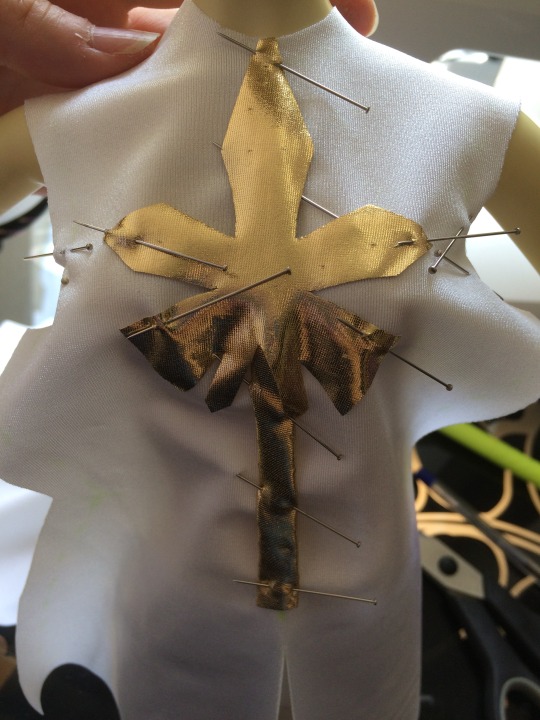

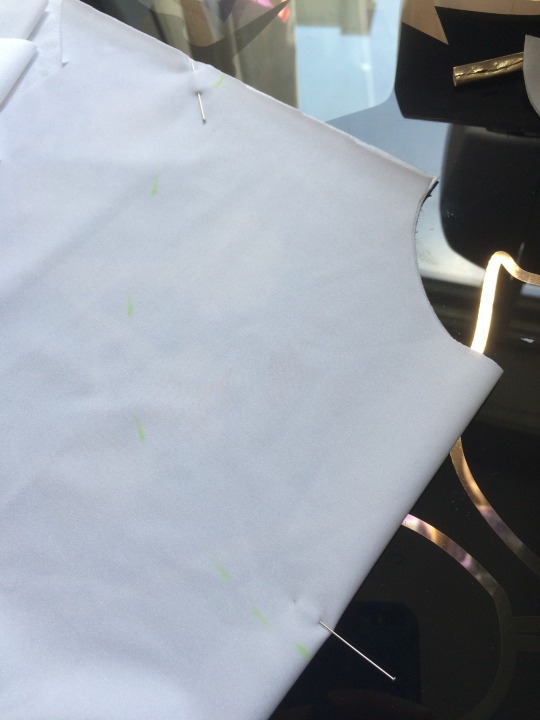
After finishing the crest I decided to wait until the end of the top to add the glass bead because I will probably work with this piece a lot! So i decided to go on with the flared part and to do the final version of it. Firsty of all I cut away the wrong part,

then I redraw it as a half circle “skirt” in three parts, one for the back and two for the front, with the center front slightly shorter than the back. I was thinking about leaving the raw edge but in the end I made a little zig zag stitch just like the shorts.
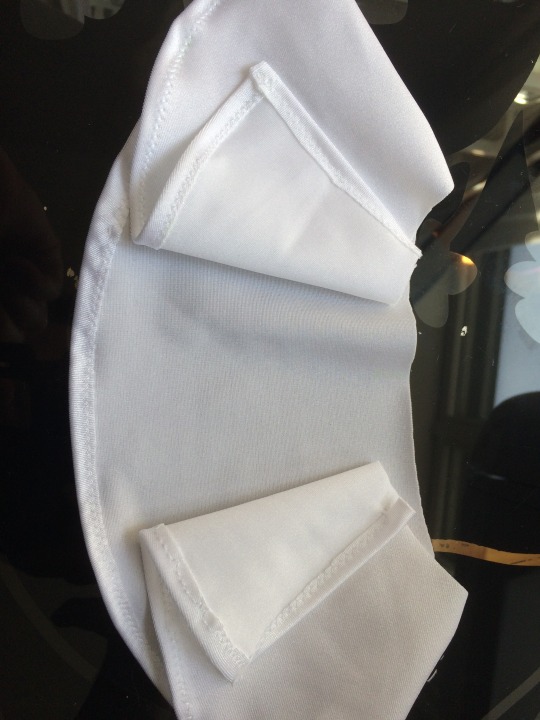
And then, for ending with the white spandex, I made a tiny hight neck collar, mostly handmade as well. I was thinking about the usual stripe of velchro fastener in the back but I noticed that a small slit on the back was enough to fit the doll’s head, so I didn’t add it but only a small snap button on the neck (most of the back will be hidden with the cape anyway...)
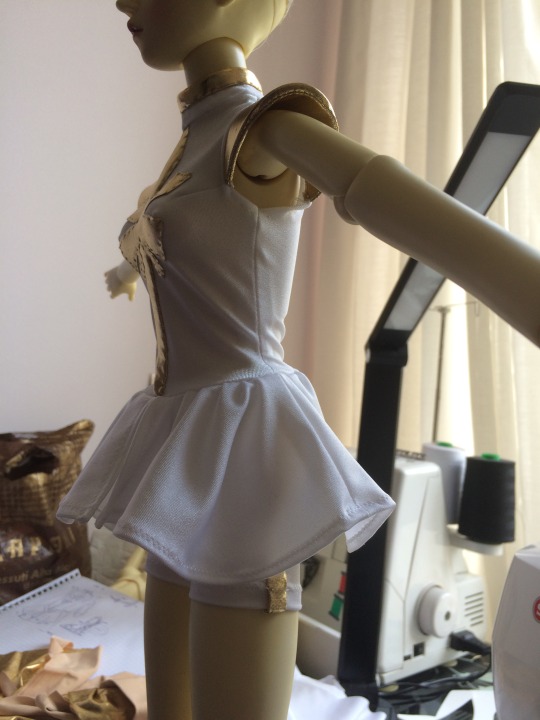
To finish the top I started to make the epaulettes, with 2 mm foam as a base. I drafted the basic shape in paper pattern, then I made it two times in foam and then on a double layer of golden spandex.


I sewn the little gap with tiny handmade stiches and the I attached them on the sleeve cap with some others handsewn stitches.

This is the (almost) finished top! Isn’t it lovely? My fangirl soul is so eager to finish this costume!

This is a little preview with the flared part attached...I’m alredy in love!!
- Step 4: cape and belt
Before starting with the accessories, that I will probabily show you in Part 2, I made the cape and the belt to finish the base of the costume.
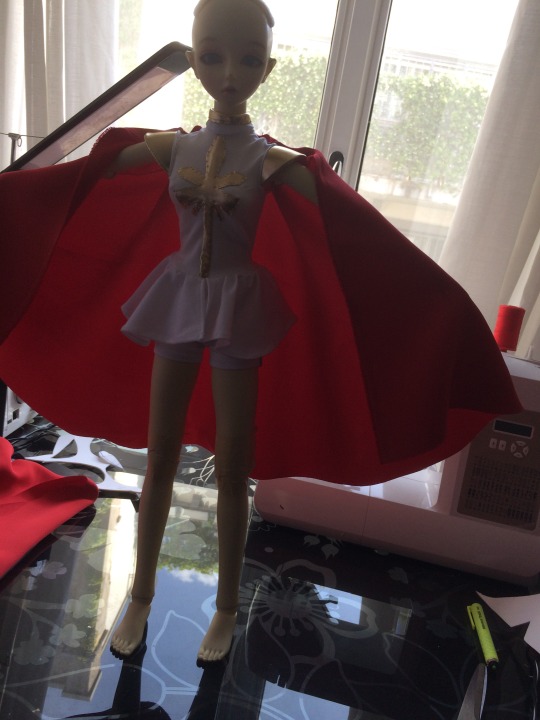
For the cape I made an half-circle to add more volume at the hem and I also made the top wider than the shoulders so I can gather it a bit more.

(BONUS PIC - Salem wants to try the cape on)
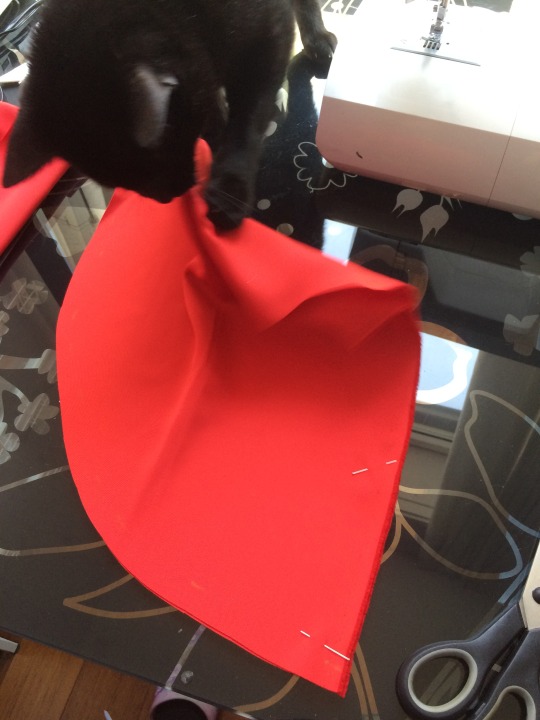
I really love the look of it! I put the cape aside for now because I still need white thread on my machine so I will hem it later on...

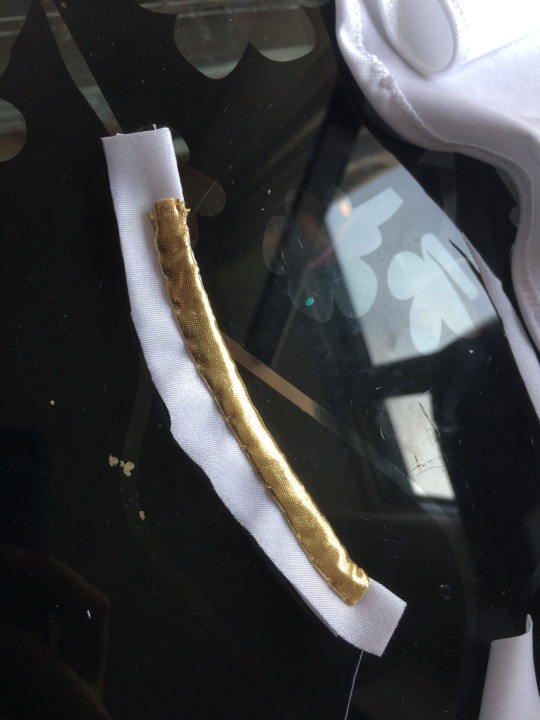
For the belt I decided to sewn it onto the top instead of doing another single piece (also to hid the waist seam because I didn’t like that much)
I made a mock up with white spandex to check the lenght and the V depth, then I use this mock up as the pattern for the final one on golden spandex.
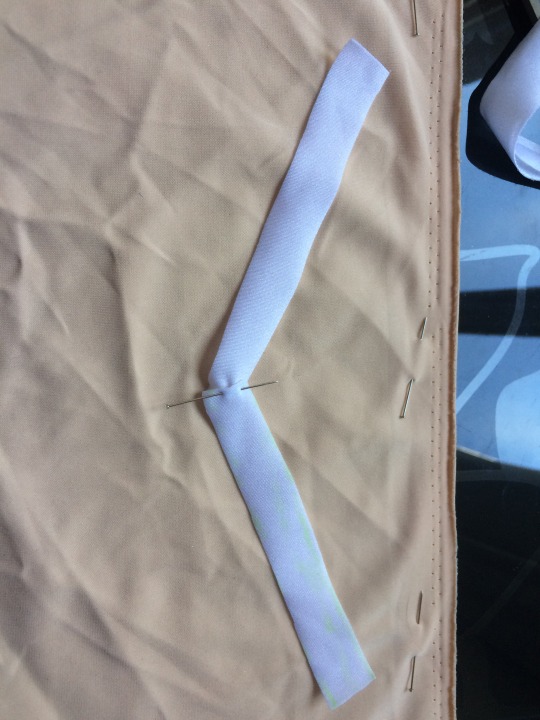


And this is the finishe top! I really like it and I cant’ wait to finish this project! As finishing touches I still need to add the glass bead on the crest and the snap button on the neck.
See you on Thursday as usual for the second part of this loooong entry where I will show you the accessories and the final look.
See ya!
Chiara (StregaCorvina)
Bentornati! Ho deciso di inserire una piccola “deviazione” alla pubblicazione del giovedi: il martedi sarà dedicato ad un set singolo, non una collezione!
E come potete immaginare dal titolo, questo primo martedi è dedicato a She-ra! Quest weekend ho divorato la 5° Stagione appena uscita su Netflix e mi sento decisamente orfana percio ho deciso di realizzare anche la sua versione BJD.
Devo dire che il reboot Netflix di She-ra è una delle serie che mi ha “preso” di più negli ultimi anni, era da tanto che non mi appassionavo così tanto ad una serie, sebbene non fossi una grande fan dell’opera originale (che ho visto da piccola e non mi ricordo quasi per niente...) Secondo me è una serie piena di messaggi e rappresentazioni positive, c’era davvero bisogno di un cartone simile, soprattutto se consideriamo che si tratta di un prodotto indirizzato ad un pubblico giovane.
Non starò qui a fare la recensione dello show visto che in giro se ne trovano tantissime, ma vi invito caldamente a guardarla se non lo avete ancora fatto! Le animazioni non sono eccelse ma sono belle, gli anime più moderni ci hanno ormai abituato ad un livello qualitativo davvero alto, ma i personaggi sono caratterizzati benissimo (per lo meno i principali, diciamo che i secondari sono davvero...sullo sfondo e basta) e come dicevo la serie è piena di messaggi positivi e rappresentazioni LGBT che sono ancora un po troppo trascurate dagli show per ragazzi...insomma, non sarà il capolavoro del secolo ma una piacevole novità nel panorama cosi vasto delle serie televisive! Avrei tanto voluto crescere con una serie cosi vent’anni fa...ma mi rendo conto che ai tempi una serie così per ragazzi era impensabile!
Parlando di She-ra, per non spoilerare troppo il nuovo costume che indossa nel corso di questa serie e che non mi piace particolarmente, (ma se avete visto la copertina su Netflix ve lo sarete spoilerato comunque come è successo a me) ho deciso di riprodurre quello della prima trasformazione, che si discosta parecchio da quello originale degli anni 80 ma che calza a pennello per il mood più teen di questo reboot!
Avevo già puntato questo costume quando uscì per la prima volta su Netflix perche avendo un fisico abbastanza simile ad Adora, avevo in mente di farne il cosplay in qualche prossima fiera....progetto che non ho ancora abbandonato del tutto chissà... perciò partiamo con la scelta dei materiali.
- Materiali
Ho deciso di utilizzare lycra bianca per le parti principali del completo, la casacca e i pantaloncini, lycra oro per tutti i dettagli (irrigidita da una base di foam qua e la in base alla funzione) e cady rosso per il mantello - avevo già usato questo cady di medio peso per il mantello di Thor in un precedente cosplay e anche se è leggermente più caro del tipo di materiale che sono abituata ad utilizzare ne vale decisamente la pena! Cade benissimo e l’aspetto...si commenta da solo -
Per il petto e il diadema userò degli ovali di vetro colorati con smalto per unghie per lasciare intatta la trasparenza, mentre scarpe, bracciali e diadema avranno un’anima in foam e il resto in tessuto... sono ancora in dubbio se fare la spada o meno, vedremo un pò in futuro...
- Step 1: patterns
Avevo in gran parte le basi gia pronte da quando ho fatto i pigiamini, perciò per la casacca sono andata abbastanza tranquilla con la base della tshirt (sto ancora valutando se fare una sorta di binder - per chi non lo sapesse è una sorta di reggiseno sportivo che comprime abbastanza il seno, usato parecchio dalle cosplayer per avere un aspetto più “maschile” - per nascondere un pò il seno delle bambole e restare più in linea con la fisionomia del personaggio)
Per gli shorts invece ho utilizzato il cartamodello dei pantaloni del pigiama che avevo precedentemente modificato per fare un paio di leggins super aderenti (che vi farò vedere prima o poi)
Quando il set sarà finito troverete il cartamodello in PDF nel mio shop su Etsy completo di accessori. Le basi ci sono, perciò iniziamo subito con...
- Step 2: shorts
Ho deciso di iniziare dai pantaloncini perchè mi sembravano la parte più rapida del costume, perciò dopo aver tagliato la base in lycra bianca ho iniziato ad applicare - rigorosamente a mano per mantenere l’elasticità - la striscia dorata sui lati.
Prima di unire le due parti ho dato una bella stirata alle strisce e ho fatto una prova sulla bambola che stavo usando come modella per vedere la giusta lunghezza.
Soddifatta degli orli ho cucito gambe e vita con uno zig zag stretto e alla fine ho deciso che l’elasticità della lycra era sufficente perciò non ho inserito nessun elastico in più.
(Una volta finita anche la casacca ho deciso di accorciare ancora un po i pantaloni perchè mi sembravano troppo lunghi). E con i pantaloni finiti era il momento di passare alla...
- Step 3: casacca
Ho realizzato la base in lycra bianca e prima di unirlo al dietro ho iniziato subito sul davanti la decorazione in lycra oro.
Come potete vedere nelle immagini, inizialmente avevo pensato di fare una casacca svasata sotto, in un pezzo unico, invece poi sono tornata su questa decisione perchè non mi piaceva la parte della “gonna”.
Ho anche aggiunto delle piccolissime pences nel giromanica perchè queste bambole sono troppo prosperose per non averle! Viste le dimensioni ridotte dello stemma sul petto alla fine ho deciso di scartare la mia idea iniziale di farlo in foam e ho semplicemente fatto un’applicazione di lycra cucita poi a mano con micro punti nascosti.
Una volta cucito tutto il contorno dello stemma ho deciso di aspettare la fine della base per incollare la pietra al centro visto che avrei dovuto manipolarla ancora tanto, perciò sono passata oltre e come vi accennavo all’inizio, ho deciso di cambiare la parte bassa della casacca perchè non mi piaceva più e l’ho tagliata via.
Per fare la parte svasata ho tagliato una “gonna” a mezza ruota divisa in tre parti con cuciture sui fianchi, leggermente più corta sul centro davanti. Avevo pensato di lasciare l’orlo a taglio vivo ma poi ho deciso di fare un piccolo orlino a zig zag come per l’orlo dei pantaloni.
Infine per terminare le parti in lycra bianca ho fatto un mini collo alto, anche questo cucito prevalentemente a mano visto le dimensioni ridotte.
Avevo deciso di chiudere il retro con una striscia di velcro ma considerando la presenza del mantello ho deciso di fare solo un’apertura fino alle scapole e chiudere poi il collo con un automatico.
Per concludere la base del costume ho iniziato le spalline, dopo aver fatto una prova con un pezzo di carta per decidere la grandezza definitiva ho realizzato una mezzaluna in foam (bhe, due) e l’ho riportata su un doppio strato di lycra oro.
Ho chiuso poi la parte lasciata aperta con dei piccolissimi punti a mano e le ho attaccate al giromanica, sempre a mano, con dei punti nascosti.
Ed ecco la casacca quasi pronta pronta! Non è un amore? Il mio animo da fangirl è super entusiasta di fare questo costume!
Per concludere la casacca ho attaccato la parte della “gonna” ed ecco una preview...gia la adoro!!
- Step 4: mantello e cintura
Prima di passare agli accessori, che visto la lunghezza di questo post verranno presentati in una Parte 2, mi sono occupata della cintura e del mantello, per concludere la base del costume.
Per il mantello ho deciso di realizzare una mezzaruota per averlo bello ampio e fluente, leggermente più ampio della larghezza spalle in modo da drappeggiare un pò la parte alta.
(BONUS PIC - Salem che decide che vuole provare il mantello)
Direi che come ampiezza ci siamo! Per il momento visto che mi serve ancora il filo bianco sulla macchina da cucire mettiamolo da parte, lo finirò più tardi.
Per la cintura invece ho scartato l’idea di fare un pezzo separato visto che il costume aveva già tanti pezzi e ho deciso di cucirla sulla casacca per nascondere la cucitura sotto la vita.
Ho fatto prima una prova con un pezzo di lycra bianca per decidere l’altezza e la profondità della V, poi l’ho usata come base per quella vera e propria realizzata con due strati di lycra oro.
Ed ecco la casacca finita! Mi piace sempre di più e non vedo l’ora di finirla!! Come ultimo tocco devo aggiungere solo la gemma al centro dello stemma e l’automatico dietro per chiudere il collo.
Visto che questo post sta diventando lunghissimo vi farò vedere gli accessori e il final look nel prossimo post, che verrà pubblicato normalmente di giovedi.
A presto!
Chiara (StregaCorvina)
#bjd#bjddoll#bjdcosplay#cosplay#sheracosplay#bjdshera#custombjd#handmade#handmadecosplay#bjdclothes#handmadebjdclothes#bjdset#she ra reboot#she ra netflix#sewing#seamstress#handmadesewing#cosmaker#stregacorvina
37 notes
·
View notes
Text
Hello hello hello!
Welcome back! As usual, it’s been a while since my last entry 😫 I am so sorry but it’s really difficult for me to find the time to keep this journal going steady, I do not know why (well, actually I know...the fact that I have to upload entry only from my computer it’s the main reason...I only turn on my pc twice a month maybe?? 😅 )
Anyway, welcome back, today I wanna show you another BJD entry, my new baby, the Pink Ballerina ❤️

As usual you can buy this set in my Etsy Shop I hope you will go check her out!
Today I wanna talk about how I made her outfit, it’s kind of a re-fashion outfit as it was the original dress it came with one of my doll (or at least, the dress the doll was wearing when my friend give her to me) I do not have pictures of the original dress but it was really old and almost falling apart in some seams so I decided to give it a new life! ✨
- Pattern making
I decided to keep the skirt as it was in quite good condition but the top part was slowly falling a part so I decided to make a leotard and transform this outfit in a ballerina set ❤️
I started with making a new pattern as I never made a leotard for dolls so... first of all I use a muslin to make a base with my doll measurements and I traced the basic shape.


Then I cleaned up the lines and remove the mock up from my doll

After tracing it to eavy paper I had the basic pattern! (Soon I will sell it in my shop as well)

And this is the final result! ✨ Do you like it?

- The leotard
After drawing the pattern I took apart the original bodice and I used the fabric to make the leotard. The fabric was a really cute white jersey knit with pink polka dots.
I decided to avoid the darts at the bust but instead I made a gathered top part: to do so I cut the front pattern in half and pinned the top over the bottom part. So it can fit more dolls!

And this is the results so far...

Then to finish the leotard I decorated the underbust seam with a gathered white lace and I made two little ruffled sleeves with some white tulle net.
- The skirt
As I said I almost left the skirt as it was (I am trying to remember if the original was a one piece dress or was a top+skirt outfit 🤔 ....) I just add and elastic waistband made with the same jersey of the leotard and decorated it with pink ruffled tulle net.
Then, just to add more sparkles ✨ I added 4 layers of iridescent pink tulle net underneath the white original tulle net of the skirt.

The gathered pink tulle net and white lace at the hem were on the original skirt so I decided to leave them like that because I like the total look.
Then for the accessories, I used the scraps from the bodice to make two little elastic cuffs, nothing too fancy as I almost run out of fabric, just two little stripes with elastic bands inside.

- Final look
Here some pictures of the finished set, as you can see my cat liked it very much 🤣
(I used a smaller doll for these pictures so the leotard was a bit loose 😅)


Thant’s all for today, I hope to be back soon! As a New Year resolution I print out a kinda of planner to schedule all my social media activities so I hope it will help me to be more active! 😅
Thanks again for reading it! ❤️
Chiara (StregaCorvina)
#bjd#custombjd#bjdclothes#handmadebjdclothes#handmadebjd#bjdset#bjdballerina#dollsclothes#handmadedollsclothes#sewingfordolls#sewingforBJD#ballerinaBJD#ballerinadoll#sewing#handmade#handmadesewing#BJDdoll#1/3BJD#1/3bjdset#1/3bjdclothes#seamstress#cosmaker#stregacorvina
3 notes
·
View notes
Text
Shirts shirts shirts!!
Welcome back to our Thursday entry about a collection for BJDs! Today is not about a collection actually, but about a bunch of Lolita shirts I made to take pictures of the skirts.
As you already know, you can find these items in my Etsy shop, the shirts as well as the patterns to make them!
The first ones I did were the White shirts because I need something to complement my Cute Bunny collection.

For both of them I used the pattern I did for the pajama tshirt with a few changes, mostly the collar and the waist lenght. Unfortynately I do not have any picture of the making of because I didn’t think to do a whole post about them :(
I can talk briefly about the materials and the costructions but as I said I do not have progress pictures... For the base I used a really soft white cotton with a light diagonal stripe pattern on it and I decided to cut both of the front pieces on the fold so the closure will be hidden on the back. For the closure I used a stripe of velchro fastener sewn with my machine to make it very durable, sometimes it gets stuck in the hair but I think it is the best choice for dolls dresses.
I decided to make a pointed collar for the button shirt and a rounded collor for the ribbon one, to add a little variation. Then it was time for my favorite part: of course is decoration! I decided to make some variations also with laces and notions, so I use the buttons only for one of them, for the other I added some nice satin ribbons and I changed a little the front panel.
This is the first one I did before the buttons.

I do not even take a picture of the finished second shirt except this one below, so I can only left you with pictures of them worn with different skirts. I hope you will like them!

Here the finished shirts!


And the shirts worn with the Cute Bunny skirt.


After those white shirts I decided that I need also some Offwhite Shirts so I sew other two!

This time I decided to make a long sleeves shirt with high collar, for a more Classic Lolita look, and a frilly shirt with the gathered top, more feminine and sexy.
For the fabric I choose a light offwhite cotton with no particular pattern on it and I serchead (a lot actually) for matching color trims and laces.
For the long sleeves one I decided to minimize the decorations so I just add a stipe of lace with satin ribbon on the front and two small pieces of offwhite cotton trim on the cuffs. I used this trim a lot in my other collections so I can pair this shirt with a lot of skirts!
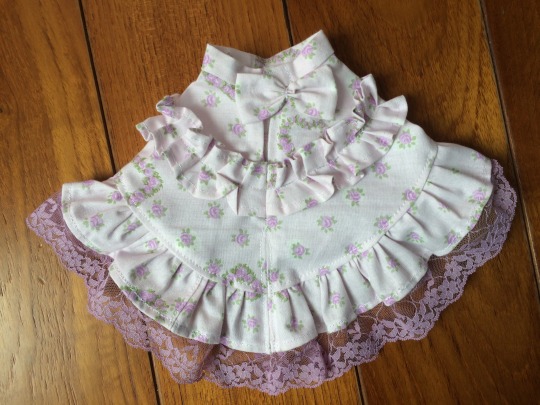
The second one instead has a lot more decorations! I used a floral lace all around the neckline and the botton hem and I added a different kind of lace on the underbust seam with a wide satin bow on the center.
Even for those I do not have progress picture because I made them last minute to shoot the other collections so I will left you with some flat pictures ad well as other pictures with some skirts. I hope you will like them!


The shirts worn with some skirts from my English Rose collection (you can already find these next collections in my Etsy shop but I still need to write the entry about them)


Other pictures with my Mermaid Sea collection..


I used them a lot more than the Whites one XD
I also made a shirt (two of them actually) with the same fabric of the English Rose collection that you will see in the future.


I also filmed a little video tutorial sewing this last shirt when I was thinking about opening a Youtube channel but I never had the time to edit it properly so I don’t think it will never see the light XD
That was all for today entry! I hope you like these shirts even if they are not a proper collection themselves. I still haven’t planned the Tuesday entry so we’ll see..
Have a nice day!
Chiara (StregaCorvina)
Bentornati al post del Giovedi su una colezzione per BJDs! Oggi in realtà non parliamo di una collezione vera e propria ma di alcune camicette in stile Gothic Lolita che ho realizzato per forografare meglio le gonne.
Come saprete già, trovate queste camicette nel mio negozio Etsy, così come i cartamodelli per realizzarle!
Le prime che ho realizzato sono delle Camicette bianche che mi servivano per fotografare meglio la collezione Cute Bunny.
Per entrambe ho usato il cartamodello fatto per la maglia del pigiama già realizzata con alcuni cambiamenti, soprattutto il collo e la lunghezza. Purtroppo non ho fatto foto mentre realizzavo queste camicette perchè non pensavo di fare un post a riguardo :(
Vi racconterò però brevemente dei materiali e di come le ho realizzate visto che non ho foto da mostrarvi... Per la base ho usato un morbido cotone bianco con una leggera trama diagonale e ho deciso di tagliare interi entrambi i davanti in modo da lasciare la chiusura sul retro. Per la chiusura ho usato una striscia di velcro perchè è il mio metodo preferito per chiudere gli abiti delle bambole, anche se ogni tanti vi rimangono impigliati i capelli...
Ho deciso di fare il collo a punta sulla camicia con i bottoni e rotondo sulla camicia con i fiocchi, per cambiare un pò i modelli fra loro. Ora è giunto il momento della mia parte preferita: ovviamente le decorazioni! Ho deciso di usare anche decorazioni diverse fra le due camicie in modo da avere modelli differenti: ho usato due pizzi diversi, ho aggiunto dei bottoncini su una delle due, mentre sull’altra i fiocchetti di raso e ho cambiato un pò le decorazioni sul davanti .
Ecco la prima che ho realizzato, prima dell’aggiunta dei bottoni.
Purotrppo non ho fatto foto alla seconda camicia tranne questa che vedete qui sotto, perciò vi farò vedere come le ho abbinate alla gonna.
Ecco le camicette finite!
E con la gonna della collezione Cute Bunny.
Dopo aver fatto queste camicette bianche ho deciso che me ne servivano anche altre color Crema perciò ne ho cucito altre due!
Questa volta ho deciso di realizzare un modello a maniche lunghe con il collo alto per un look più Classic Lolita, e un’altra arricciata con molto pizzo per un look più femminile e sexy.
Come tessuto di base ho scelto un leggero cotone color crema e ho cercato dei pizzi e delle decorazioni in tinta (e non è stato per niente facile abbinare le varie tonalità!)
Per la camicia con le maniche lunghe ho deciso di usare poche decorazioni perciò ho usato solamente una striscia di passanastro di pizzo nel centro davanti e due piccole strisce di passamaneria sui polsini. Ho usato questa passamaneria in molti capi nelle altre collezioni perciò riuscirò ad abbinare questa camicetta facilmente.
Per la seconda camicetta invece ho usato molte più decorazioni! Ho usato un pizzo floreale sulla scollatura e sull’orlo e un pizzo di tipo diverso sottoseno. Ho aggiunto poi un bel fiocco di raso al centro.
Anche di queste non ho fatto foto durante la realizzazione perchè le ho cucite all’ultimo minuto per fotografare le altre collezioni perciò vi farò vedere qualche foto da piatte e con alcune gonne diverse. Spero che vi piacciano!
Ecco le camicette con le gonne di alcune collezioni che trovate già nel mio negozio Etsy ma non ancora su questo blog, iniziamo con la gonna della collezione English Rose...
...poi con la gonna della collezione Mermaid Sea
Ho usato molto di più queste crema che quelle bianche XD
Ho fatto anche due camicette per la collezione English Rose con il tessuto della collezione, che vedrete più in la.
Avevo fatto anche una specie di video tutorial mentre cucivo queste ultime camicette (perchè pensavo di aprire un canale Youtube prima o poi...) ma alla fine non l’ho mai editato decentemente perciò non credo che vedrà mai la luce XD
E per oggi è tutto! Spero che vi piacciano queste camicette anche se non sono una vera e propria collezione! Non ho ancora deciso cosa pubblicherò nel post di MArtedi precio vedremo...
A presto!
Chiara (StregaCorvina)
#bjd#bjddoll#bjddress#bjdshirt#handmadeshirt#bjdclothes#handmadebjdclothes#custombjd#gothiclolita#gothiclolitabjd#gothiclolitashirt#handmadegothiclolita#sewing#seamstress#handmadesewing#handmadeclothing#stregacorvina
10 notes
·
View notes
Text
Violet Bouquet
Welcome back to the Tuesday entry! Today I wanna show you a single set that is also part of a mini collection with the same name “Violet Bouquet”.

There are all the pieces that create the Violet Bouquet collection. I am making only one post for the set and the collection this time because it is made of only few pieces, unfortunately I do not have this lovely fabric anymore - but I have a couple of totebags made with this that I can dismantle to have more.
I bought this fabric long time ago to make a Lolita skirt for me, I think I still have some picture somewhere.... yes I found them!
This skirt was a set corset + skirt actually, the corset is removable and I did the skirt with some ribbons inserted in the princess seams on the front and on the back to be gathered as a bustle. I used some purple cotton trim and lace to decorate this skirt but I do not have any more left to add to the dolls clothes. It was a really fun skirt to make and I have worn it a lot (I also wear this skirt the day I graduated from the Fashion School), I think it is still somewhere in my parents’ house.
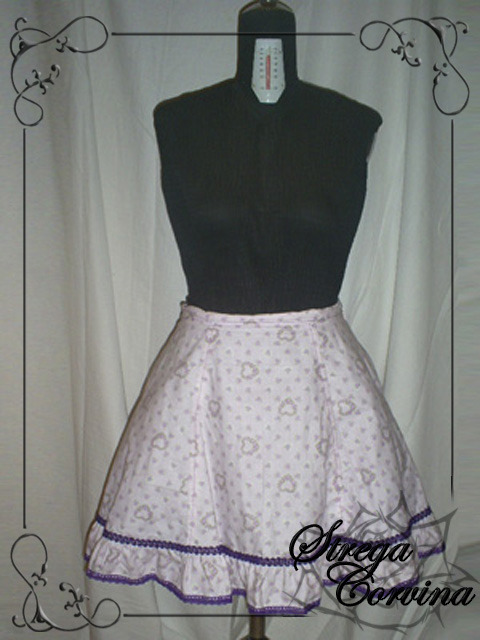
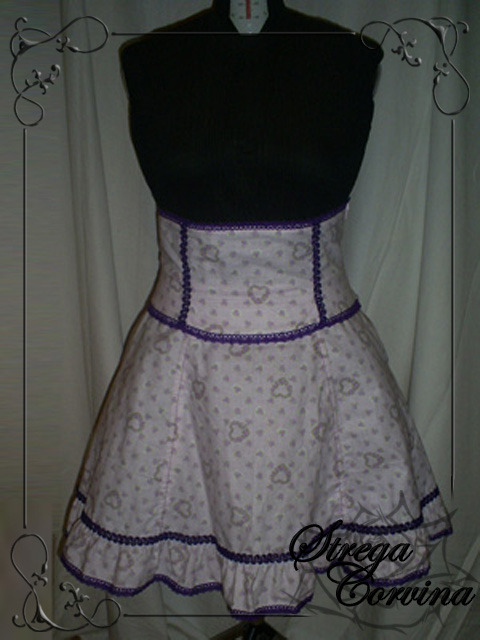

I used to wear it with my lilac corset, the first corset I ever did. (Sorry if the pictures are really ugly, I was in high school when I sewn these garments so they are more than 15 years old! - also you can see the logo and the frame of my old website, not active anymore)


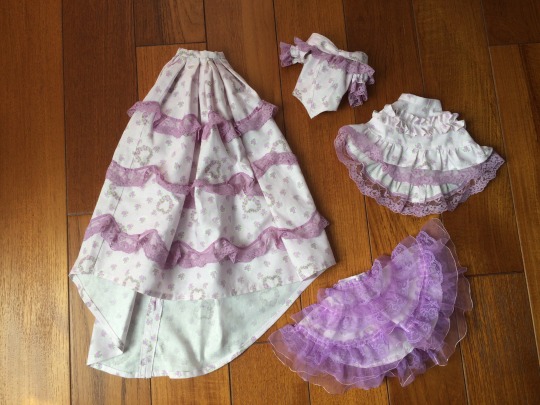
Anyway, let’s go back to the Violet Bouquet collection! This collection is made of a corset, a long skirt and two short skirts. The set corset + long skirt started as an historical project as I was using a circa 1600 gown for reference, but then I changed my mind because I did not have enought fabric for all the ruffles :(


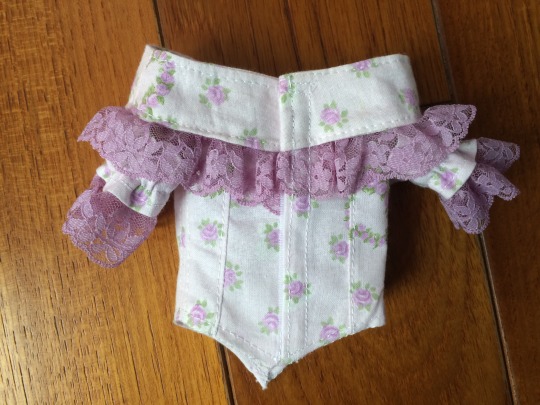
As you can see I was quite accurate with the corset (except for all the details on the bertha collar), I did the same V shape on the front and tried to replicate as much as I can the sleeves, luckly I had a purple lace that was perfect for this project!


For the skirt I tried to stay true to the original silhouette but again I did not have so much fabric so I changed the shape a bit: I kept the pleats on the waist but I made them less deep and I decided to do a little train on the back. I used the same lace and three small bows to make the ruffles and the decorations on the back.

I tried a little shooting with this dress (again on my sofa) to check if the lenght was the one I want and to be sure it didn’t need a petticoat underneath to keep its shape, when I was satisfied I took better pictures against the wall.


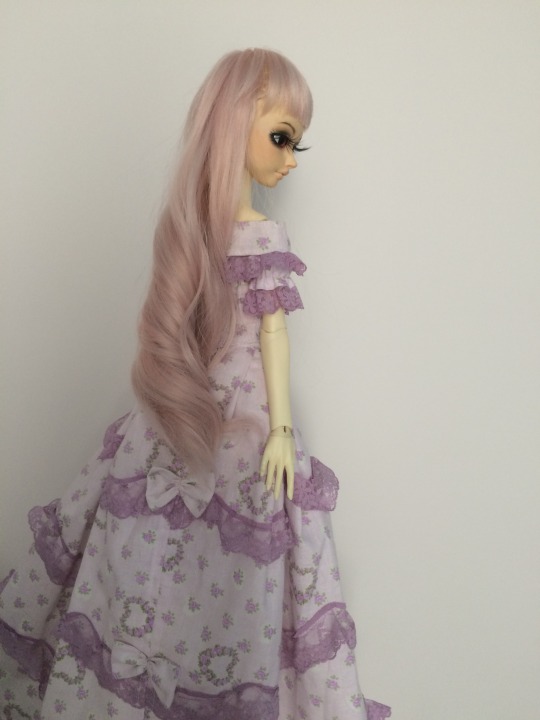

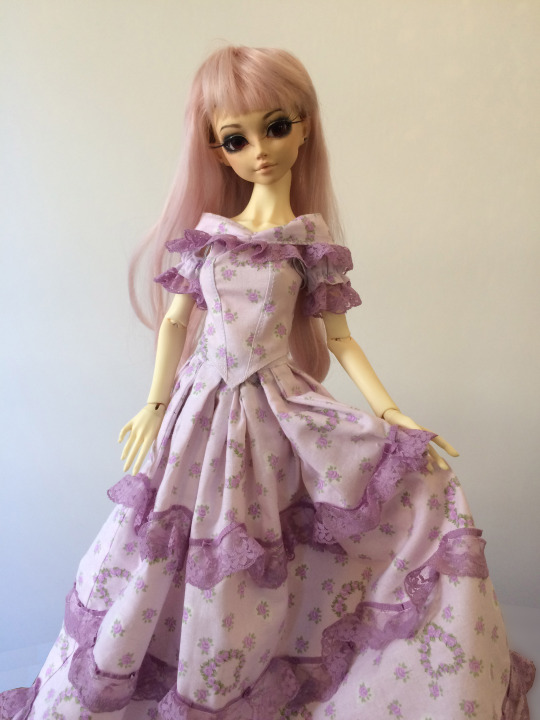
I love sooo much this set and I think it’s perfect for this doll and this wig. It’s by far ma favourite project togheter with She-ra. Do you like it? What do you think? Let me know! You can always find this project in my Etsy shop if you are interest and it can be made in any fabric you like and fort any dolls you like.
Moving on to the rest of the pieces, the two skirts, I made them using a circle skirt pattern that it is also available on Etsy along with the corset pattern.

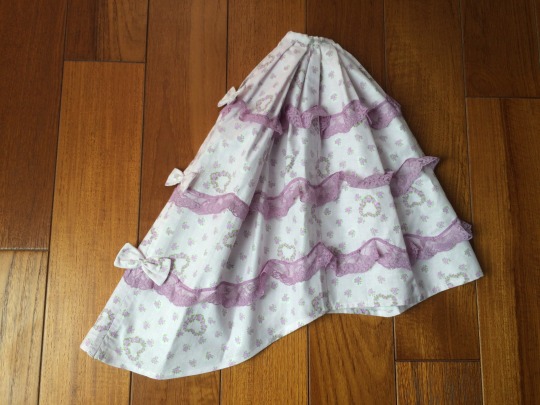
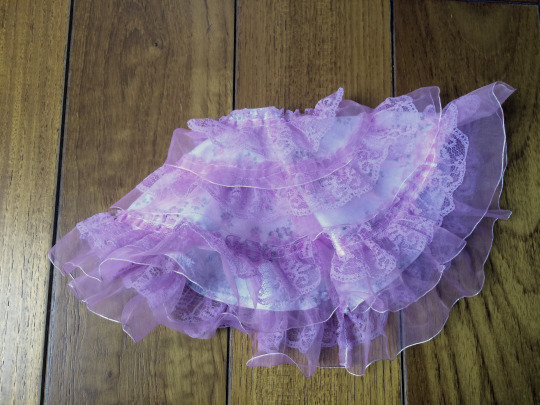
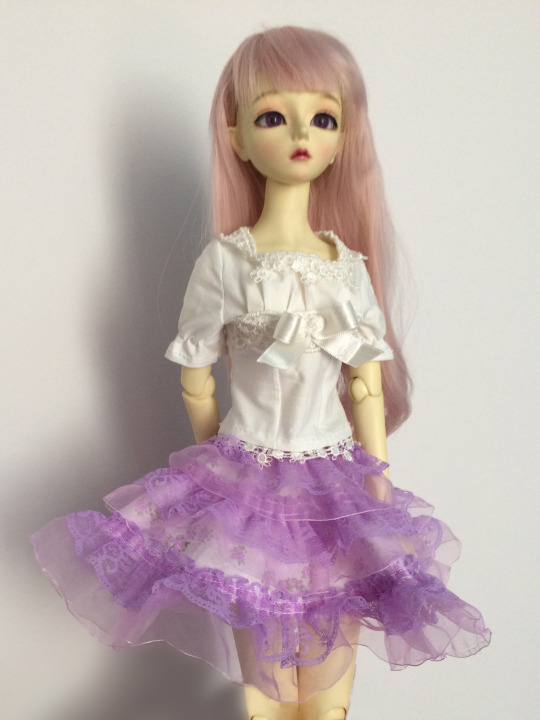
The first skirt is a simple circle skirt with three layers of gathered lace and organza, the same you have seen in white on my Belle Cosplay. It closes with a bit of velchro fastener in the back, hidden under a little bow in the same fabric.

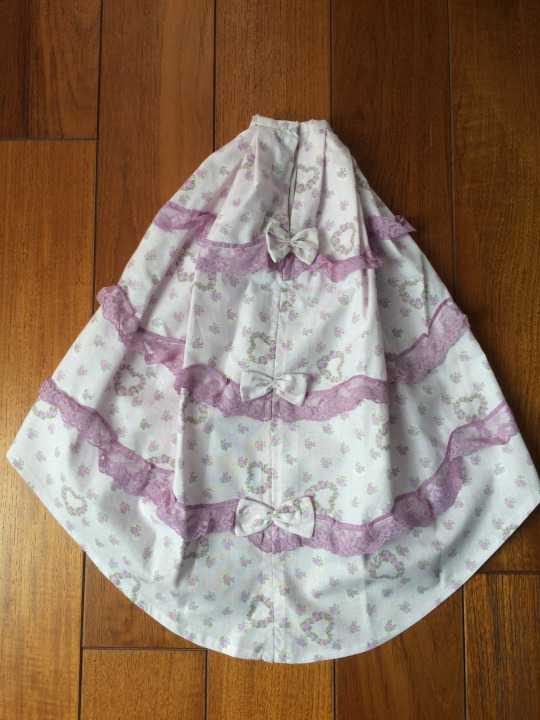
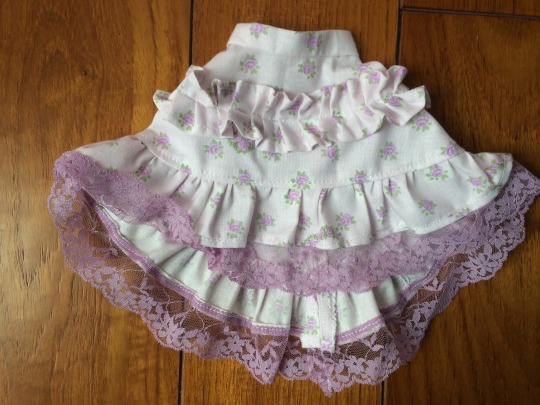
The second skirt is an asymmetrical skirt, longer on the back with a gathered ruffle in the middle made in the same fabric and the same purple lace used on the set on the bottom ruffle. Again, it closes with a bit of velchro fastener in the back, hidden under a little bow in the same fabric.
And there are some pictures of these skirts with the off-white shirt that I already shown you and the corset of the set.

I hope you like them and that you like this fabric as much as I do! See you again on Thursday with another dolls collection.
Chiara (StregaCorvina)
Bentornati al post del Martedi! Oggi vi farò vedere un set singolo che fa parte di una mini collezione chiamati entrambi “Violet Bouquet”.
Questi sono tutti i pezzi che fanno parte della collezione Violet Bouquet. Faccio un post unico per il set e la collezione questa volta perchè è fatta solo di pochi pezzi, purtroppo non ho più questa adorabile stoffa - anche se ho due borse realizzate con lo stesso tessuto che potrei sempre smontare per averne di più.
Ho comprato questa stoffa tanto tempo fa per farmi una gonna Lolita dovrei ancora avere le foto da qualche parte.... a si le ho trovate!
Questa gonna in realtà è un completo corsetto + gonna, il corsetto è una sorta di cintura removibile e nella gonna ho inserito dei canali nelle cuciture davanti e dietro per far passare all’interno dei nastri di raso da tirare su per arricciare la gonna. Ho usato poi una passamaneria e un pizzo di cotone viola per decoare orli e cuciture, purtroppo però non ne avevo più per usarli anche sugli abiti per le bambole. E’ stata una gonna molto divertente da realizzare e l’ho usata tantissimo (l’ho indossata anche il giorno che mi sono diplomata all’Accademia di Moda) e probabilmente è ancora da qualche parte a casa dei miei genitori.
La indossavo sorapttutto insieme al mio corsetto lilla, uno dei primi corsetti “seri” che ho realizzato. (Mi spiace le foto sono veramente orribili, ero al liceo quando ho cucito questi abiti...perciò più di 15 anni fa! - inoltre potete vedere il vecchio logo e la grafica che usavo nel mio vecchio sito web, non più attivo ormai)
Comunque, tornaimo a parlare della collezione Violet Bouquet! Come dicevo questa collezione è costituita da un corsetto + gonna lunga e da due gonne a ruota corte. Il set è iniziato come un progetto storico perchè stavo usando un’immagine di un abito del 1600 circa come ispirazione, poi ho dovuto purtroppo cambiare idea strada facendo perchè non avevo abbastanza stoffa per la gonna e tutte le arricciature :(
Come potete vedere ho cercato di rimanere abbastanza fedele nel fare il corsetto (tranne che per tutte le decorazioni sulla scollatura), ho tenuto la forma a V del davanti e anche le maniche sono abbastanza simili, per fortuna avevo un pizzo lilla perfetto per questo abito!
Per la gonna invece ho cercato di mantenere il più possibile la silhouette originale ma ho dovuto fare alcune modifiche per via della mancanza di stoffa: ho mantenuto le pieghe in vita ma le ho fatte meno profonde e ho deciso di fare un piccolo strascico sul dietro. Ho usato lo stesso pizzo lilla per le balze e ho fatto tre piccoli fiocchetti nello stesso tessuto da mettere sul dietro.
Ho fatto qualche foto (sempre sul divano) per controllare la lunghezza finale e verificare se fosse necessaria una petticoat per mantenere la forma, dopo aver verificato che l’aspetto era come lo volevo ho fatto delle foto migliori contro il muro.
Adoro tantissimoooo questo set, credo sia perfetto per questa bambola e questa parrucca. Fin’ora è sicuramente il mio lavoro preferito insieme a She-ra. Che ne pensate? Vi piace? Fatemi sapere! Come sempre trovate questo progetto nel mio negozio Etsy se vi interessa e può essere riprodotto con qualsiasi tessuto e per qualsiasi bambola.
Andando avanti con gli altri pezzi, le due gonne, le ho realizzate usando il cartamodello per gonne a ruota disponibile nel mio negozio, così come il cartamodello per il corsetto.
La prima gonna è una semplice gonna a ruota con tre balze di organza e pizzo arricciati, lo stesso pizzo che ho usato bianco per il Cosplay di Belle. Dietro si chiude con un pezzetto di velcro sulla cintura, nascosto da un fiocchetto dello stesso tessuto.
La seconda gonna è una gonna asimmetrica, più lunga dietro, decorata con una balza arricciata di tessuto al centro euna balza arricciata in fondo, decorata con lo stesso pizzo del set. Anche questa, si chiude dietro con un pezzetto di velcro sulla cintura, nascosto da un fiocchetto dello stesso tessuto.
Ed ecco alcune foto delle gonne indossate, con la camicetta crema che vi ho già mostrato e con il corsetto del set.
Spero vi piacciano e che troviate la stoffa adorabile come me! I hope you like them and that you like this fabric as much as I do! Ci vediamo Giovedi per parlare di un’altra collezione di abiti per bambole! A presto
Chiara (StregaCorvina)
#bjd#bjddoll#bjddress#custombjd#handmadebjd#handmadebjdclothes#bjdclothes#sewing#seamstress#handmade#handmadesewing#handmadeclothing#stregacorvina
6 notes
·
View notes
Text
Sweet Bears Collection
Welcome back on my journal! Today let’s go back to talk about BJD collections, back to the usual schedule XD
The collection I wanna show you today is the Sweet Bears collection, available as always in my Etsy Shop.

This collection is made of only three pieces but I find out recently that I have still some fabric left so if you want to request some different clothes it is still available! This fabric cames from my Sweet Lolita stash, is a very cute fabric slightly off-white with bears and pink hearts, perfect for dolls clothes!
The first dress I did was the one with the princess seams, I use the same pattern as in the Cute Bunny collection dress because I really like how it turned out. I decorated the front and the sleeves with some little bows in the same fabric and the collar, the sleeves and the hem were decorated with white cotton lace.


The second dress instead was made using the pattern with cups I created for the Midnight Queen set, with the gathered top part and the separated "cups”: This time I decided to do a very high neckline gathered on top but I used the same lace and a little bow like the previous dress. The skirt is made of three layers gathered at the waist line


To finish the look I did two little capes closed on the front with a satin ribbon and the same white cotton lace at the hem. I made a little rounded collar and that’s it! isn’t it lovely?


That’s all for today, just a very quick entry to show you more in detail this collection. Next week we wiill go back to the usual schedule: single set on Tuesday and a collection on Thursday, then when I’ll be done with the BJD I will start (or go back) to all the cosplay I didn’t show you yet!
See you soon!
Chiara (StregaCorvina)
Bentornati sul mio blog! Welcome back on my journal! Oggi torniamo al solito programma e parliamo di una collezione di abiti per bambole.
La collezione che vi voglio far vedere oggi è la collezione Sweet Bears, disponibile come il resto nel mio negozio Etsy.
Questa collezione si compone di tre capi ma mi sono accorta recentemente di avere ancora parecchia stoffa perciò in caso vogliate richiedere dei modelli particolari è possibile! Questa stoffa viene direttamente dal mio mucchio di stoffe Sweet Lolita è una stoffa veramente carina con degli orsetti e dei cuoricini rosa, perfetto per gli abiti delle bambole!
Il primo vestito che ho fatto è quello con i fianchini layerali, lo stesso cartamodello che ho usato per l’abito della collezione Cute Bunny perchè mi era piaciuto davvero tanto! Ho decorato il davanti e le maniche con dei fiocchetti nella stessa stoffa e sul collo, maniche e orlo ho aggiunto un bellissimo pizzo di cotone bianco.
Il secondo vestito invece l’ho realizzato usando il cartamodello con le coppe separate che ho creato per realizzare il set Midnight Queen. Questa volta ho fatto un collo molto alto arricciato in alto e ho usato le stesse decorazioni dell’altro abito. La gonna è fatta con tre balze arricciate sul punto vita decorate con il pizzo bianco di cotone.
Come accessori ho realizzato una coppia di mantelline chiuse davanti con un fiocco di raso e sull’orlo lo stesso pizzo in cotone bianco. Poi ho fatto un piccolo collo tondo, che ve ne pare? Non è un amore?
Ed è tutto per oggi, un post molto breve per farvi vedere meglio i dettagli di questa collezione.
Prossima settimana ricomincerò con i soliti post: un singolo set il Martedi e una collezione il Giovedi. Quando avrò finito i post sulle bambole comincerò (o meglio ricomincerò) a farvi vedere tutti i cosplay che non ho ancora postato!
A presto!
Chiara (StregaCorvina)
#bjd#bjddoll#bjddress#custombjd#handmadebjd#handmadebjdclothes#bjdclothes#sewing#seamstress#handmade#handmadesewing#handmadeclothing#stregacorvina
4 notes
·
View notes
Text
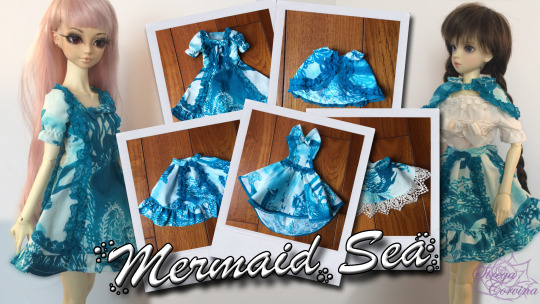
Mermaid Sea!
Welcome back to my Journal! This will be probably one of the last post about BJD Clothes as I am running out of them XD Maybe then I will switch back to one entry per week about making cosplays...I have not decided yet...
Anyway, today I wanna show you the clothes made with one of my favourite fabric ever! I am so sad that this fabric was given to me by a client for her commissions (I think I made one or 2 dress for her with this fabric...) and I wasn’t able to ever found it again anywhere else! It is so beautiful! The color, the pattern, the beautiful mermaids and the oceanic landscape...and teal is one of my favourite colors ever! (someone said Sailor Neptune? XD)
Without further ado...let’s talk about my Mermaid Sea collection!
This collection is made of several pieces in this lovely fabric and some matching laces to go with it. Togheter with the English Rose collection is probably the most “crowded” collection XD
You can find a lot of the patterns I used for this collection in my Etsy Shop as asual: the dress with separated top, the princess seams dress, the cape and the circle skirts.
Like I said, the fabric comes from an old lolita commission I made ages ago, let’s see if I can find the pieces I made with this... (like I said in my previous entry I had a really terrible camera back then so again, blurry pictures...)


Talking about the BJD collection...it is made of several pieces: two dresses, two skirts and a couple of capes.

The first dress is a classic princess seams dress with puffly sleeves, one of my favourite pattern (and as usual you will find it in my Etsy shop) It has a little bow on the front and a gathered ruffle all around the hem, the princess seams are decorated with gathered teal polyester lace, it was bought ages after the first commission but it matches the fabric perfectly.


The second dress has an asimmetrical skirt, longer on the back and it is made with my separated top bodice. It also have a little bow on the front and the same lace, gathered around the underbust and waist seams and plain around the hem.


The first skirt is a simple mini circle skirt with a big bow on the back and a nice off-white macramè lace on the hem. Really simple but really cute, and really SHORT as I was running out of scraps!


The second skirt is similar to the first dress, with princess seams, two gathered ruffles (one at the hem and one on the back) and gathered lace on the seams and a bow on the back.


Finally, the cape, is a simple cape with rounded collar decorated with lace to match the other pieces, I made two of them to sellit with both the skirt or the dresses.


I hope you like this collection! I really wish I had more fabric to sew something more :(
And here some pictures with the clothes worn by my dolls with the Cream Shirt (I think I did them for this collection...)


I hope you like this collection! It’s one of my favourite for sure!
Let’s meet again next week! I will probably be back to one entry per week but we’ll see.... please keep following my social pages for more updates <3
Chiara (StregaCorvina)
Bentornati sul mio blog! Questo sarà probabilmente uno degli ultimi post sugli abiti per BJD che ho realizzato perchè sto per esaurire quelli già fotografati e messi online XD Probabilmente tornerò al ritmo di un post a settimana sui tutorial e i procedimenti dei Cosplay che ho realizzato su commissione.. acnora non ho deciso, vedremo!
Comunque, oggi voglio farvi vedere gli abiti che ho realizzato con una delle mie stoffe preferite di sempre! Sono davvero dispiaciuta che non ho mai più trovato questa stoffa da nessuna parte! Mi è stata data da una cliente per una sua commissione (credo di averle fatto uno o 2 vestiti con questa stoffa...) ma purtroppo non l’ho più ritrovata... E’ cosi bella! I colori, i disegni, le sirene e il paesaggio sottomarino...e qyesta sfumatura di verde acqua è uno dei miei colori preferiti in assoluto! (qualcuno ha detto Sailor Neptune? XD)
Ed acco a voi la mia collezione Mermaid Sea!
Questa collezione è costituita da diversi pezzi realizzati con questa stoffa stupenda e dei pizzi abbinati. Insieme alla collezione English Rose è probabilmente quella con più pezzi realizzata fin’ora.
Potete trovare la maggior parte dei cartamodelli che ho realizzato per questi abiti nel mio negozio Etsy come sempre: il vestito con il bustino in due pezzi, il vestito a telini, la mantellina e le gonne a ruota.
Come ho detto, la stoffa viene dagli avanzi di una vecchissima commissione lolita, vediamo se riesco a trovare delle foto dei capi realizzati... (come ho detto nel post precedente, avevo una macchina fotografica terribile all’epoca perciò...ancora foto sfocate...)
Tornando alla collezione, è fatta di diversi pezzi: due vestiti, due gonna e una coppia di mantelline (la stessa realizzata due volte)
Il primo vestito è fatto con il cartamodello a telini che adoro tanto (e come sempre lo trovate in varie taglie nel mio negozio Etsy) Ha due telini davanti e due dietro, le maniche a palloncino e un piccolo fiocco sul davanti. E’ decorato con del pizzo in poliestere arricciato sulle cuciture e una balza arricciata dello stesso tessuto sull’orlo. Anche se il pizzo è stato comprato secoli dopo la prima commissione è assolutamente perfetto per questa stoffa!
Il secondo vestito invece è fatto con il cartamodello con il corpino in due pezzi e ha una gonna asimmetrica, più lunga dietro, e anche questo è decorato con un fiocco sul davanti e del pizzo abbinato, arricciato sulle cuciture di sottoseno e vita e “liscio” sull’orlo.
La prima gonna è una semplice gonna a ruota con un grande fiocco sul dietro e un bel pizzo macramè color crema sull’orlo. E’ davvero MOLTO corta perchè stavo finendo la stoffa XD
La seconda gonna è simile al primo vestito, con fianchini laterali davanti e dietro decorati da pizzo arricciato, due balze arricciate di tessuto (una sull’orlo e una solo dietro) e un bel fiocco dietro.
Per ultimo, le mantelline, un modello molto semplice con colletto circolare e pizzo arricciato sull’orlo. Ne ho fatte due per venderle sia con la gonna che con gli abiti.
Spero che vi piaccia questa collezione! Vorrei proprio avere ancora stoffa per fare tanti altri capi cosi...
Ed ecco qualche foto dei capi indossati, insieme alle Camicette Creama (che credo di aver realizzato proprio per fotografare questa collezione....)
Spero vi piacciano! Questa è sicuramente una delle mie preferite!
Ci vedremo la prossima settimana! Come dicevo, probabilmente tornerò ad un aggiornamento a settimana ma vedremo...continuate a seguire le mie pagine social per maggiori aggiornamenti <3
A presto!
Chiara (StregaCorvina)
#BJD#bjdclothes#bjddoll#bjddolls#custombjd#handmadebjd#handmadebjdclothes#bjdskirt#bjddress#gothiclolita#gothiclolitaclotes#gothiclolitabjdclothes#gohticlolitaBJD#sewing#handmadesewing#seamstress#handmade#handmadeclothing#stregacorvina
4 notes
·
View notes
Text
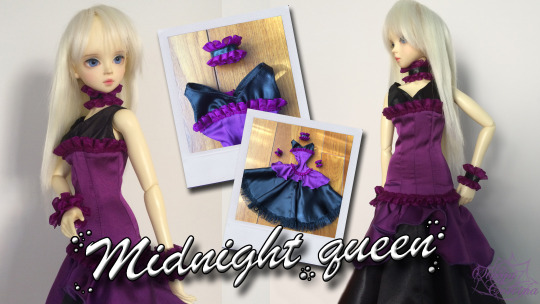
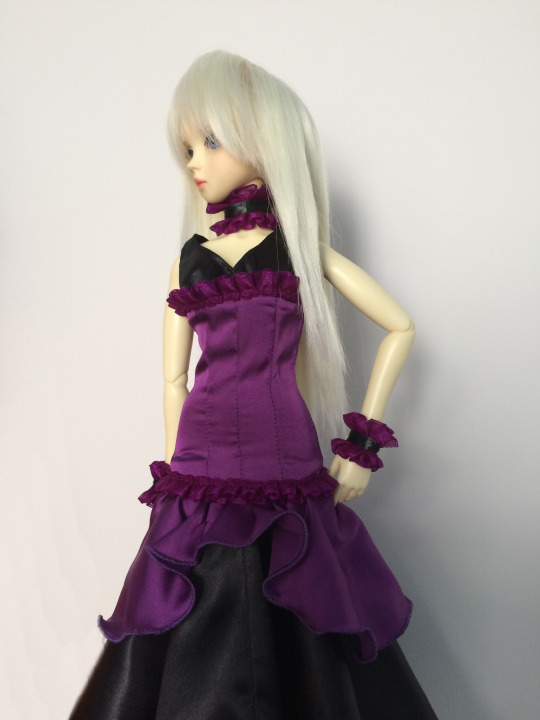
Midnight Queen <3
Welcome back! A little change of plans again as you can see, I didn’t finish all the stuff to upload the She-ra Part 2 entry today so I had to switch with the entry already planned for Tuesday (luckly I have already finish that) (Also I put the English on top because almost all the italians can read English but a few can read Italian so... XD)
The set I present you today is the Midnight Queen! (That you can find in my Etsy shop as usual)
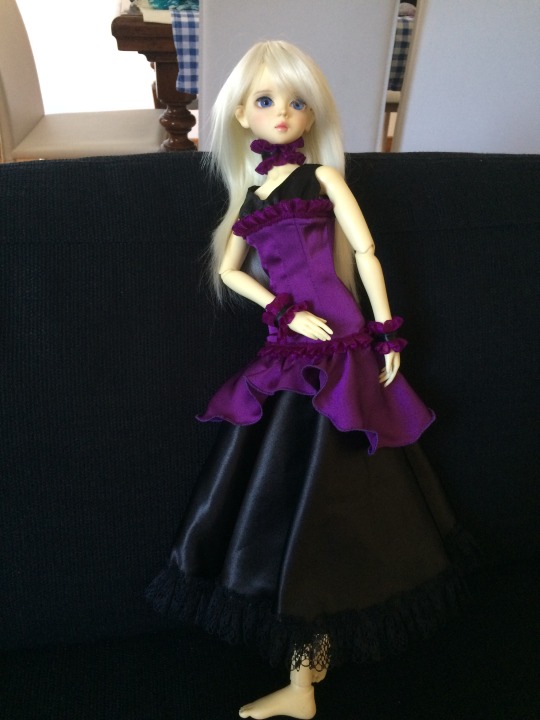
I really like this set, I hope to do it again in other colors too, I didn’t have the goth wig and the boots when I did it unfortunately so she’s barefoot XD
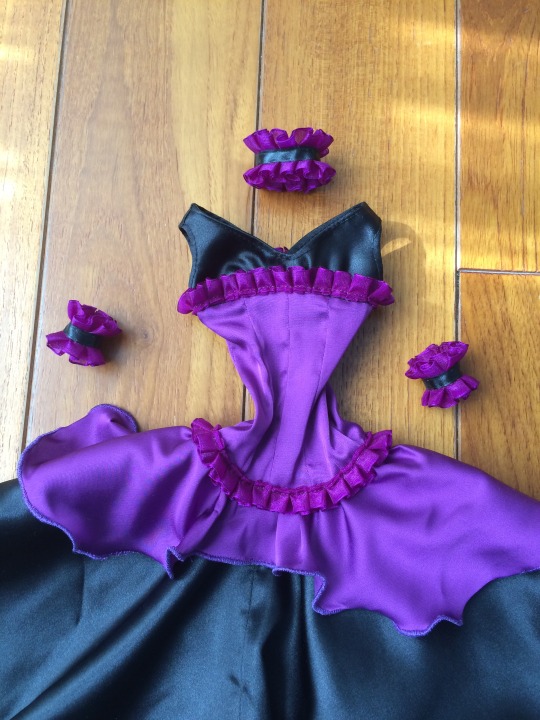
As almost every bjd’s dress, this one also is born after some scraps from previous projects, this time the starting point was a “almost-circle skirt” (asymettric as it’s shorter in the front) in light purple satin. (coming from I do not know what circle skirt for human XD)
This set is not born after a project but I made it as I went on, it gave life to a new pattern for the bodice and I used it a lot for other collections... You can find this pattern in my Etsy Shop as well as the whole set. I drafted the pattern directly on my 54 cm doll shown in the pictures, that’s why it suits only this doll and not the other two as they have bigger breast (but the pattern is available in any size)
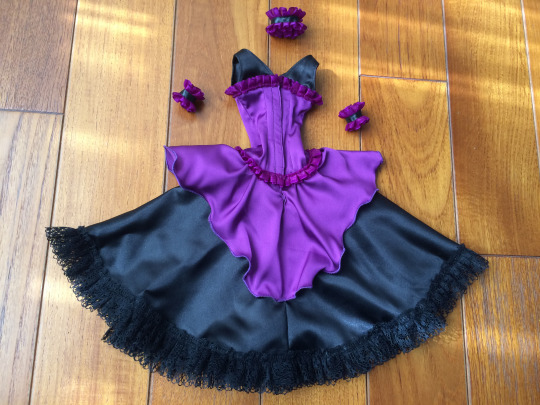
First of all I made a tiny tiny rolled hem on the purple skirt making it very wavy, then I started to think how to coordinate this fabric. I decidet to match purple and black, one of my favourite combinations, so I made another circle skirt from heavy black satin (even this one is a scap from somthing else, that’s why it is shorter than the doll and has the center front seam)
I want to add some movement in the top part of the bodice that’s why I made the new pattern: starting from the sheath dress base I separated the top part of the bodice creating two “cups”. On the front I dediced to add some volume to make a gathered cup, I left the back as it was because it will be covered with hair for the most part. I still had some purple satin to do the lower part of the bodice so I made the cups in black and the bodice in purple, I am “almost” happy with the results, as i should have make the bodice shorter, I am not really satisfied with the lenght actually...

The dress was completed but it still was missing something...decorations! I went through my decorations stash and find a cute trim made with pleated organdy, the color was perfect! I use it on the underbust and low-waist seams, as well as to make some cute accessories with black satin ribbon: a chocker and two cuffs!
(I don’t know why I didn’t use elastic bands intead of three tiny tiny snaps buttons!)
The skirt needed some decorations too! So I came back to my stash and find a medium-high black polyester lace I bought from Aliexpress some time ago (I never use it because looks to cheap to me, but I bought 5 meters for 1€...so it was ok!) I gathered it with the gathering foot of my sewing machine (since I discovered it I can’t live without!) and sewn it on the hem of the black skirt.

I really like this “improvised” project, I have to say that even without all my planning in advance it turns out very balanced and cohesive!

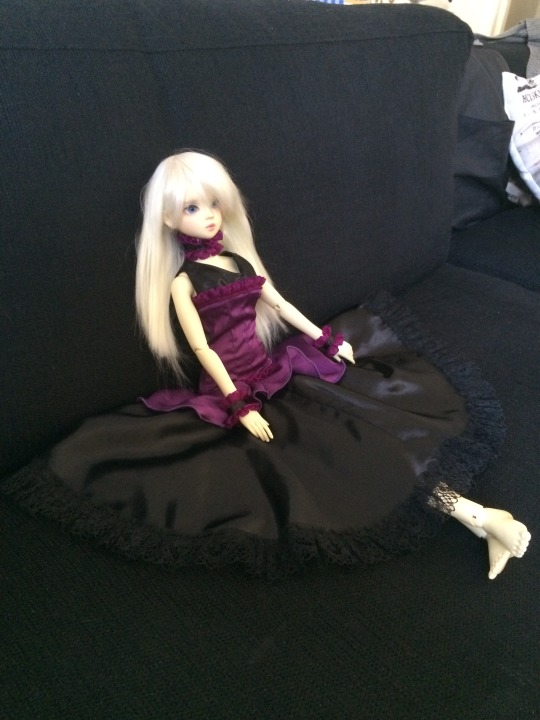
I will leave you with some of the (disastrous) shoots I made for this set before I realize that I really needed a stand to take good pictures!
Attempt nr 1: Couch (I needed to cut away almost half of the background every time, also I didn’t like how the doll sits...so, nope!)
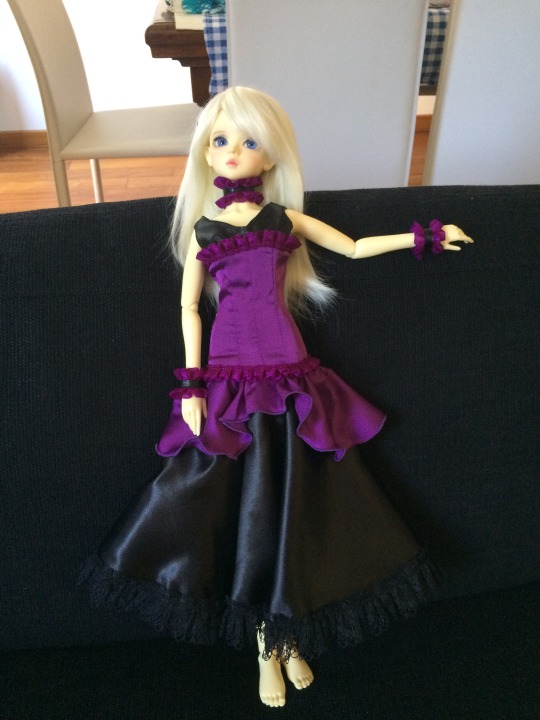

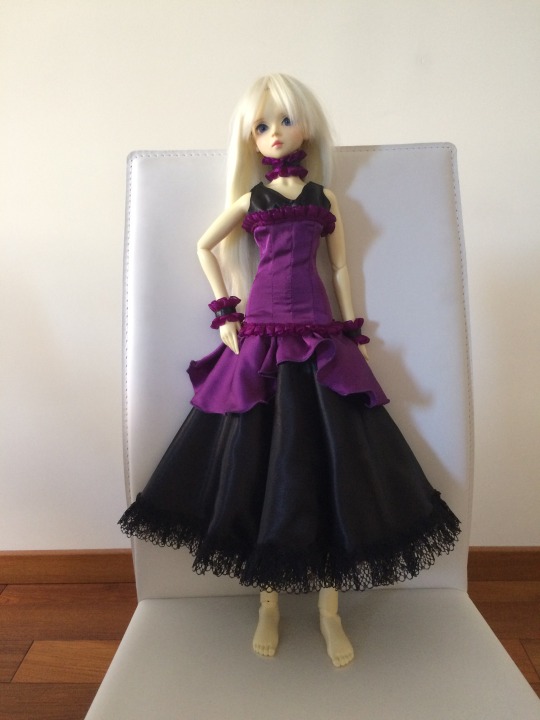
Attempt nr. 2: Chair (Almost acceptable, best for smaller dolls/clothes or else tons of background editing again...)

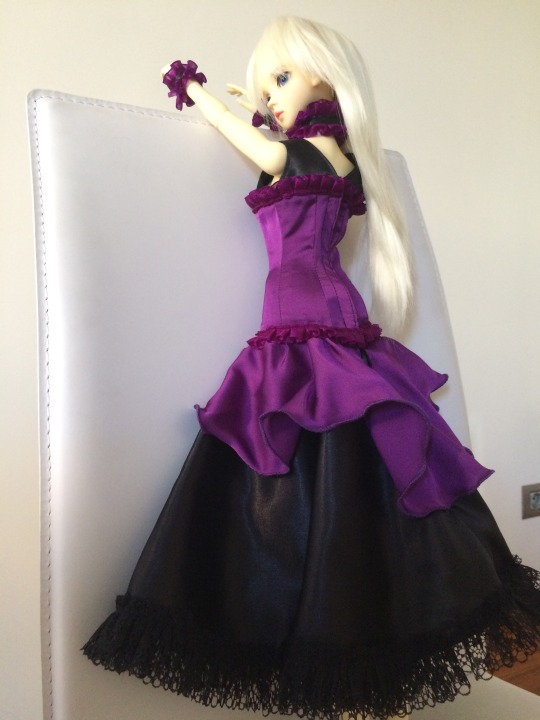
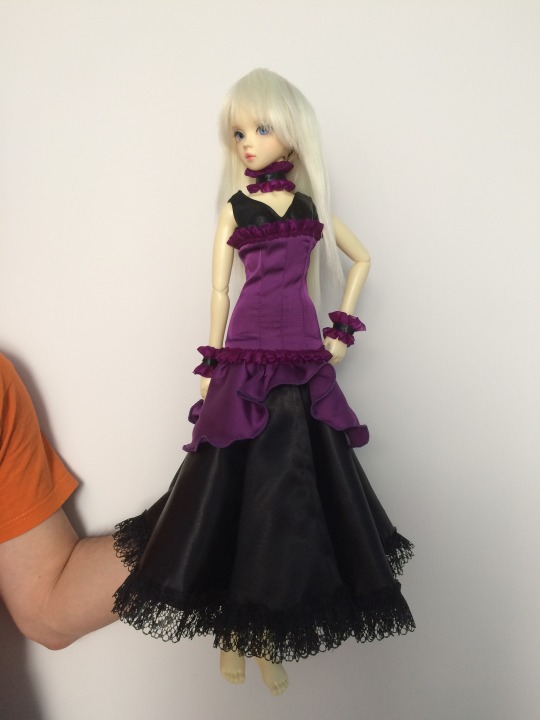
At the end I decided to shoot helding the doll against a plain wall and I used this method for almost all the pictures. I will definitely need my boyfriend to hold the doll for me (because I cannot shot with one hand XD) so I just need to photoshop his arm out of the picture.

I hope you like her! See you on Tuesday with She-ra Part 2 (I still need to finish accessories!!) and then again Thursday with the entry about a new collection (well, this time is more about some “accessories”)
Chiara (StregaCorvina)
Bentornati! Piccolo cambio di programma di nuovo, come potete vedere XD Non sono riuscita a finire tutto quello che dovevo fare per mettere on line la seconda parte del post su She-ra perciò... per fortuna avevo già programmato il nuovo set del Martedi perciò ho invertito questo con She-ra. (E inoltre ho deciso di spostare l’italiano in basso perchè alla fine anche gli italiani sanno l’inglese, mentre ben pochi stranieri sanno l’italiano XD)
Il set che vi presento oggi è quello che ho chiamato Midnight Queen! (Che come sempre trovate in vendita nel mio negozio Etsy)
Mi piace davvero tanto questo set, spero di riuscire a farlo di nuovo in altri colori prima o poi. Purtroppo non avevo ancora la parrucca più gotica e gli stivaloni alti quando ho fatto le foto perciò alla fine l’ho lasciata scalza XD
Come la maggior parte degli abiti per le bambole, anche questo nasce da avanzi di stoffe o da recuperi vari, in questo caso l’origine dell’abito è stata la “sopragonna” di raso leggero viola, avanzo di non so bene quale gonna a ruota XD (in realtà è più una ruota asimmetrica visto che davanti è molto corta...)
Questo abito non è partito da un vero e proprio progetto ma è stato creato man mano, e anche in questo caso ha portato alla realizzazione di un nuovo cartamodello che poi ho usato per tantissimi abiti successivi... Potete trovare anche il cartamodello nel mio negozio su Etsy. L’ho modellato direttamente sulla bambola da 54 cm che vedete in foto per questo motivo è leggermente più piccolo della base standard e puo essere usato solo per la bambola più piccola delle tre che ha meno seno.
Per prima cosa ho bordato con un orlino stretto stretto la sopragonna viola creando un bell’effetto ondulato, poi ho pensato a come poterla sfruttare a pieno. Per far risaltare il viola ho quasi subito deciso di abbinarle il nero e perciò ho realizzato un’altra gonna a ruota con un avanzo di raso nero (anche questa volta il pezzo non era grandissimo, ecco perchè non arriva fino ai piedi ma si ferma prima)
Poi volevo creare un po di movimento nella parte alta e sfruttare entrambi i tessuti perciò ho creato da zero il top partendo da una base a tubino e separando la parte sopra delle coppe. Ho fatto un taglio sotto il seno e ho deciso di svasare un po la parte davanti in modo da creare una coppa arricciata, mentre ho lasciato liscio il dietro, tanto la maggior parte delle bambole hanno i capelli lunghi e non si sarebbe notato troppo XD Per fortuna avevo ancora abbastanza raso viola per creare il resto del corpino dell’abito e cosi ho usato la parte sotto della base appena tagliata...anche se per il futuro ho deciso di farla leggermente più corta perchè non sono soddisfata all 100% dell’altezza della vita.
La base dell’abito era completa ma mancava ancora qualcosa...perciò sono andata a vedere nel mio sacchetto delle decorazioni e ho trovato questa passamaneria di organza plissettata che era assolutamente perfetta! L’ho usata subito per sottolineare il taglio sottoseno e sulla vita bassa e poi visto che me ne era rimasta ancora un pochina usando un nastro di raso nero basso ho creato anche gli accessori: un collarino e due polsini/braccialetti.
(Non so perchè non mi è venuto in mente di montarli su un elastico invece di cucire tre minuscoli automatici neri sul resto del nastro XD)
Anche la gonna però aveva bisogno di un pò di decorazioni, perciò sempre dal mio sacchetto delle decorazioni ho tirato fuori un pizzo nero medio/alto che avevo comprato su Aliexpress tantissimo tempo prima e non avevo mai utilizzato (perche mi sembrava un po troppo sintetico, ma del resto ho pagato tipo 1€ per 5 metri!). L’ho arricciato con l’apposito piedino per la macchina da cucire (da quando ho iniziato ad usarlo non riesco più a farne a meno!!) e l’ho applicato sull’orlo a ruota della gonna.
Mi piace tantissimo questo progetto “improvvisato”, devo dire che nonostante non avessi pianificato in anticipo i materiali e le decorazini da usare come faccio di solito, è venuto fuori un risultato molto armonioso e coeso!
Vi lascio qualche foto del primo (fallimentare) “servizio fotografico” che ho fatto per questo set, che mi ha fatto realizzare definitivamente di avere bisogno di un piedistallo XD
Tentativo fallimentare 1: Divano (avrei dovuto scontornare ogni volta tutta la parte alta e quando la mettevo seduta era troppo all’indietro, perciò...location bocciata!)
Tentativo (semi) fallimentare 2: Sedia (anche qui avrei dovuto scontornare parecchio ogni volta ma magari per abiti più piccoli può andare bene...)

Alla fine ho fatto un paio di prove tendendola dritta con il muro bianco di sfondo e ho optato per questa soluzione per tutte le foto future (facendo tenere la bambola al mio ragazzo per poter scattare in più libertà)
Spero vi piaccia! Ci vediamo Martedi con la Parte 2 di She-ra e poi Giovedi per il solito post sulla genesi di una nuova collezione! (anche se questa settimana più che una collezione si tratta di “complementi”)
Alla prossima
Chiara (StregaCorvina)
#bjd#bjddoll#bjdclothes#gothicbjd#midnightqueen#midnightqueenbjd#custombjd#bjdset#bjddress#handmade#handmadebjdclothes#sewing#seamstress#handmadesewing#handmadeclothing#stregacorvina
3 notes
·
View notes
Video
instagram
#casualgirl set online on Tumblr! Let’s go checking out! 💙 #bjd #bjddoll #bjddolls #bjddollclothes #custombjd #handmadebjd #handmadebjdclothes #denim #dollsclothes #sewing #handmadesewing #seamstress #stregacorvina (presso Magie di stoffa by StregaCorvina) https://www.instagram.com/p/CCDdUM5DB9z/?igshid=1lxy2gtfgd596
#casualgirl#bjd#bjddoll#bjddolls#bjddollclothes#custombjd#handmadebjd#handmadebjdclothes#denim#dollsclothes#sewing#handmadesewing#seamstress#stregacorvina
1 note
·
View note
Text
Casual Girl
Welcome back! Today is a very random entry as I had no idea for this Tuesday entry until...10 minutes ago XD
As I am running short of single BJD set to show you (well, I have still 2 or 3 but I still need to take pictures, make listings....) I will probably switch back to cosplay for the Tuesday entry... Anyway, today I will show you the Casual girl set!

As usual I made these clothes from scraps: the denim fabric cames from an alteration I did for a client ages ago, I think it was a shirt but I really don’t remember XD The grey wool instead cames from some leftovers of a shirt/sweatshirt/I don’t know how to call it that I made for a lolita commission looooong time ago.
Let’s see if I still have pictures of it... yes I do, they are horrible and blurry but anyway... (I really had a terrible camera back then sorry....)


But let’s go back to the main topic... the Casual girl XD The set is made of a shirt and a pair of shorts in denim fabric, I had really fun making the little pockets on the back and all the topstiches like a real pair of jeans.

For the shirt, if you want you can purchase the pattern by clicking on it, I think that the floral stripe on the front comes with the original fabric but I am not sure of that, maybe it is something I added with the alterations...anyway I decided to keep it to add some color to the shirt. And no buttons, to show some cleavage XD

And this is the set worn by one of my models.


To match this set I decided to make also a couple of accessories, the scarf and the beret from the wool(len) fabric, because the ensemble was too plain for my tastes XD
They are really simple, a stripe of fabric with fringes (the fabric selvages actually XD) at each ends for the scarf and a classic beret pattern in dolls size for the hat. What do you think?


I think they are soooo cute <3
I use the same grey wool to do also another BJD project, a suit, but I never take any proper pictures of it except when sewing it so I will just show you a couple of shots.
For jacket I the took the buttons from an old pajamas and the little pockets are real as well as the buttonholes. The skirt is a sort of wrap skirt closed with velchro fasteners. Nothing too fancy, perfect for a day in the office XD


It will be probably put on my Etsy Shop in the “Fall-Winter Up” together with some velvet stuff I did.
That’s all for today entry, like I said a really random entry I am sorry XD But I am starting right now the Thursday entry as I already know what to show you!
See you next time!
Chiara (StregaCorvina)
Bentornati! Il post del Martedi di oggi è abbastanza messo insieme all’ultimo minuto perchè letteramente non avevo idea di cosa pubblicare fino a 10 minuti fa XD
Siccome sto per terminare i set singoli per BJD che ho fatto fin’ra (in realtà ne ho ancora 2/3 ma sono ancora da fotografare, sistemare, mettere online...) probabilmente tornerò a parlare di Cosplay il Martedi! In ogni caso, ecco a voi l’argomento di oggi: il set Casual girl!
Come al solito, i tessuti per questi capi vengono da avanzi di altri progetti: la stoffa di jeans è di una vecchia riparazione che ho fatto per una cliente secoli fa, credo fosse propio una camicia ma sinceramente non me lo ricordo più XD La lana grigia invece viene da una vecchia commissione lolita: una maglia/felpa/non so come chiamarla anche questa realizzata secoli fa!
Forse ho ancora delle foto di questa commissione, vediamo se le ritrovo...ah si eccole! Sono orribili e super sfocate ma rendono l’idea...(avevo veramente una pessima macchina fotografica all’epoca scusate XD)
Ma torniamo all’argomento del post... il set Casual girl XD Questo completo è fatto da una camicia e un paio di pantaloncini in tessuto jeans, mi sono proprio divertita a fare le taschine sul dietro e tutte le impunture a contrasto come se fossero un vero paio di jeans.
Per la camicia invece, se cliccate sul testo potrete comprare il cartamodello se vi interessa, credo che la striscia floreale fosse già sulla camicia originale ma non sono sicura se invece fa parte delle modifiche che ho fatto successivamente...in ogni caso ho deciso di tenerla per dare un pò di colore alla camcia. E non ho aggiunto bottoni per mostrare un po di scollatura XD
Ed ecco il set indossato da una delle mie bambole...
Ho deciso poi di aggiungere qualche accessorio a questo set perche mi sembrava un po troppo semplice...una sciarpa e un baschetto in lana grigia.
Sono abbastanza semplici, una striscia di tessuto con frange alle estremità (sono le cimose del tessuto) per la sciarpa e un cartamodello in misura da bambola per un classico baschetto. Che ne pensate?
Penso che siano proprio un amore <3
Ho usato la stessa lana grigia per fare un’altro set per bambole, un tailleur, ma non ho mai fatto delle foto decenti tranne qualcuna mentre lo cucivo.
Per la giacca ho preso dei bottoncini da un mio vecchio pigiama e ho fatto delle vere tasche e delle vere asole. La gonna invece è una specie di gonna a portafoglio chiusa con del velcro. Niente di troppo elaborato, perfetti per una giornata in ufficio XD
Lo metterò propbabilmente on line nel mio negozio Etsy nell’aggiornamento “autunno-inverno” insieme ad alcuni capi in velluto che ho già cucito.
Ed è tutto per oggi, come ho detto un post abbastanza random mi spiace XD Ma inizierò subito a scrivere il post di Giovedi visto che almeno per quello so già di cosa parlare!
Alla prossima!
Chiara (StregaCorvina)
#bjd#bjddoll#bjddolls#bjdclothes#handmadebjdclothes#handmadebjd#handmadebjddress#custombjd#sewing#handmadesewing#bjdskirt#bjdshirt#bjdset#bjdjacket#seamstress#handmade#handmadeclothing#stregacorvina
1 note
·
View note
Video
instagram
Let’s go picking roses in the English countryside ❤️❤️ #BJD #bjddolls #bjdclothes #handmadebjd #custombjd #dollsclothes #handmadedollsclothes #handmadebjdclothes #sewing #handmadesewing #seamstress #stregacorvina (presso Magie di stoffa by StregaCorvina) https://www.instagram.com/p/CB48XQoI80s/?igshid=wc0h8090xea4
#bjd#bjddolls#bjdclothes#handmadebjd#custombjd#dollsclothes#handmadedollsclothes#handmadebjdclothes#sewing#handmadesewing#seamstress#stregacorvina
1 note
·
View note
Text
English Rose Collection
Welcome back! <3 Today I will show you another BJD clothes collection I did during this quarantine. This time it will be the English Rose Collection.

This collection is made of several pieces as I still had a lot of leftovers from a dress I sewn for myself using this fabric (let’s see if I can find pictures again....)
It is a Lolita Dress I made for myself almost 10 years ago I think (OMG...) with a gathered topand sleeves and a princess seams A line. I use two types of cotton laces to decorate the dress: a dark and a light blue one. It has a ribbon on the neck, a zipper and another ribbon on the back.


I think I did also some accessories with this fabric (I find a bonnet I sold for sure, and maybe a bag..I don’t find any pictures right now...) but anyway I still have a lot of fabric left so I decided to use it for my dolls.

The first piece I did was a very simple circle skirt, with a gathered ruffle in the middle, here some pictures...


...then I did another corset decorated with some lace from my dress.


As I has still some lace I made also a matching skirt, another simple circle skirt with elastic waist, the same light blue cotton trim and a off-white cotton decoration on the hem.


I made also a dress with long sleeves, with a loto of cotton lace and satin ribbon decorations...

...and the last skirt of the collection, another simple circle skirt with off-white cotton trim, gathered ruffle at the hem and a little bow on the elastic waist. I did a lot of skirt for this collection XD


After these pieces I made also a couple of capelets for shooting pictures...

...and also a couple of shirts that I already shown in the entry about shirts.

These are all the pieces I did for this collection, I really DID have a lot of fabric XD (7 styles and the shirt and the capelet are 2 pieces each)

What do you think? What is your favorite style? I really like the dress and the B skirt. Here some worn pictures of all the pieces matched togheter with the Cream Shirts I did a while ago.


See you on Tuesday for another entry!
Chiara (StregaCorvina)
Bentornati! <3 Oggi vi farò vedere un’altra collezione di abiti per BJD fatta durante la quarantena. Questa volta vi faccio vedere la collezione English Rose.
Questa collezione è costituita da molti pezzi perchè avevo ancora parecchi avanzi di tessuto che avevo comprato per un vestito che ho fatto per me (vediamo se trovo le foto...)
Si tratta di un vestito Lolita che ho fatto per me più di 10 anni fa credo (oddio...) con una parte alta arricciata e le maniche a palloncino e una linea ad A con dei finachini laterali. L’ho decorato usando due tipi di passamaneria di cotone: azzurro e blu. Ha un fiocco incrociato dietro al collo, una cerniera e un altro fiocco sulla schiena.
Mi ricordo di aver fatto anche alcuni accessori con la stessa stoffa (ho ritrovato le foto di un bonnet che ho venduto, e credo anche di aver realizzato una borsa anche se ora non la ritrovo...) ma nonostante tutto avevo ancora parecchia stoffa avanzata.
Il primo pezzo che ho fatto per questa collezione è stata una semplice gonna a ruota con vita elastica una striscia arricciata al centro, ecco alcune foto..
...poi ho realizzato un altro corsetto decorato con la passamaneria celeste che avevo usato per il mio abito.
Siccome avevo ancora passamaneria ho fatto anche una gonna abbinata, un’altra gonna a ruota con vita elastica, la stessa decorazione azzurra e un pizzo di cotone color crema.
Ho fatto anche un abito a maniche lunghe, con un sacco di decorazioni in pizzo e nastri di raso...
...e l’ultima gonna della collezione, un’altra gonna a ruota con una passamaneria di cotone color crema, una balza arricciata in fondo, vita elastica e un fiocchetto dietro. Ho fatto un sacco di gonne in questa collezione XD
Dop otutti questi capi ho fatto anche una coppia di semplici mantelline da usare per le foto...
...e una coppia di camicette che vi avevo già fatto vedere nel post sulle camicette.
Questi sono tutti i pezzi che ho realizzato per questa collezione, effettivamente avevo ancora un sacco di stoffa XD (7 capi diversi e la mantellina e la camicetta le ho realizzate doppie)
Che ne pensate? Vi piacciono? Quale sono le vostre preferite? A me piace tantissimo l’abito con le maniche lunghe e la gonna modello B. Ed ecco alcune foto indossate di tutti i pezzi abbinati fra loro e con le camicette crema che ho cucito un po di tempo fa.
Ci vediamo Martedi con un nuovo post!
Chiara (StregaCorvina)
#BJD#BJDdolls#BJDclothes#customBJD#handmadeBJD#handmadebjdclothes#gothiclolita#gothiclolitaclothes#handmadegothiclolita#gothiclolitaBJD#sewing#bjddress#bjdskirt#bjdshirt#seamstress#handmade#handmadeclothing#handmadesewing#stregacorvina
1 note
·
View note