#handmade rose
Explore tagged Tumblr posts
Text

Handmade Crochet Rose – Chenille Petals & Flexible Stem
Give a flower that will last forever with this beautifully handmade crochet rose! Crafted with love and detail, this soft, plush rose features velvety chenille yarn for the petals and sturdy acrylic yarn for the stem and leaf. The flexible stem is wrapped with floral wire, allowing you to gently bend and shape it for display in vases, bouquets, or gifts.
Product Details:
Length: Approximately 16 inches (about 40.5 cm)
Materials: Chenille yarn (petals), acrylic yarn (stem/leaves), and floral wire for shaping
Features: Includes a small charm for a personalized handmade touch
Pattern: Designed using the lovely pattern by She’s Crafty
This crochet rose makes a perfect gift for birthdays, anniversaries, Valentine's Day, or as a lasting token of affection. Each rose is carefully stitched and shaped, ensuring it's as unique as the love it represents.
Note: Contains small parts (charms) and is not suitable for young children.
Bring home a forever bloom today – a soft, cozy alternative to fresh flowers that never fades!
https://creaturecrochetok.etsy.com/listing/4295581112
# # # # # # # # # # #
#crochet flower#Handmade Rose#Forever Bloom#Chenille Crochet#Handcrafted Gift#mothers day gift#crochet decor#Acrylic Yarn Art#Floral Wire Stem#shescraftypattern#etsyhandmade
0 notes
Text


Cute things about mid-month
A blue rose handmade
A cute keychain of a friend
A drawing draw by a friend
A lucky charm from chinese New Year
1 note
·
View note
Text
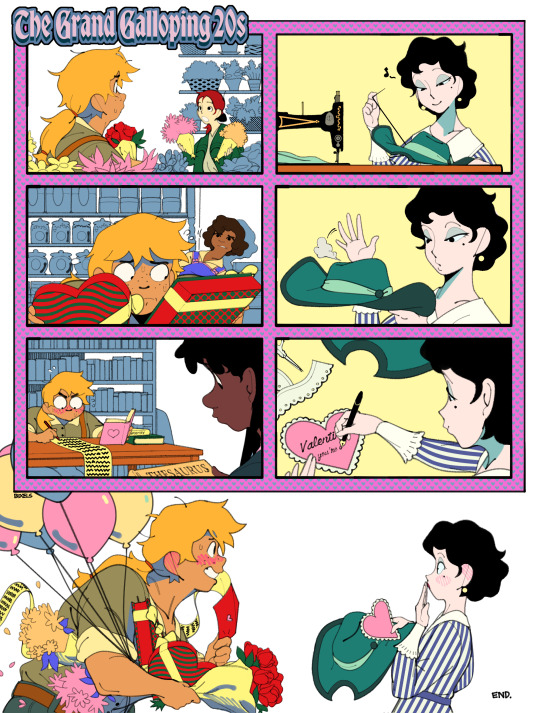
There's no such thing as overpreparing for love.
Happy (late) Rarijack Valentine's.
#mlp#rarity#applejack#rarijack#my art#fanart#comic#the grand galloping 20s#bonbon#rose#my little pony#aj is 100% the type to overthink/overdo things especially for people she cares about#panics because she starts second guessing her valentines plans for rarity so she buys out the entire flower boutique cuz she can't remember#her favorite flower. “ten boxes of chocolates is better than one right???” meanwhile rarity gives extremely thoughtful handmade gifts
21K notes
·
View notes
Text
𝐻𝒶𝓃𝒹𝓂𝒶𝒹𝑒 𝒮𝓅𝑒𝓁𝓁 𝒥𝒶𝓇𝓈 🫙💕
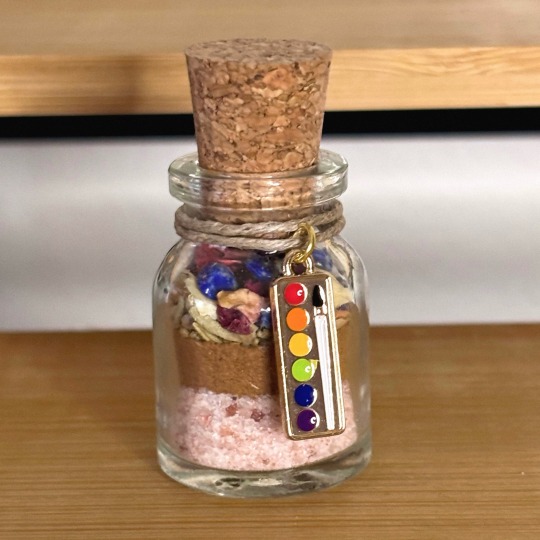
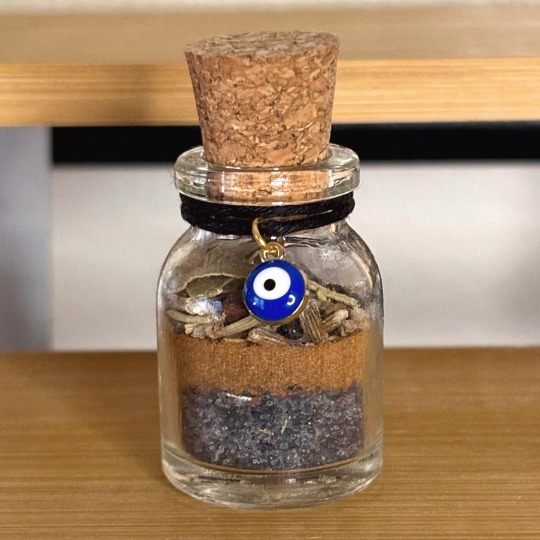
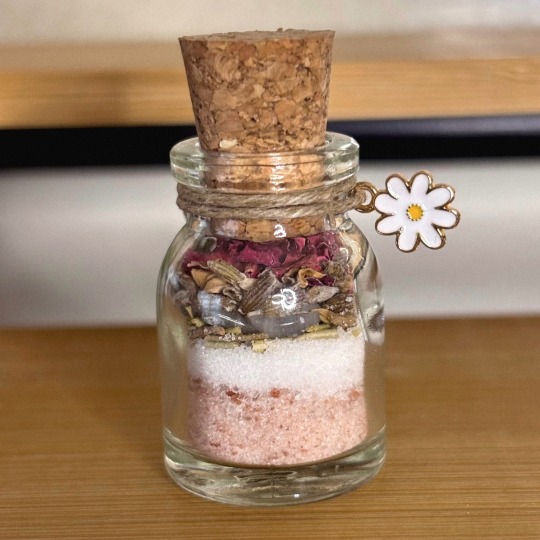
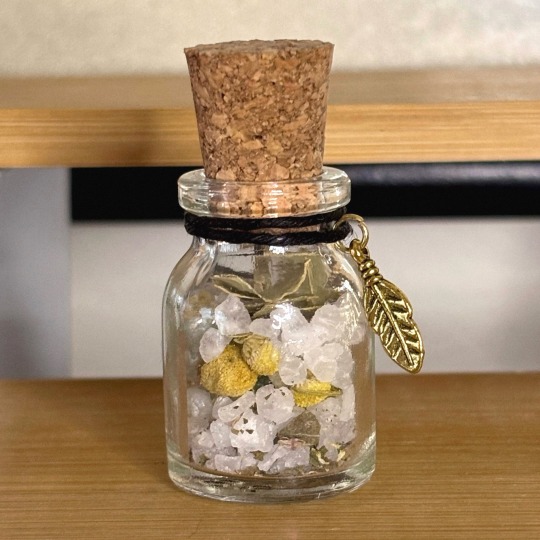
𝐼𝓃𝑔𝓇𝑒𝒹𝒾𝑒𝓃𝓉𝓈: 📜
1. 𝑪𝒓𝒆𝒂𝒕𝒊𝒗𝒊𝒕𝒚 🎨
Intention: 𝙸𝚗𝚜𝚙𝚒𝚛𝚊𝚝𝚒𝚘𝚗, 𝚊𝚛𝚝𝚒𝚜𝚝𝚒𝚌 𝚎𝚡𝚙𝚛𝚎𝚜𝚜𝚒𝚘𝚗, 𝚊𝚗𝚍 𝚞𝚗𝚕𝚘𝚌𝚔𝚒𝚗𝚐 𝚌𝚛𝚎𝚊𝚝𝚒𝚟𝚎 𝚙𝚘𝚝𝚎𝚗𝚝𝚒𝚊𝚕.
✧~ Pink Himalayan Salt
✧~ Jasmine
✧~ Rosemary
✧~ Cinnamon
✧~ Citrine
✧~ Lapis Lazuli
✧~ Rose
2. 𝑷𝒓𝒐𝒕𝒆𝒄𝒕𝒊𝒐𝒏 🧿
Intention: 𝚂𝚊𝚏𝚎𝚝𝚢, 𝚜𝚑𝚒𝚎𝚕𝚍𝚒𝚗𝚐 𝚏𝚛𝚘𝚖 𝚗𝚎𝚐𝚊𝚝𝚒𝚟𝚒𝚝𝚢, 𝚊𝚗𝚍 𝚜𝚙𝚒𝚛𝚒𝚝𝚞𝚊𝚕 𝚙𝚛𝚘𝚝𝚎𝚌𝚝𝚒𝚘𝚗.
𖤓~ Black Salt / Egg Shells
𖤓~ Cinnamon
𖤓~ Rosemary
𖤓~ Lavender
𖤓~ Black tourmaline
𖤓~ Bay Leaf
𖤓~ Clear Quartz
𖤓~ Cloves
3. 𝑳𝒐𝒗𝒆 💗
Intention: 𝚂𝚎𝚕𝚏-𝚕𝚘𝚟𝚎, 𝚌𝚘𝚗𝚏𝚒𝚍𝚎𝚗𝚌𝚎, 𝚊𝚗𝚍 𝚊𝚝𝚝𝚛𝚊𝚌𝚝𝚒𝚗𝚐 𝚙𝚘𝚜𝚒𝚝𝚒𝚟𝚎 𝚛𝚎𝚕𝚊𝚝𝚒𝚘𝚗𝚜𝚑𝚒𝚙𝚜.
♡~ Himalayan Pink Salt
♡~ Sugar
♡~ Rosemary
♡~ Lavender
♡~ Rose Quartz
♡~ Rose
4. 𝑴𝒐𝒏𝒆𝒚 💵
Intention: 𝙰𝚋𝚞𝚗𝚍𝚊𝚗𝚌𝚎, 𝚙𝚛𝚘𝚜𝚙𝚎𝚛𝚒𝚝𝚢, 𝚊𝚗𝚍 𝚏𝚒𝚗𝚊𝚗𝚌𝚒𝚊𝚕 𝚠𝚎𝚕𝚕-𝚋𝚎𝚒𝚗𝚐.
$~ Sea Salt
$~ Mint
$~ Chamomile
$~ Bay Leaf
$~ Aventurine
$~ Citrine
𝐻𝑜𝓌 𝓉𝑜 𝒰𝓈𝑒:
• Carry It With You: You can carry the spell jar in your bag, pocket, or purse to keep its energy close. This allows you to tap into its intention whenever you need it.
• Wear It: If you prefer, place the jar in a macrame necklace or another wearable item. This makes it a personal talisman, connecting you to its energy throughout the day.
• Create a Sacred Space: Set the jar in a special place in your home where you can see it regularly. This will help you stay aligned with its intention.
• Set Intentions: Take time to hold the jar and focus on your intention. Visualize what you want to manifest as you connect with its energy.
• Incorporate in Rituals: Use the jar in your rituals or meditative practices. Before starting a new project or during moments of reflection, hold the jar and invite its energy to support you.
𝔁𝓸𝔁𝓸- 𝓚𝓲𝓴𝓲 🔮
𝙲𝚛𝚢𝚜𝚝𝚊𝚕 𝙷𝚎𝚊𝚕𝚒𝚗𝚐 𝙿𝚛𝚘𝚙𝚎𝚛𝚝𝚒𝚎𝚜
𝙼𝚘𝚛𝚎 𝚒𝚗𝚏𝚘𝚛𝚖𝚊𝚝𝚒𝚘𝚗 𝚘𝚗 𝚗𝚊𝚝𝚊𝚕 𝚌𝚑𝚊𝚛𝚝 𝚛𝚎𝚊𝚍𝚒𝚗𝚐𝚜 𝚊𝚗𝚍 𝚖𝚢 𝚊𝚛𝚝 𝚒𝚜 𝚌𝚘𝚖𝚒𝚗𝚐 𝚜𝚘𝚘𝚗—𝚜𝚝𝚊𝚢 𝚝𝚞𝚗𝚎𝚍! ✨☺️
©𝚊𝚜𝚝𝚛𝚘𝚜𝚘𝚞𝚕𝚍𝚒𝚟𝚒𝚗𝚒𝚝𝚢 𝙰𝚕𝚕 𝚁𝚒𝚐𝚑𝚝𝚜 𝚁𝚎𝚜𝚎𝚛𝚟𝚎𝚍.
#spell jars#art#witchblr#witchcraft#witchcore#witch aesthetic#spells#protection spell#money spell#love spell#spell work#creativity spell#self love#abundance#manifestation#crystal healing#artists on tumblr#support black creatives#support black artists#arts and crafts#rose quartz#citrine#black tourmaline#clear quartz#lapis lazuli#kitchen witch#herbal magic#witch community#handmade#made with love
576 notes
·
View notes
Text


I finished my moorish rose chainmail dice bag! This took me 30+ hours over the span of a few weeks and was a really fun challenge. I had never made three dimensional moorish rose before.
In total the bag has 1,452 brass and copper rings, all of which I made myself out of 1mm wire. It can fit up to three sets of dice and weighs 260 grams, which is slightly impractical for a dice bag but I'm fine with carrying a bit of extra weight around.
The second pic is a close up look at the design—moorish rose is a 9-in-1 weave, so every ring goes through 9 other rings—and the last pic is of the inside of the bag, which I just thought made a cool picture
#chainmail#chainmaille#dice bag#dnd#d&d#dungeons and dragons#moorish rose#my stuff#handmade#chain mail#chain maille#chainmail dice bag#metal dice bag#copper#brass#metalwork
1K notes
·
View notes
Text
custom shape requests are open, and I also am looking for help with sales. I have seen now many artists use the help of others to help market their work, and I want to create create create and create some more, sales is an entire event on its own. Please send me a message if you're interested, thanks! ... roses are all about love, please also realize they have thorns too.... and stuff happens in life. I think one of the most important things I'm looking for in a sales CEO is the ability to have a good attitude after any unforseen "not so fun" parts of life... effort counts too.

before paint and resin... el naturale
#roses#flowers#handmade rose#handmade flower#palm rose#palmetto rose#sweetgrass rose#abstract art#job hunting#jobs#jobsearch#jobseekers#online jobs#job search#jobs in usa#job opportunities#miss my job#love my job
11 notes
·
View notes
Text
Momoko, the Moon Shine Bright...
Channeling Kamikaze Girls' Momoko! I hand embroidered a few accessories to match Rose Ribbon Embroidery for the BtSSB NYFW show. This post is more of a process/homage type of video, but there is a lot more video and photos to come!
#sweet lolita#lolita fashion#oldschool lolita#baby the stars shine bright#btssb#shimotsuma monogatari#kamikaze girls#daily coordinate#victorian maiden#usakumya#rose ribbon embroidery#rose ribbon embroidery jsk#handmade#下妻物語
623 notes
·
View notes
Text


Rose Quartz's shield pin I made out of a soda can bottom
#rose quartz#rose quartz steven universe#rose quartz shield#handmade#diy craft#diy#handmade pins#steven universe#craft
108 notes
·
View notes
Text

A portrait of my cat made entirely of pressed flowers and leaves.
I did two~ish layers to make it opaque and then added smaller flowers, like baby’s breath, on top to add detail.
For adhesive, I used a generous amount of modge podge matte finish.
Happy crafting <3
#art#artists on tumblr#artwork#queer artist#small artist#my art <3#original art#cute cats#my cat#cat#cats of tumblr#cat art#pressed flowers#flowers#roses#crafts#handmade
232 notes
·
View notes
Text


https://www.instagram.com/piratesxrose/
@piratesxrose ~『 キミコイ』
#pirates and the crown rose#lolita fashion#handmade#dress#fashion#harajuku#indie brand#baroque#kawaii#harajuku fashion
195 notes
·
View notes
Text

Crochet a Classic Cathedral Rose Afghan, Pattern By Julene Watson For Annie's Attic: 👉 https://buff.ly/3dPsmZu 💜
662 notes
·
View notes
Text
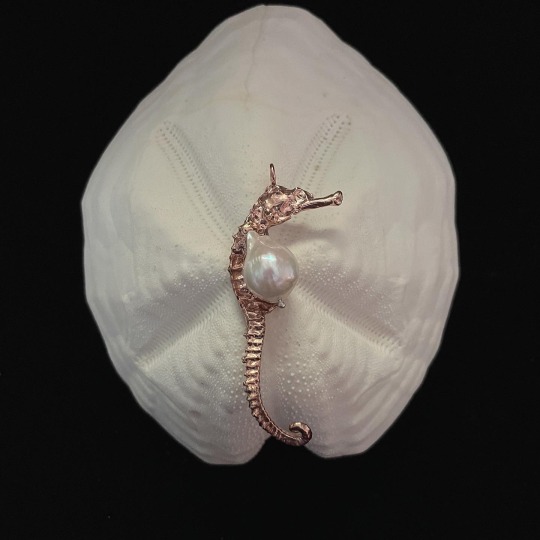

Rose gold plated pregnant male seahorse pendant with baroque pearl pouch
#seahorse jewelry#seahorses#sea creatures#handmade jewelry#moon and serpent#fine jewelry#support artists#wearable art#sea witch#nonbinary#genderqueer#pregnant#pink jewelry#rose gold#ocean#seagrass#merfolk#merpeople#merman#mermaid jewelry#mermaidcore#pearl jewelry
2K notes
·
View notes
Text
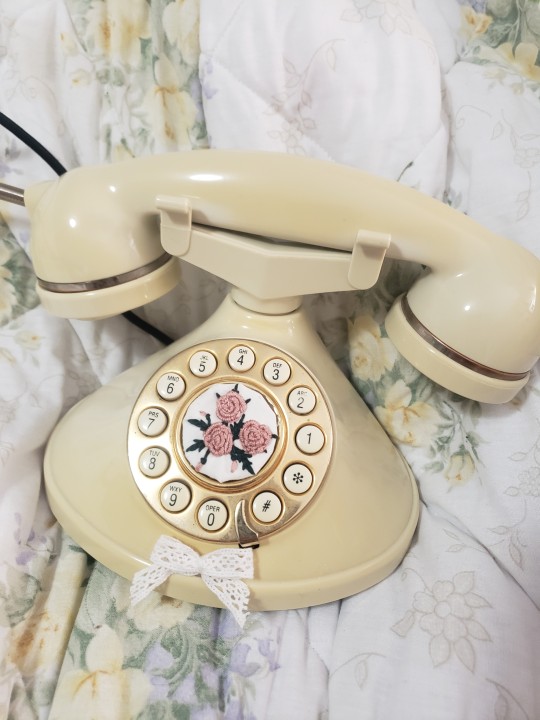

Small project. Embroidered a patch to cover the missing logo plate on this old phone.
#crafts#cottagecore#crafting#handmade#artists on tumblr#cottagecore aesthetic#sewing#sewists of tumblr#hand embroidery#embroidery#hand embroidered#embroidered#sewing crafts#sewing project#conair#conairphone#vintage#upcycling#coquette#springtime#roses#bullion roses#flowers#vintage phone
355 notes
·
View notes
Text
you can tell by the pavement... that was taken in Wynwood Miami. Read the description.

a rosemobile in green.. version 4.7 I made a bunch of rosemobiles before finding what worked best
#wynwood miami#wynwood art district#palm rose#palm roses#palmetto rose#palmetto roses#abstract art#recycle#upcycle#phoenix lahw#phoenix lahw comsultationz#phoenix lahw consultations#handmade rose#handmade flower#tropical#wynwood miami rose man#wynwoomiamiroseman#palmettoroseman#palmettostateroseman#miami#dade county
5 notes
·
View notes
Text

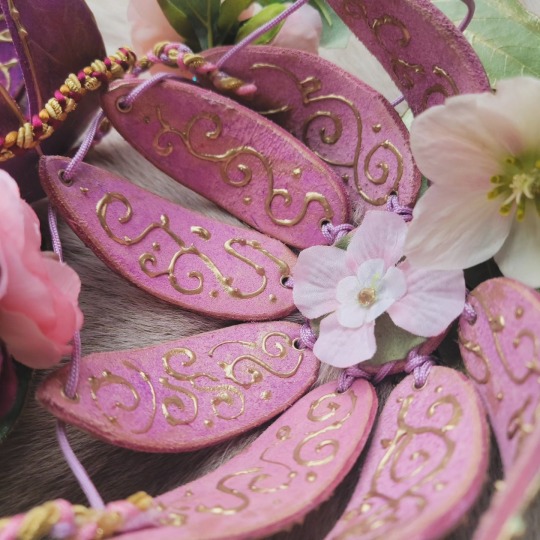
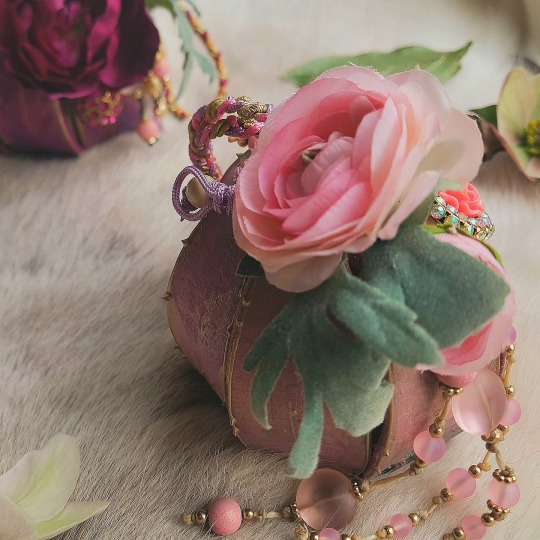
Pink Petal Pouch. :)
Perfect for those spring tea parties or general fairy outings. 🩷
SOLD
https://www.etsy.com/shop/ArcherInventive
#pink#purse#petal pouch#bag#rose#handmade#fairy fashion#fantasy fashion#one of a mind#wearable art#archerinventive
197 notes
·
View notes
Text
𝑻𝒂𝒓𝒐𝒕 𝑹𝒆𝒂𝒅𝒊𝒏𝒈: 𝑷𝒊𝒄𝒌 𝒂 𝑷𝒊𝒍𝒆 ✨
What specific aspects of your authentic self-expression have you been neglecting?
1 2 3


Pile 1: Earrings (Seven of Pentacles, Eight of Wands, & The High Priestess).
How to Heal:
There is a need for deeper reflection and acknowledgment of your skills at this time. You should make time to celebrate your achievements, no matter how big or small. You might be holding back in some way, struggling to express your innermost thoughts and desires, possibly due to a fear of judgment. But there is a disconnect from your intuition and inner voice, which could stem from self-doubt or external influences. It’s important that you reconnect with your intuition and trust your instincts and feelings. Additionally, identify what is causing these delays. This could involve addressing any fears or external pressures that are preventing you from accessing your true self. Authenticity is the highest frequency; while it attracts, it can also repel. However, by embracing this energy, you will naturally draw in what is meant for you. Although it may feel intimidating at first, fully embracing your authentic self-expression can be incredibly liberating. 🦋

Pile 2: Necklace (Five of Cups, The Fool, & Two of Cups).
How to Heal:
You may be overlooking the positive aspects of your life and the opportunities for growth and connection around you. It’s easy to focus on previous disappointments, which creates barriers preventing you from fully embracing your authentic self. Additionally, you might be neglecting the playful and carefree aspects of your self-expression, causing you to remain stuck in unhealthy cycles. When you focus solely on the negative, it can stifle your creativity and joy, making it harder to explore the lighter, more adventurous sides of your personality. I encourage you to take risks and embrace spontaneity. Step into the unknown and take a leap of faith. A fear of trust might also lead you to withdraw from relationships, so seek out a supportive community that helps you feel valued. Remember to find spaces where you are genuinely appreciated and loved, rather than merely tolerated. ♥︎

Pile 3: Ring (Ten of Swords, Five of Cups, & The Hermit).
How to Heal:
You are in the process of healing and recovering from past trauma. This may involve coping with a betrayal or painful experiences that have left you feeling defeated and isolated. These experiences could have created barriers between you and your authentic self, as you might be focusing on the pain rather than on your healing and renewal. As a result, you may be neglecting aspects of your self-expression, fixating on past hurts or regrets, which can hinder your ability to move forward and embrace your true healed self. While it's natural to seek solitude to process your trauma, excessive isolation can also contribute to this disconnect. It's important to find a balance between introspection and engaging with the world around you. The darkness is where you learn, but the light is where you share those lessons. 💡
Feedback: 📝
𝚃𝚑𝚒𝚜 𝚛𝚎𝚊𝚍𝚒𝚗𝚐 𝚒𝚜 𝚒𝚗𝚝𝚎𝚗𝚍𝚎𝚍 𝚏𝚘𝚛 𝚝𝚑𝚎 𝚌𝚘𝚕𝚕𝚎𝚌𝚝𝚒𝚟𝚎; 𝚝𝚊𝚔𝚎 𝚠𝚑𝚊𝚝 𝚛𝚎𝚜𝚘𝚗𝚊𝚝𝚎𝚜 𝚠𝚒𝚝𝚑 𝚢𝚘𝚞. 𝙸𝚏 𝚢𝚘𝚞 𝚏𝚒𝚗𝚍 𝚝𝚑𝚊𝚝 𝚝𝚑𝚒𝚜 𝚛𝚎𝚊𝚍𝚒𝚗𝚐 𝚛𝚎𝚜𝚘𝚗𝚊𝚝𝚎𝚜, 𝚢𝚘𝚞𝚛 𝚏𝚎𝚎𝚍𝚋𝚊𝚌𝚔 𝚠𝚘𝚞𝚕𝚍 𝚋𝚎 𝚐𝚛𝚎𝚊𝚝𝚕𝚢 𝚊𝚙𝚙𝚛𝚎𝚌𝚒𝚊𝚝𝚎𝚍. 💕
🫙- 𝚃𝚒𝚙 𝙹𝚊𝚛 (𝚂𝚞𝚙𝚙𝚘𝚛𝚝 𝙼𝚢 𝙲𝚘𝚜𝚖𝚒𝚌 𝙹𝚘𝚞𝚛𝚗𝚎𝚢) 🙏🏿

🧚🏾♀️ 𝚃𝚑𝚎 𝚓𝚎𝚠𝚎𝚕𝚛𝚢 𝚏𝚎𝚊𝚝𝚞𝚛𝚎𝚍 𝚒𝚗 𝚝𝚑𝚒𝚜 𝚛𝚎𝚊𝚍𝚒𝚗𝚐 𝚠𝚒𝚕𝚕 𝚋𝚎 𝚊𝚟𝚊𝚒𝚕𝚊𝚋𝚕𝚎 𝚏𝚘𝚛 𝚙𝚞𝚛𝚌𝚑𝚊𝚜𝚎 𝚘𝚗 𝚖𝚢 𝙴𝚝𝚜𝚢 𝚜𝚑𝚘𝚙. 💎
📋 - 𝙼𝚊𝚜𝚝𝚎𝚛𝚕𝚒𝚜𝚝 - 𝚆𝚎𝚕𝚌𝚘𝚖𝚎
📖 - 𝙿𝚊𝚒𝚍 𝚁𝚎𝚊𝚍𝚒𝚗𝚐𝚜 - 𝙰𝚜𝚝𝚛𝚘𝚕𝚘𝚐𝚢 🌌 ✨
🧿 - 𝚄𝚙𝚌𝚘𝚖𝚒𝚗𝚐: 𝚃𝚊𝚛𝚘𝚝 𝚁𝚎𝚊𝚍𝚒𝚗𝚐𝚜 (𝚂𝚝𝚊𝚢 𝚃𝚞𝚗𝚎𝚍)
©𝚊𝚜𝚝𝚛𝚘𝚜𝚘𝚞𝚕𝚍𝚒𝚟𝚒𝚗𝚒𝚝𝚢 𝙰𝚕𝚕 𝚁𝚒𝚐𝚑𝚝𝚜 𝚁𝚎𝚜𝚎𝚛𝚟𝚎𝚍.
#tarot reading#spirituality#tarot#jewelry#handmade#artists on tumblr#authenticity#self expression#rose quartz#evil eye#shadow work#divination#healing journey#spiritual healing#witchblr#witch community#self love#self discovery#pick a pile#tarot pick a card#tarot pick a pile#intuitive readings#intuitive tarot reader#pick a photo#crystals#occult#tarot community#tarotblr
67 notes
·
View notes