#halogen headlight assembly
Explore tagged Tumblr posts
Visit Tumblr Blog
Explore Tumblr blogs with no restrictions, modern design and the best experience.
Last Seen Tumblr Blogs


Fun Fact
12.7% of mobile users access Tumblr.
Text
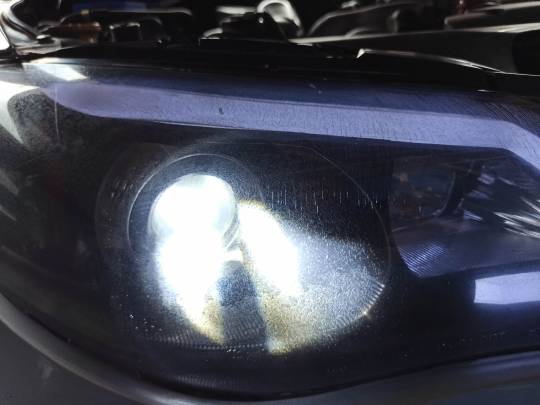
#ford life#ford nation#ford lover#ford cars#ford taurus#headlightassembly#halogen headlight#halogen headlight assembly#buffer
0 notes
Text


Baby car, I love you so much. You were so beautiful.
Neighbor thinks he can get the hood to sit back into the latch. Core support has been switched out and EVERYTHING we needed to take off to get to it - is back. Well, except the grill. I'm not putting that back on until my neighbor is satisfied with beating the shit out of my car.
I need transmission cooler lines. :( I dunno if I can do that. Think I can just ... tape the pinhole leak?
#to be fair ... I think the transmission cooler lines has been a long term problem#I need a new headlight assembly before I deem this safe again too#the exposed bulb is not good#but the light projection is even worse than the bullshit I've been dealing with since switching off my beloved halogens
2 notes
·
View notes
Text
Why is one headlight significantly dimmer than the other one, and how do you fix it?
A dim headlight can result from several underlying issues. Here are the key causes and solutions, prioritized by commonality and repair complexity:
Bulb Failure or Aging
Cause: Filament degradation, incorrect bulb type, or mismatched power (e.g., replacing a halogen bulb with an incompatible LED) can cause uneven brightness . Fix: Replace the dim bulb with an OEM-specified type. Ensure both headlights use bulbs of identical voltage and wattage to avoid circuit overload .
Poor Electrical Contact
Cause: Corrosion, loose wiring, or oxidized connectors increase resistance, reducing current flow to the bulb . Fix:Clean bulb sockets and connectors with electrical contact cleaner.Tighten loose plugs or replace damaged wiring/connectors.Check the ground connection (common issue in older vehicles) .
Fuse or Relay Issues
Cause: A partially blown fuse or failing relay may allow reduced current to one headlight . Fix: Locate the fuse box (refer to the owner’s manual), test the fuse with a multimeter, and replace it if necessary.
Voltage Imbalance
Cause: Weak alternator, aging battery, or faulty voltage regulator can destabilize the electrical system, affecting brightness . Fix:Test battery voltage (should be 12.6V when off, 13.7–14.7V when running).Replace the battery or repair the alternator if voltage is inconsistent.
Lens/Reflector Degradation
Cause: Yellowed/foggy lenses or corroded reflectors scatter light, reducing output . Fix:Polish the lens with a UV-resistant headlight restoration kit.Replace the entire headlight assembly if the reflector is damaged. Diagnostic Steps:
Swap Bulbs: Test if the dimness follows the bulb (indicates bulb failure). Check Voltage: Use a multimeter to measure voltage at the bulb socket (should match battery voltage). Inspect Wiring: Look for melted insulation, corrosion, or loose connections. For complex issues (e.g., internal circuit faults), consult a professional mechanic to avoid damaging the vehicle’s electrical system .

#led car light#car lights#led lights#youtube#led auto light#led headlights#led light#young artist#led headlight bulbs#ledlighting
0 notes
Text
The Ultimate Guide to Honda Civic LED DRLs: Style and Safety Combined
The Honda Civic LED DRL (Daytime Running Light) is a feature that enhances both the aesthetics and safety of the vehicle. As LED technology has revolutionized automotive lighting, DRLs have become a standard in modern cars, including the Honda Civic. These lights not only give your car a distinctive, high-end look but also improve visibility during daylight driving. Whether you're upgrading or replacing your DRLs, understanding their benefits and installation process can help you make the best choice for your Civic.
What Are LED DRLs and Why Are They Important?
Daytime Running Lights (DRLs) are designed to increase a vehicle's visibility during the day, reducing the risk of accidents. Unlike headlights, which are mainly for nighttime driving, DRLs operate automatically during the day.
Honda has incorporated LED DRLs into many of its newer Civic models due to their efficiency, longevity, and stylish appearance. These LED lights consume less energy than traditional halogen bulbs while providing superior brightness, making them a preferred choice for both manufacturers and car enthusiasts.
Benefits of Honda Civic LED DRLs
1. Enhanced Road Safety
One of the key advantages of Honda Civic LED DRLs is improved visibility. Studies show that DRLs reduce the likelihood of daytime collisions by making vehicles more noticeable, especially in cloudy, foggy, or rainy conditions.
2. Energy Efficiency
LED lights consume significantly less power than traditional halogen bulbs. This means they put less strain on the car’s electrical system, improving overall efficiency. For Civic owners, this translates to better battery life and fuel economy.
3. Long Lifespan
Unlike halogen bulbs, which tend to burn out after a few thousand hours, LED DRLs can last up to 50,000 hours or more. This durability means fewer replacements and lower maintenance costs over time.
4. Modern and Sporty Look
The Honda Civic has always been a stylish vehicle, and LED DRLs add a touch of modern sophistication. The crisp white light gives the car a premium and sporty appearance, helping it stand out on the road. Some aftermarket options even offer sequential turn signals or dynamic lighting effects, further enhancing the car’s look.
OEM vs. Aftermarket LED DRLs
Honda Civics, particularly in higher trims and newer models, come with factory-installed LED DRLs. However, older models or lower trims may still use halogen-based DRLs, making aftermarket LED upgrades a popular choice.
OEM Honda Civic LED DRLs
Perfect fitment – Designed specifically for Honda Civics
Factory-grade quality – Meets Honda’s durability and performance standards
Seamless integration – Works with the car’s existing wiring and electrical system
Aftermarket LED DRLs
More variety – Available in different colors, styles, and brightness levels
Custom features – Some include sequential turn signals or RGB lighting options
Lower cost options – Affordable alternatives to OEM replacements
How to Install LED DRLs on a Honda Civic
Installing LED DRLs can be a straightforward process, especially if you're replacing stock lights with OEM replacements. However, aftermarket installations may require additional wiring and modifications.
Tools Needed:
✔ Screwdrivers ✔ Socket wrench set ✔ Electrical tape or soldering kit ✔ Wiring harness (if applicable)
Step-by-Step Installation:
Disconnect the Battery: Always start by disconnecting the battery to avoid electrical shorts.
Remove the Front Bumper (If Necessary): Some Civic models require bumper removal to access the DRL housing.
Unplug and Remove the Old DRLs: If replacing existing lights, unplug the wiring and remove the DRL assembly.
Install the New LED DRLs: Secure the new DRLs in place and connect the wiring harness.
Test the Lights: Before reassembling, turn on the ignition to ensure the new DRLs are functioning correctly.
Reassemble Everything: Once confirmed, reinstall any removed components and reconnect the battery.
If you're unsure about the wiring, professional installation is recommended to prevent electrical issues or improper connections.
Choosing the Right LED DRLs for Your Honda Civic
When selecting LED DRLs, keep the following factors in mind:
Brightness and Color Temperature: A cool white output (5000K–6000K) provides the best visibility and a premium look.
Compatibility: Make sure the LED DRLs fit your Civic’s specific model year and trim.
Build Quality: Choose brands known for durability, such as Philips, Osram, or OEM Honda parts.
Additional Features: If you want extra functionality, look for dynamic turn signals, sequential lighting, or RGB customization.
Conclusion
The Honda Civic LED DRL is a must-have for drivers who value safety, efficiency, and aesthetics. Whether you’re replacing a faulty DRL or upgrading to a more stylish design, LED technology provides long-lasting brightness with minimal power consumption. Investing in quality LED DRLs enhances both the look and functionality of your Honda Civic, ensuring you stay visible and stylish on the road.
0 notes
Text
Step-by-Step Guide to Replacing C6 Corvette OEM Headlights
Replacing the C6 Corvette OEM headlights can feel intimidating, but with the right tools, preparation, and guidance, it’s a straightforward process. Whether you’re upgrading to LED headlights for better visibility or replacing a damaged assembly, this guide will walk you through the process step-by-step.
Shop jeep gladiator led tail lights oem at the TX Used Parts
1. Introduction
The C6 Corvette is a legendary vehicle, but over time, its OEM headlights may require replacement due to burnouts, damage, or a desire for improved lighting performance. Upgrading to modern LED headlights or restoring the original look with new OEM replacements can make a significant difference in your vehicle’s appearance and functionality.
Replacing your headlights not only enhances visibility but ensures safety during night driving. In this guide, we’ll cover everything from tools to testing the new installation.
2. Tools and Materials Required
Before starting, gather the following tools and materials to make the process seamless:
Torx screwdriver
10mm ratchet
LED bulbs or OEM replacement bulbs
Headlight sealant (if required)
Gloves and safety glasses
Having these items ensures that you can handle everything from removing the headlight assembly to securing the new unit. Proper tools prevent damage to sensitive components like the wiring harness.
3. Safety Precautions
Safety should always come first. Follow these steps to avoid injury or damage to your car:
Disconnect the battery terminal to avoid electrical hazards.
Wear protective gloves to prevent oil from your skin from contaminating the halogen bulbs or LED modules.
Handle the headlight assembly carefully, as it contains fragile parts like the lens and reflector.
Additionally, dispose of old bulbs properly to protect the environment and avoid exposure to harmful materials.
4. Step-by-Step Replacement Process
Here’s how to replace your C6 Corvette headlights:
Access the Headlights: Open the hood and locate the headlight assembly. You may need to remove the front bumper to access it fully.
Disconnect the Wiring Harness: Carefully unplug the wiring connections, ensuring no wires are damaged.
Remove the Old Headlight: Unscrew the mounting screws using the Torx screwdriver or ratchet. Pull the headlight assembly out gently.
Install the New Headlight: Align the new unit in place and secure it with the screws. Connect the wiring harness.
Reattach the Bumper: If the bumper was removed, reattach it securely.
5. Testing the New Headlights
Once installed, test the new headlights to ensure they’re functioning correctly:
Turn on the low beams and check for proper illumination.
Switch to high beams to confirm functionality.
Adjust the headlight alignment if necessary using a beam tester or alignment tool.
Proper testing guarantees your headlights provide optimal visibility and meet safety standards.
6. Common Issues and Troubleshooting
Sometimes, issues can arise after installation. Here are common problems and their fixes:
Burned Fuses: Check the fuse box and replace blown fuses.
Moisture in Headlights: Use headlight sealant to prevent condensation.
Improper Wiring: Double-check the wiring connections to ensure they’re secure and correctly placed.
If problems persist, consult the C6 Corvette manual or seek professional help.
7. Conclusion and Maintenance Tips
Replacing your C6 Corvette OEM headlights is a rewarding project that enhances both safety and aesthetics. To ensure longevity:
Regularly clean the headlight lens using a gentle cleaning solution.
Check for cracks or damage during routine maintenance.
Use UV protection film to prevent lens discoloration.
By maintaining your headlights, you’ll enjoy clear visibility and a sharp look for years to come.
0 notes
Text

Upgrading to LED Headlights on the Yamaha MT09
The Yamaha MT09 is a powerful motorcycle known for its agility and sleek design. However, like many motorcycles, its stock headlights may not provide the brightest or most efficient lighting for nighttime riding or low-visibility conditions. Upgrading to LED Yamaha MT09 aftermarket headlight is a practical modification that offers increased visibility, longer lifespan, and enhanced style. This guide covers the benefits of an LED upgrade, the selection process, and step-by-step installation.
Benefits of LED Headlights on the Yamaha MT09
Upgrading to LED headlights offers a range of advantages for MT09 riders:
Improved Brightness and Visibility: LED headlights produce a bright, focused light that illuminates the road more effectively, enhancing nighttime visibility and helping you spot obstacles sooner.
Energy Efficiency: LEDs consume less power than traditional halogen bulbs, which means less strain on your bike's electrical system and battery.
Longer Lifespan: LED lights last significantly longer than halogens, reducing the frequency of replacements and maintenance.
Modern Aesthetic: LEDs emit a crisp, white light that gives the MT09 a sleek, updated look, adding to the bike’s overall visual appeal.
Quick Response Time: LEDs turn on instantly, which is especially useful for brake lights and turn signals, providing faster signaling to other drivers.
Choosing the Right LED Headlight Kit
To find the best LED headlights for your Yamaha MT09, consider the following factors:
Brightness Level: Look for headlights with a high lumen rating to ensure they offer enough brightness. Most LEDs range between 6,000 and 10,000 lumens.
Color Temperature: A temperature between 5,000K and 6,500K offers a bright white light ideal for visibility without creating glare.
Compatibility: Verify that the LED kit is compatible with the MT09’s headlight housing and won’t require additional adjustments to fit.
Durability: LED headlights should be weather-resistant, with a high waterproof rating (IP67 or IP68) to withstand rain and dust.
DOT Certification: For street-legal use, make sure the LED headlights are DOT-certified, ensuring they meet road safety standards.
Tools and Materials Needed
Before starting the installation, gather the following tools and materials:
LED headlight kit compatible with the Yamaha MT09
Screwdriver set (usually Phillips and flathead)
Allen wrenches (if necessary)
Electrical tape and zip ties (for securing wiring)
Owner’s manual (to check specifications)
Step-by-Step Installation Guide
Follow these steps to install LED headlights on your Yamaha MT09:
Turn Off the Engine and Disconnect the Battery: For safety, make sure the bike is off and disconnect the battery’s negative terminal to prevent electrical shorts.
Access the Headlight Housing: Locate and remove any screws or bolts securing the headlight housing. On the MT09, this may involve loosening bolts around the headlight assembly or nearby fairings to gain access.
Remove the Stock Bulbs: Carefully twist and remove the stock halogen bulbs from the headlight housing. Handle the bulbs gently, as they can be fragile.
Install the LED Bulbs: Insert the new LED bulbs into the headlight sockets, ensuring they are positioned securely. Check that they’re facing in the correct direction to maximize light output. Some LEDs have adjustable bases for proper alignment.
Connect the Wiring Harness: Most LED kits include a plug-and-play wiring harness. Attach the harness to the bike’s wiring connector, and ensure it is secure. Use electrical tape or zip ties to organize and secure any loose wires, preventing them from interfering with other components.
Reassemble the Headlight Housing: Reinstall any bolts or screws to secure the headlight housing, taking care to check that everything is aligned correctly. Tighten screws firmly but avoid over-tightening to prevent damage.
Reconnect the Battery and Test the LEDs: Reattach the battery’s negative terminal, turn on the bike, and switch on the headlights. Verify that the LEDs are functioning correctly and check the high and low beam settings. If the LEDs appear too high or low, make adjustments to the headlight alignment.
Adjusting Headlight Aim
Proper headlight aim is essential to ensure optimal visibility without causing glare to oncoming traffic. To adjust:
Find a Flat Surface and Wall: Park the bike on a level surface facing a wall approximately 25 feet away.
Measure the Beam Height: Mark the center of the headlight beam on the wall using painter’s tape. The beam should be slightly below the headlight height to avoid shining too high.
Adjust the Beam: Use the adjustment screws on the headlight assembly to lower or raise the beam as needed.
Maintenance Tips for LED Headlights
After installing LED headlights, follow these maintenance tips to keep them in optimal condition:
Clean Lenses Regularly: Wipe the headlight lenses with a soft cloth and mild cleaner to prevent dust or dirt buildup, which can reduce light output.
Check for Moisture: LED headlights are generally sealed, but condensation can still form. If you notice moisture inside the housing, inspect the seal and dry it out to prevent long-term damage.
Inspect Connections Periodically: Ensure wiring connections remain secure, especially if you frequently ride in rough conditions. Reapply electrical tape or adjust zip ties if necessary.
Upgrading to LED headlights on the Yamaha MT09 enhances both safety and style. With improved brightness, energy efficiency, and longevity, LED headlights are a worthwhile investment for MT09 riders. By following the steps outlined here, you can enjoy a more comfortable and safer nighttime riding experience while giving your MT09 a modern, standout look on the road.
0 notes
Text
Illuminating the Road: A Guide to Automotive Lights and Lighting Parts

Automotive lights are essential for ensuring safety, visibility, and communication on the road. From headlights to tail lights, each lighting component plays a crucial role in enhancing the driving experience. This blog explores the various types of automotive lights, their functions, components, and the importance of proper maintenance.
The Importance of Automotive Lighting
Automotive lights are not just about visibility; they are a critical aspect of vehicle safety. Proper lighting allows drivers to see the road clearly, be seen by others, and communicate their intentions.
Key Functions
Visibility: Ensure that the driver can see the road, obstacles, and other vehicles clearly.
Communication: Signal other drivers about the vehicle's actions such as turning or braking.
Safety: Enhance the overall safety of the vehicle, especially in low-light conditions or adverse weather.
Types of Automotive Lights
Headlights
Headlights are the primary source of illumination for a vehicle.
Low Beams: Provide adequate illumination without blinding oncoming traffic.
High Beams: Offer a brighter, longer-range light for use in low-traffic areas.
Tail Lights
Tail lights are located at the rear of the vehicle, indicating the vehicle's presence to others.
Brake Lights: Illuminate when the brake pedal is pressed, signaling that the vehicle is slowing down or stopping.
Reverse Lights: Light up when the vehicle is in reverse, indicating that the car is backing up.
Fog Lights: Provide extra illumination in foggy or poor visibility conditions.
Turn Signals
Turn signals, or blinkers, indicate the driver’s intention to turn or change lanes.
Daytime Running Lights (DRLs)
DRLs are designed to make the vehicle more visible during daylight hours, enhancing safety.
Fog Lights
Fog lights are positioned lower on the vehicle to cut through fog and mist, providing better visibility in poor weather conditions.
Interior Lights
Interior lights include dome lights, map lights, and dashboard lights, providing illumination inside the vehicle for visibility and convenience.
Auxiliary Lights
Auxiliary lights include additional lights such as spotlights, floodlights, and off-road lights, often used for enhanced visibility in specific driving conditions.
Key Components of Automotive Lighting
Bulbs
Bulbs are the light sources within the lighting assemblies. Types of bulbs include:
Halogen Bulbs: Common and cost-effective, providing good brightness and lifespan.
LED Bulbs: Energy-efficient and long-lasting with bright, clear light.
Xenon/HID Bulbs: Provide intense, bright light with a longer range.
Lighting Assemblies
Lighting assemblies house the bulbs and include lenses and reflectors to direct light.
Headlight Assemblies: Include the housing, reflector, lens, and bulbs for headlights.
Tail Light Assemblies: Include the housing and lens for brake lights, reverse lights, and turn signals.
Wiring and Connectors
Wiring and connectors provide the electrical connections necessary for the lights to function.
Switches and Relays
Switches and relays control the operation of the lights, allowing the driver to turn them on and off as needed.
Importance of Maintenance
Proper maintenance of automotive lighting is crucial for safety and performance. Regular checks can prevent accidents and ensure compliance with traffic regulations.
Key Maintenance Tasks
Regular Inspection: Check all lights regularly to ensure they are functioning correctly.
Clean Lenses: Clean headlight and tail light lenses to ensure maximum brightness.
Replace Burnt-Out Bulbs: Replace any bulbs that are not working to maintain visibility and safety.
Check Alignment: Ensure headlights are properly aligned to avoid blinding other drivers and to maximize road illumination.
Signs of Lighting Problems
Dim Lights: May indicate a problem with the bulb, wiring, or electrical system.
Flickering Lights: Could be a sign of loose connections or failing bulbs.
Lights Not Working: Check for blown fuses, burnt-out bulbs, or wiring issues.
Foggy or Discolored Lenses: Can reduce the effectiveness of the lights and should be cleaned or replaced.
Conclusion
Automotive lights and lighting parts are vital for the safety and functionality of any vehicle. Understanding the different types of lights, their components, and the importance of regular maintenance can help ensure that your vehicle remains safe and visible on the road.
Proper lighting maintenance not only enhances your driving experience but also ensures that you are complying with legal requirements and contributing to road safety. Regular inspections and timely replacements can prevent potential hazards and keep your vehicle in top condition.
0 notes
Text
TOP FIVE AUTOMOTIVE CAR LED BULBS MANUFACTURER
Want the best automotive lights for your car? Various reputed brands manufacture good quality automotive lights in India. Automotive lights help car drivers eliminate the risk of accidents by having clear visibility. As per WHO reports, it is regarded that approximately 1.25 million road accidents happen because of invisibility.
With advanced technology & new variety of products in the market, companies have started to grab the market of automotive lights. These automotive lights enhance the visual appearance and visibility during harsh weather conditions. Automotive lights come in the form of LED bulbs for cars, headlights, fog lights, halogen lamps, etc.
When it comes to choosing the best automotive car LED bulb light brands in India, customers usually check the performance, quality & reliability of the product and then purchase it.
Here are the top 5 automotive LED brands in India-
Auxbeam
AUXBEAM is a renowned brand that offers advanced, durable and high-quality automotive headlight and fog light LED bulbs in different range. We also have car LED bulbs of high performance and superior quality. Our products have been tested to ensure that they serve you efficiently and safely even in the worst conditions. With AUXBEAM, you can rest assured that you are investing in energy efficient, durable and highly relevant performance solutions. AUXBEAM offers: https://auxbeam.in/collections/led-light-bulbs & https://auxbeam.in/collections/led-fog-light-assembly
GX Ultra Series 200W – 6000K & 4300K
GX Pro Series 160W – 6000K & 4300K
GX Series 120W – 6000K
GX Duo Series 120W Switchback – 6000K/4300K
F22 110W – 6500K
Q30 110W – 6500K
3 inch Bi-Led Tri-Beam Laser Projector Fog Light Assembly
3 inch Bi-Led Tri-Beam Projector Fog Light Assembly
2.5 inch Bi-Led Bi-Beam Projector Fog Light Assembly
2 inch Bi-Led Bi-Beam Projector Fog Light Assembly
Philips
Philips Electrical Co. is the top supplier of automotive lighting products in India and across the globe. The company manufactures LED headlight bulbs, LED driving lights, and halogen headlights in India. X-tremeUltinon, the Ultinon Essential has been one of the best sellers in India because of its capacity to provide maximum output and durability.
Osram
The oldest automotive light manufacturing company in India proudly supplies products to more than 30 states in India. Osram India is known for its best road legal LED headlight for car India and its high-performance lighting that enhances driving. The company offers automotive lighting products with a 5-year warranty to its customers.
Hella
HELLA India Automotive is a leading automotive company that excels in providing advanced solutions and services. With a strong presence in India, they deliver innovative lighting, electronics, and aftermarket products. Their Commitment to quality and sustainability has earned them a reputation as a trusted partner for global automotive manufacturers. HELLA India Automotive continuously strives to enhance mobility experience through their reliable and forward thinking solutions.
Bosch
The infamous brand in the automation industry is known to offer LED headlights because of their reliability and longevity. The headlights & bulbs sold by the company are excellent for all types of vehicles & offer a smooth driving experience during the drive.
In India, many brands provide automotive lights, car bulbs, and other car accessories for your vehicle but these are the top five brands that top the list. If you are looking for reputable automotive light brands, contact us for assistance, and we will be able to help you. Explore a wide range of AUXBEAM bulbs, with each carrying its unique but perfect beam pattern. Visit our website on https://auxbeam.in/ to explore more products.
0 notes
Text


COLOR: WHITE / 6000K ✔️SOLD BY PAIR / 2 PCS ✔️AVAILABLE FOR ALL UNITS DEPENDING ON YOUR SOCKET TYPE / ASSEMBLY ✔️LED HEADLIGHT BULBS ✔️UP TO 1 YEAR WARRANTY | BRIGHTER | SAVING | SAFER | HELLSTEN specializes in car LED techniques using innovative technologies to ensure top-quality products to get that brighter and safer driving experience. TECHNOLOGY FROM GERMANY «SUPER BRIGHT LED HEADLIGHT BULBS» FEATURES TYPE: GX55 CAR LED HEADLIGHT VOLTAGE: DC 9v-32v INPUT POWER: 160 ± 10% LUMINOUS FLUX: 20000 LUMENS WATTAGE: 55 WATTS PER BULB / 110 WATTS TOTAL LIFESPAN: >50000 HOURS IP RATE: IP68 OPERATING TEMPERATURE: -40°C~+90°C LIGHT SOURCE MODEL: H 7035 MATERIAL: AVIATION ALUMINUM 6063 ✔️CAR SPECIFIC CUSTOMIZED CHIPS ✔️IP68 WATERPROOF ✔️FULL SEALED WATERPROOF DESIGN. KEEP THE HEADLIGHT BULBS WORKING ON RAINY DAYS OR OTHER BAD CONDITIONS. (SUCH AS SNOWY, WINDY, RAINY & FOGGY CONDITIONS) ✔️BUILT-IN EMC SYSTEM. BUILT-IN SMART THERMO CONTROL SYSTEM, MONITORS, AND ADJUST THE TEMPERATURE AT ANY TIME. ENSURE THE LED HEADLIGHT BULBS WORKING NORMALLY! ✔️PERFECT BEAM PATTERN ✔️LONG LIGHT RANGE ✔️EASIER DRIVING WITH NO GLARE/NO DARK SPOTS ✔️CLEAR NIGHT VISION. ENSURE WIDER AND FURTHER LIGHTING AREA ✔️ENSURE YOUR SAFETY. NO BLINDING ONCOMING DRIVERS. ✔️THE BEAM ANGLE IS DESIGNED TO BE BRIGHT FOR THE DRIVER WHILE DIM FOR THE COMING DRIVERS. ITS SAFETY MEETS THE REQUIREMENT OF INTERNATIONAL STANDARDS. ✔️PLUG AND PLAY. EASY INSTALLATION ✔️650% BRIGHTER THAN THE STOCK HALOGEN HEADLIGHTS ✔️EFFICIENT HEAT DISSIPATION. VACUUM COPPER TUBE + SILENT FAN ✔️ VACUUM COPPER TUBER TO HEAT DISSIPATION. VACUUM PROCESS AND HIGH HEAT CONDUCTION EFFICIENCY ✔️LOW WIND RESISTANCE AND SILENT FAN. HIGH HEAT DISSIPATION AND LOW NOISE
0 notes
Text
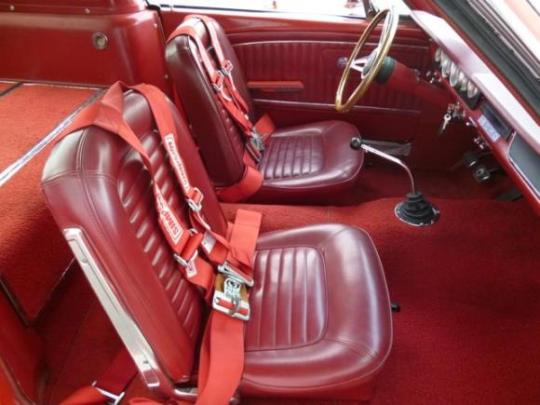
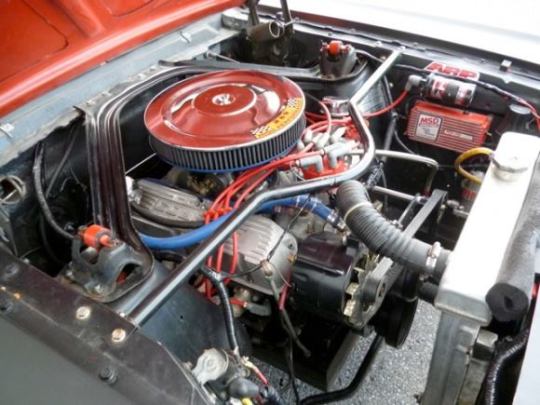


This 1965 Ford Mustang fastback (Chassis 5T09A146475) is built for spirited road performance with a Terlingua paint scheme found much less often than the Shelby stripes commonly seen on modified fastbacks. The build sheet is impressive, with a dyno-tuned 302, Tremec 5-speed, 4-wheel disk brakes, Cobra Automotive suspension, and a stiffened unibody. The original A-code 289 and 4-speed transmission are included (needing rebuild), and the car is a turn-key driver with a aged patina that makes it perfect for road events
This car was originally delivered to the state of Florida and discovered in North Carolina wearing its original time-faded body panels and interior. The seller says that the car is amazingly fun to drive, partially because there is no power steering, power brakes, A/C, or radio. We had the same list in our ’65 fastback, and so did the ’65 Shelby cars before they were softened in ’66, and wouldn’t do otherwise if we have one again. Mechanical enhancements from Cobra Automotive are as follows: ■Big spindle kit w/larger bearings (as per the Trans Am cars) ■Billet aluminum racing hub kit ■Deep Trans-Am lug nuts ■Rollerized coil spring pivots ■Road race coil springs (600 lb. with polyurethane spring insulators) ■Koni adjustable shock absorbers w/Koni urethane bushings kit ■Competition front cross member (used on the Boss 302 Trans Am cars) ■Super duty tie rod end kit ■Quick steer kit w/frame pin and rollerized bearing kit w/idler arm pitman arm ■Competition master cylinder upgrade with stainless steel brake lines ■Adjustable brake proportioning valve ■Competition front & rear disc brakes ■Adjustable brake push rod ■Roller bearing steering kit ■Stage 1 Road Race Rear Suspension ■Shelby style under ride traction bars ■Lowering blocks (1 inch) ■Competition kill switch (battery) ■Rotunda racing mirrors ■GT 350 hood pin kit; Other upgrades include: ■Control Freak Suspension upper & lower control arm set ■Torque Thrust aluminum wheels ■Sub-frame connectors ■Heavy duty racing clutch ■1-inch competition front sway bar ■Halogen head lights (Tri-bar) ■LED tail lights ■Battery relocation to trunk ■Electrical rewire (Ron Francis Retro kit) ■Headlight wire mesh stone guards;
The engine was built on a 1992 302 roller block and was broken in on the dyno and tested at 300hp and 315 lb-ft of torque. It has 3000 miles since the rebuild at West Carleton Automotive in Ottawa, Canada, and was assembled in the style of the ’65 Shelby GT 350 with black painted block, Cobra valve covers, hi-po 14″ air cleaner assembly, and ceramic coated Tri-Y headers. Other details on the build include: ■Hot tank and mag tested parts ■Sonic inspection on block ■Align hone ■Pedestal rockers ■E303 roller cam ■Roller lifters ■Eagle connecting rods ■Speed Pro pistons ■Speed Pro oil pump and pick-up ■Clevite cam bearing set ■ARP fasteners ■True roller timing set ■MSD electronic distributor ■140 amp heavy duty alternator ■Heavy duty fuel pump ■K & N air filter ■Competition high capacity oil pan ■4 core aluminum radiator w/ electric fan ■Dual exhaust with Shelby type glass pack mufflers matching revs. There is also an alarm and kill switch installed
The car still features the original seats, headliner, and door panels, and is fully original apart from the new original style carpet and one arm rest. The fold-down rear seat remains intact and a quality wood steering wheel from Tony D. Branda has been added. The dash has the R-model instrument panel with AutoMeter tach, speedo, fuel, water temp, amp., oil pressure, and volts gauges, as well as a competition oil pressure warning light. The ’65 Shelby radio block-off plate means the driver gets to concentrate on matching revs. There is also an alarm and kill switch installed.
#1965 ford mustang#ford mustang#fordperformance#muscle car#classic cars#fastback mustang#pony car#american muscle
12 notes
·
View notes
Text
The Ultimate Guide to Honda Civic Headlights: Types, Maintenance, and Upgrades
Your Honda Civic headlights are more than just a design element; they play a crucial role in ensuring safety and visibility while driving. Whether you're navigating dark roads, adverse weather conditions, or simply looking to enhance your vehicle's appearance, understanding different headlight types, maintenance tips, and upgrade options can significantly improve your driving experience.
Types of Honda Civic Headlights
1. Halogen Headlights
Halogen bulbs are the most common type found in older Honda Civic models. They are cost-effective and provide decent illumination, but they consume more energy and have a shorter lifespan compared to newer technologies.
2. LED Headlights
LED (Light Emitting Diode) headlights are now a popular choice due to their energy efficiency, longevity, and bright, white illumination. Many newer Honda Civics come equipped with LED headlights as standard, offering improved visibility and modern aesthetics.
3. HID (Xenon) Headlights
HID (High-Intensity Discharge) headlights produce a much brighter and whiter light than halogen bulbs. They offer excellent visibility and a longer lifespan but can be more expensive to install and maintain.
4. Projector Headlights
Projector headlights use a lens to focus light, resulting in a more even and directed beam. This reduces glare for other drivers while improving road illumination.
Signs Your Honda Civic Headlights Need Replacement
To ensure optimal performance, it's important to recognize when your headlights need attention. Here are some common signs:
Dimming or flickering lights: This could indicate a failing bulb or electrical issue.
Cloudy or yellowed lenses: Over time, headlight lenses can become foggy, reducing their effectiveness.
Uneven brightness: One headlight appearing brighter than the other may signal a problem.
Complete headlight failure: If one or both headlights stop working, replacement is necessary for safe driving.
Essential Headlight Maintenance Tips
Proper care and maintenance can extend the lifespan of your Honda Civic headlights and ensure optimal performance. Follow these simple tips:
Regularly clean headlight lenses: Dirt and oxidation can reduce brightness. Use a headlight restoration kit or household remedies like baking soda and toothpaste.
Check and replace bulbs as needed: If one bulb fails, it's best to replace both to maintain balanced lighting.
Adjust headlight alignment: Misaligned headlights can cause visibility issues and glare for other drivers.
Inspect for moisture buildup: Condensation inside the headlight assembly may indicate a seal issue that needs fixing.
Upgrading Your Honda Civic Headlights
If you're looking to enhance your Civic’s lighting performance, consider these upgrade options:
1. LED Conversion Kits
Upgrading from halogen to LED bulbs can significantly improve brightness and energy efficiency while providing a modern look.
2. HID Conversion Kits
For superior illumination, HID kits are an excellent choice. However, they may require professional installation for best results.
3. Custom Headlights
Aftermarket headlights come in various styles, including smoked lenses, halo rings, and projector designs, allowing you to customize your Civic’s appearance.
4. Adaptive Headlights
Some high-end headlight systems feature adaptive lighting that adjusts brightness based on driving conditions, improving safety.
Conclusion
Your Honda Civic headlights are essential for safe driving and vehicle aesthetics. By understanding different headlight types, maintaining them properly, and exploring upgrade options, you can improve both functionality and style. Whether you're replacing old bulbs or investing in a high-performance lighting system, keeping your headlights in top condition ensures a safer and more enjoyable driving experience.
0 notes
Text

How to Troubleshoot Lighting Issues on a 2013 Chevy Silverado 1500
Lighting issues on your 2013 Chevy Silverado 1500 can range from minor bulb failures to more complex electrical problems. Properly functioning lights are critical for both safety and legal compliance, so it's essential to troubleshoot and resolve any issues quickly. This guide walks you through the steps to troubleshoot common lighting problems on your Silverado.
1. Check the Light Bulbs
The first and easiest step in troubleshooting is to check the light bulbs. Over time, bulbs can burn out or get damaged.
Headlights, taillights, and fog lights: If a single light is out, it may just be a burned-out bulb.
Turn signals: If your turn signals flash quickly, it often indicates a burned-out bulb.
Steps:
Remove the affected bulb and inspect it for blackening, breakage, or a broken filament.
Replace any faulty bulbs with new ones of the same type (e.g., halogen, 2013 Chevy Silverado 1500 LED headlights assembly).
Ensure the bulbs are properly seated in their sockets.
2. Inspect the Fuses
A blown fuse can cut power to certain lights, such as the headlights, taillights, or interior lights. The fuse box in the 2013 Chevy Silverado 1500 is located under the hood and inside the cabin (driver’s side).
Steps:
Check the owner’s manual for the correct fuse related to the lighting system.
Use a fuse puller or needle-nose pliers to remove the fuse.
Inspect the fuse; if the metal filament inside is broken, replace it with a fuse of the same amperage rating.
3. Examine the Light Switch
The headlight switch controls multiple lights, including the headlights, parking lights, and fog lights. If none of the exterior lights work, the problem could be the switch.
Steps:
Turn the headlight switch to each position (off, parking, headlights, etc.) and check for functionality.
If the lights don’t respond, the switch might need to be replaced.
4. Test the Wiring and Connections
Loose or damaged wiring can cause intermittent lighting issues. Corrosion, especially in areas with high humidity or salted roads, can affect the electrical connections.
Steps:
Inspect the wiring around the headlight, taillight, and turn signal assemblies for damage or corrosion.
Check for loose connectors or frayed wires, particularly near the bulb sockets and fuse box.
Use electrical contact cleaner to clean corroded terminals.
Ensure all connectors are properly seated and secured.
5. Check the Ground Connections
Electrical ground issues are common culprits when lights flicker or dim. A poor ground connection can disrupt the electrical circuit.
Steps:
Locate the ground wires and connections around the lighting system. Ground wires are usually black and connect the lights to the vehicle’s frame.
Ensure the ground points are clean and free of rust or corrosion.
Tighten any loose ground bolts or connectors.
6. Test the Lighting Relays
Your Silverado’s lighting system includes relays that regulate the flow of electricity to the headlights and other lights. A faulty relay can prevent lights from turning on or functioning properly.
Steps:
Locate the relay box (usually near the fuse box under the hood).
Identify the headlight or fog light relay and remove it.
Swap the relay with a known working one (e.g., swap it with the horn relay temporarily).
If the lights work with the replacement relay, then the original relay is faulty and needs to be replaced.
7. Inspect the Dimmer Switch
If the high beams aren’t functioning, it may be a problem with the dimmer switch on the steering column.
Steps:
Test the high and low beams by activating the dimmer switch.
If only one mode works (high or low beams), the dimmer switch may be faulty.
Replace the switch if necessary.
8. Check for a Faulty Light Control Module
The Body Control Module (BCM) in your Silverado controls many of the electrical systems, including lighting. A malfunctioning BCM can lead to various lighting issues, such as lights not turning on or flickering.
Steps:
If other electrical components like power windows or locks are also malfunctioning, the BCM may be at fault.
A diagnostic scan tool may be required to check for BCM-related error codes.
Consult a professional mechanic for repairs or BCM replacement.
9. Test the Battery and Alternator
Low voltage from a weak battery or failing alternator can cause dimming or flickering lights. If you’re experiencing inconsistent lighting performance, the issue might be with the vehicle's charging system.
Steps:
Test the battery with a multimeter; it should read 12.6 volts or higher when the engine is off and around 14 volts when the engine is running.
If the voltage is low, the battery may need to be replaced, or the alternator could be failing.
10. Consult a Professional
If you’ve gone through these steps and are still experiencing lighting issues, it may be time to consult a mechanic. Complex wiring problems or module failures may require professional diagnosis and repair.
Troubleshooting lighting issues on your 2013 Chevy Silverado 1500 involves a methodical process of inspecting bulbs, fuses, switches, wiring, and other components. Many problems can be resolved with simple fixes like replacing a bulb or a fuse, while more complex issues may require professional assistance. Keeping your lighting system in top condition ensures safety and compliance with road regulations.
0 notes
Text
Everything You Need to Know About Toyota Camry Headlights
Headlights are one of the most essential components of any vehicle, ensuring safe driving conditions, especially at night or in low visibility situations. Toyota Camry headlights, known for their durability and efficiency, have evolved significantly over the years. Whether you're looking to replace, upgrade, or maintain your Camry's headlights, this guide will provide you with everything you need to know.
Types of Toyota Camry Headlights
The Toyota Camry has featured various headlight technologies over the years. Below are the most common types:
1. Halogen Headlights
Halogen headlights have been the standard for many years. They are affordable and easy to replace but tend to have a shorter lifespan and lower brightness compared to more advanced options.
2. LED Headlights
Modern Toyota Camry models are equipped with LED headlights. These lights offer brighter illumination, energy efficiency, and a longer lifespan compared to halogen lights.
3. HID (Xenon) Headlights
Some high-end Toyota Camry trims feature HID (High-Intensity Discharge) headlights. These provide excellent brightness and longevity, making them a popular upgrade choice.
4. Adaptive Headlights
Newer Camry models may come with adaptive headlights, which adjust their beam direction according to the vehicle's movement and steering angle, enhancing visibility during turns.
Common Headlight Issues and Troubleshooting
Despite their durability, Toyota Camry headlights can encounter some common problems:
1. Dimming or Flickering Lights
This can be caused by a failing battery, bad wiring, or an aging bulb. Replacing the bulb or checking the vehicle’s electrical system may resolve the issue.
2. Foggy or Yellowed Headlight Lenses
Over time, headlight lenses can become cloudy or yellow due to oxidation. A headlight restoration kit or lens replacement can restore clarity.
3. Headlights Not Turning On
If your headlights fail to turn on, inspect the fuse box, wiring connections, and relays. A blown fuse or faulty headlight switch could be the issue.
How to Replace Toyota Camry Headlights
Replacing a headlight on a Toyota Camry is a straightforward process:
Step 1: Gather Tools and Materials
Replacement headlight bulb (compatible with your model year)
Screwdriver or socket wrench
Gloves (to prevent oil contamination on the bulb)
Step 2: Open the Hood and Locate the Headlight Assembly
Access the headlight assembly from the engine bay.
Step 3: Remove the Old Bulb
Unplug the wiring harness, twist the bulb counterclockwise, and gently pull it out.
Step 4: Install the New Bulb
Insert the new bulb, twist it clockwise to secure it, reconnect the wiring harness, and test the headlights.
Upgrading Your Toyota Camry Headlights
If you want to enhance your vehicle’s lighting performance, consider these upgrades:
1. Switching to LED or HID Bulbs
Upgrading to LED or HID bulbs improves brightness and energy efficiency.
2. Installing Projector Headlights
Projector headlights offer focused and more precise light distribution, enhancing nighttime visibility.
3. Adding DRLs (Daytime Running Lights)
Daytime Running Lights improve visibility during the day and give your vehicle a modern look.
Headlight Maintenance Tips
To ensure long-lasting and efficient headlights, follow these maintenance tips:
Clean the headlight lenses regularly to prevent fogging.
Check bulb alignment to ensure proper beam projection.
Replace bulbs in pairs for consistent brightness.
Use UV-protection sprays to prevent lens yellowing.
Conclusion
Toyota Camry headlights play a critical role in both safety and aesthetics. Understanding their different types, common issues, and upgrade options can help you maintain optimal visibility and enhance your driving experience. Whether you need a replacement or an upgrade, proper care will ensure your headlights perform at their best for years to come.
0 notes