#frontpanel
Explore tagged Tumblr posts
Text
The Making of the Howl Jacket (Tutorial)
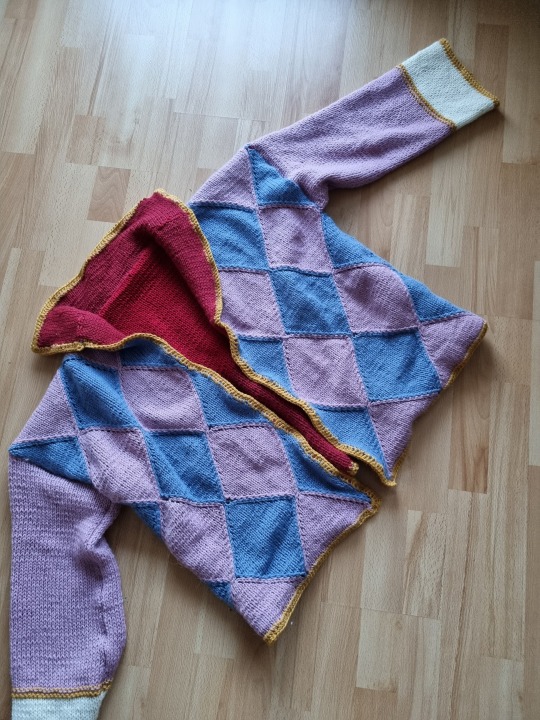
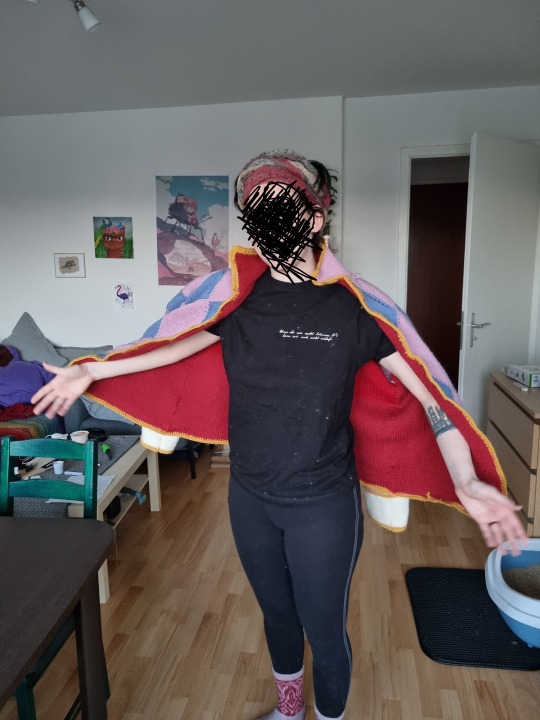
Many People have been asking me about how I did my Howl (inspired) jacket, so here it goes:
(obligatory disclaimer that I am just some person and not a professional pattern maker or anything)
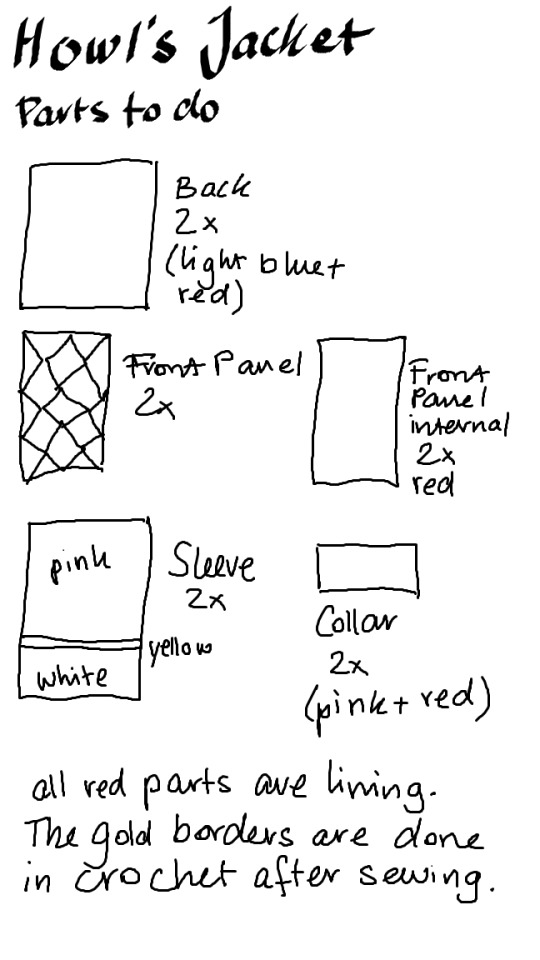
This is an overview of the parts I did. Note that I did no lining for the sleeves because I felt it would be overkill (and strand me on sleeve island forever).
So, let's get technical:
I used Drops Nepal (65% wool, 35% alpaca) and 5 mm needles.
pink (6 balls)
light blue (7 balls)
red (9 balls)
yellow (2 balls)
white (1 ball)
however I was a dumbass and only ordered 6 red balls so there is a colorshift on the backpanel of the lining.
The knitting:
All the pieces are rectangular and mostly in stockinette stitch. I had most trouble with the front panel which also changed the most after blocking, so I would recommend starting with them. Also block the pieces as you go and pay attention to the dimension you block them to.
Frontpanels (outer and lining):
Cast on 55 stitches.
For lining: work flat for 120 rows (or until desired length. Mine are 32 cm wide and 60 cm high)
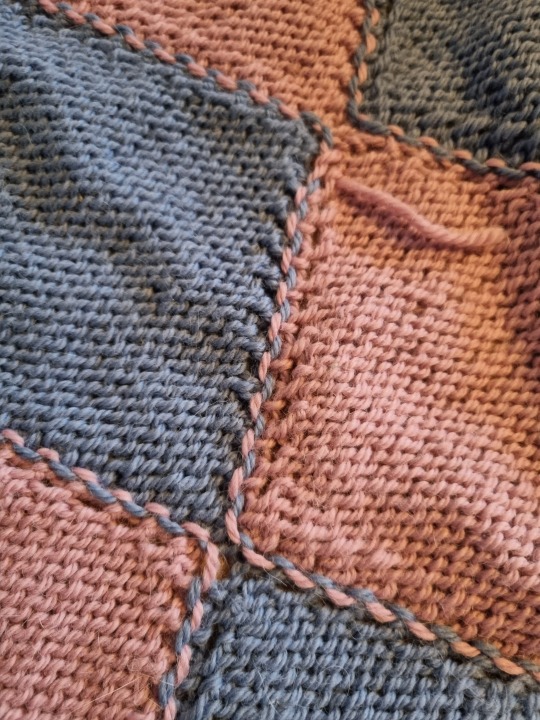
For outer layer: work 1 stitch blue, 26 pink, 1 blue, 26 pink, 1 blue from seperate balls of yarn. Then work increases and decreases like I outlined here.
This will lead to you having odd stitches of blue and even stitches of pink. When you come to the tips of the pink diamonds, cross them over like you would with cables (1/1 left over right). On the tips of blue diamonds you can slip one, knit two together and slip the first stitch over to make 3 into 1 stitch.
Backpanels (outer and lining):
Cast on 100 stitches, work flat for 120 rows (or until desired length. mine are about 60 cm high and 65 cm wide)
Collar (outer and lining):
Cast on 109 stitches, work flat for 18 rows.
Sleeves:
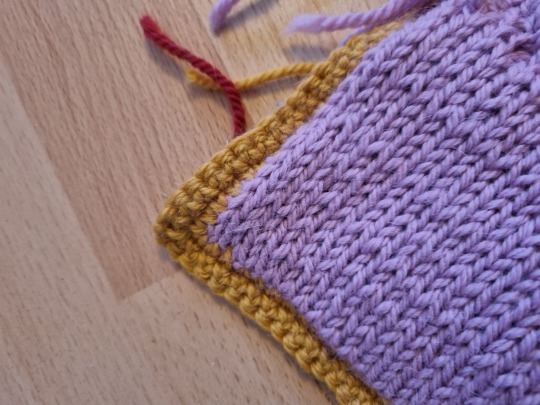
Cast on 60 stitches, work flat in pink for 72 rows (about 35 cm), then work 3 rows in GARTERSTITCH in yellow (this will raise the yellow off the flat part) followed by 18 rows white.
You can either work the crochet border immediately (2 rows of single crochet) or after you sewed the sleeves together.
Congrats! You did all the parts!
The construction:
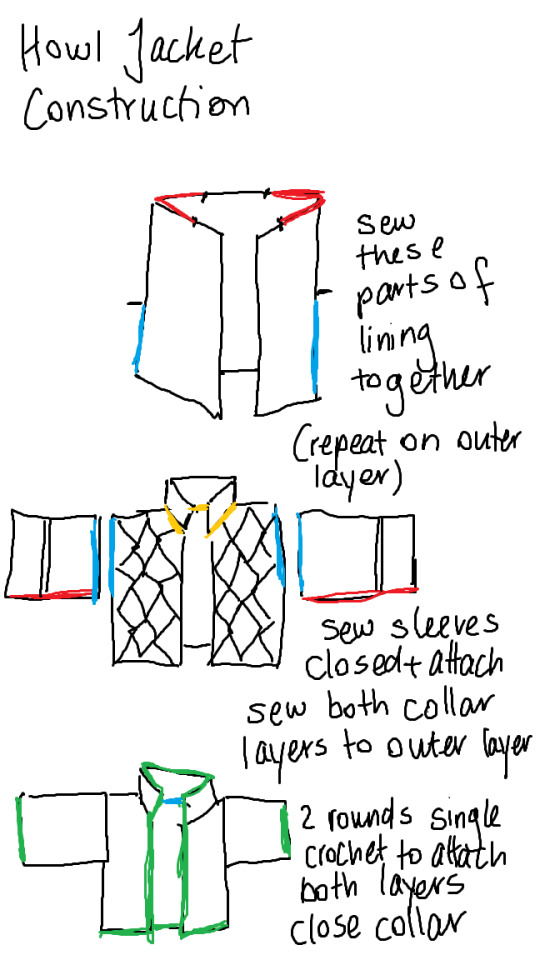
sew the front panels to the back panels. leave 20 cm on the backpanel and 10 cm of each front panel open for your neck to fit and attaching the collar. leave about 30 cm open to attach the sleeves. do this on the lining AND the external layer.
sew sleeves closed and attach to both lining and outer layer at the same time. attach collar on both layers seperately (outer and lining).
Finish off the edges by doing two rows of single crochet.
Weave in all your ends and DONE!
Some detail photos for you:
39 notes
·
View notes
Link
Check out this listing I just added to my Poshmark closet: NWT Jimmy Choo Varenne Glitter Cell Phone Case/.
0 notes
Note
What level math do you need to know for AI and CV? I’m gonna be taking 4 and 5
Response from Padma:
You can find pre-reqs for every single TJ class here: https://insys.fcps.edu/CourseCatOnline/frontPanel/503/nocourselist/0/0/0/1
There are no math pre-reqs for AI or CV beyond APCS, but keep in mind that ML has Multi as a co-req.
0 notes
Photo


Multi layered-Dual Color Designer Abaya-Black-Maroon.
Stand out from the crowd with this alluring piece of Designer Abaya made from Black Nida Matt fabric and styled with two different colors of fine georgette fabric. It has double layers of georgette fabric on 'bell sleeve's and 'front panels' giving it a perfect and magnificent look. Made using very fine 'Georgette' and' Nida-Matt' fabric which is soft, breathable, lightweight, and has a great fall. Go for it, if you are looking for a very fashionable burqa
https://bashariya.com/buy-abaya-online-india.html
#abaya#abayadress#abayastyle#abayadubai#abayafashion#veiled#elegantabaya#latestabaya#abayadesign#designerabaya#frontpanel#modestwear#multilayered#muslimabaya#occasionabaya#bashariyabaya#hijab#hijabi#burqa#niqabi#abayalife
2 notes
·
View notes
Photo
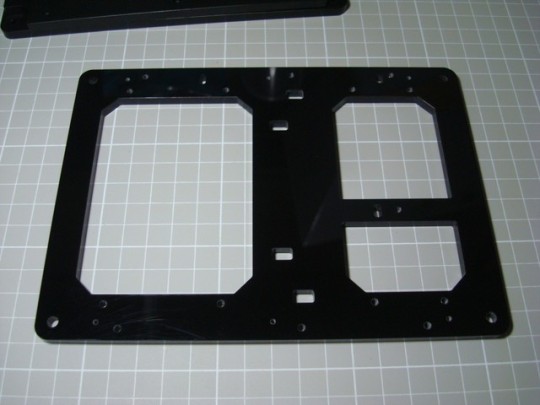
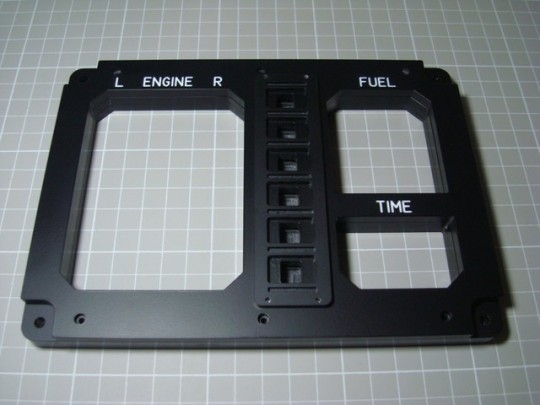
4層目完了。表面に出てくるのはここまで。あとの2層はMDFの隙間を埋めるための物になります。
1 note
·
View note
Video
instagram
Look what I'm gonna use to make a #halloween #frontpanel for my #kilt www.kiltthis.com #kiltthis #skull #skeleton #tophat (at Kilt This!)
2 notes
·
View notes
Photo

#ASM2 #elby #elby-designs #analog #analogsynth #frontpanel https://www.instagram.com/russian.ghetto.hacker/p/Bvo0ouile4S/?utm_source=ig_tumblr_share&igshid=12s4sbsms6lz5
0 notes
Photo


Precision Adder (for pitch CV’s)
High impedance inputs prevent pitch droop. Output = A + B + C*x. Inputs A and B are always at unity gain. Input C is at unity gain when its knob is at maximum, or it can scale the input down to zero. Input C is normalled to +5V, so it can add a variable offset without any other voltage sources.
My design, built on a Eurorack Stripboard, with panel by Front Panel Express. Module width is 3hp.
Inspired by the simple two input unity mixer on the Korg SQ-10, and by the Doepfer A-185-2 Precision CV Adder. Technical documents (schematic and layout) can be found here.
1 note
·
View note
Text
With the framer next door gone, I have had to start framing my own art. It's simple enough, or it would be if the framing supplies I received came with glass frontpanels instead of cardboard.
I find myself wondering just how it is that sandwiching the picture between two pieces of cardboard will properly display it.
7 notes
·
View notes
Photo

HUAWEI CRACKED LCD SCREEN REPLACEMENT HUAWEI P10 plus $160 HUAWEI P10 $140 HUAWEI P10 Lite $80 HUAWEI P9 plus $150 HUAWEI P9 $99 HUAWEI P9 Lite $99 HUAWEI P8 $99 HUAWEI P8 Lite $99 HUAWEI Mate 10 Pro $ ? HUAWEI Mate 9 Pro $ ? HIAWEI Mate 10 Lite $ ? HUAWEI Mate 10 $ ? HUAWEI Mate 9 $120 HUAWEI Mate 8 $120 HUAWEI Mate 7 $99 Please call on 0450709055 for bookings #huaweiphones #huaweiscreenrepair #phonerepair #huaweifix #huaweicheapfix #lcdscreen #brokenhiaweiscreen #frontpanel #crackedphones #huaweicheaphonefix #cheapestinperth #beckenham #australia (at Beckenham, Western Australia) https://www.instagram.com/p/Bqhf4F-DGN8/?utm_source=ig_tumblr_share&igshid=1nwp12m3trpr1
#huaweiphones#huaweiscreenrepair#phonerepair#huaweifix#huaweicheapfix#lcdscreen#brokenhiaweiscreen#frontpanel#crackedphones#huaweicheaphonefix#cheapestinperth#beckenham#australia
0 notes
Photo

Chrome Front Panel For HINO DUTRO 2012 #truckaccessories More items for #truckparts:Front Panel ,Bumper, Grille ,Headlamp,Tail Lamp ,Corner Lamp ,Fog Lamp ,Mirror www.atruckpart.com
0 notes
Link
Check out this listing I just added to my Poshmark closet: NWT Jimmy Choo Varenne Glitter Cell Phone Case/.
0 notes
Photo

Finished up on Lew’s front. #dotwork #dotworktattoo #owltattoo #stomachtattoo #frontpanel #torso #guyswithtattoos #guyswithink #tattoo #studio #bespokebodyart #customtattoo #grimsby #cleethorpes #lincolnshire #tattooist #tattooer #tattooartist #tattoostudio #tattoodesigns #uktattoos #tattooinspiration #grimsbytattoos #cleethorpestattoo #tattootime (at Bespoke Body Art - Tattoo & Laser Treatments)
#tattoo#tattooer#uktattoos#grimsbytattoos#dotworktattoo#stomachtattoo#tattoodesigns#tattooartist#customtattoo#guyswithink#grimsby#tattootime#guyswithtattoos#studio#lincolnshire#cleethorpes#frontpanel#tattooist#bespokebodyart#cleethorpestattoo#tattooinspiration#owltattoo#tattoostudio#dotwork#torso
0 notes
Photo
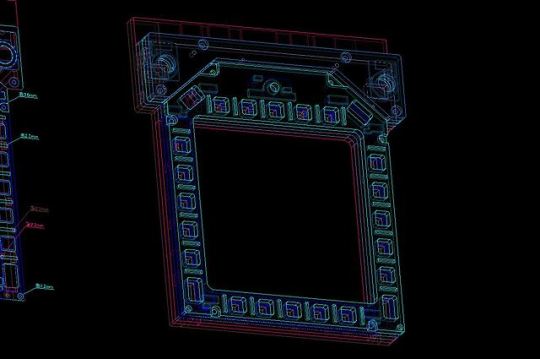
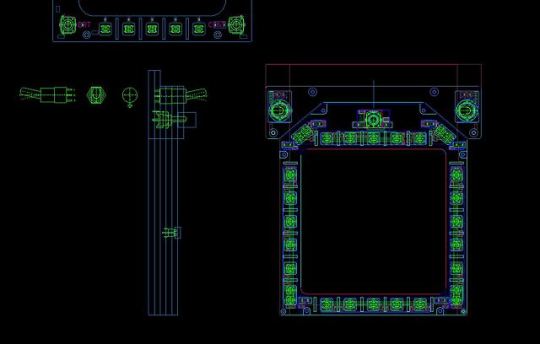
アクリル材を切らしてしまったので次回製作予定のMPCDを再設計中。構造は今までどおりアクリル板の積層構造です。実機ではボタン部分の枠がかなり細いのですが、配線が収まらないのとモニターサイズの関係から太くしました。そのためDDIとあまり変わらない太さになってしまった・・・。
1 note
·
View note
Photo

Переходник V-T CN26 с USB на 2*PS/2 . ☝️Пример использования: у Вас хорошая Клавиатура⌨️ или Мышь🖱️, но разъем PS/2 из строя вышел или хотите подключить их к Ноутбуку💻. ➡️Переходник с USB на 2*PS/2 (Keyboard+Mouse) CN26Lit Вам поможет в этом! ⚙️Характеристики Вес с упаковкой: 25г. Вес без упаковки: 10г. Размеры переходника: 4.8см х 2.9см х 1.9см Размеры упаковки: 15см х 10см х 1.5см. . 👍Гарантия 1 год по всему 🇰🇿! . . #ViTikz #V_Tkz #V_T.kz #ViTi.kz #Almaty #Алматы #KZ #Kazakhstan #Qazaqstan #Posmotri_potom_kupi! #Za_upakovku_ne_plati! #Garantiya_po_kz #usb #frontpanel #ssd @KupiSam.kz https://www.instagram.com/p/B3s07LVH8ac/?igshid=qtjdk7v9msn6
#vitikz#v_tkz#v_t#viti#almaty#алматы#kz#kazakhstan#qazaqstan#posmotri_potom_kupi#za_upakovku_ne_plati#garantiya_po_kz#usb#frontpanel#ssd
0 notes
Photo

#UW #universityofwashington #purpleandgold #purple #yellow #Huskies #WashingtonState #kilt with #flashpleats #reversible #frontpanel #handcrafted in #Seattle by #KiltThis kiltthis.com #customclothing #fashion (at Kilt This!)
#fashion#reversible#kilt#huskies#flashpleats#customclothing#purpleandgold#washingtonstate#frontpanel#kiltthis#seattle#uw#handcrafted#purple#universityofwashington#yellow
0 notes