#free youtube to mp4 converter
Explore tagged Tumblr posts
Text
#how to download youtube video#youtube to mp3#youtube to mp4#convert youtube to mp3#youtube to mp3 download#youtube to mp3 converter --yt1#free youtube to mp3 converter#youtube to mp3 converter yt1#download youtube to mp3
0 notes
Note
How do you make your gifs?

Hello hello! I love talking about gifmaking, so thank you for giving me the chance to ramble.
Instead of a detailed step-by-step walkthrough, I will link tutorials and resources written by the wonderful Tumblr creators on here along the way. Everyone has their method and preferences, and there’s no right or wrong way to make gifs. I’m going to share techniques and resources I picked up along the way that work best for me—they may or may not be suited to your preferences, but I hope you’ll find some helpful things here.
(Warning: screenshot/image heavy)
USEFUL TUTORIALS AND RESOURCES
Here are some tutorials and resources that I found very useful when I got back into gifmaking:
Gifmaking tutorial using video timeline by @hope-mikaelson is identical to my own process
Gifmaking and coloring tutorial by @kitty-forman, whose process is very similar to my own
Giffing 101 by @cillianmurphy, an incredibly detailed tutorial that covers everything you need, including a step-by-step guide to using HandBrake
Gifmaking and coloring tutorial with 4K HDR footage by @sith-maul, another incredibly detailed tutorial with many useful tips
Gifmaking tutorial by @jeonwonwoo, incredibly comprehensive and covers so many aspects of gifmaking from basics, sharpening, captioning, and text effects
Gifmaking/PS tips and tricks by @payidaresque
Action pack by @anyataylorjoy, the Save action is especially a true life-saver
@usergif and @clubgif are amazing source blogs with many tutorials on gifmaking, color grading, and gif effects, can’t be thankful enough for the members for their work curating and creating for these blog!
TOOLS
Adobe Photoshop CS6 or higher, any version that supports video timeline. @completeresources has many links to download Photoshop, have a look!
Photopea is a free alternative to Photoshop, but it has a slightly different UI, check out these tutorials for gifmaking with Photopea
HandBrake or any other video encoder, especially if you’re working with .MKV formats
4Kvideodownloader for downloading from YouTube, Vimeo, Instagram, etc.
OBS Studio or any other similar screen capturing software. To prevent duplicate frames in gifs that prevents your gifs from looking smooth, try to match the recording frame rate (FPS) with the source.
IMPORTING FOOTAGE AND WORKING IN VIDEO TIMELINE
I work exclusively in video timeline instead of importing video frames to layers or loading files into stack. For videos that don’t require converting/encoding using HandBrake, especially ones that are already in .MP4 format, I tend to open the video directly on Photoshop, and trim the videos around directly.
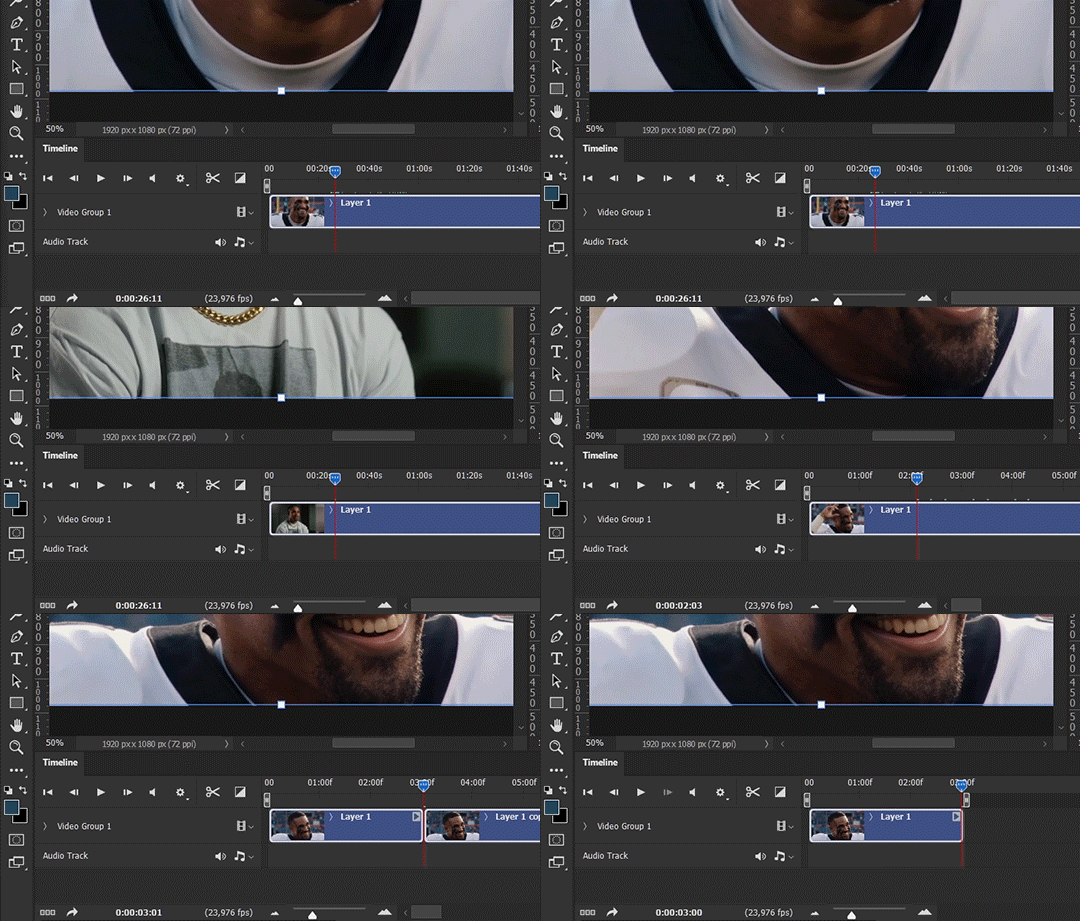
As mentioned above, this gifmaking tutorial using video timeline is exactly how I make gifs. I find it more efficient, especially if you’re making multiple gifs from the same video/the same scene with little to no change in lighting conditions You can simply slide around sections of gifs you want to save, and they will all be the same length.
Another thing also covered in the tutorial linked is the ability to change video speed in video timeline mode. Right click on the video and set the speed before proceeding with cropping/resizing. This is also very useful when you’re making blended gifs where you need the footage to have the same length.
Slowing footage down.
As mentioned in this post, changing the FPS before slowing down the gif results in smoother gifs. Doubling the frame rate before slowing down your gifs usually yields the best result.
Speeding footage up.
I love using this to speed up slow motion B-rolls to make the speed slightly more natural. It will result in nice, smooth gifs:
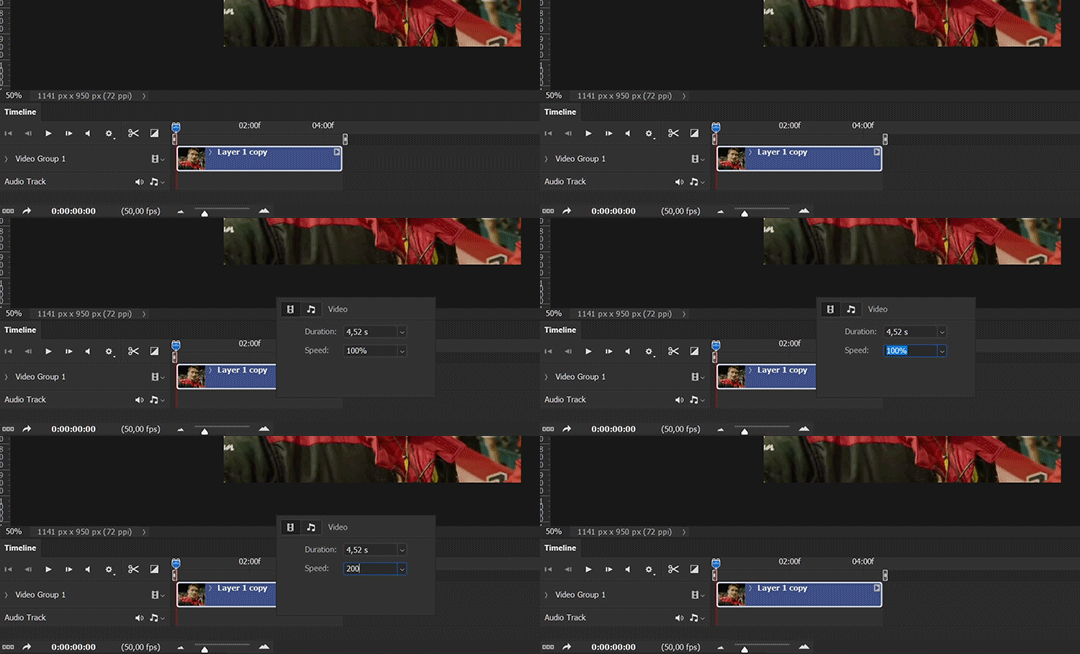

(B-roll footage, normal broadcast speed)

(200% speed)
Subject won’t stay in frame?
Another feature of the video timeline mode. Keyframes are your best friend. This tutorial by @kangyeosaang covers everything you need to know about panning gifs. I use this technique regularly, it’s a life-saver.
COLORING
Here are some coloring tutorials I found very useful:
Coloring tutorial by @brawn-gp beloved, their coloring style is second to none
Mega coloring tutorial by @yenvengerberg, for stylized /vibrant coloring
Understanding Channel Mixer by @zoyanazyalensky
Coloring rainbow gifs by @steveroger, which delves deep into Channel Mixer
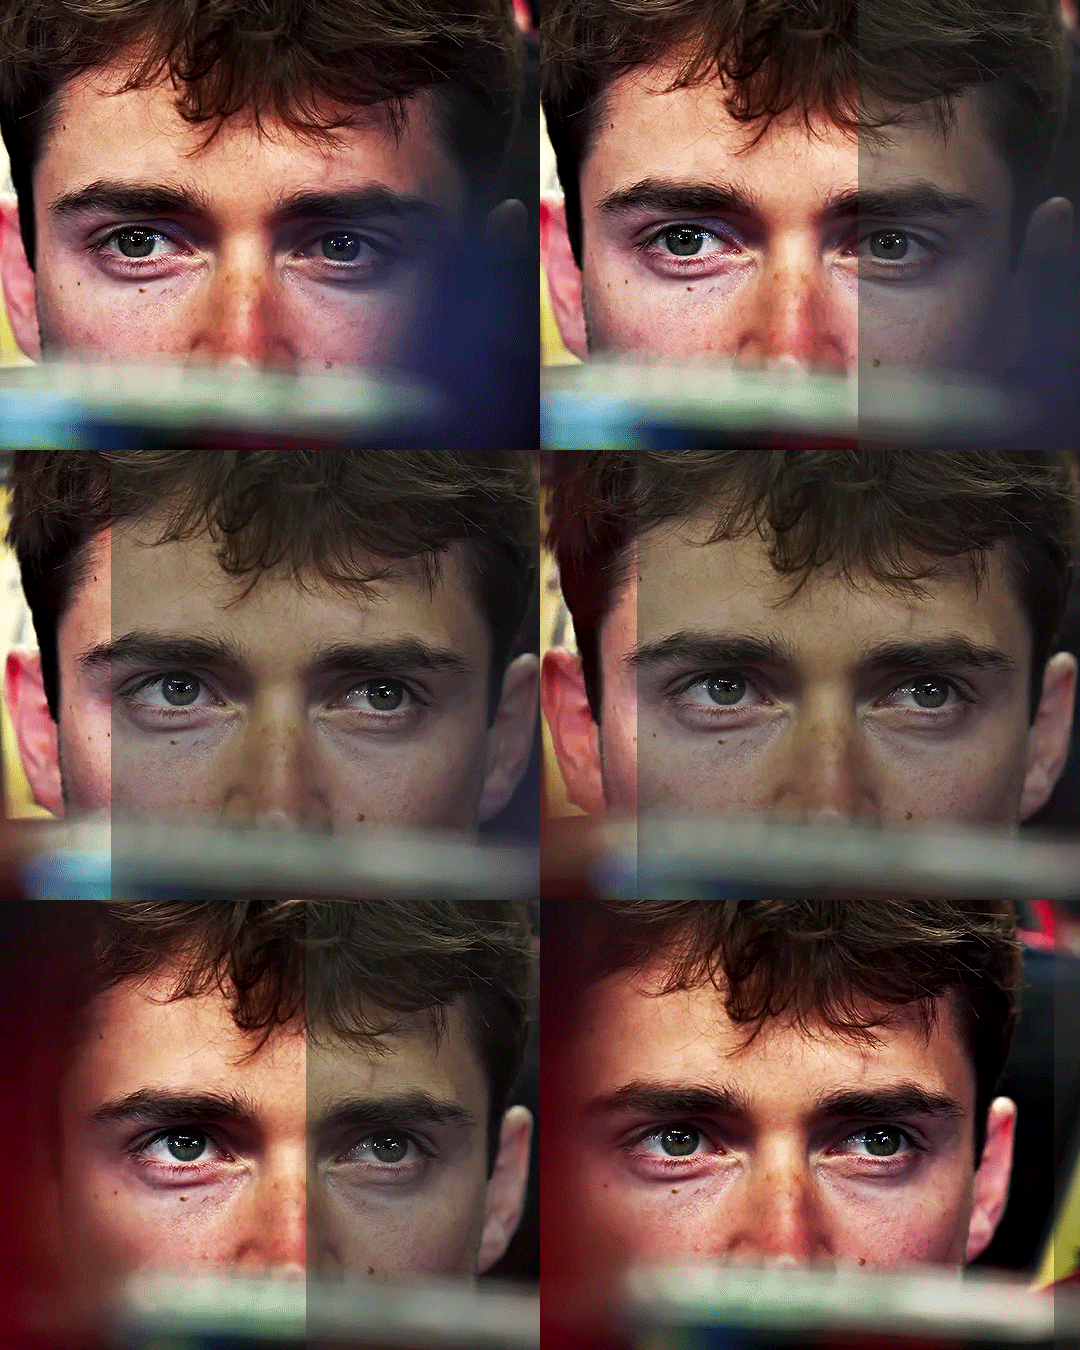
I tend to go for neutral-saturated coloring in general, especially for minimalist gifsets with no effects (blending/isolated coloring/overlays etc.), but the possibility is endless for stylized coloring. Here’s what my adjustment layers look like for the example gifs above.
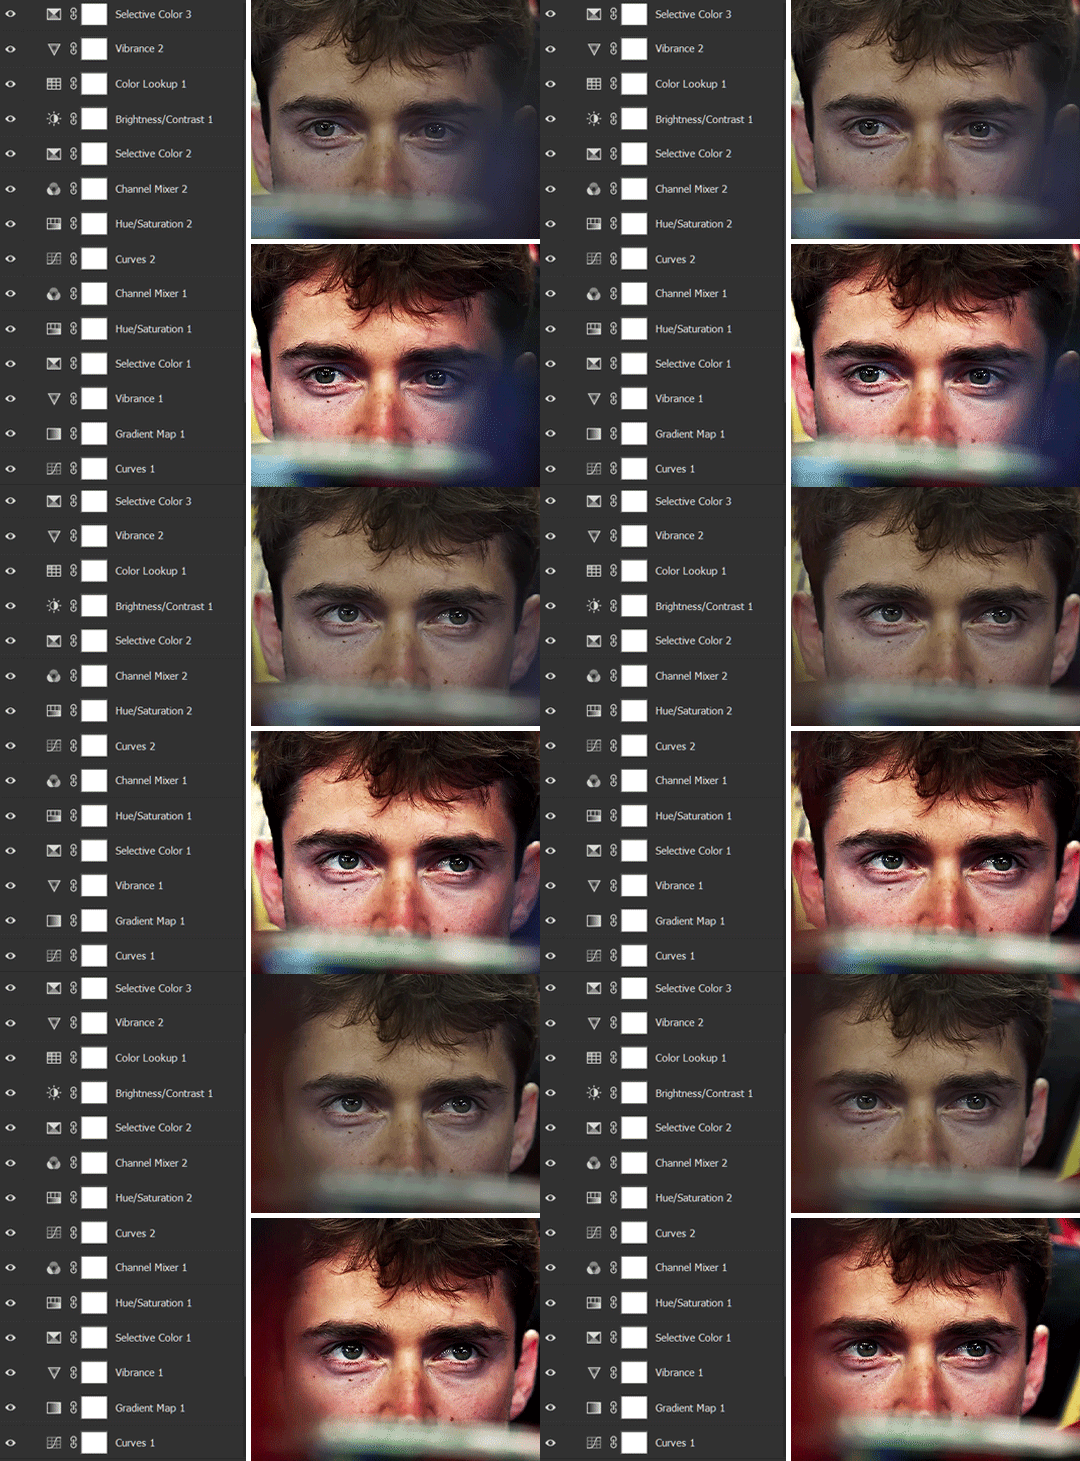
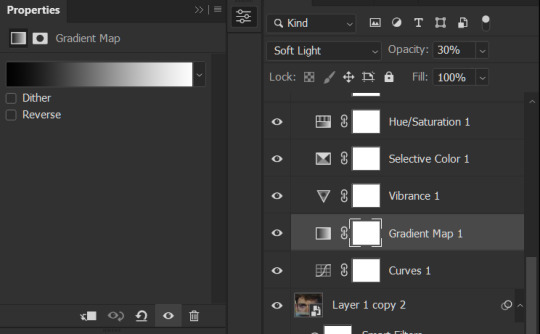
The base footage for this Charles gifset is incredibly desaturated. I started with a Curves layer to bring contrast to the gif, as well as do some color-correcting to bring the base footage to a more neutral tone. To bump contrast, I also like to add a black and white Gradient Map layer with a Soft Light blending mode at 10%-30% opacity:
The Vibrance layer is then used to lift the saturation of the base footage, with the Selective Color, Hue/Saturation, and Channel Mixer layers to help remove the green/yellow tint to his skintone.
An underrated adjustment layer/preset in my opinion is the Color Lookup. You can layer in pre-loaded .LUT color grading presets to help speed up your process. For this gif, it’s simply a base preset Soft Warming Look to achieve a warm, pink-tinted tone.
In hindsight I feel like this gifset is too saturated, his skintone is skewing very red/pink, I could’ve bumped down the lightness of the reds with a Selective Color layer or a Hue/Saturation layer. Try to err on the side of neutral for skintones. Experiment with layer orders—there’s no right or wrong! Remember that each layer build up on the one before it.
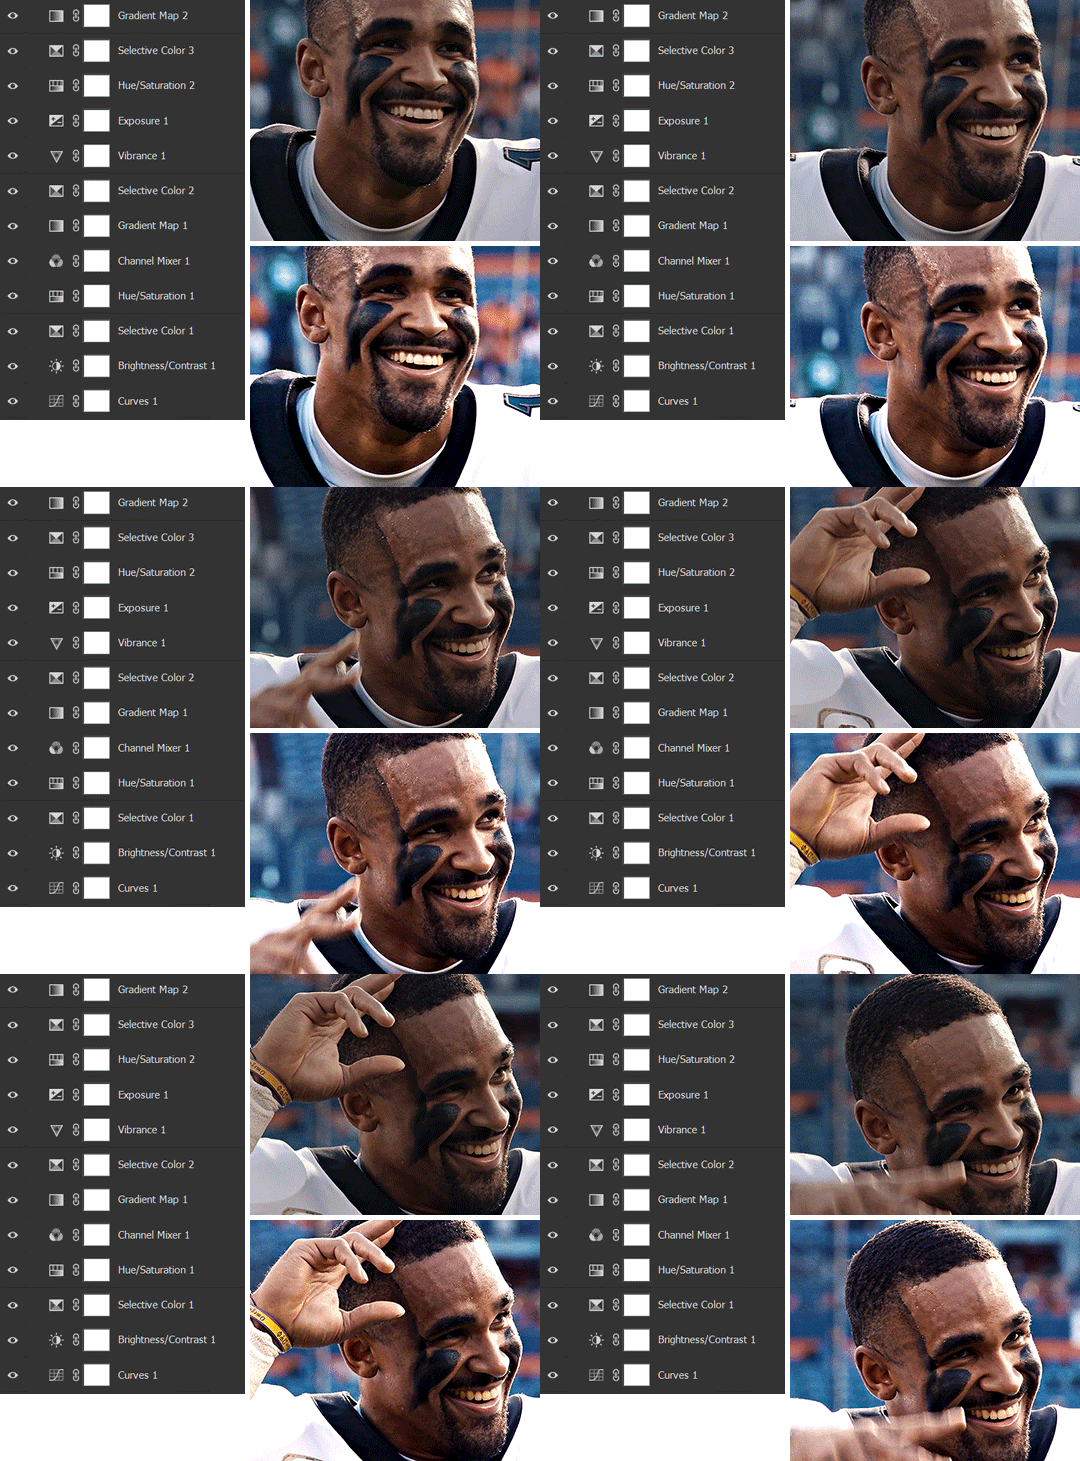
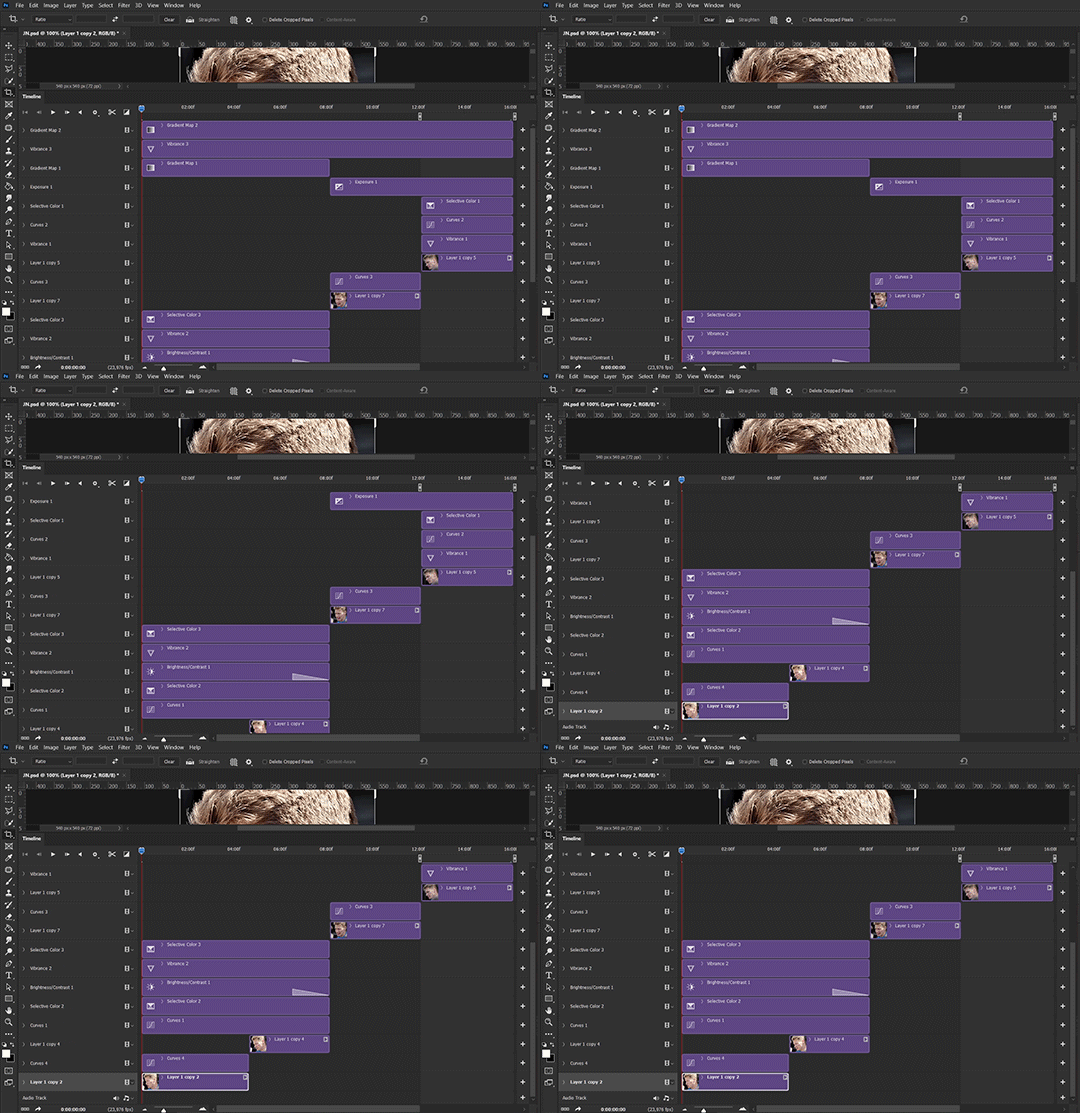
The base footage of the Jalen gif is already quite nicely color-graded, but it’s still muddy and underexposed. As with the Charles gif, I started with a Curves layer to bring the gif to a better baseline contrast. Then I focus on brightening the gif with the Brightness/Contrast and Exposure layers.
The Hue/Saturation and Selective Color layers are to color-correct Jalen’s skin tone—it’s something I spend most of my time coloring gifs and focus a lot on, especially when color grading BIPOC skintones. Putting a Vibrance layer, upping the Vibrance and Saturation, and calling it a day would make his skintone skew very, very yellow/orange.
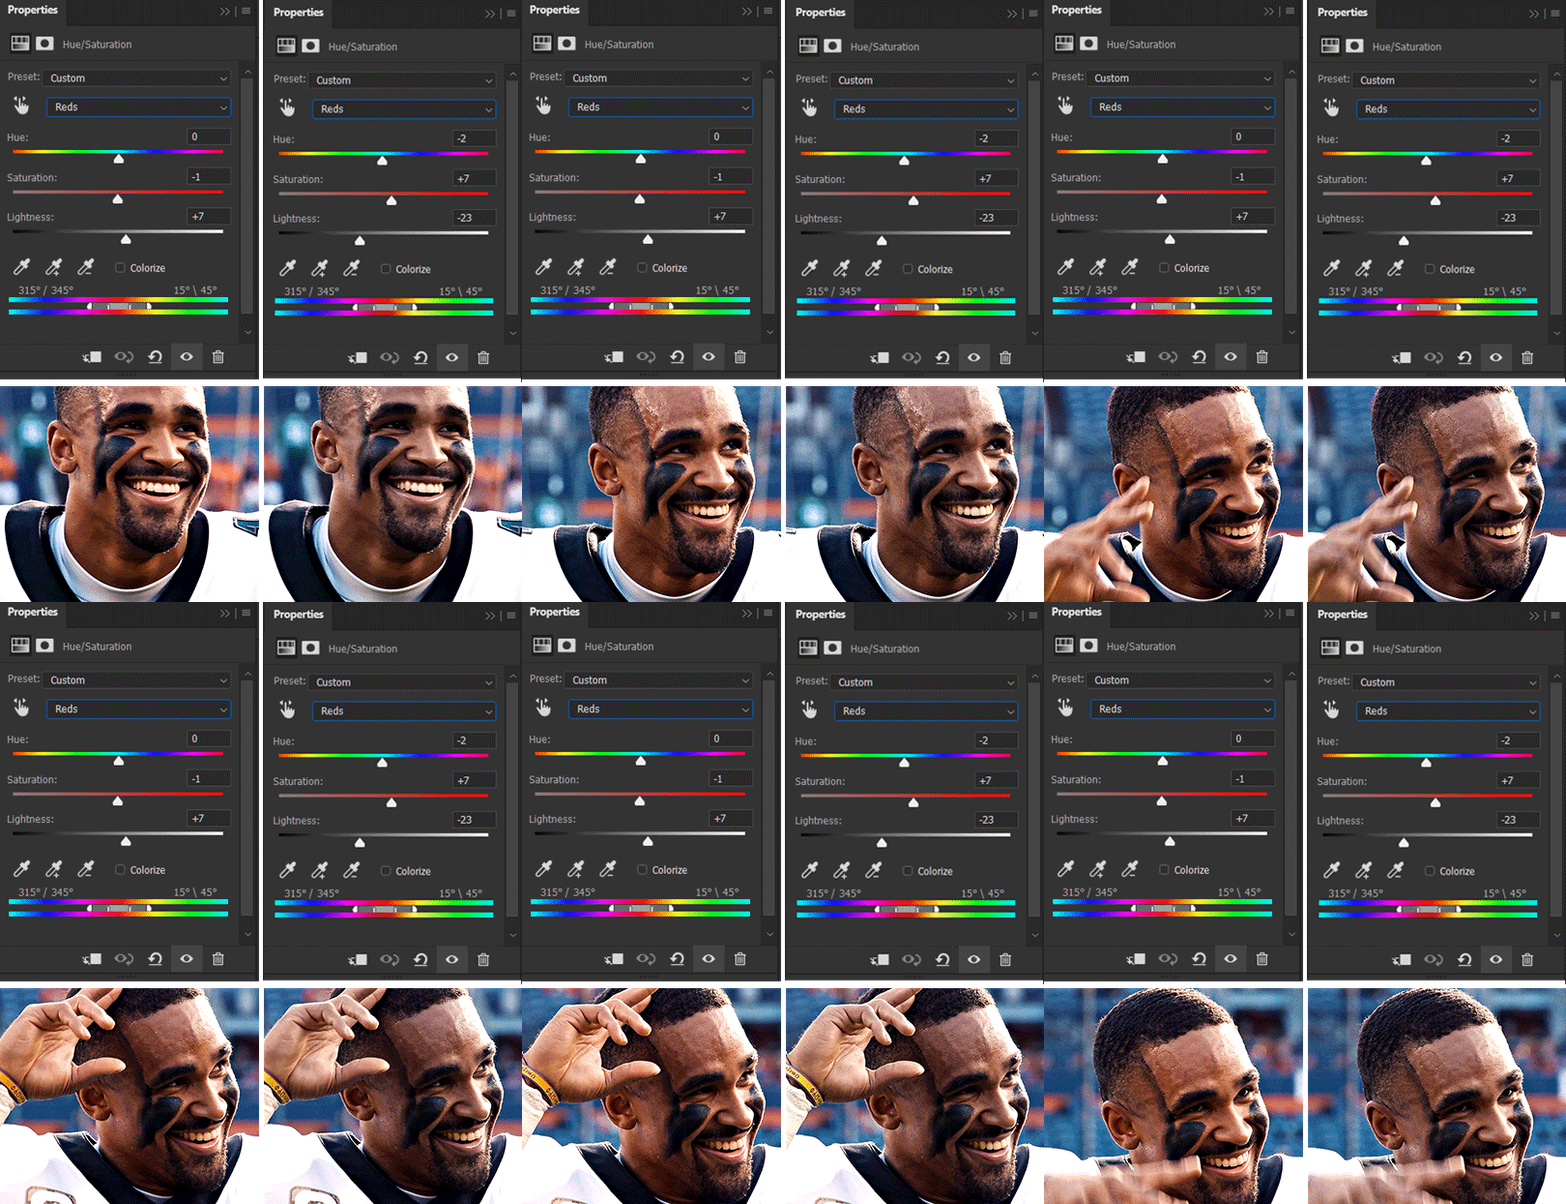
Focus on the reds and yellow for skintone, play around with the Saturation and Lightness sliders, use the Hue slider with caution.
It can be tricky to achieve the right skin tone when working with sports footage vs the higher quality, higher dynamic range footage of films or TV shows, but I try to keep it as close to the subject’s natural skintone as possible.
Here are some of tutorials with tips and tricks on coloring BIPOC:
How to fix orange-washed characters by @zoyanazyalensky
How to prevent pink-washing and yellow-washing by @jeonwonwoo
Coloring tutorial by @captain-hen
Changing lighting conditions?
Fret not—this is why I love working in video timeline. I’ll take this gifset as an example: it’s a deceptively difficult one to color. The footage is 720p and the sunlight shifts throughout the video, so matching across gifs was tricky.
My solution was to split the clips in sections with consistent lighting, and apply adjustment layers to the individual sections before applying general color grading layers on top of everything.
We can make use of the Fade Transition effect for sections where the lighting changes within the gif section we want to color.
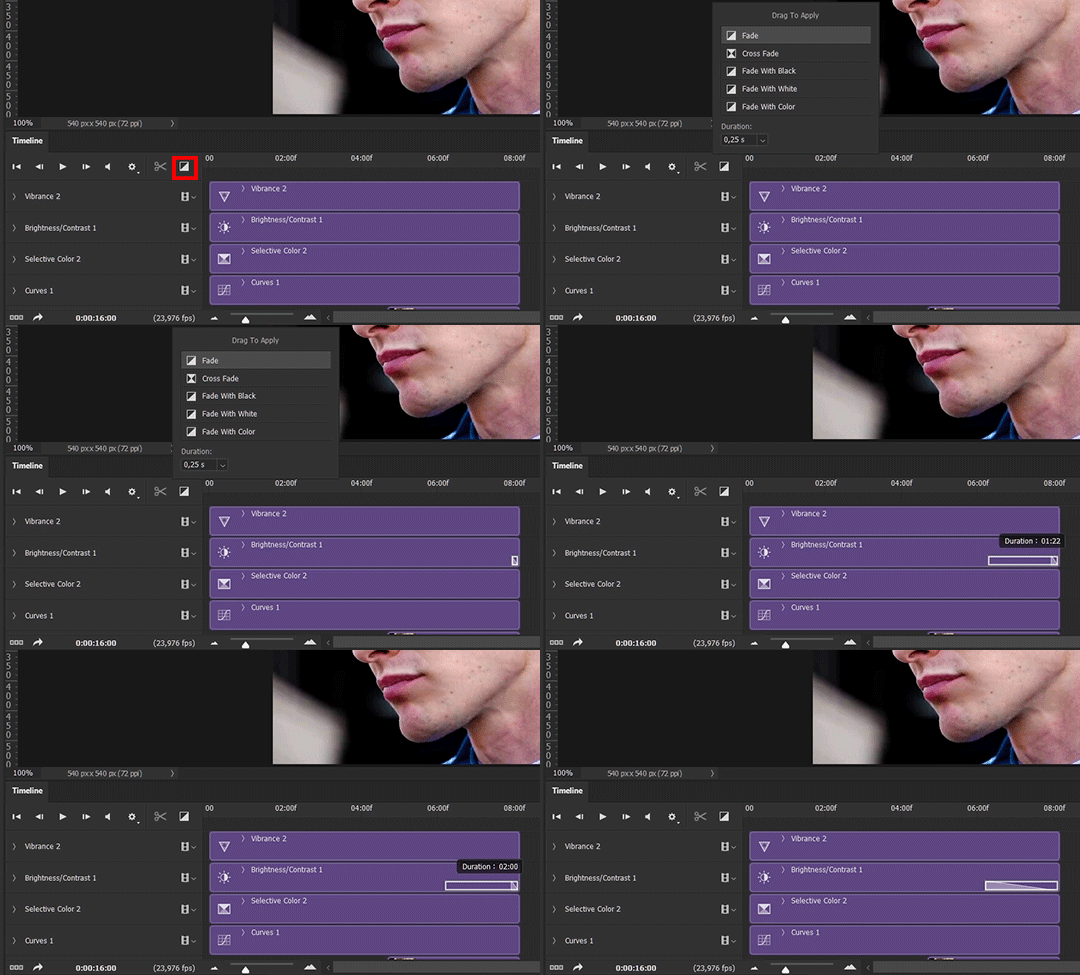

(without vs with Fade on the Brightness/Contrast layer)
The difference is subtle in this example, but the brightness in the right gif is noticeably more consistent throughout. You can also add the Fade Transition effect to the beginning for a fade in, of course.
SHARPENING AND OPTIMIZING GIF QUALITY
This tutorial by @anya-chalotra covers everything you need to know about optimizing gifs for Tumblr.
Sharpening.
Sharpening is essential to making crisp gif images. Here’s another ask I answered re: my own sharpening settings and maximizing gif quality.
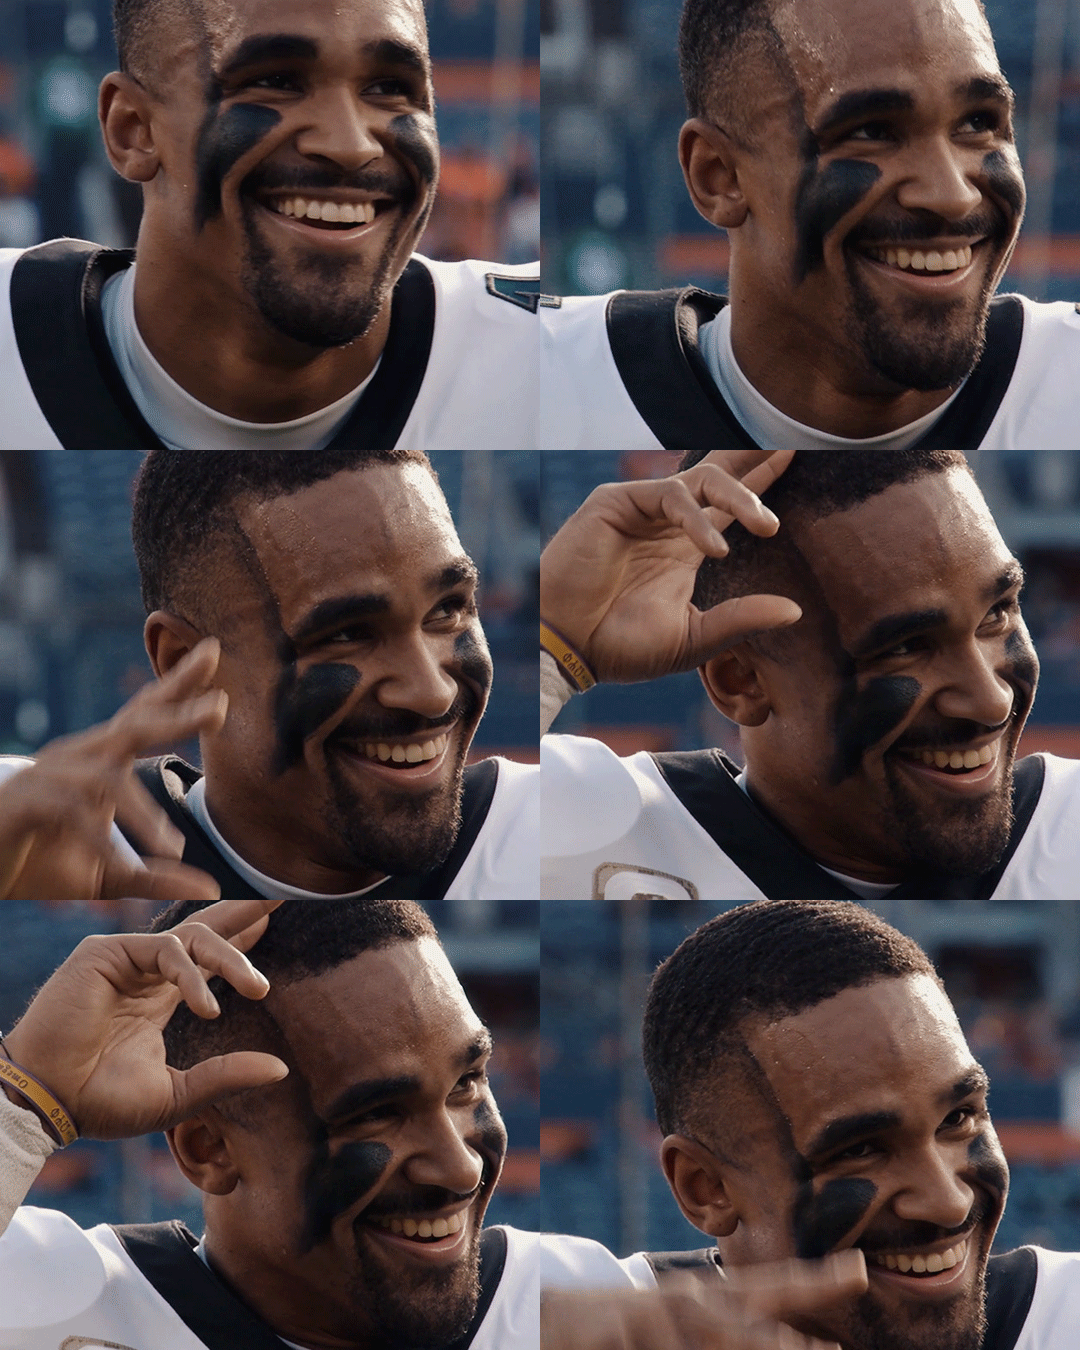
(base footage, unsharpened)
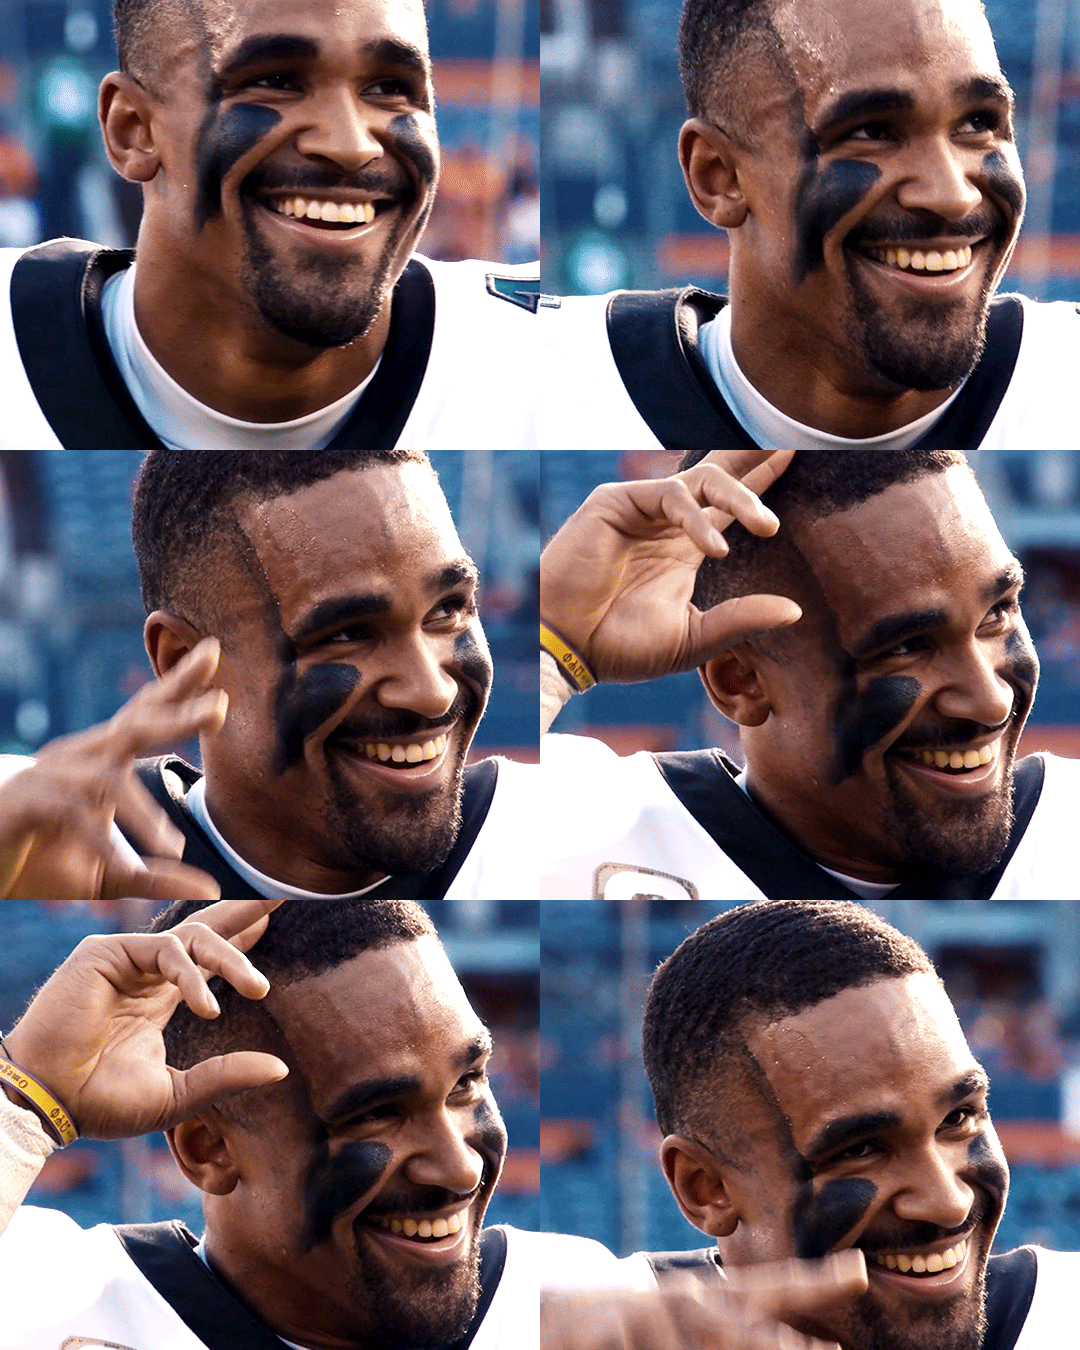
(color graded, unsharpened)

(color graded, sharpened)
The final gif is sharpened with Smart Sharpen, 500% at 0.3px and 10% at 10px (my standard sharpening settings).
Here are some tutorials and resources on sharpening:
Sharpening process by @anya-chalotra
Sharpening tutorial with added gaussian blur by @haleths
Sharpening action by @daenerys-stormborn
Size your gifs for Tumblr correctly.
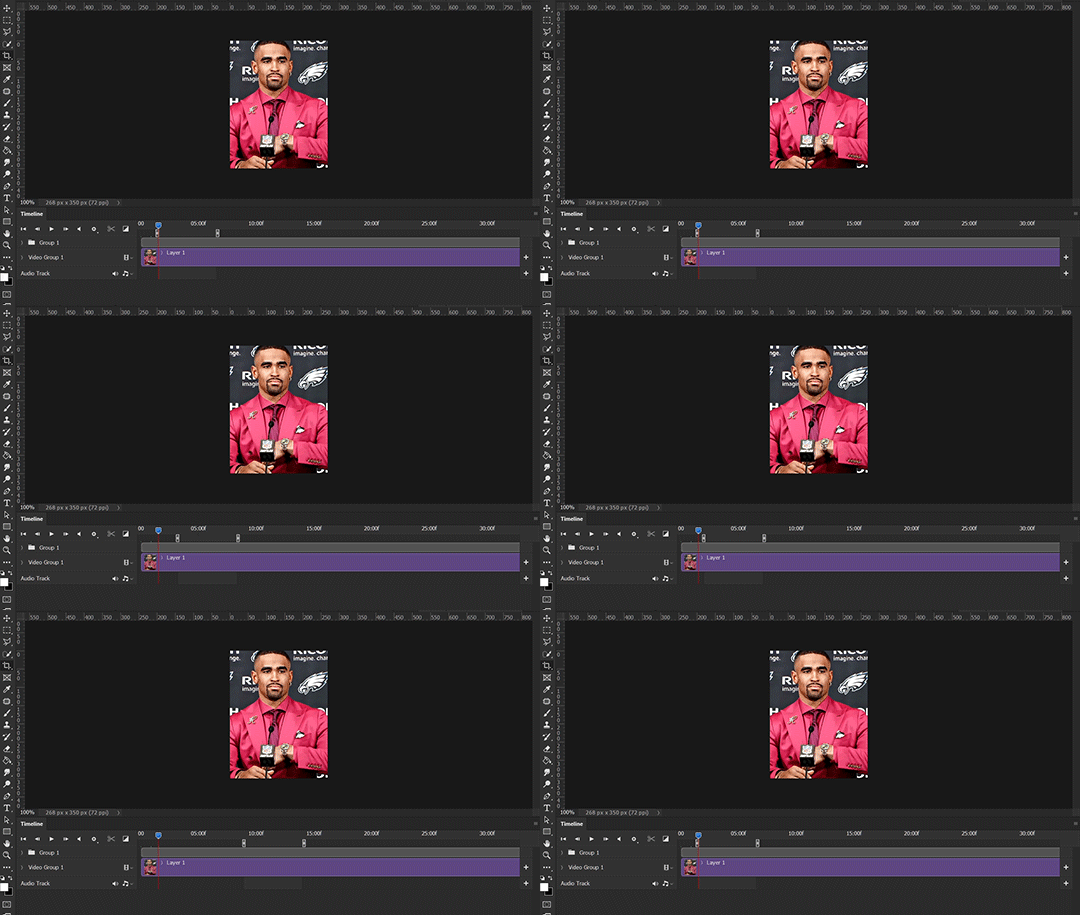
This is essential: full width gifs are 540px wide.Two side-by-side gifs should be 268px wide. Here’s a handy post on gif size guide for Tumblr.
Incorrectly sizing your gifs will take away the quality of your gifs: undersizing your gifs will especially make them grainy, blurry, and /or pixelated, and won’t display correctly on many people’s desktop theme. Oversizing usually isn't as dramatic as undersizing, but it will make the gifset glitch when displayed, and the file size will be unnecessarily bloated.
Work with HD footage if possible.
Media fandoms (films/TV shows) are luckier than us in the sports trenches—we have to work with what we have. Broadcast footage is usually subpar: lacks contrast, pixelated, very desaturated, the list goes on. But it’s possible to still make high quality gifs from subpar footage. Here are a couple of tutorials to mask low source footage quality:
low quality video ➜ “HD” gifs tutorial by @nickoffermen
Sharpening low quality footage by @everglow-ing
(This gifset I made is from a 480p footage with horrendous lighting conditions and colors, and the end result is decent I’d say)
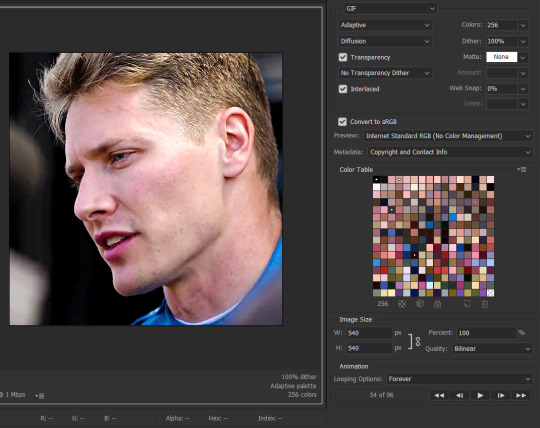
Save for Web (File > Export > Save for Web (Legacy) or Ctrl + Alt + Shift + S) settings.
I default to Adaptive + Diffusion but also use Adaptive + Pattern from time to time. Any combination of Adaptive or Selective + Diffusion or Pattern will give you a good result. In my experience some gifs will need the Selective color table for the colors to display correctly.
Here are my default settings:
SAVING AND EXPORTING FOR TUMBLR
Converting to frames and adjusting the gif speed.
If possible, avoid exporting your gif and reopening it to adjust the frame speed. I used to do this sometimes when I’m lazy, I have to admit, but this is where this Action as mentioned at the beginning comes in very handy. It converts all visible layer into smart object, then converts it back to frame animation.
Step-by-step:
1. Select all layers
2. Right click > Convert to Smart Object
3. Go to the Timeline menu (≡) > Convert Frames > Flatten Frames into Clips
4. Go to the Timeline menu again (≡) > Convert Frames > Convert to Frame Animation
5. In the same menu (≡), select Make Frames from Layers
6. Delete the first frame (it’s a duplicate) then set your frame speed

Now you can adjust the frame speed before exporting it (Save for Web).

Pay attention to the source framerate.
The frame delay of 0.05 s is usually the default to make gifs for TV shows and films, and it is preferred by most gifmakers. This stems from the fact that most movies and TV shows are 24 or 25 FPS. This may not be the case for all source videos: you might get 30 FPS footage, and sports or gaming footage can be 50 or 60 FPS. Gif speed also depends on the FPS of your original file. Play around with gif speed and see what feels most natural to you.
My rule of thumb is the frame delay Photoshop gives you + 0.01 s. For example, 50 FPS footage will give you 0.02 s frame delay (25 FPS gives you 0.04, 30 FPS gives you 0.03, etc.), so set it to 0.03 s. I usually err on the side of a faster frame delay for smoothness in in-game sports footage, anything else (interviews, press conferences, B-rolls) can get away with being slowed down. Again, experiment and see what you think looks best!
Keep gifs under the Tumblr file size limit (10 MB).
Cut down the number of frames. My gifs are usually around 60-70 frames for 540px full-width gifs, but depending on the coloring, sometimes you can get away with more. 268px gifs can go up to 200+ frames.
Crop your gifs. Remember to keep full-width gifs at 540px wide, but if necessary, you can crop the height. My go-to sizes are 540x540, 540x500, 540x450, and 540x400.
Amp up the contrast of your gifs. Flat colors like black cut down gif size.
The Grain filter or Noise filter, though beautiful for aesthetics or simply necessary sometimes to mask low source footage quality/pixelating, may bloat your gif size.
Play your gifs back before exporting.
Pay attention to duplicate frames or glitches, you might need to get rid of them!
Hope this is helpful! Don’t hesitate to send an Ask or DM if you need any help, I will happily answer all your questions and send over PSDs. (I’m also on Discord—just shoot me a message if you need my tag!) Happy creating :]

#tutorial#PS asks#gif tutorial#Photoshop tutorial#I guess this is more of a resource link dump than tutorial but. Hey. Why reinvent the wheel...#Sorry for the late answer I hope you see this Anon :]#completeresources#allresources#userxoames#userbarbi#usernrzr
1K notes
·
View notes
Text
In honor of Gavin and in light of his passing and because I would like anyone who hasn't gotten the chance to have access to all of his wonderful work that made him SO deeply important to me as a teenager I have compiled a Mega folder of every single bootleg of his work that I have gathered throughout the years and would be happy to share it for free with anyone that DMs me for it, only thing I ask is to please not upload on YouTube or distribute anywhere at least the ones that aren't already.
This includes:
Thoroughly Modern Millie
Mary Poppins (Opposite Rebecca Lock as Mary)
Hair
The Book of Mormon (1st US Tour and West End)
She Loves Me (Proshot)
Hello, Dolly! (With Donna Murphy as Dolly)
Waitress (With Sara Bareilles as Jenna)
Into the Woods (Opposite Krysta Rodriguez as Cinderella, Joshua Henry as Rapunzel's prince, Stephanie J. Block as the Baker's wife)
Quality varies, some of these you may have definitely seen on Youtube, others are ones I personally traded for or were gifted to me that you will not find online, I have converted some of the VOB files into MP4 (Some I’m still in the process of doing so, hopefully i’ll be done by tomorrow) so they will hopefully be playable on any device, though you may still need to download some due to the size.
If anyone has shows I don't have and would like to share them please do feel free to DM me, thank you.
#gavin creel#I just got home from work and have an awful headache#so im gonna go take. a nap in case I don’t reply back immediately#I think the only show I have left to convert from vob to mp4 is waitress
27 notes
·
View notes
Text
so, new spotify update.
(pt : so, new spotify update.)

[id 1/ a screenshot of spotify on a grey background. text reads, in bold, "There's a monthly limit on lyrics". text under in grey reads, "Every time you tap "Show lyrics", it will count towards your limit. To get full access to lyrics, switch to Spotify Premium." A button in green reads, "Show lyrics", and under it, another button reads "Dismiss." /end id]
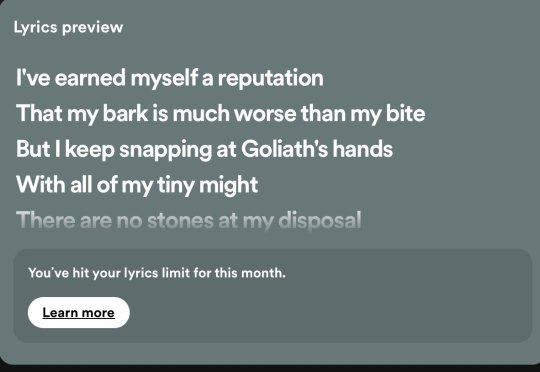
[id 2/ a screenshot of spotify on a slate grey background. Text reads above, "Lyrics preview". more text under, in bold, reads, "I've earned myself a reputation / That my bark is much worse than my bite / But I keep snapping at Goliath's hands / With all of my tiny might / There are no stones at my disposal". at the last line, it fades, and a box reads, "You've hit your lyrics limit for this month." a button under in white reads, "Learn more." /end id]
(screenshots courtesy of @thatweirdqueer , my boyfriend <3)
my boyfriend came across this message after clicking show lyrics once. they're forcing a limit on looking up lyrics to a song in their own app, and we need to talk about it.
at this point, spotify premium has been so forced onto us, that spotify is practically not even a free app. if you skip one too many songs, you have to listen to five or more ads. the dislike and like features they've implemented do nothing. everyday i boot up spotify, it flashes a larger than life ad with a button so small i can barely see it, just to dismiss myself. it tracks if you've bought premium to market these ads to you to guilt you into getting it back. you can't even download songs from it without premium. it's a barely functioning free app with everything locked behind a paywall.
if you want good lyrics for free, without having to pay a corporation for them, id recommend azlyrics, lyrictranslate, and searching the music artists channel. azlyrics doesn't have every song, which is a guaranteed, but its extremely easy to navigate, doesn't have many ads, and lays its lyrics out in a manner thats extremely easy to read. lyricstranslate has lyrics translated from many different languages, and can even translate songs into other languages on a whim. its run by people who can translate them, and is free to modify if you find a mistake. searching up the song on the artists channel (NOT the youtube owned topic) can help wield results as to what the lyrics are. one such example of this is femtanyl, who writes all of their lyrics in the descriptions of their videos.
adding onto this, if you'd like to download videos for free, whether it be mp4 or mp3, id recommend searching youtube to mp3 in an incognito tab! (id recommend this because some sites send you to rather sketchy websites sadly. they are efficient, you just have to ensure what you download is what you want. plus, it keeps it out of your search history if you share a browser with someone!) its easy, just copy the link of the video you want and paste it into the box. then, choose what file format you want it to be downloaded in, click convert, and now you have your own file downloaded for free. i've used this method for years now, and it hasn't failed me.
in conclusion, FUCK capitalism, DELETE spotify, and USE ALTERNATIVES.
-badger
71 notes
·
View notes
Note
hellooooo may i ask where you get the voice lines from deadfire?
pillars of eternity voice lines tutorial!
in steam version voice lines can be found here: C:\Program Files (x86)\Steam\steamapps\common\Pillars of Eternity II\PillarsOfEternityII_Data\StreamingAssets\Audio\Windows\Voices
all of them are in .wem format so they can’t be listened to normally. to listen to them you have to convert them into a different format. i learned how to do it by watching this video on youtube (i’m linking it in case i missed something in my tutorial or you want to see how it’s done)
the video starts with converting .bnk files to .wem, which isn’t applicable to poe
how to prepare tools for converting .wem to .ogg
1. download ww2ogg024 (for conversion) and ReVorb (for cleanup).
2. create a folder wherever under whatever name you wish. put ww2ogg024 and ReVorb inside
2. create a Script.txt file in the same folder. this is what is supposed to be in it:

for %%f in (*.wem) do "./ww2ogg024/ww2ogg.exe" %%f --pcb "./ww2ogg024/packed_codebooks_aoTuV_603.bin"
pause
for %%f in (*.ogg) do revorb.exe %%f
pause
3. save Script.txt file as .bat. you’re free to delete the .txt if you want
now your folder should look like this:

how to convert .wem to .wav
1. copy the voicelines you want to convert into the same folder as ww2ogg024 and ReVorb (remember to copy them, not move them)
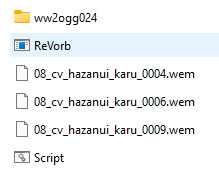
2. run Script and do what it instructs you to
3. success!
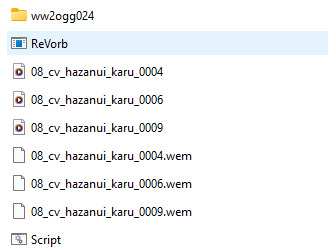
.ogg files can be listened to but if you want to post them on Tumblr you have to convert them to .mp3. i do it in VLC media player. i did have a problem with some of karū’s lines where they couldn’t be played after being converted to .mp3. i have no idea what the problem was or why only some lines were affected, but i managed to circumvent this by saving them in a different program as .mp4 and converting that to .mp3
some files can’t be accessed for some reason, not in any way i know. i found and copied the watcher’s and hazanui karū’s lines without a problem, but i couldn’t get to ooze noises
happy file converting!
#i almost deleted a chunk of karū’s lines two separate times because i moved them instead of copying#i wanted ooze noises because they sound like i what imagine teddy bears could sound like#pillars of eternity#pillars of eternity references#converting wem to wav
25 notes
·
View notes
Note
Where can i watch the new helluva boss episode without goin on YT ? Im very curious that why,why peeps hate blitzø...
You can paste the link of the episode into a video downloader to download it into you're computer. This was the video downloader I used:
You can get the link by hovering over the video with your mouse, where those dots will appear. Click on those dots, press share, and you'll see the link.
As for why everyone is hating on Blitzo...it's because he "hurt Stolas' feelings" I guess.....
I hate this episode and this fandom so much.
#vivziepop critical#hazbin hotel critical#vivziepop criticism#helluva boss critical#helluva boss criticism
32 notes
·
View notes
Note
also where can i download hardchorale
youtube

bandcamp
21 notes
·
View notes
Text
Just found this lifesaver site for editing dude holy shit
Its not even just yt its tiktok insta reddit facebook twitch and twitter too
Fucking seiss army knife of an mp4 getter this is sick
No ads either, .com, one button.
Literally so hapoy rn
7 notes
·
View notes
Text
Unfortunately as a tech worker I end up on Reddit a lot just because they have a lot of good websites and advice/solutions, and I just found a website that a guy made to make his own content, where you can download youtube videos without ANY of those scammy ass ads all up in your face. Instead of ads, the guy set up an optional link to his kofi :]
I BEG EVERYONE TO TAKE A PEAK ITS SO CLEAN AND I DON'T FEEL LIKE I'M BEING WATCHED ON IT CHECK IT OUT!!
#I don't like to advertise stuff like this because im paranoid people will think my account was hacked </3#BUT I MEAN IT LOOKIE#toby rambles#tech#emo#goth#cringe#i know you guys would appriciate it AKSJJS
8 notes
·
View notes
Note
Hi! I want to help with the Layton archiving, but have no idea how. Would it be bad to ask how to help with saving things?
Hi! I'm not really anyone who knows much about digital media preservation (there are plenty in this fandom who are!) but the basics I can offer are:
If there's a YouTube video or other resource you'd like to keep that you think would fall under the umbrella of non-transformative copyrighted work for LVL-5, download it! You can do this by looking up what format is appropriate for the file type you're looking to download - for instance, videos are usually saved as .mp4 or .mov, and audio is saved as .mp3 or .wav for the most part. Different file types have different pros and cons, but for these purposes pretty much anything will do. Then, look up how to convert from what you're looking at (e.g. a webpage, a video) to the appropriate filetype, and usually there will be some helpful links to do it for you. For instance: "youtube to mp4 converter" is a good google search for video saving.
Anything you download can be uploaded to the Google Drive. (Within reason; I have a 15GB cap on my account.)
If you can't think of anything you'd like to save, one great method for helping preserve things is by creating backups of this drive! To do that you'll need a flashdrive/USB stick or some other form of hard-drive outside of your computer. From there, you can download the whole Google Drive folder, move it to the flashdrive you've plugged in, and you're good to go! This is valuable because sometimes, if Google catches wind that people are saving copyrighted materials, they'll shut down a drive - I hope to God they don't do that since the folder is hosted on the same account as all my fanfiction (oops) - but if it DOES happen, it's really useful to have multiple backups of the folder kicking around, so that someone can restore the data and we can keep using it in the future!
Anyone involved in the Layton Lost Media project/more involved in media preservation feel free to add onto this - I'm barely computer-literate at the best of times and I'm sure there are other people who have much better recommendations than I do.
6 notes
·
View notes
Text
avast just told me the youtube mp3 converter tried to get was infected, lovely
is there one I don't have to download, it's been so long since I've had to do this
edit: I meant an mp3 download converter
edit: this seemed to work:
5 notes
·
View notes
Note
ok im preparing another hc trust . but im gonna be in a car for three hours soon so im downloading pvp civ as an mp3 and its a STRUGGLE trying to find a youtube link to mp3 converter holy shiiiiit. but anyways ill probably stare out the window and hallucinate pvp civ instead of listening to music lol (please help)
-pvp civ lunch person
Here u go pvpciv lunch person heart emoji
i use it a lot!! It does mp3 and mp4. it isnt sketchy as far as i know. It does open up a new tab when you download but it’s never lead anywhere? I just close out of it immediately in case it does do something. But yeah heres my trusty sidekick in downloading yt videos!
2 notes
·
View notes
Note
hi i just read your blog description and
how does one even begin to go about downloading an entire bootleg onto a Nintendo 3DS, of all things? what exactly prompted you to do this?
I am so glad you asked!
I enjoy the 3DS (and have an alt blog dedicated to my Nintendo shenanigans!) and I absolutely love having access to media entirely offline and without a buffering time! And to complete the trifecta, I had very bad writers block at the time. So uh there’s the why, the but how is chaos so do buckle in
First, I needed a bootleg as an MP4 as the 3DS no longer runs YouTube and I wanted to have it 100% offline. YouTube downloader and 5 minutes and that part was done. Next, actually getting it on the 3DS. A 3DS doesn’t tolerate MP4 files, and despite mine being homebrewed, I couldn’t find a program to play MP4 files. I, being me, tried to finagle it into working anyway. Unsurprisingly it didn’t, so back to the drawing board.
It took a few minutes of furious googling to remember that the 3DS had a pre-installed camera. That could take videos. However, there were some unfortunate limits..
- The filetype needed to be changed from MP4 to AVI.
- The videos could not exceed 10 minutes.
- The resolution is.. bad. 480x240. But if I wanted to watch Tanz with good resolution, why would I download it to a 3DS, eh? A grade-A viewing experience is clearly not the goal here.
Got to work chopping Tanz into 7-10 minute segments in the most sensible places I could. This is what took the longest, as I wanted the cuts to make some sort of sense. I tried to cut between songs or scenes, on top of an already present break in the music. Next, I ran all of these files through a converter to get them in the AVI that the 3DS can understand. Lastly, there was the small task of getting them onto the SD card and storing backup files in an organized manner on my computer so I can get Tanz onto my OTHER 3DS consoles at a later date. I also have a Switch Lite that I’d like to put it on, but my silly camera exploit won’t work because the Switch doesn’t have a camera. Shame.
Anyway I had to name the files so they would appear in order on the laptop and on the 3DS, and I had an AVI and MP4 for each portion. I think there were like 15 parts? I’ll check in the morning, I’m very tired and the system is dead at the moment. But there’s a folder in the applications section than I transferred the video files into, checking every so often to make sure they were working and uploading properly, and luckily they were so it was just a drag and drop operation from there. And that’s how I got Tanz on a 3DS.
I’ll proofread and add images (I think my blog banner is the Tanz credit screen on the 3DS) in the morning, and better explain some stuff. If you have any questions about this or other 3DS stuff please feel free to ask! I love to talk about it!
7 notes
·
View notes
Note
nora, how do you download videos to make gifs?
i use a video converter (winx) that comes with a youtube downloader, but you have to pay for that. there are a lot of paid video downloaders out there, but as for free options you can just google like, youtube to mp4 or youtube video downloader. the quality is hit or miss but you should be able to get relatively decent downloads
13 notes
·
View notes
Text
Youtuber voice: make a gifset with me :)
alright folks, welcome to another episode of Jo talking to the void. Gonna try and do a "follow my process" thing.
It's very- VERY long and image heavy. Under the cut and feel free to send me an ask if you have any questions/want me to elaborate on anything.
Part 1: Grab at any idea that sparks joy. Anything. Today mine is the word "horror", so we'll try and do a horror set.
Part 2: Scene analysis and reference hunting. I'll open a new folder on my pc named "Horror gifset" and dump there all the FTWS scenes I already have and that I think could be fun. Open pinterest and behance and type "horror", see if anything sparks an idea.
This takes me roughly 20 mins, here's what I have:
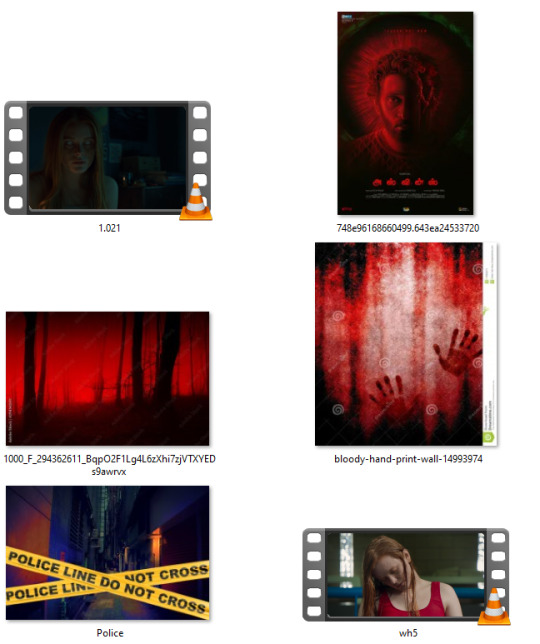
I try to take a step back and see what is it about these designs that attracted me. Clearly the red & black contrast, Bloom and I actually just like the "police line" because of the amount of storytelling it brings by doing basically nothing. (Don't be fooled, I saved many many pics before narrowing it down)
Part 3: To me this is the hardest one. I want to have a small storyline in my gifset, so time to think of it. I open a notes document and just start typing whatever comes to mind, trying to keep the mood of the previous images.

Here's what I landed on. It's not much, but I can now start the fun part of structuring the gifset.
Part 4: I've really been into layout lately, so now's the time to do math.
The first panel I knew I wanted to have the text centered in the middle and surrounded by the mini-gifs. Here are the two layouts I thought of. I decided to go with the second one because it's more interesting, but I already knew I'd tweak a lot, to resemble an actual police line, etc.
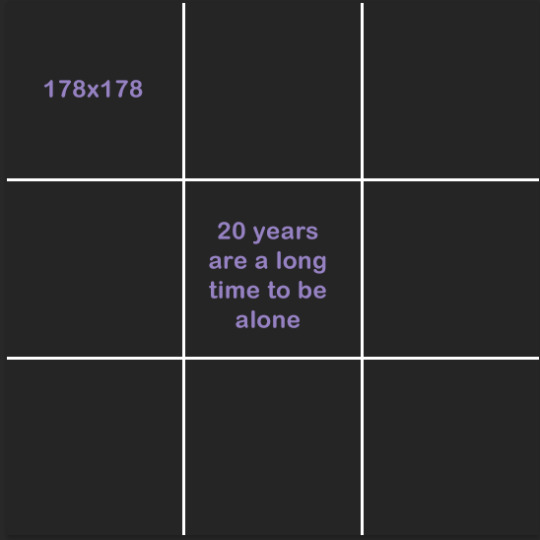
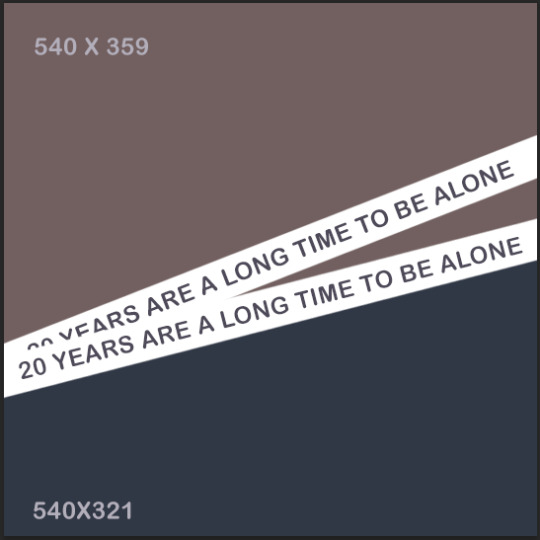
I separated all of the scenes from 2x06. Both when Bloom is arrested and when she's released, considering I could use them in reverse.
When making layouts the only things to keep in mind is that the dashboard optimal width is 540 px and that the space in between every piece of "frame" you put within a gif is 2px. So let's say I was going with the square layout 1. It's 540 px width, BUT I can't just divide 540/3 and make that the size of my layout, because I need to account for the space in between the squares too. So the math is actually 540 - 4 (because I have three columns - two gaps)/3 = 178 px. All the squares in that image are 178 x 178.
On Scene grabbing: I do everything I can to use footage that's high quality. This is the easiest way for your gifs to come out pretty, avoid anything lower than 1080. Especially if you're grabbing a scene that'll need loads of adjustments like a night scene or a period piece with too much yellow, grab even higher quality than 1080.
When I work with Redeeming Love's footage, I work with 4k quality, because I know I'm about to destroy the quality by adjusting it.
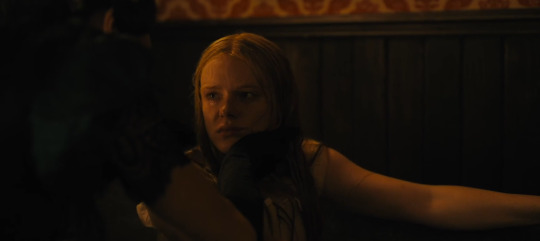
I mean look at the amount of yellow.
I t*rrent all my scenes in MKV, then use Avidmux to chop the entire movie/show into smaller sized scenes and convert it into mp4.
Part 5: Back to the set. Once I have the basic layout, I pull in my scenes and check if they make sense. One big tip is to stop thinking of scenes as what you watched, but as what you're seeing.
Scenes meaning are very easily altered by whatever context they're put in. Look for scenes in unexpected places (the romantic scene can absolutely be horror footage) and reverse the order or add in effects to alter their meaning.
Each one of these gifs had it's own peculiarities. So to break it down:
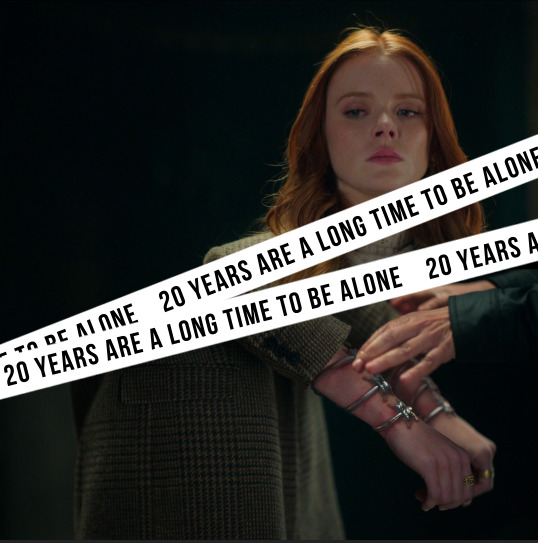
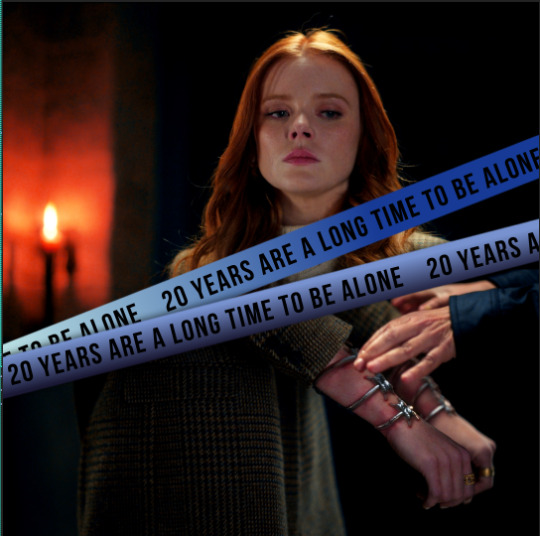
Gif 1: I colored it to bring out the black and added the blue because I knew I wanted to use overwhelming red later and this would pop-out. Shaded the white streaks so they'd appear more like police lines and colored them using a gradient just so it'd be more interesting. I didn't like how Bloom's upper part lined up with the cuffs, so I inverted it and brought out the red


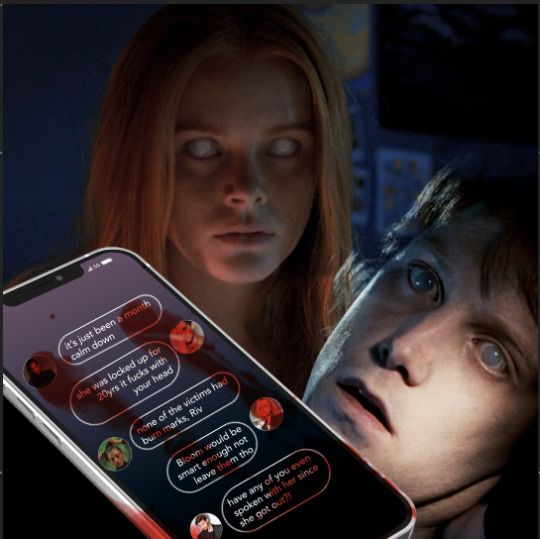
Gif 2: First off, I scavenged my memory to try and find a scene where a character appears with white eyes like Bloom's. This poor fella is from The Covenant (2005). I color matched both Bloom's and his scenes so the green was neutralized and we had more blue and red. Then finally I added the phone where the actual storyline I wrote back up starts to unfold.
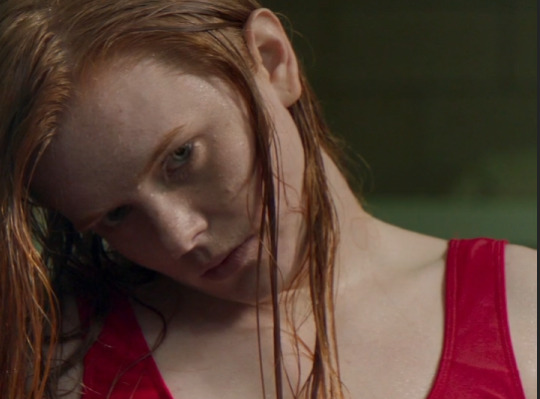
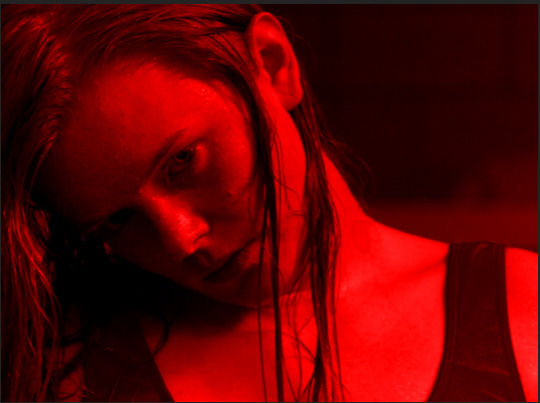

Gif 3.1: First off, this gif is 540 width, but not 540 px tall. It's actually 400 px tall, which is a good tip: You don't have to stick to one format when giffing. Sometimes a layout or scene simply won't work in a tall format and that's fine.
For this first part all I did was color Bloom, slap the all red color map and the text. Then I realized I didn't like her swimsuit under blending, so I went back and specifically desaturated the red in the starting layer and made it dark, so it'd show up black. The "20 years" are subtle, but in my head it'd be what the characters are hearing in their nightmare, so it's just a faint whisper in the corner.
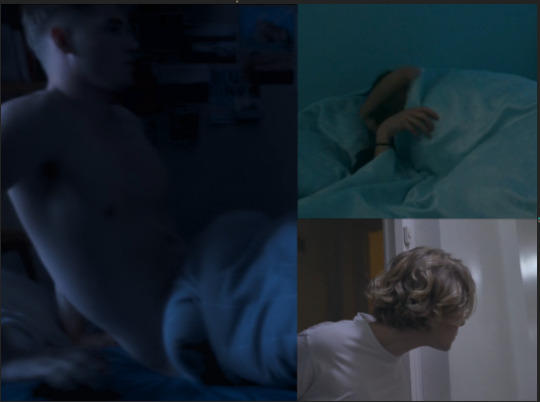
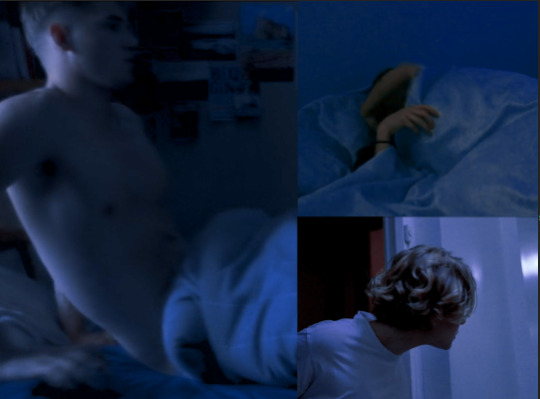
Gif 3.2: I colored all scenes to match each other. Sky's was the darkest one, so I knew I'd try and match to his because then I wouldn't have to destroy the quality of his footage to match the others. Musa's scenes was tricky because in the actual scene she's waking up slowly and happy. I chose to speed it up and start the gif already in her movement, so you don't realize she's actually very relaxed in the scene.
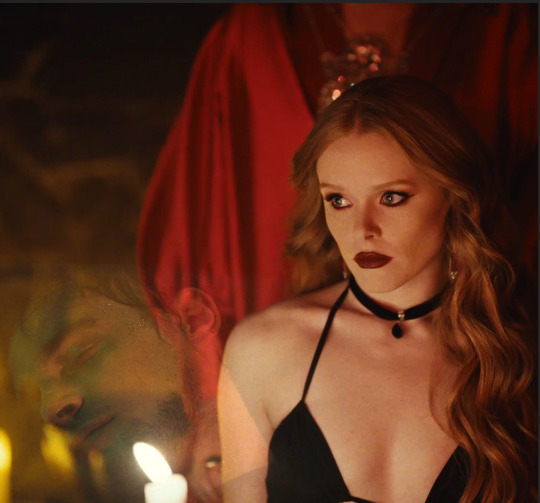
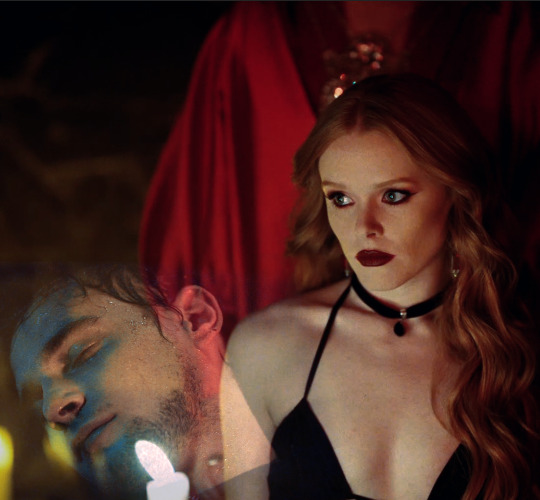

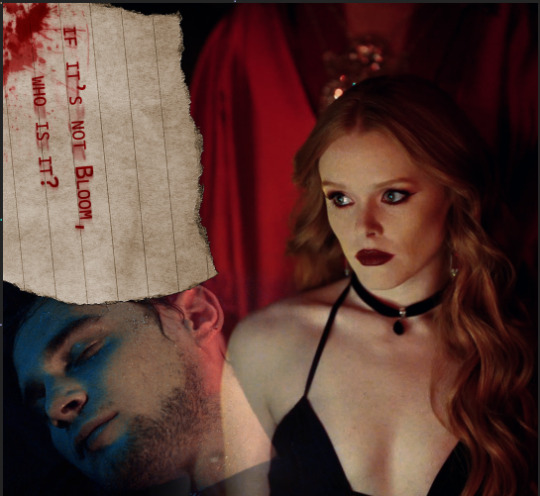
Gif 4: I started by coloring Bloom and Riven's footage, reducing the yellow and bringing out the blue and red in both. As you can see there's still a candle behind Riven, that makes it hard to see his face, so what I did was add a black shape under (or you could paint a layer in PS) with black and just blur the edges, so his footage would actually show. Finally there was that big empty spot in the upper left, so I added a note and used it to wrap up the story of the set.
There are two layers of text, both set to multiply: one is the actual text, the second one is in a brighter red and blurred in one direction, so it looks like the text got smeared in a rush. Added the blood and ta-da! We're done.
Exporting:

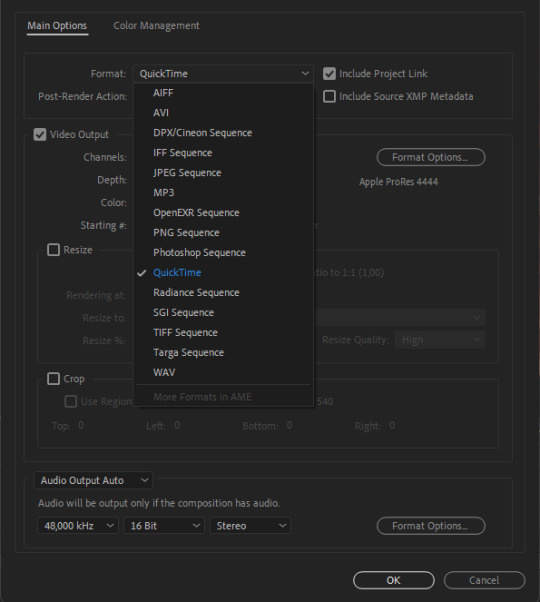
If you're exporting from After Effects, I've found exporting in MOV works better than trying to export in mp4, since it doesn't compress the file. You'll notice I'm using the format "apple ProRes 444", that's simply because this format keeps the alpha channel (transparent). While I didn't need it in this set, it's an habit.
Once I export from after effects, we're importing in Photoshop.
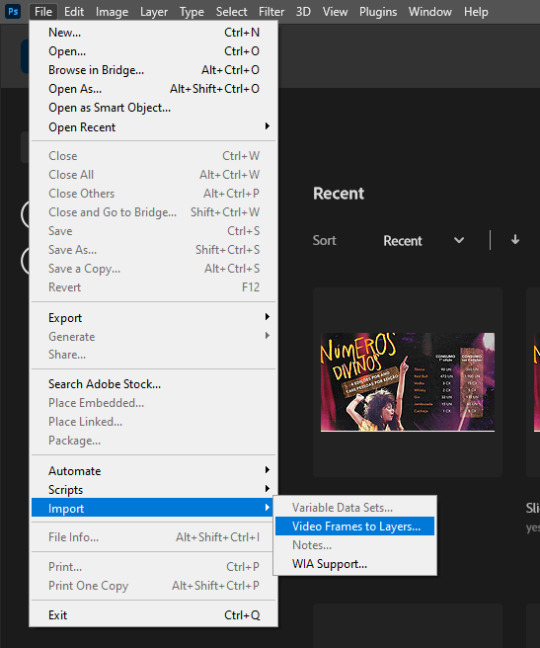
I import by going File > Import > Video Frame to Layers. Then you select your file and you should have this:

Hit OK.
If you don't have the timeline here, simply go in "Window > Timeline"
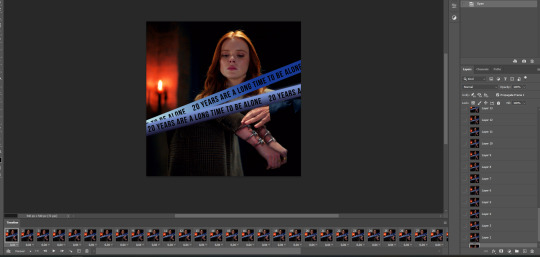
You'll end up with something like this. Now here's the most boring part of giffing, but don't give up now!

Go on the 3 lines on the bottom right of the timeline (=) and click on "select all frames". Once they're all selected, click the little down arrow under the little thumbnails to change the timing. I change mine from 0.04 to 0.05
Then I select all my LAYERS (not frames), put them inside a group. And click:
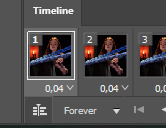
On this little piled up icon to transform into the video timeline. This is so we can sharpen our gifs.
Right Click on top of the group on the layers panel and select "convert to smart object". Then in the upper bar, click Filter > Sharpen> Smart Sharpen and use these settings:

This is what makes gifs look clear and crispy.
FINALLY we're saving. You can do it manually, like a peasant, by going on file > export > save for web (legacy). Or you can play keyboard piano and hit alt+shift+ctrl+s.
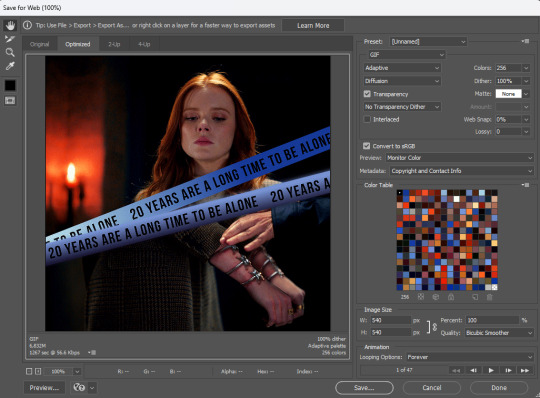
These are my export settings.
Things to keep in mind:
"Diffusion" is just one of the types of exporting you can do. TWEAK THIS for every gif. Sometimes very detailed gifs will look better with Pattern. Very colorful ones with Diffusion. It varies a lot.
"Adaptive" is just another way the pixels are laid out. I don't actually see much difference here, but I always tweak on all settings, just to make sure I'm getting the best quality by the smaller size.
On the bottom left you'll see your size. Mine is currently 6.82M. All you have to know is that Tumblr won't allow any gif bigger than 9.8M.
Looping Options: make sure it's in forever, otherwise your gifs won't play.
And then... finally, hit save.
....
Now rinse repeat and do this for 200 other gifsets, because it's a totally fun hobby to have!
26 notes
·
View notes
Text
Quick reminder that YOU DON'T HAVE TO PAY YOUTUBE TO DOWNLOAD STUFF!! literally just look up "YouTube to MP3/MP4 converter" and there are like 5 million. You paste the YouTube link in, pick your quality, click download and you have it. A lot of them have popups and stuff so be careful but I do it like all the time and still don't have a virus yet, it's fine.
Don't pay youTube for like the simplest function to find from a quick search!! Make your animation memes and download your favorite video essays!! For free!!
#purr purr purr#youtube#idk what to tag this with?#anticapitalist#piracy#those probably work for tags lmao
12 notes
·
View notes