#forever and two wacom pens
Explore tagged Tumblr posts
Text

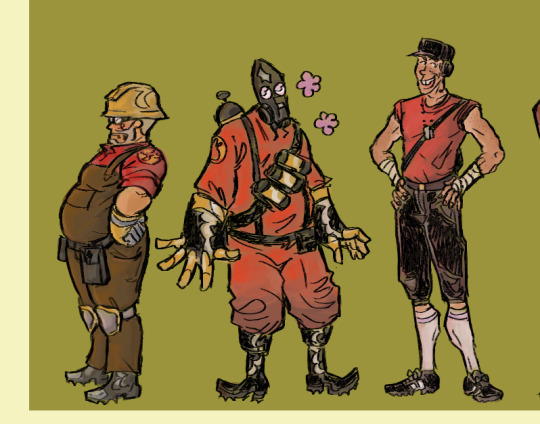
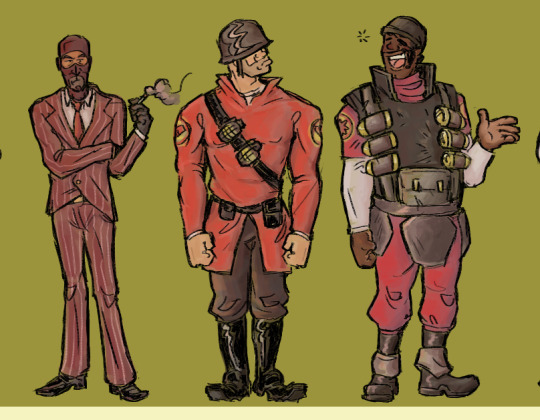
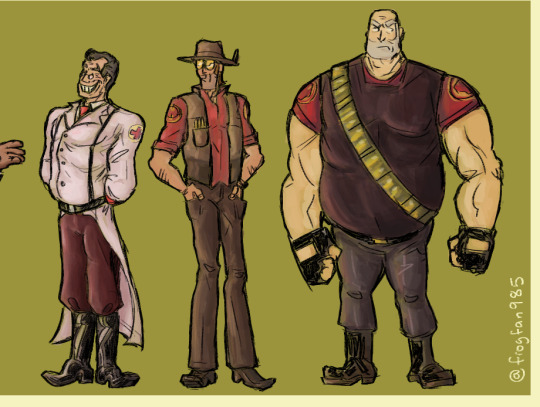
guess who finally finished this :D made a full lineup of everyone
#this took me foreverrr#forever and two wacom pens#whatever its fun and it was really good practice lol#tf2#frogfan.png#tf2 fanart#tf2 spy#tf2 engineer#tf2 pyro#tf2 scout#tf2 soldier#tf2 demoman#tf2 sniper#tf2 medic#tf2 heavy#spy tf2#engineer tf2#pyro tf2#scout tf2#soldier tf2#sniper tf2#demoman tf2#medic tf2#heavy tf2#fanart#dont mind the block of text i like tagging things thoroughly#xp
2K notes
·
View notes
Note
ohh my goodness can you pls pls pls do a brush tour?? i love ur art so so much its so cruncy >:]
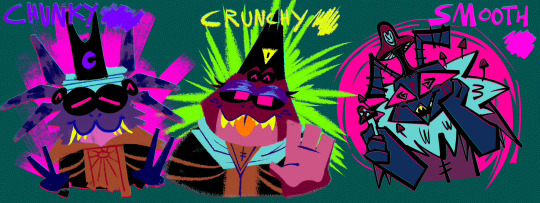
Yes I can, I appreciate your interest!! I use paint tool sai 2 which is kind of archaic, but I've been drawing on a wacom pen and touch small + using paint tool sai since 2012 and I'm too stubborn to move onto something better. I actually only use three brushes so I've made a little drawing where I only use one brush per character to show the differences:
Gonna put the screenshots of the brush settings below the cut cause it got longer than I expected:
I drew my three big faves cause frankly I am sick of looking at kallamar and narinder's smug faces lmaoooo ANYWAY. GOING FROM LEFT TO RIGHT, WE HAVE THE CHUNKY BRUSH. I use that brush for messily coloring things in, doing big blocky background shapes, or just adding texture to a drawing. It's my favorite brush to paint with but I have not....finished a painting for this blog yet...

Then for the crunchy brush, it's a tool I use half for lineart and half for coloring. I use it for stuff like changes in fur color/markings, drawing all the lines in the backgrounds I do, and finer details the chunky brush can't handle. It's also the lineart tool I use for my drawings where the lines are all on the inside of the chararacters but not the outside!
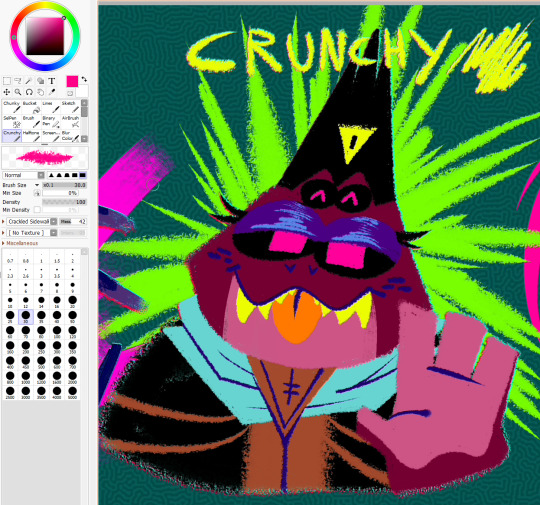
As for the smooth brush, this one only ever gets used for lines but it was created when I was so bored of my lineart tool I stopped drawing for a while. I wanted a calligraphy pen and had to work around SAI's limitations, so while it doesn't have that thin-thick angular effect that calligraphy pens have....I manually apply the pressure and it looks passable enough. I hope.
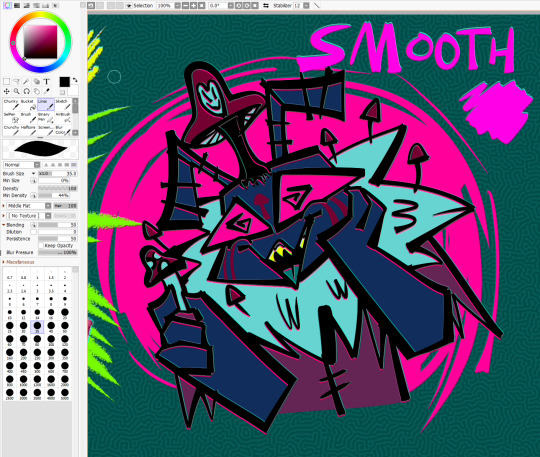
The brush settings are visible in the pics but uNFORTUNATELY I DO *NOT* remember where I got my stupid brush pack from. I literally downloaded the files before I was even a teenager but I *do* remember they're from deviantart. If anyone is for some reason kicking and screaming to acquire this ancient, crusty brush pack I'm sure I could throw it in a google drive
I have other useless information about my process if any of this is remotely helpful: for the anaglyph effect on my lines, I literally take a full 120 seconds to copy+paste two copies of my lineart, color it red and cyan, and then slightly move them up+down beneath the black lineart to get that 3dish effect. My flat backgrounds are just another sai preset texture, usually the checkerboard one cause it's swag. The rest of my brushes are just for utility or to fill in the gaps, that scroll bar leads to a bunch of empty space. They're not worth showing off just because they don't ever get used, or it's just like. The bucket tool. The select tool. A binary pen I never use. And lastly, for my usual lines, I actually go back and mess them up myself to get them to look more chaotic...my lines are usually smooth + even but it's so boring to look at and time consuming that I'm trying to unlearn that.
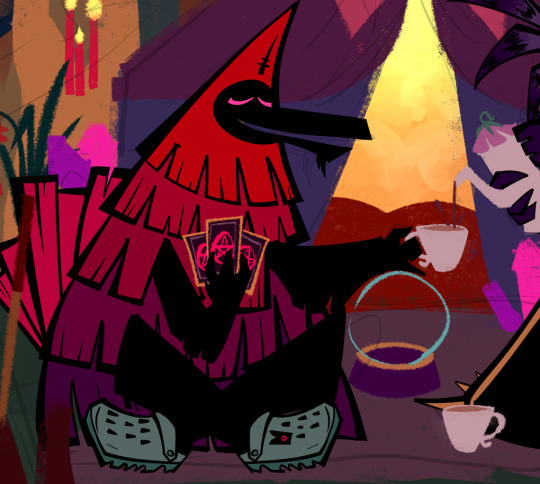
here's a wip of what my lines USUALLY look like with the smooth brush. You can see for the background I mostly used the chunky brush for shapes and then the crunchy brush for the finer lines! But yeah it takes forever to do smooth lines because I have nerve damage in my arm (it's why my stabilizer is maxed out...) and I refuse to use the line tool. In a professional setting I definitely make sure my lines are polished but this is just my goofy fanart blog and I want everything to look like it's been laced with crack.
I HOPE ANY OF THIS HELPS?? OR JUST SATES YOUR CURIOSITY, I try to not gatekeep the way I do my art so I have literally no secrets tbh
108 notes
·
View notes
Text
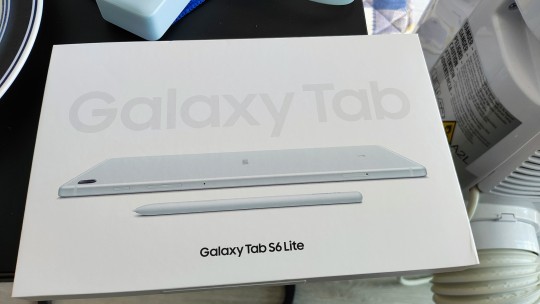
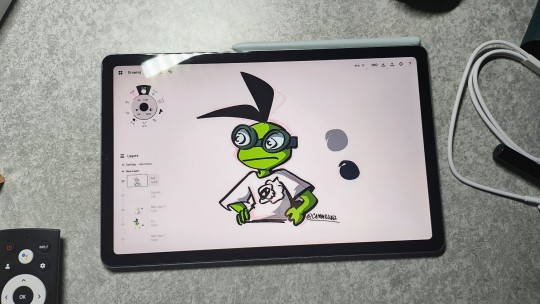
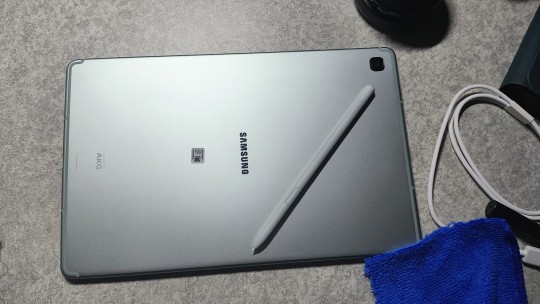
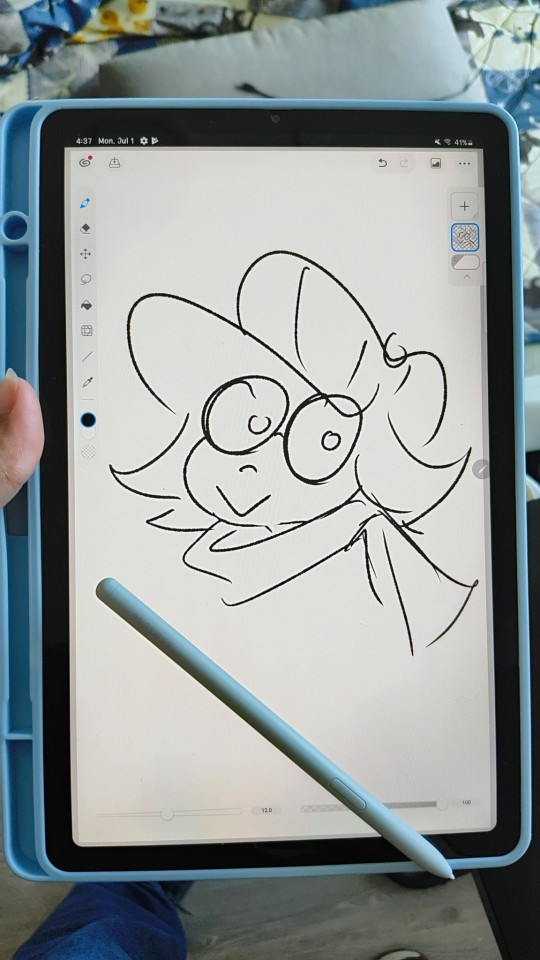
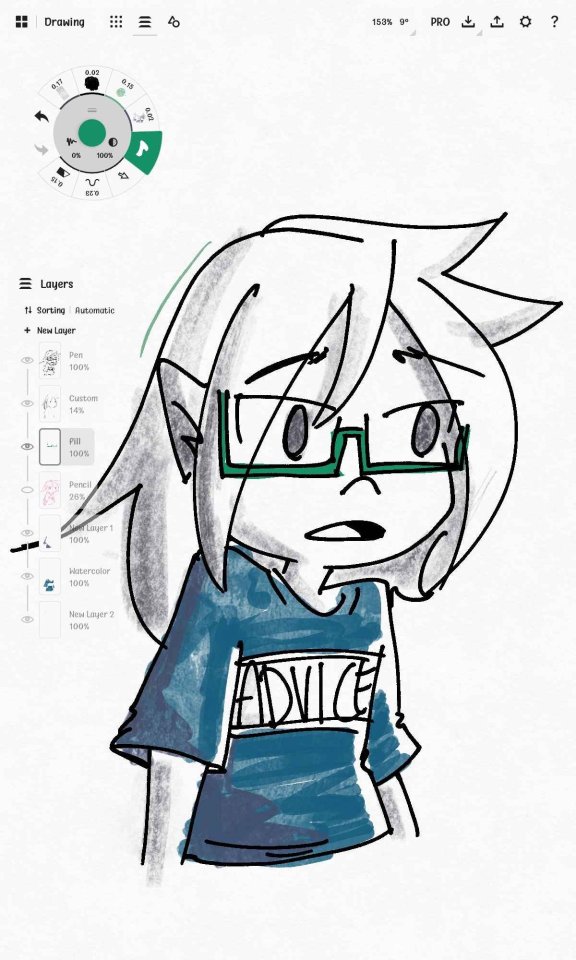

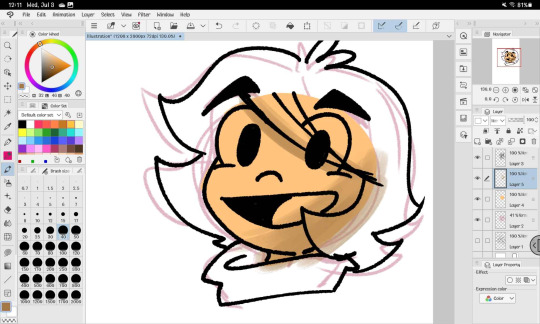
For maybe half a year, I wanted an Android tablet with a pen after hating the idea for almost a decade because Android's tablet ecosystem is garbage and it lacked good art software for a while.
Currently, there's a 2024 Galaxy S6 Lite refresh that's exclusive to Amazon at around $250, and I jumped on that to try out the Android artist space again.
Since I already have a tablet PC and an ipad to do my main art projects, I didn't need a high end android tablet. Just something I can take on my regular commutes for notes and doodles which the other two devices are too bulky for.
I can tell you though, that this is pretty slow. Takes a while to load anything, charges maybe half as fast as modern phones or tablets in the $500 range, and while Clip Studio ran fine for drawing, I've had slight lag using the Concepts App. I suspect you can't make print-resolution comics with this thing, but it draws, and i do all my media consumption on other devices anyway.
Another thing to note is that the pen (which is included, yay) looks exactly the same as the S-pens that come with the normal Galaxy S models (at least my S7 from a few years ago), but it's not as weighted because there's no bluetooth hardware inside. I'm drawing with it fine, though I do switch pens sometimes.

If anyone is interested, I can write a long info post one of these days about all the S-Pen alternatives I know of and tried. At first, I was gonna save up extra money to get the new XP-Pen android tablet, but I like the flexibility of Wacom-powered EMR pens where i can choose between things like comfortable grip or something that magnetically attaches to the device or something. It's also easier to get cute cases and screen protectors for samsungs since they've been around forever!

There's three versions of the S6 lite. The new one has a slight spec bump and runs Android 14, so it should last a few years (both the XP Pen and Huion Androids are permanently stuck on Android 12). I believe the 2020 version is still supported, upgradeable to Android 13 and the third version is the 2022 version. All three are exactly the same in size and features- they just have different processors and android versions out of the box.
Conclusion:
I won't call this a beginner's tablet. If you're a beginner artist who hates apple and wants a standalone drawing tablet, but you also happen to have $500-700 standing around, splurge in getting a better tablet. If you don't like it for drawing, it can still be used for media consumption.
I don't regret this purchase because it does what I need it to in the most basic sense, but I would only recommend it if your needs for an android drawing tablet are the same as mine (super casual art and being able to try out android versions of drawing apps), or you are on a super tight budget. I believe the Galaxy S9 FE and the XP-Pen Magic Drawing Pad are good mid-tier models while the normal Galaxy S9/Plus/Ultra are the high tier.
This is probably the cheapest EMR Android tablet that comes with a pen and oh boy does the pen write so smooth!
I wish i can retire from using an ipad for art, but I need to learn how to use Clip Studio first since I've become overly-dependent on Procreate.
ah well!
#samsung#samsung galaxy#tab s6 lite#thoughts#original characters#cammiluna's art stuff review#casual review
25 notes
·
View notes
Text
Tips and Tricks For Beginner Artists
I want to preface this by saying two things. Or maybe couple more.
One: This is my first ever blog post that I have written. There will be mistakes. I am still figuring out Tumblr Blogs. Deal with me. Thank you <3
Two: I am by no means a professional artist. I am still a student. I have been doing art for little over three years now and I am writing these to share my experiences as an artist that is self-taught. Also because I struggle with the mental aspect of art. I want to share and help people that are where I once was. I wish I had found somebody to give more personal, down to the bits advice to get me into the world of digital art. I am writing about what worked for me and how I did certain things. Enjoy.
(I am largely a digital artist. This is centered around digital mediums and methods. )
This blog post will be more helpful for people that are self-teaching and just starting art.
Regardless of why you want to do art, you need adequate tools to do it.
My first and current graphic tablet is One By Wacom in Small (ought to be replaced soon). I still use it and it serves just fine. It has no buttons on it, plain design. Wacom has excellent support and works smoothly. It was also a good budget decision. If you have a tablet that comes with a pen, work on that. Keep in mind, if you are intently buying a graphic pad or a tablet for purpose of art, buy something that you won't regret too much if art doesn't work out for you and it ends up collecting dust. It is easy to upgrade once your needs require it. Research what graphic tablets are out there and what would work best for you. There is a wild variety to choose from.
Now to the art program. Finding an art program to start on is not at all hard now. There are so many, each with its own quirk. I used Krita since forever. It is very professional, much like Photoshop but also easy for a beginner to grasp. And entirely free. Find an art program that you are comfortable in. Procreate, MediBang, Clip Studio Paint, Paint Tool SAI, Photoshop are only some of the choices.
Possibly in another post I will get more into Krita and how I use it as I am very fond of it.
Set Up Your Canvas
Here I am not going to go way too much into depth on this as it can vary greatly depending on what tools you use and what program but I want to stress the importance of having a workspace that works with you, not against you. Some of the best tips I have gotten for this are:
Set your canvas to a a medium gray color, somewhere in the middle of the gray value scale. Looking at a plain white canvas is daunting and quite inconvenient when you're starting off.
Pick your resolution. Usual choice is 300 dot per inch (DPI). Size of your canvas depends on your screen/machine/program. I usually go between 2000-2500 as my PC is past its prime and doesn't handle things well without sounding like a rocket about to take off. Research what your machine can do without lag.
I will give more advice on using brushes in another post but just going to say, using plain black color is usually bad idea. At least it was for me. It amplifies mistakes and leaves little room for fixing. Instead, try using a gray color somewhere between black and your canvas color. Medium value blue and red also work fine as sketch colors.
Start Comfortably
There is no point looking at all the masterpieces that ArtStation and Instagram has to offer and setting it as your short-term goal. A biggest downfall you can have is from starting too big.
Instead, focus of doing small things. Sketch a lot. Sketch basic shapes. And draw what you love. Art is a craft of heart, at least for me. Detaching yourself from that will make art will like a chore, a cold labor that you do not enjoy.
Ahem. Anyway.
One of the best exercises I have found is to just draw lines. This you can do on paper too as it is an excellent way to warm up. Try to make a straight line. Go not too fast nor slow. Make as many as you need until you get it straight. Do the same for circles. Make them as round as you can. Your hand is the biggest trickster. It does not cooperate with your mind as well as you want it to.
Sketch, sketch sketch, get yourself comfortable with it. Everyone does sketches, one way or another. Of course, you are free to try an entire piece but it can be very discouraging when it turns out nothing like you expected it to be.
I will make a post just on the ways you can practice as a beginner.
Find Inspiration
The biggest foe of artists is lack of inspiration and an artists block. I know it was mine. Finding inspiration is way easier when you are starting off as you often want to draw everything. There are plenty of places where you can get inspiration on what to draw. Pinterest in my all time favourite. You can also look at Instagram, ArtStation, your favourite shows, camera roll, world outside. Jot down what you want to draw when you get an idea and save it for later.
Find Artists You Love
This goes for everyone, but especially if you want to get into business of art. Having artists that inspire you and whose art you enjoy seeing is a must. It feeds your creativity and helps you develop your art style in the long run.
Don't compare yourself to other artists
Often, artists you see that get most views and likes have been in it for years. Do not go into art expecting that it will look perfect right away. Art takes time. A lot of it, often. Those artists whose works seem perfect have spent countless hours on sketches, studies, classes, lessons. Stressing over why your art is not good at the very start will not allow you to move on and better. Instead, appreciate and enjoy little what you created. Everyone's art journey is different and what matters is the road, not the destination
You don't have to be a natural
I never was exceptionally good at art growing up I did have an affinity for all things creative—I had passion for it, but my skills weren't out there. Majority of artists aren't naturals. In my opinion, passion and will is more important than natural skill set. Skills can be taught but without passion and will to learn, you won't get anywhere in art.
Your journey is unique
Everyone learns things at a different pace. What works for somebody, might not work for you. We all have different minds.. That is why everyone's art journey is so unique and interesting. When I started off, I was doing things exactly as I saw others do them and it resulted in frustrations because it wasn't turning out the way I imagined it would. Beginners are inclined towards this and that's alright. But it is important to realize that there is no law out there on how you have to learn the craft. Do it in a way that is most comfortable.
For example, I have quite an attention deficit. I cannot focus on a subject for longer than 15 minutes tops. So watching hour long lessons on Youtube or reading books on the subject didn't cut it for me. I either broke it up into smaller bits and only took what I needed in the moment or looked for compact, one-slide lessons, usually with examples, to tackle a subject. Rather than being told what to do, I needed to be shown how to do it. This might not be a good way for somebody, it really depends and comes down to you. You know yourself the best.
Now for the more practical tips
Outlining
This might be a controversial one out there, but I was never a strong believer in outlining. While it can be fun and it is helpful in beginning stages, it eventually stunts your growth. Instead of simply just outlining, look at how the things work and why does it look the way it does. Break down shapes and study them. Of course, there are instances where it does help to do it and I am not saying that you shouldn't do it, I just never did it. In my opinion, training your hand and mind to follow references is much better way to study and improve.
Use References
Do it. The best of artists use them or have used them for a large portion of their art journey. Do not see reference images as a cheat for artists. Drawing from mind is difficult and not something I would suggest to somebody starting off. Instead, find several references—for poses, shapes, color palette. The more references you have, more you will learn. I use Pinterest for this mostly. As I get can very easily distracted, I usually prepare them couple of hours in advance or a whole day before and store them so I can use them in the future whenever I need.
Don't just look at at the image and completely try to mirror it. Improvise. That's how you learn. Study it. Draw over the reference and then draw next to it. Do it as many times as you want and do it on several references. Sometimes it is enough to do reference thumbnails to effectively improve your art for the day.
Learn from Other Artists
I will make a special post on what artists I watched and learned from and how the self-teaching process looks for me. Regardless of how you study art (art school or not), it is important to find as many resources and sources as you can. Do not focus too much on narrowing it down to a specific thing. Look for lectures on basics that will prepare you for any course you might want to take, especially if you are self-taught.
Practice. Practice. Practice.
This advice I got from listening to my favourite art podcast from Adam Duff LUCIDPIXUL and it gives you this comparison.
If you spend a year reading fitness magazines but never go to the gym, are you going to get fit? No.
Try to make a routine and set the time when you are free to draw. More you do it, faster you will progress and develop your skill. No matter how bad it looks to you, just draw. You don't even have to complete it. Just sit down and put something on the canvas or paper. If it doesn't work, store it and move on. You learned something and will be better next time. It only looks bad if you didn't draw anything.
I hope this tips got to you and that you find them as helpful as I did. Happy drawing!
____________
I am a self-taught digital artist from Serbia. I hope to help people by sharing my art, process and advice that has and still is helping me.
#art#digitalart#artadvice#selftaughtartist#illustration#arthelp#arttips#tipsforbeginnerartists#artists on tumblr#artblog#artblr#digital artist#myartwork#artwork#drawing#digitaldrawing#digitalartprocess#artprocess#beginnertips#useful#reference#wacom#artcommunity#howtodraw#howtoart
7 notes
·
View notes
Text
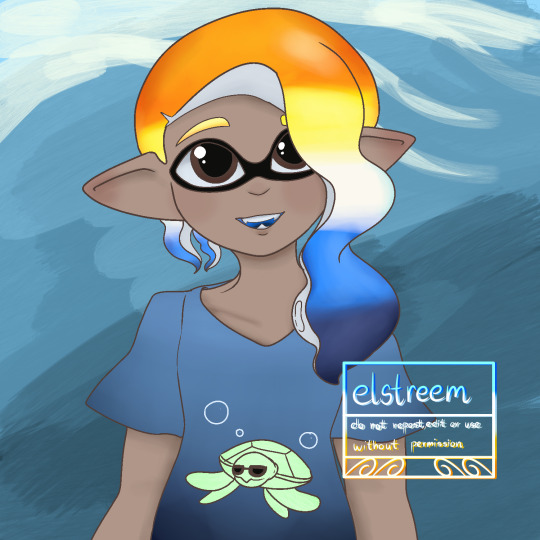
Aroace colors Inkling I made in Procreate for practice!
I've been trying to figure it out so I'm not making any good art to upload yet. This is the first thing I made that looks ok, and it's still pretty rough compared to what I usually do.
My experience working with an ipad below because wow that got long.
My dad got me an Ipad to replace my 2014 Samsung Galaxy because it's getting some battery issues but uh...I haven't used an Apple product in forever. It's been two weeks and using an ipad still feels like someone sawed off my hand and stapled it back on :') I think it's a combination of having to learn to use new hardware and software, but it's been so tough trying to make digital art on this thing.
I wish I could use Medibang since it's what I'm most used to, but for some reason the pen I'm using won't register pressure with Medibang, so I have to use Procreate. I changed the pressure settings to work with Procreate, but it's still weird and hardly works the way I want it to, so I'm not sure if it's something with the 3rd party pen I'm using, or something else. We did order a paperlike screen so hopefully that fixes some issues for me. I never had to use one for my Galaxy even though it had a glossy screen cover, but its stylus and the pen for Ipads have different tips and it's not easy using the pen to draw.
I had an easier time working with my wacom and CSP, but then again CSP and Medibang have similar layouts so it's not too difficult to adjust. Procreate is nice, but it's so different from what I'm used to that it feels like I'm arguing with someone just using its basic functions lol. I found the default brushes so difficult to use, too. My dumb monkey brain isn't flexible enough for this thing.
Kind of a rant, but it's just me complaining and it's a matter of my getting used to it. I did manage to make this, so hopefully I can consider Procreate as my next tool, But in the meantime, I still have my Galaxy and Medibang on it, so that's still where I'm mainly working. I reserve CSP for really big digital works or more complicated paintings since...it's a hassle setting up my pc and wacom tablet lol.
6 notes
·
View notes
Text
Tu... torial? Pt. 5.
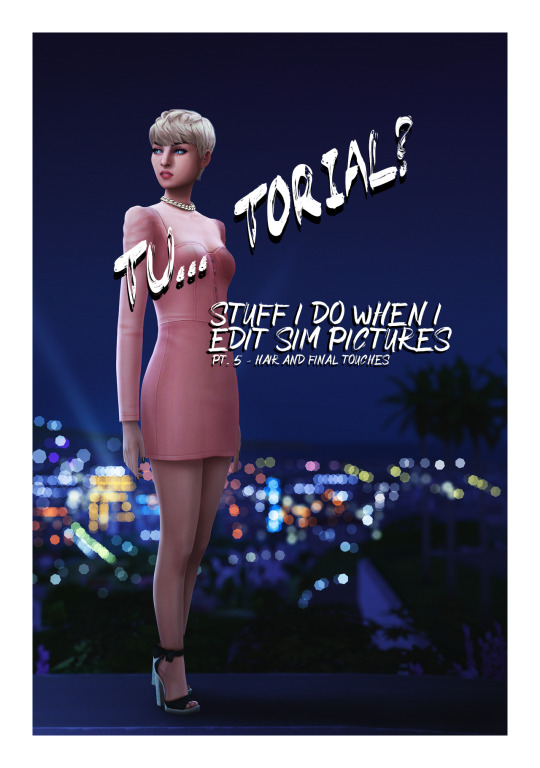
Final part of my tutorial! This is a little all over the place, because that’s how I am in this stage of editing. Also I didn’t proofread this...
Open this in dashboard for best view of the screenshots.
Disclaimer: I have no formal training for any kind of graphics stuff, I work in an office as a receptionist - I serve coffee for a living. I am absolutely self taught and while I consider myself pretty comfortable with photoshop, that doesn’t mean that there isn’t about a gazillion of other things that can be done that I have no idea about. There are people far superior than me in the Sims community. This is just how I do it, with techniques I have picked up through the years. Some things I go over in these will be pretty basic, some things a little more unorthodox. Disclaimer 2: My edits take time. This is what I do to relax, one edit takes several hours for me. Sometimes days :))) Disclaimer 3: My photoshop is in Swedish, which is my first language. I tried my best to find the English translations for every step that I do.
Tools used: The Sims 4, Adobe Photoshop 2020, One by Wacom Pen Tablet (very basic and unfancy).
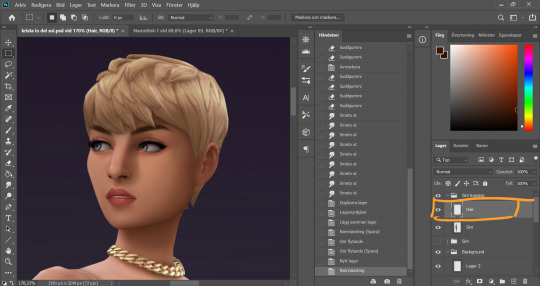
It´s hair time baby! I very much enjoy drawing hair on sims. I make a new empty layer on top of my base Sim layer.
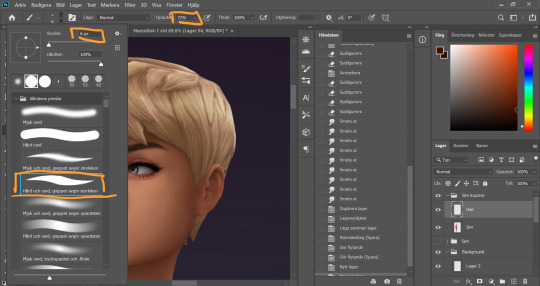
This is where having a drawing tablet makes a huge difference. We need the brush to be sensitive to pressure to get the effect of hair strands. I chose a hard brush, small small size (how small depends on the picture size of course, but I usually land somewhere 6-9 px)
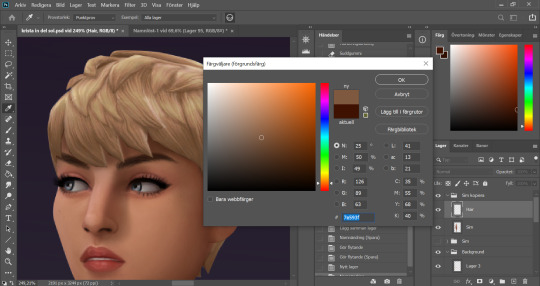
I pick up a color from the hair, I usually starts with a medium light color.
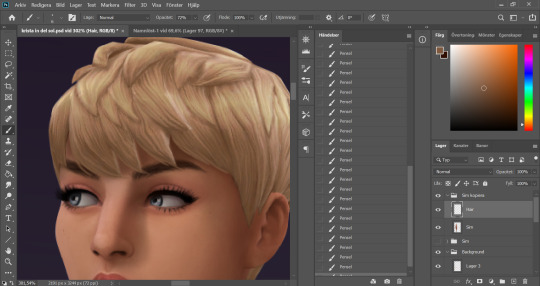
I start by drawing strands around any tips of the hair so they don't look quite so solid. I do this part with both short and long hairs. Hot lazy tip: straight unlayered hairs is the absolute easiest. This is a layered hair so I start with the bottom and work my way up. I pick up different colors from the hair as I go along, to add dept.
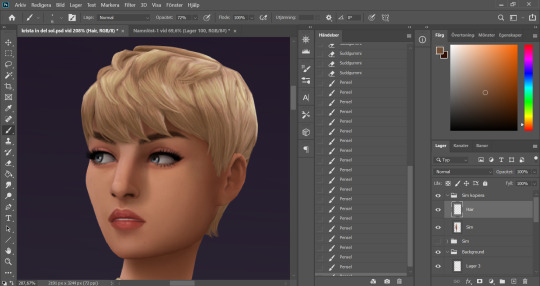
Continuing up in the hair and add strands to the pointy bits.
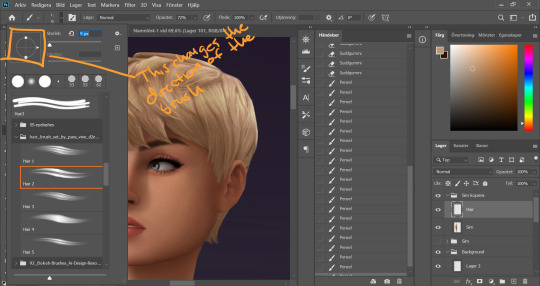
When I feel like the pointy bits have been softened I select one of my hair brushes. I use these ones by Para Vine.
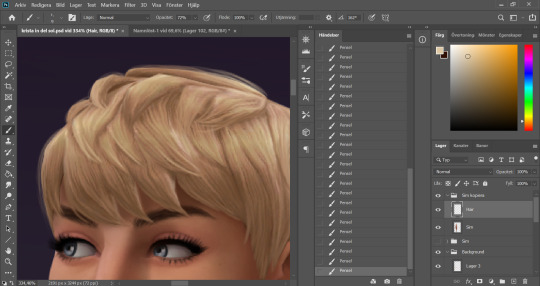
I start painting "around" the hair with one of the lighter colors picked up from the hair, changing the direction of the brush every once in a while for a more natural result.
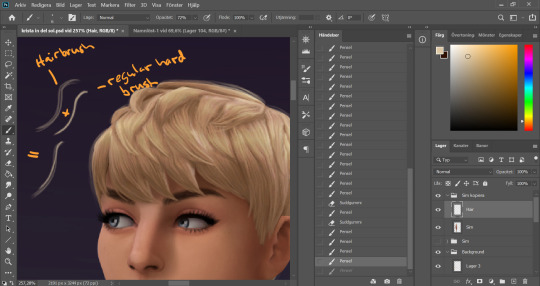
After this the hair is looking a little fuzzy, so I'm going to go back with my small harder brush to fill these parts out.
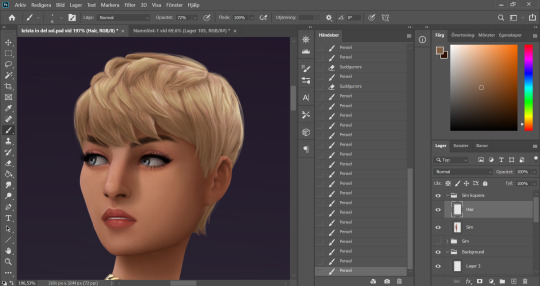
I don't add a lot of them, just small bits here and there for filling.
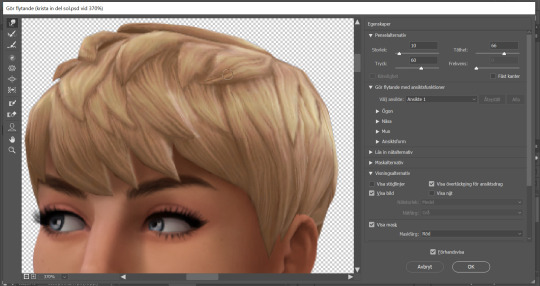
This is a little overkill but... now we have some of that "squary" thing going on in the hair as well that are still showing through our painted layer. Now we could paint over these, but painting can actually be overdone and I wan't to keep the hair recognizeable because the creator put a lot of work into it! So I go into liquify and smooth over any wonky lines still showing, just slightly.
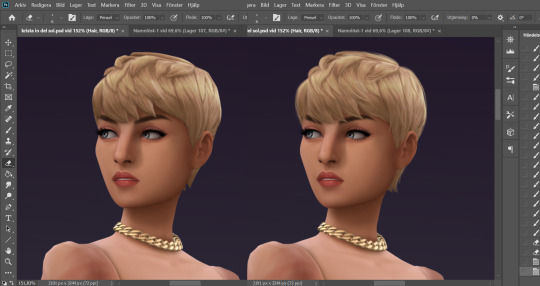
A comparison of before and after hair. Still recognizeable, but softer.
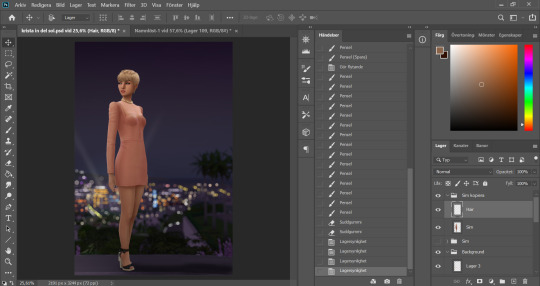
This is our result so far. We've come a long way, but we're not done.
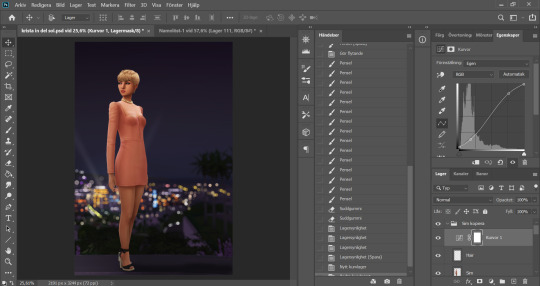
At this point (or actually sometimes sooner) I add an adjustment Curves layer, this will not end up in the finished image, this is just to give me an idea of what the image might look like with more contrast (which we will add later). I keep this at the very top of the layer panel and turn this on and off as I go. Very important to have it turned off if we are going to eyedrop a color and use that to paint, since it would pick up the wrong hue if we have it turned on.
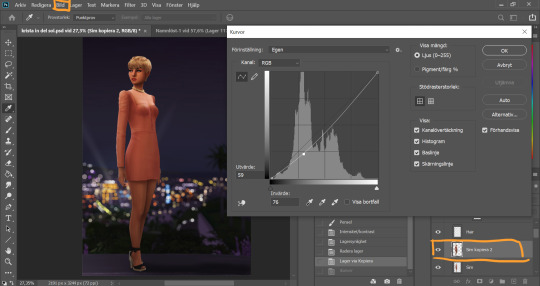
Now I still want the front of my sim to be a little darker to fit my lighting, but I don't want to go over with any more shadow. So I duplicate my Sim layer, and go to Layer -> Adjustments -> Curves. This will only change the active layer, as opposed to creating an adjustment layer down in the Layer panel that will change all layers below it. I drag the curve down a bit to make my new Sim layer darker.
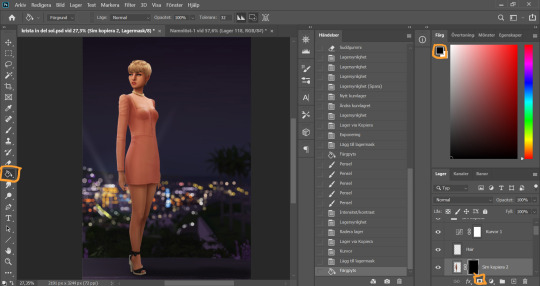
I add a layer mask to my new Sim layer, and bucket fill it with black color so the new layer gets hidden.
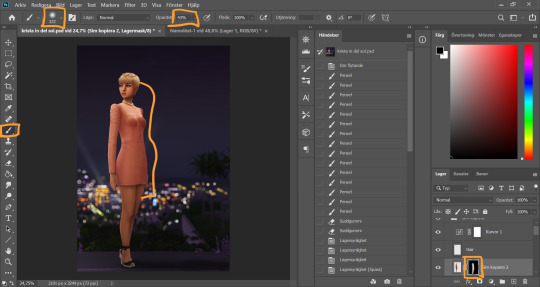
I chose an absolutely HUGE soft brush, with medium opacity, and starts painting white on the areas where I want the new darker layer to be showing. And blend by going back with black where the line is to harsh.
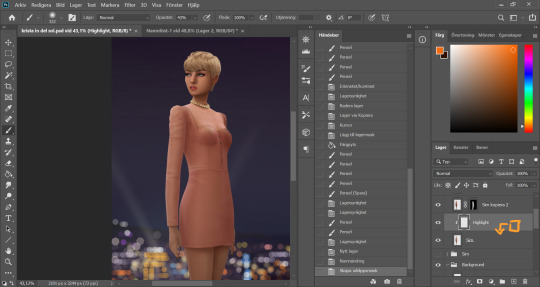
Time to add some highlights. I create a new empty layer between my two Sim layers, and add a clipping mask by holding Alt and hovering on the line between the new layer and my bottom sim layer, until the little square with the arrow symbol comes up and then click. This will make whatever I do on my new highlight layer, only show up on the areas where the layer underneath is filled.
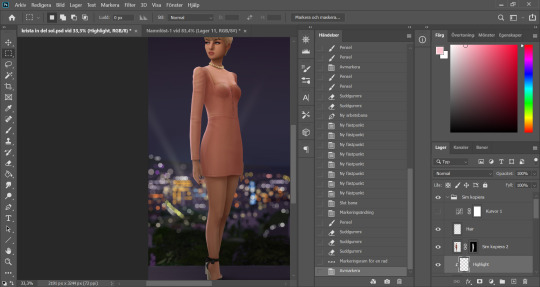
Time to paint. I disable the curve adjustment layer for this. I choose a bright color, in this case a light pink because I didn't want a contrasting color for this picture. I go with a big soft brush around the edges where I want my highlight to hit. In this case, the arm, the hand, the arch of the back and the calf. I didn't add anything to the face in this picture because I didn't like the way it looked, but usually a little highlight to one of the cheeks is just *chef's kiss*
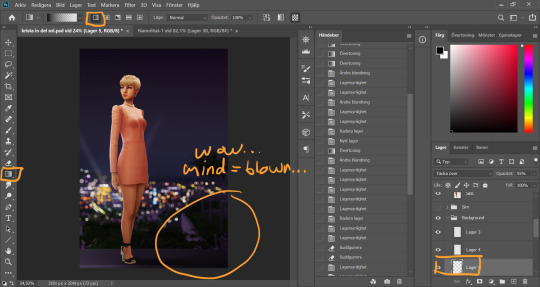
And somewhere around here I got really stuck and really struggled to follow with this tutorial. I felt the picture was lacking something and I tried several different things. I added light rays, tried creating different light sources, there was a moon at some point. But I ended up with just a simple additional gradient shadow down in the right corner (on a new layer down in the Background layer group). Life changing…
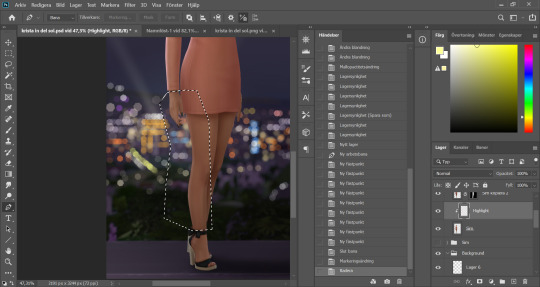
And then I didn't like the pink highlight on the skin (sigh, this is how I work, but it’s not recommended to be this indecisive) so I removed that and added a more beige-yellowee highlight instead. And forgot to take a picture after the highlight was added....
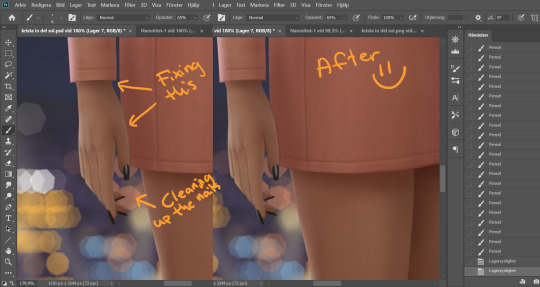
And now I go into nitpicking mode. I add a new empty layer on top of my Sim layer, I add it under the highlight layer so it automatically takes on the clipping mask of the Sim layer, I name it Clean-up Crew and go in to refine anything slightly wonky. Picking up colors with the eyedrop tool and going over flaws with a tiny brush.
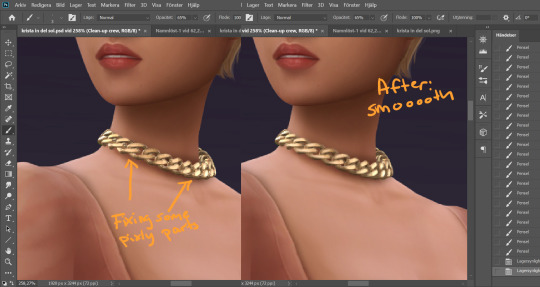
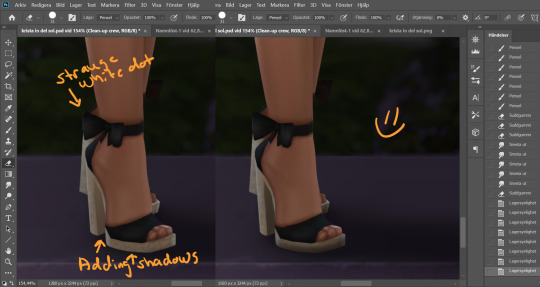
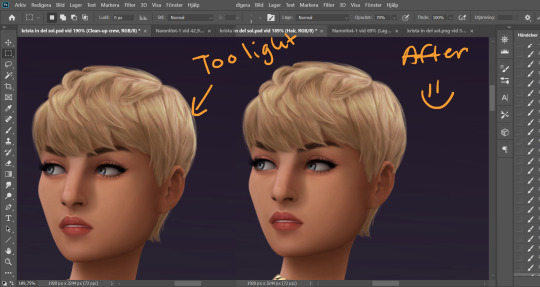
When I fixed this little light area on the back of her head I left the Clean-up Crew layer and went to my Hair layer instead, because I still have that separate and it's above all the other layers.
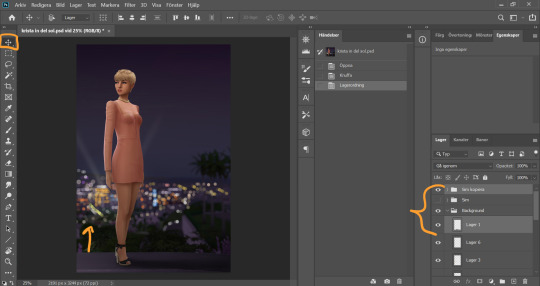
I thought my sim was a little too far down in the picture so I moved her up by selecting my whole Sim layer group and the layer on which I have her ground shadow, chosing the move tool and pushing them up. This will move all the layers in the Sim layer group as well as the ground shadow layer equally.
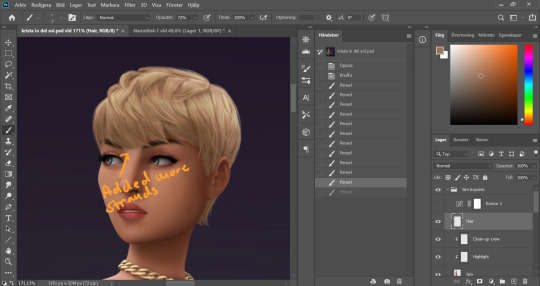
I'm telling y'all, nitpicking mode could go on forever. Added more strands to the bangs.
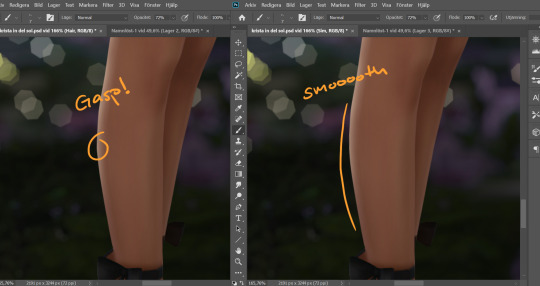
Noticed a little pointy part on the calf, so I wen't into Liquify on the base Sim layer and smoothed that out. Since the highlight layer has a Clipping Mask corresponding to the Sim layer, the highlight stayed in place.
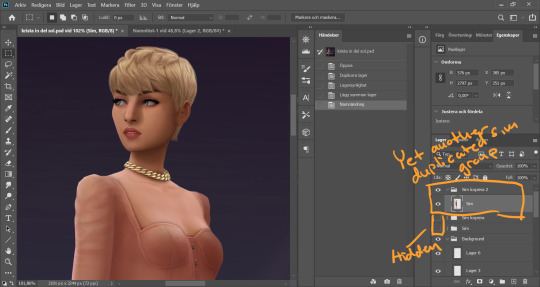
I duplicate my Sim layer group once more, and merge the layers within this group. So now the Hair, Highlight and Clean-up Crew is all merged onto the Sim layer. I hide the previous Sim groups.
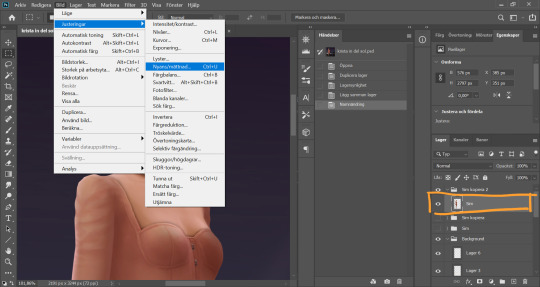
With my new Sim layer selected, I go to Image -> Adjustments -> Hue/Saturation. I want to make my Sim a little less bright so it will match the background a bit better.
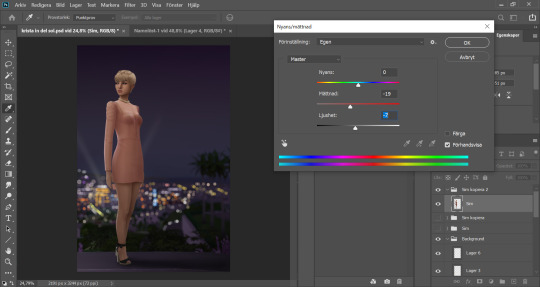
I drag down the Saturation and Brightness slider a bit until I like what I see. After this I save my whole image as a PNG-file because from now on I want to edit the whole picture but still want to keep this psd-file as it is for anxiety purposes. Important: I disable my curves layer before saving this as a picture, I don’t want that brought with me into the next steps because I will be adding new curves there.
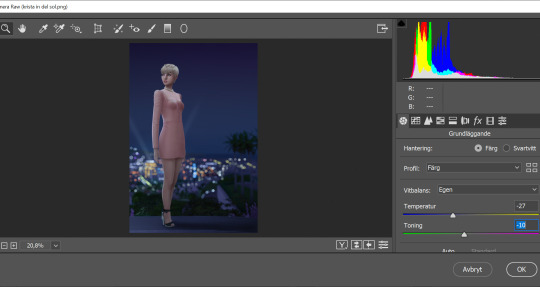
I open my new saved PNG-file. I go to Filter -> Convert for Smart filters. This will allow us to go back and change any filters we add to this layer. I go to Filter -> Camera Raw Filter and for some reason this window opens up humongus. I start by dragging down the temperature. How much depends on the picture, usually more if it's nighttime.
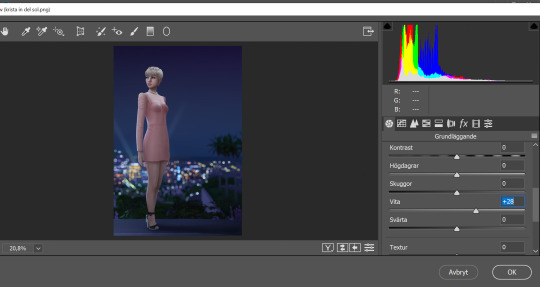
I pull up the Whites a bit for a cleaner look.
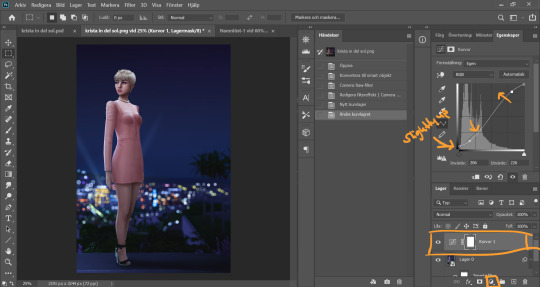
Now I add a Curve Adjustment Layer. Now you can add Contrast in the Camera Raw Filter as well, but I prefer the curve layer because I like to control the different levels. This way I can make my darkest parts a little brighter, giving just a little washed out flair to it all.
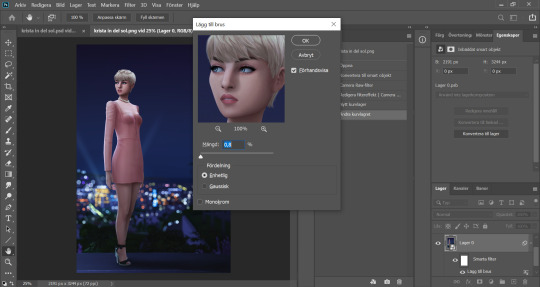
I select my background layer again and go to Filter -> Noise -> Add Noise and choose a level that I think looks good. This just brings the picture together a bit more. Also vintage vibes :)))
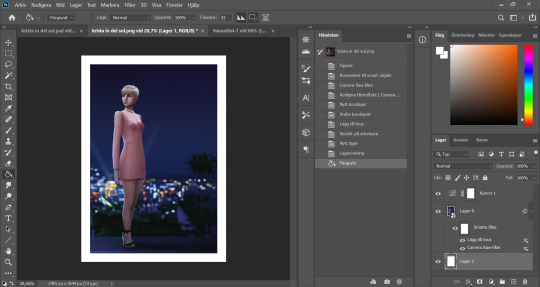
I add my frame (because it´s my aestethic and I think it looks cool on tumblr) by resizing my workspace and adding a filled white layer underneath the background layer.
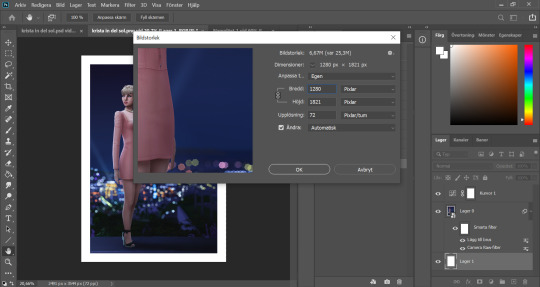
I resize my picture (Image -> Image Size) because we don't need it to be huge.
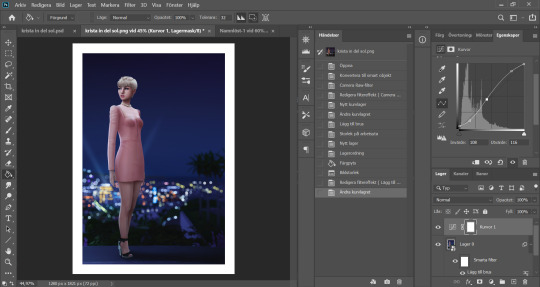
And they I just fine tune the Filters and Curves until the end of time :’)))
And that is that my friends! That’s the end of the tutorial! I hope you could follow somewheat and that someone found it useful. Thank you for reading and never be afraid of contacting me if you have any questions :) I’m very friendly.
65 notes
·
View notes
Photo
Want to be featured here? Head to this page and fill in the form!
See what this is about here, or if you’re using the app here.
What’s your fannish ID? bleedxblack on Ao3, bleedxblack-art on Tumblr. The username comes from the AFI song Bleed Black, off of the forever iconic album Sing The Sorrow!
What types of fanworks do you create? I create digital art and fic! To draw I use Photoshop and a 15 inch XP pen tablet, the most recent model they came out with. Because of its size it isn't very portable, so I carry around a Wacom intuos tablet for on the dog situations. I picked up writing fic when I was a preteen and kept it up until now (weird to say out loud) but my primary focus as of the last year has been digital art! I really love drawing digitally and all I can do with it. Using different style brushes like watercolor brushes, charcoal/clalk brushes, they all honestly feel like different mediums even though it's all digital! Always looking to branch out. When not making fanworks I have an Etsy shop where I sew & make over porcelain dolls to make them look like something out of a horror movie, among other things. I also do makeup art on myself and other people!
What are your favourite types of fanworks, when you’re not creating? I read tons of fic and have loads of fanart on my phone I love looking at for my own pleasure and for inspiration in my own work. On Ao3, some of my favorite authors are buckybleeds, Hyperthetical, SkinSlave, itallstartedwithdefenestration, MarleyMortis and howler32557038. Some of my favorite artists are @leehanji, @dorkbait, @pineapplebread, and @elkleggs!
What do you like in particular about this fandom? My favorite ship is hands down Matt/Frank, but I've on occasion enjoyed Matt/Frank/Foggy *cough* check out the devil and me by lemonandpie *cough*. Because of how dark the characters are in the comics and in their shows, a lot of fanworks feature more whump than other fandoms do and I LIVE for it. I also really enjoy the age/gender/interests demographic of Daredevil fans compared to other subsets of MCU fandom. Not shading anybody just something I've really liked!
Do you like participating in fan events? Yes! I love using them as an opportunity to connect with other fans and to get more exposure for my artwork from the event pages themselves. I've met so many cool people through bingos/bangs/exchanges and it's been awesome.
What about your creating process? I draw while I watch shows! Currently finishing up House of Cards, and most recently just binged the first two seasons of the Boys. Looking forward to season 3 a ton!
Do you interact a lot with other fans? I had a whole bunch of loyal commenters and readers on Wattpad back when I posted bandom content, a base of followers I built up over 6+ years. I've only just since quarantine started to really participate in online marvel fandom, even though I've been a fan myself since I was itty bitty. So suffice to say, I barely get any interaction on my artwork and get few comments on my fic. But regardless of that, it's super satisfying to make! And I've been trying to train myself to find value in the process of creating itself rather than just a quantifiable outcome at the end. If I could have it my way though, I'd definitely have more interaction since it feeds my soul and makes me so much more motivated to do my shit!
Do you have other fandoms you'd like to talk about? I'm big into Stucky and HTP (Hydra Trash Party), as well as some Supernatural and horror movies in general, classic or contemporary. The comics I'm the most into are around Batman, the Wolverine, The Walking Dead, and basically every winter soldier comic run that wasn't "bucky in space". Is there any particular piece you'd like to showcase for this post? I'm super proud of this painting! It was my first attempt at realism and my first fanart made on a digital tablet in the spring of this year. I've learned a ton since then but this is still a favorite. I'm super proud of how it turned out! https://bleedxblack-art.tumblr.com/post/659014600991309824/world-on-fire-daredevil-digital-painting Another one I'd share (explicit, so proceed with caution) is this collaboration piece with @mxaether featuring Frank Castle & Bucky Barnes. Super happy with how this one ended up too! I've got a thing for red and black color pallets, if you couldn't tell, ha.
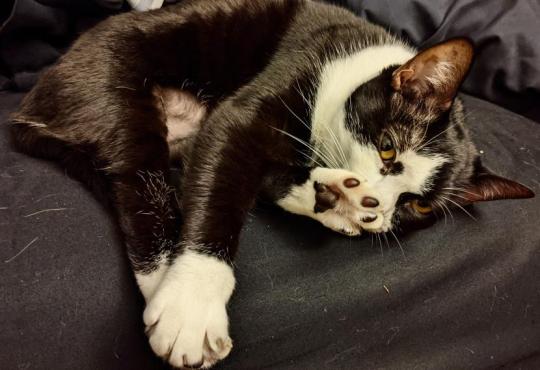
Is there anything else you want to tell us about yourself? I'm a proud, proud father to two adorable cats [pic below]. And I strongly believe they should be featured in this post at least once.
Where can your fanworks be found? http://bleedxblack-art.tumblr.com https://archiveofourown.org/users/bleedxblack
Thank you, @bleedxblack-art !
banner by @context-is-for-kingpins !
[ID on a white background, four black triangles that look like spotlights from above. Each illuminates one of the Defenders silhouetted in white: Jessica, Luke, Danny, Matt. A hand on the left is holding a pen writing the words Content Creator Spotlight. There is a little Punisher skull on the pen. End ID]
#Daredevil#marvel#Matt Murdock#frank castle#foggy nelson#fratt#the punisher#mattfoggy#punisher#Content Creator Spotlight
10 notes
·
View notes
Note
Hi, Love your art btw... But can i ask you somethin? What kind of drawing tablet you use? With screen or without? If so, What brand?
Hellooo Anon! Thank you for the kinds words--IDK when you sent this but I figured I’d answer it!
Curreeently I use a Cintiq 16! (By Wacom of course)

I actually won it for taking one of the second place spots in CELSYS CLIPSTUDIO International Comic Contest for my short story HeARTfelt! (Forgive me, I just wanted to brag a little...)
https://www.csp-web.net/promotion/comiccontest/result/en/index.html
I really like drawing with the screen because it’s just a tiny tiny bit faster for me!
Bbbuuuutttt for years before that I used a dinky little Bamboo Wacom Tablet!

It’s hard to find the original one I used nowadays, but know it was small--had around 5 inches of working area--and lasted for a really long time! I had replace the pen and the wires but the tablet worked for my whole high school and college career--I only had to replaced it when all my stuff got stolen!
I actually only really started using a Cintiq consistently around this time last year--I used to use my college’s cintiqs but Obviously since graduating I can’t do that anymore lol.
I assume you’re probably looking to buy a tablet anon-chan and I gotta say it’s worth it to splurge/save up on a wacom brand tablet, they really do last for forever--I’ve tried cheaper brands and they usually pooped out on me pretty quick. As long as you take care of them (And don’t smoosh the wires and tear them and throw your pen on the ground..Like I do...) they’ll work fine--plus they’re very modular, so if something break (Like, yanno, the wires or pen...) you can usually just replace that component rather than buying a whole new thing!
They can get as cheap as $100 for a small one so--yeah! My two cents--I’m sure there are other brands folks would swear by but just from my experience there’s a reason why Wacom is the leading brand in this stuff!
SORRY THIS GOT SO LONG I LIKE TO TALK...............................................
88 notes
·
View notes
Note
what art tablet / programs would u rec for someone who is only Vaguely familiar with art tablets but wants to get more into digital? :0 I was thinking about getting an ipad and using procreate, since it seems like one of my cheapest and easiest options, and it's about as close to an affordable display tablet that I can find rn lmao .. but I also wanted to see ur opinion bc I have such high respect for u as an artist I look at ur art everyday and am filled with wonder and joy
hi !! so sry it took me forever to respond ! i guess it all depends on what you're looking for in a pen display tablet. i think the ipad (or any related tablet device) would be reasonable for someone who's looking for dual-purpose // something that isn't just an interactive screen monitor. as in, if you're in school or looking for something useful outside of art, that might be more "cost effective" in the long run
however, if you're okay with investing in something that acts strictly as a screen monitor / drawing tablet , i recommend looking into some XP-PEN or Huion tablets. these can pretty costly on their own (given that they only function as a drawing tablet / second monitor), but are pretty good alternatives to the unnecessarily expensive wacom/cintiqs (which range in the thousands :/)
here are some links that you can check out jic
XP-PEN Artist-Display 12 Drawing Tablet ($200) (and other XP-PEN Artist Display tablets)
Huion Kamvas 12 ($219) , Huion Kamvas 13 ($240) , (and other Huion Pen Display tablets)
and while i know you mentioned display tablets in particular, i still think non-display tablets can be really good tools . they're a bit harder to grow accustomed to imo, but they're wayyy way way more affordable; usually in the sub hundred range (they average around $60 from what ive seen).
Huion pen tablets are ranged $25-150, XP-PEN from $26-100s, Monoprice ($50+), GAOMON ($60+), and even some Wacom intuos from $75+ . ofc these aren't the only manufacturers out there && i'm sure you can save on cost if you buy them used or second-hand
overall, i'm not too confident with my knowledge on tablets to give u a direct answer, but hopefully that's something worth considering ! i don't own an ipad and don't think i would buy one in the future since i enjoy the specificity of drawing tablets (conformation, pen pressure, etc) BUT if you're looking into it, don't let me dissuade you either AHHA
ive only ever used two different types of tablets, both of which are now discontinued . the wacom bamboo capture ( ~$40 non-display pen tablet; precursor to the intuos i think) and the huion gt-190, which is like a $300 pen-display . i can def go into more detail about either of these / my experiences with them if you'd like, but i still use both of them today if that's any consolation !!
i hope that helps a little bit :-( if anyone else has any recs or advice to offer, feel free to leave a msg
#and thank u abt the sweet comment omgg omgg thats so nice of u#good luck !!#also another thing to consider would be the price of procreate + the ipad apple pen . idk if those are a bundle / cost extra#or are included but jic !!#the tablets above come w their pens & cords and you can usually find art programs for free or for pretty cheap#ex: cracked vers of sai / ibis paint (free i think?) or clip studio when its on sale for like $25 (one time purchase)#these do need to be connected to a laptop or smth with usb output while an ipad can function on its own#pen computers are the ones that can function independently i believe. not pen tablets or pen displays#asktag#anonymous
8 notes
·
View notes
Note
Ive been following you since forever and it always amazes me to see how much your art is improved and how it continues to do so. Now, I dont know shit about drawing but do you have advice for someone who wants to get into it and learn? Tips for beginners, thanks and luv u
This message means so much to me? Thank you so much for sticking by my side, even as I develop my skills and grow as an artist. Now advice for a new artist? I have a lot. I hope that’s okay.
Firstly, I’d say that if you have even the slightest desire to start drawing -- GO FOR IT. It’s never too late to try something new, and life is too short to not pursue something you’re interested in simply because you think it’s “too late”. It is NOT too late.
Secondly? Learning how to draw isn’t something you’re gonna achieve overnight. You can’t give up after six weeks of drawing. If you gave up six weeks in, you would’ve barely even scratched the surface of your artistic potential. In fact, I personally believe there is NO such thing as the “perfect” artist. If an artist became absolutely perfect at their craft, then there would no longer be any point in drawing after that. You draw to create, and to create is to learn, and to learn is to discover new things about the world. Therefore, with every drawing you make, you are immediately learning something new about the world and how it visually presents itself. You’re gonna be learning new things about art -- and by extension, the world around you -- until the day you die, and I think that’s what makes art so amazing.
Thirdly, don’t be afraid to use references. References are there so that you can build the muscle memory required to draw something without a reference later. It’s the same with music -- you can’t play a song from memory unless you’ve memorized the sheet music first. So? You can’t draw something from memory unless you’ve memorized the structure of that thing first. This ALSO isn’t gonna happen over night. I didn’t figure out how to draw hands just by looking at a hand once and then never googling a hand again -- I had to practice. Hell, I’m still practicing. I will ALWAYS BE PRACTICING. I’m pretty sure my roommate hates me because every time I can’t figure out a pose I yell at him to pose for me and I take a picture of him or I stare at his leg for 15 minutes.
Fourth -- and this is sort of tied to three -- I highly recommend collecting photos and making pinterest boards of things from the world that inspire you. Collect photos of people, places, cities, buildings, signs, food, clothes, shoes, skies, color schemes, bedrooms, kitchen layouts, furniture you think is neato, cars, photos of fucking ANIMALS -- basically? Collect what you love about the world so that you can incorporate it into your art.
Fifth, you don’t need a ton of fancy materials, and if there is a material that you really enjoy using? a ballpoint pen? a number two pencil? Then use it. Hone your ability with that material to the point that you’re so confident in it that it allows you to expand to other materials with that material as a base. Explore what you’re comfortable with. I know that right now digital art is all the rage, but sometimes it’s not for everyone, and sometimes it isn’t financially available to people. That is OKAY. And? If you want to try digital art? You don’t need a big fancy wacom or an ipad pro. I didn’t start out my art career with an ipad all slammin and ready?? I actually started my art career on a Lenovo Thinkpad 2, and it carried me with my digital art all the way through highschool. You can get one refurbished for like a hundred bucks. (Granted there are some steps required to make it work for digital art, but it IS an option!!)
Anyway, this was longer than I intended? Regardless, good luck and please try art. Art is amazing, and I definitely believe it’s for everyone. :)
114 notes
·
View notes
Text
In anticipation of an upcoming payday I decided it was time to treat myself to something: a drawing tablet.
I’ve had a shitty Wacom tablet for awhile now, but it was one of those draw-on-the-tablet-while-you’re-looking-at-the-screen types, and while I’ve got pretty decent hand-eye coordination, those things just do. not. work. for me. I can use them, but it takes me four times as long as it should as I constantly draw, erase, draw, erase, draw erase every single fucking line when they invariably go astray.
Can you tell they frustrate me a little?
For awhile I was getting by with my old iPad, but it was going on ten years old and constantly crashing, so that was no longer a viable option.
Doing digital commissions has been taking me forever because I can’t do quick linework, and digital commissions have always been a good source of a quick pocket cash for me sooooo here we were.
I did my research, found a pen-to-canvas style tablet that I thought was reasonable and had good reviews, and ordered it. It was here when we got home tonight.
It took a little bit to get it up and running, and I had it up just long enough to knock this out:
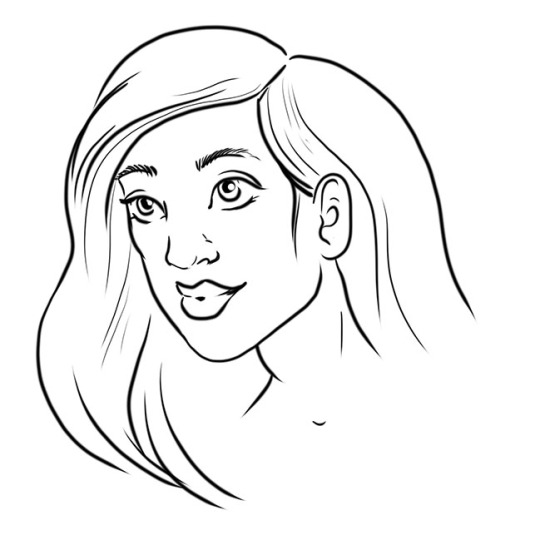
So just a quick doodle. I’m still getting used to the feel and the delay, but I dig it so far. I’m looking forward to playing around with it some more, and especially to being able to more digital work without having to jump through the exhausting hoops of: pencil work, ink the pencils, scan the inks, clean up the artifacts from the scan while hopefully preserving my inks... and that’s not even approaching color.
Like, for awhile there I was just taking cell phone snapshots of my pencils because I’m like, “I cannot be fucked to do all that shit, I just want to post this online somewhere.”
I actually have a commission I neeeeeed to work on... ugh. Maybe I’ll try to knock that out tonight. One thing I know for sure: my current desktop setup is NOT going to work. I’ve got a laptop, external monitor, mouse, and now a gigantic fucking drawing tablet all crowded on two tiny little uneven desks. It only works if I put the tablet directly in front of the laptop, and then I can’t access the keyoard, and there’s nowhere to manipulate the mouse, so... yeah, not gonna work.
I’m hoping for a nice, quiet, rainy Sunday so I can spend some time reorganizing the workspace and maybe working out another solution.
For now, I guess I’d better stop putting off that commission. :/
2 notes
·
View notes
Note
i have the Vergil motivation to start doing digital drawing. But its kinda intimidating. I mean I've always done things traditionally and I do know how to make designs on Adobe software but not drawing. I was wondering if you have a software that you prefer or would recommend; or just tips in general.
Hello anon! how are you doing? :D
Thank you for asking, I’m not en expert, but I’ll try to help you as much as possible :D. Also, bear in mind that english is not my mother tongue, so there may be some mistakes (ans I’m also a idiot who types really fast without re-reading xDD).
First of all, I assume that you own a graphic tablet, this tool is essentioal for digital art, as they have pen pressure and helps a lot to create unique effects! The brands I’ve seen people recommending the most latelly are Wacom and Huion. I can only give you my opinion about the first one though, I’ve owned a Wacom Intuos 4 for over 6 years and it has never failed me ♥ not even when I accidentally threw the pen inside my tea xD.
Now, speaking about software, I have tried 3: Paint Tool Sai (1 and 2), Clip Studio Paint and Photoshop. Each one has their pros and cons, and you also have to bear in mind what your computer can handle.
1. Paint Tool Sai:
This is the one that I use and like the most, the interface it’s quite simple and the only thing that may cause you trouble may be the brushes settings, but once you have created you own ones, the only preset you’d probably need to change is density.
This software comes with a pen stabilizer, which is very handy if you do linework, I always set mine to S-3 so it’s easier to get more accurate and less “crispy” lines, you may also notice that the pressure works a bit different, like it’s a bit more sharp.
For colouring I always set my flats with selections and the bucket tools, and then I add layers for shadows ans highlights. I always start with flat shadows and blend them using both the Brush and the Water tool. I may share my brushes presets for Sai 2 if you like. This software also includes a “transparent” color, which is really useful when you need to fix some blended areas or softly remove part of the colour.
I have used bot Paint Tool Sai 1 and Paint Tool Sai 2, I have noticed that in the second version brushes work a bit different, specially when it comes to using the transparent color. But Sai 2 comes with many enhacements which makes it more enjoyable, thing such as:
Elipse Rulers
Linear Rulers
Perspective Rulers (they work wonders even if you know 0 about perspective)
Text
Shapes
Gradients
Better compatibility with Photoshop’s layers
It seems that Sai 2 is going to be on Beta forever, but you can still download (illegally, lol) and use it, It’s my fave one, so I really recommend this one.
If you want to see more about its interface, I highly recommend you to take a look to my youtube channel, I tend to upload there some of my drawings speedpaints, I hope they can help you to understand hot it works.
2. Clip Studio Paint
I haven’t used this one that much, I only made my first V drawing with it, as well as some headshots for practicing.
This also comes with a pen stabilizer, but I noticed it didn’t worked the same way as Sai’s, it took me a while to get a level of hardness that I liked. The good thing is that it comes with a wide variety of pens, and I really recommend G-pen when it comes to making linearts, it has a nice and sharp finishing.
It also comes with poseable 3D models to use as references, I don’t really like to use them as they have anime-ish proportions and such, but some people may find them handy I guess. CSP also has a wide variety of resources such as premade images (grass, dust, floers, manga panels, halftones…) so this one may be a good option if you also plan to create comics and such.
If you are going for the paid version, you also get access to a marketplace in which people uploads their resources, and you may find some interesting ones there for free.
CSP also has rulers and perspective tools as far as I remember, but I haven’t tried the new ones (this software used to be called Manga Studio, and that was the first time I used it xD).
You can see me struggling with it in this video.
3. Photoshop
I think this is the one that everyone knows the most, right? xD. Though the use of Photoshop has been widely spreaded, we have to keep in mind that this software is very heavy to handle for some cumputers, you’ll probably need over 8GB of RAM memory (I have 16 GB and it still crashes some times) to make it run “properly”. I am isung CC 2015, since I don’t have enough space in my HD for CC 2019, and I would probably need an SSD to make it work smoothly.
I find it really difficult to do linework with Photoshop, it doesn’t have a pen stabilizer (unless you pay for the lazy nezumi plug-in), so the pen usualy “slips” more, I don’t really know how to call this, but I don’t like the feeling I get when I do linework with it. On the other hand, I find it really funny to sketch with it, don’t ask me why xD.
When it comes to colouting, you have to find the brushes that appeal to your style the most, and it’s also really easy to make your own, you can also make patterns and such. Bad thing that you have to use the sampler a lot, in the end you have to use 3465654 tools to blend properly in photoshop, when in either Sai or CSP you only need two, and this is depending on your style.
I have seen many people doing wonders with realist style in PS (you may take a look to @i-have-no-name-v‘s works, they are awesome!) though!
Other thing I don’t like about PS is their color wheel…It works totally different to Sai’s or CSP’s, and most of the times I find it hard to pick the tone I really need. You may also need a plug in tho swap your color wheel too.
I like to use Photoshop when it comes to adding effects to a drawing, be it lightin, particles, color corrections, etc. It’s very handy for this, and it’s also a good thing that both Sai and CSP allow you to save in .psd format.
I hope this long post has been helpful to you or to anyone that needs it, as I said, I have no problem in sharing my Sai 2 brushes presets if you want, you can either reply here or send me another ask ;D
8 notes
·
View notes
Note
for the meme: body pillow with normal sheet and not anime, joypad for desktop, wacom tablet, prayer rug, betadine
An adventure game’s inventory, inspired by prokopetz’s writing prompt. Send me five items near your, and I’ll write you backpack adventurer’s inventory later today!
Body pillow (with a normal sheet not anime) - A long, soft pillow perfect for when your full body is tired, not just your head. If this weren’t an adventure game, it would look quite comical sticking out of your pocket.
Joypad for desktop - A computer compatible controller, perfect for a more user friendly gaming experience. Exactly what you need for intense games such as text-based backpack adventures.
Wacom tablet - A digital device used to draw on a computer. By using the compatible pen you- wait, fuck, where did that pen go??
Prayer rug - A small, rectangular, and brightly patterned rug used for prayer. Beautiful and portable, for which your overflowing pockets thank you for.
Betadine - A disinfectant for minor cuts. Why does it always seem to hurt worse than the original wound?
>USE body pillow (with a normal sheet not anime) ON joypad This is no time to get comfy in front of a game!
>USE body pillow (with a normal sheet not anime) ON Wacom tablet A few more hours of work and a small manufacturing fee, and soon your body pillow (with a normal sheet not anime) will be able to evolve into body pillow (with an anime sheet) and you will forever have your waifu at your side.
>USE body pillow (with a normal sheet not anime) ON prayer rug You lay the pillow on top of the prayer rug. You curl up on top of the prayer rug and the pillow. Sleep until morning YES/NO?
>USE body pillow (with a normal sheet not anime) ON betadine You tear the pillow case into strips and dip them in betadine. You now have somewhat disinfected bandage strips.
>USE joypad ON Wacom tablet If only you’d been able to fit your desktop computer in your pockets.
>USE joypad ON prayer rug This prayer rug, a continuation of an ancient, religious practice that has been performed for centuries, does not seem to support USB.
>USE joypad ON betadine Just what you need after how badly you got burned in that last match.
>USE Wacom tablet ON prayer rug You begin to place your Wacom tablet on the rug until you realize it will be stepped on, probably by yourself, in approximately two and a half minutes. Better not.
>USE Wacom tablet ON betadine You’ve disinfected the Wacom tablet. Surely this can’t hurt your artistic endeavours…
>USE prayer rug ON betadine I’m not sure this is what they mean when they talk about religious purification.
#thanks yarra!#this is exactly what i need to relax after the work day i had!#yarrayora#thoughts#adventure game writing prompt#vg#i hope i didn't say anything insensitive or inappropriate when goofing with the prayer rug but let me know if i slipped up at all#bene speaks
12 notes
·
View notes
Text
Q and A!
What drawing program do you use?
I used to use Autodesk Sketchbook, but thanks to one of my friends, I now have Paint Tool Sai. Autodesk Sketchbook is pretty good, but it doesn’t have nearly as much stuff that you can work with that Paint Tool Sai does.
What drawing tablet do you use?
I have a Wacom Intuos small touch tablet. I got it a few years ago on my birthday, and I love using it, it works really well for me.
What supplies do you use for traditional art?
I use really cheap supplies. I do have Copic, Prismacolor, and Ohuhu markers, but I seldom use them because I don’t want them to dry up really fast (if that makes any sense?) But what I primarily use is Prang Watercolors (pack of 16, you can get them at Michael’s for pretty cheap,) some liner pens (I have a mix of Faber-Castell, and Micron,) and just some average pencils and stuff.
Will you make more animatics?
I will try to, I’ll most likely be able to do a lot more stuff during the summer, when I’m not in school, so you will have something to look forward to. But yes, I do plan on making more animatics in the future.
Can you make a tutorial on how you make your art?
I might?? I mean, I don’t have a proper camera, and I got a computer for my birthday, but I don’t have an editing program (and I can’t afford one either) so the odds are that I will, but it’s going to take a while. If you mean for digital art, again, I need to find proper editing software, and I need to figure out how to record my screen.
What other fandoms are you in?
Way too many, really. I like the musicals (Heathers, Hamilton, Be More Chill and Dear Evan Hansen,) I love Gotham, I love anime, I love Stranger Things, I love certain Youtubers (read the description on my blog to know which ones!!). So yeah, I am in a lot of fandoms.
Will you try doing any art challenges?
Maybe?? I try to steer away from art challenges, mainly because I’m worried that either my art will turn out bad, or I just won’t commit to it. But, I can try to do some.
What other artists do you take inspiration from?
A lot. I mainly watch Tamaytka’s videos to get some inspiration on how she does her art, but I also watch ABDIllustrates, cryptidsp00n, a lot of other artists whose usernames I can’t spell at the moment. I kinda will watch whatever artists I can find, just to see how they make their art so good.
Do you have any sideblogs?
Yes, but I stopped using both, mainly because I realized that making a sideblog for every fandom I’m in does not do me any good, and I’d rather keep everything on this blog.
Do you prefer digital art, or traditional art?
I love both, honestly. With traditional art, I like seeing the paint go on the paper, I love mixing colors, I love just the overall aesthetic part of traditional art. But with digital art, there’s a lot more stuff you can do, you can add effects to your art, you can make it look prettier, you can do a lot. So yeah, I love traditional art, but I also love digital art.
Do you ever get art block?
I really don’t know, I think the last time I was in a severe art block was like....2017. That year sucked for me, just because I couldn’t figure out what I wanted to draw, and I was constantly bored with my art. Now, I occasionally get frustrated, but as long as I have something I want to draw, I usually am not in an art block, and there’s a lot of things I like to draw.
Do you like pineapple on pizza?
Ah yes, the great controversial question. I am so sorry, but no, I don’t like pineapple on pizza. It has nothing to do with the fact that it’s pineapple, because I love pineapple by itself, but more of the fact of how it tastes. I don’t know, I just never really liked pineapple on pizza, and I apologize to the probably millions of people that I just offended. If it helps any, I like black licorice, and I’m basically the only one in my entire family who does.
Does a straw have one hole or two?
Yes.
Favorite color?
Purple. I’ve loved purple since forever, hell my room is painted purple. I like all shades of purple, I like the light, pastel purple, and the dark, mysterious purple. I just like how it looks, and I think it’s sorta fitting to my personality. xD
And that’s the Q and A!! Hopefully you all feel like you know a little more about me, I tried to answer good. Uhm, bye!
1 note
·
View note
Photo
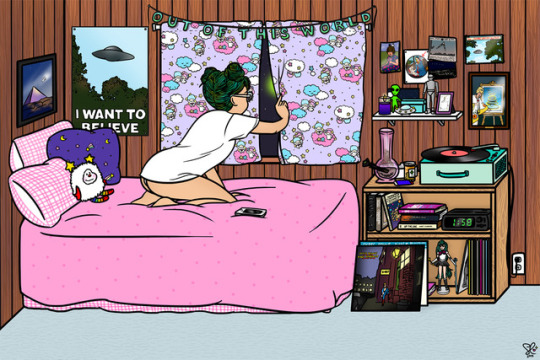
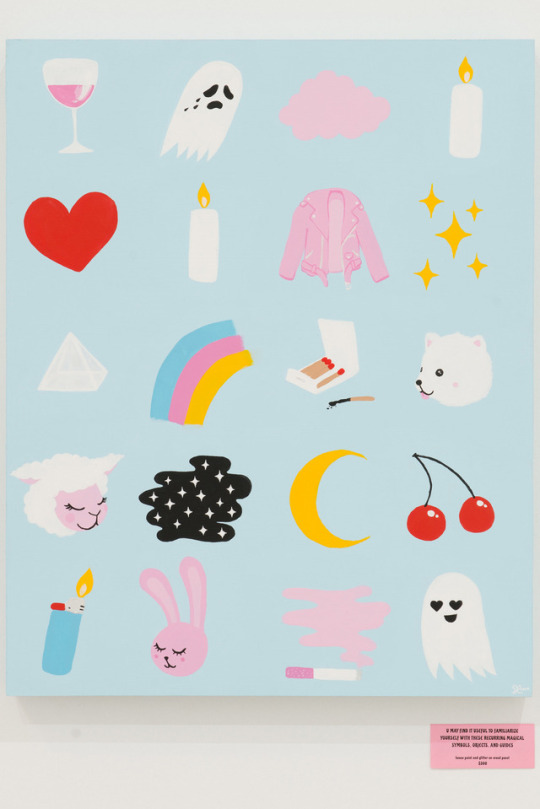
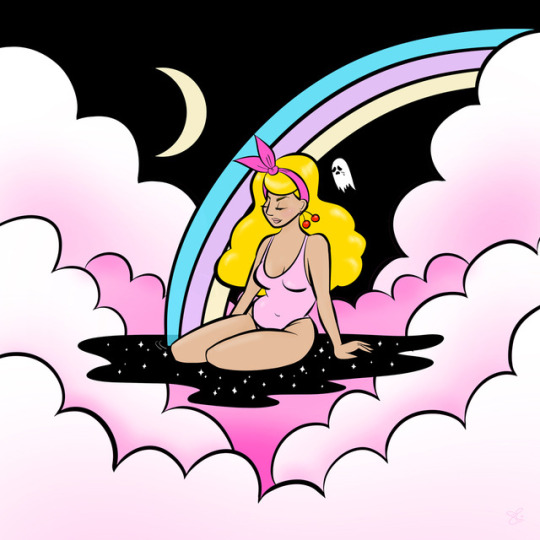

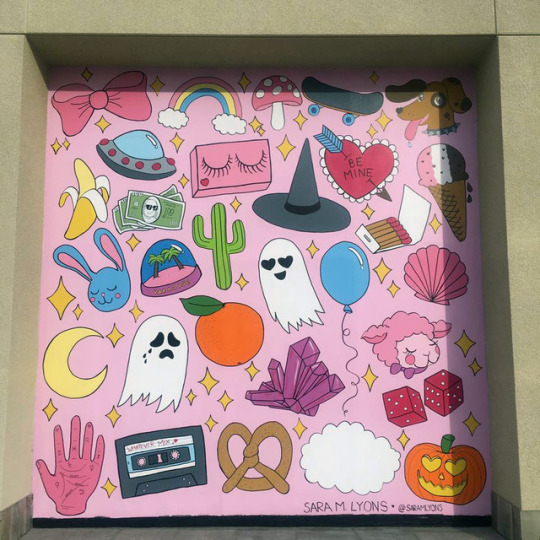
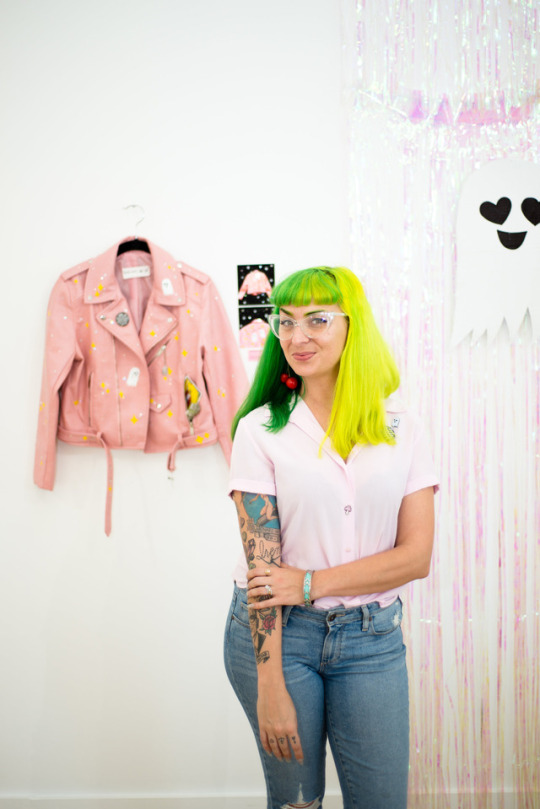
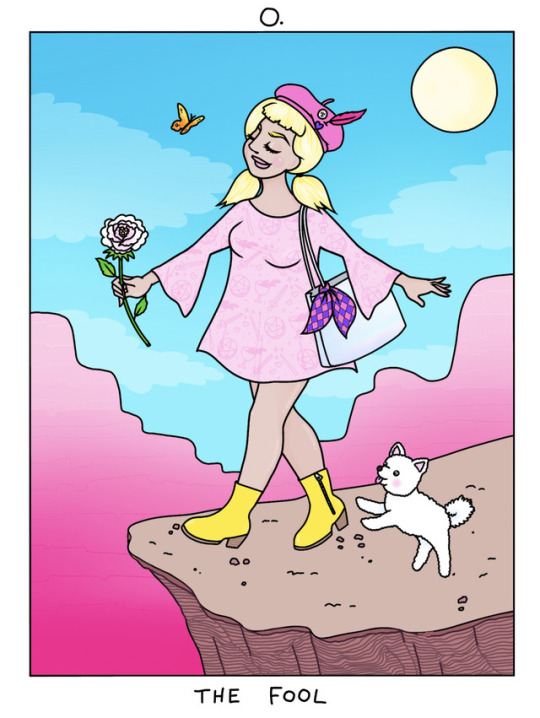
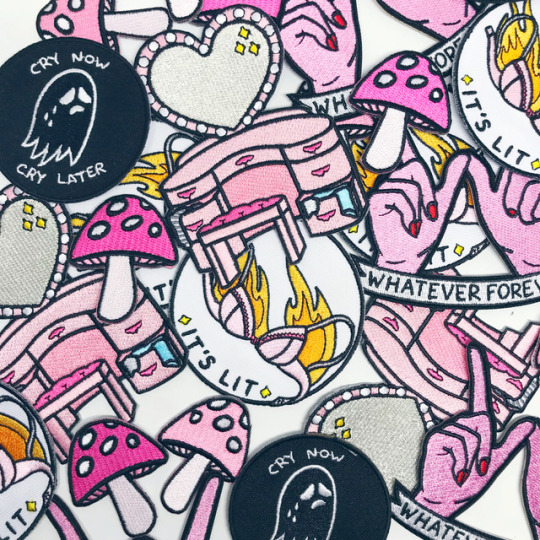
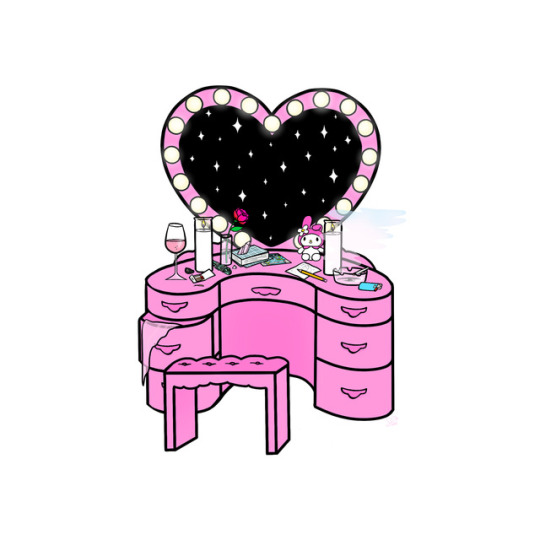
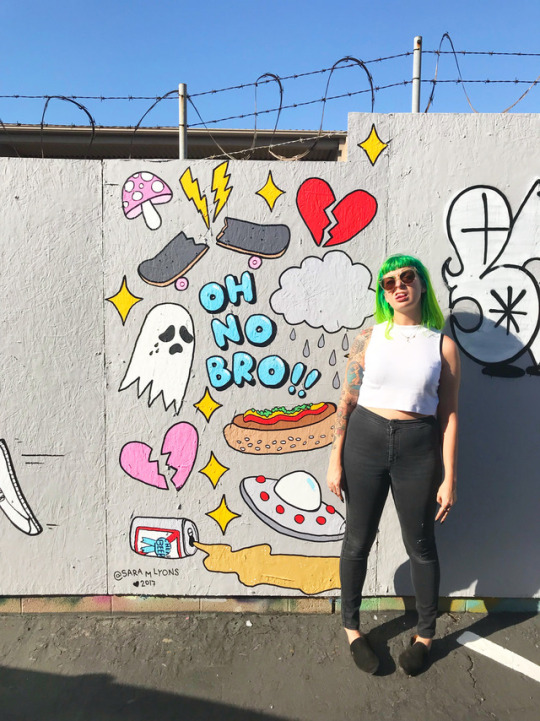
ART SCHOOL | Q&A with SARA M. LYONS
Influenced by the works by the likes of designer Lisa Frank and Saturday morning cartoons, artist Sara M. Lyons’s illustrations are colorfully eye-catching, vibrant, and filled with fun! Not only ONE thing, Sara also runs an online shop filled with her awesome creations from patches, pins to an upcoming Tarot card deck she’s creating. We’re stoked to chat with Sara and learn about her process, her favorite artists to follow, and about her local art scene in this week’s Art School w/ Sara M. Lyons. Make the leap!
Photographs courtesy of the artist
Hi Sara!, Could you tell us a little about yourself ? For sure! I’m Sara M. Lyons, and I’m an artist, illustrator, muralist and product designer living and working in Orange County, CA!
When did you first get into drawing? Was it a hobby turned career or something you knew from the start that you’d eventually wanna do for a living? I’ve been drawing since before I can remember, and it’s always been something I did for fun, but I never really considered that it could be a career until I suddenly found myself in the middle of it. I didn’t start leaning into this as a living until I was in my late twenties (I’m 32 now), so I feel like I’m still learning the best ways to navigate everything.
Who were some of your early artistic influences? Art mentors? I was born in ’85, so I was surrounded by Lisa Frank and Saturday morning cartoons, and I think a lot of that spirit is present in my work. I also grew up reading Betty & Veronica obsessively, so Archie comics and the drawing style of Dan DeCarlo in particular was what I started emulating as a kid when I was teaching myself to draw. In high school that developed into an interest in indie comics, and I was really inspired by Los Bros Hernandez. I think you can really still see the influences of both of those comics in my character drawings.
You make some much fun and colorful things, for a lack of a better word, from pins to patches to just about everything? What’s some of the stuff that’s in the works now? I love making small pieces of art that are accessible and affordable, and that’s always been my thought process when designing products like pins and patches. I think I’ll always be doing stuff like that, but this year I hope to try some new things too. I’m working on a deck of Tarot cards right now (I released a Lenormand fortune telling deck in 2016), and it’s really exciting to create a bunch of highly detailed illustrations in that context - knowing that when I’m done with these 78 drawings, they won’t be just one-offs going on a wall somewhere, but that they’ll be accessible to anyone who is interested.
Do you keep a sketchbook or work your ideas as you go along? Organized, Sort of, or Complete Chaos? What’s your process for new ideas like? I’d say I exist in a constant state of Organized Chaos. My ideas, sketches, and concepts are spread all over the place - I’m usually bouncing between my planner, my journal, my phone, my sketchbook, my iPad Pro, and my desktop computer, and that’s probably the approximate order of where ideas get parsed out as well. When I’m working for a client, I move really quick, but with my personal stuff I’m a slow starter - I’m both heavy on self doubt and a perfectionist, so there’s often a LOOOOOOONG stretch of time between conception and completion of any given concept. I’m not one of those artists who can sit down and knock out two or three completed drawings in a day. Sometimes I’ll have a sketch on a Post-It in my office or an idea in a note on my phone for over a year before I even start to develop it. But once I really get going on something that I believe in, I get laser-focused.
What mediums do you love to work with? What are your essential art tools? My favorite medium right now is a huge wall - I’ve been working on murals since late 2016 and it’s so much fun and such a complete departure from my usual artistic process!
But my most comfortable, well-loved mediums are digital and plain old pen and paper. Drawing digitally, I used to work mostly in Photoshop on my desktop using an ancient Wacom tablet, but these days I spend a lot more time drawing in Procreate on my 10.5” iPad Pro (rose gold, obvi!). I know they’re not for everyone, but the iPad and Pencil have been a game changer for me creatively - I love being able to sit on the couch watching trashy reality TV while I work on fully layered digital pieces.
But still, sometimes nothing beats the classics. I pretty much exclusively use Canson Mixed Media XL sketchbooks, any size, because I like the heavy paper, spiral binding, and turquoise blue covers. I’ll draw with any old pencil - I mostly hoard and use ones I take from hotels when I’m in on trips - and Microns are my favorite drawing pens.
Who are some rad artists you think folks should definitely check out and follow? I love Jenee Larson’s super distinct style and sassy digital illustrations of petulant ladies - @bobbypinss Bianca Xunise makes the most poignant, funny, personal, emotional diary comics - @biancaxunise Ayaka Sakuranbo is a Tokyo-based artist and I’m obsessed with her whimsical paintings and incredible color palette - @ayakasakuranbo Ashley Lukashevsy makes powerful illustrations with a focus on intersectional feminism and anti-racism - @ashlukadraws Ms. Wearer based in the UK does amazing rainbow-drenched pop art - @ms_wearer Lilly Friedeberg in Dusseldorf is one of my favorite graphic designers; I love her clean, fun sensibility - @elfriede_s Yoko Honda’s work makes me want to transport myself INSIDE the beautiful world she’s created and live there forever - @yokopium
What’s a common misconception about what you do? There’s a lot more “boring office stuff” to my job than most people think. I wish I was drawing and painting and creating all day every day, but in truth I spend like half my time answering emails, fulfilling orders, taking inventory, going to the post office, keeping the online shop up to date, managing all manner of legal nonsense, staying on top of social media, hustling for new work, and so on.
What do you do to take a break from art life and just the day-to-day hustle of running a shop? Drawing is still a release for me, and my husband (@therealjoshr) is an artist too, so it’s not uncommon for us both to still want to be making stuff in our “off” time. When we’re not doing that, we like to do a lot of really grown up stuff like going to theme parks, arcades, swapmeets, and toy stores. We also like taking weekend trips, and I really love being in the desert, so we try to get out to Palm Springs and Joshua Tree as much as we can too.
What can you tell us about the art community around where you are? What’s the art scene and culture like? Orange County sometimes gets a bad rap, but I think it’s a really cool and diverse place to be a creative person. A lot of iconic art and punk rock and culture has come out of this area (just look at Vans!!)!
As an artist today in OC, I feel like there’s breathing room here - the contemporary and alternative art scenes are still growing and finding themselves here, so it doesn’t feel as high pressure as the larger LA art scene - but you’re close enough to LA to get involved in that scene, and you still have easy access to so many amazing shows and museums and events. There’s just something distinctive about Orange County that is hard to put your finger on unless you’ve kinda grown up here. I went to high school in Newport Beach; I’ve lived in Anaheim now for years - of course there are pockets everywhere where those Real Housewives stereotypes are painfully true, but that hasn’t been my overall experience in OC. I love it here and I really hope I can help the creative community here continue to develop.
What’s something you liked to see more of in art? More women in the spotlight.
What do you think you’d be doing if you weren’t an artist? Oh my god, probably working on a cruise ship or something. I didn’t go to school and I don’t really have any other marketable skills, so hopefully this works out!!
What are your FAVORITE Vans? It’s a toss up between two SK8 Hi’s - blush pink suede or baby blue faux fur. Don’t make me choose!!
What advice would you give someone thinking about art as a career? This is a super nebulous job choice, and “art as a career” in general is really subjective. Know yourself well, but don’t pinhole yourself. The scope of this creative industry is constantly shifting and changing, and things come in and out of fashion quickly. Something that’s your livelihood one year might become a nonstarter the next. If you can identify and remain true to the things that make you unique as an artist and the things people respond to in your work, the knowledge of that point of view will carry you from phase to phase.
What’s on the horizon for 2018? I’m still trying to figure that out myself! After some major plans I had for this year fell through at the last minute, I’m at kind of a blank slate phase in my career. I have a ton of different ideas and I’m trying to nurture them all to see what blossoms first! I’d really like to paint more murals this year, travel more for events, and continue to develop my more personal illustration work. Something I’m trying to keep in mind this year is that it’s OK to be small - not chasing the giant clients or the big money projects, and just doing work that fulfills me creatively and resonates with the people who care about what I do.
Follow Sara Lyons | Instagram | Website
165 notes
·
View notes
Note
Hello, yes, hi, I recently found your art and account and I love what you do. I'm turning 14 in April and I've asked for a drawing pad, but I have no idea how to use one as of yet. Have you got any tips or anything? Because I've wanted to try digital art for a while and your art makes me want to even more lmao. Thanks! - B.A.
BOI OH BOI DO I GOT SOME TIPS FOR U <3
(I’m not sure what kind of comp you’re going to be using, so I’ll list for both.)
FIRST: Drawing Programs; the free and the great.
-Firealpaca: Lightweight drawing program. I draw Recovery using this! It’s easy on the RAM if you have a weak comp/are paranoid about yours like I am, it is mainly for basic comic making, and has all the basic brushes you need (pen/pencil/airbrush/symmetry/etc). You can add your own brushes as well but they’re p basic settings. Has basic Animation/Gif making as well using Onion Mode! Layout is a piece of cake. Please note that If you leave it open for a week it’ll crash on you, even if you haven’t anything on it at the moment, and sometimes the brush sensitivity just stops working so you just have to close and then open it again. (Also I have no idea how to update it aside from deleting it completely and just downloading the new version from scratch, so thats a thing.) Mac/Windows
-MedibangPaint: This is basically FireAlpaca But Better. Has tons of screen tones, brush patterns, and tools. I don’t use it much because I’m used to FA’s layout and get confused with the the placement of tools in here, so if you can I highly suggest just going with this first. Also has basic animation/gif making! Has storage for the website as well, and you can upload more preset brushes. It’s v anime. This program has waaay more in terms of basically everything, so it just takes more RAM. NBD, you don’t have to have every brush downloaded from the storage ^u^. Mac/Windows
-Clip Studio Paint: Okay this one isn’t free, it’s a pricey one, HOWEVER once a year they take the price way fuckin down by at least 75%. Sign up for the email list and it’ll let you know when that precious day comes. It’s how I got it @u@, around christmastime? This program is basically MedibangPaint On Steroids. I do all of my digital-yet-tradition-style-painting on here! The brushes all have some neat af settings to play with, you can make your own brushes, has tons of screen tones, pre-made panels, and settings. You can save projects as basically anything you need, is a hardy program that almost never crashes, and It’ll take a nice chunk of space on your comp depending on how much memory you have but hey, its worth it. It’s much more complex layout-wise than the other two here, but you get used to it after playing around and watching tutorials haha.
-Mischief: It’s a 25$ app, has like four brushes and five layers only but is vector-based with an endless canvas. Not really worth having unless you like the vector thing. UP TO YOU. I spent forever with this one doing all that homestuck stuff, so it’s not really bad so much as it is a basic bitch. Mac
-MyPaint: I used this a bunch when I still did digital art on my windows laptop before I upgraded to a Mac. It’s easy on the comp and has plenty of brushes and settings. You can also get brush packages if you don’t feel like you have enough that comes with the program! Also has endless canvas; pretty sure you can just select an area and then export as is. I barely remember the rest but It’s pretty great. Windows/MacPorts(which I hate)
-GIMP: I hate this thing. I cannot figure it out for the life of me. It’s got loads of shit though, can handle layers, has plenty of brushes, and can do basic animation/gifs if you ever figure it out. Windows/mac
I’ve heard good things from paint tool SAI and Krita as well, but have never used them myself.
***You can always pay through the nose/use a student discount for the photoshop series and pay that shit monthly, those fuckers have literally everything, but I am a cheap college kid making minimum wage with a car payment; I’d rather just pay once/not at all.
TABLETS: treat that shit like a newborn babe 24/7
-I have literally only ever owned a Wacom Intuos4. It has lasted me six years, and at least five moves across many miles. I broke one of the cord ports the day I opened it by holding it wrong, have one left, and now treat it like it’s going to die if the cord moves badly. Please be aware that if you break both ports, you better either sodder it back together yourself or upgrade to smth else because it costs about as much as the tablet itself was bought at to be fixed. Good news, though, it comes with at least six extra pen nibs, has programable buttons on the side (that I have never bothered to use) and a scroll bar in case you’re too lazy to use the keyboard (…I don’t really use that either unless I’m just scrolling through tumblr LMFAO).
-I would die for a Cintiq.
HOT TIPS: its useful.
-most of the programs listed use the same keyboard shortcuts. MEMORIZE THEM. It’s pretty easy, since you’ll use em a lot. [cntrl/cmmd+T] lets you resize what you just drew on that layer, and [cntrl/cmmd+z] is undo. I use those the most, for obvious reasons.
-vector-based programs are pretty great because when you resize an image it looks prefect. You can’t do that with a program that isn’t, so I just resize the base roughdraft and draw the lineart again on the layer above so I don’t get weird JPEG quality lines.
-You can use a ruler with your tablet, just slap it on and go, but honestly most programs have settings for that. just use those.
-You can also trace stuff on your tablet, so long as the paper isn’t too thick. I just scan/take a photo and then open it up in the program, though. much easier.
-SAVE CONSTANTLY. Art programs like to crash on you, even when they’re hardy and you have a good comp. make it a habit to quick save your work.
-Use a desk and have good posture. You’ll be able to draw a hell of a lot longer if you do. I personally keep fucking up my knees by sitting on my legs as I work out of habit, and don’t actually have a desk chair. Keep your screen at eye level and at a fair distance to prevent eyestrain and also neck-strain haha
-Chances are you won’t be used to the tablet right away. Most places you buy from say it’ll take a couple of months to get used to how weird it is to draw while not looking at your own hand, so don’t be frustrated If your drawings look a bit off at first.
-if you draw at least one thing every day, by the end of the year you’ll have improved exponentially. I literally made this blog to make myself draw once a day.
-don’t be afraid to check out speedpaints and tutorials. It’s always good to get more familiar with the program you’re using and new techniques previously unconsidered.
-get familiar with clipping layers. They are insanely useful; you clip one layer to the one below and then when you draw it only shows up on the drawing of that layer below. Shit is a godsend if you’re bad at coloring in the lines/lazy. The bucket tool is also really useful, and you can adjust the expansion by pixel so you don’t miss anything between the lines.
-experiment with your brushes, shit be fun af
-warmup your wrists before and after drawing. prevent swollen veins and such. dont want hand pain/numbness, its reaaaaally bad.
—basically if your hands hurt stop for the day.
-PNGS are for internet, JPEGS are for printing/fucking with quality (cough hack homestuck)
-resolution doesn’t have to be much more than 350 dpi if its just going to be on a webpage. Maximize that shit if you’re going to be printing, though. Especially if you put stuff on redbubble.
-DeviantArt has this thing called Sta.sh where you can dump art, keep it in perfect quality and just share it with certain people with a link instead of all of the website. Great for storing commission pieces, its the only reason I have DA in the first place.
-you get a different audience depending on what site you use for posting art, so keep that in mind for the kind of feedback you want.
-after awhile of drawing using a tablet, you may lose patience/forget that in traditional art there isn’t an undo button lmfao It’s cool; you don’t have to choose one over the other or anything.
-Honestly you can work around almost anything. You just invent new ways and techniques for yourself and you’ll do just fine.
Aaaaand that’s all I got for today! Thanks for sticking around <3
277 notes
·
View notes