#float4
Explore tagged Tumblr posts
Text
here's what i learned:
- dont check if a value is < 1 in a shader. it will be both true and false randomly on a whim - dont use SetFloat on an int in a shader. it will be both less than -100000 and greater than 100000 randomly on a whim - dont use a texture2d<float4> when it is .RGFloat
102 notes
·
View notes
Text

To create new clickable color picker in ZukuRace it is necessary to call the same function on GPU and CPU side. So I decided to create mini library in C++ with HLSL classes. Because I love over-engineering.
The screen surface pixel data can be read over a mouse pointer as well. But in this case I will deal with sRGB color correction and color of decorative elements on a color picker. So, it is not an option.
I know, there are libraries to write shader-like code on C++, but I don't want to add dependencies or add many files to the project. And I want to try it myself. So, over-engineering is an option.
My personal challenge was to implement vector swizzles like .xyz, .zxy, .zwzw, etc. Without brackets, like .zwzw(). So I decided to keep them inside unions. And I am not going to implement all the combinations now (num combinations: float2: 16, float3: 64, float4: 256 = 316 of them). This library will only contain the necessary functions :)
0 notes
Text
How I made the wind effect
Breaking it down the effect is made with a
One Shader
Two different materials
One mesh
All are put together into a particle system where they can be utilized.
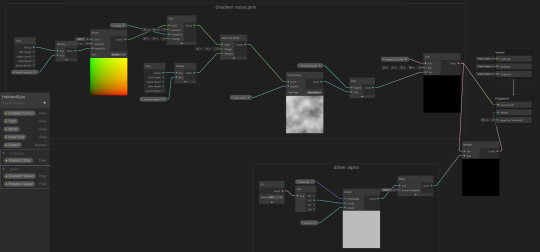
The shader itself isn't complex but there are a few considerations we have to take into account. Trying to make something look like wind usually is done lowering the opacity of your wind shape; like whatever is your mesh or particle (・_・;) but transparent materials can cause performance problems mainly if they're layered over each other. So to avoid that I used alpha clipping with dither to fake transparency. When making this I (by mistake) found the dither to be kinda cool and gave it a stylized look which I incorporated to other effects.
The other important bit apart of the alpha is the UV node. That node has nothing to do with the meshes UV but is being used to communicate information from the particle system to the shader. It is a confusing process but a very common one used by vfx artists. Basically, the amount of dither is controlled within the particle system and can be adjusted using that instead of the constant or with time. (This UV stuff is being put through a branch, pretty much meaning I can switch between a constant amount of dither or use the particle systems amount. This is mainly used for testing.)
(more on this in abit)
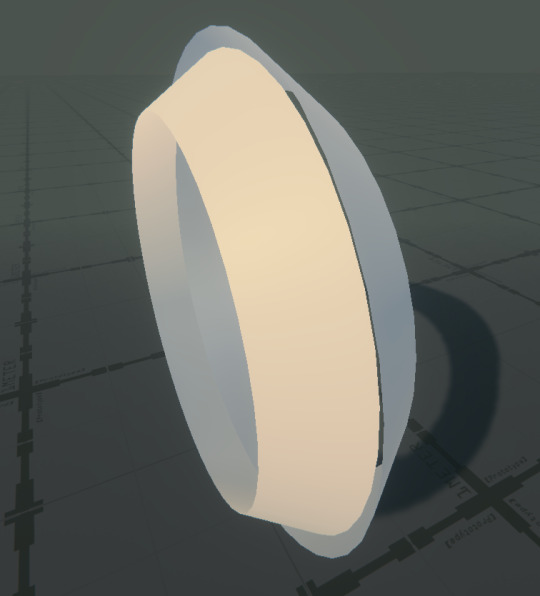
The mesh itself is just two rings. nothing fancy.
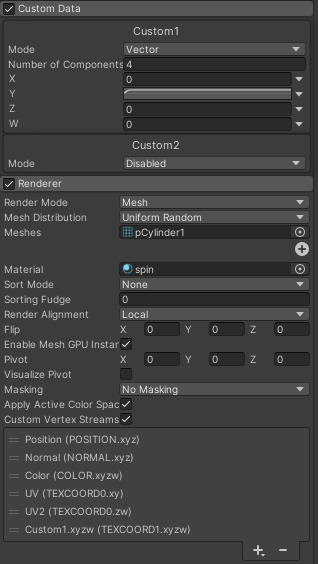
The important part in the particle system is the custom data (the UV stuff from earlier.) Using custom vertex streams we can enable UV2 and Custom1.xyzw. (xyzw being the same as rbga just a float4) By splitting the UV 'G' value we can apply a curve to the custom data to dynamic change the particles dither amount over time. This technique is used for nearly every other effect I make for this.
0 notes
Photo

Cosmic Blob #c4d #octane #blob #float4 (à Float4 Interactive)
1 note
·
View note
Photo

Dithering, specifically Ordered Dithering, is a way of displaying images, and was used back when computers only had about 16 colours to choose from, often they were completely monochromatic. Now it's more of a stylistic choice, and a similar effect was used in indie smash hit, Return of the Obra Dinn.
I wanted to create this effect in Unity, because it seems pretty cool and I want to learn more about post processing, and writing my own post processing scripts.
Initially I tried to posterise the view, like in Photoshop, and use each layer as a mask to show a different dithery texture, but decided that was just too messy. And it turns out that a dithering algorithm is available online, so it just made sense to use that and adapt it for what I need.
Post Processing Script
This script just passes the view from the camera to the material specified, which will use our shader. By using ExecuteInEditMode we can see the effect without pressing play
using UnityEngine; [ExecuteInEditMode] public class PostProcess : MonoBehaviour { public Material material; void OnRenderImage (RenderTexture source, RenderTexture destination) { Graphics.Blit(source, destination, material); } }
Dithering Shader
Our shader only needs three properties, the MainTex, which comes from the camera, and the two colours to dither between
_MainTex("Texture", 2D) = "white" {} _BackgroundCol("Background", color) = (0,0,0,0) _ForegroundCol("Foreground", color) = (0,0,0,0)
Now at this point, if we just return the texture, we'll get our normal scene view

float4 frag(v2f_img input) : COLOR { float4 base = tex2D(_MainTex, input.uv); return base; }
So we want to now pass that texture through the dithering algorithm. And that works by getting each of the rgb channels and seeing how close they are to 0 and passing back a 1 or 0 accordingly. You can read more about it here.
float4 frag(v2f_img input) : COLOR { uint matSize = 4; float4x4 mat = { 1, 8, 2,10, 12,4,14, 6, 3, 11, 1,9, 15, 7 ,13,5 }; mat = mat / (matSize * matSize); int pxIndex = input.pos.x; //x index of texel int pyIndex = input.pos.y; //y index of texel float4 base = tex2D(_MainTex, input.uv); //get which index of dithering matrix texel corresponds to int mati = pxIndex % matSize; int matj = pyIndex % matSize; //quantization if (base.r > mat[mati][matj]) { base.r = 1; } else { base.r = 0; } if (base.g > mat[mati][matj]) { base.g = 1; } else { base.g = 0; } if (base.b > mat[mati][matj]) { base.b = 1; } else { base.b = 0; } return base; }
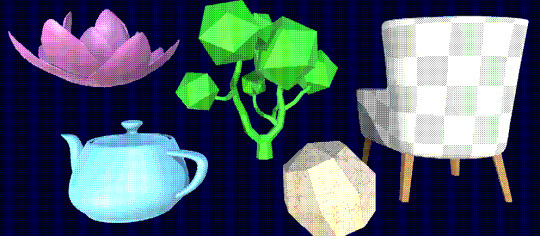
Now this does dither the image. But I want to change this so that it only uses two colours.
So I added another line underneath base. This takes all three channels and adds them together, dividing by three to make it greyscale. It's not enough to just use one channel.
float c = (base.r + base.g + base.b)/3;
I can also delete all those if else statements at the end and replace with this one:
if (c > mat[mati][matj]) { c = 1; } else { c = 0; } return c;
This will return a black and white dithered image!

And to add our colours in, we change the return line to make it a lerp. Now the black and white will be replaced with our two colours!
return lerp(_BackgroundCol, _ForegroundCol, c);

Scaling the Dither
I felt that the pixels here were too small. I wanted more retro chunky pixels. Originally I had a RenderTexture attached to the camera, which I stuck on a canvas. I could control the size of the RenderTexture, making the resolution smaller and the pixels bigger. But my friend pointed out that I was just doing the same thing twice in different ways, and making two RenderTextures.
So instead I looked at editing the RenderTexture I had already created.
I added a scale variable to the PostProcess script, using a Range attribute so I don't accidentally divide by 0.
[Range(1,10)] public int scale;
Inside the OnRenderImage I set up a temporary RenderTexture, which we will blit to, and then blit from that to the destination. We set the dimensions to the scale. Create a temp texture and set the filtermode to Point. This ensures that the dithers stay crisp. Otherwise they're all blurry and just don't look good.
int width = source.width / scale; int height = source.height / scale; RenderTextureFormat format = source.format; RenderTexture r = RenderTexture.GetTemporary(width, height, 0, format); r.filterMode = FilterMode.Point;
I found that I add to edit the shader to make this look better too, so I set the scale of the shader based on this scale too. We'll assign this in a minute.
material.SetFloat("_Scale", 1f/scale);
Then we blit the source texture to our temporary one, then the temporary to the material and finally release it.
Graphics.Blit(source, r); Graphics.Blit(r, destination, material); RenderTexture.ReleaseTemporary(r);
Back in the shader script, add "_Scale" to the properties. And multiply the x and y by it.
int pxIndex = input.pos.x*_Scale; int pyIndex = input.pos.y*_Scale;
Now when I move the scale slider up and down the pixels get bigger and smaller, and I can set them to be as chunky as I want
This gif looks really bad, go check out the demo to see it work!

13 notes
·
View notes
Text
MME Laughing Man FX READING: a translation by ryuu
The following tutorial is an English translation of the original one in Japanese by Dance Intervention P.
Disclaimer: coding isn’t my area, not even close to my actual career and job (writing/health). I have little idea of what’s going on here and I’m relying on my IT friends to help me with this one.
Content index:
Introduction
Overall Flow
Parameter Declaration
Billboard Drawing
Final Notes
1. INTRODUCTION
This documentation shows how to edit the Laughing Man effect and read its HLSL coding. Everything in this tutorial will try to stay as faithful as possible to the original one in Japanese
It was translated from Japanese to English by ryuu. As I don’t know how to contact Dance Intervention P for permission to translate and publish it here, the original author is free to request me to take it down. The translation was done with the aid of the online translator DeepL and my friends’ help. This documentation has no intention in replacing the original author’s.
Any coding line starting with “// [Japanese text]” is the author’s comments. If the coding isn’t properly formatted on Tumblr, you can visit the original document to check it. The original titles of each section were added for ease of use.
2. OVERALL FLOW (全体の流れ)
Prepare a flat polygon that faces the screen (-Z axis) direction.
Perform world rotation and view rotation inversion on objects.
Convert coordinates as usual.
World rotation and view rotation components cancel each other out and always face the screen.
3. PARAMETER DECLARATION (パラメータ宣言)
4 // site-specific transformation matrix
5 float4x4 WorldViewProjMatrix : WORLDVIEWPROJECTION;
6 float4x4 WorldViewMatrixInverse : WORLDVIEWINVERSE;
7
• WorldViewProjMatrix: a matrix that can transform vertices in local coordinates to projective coordinates with the camera as the viewpoint in a single step.
• WorldViewMatrixInverse: the inverse of a matrix that can transform vertices in local coordinates to view coordinates with the camera as the viewpoint in a single step.
• Inverse matrix: when E is the unit matrix for a matrix A whose determinant is non-zero, the matrix B that satisfies AB=BA=E is called the inverse of A and is denoted by A-1 . Because of this property, it’s used to cancel the transformation matrix.
• Unit matrix: asquare matrix whose diagonal component is 1 and the others are 0. When used as a transformation matrix, it means that the coordinates of the vertices are multiplied by 1. In other words:
8 texture MaskTex : ANIMATEDTEXTURE <
9 string ResourceName = "laughing_man.png";
10 >;
• ANIMATEDTEXTURE: textures that animate in response to frame time. Animated GIF and animated PNG (APNG) are supported.
• APNG: Mozilla Corporation's own specified animation format that is backward compatible with PNG. I hacked libpng to support it, but it was rejected by the PNG group because the specification isn’t aesthetically pleasing.
11 sampler Mask = sampler_state {
12 texture = <MaskTex>;
13 MinFilter = LINEAR;
14 MagFilter = LINEAR;
15 MipFilter = NONE;
16 AddressU = CLAMP;
17 AddressV = CLAMP;
18 };
• MinFilter: methods used for the reduction filter.
• MagFilter: methods used for the expansion filter.
• MipFilter: methods used for MIPMAP.
• AdressU: method used to resolve u-texture coordinates that are outside the 0-1 range.
• AdressV: method used to resolve v-texture coordinates that are outside the 0-1 range.
• LINEAR: bilinear interpolation filtering. Uses a weighted average region of 2×2 texels inscribed in the pixel of interest.
• NONE: disable MIPMAP and use the expansion filter.
• CLAMP: texture coordinates outside the range [0.0, 1.0] will have a texture color of 0.0 or 1.0, respectively.
• MIPMAP: a set of images that have been precomputed and optimized to complement the main texture image. Switch between images depending on the level of detail.
21 static float3x3 BillboardMatrix = {
22 normalize(WorldViewMatrixInverse[0].xyz),
23 normalize(WorldViewMatrixInverse[1].xyz),
24 normalize(WorldViewMatrixInverse[2].xyz),
25 };
Obtain the rotation scaling component xyz of the inverse matrix, normalize it by using normalize, and extract the rotation component. Do this for each row. The 4x4 inverse matrix contains a translation component in the fourth row, so it’s cut off and made into a 3x3 matrix.
The logical meaning of the matrix hasn’t been investigated yet. Without normalization, the size of the display accessory is 1/10, which suggests that the world expansion matrix component is used as the unit matrix. Also, each row corresponds to an x,y,z scale.
29 struct VS_OUTPUT
30 {
31 float4 Pos : POSITION; // projective transformation coordinates
32 float2 Tex : TEXCOORD0; // texture coordinates
33 };
A structure for passing multiple return values between shader stages.
4. BILLBOARD DRAWING (ビルボード描画)
35 // vertex shader
36 VS_OUTPUT Mask_VS(float4 Pos : POSITION, float2 Tex : TEXCOORD0)
37 {
38 VS_OUTPUT Out;
39
40 // billboard
41 Pos.xyz = mul( Pos.xyz, BillboardMatrix );
BillboardMatrix is a 3x3 rotation matrix, so multiply it by the xyz3 component of Pos.
If the object is fixed in the world and doesn’t rotate, then Pos.xyz = mul(Pos.xyz, (float3x3)ViewInverseMatrix); or Pos.xyz = mul(Pos.xyz, (float3x3)ViewTransposeMatrix); cancels the screen rotation. Since the rotation matrix is an orthogonal matrix, the transpose and inverse matrices are equal.
42 // world-view projection transformation of camera viewpoint.
43 Out.Pos = mul( Pos, WorldViewProjMatrix );
44
45 // texture coordinates
46 Out.Tex = Tex;
47
48 return Out;
49 }
Perform world-view projection transformation and return the structure as usual.
51 // pixel shader
52 float4 Mask_PS( float2 Tex :TEXCOORD0 ) : COLOR0
53 {
54 return tex2D( Mask, Tex );
55 }
Return the color of the texture retrieved from the sampler.
57 technique MainTec < string MMDPass = "object"; > {
58 pass DrawObject {
59 ZENABLE = false;
60 VertexShader = compile vs_1_1 Mask_VS();
61 PixelShader = compile ps_2_0 Mask_PS();
62 }
63 }
Self-shadow disabled? (technique is ignored by object_ss when enabled), run without depth information.
• ZENABLE: enable seismic intensity information (Z buffer) when drawing pixels and make drawing decisions.
5. FINAL NOTES
For further reading on HLSL coding, please visit Microsoft’s official English reference documentation.
3 notes
·
View notes
Video
tumblr
fixed4 frag(v2f i) : SV_Target { float2 uvr = round(i.uv * _CompressionResolution)/ _CompressionResolution; float n = nrand(_Time.x, uvr.x + uvr.y * _ScreenParams.x); float4 mot = tex2D(_CameraMotionVectorsTexture,uvr); mot = max(abs(mot) - round(n / 2), 0) * sign(mot); #if UNITY_UV_STARTS_AT_TOP float2 mvuv = float2(i.uv.x - mot.r,1 - i.uv.y + mot.g); #else float2 mvuv = float2(i.uv.x - mot.r,i.uv.y - mot.g); #endif fixed4 col = lerp(tex2D(_MainTex, i.uv), tex2D(_PR, mvuv), lerp(round(1 - (n) / _sat ), 1 , _Button)) ; return col; }
1 note
·
View note
Photo

- Float4 -
Intern Motion work : Company Gif Card
7 notes
·
View notes
Photo
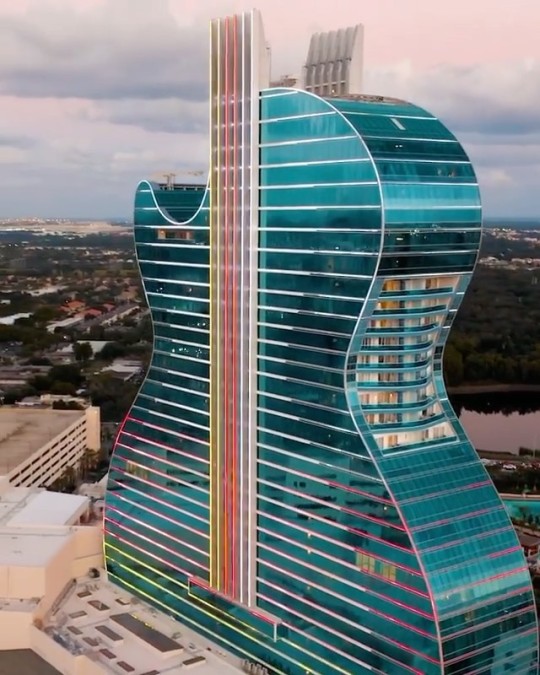
The world’s first guitar-shaped hotel in Hollywood, Florida. The new hard rock hotel & casino has been designed by Klai Juba Wald Architecture + Interiors. The entire façade has been transformed by float4 into a digital sculpture — capable of presenting a multitude of visual effects and presentations that utilize 2.3 million LED lights, video mapping and lasers. Video by @jeremyaustiin #usa #florida #awesome #архитектура www.amazingarchitecture.com ✔ www.facebook.com/amazingarchitecture A collection of the best contemporary architecture to inspire you. #design #architecture #picoftheday #amazingarchitecture #style #nofilter #architect #arquitectura #luxury #realestate #life #cute #architettura #interiordesign #photooftheday #love #travel #instagood #fashion #beautiful #archilovers #architecturephotography #home #house #amazing #معماری (at The Guitar hotel at Seminole Hard Rock Casino & Casino) https://www.instagram.com/p/B6UgqkeFEjm/?igshid=1o5b74z8313j0
#usa#florida#awesome#архитектура#design#architecture#picoftheday#amazingarchitecture#style#nofilter#architect#arquitectura#luxury#realestate#life#cute#architettura#interiordesign#photooftheday#love#travel#instagood#fashion#beautiful#archilovers#architecturephotography#home#house#amazing#معماری
7 notes
·
View notes
Text
[First week of 2020.3] White Spirit dev status

Hi, there!
This week I was creating some shaders then placing decorations and lights in next stage.
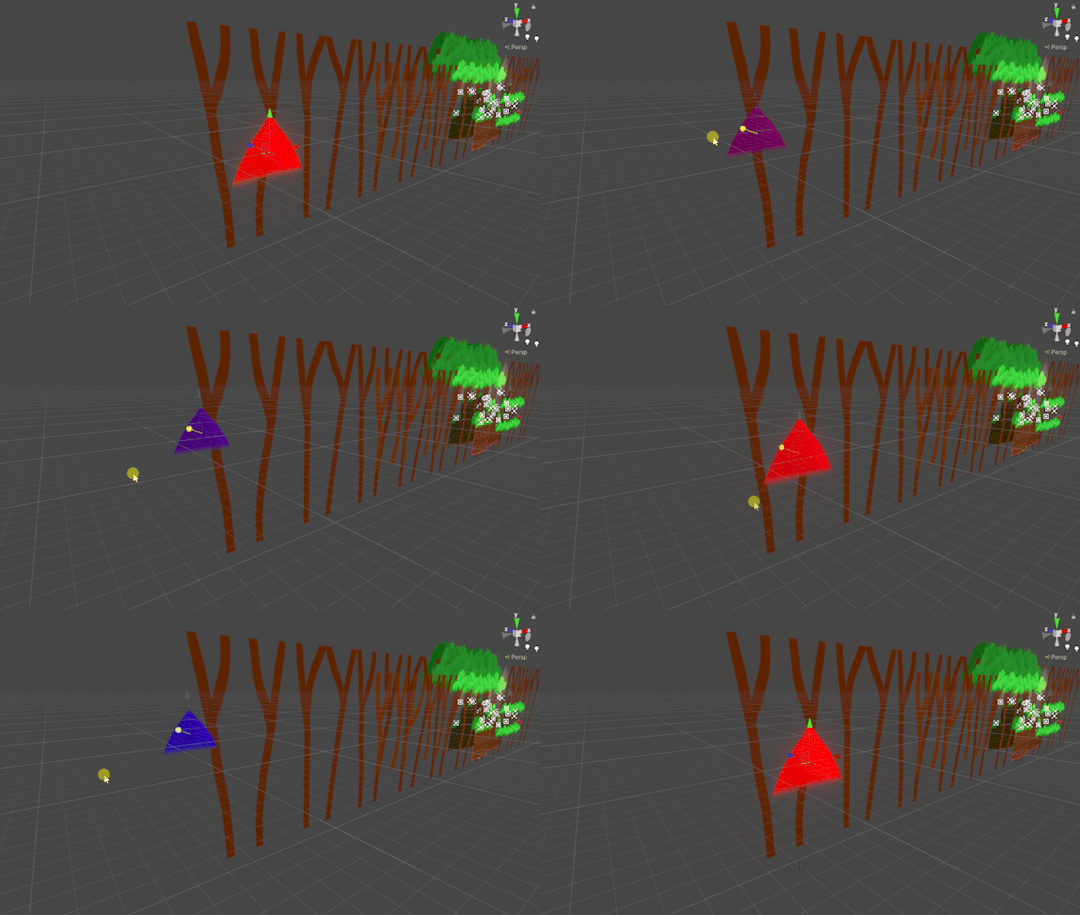
I have created a shader that interpolates to the desired color based on the Z depth. Because I wanted to express the color of the fog according to the distance to the front of the camera.
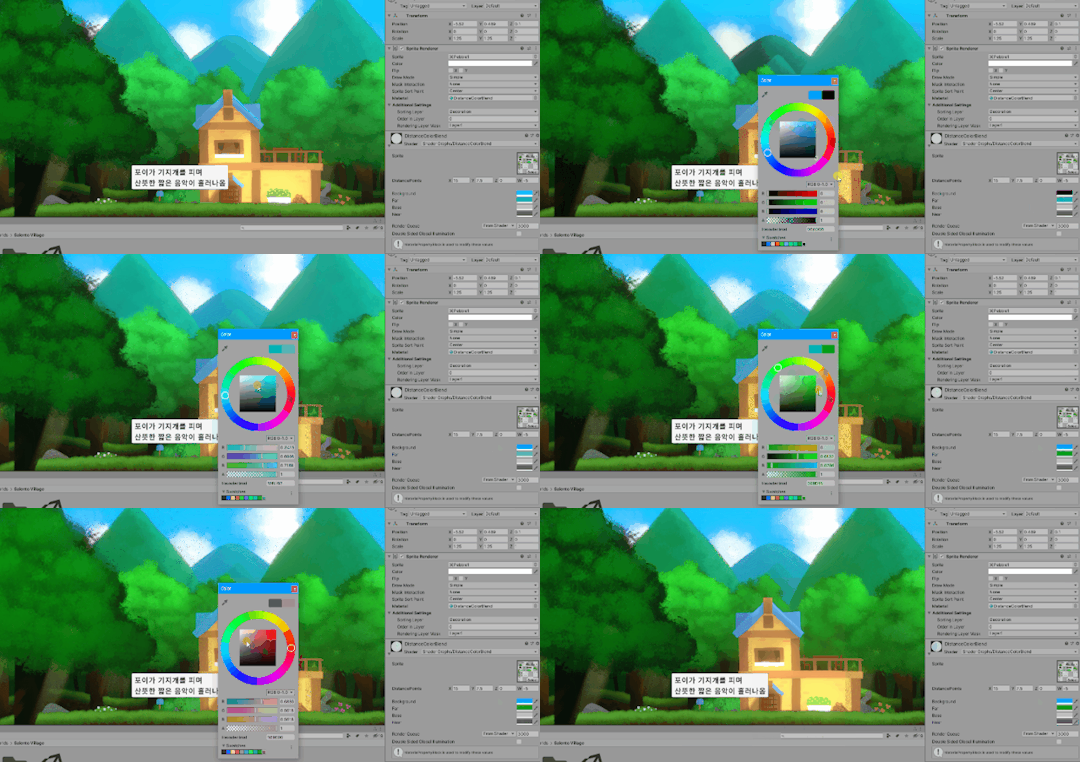
In this way it creates a sense of space.
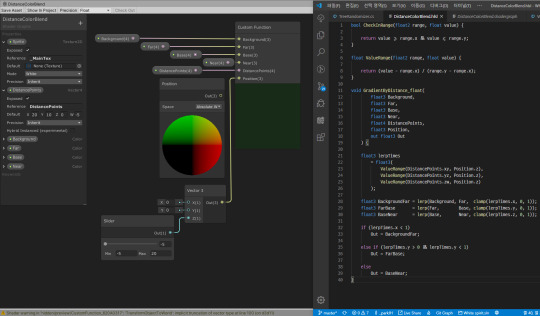
The process of creating shaders what I want wasn't easy, because it seems that shader graphs support Gradient but there's no way to make them available as input. So, I implemented the gradient by interpolating using four colors and Vector4 (float4).
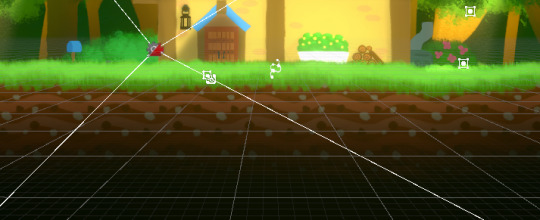
And second, I attempted to make the shader that makes terrain's brightness automatically darker as it went inward. But I realized that this wasn't easy for many reasons, so I came back to placing the light manually...
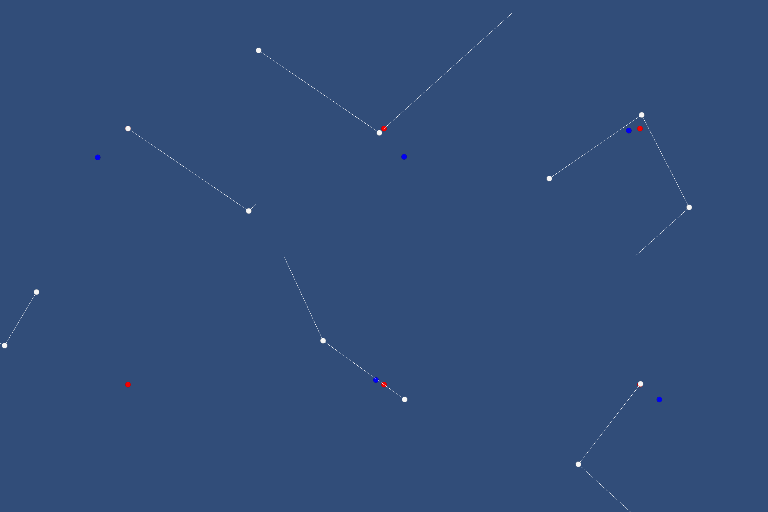
My goal was to get the vertex positions and darken output colors using the distance between the vertex lines and the screen position, but...

The Position node in the shader graph seems to change to vertices position or fragments position depending on the output, so I gave up(...)
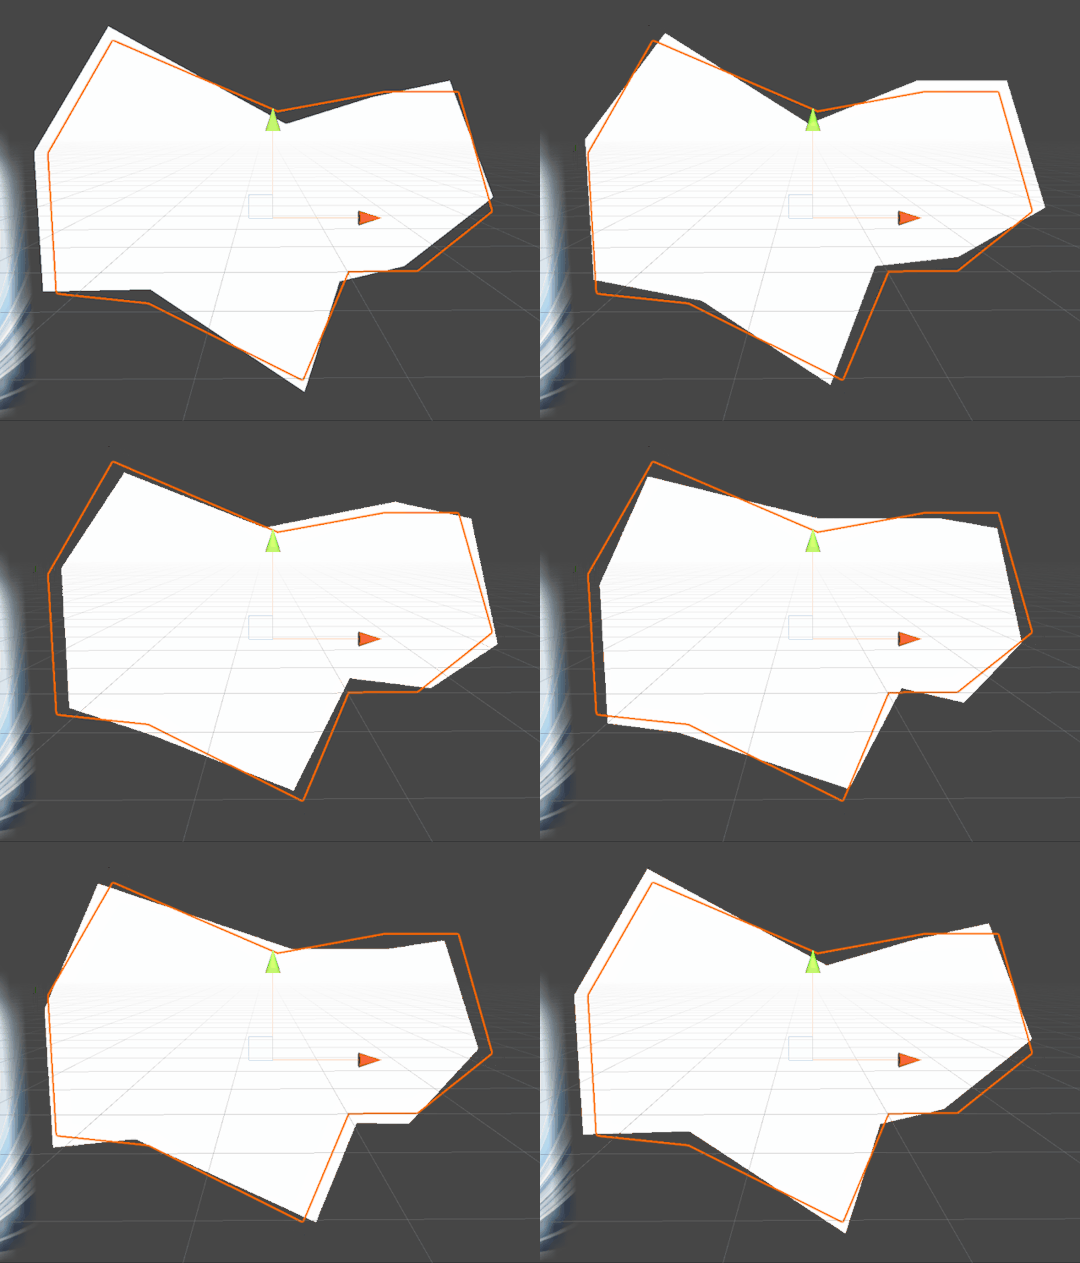
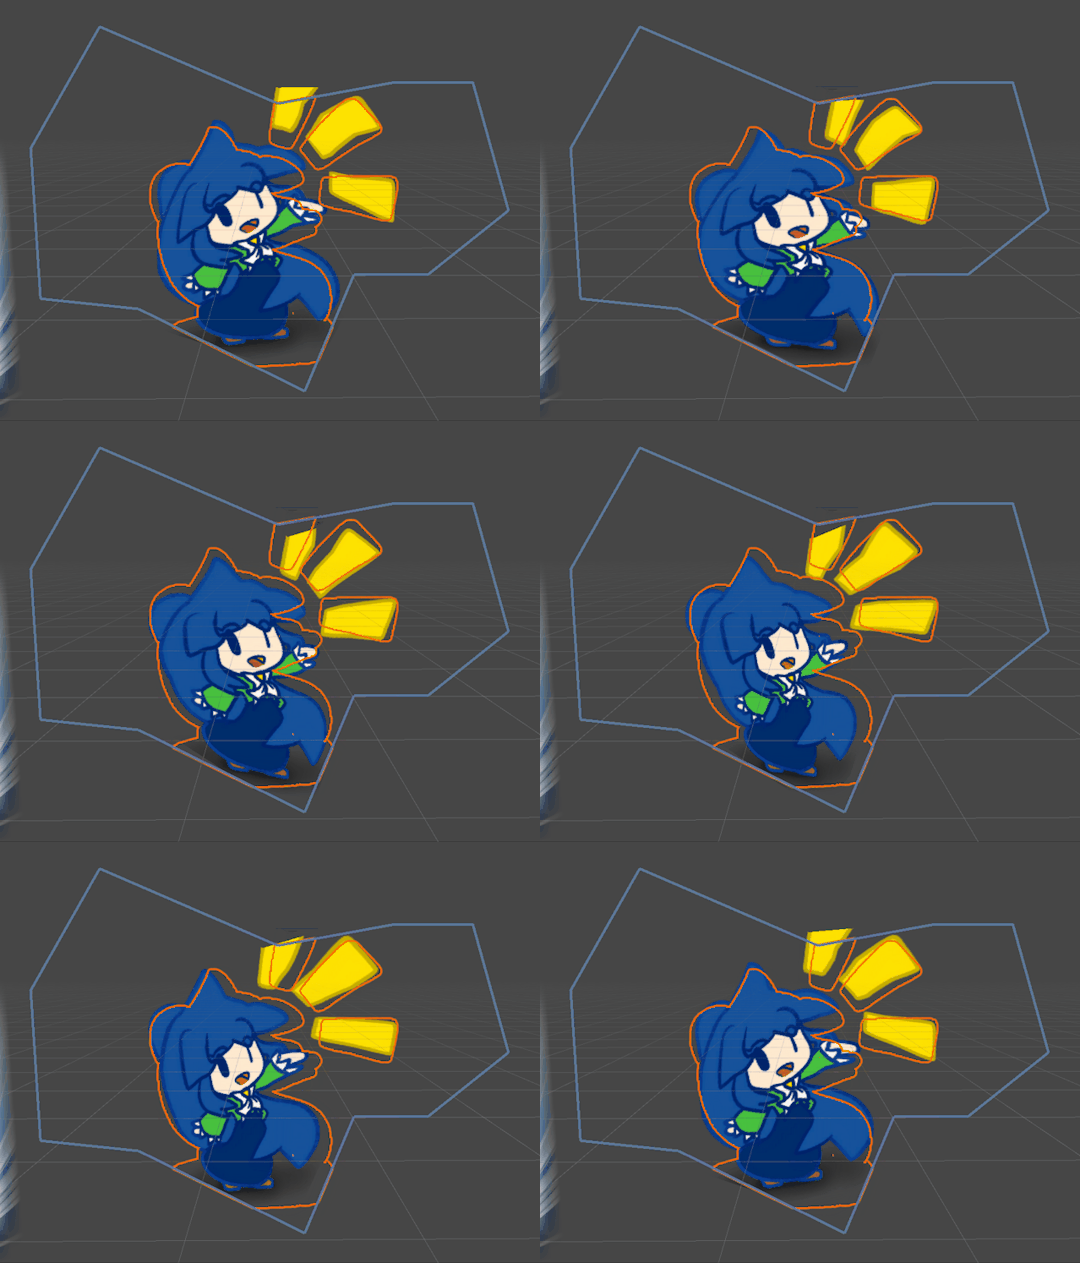
I was tired of this so I made various things with vertex output. This effect makes wavy by passing to sine cosine function in proportion to the vertex's x position. Now that I know how this looks, so I'll going to put an expression of the leaves or grass wavying with it soon.
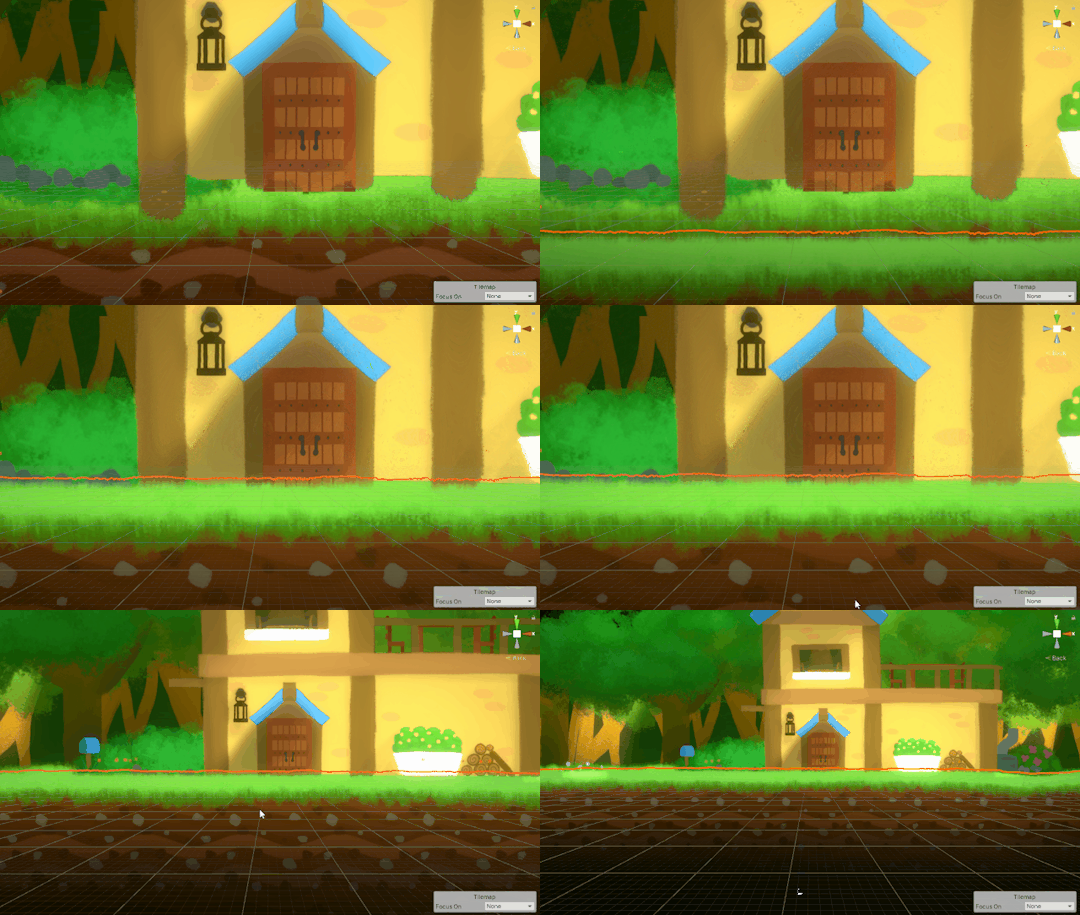
Now back to what I was going to do... As I did in Concept Art, I added the cover of the grass terrain to represent the depthness style. But it feels more flat style than the original, so I think I need to fix it.
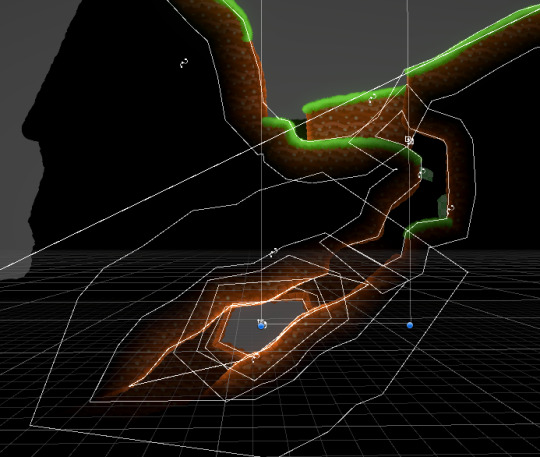
I usually use light in this way, using FreeForm to artificially light or leak light.

Then, after adding the decorations and put some light sprite textures that I made with the sprite light source to add some space.
*sigh*
------------------
See you in next week.
2 notes
·
View notes
Text
RWTexture2D textureBuffer; textureBuffer[dispatchThreadID.xy] = (float4)0;
0 notes
Photo

Projects - FLOAT4 Cool Creatives https://float4.com/en/
0 notes
Text
Capturing the ambience of Escape from Butcher Bay
Although its design spans many genres, I primarily think of EFBB as an adventure game. After all, it is Butcher Bay’s rapidly changing environments - not the game’s faint RPG elements - that gives players a sense of progression.
Thanks to developer tools exposed in release builds, capturing these varied settings is technically straightforward. The main challenge is choosing which scenes to include - complicated by the existence of EFBB’s 2009 remake.
No-HUD Mode
This is trivial in EFBB. Just holster your gun, and/or disable drawing a crosshair in the menu. There is also the cl_toggleshowhud command accessible from the console (see below).
Noclip / Freecam Mode
Accessible via EFBB’s console commands. To open the console, press CTRL + ALT + Grave (aka Tilde) while in-game. Then run: cmd(noclip). In this mode you can steer Riddick through walls, and he’ll be invisible to enemies. Press the jump key to ascend.
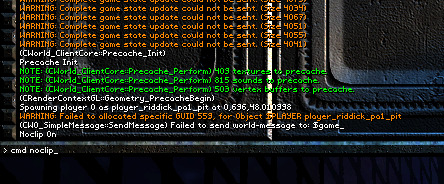
Visual Settings / Modifications
I don’t care for the film grain effect, or the SSAO, of 2009. Disabling the former requires you to modify some shader code inside XREngine_Final5.fp:
float4 grainfull = texture2D(Sampler_Grain2, tc0.xy * GrainOffsetScale.zw + GrainOffsetScale.xy); grainfull.x=0; grainfull.y=0; float grain = grainfull.x;
Note that this also seems to remove a yellowing tint otherwise applied to the game’s final picture.
For higher resolutions in 2004, check out TCoRFix.
2004 has a hidden anti-aliasing setting. Follow the steps on PCGamingWiki to enable it.
Extracting Sounds
There are a few tools available online for this. EkszBox successfully extracts the OGG assets, but without proper names. Searching more, I found a dedicated tool called RiddickUnXWC which exacts perfectly. However I ended up using DragonUnpacker, which supports XWC archives and offers a nice GUI on top.
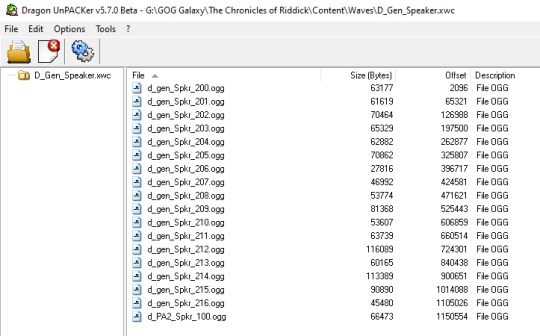
For 2004, we’re interested in the stereo ambient assets stored in Music.xwc and the positional sound effects stored in All.xwc. Sounds were packaged in a more modular way for the 2009 release - we obviously want the contents of Ambience_Butcher_bay.xwc, but beyond that we’ll need to dig in the various archives to find the SFX we want.
I also managed to extract sounds from the 2004 Xbox release. Sadly, they turned out to be strictly worse-sounding than the PC ones. You can read more about this search on the HCS forums.
2004 vs 2009
Most 2009 assets are qualitatively different from 2004. You’ll need to listen to each side-by-side to pick your subjective favorite. Where assets differed only quantitatively (e.g. bitrate), I found no pattern in which release offered the better-sounding asset and thus ended up exploring both.
Determining How Sounds are Placed
If you’re handy with a hex editor, you can inspect the “world” files for each level and peek into where positional assets are played, and at what pitch. I used this method until I discovered there’s a console command for debugging sound: showSoundToggle. This onscreen overlay details which sound assets are playing, at what volume, and at what sample rate (aka playback speed). Activating this also revealed to me that the pitch multipliers stored in the world files aren’t on a linear scale as I had assumed.
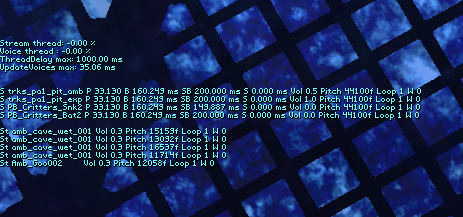
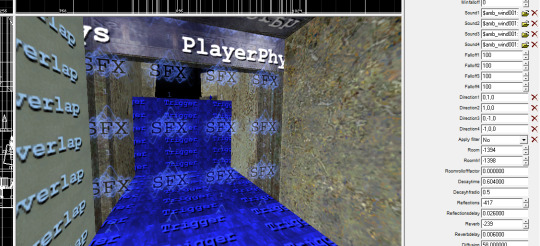
To investigate the sound engine’s inner workings, you can install the GDK that’s available for 2004 and explore a couple of the maps in Ogier. For example, we can find SoundVolume objects, and see that each defines a set of four ambient sounds. Experiments with showSoundToggle reveal that all four are played back at equal volume whenever the player enters the zone. However it’s unclear how panning works between them (experimentally, it seems they each get a fixed virtual position somewhere within the zone).
Putting it All Together
Now all that remains is deciding which scenes you’d like to capture, and recording them while taking note of the showSoundToggle report of each location.
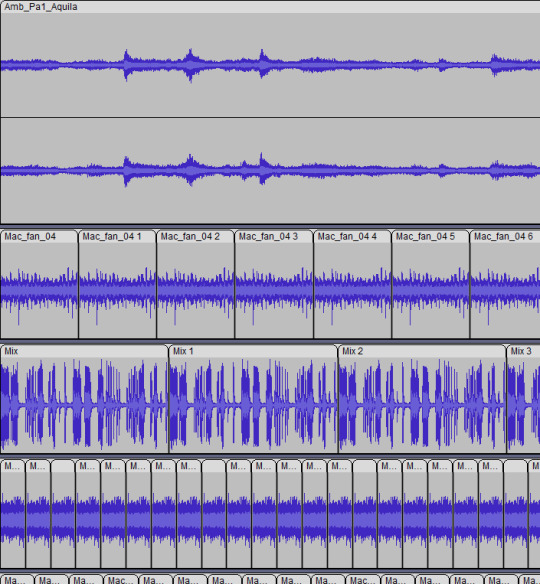
Whether you prefer the presentation in 2004 vs 2009 probably comes down to your personal beliefs about 6th vs 7th generation aesthetics. It will also vary on a scene-by-scene basis as the basic feel of certain locations changed significantly between releases.
youtube
1 note
·
View note
Text
Hikey970について
エンジニアの徳田です。芋を煮るにはいい季節になってきましたね。
我々は普段はActcastの開発のためにRaspberry Piと戯れておりますが、周辺のSoCのチェックも当然行っております。 その中でも、Hikey970というボードを紹介します。
Hikey970
Hikey970はSoC Kirin970を用いたDevelopment Boardです。 特徴はやはり、ARMのMali GPUが使えること、NPUが搭載されていることでしょうか。

他にもあっさりLinuxが動作するため、通常のaarch64環境のテス���などにも用いることができると思います。
CPUの計算能力も高く、ARM Computing Libraryをビルドしても24分ほどで終わります。ちなみに私のデスクにあるRyzen 7 1700のマシンでは3分ほどです。
遅く見えますがRaspberry Piの上では絶対にやろうとは思わない程度にこのライブラリは大きいので、 自前の環境でビルドできてしまうのは驚きでした。
メモリもLPDDR4Xで6GBあります。 前職のノートPCと同じ容量です。。。
温度
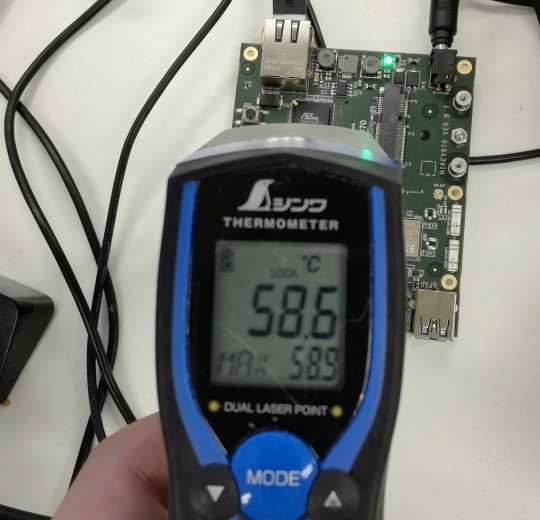
Hikey970は高性能っぷりにあわせて発熱もすごいです。会社で測定してみましたが、アイドル時で約60度あります。
これは本当にアイドル時で、何回も計算させた後では80度を超えることもあり、机に置くときは危険なので触れない場所に置くようにしてください。
セットアップ
他の96boardのSoCはたくさん落とし穴があったりして苦労するのですが、この子は本当に楽でした。96boardsで共通ですが、電源だけ12V 2Aのものが必要なので気をつけてください。また、プラグは日本ではあまり見かけないEIAJ-3規格に準拠したものですが、変換コネクタがついているため心配しなくて大丈夫です。
イメージも公式ページにリンクがあるものを指示通りに焼けばいいです。Raspberry Piと異なり、USB Type-Cを接続しfastbootコマンドでイメージを焼く所は戸惑うかも知れません。
イメージを焼いて起動してみると、GUIデスクトップが本当にあっさり動きます。感動します。ただし無線LANドライバは機能していないように見えます。
ただしGPUの仮想ファイルである/dev/mali0のパーミッションに気をつけてください。配布されているイメージではrootしかこれに触れないようになっています。
動作確認
まずはclinfoを動かしてみます。
$ ./clinfo Number of platforms 1 Platform Name ARM Platform Platform Vendor ARM Platform Version OpenCL 2.0 v1.r10p0-01rel0.e990c3e3ae25bde6c6a1b96097209d52 Platform Profile FULL_PROFILE Platform Extensions cl_khr_global_int32_base_atomics cl_khr_global_int32_extended_atom\ ics cl_khr_local_int32_base_atomics cl_khr_local_int32_extended_atomics cl_khr_byte_addressable_store cl_khr_3d_imag\ e_writes cl_khr_int64_base_atomics cl_khr_int64_extended_atomics cl_khr_fp16 cl_khr_icd cl_khr_egl_image cl_khr_imag\ e2d_from_buffer cl_khr_depth_images cl_arm_core_id cl_arm_printf cl_arm_thread_limit_hint cl_arm_non_uniform_work_gr\ oup_size cl_arm_import_memory cl_arm_shared_virtual_memory Platform Extensions function suffix ARM Platform Name ARM Platform Number of devices 1 Device Name Mali-G72 Device Vendor ARM Device Vendor ID 0x62210001 Device Version OpenCL 2.0 v1.r10p0-01rel0.e990c3e3ae25bde6c6a1b96097209d52 Driver Version 2.0 Device OpenCL C Version OpenCL C 2.0 v1.r10p0-01rel0.e990c3e3ae25bde6c6a1b96097209d52 Device Type GPU Device Profile FULL_PROFILE Device Available Yes Compiler Available Yes Linker Available Yes Max compute units 12 Available core IDs Max clock frequency 767MHz Device Partition (core) Max number of sub-devices 0 Supported partition types None Supported affinity domains (n/a) Max work item dimensions 3 Max work item sizes 384x384x384 Max work group size 384 Preferred work group size multiple 4 Preferred / native vector sizes char 16 / 4 short 8 / 2 int 4 / 1 long 2 / 1 half 8 / 2 (cl_khr_fp16) float 4 / 1 double 0 / 0 (n/a) Half-precision Floating-point support (cl_khr_fp16) Denormals Yes Infinity and NANs Yes Round to nearest Yes Round to zero Yes Round to infinity Yes IEEE754-2008 fused multiply-add Yes Support is emulated in software No Single-precision Floating-point support (core) Denormals Yes Infinity and NANs Yes Round to nearest Yes Round to zero Yes Round to infinity Yes IEEE754-2008 fused multiply-add Yes Support is emulated in software No Correctly-rounded divide and sqrt operations No Double-precision Floating-point support (n/a) Address bits 64, Little-Endian Global memory size 4294967296 (4GiB) Error Correction support No Max memory allocation 1073741824 (1024MiB) Unified memory for Host and Device Yes Shared Virtual Memory (SVM) capabilities (core) Coarse-grained buffer sharing Yes Fine-grained buffer sharing Yes Fine-grained system sharing No Atomics Yes Shared Virtual Memory (SVM) capabilities (ARM) Coarse-grained buffer sharing Yes Fine-grained buffer sharing Yes Fine-grained system sharing No Atomics Yes Minimum alignment for any data type 128 bytes Alignment of base address 1024 bits (128 bytes) Preferred alignment for atomics SVM 0 bytes Global 0 bytes Local 0 bytes Max size for global variable 65536 (64KiB) Preferred total size of global vars 0 Global Memory cache type Read/Write Global Memory cache size 524288 (512KiB) Global Memory cache line size 64 bytes Image support Yes Max number of samplers per kernel 16 Max size for 1D images from buffer 65536 pixels Max 1D or 2D image array size 2048 images Base address alignment for 2D image buffers 32 bytes Pitch alignment for 2D image buffers 64 pixels Max 2D image size 65536x65536 pixels Max 3D image size 65536x65536x65536 pixels Max number of read image args 128 Max number of write image args 64 Max number of read/write image args 64 Max number of pipe args 16 Max active pipe reservations 1 Max pipe packet size 1024 Local memory type Global Local memory size 32768 (32KiB) Max number of constant args 8 Max constant buffer size 65536 (64KiB) Max size of kernel argument 1024 Queue properties (on host) Out-of-order execution Yes Profiling Yes Queue properties (on device) Out-of-order execution Yes Profiling Yes Preferred size 2097152 (2MiB) Max size 16777216 (16MiB) Max queues on device 1 Max events on device 1024 Prefer user sync for interop No Profiling timer resolution 1000ns Execution capabilities Run OpenCL kernels Yes Run native kernels No printf() buffer size 1048576 (1024KiB) Built-in kernels (n/a) Device Extensions cl_khr_global_int32_base_atomics cl_khr_global_int32_extended_atom\ ics cl_khr_local_int32_base_atomics cl_khr_local_int32_extended_atomics cl_khr_byte_addressable_store cl_khr_3d_imag\ e_writes cl_khr_int64_base_atomics cl_khr_int64_extended_atomics cl_khr_fp16 cl_khr_icd cl_khr_egl_image cl_khr_imag\ e2d_from_buffer cl_khr_depth_images cl_arm_core_id cl_arm_printf cl_arm_thread_limit_hint cl_arm_non_uniform_work_gr\ oup_size cl_arm_import_memory cl_arm_shared_virtual_memory NULL platform behavior clGetPlatformInfo(NULL, CL_PLATFORM_NAME, ...) ARM Platform clGetDeviceIDs(NULL, CL_DEVICE_TYPE_ALL, ...) Success [ARM] clCreateContext(NULL, ...) [default] Success [ARM] clCreateContextFromType(NULL, CL_DEVICE_TYPE_DEFAULT) Success (1) Platform Name ARM Platform
Mali G72が正しく認識されているようですし、周波数も767MHzと正しいです。 ローカルメモリもあるし、OpenCLがちゃんと実装できるハードウエアって良いですよね。
基礎性能
まずは単純な計算での計算能力がみたいので、clpeakを動かしてみます。clpeakはOpenCLで書かれた単純なカーネルを実行して、ハードウエアの性能を測るためのツールです。
clpeakは、例えばSingle-precision computeの性能を測るために、FMA命令が連続で出て最後にstoreがある、といった命令列がおそらく出力されるであろうカーネルを実行します。それをみることで、単純に命令が連続で出力された場合の性能を見ることができます。
$ ./clpeak Platform: ARM Platform^@ Device: Mali-G72^@ Driver version : 2.0^@ (Linux ARM64) Compute units : 12 Clock frequency : 767 MHz Global memory bandwidth (GBPS) float : 16.23 float2 : 15.32 float4 : 16.20 float8 : 5.86 float16 : 3.36 Single-precision compute (GFLOPS) float : 175.93 float2 : 175.79 float4 : 175.74 float8 : 175.43 float16 : 174.67 half-precision compute (GFLOPS) half : 55.93 half2 : 105.62 half4 : 105.50 half8 : 105.22 half16 : 104.81 No double precision support! Skipped Integer compute (GIOPS) int : 175.62 int2 : 175.20 int4 : 175.05 int8 : 175.16 int16 : 173.86 Transfer bandwidth (GBPS) enqueueWriteBuffer : 7.06 enqueueReadBuffer : 7.80 enqueueMapBuffer(for read) : 791.32 memcpy from mapped ptr : 7.82 enqueueUnmap(after write) : 1950.13 memcpy to mapped ptr : 7.70 Kernel launch latency : 127.99 us
デスクトップのGPUと比較すると単精度性能が175.93 GFLOPS性能が低いですが、モ��イルGPUとしてはかなりよい結果が出ています。ちなみにRaspberry Piに搭載されているVideoCore4の単精度の理論性能は300MHz動作で28.8GFLOPSで、私のスマホのMali T834ではclpeakの単精度性能は20GFLOPSでした。
半精度の場合の性能が面白いですね。half-precisionのhalfの結果とhalf2の結果で倍の性能差が出ています。
彼らのHotChip28の発表スライドで、この次世代のMali GPUは32bitをベースにしたアーキテクチャであることが明らかになっています。 SIMTアーキテクチャなので計算モデル上は通常スカラ値としてすべての値を扱ってよいはずなのですが、fp16は32bitのレジスタ?を2分割して使っているようなことがスライドで暗示されており、おそらくhalfの際にはこの部分のSIMD化がソフトウエア的に動いていないのですが、half2を使って手動でSIMD化すると期待通りの動きをしているのではないかと推測できます。
この結果はこのハードウエアの構成が見えるようで面白ですね。
DLの性能
我々はこれでDeepLearningなどの機械学習アルゴリズムがどの程度の速さで動くのか興味がありますので、ARM ComputeLibraryで性能を測ってみます。
ちなみに、OpenCLでの数値計算カーネルの評価はCLBlastも考えたのですが、ComputeLibraryのほうがsgemmの性能が出ているようなのでこっちで良いやと思いました。
測定のため、このライブラリのUtil.cppに時間計測のコードを挿入しています。測定時点のバージョンはv18.05です。
気をつけることは、TunerのオプションをONにして測定することです。 TunerなしではMali G72はこれよりハードウエア性能が劣るMali G71に負けることがあります。Hikey970のMali G72は12コア767MHz動作しますが、Hikey960のMali G71は8コア1037MHz動作します。このとき並列度を使い切れていないのか、何も考えないで実行するとシングルコアの性能差でG71のほうが性能が高く出るときが当然あります。
$ LD_LIBRARY_PATH=. ./examples/graph_resnet50 --target=CL --enable-tuner --fast-math ./examples/graph_resnet50 Threads : 1 Target : CL Data type : F32 Data layout : NHWC Tuner enabled? : true Tuner file : Fast math enabled? : true 200729 ms 85 ms 68 ms 67 ms 68 ms 68 ms 68 ms 68 ms 85 ms 68 ms Test passed
チューナーをONにした初回は凄まじい時間が��かっているのがわかります。 チューニング結果はcsvファイルで出力されるため、次実行するときにはこの結果をそのまま用いることができます。
$ LD_LIBRARY_PATH=. ./examples/graph_resnet50 --target=CL --fast-math --tuner-file=./acl_tuner.csv ./examples/graph_resnet50 Threads : 1 Target : CL Data type : F32 Data layout : NHWC Tuner enabled? : false Tuner file : ./acl_tuner.csv Fast math enabled? : true 74 ms 67 ms 66 ms 67 ms 68 ms 67 ms 67 ms 67 ms 66 ms 66 ms Test passed
実験結果を下に示します。全部のグラフを実行するのは大変なので、適当に選んで示しています。なお入力はすべて224x224です。
| googlenet | resnet50 | resnext50 | vgg16 | | 31 ms | 67 ms | 174 ms | 131 ms |
まとめ?
本当は他のAdreno GPUなどと比較したいところですが、あんまり時間もないのでこのへんで。。。 みなさんも火傷に気をつけながらHikey970で遊んでみてください。
1 note
·
View note
Video
instagram
Notch RigidBody ... #madewithnotch #notchvfx #rigidbody #k7 (à Float4 Interactive) https://www.instagram.com/p/Bo-xQ8GFUmM/?utm_source=ig_tumblr_share&igshid=k8g8dbylh7ni
1 note
·
View note
Text
Pritimitive Data Types Size & Values
Pritimitive Data Types Size & Values
Primetive Data Types Size & Values Data TypeSizeValue Range1. Byte1 byte-128 to 1272. short1 byte-32,768 to 32,7673. int2 byte-2,147,483,648 to 2,147,483,6474. float4 byte3.40282347 x 1038 to 1.40239846 x 10-455. long8 byte-9,223,372,036,854,775,808 to 9,223,372,036,854,775,8076. double8 byte1.7976931348623157 x 10308, 4.9406564584124654 x 10-3247. char2 byte0 to 65,5358. booleanDepends on…
View On WordPress
0 notes