#flexbond
Explore tagged Tumblr posts
Text

Marc Horowitz - Surprise Asshole, 2015 - hemp rope, high density foam, FlexBond glue, bondo resin, resin, fiberglass, clay, acrylic spray, acrylic
123 notes
·
View notes
Text

Beauty & the Beast/Doctor Who / Cosplayer : @thats_so_cosplay (Abbi & Ace) / Photo : s @booksavvy (IG) @carlosmphotos.cosplay (IG)
My "cosplay origin story" is pretty gradual. I have early memories of helping my mom sew a few of my halloween costumes growing up. Most notably we made an Arwen gown when i was in 6th grade. My mom did most of the sewing, but she made sure I was helping or watching the whole time. I also got really excited to dress up for fandom release party events in high school/college.
I attended to Leakycon and Chicago Tardis during college with closet/thrifted cosplays. I yearned for more cons and cosplay oppurtunities, but at that time I was too busy/stressed to make my own costumes.
Our first semi-homemade cosplay experience was Rey & Poe from The Force Awakens, for Wizard World 2016. The positive feedback experience of getting so many compliments and photo requests got me hooked and eager for more cosplay.
I sewed the Dalek gown from the same Simplicity pattern that I used for my yellow Belle dress, so it felt good to be working with familiar steps and techniques. I chose bronze & brown fabrics to emulate the popular Bronze Dalek, with a black mesh fabric and gold cording on the bodice to add the effect of the dalek's neck cage. I also added a black satin border filled with batting at the bottom of the skirt to be the Dalek's base.
I painted styrofoam half-orbs gold and sewed velcro onto the skirt to place them in rows. For the lights on the top of the Dalek's head, I 3d printed translucent casings for LED button lights and attached them to hair clips to go on my wig. Similarly, i constructed a "dalek eye" from a 3d printed light case and rubber tubing, and velcroed it to the bodice of the dress. I made arm cuffs from foam and elastic in the style of the metallic tiles that go around the dalek below the neck cage. Finally, I made the dalek's weapons from a real mini-plunger and mini-paint roller with velvet ribbon to hang from my wrists.
One big lesson that I've learned is the value of patience, practice, and test pieces. My biggest "issues" with construction have come from rushing a step. For example, the orbs on the skirt of the Dalek were Styrofoam semi-spheres that we bought. Without doing a test, we spray painted them gold and the paint caused the styrofoam melt and pucker badly. Some of the orbs were salvaged by sanding them down, others had to be trashed. Then we were able to refinish them with flexbond primer and acrylic paint.
26 notes
·
View notes
Text


Progress update!
goal: make this in one or two days

its possible through the power of sheer audacity, being unemployed, and using an old broken sword prop as a base
#cosplay wip#I’ve actually also covered it in flexbond and painted a lot of it#but didn’t take any more pictures yet
22 notes
·
View notes
Text


new cosplay, new little behind the scenes progress pics post!!
Perfection is the enemy of good.. no better quote sums up this cosplay! Basic assembly of the foam pattern was fine, but once we got to sanding down the white foam clay on top.. oh boy. I spent legit months off and on hand sanding this thing, before giving up and buying a tiny hobby drill and turning that into a DIY mini sander.. much more efficient!
Once I was happy with the overall smoothness (and also had no time left budgeted to sand more :P) I coated the clay in Flexbond, before painting with white rustoleum spray paint! I then sealed it on top with more Flexbond because I was terrified of it cracking in the icy winds of Sydney's cold winter ❄️ however this did leave it vulnerable to rain... and ofc, it rained day of the convention 🥲 Last step was glueing in black mesh over the eye holes for that perfect blacked out eye effect!
As challenging as some bits were I absolutely am over the moon with how it all came together ♥️ this is my first big cosplay where I've made pretty much everything myself from scratch.. all the long nights sewing horsehair and sanding was worth it!
#hk hornet#hollow knight#cosplay#wip#supanova#silksong hornet#hollow knight hornet#hollow knight cosplay#hornet
32 notes
·
View notes
Text
Houseki no Kuni/Land of the Lustrous Wig Tutorial: How to Create a Beautiful Gem-like Finish!
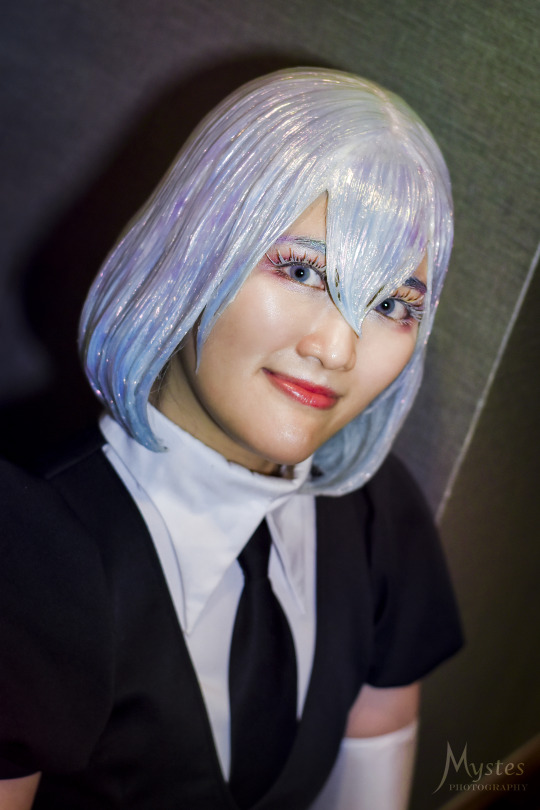

(Left photo taken by @/mystes_photo on Instagram)

When I first saw the characters in Houseki no Kuni, I knew right away that I wanted to cosplay Diamond, but to be honest, I did not like any of the commonly used methods to achieve the iridescent effect at the time (cellophane can easily be damaged, glitter doesn’t have the finish I want, resin is difficult to work with, etc.), so I did some research on ways to achieve a more convincing finish.
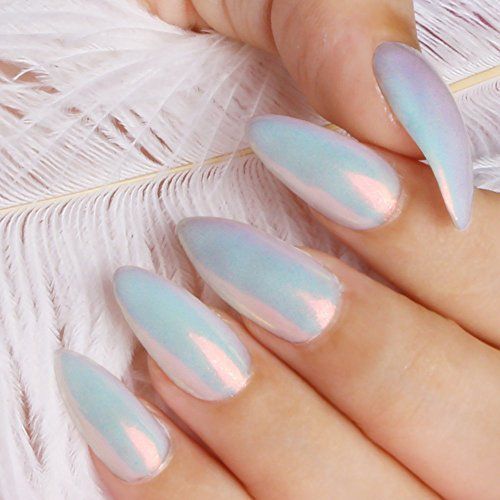
My main inspiration came from nail artists achieving a smooth iridescent finish similar to what I wanted for my wig (Fun fact, I became a SimplyNailogical fan during this whole process XD). Once I discovered that iridescent nail powder was the key material I needed, from there, I did some trial and error experiments to figure out the best method to apply it onto a wig and came up with this method!
This is not a styling tutorial on how to create a Diamond wig specifically, but rather how to create the unique gem-like finish on any wig! This tutorial can apply to any Houseki no Kuni/Land of the Lustrous character you’d like! :D
(Disclaimer, this method and the Diamond wig pictured above were created in 2021, but the wig featured in this tutorial was styled in 2024)
Skill level: Intermediate
Prerequisite: At least basic wig styling skills, dependent on character
Materials needed:
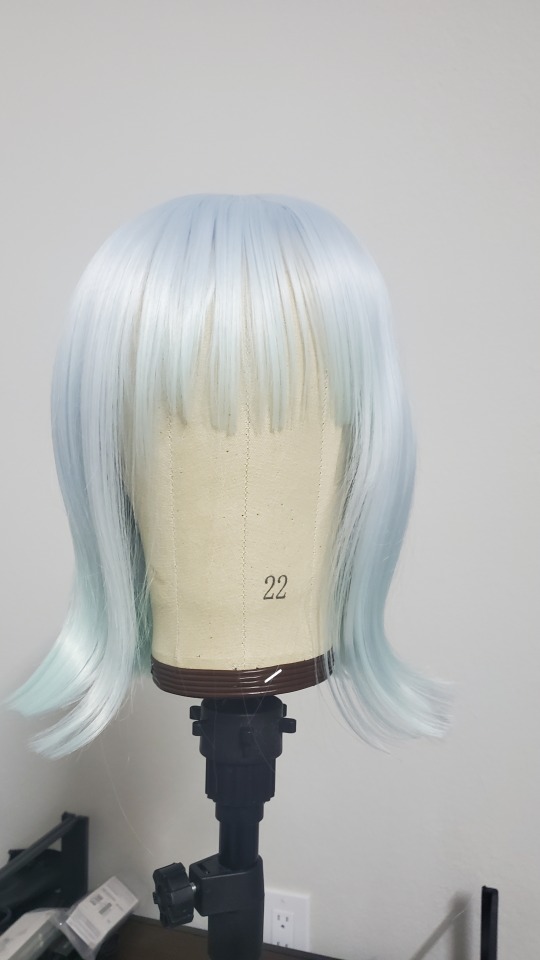

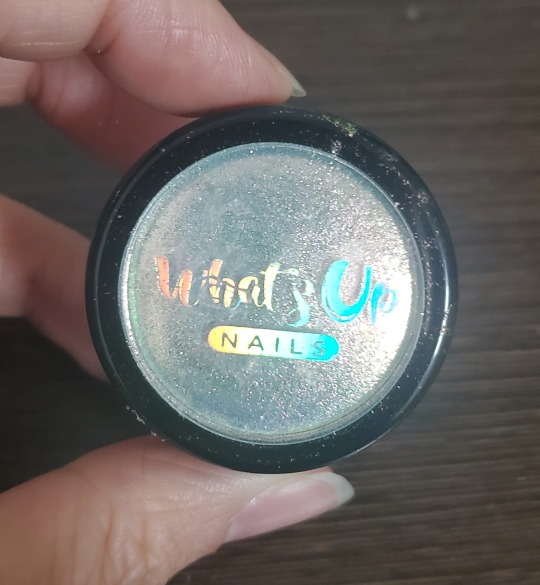
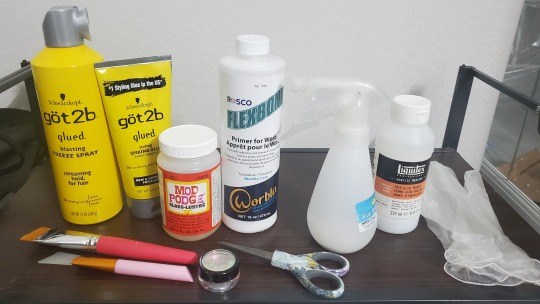
Wig (style varies based on character, but I recommend using a thick base wig if you can! )
Wig head that’s close to the size of your head to ensure that style conforms properly to your head size
Wig stand
Got2b spray and glue
Flexbond primer (amount needed varies, but for reference, I was able to cover my Diamond wig with about ¾ of a 16 oz bottle)
Mod Podge Gloss waterbase sealer (optional if Flexbond is tacky enough on its own)
Iridescent/holographic nail powder (any can work depending on the finish you want, but I used the Aurora pigment powder from the brand What’s Up Nails. One little 1 gram jar was enough to cover two Diamond wigs with quite a bit left over, a little goes a long way!)
Clear gloss varnish
Spray bottle
Wide decoupage brush and/or any wide paintbrush
Silicone face mask brush (optional, but I find it great for smoothing out thick coats of Flexbond)
Mini scissors to trim stray hairs and/or excess Flexbond
Latex or vinyl gloves to rub on nail powder
Safety requirements:

Wear gloves to protect your hands. The nail powder is safe to touch barehanded, but the rubbing needed to buff the powder onto the wig may cause skin irritation or chafing if done excessively.
The nail powder is very fine, so I suggest wearing a face mask to avoid breathing it in/blowing it away. There are no toxic fumes or substances used in this tutorial, so a basic face mask should suffice.
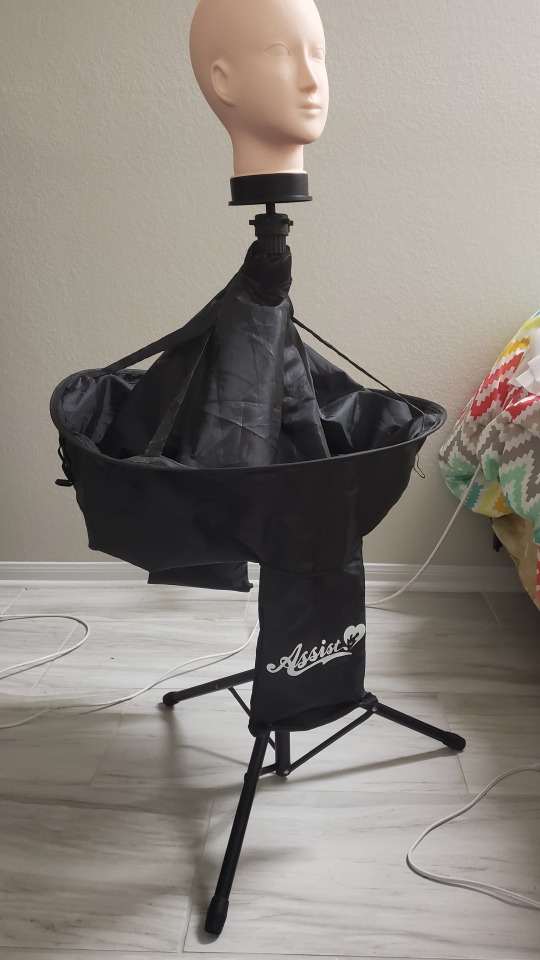
Keep the floor covered to protect the Flexbond from getting on it and causing a slipping hazard (also great for easy cleanup!) I initially laid out a bunch of old Amazon bags around the wig stand, but I recently picked up a handy device from Assist Wigs in Japan that was originally designed to catch cut wig hair, but it does a pretty good job catching dripping glue and loose nail powder as well!
Step 1:


Style your wig as you would a normal wig. This is highly dependent on the character you choose, but from experience, I have two tips I would highly recommend:
Make your wig about 10-20% fuller than you want the final wig to be. Like how actual hair flattens when it’s wet, depending on how the wig is styled, the same thing may happen once the Flexbond is added.
Try to keep at least the outer layer of hair on your wig as smooth and free of tangles as possible. When you coat the wig with Flexbond, any knots or irregularities in the wig will be emphasized. To avoid this, thoroughly comb through your wig to get rid of tangles and straighten any kinks or irregularities. Teasing your wig can leave the outside looking messy, so try to stick to the crimping method to add volume to wigs if needed, or at least limit teasing to areas that will be hidden with smoother hair later on.
youtube
I was quite fortunate that there’s an official 3D model video with the perfect references for Diamond’s hair that I was able to use as reference for my wig!
Step 2:
If you haven't already, protect the floor underneath your wig with any sort of protective covering to catch the Flexbond that will drip down from your wig.
Step 3:
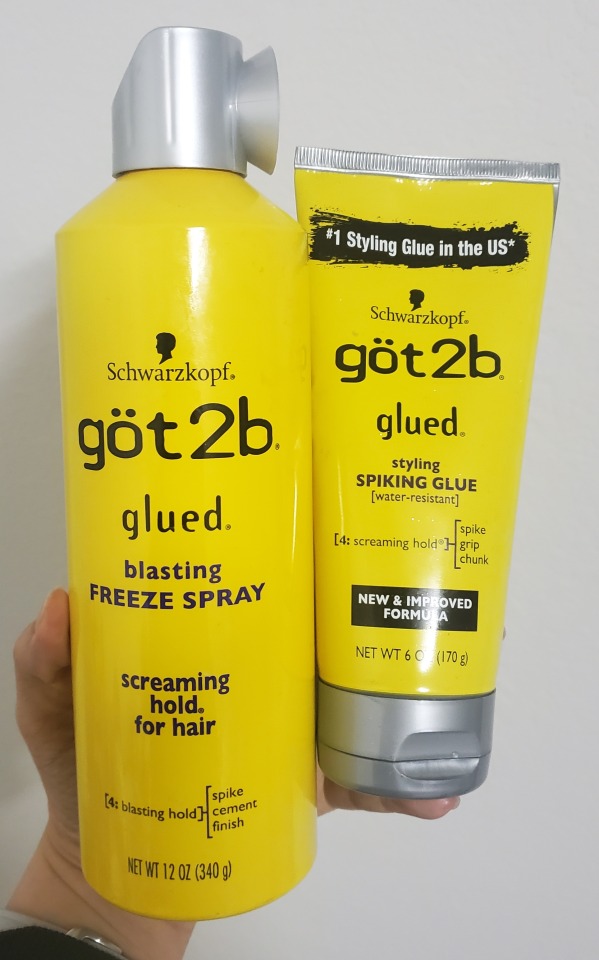
Use Got2B spray and spiking glue to hold the style in place to prepare for the next steps. Apply enough to make the wig relatively stiff, but avoid getting the hair saturated up to the point where the hair looks wet and stringy.
You'll know your wig is ready for Flexbond when your wig is quite stiff on the outside, as shown in the video above.
Step 4:

Take your Flexbond and dilute it with water to make a thin sprayable glue. I recommend about a 1 to 3 ratio of Flexbond to water to create a solution that is thin enough to easily spray yet still strong enough to be an effective glue. I would say the viscosity is similar to milk.
Step 5:
Apply the diluted Flexbond to the wig in a fine mist. If you see any significantly large droplets, use your fingers to carefully smooth them out. Do your best not to press down too hard or oversaturate the wig, as the goal is to create a hard outer shell on your wig rather than to saturate the entire wig in glue.
Repeat Step 5 a few times until your wig feels solid up to the point where the wig hair stays in place even when shaken around (or even turned upside down!) This step is very important because this creates the solid foundation for your wig that will support all the thick Flexbond layers you will be applying later.
Step 6:
Once your wig is solid, coat the outer surface of the wig (you can cover all visible hair if desired, but I like having the hair inside soft against my skin) with a generous coat of Flexbond. You want this first coat to be thick enough to completely cover the outside of the wig’s surface, but not so much that the Flexbond is dripping.
However, if noticeable drips do occur, you can smooth them out with your brush while they’re still wet or trimmed off with scissors if already dried.
Repeat Step 6 for about 2-3 layers or until your wig has a smooth, almost glossy looking appearance, as pictured below.
Below are a few helpful tips to help you with this step!

Remember how if you did Step 5 correctly, you should be able to turn the wig upside down? You can use this to your advantage to help you coat the bottom half of the wig! Just be sure that the top half is completely dry before you place it on a surface. I would also alternate between coating the top half and the bottom half to keep the coats even.
2. You can use the Flexbond to gradually fill gaps between the fibers for a smoother appearance. Also, the more layers, the less emphasized the hair strands will be on the final product.
Step 7:
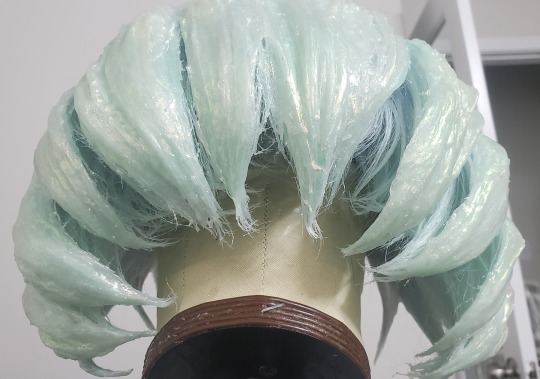

If you have stray hairs or glue strands that you find distracting, you can trim them off using a sharp pair of scissors. In the example above, you can see how I trimmed the frayed-looking ends of the hair to create nice clean points
Make sure to do this step prior to applying any nail powder to avoid wasting powder that be covering an area that will be cut off.
Step 8 (Possible extra step):
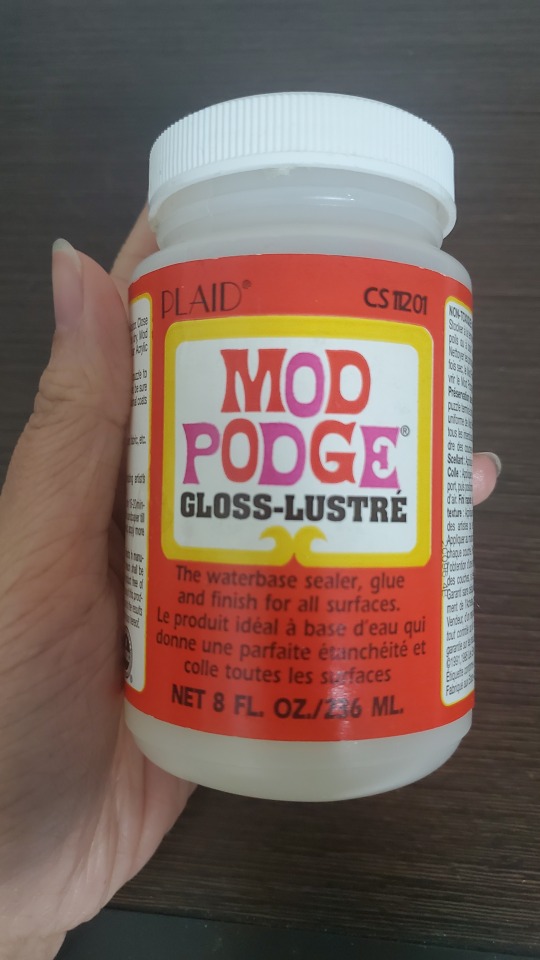
The first time I made my Diamond wig, I was able to rub the nail powder directly onto the Flexbond, which was just tacky enough for the powder to adhere itself to the wig. However, this time around, the Flexbond was not tacky enough and the powder would not adhere properly. I am unsure why this occurred, whether it was the weather/humidity (I created the first wig around Summer 2021 vs. this wig in late winter/early spring 2024) or Rosco tweaking the Flexbond formula sometime in the past few years. Thankfully, I was able to remedy this issue by applying a thin coat of Mod Podge Gloss, which I found stayed temporarily tacky for about 20 minutes after drying.
If you also encounter the same issue, apply a layer of Mod Podge Gloss over your wig. Check it frequently to able to apply the powder as soon as possible once it is dry before the Mod Podge loses its tackiness. Don't be too impatient though, as the Mod Podge will smear if you try to apply the powder before it is dried.
(I’m not sure if using only Mod Podge to create this outer shell would work as opposed to using the Flexbond due to its lower viscosity and lack of flexibility in thicker coats, but I do think it’d be an interesting experiment to try! If it’s successful, it’d be a much more accessible and budget-friendly option!)
*If the Flexbond you applied is tacky enough to apply powder onto directly, you can skip this step and jump ahead to Step 9.
Step 9:
Once your wig is dry, put on your gloves and dip your finger into the nail powder to coat it with a thin layer of powder. Take this powder and buff it onto the surface of your wig, similar to how you would buff nail powder onto your nails. Buff thoroughly until the surface is smooth and looks reflective. It should look almost like metallic/iridescent paint was applied rather than a powdery glitter. Continue this process on the entire wig.
Step 10
If you feel like you need more coverage with the nail powder after applying the first layer, coat the wig with another coat of Flexbond/Mod Podge (depending on what you use to adhere the nail powder), let it dry, then apply another layer of nail powder. You can repeat this process until you satisfied with the coverage. Depending on the powder used, I find that at least 3-4 coats are needed to obtain full coverage and a smooth finish!
Step 11:
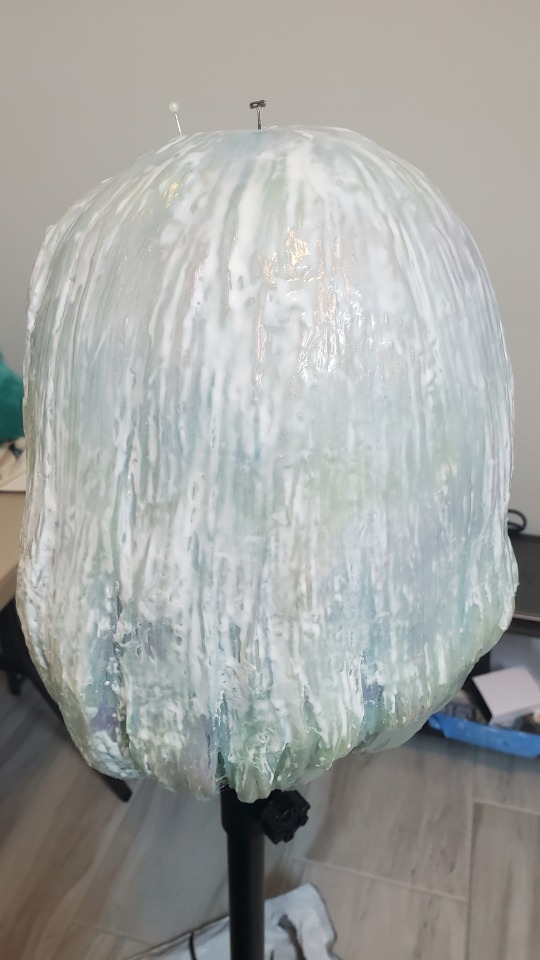
Once you are satisfied with the finish, coat the wig in one last layer of Flexbond to protect the finish and add a bit of depth to the glassy finish as opposed to varnish alone.
Step 12:
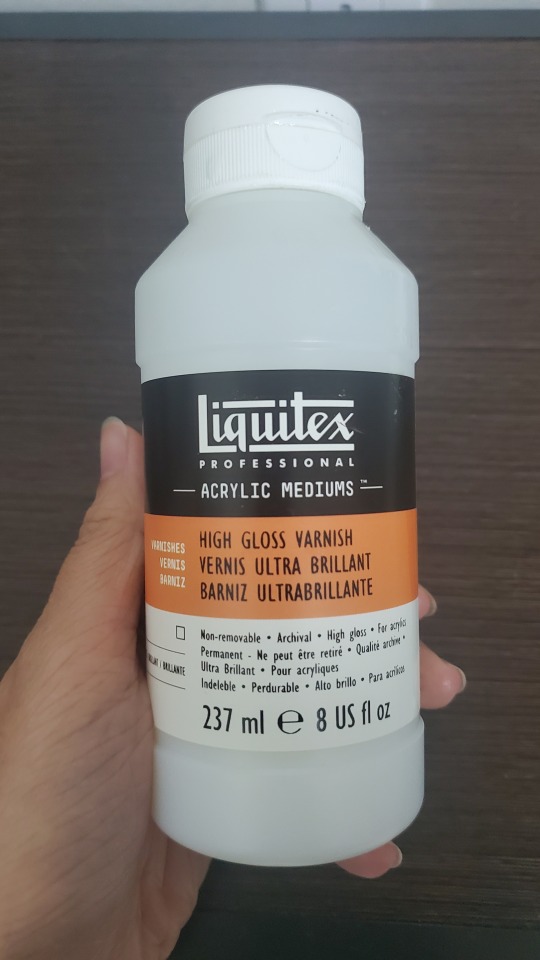
Add a final coat of gloss varnish to give your wig a beautiful glassy finish! You may notice the Flexbond turning white again underneath the varnish. Do not panic, Flexbond is known to do that when it gets wet! Once everything is dry again, it will return to being clear. :)
You Did it!
Now you have your finished Houseki no Kuni wig with a lovely iridescent finish that is not only beautiful, but also indestructible (seriously, I’ve thrown this thing at a wall and it stayed in perfect condition XD) and super easy to put on (very flexible and goes on like Lego hair XD)!
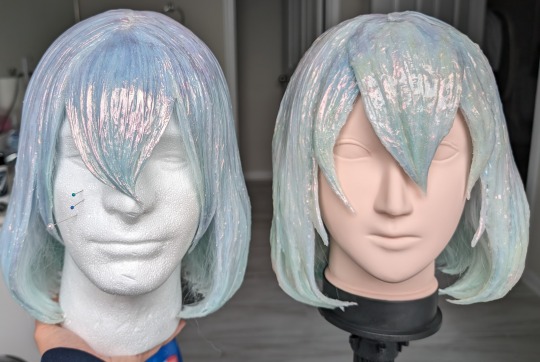


For my second Diamond wig, I wanted to be experimental and try remaking the wig with a shape more accurate to the show (less visible hair strands and more like solid shapes) and adding subtle stripes of color underneath the Flexbond. I will be honest, I actually ended up liking the first one a tad more ^^; It’s okay though, I still learned a lot, and I feel the mistakes I went through the second time around really helped me perfect the technique for this tutorial :)
Another key thing that I messed up on for the second wig is that due to lack of time, I was unable to apply as many layers of the nail powder as I would've liked. As mentioned in Step 10 above, adding at least 3-4 coats will result in a smooth lovely iridescent finish, as seen here on my first Diamond wig!
As mentioned before, this tutorial can apply to any Houseki no Kuni character! Here’s a little work-in-progress of my Phos wig! :) I actually used body glitter by Nyx Cosmetics instead of nail powder because it gave a similar smooth finish to the nail powder and gave the wig more of a blue-green-gold shift rather than a full iridescent rainbow spectrum.
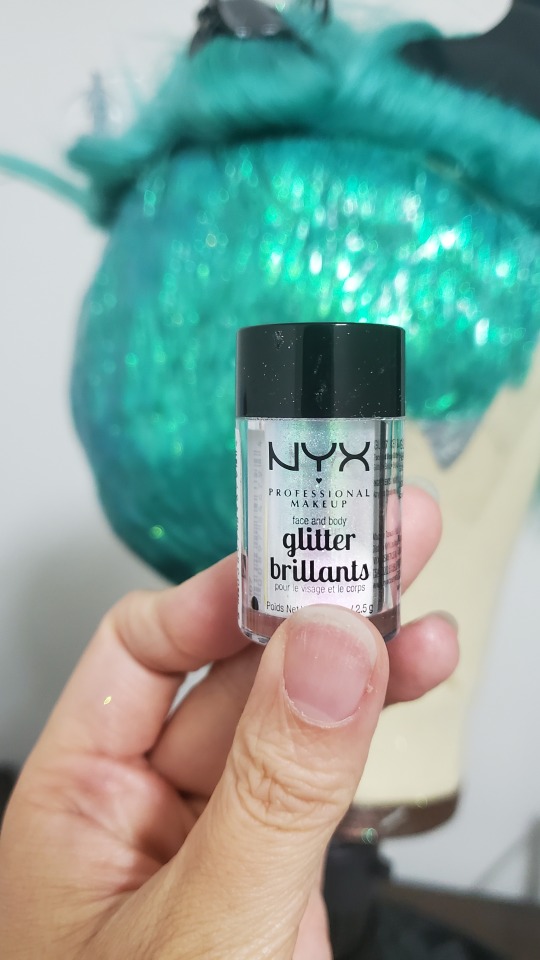
Bonus tip: for characters who have multiple distinct layers/sections in their hair, like Phos in this example (undercut and top half), I suggest applying the Flexbond and nail powder in sections as opposed to all at once.
Final words
Thank you so much for taking a look at my tutorial! I can’t wait to see all the lovely wigs that can be made using it~ ^_^
I'm not very active on Tumblr these days, so if you have any questions or need any clarifications for this tutorial, feel free to reach out to me on my Instagram account @/ashtheketchup!
(This tutorial is my entry for @/cosplaytutorialchallenge on IG's Online Cosplay Tutorial Challenge 2024)
31 notes
·
View notes
Text

The ushaan-tor is made of rubber-like (MJF) thermoplastic polyurethane (TPU) material. It was primed with Flexbond, under-painted with Rust-Oleum hammer black, glossed with Pledge Floor Care Finish, chromed with Spaz Stix Ultimate Mirror Chrome, and the black handle was painted with Blk 3.0 and then coated with a 50/50 mixture of Flexbond and Pledge Floor Care Finish to make it safer to handle. This ushaan-tor, being made of rubber-like, should be safe at cons. It's not sharp at all.
I made the STL design myself using Inventor, based off various canon designs.

17 notes
·
View notes
Text


WiP - Allen's Curse
You might have seen it already but while I was working on the buttons for Clown Allen I also worked on the gears for the curse!
I already had started making them around the time I made the Innocence gloves but never came further than cutting the base parts.


So after picking the whole project up again I ordered some red sunglasses as base and worked on the gears by covering them with foam clay.
And added some texture later on.


After priming them with flexbond I added silver leaf to it for the certain shine, but as you know me... I love battle gear for the used look. Of course I went on it with paint again.

The next thing was attaching the gears to the sunglasses.

Which was overall not the problem but it took me another 3 hours to figure out how to adjust everything to actually wear them without the curse slipping off by a slight movement.


Buuut it was worth it. It's a small addition but I think a pretty cool one.
I have another idea to upgrade one of the outfits we will see if I come to that or if I actually will work further on other projects.
This has been queued up for a while as a lil showcase I already wore it to a con and I have to say it rarely slipped which was pretty cool. The fiddling paid off.

11 notes
·
View notes
Text
For the past several months I've been working (and am still working on) a cosplay of my OC George Jackdaw. George is a corvid bard, a jackdaw in fact, who didn't have a last name so it'll just put down it's species instead.
I'm using mostly @rah-bop 's tutorials (bless you and your tutorials on Rue) and a pattern from Etsy for the head. Here's some progress pictures, because I'm nowhere near finished:

The mask is an EVA foam base from an etsy pattern for a corvid skull. I'm still racking my brain on how to add the eyes in there with me still being able to see.
Speaking of which, here's a little clip from my Twitch stream(same handle as here) that shows my prototype of animatronic eyes with an Arduino Nano Every. I've since changed the eyelid base from foam to 2mm aluminium wire.
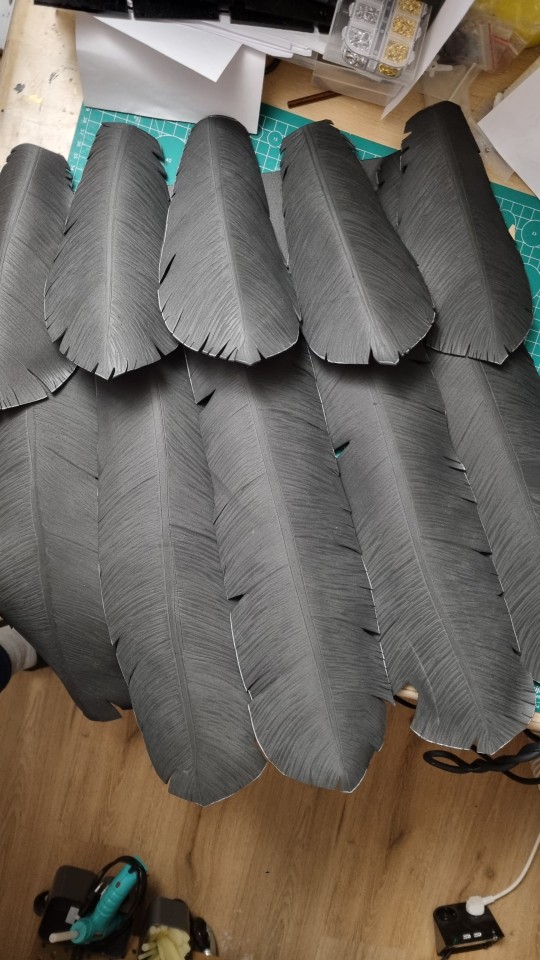
And some tail feathers that I added metal wire to for support (not pictured). I added flexbond primer today (also not pictured because I've been too busy) and sadly it covered a lot of the lines I scored in for detail, so I'll need to figure out a way to fix that. Or not.
6 notes
·
View notes
Text
Have not been on here nearly as much as I used to-outside of my job I've been working very hard on my next cosplay build: Electra from starlight express
This is the most complex costume I've ever made, but I'm very pleased with what I have so far!
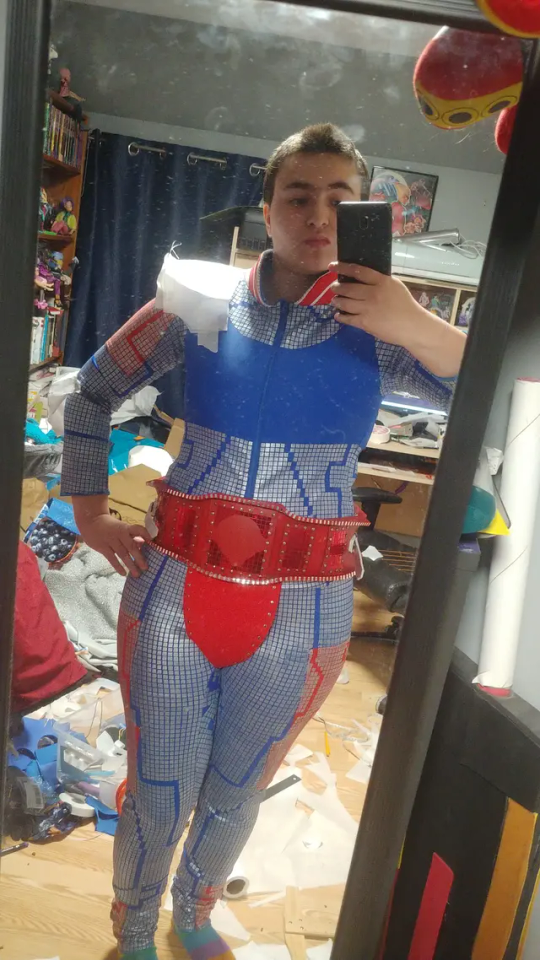
Still have a lot of ways left to go! But it's been extremely rewarding seeing things piece together so nicely
Write-up and WIP photos under cut
The very first thing I started with this costume was the bodysuit, it is the foundation that everything will sit upon so it should be out of the way first, and it would be easier to pattern my armour once I know how it will sit in relation to the rest of the costume
I also knew I would be wearing this to a convention and would want to have easy access for the washroom, so I actually turned a full bodysuit pattern into separate leggings and a leotard with a snap crotch closure
Did the leggings first-at first I wanted to be as accurate as possible with a silver chrome foil HTV that I cut on my Cricut machine with the circuit pattern cut out- but I found out after ironing that despite there being all these spaces between the squares that the fabric did not stretch enough to be able to fit(I had made mock-ups for my clothing pieces and those did fit correctly)
Red sections of clothing is turned edge applique done with water soluble stabilizer so it could stretch after throwing it in the wash
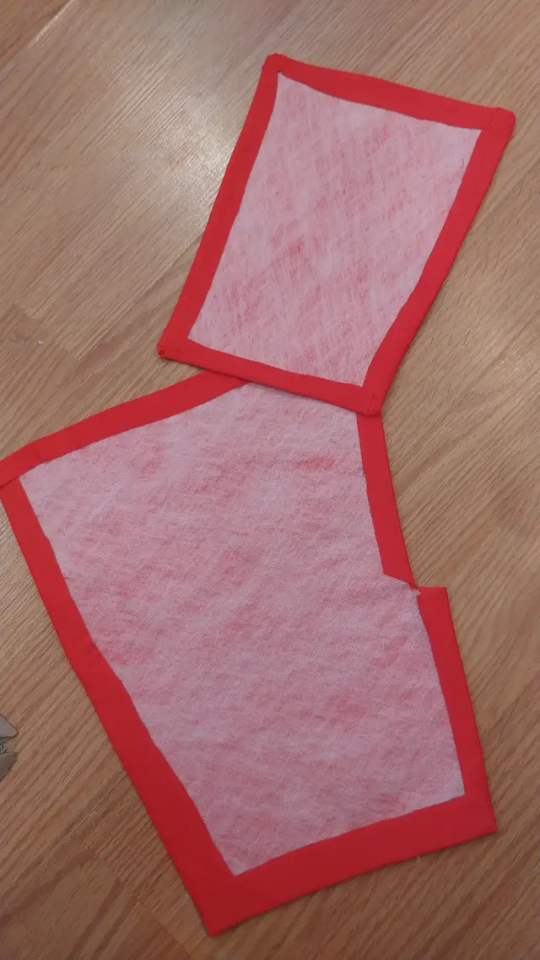
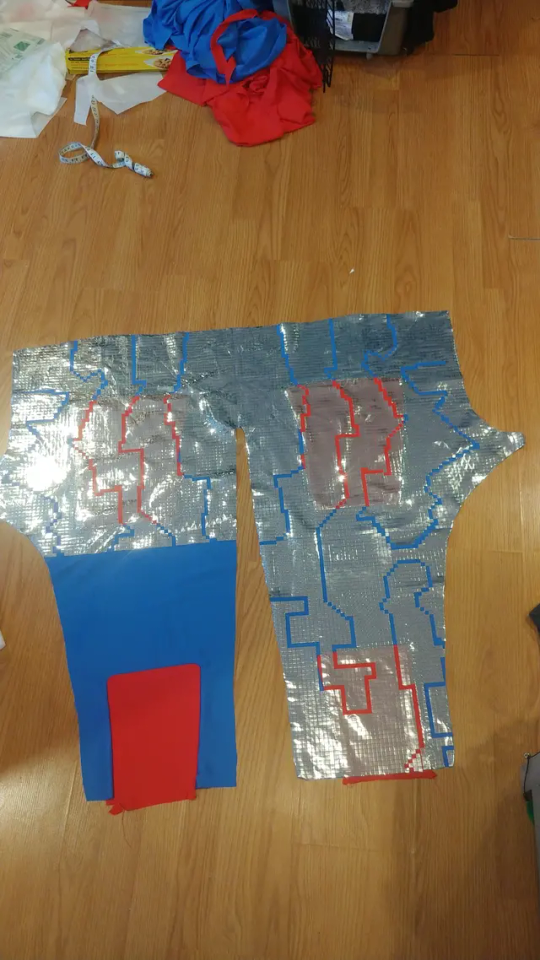
So after that didn't pan out I switched to a stretch HTV, just using the same design files, and widened the legs a bit, it helped a bit but the HTV not only did not stretch enough, but does not like the lycra I was using and in areas with the most stretch the squares were peeling and in some places even falling off
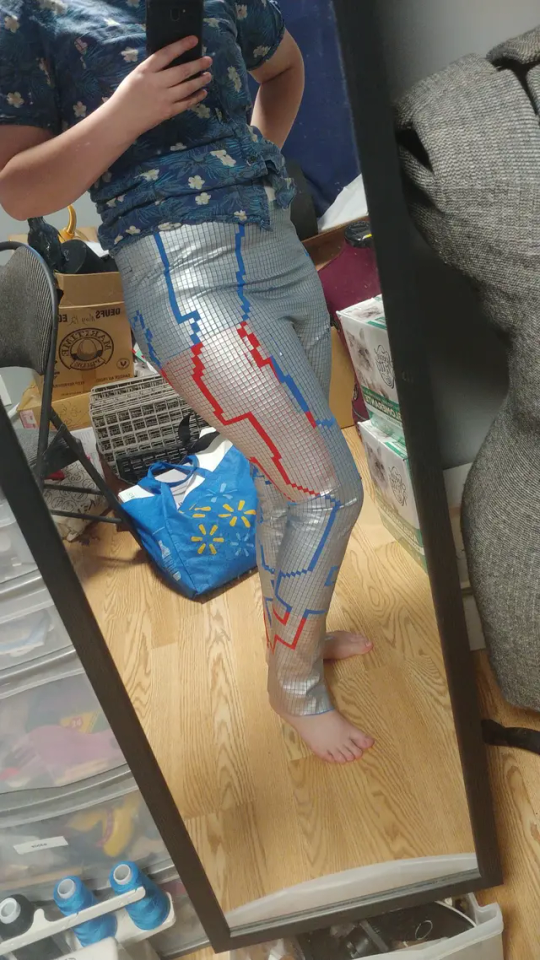
At this point I had spent almost an entire month on just my leggings-clearly I had to try something else because the HTV was just not going to work
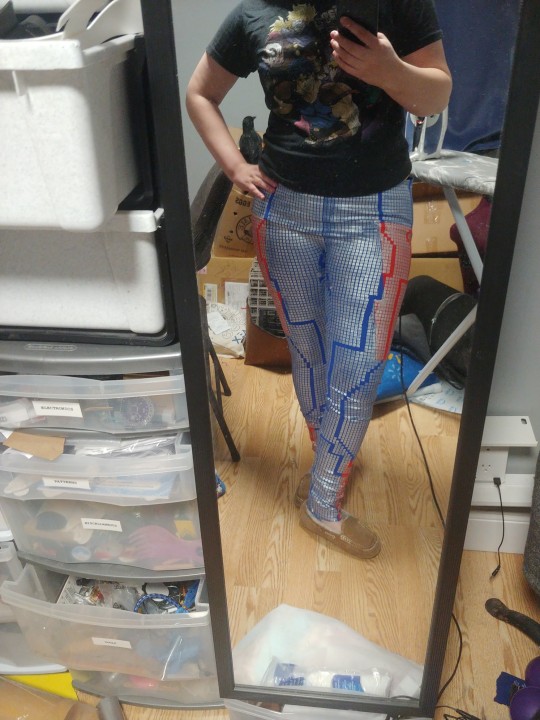
I got jacquard lumiere fabric paint in silver-it's okay if I could go back I'd probably just have gotten angelus leather paint I find it has much nicer stretch and softer feel
I also widened the spaces between my squares to give them a little more stretch, and cut just a full grid of adhesive vinyl to use as a stencil and kept the wider pants pattern from my second pair
I did have to mask off the circuit pattern this way but it came out very nicely and finally had a method that gave me a wearable garment
So I moved onto my leotard next with significantly less headaches- though my arms did not stretch enough after being painted but that was easily remedied with a gusset on the underarm
Collar is interfaced with flexfoam
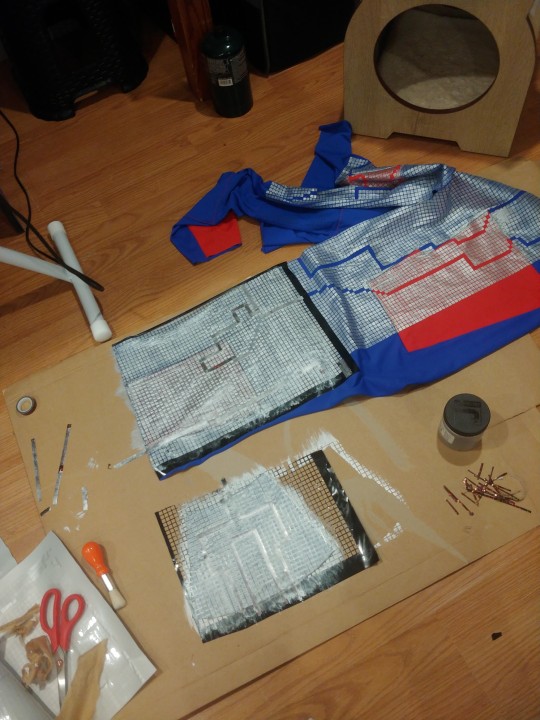
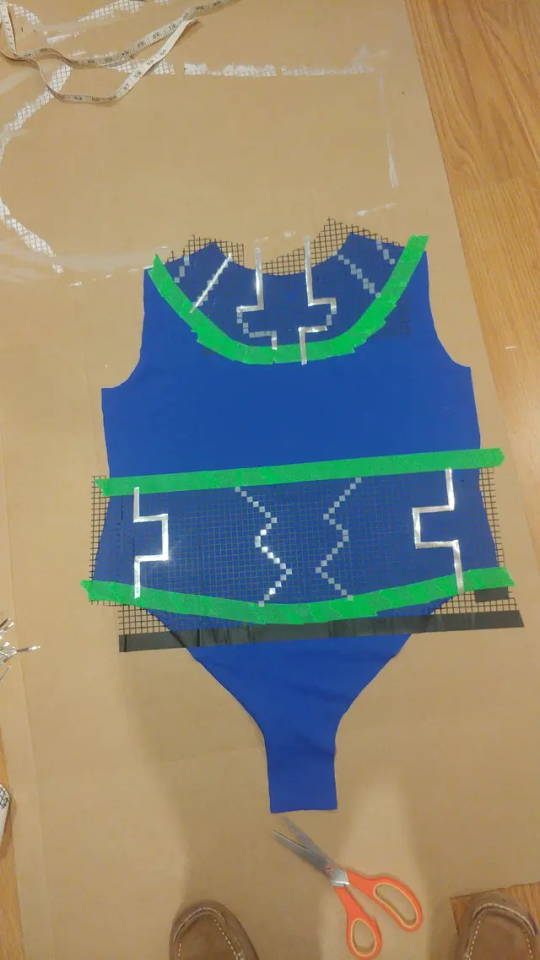
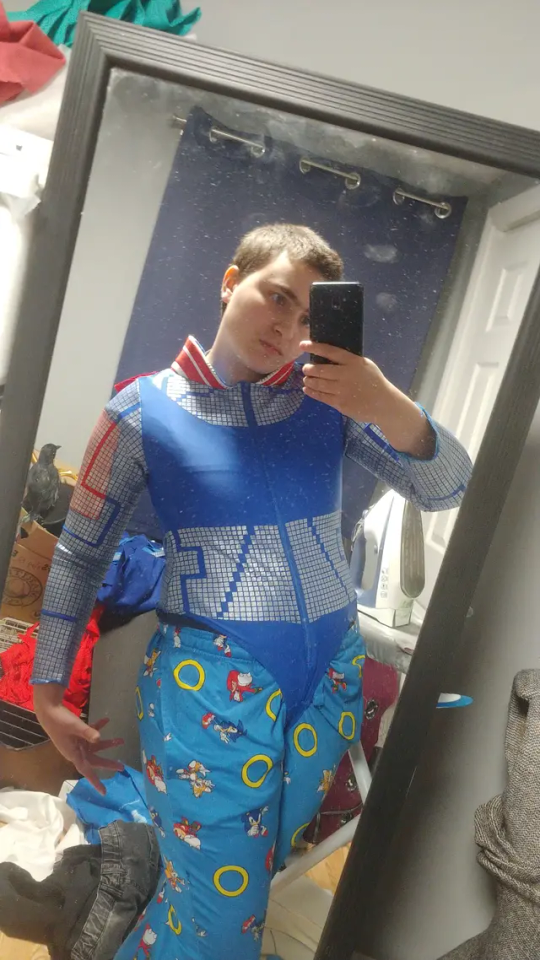
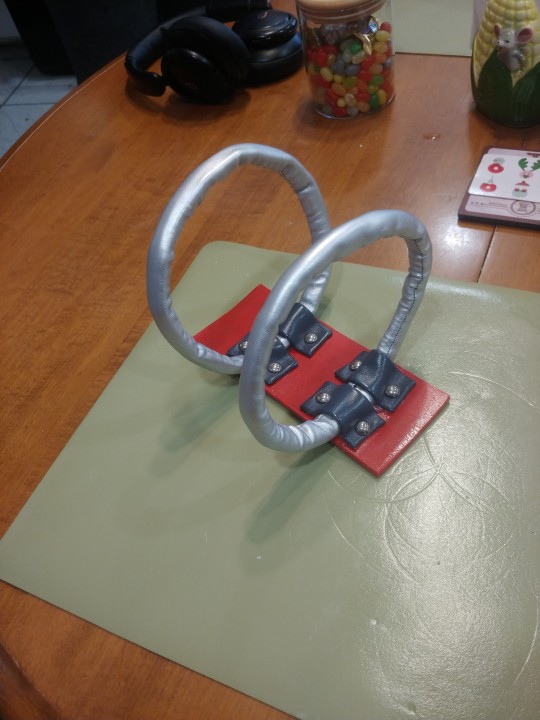
Since my thigh armour will attach to the belt that was next, honestly pretty easy, mostly rectangles, used real studs and then permanent vinyl for the red and silver bits
Couplers are flexfoam inside a tube of silver pleather, physical belting straps is a thick interfacing covered with the same silver, had to use grommets for the belt holes because it was very frayed when I punched them open
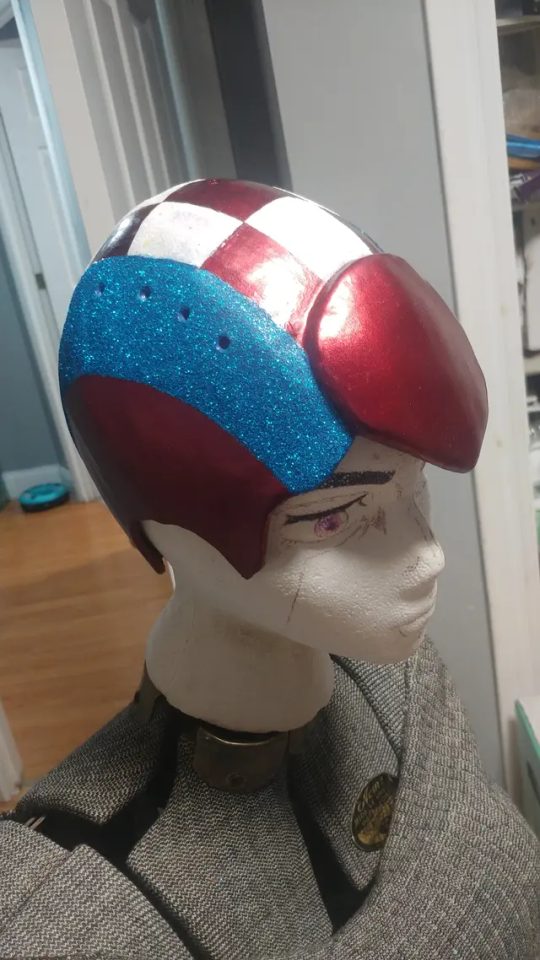
Tumblr mobile won't let me add more than 10 photos on mobile but for my helmet I duct tape patterned my head and then used 2mm foam covered in worbla, used wood filler and sanded that as much as I could, then covered in a few layers of flexbond and then wet sanded that
Painted with automotive paint to get those little silver flecks, and then painted the colour blocks and covered them with glitter
Still have to add the stripes and chinstrap, and going to be using magnet snaps to attach the Mohawk to the helmet
That's essentially what I have so far!
I 3D modeled the little arrow thing that goes on the front of the belt and elbows, my brother's going to 3D print them for me 🤭
Started foam patterning this week, my original goal was to have this done by November 7th(leaving for the con I'm taking them to) but again-i did have almost an entire month of setbacks so I'm going to try to not take it too hard if I don't
11 notes
·
View notes
Text
Much later than I thought it'd be done, it's Stygius v2! Not absolutely perfect, but much better than my first attempt


(Full process under the cut)
[Skull pauldron] [Belt] [Greaves] [Toga + sash] [Wig + Laurels] [Armbands] [Flaming feet] [Satyr Sack] [Stygius v1] [Stygius v2] [Nectar]
For Stygius v2 I kept the blade the same, and used the same base pattern as v1 - the main change was the hilt, which I made shorter and adjusted the skull and pommel accordingly. To reduce the hilt diameter I also used some sort of shrink rubber (that I believe is meant to be used for electrical work) instead of covering the PVC pipe with foam like I did with v1
From there the process was much the same - cut away most of the bevel for the edges, then sand down to a smooth finish. I used a hand sander immediately instead of trying to get an even edge with a dremel, but even then I had some issues and decided to do the whole edge with foam clay for the smoothest finish

Before that though, I got to work on the pommel and skull! I used the same process for the resin gem at the end, but hated the colour so decided I would paint over it this time. I also made sure to pack the aluminum foil extra tightly when crafting the skull so it wouldn't have the slight give that Stygius v1 has, and caused a few minor cracks in the finish. The actual pommel was designed to be much shorter and with a smoother curve, though I was kinda making it up as I went to once again it became an area I had to fill with foam clay


Foam clay my beloved <3
After cleaning up the blade edges with foam clay and letting it set I could get started on the leaves. I used the same process as v1, though I changed the placement slightly and added a few on the sides. I also wasn't super happy with how easily the runes got lost on v1, so I cut the patterns into the foam instead of pressing them in for v2.


I used flexbond to prime the foam this time since plastidip is expensive and I have terrible luck with aerosols, especially since I don't have a dedicated spraying area and Australian spring and summer weather is all over the place which makes for a terrible outdoor spraying experience. That being said, I did use a base spray paint coat of ivory to get the sword a uniform colour before painting the colours and details

...by hand. all of it. Each colour needed a minimum of 3 coats
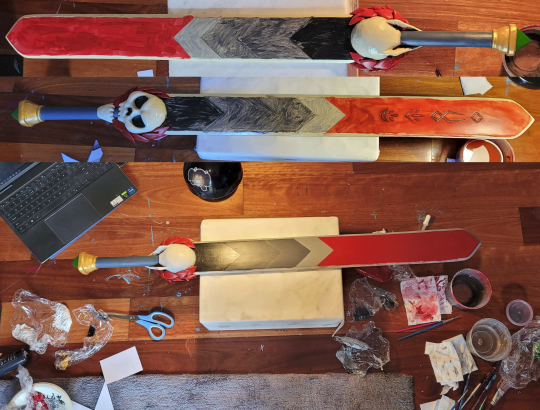
Then the only thing left was to spray the clear protective coats! Matte for the hilt and skull, gloss for the blade and pommel

While the edge isn't perfect and I would have liked the gem to be more glossy, I'm incredibly happy with how v2 turned out, and v1 now gets to live out its retirement sitting over my window watching over my room

#my cosplay#cosplay process#hades game#zagreus cosplay#cosplay props#stygius#NEW AND IMPROVED#I had a year to remake this but still only got it done the week before the con why am I like this
18 notes
·
View notes
Note
How do you make your cosplay weapons?? They look so cool!!
Thank you so much!!!
I mostly work with EVA foam and some worbla. I haven’t made a ton of weapons yet but they are pretty fun. Weapons usually need an internal structure so they don’t get floppy. The spear I’m almost done with is pretty much a half inch PVC pipe (which is cheap and you get to confuse your local Home Depot when buying it). I have used sculpture armature wire in the 2 swords I’ve done, but people use other stuff, too- I already had the wire.
A lot of people 3D print this sort of thing, too. I don’t have space for a printer and learning how to model and print is a whole bunch of other skills I’ve decided I don’t need to try and learn at the moment. I find prints more brittle and they are harder to repair but I also feel the fidelity is a lot better?
I tend to do competitive stuff because that’s how I am, and the more stuff you actually do, the better, so I also prefer to work in foam as with a print I’d buy a file and pay someone else to print it right now, so I can only be judged on finish work. With a foam weapon- I did buy a template for my spear but I had to figure out how to make a 2D drawing a 3D object


Like I started with paper and a pipe a month ago. I’ll have this done today.
I find the cosplay community is super helpful, too, if you need help figuring something out. I had lots of tutorials and videos about how other people made their stuff so I could pick over ideas on how to make mine. The spear breaks down into three parts to make it easier to travel with…and so I can convert it into a fusible TOTK style spear (hopefully in the near future)
I also finish stuff by hand- weather is unpredictable here in the spring so this is primed with a brush on self leveling and flexible primer called Flexbond - it’s meant for foam and thermoplastics- and I hand paint it all with acrylics. There’s a ton of fun paint out there and it’s easily my favorite part. The spear uses a metallic black and red as well as the silver.
I need to finish this up today and take its glamor shots so I’ll probably share those later. Thanks for the ask!
#cosplay#answered ask#prop making#legend of Zelda#readwritebeawesome#my midlife crisis is more fun than yours
15 notes
·
View notes
Text

Building Dango: Part 4
We're so far in and still have so fucking much to do. I am fearing I may not have this guy made in time. Which I'll have to stomach through clenched teeth.
We're moving on to priming. And I'll be using Flexbond for this. I previously used a spray version, which fucking stinks. (If any of you guys remember the making of my kenku fursuit then you remember the horrors of gassing my family.)
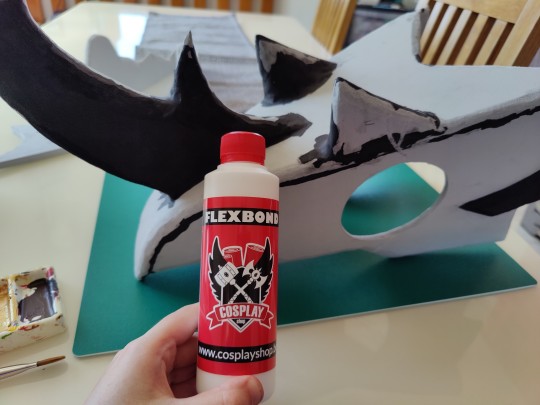
This is odourless and I can slap quite thick bits of it on there.
It's water based and kinda smells like PVA glue (suspicious...) but honestly it worked wonders. I was hoping it would cover up the majority of roughness and imperfections, and with three coats, it did mostly that! Kudos to my friend for pointing me in the direction of this substance.
It took about 3-4 hours to dry on each coat, and I could safely do it inside. Unfortunately there are paintbrush streaks. But I can stomach that.

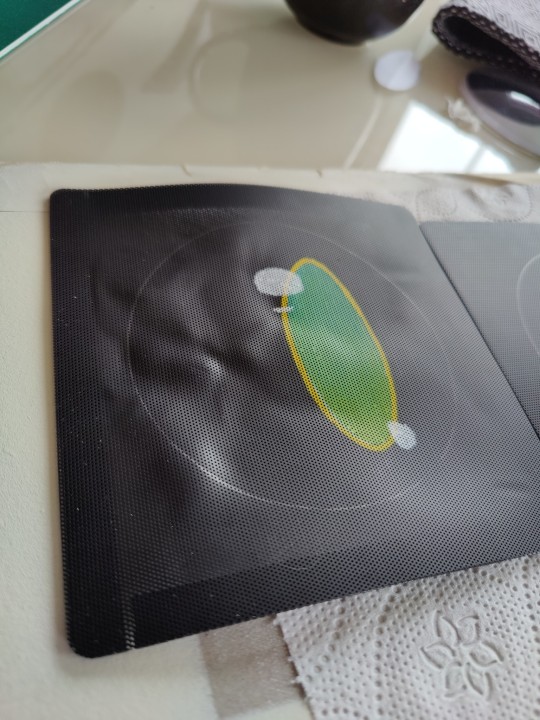
In between waiting for the coats to dry, I got to work on the eyes. I'm using this mesh as the base. It's nice and thick, does have a bend to it, and has fantastic view through the many holes in it. And since it's already black, I only need to paint the pupil. Though I have also painted a set of eyes for a friend that were fully painted and they looked fine too. Poking any clogged up holes IS a chore though, so to make sure there's as little of that as possible, you gotta water down your acrylic paint and slowly work your way up with coats. I haven't tried dried brushing it, mainly because that method is quite messy, and watered down colour worked better for me.

However, this didn't go without a tragedy. While trying to get the paint to dry faster, I often use a hairbrush. But. Well I was holding the mesh up in the air and drying it. And I guess I held the hairbrush too close and it bent the metal just enough to make dents from where my fingers held it. And. Unfortunately. Begudgingly. I could not restore the mesh back. So I had to paint the second eye all over again. So if you're drying with a hairbrush- do so on a flat surface.

For the JAW.
And here's where I start to realise I'm doing this backwards.
For the Jaw I will be using chicago screws. Originally I was going to use this hinge I got off etsy from a polish maker:

But Dango's head is already quite. Tight. And these would add another centimeter on each side of the head and there's just not enough space for that- nor do I think they would fit actually....
SO HERE WE ARE: CHICAGO SCREWS.

Chicago screws are originally used for leather work, and come in various sizes. The main body of the screw is sleek, so the jaw can freely move around on the middle part, while the actual tube is hollow with end being the 'screw' part. This screw part will be inside the jaw so I can freely unscrew it if I ever need to. While two pieces of my high density foam are about 2cm in thickness when smooshed together, I opted for 17mm thick screws instead. Which meant I head to drill holes, then indents into those holes, to make sure the screws fit in.
I did this because A: the flat part of the screw is going to poke through to the outer layer of the skull that will not have fabric covering it. It needs to be flush with the skull so that its not as easily seen. I made it sink into the foam by another 1-2mm so I could then cover it in sculpting foam and then.... prime it again. Like an egit. Anyway. And B: I didn't want the screws to poke me into my cheeks. Even though they're flat, Id rather drill into the foam and have it flush against it then poke out and be texture hell yanno?
Always test the drill bits on scraps though before you commit to the real deal! It took me a while to get the hang of the actual drill bit of my rotary carver, but in the end I was confident in actually drilling the mask.

ISN'T THIS CLEAN. God I'm so proud of it.

So I was drilling again after priming shit. I should've done this before the priming stage. But tbf they only arrived in the mail after I primed so. Whatever. (spoiler: this isnt the last time I pull out the fucking carver)
THE JAW IS HINGED.

And we continue working....
12 notes
·
View notes
Text
Ezio Auditore Pauldron Part 1
Starting with reference photos, I created a paper pattern and traced and cut it out of 5mm EVA foam for the base structure and foam clay for the details, similar to the bracers.
For the base structure it took a few sheets of 5mm foam and I also cut a foam disc to create the raised circular detail. Having learned from the bracers, I first shaped the pauldron before adding the foam clay details. I rolled many snakes of foam clay and using water attached it to the base structure. After heat sealing the foam, I used Kwik Seal to smooth over any gaps, using water to make it smooth. Then I used 3 layers of Flexbond for sealant.
#ezioauditorecosplay
#ezioauditoredafirenze
#ezioauditore #assassinscreed #assassinscreedbrotherhood #foamarmor #wipwednesday #wip #pauldron
instagram
#cosplay#wip#foamarmor#assassinscreed#assassinscreedbrotherhood#nycc#ezioauditorecosplay#ezio assassins creed#ezioauditoredafirenze#ezio auditore#Instagram
2 notes
·
View notes
Link
Check out this listing I just added to my Poshmark closet: Red Wing Brown Flexbond 6” Safety Toe Metguard Work Boot Style 4421 Mens 10 NWT.
0 notes
Text
I've been working with foam clay a fair amount and here are my tips if you want them:
You can add some kinds of fine detail after it dries. Foam clay can be cut and sanded. A craft knife/scalpel works ok. A dremel tool works better if you have one, plus dremels have all these attachments to get different shapes and textures.
Apparently you're supposed to seal before you paint but I never have! Whoops.
Sand and prime before you paint. Even just lightly sanding with the finest sandpaper by hand will help so much. Flexbond gets recommended as a primer a lot, but even just going over it with a plain white acrylic first will help some.
Acrylic paints work best in my experience. I've learned to be patient letting coats dry, otherwise my paint often comes off (anybody with real painter education probably knows this but I am merely a craft supply hoarding goblin).
Some kind of fixative spray after you're done painting will help with paint durability.
This is what I've been working on! Lil mushrooms for a cosplay.

Gonna need to come up with a name for this (future) puppet soon.
4K notes
·
View notes
Text

WiP - Crown Clown, Crown Ornaments & Redoing the glove


As I started working on the Innocence Arms I wanted to work on Crown Clown as well and coated the Ornaments (my parcel with Flexbond still in postal limbo q_q ) but the whole thing didn't work.


The paint flaked off several times and I wasn't happy with the magnets and somehow... I decided to redo the whole thing. And then postponed working on it until I had figured out something better.


Plus with the Innocence I made a better pattern for gloves and learned new ways to attach things, I decided to improve the whole glove, good thing I started early enough.


I'm not sure how to add the parts by now, I'm torn between several methods. But for now I have to put this aside.
As you know this stuff is queued up and this was how I needed to leave everything behind as I had to pack for the bookfair (... and in hinsight I should have paid more attention while packing things, would have helped greatly to pack in EVERYTHING).
Aside that I have choosen the variant I will wear underneath Crown Clown for the Dokomi, it's the prisoner outfit, shouldn't be too complicated to sew.

I already bought some shoes and figure out the closure. The pattern is pretty basic though.

While I was at it I got new boots for the third Uniform, as I will attend a smaller (more local) con in May I decided to wear the third one again, I repaired it and a tiny upgrade is nice I guess C:
5 notes
·
View notes