#figured out how to export with colored highlighter
Explore tagged Tumblr posts
Text
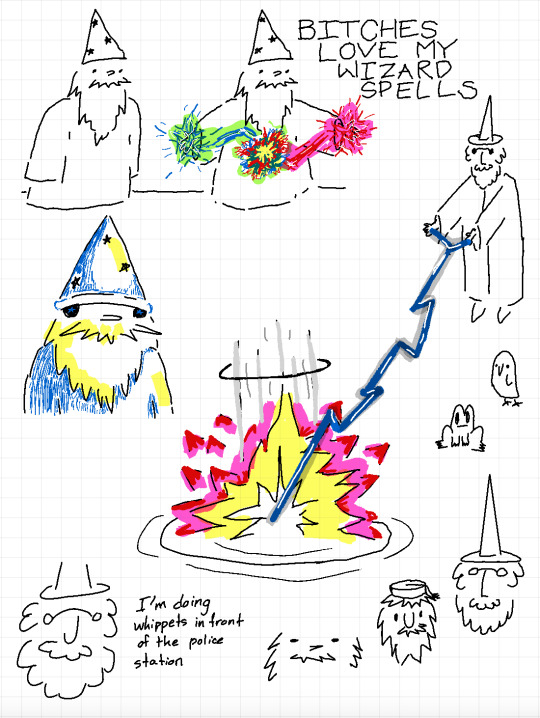
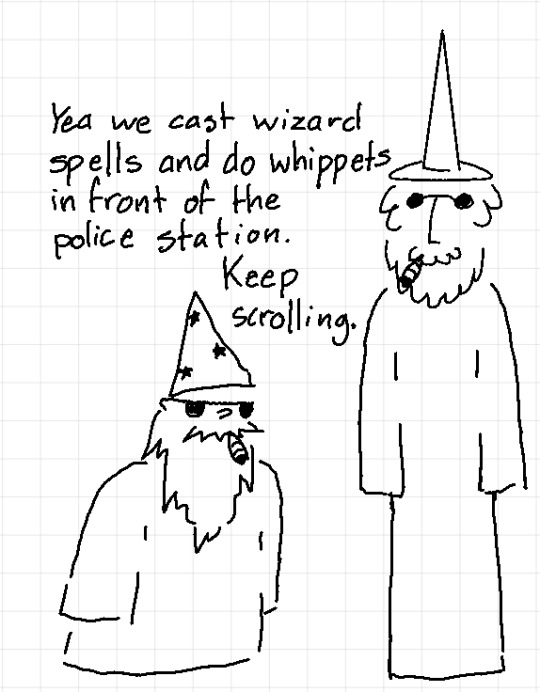
doodles from class: wizards once again. now with colour!
#wizard spells#wizard#wizardposting#wizardblogging#wizard shit#shitscribble originals#figured out how to export with colored highlighter#kind of a shit range of colour once it's exported#but what are you gonna do#also figured out how to copy+paste the doodles onto one page#so nobody has to see The Maths or The Sciences
19 notes
·
View notes
Text
HOW TO: change the background color of a gif with a lot of movement ⭐
for if you are lazy as fawkkk like me and don't feel like figuring out how to use keyframes, or if your gif has too much movement to make it work teehee. it is labor intensive, but this gif originally looked like this so it is definitely worth the effort!
METHOD 1: adjustment layers
this works well with movement, however results are best if the background is very distinct! i would not advise against attempting this with a red or yellow background because it is going to mess with the skintones. i'd aim for blues, cyans, pinks, purples and very saturated greens (because some shades of green will be picked up as yellow and not adjust well)
for tutorial purposes, i'm going to go with a gif with a background that's cyan/blue. you can go ahead and get your gif loaded in, sharpened, etc. you can color it first, however i'm not going to be doing so.
the first thing you're going to do is make a hue/sat adjustment layer. you are going to bring the overall saturation up first (so leave it how it is and increase saturation). this is very much a matter of personal taste so just do as much or as little as you'd like. i'm also going to do a levels layer. use the eyedropper to pinpoint the darkest black and whitest white on the image. this leaves us with this, the goal here being to accentuate the background a bit.
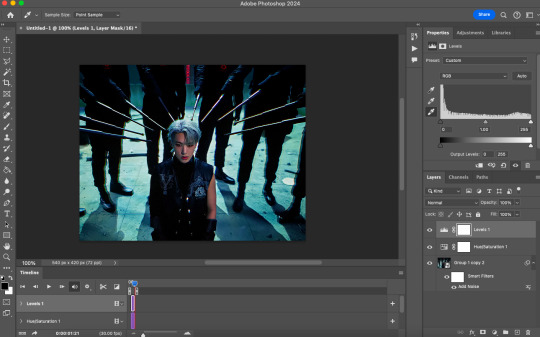
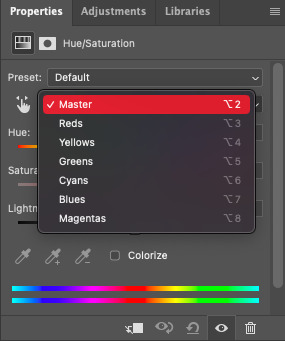
now, create another hue/saturation adjustment layer. instead of leaving it as is, change 'master' to the most prominent color in your background. i'm going to go with blue. if you are working with a blueish background, you will likely need to follow this step with blue and cyan for everything to be picked up!
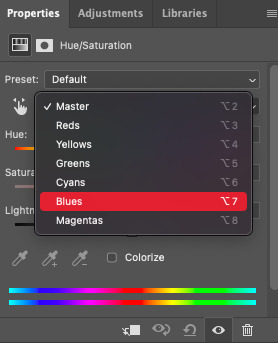
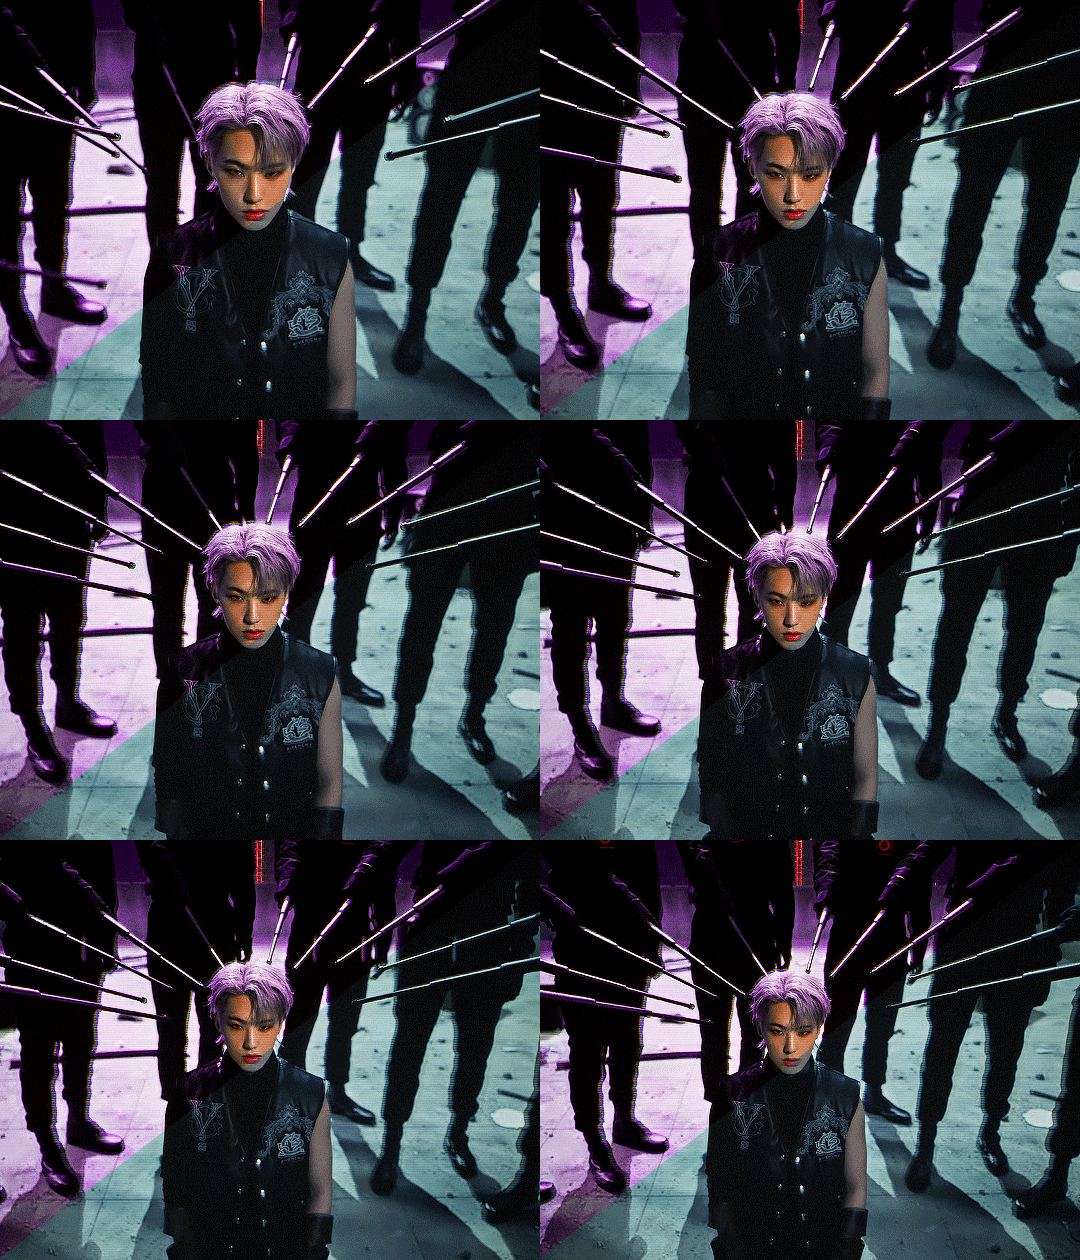
drag the 'hue' slider over in either direction until you achieve the color you're looking for. some shades will be easier than other: going from a blue to a purple or pink will be easier than reaching a yellow shade. however with enough tweaking anything is possible :3 this is what it looks like now.
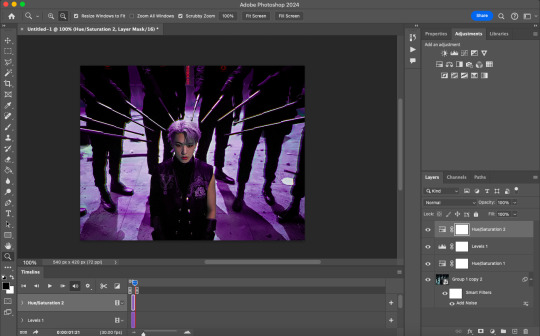
i'm going to do some coloring over this now, and some underneath as well. color to your liking! if the skin tones are off when coloring over this layer, move your coloring layers beneath it. you can also just color it first as i mentioned earlier :) either works fine. export it and this is what we're left with!
METHOD 2: frame by frame
this method is a little more time intensive, but it works well when your background is a neutral color, multiple colors, or too close to a skintone to be manipulated.
a few notes here: this works best in my experience if the person in the gif has dark hair. it can totally work otherwise but dark is more forgiving lol. it also helps it blend better because you can change the highlights without throwing the rest of the hair off!
you are going to want to do all of your sharpening, coloring and any other edits first. otherwise, your background may be messed up when coloring over it. once your coloring is done, convert your gif back to a frame animation. you can find a quick tutorial on how to do this as well as an action here.
with your gif converted back, create a gradient map with the color(s) you want your background to be. start with the very first frame in the gif and put the gradient map one layer above this frame. change the blend mode to whatever you happen to think looks best: i'm using color here.
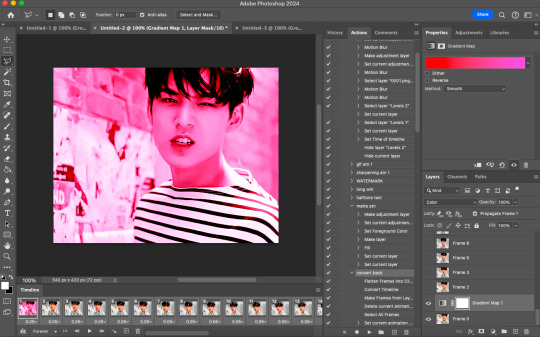
now, you're going to click that first frame and select your magic wand tool. on your top toolbar you'll see an option to 'select subject'. click the drop down menu, select 'cloud select'. then click 'select subject' and it'll select the person in your gif.

then, go back to your gradient map and select your layer mask. make sure your foreground color is white and background color is black. then, go to edit -> cut. this will mask the layer so the gradient map is only applied to the background. make any adjustments using a white brush tool on the layer mask. here, there's still some small orange pieces left over so i'm going to fix that.
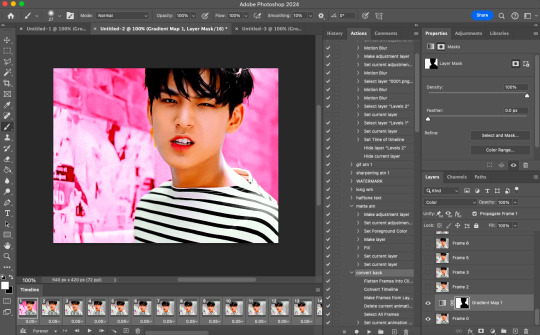
afterward, you will merge your frame with your gradient map (i recommend copying the gradient map first so you don't have to create it over and over again lmfao).
the highlights in his hair start to become more visible a few frames in, so when i'm adjusting the layer mask i'm going to account for this by brushing over his hair so the highlights go from their original white to pink. again, this is optional! the white just stands out too much for my linking.
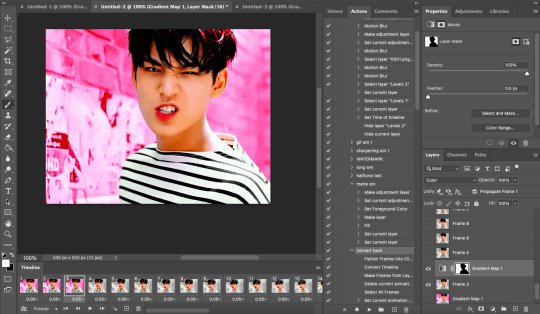
now... you are going to repeat this step until you reach the end of your gif :) gradient map above the frame you're working with, layer mask, merge, repeat. it's time consuming but worth it!
once you're finished and your sanity is depleted, delete the frames from the timeline. the animation is going to be thrown off by all the editing we've done so it's best to just remake it.
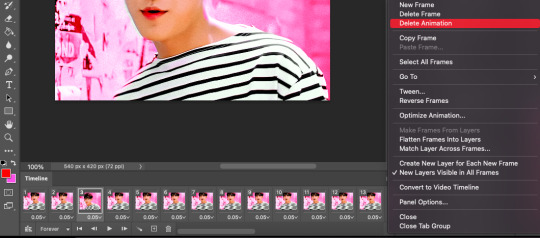
to remake it, click the three lines, then 'make frames from layers'

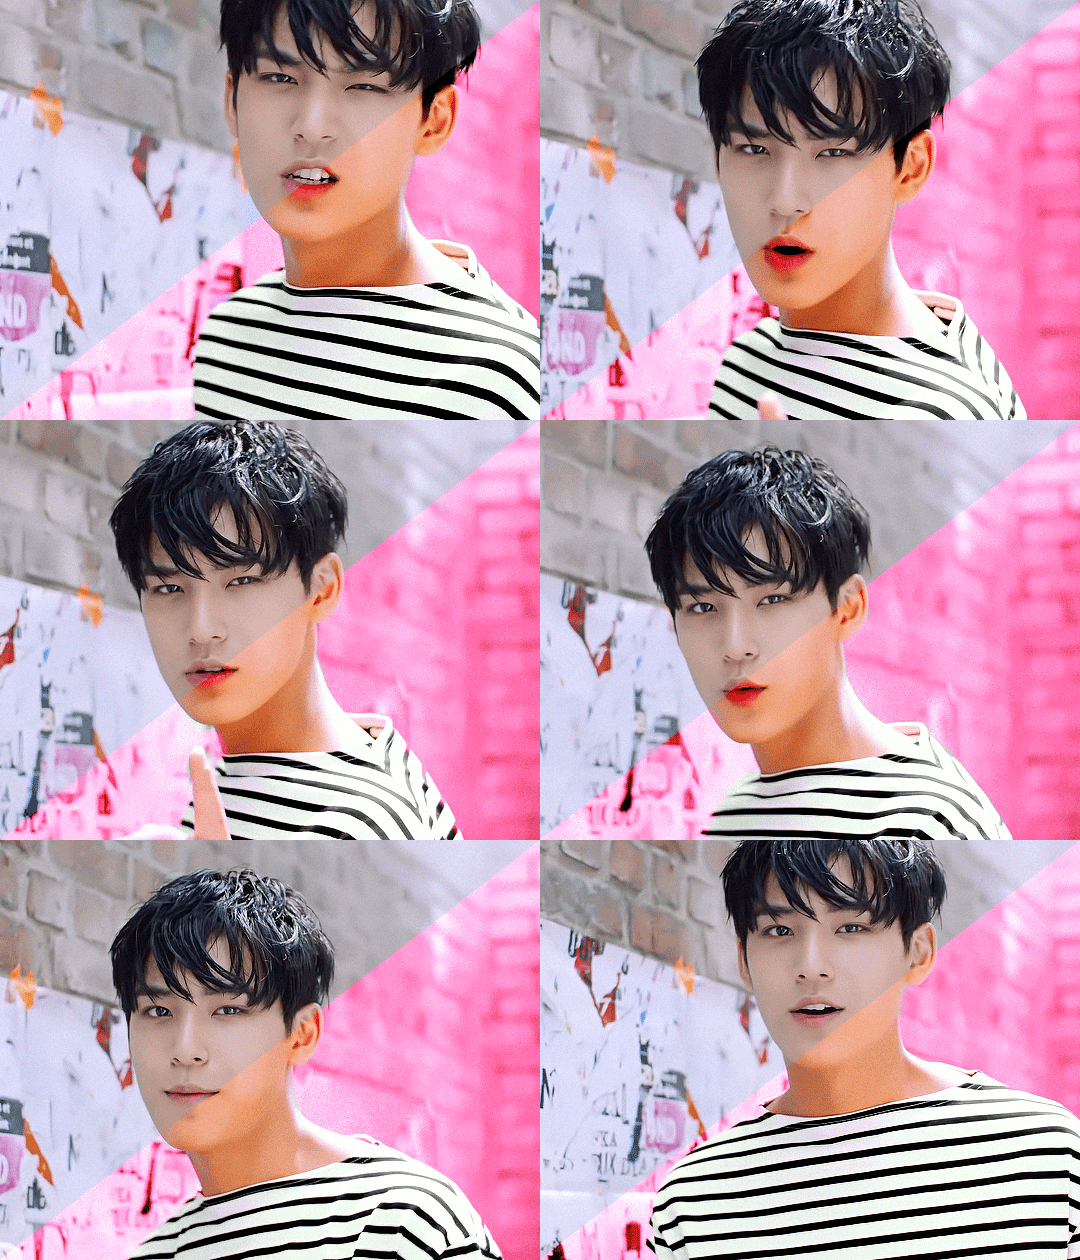
then, select all your frames and set the frame delay to 0.07 (you can do 0.05 too but that's just my preference). you can either export it like this or convert it to a smart object for further editing. this is how it turns out!
37 notes
·
View notes
Text


Above: before-and-after pictures of this process. Thank you to @cloudywithachanceofsims, @silverthornestudfarm, and @blueridgeequines for giving me permission to use their coats as examples!
CK's Guide to Fixing Pixelated Horse Coats
As we all know, every time you paint a horse (or any pet or werewolf, really) in Create-a-Pet, it inevitably gets pixelated. This is due to the TS4 engine's compression of Sims textures, which it does to theoretically save on file space and load time. The more you paint on your horse (and the more you save it over and over again), the greater the artifact damage becomes, until you're left with a pixelated mess.
Luckily, I've figured out a way to fix it. Yay!
This method uses a program called chaiNNER, which is an incredibly versatile node-based graphics UI that (among many other things) uses AI models to upscale and process images. After a month and a half of experimenting on multiple different types of coats with about a dozen different models, I've identified two AI models that work best at repairing the artifacting damage done by TS4: RealESRGAN_x2plus and 2xAniscale. I extract the painted coats from the tray files using Cmar's Coat Converter, process them using chaiNNER, use Photoshop to make any touch ups (softening hard edges, fixing seams, adding in the appropriate hoof texture), and then create a new hoof swatch to put the newly fixed coat back into the game.
Fair warning: chaiNNER is a bit of a hefty program that requires significant RAM and VRAM to run. If you have a beefy gaming computer, you should have no issues running this (as long as no other major programs - games, graphics programs, etc. - are running as well). If you've got a lower end computer, though, your computer might not be able to handle it and this method might not be for you. Make sure to read all the documentation on chaiNNer's github before proceeding.
Before we begin, we're going to need to gather some resources. We will need:
A graphics program. I use Photoshop, but GIMP or any other program that can work in layers will work too.
chaiNNER
AI Models; these are the ones I use are RealESRGAN_x2plus and 2xAniscale
Cmar's Coat Converter to extract the coat textures from your tray files
Tray Importer (Optionally) to isolate your household tray files and save you the trouble of searching the Tray Folder
The TS4 Horse UV as a helpful guide to make sure all our textures are lined up properly
Sims 4 Studio to create your new package.
I recommend using S4S to export hoof swatch textures from the game or from existing hoof swatch cc. Some popular hoof swatch CC include @walnuthillfarm's Striped Hooves and @pure-winter-cc's Glorious Striped Hooves
This tutorial assumes you are familiar with the basics in how to use Sims 4 Studio, such as how to clone a base-game item & how to import and export textures, and the basic functions of your graphics program, such as adding multiple different image files together as layers. I'll try to keep my explanations as straight-forward as possible.
STEP ONE: Extract the Coats
Install Cmar's Coat Converter and run it. Cmar's Coat Converter works by looking through your tray files for specific texture files (ie. The coats of cats, dogs, horses, and werewolves) and converting them to png files. You can go through the households of your Tray folder one by one, but I typically just use Tray Importer to separate the household containing the horses I want to fix.
Save the extracted coats in a project folder. These are your OG coats.
STEP TWO: Extract the hoof textures
Open up S4S. To extract the hoof swatches from the base game, create a new package by clicking CAS -> New Package, filter everything by species (ie. Horse) and then part type (Hoof color). Highlight all the basegame swatches and then save your new package.
Open up that package and then extract the texture for each swatch. Save them in your project folder (In a 'basegame hooves' folder to keep things organized).
To extract the textures from Hoof Swatch CC files, simply open them up in S4S and repeat the above.
STEP THREE: Download the AI Models
Right as it says on the tin. These are the models I use currently & some notes about them:
RealESRGAN_x2plus - this model is THE workhorse. It repairs artifact damaging with minimal loss to texture quality and results in a very smooth coat. It may sometimes darken the texture a little bit, but it's not noticeable in-game. That being said, it has a harder time with finer details such as spots, individual ticking for roans, dapples etc. I run this one first on all the coats because it usually does the job.
These models are trained to find and repair any incidence of artifacting/jpeg damage and approximate what the image is supposed to look like. The reason RealESRGAN_x2plus has an especially hard time with spots/dapples/tiny repetitive details etc. because it registers those areas as particularly damaged and works extra hard to smooth it out… which can sometimes result in a bit of an iffy coat repair. When things don't turn out the way I want, I turn to...
2xAniscale - I use this model for any appaloosas, roans, sabinos etc. that have very fine detail and came out mangled by RealESRGAN_2xPlus. It's also good for light-duty repairing (in cases where people have only 'saved' the coat once, as opposed to working on it on and off). While not strong enough on its own to tackle the more heavily damaged coats, it still does a decent job while keeping the fine details intact.
Go make a folder somewhere and name it 'AI Models' or something similar, and drop these guys in there.
STEP FOUR: Setting up chaiNNER
Obviously, go ahead and download chaiNNER, and then (through chaiNNER itself) download & install the dependencies. You really only need PyTorch for this, so if you'd like, you can skip NCNN, ONNX, and Stable Diffusion.
At first glance, chaiNNER is a bit overwhelming. It is unlike any other graphics ui I've seen before, but the basic premise is pretty straightforward: you 'chain' together specific functions ('nodes') in order to get your result.
We're going to start by setting up a chain for single coat conversions.
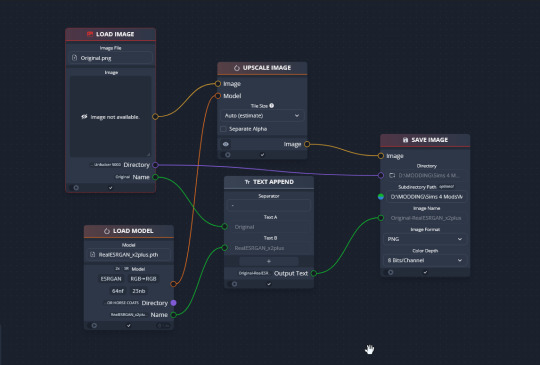
Drag & drop these nodes into your workspace:
Load Image
Save Image
Upscale Image
Load Model (From the PyTorch tab only!)
Text append
Next, connect the nodes just as I have connected them in the image.
Load Image, obviously, loads your image. We then tell the program we want to upscale that image by linking to the Upscale Image node. Upscaling can't happen without a model, so we then want to link Upscale Image with Load Model.
Text Append takes the original name of the image and combines it with the model name. This is super helpful, because if you're playing with many models at a time, you need to tell your result images apart. Link the output text to the Save Image Model.
Finally, Save Image obviously saves the image. We link the directory from Load Image to save it in the same place as the OG image, or, optionally, add in a file path link to another folder (in my case, I load images from a folder called 'Unprocessed' and save them into a folder called 'Processed'. Link the image from Upscale Image to Save Image to complete this chain.
Go in and select your image, model, and save locations.
Ta dah! You made your first chain.
To create an Iterator to batch process coats, we follow the same general idea, only we use 'Load Images'.
STEP FIVE: Run chaiNNER
Go ahead and run chaiNNER. Repeat using 2xAniscale if your spotty/dappled coat comes out funky.
Optionally, you can also add 'Resize' between 'Upscale' and 'Save Image' so the output texture is the same size as the OG. I like keeping mine big, as it makes it easier to fix any fine details in Photoshop.
STEP SIX: Combine in Photoshop
Go ahead and open up the horse UV, your coat texture & hoof swatches in Photoshop. This is a fairly straightforward process: layer the hooves overtop the texture, and then hide all hoof layers except the one you want. Make sure everything is lined up properly using the horse UV.
This is also where you would go in and fix any sharp, jagged edges you might spot. I often notice jagged edges on white face markings. Since the head is often one of the worst areas for artifacting, the AI models don't really have much to work with, resulting in jagged edges as they try to extrapolate what had been there 'before'. Either paint over it or use blur to smooth it out.
I personally would also remove any stray color that isn't the horse texture (body + ears). It won't hurt to leave it there, but I personally like things neat and tidy. Use the horse UV as a guide.
I also add in any little details using extracted stencils & layer masks.
Save your new coat as a png. Optionally, downsize it by 50% back to the original size. I don't do this because I'm very forgetful, but this would definitely help in keeping your package size smaller.
STEP SEVEN (Optional): Make a thumbnail
I make thumbnails for all the coats I do because it makes it much easier to identify them under the Hoof Swatch category. TS4 thumbnails are 144 x 148. You can label it with your horse's name, or stick a headshot in there etc. whatever works for you that will help it stand out from the other hoof swatches.
STEP EIGHT: Put it all Together
Finally, we've come to the end.
Using S4S, create a new package cloned from a hoof swatch. Import your new coat into 'Texture', and your thumbnail into 'Thumbnail'. Make sure you import the thumbnail for both Male and Female!
Check to make sure there aren't major seams, and that your texture is properly projected onto the S4S horse model. If there are seams, go back to check that your texture is lined up properly with the Horse UV. If there are minor seams (legs, chest, underbelly etc.) you can carefully paint (using the same color as on either side of the seam) just beyond the UV mesh boundaries to close the seam.
Then, go into Categories, scroll down, and uncheck Random. This will prevent random townie horses from wearing the coat.
Save your package.
Congratulations! You're done!
#ts4 tutorial#ts4 resource#ts4 guide#Ts4 horse cc#ts4 equestrian cc#sims 4 horse cc#sims 4 equestrian cc#ts4 equestrian#sims 4 equestrian#ts4 horses#sims 4 horses#ts4 horse ranch#sims 4 horse ranch#sims horses
77 notes
·
View notes
Note
How and where did you learn to do art like the actual game cause it looks awesome!?
First of all, sorry for the late response!! I was waiting to finish the piece I was working on to use as an example, as my method is a bit messy
Explanation below the cut!
I mostly just kinda studied the way the splash art is rendered via staring at it a lot lol and figured out the general Danganronpa character proportions for the sketch (like that giant forehead, small torso, large legs, you get it)
The method I follow is coloring on grayscale over the sketch, adding colors with a color layer, and then just keep stacking overlay, multiplying and soft light layers until it gets to where I like it
I use only a watercolor brush at different opacities (mostly under 20% opacity) for the grayscale part and an airbrush for shadows and lights
As a tip, remember that dr cg art has hard strokes all over and mostly black shadows, so I kept going back on dark spots to make them darker and highlighted others to create more of a contrast
Here are exports from the different stages of the last one I did to hopefully make myself clearer (I recommend having a design already established to not keep changing it mid render like I did lol)


Thank's for the ask!
#ask#danganronpa#hopefully it's helpful!!#i just kinda wing it with the opacity of brushes and the layers I use for colors and other overlays#sorry if it's too over the place
50 notes
·
View notes
Text
ATTENTION ‼️ this chapter was made with collaboration of @immaculatemarydonna✨ :3 visit his account (it has good content) and enjoy more chapters on my profile.

🌸•Spies•
----------------------------------------------------------
Rocky quickly got out of the vehicle and opened the passenger door, it was too late.
He was going to knock on the door to make Lacy hurry up, but suddenly a white kitten appears in front of him, with a collar that highlighted the color of her eyes and the bright blonde of her hair. Rocky stared at him in shock for a moment until he remembered the mission, coming back to reality. Lacy had already gotten into the car and he, hastily closing the door, resumed his place in the driver's seat and drove away.
Rocky: Hi Lacy, how are you? (Rocky said while looking at his appearance until he looked him in the eyes)
Lacy: Good, and you? (Lacy looked at him too)
Rocky: fine as well, you look pretty dapper for a spy mission, don't you think?
Lacy: We have to mingle with the rich. (He justified himself with a smile)
Rocky: So, I think I'm going to stand out next to you (He said with a slightly sad tone)
Lacy: Why?
Rocky: I'm wearing my usual clothes, I just changed my vest (he said while laughing)
Rocky: (as his laughter died down and then he became serious and cleared his voice, he said) On the other hand you look... AHEM radiant AHEM. (He adjusts his tie to hide the comment)
Lacy: I don't think the others notice that, I think you look... cute (looks out the window)
Rocky lowered his ears involuntarily, he could not hide his surprise at the secretary's comment, like Lacy, their minds began to wander a little due to the other's comment.
After a long and awkward silence, Lacy tried to say something else again to try to imply that that comment had been just another one.
Lacy: And have you already figured out where it will be?
Rocky: Yeah, we're headed there.
Lacy: Okay...
Rocky: Ajam... He's out of town... (While playing with his fingers on the steering wheel to release tension)
Lacy: ...Well...
Upon arriving after many awkward silences and a lot of tension in the atmosphere, they found a place that looked like a kind of open-air restaurant, very elegant with tables that used floral tablecloths that coexisted perfectly with the export rose and cherry trees that decorated the restaurant. place, with white chairs that had small golden details that complemented them perfectly.
Once inside, Rocky posed as a millionaire whom he had murdered during a business trip. Nobody knew this man so people cared little about his presence. He also lied about the money to get a table, saying he would send it immediately upon arriving at his mansion.

<<Former
Next>>
Chapter 1
8 notes
·
View notes
Note
Hi Sine! I find myself in possession of a very long plot (not going to count how many of those are in my inventory), and was hoping you'd share what program(s) you use for yours? I'm the sort who'd use a murder-wall with notecards but I don't have space rn. I *should* use tagging systems but all the ones available are so sketchy and unreliable that I lose focus just typing. Also I tried to search but. This is tumbs. Thanks - Shusu
Oh boy, this question was made for me!
The first novel-length story I wrote, I wrote in TextEdit. All 90,000 words of it. I basically just made a list of the scenes I wanted in the order I wanted them in, started typing the story above the list, and deleted every scene from the list when I had written it. I don't recommend this.
These days, I use Scapple and Scrivener. I have much more detail below. I am sure I have talked about them before but, as you say, Tumblr is hard to search.
Different things will work for different people, and I don't always start this way, but sometimes, while I'm still trying to rough out an idea, I start with a mind mapping program. You know that brainstorming technique that you learned in, like, third grade, where you take a piece of paper and you write down the main idea in the center in a bubble and then branch lines out from those with more bubbles containing related ideas, and then branch things out from those, and so on? You can get programs to do that instead of a big piece of paper, and the advantage to doing this on a computer is that your piece of paper can be infinitely large and you won't ever run out of space.
I will sometimes skip this step if I already know what order things are going to happen in (in that case, I just make an outline), but if it's the kind of unformed idea where I just want to write down everything that happens as I think of it so I won't forget it later, then I use a mind map.
I also use it to write down bits of dialogue as I think of them; the program I use lets me change fonts and colors and so on, so I have color-coded my dialogue by character:
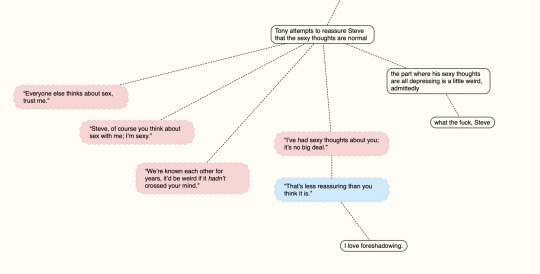
I feel like I have probably posted this before but Tumblr is not letting me search. Also, this is probably not how you're supposed to use this, judging by how it exports data, but whatever.
There are a variety of programs that can help you make mind maps, and I'm sure a lot of them are good. The one I use is Scapple, which I like for a few reasons: it's very easy to use (you type something in, and then to connect two bubbles you drag one on top of the other) in a way that gives you a lot of freedom; it's not a subscription model like a lot of apps are (you buy it, you pay once, you can use it forever, and it costs about $20); and mostly, it's made by the developer of the writing program I use (Scrivener), meaning that the two programs integrate very well.
So then there's Scrivener.
Scrivener is probably the absolute most useful software I have ever owned; I have bought it four times now. (All three desktop versions and then the iOS version.) It is a word processor that is designed to help you structure and write novels. There are similar programs for free or at least cheaper, of course, but this is the one I use. (It also isn't a subscription; you just buy it.)
The downside is that it's a very complex program. This isn't necessarily a bad thing, but it can look a little daunting. It's one of those programs that has hundreds of features and you will only use about fifty percent of them, but everyone uses a different fifty percent, so there's something for everyone. (It can generate character names! There's a feature on the Mac version where it can highlight words by part of speech! You can change all the icons! The LaTeX export is pretty decent!)
Honestly, as long as you can figure out how to make scenes, rearrange scenes, edit synopses, and get your work out of the program, you're good to go; that's probably what you'll be doing most of the time.
Scrivener is basically designed around the murder-wall-of-notecards writing approach. A Scrivener project contains your Draft, which can have a bunch of folders in it (chapters) which can have individual documents (scenes). Each scene has an index card associated with it, and each index card is where you can write a synopsis for each scene.
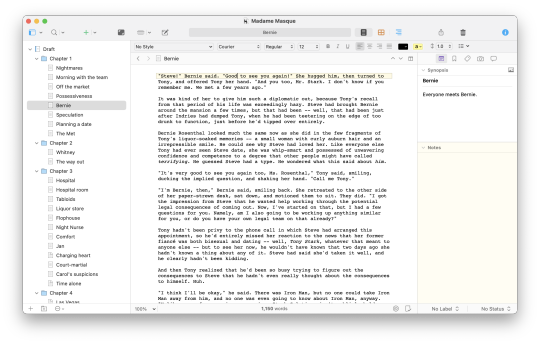
You can view your story as single scenes or as a whole story (optionally with a window showing the synopses, so you can remember what you thought was going to happen while you are writing; I have shown this above) or you can just view the synopses as an outline or as index cards, like so:
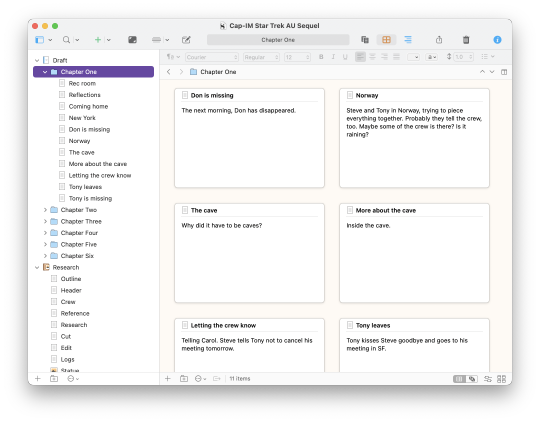
There's your murder wall right there.
Rearranging the index cards also rearranges the scenes. (Rearranging the scenes using the list in the sidebar also rearranges the scenes.) So if you want to swap scenes around, you can do that. If you want to write the end first, you can do that. If you want to add three more scenes in the middle, you can do that.
You can also search your whole project, color code the index cards, tag them however you want with keywords (e.g., a keyword for every character who appears in the scene) and then look at everything you've tagged with particular keywords, notate scenes by whether they're done or not, and basically everything else you can think of. Mostly I have used this to color code scenes by POV so I can keep track of who's talking; I could also have used keywords.
So my first move when I start a project in Scrivener is to make a bunch of blank documents for all the scenes I think I will have, give them some kind of meaningful title, start writing down on the notecards things that will happen in each scene, and then move them around. This is where Scapple comes in handy -- both because I already have an idea from making a mind map in Scapple of what scenes I want, and also because the integration between Scapple and Scrivener makes it really, really easy to get started.
How do Scapple and Scrivener integrate, you ask? If you make a mind map in Scapple, you can drag and drop it into Scrivener and it will automatically make one scene for every bubble you have, and the text of each bubble will be on the notecard, so you can basically start with all of your scenes that you already have made in Scapple and then reorder them as you like.
Scrivener projects also have a Research section, where you can store basically anything related to what you're working on; you can set it to show your draft and your research at the same time. Basically anything can go in here. Mine usually have notes, more notes, character information, lines I cut but wanted to save somewhere (there is also a versioning system built in if you prefer that), comics panels, reference pictures, and entire webpages. This way, you'll never have to figure out what you did with that thing you looked up for your story, because you can keep it right there with your story.
Scrivener costs $60, which is kind of a lot, but there are very often coupons for 50% off from online software retailers (I just saw one on Boing Boing a couple days ago that still works as of the time I am answering this; I can vouch that they are a legit retailer). Also if you know anyone who has won NaNoWriMo, they get a Scrivener coupon as part of their winnings, and some people don't use theirs. It has a thirty-day free trial period (IIRC that's 30 days of use, not 30 calendar days) so you can try it and see if it works for you.
I also made a Compile Format for Scrivener 3 -- the current version -- so I can export HTML suitable for AO3 or Dreamwidth in one click. Scrivener can export your work in basically any format you can think of, but the default HTML exports all have too much stuff in them for my liking.
(Scrivener also has a bunch of preset templates for various kinds of writing -- like, there's a Novel template with room for character sheets and settings and all of that. You can make your own template, too. I actually made my own template for writing fanfiction for AO3. I'm not sharing this one because it is so personalized to me that it wouldn't be useful -- but, for example, I already know that I'm going to want a document in my Research section where I list notes about canon, and one where I list what bits I need to edit, and one where I copy in any conversations I've had with beta readers that I might want to refer to, and one where I list the things that will be in the AO3 header (it contains empty spaces for Title, Fandom, Tags, Summary, etc) so I can now always start with that. You can make a template yourself by opening a new project, setting it up exactly the way you like with the Research documents exactly the way you want, and then doing File > Save as Template. It will copy everything including any text that's in there so you want to use something that doesn't already have any story or research content written in it because then that will get copied. But it's a real timesaver.)
Anyway. Scrivener is the best.
53 notes
·
View notes
Text
Someone sent me an ask while I was on my hiatus about how to make recolors. It was so long ago they probably figured it out by now; but I figured I'd show how I do it anyway.
I'm making this in a extremely simple way with steps some people would think were obvious, so for those people that might get just a little annoying, but I wanted it to be as accessible as possible.
It's very helpful if you already know photo editing.
Bed recolor (not pattern) tutorial under cut
Warning: LONG AS HELL
To start, you need Sims 4 Studio and Krita
Open Studio
We're making a bed so click on "Object", standalone recolor should be automatically selected.

You'll be greeted with a list of every object you have in the game. Yikes! Good thing we can just search the kind of object we want. So we type in "bed"
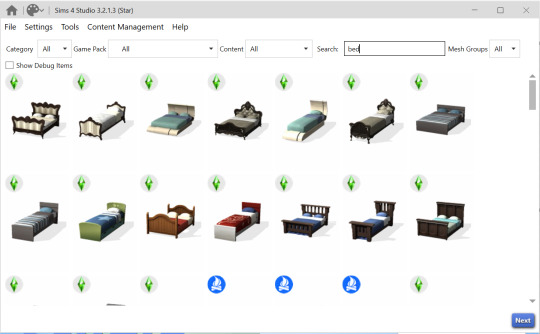
Click on your preferred object, which will then be highlighted, and click "next"
You'll then get a "save document" pop up. Type whatever you want it to be called and save it in your Mods folder, preferably a subfolder (folder in folder)

Click "Save"

We have our bed! But now there's even more options, that's a little overwhelming! So how do we really start?
At the top there is all the swatches of the bed that are already in the game. We don't need all those so just selected all your undesired ones and click "Remove Swatch".
Then, with the swatch you want to change, (maybe pick one that is as close to the colors you want as possible. Like light or dark frame.) Click "Export"
You also probably notice what we're saving looks pretty weird... That's because all the sides of the bed are being spread flat. It's like 3D folding:
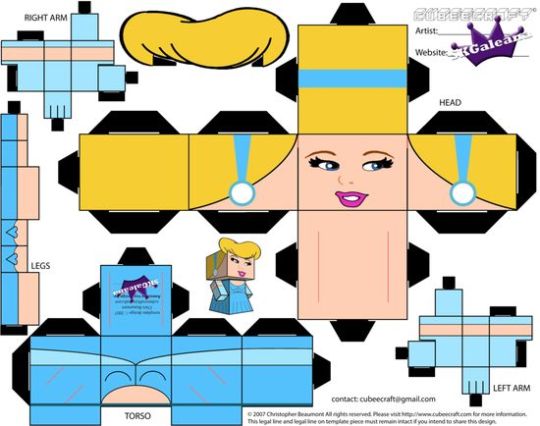
Anyway!

More file saving! This time we are saving a png (this is important, make sure png is chosen in "save as type" at the bottom)
For now, save it to where ever is easiest to get to. If you start to do this regularly you will probably want to get more organized.
Anyway, name it whatever, though preferably (dang I'm using that word a lot) something simple if you need to just search for it real quick.
Open Krita.

Dun, dun, dun! We're really in it now! Go up to "file" at the top and select "open" here just find your png and open it.

Well I don't want to change the color of ALL of the pieces! Let's start with the sheets (the white square). Go to the side and click the "rectangular selection tool"
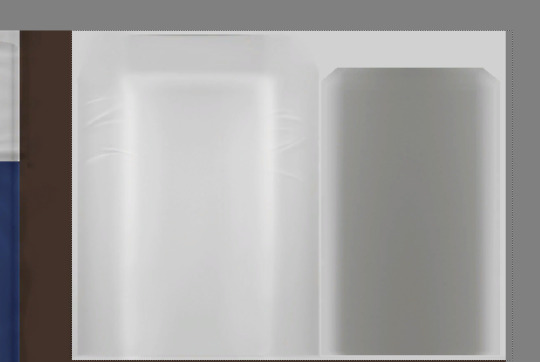
Carefully (you can zoom in with scroll to get a closer look) drag the tool around the sheets and hit ctrl+X, this cuts the shape out of the rest of it. It disappeared! Don't worry just press ctrl+V. This pastes it back to the project.
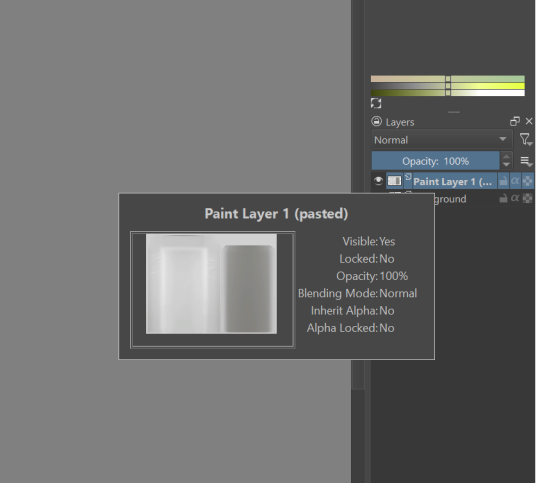
Now it has its own layer separate from everything else.
Deselect it real quick (mostly just cuz right now)

Now to actually recolor it. Finally! With the correct layer selected (THIS IS IMPORTANT) go up to filter-adjust-color balance

This give you a pop up of primary color sliders.
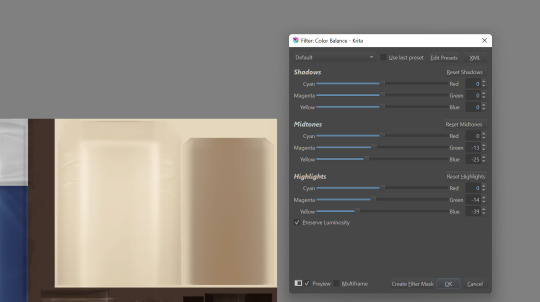
You have three for different shades of the picture. Since there's quite a bit of shading in our sheets we'll need to use at least the bottom and middle options.
Fuck around. No really. I mean it helps (like a lot) if you know how certain colors mix. But really just start sliding! See what happens! Eventually you'll figure out what combo makes a pink-purple vs a blue-purple etc.
Ok, so we've fucked around and now our sheets are a gold-tan. Click "OK"
Well, that colors a little light for what I want. So we go back up to filter-adjust and click "Burn"

More sliders!
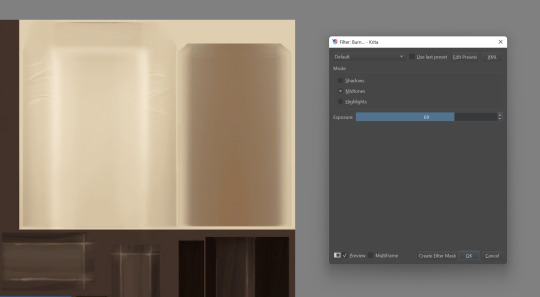
Fuck around!
Note: To get the PERFECT shading you're gonna need to go back and forth sliding different options. Like Burn-Midtones, then go Dodge-Highlights etc. it effects different areas like the color sliders do.
Well that color's pretty dull... Good thing we have cross channel adjustment curves (what a mouthful...)
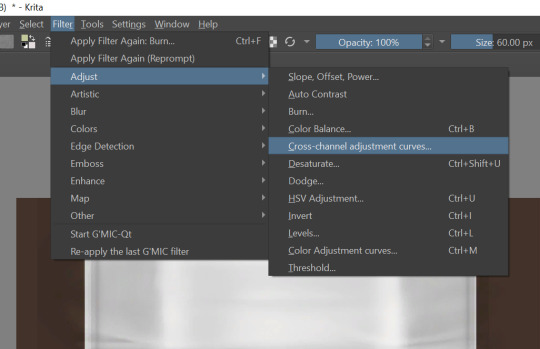
Pulling the curve up from the middle makes the color more vibrant! This is especially helpful after going back and forth form Burn and Dodge which can REALLY dull the color.
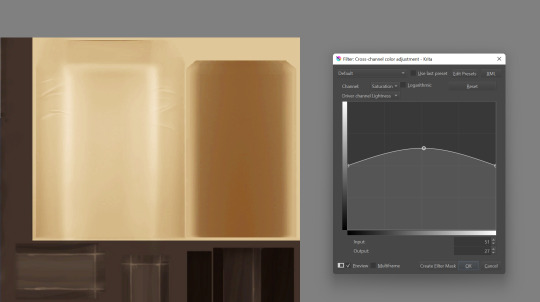
We've made our changes! So go up to the top and file-save. Make sure it's still a png!!
Go back to Studio
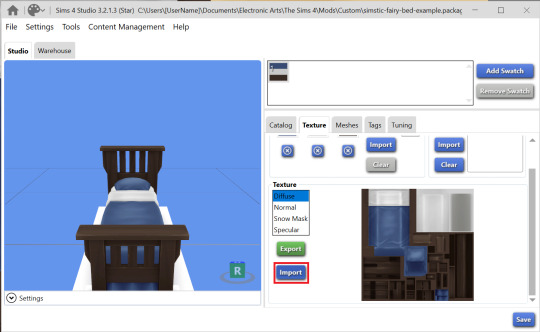
To FINALLY change our object we click "Import" and select the image we just changed.

It's not to my standards, but it's good I can go back and edit what I already have and just save it again! And do this many, many, many times...
That's recoloring! Maybe I'll do a pattern tutorial idk...
10 notes
·
View notes
Text
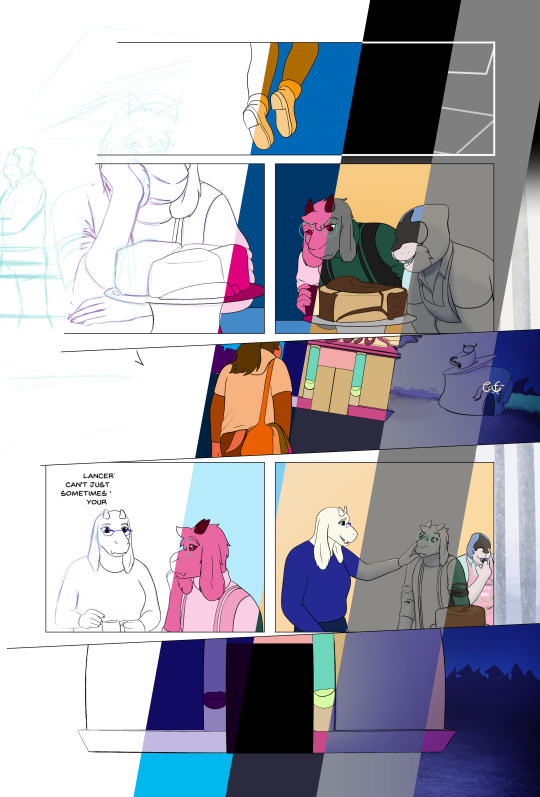
Looking Glasses Behind the Scenes #1
Here's a look at my process for building a comics page
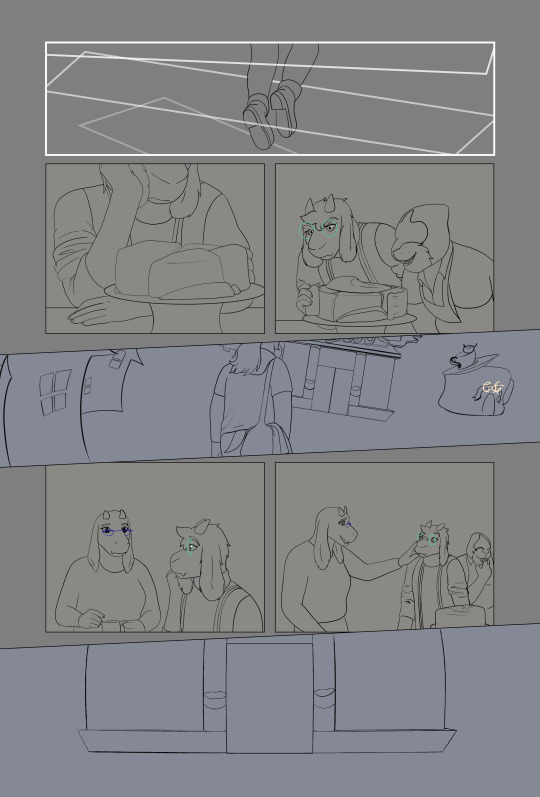
Let's use Page 55 of Looking Glasses as an example
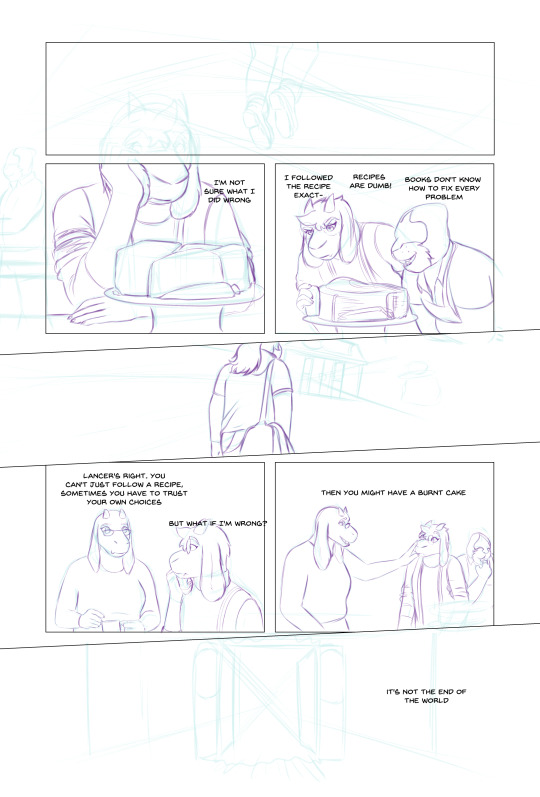
Roughs
I start with a layout, roughly sketching scenes from my script, trying to puzzle out how they'll fit into panels on the page. I don't usually specify panel layouts in my scripts, I find it kind of hard to picture layouts until they're actually on the page. Here's my initial layout
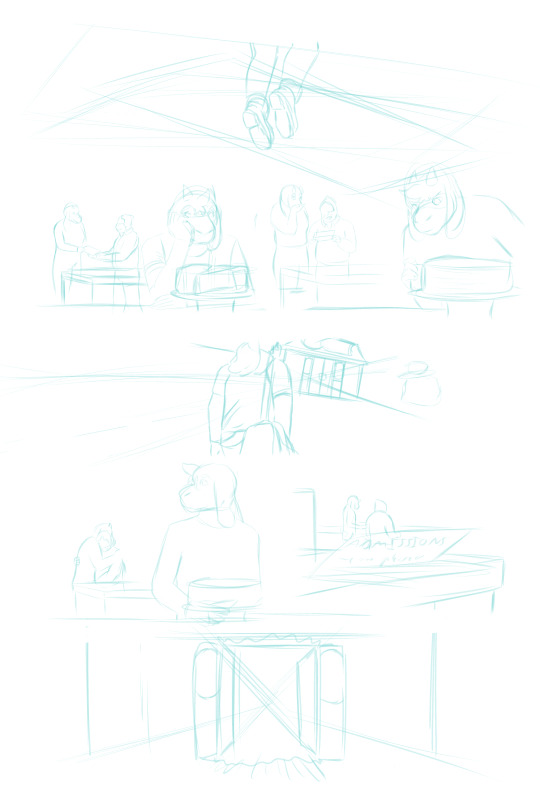
You can see there are some major differences from the final product. I initially planned for Lancer to get his admissions letter in the background of this page, with no dialog, but I came to realize that it needed more space to breathe. It was harder to tell what was going on here and I wanted Lancer to get a moment with Toriel, so I ended up moving that scene to the previous page and scrapping most of these panels, although I reused some elements that I liked. After a round of revisions I got this:
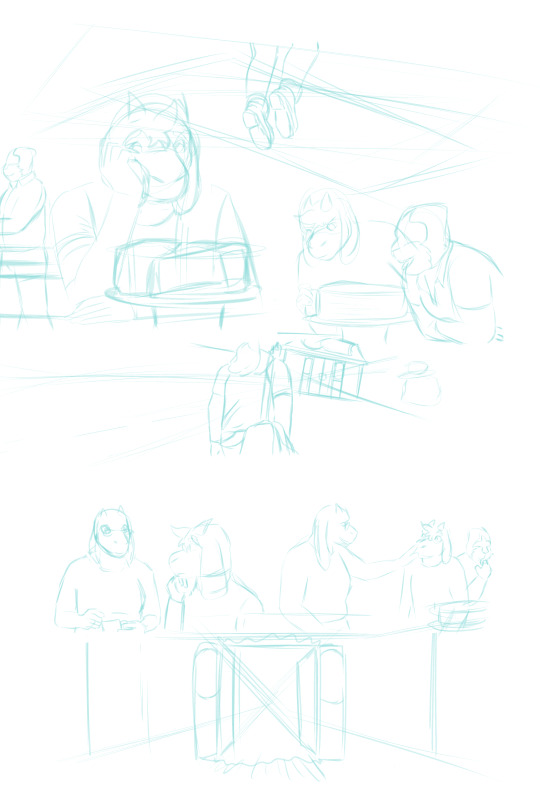
Sketch Phase
From here I move my sketches around and test out panel borders until I find something I like, roughly place the text, then I refine the weaker sketches. This page went through so many versions that most of the roughs were pretty sketched out already, sometimes my roughs are practically just have stick figures.
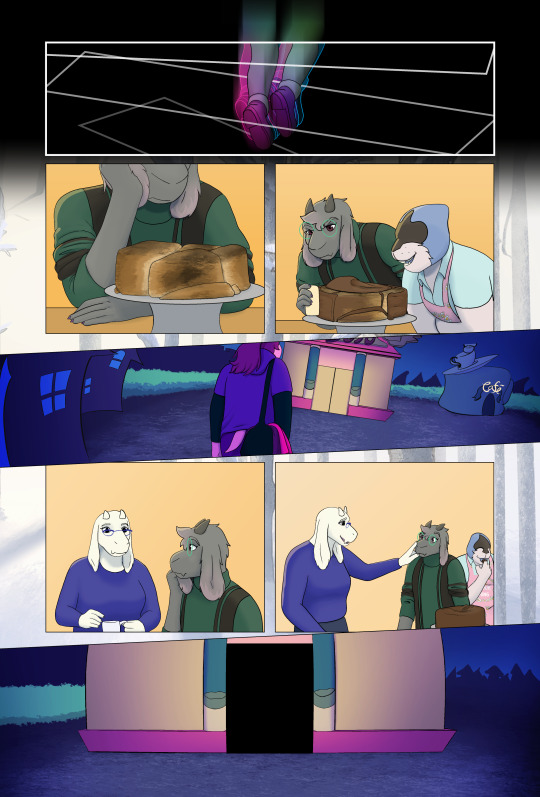
I have strict rules about paneling Looking Glasses, which are pretty evident here. The Light world has exclusively gridded panels with gutters. For the dark world, panels aren't allowed to be rectilinear, they have to overlap with each other, and they're always full bleed. The space between the dark and light world literally uses panel borders to transform from one to the other (you can see how the shapes Susie is passing through in the final page are just transformed versions of the panel border)
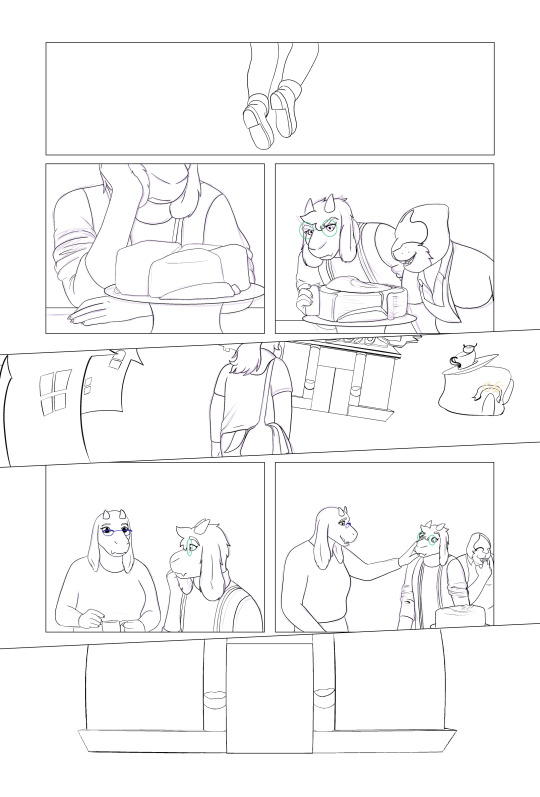
Inking
Next, I ink over my sketches. Sometimes I have to come back and re-draw something after this stage, but I try to keep from changing my inks after this.
Flatting
Using the Close Area Fill tool in clip studio, I add flat colors to a layer behind my inks. My lineart is aliased, so I could just use a paint bucket, but I work professionally as a flatter, and I prefer the types of flats I get from the Close Area Fill.
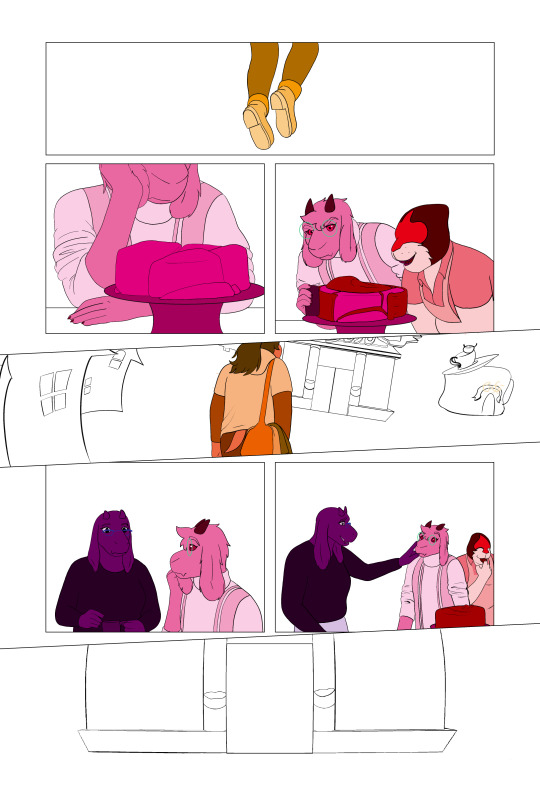
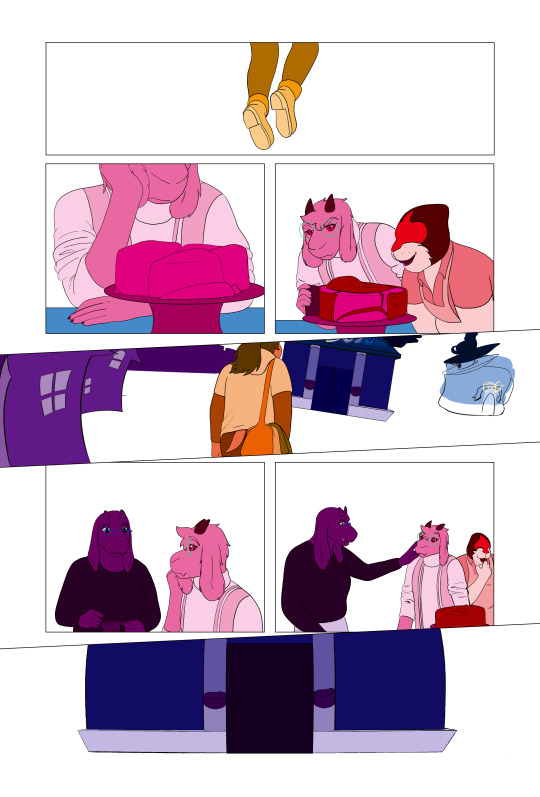
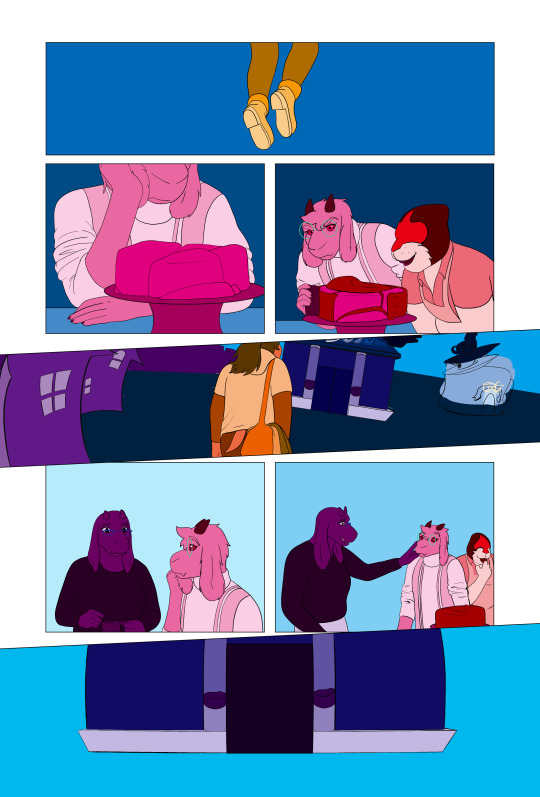
I flat my work in three stages. First I do the figures, making sure that I use the same colors for each repeated element, then I duplicate that layer and do any background elements. After this I flat the panel backgrounds separately. This allows me to select the figures or the panels quickly and easily during later steps.
Coloring! (My favorite bit)
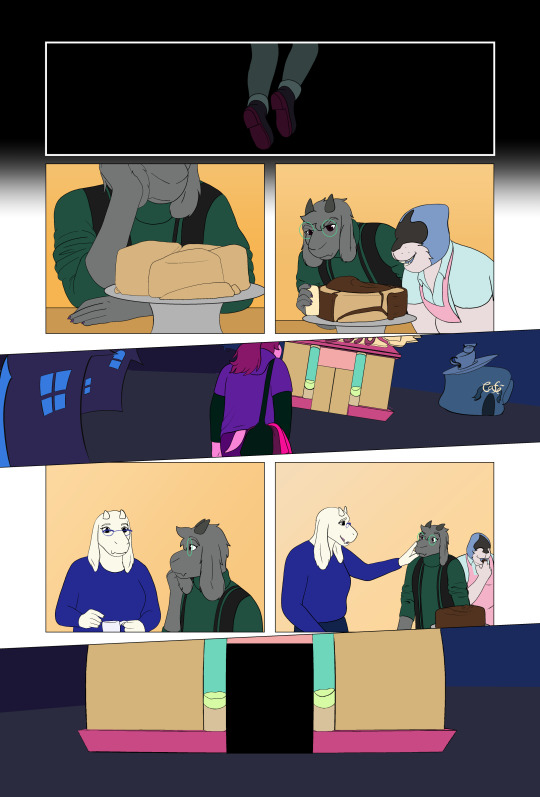
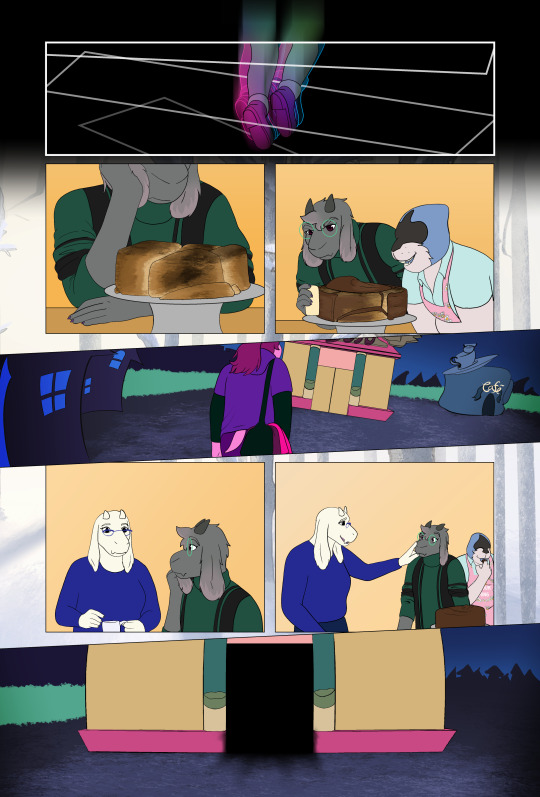
I duplicate my flats and merge them, use the paint bucket to drop the correct colors into place, and then do any detail work/painting/effects in a separate group.
Shading
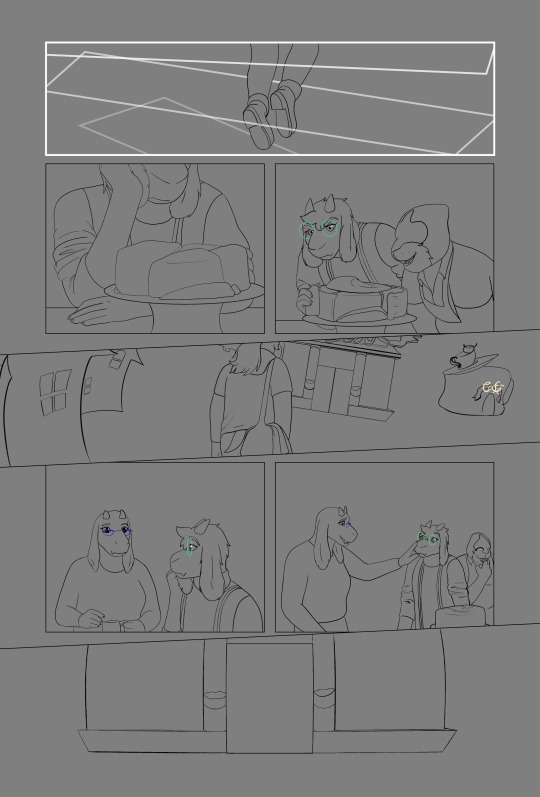
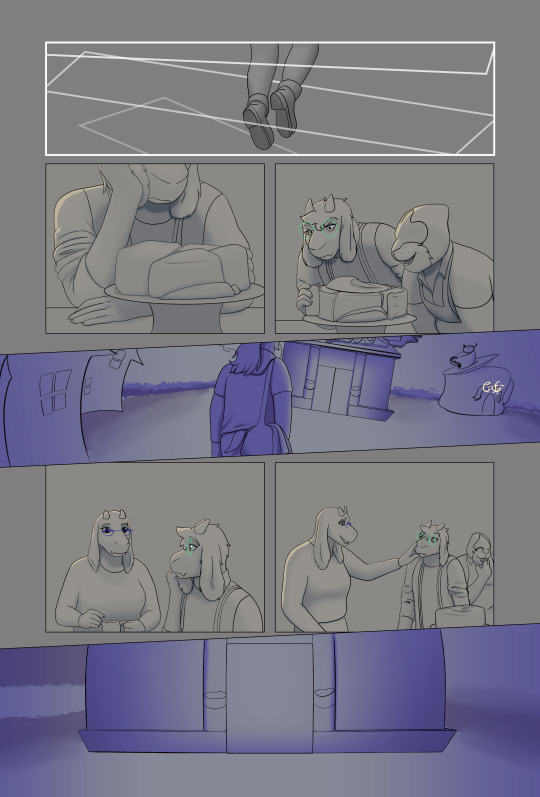
I like to shade over a neutral background, so I add a layer of grey under the lineart. Then I adjust the colors of each scene with a minor tint, to help unify my colors. Toriel's house is very orange, so I give it a little bit of extra warmth, where as the dark world is otherworldly and vibrant, so I push it towards blue. Then I render the work. Each location in looking glasses gets a different treatment. The dark world gets really strongly colored shadows, but because there's no light in the dark world I don't add highlights unless there's an obvious light source. The light world gets fully rendered (shadows, highlights, fill lights, rim lights, etc.) but I make sure to use desaturated colors. In the space between the dark and light worlds, I only shade with black shadows and white lights, it's also the only location that doesn't get a tint.
Finalizing
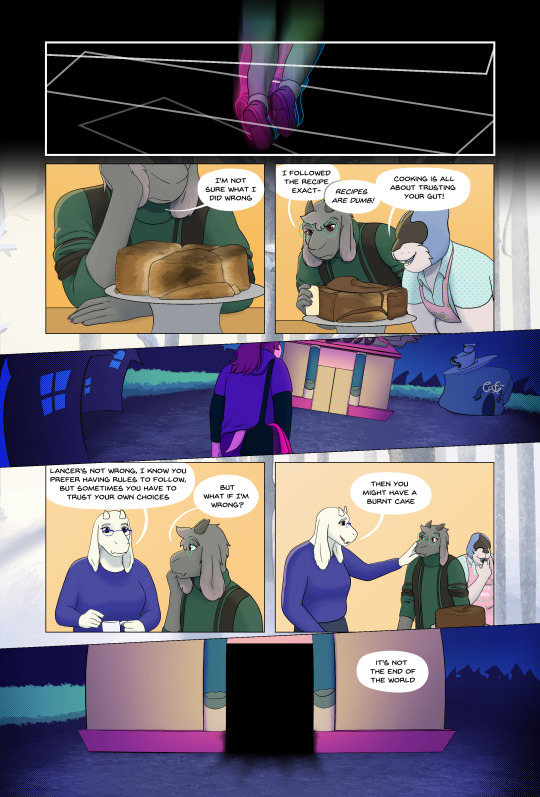
Lastly I finalize my dialog, which often goes through a couple of wording changes once it's on the page (You can see that happened here). Then I add my balloons, give them tails, and export the page.
And that's it!
#looking glasses#ferrousart#ferrouscomicscraft#I really wanted to do a breakdown of this page because of the three different visual styles#I know the “and then I color” step leaves a bit to be desired#maybe I'll do one of these just about my coloring process
17 notes
·
View notes
Text
Understanding Gerber PCB Layers
Usually there are layers below in a Gerber:
-Top silkscreen
-Top solder mask
-Top copper
-Bottom copper
-Bottom solder mask
-Bottom silkscreen
-Outline / mechanical
-Drill
-Inner copper
Top Silkscreen (GTO)
The top silkscreen Gerber file contains data to be printed, typically the white or black text on the PCB board, such as part designators, component outlines, logos, polarity indicators, etc. This layer is optional. It is totally OK to have a PCB without silkscreen if that is what you want.
Top Solder Mask (GTS)
Contains data for the protective solder mask which protects the copper. This is typically a green film but can come in a variety of colors. Solder mask layers are negative—meaning filled areas correspond to openings in the solder mask where no solder mask will be applied. These filled areas in the Gerber solder mask layer will leave copper exposed in the final product. This exposed copper is used for component attach and test access points.
Top Copper Layer (GTL)
Contains data for all areas requiring copper, including traces, pads, copper pour, vias, plated through holes, etc. All filled areas correspond to areas with copper plating.
Bottom Copper Layer (GBL)
Identical to top copper, but flipped horizontally around the y-axis. All filled areas correspond to areas with copper plating.
Bottom Solder Mask (GBS)
Identical to the top solder mask, but flipped horizontally around the y-axis. Solder mask layers are negative—meaning filled areas correspond to openings in the solder mask where no solder mask will be applied. These filled areas in the Gerber solder mask layer will leave copper exposed in the final product. This exposed copper is used for component attach and test access points.
Bottom Silkscreen (GBO)
Identical to the top silkscreen mask, but flipped horizontally around the y-axis. This layer is optional. Many single-sided PCBs will not have any silkscreen on the bottom side.
Outline (GKO) and Mechanical Layer (GML)
Contains the board outline, any cut-outs, v-cuts, panel outline, tabs, etc. Without this layer, the manufacturer does not know how to cut out the individual PCBs from the larger panels typically used in manufacturing. Mechanical elements should be included in a single outline layer to prevent some features from being missed unless it makes the outline unclear.
Drill Layer (DRL)
Contains all the drill locations and hole and via sizes. Drill files have numerous file extensions, including .txt or .drl. This layer file must not be confused with the drill drawing or drill map files. Technically not a Gerber file. Some EDA software will export separate files for plated and non-plated holes (vias). This has little meaning, and whether the holes are plated or not will depend on the copper layers.
Inner Copper Layer (GT#)
Multilayer boards may contain additional copper layers for signals or planes (ground or power) between the top and bottom copper layers. Inner plane layers may be in negative format, meaning the filled areas are areas of no copper.
PCB Stencil Gerber Files
Gerber files are also used in the manufacturing of the stencils that are used during the application of solder paste prior to component attachment. Figure 11 highlights a portion of a solder stencil. The solder stencil is aligned to the PCB and placed in direct content. The solder stencil openings are aligned to exposed copper on the surface of the PCB. The solder paste is forced through the openings by a squeegee blade on the stencil printer.
Top Paste (GTP) and Bottom Paste (GBP)
Contains data to make PCB stencils for the boards. Similar to solder mask layers, the data typically contains openings for surface mount parts only. Openings may be slightly smaller than the solder mask openings or partitioned to reduce the volume of solder paste that is applied to the pads. The bottom paste layer is identical in function to the top paste layer but is flipped horizontally around the y-axis.
Understanding Gerber layers doesn't have to be confusing. Familiarizing yourself with the names and functions of each Gerber layer in PCB manufacturing can enhance your design process and streamline communication with your board house. Hitech has professional engineers who can help you design Gerber files. Just share your idea, and we'll take care of the rest. If you have Gerber, you can send it to us for quotation. We will provide you with the best price. Just email [email protected] For more information, please enter https://hitechcircuits.com/
0 notes
Text
ICCPP Leads the Way: Navigating Challenges and Seizing Opportunities in the Global Vape Market
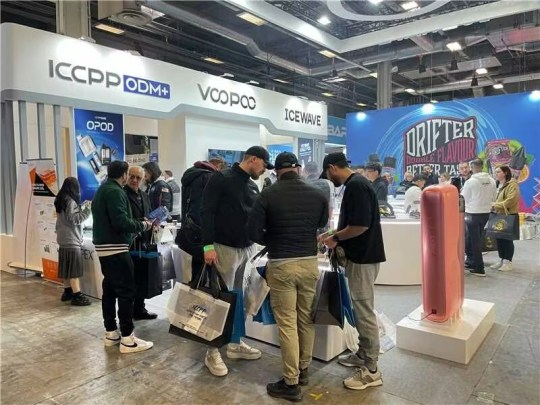
As the vaping industry rapidly evolves, maintaining a competitive edge and smoothly navigating industry cycles have become focal points of interest. Today, we delve into a special interview hosted by the Electronic Cigarette Industry Committee of China Electronic Chamber of Commerce with a leading figure in China's vaping industry, Everest, the founder and CEO of ICCPP (parent company of VOOPOO). His insights shed light on how the Chinese vaping industry can continue to thrive by building new production capacities. The Rise of China as a Vaping Powerhouse China, the birthplace of electronic cigarettes, now holds over 70% of the global patents related to vaporization and over 90% of the production capacity. This dominance makes vaping one of the few industries in China that can truly claim the label "Made in China, Consumed Globally." Despite challenging global economic conditions and complex geopolitical landscapes, China's vaping product exports soared to $11.084 billion in 2023, marking a 12.5% year-on-year increase. This achievement highlights the significant contribution of the vaping industry to China's "dual circulation" economic strategy. However, behind the growth in export volume, risks are gradually emerging. According to public data from listed companies, many firms saw a decrease in performance in 2023. The decline in profits among competitive leaders suggests that the challenges may stem from market issues rather than merely operational problems. The global vaping market is likely reaching a growth bottleneck after years of steady increases, facing more intense challenges and uncertainties ahead. Innovative Drive: The Heart of Development There is no doubt that technology and innovation are the main drivers of today's world, and nowhere is this more evident than in the vaping industry. As a nexus of interdisciplinary sciences including industrial design, thermodynamics, chemistry, biology, electronic engineering, and material science, the industry requires a broad range of expertise. The push for innovation is also advancing these disciplines, making electronic cigarettes a prime example of how new productive forces can drive industrial progress. Striving for Differentiation in a Competitive Market The key to standing out in the highly competitive tech-intensive vaping industry is differentiation, not homogenization. This is a lesson learned from various industries around the world, such as color TVs, smartphones, and small appliances, where only a few brands with distinct characteristics survive the fierce competition. Today's vaping market demands a mature, rational, and professional consumer base that values uniqueness and innovation. Reflecting on the strategies of multinational tobacco giants and leading Chinese firms can provide valuable insights into successful differentiation tactics. Regulatory Compliance: A Foundation for Sustainable Growth In the face of a complex and vast user base worldwide, reverence for market regulations is paramount. The commitment to compliance should not just be seen as a limitation but as an opportunity for innovation and advancement. Effective regulation ensures consumer safety, fosters fair competition, promotes innovation, and upholds corporate responsibility. The recent implementation of a robust regulatory framework in China serves as a model, highlighting the country’s leadership in fostering a regulated and healthy development of the vaping industry. Conclusion: Pioneering the Future of Vaping As we navigate through the evolving challenges of the global market, the need for a broader perspective and deeper analysis becomes evident. Chinese enterprises must enhance their capabilities in technology, product innovation, and branding to meet the rising market demands and regulatory standards. Perseverance in innovation and commitment to differentiation are key to breaking new ground. In conclusion, ICCPP's CEO Everest emphasizes the company’s core principles: compliance, technological innovation, and consumer priority. By focusing on enhancing user experience and investing in harm reduction research, ICCPP aims to provide safer and more satisfying vaping experiences, steering clear of price wars and imitation, and fostering a positive development ecosystem for the global vaping industry. Read the full article
0 notes
Text
#11: Shit I forgot
I may have forgotten to update last week and a little late this week, but I did something during those times.

Look at the progress here. And I also did some programming. Like an automatic gif creation with ffmpeg. Quality is low though. I think I can improve it by messing some of the parameters but it's good enough. Shortened it even more with a .bat file.
I was watched this short from proko while working on the commission that inspired me to do it. You can see it here with the Puck's hair.


It's subtle but I like it a lot. You may also noticed the green highlights I added. I realized that as long the color isn't too dominant and is presented as a highlight, people will think it's a highlight and still look good. I color pick the green from Kero's shirt so the piece would feel more whole together. I also went back in a bit and added those blue streaks. Same reasoning as before without the highlighting thing.
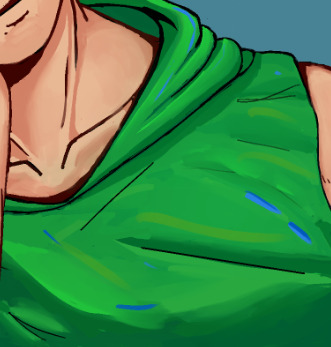
It looks amazing for me and I really how it turned out. But I knew I needed to control myself as this would be a great way to introduced some contrast between those with and without color jittering. If you looked at the whole WIP I made below, you'll see that I only did it at two places only. It brings emphasis towards those areas. At least in theory. Though I am considering to add at Kero's hair as well to match his boyfriend.
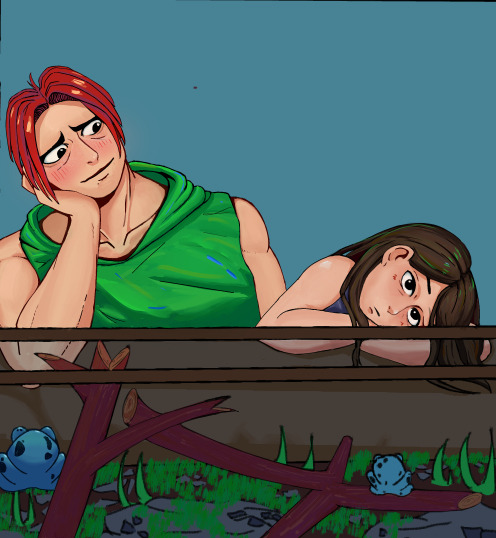
They're done though so only thing I have to do is all the BG for it.
------------------------------------------------------------------------------
As for programming, I learned one ffmpeg command. I like using gifs to show progress over time. I did'nt know how to export gifs in CSP so I what did was export as jpeg then upload them to a online gif maker. I was looking for a new programming project to do after the blog updater (Still Broken in auto runnning, will fix eventually ) I thought why not automake gifs instead? Downloaded ffmpeg and after some finagling, figured out this command
ffmpeg -y -f image2 -framerate 1 -i in%03d.jpg -vf "scale=500:500" out.gif
I wanted it to be a single clock as well so turned it into a .bat file. Broke, spent an hour figuring out why till learned that .bat file reads % as to fill. I escaped with a double percent sign instead and it works.
ffmpeg -y -f image2 -framerate 1 -i in%%03d.jpg -vf "scale=500:500" out.gif
A single click and boom, a gif is made instantly. Better than the 3 minutes during the oldways.

1 note
·
View note
Text
How to Craft an Irresistible Malaysian Food and Beverage Export Brand
Crafting an irresistible Malaysian food and beverage export brand requires a blend of authenticity, storytelling, quality, and strategic marketing. Malaysian cuisine is renowned for its diverse flavors and cultural richness, making it a sought-after export. To make your brand stand out and captivate international audiences, follow these steps to create an unforgettable brand.
Step 1: Understand Your Unique Selling Proposition (USP)
Identify what sets your Malaysian food and beverage brand apart from others. It could be the traditional preparation methods, a unique flavor profile, sustainable sourcing, or a combination of factors. Understanding your USP is essential for building a strong brand identity.
Step 2: Define Your Brand Story
Every successful brand has a compelling story. Share the history, cultural influences, and passion behind your brand. Describe the journey of your products from local markets to international shelves, emphasizing the authentic Malaysian roots and the love for flavors ingrained in the brand.
Step 3: Authenticity is Key
Authenticity is the foundation of a successful Malaysian food and beverage brand. Ensure that your products retain the genuine flavors and characteristics of Malaysian cuisine. Transparency about the ingredients, sourcing, and preparation methods is vital in building trust with consumers.
Step 4: Create an Engaging Brand Name and Logo
Choose a brand name that resonates with the essence of Malaysian culture and food. Design a logo that conveys the vibrancy and diversity of Malaysian flavors. The name and logo should be memorable and visually appealing, leaving a lasting impression on consumers.
Step 5: Design Attractive Packaging
Invest in packaging that showcases the uniqueness of Malaysian products. Use vibrant colors, traditional patterns, and visuals that evoke the essence of Malaysia. Ensure that the packaging is practical, informative, and aesthetically pleasing to entice consumers.
Step 6: Quality Assurance and Certifications
Highlight your commitment to quality by obtaining relevant certifications that assure consumers of your product's quality, safety, and authenticity. Display these certifications prominently on your packaging and marketing materials to instill confidence in potential customers.
Step 7: Develop a Consistent Brand Voice
Craft a consistent and relatable brand voice in all your communications, from packaging to social media. Ensure that the tone and language align with your brand's story and values. Consistency builds recognition and reinforces your brand's identity.
Step 8: Leverage Digital and Social Media Marketing
Harness the power of digital marketing to reach a global audience. Create engaging content that showcases Malaysian culinary traditions, recipes, and the uniqueness of your products. Utilize social media platforms to connect with food enthusiasts and potential consumers.
Step 9: Collaborate with Influencers and Chefs
Collaborate with influential figures in the food industry, both locally and internationally, to endorse your products. Their endorsement can significantly amplify your brand's reach and credibility. Encourage them to create content that highlights the authentic Malaysian flavors your brand offers.
Step 10: Solicit and Showcase Customer Testimonials
Encourage satisfied customers to share their experiences and testimonials. Display these testimonials on your website, social media, and marketing materials. Genuine customer reviews build trust and credibility for your brand.
Step 11: Participate in Food Exhibitions and Trade Shows
Participate in international food exhibitions and trade shows to showcase your brand and products. Engage with visitors, offer tastings, and provide information about Malaysian cuisine. These events offer excellent networking opportunities and can help establish your brand in the international market.
Creating an irresistible Malaysian food and beverage export brand involves a delicate balance of authenticity, storytelling, and marketing strategies. By staying true to the flavors of Malaysia, engaging with consumers, and crafting a compelling brand narrative, you can enthrall international audiences and make your mark in the global culinary arena.
0 notes
Text
i had a lot of fun with this one so i wanna talk abt it a little more
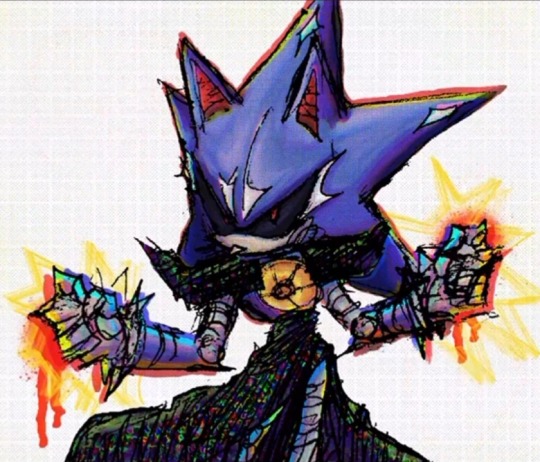
originally i wanted to go with a more comic book style until i realized i dont have nearly enough skill to pull off a background like that—plus i didn't think that that brush i used for the shading/highlights (oil paint on procreate btw) really fit with a comic book style? i still like the red graffiti drips on the fists but i liked the glitchy effect way better (its just a bunch of saturated squares merged together, glitched, flipped, and distorted)
speaking of distorted—the background is that last panel from the end of the world domination arc, but cropped, flipped upside down, and distorted to hell and back on ibispaintx
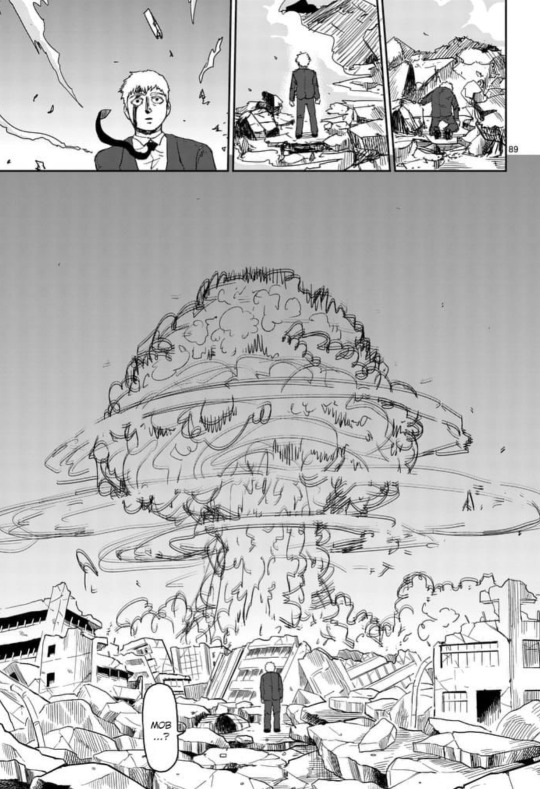
i like this one way more than the other one i did and it was also way easier because i didnt have to figure out colors and where to highlight and shade like last time LOL . doing a metallic-ish shading was way easier with the oil paint brush than with the cell shading style i tried before.

and here he is transparent, almost exactly how i exported him from procreate into ibispaintx for the background + other effects (i ended up doing the little eye flare and more shading on the silver of the mouth there too)
my favorite thing to do on ibis paint is using the noise texture brushes and the halfpoint shit. you can tell. especially the noise texture used for the outfit. . YEAH!
WHEN YOU COME OUT YOUR SHIT'S GONE
I'M IN—YOUR AREA

(lineart by @mmm-asbestos !!)
(click for quality 👍)
#im really proud of this one#idk if ill do another one for now though i need to focus on college . lol
631 notes
·
View notes
Note
could you make a detailed tutorial on how you do your big gifs, specifically the hotd ones? i struggle a lot with coloring cause everything is so grainy and dark. i have every episode in 1080p but the quality just doesn't seem to be that good once it's giffed
hi anon!
i have a comprehensive tutorial of sorts in the works, but i have, uh, absolutely no idea when it will be done. that said, i do have some tips/example psds i'm happy to share right now ✨
basic tips
to start off: my giffing process is the same no matter the size of the gifs. i use the process outlined in tay's incredible tutorial, so just follow that if you want to do exactly what i'm doing
always gif from 1080p or higher (i’m using 1080p here)
use the "load files into stack" method (see tutorial above) instead of "import video frames to layers"; this will give you much clearer, crisper gifs
crop once and do not attempt to resize once you have cropped; resizing/recropping will introduce a lot of fuzz
coloring tips
some caveats! coloring is hard, yo, and there are a million different way to go about it. the best (and least immediately helpful) advice i can give you is honestly to just screw around and figure out exactly what each adjustment option does—curves, exposure, levels, channel mixer, etc.—and start piecing together your own style
when it comes to "grainy" gifs, there are gifs with film grain and gifs that are noisy/fuzzy. hq footage will have film grain, and lightening aggressively tends to highlight that. if you're worried about noisy or fuzzy gifs, "files into stack" and cropping only once should help minimize those issues
also, hbo hates gifmakers. got and hotd are both straight up nightmares to color, so if you feel like you're struggling, just know that everyone is struggling :/
lighten first: i usually try one or two curves layers first to see if i like what the rgb "auto" option gives me. if i don't, i move on to exposure and adjust using that tool
darken the blacks: it sounds counterintuitive, but as you lighten the scene, you need to make sure you're not washing it out as well. darken blacks using selective color or increase contrast using levels (or both)
adjust colors: hotd is hideously yellow a lot of the time, so channel mixer is your friend here. i typically increase the green slider in the blue output channel and then fine tune by decreasing yellows in selective color. if i'm still struggling, i'll go to hue/saturation and adjust the yellows there
smooth artifacts: artifacts are blocky sections that don't match the coloring on the rest of the gif. do your best to correct them by adjusting in selective color or by cheating and applying a black and white gradient map over the gif— set the blend mode to color and reduce the opacity to around 10-20% to smooth out some of the artifacts
duplicate + blur: if you're really struggling with excessive fuzziness/artifacts, you can duplicate your base gif directly on top of the original, add gaussian blur at 3.5, and set the opacity to somewhere between 10-25% to smooth out the mess. be aware that this will increase your overall file size
adjust export settings: i use "diffusion" exclusively, but that's a personal preference. some people think "pattern" looks cleaner, and sometimes it can help reduce noise
and finally, here's a selection of psds i've used for hotd scenes:
psd #1
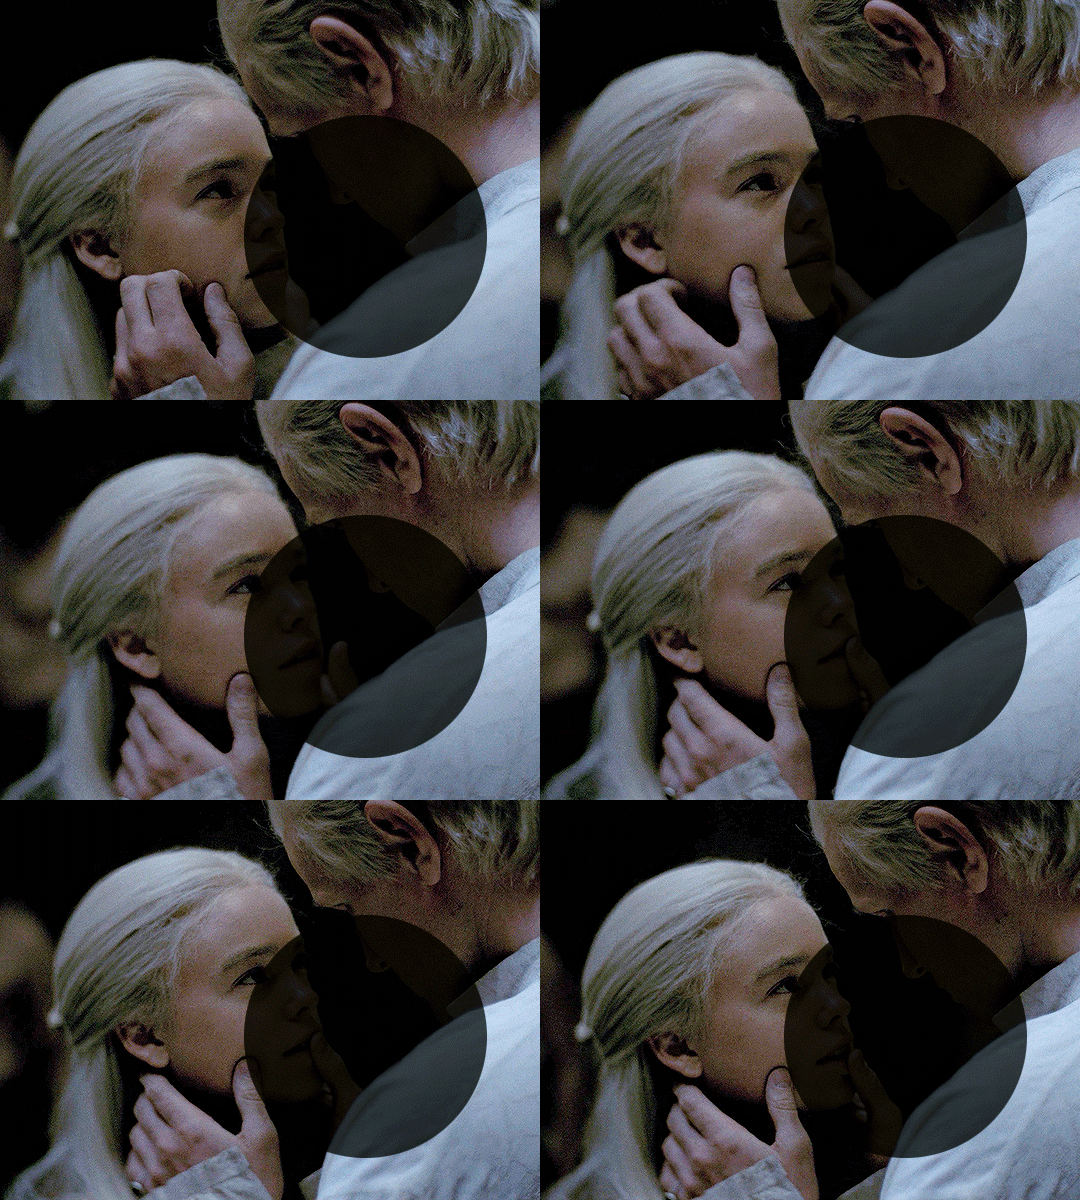
psd #2
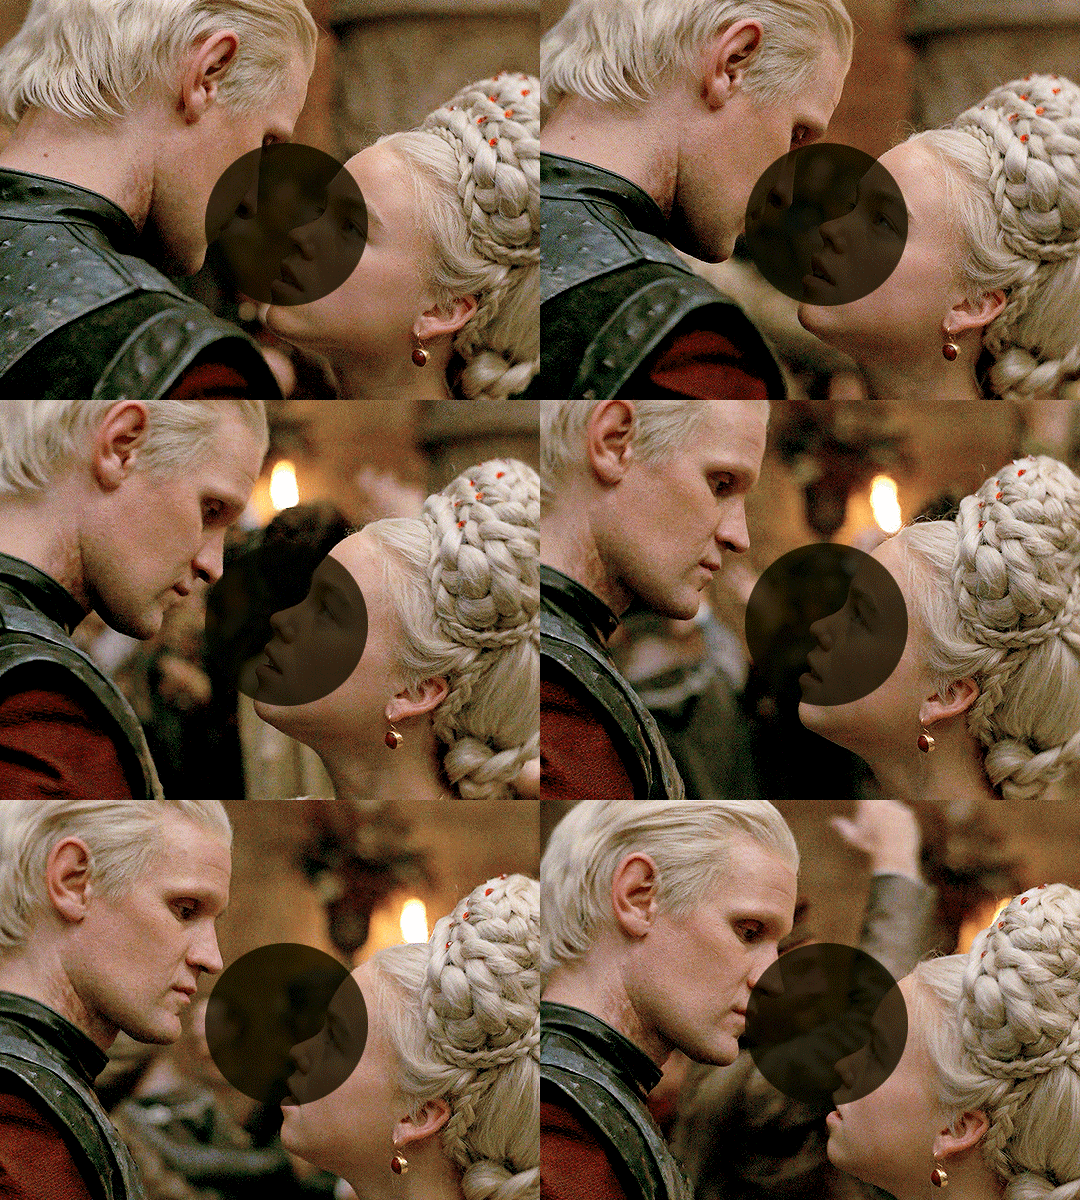
psd #3
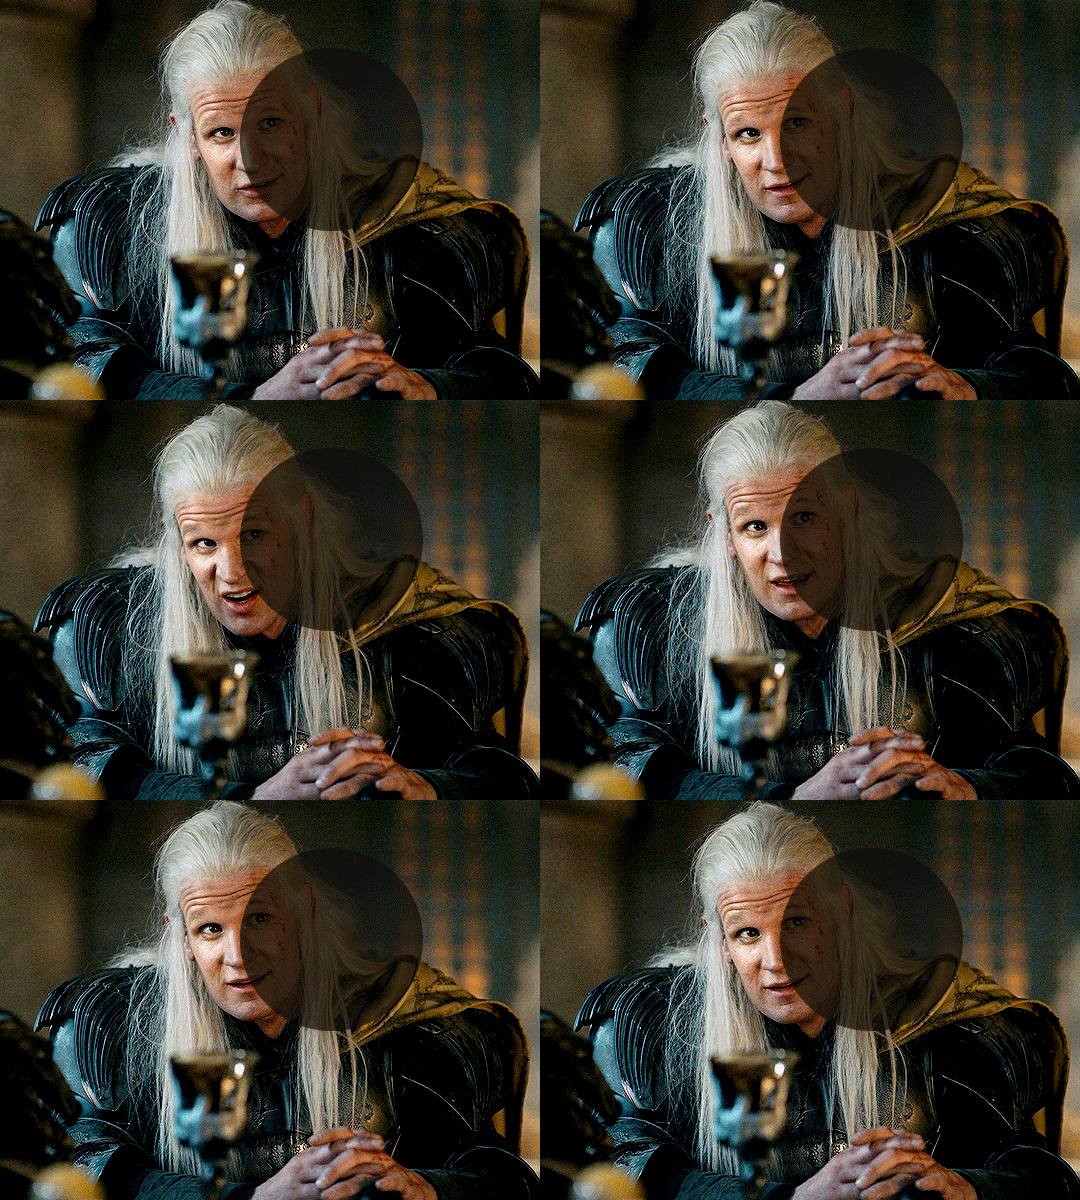
psd #4
there you go! these psds should give you a pretty good look at how i color, but feel free to send me another ask if you any more questions or want tips on coloring a particular scene!
good luck!
88 notes
·
View notes
Text
Ao3 Tips and Tricks
So I thought I would make a post about some cool stuff you can do with Ao3 and userscripts, and some tips I’ve learned from setting them up for myself! I promise it's not hard, though this is a lot of info. I'm happy to help if I can.
What You’ll Need:
First, you will need the Tampermonkey extension for your browser (depending on what browser you use, Greasemonkey is the equivalent). On Android, you can even run Chrome extensions on mobile with Kiwi Browser! It is easiest to configure the scripts on your desktop and then sync to mobile with Tampermonkey’s cloud sync feature or by exporting the configured scripts and importing in your mobile browser (I will explain how to do this later in the post). If you use any of the tweaks I outline below, be sure to backup your scripts in case your settings are lost.
Once you have Tampermonkey installed, you can get scripts from GreasyFork. The inimitable @flamebyrd also has some great scripts and bookmarklets and has been incredibly helpful while I figured all this out.
Find a script that looks interesting, click on it, and then click “install this script.” Pretty straightforward. Once you have it installed, you can go to Tampermonkey to configure it (only necessary for some scripts) by clicking on the Tampermonkey extension icon in your browser (under the three dot menu in Kiwi) and clicking “dashboard”, then clicking the edit icon next to the script you want to configure. When you’re done, click File->Save.
Scripts and instructions under the cut
Some of my favorites:
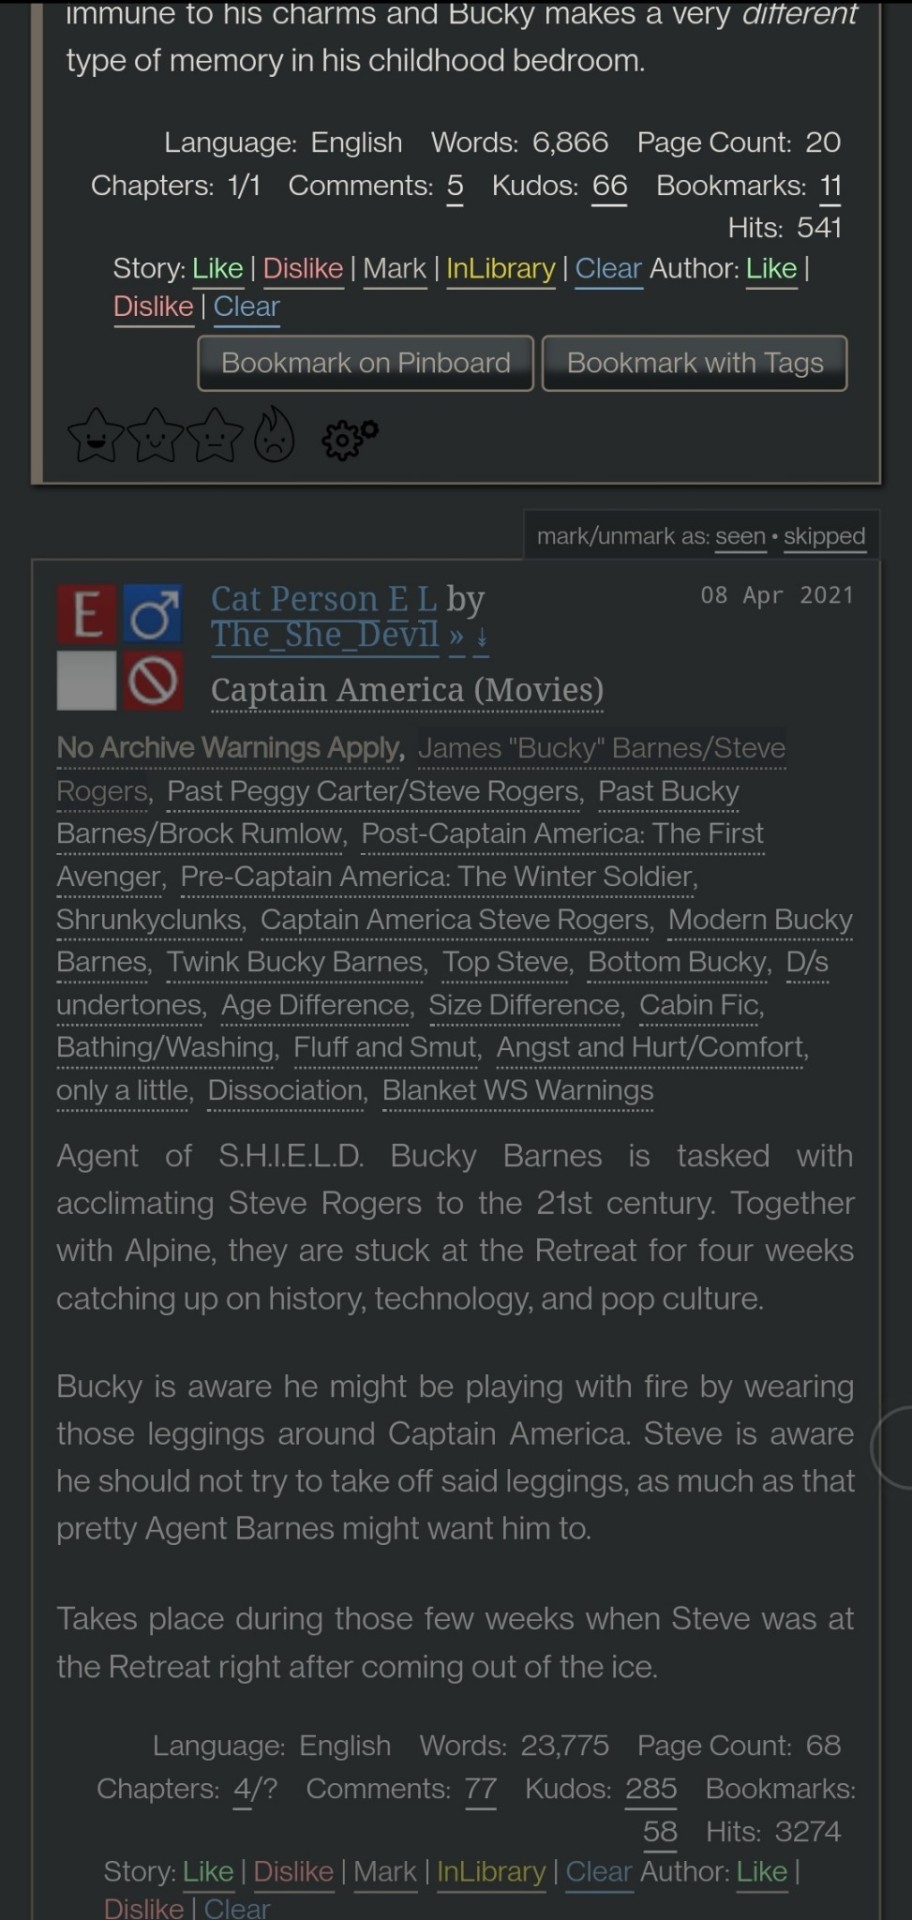
Flamebyrd’s Incomplete Works script - fades out WIPs on works listings, and displays the work stats (wordcount, chapters, etc) in red on single works to make it more obvious that they’re WIPs as you’re browsing:
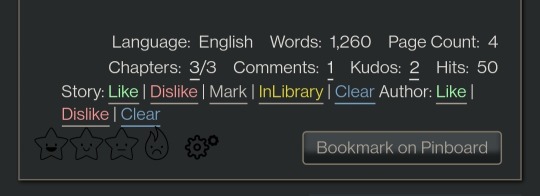
Flamebyrd’s Ao3 to Pinboard bookmarklet/script - if you click the bookmarklet while on a work’s page, it opens the Pinboard save screen and prefills the title, tags, description, word count, etc, and adds ?view_full_work=true&view_adult=true to the URL so Pinboard’s archiver will archive the complete work and not the adult content warning screen (note that Pinboard still cannot correctly archive works locked to Ao3 users, so you may want to download them as a backup. I’ve asked him about fixing that.), based on your selections when configuring the bookmarklet on the linked page. If you use the userscript, it adds a button to the works listings page so you don’t even have to open the work to save it:
I tweaked this script so that it only grabs the first pairing tag, since I don’t typically care about secondary pairings and they were clogging up my Pinboard tags. It’s a simple fix (though I know nothing about coding so I had to do some googling and inspect-sourcing; kinda proud of myself tbh):
Just change this part of the script
if ( options.relationship_include ) {
- $(".relationships a.tag", $work).each(function () {
To this
if ( options.relationship_include ) {
- $(".relationships a.tag:first", $work).each(function () {
I also found this cool mobile-optimized Pinboard bookmarklet called Pincushion and combined it with Flamebyrd’s script. Everything works except the auto-tagging, but I’ve reached out on GitHub to see if he can help (according to Flamebyrd, there’s no tag field ID attribute to map to). However, this bookmarklet has tagging autocomplete features that make it easy to tag manually. For example, if you type “steve 21st” it will suggest “steverogersvsthe21stcentury” rather than having to type out “steverogersvs…” in order for it to autocomplete like it does on the regular Pinboard bookmarklet. I actually have two buttons set up (which you can see in the next screenshot) - Flamebyrd's to quickly grab the tags and close without me having to do anything, and then the Pincushion one to quickly edit the tags. If anyone's interested, I can explain how to do that.
To combine Pincushion with Flamebyrd’s script (so it works from the Ao3 works listings page as mentioned above), simply change this part of Flamebyrd’s script:
t = t.split(" ").join( options.space_replacement );
var pb_url = "https://pinboard.in/add?url=" + encodeURIComponent(q) + "&description=" + encodeURIComponent(d) + "&title=" + encodeURIComponent(p) + "&tags=" + encodeURIComponent(t);
void(open(pb_url, "Pinboard", "toolbar=no,width=700,height=350"));
To this
t = t.split(" ").join( options.space_replacement );
var pb_url = "https://rossshannon.github.io/pincushion/?user=YOURUSERNAME&token=YOURAPITOKEN&url=" + encodeURIComponent(q) + "&description=" + encodeURIComponent(d) + "&title=" + encodeURIComponent(p) + "&tags=" + encodeURIComponent(t);
void(open(pb_url, "Pinboard", "toolbar=yes,width=600,height=700,left=50,top=50"));
You’ll need to get your API Token from your Pinboard account and plug it in where it says YOURUSERNAME and YOURAPITOKEN (number part only) above.
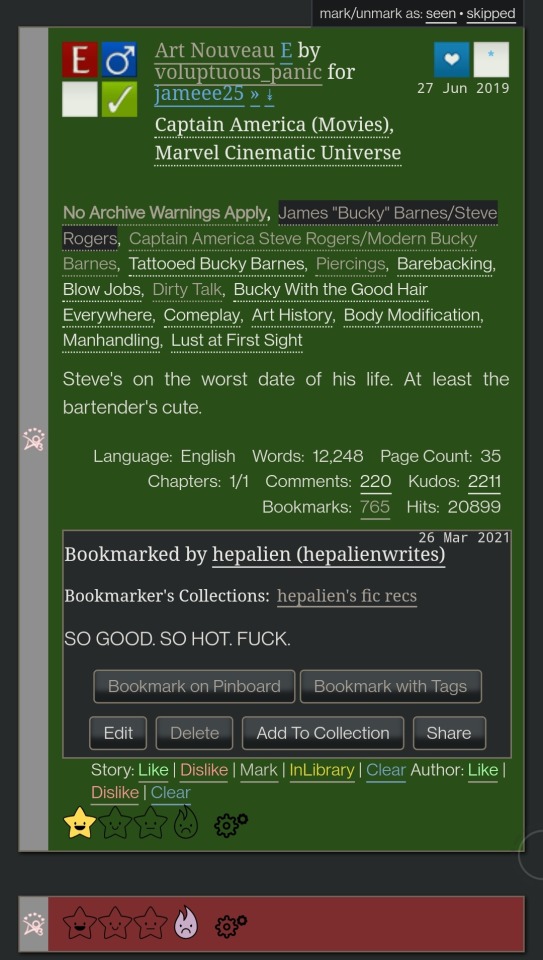
FanFictionNavigator - mark fics as Like/Dislike/Mark/InLibrary, highlight with colors based on which option you select, hide/show based on category, like/dislike author and highlight with color. Only you will see how you've marked things.
You can tweak the colors for the highlighting by configuring the script (I find the default colors make the text hard to read because I use the Reversi skin on Ao3 for white-ish text on a gray background). I also changed it so that when I click “hide likes” it only hides liked fics and not liked authors (i.e. hides fics I’ve read, but not unread fics by authors I like), changed the color of the like/dislike/etc links to match the highlighting color and to show up better, and changed the way it highlights authors (I think the default is bold/strikethrough which doesn't really catch my eye. I changed it to highlight the author name in red/green):

Here are my configured scripts if you’d like to use them instead of tweaking yourself (you need to install both):
FanFictionNavigator
FanFictionNavigator - Colors
Note: Your settings for this script will sync via Tampermonkey but not your data (i.e. fics you’ve liked/marked/etc). If you ever switch between browsers, you’ll need to go to your Ao3 Dashboard and click FFNOptions, export your data, then go through the same process to import it into the new browser.
AO3: Kudosed and seen history - highlight or hide works you kudosed/bookmarked/marked as seen. If you want to use this with FanFictionNavigator, you’ll need to turn off “highlight bookmarks” from the settings under the “Seen Works” dropdown that gets added to your Ao3 navbar or FFN’s colors won’t show. Again, data doesn’t sync between browsers but you can copy it from the dropdown settings. However, it pulls your kudosed and bookmarked fics from Ao3 itself, so that will always show. It's just seen/skipped that doesn't sync:
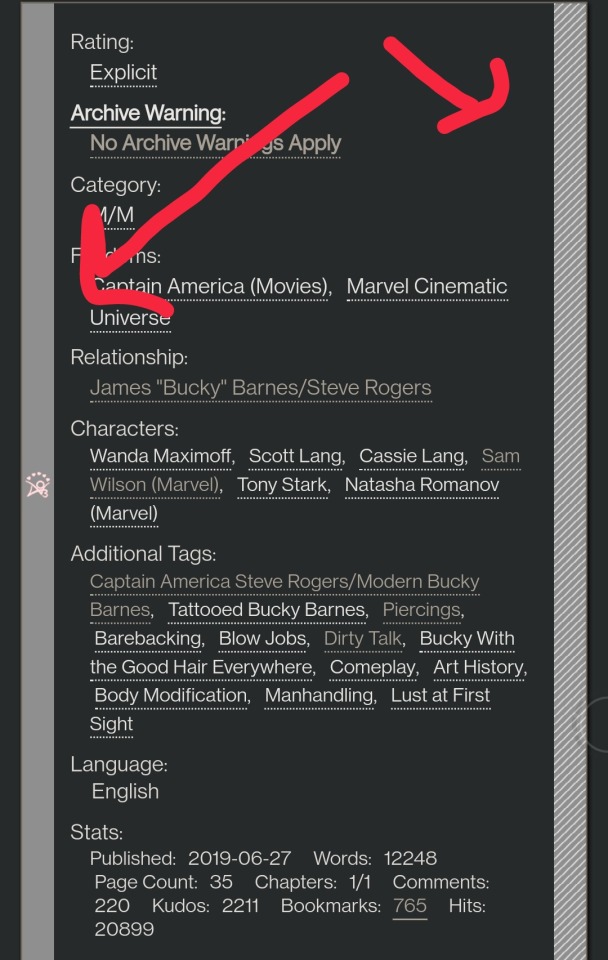
Ao3 download buttons - adds a download button to the works listings page so you don’t have to open the fic to download it. However, it also doesn’t play nicely with FFN’s colors, so I’m using AO3 Review + Last Chapter Shortcut + Kudos-sortable Bookmarks script which also has a download button that works with FFN (a small down arrow next to the author name). The download button doesn’t work as-is from that link, so here’s my tweaked version based off of this comment. You can configure what format you want it to download by default in the script. There’s also a tweak in the comments to fix kudos-sorting, but it overloads Ao3 and you get a “retry later” error for a few minutes when you try to open Ao3, so I don’t recommend it. I don’t know if any of the other functionalities of the script work because I don’t use them, but it looks like there are tweak suggestions in other comments you can try:

I was using Ao3 Replace Words to replace words in fics that bug me but I realized it wasn’t working on mobile, so I’m using zensurf instead which is not Ao3-specific but works basically the same way. If you want to limit it to just Ao3 (so it doesn’t change words on non-fic sites), just add this
// @include http://archiveofourown.org/*
// @include https://archiveofourown.org/*
Above this line
// ==/UserScript==
(function() {
You can // @include other fic sites like ffnet that way too.
AO3: Links to Last Chapter and Entire Works does what it says on the tin, but the creator was kind enough to give me a code snippet to add that makes the “E” (for Entire Work) appear next to all works and add ?view_full_work=true&view_adult=true to the work URL so that I can easily right-click and share to Instapaper and have it be saved correctly (not just the first chapter but the whole work + not the content warning screen for NR/M/E works). Here is the script with this tweak applied:

I think those are the only ones that I’ve done special tweaks for. Here are some others that I find useful that either don’t require any configuration, or should be pretty straightforward to configure and are explained on the script page.
AO3 author+tags quick-search - doesn’t require configuration
Generates quick links from AO3 fics to more by the same author in the same fandom (or character/pairing/any other tag):
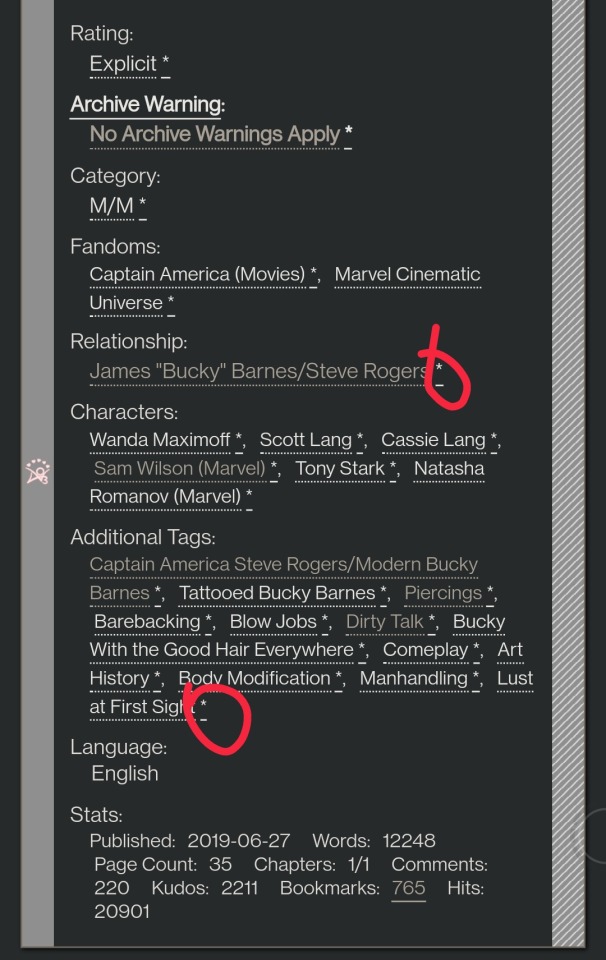
Remove leading spaces in AO3 - doesn’t require config
Removes the leading indents for paragraphs in AO3 works.
Ao3 Only Show Primary Pairing - you have to enter the pairings you want in the script, and you can change how early in the sequence they must appear before the work is hidden. Also works with character tags.
Hides works where specified pairing isn't the first listed. Hidden works show a placeholder that you can click to unhide:

AO3: highlight tags - have to enter the tags you want highlighted, as well as the color you want. It matches case so you may have to enter both “Dog” and “dog”, for example.
Configure tags to be highlighted with different colors. This makes a tag more obvious to your eye when browsing. I use it to highlight things I’m wary of in red so I don’t miss them and start reading a fic I might not want.
AO3: Tag Hider - configure how many tags you want to see before it hides them
Hide tags automatically when there are too many tags. Add hide/show tags button to browsing page and reading page.
AO3 Remove Double-Spacing - no config
Removes awkward double spaces between paragraphs on AO3. Doesn’t smush together paragraphs that have a single line break - it leaves those alone.
ao3 series collapser - no config
Collapse works that are later than part 1 of a series. Leaves a placeholder so you can uncollapse if you want to see it.
AO3 Blocker - no config, but you enter what you want to block from the added navbar dropdown in Ao3
Fork of ao3 savior; blocks works based on certain conditions. I find this simpler to use than Ao3 savior.
FYI there are also style scripts for Pinboard on greasyfork and userstyles.org (this site is slow af for some reason, so be patient while it loads). I use show unread bookmarks more clearly and Modern Pinboard Style (basically a dark mode). Neither require config unless you just want to tweak the settings to your liking. To install to Tampermonkey from userstyles, scroll down to “Install style as userscript”.
I also use these extensions in Kiwi:
Ao3rdr - Adds a star rating system (pictured in some of the screenshots above) to Ao3 works that only you can see. This one will sync your data between devices if you use the cloud sync option, which I recommend so you don’t lose your data if something happens to your device or browser.
Dark Reader - not really necessary for Ao3 if you use Reversi skin, but does make all browser pages dark mode if you want it on sites other than Ao3.
Speaking of Ao3 skins, I have another one set up in conjunction with Reversi that shows all the fandoms on a user’s profile, rather than having to click “expand”:
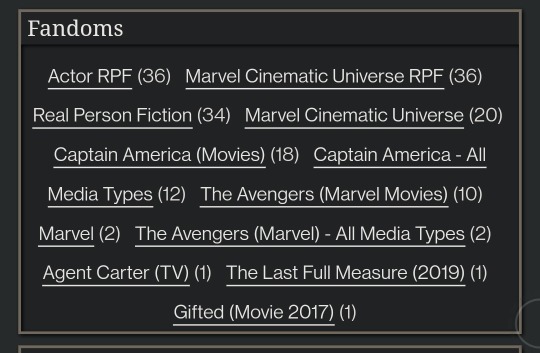
Unfortunately, I can’t remember where I found this. To set it up yourself, go to your Ao3 -> Dashboard -> Skins -> Create Site Skin, fill in the Title (has to be unique), and paste the code below in the CSS box:
#user-fandoms ol.index {
padding-bottom: 0;
text-align: center;
}
#user-fandoms ol.index li {
display: inline;
margin-right: .5em;
line-height: 2.15em;
}
#user-fandoms ol#fandom_full_list {
padding-top: 0;
padding-bottom: 1.5em;
display: block !important;
}
#user-fandoms p.actions {
display: none;
}
Then hit Submit -> Use. There are ways to hide or highlight various elements (ships, characters, blurbs, work stats, etc) on a works listing page using skins on Ao3. This is getting long so I’m not going to go into that, but I’m happy to help if you want to try it. It’s very easy.
Once you have everything configured on Tampermonkey on your desktop, you can migrate it to your mobile device in one of two ways:
Option 1: Go to Tampermonkey settings and change Config Mode to Advanced
Go down to Script Sync and select your preferred cloud service and save
It will ask you to log in to said cloud service
Install Tampermonkey in Kiwi and do the same thing
Wait for it to sync (this can be slow)
It should sync any changes you make moving forward, but again, it’s slow
Option 2: go to Utilities and check all 3 checkboxes under general (include script storage, include Tampermonkey settings, include external script resources)
Either export to your preferred cloud service or
Export as a zip file, move it to your mobile device, go to this same screen and import
I would recommend exporting as a zip for a backup even if you don’t use it to migrate your scripts
You can unzip and upload individual script files (.js) on this page if you ever need to reinstall a single script with your settings instead of all of them
Let me know if you run into any issues and I can try to help! The script writers are also super nice and helpful if you reach out to them. Yay fandom!
#ao3#archive of our own#fanfiction#ao3 resources#fandom#fanfic#tech#Tampermonkey#userscripts#ao3 tips#musette22#I hope you don't mind that I used you for the 'liked author' example ^_^#ditto voluptuous_panic#y'all should read art nouveau it's so good
481 notes
·
View notes
Text
Tutorial: Batch Creating Animated Gifs in Adobe Premiere
I figured out how to make gifs with Adobe Premiere and the results, surprisingly, do not suck ass.
Here’s a gif from photoshop. No effects or lighting etc, just resized to 540 width and exported with Selective Color & Diffusion chosen for export settings.

Here’s the same clip done with Premiere + Media Encoder, bypassing Photoshop entirely. I used the Animated Gif preset when exporting, and only changed the size.

They look pretty much the same to me, which is not something I’ve found from experiments in previous years. Edit after multiple additional experiments: the quality is not predictable. Premiere offers no options for dither or optimization of your gifs, so based on lighting, how strong your highlights are, etc, you can get results that have a lot of artifacts; dark indoor scenes with brightly lit actors seem especially bad. I’m finding about half of my gifs look good, and half have annoying white dots in them.
But this is all so fast that it’s worth doing anyway; worst case I’ve done my lighting mods in premiere, which is fast, and just have to export half of the mp4′s from photoshop for proper diffusion.
Why Use Cruel, Unfriendly Premiere?
Premiere has a steep learning curve, but it is full of good features. Good-quality batch GIF exporting is basically the holy grail of gif-related features, at least when your hobby is making giant shitposts full of gifs.

You also can use Premiere to apply the same lighting effects and whatnot to a series of clips. That’s a bit more advanced than this here tutorial, however. This here tutorial will show you everything you need to click in order to clip and export gifs from Premiere, without learning anything else about it.
Version
This tutorial is for Adobe Premiere 2021, Version 15.1.0, released around April 2021 and Media Encoder 2021, also version 15.1.0. It should be the same or similar for any newer versions, but older versions may not have these functions. Or they might have them but produce terrible gifs.
The Illustrated Steps Are Behind A Cut Because I’m Not An Asshole
The Steps
Note: These gifs are generally cropped to the relevant part of the workspace only, so you can see what I’m clicking.
1. Open a new file in Adobe Premiere and save it to somewhere sensible, not the stupid location that Premiere thinks you want to save files in. You’ll probably never open this file again once you’re done exporting, but you should still save it in case the power goes out while you’re clipping.

2. Switch to the Assembly workspace.
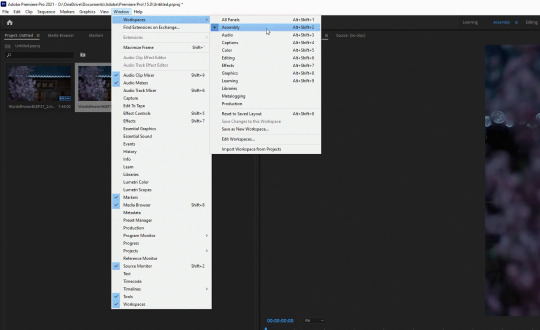
3. Right-click in in the media area and choose import media, or just drag an MP4 in from your file browser.

4. Drag the media to the timeline.

5. Unlink the audio and delete it, since it’s not needed for giffing.
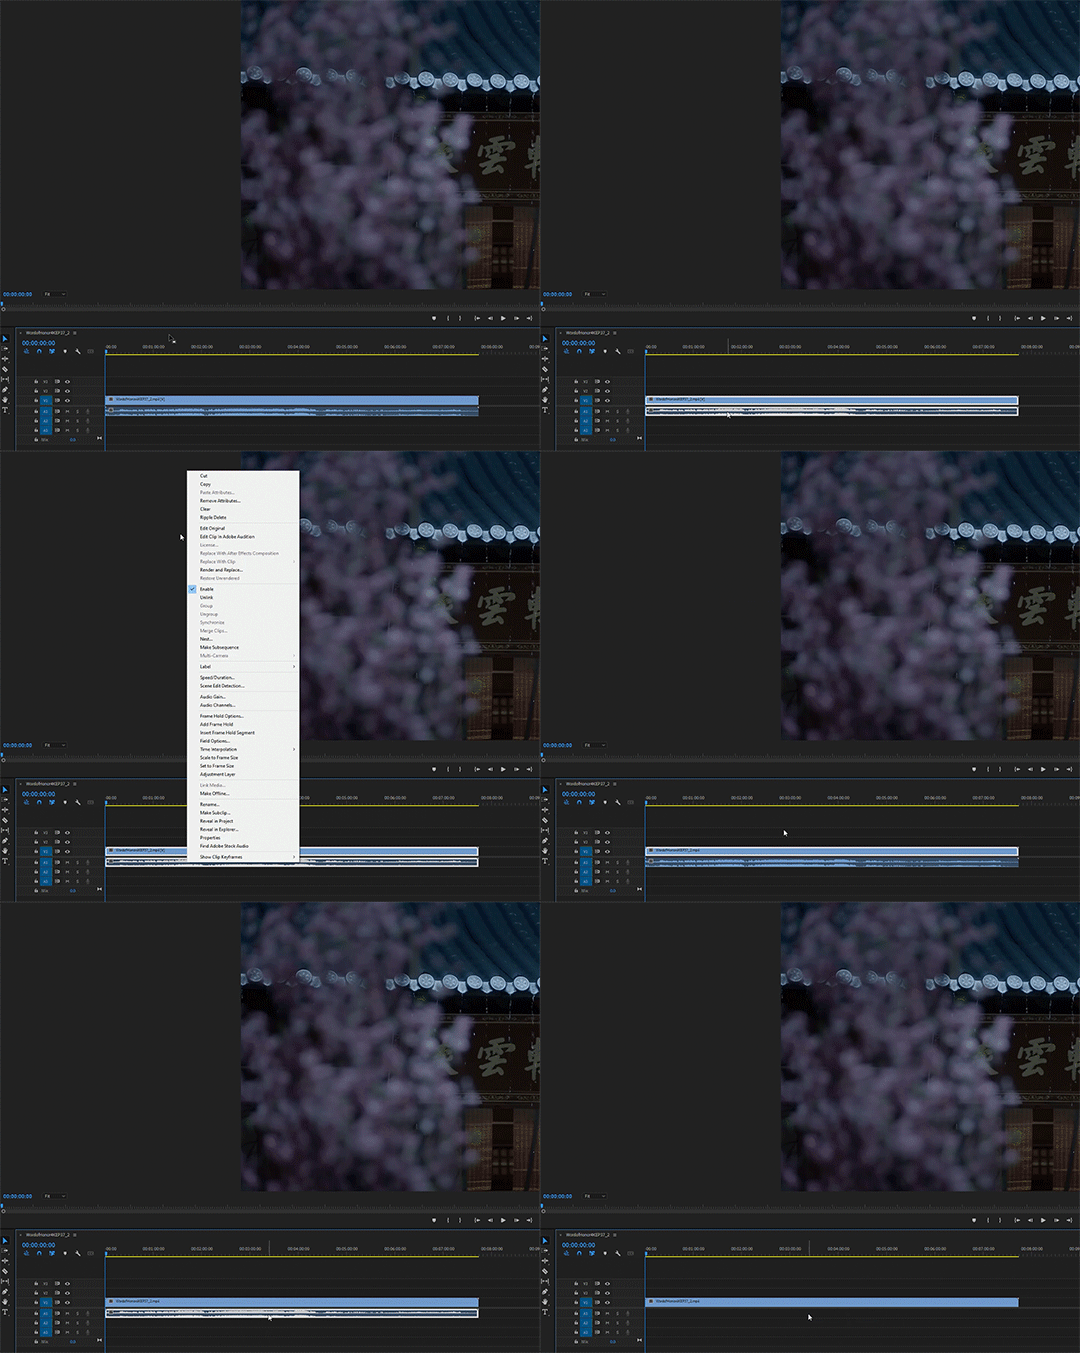
5. Pick up the razor (Keyboard shortcut C) and get cutting. Go to the frame AFTER the break point, then cut on the line. You can use the right and left cursor keys to move between frames one at a time, if you don’t want to use the mouse to click like I’m doing here.
Use the bar at the bottom of the timeline to adjust its scale while you work. This only affects the visual interaction with the timeline, not the clip timing.

6. After you’ve snipped stuff, pick up your pointer (Keyboard shortcut V) to select individual clips. Delete the clips you don’t want by selecting them and clicking the delete key.
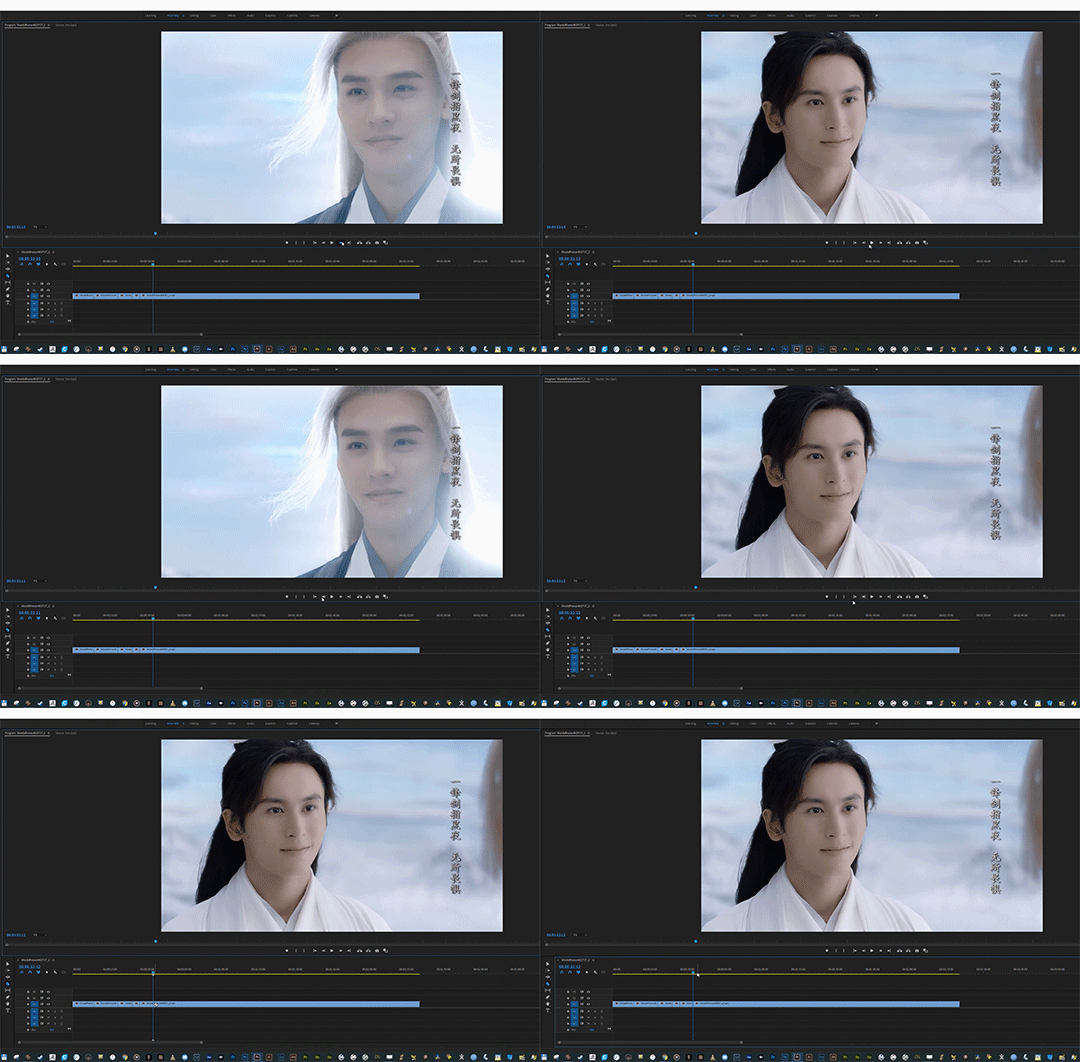
7. If you don’t like gaps, choose “close gap” from the Sequence menu.

For individual gaps (or clips) you can right click on a gap and choose “ripple delete” which deletes the gap and moves the next clip into place.

You don’t strictly need to know how to close gaps in order to make gifs, but if you want to combine two into one, this is useful.
The Magical Command
In order for it to export your clips correctly as single files, instead of as one big file, here’s the trick:
8. Use the “Make Subsequence” command. You have to do this individually for each clip that you want to batch export. Select the clip, right-click, and choose “make Subsequence.” (Note: earlier versions call this “nested sequence”)
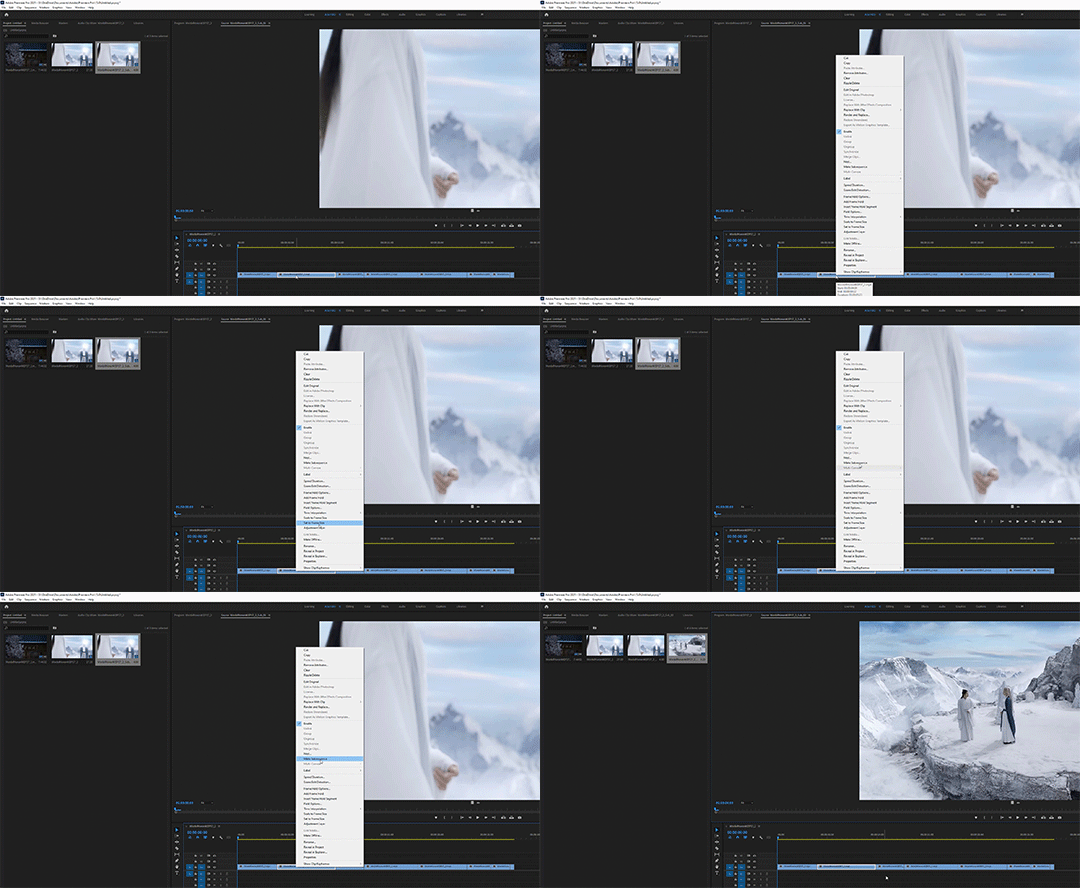
You can also combine two clips into one by selecting them together and making them a subsequence.
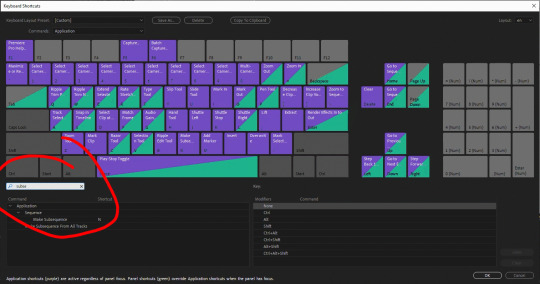
9. To speed things up, define a hotkey for this command.
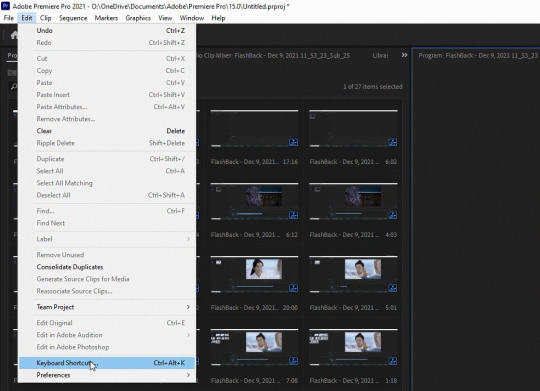
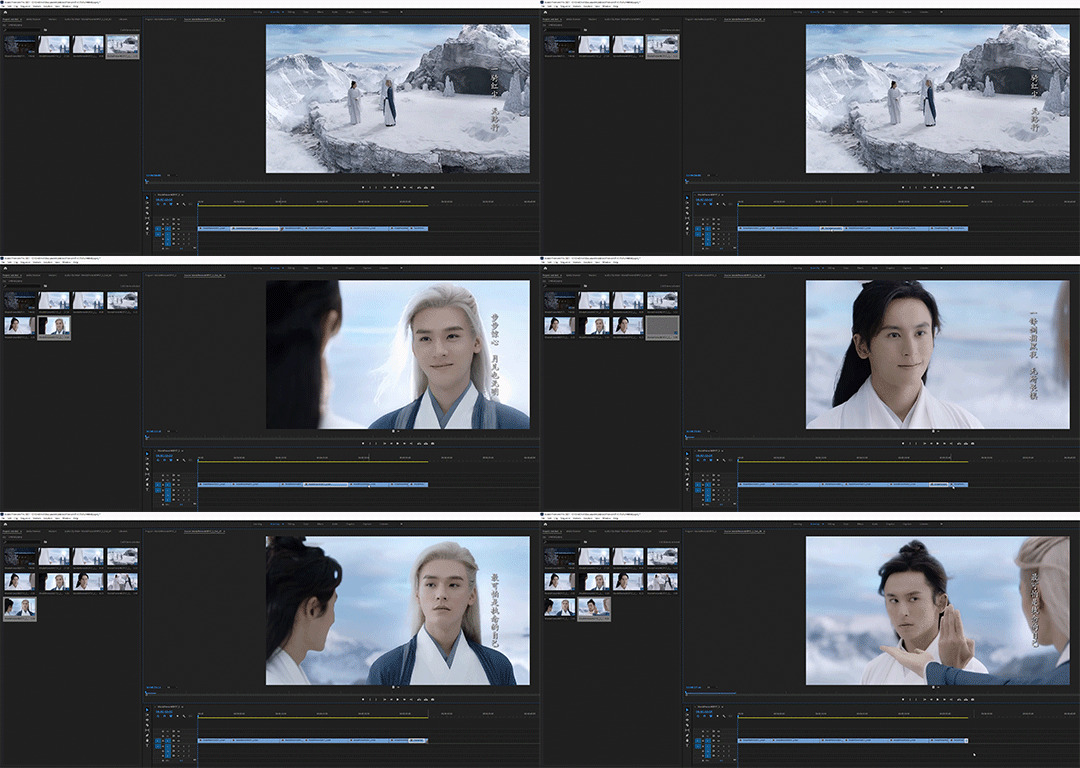
Here’s how fast it goes when you have a hotkey.
Export
10. When you’re done making subsequences, select all of the subsequences in the media area. That means all of the items in the media area except the first item (which is the original video file) and the second item (which is the entire timeline). Right-click and choose “Export Media.”
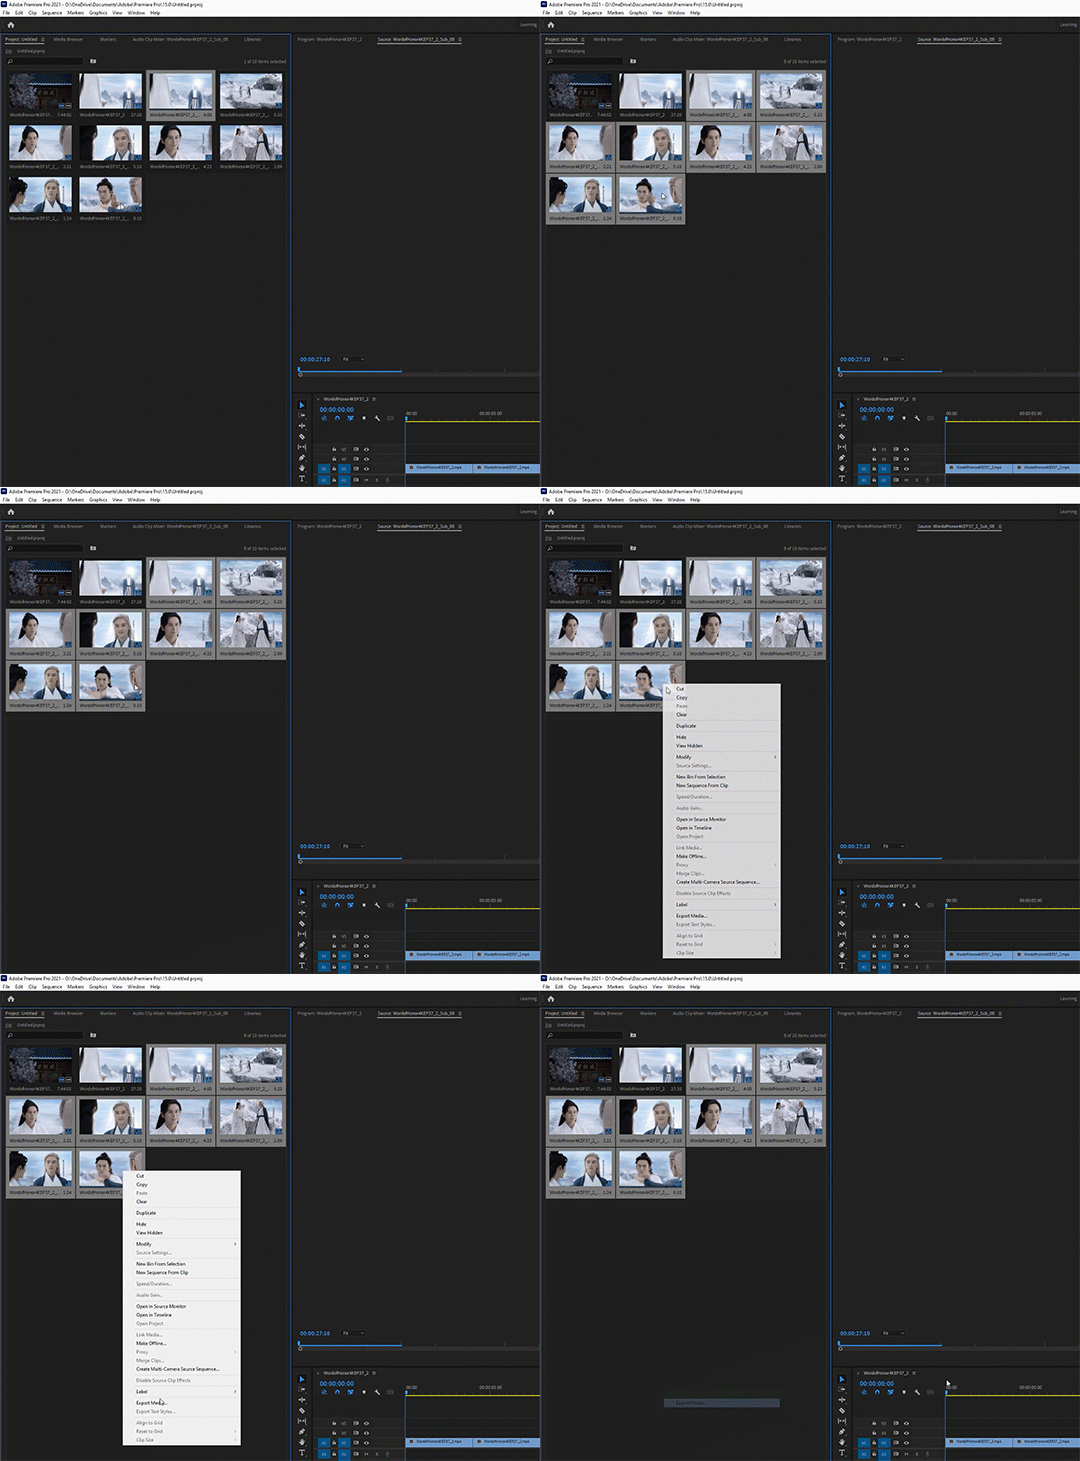
11. In the Export dialog, choose the “Animated Gifs” format - but don’t take the original resolution, because that will be huge. Set it to whatever you want it to be. Tumblr compression currently (in 2021) likes things to be 540 pixels wide. You can tweak a lot of other settings if you’re feeling adventurous.

12. Once you have your settings the way you want them for exporting, before you do anything else, save an export preset with these tweaks that you can use next time. Note: The preset will save the height as well as the width, so you can only use it unaltered if the next project has the same aspect ratio.
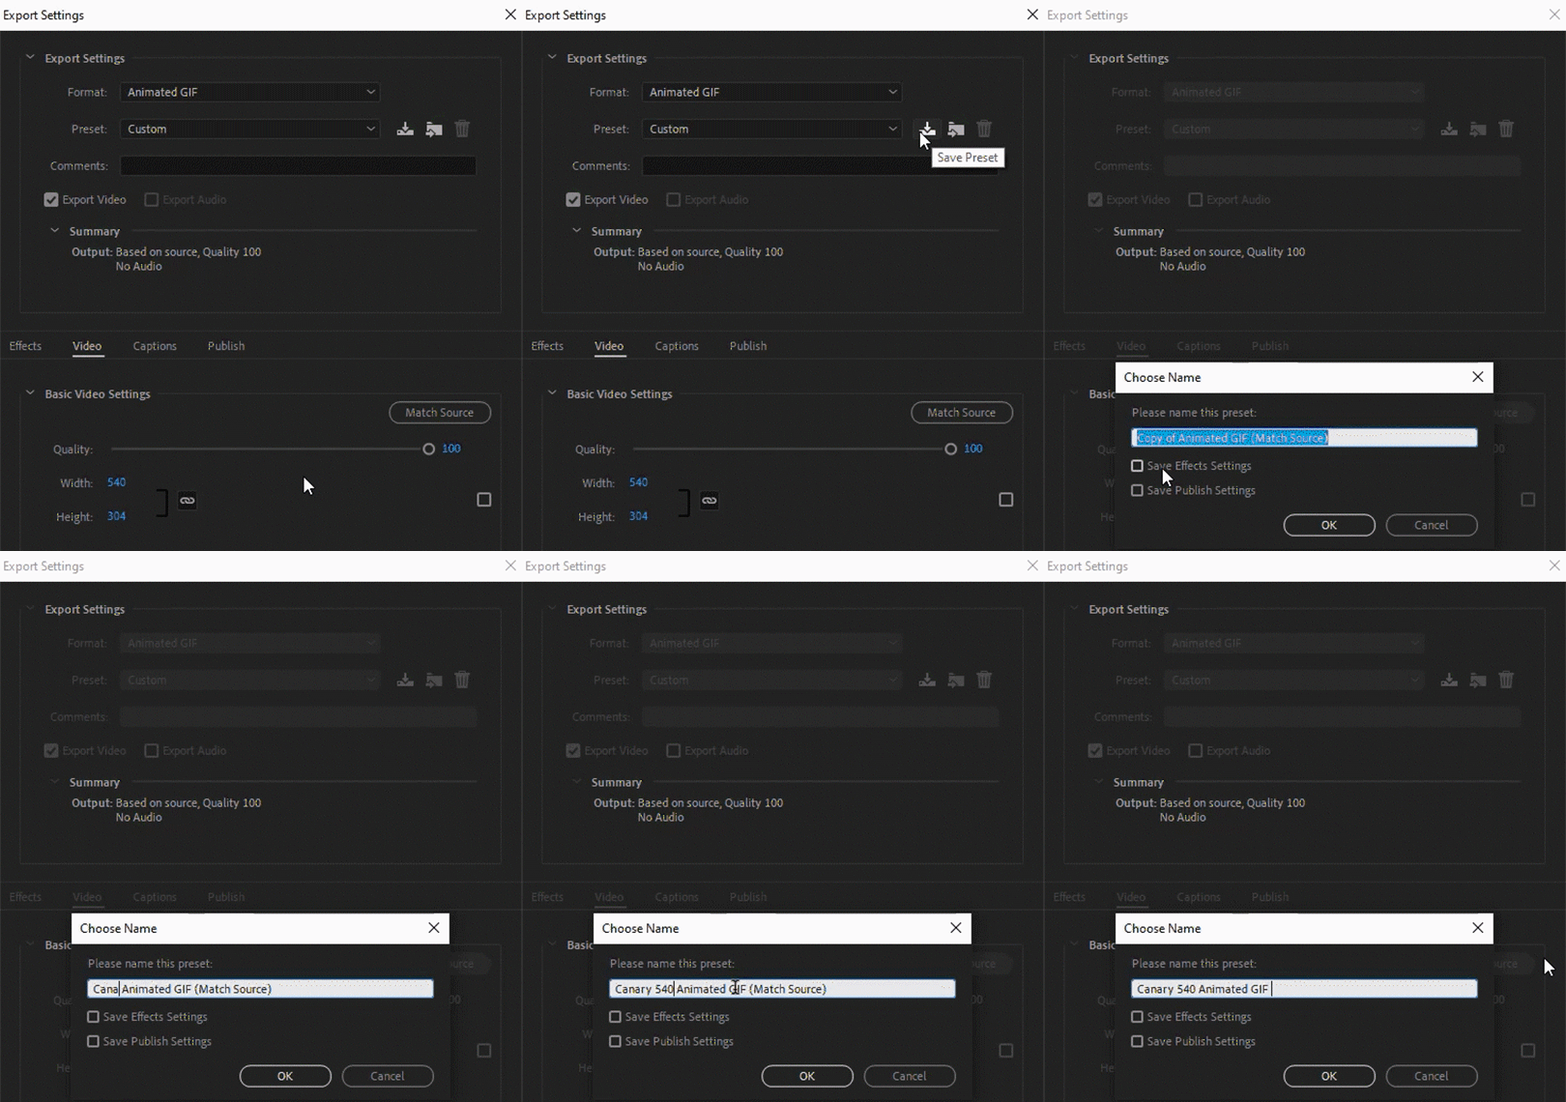
13. Click “Queue” to send everything to Media Encoder for baking. Always use “queue” instead of direct export, even if you’re only exporting one clip. (With multiple clips, queue is the only option).
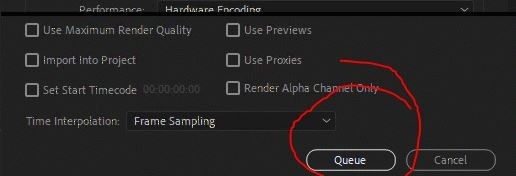
Premiere seems to forget my export settings if I export directly from Premiere, but if I choose “queue” it hands everything off cleanly to Media Encoder.
14. Hop over to Media Encoder (it will autolaunch when you click Queue). You can change the export location of the files here by right-clicking the file names in the queue. Even better, you can tell Media Encoder to always export things to the same folder, so that Premiere’s save location doesn’t affect it. Go to Edit menu --> Preferences to set this up.
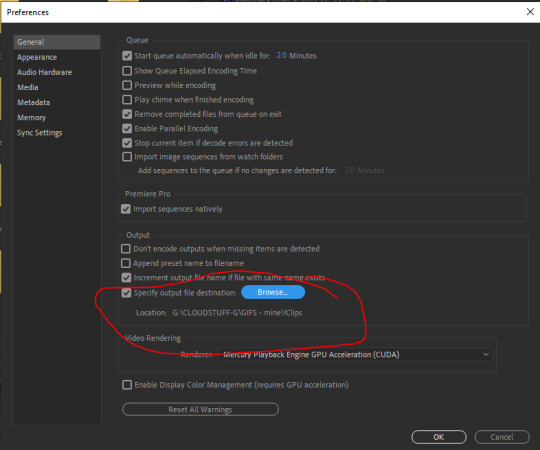
15. Once the queue is loaded up in Media Explorer, click the green “play” icon to export the clips.
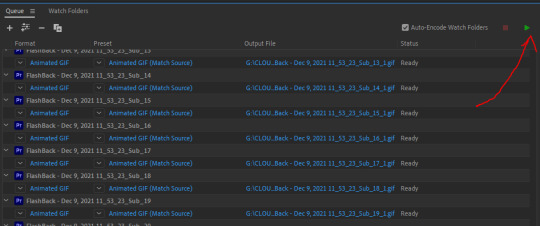
You can also set ME preferences to automatically run the queue after x minutes if you, like me, frequently forget to click “play” after queuing things.
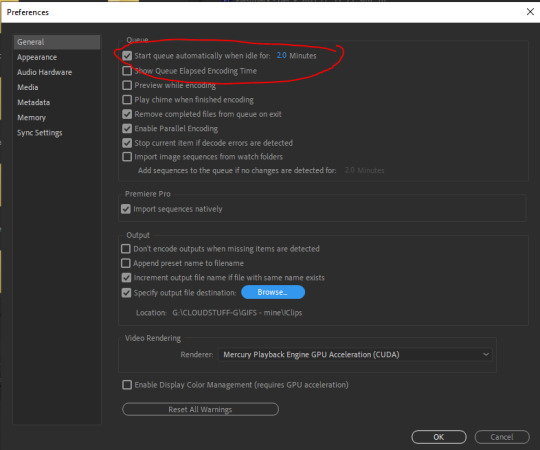
16. While the queue is running, go back to Premiere and do another export; this time use the H.264 encoding preset to export (via the M.E. queue) a set of full-size MP4′s.

This way if any of your gifs look bad, you can use the MP4′s in photoshop to make better ones, or just store them for later adventures.
And that’s it! Happy giffing!
Bonus: Look at these dorks


60 notes
·
View notes