#fibercrafting
Explore tagged Tumblr posts
Visit Tumblr Blog
Explore Tumblr blogs with no restrictions, modern design and the best experience.
Last Seen Tumblr Blogs


Fun Fact
The “We are the 99%” Tumblr blog became the slogan for the Occupy Wall Street movement.
Text
sewing and dyeing
I have managed to achieve some sewing!
I finished the silk dress from the yardage I'd dyed around Christmas, even hemmed it and everything, I feel very accomplished. So that's done.
And the linen bias-cut slip dress I made around Christmas, which I never wore anywhere because it was white-- I've managed to dye it, and it came out much more interesting than I'd expected! So, pictures and discussion behind the cut.

[image description: A mirror shot of me, a fat blonde white woman, in a grungy basement, wearing a clingy white knit tank top with a drapey cowl neck]
Firstly, I made this tank top (I bound the armholes, it looks nicer that way)-- started with the Cashmerette Wexford top, then used this tutorial from Threads Magazine to hack a cowl neck onto it. Ages ago I'd had a cowl neck sleevless top that I loved, and wore holes in, and couldn't find one again. So I used a yard or so of very slinky knit, probably some kind of rayon blend from Dharma would be my guess.
I tried it on, and immediately threw it in the soda ash solution to dye it because I don't need a white top like this, it'll get shit dripped on the tit immediately so I might as well give it a busy dye job. I will make more of this top in other fabrics, but 1) make the cowl just a bit longer so it drapes farther, and 2) make the self facing deeper, I feel like this one is going to flip out all the damn time.
I also think I'll hem this shorter, but I haven't hemmed it at all so far so it remains to be seen.
Secondly, I have nearly finished this button-up camp-collar shirt from the Cashmerette Club, in a natural linen that I have so many yards of from an old project I never did.
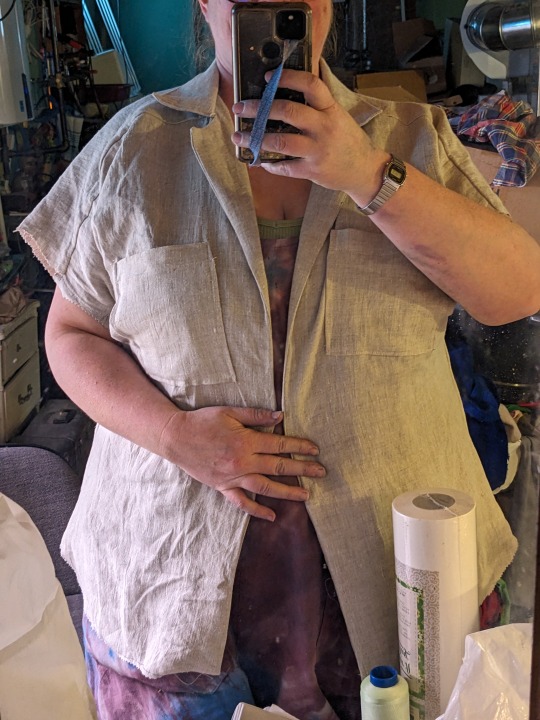
[image description: me in the same grubby cluttered mirror view of my basement, wearing a gray shirt, slightly wrinkly, with unfinished sleeve edges and I'm holding it shut because there aren't buttons on it yet. There are two breast pockets and one is significantly higher than the other.] So the breast pockets are optional and uh I am definitely only going to put one or zero on the next one of these I make because I checked and rechecked and rechecked and this is literally the best I could do at making them even??? ugh also they don't sit right because there's a bust dart and one of them went on ok and somehow the other one is overlapping the bust dart slightly, which means it's Not On Straight. Just.... not optimal. I get why there are pockets but I also super get why they're optional. No thanks!
I hate the interfacing too, it was awful to work with and feels like paper. But once I've finished and washed this I hope it will settle down. (In the past I've used shitty salvaged interfacing for things I was making, and used spray adhesive and sewed the edges where possible, and it worked fine. This, I splashed out and got the stuff in the package that's ostensibly meant to fuse on with your iron and guess what doesn't fucking work? that. So it's been just a nightmare and I'm not buying the nice stuff again because it fucking sucks. I get that you don't want to not interface the collar of a shirt like this, and the button band would be awful un-interfaced, but christ, I'm using the flimsy salvaged shit I cut out of an old bedskirt next time.
The directions on this pattern are... well as long as you know what they mean it's great. But there's a video sewalong, and that helped a ton. This is a very complicated pattern and yet somehow none of it has been beyond me, even though i sewed one bust dart inside-out first thing, and immediately also sewed the yoke to the back inside-out, and then right away also assembled the collar inside-out because I was so distracted by how much the interfacing did not actually fucking do what it was supposed to (yes i followed the package directions, no it did not fucking fuse). I got a lot of seam-ripping done, is all. (It really is a cool pattern, and if you manage to get through the directions, which are extremely specific, you wind up with a fully-finished interior with almost all the seam allowances beautifully enclosed-- it's cool as fuck.)
I have fabric already set aside to make at least two more of these. IDK how much I'll wear them but I love them. (I *have* coveted a shirt-dress for years, with one Almost Okay from Torrid that I wore a lot but have recently realized looks awful on me actually, so I will be making it a dress too, no fear.)
But then! Also: Dyeing!
So I looked on Dharma Trading for their tutorials and was not disappointed. I don't want to do traditional tie-dye, but I want the effect I got at Christmas with the silk scarves that I space-dyed. I don't have to steam-set fiber-reactive dyes, so that's a plus.
I saw this tutorial on dharma for ombre dyeing and I'm super gonna try that next, but haven't yet.
Tie Dye Tutorial on Dharma Trading: this is the one I used as a starting point.
So I dissolved a cup of soda ash in a gallon of warm water, put that in a plastic bucket, and soaked my fabric for 5-15 minutes, and then I decided to do a kind of gravity-based thing with squirt bottles and a spray bottle. I hung a clothes hanger from the gas pipe in the ceiling, put a big plastic mortar tub underneath, put a smock on myself, mixed up my dyes (and urea and in some cases salt, as directed by dharma the all-knowing-- half-cup batch size for the squirt bottles, and quarter-cup sizes for the spray bottle), and got to work one garment at a time.
I put some pleats into the garments and held them with clothes pins. Then I sort of "drew" along the pleats, picking a color to be the tops, and a second color to squirt into the valleys. I filled in with the spray bottle to highlight the pleats more, since that would hit the outer parts of the folds but the interior would be shadowed and stay white; then I could go draw in those white areas with my shadow color.
Everything then would drip down toward the hem of the garment, though there wasn't really that much movement; if I wanted a drip to cascade, i had to draw it down there myself with the squeeze bottle.
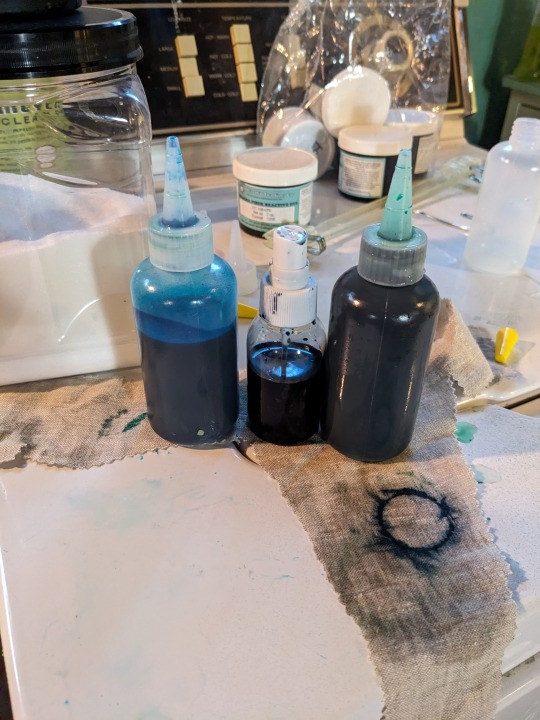
[image description: two squeeze bottles with narrow nozzles, and a spray bottle of more rigid plastic with a pump-dispenser top, sitting on top of a piece of stained scrap fabric on an old washing machine with tubs of dye powder sitting in the background.]
I also did a shirt where I spread it out on a rack in a pan at an angle, and sprinkled a mixture of dye powder and salt on it. Then I went and used the squirt bottles too, but it was a fun technique and I'd use it again.
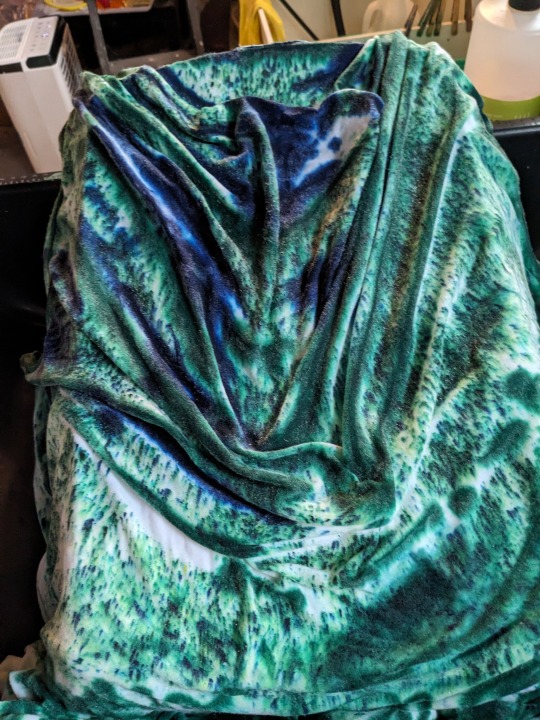
[image description: a garment lies in loose folds, speckled with dark blue-green spots, and at the top decorated in splotches of blue and green.]
I wrapped the garments in plastic, and put the smaller ones into plastic bags, and then hung them outside in the sun so that a) the dye would flow downward rather than backstaining the areas I'd meant to leave white, and b) the sun would warm them so the dye could cure, and c) the plastic would keep them wet because the dye only chemically sets while damp.
Let them cure for 24h, and then today I brought them in and rinsed them for about a thousand years, and then washed them and gave them a soak and rinse in dye-fixative, then dried them on the line.
Here is the linen bias-cut slipdress I made at Christmas time, dry and ironed.
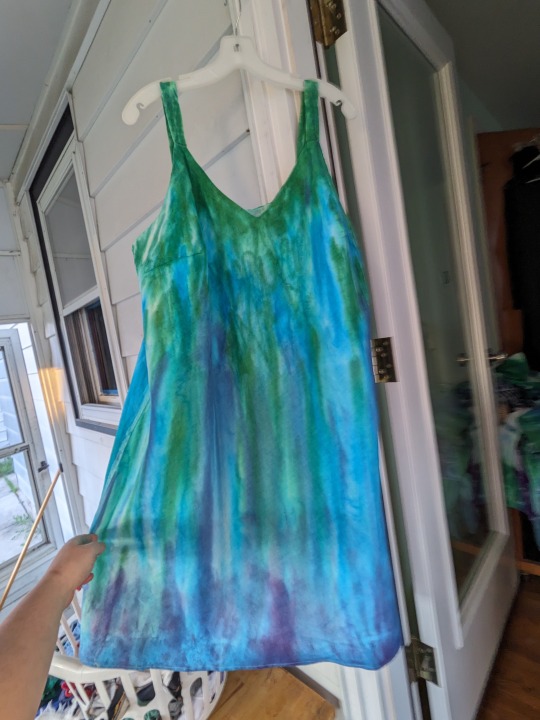
[image description: a dress on a hanger, with my hand pulling out one side of the skirt: the straps and neckline are bright emerald green, and then the body is streaked vertially with varying shades of green, teal, and dark blue, with a little purple at the hemline. The colors are light and a little muted, and some white shows between them in a few places.]
The linen took the dye lightest, the cotton a little darker, and a small offcut of rayon I'd had sitting around took the dye darkest of all.
here's everything still damp on the line:
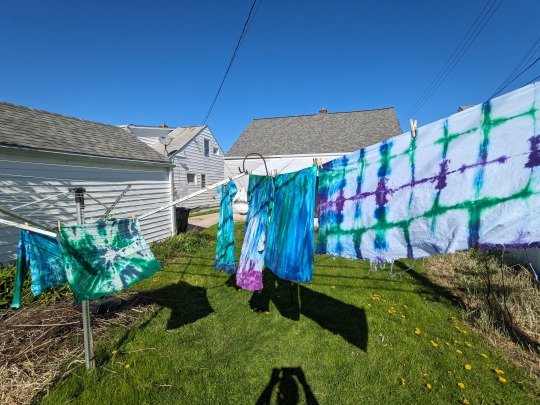
[image description: under a blue sky, a metal clothes-tree-style line on the left has several small items in shades of green and turquoise, and then a line crosses the screen from right to left through the middle, with several items hanging on it. In the background are two cotton dresses, one mostly teal and the other green at the top with a white and purple skirt, then the linen dress from above in the middle, and closest to the camera is a mostly-quite sheet of fabric with geometric lines in green, blue, and purple.]
The foreground fabric is the rayon, and I sandwiched it between two blocks of wood with rubber bands holding it in place, and just saturated the edges with dyes. I'm extremely into it, it came out beautifully. i have more rayon so I am going to make something from that to ombre-dye, for sure.
I have severely overdone my physical activity the last two days though; I lay awake for a couple of hours the other night with my sciatic nerve just burning, and I expect the same tonight. We'll see though, maybe I'lll be pleasantly surprised, or just lucky.
Oh yah I'm trialing Ritalin, but just like the other medications, it's such a low dose and it's not extended-release. I looked up how to take it and the directions assumed I'd been given two or three pills to get through a day. Not so! So I have about four medicated hours in a day, and keep experimenting with where to put them. I don't notice it wearing off the way I did with Adderall though, so there's that at least.
Maybe by the end of May I can try a full dose of something, and see if that helps. IDK, it seems like it might.
28 notes
·
View notes
Text
Daaaaaaaaaaaaaang wool purists are snooty! I'm watching a video on machine washable wool, and the video starts with a description of how wonderful wool is (water resistant but water absorbant, warm, etc etc), but unfortunately it tends to felt if you're not careful with it. After describing the superwash process (which involves a coating of polymer, I had no idea!), she says "So what do we gain by doing this? Well, the wool is now machine washable and softer." *stares blankly at the camera with cricket sounds*
Oh pardon me, fancy fiberwear lady who thinks unadulterated wool is incomprehensibly superior, some of us have been using acrylic yarn that we can get from the craft store for years and are only just starting to explore wool! The switch from completely plastic yarn to mostly natural and a little bit plastic yarn is so much less intimidating than going directly to something that you have to give so much care to. I've seen so many instances of people not buying something if it says hand wash/dry clean only because "Ain't nobody got time for that!" so the wool now "only" being machine washable is actually a huge deal for people. Plus most people don't spend hours in frigid, windy, wet environments, so all of the main reasons that wool was such a super-fiber back in the day when people were more exposed to the elements are really just not much of a concern anymore. ALSO there's the fact that a lot of people are sensitive to textures and knowing that they can make something that touches their skin without worrying that they have proper under-layers that extend past the edges is pretty great as well.
Don't get me wrong, I think the fact that superwash wool is partially plastic is pretty important information that should be more widely known, but yikes. I will also concede the point that any industrial process is likely rife with all sorts of environmental concerns (the creator said she was an environmental chemist so it's not just "ooh, scary chemicals bad!).
She mentions that she does not judge people for their choices and points out that individual choice and systemic issues are very different things. I still think the video overall comes across as a bit disdainful.
17 notes
·
View notes
Text


Oh my gosh I'm so behind on Tour de Fleece posts, but I feel like I have a decent excuse: what with having to move states in 2 weeks with a few days' notice, lol.
I'm getting a lil spinning in here and there, it is definitely a good way to destress between frantically packing boxes
#im not panicking not me no sir of course n o t#WhEeeeeeeee#tour de fleece 2023#fibercraft#handspinning#spinning yarn#yarn spinning#fibercrafting#pixiecrafting
33 notes
·
View notes
Text

I am cautiously hopeful that this will be my last batch of yarn spun while sitting around in hospitals this year. I’ll ply it tomorrow.
6 notes
·
View notes
Text
There is in fact an entire book, Knitting With Dog Hair, focused entirely on the problem of knitting partially or entirely with dog hair/dog fiber with 25 years of experience. It even has a wistful strategy for attempting to incorporate hair from a dog with a smooth, short coat ("sprinkle the hairs atop a base of some other, longer fiber", typically) should you feel emotionally called to do this. There are also practical notes on which dog breeds are best for fiber lovers who intend to spin from the dog, which are passable but work best blended with other fibers, and which are just sort of depressing for the enterprising fiber artist ("sprinkle").
The conclusions are pretty much what anyone who has considered a wide range of animal fibers might expect: the fewer the guard hairs and the longer the hair the better (meaning curlier textures are best--see Poodles). For maximal fiber length, you brush the fiber whole from the dog's coat as it naturally sheds and collect it until you have enough to wash, card, and spin, whether or not you blend it with wool or hair from another breed first.
I'm pretty sure I could spin from Tilda's undercoat if I wanted, but I also think I'd need to let her go ungroomed for a while to catch enough coat. For various Yucky Tilda reasons, she gets a bath about once a month or so and I usually use that occasion to get as much undercoat as I can out. And of course I'd get to decide whether to sort the fiber by color, too; I think Matilda's undercoat is darker than her guard hairs but I believe there are some paler fibers in there on account of the roan.
BTW, the Salish Wool Dog may be extinct, but if you own an arctic or any other high-shedding breed, you can 100% make yarn from your dog's yearly coat blowout.
youtube
#fibercrafting#knitting with dog hair#a book that is intensely satisfying to several autistic special interests at once
278 notes
·
View notes
Text


still rolling around on the ground over the contrast between Jack and Mal. it's so...🤌🤌🤌
#art#twisted wonderland#twisted wonderland spoilers#sam's new year sale 2025#(sorry if i made any mistakes with the outfits! i did my best but they're SO detailed)#man. i always love these silly events but this one really is just. chef's kiss.#i need an entire shounen anime about kite fighting immediately#i know it's a real thing i just need the big dramatic anime about it#preferably with jack continuing to just be extremely annoyed at floyd about everything all the time#also brb shoving everything out of the way to focus on canon confirmation that malleus does fibercrafting#even if it's only spinning and nothing else i am SO delighted#i'm not sure how much kite-flying is actually similar to spinning but you know if it helps it helps#malleus: though you fought valiantly i have ultimately claimed victory by conquering your kite in battle#malleus: also behold! i have made you a sweater
5K notes
·
View notes
Text


My Dragon Age Inquisition character card embroideries all together! Each is 11.5x19.5 cm. Dorian took 73 hours, Cassandra took 89 hours, and Sera took 75 hours.
I wonder which character I'll do next...
-
[Image descriptions: Embroidered versions of the Dorian, Cassandra and Sera character selection card from Dragon Age Inquisition.
Dorian holds a book under his left arm while casting magic with his right. There are white glyphs in the air and a white snake running under his cloak and under his arm.
Cassandra sits atop a war horse with Inquisition soldiers behind her. She wears black armour with a gold-trimmed cloak, and the Seeker flag and he cloak stream behind her.
Sera stands atop a slanted tree trunk with her bow held suggestively between her legs, looking at the Skyhold tower in the distance, where the tiny figure of the inquisitor is present in the window. Mountains and turrets make up the background behind her.]
#dragon age#dragon age inquisition#tarot#embroidery#dorian pavus#cassandra pentaghast#dragon age embroidery#my embroidery#fibercraft#dragon age tarot
6K notes
·
View notes
Text
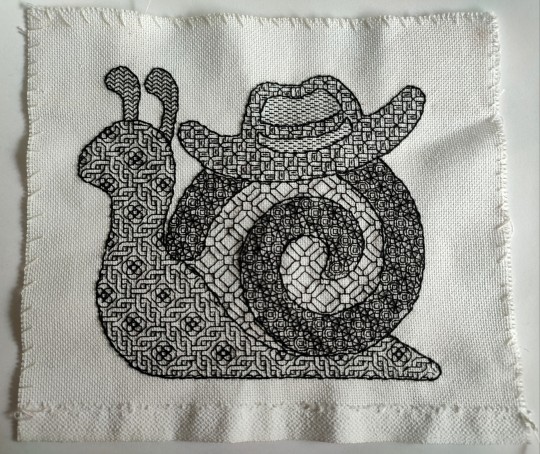
i realised recently i never posted this guy finished. his name is Edward (effervescent) and i once edited him from discord emojis . he's been done for like a year


#bis arts#embroidery#blackwork#blackwork snail#blackwork embroidery#artists on tumblr#my art#traditional art#fibercrafts#fibercraft#physical art#counted embroidery#image described#described in alt text#id in alt text
4K notes
·
View notes
Text
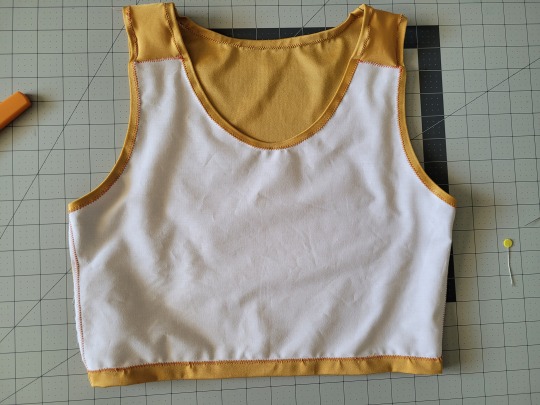
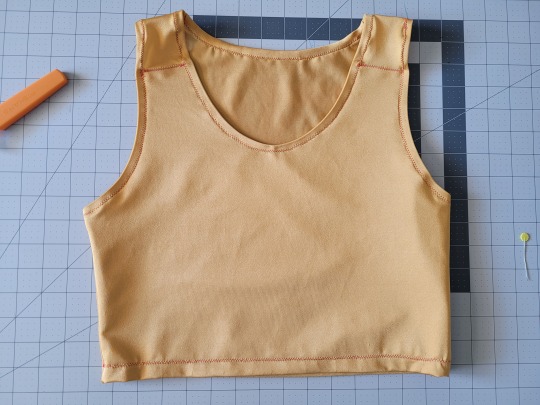
How to Make Your Own Binder that Fits Well and Looks Good
A while back I was in need of some new binders and thought hey, I bet I can make one way cheaper than buying it from somewhere (especially cus some of the ones I’ve bought in the past didn’t really fit right). Except when I started looking for a binder patterns online, I was very surprised that I really… couldn’t find many that looked very nice lol. Most of them had really wrinkled necklines, or didn't bind well, or just overall looked weird. A lot of the patterns also required a serger, which I don't have.
So I just said fuck it and made my own pattern! And it ended up being relatively easy! And the binders fit REALLY WELL and are comfortable to wear, even for long periods. The neckline doesn't show under shirts with loose collars, and the bottom hem doesn't gap or stick out. Here's me wearing one:
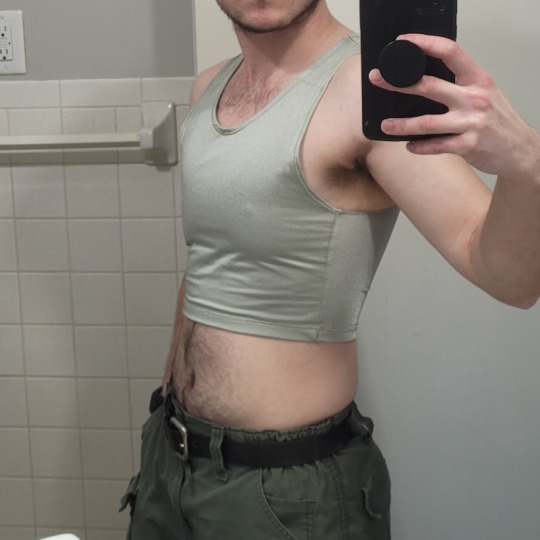
(plus I was able to make myself 5 of them for a total of like ~$50.)
So I figured I could throw together a guide to help out anyone else who wanted to make their own binder but was dissatisfied with the patterns available!
Disclaimer: This tutorial is going to assume a baseline level of sewing experience, and also will require access to a sewing machine. It is not a complicated pattern, but it will most likely require some tweaking and adjustments after you make the first one. Don’t be afraid to make alterations to make it fit better!
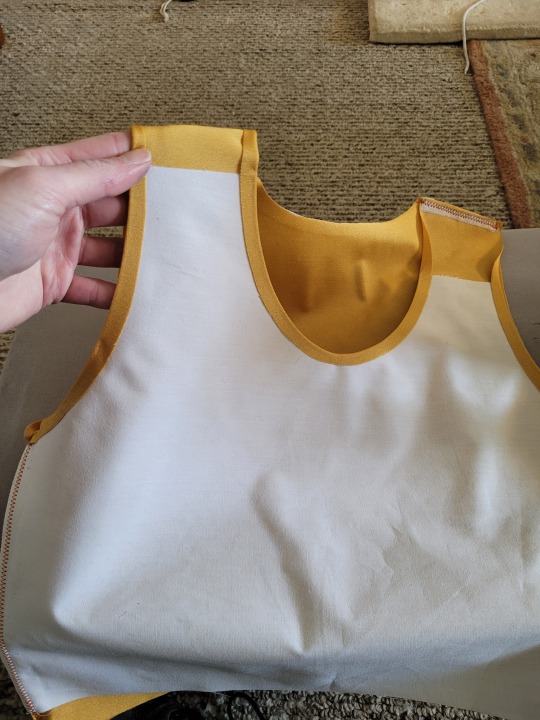
This tutorial is for a gc2b-style half-tank binder. It could be altered to be a full-tank binder, but all instructions will be for the half-tank design.
Materials needed:
Stretchy fabric, probably listed as 'athletic fabric' (I use this kind from Joann’s. Most athletic stretch fabrics should work, look for around 80% nylon/20% spandex blends)
Stiff fabric (I use this shirting cotton because I like how lightweight it is. If you want something a little stiffer with more structure, you can use a cotton or cotton/poly blend twill like this. gc2b binders use twill for theirs.)
Lightweight fusible interfacing (I use this kind) (get FUSIBLE not sew-in)
Fusible webbing like Pellon Wonder-Web (this is technically optional but it WILL make your life easier when you’re sewing - just make sure to get the kind with the paper backing!!!)
“But kiwisoap thats 4 whole kinds of materials, surely I don’t need that many!” Ok sure, you can probably get by without the fusible web and interfacing, but consider: they are both dirt cheap (im talking like $1-2/yard), they will make it much easier to sew the final product, and will give you an overall better-looking result. This tutorial is written with the assumption that you’ll use them.
"How much fabric will I need?" Measure the circumference of your chest below your armpits. Add 6 inches just to be safe. This is the yardage of stretch fabric you’ll need, and should give you enough material to make at least 3 binders without much excess left over. You will need around half as much stiff fabric.
Other supplies:
Big Paper (for drawing the pattern)
Flexible measuring tape
Sewing machine
Iron
Pins
Step 1: Measuring
You will need 4 main measurements for this pattern.

A) Measure the circumference of your chest just below your armpits, then divide the number in half. This will be the widest part of the pattern.
B) Measure from the top of your shoulder down to where you want the binder to end. For most folks, this will usually be around the natural waist (narrowest part of the torso), about 3-6 inches above the belly button. This will be the overall height of the pattern.
C) Measure the distance from below your armpit to where you want the binder to end. This will determine where the arm hole starts.
D) Measure the circumference of your waist where you want the binder to end, then divide the number in half.
So for example, after dividing A and D in half, my measurements are 17", 15", 7", and 14.5".
Next:
Subtract one inch from measurement A - This will help provide some compression. You might need to take it in even further depending on how it fits, but one inch is a safe starting point. I take mine in around 1.5 inches.
Subtract half an inch from measurement D. This will help prevent the bottom edge of the binder from gapping. Again, you may need to take it in more or less, depending on your own body.
Add 1.5 inches to measurement B and one inch to measurement C. This is to account for the hems and armhole placement.
This makes my final measurements
A = 16"
B = 16.5"
C = 8"
D = 13.5"
From here on out, we are only going to be working with the measurements that we have added/subtracted to, NOT the ones we initially took.
Step 2: Drawing the Pattern
You will need a piece of paper large enough to accommodate the entire pattern. This may involve taping multiple pieces together, or using a piece of newsprint, etc.
I recommend folding the paper in half to ensure that you get a symmetrical pattern. However, this means you will need to divide measurements A and D in half again, or else you’ll end up with a pattern that’s twice as wide as it should be!
Also note: the pattern is drawn with the seam allowance built in! You don’t need to add any seam allowance.
To draw the pattern:
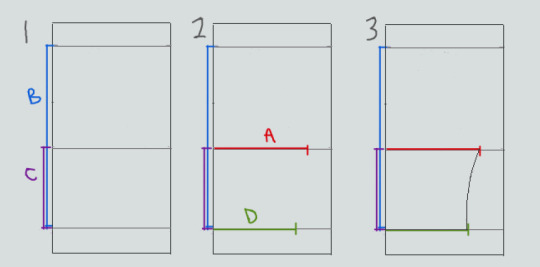

Begin with your folded paper. Measure and mark B and C on the paper, and draw a line extending across the paper. These will be your guidelines.
Measure and mark A and D along the middle and bottom guidelines, respectively. Remember, the paper is folded, so you only use half of the measurement for A and D.
Draw a loose curve connecting the endpoints of A and D. If needed, you can also just draw a straight line between the two.
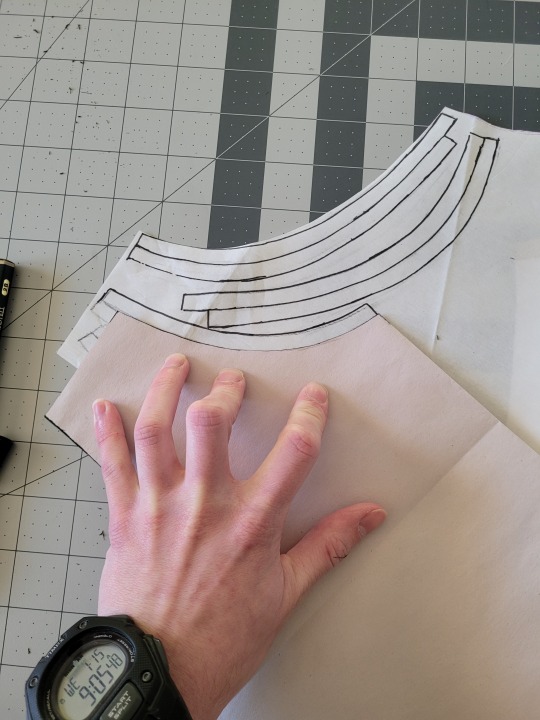
Mark the opening for the neck hole. Depending on your size, it will measure around 6-8 inches across at the top (remember to divide this in half for the folded paper) and about 5-6.5 inches deep. (mine is 6.5" across and 5.5" deep) Draw a curve to connect the two points. This part will take some tweaking and adjusting to get it to look right lol.
Measure the width of the strap - this should be somewhere between 2.5 - 4 inches wide. They will end up about 1/2” to 3/4” narrower once you sew them. Draw the line at a slight angle, as shown.
Connect the endpoint of the strap to the endpoint of line A with a curve like in the diagram.
This will be the pattern for the front piece.
To make the back piece, trace the front pattern, but make a very shallow curve for the neckline instead of a steep one, as shown:
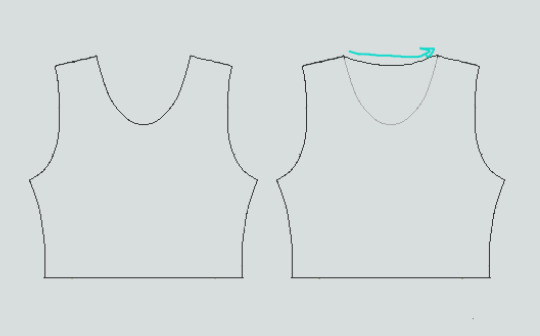
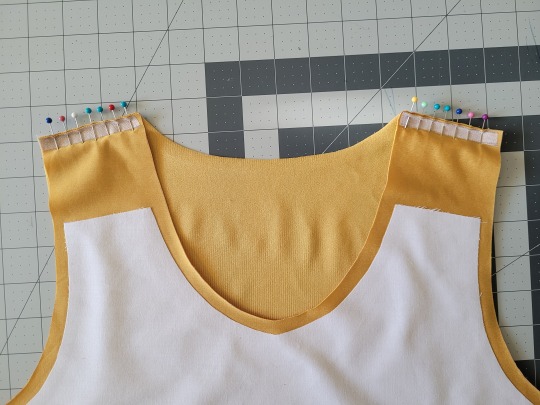
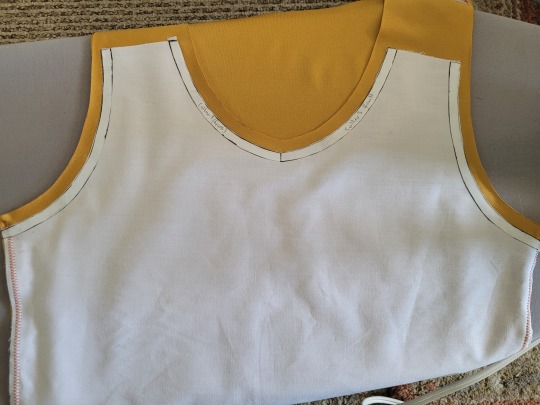
The last piece is the stiff front panel. This is what provides the flattening effect of the binder. To make the pattern, trace the front pattern again. Trim 3/8” in on the sleeves and neckline, and 3/4” to 1” along the bottom. This gives a flatter hem. Then trim the straps shorter by a few inches. This helps the binder lay flatter along the shoulders.
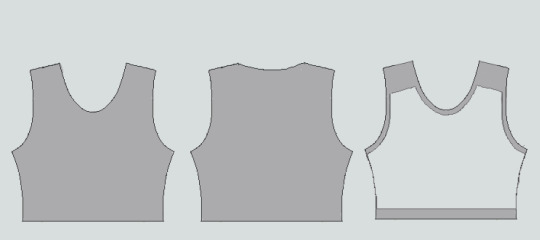
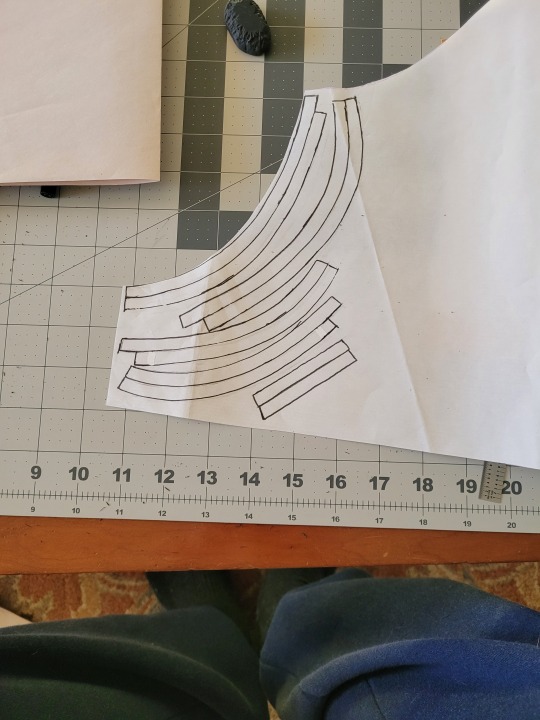
When you're done, you should have 3 pattern pieces that look approximately like this (stiff panel shown overlaid on the stretch fabric to show how it fits together).
NOTE: If you want more compression or just want to make it a bit sturdier, you can add a second panel of stretch fabric to the back piece. Just use the bottom half of the back pattern (from the widest part down to the bottom hem) to cut out another piece of stretch fabric. Attach it to the back piece with a strip of fusible webbing and a zig-zag stitch along the top.
Step 3: Putting It All Together
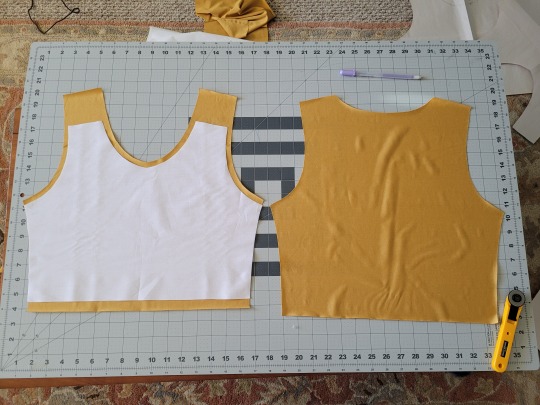
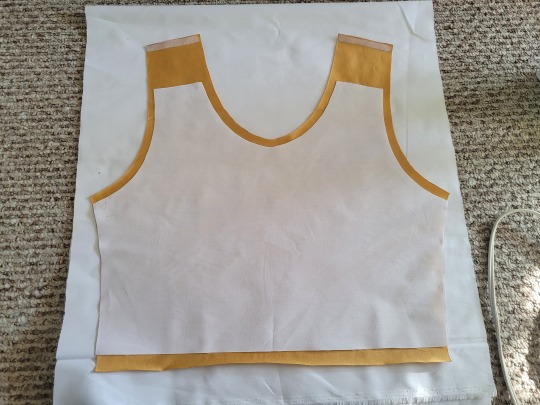
Once you’ve made the patterns and cut out the pieces of fabric, you should have something that looks like this:
The next step is adding interfacing and fusible webbing. Use your pattern to cut out 3/8" strips to fit on the top of the straps for both pieces, and to the neckline, sleeves, and bottom hem of the back piece, as shown:
If you want to add it to the bottom hem of the front piece, it will help keep that hem flat when sewing it down later, but it's not essential.
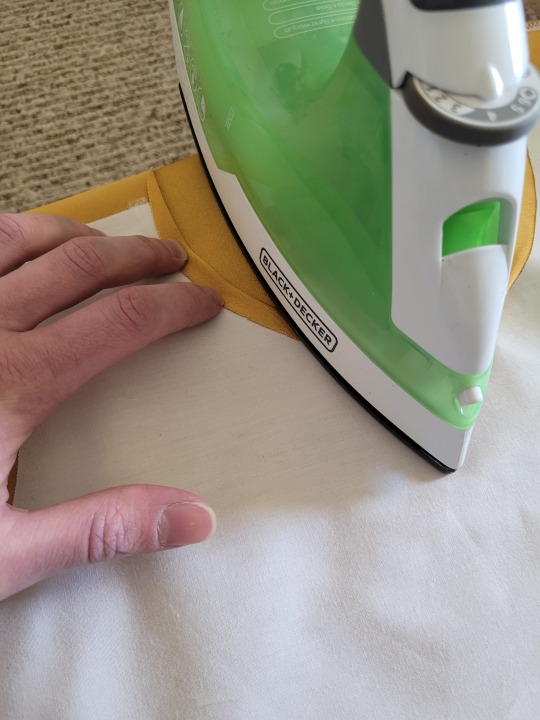
If you choose to also use fusible webbing (WHICH I RECOMMEND), you will apply it to the stiff front panel similarly to how the interfacing was applied, ~3/8” strips along the neckline, sleeves, and top of the straps. Cut out two strips for the neckline and sleeves, because we'll use those later too.
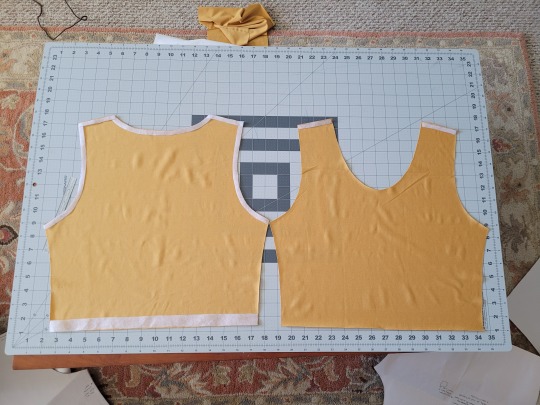
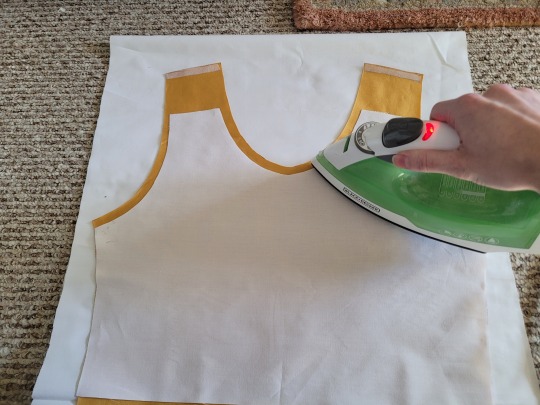
Iron the strips onto the front panel as shown:

Once it's on, just peel off the paper, position it webbing-side down on the stretch fabric, and iron it to fuse the two pieces together so everything stays in place while you sew. THIS MAKES IT WAY EASIER TO SEW.
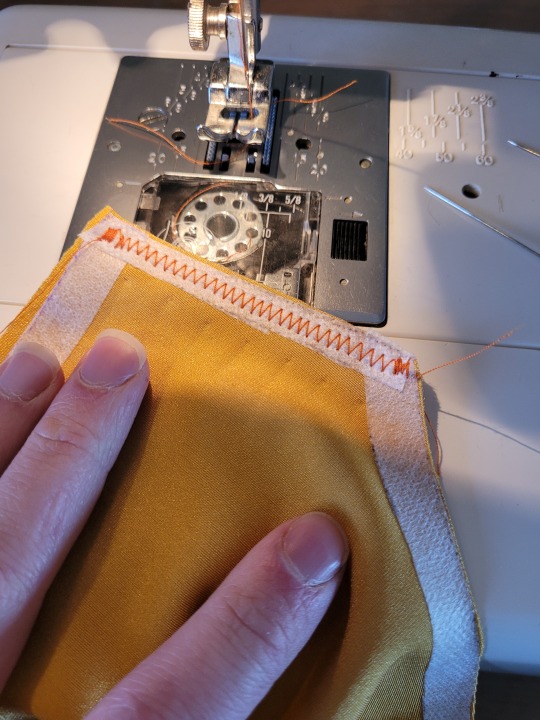
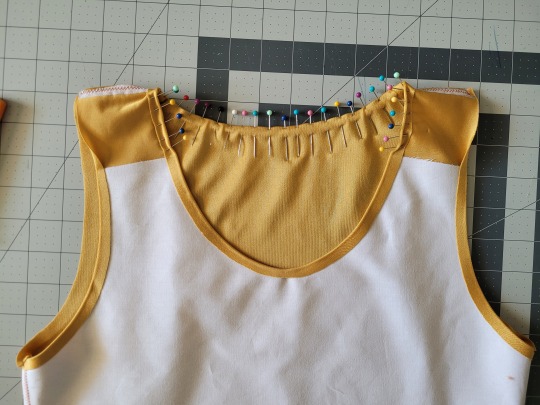
After the stiff front panel is fused to the stretch fabric, you’ll sew the straps of the front and back pieces together, then join the pieces along the sides. Pin the hell out of it to keep everything in place -this type of material is VERY prone to puckering.
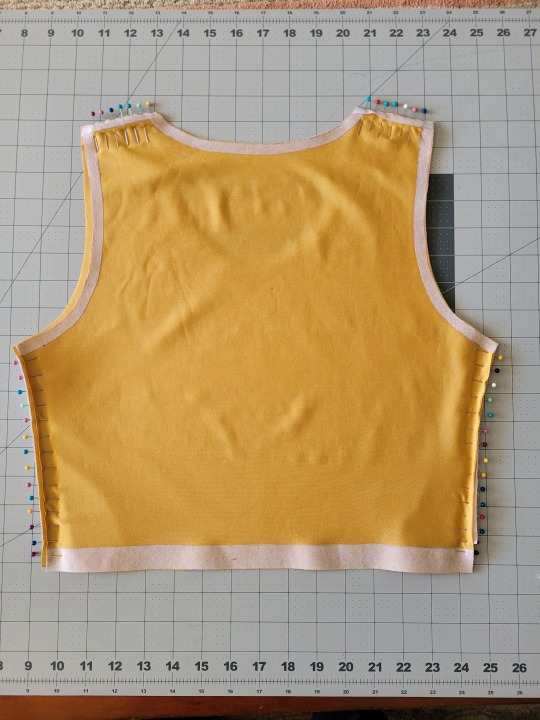
When sewing, USE A ZIGZAG STITCH. A straight stitch will NOT WORK for stretch fabric. I adjust mine to 1.3mm long and 3.5mm wide which has worked well. If your machine doesn’t let you adjust stitch length or width, well. That sucks, I don’t really have any advice.
After you sew the front and back pieces together, you can add more fusible webbing to the front panel to help hold the hem down flat and prevent it from puckering while you sew it. Just add the strip, peel the paper off, then fold the hem over and iron it down. This part isn’t really necessary, but it does make the hems look nicer. If nothing else, I would recommend adding it to the neckline.
After that, you just fold & pin all the hems and sew them up with a zigzag stitch, then go over the raw edge at the top of the stiff panel (where we cut the straps shorter).
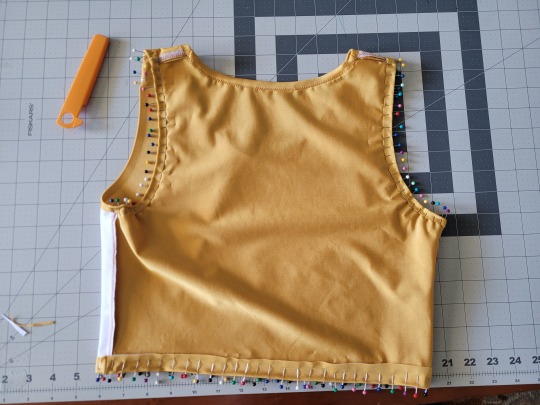
And that’s it! You’re done! And now you can make your own binders whenever you want!
And hey! If you used this tutorial and wanna throw me a dollar or two on ko-fi, I wouldn't complain.
1K notes
·
View notes
Text

Not knitting nor crochet but a secret third thing
(Finally got the hang of nalbinding--here im working with some merino i spun up with a drop spindle)
3K notes
·
View notes
Text
This silly idea turned out SO CUTE it's worth the fluff that now covers every inch of my bedroom floor :D
usual catalogue post to follow ^v^
Update: Pattern now live!
#completed projects#crocheting#crochet#amigurumi#crochet mushroom#walking mushroom#dungeon meshi#dunmeshi#delicious in dungeon#hand crocheted#handmade#fiberarts#fibercrafts#fibrecrafts#crocheters on tumblr#crochetblr#crocheters of tumblr
2K notes
·
View notes
Text


QUEER YARN QUEER YARN QUEER YA--
#lgbt#trans#trans positivity#transgender#lgbtqia#lgbtqia positivity#pride#yarn#crafting#needlework#fibercraft#art#crochet#knitting#lesbian pride#gay pride#trans pride#transgender pride#bi pride#bisexual pride#positivity#yarnwork#art stuff
495 notes
·
View notes
Text


Crochet Morningstar Flail Plushie & Crochet Greataxe Plushie
Patterns
#my art#crochet#amigurumi#plushies#dungeons and dragons#it's been a minute since I designed these!#fiberart#fibercraft
733 notes
·
View notes
Text

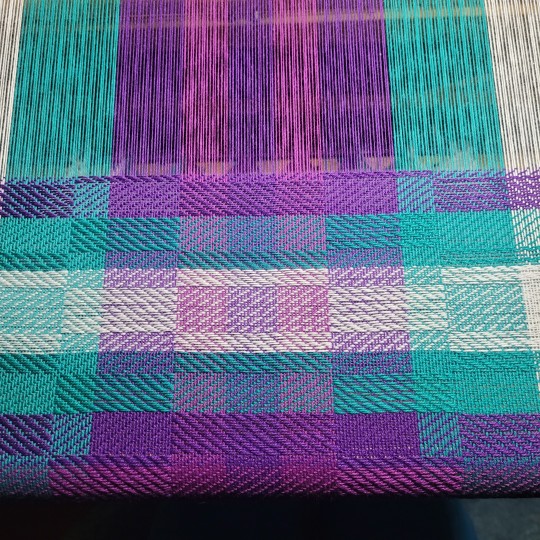
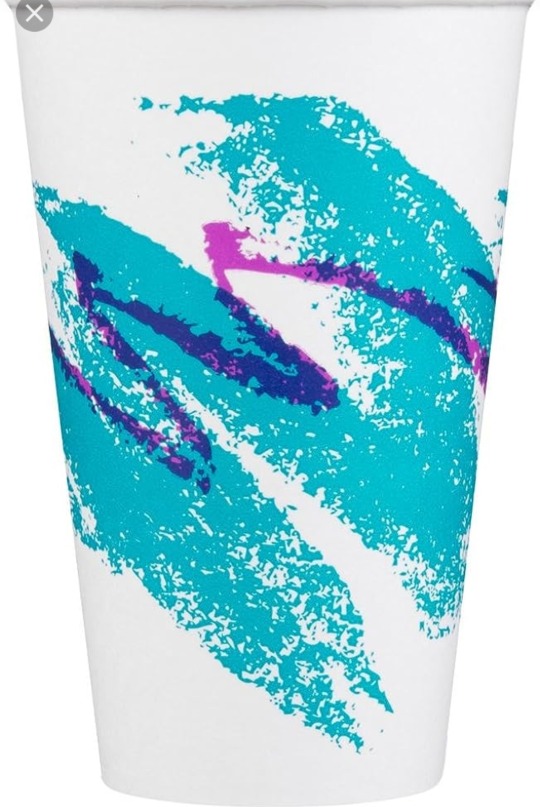
I LIVE I SWEAR. Have this 90's soda cup inspired warp as a proof of life lol.
#its been crazy!!!!#i moved states and finally am settling in#fibercraft#weaving#handcraft#loom weaving#weaving loom#weaving asmr#asmr
11K notes
·
View notes
Text


22ct Aida cloth, 2 strand DMC floss with 4 spaces treated as one!
Pattern found here!
I had so much fun making this little guy for a friends birthday. When we worked together we would intimadate each other red panda style just to make the day a little more fun.
The icing on the cake for me is the crochet border, Its just going to look so cute hanging on her wall!
#i made this#cozy ghost#crafts#crafting#handmade#cross stitch#fiber art#fibercraft#needle crafts#x stitch#xstitch#crocheting#crossstitch#crochet#red panda
458 notes
·
View notes
Text

‘Don’t you leave him, Samwise Gamgee,’ and I don’t mean to, I don’t mean to!
#lotr#frodo baggins#lotr fanart#lotr frodo#lotr sam#sam gamgee#embroidery#cross stitch#my art#mine#my first self-drafted pattern!#finally bought a frame for it#lord of the rings#fibercraft#fiber art#hand embroidery
218 notes
·
View notes