#fetchrequest
Explore tagged Tumblr posts
Visit Tumblr Blog
Explore Tumblr blogs with no restrictions, modern design and the best experience.
Last Seen Tumblr Blogs


Fun Fact
Women make up for the other 50% of Tumblr’s audience.
Text
NSIncrementalStore Tutorial for iOS: Getting Started
Working with large amounts of data and loading it to memory can be an expensive and time-consuming operation. Wouldn’t it be great if you could bring into memory just the data your app needs to operate?
NSIncrementalStore gives you exactly that. It’s a persistent store in Core Data that allows you to read and write just the content you actually need, little by little.
In this NSIncrementalStore tutorial, you’ll take a Core Data app that uses an atomic (“regular”) persistent store and change it to use NSIncrementalStore instead.
The starter project is suspiciously similar to the finished project from the Getting Started with Core Data tutorial. So, if you feel like your Core Data expertise needs freshening up, you’re more than welcome to check out that tutorial before proceeding!
Getting Started
Download the starter project for this NSIncrementalStore tutorial from here.
Unzip it, and build and run the starter project, where you’ll see a table view with no content. The header has two buttons: Refresh on the left and Add on the right.
The Refresh button will add a random number of new “terrible” bugs to the list, while the Add button will let you add a single bug with custom text.
Terminating and relaunching the app will save the current state of bugs, since you don’t want to lose them before you know they’ve been resolved.
This is all good and well for cases when your users have a small number of bugs. But some of your users have a huge number of bugs in their apps. Loading all bugs into memory could for that reason cause your app to slow down and, in the worst case, run out of memory.
Therefore, you’ll need to upgrade the current version of the app to use NSIncrementalStore to load the huge lists of bugs little by little. Not to mention the fact that this will help prepare the app for its next version, which will have a database in the cloud instead of the local one you’re currently using. See, with a cloud-based database you would also need to retrieve bugs little by little as to not consume a lot of mobile data.
This sounds great, but before you dive into the code you should probably get a little familiar with NSIncrementalStore first.
What is NSIncrementalStore?
Core Data is divided into several layers:
This NSIncrementalStore tutorial focuses on the bottom layer: the persistent store. NSIncrementalStore is in charge of the implementation of the persistence mechanism, while the Core Data framework takes care of the managed objects in memory.
Incremental stores must perform three tasks:
Handle metadata the persistent store coordinator uses to manage your store.
Handle fetch and save requests sent by a managed object context.
Provide missing data when requested by a managed object.
All of these will be covered in the next sections of this NSIncrementalStore tutorial. In the meantime, what’s important for you to understand, as you’re getting into the code, is that you’ll only be changing the bottom layer of Core Data as seen in the illustration above. You won’t be changing anything in BugSquasherViewController.swift. The save/load actions will remain unchanged as far as the app is concerned – which is the whole beauty of this architecture.
Curious to learn how this is done? Time to dive right in!
Setting Up an Incremental Store
First, create a new class for your custom NSIncrementalStore. Start by creating a new file using File\New\File\Swift File. Name the new file BugSquasherIncrementalStore.swift.
Next, add the following class definition to BugSquasherIncrementalStore.swift:
import CoreData class BugSquasherIncrementalStore : NSIncrementalStore { var bugsDB: [String] = [] class var storeType: String { return String(describing: BugSquasherIncrementalStore.self) } }
Your new custom class inherits from NSIncrementalStore, which is an abstract subclass of NSPersistentStore.
At this point, the implementation includes:
An array of bugs, represented as Strings. Since this NSIncrementalStore tutorial focuses on the main concepts of NSIncrementalStore, and not on specific underlying store implementation, the “database” is going to be extremely basic: an array of Bug objects being saved to and loaded from a file. This is the array that will hold your bugs.
A class variable with a string representing your new custom class. This will be used to let the persistent store coordinator know about your new custom class.
If you build and run the app now, everything will still behave exactly the same as before. You need to register your NSIncrementalStore with Core Data in order to use it in your app.
In BugSquasherAppDelegate.swift, add this line to application:didFinishLaunchingWithOptions:
let storeType = containerName + "." + BugSquasherIncrementalStore.storeType NSPersistentStoreCoordinator.registerStoreClass(BugSquasherIncrementalStore.self, forStoreType: storeType)
This will ensure that registration happens before you attempt to add your custom incremental store to your persistent store coordinator. The persistent store coordinator creates instances of your class as needed based on the store type you provide it with.
Now you’re ready to use this store by enabling the store type on the persistent container. Still in BugSquasherAppDelegate.swift, add the following code right after initializing container inside the persistentContainer scope:
var bugSquasherStoreDescription = NSPersistentStoreDescription() bugSquasherStoreDescription.type = container.name + "." + BugSquasherIncrementalStore.storeType container.persistentStoreDescriptions = [bugSquasherStoreDescription]
All you do in this code block is let the container know that it needs to use your new custom class as a persistent store when relevant. Since this is the only persistent store you provide it with, this will be the one used whenever the managed object context will attempt to load or save an object.
When your persistent store coordinator creates an instance of your custom incremental store, it needs to perform basic validation and setup.
To do this, open BugSquasherIncrementalStore.swift and add the following method:
override func loadMetadata() throws { // 1 let uuid = "Bugs Database" self.metadata = [NSStoreTypeKey: BugSquasherIncrementalStore.storeType, NSStoreUUIDKey: uuid] // 2 if let dir = FileManager.default.urls(for: .documentDirectory, in: .userDomainMask).first { let path = dir.appendingPathComponent("bugs.txt") let loadedArray = NSMutableArray(contentsOf: path) if loadedArray != nil { bugsDB = loadedArray as! [String] } } }
Your loadMetadata: implementation needs to include the following:
Creating the store object’s metadata dictionary, with (at least) these two key-value pairs:
NSStoreUUIDKey: A unique identifier for the store at the given URL. It must be uniquely and reproducibly derivable, such that multiple instances of your store return the same UUID.
NSStoreTypeKey: The string identifier you used to register the store with the persistent store coordinator.
Loading metadata from the backing data store if it already exists. For the purposes of this NSIncrementalStore tutorial, you load the content saved to a text file on disk into memory so that you can continue working with the in-memory representation of the bugs data in bugsDB.
The last thing to do so you can run the app without crashing is to satisfy Core Data in loading and saving data from the underlying persistent store.
In BugSquasherIncrementalStore.swift, add the following function implementation:
override func execute(_ request: NSPersistentStoreRequest, with context: NSManagedObjectContext?) throws -> Any { return [] }
This is still just a skeleton. You’ll add the actual fetching and saving in the next couple of sections.
Build and run your app. Your table view should now contain no content, no matter how many bugs you had there from playing around with your starter project. This makes sense, since the method in charge of fetching and loading data currently doesn’t do much. Time to fix, and then load, some bugs!
Fetching Data
Now that you have everything set up, you can start implementing the fetch and save logic. You’ll start with fetching, even though there will be nothing to fetch until you actually save something. But first, a new definition:
Faults: Fetching a faulted object allows for increased flexibility as it postpones materialization of property values until they’re actually needed. When a property is accessed using the valueForKey: method, Core Data checks if the object is faulted. If so, it fetches the value from storage to the context, which fulfills the fault and returns the requested value. There’s more on the methods involved in this process in the upcoming sections.
Both fetch and save requests from the managed object context result in the persistent store coordinator invoking your persistent store’s execute(_:with:) method.
In most cases, fetch requests will result in an array of NSManagedObject instances. The properties of these objects will be faults and will only be fetched as needed (more on that later). Let’s start with the simplest fetch request: returning an array of every managed object of a single entity type – Bug.
In execute(_:with:) add the following above the return statement:
// 1 if request.requestType == .fetchRequestType { // 2 let fetchRequest = request as! NSFetchRequest<NSManagedObject> if fetchRequest.resultType == NSFetchRequestResultType() { // 3 var fetchedObjects = [NSManagedObject]() if bugsDB.count > 0 { for currentBugID in 1...bugsDB.count { // 4 let objectID = self.newObjectID(for: fetchRequest.entity!, referenceObject: currentBugID) let curObject = context?.object(with: objectID) fetchedObjects.append(curObject!) } } return fetchedObjects } return [] }
This is what’s happening:
Make sure this is a fetch request first, otherwise you still just return an empty array.
Check the request and result types to verify they indeed match a fetch request, and not, for example, a save request.
Then you get all of the bugs from storage. To remind you, the “storage” you use in this case, for simplicity, is the bugsDB array that’s re-loaded from file on every app launch.
Use the entity of the fetch request and the bug ID to fetch the object from the managed object context and add it to the fetched objects that will be returned. In order to understand the internal logic of the for loop, you need to take a slight detour…
Managed Object IDs
You need to be able to translate between the unique identifiers in your backing data store and the NSManagedObjectID instances you use to identify objects in memory. You will usually want to use a primary key (of type NSString or NSNumber) in your data store for this purpose.
NSIncrementalStore provides two methods for this purpose:
newObjectIDForEntity:referenceObject: creates a managed object ID for a given reference object.
referenceObjectForObjectID: retrieves reference object for a given managed object ID.
In the for loop above, you create a new managed object ID that the managed object context can use to look up the actual object. You then add this object to fetchedObjects and return that to the caller.
If you build and run your app, you’ll see not much has changed. You can still create new bugs by using either the Add or Refresh buttons, but when you terminate and relaunch the app, the content is no longer there. This makes sense, since you haven’t implemented the save logic yet. You’ll do that next.
Saving Data
When your managed object context receives a save request, it informs the persistent store coordinator, which in turn invokes the incremental store’s executeRequest:withContext:error: with a save request.
This request holds three sets of objects:
insertedObjects
updatedObject
deletedObjects
This NSIncrementalStore tutorial will only cover new objects. But you should know that this is the place to handle update and delete requests as well, once you have a slightly more complex backing data store.
In order to save bugs, add the following method to BugSquasherIncrementalStore.swift:
func saveBugs() { if let dir = FileManager.default.urls(for: .documentDirectory, in: .userDomainMask).first { let path = dir.appendingPathComponent("bugs.txt") (bugsDB as NSArray).write(to: path, atomically: true) } }
This method saves the local array to disk. It’s important to stress that this is an oversimplified approach to a database. In a real life situation, you may be using a SQL database, you may be using a distant database and communicate with it via web services, or other persistent stores. The interface remains unchanged, but the underlying backing data store implementation depends on your specific app’s needs.
Next, add this block of code to executeRequest:withContext:error:, as the else section matching if request.requestType == .fetchRequestType:
else if request.requestType == .saveRequestType { // 1 let saveRequest = request as! NSSaveChangesRequest // 2 if saveRequest.insertedObjects != nil { for bug in saveRequest.insertedObjects! { bugsDB.append((bug as! Bug).title) } } self.saveBugs() return [AnyObject]() }
This is fairly straightforward:
Ensure this is indeed a save request.
Check whether there are any inserted objects. If so, each one of the new Bug objects is added to the bugsDB array. Once the array is up-to-date, you call saveBugs, which ensures that the array is saved to disk. After saving the new objects to your backing data store, you return an empty array to signify success.
Permanent Object IDs
When new objects are created, they’re assigned a temporary object ID. When the context is saved, your incremental store is asked to provide a permanent object ID for each of the new objects. In this simplified implementation, you’ll create a newObjectID based on the new object’s bugID field and return that as the permanent ID.
To do this, add the following method to BugSquasherIncrementalStore:
override func obtainPermanentIDs(for array: [NSManagedObject]) throws -> [NSManagedObjectID] { var objectIDs = [NSManagedObjectID]() for managedObject in array { let objectID = self.newObjectID(for: managedObject.entity, referenceObject: managedObject.value(forKey: "bugID")!) objectIDs.append(objectID) } return objectIDs }
Almost there! There’s just one more method you need to implement that will bring it all together and allow you to build and run your app.
First, add a new property to represent the current bug ID to BugSquasherIncrementalStore:
var currentBugID = 0
Then, add this code to BugSquasherIncrementalStore:
override func newValuesForObject(with objectID: NSManagedObjectID, with context: NSManagedObjectContext) throws -> NSIncrementalStoreNode { let values = ["title": bugsDB[currentBugID],"bugID": currentBugID] as [String : Any] let node = NSIncrementalStoreNode(objectID: objectID, withValues: values, version: UInt64(0.1)) currentBugID += 1 return node }
newValuesForObject(with:with:) is called when the values for the faulted fetched objects are needed. When these values are accessed, this method will be called and asked to provide values for the fields that weren’t needed until now. This is done to allow for faster, more efficient loading.
In this method, based on the objectID received as parameter, you create a new NSIncrementalStoreNode with matching title and bug ID values.
Note: Since this NSIncrementalStore tutorial focuses on NSIncrementalStore concepts, and not a specific backing data store implementation, this method implementation is extremely simplified. It assumes that the fetch logic happens on all objects in the order in which they’re saved in the bugsDB array.
In your real-world apps, this implementation can be more complex and tailor-made to your app’s needs. For the purposes of this NSIncrementalStore tutorial, this simplified version should help you understand all the moving pieces.
Build and run your app. Add a few new bug entries, then terminate and relaunch the app. Your bugs should now persist between different app sessions.
You’ve replaced the underlying layer of Core Data with your own custom implementation of NSIncrementalStore and lived to brag about it. Pretty cool, right?
Next you’ll cover some more advanced topics that will be of interest as you work on more complex apps.
Working With Web Services
Now that your fetch and save requests are running customized logic you defined, you can be flexible with your datastore instead of accessing a local SQLite database directly. One popular use case for this newly-found freedom is making network requests to fetch and update remote objects.
If, tomorrow morning, you woke up and decided to upgrade this app to use a remote database on your server, you’d simply need to change the implementation of the fetch and load requests. Your app doesn’t even need to know that the underlying database implementation has changed.
Working with a remote database introduces several new challenges:
Since you’ll be relying on remote objects, you need to make sure to consider latency. If you’re used to making requests on the main thread, you’ll need to reconsider your approach. Since network calls shouldn’t be made on the main thread, as it blocks the UI, your Core Data code now needs to move to a background thread. Working with Core Data on multiple threads introduces additional challenges.
Make sure your app can handle poor or non-existent network availability.
To help you with these, you can use the Instruments app to test your app thoroughly in multiple use cases and network conditions to ensure your custom incremental data store meets your needs.
Best Practices And Gotchas
Someone wise once said that “with great power comes great responsibility.”
Incremental stores give you the tools you need to work with large complex data stores. This section will introduce you to some best practices to maximize the performance and efficiency of your custom incremental stores.
Caching
Use caching in a way that best matches your app’s characteristics and needs. Some rules of thumb:
Prefetch and cache values for fetch requests if your backing store can efficiently return complete (unfaulted) objects in a single request.
Batch request objects if one large request is faster than multiple smaller requests, instead of creating an individual request each time a fault is fired on an object. This is usually true when working with remote databases.
Write the cache to disk if the availability of your backing store is unreliable or if requests are slow. That way, you’ll be able to immediately respond to requests and update the data later by posting a notification for the UI to refetch when the updated data is available.
Relationships
The Saving Data section of this NSIncrementalStore tutorial mentioned the newValuesForObjectWithID:withContext:error: function for retrieving values of properties for faulted fetched objects. This method is used for “to-one” relationship faults.
If your data model contains “to-many” relationships, you’ll need to use newValuesForRelationship:forObjectWithID:withContext:error: for fulfilling faults. You can use the relationship’s name property to identify the relevant relationship, and fetch the relevant unique identifiers from your backing store.
Optimistic Locking and Memory Conflicts
Core data offers a mechanism to detect in-memory conflicts and when another client has made changes to the backing store. This mechanism is called optimistic locking.
Resolving In-Memory Conflicts: When working with multiple contexts on multiple threads, changes are only merged when the contexts are saved to the store, depending on the provided merge policy.
To facilitate the persistent store coordinator’s in-memory locking mechanism, your incremental store needs to store a number for each record and increment it every time that record is saved.
Resolving In-Storage Conflicts: Your custom incremental store is responsible for detecting conflicts in the backing data, due to changes made by another client.
To resolve these issues, you should use the NSMergeConflict class (reference).
Where To Go From Here?
You can download the completed project for this tutorial here.
For additional information, I recommend checking out Apple’s official Incremental Store Programming Guide.
Also, If you enjoyed this NSIncrementalStore tutorial, you’ll definitely enjoy our book Core Data by Tutorials.
The book covers additional aspects of Core Data and is written for intermediate iOS developers who already know the basics of iOS and Swift development but want to learn how to leverage Core Data to persist data in their apps.
I hope you enjoyed this tutorial. If you have any questions or comments, please join the forum discussion below!
The post NSIncrementalStore Tutorial for iOS: Getting Started appeared first on Ray Wenderlich.
NSIncrementalStore Tutorial for iOS: Getting Started published first on http://ift.tt/2fA8nUr
0 notes
Text
Appdelegate
let ad = UIApplication.shared.delegate as! AppDelegate
let context = ad.persistentContainer.viewContext
Save
let store = Store(context: context)
store.name = "Amazon"
let store1 = Store(context: context)
store1.name = "Pchome"
let store2 = Store(context: context)
store2.name = "Yahoo"
let store3 = Store(context: context)
store3.name = "Asos"
ad.saveContext()
Fetch
let fetch : NSFetchRequest<Store> = Store.fetchRequest()
do {
self.stores = try context.fetch(fetch)
self.selector.reloadAllComponents()
}catch{
//Handle error
}
-----------------------With table view
#PREPARE
UITableViewDelegate,UITableViewDataSource,NSFetchedResultsControllerDelegate
func controllerWillChangeContent(_ controller: NSFetchedResultsController<NSFetchRequestResult>) { tableView.beginUpdates()
}
func controllerDidChangeContent(_ controller: NSFetchedResultsController<NSFetchRequestResult>) { tableView.endUpdates()
}
func controller(_ controller: NSFetchedResultsController<NSFetchRequestResult>, didChange anObject: Any, at indexPath: IndexPath?, for type: NSFetchedResultsChangeType, newIndexPath: IndexPath?) {
switch type {
case .insert:
if let indexPath = newIndexPath{
tableView.insertRows(at: [indexPath], with: .fade)
}
break
case .delete :
if let indexPath = indexPath{
tableView.deleteRows(at: [indexPath], with: .fade)
}
break
case .update :
if let indexPath = indexPath{
let cell = tableView.cellForRow(at: indexPath) as! ItemCell
ConfigCell(cell: cell, indexPath: indexPath as NSIndexPath)
}
break
case .move :
if let indexPath = indexPath{
tableView.deleteRows(at: [indexPath], with: .fade)
}
if let indexPath = newIndexPath{
tableView.insertRows(at: [indexPath], with: .fade)
}
break
}
}
------FETCH
let fetchRequest : NSFetchRequest<Item> = Item.fetchRequest()
let dateSort = NSSortDescriptor(key: "created", ascending: false)
fetchRequest.sortDescriptors = [dateSort]
let controller = NSFetchedResultsController(fetchRequest: fetchRequest, managedObjectContext: context, sectionNameKeyPath: nil, cacheName: nil)
self.controller = controller
do{
try controller.performFetch()
}catch{
let error = error as! NSError
print("\(error)")
}
0 notes
Text
What The Context ? The Managed Object Context
The Managed Object Context is the epicentre of all Core data Programming. Its strewn in every sentence while learning CoreData and finds itself between most of the method calls in a CoreData driven application.
But what exactly is a context ?
Its crucial for anyone trying to learn CoreData programming to be able to picture what a context is. Context is better understood as something that is, rather than what it does.
So what it is ?
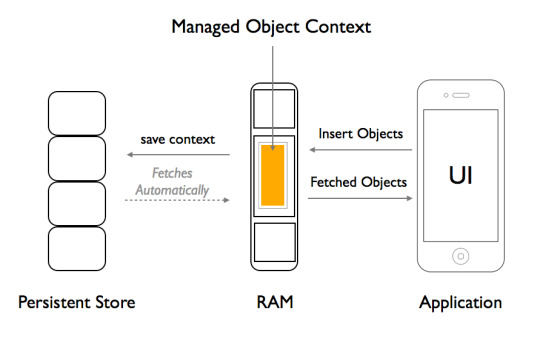
A Managed Object Context is a space in RAM or fast memory.
Thats it ! You could probably close this tab and move on, because this blogs purpose has been fulfilled.
Okay for those of you who want to stick around and know more.
A context is a space in fast memory which allows faster read and write, so that data can be retrieved and stored faster during an applications life cycle to provide a smooth user experience and can only be persisted when necessary. Here’s a pictorial representation to help you understand better.

As you can see, there are three main regions for any CoreData driven application. There is the persistent Store which is most probably an SQLite database in iOS which lies at the very end of any application, there is your application’s UI which lies right at the top level and in-between these two lies the the RAM which contains a space called the managed object context.
Now obviously the managed object context is just not a space in RAM. Its actually an API to manage that space in RAM, meaning it contains methods and variables and a whole lot of other stuff to manage that space in RAM. Conventionally when you start a project with CoreData selected, there is a whole bunch of boiler plate code in your AppDelegate files which sets up your persistent store and managed Object Context.
After your SQLite database has been set up, a space in RAM is also set aside for the Managed Object Context.
Assuming you have done a bit of CoreData programming, There are a set of imperative code you write for an CoreData driven application.
Here’s a picture depicting some of the functions that are performed throughout your application.
Inserting Objects
When the need to persist data occurs the first method usually written is
[NSEntityDescription insertNewObjectForEntityForName:@"Your entity
Name" inManagedObjectContext:self.managedObjectContext];
If you draw your attention to only the name of this method, you can see the part insertNewObjectForEntityForName which means create managed objects of the model class having a name @"Your entity Name" and if you notice the last part inManagedObjectContext, it actually means store these objects in the context that you provide through the parameter.
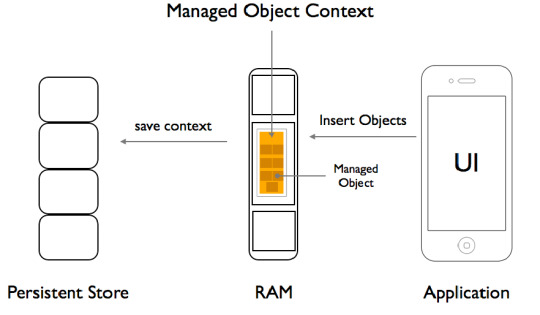
This method returns a pointer to that managed object, just created in that space in RAM and you can now go ahead and treat this as an object.
(Note: any object that belongs to Managed Object Context is referred to as a managed object.)
So your new managed object now lies in RAM, inside a space given to your Managed Object Context. But as we all now, that any object will be flushed away if its not persisted.
Hence the second method call
[self.managedObjectContext save:&error]
As its now evident that we need to tell the context to take this object we now created and store it permanently in your persistent store file which mostly is an SQLite database.
This method returns a BOOL of YES or NO stating whether the save was successful or not, and takes a pointer of an NSError to debug incase if the save was not successful. This causes the managed objects information to be written and stored permanently in your SQLite database.
Does this mean the managed object is removed from the Managed Object Context ?
NO ! Your object still lies in the Managed Object Context.
FETCHING
Now you have saved a whole lot of objects in the database, its time to fetch‘em.
Lets take a look at how fetching works.
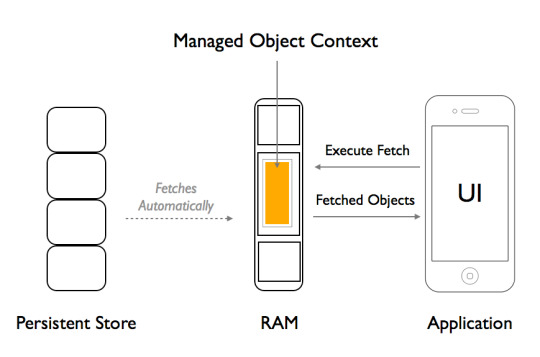
While Fetching managed objects there are two main criteria’s you need to specify to fulfil a fetch.
What are you looking for ?
Where do you want to look ?
The first part is handled by an instance of a NSFetchRequest which specifies what class does the managed objects your looking for belong and are there any particular kind of managed objects you need .
Heres an example :
NSFetchRequest *request = [NSFetchRequest fetchRequestWithEntityName:@"Your entity name"];
Here your specifying what class does the managed objects you need belong too.
An instance of NSFetchRequest also has references to instances of NSPredicate which tells what kind of objects are you looking for, in other words your search criteria. And an instance of NSSortDescriptor which specifies any sorting order you need for these managed objects.
This completes the first part of what managed objects you need. Now moving on to where to look for the objects.
This is the most important part, where do you find these objects you are looking for? Obviously the same place you created them, in a Managed Object Context.
Hence you tell the Managed Object Context to execute a fetch request which contains what is your search criteria so that it can look around in that memory space in has in the RAM to return the objects which fulfil your criteria.
Heres an example of the method call to fetch.
[self.context executeFetchRequest:yourRequest error:&error];
As you can notice you are asking the context to look for these objects by passing an instance of NSFetchRequest and an instance of an NSError to debug incase the fetch was not successful.
This method returns an array of objects that fulfilled the criteria or nil if there were no objects.
Sometimes an Object may not exist but exist in your Sqlite Database, therefore the context automatically will retrieve the information from the database and create an object for you.
Thats what the Context is all about. And it should be clear now as to why its important to pass the same instance of the NSManagedObjectContext through out the classes of your app. Because you need to access the same memory space given to the Managed Object Context.
- Navin Dev, iOS Developer.
#CoreData#Context#Managedobjectcontext#fetchrequest#NSManagedObjectContext#NSFetchRequest#ObjectiveC#iOS#Appdevelopment#XCode#AppdevelopersBangalore#mobileapp
0 notes
Text
Core Data part 4 / 5 - Change Core Data model, using SortDescriptor, NSPredicate FetchRequest and filter Array using Predicate
Before you start, here is the first and second part of this series:
Core Data tutorial Part 1 / 5 - Create Core Data Managed Object Model with Attributes, Relationships and Delete Rules
Youtube Video Part 1
Core Data tutorial Part 2 / 5 - Save Entity’s Attributes, Relationships, and make FetchRequest
Youtube video for part 2
Core Data tutorial Part 3 / 5 - Edit, Delete Objects
Youtube video for part 3
Check my article: “You must to know! Collection - Core Data simple explanations”
IOS 8.1, Xcode 6.1
Steps in part 4:
Create Hobby Entity - change Core Data model
Create and Save hobbies to user.
SortDescriptor and NSPredicate
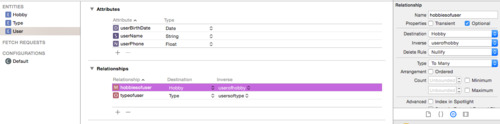
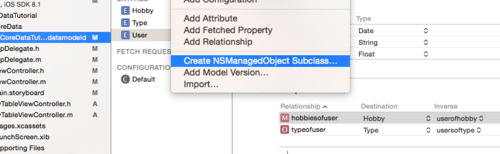
1. Create Hobby Entity - change Core Data model
1.1. Add New Entity, Name: “Hobby”, and add attribute: “hobbyName” as String, and then create relationship: “userofhobby” destination:User, type: to One.

1.2. Add the “hoobiesofuser” relationship to the User entity, set the Destination to Hobby, set the inverse, as “userofhobby”, finally set type to “to many”.
1.3. Now, you must to update your Core Data model. You have 2 ways to do this.
1. case you should just delete the entity’s earlier .h and .m files, and delete the App from the simulator. In this case you just work on the project, but this App not available in the App Store, so you do the changes just for yourself. We do now this.
2. case you have to do migration, before send the App to the Appstore. We will do in the fifth part of this series.

So just Delete (Move to trash), and then Editor - Create managedObject again
1.4. Open Simulator and delete the App. After that run the app, test that it works again. Create some user with type, and save them.
Great!
// <![CDATA[ (adsbygoogle = window.adsbygoogle || []).push({}); // ]]>
2. Create and Save hobbies to user.
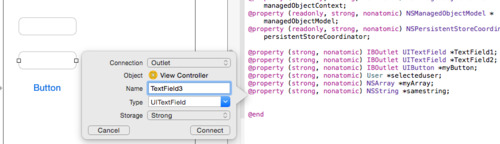
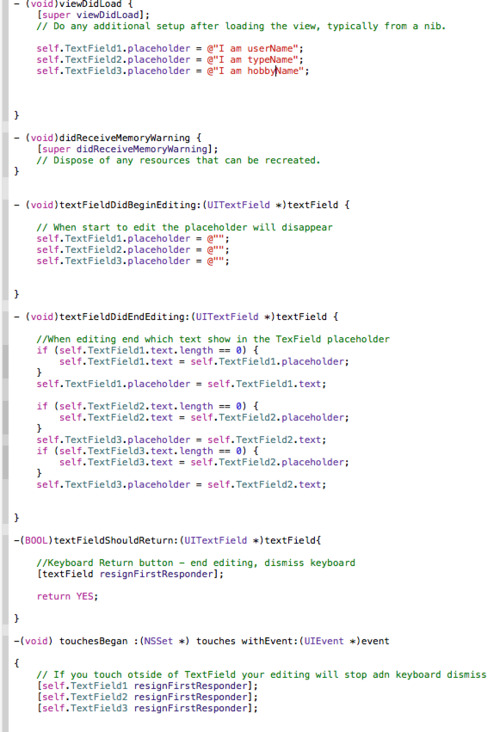
2.1. Create a new TextField on storyboard, check delegate!, and declare in ViewController.h file property, and synthesize in .m file, and import Hobby.h file in your ViewCotnroller.m.
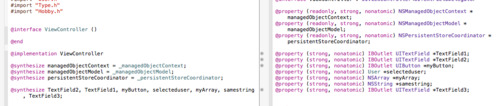
2.2. Set the Textfield3 properties as the TextField1 and 2. You should just copy them.
looks like this:
2.3. Change the prepareForSegue code to save the hobby for the user. Set hobby1 string with TextField3.text, and add to the user.
2.4. In MyTableViewcontroller.m import Hobby.h file, set the cell.detailTextLabel.text to show on first place the typeName string, and the second place the hobbyName string. You have to create an Array for the user1’s hobbies, and then from that detect hobby1 object, and use the hobbyName string.
2.5. Test you App!
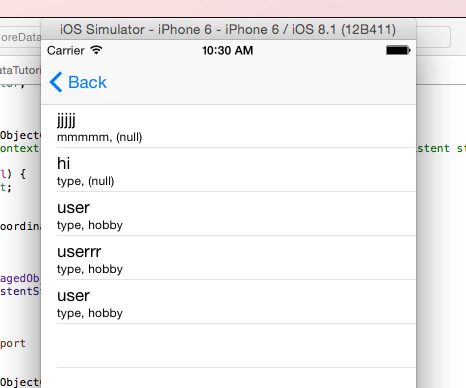
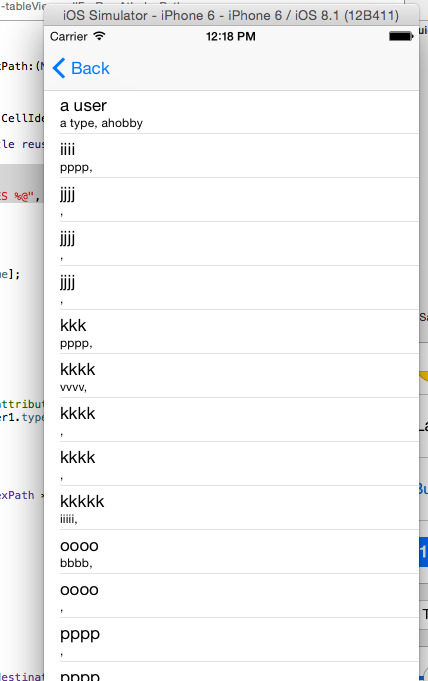
You can see (null) where no hobbies of the user. So you can create a Predicate to check, if user has hobby we list, and in other case no.
3. SortDescriptor and NSPredicate
First of all do look at this SortDescriptor code, we use it, and then we can see our list just in alphabetical.
3.1. Put in your AppDelegate.m file in the (NSArray*)getAllUserRecords code, after the NSEntityDescriptions and before the NSError line this 2 line:
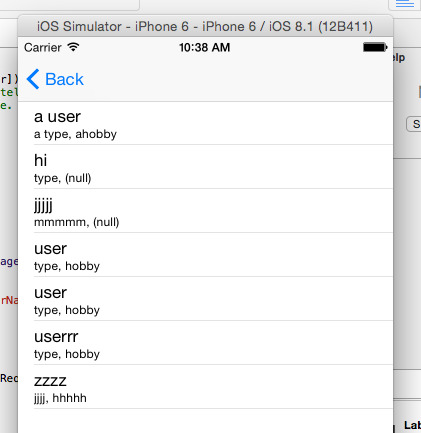
3.2. Run your simulator, and you can see, that your list ordered alphabetical. You can test with one user which start with “a”, and one user which start with “z”.
3.3. Now we can use NSPredicate to check, that user has hobby or not. And if not, we don’t list them.
// <![CDATA[ (adsbygoogle = window.adsbygoogle || []).push({}); // ]]>
Use this code after your SortDescriptor:
In this case, you see in your simulator just those users, who have no hobby, exactly have a hobby “null” value. You created these users, at the 1.4., when we have no hobby entity.
If you change the count value from 1 to 0: (hobbiesofuser.@count != 0), you will see those users, who has at least 1 hobby. Maybe you leave blank the TextField, in this case the hobby value will be @“”, but not “(null)”. So the count of the hobbiesofuser relationship will be 1, and your user will be list. So when you use 0 in Predicate, you would like to not show those, who has 0 hobby. I did some test without enter hobby in textField3. My result:

3.4. You can use multiple conditions using “AND” between conditions, and you can use NSPredicate to filter your array.
For example, we would like to see just those users, who’s name hasn’t contain “user” string, we can use this predicate code in your MTableViewcontroller.m file, in cellForRowAtindexpath before this line: User *user1=[self.myArray objectAtIndex:indexPath.row];
// <![CDATA[ // ]]>// <![CDATA[ (adsbygoogle = window.adsbygoogle || []).push({}); // ]]>
And the result: list without username, which contain “user”.
NEXT
Download the Xcode template from Github
The next part of the series:
Core Data tutorial part 4.2 / 5 - Using NSFetchedResultsController, Reorder/Moving Table View Cells with Long Press Gesture, and update immediately Core Data displayOrder attribute
If you would like to be notified of my new solutions, please
Subscribe to my youtube channel!
Follow me on twitter!
Like on Facebook!
#CoreData#core data tutorial#coredata#fetchrequest#nspredicate#sortdescriptor#filter#nsarray#ios#ios 8.1#ios tutorial#coredatamodel#xcode#xcode 6#xcode 6.1
0 notes