#coredatamodel
Explore tagged Tumblr posts
Visit Tumblr Blog
Explore Tumblr blogs with no restrictions, modern design and the best experience.
Last Seen Tumblr Blogs


Fun Fact
The Tumblr app for Google Glass was released on May 16, 2013.
Text
CoreData Tutorial Part 5/5 - Model Versioning, Lightweight Migration, Model Mapping
IOS 8.3 Xcode 6.3.
Before you start, here is the first and second part of this series:
Core Data tutorial Part 1 / 5 - Create Core Data Managed Object Model with Attributes, Relationships and Delete Rules
Youtube Video Part 1
Core Data tutorial Part 2 / 5 - Save Entity’s Attributes, Relationships, and make FetchRequest
Youtube video for part 2
Core Data tutorial Part 3 / 5 - Edit, Delete Objects
Youtube video for part 3
Core Data part 4 / 5 - Change Core Data model, using SortDescriptor, NSPredicate FetchRequest and filter Array using Predicate
Core Data Part 4.2. / 5 - Using NSFetchedResultsController, Reorder/Moving Table View Cells with Long Press Gesture, and update immediately Core Data displayOrder attribute
Youtube video for part 4
Check my article: “You must to know! Collection - Core Data simple explanations”
Steps in part 5 :
Add New Managed Object Model Versions
Set Lightweight Migration
Add Model Mappings
Test
When you need to change your Core Data Entities or structure, you have to add new model version before you send your App in AppStore. If you change just attributes or fetched templates, it’s not need, you can do it without consequence. But if you want to add a new Entity, you have to migrate your persistent store to a new model versions. You should also set mappings for the migration. In this tutorial we add model versions, model mappings, and using Lightweight Migration.
1. Managed Object Model Versioning
If you learn CoreData, I’m sure, you use the “delete App in Simulator before Run” method, when you change your Database and get crash when try to run your App in IOS Simulator or on your IOS device. If you work on a real App, and you want to submit it in App Store, you have to use this easy Managed Object Model Versioning method.
1.1. Add new Model
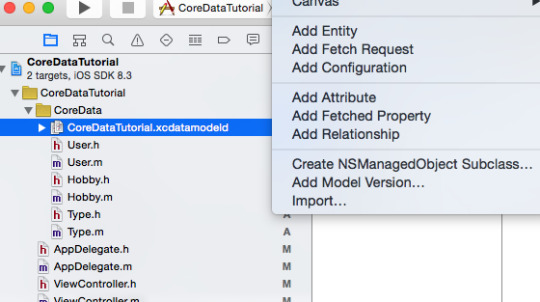
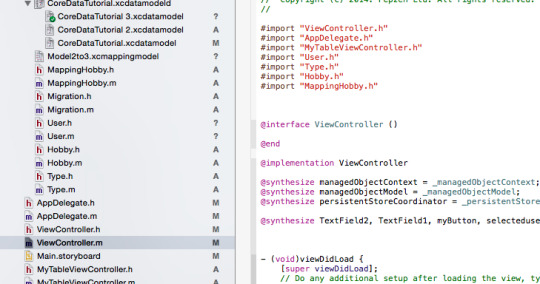
Select your CoreDataTutorial.xcdatamodeld file in your XCode, In “Editor” menu select the “Add Model Version…” submenu.
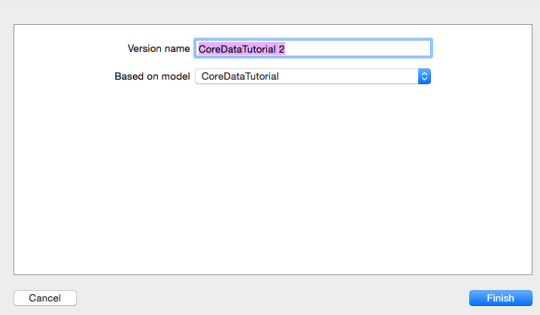
Xcode add Version name with number 2 automatically. If you use these version names in the future, you can see the changes step by step. The important thing is, the “Based on model” select Field should selected the correct actual model version.

1.2. Select the CoreDataTutorial.xcdatamodeld group, and at the right side set the new version as a current model version
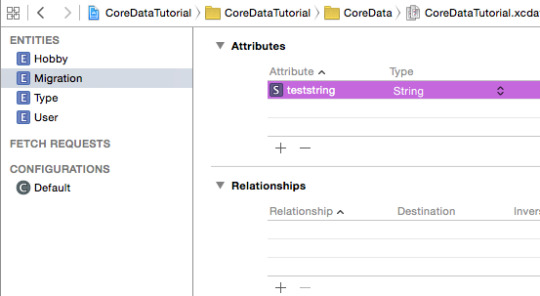
1.3. Add new Entity named: “Migration”, and a new attribute: “teststring” as a String attribute.
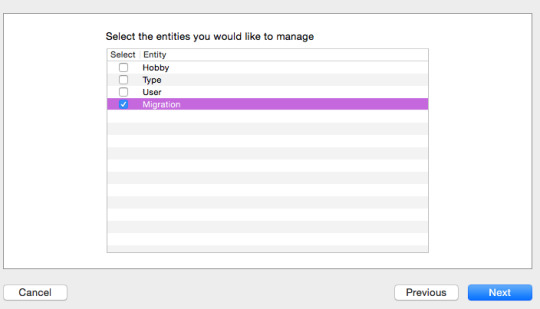

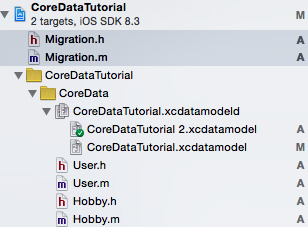
1.4. In Editor menu **click on **“Create NSManagedObject Subclass..”. In the pop-up window select the current model versions, than thick only the “Migration” Entity. Not select the “scalar properties for primitive data types”.
2. LightWeight Migration
For Model Versioning and for Model Mapping you need to use Lightweight Migration. This will be necessary for iCloud sync too.
In Appdelegate.m file created you the NSPersistentStore. Here you need to use NSDictionary to use NSMigratePersistentStoresAutomaticallyOption and NSInferMappingModelAutomaticallyOption Both of them are YES. In this case, the first line help Core Data automatically migrate the lower versioned stores to the latest model. NSInferMappingModel help to Core Data to infer automatically the attributes of source model entities as attributes in the destination model entities.
You can add these options to your PersistentStore with this simple code: Using those two options together is called lightweight migration.

You should change your - (NSPersistentStoreCoordinator *)persistentStoreCoordinator { part of code for this with this NSDictionary line and addPersistentStore “options:nil” need to change to “options:options”:

Run the App and create some User with type and Hobby:
3. Model Mapping
When you want to say manually, which data from the earlier Model should goes which attributes to the new current model versions, you need to creata Model Mapping and change NSInferMappingModelAutomaticallyOption from YES to NO. Start with this.
**3.1. **Add a new Model Version and a new Entity
Add a new Model Version: CoreDataTutorial 3
Set the Model 3 to the current Model.
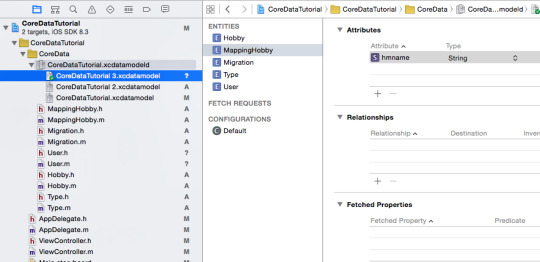
Add New Entity: MappingHome with an attribute: “hmname” as a String attribute.
Create NSManagedObjectModel Subclass…
**3.2. **Create Model Mapping
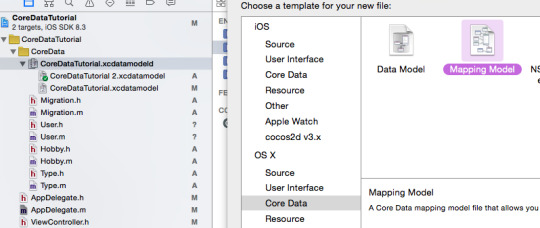
Select Data Model group, right click, New File and select Mapping Model:
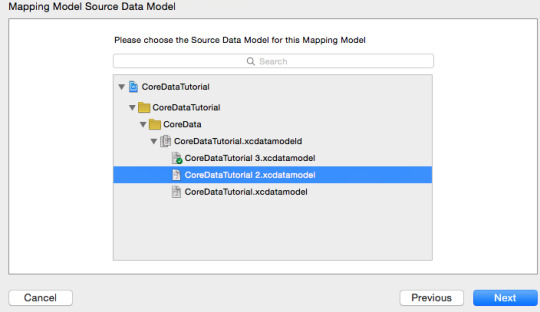
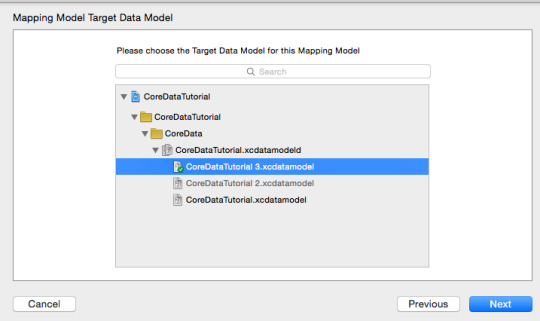
Set CoreDataTutorial 2 as** Source Data** and** CoreDataTutorial 3** Model version as Target Data Model:
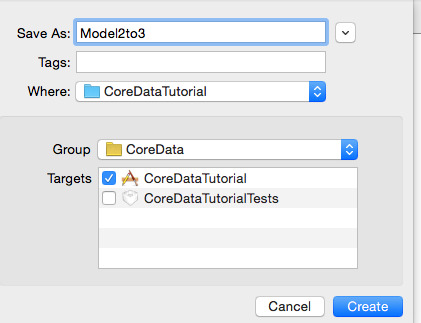
Save with the name: “Model2to3”:
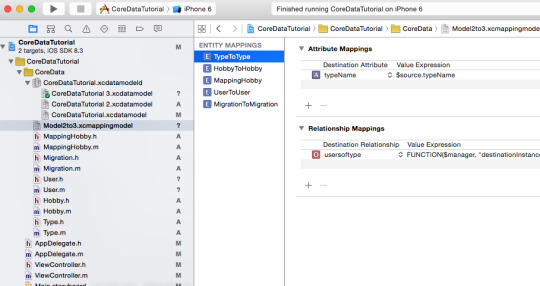
Now you have a Mapping Model:
3.3. Set Source and Destination Data:
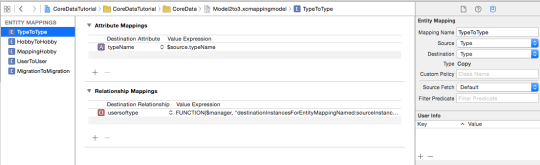
Click on Type Entity, and check the right side at the Entity Mapping the Source and Destination Entity names. These are the same. At the typeName attribute there is a Value Expression: “$source.typeName”, that means, the Destination typeName attribute use the typeName attribute from the source Model’s Type Entity.

Now click on your new Entity. You can see, that MappingHobby hasn’t got Value Expression, that means, no source Data.
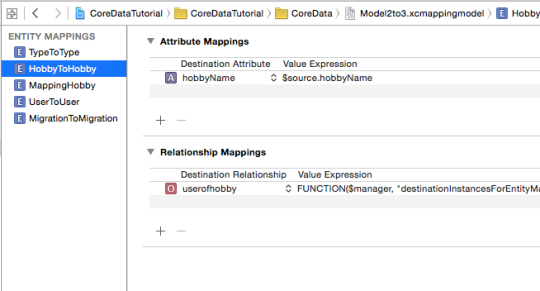
But we would like to see here, the old Hobby Entity’s hobbyName attribute data.
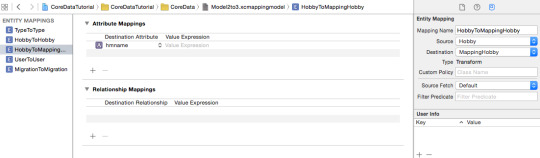
Select MappingHobby Entity, at right side select “Hobby” as a Source. Now Your Entity Name chnaged from “MappingHobby” to “HoobyToMappingHobby”.
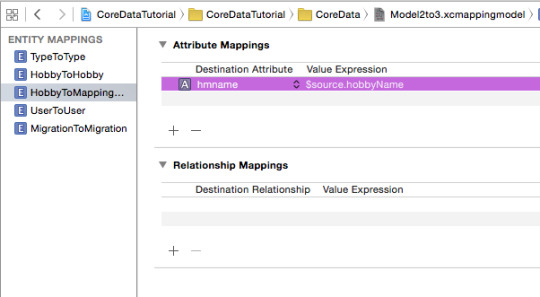
Now Add source Value Expression to the “hmname” attribute: “$source.hobbyName”.
4. Test Model Maping
Yes, we should test it. Go to
** ViewController.m**
, import
“MappingHobby.h”
file.
in ViewDidLoad create a FetchRequest for the MappingHobby Entity, and List in NSLog all of the string attribute “hmname” strings, which should be the name of the Hobby Entity. So we call them too:
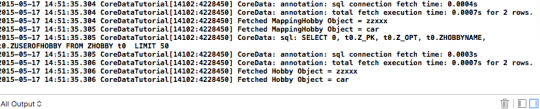
Run Project —> Clean, than Run the App, and check the log, you should see the Fetched MappingHobby Object names as same as Hobby Object names.
Now you are ready to use Model Versioning with Lightweight Migration or create Model Mapping.
NEXT
Download the Xcode template from Github
The next part of the series: soon. (Export - import data, migration.)
If you would like to be notified of my new solutions, please
Subscribe to my youtube channel!
Follow me on twitter!
Like on Facebook!
#coredata#core data tutorial#coredatamodel#lightweightmigration#migration#lightweight#xcode#xcode 6.3#ios8#ios 8.3#objective-c#ManagedObjectModel#spotlessicode#modelmapping
0 notes
Text
Core Data tutorial part 4.2 / 5 - Using NSFetchedResultsController, Reorder/Moving Table View Cells with Long Press Gesture, and update immediately Core Data displayOrder attribute
IOS 8.1 Xcode 6.1.
Before you start, here is the first and second part of this series:
Core Data tutorial Part 1 / 5 - Create Core Data Managed Object Model with Attributes, Relationships and Delete Rules
Youtube Video Part 1
Core Data tutorial Part 2 / 5 - Save Entity’s Attributes, Relationships, and make FetchRequest
Youtube video for part 2
Core Data tutorial Part 3 / 5 - Edit, Delete Objects
Youtube video for part 3
Core Data part 4 / 5 - Change Core Data model, using SortDescriptor, NSPredicate FetchRequest and filter Array using Predicate
Youtube video for part 4
Check my article: “You must to know! Collection - Core Data simple explanations”
Steps in part 4.2 :
Set NSFetchedResultsController, and do changes in the code, create displayOrder attribute.
Using Long Press Gesture to Reorder Table View Cells
Updating Core Data displayOrder attribute when reorder cells
Test
Our goal:

Youtube video for this tutorial!
First of all:
Why you need to use FetchedResultsController, and not use just simple FetchRequest? Maybe after edit your attributes, your UITableViewController not update right away. Maybe you have a very big database, and you would like to fetch just those, which show for the user on the screen, and when the user start to scroll you can fetch more data (setFetchBatchSize code). Or maybe you have other reason.
IOS Developer Library NSFetchedResultsController_Class:
Please read the entire article, but at least this small part:
You use a fetched results controller to efficiently manage the results returned from a Core Data fetch request to provide data for a UITableView object.
While table views can be used in several ways, fetched results controllers are primarily intended to assist you with a master list view. UITableView expects its data source to provide cells as an array of sections made up of rows. You configure a fetch results controller using a fetch request that specifies the entity, an array containing at least one sort ordering, and optionally a filter predicate. The fetched results controller efficiently analyzes the result of the fetch request and computes all the information about sections in the result set. It also computes all the information for the index based on the result set.
In addition, fetched results controllers provide the following features:
Optionally monitor changes to objects in the associated managed object context, and report changes in the results set to its delegate (see The Controller’s Delegate).
Optionally cache the results of its computation so that if the same data is subsequently re-displayed, the work does not have to be repeated (see The Cache).
A controller thus effectively has three modes of operation, determined by whether it has a delegate and whether the cache file name is set.
1 No tracking: the delegate is set to nil.
The controller simply provides access to the data as it was when the fetch was executed.
2 Memory-only tracking: the delegate is non-nil and the file cache name is set to nil.
The controller monitors objects in its result set and updates section and ordering information in response to relevant changes.
3 Full persistent tracking: the delegate and the file cache name are non-nil.
The controller monitors objects in its result set and updates section and ordering information in response to relevant changes. The controller maintains a persistent cache of the results of its computation.
If you are planning to develop a larger app with more Entities and relationships and attributes, then you have to read all about NSFetchedResultsController, and must use the settings in the right way.
// <![CDATA[ (adsbygoogle = window.adsbygoogle || []).push({}); // ]]>
Now start the work!
The starting point is the 4. part of this Core Data tutorial.
1. Set NSFetchedResultsController
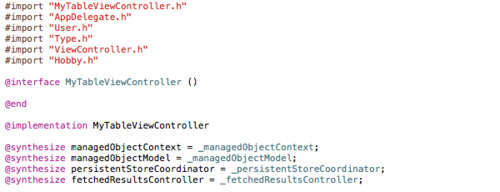
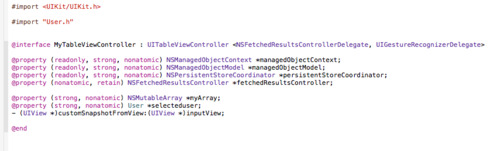
1.1. In MyTableViewcontroller.h file set NSFetchedResultsControllerDelegate method, and create NSFetchedResultsController property, and in.m file synthesize it:
MyTableViewcontroller.h:

MyTableViewController.m
1.2. Create the fetch request with NSFetchedResultsController.
You must to use SortDescriptor, when you use NSFetchedResultsCotnroller. For example you can tell that you want to order your fetched data ascending by your “displayOrder” attribute.
You can use setFetchBatchSize, after then create NSFetchedResultsController. At this point, we just put nil to key Path, because we use just single section in our UITableView. And I don’t want to use Cache, so I put nil to this part too.
IMPORTANT
If you are using a cache, you must call deleteCacheWithName: before changing any of the fetch request, its predicate, or its sort descriptors. You must not reuse the same fetched results controller for multiple queries unless you set the cacheName to nil.
1.3. Implementing Table View Data source method
Simply put this code to your MyTableViewController, then when you insert or delete or change your TableView, the FetchedResultsController will do the updates. So you can use fewer code in the future to do these things, because the controller will do it for you.
But there will be a big problem. We call sortDescriptor with “displayOrder” attribute, but in our model, we haven’t got displayOrder attribute yet. So we have to change our model:
1.4. Create displayOrder attribute for User Entity. Type: “Integer 32” Type, “displayOrder” name.
You can change model in earlier parts, so you can do it, just create the attribute, after then delete the User.m and .h file, and create them again (CreateManagedObjectSubclass). And of course you can delete the app in the Simulator.
// <![CDATA[ (adsbygoogle = window.adsbygoogle || []).push({}); // ]]>
1.5. Replace the old code at the Table View settings for the new one to able to use the controller.
In viewDidLoad block instead this line, where you call appDelegate FetchRequest, what we did earlier:
self.myArray =[[appDelegate getAllUserRecords]mutableCopy];
We can use perform fetch, and nil the controller, and then set the myArray with the fetchedObjects of our controller:
Now you can test your app, it will work. But, you not add displayOrder attribute to the user object, therefore your app can’t order them by “displayOrder” attribute. It’s logic. So we can add the number for every user when we create them.
1.6. Set displayOrder value for user:
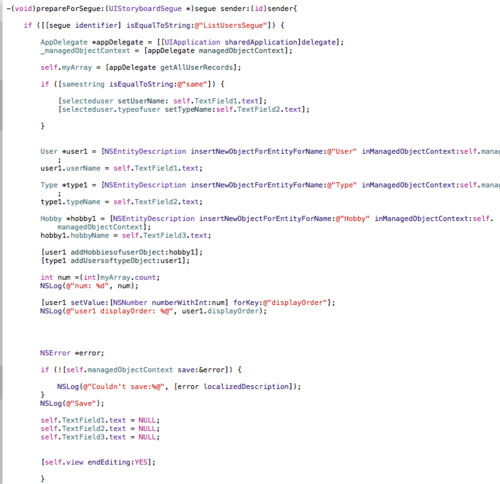
Using this 2 line of code in your ViewController.h file in prepareForSegue block before NSError *error line:
So now, your ViewController.m file prepareForSegue code looks like this:
In MyTableViewController.m file, in tableView cellForRowAtIndexPath, change your cell.textLabel.text to show the displayOrder number before the user name. Change your line to this:
1.7. To clean your all old code, you need to change the UITableViewCellEditingStyleDelete method.
Because Controller will do the “deleteRowsAtIndexPaths” line, so you should delete here this line, and also you have to change the self.myArray = [appDelegate getAllUserRecords] code to this:
self.myArray = [_fetchedResultsController.fetchedObjects mutableCopy];

1.8. Run your simulator, test your app, and you will see the ordered users fetched by NSFetchedResultsController, and you can delete them.

But you would like to reorder them.
// <![CDATA[ (adsbygoogle = window.adsbygoogle || []).push({}); // ]]>
2. Using Long Press Gesture to Reorder Table View Cells
When you would like to reorder your TableViewCells without editing mode, you can use this perfect tutorial at raywenderlich.
As I know this code updated, because there was more bugs on IOS8, but me and some other developer try to find solutions, (you can see in comments), so finally, it works fine! (I didn’t check the updated code, but I use this, as I wrote in the comment, so you can copy this).
And please read the article to understand how this code works!
2.1. First, we create a Gesture, but you need delegate method too.
Put in your MyTableViewController.h file the UIGestureRecognizerDelegate to your interface, and this SnapshotView code to call: - (UIView *)customSnapshotFromView:(UIView *)inputView;
2.2. In your viewDidLoad in MyTableViewcontroller.m file, set your TableViewEditing mode to No, Scroll enabled YES, and Create the UILongGestureRecognizer:
2.3. Put the moveRowAtIndexPath, canMoveRowAtIndexPath, editingStyleForRowAtIndexPath, and shouldIdentWhileEditinRowAtIndexPath codes.
You can read more about these here!
2.4. Put the raywenderlich code and gesture settings, and Snapshot view helper to the bottom of your MyTableViewController.m file: (this is my final code, what I use, maybe not entire same which is on the raywenderlich website)
2.5. Test your App, Run, and try to drag and reorder your cells. It woks fine! Great! But you can see, that your “displayOrder” number not change, because the new reorder state not saved into Core Data.
3. Save changed “displayOrder” into Core Data, so save the new order
3.1. Use this short code in your handleLongPress: block in UIGestureRecognizerStateChanged: case before the “break” line.
should looks like this:
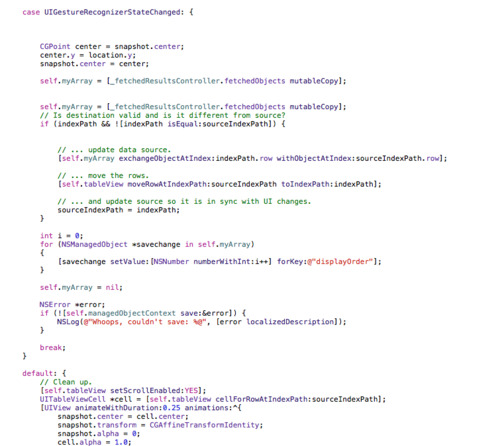
But it will be not perfect!
You need to use _fetchedresultcontroller.fetchedObjects everywhere in the TableView.
// <![CDATA[ (adsbygoogle = window.adsbygoogle || []).push({}); // ]]>
3.2. change self.myArray to _fetchedResultsController.fetchedObjects in your .m file.
in viewDidLoad delete or comment out this: //self.myArray =[_fetchedResultsController.fetchedObjects mutableCopy];
in tableView numberOfRowsInSection: use this code instead of “return myArray.count”:
in tableView cellForRowAtIndexPath: change User *user1 = [self.myArray to this: User *user1 = [_fetchedResultsController.fetchedObjects objectAtIndex:indexPath.row];
in didSelectRow block also need to change myArray
and you should put [self.tableView reloadData]; line into fetchedResultsController block before the last “return _fetchedResultsController” line.
These little things need to everything works together in a right way! If you didn’t do these, but use the method which will reorder your data and save into core data database, it will show that numbers change, but position not, or position change but numbers no, and other types of mistakes.
3.3. Create userchangeArray NSMutableArray:
In MyTableViewController.m after interface create the MutableArray, and set as _FetchedResultsController.fetchedObjects mutbalecopy top of your file:
3.4. Set the reorder method in handleLongPress: block case UIGestureRecognizerStateChanged:
4. Test
Now you can run your App in simulator, and you can reorder your rows, and you will see, that your numbers change too as a new position of the cell/data.
If you use just commitEditingStyle UITableViewCellEditingStyleDelete - maybe now it not works, I suggest to use some of Swipeable Table View Cell to use this function, and create own gesture settings. (I will create a tutorial for this).
NEXT
Download the Xcode template from Github
The next part of the series: soon. (Export - import data, migration.)
If you would like to be notified of my new solutions, please
Subscribe to my youtube channel!
Follow me on twitter!
Like on Facebook!
#core data tutorial#coredata#coredatamodel#iOS 8.1#ios#ios tutorial#ios8#fetchrequest#fetchedresultscontroller#NSFetchedResultsController#displayOrder#order#reorder#Xcode 6#Xcode 6.1#xcode#uigesturerecognizer#gesture#uitableview
0 notes
Video
youtube
Steps in part 4: 1. Create Hobby Entity - change Core Data model 2. Create and Save hobbies to user. 3. SortDescriptor and NSPredicate Sorry for the end of the video, i finally did product -clean, and then it worked fine. But i just present the way of using filteredArray with Predicate. The correct, best solution at this App to using the simple setPredicate in AppDelegate FetchRequest.! Full tutorial here! Xcode template file on Github here
#CoreData#core data tutorial#coredata#coredatamodel#nspredicate#predicate#sortdescriptor#fetchrequest#xcode#xcode 6#xcode 6.1#ios#ios 8.1#ios tutorial#iphone
0 notes