#do any other gifmakers have that thing
Photo

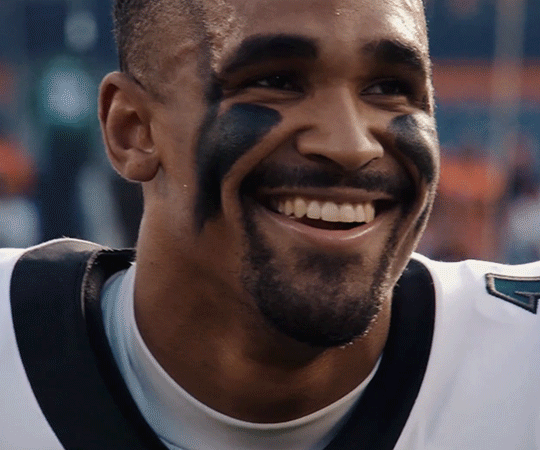
@gleeful-paintbox-project -> Kurt and Blaine dynamics {insp}
#kurt hummel#blaine anderson#klaine#gleeedit#gleesource#gleeful-paintbox-project#*wanders in late holding starbucks*#ahdslk#one day I'll get there in time#do any other gifmakers have that thing#where they'll have the concept#they'll make one or two bits of and be happy#and then nothing else in the gifset lives up to that first thing you did?#that was me with this#it was a struggle#anyways#i made this
244 notes
·
View notes
Text
tiktokers be like “I am going to create the most beautiful, relaxing, aesthetically pleasing video ever, with gorgeous lighting, and deeply satisfying content”. …….. “and then I’m going to cut the video fifty thousand times in thirty seconds-”
#chatting tag#WHY. WHY. PLEASE.#I swear like every gifset I ever see that comes from tiktok is like the most gorgeous shit I’ve ever seen in my life#(specifically those videos of food that have really sunny lighting. OUGH that’s my SHIT)#but then EVERY TIME there’s like 5 cuts in every single individual gif. and it drives me crazy#don’t get me wrong they are good gifsets and it is not the gif makers fault. and obviously I know why the tiktok makers do that#bc there’s such a short time limit on the videos and they want to keep their attention and what not#but I swear to god they will make cuts that are SO FUCKING UNNECESSARY like just cutting literal milliseconds out of a satisfying shot.#which makes it no longer as satisfying. why. why do you do this to me.#listen I just have this secret rule that I never use gifs that have any cuts in them at all in my boards#unless they’re like really really nice. but even then like only two cuts max or I go crazy. I don’t like how weird and choppy it looks!!!!#so then like all of the prettiest gifs ever. I can’t use. BC THERES SO MANY GIDDAMN CUTS#like there’s so many videos I’d want to make gifs of but you can’t even get like a millisecond long gif out of it without including cuts 😭😭#ugh. anyways. that was my unnecessarily petty and extensive rant that I’ve just been holding in for a while. sorry.#also sorry but the other thing that bothers me is that stupid logo taking up half the gif.#one of my othe hyper specific secret rules is that I cannot use any gif that has a visible logo or watermark on it bc it drives me nuts#and like. not to rag on gif makers. bc gif makers are the most wondrous thing in the entire world and everything they do is great.#but I DO know a REALLLYYY easy way to download TikTok’s without the watermark it’s so simple it would take like two seconds. please. for me#just look up tiktok video downloader there’s like four good functional websites immediately. it’s so easy#let’s all start doing this pls we could make the most perfect gifsets ever without that ugly ass logo#(again not mad at gifmakers. I love u gifmakers. muah.)
11 notes
·
View notes
Text

hi! someone requested me to do a tutorial based on this gifset!
this tutorial requires an intermediate knowledge of gifmaking. i won’t teach you how to do gifs from scratch, there are other tutorials for that out there.
[tutorial under the cut]
THE BASICS
AN INTRODUCTION
first off, the gifset in question is based on this gifset by @/eddiediaaz and i got permission from them to explain the process. i won’t be sharing the template because it’s a near replica of theirs (that isn’t shared to the public) and i don’t feel comfortable doing so, but you can recreate it by yourself just like i did!
also, ESL, so please pardon any mistakes.
THE FONT
Circular ST (Medium & Black). download it here & here.
CLIPPING MASKS
clipping masks are the way i put images and gifs inside of shapes. i used that method in the first and second gif of the Spotify gifset as you can see here.
what does a clipping mask do? basically, it links two or more layers together in a way it follows the “shape” of your base layer. ie, everything that is shown follows the “shape” of your main layer and nothing more. your base layer can be anything: a shape, an image, a gif, a text, an adjustment layer, really everything. let’s see an example:
CLIPPING MASKS & SHAPES

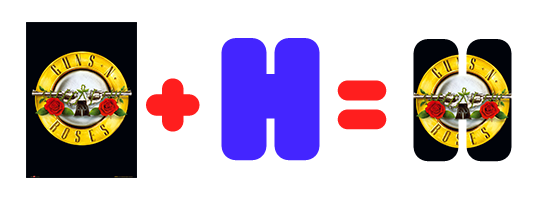
the original image (Gun 'n' Roses logo) is intact, as in, it’s not cut like a circle, something that cannot be undone. instead, everything outside the limits of the blue circle is just hidden. if i delete the base layer (the circle layer), the original image will appear as it originally is, as an rectangle.
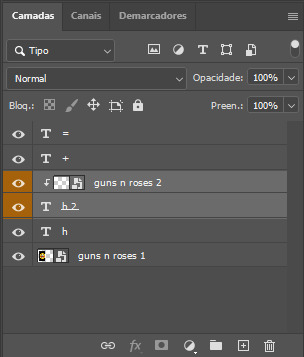
talking about layers, let’s see my layers panel (some things are in Portuguese, but i think you can understand):
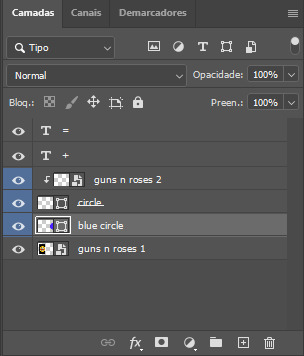
notice the little arrow pointing downwards to the “circle” layer. that is the clipping mask symbol. the base layer always needs to be below what is being clipped. if the base layer is deleted, the chain is broken and every layer clipped will now act independently and have its original shape. you can have as many clipped layers as you want. you can also have multiple chains going on in a .psd, each one with its own base layer.
to clip a layer, you just need to press ctrl+alt+G or cmd+option+G while having the layer you want to clip selected (NOT your base layer). or, you can go to LAYER > CREATE CLIPPING MASK.
CLIPPING MASKS & TEXT
let’s see the same example, but with text instead:
A TIP
because adjustment layers are clippable, you can completely gif by using clipping masks. this is very useful when you have more than one gif inside a canvas and don’t want an adjustment layer to affect everything besides a certain layer/element.
let’s take my first gif of the Spotify gifset as an example.
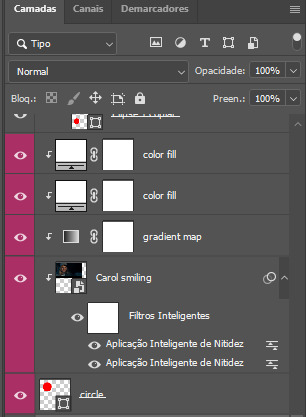
the circle is the base layer. the “Carol smiling” layer is my gif converted to a smart filter. above that “Carol smiling” layer, there is a black and white gradient map and two color fills of white so i can achieve the coloring you see. all those layers are clipping onto the circle layer, making my now b&w gif have the shape of a small circle as well.
those layers are in a folder in the .psd of my first gif, so i don’t have multiple files sitting on my PC to assemble just one gif. i could have giffed that small gif separately and pasted it onto my canvas as well, but i like to do this way so i can adjust everything i want in real time instead of redoing a gif over and over every time i want to change something.
HOW TO MAKE EACH GIF
all gifs are 540x540px.
THE FIRST GIF
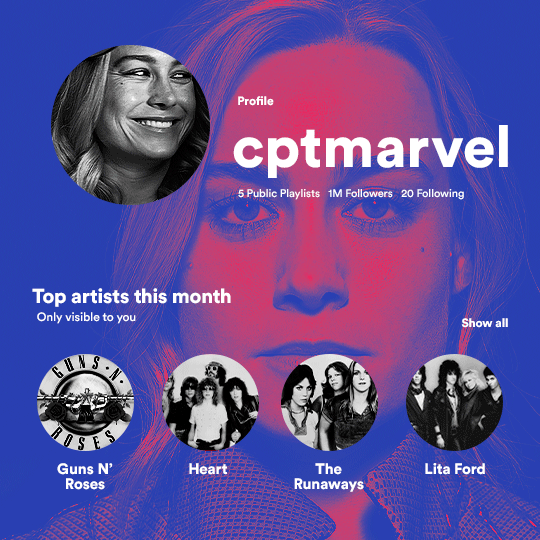
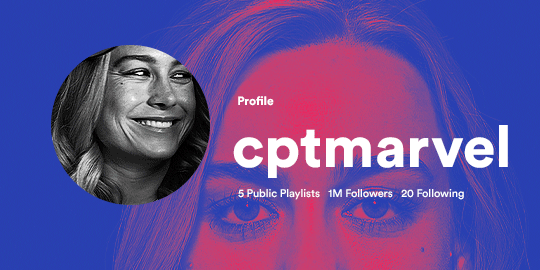
the first gif has 6 elements. the elements are: a big gif serving as a background (a close-up of Carol), a smaller gif inside a circle (a b&w gif of Carol smiling) as a profile picture and four static images for the featured artists.
i giffed as i normally do (loaded screencaps, resized the gif, sharpened the gif, etc) for my background gif. to achieve the coloring, i’ve added a gradient map (layer > new adjustment layer > gradient map) purple to pink.
to the profile picture, i made a 160x160px circle in the top left corner. the color of it doesn’t matter. the next step is a matter of taste: i giffed the smaller gif in the same .psd thanks to clipping masks that i explained earlier, but you can do it in a separate canvas too.
for the featured artists, i made four circles with 98x98px each. for the images, i had to check Spotify for their selected PFPs. after that, i googled “[band/artist] spotify” to find the images.
the PFP of bands and artists in the Spotify app are displayed in black and white, so you might have to make them b&w if you happen to find them only in color.
to make the artists PFPs pop a bit more, i transformed them into smart filters and added a bit of sharpening to them (intensity 10 x radius 10). you can adjust the colors and the brightness if you want, too.
the sizes of the texts in the gif are: 58px (username), 20px (top artists of the month), 15px (name of the artists), 12px (only visible to you + show all + profile) and 11px (following and follower numbers).
SECOND GIF
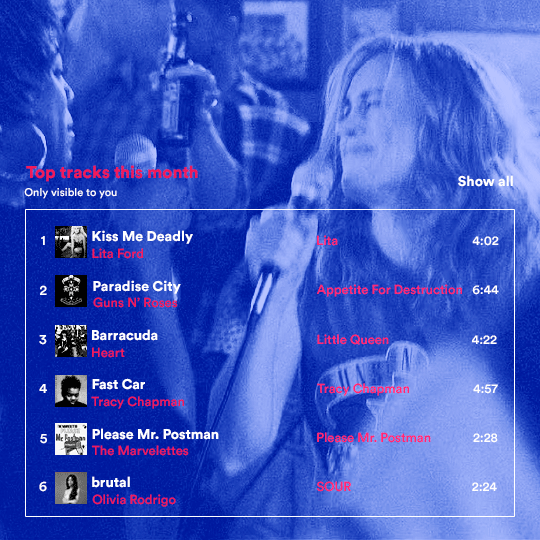
for the chart, i created a black rectangle (490x308px) that i set its blending mode to lighten (thus making it transparent) and i added an internal white stroke. i added the text and the little squares next to the top 6 numbers.
the font sizes are: 17px (top tracks this month), 11px (only visible to you), 14px (song title, show all, top 6 numbers), 13px (artist/band, album title, length of the song).
i added the album covers — that i made b&w — by clipping images onto 32x32px squares.
for the coloring, i added a gradient map (dark purple > light purple).
THIRD GIF
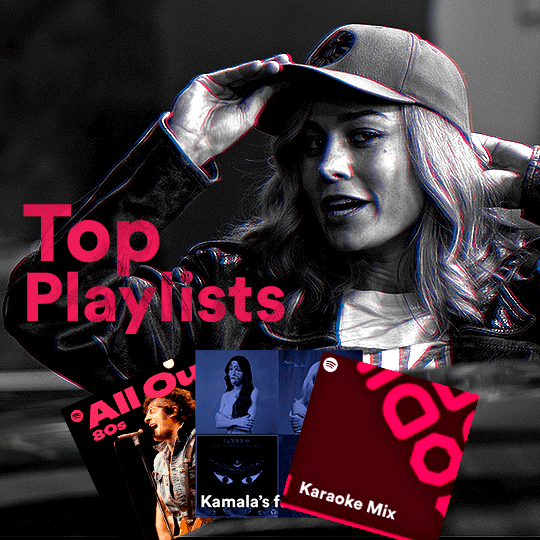
there are three types of playlists in this gif: a Spotify original playlist, a playlist made by a user and a Mix. you don’t have to follow this formula if you don’t want to, but in the case you do, here’s how i did it:
browse Spotify for an original playlist of theirs. chances are, if you google the playlist’s name, you can find its cover on Google Images. at least, i found the “All Out 80s” cover that i used in my gifset. you can also create your own.
for the user playlist, just pick four songs and find their (album) covers, also on Google. create a square canvas on Photoshop and make four squares, each in one quadrant of the canvas. paste your images onto your canvas and clip the images to each square. then, add a gradient map (black + whatever color you want) to all those images and title your playlist (font size: ). save that collage as a PNG and load to your gif canvas or merge all the layers+transform into a smart filter and drag the smart filter layer onto your gif canvas.
now, the trickiest one. while you can invent your own Mix, i wanted to use a real one, but i had no idea on how to find them. thanks to reddit, i discovered that, if you search “made for you” on Spotify, you will find their Mixes! some of them are very whacky and specific! i just picked the Mix that made the most sense for Carol from that (gigantic) list.
before doing the next step, i would advise you to google the name of the Mix you picked to see if you are able to find the cover of it with good quality. i wasn’t able to find mine (Karaoke Mix), so i just screenshotted my Spotify app, pasted that screenshot into Photoshop and cut the Mix cover and pasted that onto my canvas.
the quality wasn’t great, so i transformed the cover into a smart filter, added a bit of gaussian blur and then sharpened it (intensity 10 x radius 10). the color wasn’t what i wanted either, so i used Hue/Saturation to change the hue.
because the original image for the Mix was smaller than i wanted and i stretched it to make it bigger, the quality of the text and the Spotify logo was botched. i painted over the Mix cover and created a text with the font i linked earlier to replace its now pixelated title. i also painted over the little Spotify logo, found a logo in the internet and pasted over the Mix cover about the same size of the original logo.
to achieve the “3D effect” of the gif, i made my b&w gif, the base. then, i duplicated all layers and added a gradient map (black > pink) and merged all the layers of that duplicate. i made a second replica of my gif, now with a different gradient map (black > blue). i set both replicas to the ligthen blending mode. you will notice that the replicas will "disappear" and only the original b&w gif will remain. if you move the replicas a bit, that colored border will appear. this doesn't work much in very bright gifs without a lot of dark areas, btw.
FOURTH GIF
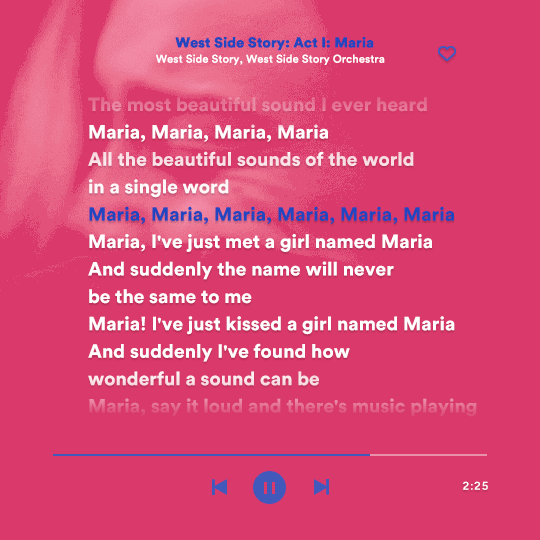
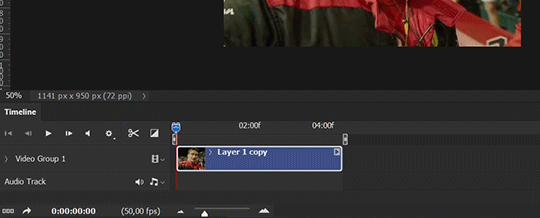
this gif used an altered (by me) version of this template. (i changed the fonts to match the rest of the gifset, too.)
for the color text effect, you will have to gif with the timeline bar. take your gif’s length and do the math to find how many frames are ⅓ of it. take your lyrics’ layer and cut it into three equal parts or close to it by using the scissors icon in the timeline panel. in each third, change the color of just one line, line by line.
when you play your gif, the colors of the lyrics will change like in Karaoke.
you can do the same thing with frames iirc, though. i explained the timeline method because that’s the one i used in this gifset and use in general gif making.
for the coloring, i added a gradient map. to make the colors pop a bit more, i add two gradient maps: the first one is in black and white, the other is in color. that adds depth to the blacks and darker colors of the gif.
FIFTH GIF
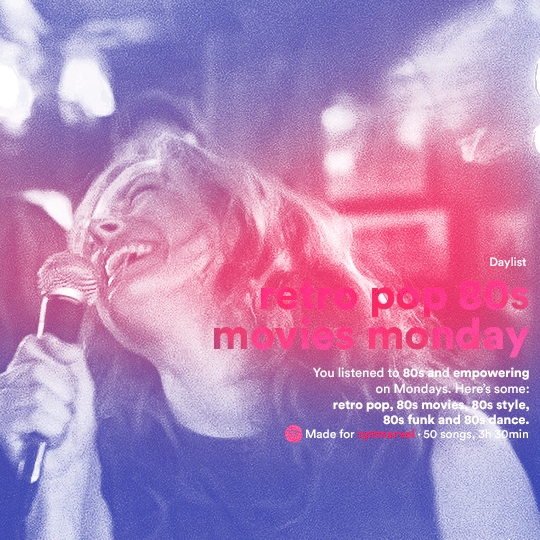
like in the Top Playlists gif, i wanted for my Daylist to be real as well. to achieve that, i listened to my Carol Danvers companion playlist (that you can listen here) for a long time until my Daylist refreshed itself. (Daylists refresh in certain times of the day — don't worry, Spotify will tell you when.)
then, i just copied what it told me — the title and the genres i listened to generate such a Daylist, plus the genres i should check it out. you can invent your own Daylist if you want, but because it is generated by AI, i find very difficult to mimic its crazy titles, but you can try!
you can also search in the web for other people’s Daylists if you want, but usually people don’t tell you what they listened to to get those playlists and nor what was recommended for them to listen to and i, at least, find that information important for the gifset.
be aware that Daylists aren't available for every country yet (like in mine), but i found a way to work around that. the browser Opera GX offers a free "VPN" — not exactly a VPN, but it works close enough — so you can set your location to the US and listen to in-browser Spotify. i recommend not log into Tumblr while using Opera's VPN as there is a myth (that could easily be true!) that Tumblr terminates people's accounts that use a VPN.
font sizes: 43px (daylist title), 13px (text), 12px ("daylist" & "made for").
for the flare effect, i searched for flare overlays on YouTube and downloaded one of those videos with 4K Video Downloader, a free software. i loaded the overlay into Photoshop and added a gradient map (purple > pink) over it, thus changing its color. i pasted the overlay onto my b&w gif and set its blending mode to screen. voila!
that's it! i hope you liked it and that i was able to express myself well. if you have any questions, feel free to contact me, i love helping people about their gifmaking questions! 💖
#*#*tutorials#gifmaker tag#dailyresources#usergif#completeresources#alielook#userairi#userhallie#userbess#userrobin#usershreyu#userzaynab#tuserju#tusermalina#tuserheidi#usertina#userabs#userbuckleys#usermagic#userjoeys#antlerqueen#userarrow#flashing gif tw
285 notes
·
View notes
Text
TILE TRANSITION TUTORIAL

a couple of people have asked me for a tutorial on how I did the penultimate gif in this set, so here goes! this is my first tutorial, so please feel free to reach out with further questions if anything's unclear.
note: this tutorial assumes you know the basics of gifmaking, can create the base gifs, and are familiar with timeline mode.
STEP ONE: create the base gifs! I'd recommend staying between 25-40 frames for each gif, since the transitions we'll use later tend to increase gif sizes. these are the ones I'll be using for this tutorial:


STEP TWO: create the guide layouts for both base gifs. for this panel, I chose a 4x4 grid — I would recommend keeping the number of "tiles" low because it can get tedious, but have a minimum of 9 (3x3 grid).


now your canvas should look like this:

STEP THREE: create the tiles. this is where the going gets rough; there might be easier ways to do this that I couldn't think of 😭 if there are any please send me an ask!
essentially, in this step we'll cut up the base gifs into smaller squares so that each tile can be manipulated separately when we put both gifs together. to do this, first create a square using the rectangle tool and the guides. then duplicate the base gif, move it above the square, apply a clipping mask, and then convert the clipped gif and square (selected in the image below) into one smart object.


ALTERNATELY: you could duplicate the original base gif and use layer masks to isolate tiles. create a layer mask for the duplicated gif layer and, with the layer mask selected, drag your mouse over a square (using the guide layout) and press delete. then press ctrl/cmd + i to invert the layer mask so that the gif only shows in the square of your choosing.
now repeat until you've got the entire gif in tiles, and do the same for the other gif!
since the transition effect is achieved by staggering the crossfades for each tile of the final gif, you can cheat by having multiple tiles "flip" at a time, ideally no more than four. this means you need to cut the base gif up into fewer pieces. to do this, simply draw multiple squares instead of one and then merge the shapes, before duplicating and clipping the gif onto them.


if you do this, it's essential to remember that you have to divide both gifs up in the exact same way. each piece of the b/w gif has to correspond to a piece of the purple gif!
this is what the layers look like for each gif once I'm done:


I have them lettered so that it'll be easier to match them up in the next step.
STEP FOUR: this is the complicated bit that took me two days to figure out. I'll do my best to explain but don't hesitate to reach out if something isn't clear!
to begin, open up a new psd and import both base gifs into it. (remember to click "create video timeline" and ensure that your gifs are all in order before proceeding.)
now, the trickiest part about this transition is ensuring that all the little tiles sync up so that the larger gif is coherent. so first we'll create some markers (just empty layers) to ensure that everything lines up as it should.
— marker 1: at about halfway through the first gif (b/w in this case)
— marker 2: at about a quarter of the gif length
— marker 3: close to the end of the gifs

at this point we're ready to start bringing in the tiles. I'm going to delete the base gifs from this new psd just to keep things cleaner!
first thing to do is import my b/w tile. move the timeline slider over to marker 1 and split the first gif. (if it helps, rename the split gifs and add (start) and (end) to the two halves.) then, move the (end) half to the beginning of the timeline, and the (start) half to line up with marker 3.
the purple tile is easier to manage. simply import it into the psd and line it up with marker 2.
your timeline should now look like this:

notice the overlap between the gifs at their beginnings and ends — this is where you'll be able to cascade the tiles flipping, so it helps to have a significant amount of overlap.
crop the three gifs for this tile as you see fit! since this is the first tile I want to flip from b/w to purple, I'll crop gif 1a (end) all the way to the current position of the timeline slider (red line with blue tip) and leave the beginning of gif 2a uncropped. for the flip from purple to b/w, I'll crop both gifs a bit.
once that's done, drag all three gifs onto the same level in timeline so they form a video group. your timeline should look something like this:

now you just repeat the process for all the other tiles! as long as you made sure that all the tiles in one gif correspond with tiles in the other gif in step three, this should be a fairly painless process. make sure to crop the starts/ends of the gifs separately so that they don't all flip together.
this is what my layers look once I've done all the tiles:

and the gif!

STEP FIVE: transitions! click on the half-white square (top right of the left column in the timeline, beside the scissors) and select the crossfade transition, then drag it between two gifs in a video group. it should create a two-triangle symbol and shorten the overall length of the video group.


apply the transition to all the tile flips, ensuring that the duration of all transitions is constant. this can sometimes be tricky because ps likes to change the duration of each transition, so right click on the transition symbol and manually change all your transition durations to be the same.
your layers should now look something like this:

STEP SIX: draw the grid. bring back the guide layout from step two and using the line tool (I like 2px thickness), trace the grid. adjust opacity as you see fit (50-80% is usually a good idea), so that the canvas looks like this:

STEP SEVEN: export and celebrate! you're done!
I hope this tutorial made sense and was easy to follow, and happy giffing! my inbox is always open for any questions <3
#tutorial#ps help#ps tutorial#userace#alielook#userabs#usercats#userhella#userfaiths#tuserabbie#usershreyu#usertreena#tuserlucie#uservivaldi#usertj#usergiu#userroza
738 notes
·
View notes
Text

Hello! And welcome to my brand new whump gifmaking challenge! I'm your host @aceofwhump and I'm excited to bring a whump challenge specifically created with gifmakers and visual artists in mind.
The challenge begins August 1, 2024!
Rules:
All gifs posted must be made by you. Do not just post gifs using the gif keyboard and claim them as yours and do not repost other people’s gifs. No AI-generated content please.
Various mediums are welcome! So long as the visual art aspect is the focus you can make whatever you want. Yes this is primarily a gifmaking challenge so everything is geared towards that but any visual art is welcome. If you draw, make moodboards, edits, videos, etc you’re welcome to participate!
You can use the prompts however you like. There is no wrong way to use a prompt. Feel free to interpret them however you wish. If you think it counts as whump? It's whump! Make it! Angst, comfort, emotional whump, small things, big things, it all counts so no need to over think it.
Tag all potential triggers (things like emeto, gore, nsfw, blood, eye whump, rape/noncon, etc.) When in doubt, tag it.
Tags to use when posting so I can find your ppst: #whumpedit, #whumpgifathon, #whump gifs
Please try to include the show/movie title, character names, and episode number (if applicable) somewhere either in your tags or in the post caption. This way anyone interested in watching it can find it easily.
An example of a way you can caption your gifsets:
@whumpgifathon | Day #: "prompt description"
Show/Movie title, episode number, character name
And here's the prompt list!!! I hope you guys like it and find it inspiring but not overly challenging!
Remember that this is a relaxed event!!! I just want to offer my fellow visual artists some inspiring prompts and an opportunity to have some fun. So sit back, relax, and have fun!
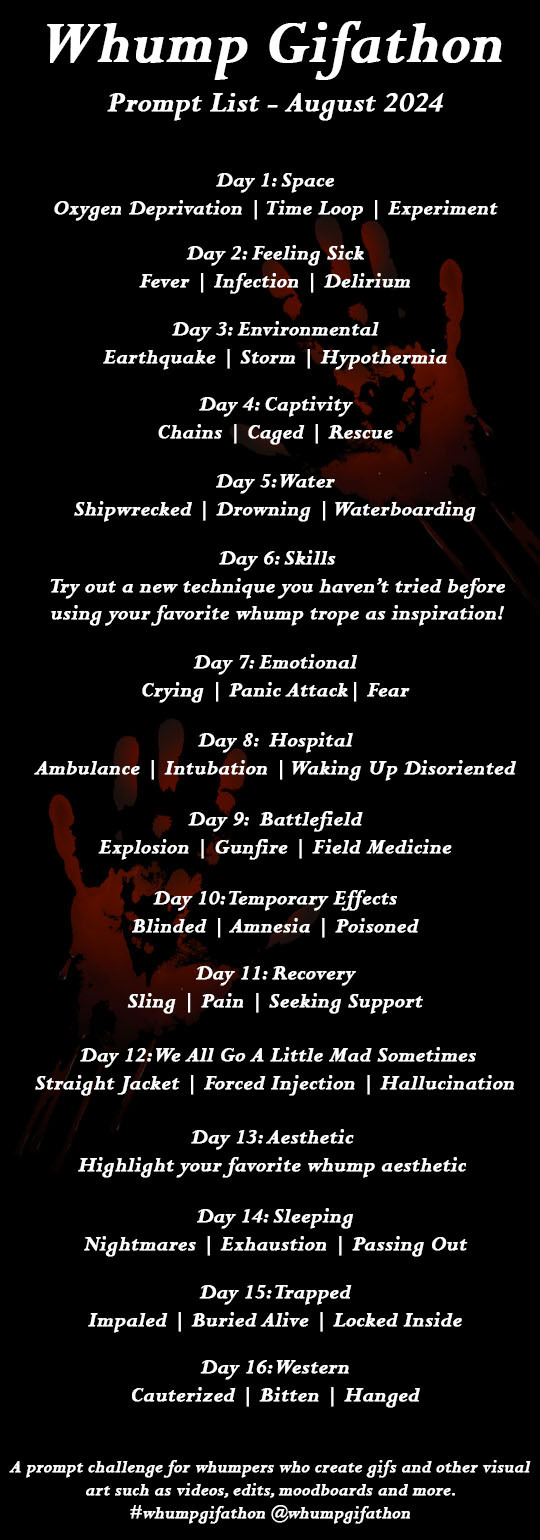
Text version below:
Whump Gifathon - August 2024 Prompt List
Day 1: Space
Oxygen Deprivation | Time Loop | Experiment
Day 2: Feeling Sick
Fever | Infection | Delirium
Day 3: Environmental
Earthquake | Storm | Hypothermia
Day 4: Captivity
Chains | Caged | Rescue
Day 5: Water
Shipwrecked | Drowning | Waterboarding
Day 6: Skills
Try out a new technique you haven’t tried before using your favorite whump trope as inspiration!
Day 7: Emotional
Crying | Panic Attack| Fear
Day 8: Hospital
Ambulance | Intubation | Waking Up Disoriented
Day 9: Battlefield
Explosion | Gunfire | Field Medicine
Day 10: Temporary Effects
Blinded | Amnesia | Poisoned
Day 11: Recovery
Sling | Pain | Seeking Support
Day 12: We All Go A Little Mad Sometimes
Straight Jacket | Forced Injection | Hallucinations
Day 13: Aesthetic
Highlight your favorite whump aesthetic
Day 14: Sleeping
Nightmares | Exhaustion | Passing Out
Day 15: Trapped
Impaled | Buried Alive | Locked Inside
Day 16: Western
Cauterized | Bitten | Hanged
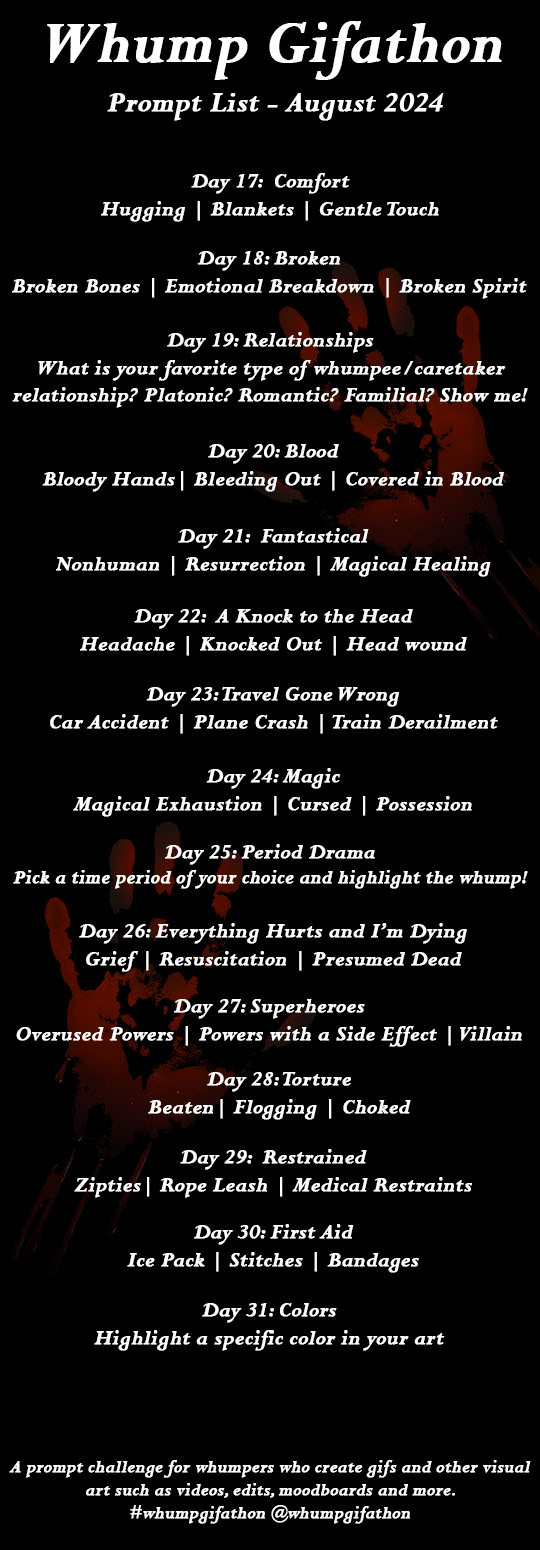
Day 17: Comfort
Hugging | Blankets | Gentle Touch
Day 18: Broken
Broken Bones | Emotional Breakdown | Broken Spirit
Day 19: Relationships
What is your favorite type of whumpee/caretaker relationship? Platonic? Romantic? Familial? Show me!
Day 20: Blood
Bloody Hands | Bleeding Out | Covered in Blood
Day 21: Fantastical
Nonhuman | Resurrection | Magical Healing
Day 22: A Knock to the Head
Headache | Knocked Out | Bloody face
Day 23: Travel Gone Wrong
Car Accident | Plane Crash | Train Delrailment
Day 24: Magic
Magical Exhaustion | Cursed | Possession
Day 25: Period Drama
Pick a time period of your choice and highlight the whump!
Day 26: Everything Hurts and I’m Dying
Grief | Resuscitation | Presumed Dead
Day 27: Superheroes
Overused Powers | Powers with a Side Effect | Villain
Day 28: Torture
Beaten| Flogging | Choked
Day 29: Restrained
Zipties| Rope Leash | Medical Restraints
Day 30: First Aid
Ice Pack | Stitches | Bandages
Day 31: Colors
Highlight a specific color in your art
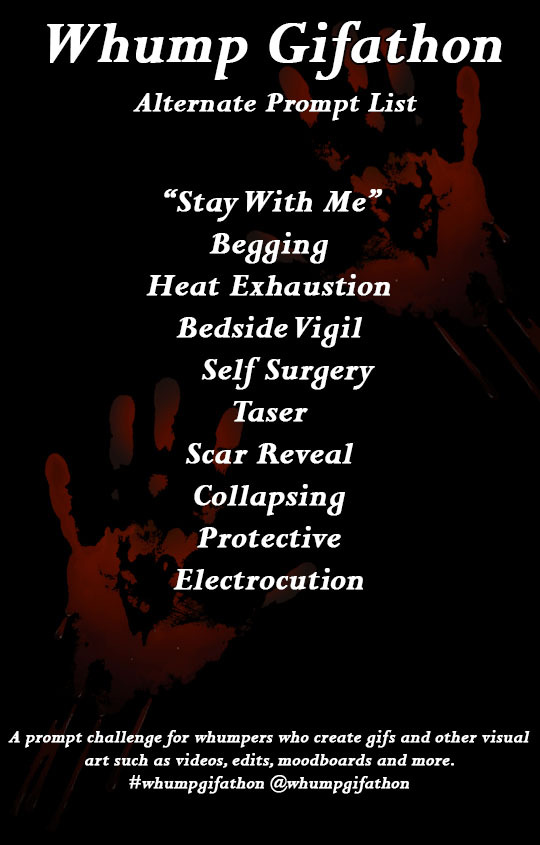
Alternate Prompts:
"Stay With Me"
Begging
Heat Exhaustion
Bedside Vigil
Self Surgery
Taser
Scar Reveal
Collapsing
Protective
Electrocution
#whump#whump event#whumpedit#whumpgifathon#whump events#whump prompts#gif making#gif making events#2024 prompt list#2024 event info#mod post#hopefully i fixed all the typos and repeat prompts but if i missed a big one please let me know#i've read this like a billion times now#the words no longer mean anything to me lol
224 notes
·
View notes
Text
Top 10 Things I Love About the QL Tumblr Community 2023
I'm loving everyone's end of year lists, and decided to make up one of my own.
I haven't been on Tumblr for very long and was originally just lurking. 2023 marks the year where I finally started posting, after I read a take that made me feel compelled to come to a fictional character's defense. (Saengtai, my poor little blorbo).
So in commemoration of my first proper year of active tumblring, I present what I love about this community (in no particular order).
(Side note - Technically I know this is still primarily a BL community, but I like to say QL because I am trying to manifest more lesbians for us.)
1) The Gifmakers
Y'all are a good 70% of the reason I joined Tumblr in the first place. There are so many show moments that I want to relive, but without having to search through videos. Sometimes I want to appreciate the aesthetics. Sometimes I want to remember adorable or goofy moments. Sometimes I just want to see cute boys eating each other's faces. Our gifmakers give all of that to us, with the addition of so much creativity and style.
There's too many amazing ones to mention everyone, but I have to shout out @sparklyeyedhimbo, because the way your brain works makes me so happy.
2) The expertise
The other part of why I joined Tumblr was to learn more about what BLs were out there and what I might be missing. And holy hell. Y'all are putting in the work. Not only lists and resources for finding all kinds of QLs, like these fabulous monthly breakdowns by @gunsatthaphan, but also amazing posts that add additional context, like @absolutebl's incredibly helpful breakdown of Asian honorifics. There is so much research people do, for fun! And then they share it!
3) The meta analysis
I frickin love reading people's takes and analyses on series. I love learning, I love seeing perspectives from people with different cultural backgrounds to my own, it's all so fascinating! There's so much context we can miss due to our own privileges, or lack of knowing about various cultures, or due to whatever bubbles we've been living in. People here are just so smart, and nuanced, and willing to reflect and think about things, and also push back at each other, but generally with respect (except when you call out the dumb shit you see, usually on Twitter or TikTok, where people are being reductive and dumb about gender and sexuality).
And I've seen a few takes where people complain about analyses, and say that the director/production doesn't do everything deliberately, and we're all reading too much into it. To which I say, eh, lighten up. How people connect to and relate to media has relevance beyond what was intended. The point is we get to think and discuss and learn and grow. That doesn't happen if we don't analyze.
Special shout out here to @respectthepetty because colors mean things!
4) The wild theories
The other side of the analysis coin, the clown cars y'all drive around in with the wildest of theories. I have happily climbed into an occasional clown car, and usually I am utterly wrong (*cough* Saifah *cough*). But it's a super fun ride. I love seeing how people's brains work. I love it when y'all are wrong. I love it when y'all are right. It's beautiful.
5) Immediate acceptance
I am one of those people who knows that I have a lot of good qualities, and also, always kind of expect rejection. Blame the childhood bullies, I guess. Anyway, whenever I delve into a new space, I still feel like a total dork that no one will want to talk to. It's kind of a fraught way to move through the world, but I manage.
Anyway, I started posting my thoughts as they came up, and people are just totally cool with it. People even follow me sometimes. Even my silliest thoughts and dumbest jokes get at least a couple likes. It's so validating.
And my very silly joke about gay mafia in Kiseki has over 800 likes. I feel very seen.
6) Mutuals
I still kind of can't believe I have any. This ties in to the dork feeling above, but seriously - they are soooo cooooool. They're smart and awesome and funny, and they somehow find me worth following back, which is baffling yet wonderful. I want to squish their faces and give them many kisses (if they're into that kind of thing).
7) The self-exploration
I really appreciate how it's become more talked about how a lot of people are discovering queerness through BL, because that is so the case for me. I think it's both that I was in a bit of a hetero bubble before, and also that I'm evolving a bit as I age. I had figured out I was demi, and maybe a little bit gay, before getting in to BL, but being in this community, and seeing so many of you share so openly and freely, has made me realize it might be more than a little bit.
Either it was a new realization, or being around y'all has made me more gay. Win win, either way.
8) The weirdness
I'm weird. Y'all are weird. I love it.
9) The thirst
So many in this community are thirsty as fuck, and as someone who is in that same condition, I love that it's not just me. There are not many places where I can freely admit how horny I am as a part of my general existence.
Here? I could post about wanting to lick some random BL actor's face, and it would get a bunch of likes and some tags like #lickable, and it's just not remotely a big deal.
Also the gifmakers understand this, and give us beautiful cuts of our spicy scenes. They are genuinely too good for us.
10) The communal watching experience
There is absolutely nothing like watching along with people in the community. It is so worth the torture of having to wait week to week for new episodes. Seeing the show trend, watching the theories fly fast and furious, or the way everyone collectively loses their minds over particular moments. In a world that can feel very isolating, it's a very warm experience.

So there you go. Thank you all for being you. Here's to another year of QL shenanigans and losing our collective minds!
273 notes
·
View notes
Text

The silent art of gif making
The gif above has 32 layers plus 6 that aren't shown because this is part of a larger edit. I wanted to share it to give everyone a glimpse of the art of gif making and how long it usually takes for me to make something like this. This one took me about an hour and a half but only because I couldn't get the shade of blue right.
I use Adobe Photoshop 2021 and my computer doesn't have a large memory space (I don't know what to call it) so usually most of psds get deleted because I'm too lazy to get a hard drive. It doesn't really bother me that much because I like the art so when it's done, it's done. Off to somewhere else it goes.
Here are the layers:

Everything is neat and organized in folders because I like it that way. I prefer to edit it in timeline but others edit each frame. There's a layer not shown (Layer 4 is not visible) and it's the vector art. Here it is:

Now it is visible. I don't plan to make this a tutorial, but if you're interested I'd love to share a few tricks about it. I'm pretty new to the colors in gifmaking but the rest is simple to understand. Here, I just want to show how much work it takes to make it.

I opened Group 2 and here's the base gif. I already sharpened and sized it correctly but that's about it. Let's open the base coloring next.

Yay! Now it looks pretty! The edits are in Portuguese but it doesn't matter. There's a silent art of adding layers depending on how you want the gif to look but you get used to it. The order matters and you can add multiple layers of the same thing (for eg. multiple layers of levels or curves or exposure).

This was pretty much my first experiment with coloring so I don't know what I'm doing (this happens a lot with any art form but gifmaking exceeds in DIYing your way to the finished product) but I didn't want to mess up his hair, that's why the blue color is like that. Blue is easy to work with because there's little on the skin (different from red and yellow but that's color theory). I painted the layers like that and put it on screen, now let's correct how the rest looks.

I was stuck trying to get the right teal shade of blue so yes, those are 10 layers of selective color mostly on cyan blue. We fixed his hair (yay!) we could've probably fixed the blue on his neck too but I was lazy. This is close to what I wanted so let's roll with that.

BUT I wanted his freckles to show, so let's edit a little bit more. Now his hair is more vibrant and his skin has red tones, which accentuates the blues and his eyes (exactly what I wanted!). That lost Layer 2 was me trying to fix some shadows in the background but in the end, it didn't make such a difference.

This was part of an edit, so let's add the graphics and also edit them so they're the right shade of blue and the correct size. A few gradient maps and a dozen font tests later, it appears to be done! Here it is:

Please reblog gifsets on tumblr. We gifmakers really enjoy doing what we do (otherwise we wouldn't be here) but it takes so long, you wouldn't imagine. Tumblr is the main website used for gif making and honestly, we have nowhere to go but share our art here. This was only to show how long it takes but if you're new and want to get into the art of gif making, there are a lot of really cool resource blogs in here. And my ask box is always open! Sending gifmakers all my love.
#gif making#gif tutorial#resources#completeresources#y'know what that post yesterday got me into this#i love creativity so i send all my love to gifmakers#this is HARD#my tutorials#tutorials
385 notes
·
View notes
Note
How do you make your gifs?
Hello hello! I love talking about gifmaking, so thank you for giving me the chance to ramble.
Instead of a detailed step-by-step walkthrough, I will link tutorials and resources written by the wonderful Tumblr creators on here along the way. Everyone has their method and preferences, and there’s no right or wrong way to make gifs. I’m going to share techniques and resources I picked up along the way that work best for me—they may or may not be suited to your preferences, but I hope you’ll find some helpful things here.
(Warning: screenshot/image heavy)
USEFUL TUTORIALS AND RESOURCES
Here are some tutorials and resources that I found very useful when I got back into gifmaking:
Gifmaking tutorial using video timeline by @hope-mikaelson is identical to my own process
Gifmaking and coloring tutorial by @kitty-forman, whose process is very similar to my own
Giffing 101 by @cillianmurphy, an incredibly detailed tutorial that covers everything you need, including a step-by-step guide to using HandBrake
Gifmaking and coloring tutorial with 4K HDR footage by @sith-maul, another incredibly detailed tutorial with many useful tips
Gifmaking tutorial by @jeonwonwoo, incredibly comprehensive and covers so many aspects of gifmaking from basics, sharpening, captioning, and text effects
Gifmaking/PS tips and tricks by @payidaresque
Action pack by @anyataylorjoy, the Save action is especially a true life-saver
@usergif and @clubgif are amazing source blogs with many tutorials on gifmaking, color grading, and gif effects, can’t be thankful enough for the members for their work curating and creating for these blog!
TOOLS
Adobe Photoshop CS6 or higher, any version that supports video timeline. @completeresources has many links to download Photoshop, have a look!
Photopea is a free alternative to Photoshop, but it has a slightly different UI, check out these tutorials for gifmaking with Photopea
HandBrake or any other video encoder, especially if you’re working with .MKV formats
4Kvideodownloader for downloading from YouTube, Vimeo, Instagram, etc.
OBS Studio or any other similar screen capturing software. To prevent duplicate frames in gifs that prevents your gifs from looking smooth, try to match the recording frame rate (FPS) with the source.
IMPORTING FOOTAGE AND WORKING IN VIDEO TIMELINE
I work exclusively in video timeline instead of importing video frames to layers or loading files into stack. For videos that don’t require converting/encoding using HandBrake, especially ones that are already in .MP4 format, I tend to open the video directly on Photoshop, and trim the videos around directly.
As mentioned above, this gifmaking tutorial using video timeline is exactly how I make gifs. I find it more efficient, especially if you’re making multiple gifs from the same video/the same scene with little to no change in lighting conditions You can simply slide around sections of gifs you want to save, and they will all be the same length.
Another thing also covered in the tutorial linked is the ability to change video speed in video timeline mode. Right click on the video and set the speed before proceeding with cropping/resizing. This is also very useful when you’re making blended gifs where you need the footage to have the same length.
Slowing footage down.
As mentioned in this post, changing the FPS before slowing down the gif results in smoother gifs. Doubling the frame rate before slowing down your gifs usually yields the best result.
Speeding footage up.
I love using this to speed up slow motion B-rolls to make the speed slightly more natural. It will result in nice, smooth gifs:

(B-roll footage, normal broadcast speed)
(200% speed)
Subject won’t stay in frame?
Another feature of the video timeline mode. Keyframes are your best friend. This tutorial by @kangyeosaang covers everything you need to know about panning gifs. I use this technique regularly, it’s a life-saver.
COLORING
Here are some coloring tutorials I found very useful:
Coloring tutorial by @brawn-gp beloved, their coloring style is second to none
Mega coloring tutorial by @yenvengerberg, for stylized /vibrant coloring
Understanding Channel Mixer by @zoyanazyalensky
Coloring rainbow gifs by @steveroger, which delves deep into Channel Mixer
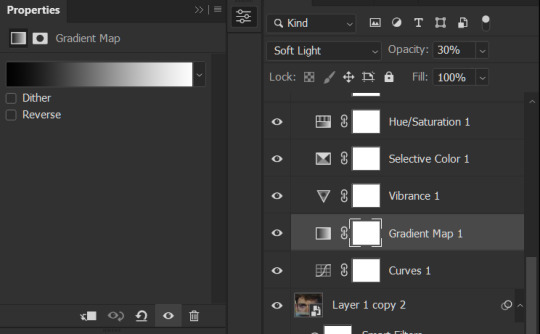
I tend to go for neutral-saturated coloring in general, especially for minimalist gifsets with no effects (blending/isolated coloring/overlays etc.), but the possibility is endless for stylized coloring. Here’s what my adjustment layers look like for the example gifs above.
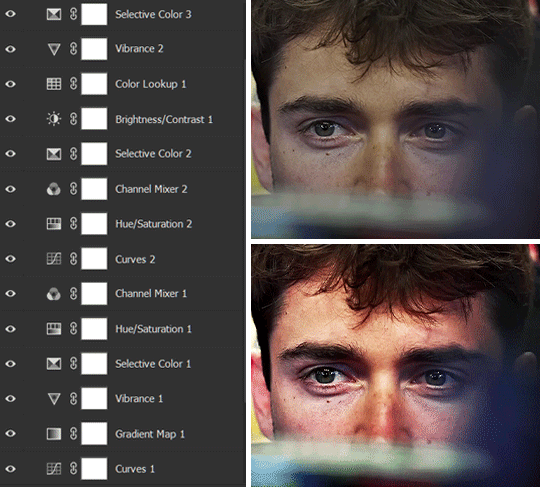
The base footage for this Charles gifset is incredibly desaturated. I started with a Curves layer to bring contrast to the gif, as well as do some color-correcting to bring the base footage to a more neutral tone. To bump contrast, I also like to add a black and white Gradient Map layer with a Soft Light blending mode at 10%-30% opacity:
The Vibrance layer is then used to lift the saturation of the base footage, with the Selective Color, Hue/Saturation, and Channel Mixer layers to help remove the green/yellow tint to his skintone.
An underrated adjustment layer/preset in my opinion is the Color Lookup. You can layer in pre-loaded .LUT color grading presets to help speed up your process. For this gif, it’s simply a base preset Soft Warming Look to achieve a warm, pink-tinted tone.
In hindsight I feel like this gifset is too saturated, his skintone is skewing very red/pink, I could’ve bumped down the lightness of the reds with a Selective Color layer or a Hue/Saturation layer. Try to err on the side of neutral for skintones. Experiment with layer orders—there’s no right or wrong! Remember that each layer build up on the one before it.
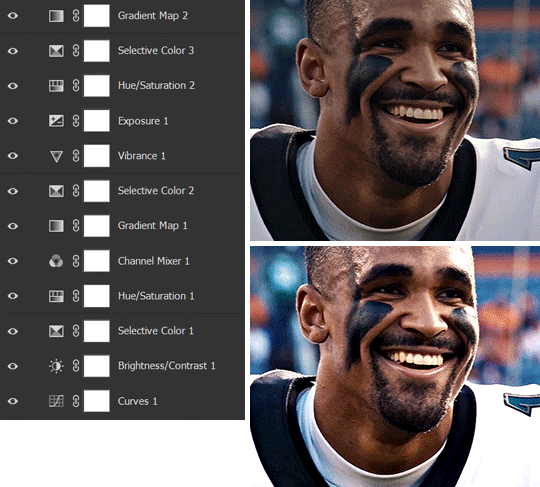
The base footage of the Jalen gif is already quite nicely color-graded, but it’s still muddy and underexposed. As with the Charles gif, I started with a Curves layer to bring the gif to a better baseline contrast. Then I focus on brightening the gif with the Brightness/Contrast and Exposure layers.
The Hue/Saturation and Selective Color layers are to color-correct Jalen’s skin tone—it’s something I spend most of my time coloring gifs and focus a lot on, especially when color grading BIPOC skintones. Putting a Vibrance layer, upping the Vibrance and Saturation, and calling it a day would make his skintone skew very, very yellow/orange.
Focus on the reds and yellow for skintone, play around with the Saturation and Lightness sliders, use the Hue slider with caution.
It can be tricky to achieve the right skin tone when working with sports footage vs the higher quality, higher dynamic range footage of films or TV shows, but I try to keep it as close to the subject’s natural skintone as possible.
Here are some of tutorials with tips and tricks on coloring BIPOC:
How to fix orange-washed characters by @zoyanazyalensky
How to prevent pink-washing and yellow-washing by @jeonwonwoo
Coloring tutorial by @captain-hen
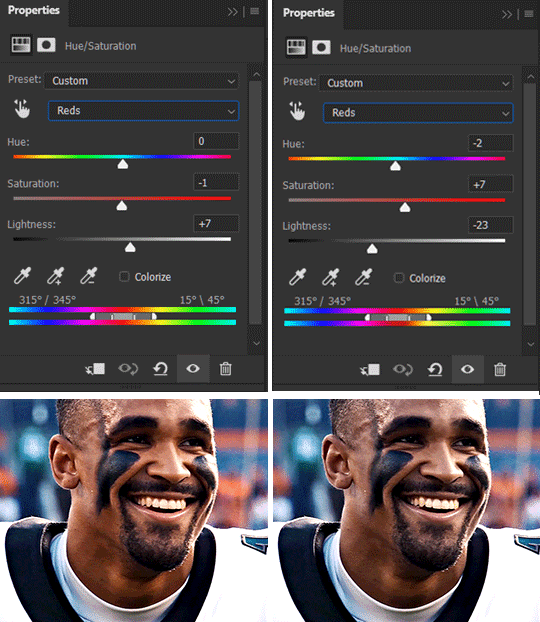
Changing lighting conditions?
Fret not—this is why I love working in video timeline. I’ll take this gifset as an example: it’s a deceptively difficult one to color. The footage is 720p and the sunlight shifts throughout the video, so matching across gifs was tricky.
My solution was to split the clips in sections with consistent lighting, and apply adjustment layers to the individual sections before applying general color grading layers on top of everything.
We can make use of the Fade Transition effect for sections where the lighting changes within the gif section we want to color.

(without vs with Fade on the Brightness/Contrast layer)
The difference is subtle in this example, but the brightness in the right gif is noticeably more consistent throughout. You can also add the Fade Transition effect to the beginning for a fade in, of course.
SHARPENING AND OPTIMIZING GIF QUALITY
This tutorial by @anya-chalotra covers everything you need to know about optimizing gifs for Tumblr.
Sharpening.
Sharpening is essential to making crisp gif images. Here’s another ask I answered re: my own sharpening settings and maximizing gif quality.
(base footage, unsharpened)

(color graded, unsharpened)
(color graded, sharpened)
The final gif is sharpened with Smart Sharpen, 500% at 0.3px and 10% at 10px (my standard sharpening settings).
Here are some tutorials and resources on sharpening:
Sharpening process by @anya-chalotra
Sharpening tutorial with added gaussian blur by @haleths
Sharpening action by @daenerys-stormborn
Size your gifs for Tumblr correctly.
This is essential: full width gifs are 540px wide.Two side-by-side gifs should be 268px wide. Here’s a handy post on gif size guide for Tumblr.
Incorrectly sizing your gifs will take away the quality of your gifs: undersizing your gifs will especially make them grainy, blurry, and /or pixelated, and won’t display correctly on many people’s desktop theme. Oversizing usually isn't as dramatic as undersizing, but it will make the gifset glitch when displayed, and the file size will be unnecessarily bloated.
Work with HD footage if possible.
Media fandoms (films/TV shows) are luckier than us in the sports trenches—we have to work with what we have. Broadcast footage is usually subpar: lacks contrast, pixelated, very desaturated, the list goes on. But it’s possible to still make high quality gifs from subpar footage. Here are a couple of tutorials to mask low source footage quality:
low quality video ➜ “HD” gifs tutorial by @nickoffermen
Sharpening low quality footage by @everglow-ing
(This gifset I made is from a 480p footage with horrendous lighting conditions and colors, and the end result is decent I’d say)
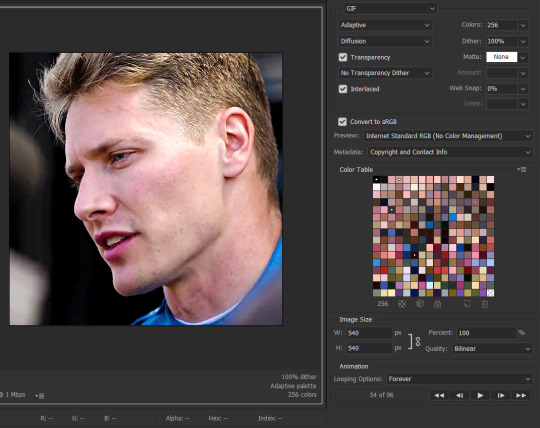
Save for Web (File > Export > Save for Web (Legacy) or Ctrl + Alt + Shift + S) settings.
I default to Adaptive + Diffusion but also use Adaptive + Pattern from time to time. Any combination of Adaptive or Selective + Diffusion or Pattern will give you a good result. In my experience some gifs will need the Selective color table for the colors to display correctly.
Here are my default settings:
SAVING AND EXPORTING FOR TUMBLR
Converting to frames and adjusting the gif speed.
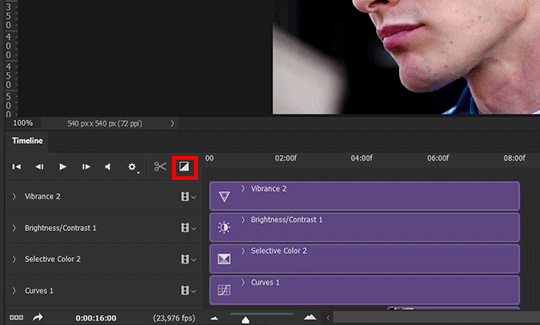
If possible, avoid exporting your gif and reopening it to adjust the frame speed. I used to do this sometimes when I’m lazy, I have to admit, but this is where this Action as mentioned at the beginning comes in very handy. It converts all visible layer into smart object, then converts it back to frame animation.
Step-by-step:
1. Select all layers
2. Right click > Convert to Smart Object
3. Go to the Timeline menu (≡) > Convert Frames > Flatten Frames into Clips
4. Go to the Timeline menu again (≡) > Convert Frames > Convert to Frame Animation
5. In the same menu (≡), select Make Frames from Layers
6. Delete the first frame (it’s a duplicate) then set your frame speed

Now you can adjust the frame speed before exporting it (Save for Web).
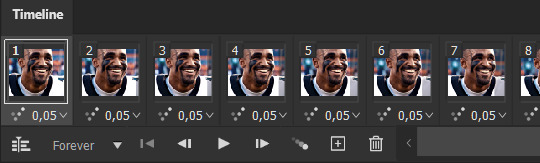
Pay attention to the source framerate.
The frame delay of 0.05 s is usually the default to make gifs for TV shows and films, and it is preferred by most gifmakers. This stems from the fact that most movies and TV shows are 24 or 25 FPS. This may not be the case for all source videos: you might get 30 FPS footage, and sports or gaming footage can be 50 or 60 FPS. Gif speed also depends on the FPS of your original file. Play around with gif speed and see what feels most natural to you.
My rule of thumb is the frame delay Photoshop gives you + 0.01 s. For example, 50 FPS footage will give you 0.02 s frame delay (25 FPS gives you 0.04, 30 FPS gives you 0.03, etc.), so set it to 0.03 s. I usually err on the side of a faster frame delay for smoothness in in-game sports footage, anything else (interviews, press conferences, B-rolls) can get away with being slowed down. Again, experiment and see what you think looks best!
Keep gifs under the Tumblr file size limit (10 MB).
Cut down the number of frames. My gifs are usually around 60-70 frames for 540px full-width gifs, but depending on the coloring, sometimes you can get away with more. 268px gifs can go up to 200+ frames.
Crop your gifs. Remember to keep full-width gifs at 540px wide, but if necessary, you can crop the height. My go-to sizes are 540x540, 540x500, 540x450, and 540x400.
Amp up the contrast of your gifs. Flat colors like black cut down gif size.
The Grain filter or Noise filter, though beautiful for aesthetics or simply necessary sometimes to mask low source footage quality/pixelating, may bloat your gif size.
Play your gifs back before exporting.
Pay attention to duplicate frames or glitches, you might need to get rid of them!
Hope this is helpful! Don’t hesitate to send an Ask or DM if you need any help, I will happily answer all your questions and send over PSDs. (I’m also on Discord—just shoot me a message if you need my tag!) Happy creating :]
#tutorial#PS asks#gif tutorial#Photoshop tutorial#I guess this is more of a resource link dump than tutorial but. Hey. Why reinvent the wheel...#Sorry for the late answer I hope you see this Anon :]#completeresources#allresources#userxoames#userbarbi#usernrzr
1K notes
·
View notes
Text
I've been in multiple tumblr fandoms over the years and the same shit comes up over and over again wrt arguments about how we all engage with our chosen media on here, so here are a few things to keep in mind that have helped me along the way:
Not everyone is going to engage in the same way as you, and that's good, actually. Some people are purely here to gush over the things they like. Some people are here to do deep analytical breakdowns which will include criticism. Some people are cheerleaders. Some people are haters. A lot of people are a mix of both depending on what they're talking about on any given day. It's all good and valid, and it's what gives this space variety, allows us to learn from each other, and keeps it interesting.
The filter, unfollow, and block functions are your friend. If you love a mutual but hate the volume or the way they talk about a certain thing, just add it to your filtered tags (relatedly: tag your shit so people can filter you when needed!). If you consistently don't vibe with the way a person chooses to engage on here, just unfollow them. If you find them actively offensive or detrimental to your mental health, hit that block button, baby. We are all anonymous internet strangers and no one will die.
Someone expressing a different opinion from yours is not a personal attack on you. If someone hates a thing you like, they are not calling you stupid for liking it. If they love a thing you hate, there's nothing wrong with them, they are just taking something different from it than you are. That shit is all about you and your own insecurities, don't try to put it on them.
Vague posting is rude. If you want to directly respond to something someone said to get better clarity about what they meant, reply to their post or shoot them an ask or DM and talk to them about it. If you simply want to express a counterpoint without directly engaging them, just post your own take without vaguely alluding to them and building what is almost certainly a strawman of their original point. People you're vaguing can see you on here, folks. Don't be a dick.
Credit and reblog other people's ideas when you are building on them, and be kind to the creators who provide the artwork that make this place so special and unique. Reblogging is the lifeblood of this website. It's the only way people get to see content that is by anyone they don't follow, and the gifmakers on here in particular put in so much time and effort to give us beautiful images--share their work and tell them you appreciate it! You also don't have to agree with every single word of a meta post to reblog it (why would you expect to, it comes from a different brain than yours), and you absolutely should be crediting people and sharing their words when they sparked something that inspired your own thoughts. This is just being a good community member.
Embrace the difference between meta and fanwanking. Meta writing is analysis of the actual media content as it is presented, with arguments based in the canon text. Fanwanking is doing your own work to fill in gaps or create headcanons to supplement the canon text. Some people prefer content that leaves a lot of gaps because they love to creatively fanwank; some people prefer to be told complete stories without having to do all that extra work to make them make sense. These are both very cool and fun ways to engage, but when you're fanwanking be aware that those ideas are all coming from you, not the actual media being discussed, so others might not vibe with your interpretation.
When posting your own opinions, try to be clear about where you're coming from and why. If you have a personal experience or bias that is affecting your read, own it. If you're looking at a piece of media from a specific angle related to your own interests and learning, say that. It helps other people to know where you're coming from and why you're thinking about something in a certain way that can then help them puzzle out why they feel differently.
You don't owe anyone your presence here, and you don't have to express opinions on everything or respond to tags or asks if you don't have anything to say. Sometimes you might just want to take a break from posting, some things in the discourse might just flow right on by you, sometimes you will not have a firm opinion on a debate. You can post as much or as little as you want. You can suddenly decide you don't want to talk about a show anymore. You can not log into your tumblr for days or weeks at a time. Do you, boo!
Most people come to tumblr because they do want to engage with others, and this place can be a lot of fun if you just take what you need from it and let things that aren't serving you go.
149 notes
·
View notes
Text

It's always a shame when you put hours of effort into a gifset, only for it to get 60 notes. And now, as people are reblogging less and less, the success of your gifset relies even more on using tags effectively to expose it to the maximum number of people possible.
Of course, at the end of the day, you should create for you, not notes, but that doesn't stop it from hurting. So, without further ado:
Guide to Tagging Gifsets
There are three main categories of tag, which I'll explain one at a time: fandom tags, sourceblog tags, and user tags. But it's key to remember only the first 20 tags are searched for; tags after that are irrelevant. So make sure every tag counts. It's also a good idea to visit a tag before you use it; if there's hardly any posts in that tag, it's probably not worth including.
Fandom (edit) Tags
Tags relevant to each fandom. I'll use Marvel as an example:
#tvedit, #filmedit, #[genre]edit, eg. #scifiedit
#[fandom]edit, eg. #marveledit, #mcuedit. Sometimes uses an abbrievation, particularly if the name of the fandom is quite long
#[show/tv]edit, eg. #infinitywaredit, #wandavisionedit. Only relevant if the fandom had multiple pieces of media.
#[character]edit, eg. #natasharomanoffedit. Mainly applicable to larger fandoms.
#[ship]edit, eg. #sambuckyedit. Mainly applicable to larger fandoms.
#[actor]edit. Note that this is sometimes the full name, sometimes first-initial-followed-by-surname. Check the tags to find the relevant one.
There are, of course, other types, but these are the main ones. It's a good idea to use these ones before tracked tags, as it makes it easier for people to find the content they're looking for.
Sourceblog Tags
A sourceblog is a blog dedicated to one fandom/character/genre etc, usually run by multiple people. Their main purpose is collecting every relevant post for whatever it's dedicated to, in one place for easy access.
They usually have names including 'source', 'daily', 'gifs', or 'edits'
Most sourceblogs have a tracked tag, often the name of the blog, and may also track the main edit tag. In that case, you may not need to bother tagging the sourceblog as well.
However, many sourceblogs go inactive, and so it's a good idea when tagging one for the first time to have a quick look in the archive and see if they're active. Just note that most sourceblogs don't use a tag such as 'thanks for tagging' to indicate they're reblogging from the tracked tag.
Sourceblogs usually have a lot of followers, all interested in whatever the blog's dedicated to, and therefore it's an excellent idea to tag any relevant ones.
You can search our blog to find relevant source blogs and their tracked tags.
User Tags
These are not always exclusive to edits, so pay attention to what people say they'd like to be tagged in. You can usually find people's tracked tag in their blog description, pinned post or about page.
I'd like to highlight - don't be afraid to tag people in your gifs! Most people love to be tagged. Although be aware it is common courtesy to only tag people that you follow/are mutuals with.
Most user tags are either #user[x] or the blog's url. Most people state what they do/don't like being tagged in, but if they don't, just go by what they reblog.
Just be aware of gifmakers that you follow, so that the next time you make a post, you can check their blog and see if it is appropriate to tag them
Usertags are best to use after fandom and sourceblog tags, to fill it all the way up to 20 tags, personal blogs are not dedicated to one thing only (usually), and therefore a lower proportion of followers will be in that fandom.
Finally, it's also good to use non-edit tags: for the fandom, character and ship. This means it's easy for people looking in the tags to find content.
If you have any questions, please don't hesitate to ask! And if you run a sourceblog we haven't yet added to our directly, please send us the url of the blog and we'll add it right away.
Good luck & have fun with your giffing!
#resource#arthurpendragonns#ughmerlin#userava#userbecca#useralison#userisaiah#alivedean#usertom#jemmablossom#tusershay#userkristi#userhaleths#userv#usernik#userelio#uservivaldi#userk8#uservalentina#userace
328 notes
·
View notes
Text
*taps the mic and laughs nervously because of the major stage fright*
Lizzington shippers, fam, grandmas and grandpas, can I have a moment of your attention, please?
It's not a secret that, while some people in Lizzington community are still active, whether they write or make gifs or keep our dash full of Lizzington even in this trying times ( @melbob26-blog, thank you for this! ), Lizzington community as a whole went into hibernation over the last couple of years.
And I get it, interests change, especially when one show ends and there's another ongoing, moving on from the show that ended is totally natural, especially when it didn't give your favorite characters the happy ending they deserved.
I get it.
Hell, for a pretty lengthy while there I focused on other ships and shows, too, especially after TBL ended ended last year.
But you know what I realized earlier today, when I reread some of the old fics, browsed through gifsets and text posts, watched some fanvids?
It's the show that ended, for some in 2021, for others in 2023. And the only thing that means is that it cannot disappoint us anymore.
( it's not like we were suddenly deprived of quality content, because let's face it, the fans have been the main source of the quality lizzington content for years now, while the show gave us mere crumbs, on a good day )
But Red and Liz?
They are still out there, fighting criminals, catching Blacklisters, travelling the world, shamelessly flirting, toppling shadow organizations, raising Agnes and/or any other children they have, and generally being the sexy badass power couple they are!
Nothing changed in that regard.
So why would we mourn them, when they are out there, healthy and happy and in the middle of yet another adventure? I'm sure right this moment Red is drawing Liz into another one of his heists and she's only too happy to join him, even though she pretends that she's not, for the sake of the game.
There's literally no reason for us to stop writing, giffing, editing, sharing theories and headcanons and memes and just talking about our favorite couple.
And by writing all of this, I want to propose something daring to you:
Let's revive the Lizzington community!
Let's rewatch earlier seasons and gif the hell out of them because it's been a while and because precious moments between these two are not going to become less precious even if it's giffed 10 or 100 more times, not to mention that ever gifmaker's style is different, so there are virtually no two identical gifsets as there are no two identical snow flakes.
Let's make fanvideos, picspams, picture edits, fanart, moodboards! The amount of songs, quotes, moments etc that can inspire you is virtually endless!
Let's write fics, let's explore AUs, let's give each other prompts and challenge each other to try something new or practice some aspect of writing, like writing kisses or AUs or hugs or making up Blacklisters etc!
Let's share headcanons and theories and ideas and what our versions of Red and Liz are like, because everyone has their own unique versions of Red and Liz living in their head, and it's just beautiful, if you ask me!
Let's reblog stuff, filling each other's dashes with Lizzington!
Let's scream about Lizzington because no one does it like them!
Let's revive the Lizzington Community, we all miss it!
PS. Feel free to reblog this post – spread the suggestion!)
PPS. To assure you that I'm not the type of person who encourages others but doesn't do anything themselves, I can tell you I've already got some ideas for a couple of Lizzington events in mind. Those include challenges, thematic weeks etc.
PPPS. I'm not sure how many people are checking the tags these days, so I'm gonna tag some people I know under the cut, just in case, to spread the suggestion. If you weren't tagged, trust me, it's nothing personal!
@meetmeatthecoda @iwouldlovetoeatyourtoast @agxntkeen @factoseintolerant @tale-xistime @james-baeder @lettie1609 @withwhatiam @peace-love-on-planet-earth @missourired @felilaprivada @strawberry-pills @roominthecastle @codewordpumpkin @my-robot-heart @kitkate91060 @imyourplusone @shelly1952 @itsjustme-itsmylife @castle2cute @nancyjocom @cress-26 @lunaarlilacs @femaleoptimistic @scifi-gk @greeneyedsoul88 @figureofdismay @shippinglizzington @kissthefuture @thetwistedargent @actuallylorelaigilmore @sorrydearie @turningtimeinthetardis @buildinggsr @apicturewithasmile @windfalling @piketrickfeet
#lizzington#raymond reddington#james spader#elizabeth keen#megan boone#elizared#elizabeth reddington#agnes keen#agnes reddington#agnesgate
70 notes
·
View notes
Text
Suo Gân — Part Two
Chapters: 2/4
Rating: M
Relationship: Edwin Payne/Charles Rowland
Additional Relationships: Crystal Palace & Charles Rowland, Edwin Payne & Crystal Palace, Charles Rowland & Niko Sasaki
Tags: Post-Season 1, Pining, Getting Together, Hurt/Comfort, Grief/Mourning, Religious Imagery & Symbolism
SUMMARY:
Charles tells her. He tells her of a boy who saved him, in one way or another. How Edwin came from hell on Earth and brought him light, brought him warmth. How Edwin read to him just so Charles wouldn’t feel scared, or alone. Who does that? Charles has always wondered. What kind of person escapes Hell, and the first thing they do is offer comfort to someone they don’t even know?
He tells her about how Edwin is his best mate, that he is the best person Charles knows and will ever know. He tells her that Edwin was bullied, just like him, and those bullies led to his death, but if it makes her feel any better, those boys were probably sent to Hell, too.
“He’s kind,” Charles tells her, head dipped low and he’s smiling as he looks into Bette’s eyes, recalling Edwin. “The nicest bloke I’ve ever met. And—and he’s good now. You know he went through a crock of shit but it somehow only just made him kind. You would be proud of him, yeah? You’d be so proud. So you don’t need to worry about him.” Charles smiles.
Bette doesn’t say anything.
NOTES: I wasn’t planning on updating for a little while yet (I still have more writing to do) but with the news of the cancellation I felt the urge to connect with the fandom, and since this chapter was done I thought it was only right. I’m obviously very sad. I don’t have a lot of words, but this show means a great deal to me. I really connected with it and the characters in a way I haven’t to this level with any other show in a very, very long time. I was really hoping we’d get at least one more season with Edwin, Charles, Crystal and Niko. I’m trying to remind myself, so I will also remind you, that just because a show is gone does not mean the fandom goes with it. Writers, gifmakers, artists, etc. are all still here, and there is still so much we can play around with in this universe. Just because Netflix abandoned DBDA does not mean we have to. We are still here. As long as the red earth rolls. ♥️
Read Part Two on Ao3 | From the Beginning
33 notes
·
View notes
Text
How to recognize stolen gifs
Reposting is a constant problem that all gifmakers deal with, both here and on other social media platforms. Whether you're new to Tumblr or just passing by, I'm going to provide an explanation on how to spot a repost and what to do with it. I'll cover both Tumblr and Twitter since, unfortunately, Twitter is the most common place for gifmakers to find their content.
Let me start by saying that most gifmakers have a unique style. We can recognize stolen gifs by their crop/dimension, sharpening, and coloring settings. After a couple of years, you're able to find the set of adjustment settings that you prefer the most. So even the most basic gifs (simple scene gifs) go through a lot before we post them on Tumblr.
If you're new here or don't know much about gifmaking you might be confused about what I meant by crop/dimension, sharpening, and coloring settings, so we're going to go through them one by one.
Crop/Dimension
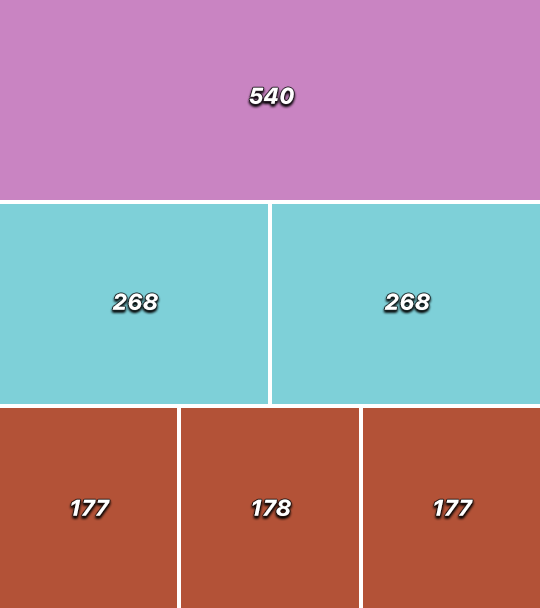
On Tumblr, for your photosets to be displayed correctly, you need to follow the correct image dimensions. For example, if you post one gif, the width should be 540px (with a maximum height of up to 810px). If you post two gifs in a row, the width of both needs to be 268px (with a maximum height of 600px). And if you post three gifs in a row, two of them need to have a width of 177px, with an exemption for the middle one, which needs to be 178px (with a maximum height of 400px for all three).

Since the maximum height is not specified, all gifmakers have different specific dimensions that they prefer, and therefore they can recognize them easily. For example, if I were to post one gif, I'd make it 540x360 or 540x380, and if I saw it being reposted, I'd recognize it.
Sharpening
Sharpening refers to the Smart Sharpen Filter. This is a filter all of us use to make our gifs look crisp and less blurry. Similarly to dimensions, everyone has unique settings for their Smart Sharpen. Some people use it once, while others use it twice. There are also different values people input into the settings of that filter, therefore they can recognize it. I'm going to provide some visual examples of a gif with and without any sharpening.
As you can see, after applying the filter, the gif became more detailed and less blurry.
Coloring
Now, let's talk about what makes gifs special and unique. Coloring involves a set of adjustments applied to a gif to enhance brightness, and vibrancy, or to remove color tints and alter specific colors within the gif. Even the most basic gifs undergo this process. And as you might expect, everyone has their own coloring settings, ensuring that no two gifs are exactly alike.
One last visual example I'm going to provide is a comparison between a gif without sharpening and coloring and a gif with sharpening and coloring. This way, you can see the difference between what you witnessed on screen while watching a specific TV show and how someone edited that scene in a gif.

Personally, I'm always trying to give a gif more contrast, vibrancy, and brightness. One specific thing I do, which makes it easy for me to recognize my gifs, is changing the leaves in the background from green to yellow. I often aim for this little detail if I know that plot-wise TV show takes place in autumn but the filming took place in summer. Similarly, other gif makers have their own unique additions to their sets that are easily recognizable to them.
Now that we've figured out what makes a gif special and how gif makers recognize them, let's move on to the section about how you can recognize stolen gifs and what you should do about it.
Twitter
This one is extremely easy. Twitter is not exactly known for gifmaking. Sure, some gif-oriented accounts make gifs, but they're not as common as Tumblr gifmakers. However, when it comes to them, there are some ways to tell if a gif was made by them. Watermarks: Twitter accounts often watermark their gifs (Tumblr folks do that too, but it's less common, I'd say). Dimensions: Twitter uses different dimensions for gifs. On Twitter, the width of a gif needs to start from 1080px, in comparison to Tumblr's 540px. When people repost from Tumblr and post on Twitter, the quality of a gif is extremely terrible because of the different dimensions. So, if you don't see a watermark, there is a clear sign of coloring, and the quality is extremely low and pixelated - the gif is most likely from Tumblr.
You can try finding the gif's source by using Google reverse image search. Usually, it'll lead you to the original creator.
Tumblr
Spotting a repost on Tumblr is a bit more complicated but of course, there are ways to do it.
Different dimensions: On Twitter, people usually repost one gif, while on Tumblr, people repost whole sets. It just so happens that sometimes they repost different gifs from different sets. So, if you see a gifset and the dimensions of the gifs in it are not the same, then it's probably stolen from different sets.
Different coloring: Again, if the coloring of the gifs is drastically different, then it means it's probably stolen from different sets.
No creator's tag: Gifmakers often track their own creations using hashtags such as #mine, #mywork, #mine, and #gif. While sometimes gifmakers may forget to include their tag, if you notice a blog posting multiple sets without them and it looks suspicious, it's likely a repost.
No tags: To give gifsets more visibility, gifmakers often use tags such as #onedirectionedit #wtfockedit #filmtvedit or different source blog tags. Reposters don't know about it and don't use it.
Weird captions: Reposters often use gifs as reaction pics. So, instead of captioning a set with something like "Steve Harrington in 3x03", they're more likely to caption it with something like "he looks so hot here!" or "he's so pretty!!" Look out for sets with such captions that look like comments. Keep in mind that they often don't format those captions either.
If you saw the gif before: As mentioned previously, no two gifs are exactly the same. The chances of two gifmakers having the exact same settings down to a pixel are close to zero. So if you think you've seen that exact gif before, it's definitely a repost.
What can you do?
If you've been in the specific fandom for a while, chances are you might have seen that gif before and you might figure out who made it easily. You can also browse through your fandom's overall creations tag to try to find the original post and gifmaker. To do so, search for #yourfandom + #edit. For example, I currently gif the TV show called Wtfock, its creation's tag is #wtfockedit. Got it? Cool! After you figure out who the gifmaker is, you can send them the reposter's post and ask if that's their set.
If you can't find the original gifmaker on your own, you can try messaging other gifmakers from that fandom and asking whether or not they know who made the gifset.
You can also contact the reposter on your own and kindly ask them not to repost the gifs. Explain the Tumblr etiquette to them, there's a chance they're new to the website and simply didn't know about it. There's a chance they might listen to you and take down the post. If they choose not to listen and block you, you can once again message or send asks to different gifmakers from that fandom to inform them of the reposter so that they can block them.
You can also encourage the reposter to make their own gifs, especially if their excuse for reposting is "I don't know how to make my own gifs." While it may seem challenging, it's not impossible. This website is full of tutorials, and many gifmakers are open to helping out and explaining things if you're new to gifmaking. I'll leave a link to a comprehensive guide 101, just in case.
That's it! I hope this post has helped you understand what makes gifs unique, how to distinguish reposts from original posts, and what to do when you encounter a repost. If you have any more questions, feel free to leave messages in my askbox.
71 notes
·
View notes
Note
love love LOVE your The Sign gifsets. im still a newbie in giffing lmao and your gifs are like reaaally pretty so i was wondering how you do your gifs? i really like how it's sharp and the colors pop up beautifully (only if you don't mind sharing ofcc <333)
bun this is the kindest thing you could have said to me, thank you so much <3 i wanted to write down my giffing process for a while in case anyone would find anything in it helpful, so thanks for giving me a push!
guzhu-furen's photoshop gifmaking process (kinda oriented on saving up time)
from

to
1. Downloading a video. i prefer to download video files instead of making screen recordings because the latter usually leaves watermarks/captions and makes image quality lower. i will not be linking the downloading websites themselves directly, but they are all easy to find through search engines if you know what to search for! i download ql dramas from:
youtube:
if the video you need is above 1080p quality, search for youtube4kdownloader
if the video is age restricted, search for 9xbuddy
both these websites work for normal videos too!
mkvdrama usually has 1080p episodes of most asian dramas.
dramacool also has downloading options in case the show is not available on other websites!
2. Screencapping (i learned it through this tutorial)
i screencap using KMPlayer. here is the installer i used, but you can find versions of this program on various websites and torrents too! install the program and proceed.
screencapping steps: open KMPlayer > press "CTRL + G" to summon the Frame Extraction window > set identical settings to these:
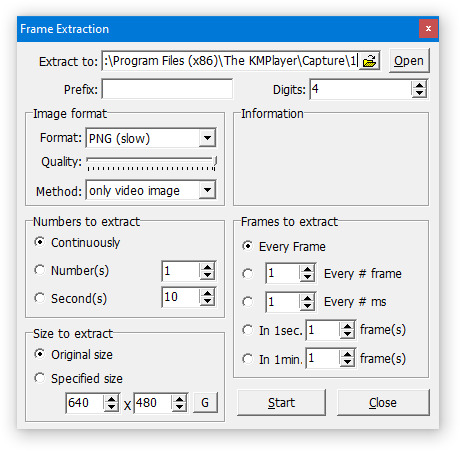
note which computer folder the screencaps will go to (it has a label "Extract to") > go to that folder on your computer and create a bunch of numbered folders there, for example ten folders named from 1 to 10, these would be our separate folders for ten gifs > write "1" or a name of another numbered folder after the backslash in "Extract to" bar in kmplayer > go the timestamp that will be the beginning of your gif in KMPlayer > press "Start" in the Frame Extraction window and press play on the video > when the moment you need to gif is over, press pause on the video and press "Stop" in the Frame Extraction window. great, you now have your folder of screencaps!
3. Importing screencaps to Photoshop
i use Adobe Photoshop 2023, but had used Adobe Photoshop CS5 for a long time before that, so you can use any version you have or find! it's available on various websites and torrents.
open Photoshop > Scripts > Load Files into Stack > press Browse in the "Load Layers" window that was opened
open your screencaps folder (and pin the KMPlayer Capture folder for faster future access) > pick the screencaps you want for your gif by clicking on the first one, and then clicking on the finishing one while pressing Shift on the keyboard > click OK and let them load for some time! i have 65 screencaps loading at the moment
when the screencaps finish loading go to Window > press Timeline > press Create Video Timeline in the opened sidebar > press three dots that will say "Convert to frame animation"


4. Sizing & making the base of a gif
next part will be automatic. i use actions for almost everything from this moment. download the basic action pack here and my additional action pack that we will need here. load them in your photoshop actions window (Actions > Load Actions).
play the Script action to create frames.
now onto sizing your gif. these are tumblr's width dimensions for 3 types of gifs
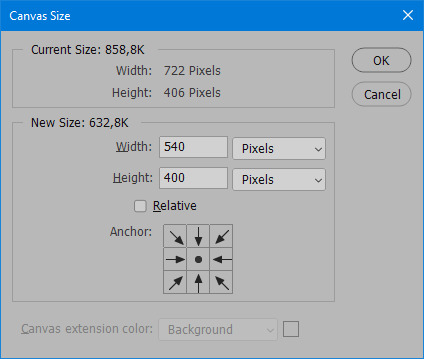
my gifs are usually 540 px in width and 640, 400 or 345 px in height. i added a 400 px action (Sizing 400) in the action pack, you can use it! or you can follow the steps by hand:
Image > Image Size > put in the height you want and add 4-6 pixels there (mine will be 406 for a 400 px high gif) > OK

now we need to crop the gif for it to fit tumblr's dimensions:
Image > Canvas Size > change Width to 540 (or 268 or 177) and take away the 4-6 pixels that we left in the previous step in Height
when you figure out which gif dimensions work best for you, record an action and use it to save up time!
after sizing use the action Smart Object. now we have the base of our gif!

you can move your gif left or right if you want! i will be doing this because i would like to show more hips in the gif.
press Ctrl + T > move the layer however you need (not in height though) > press Enter to save
i moved it to the right and my gif looks like this now:
5. Sharpening (i use Tan's sharpening settings explained here)
i added two sharpening actions in the pack, they are called Sharpen Spicy and Sharpen Spicy 12. you can use one of them or you can sharpen your gif by hand, i will explain how to do it below.
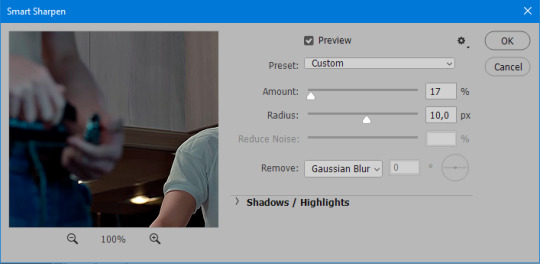
Filter > Sharpen > Smart Sharpen > 500% amount, 0,2 px radius > OK
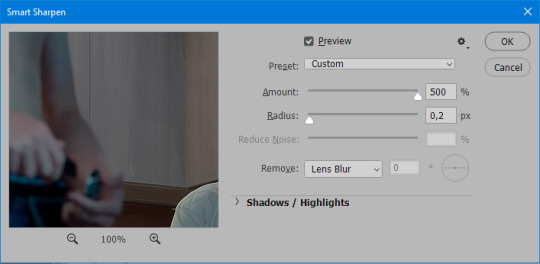
Filter > Sharpen > Smart Sharpen > 17% amount, 10,0 px radius > OK (you can change 17% to lesser or bigger, depending how intense you want your sharpening to look. i use 17% for 4k footage and 12% for 1080 px or less videos)
to smooth the sharpening a bit i use Gaussian Blur (this is optional, you can leave the sharpening as it is if you want your gif to be sharper).
Filter > Blur > Gaussian Blur > Radius 1,0 pixels > OK
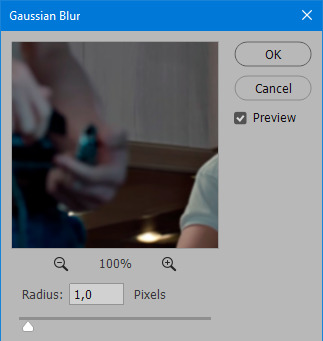
now change blending intensity to let only a bit of the blurring effect stay (you need to change this by hand if you used the sharpening action also).
press Blending Options (the highlighted place) twice > change Opacity to 10%

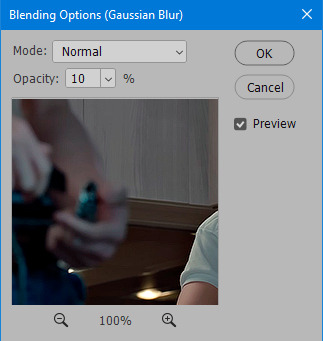
this is what my gifs looks like with sharpening now!

6. Colouring (i learned how to colour the way i do through this tutorial)
to make it easier for you to learn i will share my blank colouring file. i created it to save as much time while giffing as possible, so whenever i need to colour a gif i simply duplicate all the blank adjustment layers to the base of my every gif and start colouring! once you figure out which adjustment layers work for you best, i recommend creating a blank colouring file too to save time.
if you want to go the easy way, open my colouring file and duplicate selected layers to your gif file by Layer > Duplicate Layer > insert gif's document name

if you want to learn by hand, create the adjustment layers that i will be naming in the process on your own, you can find them all in Layer > New Adjustment Layer
now we will use adjustment layers for our colouring from the bottom to the top! first, Exposure layer to add a bit of light to the gif. i don't always use Exposure because sometimes shots are bright enough on their own. i will, however, use it here. don't use it on your gif too much, because in the next few steps we will also be brightening the gif with other adjustment layers. i added +0,49:
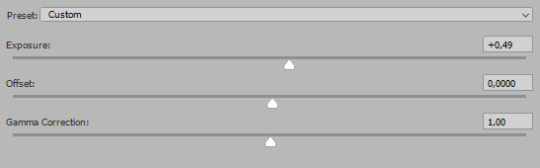
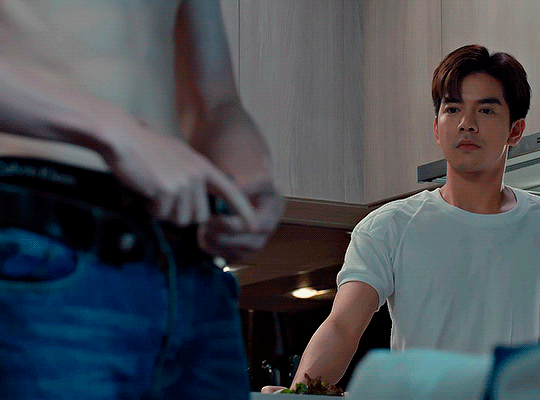
next, Hue/Saturation layer. i use it in gifs with neon lighting to color correct overly bright colours. for example if your characters are standing in neon pink, you might want to lessen Saturation in Magentas and Reds to make the final gif less pixelated, and etc. i will not use Hue/Saturation on this gif, cause it doesn't need it.
proceed to the layer Levels. this layer usually does most of my colouring. click on the lowest white dropper in your Levels window:
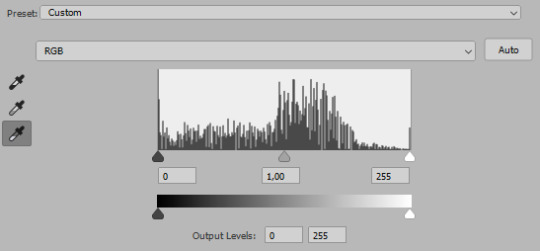
now choose a light place on your gif and click on it with the white dropper. it works especially well if you use the white dropper on the lightened parts of face skin. you can play around by choosing different bright spots and seeing what works best. here is the spot i chose and the resulting colouring:


this is too light, so now we need to balance it out with the black dropper:

choose one of the darkest places this time and click it with black dropper! once again, you can play around and click different spot to see what works best. i will be clicking the highlighted spot and you can see what my gif will look like with this Levels settings

as you can see, darkest places became darker and other colours were corrected a bit! now, this is still too bright, so i will be decreasing the opacity of Levels layer from 100% to a smaller number:
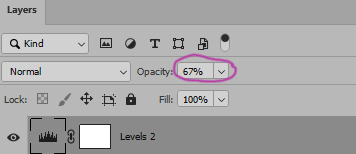
i will have to continue in another post because tumblr only allows 30 pictures per one post in the new editor now and i'd like to explain everything in visuals. click to continue
87 notes
·
View notes
Text
Poe's Giffing Tutorial (From One Beginner to Another)
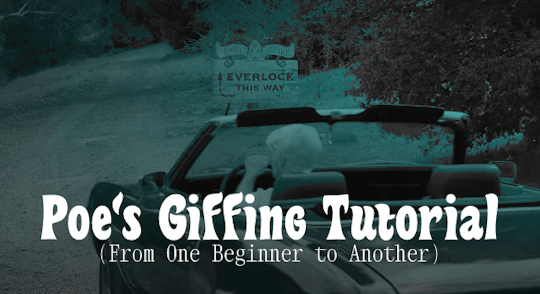
Hey, everyone! So, I've been thinking about this for a while, and decided to finally make it happen. This post aims to be a giffing tutorial that isn't a bunch of technical jargon that nobody except experienced giffers understands. This is for the person that I was when I first started out: someone who wants to make gifs, for free, without having to learn the entirety of a new program. As such, if you're already familiar with the basics, this probably won't be super helpful to you.
In this, I'll cover the basics of actually capturing a gif, the how-to of color correction (though without getting into the nitty-gritty detail of it), some basic text effects, and some more decorative effects like overlays and ~fancy coloring. I'll also show you the program I use to resize gifs.
I don't have a fun quip to lead us into the next part, so, uh, let's just dive in.
Tools*:
A PC capable of handling heavy processor loads (I use a mid-range gaming laptop; it's a little slow sometimes, but it works)
Whatever you're giffing (obviously...)
ScreenToGif (a free, basic screencapture program)
Photopea (a free, in-browser Photoshop dupe)
RedKetchup (a free file resizer/converter)
*Note: These are not the end-all, be-all of gifmaking. They may not even be the best tools for the job! But they're free, they work well, and they're relatively intuitive.
Step 1: Capture your gif.
I'm going to use ScreenToGif for this. The first thing I do is open the program and click Recorder, which opens the recording interface.

I click and drag (or manually input dimensions in the boxes next to the recording button in the lower right corner) to set my dimensions, and then I press record. The red "Record" button will change to a blue square that says "Stop," and a timer will appear in the upper right corner, showing how many seconds your gif is.
Generally, I'll pause the video 5-10 seconds before my desired start time, to give myself a buffer (you'll be able to delete those frames later), start the recording, and then start the video. You'll probably find a system that works for you once you do it a few times.
Once the scene that I want to capture is done, I'll click the blue "Stop" button, and the overlay will close itself. A few seconds later, depending on how long/complex/large your gif is, the program will pop up with a new window where you can edit. Here's what it looks like:
You can do a lot with ScreenToGif, but we'll be using the dead simple stuff today. Click the "Edit" tab, fourth from the left, and this will show up.

"Delete All Previous" and "Delete All Next" are our friends here. Go to the FIRST frame that you want in your gif, using either your arrow keys or just dragging the slider, and select it. Then hit "Delete All Previous." This will make that frame the first frame of your gif. Then, go to the LAST frame of your gif, and hit "Delete All Next." This makes the last frame of the scene that you want the last frame of the gif. You can also use the "Delete" option to delete frames by selecting them with your cursor if you want a more manual option.
Now you have your raw gif! Go to the "File" tab, the first one on the left, and select "Save As" from the menu. You want to make sure that it's saving as a .gif file, not an .mp4 or .apng --- you can check this up at the top. Don't worry, though, as .gif is the default, so unless you change it, you should be golden. Select whatever folder you want to put it in, name it, and save it.
You could absolutely stop here. It is by no means required to color your gifs or slow them down or any other number of things associated with giffing. But if you want to, here's how I do it.
Step 2: Edit your gif.
Head on over to Photopea. You'll see this:
What we want is the "Open From Computer" option. Click it, and your File Explorer will show up. Navigate to whatever folder you saved your gif in and select it by double clicking or clicking once and hitting "Open."
It'll open in a new workspace that looks like this.
You may be saying, "Gee, Poe, that sure looks a lot like Photoshop!" Yes, it absolutely does. If you're familiar with Photoshop, you will most likely be able to find your way around Photopea just fine, and can probably go from here. But if you're not familiar with Photoshop, here's the basics.
First thing's first: gifs are frequently pretty fuzzy/blurry. Luckily, sharpening them is easy.
Select all your frames (the list on the right with all the numbered layers) by clicking one end, scrolling up/down, holding Shift, and clicking the other end. Then go up to the tabs and do Filter > Sharpen > Smart Sharpen. This will automatically sharpen each frame using a percentage; the default is, I believe, 150%, and this is usually what I use because I am fundamentally lazy.
If you don't select all your frames, only the one that you're currently on (the one highlighted in a lighter color) will get the effect applied to it. This goes for basically anything you do, so it's good to get in the habit of selecting all.
Now that it's sharpened, we can color it. Go up to the tabs again, and go to Layer > New Adjustment Layer > [whatever you want to adjust]. Most commonly in Escape the Night, you'll have to adjust brightness, because there's a lot of dark, moody scenes; Season 3 is also especially yellow/orange tinted, so you'll probably want to color correct it, too, using the Color Balance adjustment layer. This is a total guessing game based on the exact scene you're doing and my method is just selecting random things and adjusting sliders until it looks good (remember: fundamentally lazy). Honestly, I'm not an expert in coloring gifs, so I won't pretend to be — especially since people can and do write entire posts just dedicated to it. For this gif, I'm just lightening it a little.
And if this is all you want to do — no text, no effects — you're done! Go to File > Export As > GIF. It will take a few moments to load, so don't panic when your page freezes. A new window will pop up that allows you to do things like set looping, time, etc. but you can also just "Save" and you're done!
But let's say you want something fun. Maybe you'd like to overlay a quote or make it a cool color. If that's the case, continue on...
Step 3: Make your gif shine.
Three parts in this: text, fun colors, and overlays. You can combine these three to do some awesome things, and they're all very simple to do, once you know what you're doing. Think of them less like steps and more like a mix-and-match deal. You can use one, two, or all three!
So, here we go.
Option 3a: Add some text.
The easiest option of the three, this one works exactly like you think it does. The uppercase T symbol on the sidebar will create a new text layer where you can type something and set a font, size, and color.

I'll spare you the lecture on typography that I could give you — you can find better ones than I could make. Generally, though, you have a decorative/display font for headings and emphasis, and then a different, more generalized font for subheadings and other things. In this, the display font is Heavy Heap, which was used on the Season 3 tarot cards, and the general font is a relatively generic serif font.
(Sidenote: you can load fonts into Photopea! Just go to a font website like Dafont, download the font you want, and then open it as you would any other file by going to File > Open and selecting it from your files. You should get a message that says "Font [Your Font Name Here] Loaded," and then you'll be able to use it in your design. That's how I got Heavy Heap in there.)
You can change size and color with these, which will show up at the top when you select the text tool. Keep in mind that if you're making changes after you type something out, you will need to select (highlight) the text you want to change — it won't do it automatically.

I will admit that Photopea's text editor is not the cleanest, simplest, or nicest to use, especially at first. I came from Canva where it was much faster and easier. The downside, of course, is that Canva is highly limited with what you can do.
There are also ways to warp the text, change the blending, and do outlines, but I'll leave that for another time as to avoid making this any longer than it already is.
Option 3b: Make it a cool color.
You have a couple different ways to do this. Probably the most intuitive is to go to Layer > New Adjustment Layer > Photo Filter. Select the color box, pick the color you want using the picker or a hex code, select your desired density, and click OK. Boom, color over your gif.
It defaults to this vintage-y orange, but you can pick whatever color your heart desires.
However, I usually use a different method using Gradient Maps. This is also pretty easy; Layer > New Adjustment Layer > Gradient Map. If you leave it black and white, by the way, you get a B&W gif (you can also just select the Black and White option in the Adjustment Layer menu). Click on the gradient, select the white square on the right side of the gradient line, and then select the square down at the bottom of the window and change it to whatever color you want.

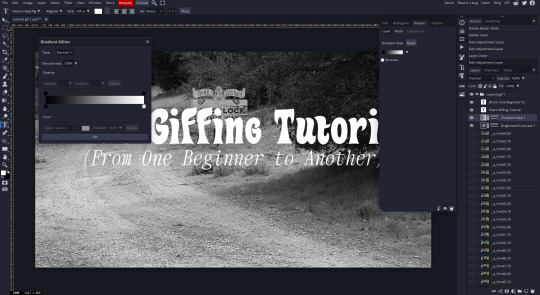
For this gif, I'm leaving it B&W.
(You can have a lot of fun with gradient maps. Play around with them!)
Option 3c: Overlay another gif on top.
Ooookay, so, this is the most advanced and tedious of effects to do (at least of the ones documented in this post), but it's worth it, I promise. For this, you'll need at least one other gif. I usually use a base gif that's relatively neutrally colored, oftentimes B&W but sometimes just faded or pastel, plus one (or more than one) colored, brighter gif. These are, of course, just guidelines — combine whatever gifs you want. The only real requirement, per se, is that they have the same amount of frames. If they don't, it'll look weird. (But if you do end up with two gifs that have different amounts of frames, you can delete the difference right in Photopea, so I don't stress about it too much.)
You also generally want to add text after this step, so if you're planning on doing this, save the text for last.
First things first: color your gifs the way you want and then save both of them. Then re-open them both in Photopea. Yes, this is annoying. I did say it was tedious.

So now I have both of them in my navbar, labeled as "tutorial base" and "tutorial overlay."
Go to your overlay gif and right-click on the gif folder. This is the top layer with a little arrow and folder icon next to the name of the gif.

Select "Duplicate Into" and then pick your base gif in the popup. In my case, it's named "tutorial base."

Now you'll click over to your base gif, and you'll see that your accent has been put on top of your base. Now you get to have fun with blending!
Right click on the overlay gif's folder again. Then, select Blending Options, which is the first menu item. It'll bring up a popup with all sorts of options for styling your layer.

The default setting is Pass Through, which is what we see here. If you want, you could just change the opacity to get your desired effect.
You could also play around with blending options such as Overlay, Color Burn, Lighten, and Screen. Every gif is different, and every gif will look different with different options, so experiment and see what looks best! You may have to go back and recolor it a few times, so I recommend just keeping the project open in your navbar for easy access.
For this gif, I think I'll go with Darker Color at 67%.
One last step, and then you're done with blending!
Go to Layer > Animation > Merge. This will merge each frame of your animation (the gifs) with each other, meaning that they'll play at the same time. If you forget this step, as I do frequently, you'll go to save your gif and find that it plays as a sequence.
Once you've merged your gifs, you can add texts, more effects, PNG overlays, whatever you want! Congrats! You did it!
Step 4: Resize your gif (if necessary).
Maybe you've made a gif, and it's beautiful, and it's amazing, and you wanna show everyone...but it's five million megabytes and you can't send or post it anywhere. Tumblr's max file size is 10 MB, while Discord's (standard) max file size is..7 MB, I think? Either way, if you try to upload something bigger than that, you'll get an error message and the familiar taste of disappointment.
Never fear, Redketchup is here!

This is Redketchup, and it's super simple.
Go to "GIF Resizer" under Animation Tools. Upload your gif, then scroll until you see the Resize GIF section. Input the percentage you'd like to reduce it by (presets are 25%, 50%, and 75% smaller, but you can set it manually, as well).
This is also the step where you can slow it down if you desire if you didn't do it in Photopea — it's in the next section down. Set the speed, if you'd like, and then go down to the bottom and hit Download.

It'll take you to a preview tab where you can check if your gif is small enough. If it is, hit Download again up in the top left, and that's that! Go share your gif with the world!
Conclusion:
Thank you for reading! I am by no means an expert gifmaker, but I want to spread the love and give other people the option to do it. I wouldn't know any of this stuff without the people who taught me, and I'll put a list of tutorials down at the bottom that I referenced when I was first learning to make gifs.
At any rate, if you use this post to make a gif, feel free tag me or send it to me so I can see! And for those of you who are on the fence about learning or starting to gif...
Do it. I double-dog dare you.
:)
References:
Blending Gifs by @the-mother-of-lions
Photopea Coloring Tutorial by @heroeddiemunson
Merging in Photopea by @bellamyblakru
And, though not a specific reference, I frequently browse @usergif for inspiration (they have tutorials there, as well, but I haven't checked them out yet).
#gifset#giffing#gif tutorial#how to gif#how to make a gif#photopea#escape the night#etn#I wrote this instead of socializing at my family's thanksgiving dinner#because that's just who I am
123 notes
·
View notes
Text
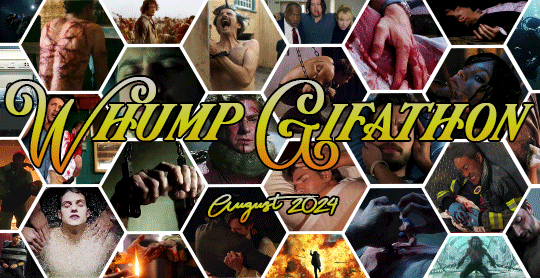
Welcome to a brand new monthly whump challenge!!
I'm Ace and I run the blog @aceofwhump. I've been making gifs now for 10 years and I've been participating in the various whump community challenges as a gifmaker for 5 years. Lately I've been thinking about how nice it would be to have a challenge made just for gifmakers and then it occurred to me. I can make one myself! So here it is! My very own whump gifmakers challenge.
Whump Gifathon is a brand new monthly challenge for all gifmakers/visual artists and anyone who has ever wanted to give gif making a try. The event runs during August and will have 31 days of prompts that will hopefully be the perfect inspiration for all my fellow visual artists!
Rules:
All gifs posted must be made by you. Do not just post gifs using the gif keyboard and claim them as yours and do not repost other people’s gifs. No AI-generated content please.
Various mediums are welcome! So long as the visual art aspect is the focus you can make whatever you want. Yes this is primarily a gifmaking challenge so everything is geared towards that but any visual art is welcome. If you draw, make moodboards, edits, videos, etc you’re welcome to participate!
You can use the prompts however you like. There is no wrong way to use a prompt. Feel free to interpret them however you wish. If you think it counts as whump? It's whump! Make it! Angst, comfort, emotional whump, small things, big things, it all counts so no need to over think it.
Please try to include the show/movie title, character names, and episode number (if applicable) somewhere either in your tags or in the post caption. This way anyone interested in watching it can find it easily.
Tag all potential triggers (things like emeto, gore, nsfw, blood, eye whump, rape/noncon, etc.) When in doubt, tag it.
Tags to use when posting so I can find your ppst: #whumpedit, #whumpgifathon, #whump gifs
An example of a way you can caption your gifsets:
@whumpgifathon | Day #: "prompt description"
Show/Movie title, episode number, character name
This is a relaxed event!!! I just want to offer my fellow visual artists some inspiring prompts and an opportunity to have some fun. So sit back, relax, and have fun!
Prompts will be posted soon!! Keep your eyes peeled!
#whumpedit#whump gifathon#whump#whump community#whump events#whumplr#whump blogs#gif making#gifmaking#gif making events#gif challenge#mod post#info post
133 notes
·
View notes
Last Seen Blogs
flossinginthesunshine
Flossing in the Sunshine

bowtieslovingblaine-blog
Prejudice is just ignorance

toddandersontruther
𝓳𝓪𝓷𝓲𝓮 🦢

lachicadeojosazules
El Blog De SunSeas