#dns server
Explore tagged Tumblr posts
Text
(this is a small story of how I came to write my own intrusion detection/prevention framework and why I'm really happy with that decision, don't mind me rambling)
Preface
About two weeks ago I was faced with a pretty annoying problem. Whilst I was going home by train I have noticed that my server at home had been running hot and slowed down a lot. This prompted me to check my nginx logs, the only service that is indirectly available to the public (more on that later), which made me realize that - due to poor access control - someone had been sending me hundreds of thousands of huge DNS requests to my server, most likely testing for vulnerabilities. I added an iptables rule to drop all traffic from the aforementioned source and redirected remaining traffic to a backup NextDNS instance that I set up previously with the same overrides and custom records that my DNS had to not get any downtime for the service but also allow my server to cool down. I stopped the DNS service on my server at home and then used the remaining train ride to think. How would I stop this from happening in the future? I pondered multiple possible solutions for this problem, whether to use fail2ban, whether to just add better access control, or to just stick with the NextDNS instance.
I ended up going with a completely different option: making a solution, that's perfectly fit for my server, myself.
My Server Structure
So, I should probably explain how I host and why only nginx is public despite me hosting a bunch of services under the hood.
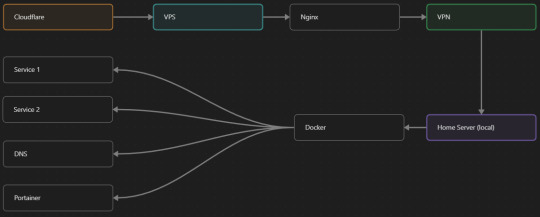
I have a public facing VPS that only allows traffic to nginx. That traffic then gets forwarded through a VPN connection to my home server so that I don't have to have any public facing ports on said home server. The VPS only really acts like the public interface for the home server with access control and logging sprinkled in throughout my configs to get more layers of security. Some Services can only be interacted with through the VPN or a local connection, such that not everything is actually forwarded - only what I need/want to be.
I actually do have fail2ban installed on both my VPS and home server, so why make another piece of software?
Tabarnak - Succeeding at Banning

I had a few requirements for what I wanted to do:
Only allow HTTP(S) traffic through Cloudflare
Only allow DNS traffic from given sources; (location filtering, explicit white-/blacklisting);
Webhook support for logging
Should be interactive (e.g. POST /api/ban/{IP})
Detect automated vulnerability scanning
Integration with the AbuseIPDB (for checking and reporting)
As I started working on this, I realized that this would soon become more complex than I had thought at first.
Webhooks for logging This was probably the easiest requirement to check off my list, I just wrote my own log() function that would call a webhook. Sadly, the rest wouldn't be as easy.
Allowing only Cloudflare traffic This was still doable, I only needed to add a filter in my nginx config for my domain to only allow Cloudflare IP ranges and disallow the rest. I ended up doing something slightly different. I added a new default nginx config that would just return a 404 on every route and log access to a different file so that I could detect connection attempts that would be made without Cloudflare and handle them in Tabarnak myself.
Integration with AbuseIPDB Also not yet the hard part, just call AbuseIPDB with the parsed IP and if the abuse confidence score is within a configured threshold, flag the IP, when that happens I receive a notification that asks me whether to whitelist or to ban the IP - I can also do nothing and let everything proceed as it normally would. If the IP gets flagged a configured amount of times, ban the IP unless it has been whitelisted by then.
Location filtering + Whitelist + Blacklist This is where it starts to get interesting. I had to know where the request comes from due to similarities of location of all the real people that would actually connect to the DNS. I didn't want to outright ban everyone else, as there could be valid requests from other sources. So for every new IP that triggers a callback (this would only be triggered after a certain amount of either flags or requests), I now need to get the location. I do this by just calling the ipinfo api and checking the supplied location. To not send too many requests I cache results (even though ipinfo should never be called twice for the same IP - same) and save results to a database. I made my own class that bases from collections.UserDict which when accessed tries to find the entry in memory, if it can't it searches through the DB and returns results. This works for setting, deleting, adding and checking for records. Flags, AbuseIPDB results, whitelist entries and blacklist entries also get stored in the DB to achieve persistent state even when I restart.
Detection of automated vulnerability scanning For this, I went through my old nginx logs, looking to find the least amount of paths I need to block to catch the biggest amount of automated vulnerability scan requests. So I did some data science magic and wrote a route blacklist. It doesn't just end there. Since I know the routes of valid requests that I would be receiving (which are all mentioned in my nginx configs), I could just parse that and match the requested route against that. To achieve this I wrote some really simple regular expressions to extract all location blocks from an nginx config alongside whether that location is absolute (preceded by an =) or relative. After I get the locations I can test the requested route against the valid routes and get back whether the request was made to a valid URL (I can't just look for 404 return codes here, because there are some pages that actually do return a 404 and can return a 404 on purpose). I also parse the request method from the logs and match the received method against the HTTP standard request methods (which are all methods that services on my server use). That way I can easily catch requests like:
XX.YYY.ZZZ.AA - - [25/Sep/2023:14:52:43 +0200] "145.ll|'|'|SGFjS2VkX0Q0OTkwNjI3|'|'|WIN-JNAPIER0859|'|'|JNapier|'|'|19-02-01|'|'||'|'|Win 7 Professional SP1 x64|'|'|No|'|'|0.7d|'|'|..|'|'|AA==|'|'|112.inf|'|'|SGFjS2VkDQoxOTIuMTY4LjkyLjIyMjo1NTUyDQpEZXNrdG9wDQpjbGllbnRhLmV4ZQ0KRmFsc2UNCkZhbHNlDQpUcnVlDQpGYWxzZQ==12.act|'|'|AA==" 400 150 "-" "-"
I probably over complicated this - by a lot - but I can't go back in time to change what I did.
Interactivity As I showed and mentioned earlier, I can manually white-/blacklist an IP. This forced me to add threads to my previously single-threaded program. Since I was too stubborn to use websockets (I have a distaste for websockets), I opted for probably the worst option I could've taken. It works like this: I have a main thread, which does all the log parsing, processing and handling and a side thread which watches a FIFO-file that is created on startup. I can append commands to the FIFO-file which are mapped to the functions they are supposed to call. When the FIFO reader detects a new line, it looks through the map, gets the function and executes it on the supplied IP. Doing all of this manually would be way too tedious, so I made an API endpoint on my home server that would append the commands to the file on the VPS. That also means, that I had to secure that API endpoint so that I couldn't just be spammed with random requests. Now that I could interact with Tabarnak through an API, I needed to make this user friendly - even I don't like to curl and sign my requests manually. So I integrated logging to my self-hosted instance of https://ntfy.sh and added action buttons that would send the request for me. All of this just because I refused to use sockets.
First successes and why I'm happy about this After not too long, the bans were starting to happen. The traffic to my server decreased and I can finally breathe again. I may have over complicated this, but I don't mind. This was a really fun experience to write something new and learn more about log parsing and processing. Tabarnak probably won't last forever and I could replace it with solutions that are way easier to deploy and way more general. But what matters is, that I liked doing it. It was a really fun project - which is why I'm writing this - and I'm glad that I ended up doing this. Of course I could have just used fail2ban but I never would've been able to write all of the extras that I ended up making (I don't want to take the explanation ad absurdum so just imagine that I added cool stuff) and I never would've learned what I actually did.
So whenever you are faced with a dumb problem and could write something yourself, I think you should at least try. This was a really fun experience and it might be for you as well.
Post Scriptum
First of all, apologies for the English - I'm not a native speaker so I'm sorry if some parts were incorrect or anything like that. Secondly, I'm sure that there are simpler ways to accomplish what I did here, however this was more about the experience of creating something myself rather than using some pre-made tool that does everything I want to (maybe even better?). Third, if you actually read until here, thanks for reading - hope it wasn't too boring - have a nice day :)
10 notes
·
View notes
Text
https://nestnepal.com/blog/dns-server-not-responding/
0 notes
Text
Implement Split-Brain DNS Policies in Active Directory
Implement Split-Brain DNS Policies in Active Directory
Implement Split-Brain DNS Policies in Active Directory In this detailed guide, we will look at how to implement DNS split-brain policies in an Active Directory environment. Creating a split-brain DNS setup is crucial for managing different DNS responses based on whether the request is internal or external. This can help streamline network traffic, improve security, and ensure that internal and…
#Active Directory#DNS#DNS Configuration#DNS Server#DNSRecord#Domain Name Service#Domain Name System#Windows#Windows Server#Windows Server 2016#Windows Server 2019#Windows Server 2022
0 notes
Text
DNS Server Not Responding [Complete Guide]
DNS converts human-readable domain names into machine-readable IP addresses. Users may view websites faster using web browsers. IP addresses allow massive retail website servers to interact with each other and all other internet-connected devices, including your phone and laptop. Visitors to websites may notice DNS problem messages like “DNS server not responding.” This article will guide Mac and…
View On WordPress
0 notes
Text
Amazon Route 53 Resolver supports HTTPS DNS

As of right now, both incoming and outgoing Resolver endpoints can use the DNS over HTTPS (DoH) protocol with Amazon Route 53 Resolver. As the name implies, DoH allows data sent for Domain Name System (DNS) resolutions to be encrypted via HTTP or HTTP/2 over TLS.
By using TLS encryption to prevent eavesdropping and modification of DNS data during communication between a DoH client and the DoH-based DNS resolver, DoH improves security and privacy.
This aids in the implementation of a zero-trust architecture, in which all network traffic is encrypted and no actor, system, network, or service operating inside or outside of your security perimeter is trusted. Utilizing DoH also facilitates adherence to suggestions like those outlined in this US Office of Management and Budget (OMB) memo.
Support for DNS via HTTPS in Amazon Route 53 Resolver
In hybrid cloud setups, you can utilize Amazon Route 53 Resolver to resolve DNS queries. For instance, it permits DNS requests from any location inside your hybrid network to be accessed by AWS services. You can configure both inbound and outgoing Resolver endpoints to achieve this:
DNS queries from your on-premises network or another VPC can reach your VPC through inbound resolver endpoints.
DNS requests can be sent from your VPC to another VPC or your on-premises network using outbound resolver endpoints.
Following the configuration of the Resolver endpoints, you can create rules that indicate which domain names you wish to have forwarded (inbound) and outbound (from your VPC to an on-premises DNS resolver).
You may now choose the protocols to utilize when creating or updating an inbound or outbound Resolver endpoint:
DNS over port 53 (Do53), which transmits packets via TCP or UDP.
DNS over HTTPS (DoH), encrypts the data with TLS.
Both, depending on the DNS client’s preference.
There is a particular implementation (DoH-FIPS) for incoming endpoints in order to ensure FIPS compliance.
Let’s examine how this functions in real life
Using the Amazon Route 53 Resolver with DNS over HTTPS
You can select Inbound endpoints in the Route 53 console by going to the Resolver part of the navigation pane. You can select Create inbound endpoint there.
You can choose the security group, the VPC, the endpoint type (IPv4, IPv6, or dual-stack), and then enter the endpoint’s name. In the Protocols for this endpoint option, you can choose Do53, DoH, and DoH-FIPS to permit the use of both encrypted and unencrypted DNS resolutions.
Then set up the IP addresses for DNS queries after that. You can choose two Availability Zones and a subnet for each. You may use the option to have the IP addresses automatically chosen for this setup from the subnet’s available addresses.
Once the incoming endpoint has been created, You can set up my network’s DNS server to route requests for the amazonaws.com domain, which is used by AWS service endpoints, to the IP addresses of the inbound endpoints.
In a similar manner, you may establish an outgoing Resolver endpoint and choose Do53 as well as DoH as the protocols. Next, you design forwarding rules that specify which domains the outgoing Resolver endpoint in my network should forward queries to for DNS servers.
DNS resolutions are now secured when DNS clients in my hybrid environment utilize DNS over HTTPS in their requests. In the setting of inbound and outgoing endpoints, you have the option to impose encryption and choose only DoH.
Important information
All AWS Regions where Route 53 Resolver is available, including GovCloud Regions and Regions based in China, now support DNS over HTTPS for Amazon Route 53 Resolver.
The default DNS protocol for incoming and outgoing Resolver destinations is still port 53. Thus, unless you intend to switch from HTTPS to DNS, you don’t need to upgrade your current automated tools.
Using DNS over HTTPS with Resolver endpoints is free of charge. See Route 53 price for further details.
With Amazon Route 53 Resolver, start using DNS over HTTPS to improve security and privacy for your hybrid cloud settings.
Read more on Govindhtech.com
0 notes
Text
Les serveurs DNS jouent un rôle crucial dans l'accessibilité et la performance d'Internet. Cependant, il n'est pas rare de rencontrer des problèmes qui peuvent entraver votre expérience en ligne. Dans cet article, nous explorerons les divers problèmes liés aux serveurs DNS et fournirons des solutions efficaces pour les Résolution DNS.
0 notes
Text
This is my 4th account, now
I even paid for domains and still the live feature got taken away from me. On every app.
<No I didn’t stop the url halfway through the redirect and catch your scripts and cookies. The bugs are numbered like my days, the promises they bring back whatever you say.>
“The Good, The Bad, and The Hacked”
By: Nicholas A. Polaris
[This is the final draft.]
#hacking#hacked#dns server#DNShijacking#Man In The Middle#MiTM#shadowbanned#truth#ask me anything#aesthetic#artists on tumblr
1 note
·
View note
Text
DNS server is not responding?
The DNS Server Is Not Responding Error
DNS is an integral part of the internet and translates domain names into IP addresses, allowing you to access websites by typing easy-to-remember words or numbers. But sometimes the server stops responding and you’re stuck with an annoying error message.
This article will explain what the problem is and how to fix it. We will explore some of the most effective methods including restarting your router, flushing DNS cache, and disabling software like antivirus or firewalls.
Restart your router or modem
The DNS (Domain Name System) is essentially the Internet’s phone book, matching easily memorized website names to their corresponding IP addresses. The entire process of querying various servers takes a fraction of a second and is imperceptible to users.
Each computer or device that connects to the Internet has a DNS server setting at either the operating system level or the router level. The latter is more important because it dictates which DNS servers all devices on a network use for Internet access.
The operating system level setting is called a DNS resolver; when a user enters a website address into their browser, the recursive resolver sends a request to the network to find out what the actual IP address is for that site. The resolver then caches the answer for future use and hands it back to the software that entered the name.
Refresh your browser’s cache
When you see this error, it usually means that your computer or browser can’t reach the DNS servers. This could be because of a variety of different reasons, including malware or a faulty router.
One of the quickest ways to find out what’s causing this issue is to use another device to connect to the internet. If you can visit the website on another device, it indicates that the problem is with your computer or browser.
Occasionally, your DNS cache can get outdated. To resolve this, you need to flush your DNS cache. This process is similar to clearing your browser’s cache but it resets the IP addresses instead of deleting your web pages. To do this, follow the steps below for your operating system.
Try a different browser
One of the quickest ways to troubleshoot DNS issues is to use a different browser. If the website loads without error in another browser, it is likely that the problem is local to your device and not a result of an Internet or DNS server outage.
To make sure the issue is not with your network connection, try accessing the site using a mobile data connection. This will help you to determine whether the problem is with your browser or your home Wi-Fi.
If you’re able to load the site using a different browser but still see the “DNS Server is not responding” error, it could be that your antivirus or firewall program is interfering with your internet connection. If this is the case, temporarily deactivating your firewall or antivirus program should allow you to navigate the web normally. This will also help you to clear any DNS cache that may be causing the issue.
Reconnect your modem or router
When you try to load a website and are met with the “DNS Server Not Responding” error message, it can be extremely frustrating. However, the good news is that most of these errors have simple solutions.
You can usually fix this problem by restarting your router or modem. Simply unplug the device and wait about 30 seconds before plugging it back in. Then, try opening the website again. If this doesn’t work, try using another device to access the internet (like a mobile phone on Wi-Fi or ethernet cable).
You can also use a command prompt to flush your DNS cache. This will clear IP addresses and other DNS related data from your computer’s cache, which may help resolve the “DNS server is not responding” error. To do this, open a command prompt by pressing the Win key and typing cmd. Then, type ipconfig /flushness and press enter.
0 notes
Text

0 notes
Text
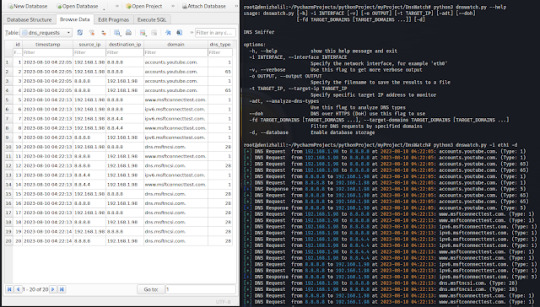
DNSWatch - DNS Traffic Sniffer and Analyzer
DNSWatch is a Python-based tool that allows you to sniff and analyze DNS (Domain Name System) traffic on your network. It listens to DNS requests and responses and provides insights into the DNS activity. Features Sniff and analyze DNS requests and responses. Display DNS requests with their corresponding source and destination IP addresses. Optional verbose mode for detailed packet…
View On WordPress
#Dns Analysis#Dns Server#Dns Sniffer#DNSWatch#KitPloit#Network Analysis#Python Scapy#Python3#Scapy Library
0 notes
Text
A peak behind the veil
Time to do something a bit less historical and a bit more modern. Today I'm going to invite you down the rabbit hole of internet infrastructure and how you could, technically, be your own internet service provider with no documentation or taxes.
I’m sure most of you already grasp the basics of how the internet works based on experience and intuition, but I'll give the basics for any 19th century hermits following my blog.
What the internet is, in essence, is a very complicated series of cables that we can send messages along, like sending a letter, the postman takes the letter and follows the address, first away from you, then towards its destination. The postman first checks the country, then the county/state, then the city/town, then the street, then finally to the house that it was destined for.
The internet postman is very reliable, and very fast, so if you send a letter you can expect a response in only a little bit longer than the time it takes for the person on the other end to write their response. This is where we lean on our computer a little. We tell our computer that we want an image, as an example, the trouble is, the image we want would take up a whole roll of film to photograph, so the computer can’t just send a request for all the photos at once, that would overwhelm the person sending the photos.
Instead the computer asks for the upper left corner of the image, the postman sends our message then comes back with the photo, then the computer asks for the photo that should go just to the right of the one we just got and the postman does that work diligently. If we didn’t have a computer we’d need to write each request ourselves and that’d take hours, but with the work of a computer and a very fast photo organiser at the other end, we can get every photo and ultimately the whole image in a very short time.
But a very simple issue can complicate this system very quickly. First we’ll be ignoring security and any kind of error checking, we’ll trust our postman totally and leave those things up to the professionals for the sake of this demonstration. There are only 2 things we can’t let the postman decide, the contents of the letter, since we have to be able to request anything, and the destination of the letter, since the postman doesn’t know where we’re sending our requests.
The first is quite simple, and much up to preference. I'm sure most people reading this would request stories, images, the odd video or 10. The tricky part is the address to send it to. In theory, all of us could write down the address for tumblr HQ and address our letters there. The difficulty comes if tumblr wants to move their HQ.
Delving into the technical side a little more, the internet address system is quite simple, it’s a series of numbers, the likes of which computers are very good at working with. The trouble is, there are only so many numbers available, and while, sure, you can just add more, you will still eventually run out. Even excluding limits, I'm sure a person, or a company might want to change address if they’re being harassed at the old one, and for such a large company, tumblr is no exception.
So, sooner or later, the address we wrote down no longer points to tumblr. The simplest solution is something that’s already been invented. A phone book! Simply find your nearest phone book and look up the current address of tumblr HQ, update your computer's address book and request away!
In technical terms the phone book is called a DNS server, it’s why when you’re having connection issues, if the error contains lots of information it includes the acronym DNS. There are loads of different kinds of DNS servers but all of them are functionally the same for this story.
The trouble comes when you have to consider how to store, print, maintain, and distribute the phone books. IRL phonebooks often cost money, or have loads of ads in them, and since the internet is notoriously against ads we have to pay for the upkeep of our DNS servers.
And now, finally, after much explanation, we arrive at internet service providers. They do a lot of complicated, and subtle things, like security and handling requests, but when you boil away the stuff that only exist to account for the failures of humanity, you’re left with a big collection of DNS servers that constantly communicate with one another, updating addresses and sending those addresses back to your router/computer.
So when you put down a small car’s worth of money to pay for your internet, you’re not paying for access to the internet, you already have that in the copper/fibre line running to your home, you’re paying for access to the providers DNS servers.
“But how can I be my own internet service provider” I hear you not asking. Well, it’s very simple, a lot of DNS servers, especially ones run by companies that want you to connect to their services, will respond to a request for an address even if that request doesn’t come from another DNS server. So you could sit at home, with no internet service provider, and just request the address for a site.
Ofcourse, you’d need to know the address for that DNS server which also changes on a regular basis, you’d also need to code a bunch of stuff like security, IP spoofing, more security, DDOS protection, MORE SECURITY, but in theory, you could run your own internet connection.
Technology is a wonderful thing, and more people knowing more about it is always good, because breakthroughs can sometimes come from the unlikeliest of places. Enough tech for now i think, perhaps i'll do geology for my next post
Also, if any tech wizards would like to correct anything i've said, please do.
0 notes
Text
How to Install and Configure a Standalone DNS Server
How to Install and Configure a Standalone DNS Server
How to install and configure a Standalone DNS Server Setting up a standalone DNS server is a fundamental step in managing network resources efficiently. While numerous DNS servers exist, customizing your own ensures tailored control and enhanced security. In this guide, we’ll delve into the installation and configuration of DNS servers on Windows Server platforms, streamlining the process for…

View On WordPress
#DNS#DNS manager console#DNS Server#DNSRecord#Primary DNS#Windows#Windows Server#Windows Server 2012#Windows Server 2016#Windows Server 2019#Windows Server 2022
0 notes
Video
youtube
Cloudflare Zero Trust Tunnel: Configuração de Autenticação Para Garantir...
0 notes
Text

canon lawlight with mikami
#brought to you by the semeL ukeLight discord server#death note#lawlight#light yagami#l lawliet#mikami teru#dn shitpost#death note shitpost
365 notes
·
View notes