#diy mending
Explore tagged Tumblr posts
Text
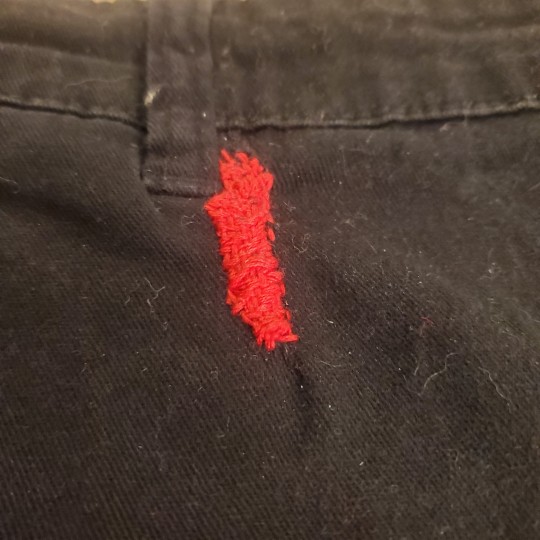

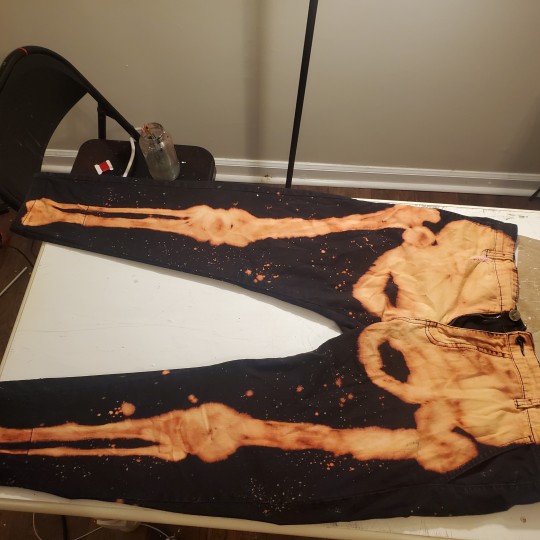

some visible mending on a pair of pants I also bleached to look like skeleton legs :) the first time I've ever done a patch like this.
316 notes
·
View notes
Text
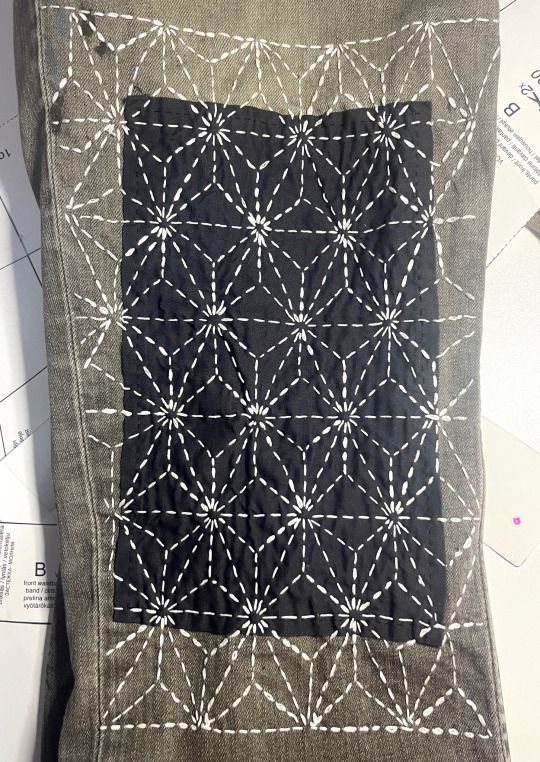
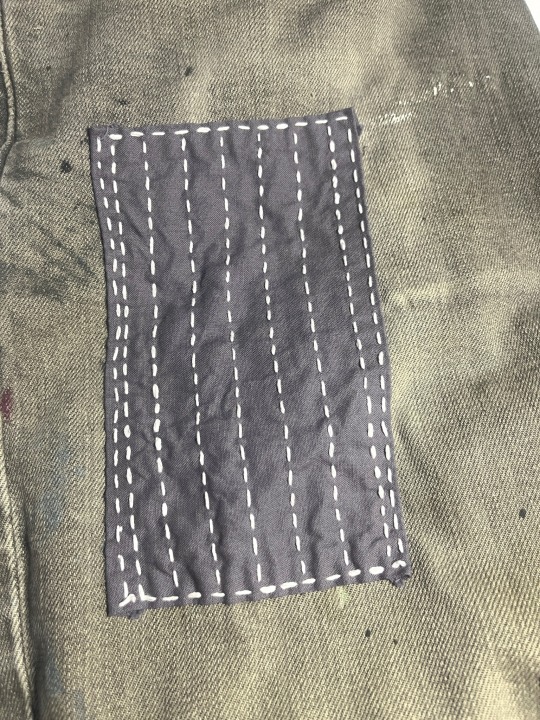
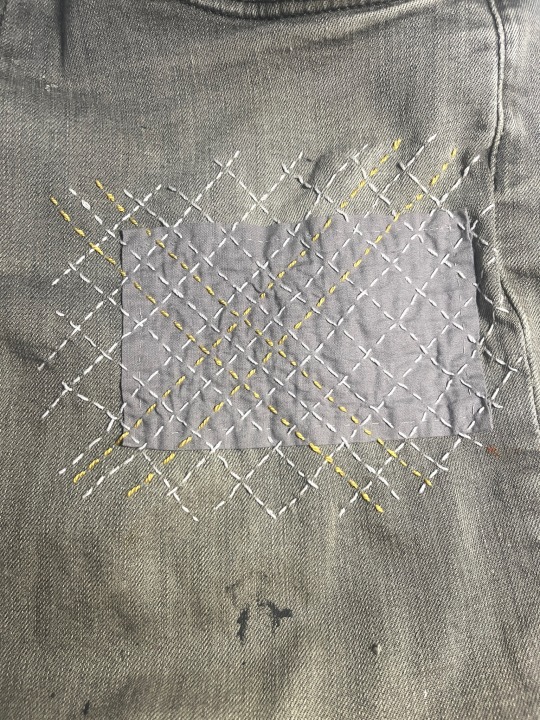
More sashiko inspired patches and mending!
I didn’t know that the traditional way to do a sashiko mend is to stitch the patch with the pattern and and then attach the patch to the clothing… but i still think it looks really cool! And it should still be plenty strong lol.
#sashiko stitching#sashiko#sashiko mend#visible mending#mending project#mending#hand sewing project#sewing project#diy mending#sustainable fashion
197 notes
·
View notes
Text


Added some pizzazz while fixing up two little holes in my Janis Joplin tee! The scrap fabric I had matched the color of the shirt PERFECTLY, it’s totally wild.
50 notes
·
View notes
Text
3ds midframe has arrived and ohhhh lord I am so fucking nervous about doing this. 😵💫
This is an "I can't operate on that man he is my own son" situation.
I have taken my meds and am about to eat lunch, and then I should be in the right frame of mind to attempt this surgery.
Oh god I am scared.
9 notes
·
View notes
Text

#crafts#crafting#mending#diy#sewing#embroidery#sashiko#visible mending#coworkers misunderstand and try to chastise me for being too humble when i argue with them for saying the top thing#so i made a meme about it#inspiration#?
28K notes
·
View notes
Text
Idea: sew some cute little moths with scrap fabrics and sew them on holes you have on your clothes so you can keep wearing them :)

#diy#sewing#visible mending#textile art#DIY culture#diy punk#sewing ideas#craft ideas#eco fashion#reduce reuse recycle
23K notes
·
View notes
Text
AT LAAAAAST

I've been thrifting as a habit for years now and finally found my white whale: a leafy-mossy-green wool spring jacket. It's 40% wool and was $9.99 at Value Village.

I can see why it got discarded, by modern standards; the fabric was pilling, it had gotten grubby but was dry-clean only, and a few little wear spots had appeared in the fabric

If only this coat could find an owner... with a bunch of spring-themed visible mending patches to test......
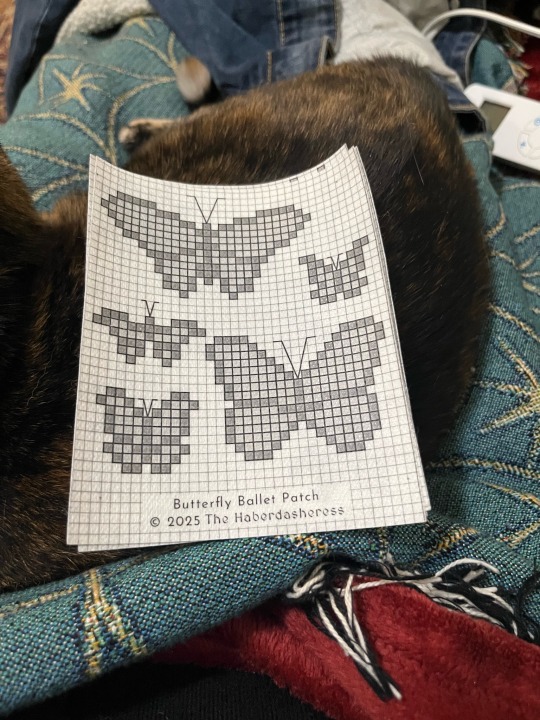
Who'd recently bought an embroidery floss pack with slightly desaturated jewel tones Alphonse Mucha would love that suited it perfectly....

Hm. Well then.
I'll keep you updated on any progress!
#embroidery#embroidery diy#visible mending#art nouveau#hearts stars and butterflies mending patch#green coat project
781 notes
·
View notes
Text


got a little carried away w/ this mend 🔥
1K notes
·
View notes
Text
my bag 🌿⛓️🌻⚙️ more details in the image ID and more pics below
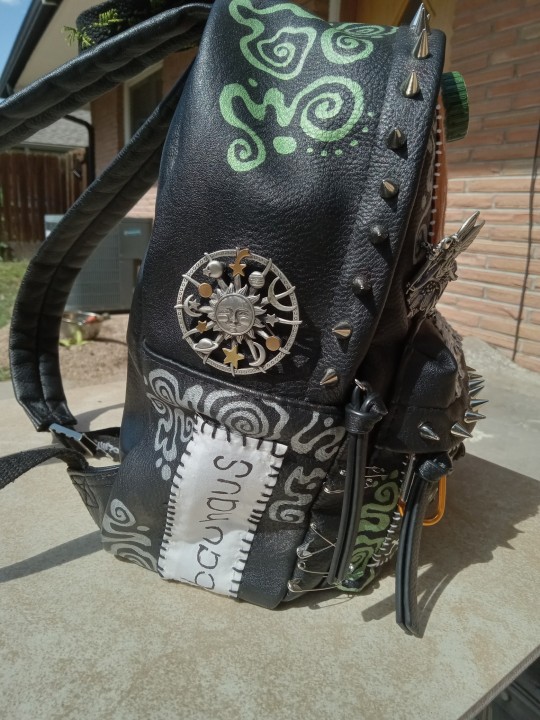
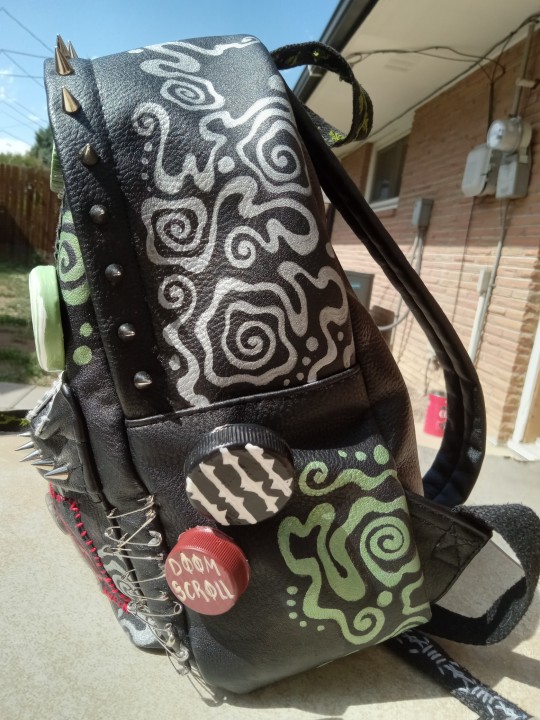
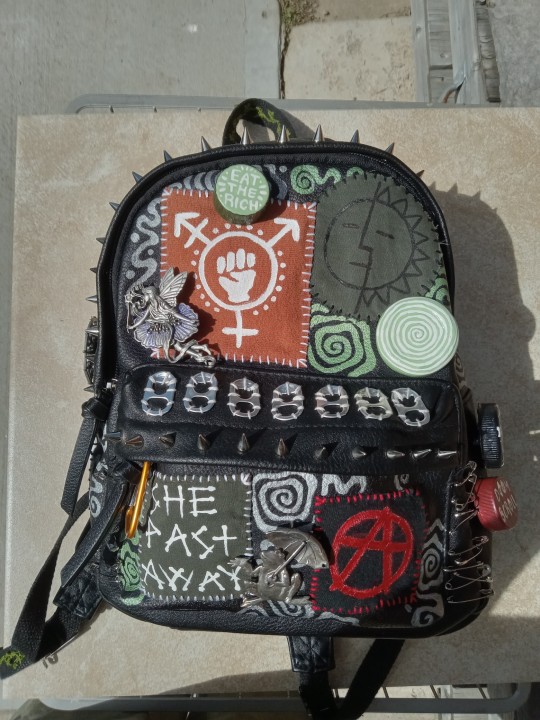
I found a small plain black leather backpack at the thrift store for $6 and made it my own :) I used silver sharpie for the swirls and made the buttons all myself with the exception of the metal ones
[Image ID: a small black leather backpack covered in patches, buttons, safety pins, studs and silver and metalic green spirals in the spaces with no patches. There are four patches on the front, an orange patch with a white trans rights symbol sewn on with white thread, and a circular green patch with a simplistic sun and moon drawin on it in black (a mirrormask patch) sewn on with black thread. And on the front pocket on the bottom, theres a dark green band patch with white lettering that says "she past away" sewn on with white thread and a black patch next to it with a red anarchy symbol sewn on the bag with red thread. There are silver spike studs lining the edges of the bag along the zipper and on the front pocket as well as soda tabs sewn onto the front pocket flap with off-white thread. And on both sides of the pocket there are safety pins decorating the empty space next to it. There are four pins on the side of the bag, a light green and white spiral pin, a light green and white "eat the rich" pin, and a metal fairy pin on the top half, and theres a metal frog with an umbrella pin on the front pocket in-between the two patches. Theres also a small orange carabiner on the pocket zipper.
On the left side of the bag, there is a patch on the bottom where a side pocket would normally be. An off-white band patch that says "bauhaus" in black lettering and it's sewn on with black thread, and there are silver spirals around it filling the space. There are some areas I left blank to make the swirls/spirals look like they're hanging down or growing up the bag like vines. There's a horizontal seam above all this that makes the area look like a pocket, and above this seam there's a metal pin with a sun, moon and stars on it.
The right side of the bag, there's no patch where a pocket should be, I instead filled this space with some spirals and more handmade bottle cap buttons. Two buttons, a larger type o negative band button that's black with white thorny vines, and a smaller red band button that says "doom scroll" on it in off-white lettering. Above the seam on this side I drew a bunch of silver spirals that look like they are growing out from behind the seam.
All thread mentioned in this post is embroidery thread, and some groups of spirals drawn on the bag are metallic green. End ID]
Here's the top of the bag as well as the straps that hang down
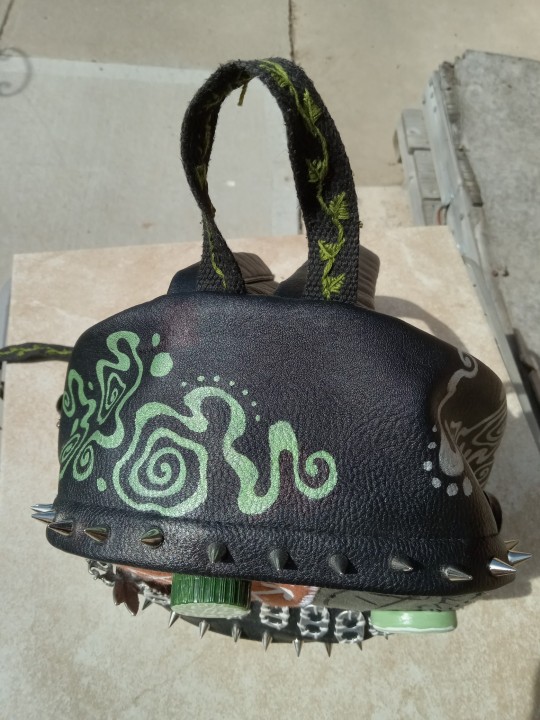
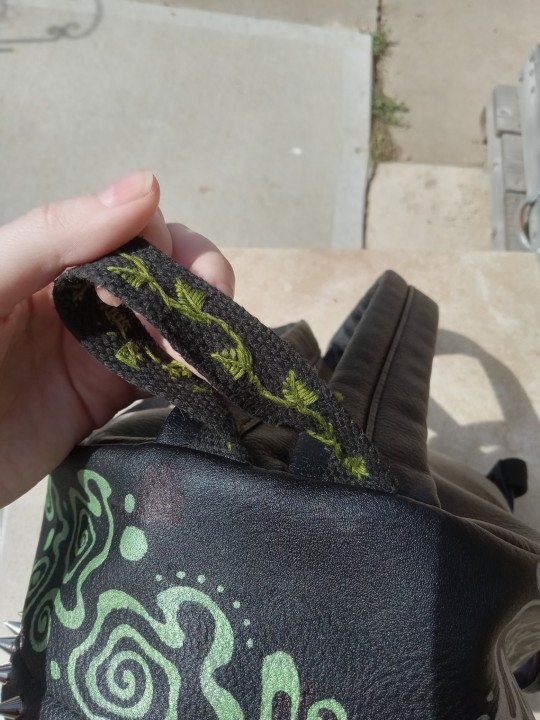
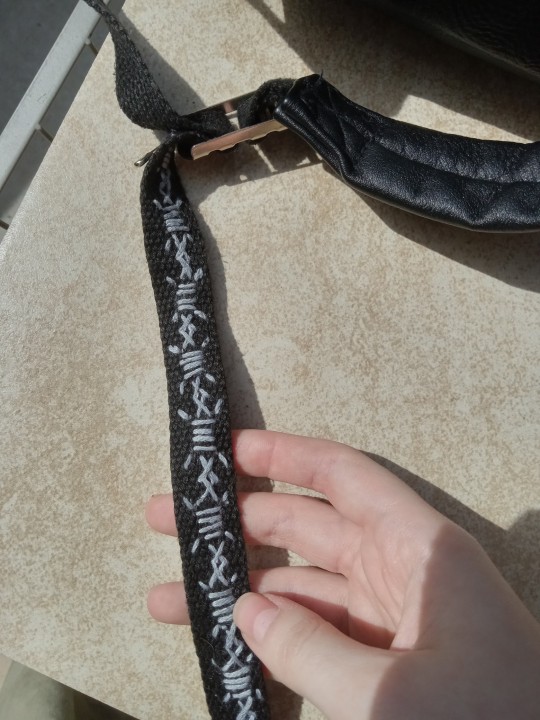
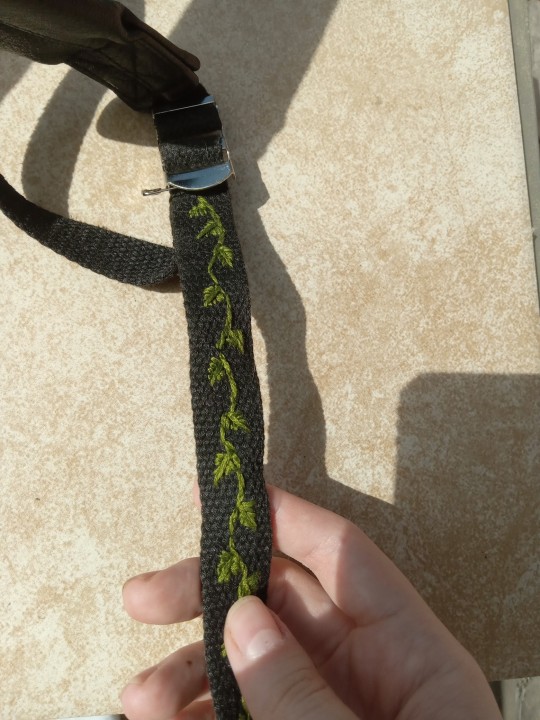
[Image ID: the bag has a rounded arch shape, and across the top of the leather I drew a cluster of green spirals in between the silver spirals I drew on the sides. There are some blank spots to avoid making the bag look busier than it already is. The loop at the top for hanging the bag is embroidered with a green leafy vine pattern. The same pattern is embroidered on the right strap that hangs down from the bottom of the bag, and on the right one, a gray barbed wire pattern is embroidered. I plan on sewing some more soda tabs onto the top of the bag at some point for the sake of adding more shiny things and also fill up some of that space I mentioned because while I don't want the bag to be too busy, I think the blank space i left on the top is a little too much blank space. End ID]
#punk#punk diy#punk fashion#solarpunk#solarpunk diy#solarpunk fashion#ecopunk#hopepunk#hatchet mends things#hatchet makes stuff#upcycled fashion#upcycling#sustainable fashion#sustainability#recycling#sewing#embroidery#crafting#diy#fashion#patches#customization#thrifting#art#goth#slow fashion
925 notes
·
View notes
Text

Shrimps is bugs.
#embroidery#hand embroidery#diy#shrimp#shrimps is bugs#sewing#shitpost#shitpost embroidery#shitpost sewing#visible mending#solarpunk#bucky crafts#bucky sews
4K notes
·
View notes
Text

New jeans project is actually looking pretty good so far.
Only thing is this is patch 1 of 5 or 6, and this is a relatively small hole compared to the others.
The backing material is synthetic, which I usually wouldn't use with denim, but it feels nice and has a good texture for this look.
The filler spirals are 3 strand embroidery floss. The shell outline is 2 strands embroidery floss and 1 strand metallic thread.
312 notes
·
View notes
Text
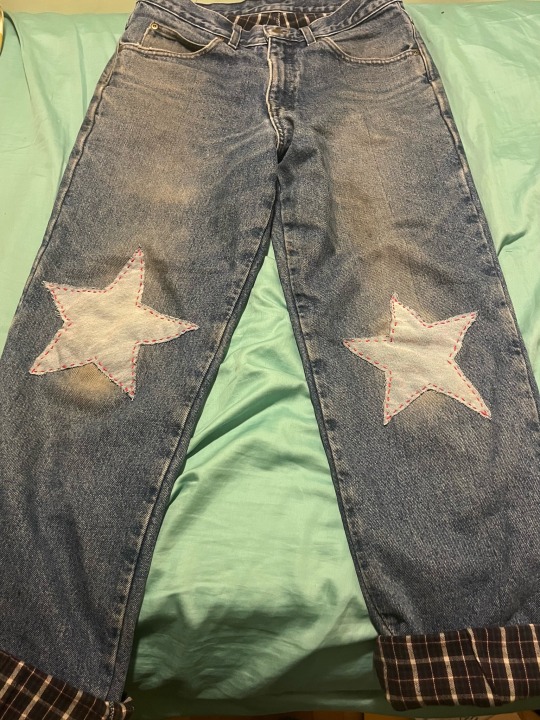
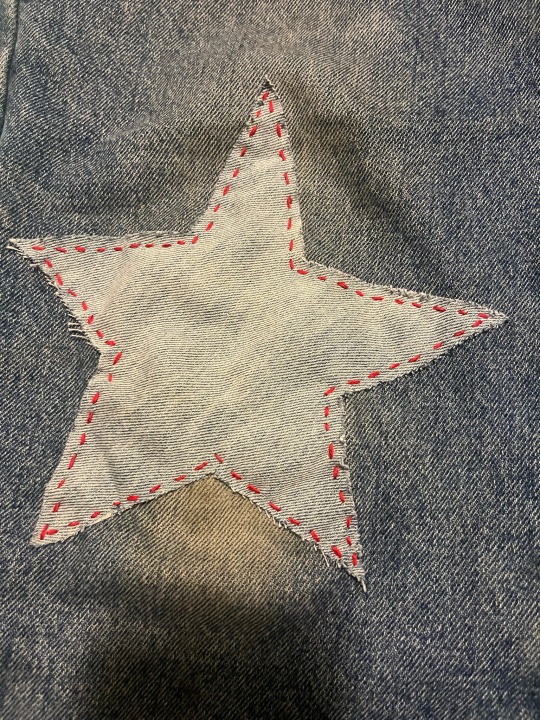

Latest visible mending! Might make a post explaining how I made these, breaking down costs and materials etc.
#solarpunk#diy fashion#patches#diy punk#punk fashion#sustainable fashion#sustainability#solarpunk fashion#visible mending#mending#thrifting#sewing#embroidery#artists on tumblr#slow fashion
843 notes
·
View notes
Text


Maybe it’s not very glamorous, but I love doing little mends like this. This is one of my husband’s favorite sweaters, but I noticed a little tear the other day.
Darning this took about 15 minutes. Now the sweater will last even longer!
Inside of the sweater is on the left, outside is on the right.
#visible mending#mended clothing#diy mending#mending project#mending#make do and mend#mending clothes#clothing repair#garment repair
26 notes
·
View notes
Text
hey. look me in the eyes.
do your craft with love. with intentionality. with fun.
kill your inner judge.
i love you.
162 notes
·
View notes
Text

I repaired this sick ass digital clock I got from a thrift store very cheaply a few years ago. It's just a floating LCD panel and I think it looks so frigging amazing. (Really makes me think of that cool Dutch YouTuber, Posy, and his love of LCD panels. (And I'm like "hell yeah!! There's so much beauty in the mundane!!! Just look how frigging cool this clock is!!"))
Anyhoo, it wasn't working when I got it. Probably why it was so cheap.
It has a little on/off switch on the back, but nothing would happen when you flipped it, but sometimes if you held its solar panel under a very bright light the clock would turn on
...for one second
before turning off again
and then back on again.
Very rhythmically.
So there was still some life left in the old girl... somewhere... 🤔
Unscrew the back of it and have a look see.
Discover a pair of circuit boards, one of which has a cr2032 coin cell clamped onto it. Hooray, a Vital Clue!
Fortunately, I have one of those batteries lying around. A second spare from when I replaced the batteries in some Digimon v-pets.
So I replace it.
Aaaaand nothing happens...
:(
Next step: fully disassemble the clock to look for More Clues.
Discover that its LCD panel isn't wired in to anything. There's just a row of teeny tiny contacts along its base which press up against a matching row of teeny tiny contacts along its control board, held together by the frame of the clock and a kind of thin pink foam buffer ring around the contacts. Very cool!
(Like two mouths kissing but only one of them has any lips. 😆)
Examine the two circuit boards under a loup. Maybe there's a visibly-broken component!
(I hope there's a visibly-broken component, else I have to dig out my multimeter and start systematically testing them one by one)
(I hope there aren't any visibly-broken components. If it's the quartz crystal or one of the two capacitors, then I might be able to replace it, because those are regular-sized, through-hole, components; but if it's one of the surface-mount resistors then I'd have to scrap the whole clock, because I just don't have the tools, experience, or know-how to deal with those microscopic little guys... :/ )
There aren't any visibly-broken components. Phew, but also consternation, because now what?
But hmm, there are some teeeeny tiny white flecks of crusty residue here and there over the circuit boards... I guess the old battery must have leaked at some point?
I gently scrape them off with the tip of a very fine pair of tweezers and then reassemble the clock enough to test it.
(LCD panel & solar panel back into front-frame, control board back over them to hold them into place and make contact with the LCD; everything else [coin-cell daughterboard, piezo buzzer, and the user-input buttons] dangling free in the breeze Winnie-The-Pooh-style)
It turns on! It chirps out a happy little song of high-pitched beeps!! It blinks "12:00" at me!!!

I fully reassemble the clock with a song in my heart and set its time and date.
Goddamn this clock looks so cool. 🥰
7 notes
·
View notes
Text

Did i ever post my beloved vans here?
Ive had them for i think 10yrs at this point. Resoled a couple of times, lots and lots of mending.
212 notes
·
View notes