#devops tutorial
Explore tagged Tumblr posts
Visit Tumblr Blog
Explore Tumblr blogs with no restrictions, modern design and the best experience.
Last Seen Tumblr Blogs


Fun Fact
Tumblr posted its first advertisements in May 2012 and subsequently earned $13M in revenue.
Text
How to Change Branch Name in Azure DevOps- OpsNexa!
Learn how to change a branch name in Azure DevOps using Git best practices. This comprehensive guide walks you through renaming a branch both locally and remotely, syncing with Azure Repos, and avoiding common pitfalls. How to Change Branch Name in Azure DevOps, Whether you're updating outdated names or aligning with naming conventions, follow these step-by-step instructions to ensure a smooth and error-free transition for your team. Perfect for developers, DevOps engineers, and Git users working with Azure DevOps.
0 notes
Text
DevOps Training
In the dynamic landscape of modern IT, where agility and collaboration reign supreme, DevOps has emerged as the driving force behind transformative success. For professionals eager to harness the power of DevOps, the journey begins with a comprehensive DevOps online course. In this exploration, we delve into the significance of DevOps training, the key components of online courses, and the transformative path toward becoming a certified DevOps expert.
Understanding the Essence of DevOps Online Course:
DevOps, an amalgamation of development and operations, transcends mere practices; it represents a cultural shift fostering collaboration, automation, and continuous delivery. DevOps training, especially through online courses, serves as the beacon guiding professionals through this cultural transformation. It is more than a set of tools; it is a holistic approach that instills the mindset needed to thrive in the ever-evolving landscape of IT.

Key Components of Online DevOps Training:
Comprehensive Curriculum: DevOps online courses boast a curriculum that spans the entire DevOps lifecycle. Participants delve into cultural transformation, mastering tools, and practices crucial for successful DevOps implementations. The comprehensive nature of the curriculum ensures a holistic understanding of the DevOps philosophy.
Hands-On Experience: Practical application is the cornerstone of effective DevOps training. Online courses offer hands-on labs, real-world projects, and simulated environments that enable participants to apply theoretical knowledge in practice. This experiential learning approach ensures a deeper understanding of DevOps principles.
Interactive Learning Platforms: Online DevOps courses leverage interactive learning platforms, providing participants with a dynamic and engaging educational experience. Virtual labs, collaborative tools, and interactive exercises bring theoretical concepts to life, fostering an environment of active participation.
Certification Preparation: A reputable DevOps online course not only imparts knowledge but also prepares participants for industry-recognized certifications. Earning a DevOps certification validates one's proficiency and enhances professional credibility. Certification preparation is integral to ensuring participants are well-equipped for the challenges of DevOps roles.
The Impact of Online DevOps Training:
In an era defined by digital connectivity, online DevOps training has become the preferred choice for professionals seeking flexibility and accessibility. These courses break down geographical barriers, allowing participants to engage with material at their own pace. Virtual labs, collaborative platforms, and hands-on experiences ensure that online training replicates the practicality of traditional in-person sessions.
Certified DevOps: A Symbol of Expertise:
As organizations increasingly seek skilled DevOps professionals, achieving certification has become a strategic move. Certified DevOps experts are recognized for their ability to bridge the gap between development and operations seamlessly. A robust DevOps online course aligns with certification objectives, ensuring participants are not only knowledgeable but also certified, enhancing their marketability.
youtube
Choosing the Right Online DevOps Course:
Selecting the right online DevOps course is crucial for a meaningful learning experience. Look for programs that strike a balance between theory and practical application. Interactive learning platforms, virtual labs, and collaboration tools contribute to a well-rounded curriculum. Ensure that the course aligns with industry-recognized certifications to maximize its impact on professional growth.
Conclusion: Empowering Your DevOps Journey with Online Training:
Embarking on a DevOps journey through online training is not just an educational pursuit; it is a transformative experience that propels professionals toward excellence. Whether you are stepping into the world of DevOps for the first time or seeking to enhance your expertise, an online DevOps course is a gateway to success.
Consider it an investment in both your skill set and career trajectory. The fusion of theoretical understanding and hands-on application is the key to unlocking the full potential of DevOps. Choose an online training program that resonates with your goals, and embark confidently on a journey where collaboration, automation, and continuous delivery are not just principles but the pillars of your DevOps expertise.
#devops coure#devops training near me#aws devops certification#devops tutorial#devops#h2kinfosys#online training#devops training#LearnDevOps#DevOpsCertificationTraining#LearnDevOpsOnline#Youtube
0 notes
Video
youtube
Amazon RDS for MySQL | Streamline Your Database Management RDS for MySQL offers a managed MySQL database environment, one of the most popular open-source databases. MySQL is known for its simplicity, reliability, and robust community support, making it an excellent choice for web applications and CMS platforms.- Key Features: - Automatic backups, snapshots, and point-in-time recovery. - Support for major MySQL versions and plugins. - Seamless scaling of compute and storage resources. - Multi-AZ deployments and Read Replicas for enhanced performance.- Use Cases: - Content management systems. - E-commerce sites. - Small to medium-sized web applications.Key Benefits of Choosing the Right Amazon RDS Database:1. Optimized Performance: Select an engine that matches your performance needs, ensuring efficient data processing and application responsiveness. 2. Scalability: Choose a database that scales seamlessly with your growing data and traffic demands, avoiding performance bottlenecks. 3. Cost Efficiency: Find a solution that fits your budget while providing the necessary features and performance. 4. Enhanced Features: Leverage advanced capabilities specific to each engine to meet your application's unique requirements. 5. Simplified Management: Benefit from managed services that reduce administrative tasks and streamline database operations.Conclusion:Choosing the right Amazon RDS database engine is critical for achieving the best performance, scalability, and functionality for your application. Each engine offers unique features and advantages tailored to specific use cases, whether you need the speed of Aurora, the extensibility of PostgreSQL, the enterprise features of SQL Server, or the robustness of Oracle. Understanding these options helps ensure that your database infrastructure meets your application’s needs, both now and in the future.
Amazon RDS, RDS Monitoring, AWS Performance Insights, Optimize RDS, Amazon CloudWatch, Enhanced Monitoring AWS, AWS DevOps Tutorial, AWS Hands-On, Cloud Performance, RDS Optimization, AWS Database Monitoring, RDS best practices, AWS for Beginners, ClouDolusamazon aurora,aurora database,cloud computing,aws cloud,amazon aurora deep dive,amazon aurora vs rds,serverless database,amazon aurora database,aws solutions architect,amazon aurora architecture,amazon aurora mysql,aws s3,amazon aurora database tutorial,aws rds,aws rds aurora,aws rds tutorial,What Is Amazon Aurora?,What Is Amazon Aurora Key Features?,What Is Amazon Aurora Use Cases?,How It Work Amazon Aurora?,cloudolus,aws bangla,amazon web services
#AmazonRDS #RDSMonitoring #PerformanceInsights #CloudWatch #AWSDevOps #DatabaseOptimization #ClouDolus #ClouDolusPro
📢 Subscribe to ClouDolus for More AWS & DevOps Tutorials! 🚀 🔹 ClouDolus YouTube Channel - https://www.youtube.com/@cloudolus 🔹 ClouDolus AWS DevOps - https://www.youtube.com/@ClouDolusPro
THANKS FOR BEING A PART OF ClouDolus! 🙌✨
****************************** *Follow Me* https://www.facebook.com/cloudolus/ | https://www.facebook.com/groups/cloudolus | https://www.linkedin.com/groups/14347089/ | https://www.instagram.com/cloudolus/ | https://twitter.com/cloudolus | https://www.pinterest.com/cloudolus/ | https://www.youtube.com/@cloudolus | https://www.youtube.com/@ClouDolusPro | https://discord.gg/GBMt4PDK | https://www.tumblr.com/cloudolus | https://cloudolus.blogspot.com/ | https://t.me/cloudolus | https://www.whatsapp.com/channel/0029VadSJdv9hXFAu3acAu0r | https://chat.whatsapp.com/BI03Rp0WFhqBrzLZrrPOYy *****************************
#youtube#Amazon RDS RDS Monitoring AWS Performance Insights Optimize RDS Amazon CloudWatch Enhanced Monitoring AWS AWS DevOps Tutorial AWS Hands-On C
0 notes
Text
Kubernetes Pods: Set and Read Environment Variables
Create a simple Pod with environment variables
Access environment variables inside the container
Check environment variables without logging in
Learn how environment variables improve deployments
Perfect for beginners and DevOps engineers!
youtube
0 notes
Text
Navigating the Nervous Waters of Coding
Daily writing promptWhat makes you nervous?View all responses AI-generated image. “This code is going well…a little too well.” The Code Creep: Why Every Line Can Feel Like a Tightrope Walk What makes me nervous? You might think it’s a looming deadline or a particularly gnarly algorithm. And while those definitely get the heart racing, the real source of my coding jitters? It’s the act of…
#Artificial Intelligence#best practices#c#c++#career advice#Cloud computing#coding#dailyprompt#dailyprompt-1916#data science#debugging#devops#java#javascript#machine learning#mobile development#Programming#python#software development#testing#tutorials#web development
1 note
·
View note
Video
youtube
🏗️ Terraform on AWS – Infrastructure as Code Explained! 🏗️
#youtube#In this tutorial we explore how Terraform empowers DevOps engineers and developers to fully automate infrastructure deployment on AWS. 🔥 W
0 notes
Text
Netflix's Chaos Monkey: Embracing Failure for Resilience
Chaos Monkey is an innovative tool developed by Netflix as part of their Simian Army suite of testing tools. It deliberately introduces failures into your cloud infrastructure to test system resilience and recovery capabilities. Chaos Monkey works by randomly terminating instances in your production environment. This might sound counterintuitive, but by forcing failures to occur, it helps…
#AWS#chaos engineering#chaos monkey#cloud infrastructure#cloud resilience#devops#disaster recovery#failure injection#fault tolerance#high availability#implementation tutorial#infrastructure automation#infrastructure testing#microservices testing#netflix chaos monkey#netflix open source#netflix technology#production testing#resilience testing#simian army#site reliability engineering#system architecture#system reliability#system resilience
0 notes
Text
Maven Essential Tutorial for Beginners with Demo 2021 | Part -1
AiOps & MLOps School empowers IT professionals through hands-on training, certifications, and expert mentorship, combining practical skills with industry insights. We offer training, certification, guidance, and consulting for DevOps, Big Data, Cloud, dataops, AiOps, MLOps, DevSecOps, GitOps, DataOps, ITOps, SysOps, SecOps, ModelOps, NoOps, FinOps, XOps, BizDevOps, CloudOps, SRE and PlatformOps. 🔔 Don't Miss Out! Hit Subscribe and Ring the Bell! 🔔 👉 Subscribe Now
0 notes
Text
Cucumber is a widely-used tool for Behavior-Driven Development (BDD) that helps teams collaborate on creating automated acceptance tests. It uses a plain-text language called Gherkin to describe the behavior of software, making it easier for non-technical stakeholders to understand. IntelliJ IDEA, a powerful Integrated Development Environment (IDE) by JetBrains, supports various plugins that enhance its functionality, including the Cucumber plugin.
0 notes
Text
IT and Non IT Training in Nepal
If you are ready to build your career in IT and Non-IT training, enroll in any of various training in Nepal!
According to my research, I found best HR training provided by UpSkills Nepal with many different IT and Non It courses!
Most Of top Non IT courses are:
Digital marketing training in Nepal
HR training in Nepal
SEO training in Nepal
Accounting training in Nepal
Graphics design training in Nepal
Diploma in digital marketing in Nepal
Most important IT courses are:
Cybersecurity courses in Nepal
Data science traning in Nepal
AI training in Nepal
DevOps training in Nepal
Python traning in Nepal
UI/UX training in Nepal
#professional hr training#hr training#digital marketing company#digital marketing#digital marketing training#seo training#seo marketing#diploma courses#devops#devops training#cybersecurity#cybersecurity training#data science training#ui ux design#python course#python tutorial#accounting tips
0 notes
Text
The Importance of DevOps Online Certification
1. Introduction to DevOps Online Certification
In today's digital world, where businesses are constantly evolving and technology is advancing at an unprecedented rate, staying ahead of the curve is crucial. As organizations strive for agility, efficiency, and continuous integration and delivery, DevOps has emerged as a key methodology. By combining development and operations teams, DevOps aims to streamline the software development process and enhance collaboration. In this comprehensive guide, we will explore the importance of DevOps online certification, particularly in the context of Azure DevOps. Whether you are an aspiring IT professional or an experienced developer, this guide will equip you with the knowledge and skills needed to excel in the rapidly changing landscape of DevOps with certified DevOps training.
2.The Benefits of DevOps Online Certification
As mentioned in the previous section, the field of DevOps is becoming increasingly competitive in the job market, with employers seeking candidates who hold recognized certifications in this area. In this section, we will explore the benefits of obtaining a DevOps online certification and how it can enhance your career prospects.
1. Increased Employability: With a DevOps online certification, you can stand out from other job applicants and demonstrate your proficiency in DevOps practices. Employers often prioritize candidates with certifications, as it validates their skills and knowledge in this field.
2. Career Advancement: Holding a DevOps certification can open doors to higher-level positions in your organization. Certification showcases your commitment to professional development, making you a strong candidate for promotions and career growth opportunities.
3. Higher Salaries: Certified DevOps professionals often earn higher salaries compared to their non-certified counterparts. Organizations are willing to pay a premium for individuals who possess validated expertise and can contribute to their digital transformation initiatives.

3.Success in the Digital World: How DevOps Online Certification can Help
In today's digital world, where businesses are leveraging technology to drive innovation and stay competitive, it is crucial to have a solid understanding of DevOps principles. DevOps online certification can play a pivotal role in your success in this rapidly evolving landscape.
With a DevOps certification under your belt, you demonstrate to potential employers that you possess the knowledge and skills to effectively implement DevOps practices. This can open up a world of opportunities for career growth and advancement.
Additionally, DevOps online certification provides you with hands-on experience and practical skills that are highly valued in the industry. By gaining proficiency in tools and methodologies used in the DevOps ecosystem, you can contribute meaningfully to your organization's digital transformation initiatives.
Furthermore, being a certified DevOps professional allows you to network with like-minded individuals and experts in the field. This community can provide valuable insights and support, helping you stay updated with the latest trends and advancements in the DevOps domain.
4.Choosing the Right DevOps Online Certification Program
Now that you understand the importance of obtaining a DevOps online certification, it's crucial to choose the right program that aligns with your career goals and aspirations. With a multitude of options available, selecting the right certification program may seem daunting, but with a strategic approach, you can make an informed decision.
Firstly, determine your specific area of interest within the DevOps domain. Are you more inclined towards DevOps methodologies, tools, or architecture? Identifying your niche will help you narrow down the certifications that are most relevant to your professional journey.
Next, research the industry-recognized certification bodies. Look for programs that are widely recognized and respected within the DevOps community. Certifications from reputable organizations enhance your credibility and validate your expertise to potential employers.
youtube
Consider the prerequisites and requirements for each certification program. Some certifications may have certain experience or educational prerequisites, while others may require passing specific exams. Evaluate your eligibility and ensure that you meet the necessary criteria.
Furthermore, assess the curriculum of each certification program. Look for comprehensive and up-to-date course material that covers the essential topics and tools in the DevOps field. A well-structured program will equip you with the knowledge and skills needed to excel in your career.
Additionally, consider the mode of delivery for the certification program. Online courses offer flexibility and convenience, allowing you to learn at your own pace. Look for programs with interactive elements, such as hands-on labs and assignments, to enhance your practical understanding of DevOps principles.
Lastly, take into account the reputation and reviews of the certification program. Seek feedback from professionals who have completed the program to get an insight into the quality of education and the value it offers. Online forums and professional networking sites can be valuable resources for gathering this information.
5.Conclusion: Embracing DevOps Online Certification for a Successful Future
In conclusion, obtaining a DevOps online certification training is a crucial step towards achieving success in the digital world. The benefits of certification are extensive and can greatly impact your career prospects. From increased credibility and job opportunities to higher salaries and career progression, a recognized certification in DevOps sets you apart from the competition.
By investing in an online DevOps certification, you gain the flexibility to learn at your own pace while acquiring the skills necessary to excel in the field. Whether you are a beginner or an experienced professional, these certifications provide the foundation or advanced knowledge to propel your career forward.
#h2kinfosys#devops#devops coure#devops training near me#aws devops certification#devops tutorial#microsoft azure#azure course#awscertification#aws services#aws course#Youtube
0 notes
Video
youtube
Amazon RDS for MariaDB | Simplify Database Management RDS for MariaDB is a fork of MySQL, offering additional features, security enhancements, and improved performance. It is fully compatible with MySQL and provides a rich ecosystem of storage engines, plugins, and tools.- Key Features: - Enhanced security features like data-at-rest encryption and data masking. - Support for MariaDB-specific features such as the Aria storage engine. - Seamless compatibility with MySQL, enabling easy migration. - Automated backups, monitoring, and maintenance.- Use Cases: - Applications needing advanced security and performance. - Users looking for an enhanced, open-source alternative to MySQL. - Web applications with moderate to high traffic.Key Benefits of Choosing the Right Amazon RDS Database:1. Optimized Performance: Select an engine that matches your performance needs, ensuring efficient data processing and application responsiveness. 2. Scalability: Choose a database that scales seamlessly with your growing data and traffic demands, avoiding performance bottlenecks. 3. Cost Efficiency: Find a solution that fits your budget while providing the necessary features and performance. 4. Enhanced Features: Leverage advanced capabilities specific to each engine to meet your application's unique requirements. 5. Simplified Management: Benefit from managed services that reduce administrative tasks and streamline database operations.Conclusion:Choosing the right Amazon RDS database engine is critical for achieving the best performance, scalability, and functionality for your application. Each engine offers unique features and advantages tailored to specific use cases, whether you need the speed of Aurora, the extensibility of PostgreSQL, the enterprise features of SQL Server, or the robustness of Oracle. Understanding these options helps ensure that your database infrastructure meets your application’s needs, both now and in the future.
#youtube#Amazon RDS RDS Monitoring AWS Performance Insights Optimize RDS Amazon CloudWatch Enhanced Monitoring AWS AWS DevOps Tutorial AWS Hands-On C#amazon auroraaurora databasecloud computingaws cloudamazon aurora deep diveamazon aurora vs rdsserverless databaseamazon aurora databaseaws#AmazonRDS RDSMonitoring PerformanceInsights CloudWatch AWSDevOps DatabaseOptimization ClouDolus ClouDolusPro
0 notes
Text

Learn the trending web technologies and programming in 2024. Learn Java, C, C++, Python, SQL, Cyber security, DevOps, AI, and ML from scratch.
0 notes
Text
Keep Ubuntu Pod Running in Kubernetes | sleep infinity
In this video you'll learn:
✔️ Why Pods exit immediately without a running process ✔️ How to fix CrashLoopBackOff errors in Kubernetes ✔️ Keeping Pods alive using sleep infinity ✔️ Hands-on YAML example to create an Ubuntu Pod ✔️ How to exec into a running Pod and practice Linux commands ✔️ Bonus: Instant kubectl one-liner to launch a Pod without YAML ✔️ Explore Alpine, CentOS, and other Linux images easily
youtube
0 notes
Text
[PowerBi] Integración con AzureDevOps Git Repos
El lanzamiento de Power Bi Developer Mode durante el evento Microsoft Build está causando gran revuelo no solo por su posibilidad resguardar un proyecto de PowerBi sino también porque por primera vez tendríamos la posibilidad de que dos o más usuarios trabajen en un mismo proyecto. Esto no es trabajo concurrente instantáneo como Word Online sino más bien cada quien modificando los mismos archivos de un repositorio y logrando integrarlos al final del día.
La deuda de versionado y trabajo en equipo finalmente estaría cumplida. Según uno de los personajes más importantes del equipo, Rui Romano, aún hay mucho por hacer. Veamos que nos depara esta característica por el momento.
Vamos a iniciar asumiendo que el lector tiene un conocimiento básico de repositorios. Entienden que en un repositorio se almacenan versiones de archivos. Se pueden crear ramas/branches por persona que permita modificar archivos y luego se puedan integrar/merge para dejar una versión completa y definitiva.
Todo esto es posible gracias a la nueva característica de Power Bi Desktop que nos permite guardar como proyecto. Esto dividirá nuestro pbix en dos carpetas y un archivo:
Carpeta de <nombre del archivo>.Dataset: Una colección de archivos y carpetas que representan un conjunto de datos de Power BI. Contiene algunos de los archivos más importantes en los que es probable que trabajes, como model.bim.
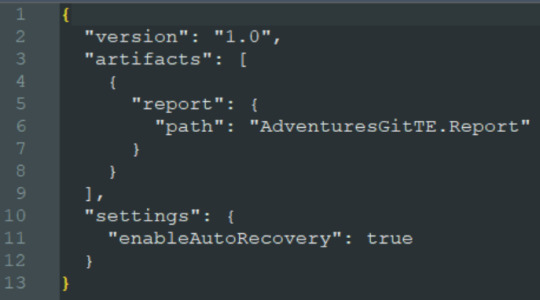
Carpeta de <nombre del archivo>.Report: Una colección de archivos y carpetas que representan un informe de Power BI. El archivo más importante es "report.json", aunque durante la vista previa no se admiten modificaciones externas en este archivo.
Archivo <nombre del archivo>.pbip: El archivo PBIP contiene un enlace a una carpeta de informe. Al abrir un archivo PBIP, se abre el informe en Power Bi Desktop y el modelo correspondiente.
Entorno
Lo primero es configurar y determinar nuestro entorno para poder vincular las herramientas. Necesitamos una cuenta en Azure DevOps y un workspace con capacidad en Power Bi Service. Para que la integración sea permitida necesitamos asegurarnos que nuestra capacidad y la de la Organización de Azure DevOps estén en la misma región.
La región de una organización de Azure DevOps puede ser elegida al crearla, al igual que podemos elegir la región de una capacidad cuando creamos una premium, embedded o fabric.
En caso de utilizar capacidad PowerBi Premium Per User o Fabric Trial, no podríamos elegir la región. Sin embargo, podríamos revisar la región de nuestro PowerBi para elegir la misma en Azure DevOps
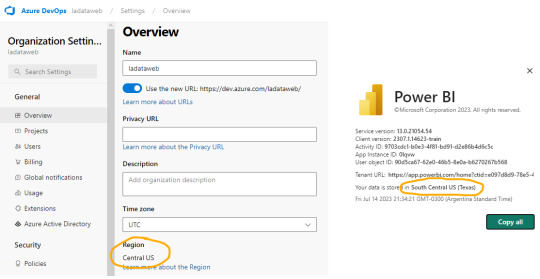
En ese caso creamos la organización de DevOps igual que nuestro PowerBi porque haremos el ejemplo con un workspace PPU.
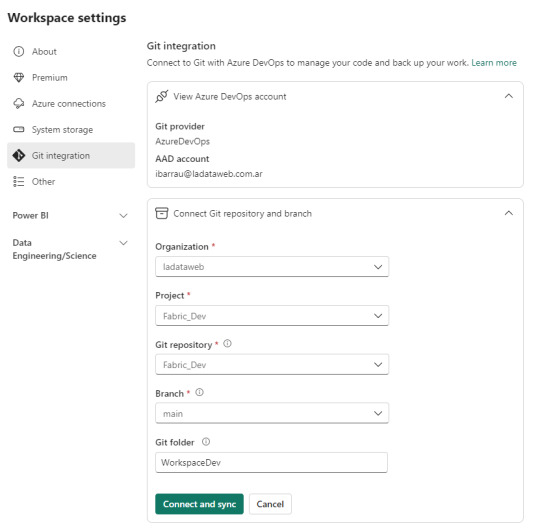
Seteo
Dentro de Power Bi Service y el Área de trabajo con capacidad que queremos versionar iremos a la configuración. Con la misma cuenta de ambos entornos completaremos los valores de organización, proyecto, repositorio, rama y carpeta (opcional).
Como nuestro repositorio esta vacío, lo primero que sucederá cuando conectemos será una sincronización de todos los items del área de trabajo en el repositorio. Ahora bien, si teníamos reportes en el repositorio y en el area, tendremos un paso más para coordinar la operación deseada si pisar o integrar.
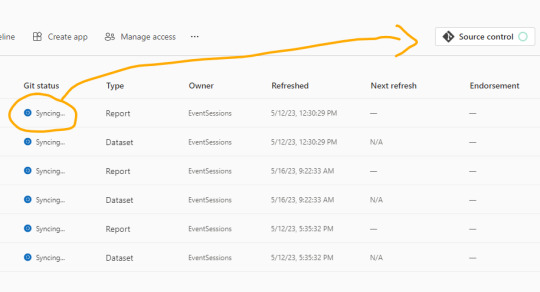
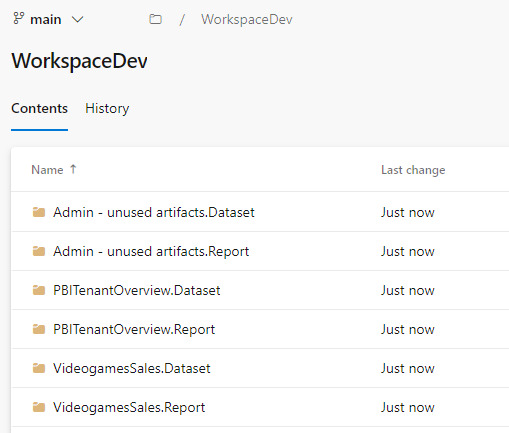
Una vez que todo tenga tilde verde y esté sincronizado, podremos ver como queda el repositorio.
En caso que ya tuvieramos informes cuando inicio el proceso, se crearán carpetas pero no el archivo .pbip que nos permitiría abrirlo con Power Bi Desktop.
Si crearamos el informe con Power Bi Desktop y eligieramos “Guardar como proyecto” si se crearía. Entonces podríamos hacer un commit al repositorio y automáticamente se publicaría en nuestra área de trabajo.
El archivo pbip es un archivo de texto. Podemos abrirlo con un bloc de notas para conocer como se constituye para generarlo en caso que necesitemos abrir con Desktop uno de los informes que sincronizamos antes. Ejemplo del archivo:
Al tener sincronizado el repositorio con el workspace podemos usar un entorno local. Si está en el repositorio en la rama principal, entonces estará publicado en el área de trabajo. Veamos como sería el proceso.

Esta sincronización también nos favorece en el proceso de Integración y Deploy continuo puesto que varios desarrolladores podrían tener una rama modificada y al integrarlo con la principal delimitada en el área de trabajo tendríamos automáticamente todo deployado.
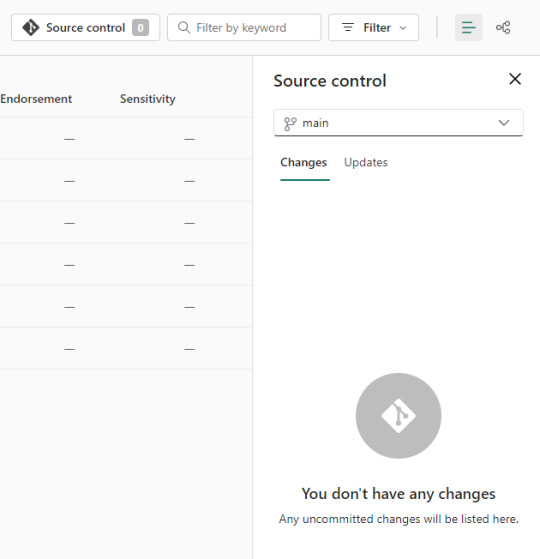
Si algo no se encuentra en su última versión o hacemos modificaciones en línea, podemos acceder al menú de source control que nos ayudaría a mantener ordenadas las versiones.
Alternativa Pro
Con las nuevas actualizaciones de Fabric en agosto 2023, podremos por primera vez, trabajar en equipo en PowerBi sin licencia por capacidad o premium. Guardar como proyecto es una característica de PowerBi Desktop. Por lo tanto, podemos usarla contra un repositorio Git en cualquier tecnología. Al termino del desarrollo, una persona encargada debería abrir el PBIP y publicarlo al área pertinente. Ahora podemos publicar desde Desktop los informes guardados como proyectos. Esto nos permite que los casos de puras licencias pro puedan aprovechar las características de histórico y control de versiones. Quedará pendiente la automatización para deploy e integración que aún no podría resolverse solo con PRO.
Conclusión
Esta nueva característica nos trae una práctica indispensable para el desarrollo. Algo que era necesario hace tiempo. Sería muy prudente usarlo aún en proyectos que no modifiquen un informe al mismo tiempo puesto que ganamos una gran capacidad en lo que refiere a control de versiones.
Si no tenemos capacidad dedicada, deberíamos trabajar como vimos en post anteriores sobre metodología de integración continua de repositorio https://blog.ladataweb.com.ar/post/717491367944781824/simplepbicd-auto-deploy-informes-de-powerbi
Esperemos que pronto tengamos una opción para importar por API estos proyectos al PowerBi Service para poder idear nuestros propios procesos sin usar las integraciones por defecto sino una personalizada a nuestro gusto.
#powerbi#power bi#power bi desktop#power bi git#azure devops#azure repos#power bi tutorial#power bi tips#power bi training#power bi argentina#power bi jujuy#power bi cordoba#ladataweb#power bi developer mode
0 notes
Photo
🦾How to automate your resume using R, R markdown, and GitHub Actions ⚡ Original repo General Automating the creation of your resume is a smart way to save time and keep your information up to date. In this article, I will guide you through a simple process using tools like Rmarkdown and GitHub Actions to automate the generation of your resume. Understanding the Tools 🧰 Before we dive into the process, it's important to understand the tools we'll be using: R: A programming language focused on statistical analysis and data visualization. We'll use R to create and manipulate our resume. Rmarkdown: An extension of R that allows combining code, text, and visual elements into a single document. We'll use Rmarkdown to create a structured resume. GitHub Actions: An automation service provided by GitHub that allows us to create custom workflows. We'll leverage GitHub Actions to automate the resume generation. Docker: A platform that enables packaging, distributing, and running applications in containers. We'll use Docker to create a consistent environment for executing our resume generation process. Now that we understand the tools involved, let's proceed to the automation process: Getting Started First and foremost, you'll need a GitHub account. If you don't have one yet, you can create one here. You'll also need access to a web browser to configure a few things. Step 1: Prepare the Repository 📦 Create a new repository on GitHub for your project. Clone the repository to your computer using Git. Step 2: Add the Resume File 📄 Create a file named data-driven-cv.Rmd (or use any name you prefer, just remember to change it in the action and it should be .Rmd) in the root of your repository. Open the file in your favorite text editor. The file should have this header: --- name: Your name surname: Your surname address: "Your address" profilepic: "./imgs/zero-cool.jpeg" position: "Software Engineer | Frontend Developer" www: "yoursite.dev" email: "[email protected]" github: yourgithub linkedin: yourlinkedin date: "`r format(Sys.time(), '%B %Y')`" headcolor: 7d34eb # Here you can choose your favorite color aboutme: "I am a software engineer with over 6 years of experience in developing modern web applications. My passion lies in creating incredible and functional user interfaces." docname: Resume output: vitae::awesomecv --- Note that in the last attribute of the YAML, you have the vitae::awesomecv. This is just one of the mentioned templates, the others are available here. In this section, personal information and resume formatting are defined. This includes name, surname, position, website links, contact information, resume creation date, header color, and a brief description about you. The file should follow this structure: --- name: Your name surname: Your surname address: "Your address" profilepic: "./imgs/zero-cool.jpeg" position: "Software Engineer | Frontend Developer" www: "yoursite.dev" email: "[email protected]" github: yourgithub linkedin: yourlinkedin date: "`r format(Sys.time(), '%B %Y')`" headcolor: 7d34eb # Here you can choose your favorite color aboutme: "I am a software engineer with over 6 years of experience in developing modern web applications. My passion lies in creating incredible and functional user interfaces." docname: Resume output: vitae::awesomecv --- {r setup, include=FALSE} knitr::opts_chunk$set(echo = FALSE, warning = FALSE, message = FALSE) require(xfun) packages <- c('vitae', 'tibble', 'magrittr', 'here', 'readr', 'glue') xfun::pkg_attach2(packages, message = FALSE) # In this part, we set the path and the file we want. If you're following the step-by-step tutorial, you'll need to change the second parameter to data.R source(file = here("data","data-generic.R")) # Experience {r EMPLOYMENT} work %>% detailed_entries( with = title, what = unit, why = detail, when = glue::glue("{startMonth} {startYear} -- {endMonth} {endYear}", .na = ""), where = where ) # Education {r EDUCATION} edu %>% detailed_entries( with = inst, what = degree, why = detail, when = glue::glue("{startYear} -- {endYear}", .na = ""), where = where ) \pagebreak # Skills {r SKILLS} skills %>% detailed_entries( with = area, what = skills, why = detail ) \pagebreak # Projects {r PROJECTS} projects %>% detailed_entries( with = accomplishment, what = area, when = glue::glue("{year}", .na = ""), where = where, why = detail ) # Certifications {r CERTIFICATIONS} certifications %>% detailed_entries( with = accomplishment, what = area, when = glue::glue("{year}", .na = ""), where = where, why = detail ) # Honors and Awards {r HONORS} honors %>% detailed_entries( with = accomplishment, what = area, when = glue::glue("{year}", .na = ""), where = where, why = detail ) Step 2: Creating data.R 📝 Create a folder named "data." Create a file named data.R with the following structure: skills <- tribble( ~area, ~skills, ~detail, "Technology", "Javascript", "Experience with Javascript in front-end projects using React", "Technology", "Javascript", "Redux, Redux Toolkit, and Context API for state management", "Technology", "Javascript", "Jest and React Testing Library for unit tests", NA, "Typescript", "Using Typescript with Prisma for database access.", NA, "Elixir", "Exploring Elixir in personal projects using Phoenix and Ecto.", NA, "Elixir", "Using LiveView for fullstack applications.", NA, "HTML", "Creating semantic and accessible web pages.", NA, "CSS", "Styling projects using SASS and BEM methodology.", NA, "Rust", "Learning Rust for secondary projects.", NA, "Rust", "Following the zero2prod book.", NA, "DevOps", "Experience with virtualization and containers using Docker.", NA, "DevOps", "CI/CD with Github Actions and TravisCI.", NA, "Databases", "Working with SQL and NoSQL databases.", NA, "Databases", "MongoDB for non-relational databases.", "Languages", "Portuguese", "Native language.", "Languages", "English", "Fluent.", ) edu <- tribble( ~degree, ~startYear, ~endYear, ~inst, ~where, ~detail, "Bachelor's in Computer Science", 2015, 2019, "Imaginary University", "Fictional City, Fictional State, Fictional Country", "Studies in algorithms, data structures, and object-oriented programming.", "Master's in Software Engineering", 2020, 2022, "Fictional University", "Fictional City, Fictional State, Fictional Country", "Research in software development, focus on agile methodologies and scalable architectures.", ) work <- tribble( ~title, ~unit, ~startMonth, ~startYear, ~endMonth, ~endYear, ~where, ~detail, "Software Engineer", "TechSoft", "January", 2020, "December", 2022, "Fictional City, Fictional State", "Worked as part of a team in developing web applications using React and Redux.", "Full Stack Developer", "WebTech", "March", 2018, "November", 2019, "Fictional City, Fictional State", "Participated in the development of a full stack application using Node.js, React, and MongoDB.", "Development Intern", "ByteCorp", "July", 2017, "December", 2017, "Fictional City, Fictional State", "Gained practical experience working on software development projects.", ) honors <- tribble( ~area, ~accomplishment, ~year, ~where, ~detail, "Hackathon", "Best Computing Student", 2021, "Wall Street", "Awarded 1 billion dollars.", "Academic Recognition", "Best Computing Student", 2019, "Imaginary University", "Recognized for academic excellence in the field of Computing.", "Programming Competition", "1st Place in Algorithms", 2018, "Fictional Programming Event", "Achieved first place in the algorithm programming competition.", ) projects <- tribble( ~area, ~accomplishment, ~year, ~where, ~detail, "Software Development", "Task Management System", 2022, "TechSoft", "Led the creation of a task management system using React and Redux.", "Software Development", "E-Commerce Platform", 2021, "Fictional Company", "Participated in the development team of an e-commerce platform.", ) certifications <- tribble( ~area, ~accomplishment, ~year, ~where, ~detail, "Professional Certifications", "React Certification", 2021, "Fictional Online Learning Platform", "Obtained React certification to showcase skills in the library.", "Professional Certifications", "Docker Certification", 2020, "Fictional Online Learning Platform", "Achieved Docker certification to demonstrate container knowledge.", ) Step 3: Setting Up Automation 🤖 On GitHub, go to the "Actions" tab in your repository. Click on "Set up a workflow yourself" to create a workflow file. Paste the following code into the file and save: name: CI for CV on: push: paths: - .github/workflows/ci.yml - 'markdowns/**' - 'data/**' branches: - main permissions: write-all jobs: build: name: Creation of resume in en and pt-br runs-on: ubuntu-latest container: image: mlampros/mycvitae:rstudiodev steps: - name: Set up Git repository uses: actions/checkout@v3 - name: Installing texlive run: | sudo apt-get -y update sudo apt-get install -y texlive-base texlive-latex-base sudo apt-get install -y texlive-latex-recommended sudo apt-get install -y texlive-xetex sudo apt-get install -y texlive-fonts-extra - name: Render the resumes run: | Rscript -e "rmarkdown::render(input = file.path(getwd(), 'data-driven-resume.Rmd'), params = list(work_dir = getwd()))" Rscript -e "rmarkdown::render(input = file.path(getwd(), 'data-driven-resume-pt-br.Rmd'), params = list(work_dir = getwd()))" - name: Commit files run: | git config --local user.email "[email protected]" git config --local user.name "GitHub Actions" git add . git commit -am "add the cv in english and pt-br files to the directory of the repository" git push Wrapping Up If you've followed all the steps correctly, you'll likely see the resume with a header similar to the one above. PS: Yeah, I know that the image is in pt-br but I'm lazy and I'm not redo all the steps just to generate one image. Conclusion Automating the creation of your resume using Rmarkdown, GitHub Actions, and Docker is an effective way to keep your information updated and relevant. The benefits range from saving time to showcasing your technical skills to employers. If you have any questions, feel free to reach out! Also, if you have any contributions, please fork the repository and open a pull request. I'll be happy to review them. I hope this article has been helpful and that you're ready to automate your resume. Happy hacking! :) https://dev.to/girordo/how-to-automate-your-resume-using-r-r-markdown-and-github-actions-2bej
0 notes