#decorative sealer
Explore tagged Tumblr posts
Visit Tumblr Blog
Explore Tumblr blogs with no restrictions, modern design and the best experience.
Last Seen Tumblr Blogs


Fun Fact
Hackers stole 65M passwords from Tumblr in 2013.
Text
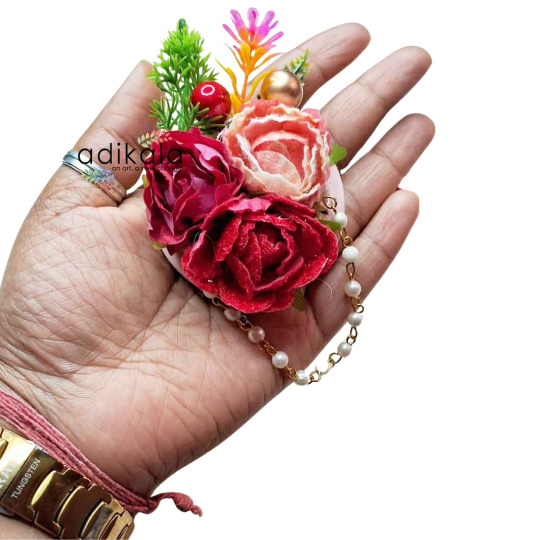
Blue & Green Color Combination Couple Brooch Pack Of 2Color: Blue & Green Color Combination
Occasion: Festive & Wedding Decoration
Material: Flower, Beads Etc.
Style: Hanging
Product Dimensions: 6cm approx.
Quantity: Pair 1 ( 2 brooch )
New range of our craft materials for upcoming festivals decoration, wedding decoration, (bandhanwar, rangoli, toran) DIY projects, scrapbooks, dress designing, dreamcatchers, resin projects etc.✅Cash On Delivery Available All Over India✅At Affordable Prices✅Pocket Friendly✅Buy Now✅Shop Now
#art#decoration#decor#100 days of productivity#indianart#misha collins#craft#museums#mua#mp100#the bad batch#batch sealers#lehnga#sharee#chanderi dupatta online#chikankari kurti set with phulkari dupatta#kalamkari dupatta online#banarasi dupatta#kota doria dupatta#flowers#plants#floral#pink flowers#green#garden#artificialflower#artificialflowers
3 notes
·
View notes
Text
Hdjsnshzjsjka
My grammy just called me and was like
"Are you SURE there isn't anything you want for Christmas besides a PRINTER???"
Shes so done with me and my mom lol
#my mom asked for a nail gun#and a new vacuum sealer although thats *technically* for my dad but he would rather just not celebrate Christmas#i went ahead and asked for a rock tumbler#she ALSO got me a decorative knife at the craft fair tho#which is why i hadnt asked for the rock tumbler until now#cuz that knife was 60 dollars#its very pretty tho 🥺#its opalescent glass with a.....i think wood handle but they also had ones with deer antler handles#and i cant remember which one i picked#WE'RE PRACTICAL PEOPLE GRAMMY#WE ASK FOR PRACTICAL THINGS#like idk man if i want like a book or movies or games or some shit and have the money for it i just buy it#like im not gonna wait for a specific day for it#i impulse buy things i just WANT#im less likely to impulse buy things i actually need#i need a printer (mostly a scanner but getting an all in one printer makes a lot more sense than just buying a scanner)#so i can digitize my art#cuz im far more comfortable doing physical art and then touching it up on my computer than i am doing straight digital art#also i wanna get into fan binding and stuff#cuz if i have to go to another location to print or scan things im just not gonna do it#its too many extra steps#also i miss having a printer#a rock tumbler would also be appreciated tho#ive wanted one since i was a little kid#so has my mom#AND I HAVE SO MANY ROCKS I WOULD LIKE TO POLISH#also i wanna see what happens if you tumble driveway gravel#one of my baby cousins gifted me some while i was drunk at a family bonfire and i almost cried#i need to test its mohs hardness tho#it probably wont get shiny
2 notes
·
View notes
Text
bought some materials to make pocket shrines only to realize that i need more materials still to decorate them the way i want too... the curse
#jess talks too much#i cant have a permanent altar setup so i thought "ill buy a whole bunch of metal tins for little shrines''#except to decorate them im going to need to decoupage#and i have... no primer or mod poge and idk if my sealer is good for this#so now i gotta wait a while longer to make some more money SO i can order these materials#plus side had fun figuring out the names to put on some more localized shrines#mother pacific has now turned into na'-ah salt-chuck (mama salt water)#mother pacific and poseidon are not the same and i stand by this
3 notes
·
View notes
Text
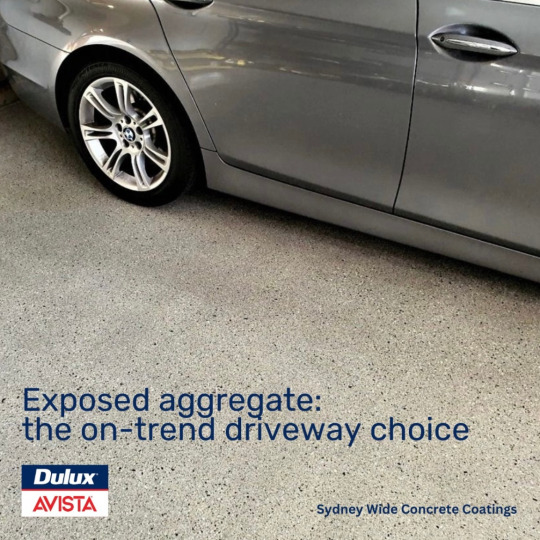
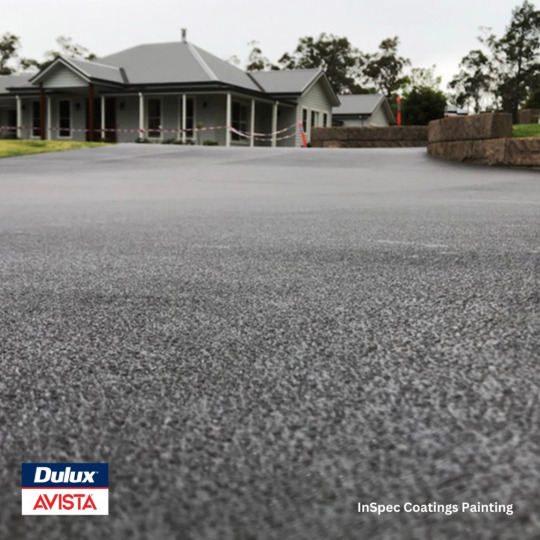
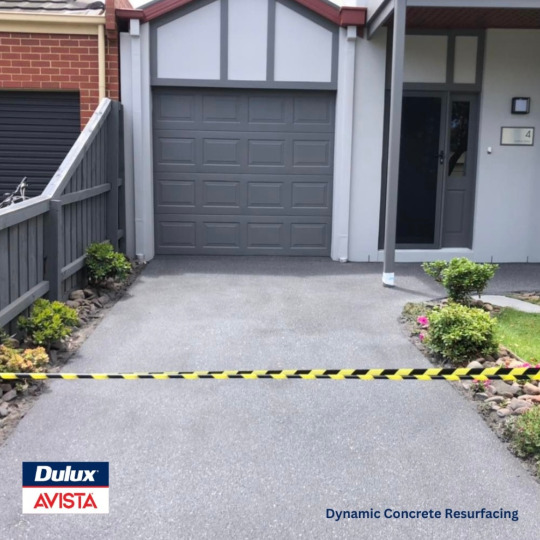
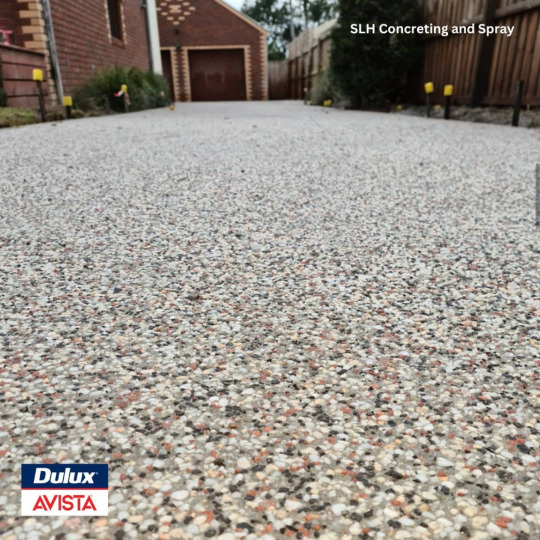
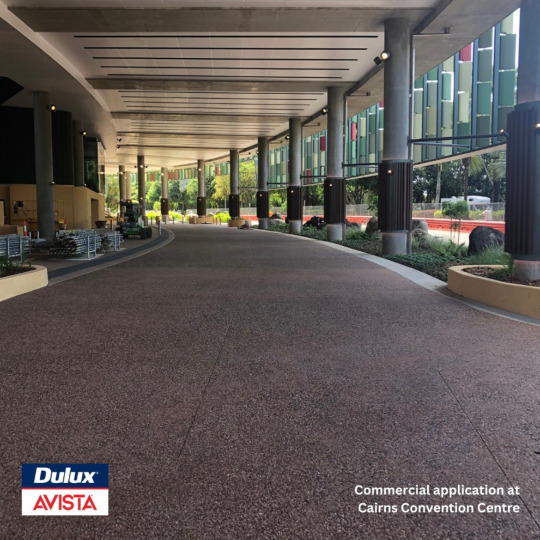
We're loving these stunning exposed aggregate driveways created by Dulux Avista Accredited Applicators around Australia. The diverse stone and pebble combinations effortlessly enhance the look of plain concrete, lending it a more earthy texture that seamlessly integrates with landscaping.
Check out the sandy pebble driveway by @slh_concreting, the dark grey pebble mix on a semi-rural driveway by @inspeccoatings_painting, the mid-grey textured driveway by Dynamic Concrete Resurfacing, and the garage floor in standard concrete aggregate wash by Sydney Wide Concrete Coatings.
Feeling inspired? Discover how easy it is to achieve a broad range of on-trend looks by varying the size and volume of stones in the aggregate mix.
Visit Inspirations Paint Gregory Hills to kickstart your exposed aggregate project today!
📷 I @duluxavista
👉🏽 Looking to transform your space? Call the professionals on 4647 2088.
👉🏽 Ready to order? Pop in-store at Unit 2/2 Holborn Cct, Gledswood Hills. We also deliver! Mondays to Saturdays for both retail and trade customers.
#Colour Hardener#concrete#concrete sealer#decorative concrete#decorative flakes#driveway resurfacing#driveways#dulux#duluxaus#Dulux Avista#exteriors#flake flooring#Gregory Hills#Home Improvement#Inspirations Paint#Inspirations Paint Gregory Hills#interiors#landscaping#landscaping ideas#modern driveways
0 notes
Text
Enhance Your Surfaces With Decorative Concrete Sealer
Discover the secret to transforming ordinary concrete into extraordinary works of art. The decorative concrete sealer provides long-lasting protection while bringing out the true beauty of your surfaces. Contact here for more.
0 notes
Text
The Versatility of Concrete Flooring: From Industrial to Modern Interior Design
Concrete flooring has come a long way from its utilitarian roots and is now celebrated for its exceptional versatility and aesthetic appeal in both industrial and modern interior design. As a durable and cost-effective flooring option, concrete has emerged as a popular choice for homeowners and designers seeking to create stylish and functional spaces. Let's explore how concrete flooring seamlessly transitions from industrial to modern interior design, transforming spaces with its unique charm and adaptability.

Industrial Charm:
In industrial interior design, concrete flooring is a hallmark feature that exudes a raw and rugged appeal. The exposed concrete surfaces, often with visible imperfections and patina, bring an authentic and industrial look to spaces. Whether it's a loft apartment, warehouse conversion, or commercial setting, the inherent strength and durability of concrete lend an unmistakable character to the overall design.
Minimalist Elegance:
In modern interior design, concrete flooring takes on a new identity as a minimalist canvas that complements clean lines and sleek aesthetics. The smooth and polished surfaces of concrete provide a sophisticated backdrop for contemporary furnishings and decor. Its neutral gray tones serve as an ideal foundation to enhance the visual impact of furniture, artwork, and accent pieces.
Stained and Decorative Finishes:
Concrete flooring's versatility shines through with stained and decorative finishes. In industrial settings, acid stains can create rich earthy tones, enhancing the concrete's natural texture. For modern interiors, decorative techniques like stenciling, engraving, or embedding aggregates offer opportunities for creative expression, adding subtle patterns or unique designs to the floor.
Seamless Transition between Indoors and Outdoors:
One of the remarkable aspects of concrete flooring is its ability to create a seamless transition between indoor and outdoor spaces. By extending concrete flooring from the interior to patios or outdoor living areas, homeowners can achieve a harmonious flow, blurring the boundaries between the two realms.
Sustainability and Eco-Friendliness:
In an era of increasing environmental consciousness, concrete flooring gains admiration for its sustainability. Concrete is often sourced locally, reducing the environmental impact of transportation. Additionally, its thermal mass properties can help regulate indoor temperatures, reducing the need for excessive heating or cooling.
Low Maintenance and Longevity:
Another advantage of concrete flooring is its low maintenance and long-lasting qualities. Properly sealed and maintained, concrete floors can withstand heavy foot traffic and daily wear, making them an enduring investment for any space.
Conclusion:
From the raw charm of industrial settings to the minimalist elegance of modern interiors, concrete flooring showcases its remarkable versatility as a design element. Its adaptability, sustainability, and longevity make it a popular choice for homeowners and designers seeking to create distinctive spaces that stand the test of time. Whether you embrace the industrial aesthetic or opt for a contemporary flair, concrete flooring provides the perfect foundation for transforming your interior spaces into stylish havens of creativity and comfort.
#Concrete Flooring#Pros and Cons of Concrete Flooring#How to Install Concrete Flooring#Concrete Flooring Ideas for Modern Homes#Cost of Concrete Flooring per Square Foot#Best Sealer for Concrete Flooring#Concrete Flooring Maintenance Tips#How to Polish Concrete Flooring#Concrete Flooring for Industrial Spaces#Decorative Concrete Flooring Trends#Concrete Flooring DIY Installation Guide
0 notes
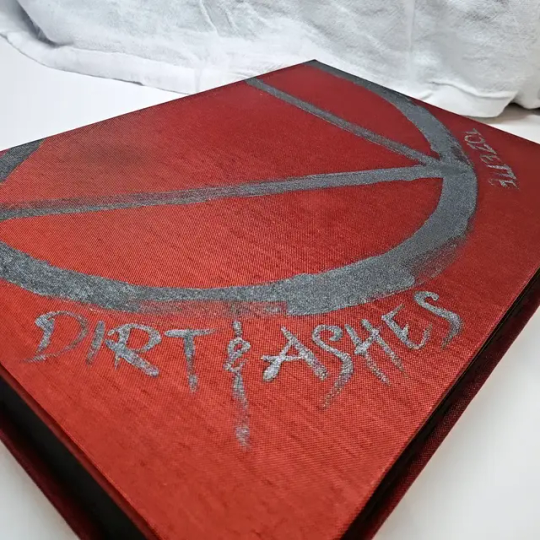
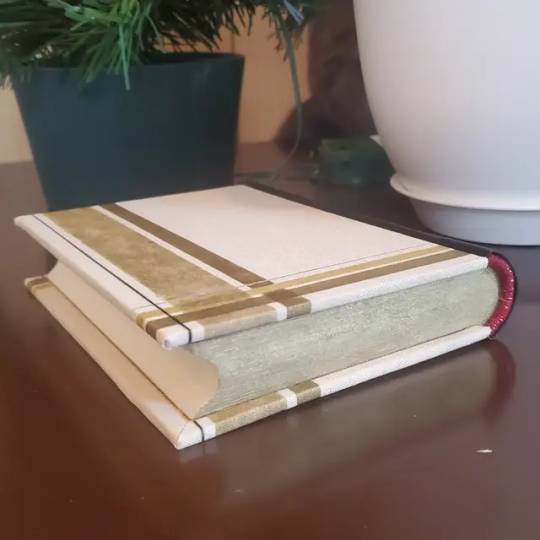
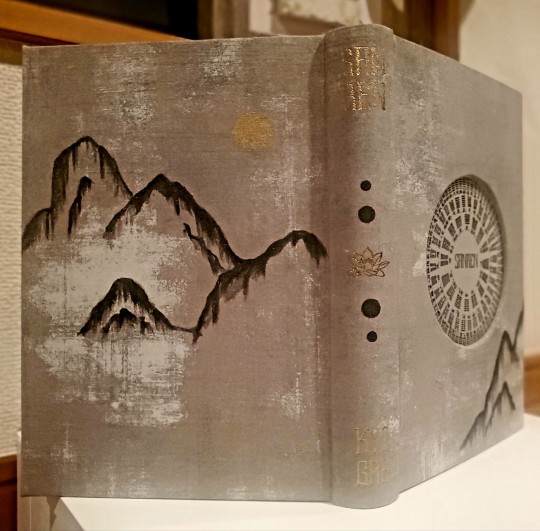
Text
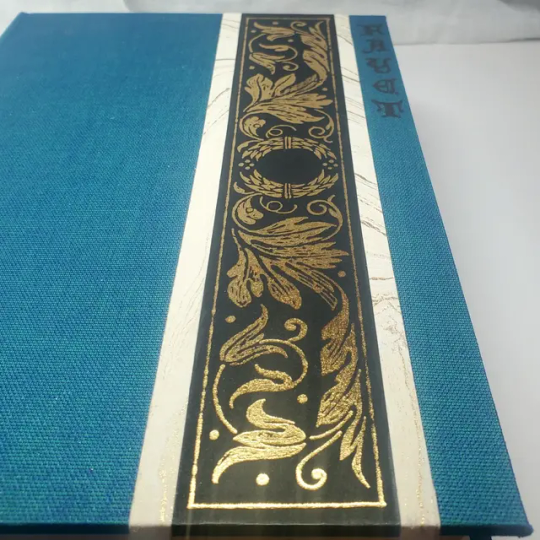
Book Decoration: AKA All The Ways I Don't Use a Cricut
(this post is for people who don't want to buy an expensive cutting tool, or for those that do have an expensive cutting tool that would like to mix things up a little)
1. Print That Shit
If you're already printing your own textblocks, an easy step for titles is to print them. Above is a title printed onto an "obi" of decorative paper. I measured out where I wanted things on the finished book and laid it out in Affinity, then printed it on a full sheet & trimmed it down to wrap around the book. A more simple method is to print & glue on the label into a slight indent in the cover (to protect it). A third option is to do the spine in bookcloth, while you print on paper for the cover and then glue that paper onto the boards (this usually looks even better when it is a three-piece bradel bind).
2. Foil Quill / Heat Pens
The heat pen is one of my go-to tools, but it can be a bit touchy about materials. The most popular version is the We R Memory Keepers' Foil Quill (which is one of the most ergonomic), but other pens exist that can get you to a higher heat temp, finer lines, or more consistent foil. For example, I have a pen created by a local Japanese bookbinding studio that fares way better on leathers than the WRMK quill & with a finer tip, but it's hell to control. Best results in general are on paper or smooth bookcloth (starched linen, arrestox, colibri - even duo will work but its less solid). The fuzzier a bookcloth is, the less your foil quill wants to deal with it. This means the heat n bond method of making bookcloth does not play nice with a heat pen usually, but there are two solutions: 1) use this tutorial on paste + acrylic medium coated bookcloth instead that will get you a perfect surface for the heat pen, or 2) use the pen on paper & then glue onto the cloth. I did a video tutorial for both foil quill use and this type of homemade bookcloth for @renegadeguild Binderary in 2023.
You get the most consistent results by tracing through a printed template that is taped in place, as I do in the video above.
3. Paint That Shit
Acrylic paints will do you fine! The above is free-handed with a circle template, because I wanted that vibe. If you need straight lines that won't seep, lay them down with tape first & then paint over it first with a clear Acrylic medium, then your color. Same goes for stencils. Two more examples of painted bookcloth:
4. IT'S GOT LAYERS

By using layers of thinner boards, you can create interesting depths & contrasts on your cover. You can also make cutouts that peep through to the decorative paper behind. The most important part to this technique is the order in which each edge is wrapped. To get a good wrapped inside edge, you will split the turn in into tabs to get them to conform to a curve. You can also layer multiple colors of bookcloth without multiple layers of board, as seen below left, so long as you mind your cut edges for fraying.
5. Inlaid... anything
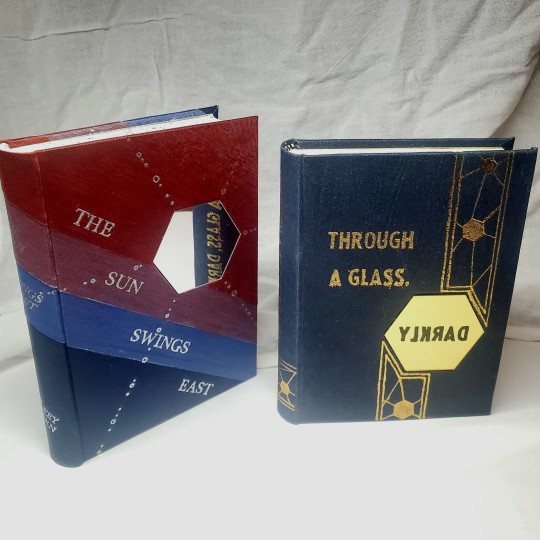
Mirrors! Marbled paper! I saw someone do a pretty metal bookmark once! The key is creating a little home for it to live in, which is pretty similar to the above layering method. On one layer you cut the shape, & glue that layer onto the bottom solid board before covering. You can do the top layer as an entire 1 mm board (like I did for the mirrors) or a sheet of cardstock, like I would use for inlaid paper.
6. Decorative Paper
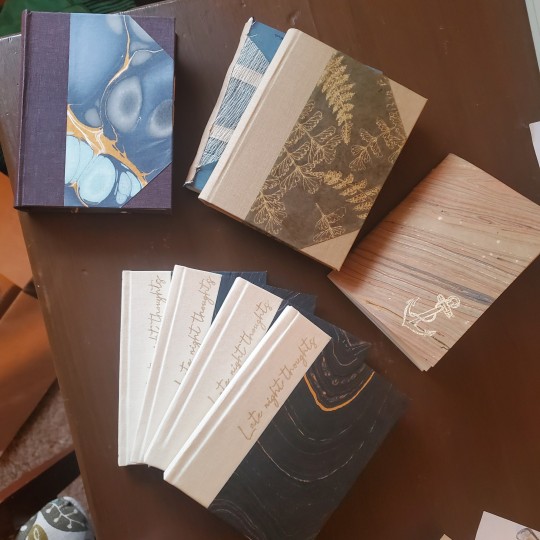
Decorative paper is always helpful & adds to the paper hoard... & its effects can be layers with other techniques, as below. Marbles, chiyogami, momi, or prints & maps of all kinds can be great additions. Some papers may need a protective coating (such as wax or a sealer).
7. Stamps (with optional linocut)
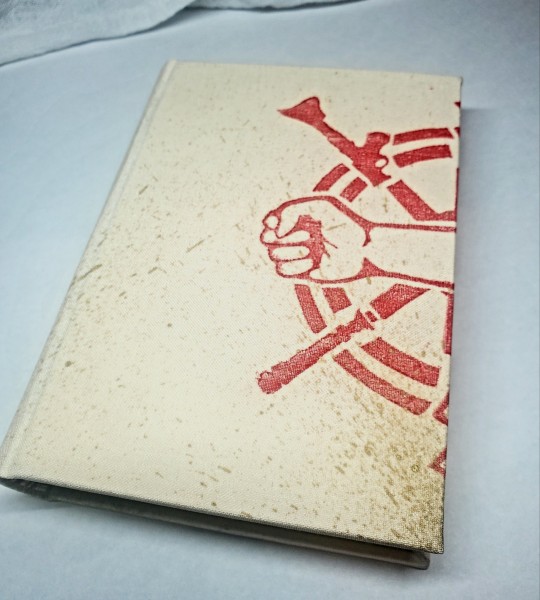
While I've not used many more regular rubber stamps, I do know some who have, successfully! And I've used one once or twice with embossing powder (see photo 3 up, the gold anchor on the little pamphlet bind). What also works is to carve your own linocut or stamp, & then use block printing ink to ink it onto your fabric (as i did above). A bit time intensive, but it was nice how easily reproducible it was, and I liked the effect I got for this particular bind.
These methods are not exhaustive, just ones I've used, and there are of course many others. I haven't gone too into detail on any of these for the sake of length (& post photo limits) but feel free to ask about more specifics. Usually I'm using them in combination with other options.
#fanbinding#bookbinding#celestial sphere press#ficbinding#in progress review#bookbinding how to#i am not particularly anti-cricut or anything#it's just a very expensive tool#and its prevalence sometimes makes new binders think they HAVE to get one#when they absolutely do not#you can make pretty books without it
472 notes
·
View notes
Text

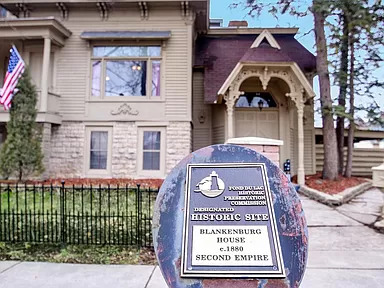
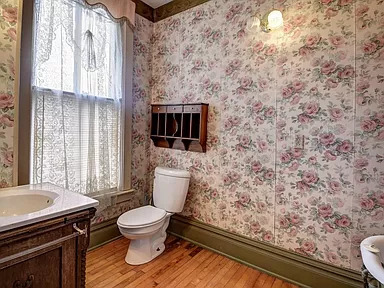
OMG, what a bargain! A wonderful 1891 Gothic Victorian in Fond du Lac, WI for only $224,900! 5bds, 4ba, and you'll fall in love with it. Take a look at this gem. Just look at the architectural details on the exterior, and the rock out front w/the historic plaque. I'm so excited about this find. I'd like to have it repainted to emphasize the pretty gothic details and strip that stone foundation, then maybe clear coat it w/sealer. They just had the whole damned thing sprayed beige.

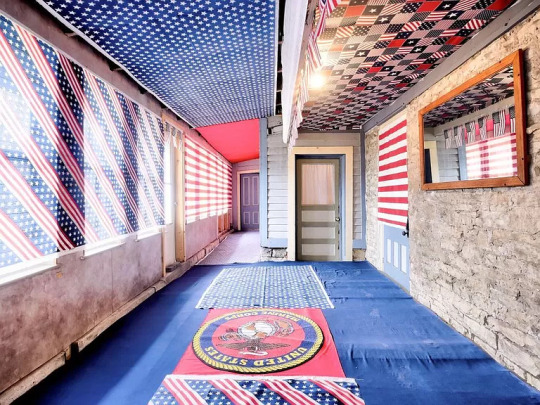
Lovely front porch.
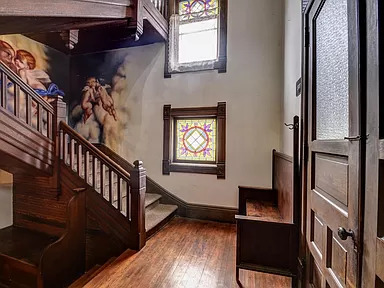

The entrance hall is stunning with the rounded stairs, fireplace, and bench. All original.
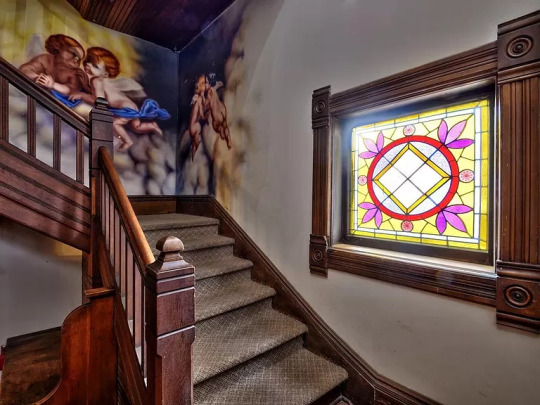
And, that mural! Not to mention the stained glass window.
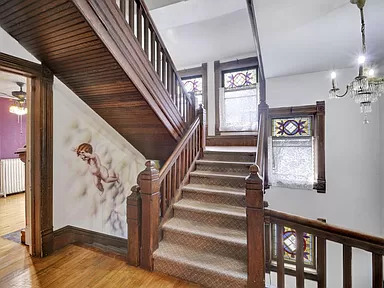
And, look at this- another mural on the next level.
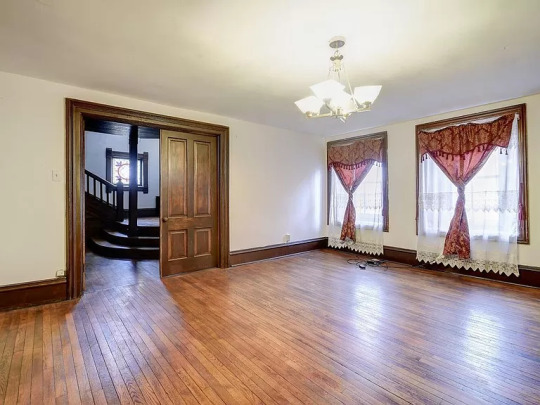
Spacious sitting room off the entrance hall. Looks like those are pocket doors.
This siting/dining room combo is a huge space. Looks like they took down a wall.
I did not include the 'virtually staged' photos b/c the modern furniture they used is offensive.


The kitchen cabinetry is plain, but the color is right, so I could work with that. Looks like they left the cute phone and some furniture pieces.

There's a large original pantry style room with an original cabinet.
This is nice, the laundry is in here, also.
I think that these are backrooms, in the addition, rather than basement rooms, b/c of the windows.
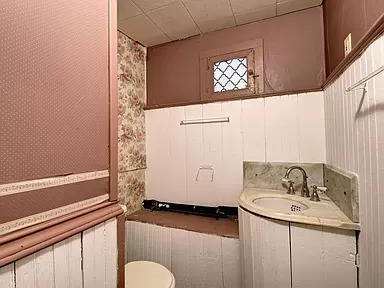
Here's a nice little vintage half bath.
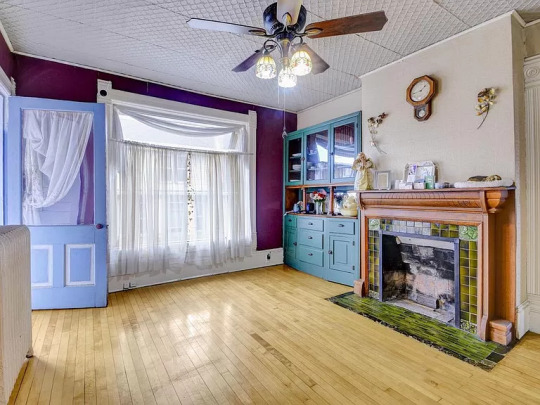
What a cute room- the blue built-in cabinet and the green tile on the fireplace. This could be anything, even a dining space.

Little fireplace in the bedroom isn't original but it's cute. This bedroom has an en-suite.

Original tub and some exposed brick in here. Very nice.
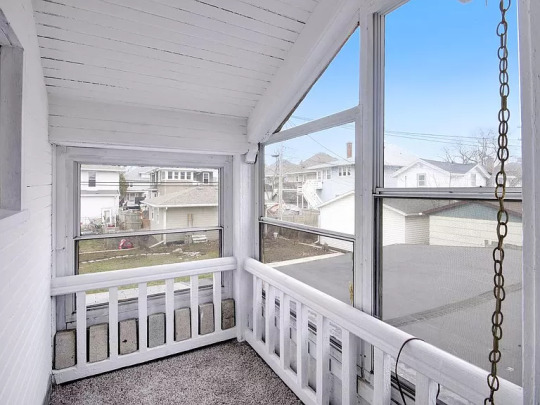
The 2nd fl. porch is so cute and it's enclosed.
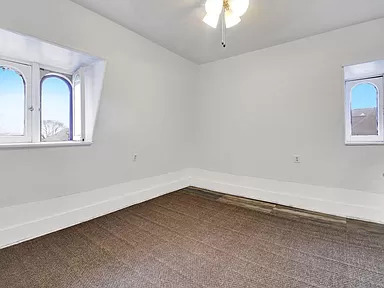
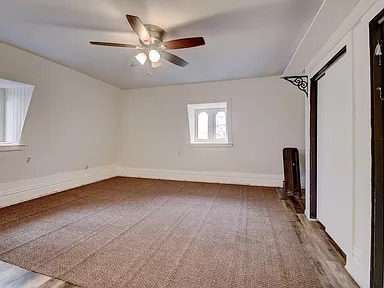
Another large room. I like the windows and it's light, waiting to be decorated.
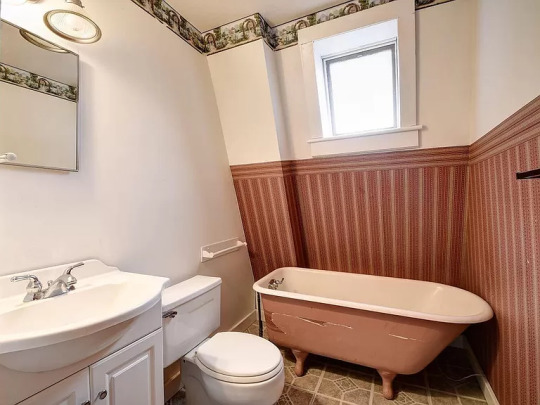
Nice bath. The tub is really original- look at the cracks. But, it still holds water.

Beautiful room. The bedrooms are surprisingly big.
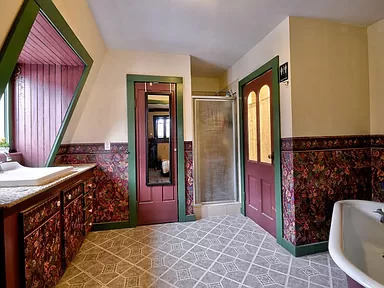
Matching bath with another original tub.
Interesting enclosed back porch. There's some exposed brick, too.
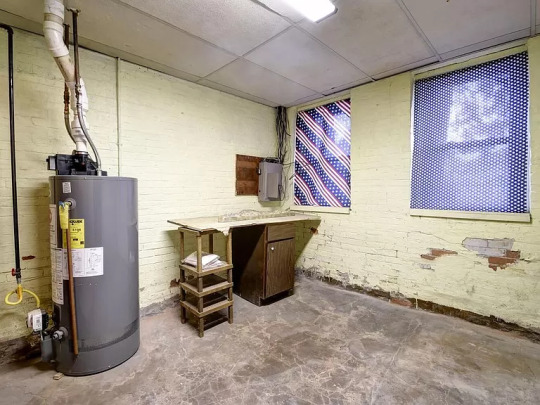
A utility room.
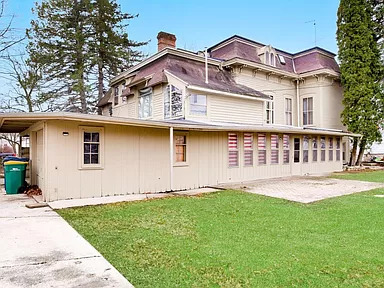
The house is deceivingly large. Look at the size of the enclosed porch in the back. The house has been added onto at some point, but the original structure has a mansard roof. It's on a 10,454 sq ft lot, so it has plenty of outdoor space.
https://www.zillow.com/homedetails/47-6th-St-Fond-Du-Lac-WI-54935/62688118_zpid/
#victorian homes#gothic victorian homes#old house dreams#houses#house tours#home tour#homes under $300K
153 notes
·
View notes
Text

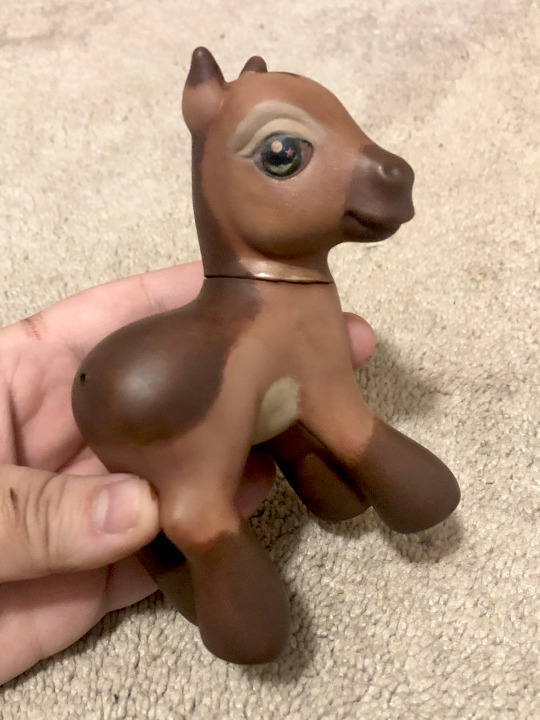
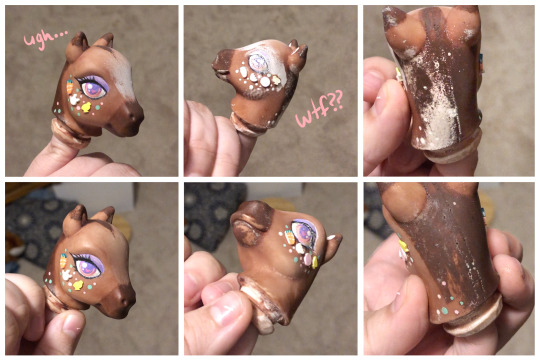
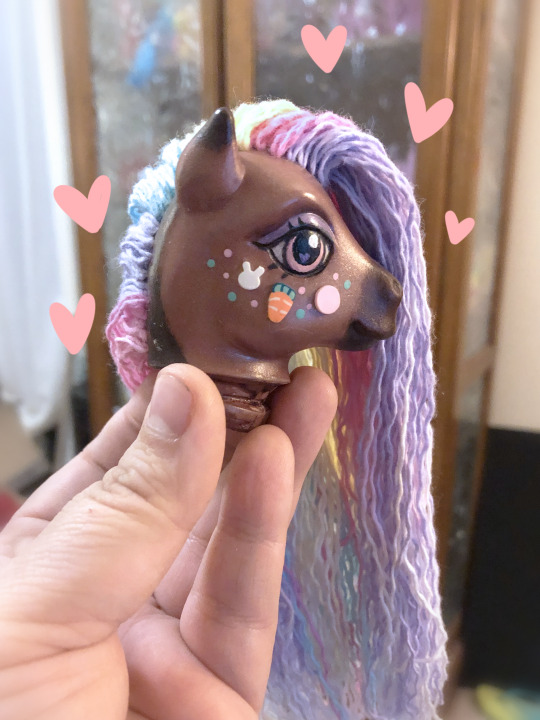
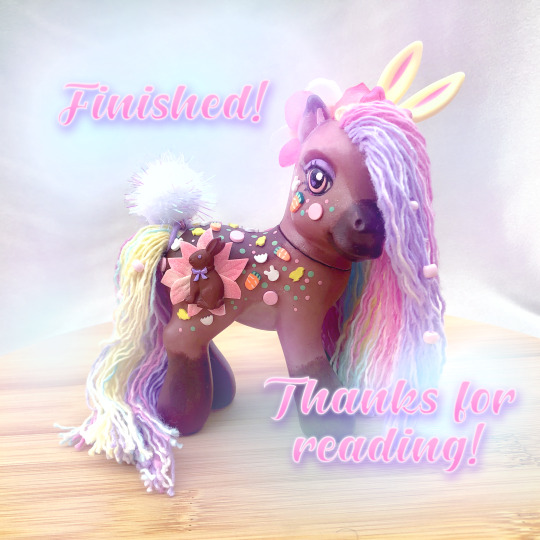
Hello! I wanted to share my process of how I made my Easter Pony! She is my second ever custom and she made all the trouble I had with the first one seem like a walk in the park in comparison ಥ_ಥ Let's begin!
DISCLAIMER: Custom ponies like this one are not to be played with by children nor made by children. This pony was made with the use of nail polish remover (acetone) which is toxic. You need to wash your hands throughly after use and use in a well ventilated area. This pony was also made with sharp tools such as an xacto knife, sewing pins, rehairing needles, and an awl.

First, the concept art! Trial and error caused her to look a little different than the concept art but I still love the end result!
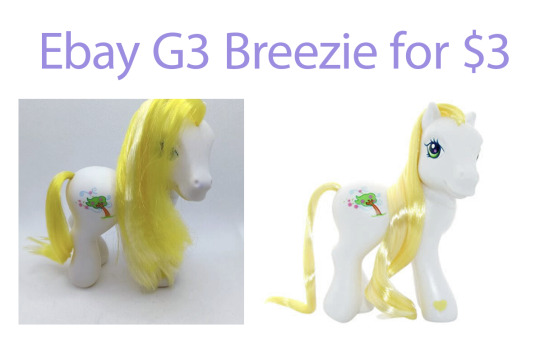
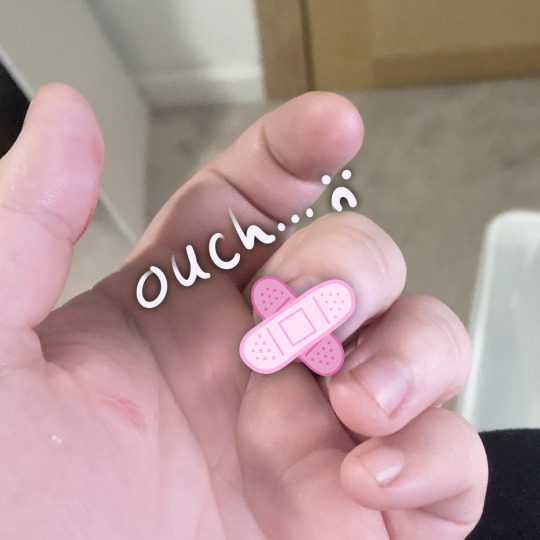
I wanted to start with a white base to give myself a clean canvas for dyeing so I got this G3 Breezie off Ebay for only $3. I decided to first remove her mane and tail which requires removing the head. If you know anything about G3 pony customzing, you know their heads are difficult to get back on once they come off. Even when you run them under warm/hot water. So to get it back on for dyeing, I tried trimming a little excess of vinyl off the neck ring with my xacto knife. It slipped and got me right under my nail! Bad omen for what's to come!
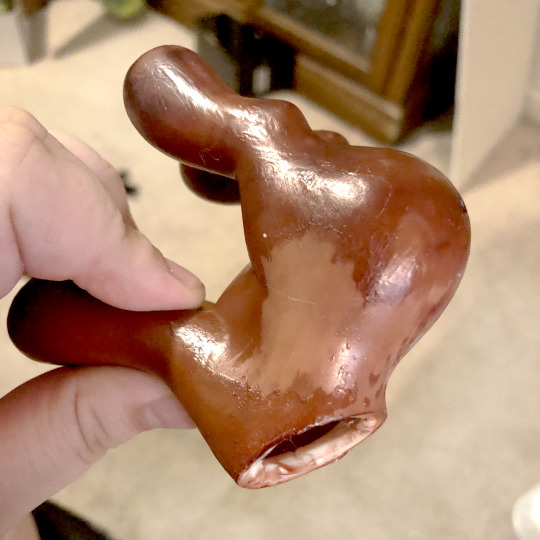
After getting her prepped (removing her mane and tail, cleaning her, using acetone (nail polish remover) to remove her cutie mark) she was ready for a dye bath! I used Rit DyeMore as regular Rit Dye won't dye the vinyl material that ponies are made of. This was my first ever time dyeing anything that wasn't fabric so I was thrilled when she came out this warm rich brown! So pretty!

I read online that dyed ponies will leach dye onto other ponies if they touch, so I wanted to try and prevent this as much as possible with some matte sealer. Lesson #1: Even though she was dry, the matte sealer reactivated the dye! The smallest touch left a print! :(

I pushed forward! And tripped immediately after! I thought, "Surely matte Modge Podge will seal her just that much more" and to my dismay, the Modge Podge kept every brush stroke I made when it dried!! She looked like a leather hand bag! ˚‧º·(˚ ˃̣̣̥᷄⌓˂̣̣̥᷅ )‧º·˚ I learned later you can buy matte Modge Podge spray online but all I had was the type you brush on to your surface.
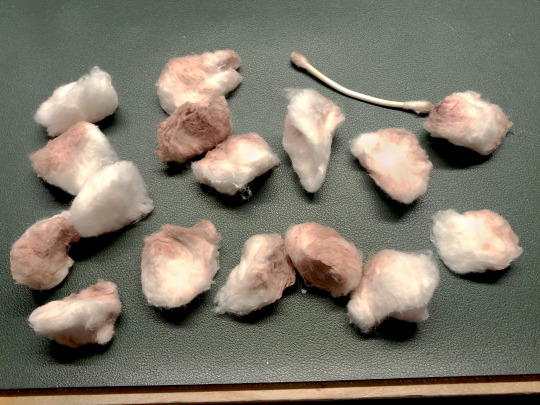
Thankfully, with the help of sixteen cotton balls and a q-tip with acetone, I managed to remove all the sealer but she was no longer that nice rich brown. Oh well I still loved her!
And whoever said the paint will protect the eyes from the dye has clearly never dyed a dark pony! Her eyes were so brown after this lol


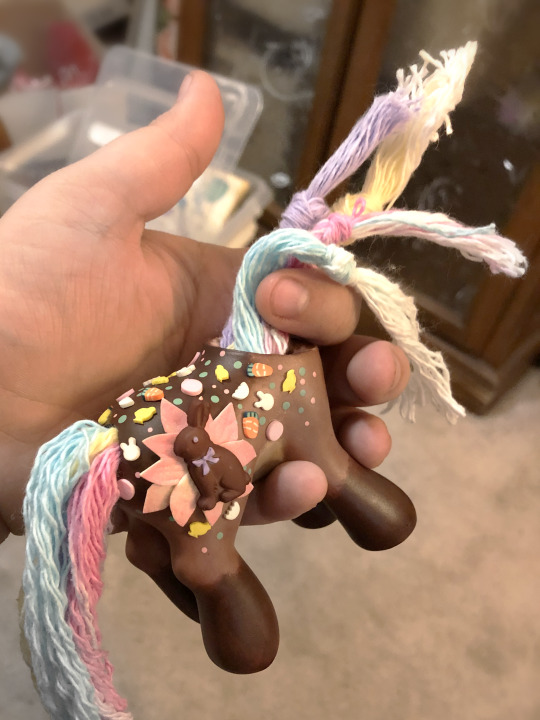
Painting, adding of polymer clay easter themed confetti, and adding her 3D chocolate bunny cutie mark went great! It was all going well until the eyes.
I had never fully painted pony eyes before so the first attempt was pretty bad. Not even my multiple attempts at glitter and using clear nail polish as a cheap gloss on the eyes could save them.
It was so bad that I almost didn't take any pictures but when I went to seal her head, this weird white powder covered half of her face?? I had never seen this before and it freaked me out thinking I just ruined her. I managed to get it off with a cotton ball and some acetone but her paint was fully damaged.
Turns out this was caused because I didn't shake the can of sealer well enough. I needed a break....
While I took a break for a few days, I decided to watch tutorials on how to paint doll eyes and learned that it's actually pretty common to use high quality watercolor pencils; either Faber Castell or Derwent (which is what I ended up buying).
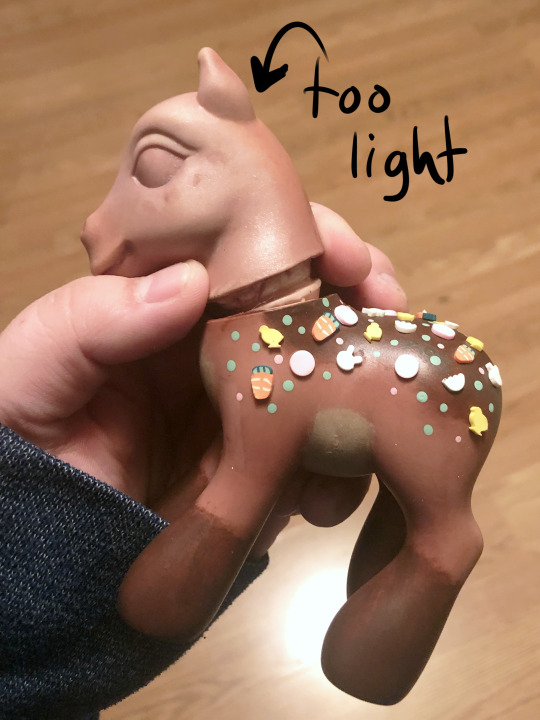
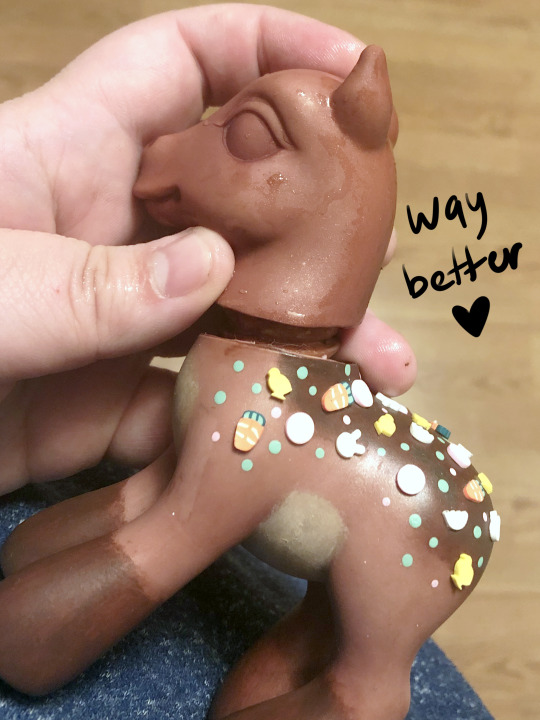
When I came back, I made the hard decision of removing all the paint and decorations from the head and starting over. Hours of work gone but it was so worth it! 🩷 Removing the paint with acetone ended up making her head lighter than her body so I had to redye her head lol. This time I mixed Derwent pencils with acrylic paints for her eyes.


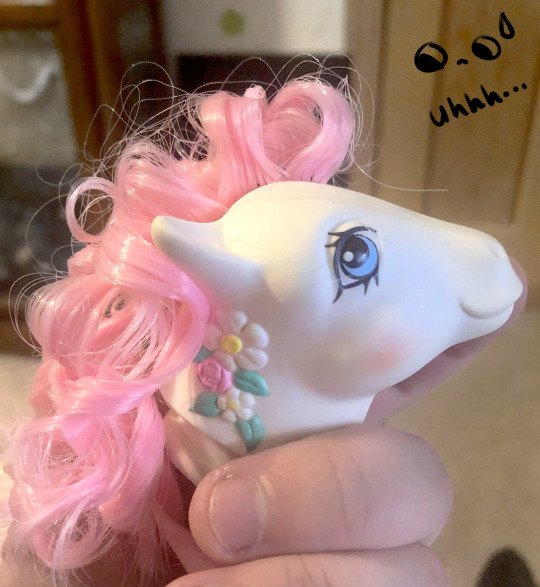
Time for the hair! I've never done curls before and my original plan was to buy curly hair online but it's so hard to find in the color and curl size I wanted.
So my second idea was to buy small curlers to use on regular nylon doll hair bought from ShimmerLocks on Etsy. But when I tested them out on poor Flower Bouquet it looked so bad ಥ_ಥ
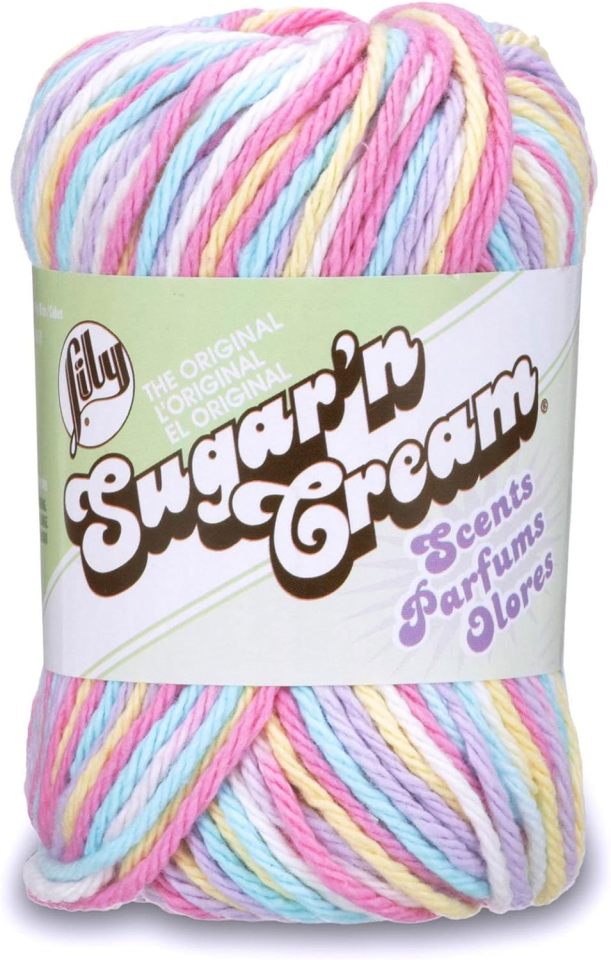
I discovered a Youtube channel you may know called Dollightful where in one of her Stock Box videos she used yarn that she unraveled to make super cute tight wavy hair for a doll. It was a perfect solution! It looks so good but omg it was tedious haha! I used it for her tail too; sectioning off the colors hoping they'd stay separated (they didn't lol).
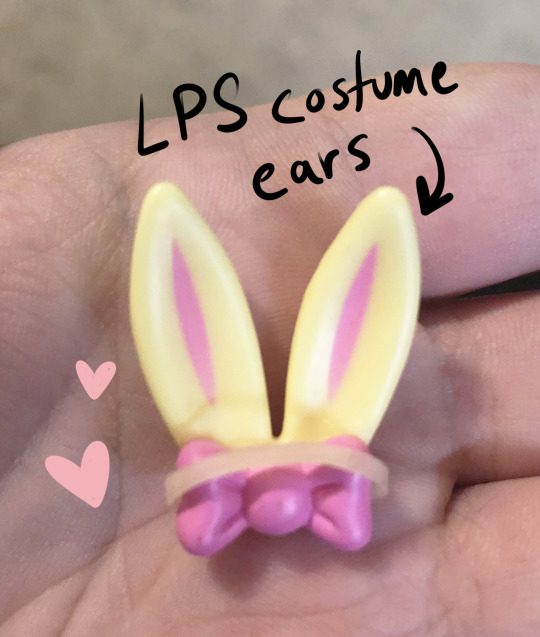
She's nearly complete! Time for small decorations! I tried so many different ears from air dry clay to stealing some from bunny decorations I bought at the store and nothing was working! But I had one last idea...
I gave these old Littlest Pet Shop costume bunny ears some use with a flat top sewing pin and some glue so now my pony has bunny ears! Yay!
I forgot it in the concept art, but I originally wanted to add flowers to her mane but I couldn't figure out how to do that without glue which I didn't want to do, too permanent, so I opted for some beads I had on hand. I didn't have any light blue so I made some with the use of acetone (nail polish remover in my case) and boom! Light blue beads! Then I washed them off so the acetone wouldn't damage anything :)
I used a gold topped sewing pin, a butterfly charm, a felt flower and two faux flowers to create a cute hair accessory!
Finally I sewed a hair tie to a puffball to give her a removable cottontail if I ever wanted to take it off.

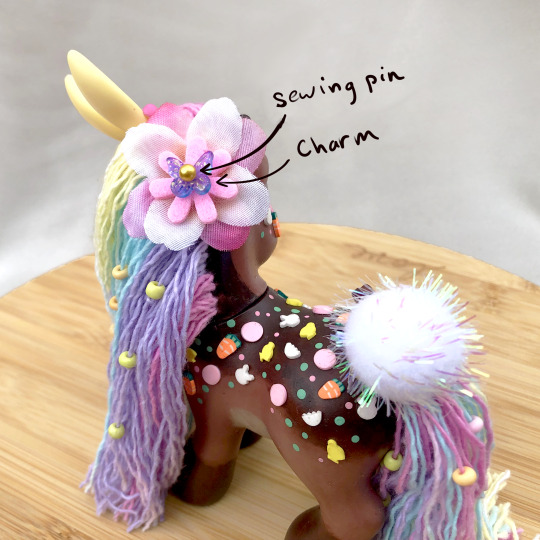
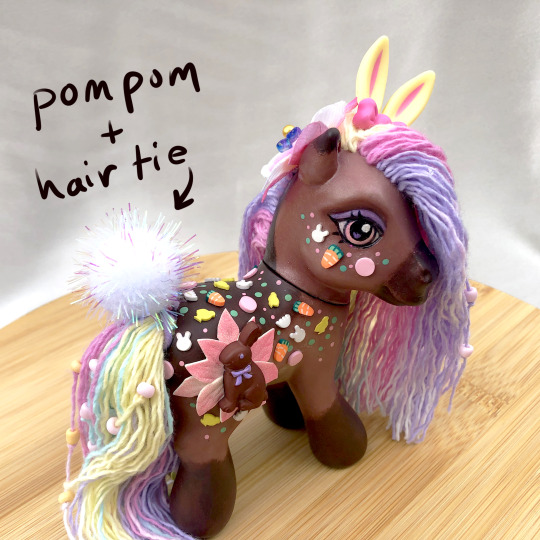
And DONE! She looks so good after so much time and effort! I worked on this girly for two weeks I think? She actually had a partner I designed but I've run out of time to make her :') Maybe next year? 👀 🩷🩷
#my art#art#horse#pony#equine#equine art#artist on tumblr#mlp#mlp art#mlp g3#my little pony g3#g3 mlp#custom pony#ooak#ooak doll#ooak mlp#ooak my little pony#custom mlp#my little pony#my custom ponies#easter#bunny#pastels#pastel rainbow#walkthrough#custom
131 notes
·
View notes
Note
your gangle cosplay is really cool, do you have any tips for someone trying to make their own?
Thank you! I appreciate it. And it depends on what you're going for with it! I've seen a lot of different Gangle cosplayers with different interpretations which are creative and fun to make I imagine! So I can't really advise any specifics on crafting etc since I don't know what you're going for.
For me when I cosplay I want to get as "accurate" as I can with the character design. I unfortunately am not very good at sewing and shaping and stuff but you can see that didn't stop me, I made it as well as I could. And Gangle is obviously one of the more difficult characters I've ever decided to cosplay so wasn't ever going to be accurate with her unless I did like... a puppet method or something. (From my understanding this falls under the "creature" cosplay category?)
Idk if these will help at all, but it's good to start with visualizing ideas you want to try for before hand:
Ideas for a Navi, Bill Cipher and Gir from Invader ZIM cosplays that went no where.
Thinking outside the box also helps in the sense of, other forms of crafting, skills or items, you wouldn't think to use might help with what you're making!
Examples:
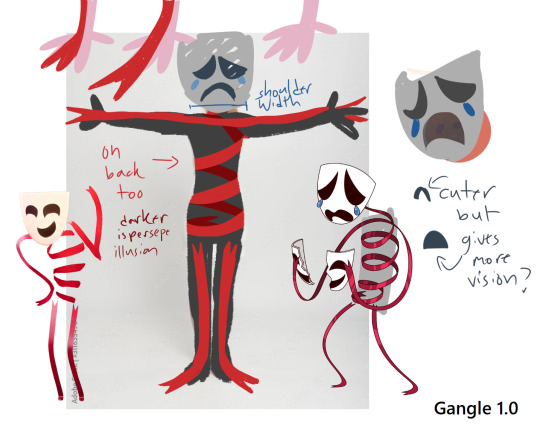
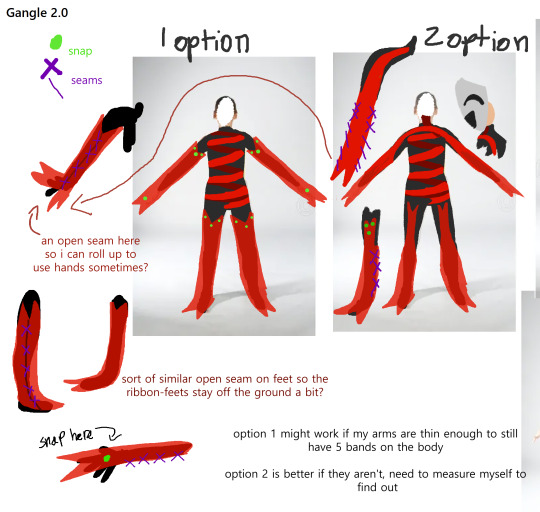
I used fursuit methods to help build my NiGHTS cosplay, I also used quilting methods to help make Gangle's ribbon limbs.
When making Circus Baby I wanted an exhaust fan that actually spun, turns out there are plenty of tutorials on how to make your own fidget spinners so used that method to make a light weight one out of cardboard and pennies for that piece! When making Gangle 2.0 to keep the shape I wanted to infuse wire into the edges of the ribbon limbs. The best method for this would have been to hand sew floral wire to an extra piece of fabric with fishing wire, then sew that one in with the edges of the the limbs. I however was only 1 and a half week away from a con and still had a ton of pieces to finish so I got a bunch of cheap wired ribbon, and infused those inside the limbs. (Kept the shape well enough but I'm at the point where I want to remake them again lol.)
Instead of using traditional adhesives like hot glue, maybe something like silicon adhesive can be used and other more hardware based unities can be used. Hardware stuff in general helps. Similar stuff they sell at craft stores can often be found cheaper at hardware stores. I've had the benefit that my father is a handyman so I grew up with a lot of that tool usage, and loved going to hardware stores with him because sometimes I'd find something that would make me be like "WAIT I CAN USE THIS For that art project I've been trying to do."
This admittedly also comes from my doll customization hobby, which believe it or not, has a lot of power tool usage to make those pretty little dolls! Some of these things I used for my Gangle. Making cute ribbon outfits or bows for dolls, you have to burn the edges of the ribbon you've cut, least it fray (in Gangle 1.0. each ribbon you see has been lovely burnt by candle LOL) when Gangle 2.0's ribbon fabric it would run after getting snagged on stuff, I made a "sealer" I'd use for making doll wigs. Watered down glue (this case Modge podge because its already watery) and painted it over any places that would receive a lot of friction as the solution admitted made the satin a tiny bit duller so didn't want to paint the whole thing with it.
Sometimes you can use the methods/shapes from existing clothing to help you make what you want. When I made my NiGHTS cosplay I found a little decorative halloween jester hat which I used as a reference to make a pattern for NiGHTS' hat/horns.
Speaking of, and also in relation to that hardware thing. Thrift shops are a great way to find random pieces of stuff you think can help with your project especially if they're going to be items you cut up/modify anyways. I wanted the illusion of floating when making my NiGHTS and musing about a Tatsumaki cosplay so wanted to use tacky clear platform heels to make it happen lol. And thrift shops have a ton of used shoes. I only needed the platform part and remove the straps so didn't need anything brand new. While I didn't find clear ones at the time I did find other platforms that helped with my NiGHTS, the feet were so big on the costume it shadowed the heels anyways and kept the illusion. (bonus concept of that Tatsumaki idea)
When I needed a squeaker for a cosplay piece I just bought a 99 cent dog toy and disemboweled it for one. In the same kind of "cheat" I just got a wielding mask, removed the mask part, and attached my Gangle mask to it to make a way method to take it on and off.
Anyways that was a lot of examples, but they're times when my dumb dumb brain was like "wait!!! I don't have to do this the hard way and get what I'm looking for!!" and it saved me from said hard way of getting what I wanted.
#long post#idk why the pictures aren't going into 2x2#ask#anon#cosplay#my advice isn't good btw i dont know what im talking about
24 notes
·
View notes
Text
What I've been working on - part 3 (late post)
Part 2
Hi

After the cape and decals were done I went back outside to seal the armour


The main spraypaint I used is Tremclad Rust Paint in Flat Black colour, I actually bought the paint for some rusty chairs years ago and just decided to use it on this cosplay instead of buying new paint.

Sealers are Decoart Americana Acrylic spray sealer, in matte and gloss.
In-game the armour has both matte and gloss parts, I wanted to keep that detail so I masked the matte area off.


After some more touch ups I assembled the helmet, could finally wear it haha

After this point I had a massive burnout and didn't want to work on the cosplay for a while, makes sense considering I've been working non stop on it for a week.

Decided to decorate my room to be more patriotic during this time

Managed to crawl out of my bed to finish shoulder decals.
These are the same baby waffle fabric I used for the cape, ironed the logo on them with htv and hot glued them to the plates.
For the brim around the fabric, I cut some cables in half and glued them down around the fabric.
---- Note: At the time of posting I've already finished the cosplay, I just forgot to post rest of the progress ;;
9 notes
·
View notes
Photo


Sabni was an ancient Egyptian official of the Old Kingdom under king Pepi II. He was an expedition leader undertaking enterprises to Nubia.
Sabni has a rock cut tomb in Qubbet el-Hawa. The tomb consist of two parts. Overground there is the decorated funerary chapel for the cult of the deceased. Under that there are five shafts with chambers for the burials of Sabni, but also for family members. On the façade of the tomb is carved a long biographical inscription, reporting his expeditions to Nubia, where he was collecting the body of his dead father Mekhu, who died there in an earlier expedition. However, the inscription is today largely destroyed.
Behind the entrance there opens a big hall supported by 14 pillars and again carved into the rock. At the back of the hall there is the false door for Sabni. On the walls and pillars of the hall are carved panels showing Sabni, family members but also funerary priests. One bigger panel shows Sabni and his father Mekhu hunting in the marsches. His father is Mekhu who shared the tomb with Sabni. Both tombs are carved into the rock side by side, while the main halls of the cult chapels as united. Sabni hold several important titles, such as royal sealer, overseer of Upper Egypt, sole friend, overseer of the foreign lands and lector priest.
In Sabni's tomb are depicted several family members. His wife was the sole ornamented of the king Setka. He had a son named Antef and a daughter Itety [source].
#egypt#ancient egypt#egyptology#archaeology#historyedit#mine#my edit#documentary#doc: egypt's darkest hour#sabni#old kingdom#pepi ii#qubbet el hawa
97 notes
·
View notes
Note
Hey!
How do they like to celebrate Christmas, if at all? What would they like as a gift?
Finally: what would be the list of them for Santa in childhood and now? What is the biggest difference and why?
thanks for everything!❤️
hello! Merry Christmas/Happy Holidays 🎄☃️
How do they like to celebrate Christmas if at all?
-Griffin: would prefer a solitary celebration, just you and him, maybe a walk through town to check out the Christmas lights and the big tree, drinking hot cider or hot chocolate.
-Tris: has big family celebrations, so you would definitely be dragged to that, dressed up in something cute he probably picked out for you based on your preferences. You'd meet a *lot* of Solis family members but it's okay if you don't remember everyone's name! Just don't forget to give Abuelita many besos or you'll offend her.
-Dell: sitting in front of the fireplace next to the tree you both decorated, reading Christmas books or poems and snacking on treats. He doesn't celebrate Christmas but would definitely go all out if you did or wanted to.
-Taipan: both of you in your matching Christmas pajamas, cozying up in bed together with all the comfy and soft blankets, watching those adorable and sometimes silly Christmas movies. Yes, especially the Hallmark and Lifetime ones.
What would they like as a gift?
-Griffin: he wouldn't ask for anything! Just your company and your happiness matters to him. But if you were to get him something, maybe a nice pair of binoculars, or a new journal to record his bird findings. Even a new lens for his camera if you're feeling generous uvu
-Tris: please, he'd get you everything you wanted. He might get emotional if you got him a nice pair of cuff links or new dancing shoes. Even a class so the two of you could learn a new dance.
-Dell: while he wouldn't want you to spend money on him, he's really into vintage fountain pens and wax sealers.
-Taipan: he would honestly be pretty hard to shop for. he would love handmade items tho, like blankets or scarves or anything, especially since he gets cold often uvu
What would be on their list for Santa as a child versus now? Biggest difference and why?
-Griffin: as a child, he probably asked for birding books, cheap disposable cameras, notebooks and scrapbooks. as an adult, he'd probably ask for new lenses, a specific birding book by an author he likes, and maybe a gift card for photo printing. There's not much of a difference for his 'wants' between his child self and adult self, he just grew more serious about his passion.
-Tris: as a child, he asked for (and received) the newest toys and gadgets, things that were popular with other kids. As an adult, he'd rather donate things for other children than ask for anything. The biggest difference obviously is that he doesn't really want for anything, so he doesn't ask for anything now. He realized as a child that he only wanted those things to 'fit in' and be liked by other kids. He grew up and would much rather make some poor child's holidays better than try to figure out what, if anything, he wanted.
-Dell: books, and lots of them. Always loved reading as a kid. As an adult, it's much the same, but he also likes to write and play around with letter making and such, hence the wax sealers earlier. Like Griffin, not a huge change, mostly gotten more serious and into the things he likes as he got older.
-Taipan: kid Tai loved sports, so he'd probably ask for new gloves and bats or basketballs/soccer balls/footballs. Typical sporty things. Now, he wouldn't ask for anything, except maybe a clean bill of health. Obvious difference here. He's not into material things anymore, and he'd much rather live a day without pain and illness than have anything else.
#duplicity griffin#duplicity asks#duplicity tris#duplicity dell#duplicity taipan#if you want to know about the other characters#feel free to ask uvu#skipping queue because christmas yay
3 notes
·
View notes
Text
Mosaic chip art involves creating intricate designs or images by arranging small, flat, and usually colored pieces of material called tesserae (or chips). These chips can be made from various materials such as glass, ceramic, stone, or even wood. Mosaic art has been used throughout history to decorate walls, floors, and objects, blending craftsmanship with visual storytelling.
Here’s a step-by-step guide to creating mosaic chip art:
1. Gather Materials
Tesserae (Mosaic Chips): These can be purchased pre-cut or created by breaking larger materials.
Base Surface: Choose a sturdy surface such as wood, cement board, or a canvas.
Adhesive: Use mosaic glue or thin-set mortar to secure the chips.
Grout: For filling gaps between the tesserae.
Tools: Tile nippers, tweezers, spatula, and safety gear (gloves and goggles).
2. Design Your Mosaic
Sketch your design on paper or directly onto the base surface.
Simplify complex images into manageable shapes and colors.
3. Prepare the Base
Clean the surface to ensure the adhesive sticks properly.
If needed, apply a base coat of paint or primer.
4. Arrange the Chips
Start placing the tesserae on the design, either directly onto the adhesive or dry for planning.
Use tweezers for precision with smaller pieces.
5. Glue the Chips
Apply adhesive to the back of each tessera or the base surface.
Press the tesserae firmly onto the surface.
6. Apply Grout
Once the adhesive is dry, spread grout over the entire surface using a spatula.
Push grout into the gaps and remove excess.
7. Clean and Polish
Wipe off grout residue from the tesserae with a damp sponge.
Polish the surface once the grout has dried.
8. Seal the Mosaic
Apply a sealer to protect the mosaic and enhance its colors.
Mosaic Chip Art Tips:
Use color gradients to create depth and dimension.
Experiment with patterns, such as geometric or abstract designs.
Incorporate recycled materials for a sustainable touch.
#home#stone#granite#diy#art#mosaic#tesserae#chips#design#create#creator#designer#wall art#floors#floor#resin#tile grout#epoxy grout#aesthetic#asmr video
4 notes
·
View notes
Text
Elevate Your Surfaces: Discover The Magic Of Decorative Concrete Sealer
Transform ordinary concrete into extraordinary works of art with premium decorative concrete sealer. It is a specialised coating that not only protects concrete surfaces from stains, UV damage, and abrasion but also enhances their appearance, offering a glossy, satin, or matte finish. Contact for more.

0 notes
Text

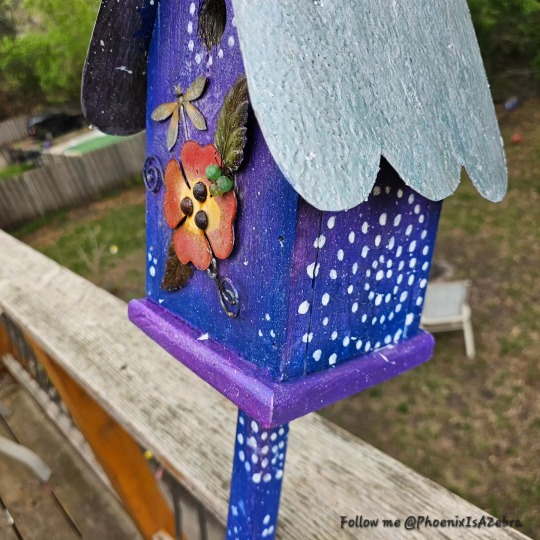
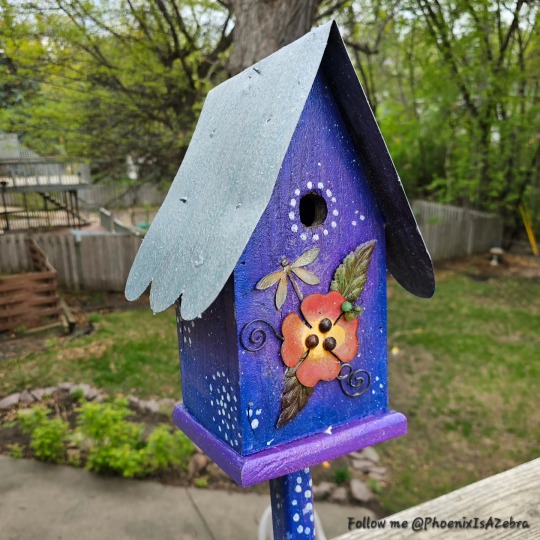
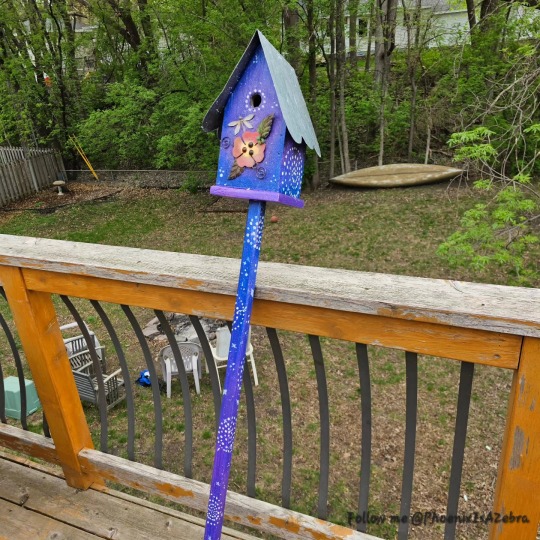
When I moved in with one of my best friends this past winter, it was hard to see all of the garden decorations that had been left behind by the previous owner of the house due to all of the snow on the ground and how faded they had become from many years in the sun. As the snow began to melt, the treasures began to appear and they became my muse for creative inspiration.
This wooden bird house had a green and brown faded metal roof, peeling and chipping natural wood throughout, and no color aside from the faded metal embellishments on the front. I used acrylic paint for color and modge podge to seal and will likely get some UV resistant weather sealer as well for extra protection.
Follow me on Tumblr, Instagram, Facebook, and TikTok to follow my health journey, art projects, advocacy, writing, and other endeavors! ✨
#art#birdhouse#bird#house#DIY#refurbished#woodworking#acrylic#paint#painting#purple#blue#butterfly#artist#disabled artist#hypermobile ehlers danlos#chronic illness#spoonie#outdoors#summer#2023#project#garden#nature#wildlife#woods#Minnesota
11 notes
·
View notes