#cropped and sharpened please click through link to see original
Explore tagged Tumblr posts
Text
Ambrotype of a cute militiaman next door whose hat is as wild as his hair, 1860
#love this auction listing for noting the “tight buff-tinted breeches” part of his replica Continental Army uniform#& love when historical people do historical costuming#he looks so pleased with himself!#cropped and sharpened please click through link to see original#19th century#1800s#1860s#1860s fashion#19th century fashion#fashion history#historical fashion#military history#military fashion#uniforms#militiamen#men's fashion#menswear#historical costuming#19th century photography#ambrotype#19th century men#vintage men
618 notes
·
View notes
Text
» 𝐆𝐈𝐅 𝐈𝐂𝐎𝐍𝐒 𝐓𝐔𝐓𝐎𝐑𝐈𝐀𝐋 𝐁𝐘 𝐑𝐄𝐏𝐋𝐀𝐘𝐆𝐈𝐅𝐒 !


hi folks! i’ve gotten a few messages on how i make my gifs, on what tutorials i used, etc. so i decided to make my own (since i didn’t use one) in hopes of helping a few people get their footing on how to make gif icons from scratch! this tutorial has been made with the assumption that you have prior knowledge of using photoshop (e.g. like smart filters), but please don’t be afraid to ask me any questions if you need anything explained or you’re a lil confused. however, do bare in mind that i am no photoshop genius, and have never become more advanced than what i required for my needs. anyways, without further ado, the tutorial on how you can make something like the above can be found below the cut. please like or reblog if you found this useful in any way!
some starting tips:
gif icon making, or gif making in general can be strenuous. do not give up if it doesn’t look like you want it to the first time! it’ll take time to find what you like.
don’t compare your gif icons to other’s, which i’m guilty of, but your gif icons are unique and lovely in their own way and you should view them as such!
♡
i am using a macbook, with a mac operating system and adobe photoshop 2020. keep in mind that this is the way i make my own gif icons, and i’m just sharing what i know so this may not be the best/easiest way to go about things, like you can probably include scripts that save it for you, etc. but i prefer having more control over to process.
♡
screenshots will be distorted, for easier viewing i’ve added a link that will take you to the full size image.
♡
before anything, a high quality gif comes from a high quality video. when downloading your content, make sure it's either 720p or 1080p resolution.
♡
step 1: open up your .mp4 file
open it up as if you are opening any other file on photoshop. no need to import video frames to layers or anything of the sort. i find that way better for making gifs for gif sets instead of like 100+ gif icons. your photoshop should look like the image below.
this works best with shorter video files of around 1-3 minutes.
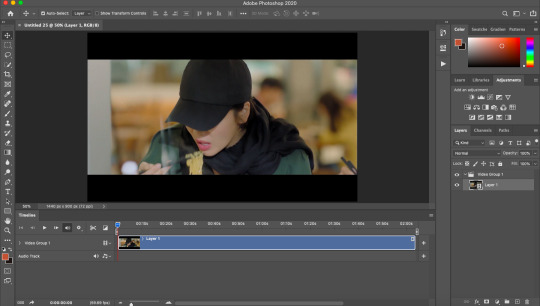
step 2: find your faceclaim
your video should now be open in photoshop as a video timeline, keep this the way it is, you’ll be able to move along the video to the next gif. using the timeline layers (see:layer 1), you can slide along until you find your faceclaim.
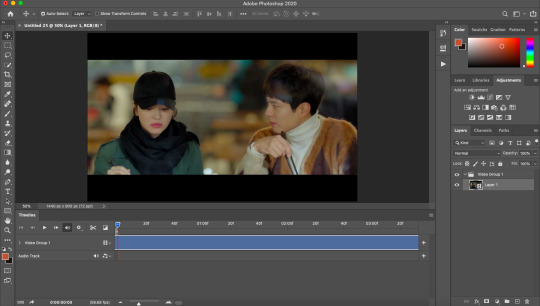
*extra info for those that don’t know. to extend your layer and make it easier to find your faceclaim, you can use the slider down below which looks like this:

this will essentially space the frames out more, if that makes sense?
step 3: select your gif focus and crop
use the rectangular marquee tool (circled in red) and select the area of your gif icon.
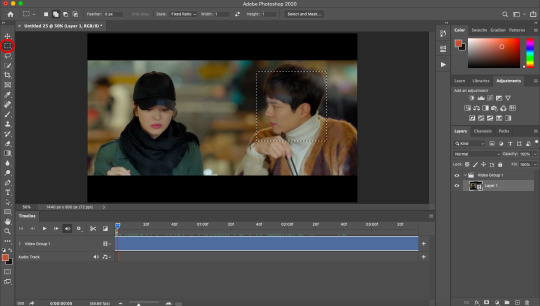
following this, use the crop tool (again, circled in red) to cut out the rest of the area. you are now left with a square.
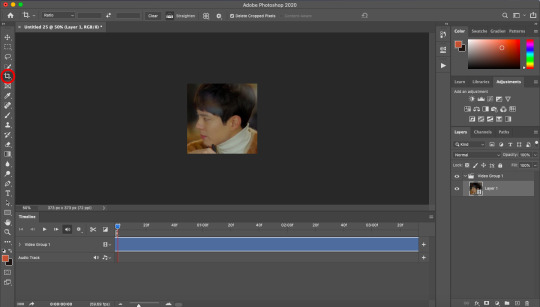
step 4: select the length/frames of your gif
this step can be done pretty much anywhere between step 2 and step 7, depending on your preference. anyway, use the slider (red arrow pointing to it) to decide where you want your gif to end.

then, bring the end of your video timeline (red arrow pointing to it) to where your animation slider is. your video timeline should now look something like this:

the space in between the lil sliders will only includes what will be in your gif.
step 5: resize
using image size, resize your gif to whatever size you wish. i prefer 80px.
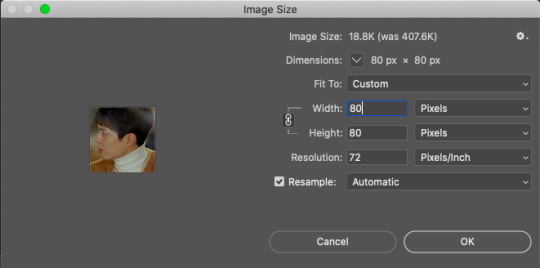
following this, it should say that your file is going to be converted into a smart object, click okay. (i can’t show the pop up since i got rid of it).
yet, now that you’re looking at your gif icon, you’ve realised you don’t really like the placement of it. simply cmd/ctrl+t to go to free transform. i moved it a tiny lil bit to the left.
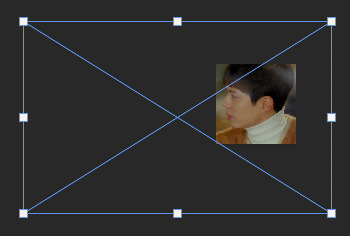
as you can see, the rest of the video area is still there. you can now transform it to your liking. this will be useful when you want to change the area again.
step 5: add sharpen settings
you now have an icon, you can sharpen it to your liking.

i use smart sharpen and gaussian blur. i tend to have them in this order.
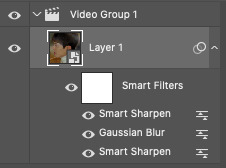
you can change the opacity of each smart filter to your liking. i won’t be sharing my exact sharpen settings (not that they’re hard to figure out), as i’d like them to stay unique to me, but do play around with this and see what you like the most (the key is less is more).
the trick here is to include the sharpen>blur>sharpen filters, which will give a sharpened appearance without overdoing it, and make your gif icon a lil smoother as well due to the blur.
**also, you may see the lil video group 1 in my layers there (and in your own too), this isn’t really necessary and is more of a pain in the ass that anything. if you have this, you can get rid of it by right clicking on it and ungrouping layers.
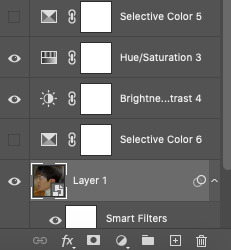
step 6: add your colouring
my colouring is a mixture of psds i’ve interchanged for years and i have lost the originals so do not intend on sharing. do look around at psds or make your own colourings that suit your tastes.

BE MINDFUL OF WHITEWASHING!!! if you are giffing people of colour, use colourings that do not make them into a white sheet or a gray mess. i see this constantly as if it isn’t 2020.
adjust! adjust! adjust! your colouring will not always work on different people or different scenes. adjust your levels, saturation, selective colour, brightness, etc to make sure the colouring works for your previous gif, as well as your next one.
even you can see here that my layers are mess because i adjust constantly.
step 7: save for web
now that you’ve made your icon all pretty, save it for web and it should look like this:

step 8 (optional): speed
if you like your gif icons slower, you now have to upload the gif file into photoshop again. this will take you to the frame timeline. you can change the speed of your gif to whatever you want, and save again.
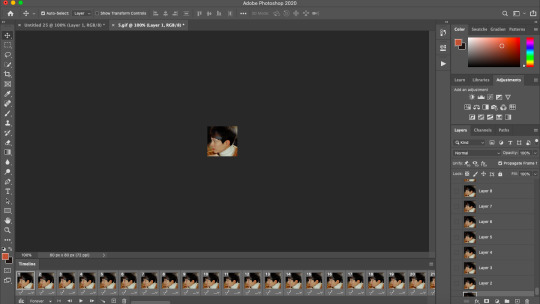
and there you have it, your is gif icon complete.

step 9: making more!
instead of going through this whole cropping process again, you can continue to move along the video timeline to different frames of your faceclaim, and making the next gif with just the exact sharpening settings, colouring, etc. this will make it super easy to make more gif icons in less time.
this can be done by simplying moving your animation timeline.
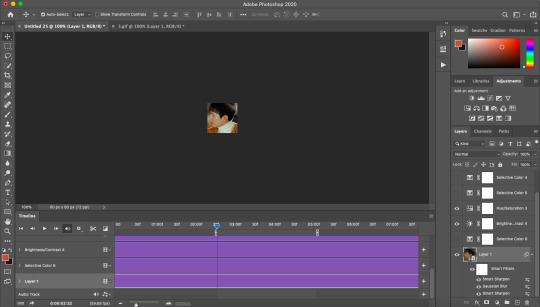
again you can use cmd/ctrl+t to adjust your gif placement. of course, this doesn’t always work, and you may need to revert back to your original video to crop the area again. an example of this is if you need a bigger or smaller area for the gif.
i just made this gif in a few seconds.

action
i use my own script to crop and have included the rest all in one action file. i did a lil digging and found this gif icon making action (resizes to 80px) that does essentially the same thing with no script. this will make it already 10x easier to make an icon. you can then make your sharpening into an action and you’ll basically have most of the job done for you in one click.
tips:
make things into actions! for example, i cut down a lil on the speed changing process by making actions that change the speed for me.
save your actions! you never know when you’ll lose them
you might get tired of looking at your gif icons after a while, they might even start to look ugly but that’s most likely because you’ve been looking at them for too long, so don’t feel discouraged!
crop close to the face, this is important! what in the fresh hell am i supposed to be seeing in a 70px gif icon if its so far away, or in general tbh
anddd that's about it! i hope you find this useful! again, if there are any questions, feel free to im me or send in a message and i'll do my best to help!
#rph#rpc#gif icons#gif icons tutorial#gif icon tutorial#i hope this is explained well im ...#i tried to be as thorough as possible to like make sure it all comes together
218 notes
·
View notes
Text
brooke’s macbook gif tutorial
hello everybody! i was asked to create a tutorial for how i make my gifs, everything you will need will be underneath the cut. if you have any questions i will do the best i can to answer them, happy giffing! if you want to, a like or reblog on this post would be greatly appreciated ♡
necessary applications & their download links:
4k video downloader
vapoursynth
*the vapoursynth installation process is slightly different than when i did it last year, but if you click on the latest release it will take you to a google drive file from which you should be able to follow the steps to install it!
photoshop
*this is the link to yeahps’ photoshop download tag, i have used multiple tutorials from them in the past and they work great!
my gif making steps:
1. open 4k video downloader
*4k video downloader will convert many types of videos, but i use it for my gifs from youtube!
2. paste youtube video link into 4k video downloader and download in 1080p (ideally, i only gif videos with 1080p quality or higher!)

3. once your video has finished downloading, click on the three dots on the far right and click on show in finder

*as you can see, it saves your video as a .mp4 file and it shows up in your movie folder!
4. pick the starting point in your youtube video that you would like to gif (ex: 2:27)

5. take the icon from your youtube video’s .mp4 file, and drag it until it’s on top of the vapoursynth icon in your dock


6. this pop up will come up asking you to type in a timestamp, this is where the 2:27 will go from the youtube video!

7. press accept, and then the pop up will ask you for an encoding duration
for my gifs, i either use a 2 or 3 second duration! it makes it easier for you to select the frames you want for your gif.

8. the resizer window will automatically pop up, you don’t need to press anything and it will look like this!

this is the point where you will start selecting your gif’s dimensions and smoothening/sharpening the gif to your liking.
9. change your gif size
*some tips
for four and nine panel sets, use 268 by 350
for eight panel sets, use 450 by 250
for single gifs, use 540 by whatever height you would prefer
for the purposes of this tutorial, i’m going to make a single 540 by 250 gif!

10. move the opacity bar until it’s at 100

at this point, i like to move my gif around if i don’t like how it looks in the middle. you can click on the gif and drag around the frame until you get it to where you prefer, but i’m not going to do that for this gif!
11. set preprocessor to qtgmc 60 fast

i’ve always been recommended to make my gifs using the 60 fast setting, and it’s what i use every time even though i’m not 100% certain how the other settings make the gif different.
12. denoise filter and sharpening
i’m going to show you my settings that i use for most of my gifs, you can move the bars wherever you want but this is right around where i usually have mine!

it’s important to mention that this process changes every time, every video is different so i just play around with these filters depending on the gif! these are always the sharp and smooth filters i use though.
13. open vapoursynth editor and paste video code
vapoursynth editor comes with the vapoursynth installation, this is the vapoursynth editor icon!

when you click on it, this screen will pop up which is where the code in the upper right corner of the resizer window will go. there’s a prompt in the code to tell you where to paste your video code! (*i’ve cropped out the top section of it because it includes my last name and i couldn’t figure out how to remove it).


14. select frames (a tip: when selecting frames for gifs try and aim for 40 frames or less! if you try and use more than 40 frames the file will take longer to download and you may have to cut length off of your gif at the end)
you’re going to place #s in front of each of the video code lines (except for the one at the top), then you’re going to click on script and click on preview.


when you open preview, the window will look like this.

when you press the play button, it will play your gif frame by frame which helps you select how long you want your gif to be.

in this case, the section that i’m trying to gif goes from frame 25 until frame 47.

at this point, the numbers 25 and 47 will be placed into the vapoursynth editor code (thus replacing the a and b that were there before).

from here, you can remove all the # symbols from the video lines in the vapoursynth editor code.
15. encode video
you’re going to click on script and then open encode video.

the window that pops up will look like this (*i’ve cropped out the top section of it because it includes my last name and i couldn’t figure out how to remove it).

from here, you’re going to change the header setting so that it says Y4M.

select start, and then the encoding process will begin!
16. convert .mov file
you’re going to locate this file (it comes with the vapoursynth installation, mine is in my recents) and double click on it.

a popup will show your gif as a quicktime player video, from here you’re going to save the .mov file!

15. open photoshop and import video as layers
go to file, import, and then video frames to layers (i always import from beginning to end, but you have the option to only import certain sections of your .mov file!)

16. select all the frames and set frame delay
to select all the frames at once, hold the shift bar and click on the first frame and then do the same thing on the last frame!

go back to the first frame and click on the down arrow by 0.02 to set frame delay to 0.04 seconds (everybody will recommend you to do something different, but 0.04 is what i use for my gifs!)

17. convert to video timeline
click on this symbol in the lower left corner.

18. convert to smart object (*make sure that you still have all of the layers selected! you can shift click if you don’t)
search up smart in the help bar, and then click on where it says convert to smart object.


now your gif should play all it’s layers at the same time while only seeing one visible layer! (the first play through is going to be very slow, when you save it it won’t look like that.)

19. do any necessary sharpening (for me, i usually don’t have to because i do my sharpening in vapoursynth!)
open smart sharpen.

the only thing i move around is the amount, i keep all of the other settings the same if i ever use photoshop’s sharpening tool!
20. export completed gif
go to file, export, and save for web (legacy).

the save page will look like this, make sure you have looping options set as forever (and then for my gifs i use the bicubic smoother quality, but it’s personal preference!)
*also in the save window your gif may look like it’s lighter than when it is in photoshop, don’t worry it’s going to save as the original version!
tada! you’re all finished. the final gif is below, i really hope you were able to learn something from this tutorial. if you have any questions please don’t hesitate to send me a message and i’ll try to help you!

51 notes
·
View notes
Text
giflinsky’s gif tutorial
ok so !! before i start, a disclaimer: i do not claim to be a professional at photoshop or know how to do everything omg i know there are multiple ways to make gifs, but this is just how i personally learned how to make gifs from a mix of tutorials that i’ve found over the years
now onto the tutorial !! i’m gonna be gif’ing my baby ofc & here’s the end product

step 1: pick the video you wanna gif
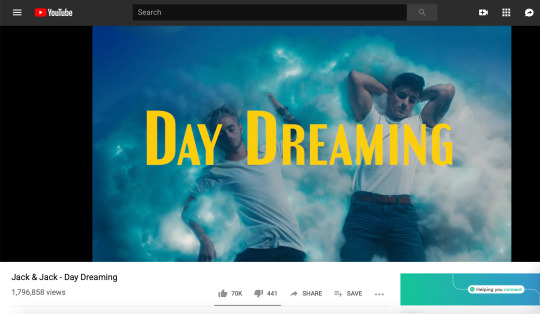
usually i get my videos from youtube or instagram, especially since i mostly gif jack gilinsky & insta is where i get like 90% of his content from lol. for this tutorial, i’m gonna gif jack & jack’s day dreaming music video ok cool
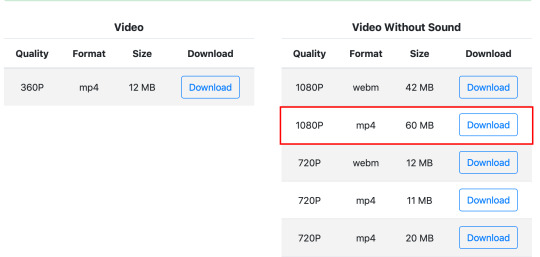
i use keepvid to download youtube videos, making sure to get the highest quality available ( 720p — 1080p ) & that the format is mp4
step 2: opening in photoshop
so i currently use photoshop cc, but i’ve used photoshop cs5 & photoshop cs6 to gif in the past. tbh i can’t remember the differences so i’m pretty sure the process is the same?? if not lmk
anyway so to import the video, go to file > import > video frames to layers
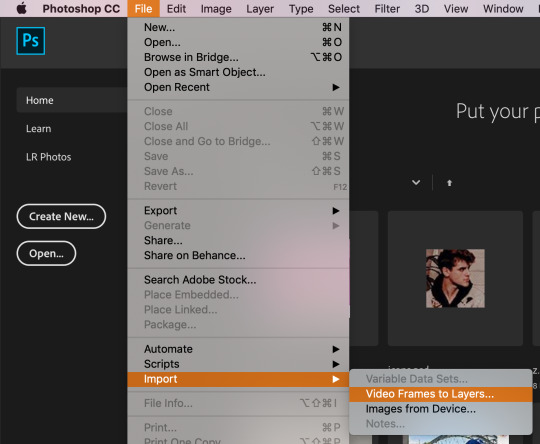
upload your video & this thing will pop up
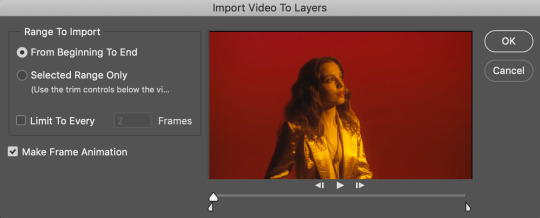
depending on the length of the video & what scene you wanna gif, you can either click from beginning to end or selected range only. if the video is 10 seconds or shorter i usually pick the 1st option, but since this is a whole music video & i only wanna gif one tiny part of it, i chose the 2nd option. either way, check the box for limit to every 2 frames (tbh i’m not sure what happens if you change the number; every tutorial i read just said leave it at that lol)
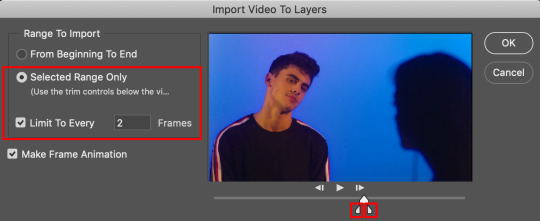
to clip the video to the part you want, use those lil’ sliders. it doesn’t have to be exact bc you can delete frames later
once you click OK, the gif should open in photoshop. make sure the timeline is open at the bottom & if it’s not go to window > timeline
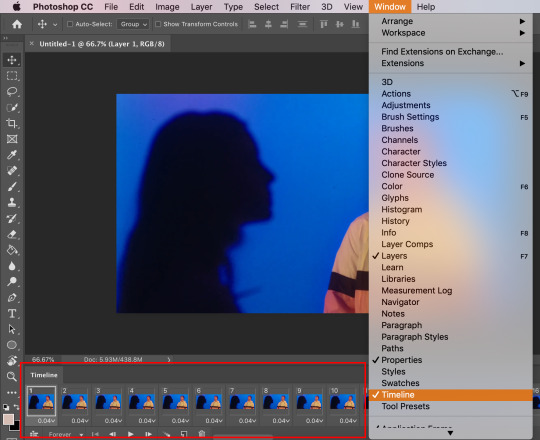
step 3: trimming the frames
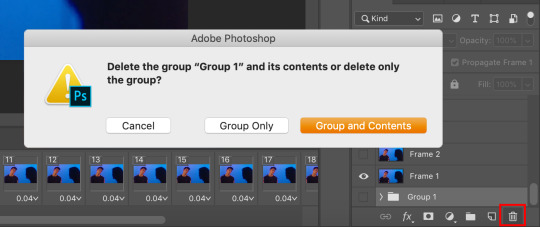
so since i imported some extra scenes from the video, there are frames that i don’t want in the gif. all i have to do is select the unnecessary frames & click the lil’ trashcan at the bottom
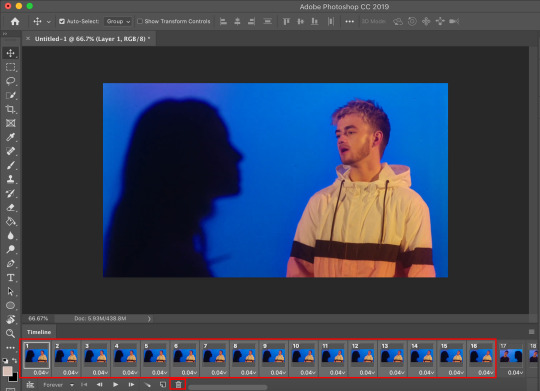
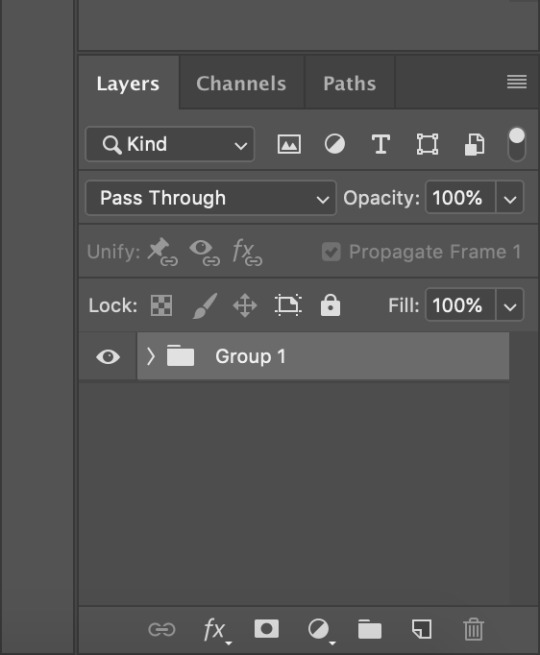
this next step isn’t really required, but i found that it helps load things faster ig? so i select all the layers in the right sidebar by using the shortcut option + command + a (control + alt + a on windows) then i press command + g (control + g) to group them together
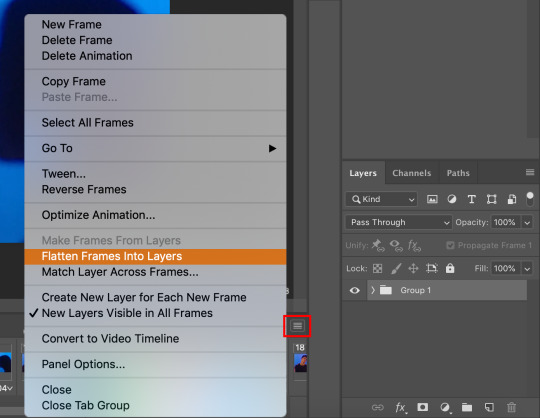
then i click the 3 stacked lines button & flatten frames into layers so that it’s only the frames that i want
then i delete the original group bc i don’t need them anymore
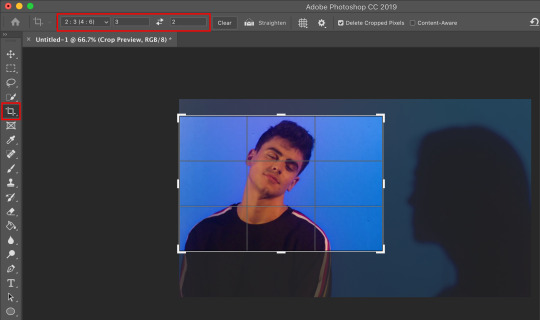
step 4: cropping
it’s just like cropping a regular image. it depends on the video (i.e. if it’s horizontal or vertical) & you can do whatever you like, there’s really no rules? for this gif, i used the 2:3 ratio to isolate gilinsky’s face
step 5: resizing
since the video size is pretty big, i have to resize it to fit tumblr’s guidelines. these are the photoset sizes for 2019 for reference
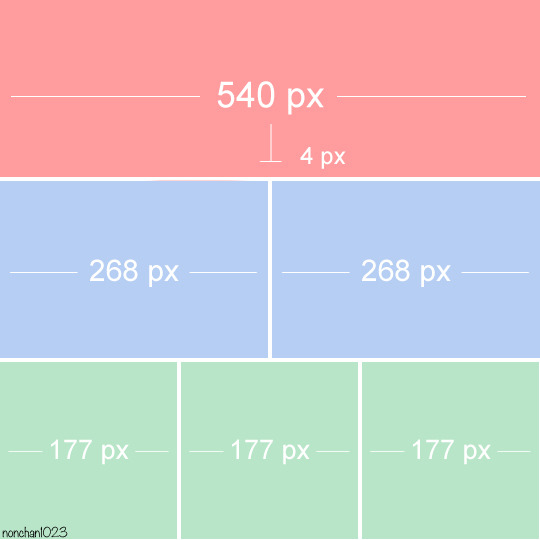
i usually make my gifs a little bit bigger, for example i size up 268px to 300px. i don’t really have a reason lol i just prefer things a little bigger i guess? anyway so to resize, go to image > image size or the keyboard shortcut option + command + i (control + alt + i)
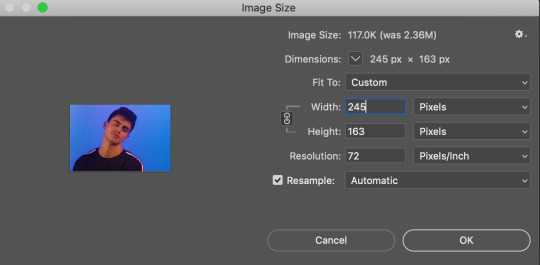
i made the width 245 pixels & it automatically set the height
step 6: sharpening
this step is optional, but i’ve found that it can make a difference in quality a lot of times. i use this sharpening action. in order to use it, you’ll have to load it onto photoshop, so click the play button thing on the right sidebar or go to window > actions
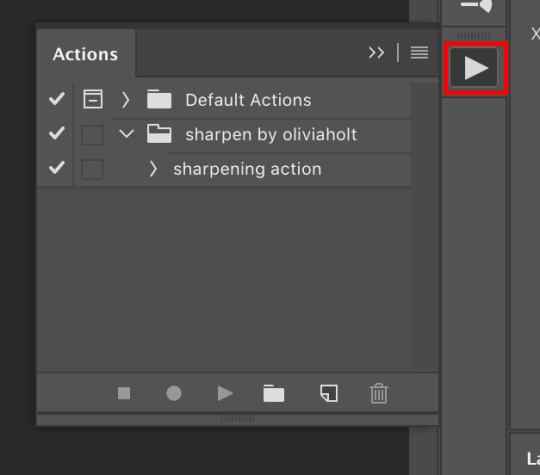
click the 3 stacked lines, go to load actions, then select the sharpening action i linked
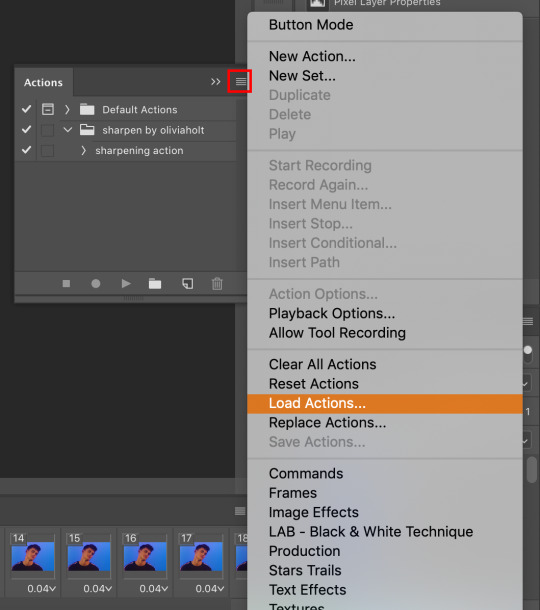
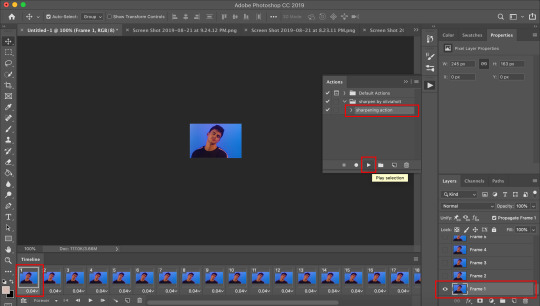
once it’s loaded, make sure the 1st frame in both the timeline & layers are selected, then click play selection on the action bar & it will work its sharpening magic
step 7: gif speed
after you sharpen the gif, all the frames should be highlighted/selected. click the drop down arrow next to 0.06 on any of the frames & some numbers should pop up
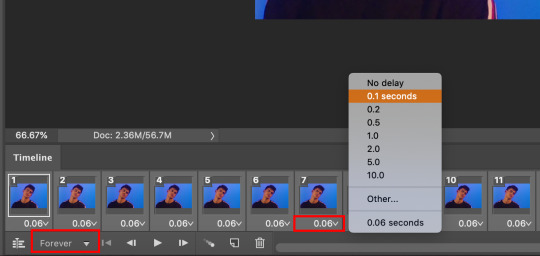
these are the options for how fast you want your gif to be. i usually use 0.08 seconds for gifs with more frames, but 0.1 seconds is a good general speed for most gifs
oh and make sure that drop down is set to forever, which loops the gif
step 9: coloring
this step is also optional. it’s really for aesthetic purpose, especially if the color isn’t to your liking
i’m not creative enough to make my own colorings lol so i usually use one of these PSDs to color my gifs. for this particular gif, however, i used this one. you can find a bunch of other PSDs just searching through the tumblr tags
i just open the file onto photoshop, drag the group over to my gif & it makes it pretty?
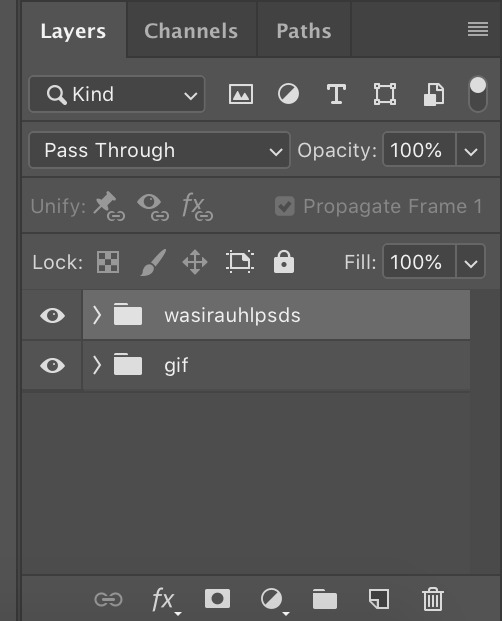
it changed the gif from this

to this

step 8: saving
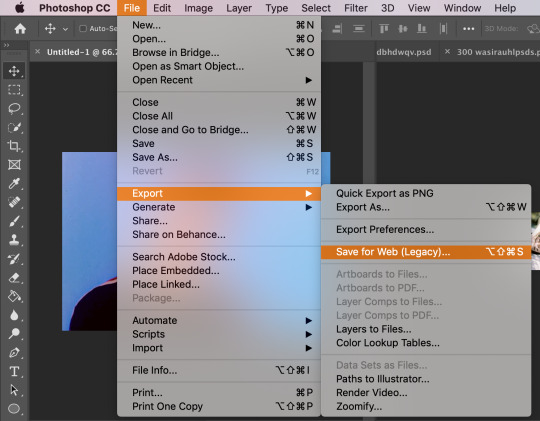
your gif is made! now all you gotta do is save & you’ll be able to use it however you please. go to file > export > save for web
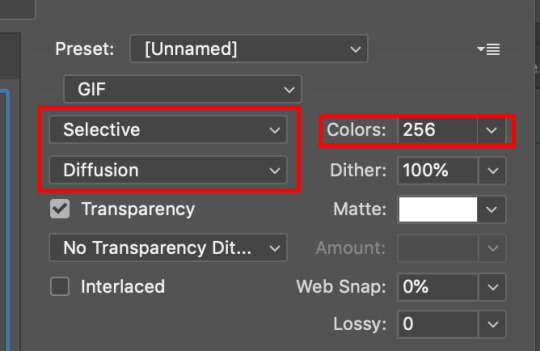
there will be another pop up window. these are the settings i have (based on the tutorials i’ve read). colors should be 256, but you can mess around with the selective and/or diffusion to see how your gif looks
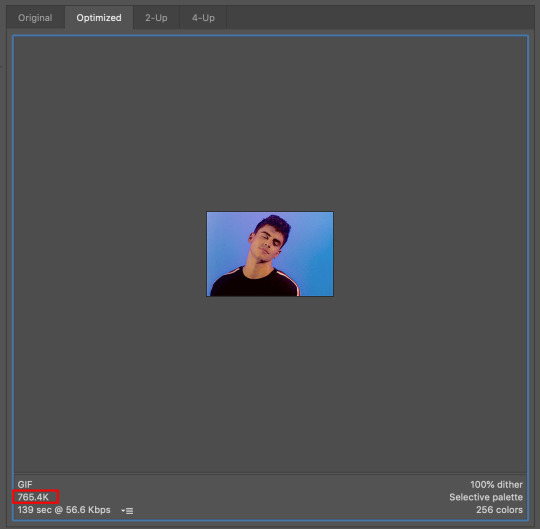
the last thing to check is the gif size. i believe the maximum for tumblr is 3.00M? any larger & the gif will freeze
& that's all i have for y’all !! i hope this made sense omg i really tried to be thorough & provide enough screenshots but like tumblr made the quality booty so if you can’t see something or if you have any questions at all please feel free to send me an ask or hit up the IMs & i’ll try my best to help you out :)
thank you to the anon who liked my gifs enough to request a tutorial, i really appreciate you & anyone who cares to like/reblog my posts !!
#gif tutorial#how to make gifs#how to edit gifs#photoshop#photoshop help#???? idk what else to tag#*#*personal
84 notes
·
View notes
Text
gif tutorial for anon!
hi everyone! an anon asked me about how i sharpen my gifs and i got a bit carried away in my answer so i decided to just turn it into a tutorial oop.
disclaimer: i’m still a beginner, so some of the stuff i do might be a bit weird! also, two of the “tricks” i use i did not come up with/figure out on my own, i linked to the posts of the original creator’s in the step.
so my settings do vary for each gif, but in this tutorial i just go through all the general steps i use for each gif i make, so hopefully it’s at least a bit helpful to someone!!! there’s a lot of images bc i’m a visual leaner so sorry if you’re not!!!🥺
for this tutorial you will need:
- photoshop + basic photoshop understanding. - a way to download videos. - patience with my ramblings. - i think that’s it?
ok here we go!!! so.
step one: the first thing you do is find the video you want to gif. i’m gonna do this one:

i use clipgrab to download videos of the youtube, which i downloaded for free from right here. i haven’t gotten a virus yet, so it seems safe. it works for youtube videos and instagram videos, but not twitter videos or vlives.
there’s also Y2Mate which is online and does the same thing, but i think for only youtube videos - i also can’t completely vouch for it because i’ve never used it, but i think it should work just fine! you can find it right here.
IMPORTANT - make sure that your video is as high quality as possible. you can either change that on youtube by clicking on the gear in the play bar (right next to cc box). usually videos are automatically set to 720p, which is pretty good, but i like to bump it up to 1080p when there’s the option to! note: clipgrab usually does this automatically for you, i’m not positive about Y2Mate and other online converters.
step two: copy the link into your converter. make sure that the quality is where you want it, then hit “grab this clip” or “convert” or whatever the prompt is and it will download onto your computer. save it wherever you want to that you’ll find it, i usually just save it to my desktop so that it’s right there for me.
step three (optional): i like to crop the video down and do a primary editing on imovie just so it’s easier to manage when making the gifs. this step isn’t necessary, but if you have imovie or another video editing app, i would suggest it!! (you can also slow down the video here if it’s too fast to make a good gif!)
here’s a before and after shot!

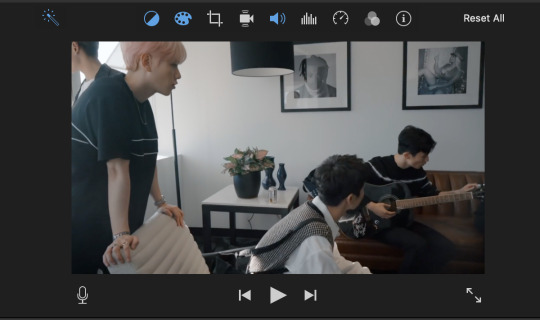
for me, i literally just click the “magic wand” or “auto-adjust” tool. but you can already see it makes a big difference!
so now i also use iMovie to crop down to the gifs i think i want to use. it makes things easier to be precise when using photoshop.
step three and a half: export your new mph. once again, make sure the quality and resolution is bumped up to your liking!

step four: so now it is time to use photoshop! open up a new document. you can set it to whatever dimensions you like, i typically prefer 500x281, but it doesn’t actually matter because it will automatically resize to the size of your video lol. anyways, once you have your canvas open, go to file -> import -> video frames to layers.
depending on if you have more than one gif in the movie file, you can either crop it down or just import the whole thing. since i have to gifs in this file, i’m going to crop it.

step five: okay, full credit to this life saving post for the next step!!!! i was stumped on how to edit all layers of a gif at once for quite a bit of time, which is why some of my earlier gifs are a much crustier looking. anyways, op explains it much better than i ever could, so i would suggest just reading their tutorial for this step!!!
step six: so now that you’ve combined all your gif layers into a smart object, it’s time to edit them!! the adjustments i typically mess around with are image -> adjustments. i almost always adjust the brightness/contrast, vibrance, hue/saturation, and selective color. i don’t have specific settings for these (sorry if that’s not helpful!) because it really does depend on each individual gif! sometimes my adjustments are drastically different for gifs from the same video!! i’m perfectly happy to help troubleshoot for specific issues if you need help, but it’s hard for me to give a blanket tutorial for this part :)
also remember to not whitewash poc when adjusting the settings. please don’t do this!!!! it’s also possible to correct whitewash w/photoshop, so just fool around on the settings until the subject’s skin tone is what it should be.
step seven: after adjusting your gif to your liking, now it’s time to actually sharpen. for steps 7 through 10, i use a trick from this amazing post to sharpen! so now that you’ve adjusted all your layers, do control/command click on the layer and choose duplicate layer. this will make a copy of the edited gif.
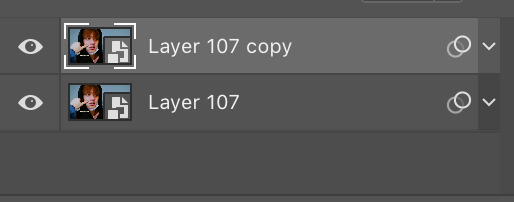
step eight: on the original layer, go to filter -> sharpen -> smart sharpen. once again, every gif is different so depending on the size and quality of your gif, the sharpen settings will be different. the larger the gif is, the more you can sharpen it, which is why i like to wait until the end to resize it!

step nine: on the copied layer go to filter -> blur -> gaussian blur. again, the amount of blur will depend on your gif. this step just smooths it out. don’t worry if it looks blurry, because it’s supposed to! after this, still on the copied layer, go to filter -> sharpers -> smart sharpen once more.

step ten: cool! now you’re going to lower the opacity of the copied layer! i usually put it at about 30 percent!
step eleven: go to file -> export -> safe for web (legacy). this is were the resizing goes! so for this particular gif, i didn’t have to crop it or anything. so the only think i do to resize it is make it 500x281. this size usually ensures it will be small enough to upload to tumblr, and it is a ratio of most standard sized videos so it works perfectly!!
and voila!

i’m so sorry if that was very long and/or hard to understand!!! please feel free to ask any clarifying questions!!
4 notes
·
View notes
Photo
One of the most frequent asks I get is “how do you make your gifs?” Previously I had just linked my FAQ where I have some resources on how to gif listed, but I figured to (hopefully) stop receiving the same ask over and over, I’d just make a tutorial on how I personally gif!
* Please note that everyone has different giffing styles and settings preferences, so the following is just how I make my gifs. Other people are likely to do things differently!
This post will be a comprehensive guide that includes details about DOWNLOADING VIDEOS, USING VAPOURSYNTH TO MAKE GIFS, USING PHOTOSHOP TO MAKE GIFS (+ a blurb on TOPAZ), and COLORING.
This post was last updated on July 30, 2020. Keep reading to get started!
DOWNLOADING VIDEOS
I use a number of sources to download videos/get video clips, depending on the origin of the video. In general, I try to gif from videos that are at least 1080p - the higher, the better. It’s almost impossible to make gifs look high quality if they don’t originate from a high quality video! Below are the sources I use:
TS files: kpop24hrs (you need an account), kpopexciting, occasionally torrent links from Google or download links from Twitter (search the group name + date in YYMMDD format + .ts)
Youtube videos: 4K Video Downloader
Vlive videos: Soshistagram
Twitter videos: Twitter Video Downloader
Instagram videos: Dredown
Long videos: If I don’t have the space (or patience) to download a certain video, or if it’s not a downloadable video (e.g. Fanship, paid online concert, etc.) then I screen record with Quicktime Player
(Side question: what’s a TS file? A TS file is essentially a very high quality video that you can find for live show performances and aired music show interviews! TS files are generally 60fps, so they’re how gifmakers can make those super clear and smooth live performance gifs. If a TS file is available for what you want to gif, use it.)
USING VAPOURSYNTH TO MAKE GIFS - OLD AND NEW VERSION
05/2020 update: I have re-installed Vapoursynth to its latest version, so I am including updated instructions/screenshots for both the old version (that I downloaded ~mid-2018) and the latest version.
After I’ve downloaded my video, I use Vapoursynth to crop, resize, sharpen, and denoise gifs. Vapoursynth is like Avisynth in that both programs can be used to crop and resize gifs without losing video quality, but VS has the added capabilities of sharpening and denoise. VS is the reason I don’t need to use Topaz on any of my gifs! You can install Vapoursynth here.
First you drag your video file to the Vapoursynth app installed on your computer. You’ll be prompted to enter a start timestamp in HH:MM:SS format (so if you want the video to start 5 seconds in, you would enter 00:00:05). Then you put the encoding duration also in HH:MM:SS format (if you want the video to be 8 seconds long, you would enter 00:00:08). Generally I’ll look for the exact moment I want to gif and enter the start timestamp 1 second earlier and have the encoding duration be between 3-5 seconds.
After you’ve entered this, a resizer.html window will automatically pop up. Below are screenshots of examples of my normal settings for my performance gif 4sets (ex. here or here) for both the old and new versions of Vapoursynth.
Old version:

New version:
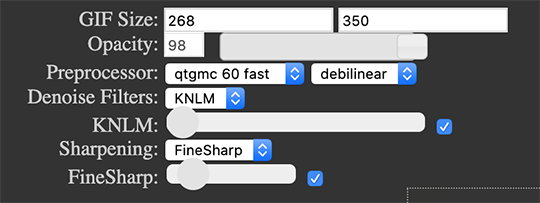
Below is an explanation of the parts:
GIF Size | The gif widths (the first number) recommended for Tumblr:
1 gif per row: 540px
2 gifs per row: 268px
3 gifs per row: 177px
You can use any height, but these are the ones that I tend to use:
1 gif per row: 243px or 300px most frequently, but sometimes I’ll do 220px/201px/400px/450px/540px depending on how large or small I want them
2 gifs per row: 350px
3 gifs per row: 300px, occasionally I’ll do 375px or 400px if it’s a very long video (e.g. some fancams)
Opacity | Don’t worry about this; it just changes how you view the video in the window.
Preprocessor | This refers to how the video will render! Super important because you’ll be given the option of 60 vs. 30 - these numbers refer to frames per second. For live performance gifs, I always use qtgmc 60 fast (slow in theory gives you better quality gifs but I’m far too impatient for that). For all other gifs, I do not use any preprocessing method. A basic rule is that if you’re using a TS file, you should preprocess it because it’ll de-interlace the file. If you’re using an mp4 or mkv or any other file, you don’t need to preprocess.
Extra Sharpening/Sharpening | Pretty self-explanatory. You can move the slider up or down depending on personal preference! I try to keep the sharpening low unless the video quality is especially bad. In the new version, I use FineSharp over VCFreq because I find the latter a little harsh for my tastes.
Denoise/Denoise Filters | Will help remove noise from gifs. In the old version, I almost always used the Light setting unless the video is super grainy, and then I might have chosen Medium instead. In the new version, I use KNLM at its lowest setting. I’ll only bump it up if the original video is quite grainy.
Once you’ve configured all your desired settings, you can copy & paste the output in the resizer.html window to your Vapoursynth editor file and enter the beginning and end frames.
The editor file for the old version:

The editor file for the new version:
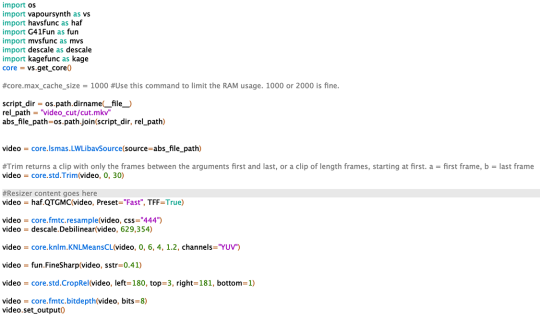
To make the gifs in the old version, just save the file and then wait until everything finishes processing! In the new version, you have to go to Script > Encode video, and then under the gif preset click ‘start.’ Wait until it finishes encoding. On my laptop, this takes anywhere from 20 seconds to 3-4 minutes, so sometimes you have to be patient. This is the end of the Vapoursynth portion of gifmaking.
USING PHOTOSHOP TO MAKE GIFS
To create gifs in Photoshop, go to File > Import > Video Frames to Layers and then select your video file/output file from Vapoursynth (output.mov). These are my settings to create the frame animation:

Once your frames have been imported, you can delete frames and add a coloring psd on top of all your layers.
Photoshop is also where you adjust the timing of your gif. In general, these are my settings:
30fps: 0.04/0.05
60fps: 0.02/0.03/occasionally 0.04 if I want it to be super slo-mo
Honestly, just use whatever timing setting that looks good to you! Some prefer faster gifs, others prefer slower, so just do what you like and things will be okay.
Save through File > Export > Save for Web (Legacy) with these settings (you can play around with selective vs. adaptive or diffusion vs. pattern; they all have slightly different looks, but 256 colors is a must):
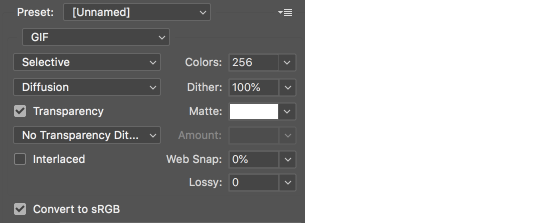
Make sure your gif is under 8mb - to decrease a gif’s size, I usually delete frames and/or use selective color to increase the black percentage for whites, neutrals, and blacks.
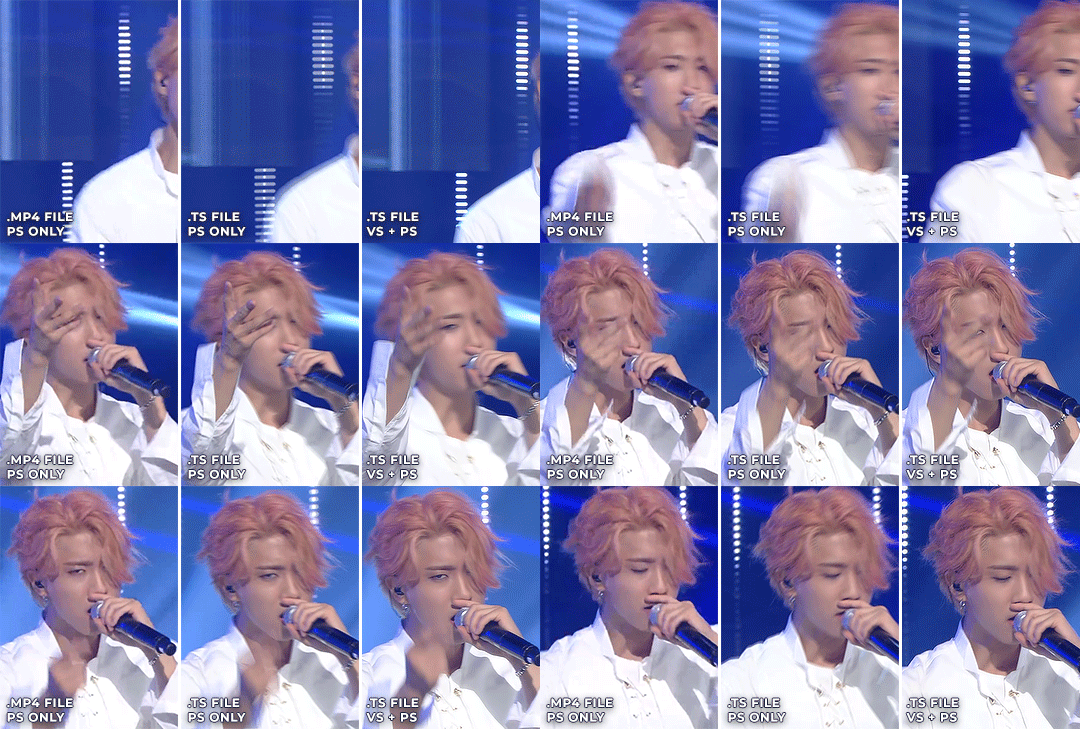
After you save, you’ll have your gif! Below is the same moment giffed in different ways to illustrate how much a difference that file type + giffing style can make. You can tell that the TS file is higher quality and less grainy than the mp4 file, but it really isn’t unless you use Vapoursynth that the gif becomes super sharp and smooth. This is because if you import a TS file straight into Photoshop, it will only import at 30fps because the video itself is interlaced. You have to run it through a de-interlacer (like VS) to actually get a 60fps clip.
With regard to TOPAZ*, I mentioned above that because Vapoursynth has sharpening and denoise functionalities built into the program, I no longer use Topaz. However, if you do not have access to Vapoursynth, then I highly recommend downloading Topaz (download links can be found through quick searches on Tumblr) and using Denoise and Clean to adjust your gifs. A warning: Topaz can take a long time to process and many gifmakers have a love/hate relationship with it, so be prepared for that. The way you apply Topaz is to select all your frames and layers, then do Filter > Convert to Smart Filters. Add the Topaz/smart sharpen adjustments, then Flatten Frames Into Layers. Once that has happened, hit Convert Frames > Flatten Frames to Clips and then Convert Frames > Make Frames from Clips.
COLORING
I get questions a lot on coloring and the truth is that coloring is an art - I by no means consider myself an expert, but I do experiment a fair amount with different settings and layers so I at least have a decent understand of what’s possible when it comes to coloring.
A few tips I’ll give:
Everyone has different coloring preferences! Whatever coloring you like may not be what others like, and that’s okay. Don’t be afraid to experiment!
PSDs are good for learning how to color - download premade ones and look at how other people made them: what layers did they use? in what order did they put them? what blending mode? at what opacity? These are all questions you’ll need to ask yourself when you create your own PSDs. (Remember not to edit others’ PSDs if they do not allow it, and given them due credit when necessary. Also don’t claim as your own!)
Tips to bring out idols’ natural tan/unwhitewash: increase vibrance, decrease brightness + increase contrast, use selective color and decrease cyan and increase black on the reds channel, use a gradient map that goes from a black/dark red to light pink/coral and change the blending mode to soft light or decrease opacity of the layer to 20-40%.
Below are some examples to show how much a difference coloring can make. I’d consider a basic PSD one that has less than 10 coloring layers/doesn’t make much change to the actual coloring of the gif besides lighting adjustments. More complex PSDs generally have 15 or more layers (the ones I used below in have 16-25+) and drastically change the colors in the original gif. You can also mix PSDs too - for a lot of my performance gifs, I’ll first add a basic PSD that increases the contrast of a gif to make the skin glow, and then I’ll add an additional PSD that adjusts colors and other various lighting aspects.

You can see just how much of a difference coloring makes:
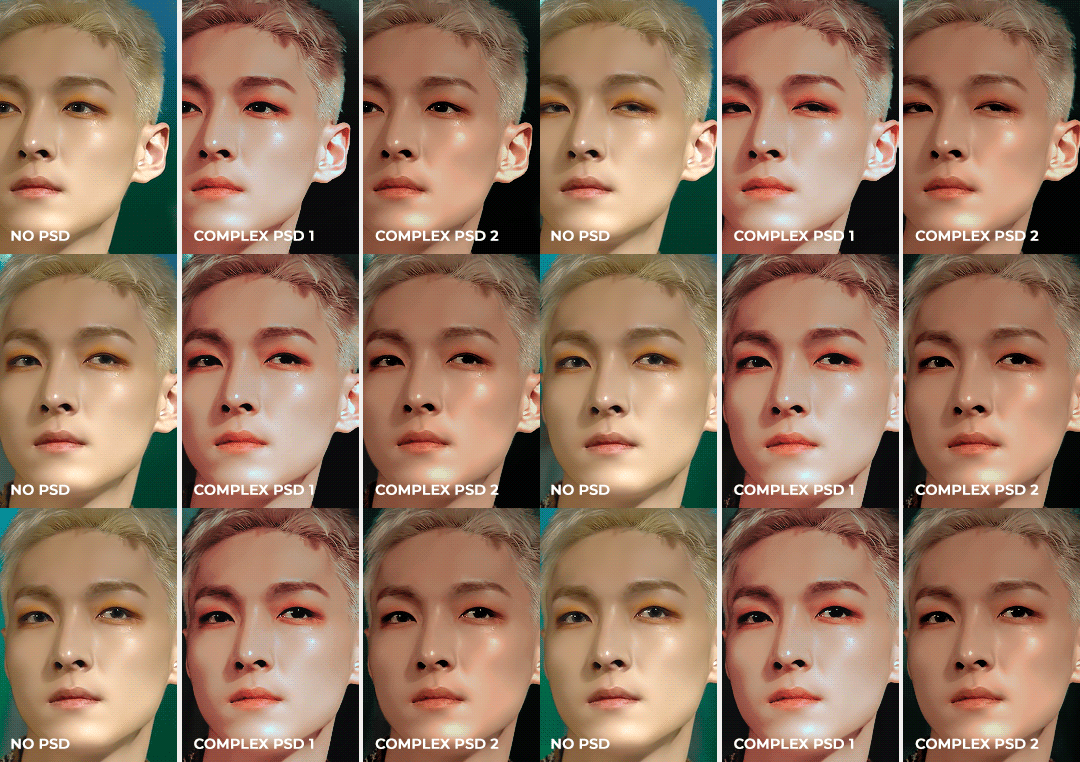
Don’t be afraid to experiment with different layers/styles! Everyone has individual preferences for how they like their gifs to look, and in a sense, coloring is the main way you can make gifs “yours.”
FINAL NOTES
Giffing is hard and requires a lot of patience - you definitely won’t be able to make amazing gifs right when you start! Even though I’ve been giffing for close to a year now, I still dislike many of the gifs I make and think that I can definitely improve. Don’t be afraid to reach out to other gifmakers for advice and help - 99% of the time, they’ll be happy to answer your questions!
I have posted a sped-up version of my gifmaking process here that you can also use as a resource!
Please let me know if I’ve missed something, and feel free to reach out if you still have questions. Good luck!
905 notes
·
View notes
Text
my mid-2018 update
salut! i feel like it’s time for an update. not just on my blog, but on myself too. i went through a seven-book (and eight-movie) series equivalent full of character development in the last year or so, and i lost my passion for drarry in the process. i lost my grip on what enchanted me about these two boys that never knew what was good for them. i knew they would always have a special place in my heart for them, but i had convinced myself that it was time to “grow up,” to lose sight of what i had told myself was a mere adolescent fantasy phase. i made myself believe that i had outgrew draco and harry, and the harry potter franchise altogether.
and then one of my friends recommended a fic. how fitting that tomorrow’s harry’s birthday, huh?
if your finger or cursor is hovering over the ‘keep reading’ button, thank you. i gotta preface that you might wanna come back later if you don’t have the time, though. i’m really about to have a heart-to-heart in the next few paragraphs.
if you visited my blog recently and looked back at the dates of the past twenty or so posts, you’ll see how spread out they are. it’s perfectly okay to assume that i would only come on tumblr once every month and reblog a couple of posts, and then disappear for weeks at a time—because that’s exactly what happened. i’m truly, deeply sorry for that. you didn’t follow a blog to only see a couple of reblogs and no original content once a month. you followed to see interesting content that showed the personality of the blogger, that showed the dedication and love for a ship you also shared. i didn’t mean to let the people who support this blog, and/or support me, down. this blog was meant to be a place to share happiness i felt for these two boys, and instead it felt like more of a responsibility.
during my semi-hiatus, i really went through it. no, not actually facing some life-or-death situations and having to go on missions with my best friends to defeat the dark lord and save the wizarding world, nothing like that. more like, those coming-of-age experiences you have in high school where you find out who you are and how to actually dress respectably. to put it in short, i feel like i aged three years despite only hitting the big one-six.
i didn’t lose only my passion for drarry, but for being creative in general. my pencils no longer had to be sharpened, my journal remained closed, and my wacom tablet collected dust in my closet. it’s sad to think about it, losing my inspiration. looking back, it was like losing a part of me.
then, something brilliant happened. my dear friend sent me a link to a fic at the perfect time yesterday. i was having a sad day, and she wanted to share this fic with me despite me being distant and unreachable for months. even at the time, i couldn’t muster the energy to focus my eyes long enough to read her texts, much less a 12-chapter fic. however, today, i had the energy and the free time to click on the link she sent me. i then continued to lie in bed for the next two hours, cuddled under my blanket with the lights out and my phone brightness on the lowest possible setting as i scrolled and read.
next thing i know, i’m completely submerged in this page of text that describes the characters i used to love so perfectly. i was content by myself for the first time in weeks, and that was enough. i wanted to prolong that feeling of happiness and joy of reading, so i kept on. until i finished.
and so here i sit, feeling like the sixteen-year-old drarry shipper i should have allowed myself to be months ago. i didn’t think i’d be so ecstatic to have back problems in my teenage years.
this is where the update ends. i’ll put a tiny lil review of the fic she sent me. thank you for reading! talk soon xx
Ligabus Filium - Tessa Crowley (tessacrowley)
[ 41.5k | 12 chapters | complete | explicit ]
tags: post-deathly hallows, hp: ewe, bdsm, top harry potter, dom harry potter, bottom draco, sub draco malfoy, virgin draco malfoy, whipping, riding crops, gags, dildos, creative use of time turners, creative use of howlers, creative use of amortentia, listen it’s the running theme of the story ok, it’s filthy bdsm smut what do you what
It should be careful, deliberate, but it isn't. Like every other part of their relationship, it happens gradually and then all at once, before they even realize it. And when the little blue threads bind them together, there's no going back.
b/n: i’ve always been a, how do i put it, slut for soulmate/veela/bond fics, and i’ve been considering the bdsm community as something i’d pursue in my… pastime… so this really got my attention for that too. the fic itself was so fun to read. it’s heavy smut and centered around bdsm so if that isn’t your thing, i don’t recommend it. in addition, there is a character that has strong, explicit homophobia so please be wary of that. however, it captured my heart so fast. the ending is so wonderful and filled my heart with joy.
tldr; heavy smut, hella kinky, and fulfilled my need for backstory within fics. 17/10
#thank you#you all mean the world to me#you don't even know honestly i#i'm just really happy#updates on nessie
6 notes
·
View notes