#cricut beginner projects
Explore tagged Tumblr posts
Visit Tumblr Blog
Explore Tumblr blogs with no restrictions, modern design and the best experience.
Last Seen Tumblr Blogs


Fun Fact
Tumblr.com is the 103rd most visited website in the world.
Text
Top 5 Cricut Beginner Projects to Get Started
Buying a Cricut machine for the first time, and if you are a beginner, the device can be intimidating by its features and looks. It can also seem like a complicated machine, with many blades, mats, materials, and tools. So, choosing your first project can be challenging given the wide range of Cricut machine's abilities. As you might already know, Cricut machines are cutting devices, and its high-end models can cut more than 300 materials. This blog contains curations of Cricut beginner projects to help you understand and work smoothly with the machine.
1. Custom Phone Case
If you want to make your mobile's trendiest new phone case, it is possible with your Cricut machine. You can mainly use the Explore machine for creating this project. It is because, along with Design Space, select your respective smartphone model from the iPhone and Android phones list. You can make a perfect Cricut phone case in just a few minutes.
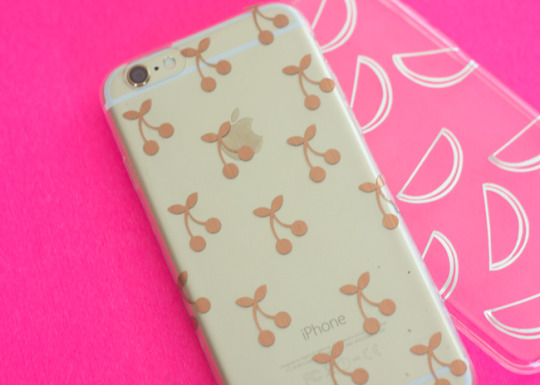
Further, the supplies you need for creating a personalized phone case are an Explore or Maker machine. You also need a clear phone case, foil adhesive vinyl, or standard permanent vinyl. Also, you need Transfer tape and the respective designs you want to cut on the material.
2. Cute Face Mug
It is one of the easiest Cricut beginner projects. You just need to cut some vinyl material and stick it on a mug with a clean surface. You can select super cute designs from the official Design Store or create your design. You can choose some cute doodles you or your kids like. And you can make various faces and expressions, even using animals such as a kitty, puppy, or unicorn.
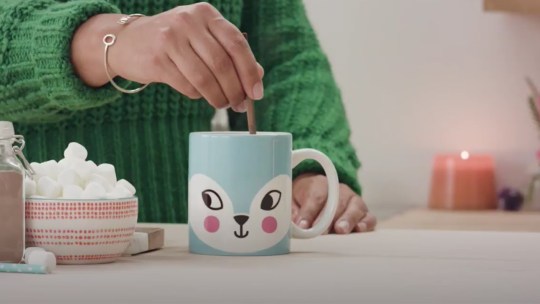
Further, the supplies you need for this project are a sheet of vinyl, a Cricut Machine, and a weeding tool. Plus, you need Transfer tape to transfer the design onto the surface of the mug.
3. Greeting Cards
You can make a set of greeting cards with your new Cricut machine as your first project. To do this project, all you need to do is cut two types or colors of cardstock, fold them, and put them together. Creating a set of greeting cards is very simple and quick, and you will also have cards with fancy patterned looks.

Further, all the standard cards are 5 x 7 inches, so you can keep them in envelopes and mail them easily. So, you need a standard cardstock, A Fine-point blade, a Cricut Joy, or Explore. Plus, the design of your greeting card. Additionally, you don't have to score or glue the end products. That is why it is the easiest of all Cricut beginner projects.
4. Wall Decals
The wall decals are another set of great projects to begin your Cricut crafting journey. You can add inspirational quotes or simple messages in your living room or bedroom. For this project, it is better to use regular permanent vinyl. However, you can also use colored vinyl to create a pop-up look.
Further, this project requires a Cricut machine, permanent vinyl, and an SVG design file. Additionally, you need to measure your space and cut the quote of your choice. After missing, clean the wall, free it from dirt, and then apply the design.
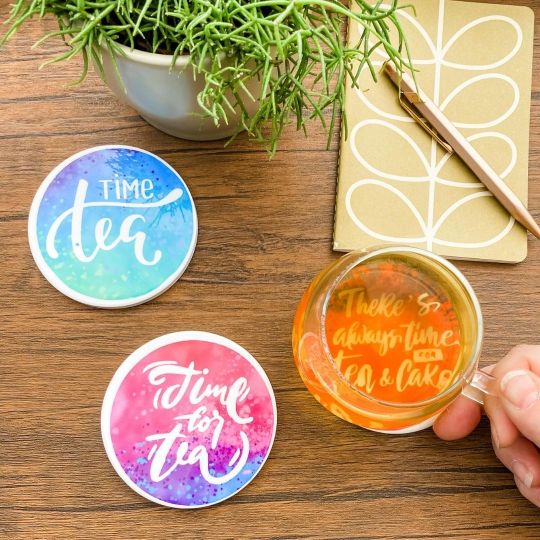
5. Coasters
Another way to decorate your coffee or personal table is by adding personalized coasters. Making coasters is easy and takes less time. It also needs less materials to make it. All you need to create a coaster is first to decide on the design you can easily peel off from the material. In addition, you need permanent vinyl and cut the design on it using your Cricut Maker or Joy.
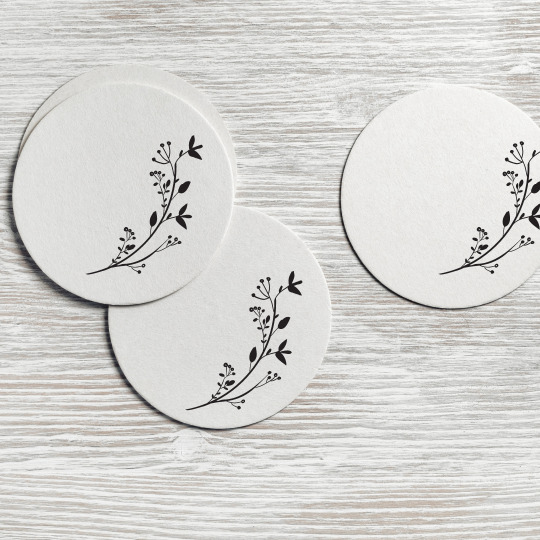
Further, using permanent vinyl to make coasters assures you of longer life and won't quickly come off from the coaster.
Conclusion
Using a Cricut machine is easy once you get comfortable with the materials, tools, and Design Space. To get comfortable as a fresh user, you must pick up projects that read to you the fundamental aspects of working with a Cricut machine. This blog will be an easy guide and Cricut beginner projects to help you in the initial stages of working with the device. In addition, you need to pick a project with fewer materials, simple steps, and less time to complete. Once you master the basic techniques, you can create complex designs and projects.
FAQs
What is the helpful advice on Cricut beginner projects?
Some important suggestions are to pay attention to instructions and get suitable materials/supplies and tools for your project. Additionally, if you are in doubt, test it first. As a beginner, you need to accept that you will make certain mistakes, and that's Okay. And your aim should always be learning and on the process and less on perfection.
What should ideally be the first Cricut project for a beginner?
Ideally, Card making is the first project new users should try with their Cricut machines. It is because you can make your cards for any situation. You can use your machine to cut the design on your cardstock and remove all the extra materials. Now; you will have your first Cricut project.
Do you need a computer to work with Cricut machine?
No, you don't need a computer to work with Maker. It is because you can use Cricut Maker with your Android or iPhone. But you can only do some things you want with a mobile. So, to use the machine's full potential, connecting it to the computer is a must.
#Cricut Beginner Projects#Top 5 Cricut Beginner Projects to Get Started#Cricut.com/setup#www.cricut.com/setup
2 notes
·
View notes
Text
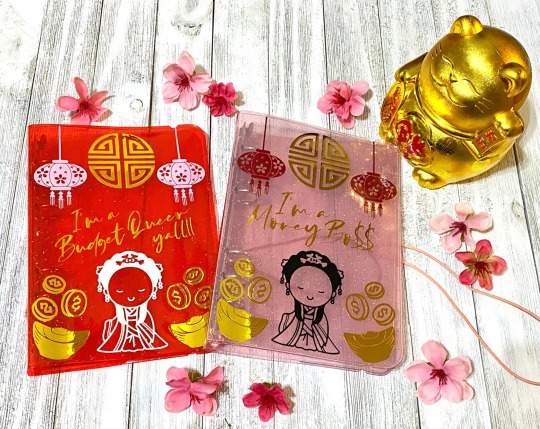
#etsyseller#etsyshop#etsystore#small business#etsy#etsyfinds#cash saving#cash stuffing#customization#personal finance#colorful glitter gel binders#glitter binder#etsy gifts#gifts for wife#gifts for mom#personalized gifts#budgeting for beginners#budgeting strategies#budgeting tools#cherry blossom#budget kit for beginners#cash stuffing a6 sized bi fee#clear laminated cash envelopes#a6 sized cash envelopes#laminated cash envelopes#cash stuffing kit for starters#colorful glitter binders#cricut project#cricut#money management
0 notes
Text
9 Free Cricut Projects for Beginners: Adding Creative Touch!
Hey, dear crafters! I got you some free Cricut projects for beginners. Do you want to explore them? Let’s look into it. I have been crafting with Cricut machines since I bought them. Whether it is personalized projects or anything else, Cricut has helped me so much.
My crafting journey started with small tools like scissors and the required materials. But now I am capable of making large projects in no time. With Cricut, it is superbly easy to handle tasks that are bigger and require precise cuts. Different types of Cricut cutting machines are available in Cricut’s lineup, helping crafters with their crafting needs.
However, there are some DIY projects that you can’t make for free as their designs cost a few dollars. Hence, if you are looking for beginner-friendly free Cricut project ideas, check out this blog.
Gift Tags
Why don’t you add gift tags when you want to create your gifts? Create this one of the free Cricut projects for beginners and offer an awesome handmade gift to anyone you love. Gift tags can be a lovely decorative item you can try making any time with your Cricut machine. Using a cardstock sheet, I created these beautiful projects. Now, it’s your turn!
Cardstock Wreath
Here is my favorite cardstock wreath! Doesn’t it look so real? It can be easier to make this project when you put a little effort into it. Don’t forget to create such beautiful projects and decorate your home like you never did before! Create these leafy designs on Cricut Design Space, or get the design from the Cricut app. However, putting in extra effort is not a big deal as you can easily create this project from scratch.
Pillow Box

So now you want to make some beautiful pillow boxes. Don’t worry; here I have one of the free Cricut projects for beginners that is easy to create. With Cricut, you can create and finish the designs in no time. Whether you want to use cardstock or poster board, you can make this Cricut project without hassle. Use supplies like glue, paper, matching paper cord, XL scrapper, and cutting machine with its essential accessories.
Birthday Card
Here is the birthday card I made for my husband’s 30th birthday. On his birthday, I love to shower him with love through the magic of words. I believe in expressing my thoughts conventionally, like our great-grandfathers used to send letters.
I used vinyl on cardstock to make this simple birthday card, and I saw this beautiful, simple-looking card. If you find it an interesting idea, give it a shot!
Phone Case

Elevate your phone’s cover with your Cricut and find the design free. You can also create this simple design yourself. All you will need is the Cricut Design Space software, and then you are ready to go. For this, I recommend you use a transparent phone case and any Cricut machine you want to use. Despite these, you will want transfer tape and Cricut software. Rest, you are good to go.
Leather Keychains

Do you know what excites me the most about Cricut projects? It is the materials, and when I have to make something out of leather, I get too excited. I have created many free Cricut projects for beginners using leather, which include keychains, earrings, and much more. I have tried more such projects that included leather materials. Try this project and beautify your keys with these keychains.
Earrings

Have you ever created any sort of jewelry using leather? No? It’s okay! Here, I created a pair of earrings using green faux leather. In the beginning, you might be overwhelmed to see this project, but trust me, this is going to be one of the easiest projects ever. To create this, you can cut faux leather using your Cricut machine.
Coasters

If you want to try free Cricut projects for beginners, bring blank coasters from the market and decorate them using your smart Cricut machine. Choose your materials, select your infusible ink transfer sheet, and transfer them onto your Cricut coaster. From Cricut Joy to Cricut Maker 3, they can easily help you create your coaster the way you want it.
T-Shirt

Feel kind while creating this T-shirt using your trusty Cricut machine. This shirt can be a great idea; try making it with different vinyl colors. My daughter loved this T-shirt when I gifted it to her after she received good marks in her exams. She was truly ecstatic when she found this handmade shirt. Hence, using iron-on material and its perfect companion — the Fluorescent Pink Glitter- is the best way to get this beautiful shirt.
FAQs
Question 1: What are free Cricut project ideas?
Answer: Endless options are available for crafters looking for Cricut project ideas. Here are a few ideas that you can consider in your projects:
Mugs
Autumn pumpkin cart
Puzzle
Cupcake wrappers
Photo booth props
Glass etching
Wedding decor
Question 2: How to find free Cricut projects?
Answer: If you are looking for free projects to make on your Cricut machine, you can easily find them on the Cricut Design Space itself. In order to find the designs for free, you have to follow the steps below:
Open Cricut Design Space on your device.
Then, click on the New Projects on the canvas’s left side.
Now, tap the drop-down menu located under All Categories.
After that, you need to select Free.
Finally, you will find 70+ free project designs.
Question 3: What are some free Cricut projects to make with cardstock?
Answer: If you only want to make free projects with cardstock material, you have the following options to try. Also, these projects are simple to find and make on your Cricut cutting machine.
Cake topper
3d layered pine tree
Farmhouse paper leaves
Cute unicorn bookmark
DIY cardstock wreath
Banners
Wedding card
Source: free Cricut projects for beginners
Visit here For More Information: Cricut Venture
Youtube
#free Cricut projects for beginners#free Cricut project ideas#cricut.com/setup#Cricut Venture#Cricut Joy Extra
1 note
·
View note
Text
8 Incredible Beginner Cricut Projects for New Crafters
Hey there! Are you in search of beginner Cricut projects? There was a time when I was at your place😁, looking for the answer to the same questions. Then, I hardly used to get an easy design I could start with. So, I used to get references from the blog but never copied the same. Using the Cricut Design Space app, I made some simple designs by adding my creative touch.
One of the biggest takeaways from creating these easier designs was that I learned almost all the features of the Cricut app, like which tools are used for what purpose. This gave me confidence and made me an expert in crafting. Today, you will explore the top 8 Cricut projects for beginners. So, what are you waiting for? Let’s get started without any further delay!
Heart Print Hoodie

I recently came up with an interesting idea: I would create a T-shirt with geometric graphics. Yes, adding a simple kind of design is boring now! So, I first found the design on the internet and did some modifications to it. Yes, modifications like resize and color are needed depending on your choice of color and the size of the T-shirt you are going to work on. Rest, Cricut has your back, and this is going to be one of the best beginner Cricut projects!
Phone Case

I love personalized phone cases. Besides, I also prefer some kind of unique pattern. If you love personalized phone cases, you can do so with Cricut. Yes, the Cricut machine can help you create or cut vinyl designs that you can place on your phone case. It will literally look great when you use your own handmade design on the case. Must give it a shot!
Leather Keychains

If you want something like beginner Cricut projects, you have an endless option for easy projects you can create even if you just got your new Cricut for the first time. Yes, Cricut has designed its machine and software to be easy to use so everyone can use them hassle-free. Now, you need to simply cut the leather into simple strips and add the text or anything that you want.
Paper Card

Want to make your loved one feel special? Try making this simple card that says everything that you want to say. I really love the font style that I selected for the word LOVE. Just imagine if you write your loved one’s name in contrast. Isn’t that going to impress your partner? Now, use Cricut to make your love life more robust than before.
Wooden Sign

Want to make your home more welcoming? Try this wooden home sign. Don’t worry about the material; Cricut can cut and engrave wood without hassle. All you need to do is get ready with your text design on your Cricut Design app. Modify according to the size of the blank that you have chosen. Once done, you can get started with your beginner Cricut projects in one go!
Pillow Cover
Why not create a pillow with a catchy quote? That one is my favorite: HOME IS WHEREVER I’M WITH YOU. It sounds romantic, doesn’t it? Add such a quote and select any font that you like. Cricut Design Space can offer you many such fonts without any issues. So, what’s the issue — you are not required to waste hours creating those intricate designs. Just type, and you are done! 😃
Jar Labels
If you are looking for easy-to-make beginner Cricut projects, try jar labels. Yes, that can be one of the easiest and most valuable projects. I made this for my kitchen jar as I was finding it difficult to figure out the whereabouts of the ingredients. Also, I created this using a simple paper, and you know how to create texts — it’s your Cricut Design Space. This software has an intuitive interface, making it user-friendly. So what are you waiting for? Get started today!
Custom Water Bottle

I love Customized bottles. Do you? If so, you should give it a try once! These types of beginner Cricut projects are always at the top of the list. If you want to work on Cricut projects for beginners, consider this. I used vinyl materials and worked on the design myself. Anyone interested in creating such a design can take a reference and try it once!
FAQs
Question 1: How to make a DIY home sign using Cricut?
Answer: In order to make your DIY home sign using Cricut, you have to follow the steps described below:
Gather your important supplies.
Create a design or add text you like.
Choose the material and place it on a cutting mat.
Cut the design using your Cricut cutting machine.
Weed out the design.
Transfer the design to your blank.
Question 2: What supplies do I need to make beginner Cricut projects?
Answer: It generally depends on what sorts of projects you are working on. However, I can tell you about some standard supplies used for almost every type of project. To know what those supplies are, have a look at the list below:
Cricut cutting machine
Cricut mat
Cricut basic tool set
Scissors
Cricut software installed on your device
Question 3: What to use for making a personalized water bottle with Cricut?
Answer: Creating a personalized water bottle with Cricut is always fun. However, you will need the following items in order to create a customized water bottle:
Cricut smart cutting machine
Cricut Scraper
Cricut Smart Vinyl Permanent (Choose colors like Purple & Champagne)
Hand towel
Cutting mat
Cricut Weeding Tool
Cricut Transfer Tape
Water bottle (Black)
Scissors
Question 3: Which Cricut machine is the best for beginner crafters?
Answer: Cricut Explore 3 is your answer! Yes, you heard that right. This machine is a mid-range model available in Cricut’s lineup. Anyone who is a beginner can start with Cricut Explore 3, as it is the latest in the Explore family and offers almost all the features that beginner crafters need in their projects.
Source: beginner Cricut projects
Visit here For More Information: Cricut.com/setup
Twitter
0 notes
Text
Fun and Easy Cricut Maker 3 Projects for Beginners [2024]
Cricut Maker 3 projects for beginners are not a big deal. You might be wondering why I am making this sentence with so much confidence. Well, it comes when you have done a lot of crafting over the years. And when you are an expert in a particular area, it is easy to say things like — “it’s not a big deal; it’s just a piece of cake!”
Yes, dear crafters, experience indeed speaks! However, gaining such an experience is not just a one-day process. I have created many projects, tried all the Cricut models, and know how to set up and use them. This is really a challenging learning process. I have spent days and nights on this valuable learning.
Today is the day I am writing this blog and telling you to try some crafts that I have made on Cricut Maker 3. Let’s delve into this guide to learn more.
1. Cake Topper
Every year, we celebrate a birthday, and decorating a cake is a very important task. But there are some Cricut Maker 3 projects for beginners that they can try to elevate this birthday celebration. Yes, you heard it right! It is a simple cake topper.
Yes, this is one of the easiest projects I have ever created using my Maker 3 machine. So, without any further delay, add this Cricut Maker 3 project ideas to your list.
2. T-shirts
Now, you can also make a personalized shirt using a robust machine like Cricut Maker 3. Creating a shirt on Cricut is a piece of cake. Just select a design on the Cricut Design Space app and start cutting it on your trusty Maker 3 machine. The machine is advanced enough to cut every inch very precisely, making it look like a professional design on your shirts.
3. Greeting Card
Although technology has changed drastically in recent years, people still prefer to try old things, such as greeting cards. I made this greeting card on Cricut Maker 3, especially for my lovely husband. The Cricut Maker 3 is a versatile machine that can make almost every type of craft.
So, whether you are looking for Cricut Maker 3 projects for beginners or experienced crafters, you can do it seamlessly.
4. Organizing Labels
Now, it’s time to organize your pantry or kitchen. For this, you can make some labels using permanent Smart Vinyl material. Start creating labels for each container in your kitchen. This will help your mom find the right container with the right ingredients.
The best part is that you can try multiple font styles with different sizes. Cricut Design Space has numerous font styles that are available for free. Just go and grab them.
5. 3D Paper Star Candy Box
Are you looking for 3D Cricut Maker 3 projects for beginners? If so, you will need to try this paper candy box. Given the shape of the star, it doesn’t only look beautiful but is also a useful thing for keeping all your sweetie candies.
Although I love paper crafts, they are easy to make and don’t cost too much. Also, when they are three-dimensional in shape, they attract more attention.
6. Wood Sign
In order to make this wood sign, I used a leftover scrap that I found in my husband’s carpentry shop. This silly signboard is perfect for your bathroom. Since I saw many such signs in other shops, I was eager to give it a try myself. Since I have my incredible Cricut Maker 3 machine, I made this bathroom sign.
7. Bookmarks
It is not the first time I made this bookmark; however, making it out of leather is something I have tried for the first time. Besides, I have used the same machine multiple times to make multiple things. Since this is a leather material, I have to use an Engraving tool to engrave the words. Also, to make the cut, I used a knife blade.
8. Coffee Mug
The coffee mug is one of the best Cricut Maker 3 projects for beginners, as it can be given as a gift. I love making this craft, and the result is quite satisfying. If you want to try this, you will also want a Cricut Mug Press so that you can transfer your infusible ink onto your mug.
However, the cutting design can be easily done on your Cricut Maker 3 machine. And trust me, Maker 3 will do its work nicely.
9. Ceramic Coasters
Coasters are an inseparable part of our lives. They are necessary to keep our dining tables clean. And who does not want to create something easy and creative, especially when your guests come to your home for dinner? With personalized crafters, you can make people feel more special and loved. So, what are you waiting for? It’s time to get started!
FAQs
Question 1: Can I make greeting cards on my Cricut Maker 3?
Answer: Yes, you can make greeting cards on your Cricut Maker 3 to make greeting cards using a Cricut card mat and cards. With its adaptive tool features, you can easily make cuts and engrave and emboss your materials. For Cricut, it is relatively easy; robust machines like Cricut Maker 3 are specially designed for it.
Question 2: Can Cricut Maker 3 cut wood?
Answer: Absolutely, yes! You can cut all types of wood materials made for crafting. Cricut Maker 3 is designed to cut delicate and tough materials easily in one go. All you need to do is use the right blade and wood. Speaking of the thickness of the wood, Maker 3 can cut up to 2.4mm thick wood in no time.
Question 3: Can I cut 3mm plywood on Cricut Maker 3?
Answer: 3mm thickness is too much for a Cricut Maker 3 machine. Hence, you can’t cut your plywood with this thickness. The suitable thickness that you can cut for wood is 2.4 mm. So ensure your wood thickness is within this range, not more than. Also, don’t try to cut without checking the compatibility of the machines; if it doesn’t support it, don’t cut it.
Source: Cricut Maker 3 projects for beginners
Visit here For More Information: Cricut.com/setup
You tube
Twitter
Pinterest
#Cricut Maker 3 projects for beginners#Cricut.com/setup#Cricut Explore AIr 2#Cricut maker 3#software technology
0 notes
Text
10 Easy Cricut Projects for Beginners to Try in 2024
Hey! Want some easy Cricut projects for this year? Today, I have a list of Cricut projects that are easier than ever. Also, I received many comments on my previous blog, and many readers wanted me to write on Cricut projects for beginners. Hence, I decided to pile up all such projects without a second thought.
So, what will you find in this blog? Well, I have included 10 easy beginner Cricut projects. They are all very different from each other and may require additional resources to make. But do you know that all projects have one thing in common? You guessed it right! It’s a Cricut machine. Without a craft machine, the projects I mention below would be impossible to create.
Hence, grab your Cricut, search for your favorite projects, and make them using different materials and blanks. You will find everything from personalized shirts to keychains in this post. Now, let’s dive in!
1. Jar Labels
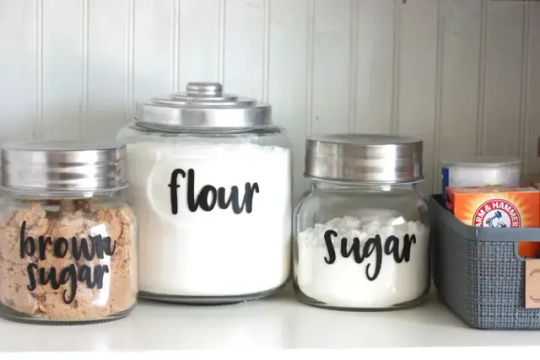
Want some easy Cricut projects? Here are the labels that I created with my Cricut Joy. This is the best idea I can give you if you are a beginner and want to make something easy. This project hardly consumed my time, so I created something useful for my kitchenware. My mom also loves these labels as they help her find the necessary items instantly. So what are you waiting for? Give it a try, and let your mom find the required items immediately.
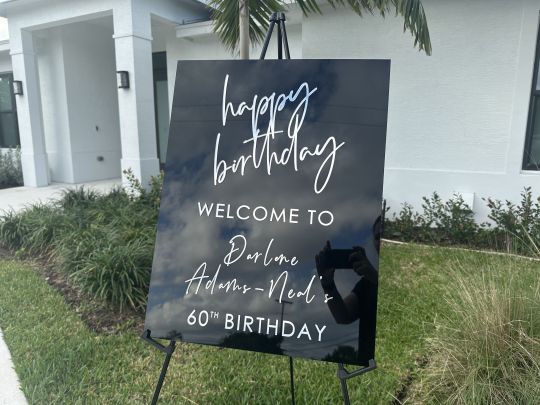
2. Happy Birthday Acrylic Sign
Every year, we have to celebrate our loved one’s birthday. Why don’t you create something using your Cricut? This will add more love and value to your celebration. As you can see in the picture above, I made this on my grandma’s 60th birthday. And I remember when she asked me to make something on her birthday using my Cricut. She was excited and happy when I got her this birthday acrylic sign. If you want, you can make these signs in advance for upcoming loved ones’ birthdays.
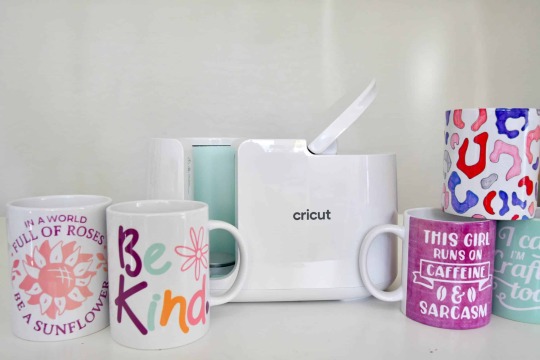
3. Personalized Mug
Personalizing a coffee mug is the best gift idea for all age groups. This is easy and simple to make. Also, you don’t need so much of materials to create this amazing mug. I have only used my Cricut Mug Press and the sublimated Cricut mug. The poly-coated mug works well with vinyl material.
Simply put, vinyl cannot adhere to any mug. Therefore, you will need a mug with a sublimation coating. In short, easy Cricut projects mean personalized mugs because they are easy to create and are considered the best for gifts.
4. Coasters
Do you want to create personalized coasters for your office or home? All you need is infusible ink and Cricut coasters. But wait, you need something! This is nothing but a Cricut machine. Yes, you get that right! A Cricut machine is required to cut your intricate design. Besides, use colorful or single-colored vinyl to transfer it to your coasters blank.
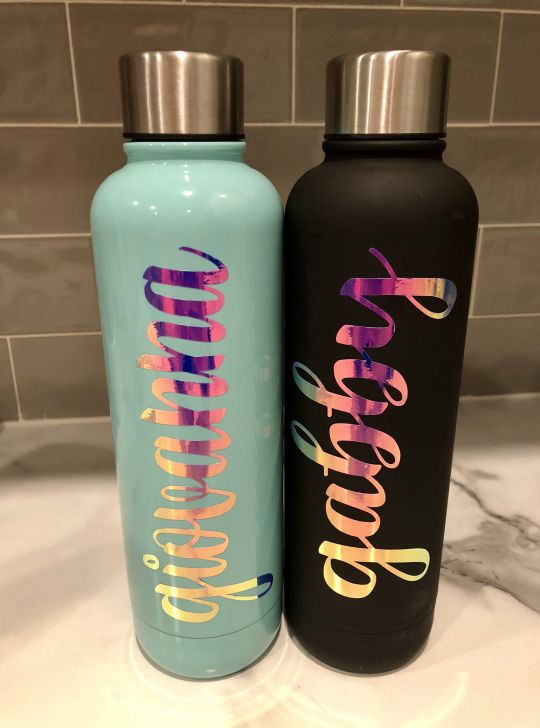
5. Holographic Cricut Vinyl Water Bottles
My children and I love personalized bottles. But our happiness doubles when they are made of holographic Cricut vinyl. This vinyl works like a cherry on the cake! It gives the bottles a gleam and appeal that no one can ignore. So if you are planning to make something similar, then I would suggest you choose a dark-colored bottle, as I have chosen a black bottle. However, try sky blue or light pink if you want a little lighter. Since we all use water bottles, I love making such easy Cricut projects every year.
6. T-Shirt
Want to make something beautiful for your mom? Whether it is her birthday or you want to make her feel special, you can make this simple vinyl T-shirt with the text ‘Blessed Mama.’ In addition, this top-notch quality cut of the Cricut cutting machine will give it a professional look on the T-shirt. So, don’t wait; try this today, as you don’t want to miss a chance to see her smiling.
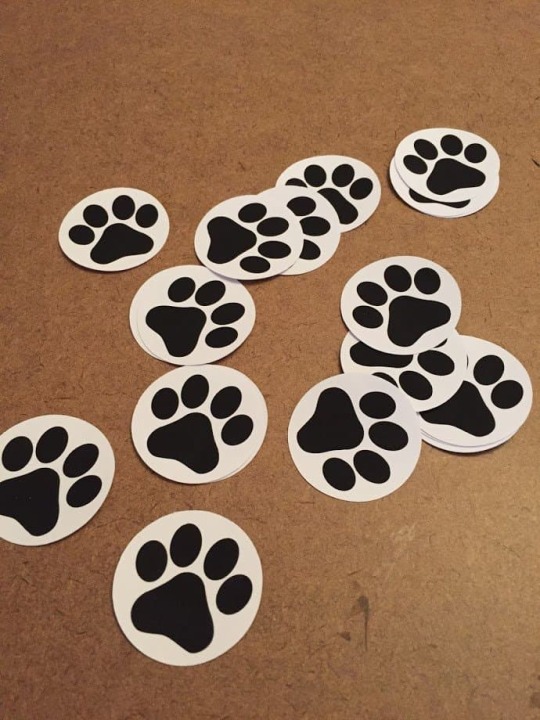
7. Dog Paw Stickers
Stickers are simple and easy beginner Cricut projects. All of us make stickers for personalizing our diaries or journals. I use them in my planner, too. But wait! Here, there is something different. Recently, I created new paw stickers for my dog’s kennel. I wanted to personalize my dog’s home. But it doesn’t matter what type of stickers you are making; making such easy Cricut projects is always effortless.
8. Keychain
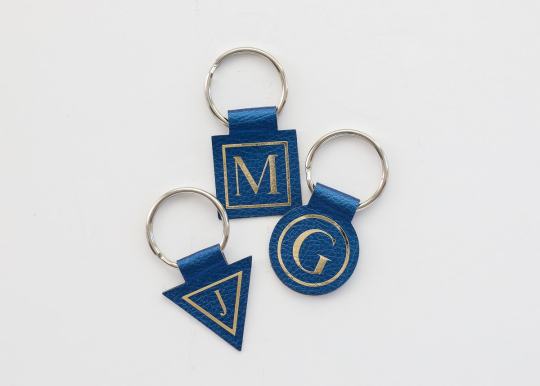
Now, you can also personalize your key chain using acrylic and vinyl. You can transfer the vinyl design made with your Cricut machine to acrylic. However, the key chain I created in the above picture is not made with acrylic but faux leather. Previously, I created many acrylic keychains, but I craved something different this time. Thus, I created a leather-based key chain and used vinyl to make it personalized.
9. Gift Card Holder
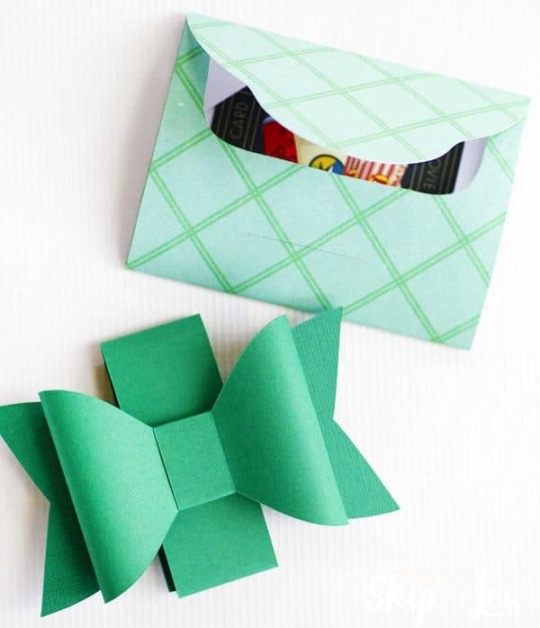
Have Cricut but have yet to try this paper gift holder? If so, you must give it a try! This card holder can be used for special occasions such as weddings, birthdays, or festivals. I created this holder using my handy Cricut Maker and cardstock. I don’t know why, but I love making things on cardstock because cutting them on a Cricut seems interesting. Anyway, if you are interested in making this Cricut project, you should never hesitate.
10. Butterfly Birthday Card
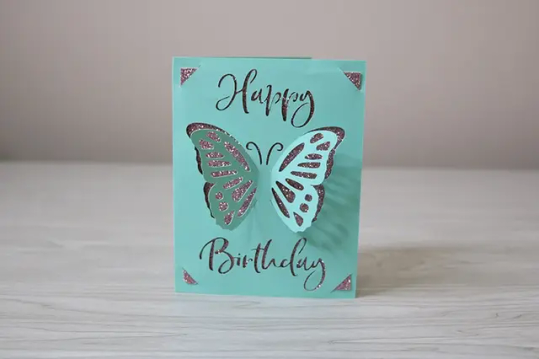
Making such a birthday card using an insert card is my favorite one. The insert card gives it a unique and gleaming look that I love. My cutie, the small Cricut Joy, helped me so much in making this easy card. So try this card for your loved ones’ birthday and send them to bring a smile to their face. Also, you can modify the design easily on your Cricut Design Space. Try this on Cricut Joy and add joy to your celebration.
Final Words
In this blog, I have included 10 easy Cricut projects that are simple as well as unique to create on a Cricut cutting machine. So, whether it is jarring labels or butterfly birthday cards, the Cricut does everything you need. Besides, these projects are those that I created when I was a beginner, so they will be useful for you as a beginner. However, if you want to add your creative touch, you are free to do so.
#Easy Cricut Projects#Easy beginner Cricut projects#cricut explore air 2#cricut design space app#cricut software#install cricut design space app#cricut.com/setup#www.cricut.com/setup login#cricut.com sign in#cricut design space login
0 notes
Text
8 Best Cricut Project Ideas for Upcoming Festivals
After buying and setting up the new Cricut machine, every crafter looks for the best Cricut project ideas. However, there are plenty of things you can make with a Cricut machine. The Cricut offers cutting-edge smart cutting tools that are compatible with more than 100 materials. So whether you are a beginner or an experienced crafter, you can get the most out of the Cricut machine. Plus, investing in a Cricut digital cutter won't make crafters regret their decisions. Besides, the blog will give you Cricut project ideas for beginners as well as experienced crafters/DIYers. As a result, you can take help from these ideas to make your DIY projects on the Cricut machine. Let's take a look at those 8 project ideas.
1. Decorative Stuff for the Party

Every year, people organize parties on special occasions like birthdays, weddings, and festivals. For this, they will have to decorate their home. However, buying decorative stuff from the market costs a lot. To make it easier, you can make various things on your Cricut machines. Using your Cricut device will help you cut the extra expenses. In contrast to the best Cricut project ideas, you can personalize your banners, tables, food signs, cake toppers, and more.
2. Customize T-shirts

To customize your t-shirts with Iron-on materials, you can take the help of a Cricut maker along with a heat press machine. First of all, you have to make a design using a Cricut Design Space. Then, you have to upload the design to your Cricut machine. Once done, you also need to size the design according to your t-shirts. Afterward, you can cut the design and then weed the extra materials. You can also gift this Customized t-shirt to someone you love.
3. Beautiful Leather Jewelry

All Cricut machines cannot cut the leather, but the Cricut Maker and Explore can cut the leather easily. These models are capable of crafting leather, bracelets, earrings, and other ornamental items. Also, handmade jewelry will not cost as much as it may cost you in shopping malls.
4. Tags for Gifts

Want to add a more personalized touch to your gift? You can do this with your Cricut cutter in one go. You can also access the pre-made designs from the Design Space and add your own touch, such as adding text and fonts with different colors. Once you design the tags, you can print them and attach them to your gifts.
5. Personalized Coffee Mugs

Making coffee mugs is not a big task today. If you want the best Cricut project ideas for beginners, then you can go for these personalized Coffee mugs. The Cricut mug press is designed by Cricut to transfer the design perfectly to the mug. Moreover, the Cricut Design Space will allow you to add beautiful fonts to your design that you can use to add a more personalized touch to the mug. So, think creatively and show it through your mug.
6. Greetings and Birthday Cards

While buying greeting and birthday cards from the market, you will not get more personalized cards. But when you create via Cricut machines, then you can add your own creativity to make it look beautiful. Also, you will need a little harder work to design the beautiful 3-D cards.
7. Custom Dividers for Closet

Difficult to manage your closet? Don’t worry; Cricut has a solution for this. You can beautify the closet dividers with a Cricut cutter. Using this divider, you can divide the seasonal clothes such as for summers, winters, and others. However, this is a great idea for your child’s closet. Moreover, you can make this divider simpler and more fancy according to your desire.
8. Sign Board

Design your own signboard and hang it on your home or door during a wedding or other special event. Use the Cricut Design Space to add appealing fonts to make it attractive. Further, you can engrave, score, and write using your Cricut digital cutter. You can add vinyl lettering or images for these signs. Besides, a welcome sign is something that will get more eyes. So think about it!
Final Words
So, have you found the best Cricut project ideas? This blog post explored 8 project ideas that you can try with your Cricut machine. If you are a beginner crafter, then you can still try all these ideas, as Cricut software offers a simple-to-understand interface. In other words, both the Cricut machine and its software are beginner-friendly, allowing users to learn quickly without much experience. However, you can freely access Cricut’s learning materials from the Design Space software. There, you can find helpful tutorials.
FAQs
Question 1: What can I make on Cricut?
Answer: There are endless possibilities with Cricut cutting machines. Here are things you can make using your Cricut device:
Acrylic bookmarks
Closet dividers
Jewelry
Shirts/T-shirt
Coffee Mugs
Custom sign board
Stickers
Birthday and Greeting cards
Personalized designs for water bottles.
Home Decor
Cake toppers
Pillow Covers
Tote Bags
Personalized Phone Cases
Question 2: Which Cricut machine can make almost everything?
Answer: Cricut Maker is a versatile machine that can make anything you want. It is capable of cutting plenty of materials, i.e., more than 300 in less time. It can easily cut materials like wood, felt, acrylic, plastic, leather, and more. Plus, this cutter can cut materials with high precision and accuracy.
Question 3: Which Cricut cutting machine is expensive?
Answer: The Cricut Maker 3 is the most advanced and powerful machine on Cricut’s list. It really costs a lot, but it offers a feature that will surprise you. Regarding its cost, the price is $429.99, and this machine is the best fit for highly experienced crafters. However, beginners can also use the machine.
#Best Cricut Project Ideas#Cricut project ideas for beginners#cricut explore air 2#cricut crafts#cricut software#cricut.com setup download#cricut.com/create#cricut.com sign in#cricut.com/setup#cricut.com design space#cricut.com setup windows#cricut.com/setup windows
0 notes
Text
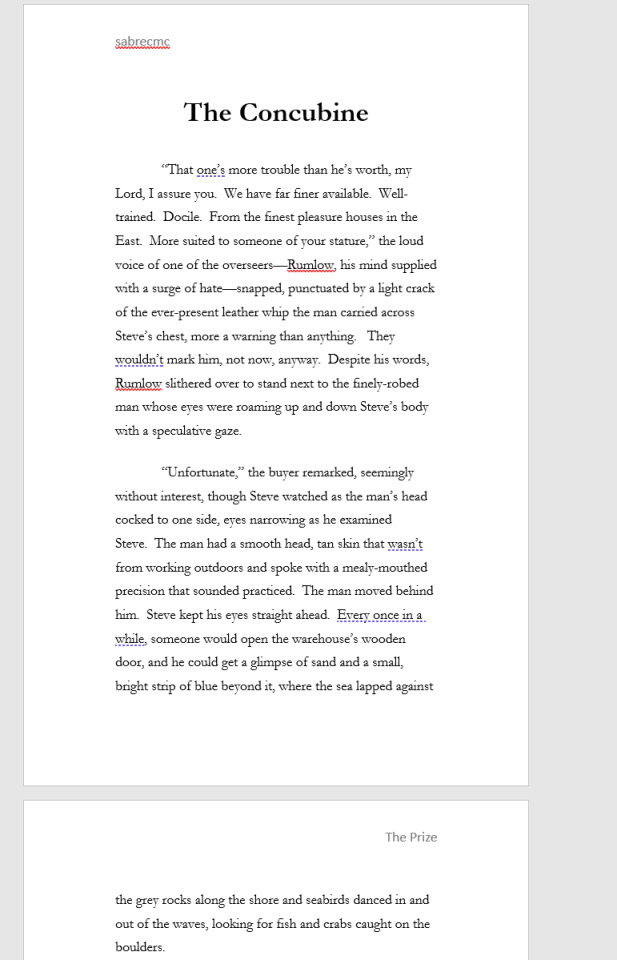
Got a bit of a different bookbinding post today. @renegadeguild got an ask from a new binder saying they were intimidated by everyone's gorgeous binds (me too, actually, some of you guys are scary good), and so they've asked people to share their first binds. And I realized I'd never even taken photos of my first one, so here it is, warts and all:
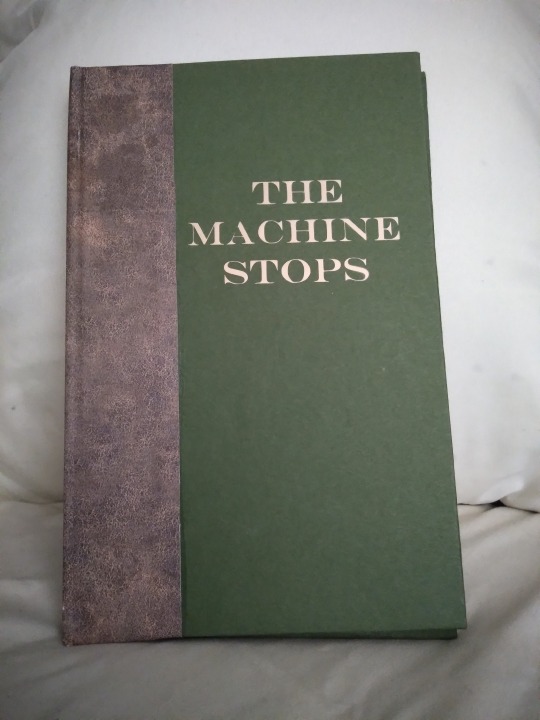
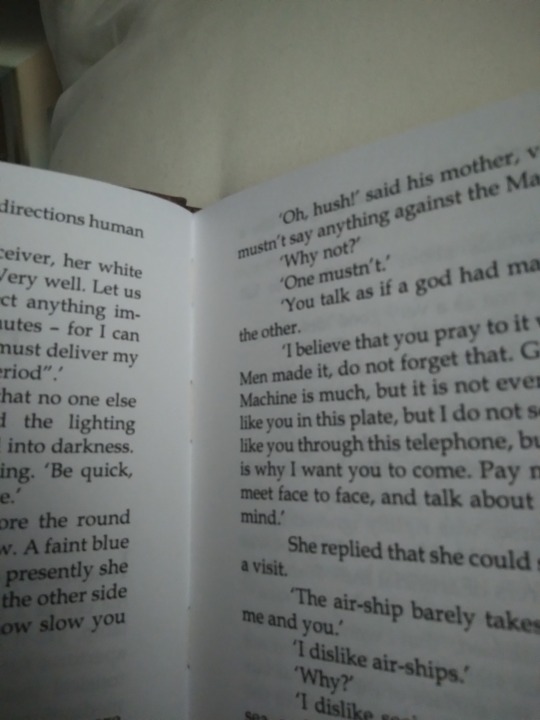
This is E.M. Forster's The Machine Stops, a public domain scifi short story that you can read for free at the link. The first reason I chose it was that it's an interesting story, and I'd bought a print-on-demand copy a few years previously that was just terrible. Baffling cover choices, basic errors in the typeset (like quotes that face the wrong way), weird size that didn't fit on my shelf; just not a good product. I couldn't do it with more indifference than the PoD people. The second reason was that I was too intimidated by the thought of asking a fic writer if I could bind their story and then producing something with a thousand sloppy beginner mistakes, and then they'd want to see photos and I'd have to show them this and it would have been mortifying, but Forster has been dead since 1970 so I could not disappoint him. It was very freeing. I bound it in 2021 as an experiment, to see if I liked this hobby enough to stick to it. The cover is green cardstock and faux leather scrapbook paper that I bought at... probably Hobby Lobby. I added the title later, as a practice project when I first got my Cricut; for the first two years of its existence it had a blank cover.
There are more photos under the cut!

In this photo we can see:
--Too much glue when attaching the leather-print paper, so it oozed out onto the cover.
--Cricut font too thin and too much heat/too long of a press, so the letters have gaps and the glue also oozed out here. It's a continuing theme with this bind.
--I tried to use a bone folder to give it a sharper hinge crease and accidentally pressed too hard and tore a hole in the paper; you can see this in the little white vertical line near the top of the hinge
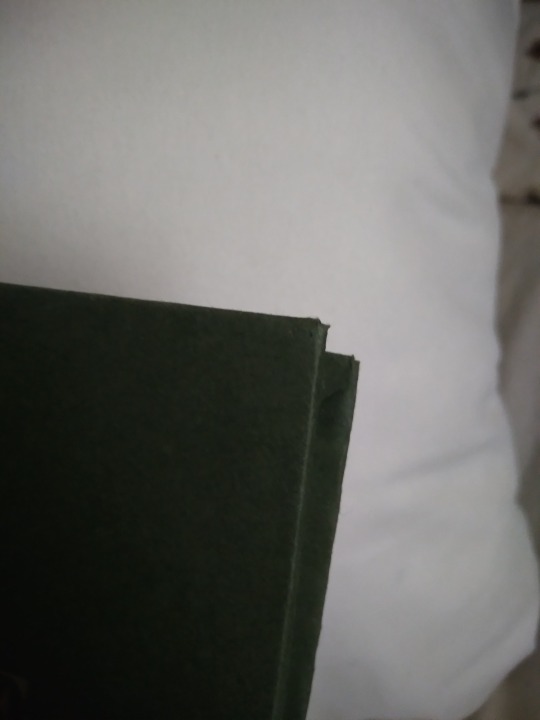
The fore edge is not square. I actually don't remember why this happened. I may have eyeballed the board position when I made the case, or the paper may have slipped while the glue was wet, or I cut it crooked and didn't notice till later. Either way it's bad enough that the book doesn't stand on its own. There was a crooked man/who walked a crooked mile/and found a crooked sixpence/against a crooked stile./He bought a crooked cat/which caught a crooked mouse/and they all loved together in a little crooked house, and I bet they read this little crooked book from their little crooked library.
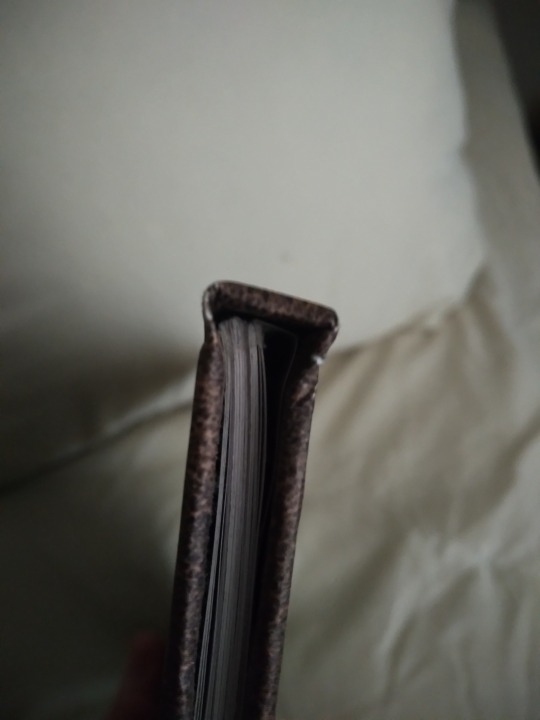

Top view, you can see that the case is too big and the text block doesn't sit straight in it. It has no endbands or bookmark, and it's hard to see in this photo but there's glue on the top of it, at the spine. This still happens to me but I know how to trim books now so this bit gets cut off. You can also see that the scrapbook paper has some cracks where its white core is visible. This is why I do cloth or actual faux leather on the spines now. Endpaper shows uneven trim (did I not use a ruler for this??), too much glue causing major seepage, and it doesn't sit evenly in the case. I'm not sure if this is because of the case itself being crooked, a badly-trimmed endpaper, or if the text block is also crooked. Or it may be a combination of all these factors. Unclear.
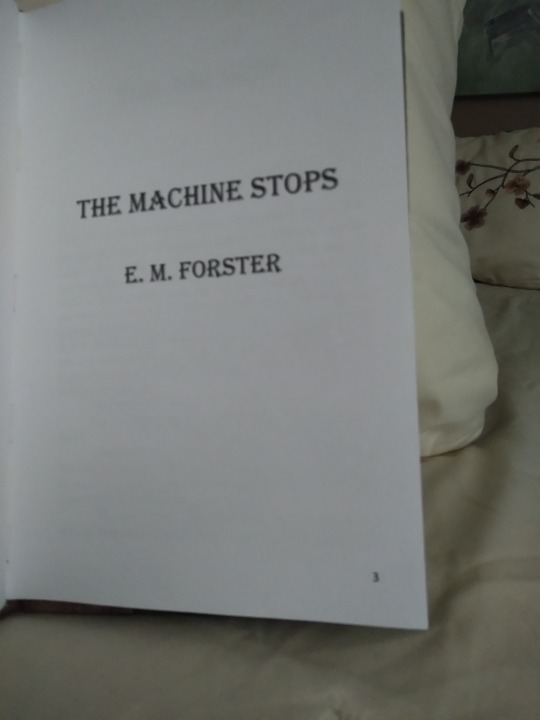
Typeset photos! Here we see:
--Title page has a page number on it. This is a pet peeve of mine and I fixed it after this book.
--There is no half title, summary, or metadata. All my later binds have these things.
--It's typeset in Times New Roman. Unlike many I don't actually hate this font but reading it reminds me of being in high school so this is the only book I used it for. Baskerville is my beloved now. The font is also much bigger than it should be. It's not huge but it's like a large print book so it feels weird for me to read it.
--Lol what are margins
--Lol what are page headers
--Actually I think I left the headers out so it wouldn't have a header on the first page of each chapter, because I knew about page breaks but not section breaks at this time.
--It's on regular-ass lightweight printer paper. There's nothing wrong with this but I switched to heavier weight paper shortly after to help with bleed-through and the light stuff feels so flimsy now.
--I didn't understand how Word's book fold worked at this time, so when I had to set the sheets per booklet and it had an option for 4, I chose that thinking it would give me 4 sheets of paper (16 numbered pages) per sig. It did not do this. It gave me 4 numbered pages per sig. So every signature is 1 sheet of paper. Every page is its own signature. I am still mad about this but it sure drove home how the setting works and also how to make kettle stitches since you make one after every sig. A book of 48 pages has 12 signatures which is just ludicrous.
--There's no photo of this but it has a piece of printer paper on the spine because I didn't have mull. I did use PVA though. Lots and lots of PVA.
--It's stitched with regular sewing thread, which means it doesn't have much swell for a book with that many sigs, but it's less sturdy and more likely to tear the paper.
And that's that! It probably sounds a bit like I was tearing it to shreds but I actually love this book quite a lot. I learned so many things that I applied to my next binds, it was an invaluable experience. It let me fall in love with the hobby so I could make the awesome things I make now. I've got those all posted on my main blog under the tag #snek makes books, or you can see them all on my side blog @papersnakepress. For a first book it's functional and readable, and still better than the PoD copy I had before. I've been thinking of doing a rebind as a sort of progress gauge, actually. Maybe next year.
#bookbinding#snek makes books#the machine stops#it's not winning any beauty contests#or technical skill contests either#but it's mine and i love it#first bind
92 notes
·
View notes
Text
How to Use Cricut Pens? (Easy Steps!)
If you are a Cricut user, then surely you know that this brand makes some smart tools and machines. You know about its capabilities and how useful it is. But did you know that apart from cutting materials, you can use pens to simplify the crafting process significantly? But how to use Cricut pens? Cricut machines are not only used for cutting different shapes out of paper or vinyl. These machines use pens to create doodles, illustrations, and intricate designs. However, you need to know some basic steps you need to perform when you are designing your projects to make them better.
Using the pens is easy and straightforward, but the important thing is that you know the process. Read this blog to discover all about Cricut pens and what projects you can make with them.
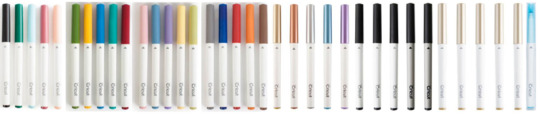
What Types of Cricut Pens Are Available?
All of the current Cricut machines can use a pen, whether Maker, Explore, or Joy. The Maker and Explore machines have interchangeable pens, and Joy has a lineup of small pens. Joy pens are incompatible with other machines due to their unique, smaller size. Before you proceed with how to use Cricut pens, here is the list of pens that you can use with the machine:
Fine Point Pens
This has an F stamped on it for fine, has a 0.4mm tip, and comes in multiple colors.
Extra Fine Point Pens
These are finer, and the pens are just 0.3mm thick.
1.0 Pens and Markers
They have a thickness of 1.0mm and can be called markers, too.
Gel Pens
Gel Pens have a roller ball instead of a tip and are 0.8 mm in size.
Glitter Gel Pens
It has a roller ball and is 0.8 mm in size.
Calligraphy Pens
These pens have a gray barrel and have C stamped to denote calligraphy.
Infusible Ink Pens
It has a 1.0mm tip, and it is used for sublimation and infusing the ink on the surfaces.
How to Use Cricut Pens: Easy and Simple Steps
Placing or installing pens is easy, but if you are a beginner, then it will be a new thing for you. Always use the pens carefully, and pens should always be fitted to the clamp A of the cutting machine. Here, I am going to show you something different about using Cricut pens to create a simple gift tag. Now, let’s look at the below process to understand how to use it:
First, go to the Design Space and click on a new project to create a design.
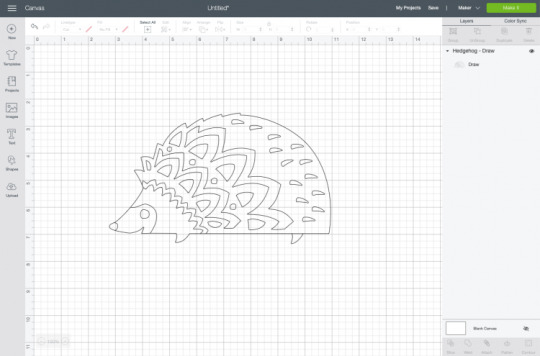
Then, create a design, or you can choose a text that you want to use with your pen. Cricut Design Space has its own vast library of images for your DIY projects.
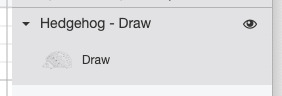
Now, remember you have to draw, not cut the image. So, go to the Edit toolbar, and from there, select the Draw option in the Layers panel.
When you click the colored square box next to the line type dropdown, you can select the type of pen and choose the Fine Point pen.

After you have completed drawing your design, it is time to add text. In the Font menu, you can filter by Cricut Writing fonts. Choose the writing style font.
You can insert a shape into your Canvas. Then, using the Align tool, you can change its size and color and move it to the back of your Canvas.
Next, select your drawing and text layer and click Attach on the right-hand side of the Layers panel.
On the preview screen, your image will appear on the mat. Click Continue, and in the Make screen option, select the material you are using. Here, I am using cardstock. The Cricut Design Space app will prompt you to insert your pen, and you can use a fine-point blade.
In the last step, you have to insert your mat into the machine, and your machine will draw and cut the tag.
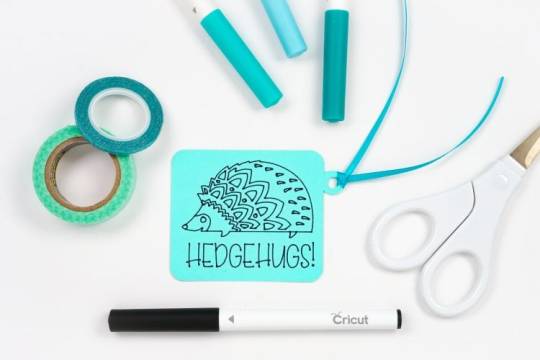
Conclusion
Now you know how simple it was to learn ‘how to use Cricut pens‘.? In this post, I have explained the types of pens and how you can craft your project with the pen. After reading this blog, you can choose a pen for your project, load it into the machine, and start crafting. Start crafting with your pen and unlock the full potential of the machine.
FAQs
How Do You Load the Pen Into Cricut Machine?
When you open the machine, you will see two clamps: Clamp A and Clamp B. To load the pen into your cutting machine, open Clamp A and insert the pen into it. Gently press the pen into the clamp until it fits properly, and you hear a click sound. Then, close the cover, and you are ready to use the machine.
What Are Cricut Pens?
Cricut makes different types of pens, which are great ways to add drawn or handwritten details to your projects. Cricut pens come in different sizes and can be easily loaded into the machine. This can be used for various creative projects, such as writing on gift tag cards or adding doodles.
What Is the Difference Between Cricut Pens and Markers?
A Cricut pen usually has a fine tip, which allows it to create a thinner line, compared to a marker, which has a thick tip and creates a thicker line. Pens are ideal for writing detailed text, signatures, or fine lines within a design, whereas markers are better for filling large areas with color.
Source: How to Use Cricut Pens
#how to use Cricut pens#cricut design space download#cricut design space app#cricut maker#cricut joy#cricut pens
3 notes
·
View notes
Text
Bookbinding for Beginners by a Beginner Part 2
Am back there were some things that I missed stating in my last post. And starting up where I mean to continue. I may add things as I go, fair warning, but there is a lot to cover and sometimes I walk away and go "Welp.... forgot that thing". But for the sake of things not being overwhelming I tried to get the most "Up front" stuff done and out of the way in part one.
And I would like to take this time to say: Take it slow, pace yourself. There is no race. And the learning curve is steep in areas. You have to be ok with making mistakes because it WILL happen. Accept that you've made a mistake but don't get upset with lost time or materials. Make a note of what happened and have a journal on hand if you'd like to see how far you've come and the "OK so.... that didn't work. Don't do that again." At the end of the day we're here to line our shelves with lovely wonderful stories and have the pride of "I did this ain't that cool?"
There are a few optional things you might want to consider.
A paper guillotine this is to make the pages of your bind more tidy, but there is nothing wrong with a deckled edge.
example of deckled edges. It's just a fancy way of saying 'uneven'. There are ways to trim your project with a crafting knife / box cutter and a ruler but my experiments have yielded not so great results. Likely, it's due to several factors: One I don't know my own strength half the time, Two "light but firm pressure" means exactly "Well which is it cause for me those are two different things". Three See one. So deckled edges it is. But if you splurge on a paper guillotine, I salute you. You can also take it slower with a more traditional paper cutter but I recommend measuring twice before committing to a tape marker of where to line your pages up. It is up to you.
Optional but fun: Scrap book paper for decorative end pages. It's fun hunting around a craft store and finding what suits the vibe of the fic you're binding. My only note is aim for something that's not too stiff aim for something fairly easily folded and thin. Card stock like paper won't lay nicely in your book.
End bands these will go on the edge of the spine of your fic but over top of the mull (What is mull? That's coming up)
Mull which is essentially stiff cheese cloth this will add extra structure to your bind
Another option is a Subscription to Canva I only say this because you can sign up for free, but some of the options are locked behind a pay wall. It's fun to play with but the Pro version of Canva also lets you resize your canvas and do custom sizes. I have also done my binders logo in Canva (I actually have two as variants). I also use it to make decorative cover pages.
For your viewing pleasure this is what I came up with. Fun fact about me, I'm a thalassophile (I love the sea and everything about it) since I was consciously aware of the sea. The primary reason WHY I got into book binding is because I am going to be eventually moving onto and living and working off of a boat.


Lucky Seas Bookbinding one and two. Depending on what I feel like using.
Cricut all cricut accessories- there is a mini cricut if you want to dip your toe in. IF you go this route you'll need "HTV" or "Heat Transfer Vinyl"
You can also build your covers in canva and get as cost saving options
Printable sticker paper. OR Heat transfer paper
But this is stuff for covers. I'll get into what you need for covering the chipboard in a minute and give you a "Recipe" for book cloth (Cause I ain't got time nor the funds for some of the book cloth that is out there) but if you want to splurge for your project by all means look and see what is out there. But make note of this- you can just cover your book case in paper and just use sticker paper. I will recommend getting some sort of transparent contact paper to protect your cover (I will go through all of this in future just make a mental note of this)
Now for I promised:
I will be using Celestial Navigation as my example fic of how to down load a fic.

You're going to go to AO3 and go alllll the way over to "Download" and hit "HTML" you can either have it pop open right away or you can go to your downloads and open it up along with your word processor of choice.
You're going to hit Control A (PC) or Command A (Mac), Control/Command C, and then go to your word processor and hit Control/Command V. And listen to the take off noise your computer brand of choice inevitably wants to do while the fic makes it's way from the HTML over to the word processor.
What this all did was copy EVERYTHING and plop EVERYTHING (Save for comments) onto your document. Feel free to save what you have this far and pat yourself on the back you're about to start type facing.
I'm a minimalist in my designs but I have expanded a touch in terms of what I'm doing just to know and experiment for what works for me and what doesn't.
I will reiterate that I will be using Microsoft Word but I'm sure there's away to do this on other processors I just don't know how to do the other one's. I know Mac has something called "Pages". I never worked with it. I will try to add as many visuals as possible but some of my instructions will be "Go to this tab, click X Y and Z to make a thing happen".
Just know that this is what works for me and this is how I've managed to bumble through thus far. This is hardly perfect and I'm still very much experimenting with EVERYTHING. IF you find a better simpler way of doing things- by all means do so.
There's even a way to set up a template when you fire up Word but I've yet to figure it out.
But for now the fun begins- there is some tedium with this but it's best done with music or something on in the background that you can easily listen too but not watch.
First and foremost what you need to do is make the formatting into "Booklet" How to get there is:
Next up hit command A again. Yes... trust me. There might be a lot of this going on for a little bit while you fiddle and fart your way into a typeset you like.
Indent first line and line spacing is found here: Home Tab, Paragraph section hit the arrow pointing down towards the document- next to that is Line and Breaks- hit that if widow and orphan control is clicked unclick it what that does is allows paragraphs to be broken up and will flow into the next page.

Widow/Orphan control example:
Font: For me personally I do Garamond at 11 or 12 depending on my mood. I just like how it looks but find a font type that pleases your eye.
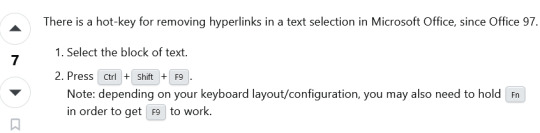
To get rid of hyperlinks:
Line spacing I set mine to 1.5 lines for easier reading. You can keep it to 1 or bump it up to two but the more space between lines means the larger the text block (AKA the book itself) will be.
Now I go back and highlight all of the fic information, and go to the popup menu after highlighting and take the line spacing down to 1 and remove the indents.
I also like to go to the headings section and get rid of the indents one by one on the chapter headings and then center them in the page. Go in front of the Chapter title EX "Chapter 1" and hit backspace until the indent is gone Highlight, there should be a pop up that allows you to change formatting, font and where the indent is.
This is all in the Layout Tab of Word:
Margins- I keep my margins at 1" all directions just because of how it looks on the page but you can have that as narrow as you please.
Next Page- separating the document to make type facing easier. What this does is make the document have "Chapters" within the document. Do this between Chapter one and the first few pages- the opening blank pages, title page ECT.
Double click on the header and footer on the document itself and click "link to previous"
What this does is make sure headers and footers (page numbers and the like) do NOT go up to the "Section" above the area you're working.
Word of note- I like having Chapters start at the beginning of a fresh page so I will go to the beginning of the Chapter Title "Chapter One" and hit "Next Section" and it will jump automatically to a new page.
You might also want to open up the navigation panel so you can hit the headings tab (I have mine set with Navigation Panel already open I don't recall how to get there, play around BUT the Navigation Panel will look akin to this on the Left Hand side of the document:
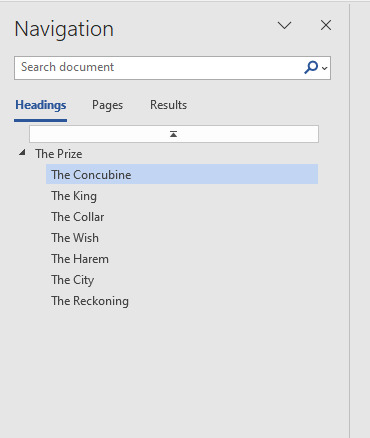
I downloaded "The Prize" to continue the examples as best I can sometimes it's hard to screen grab what I need on an already done document.
You can also add section breaks but leave it linked to previous to continue page number flow.
So you know selecting "Different odd and even pages" means that if you set a fun or different font for the page numbers you will have to go to ex page 2 and unlink the section from the previous.
Do this for headers as well. But that this does is give you the option to put the author's name and fic title alternating on odd and even pages:

Headers and footers:
With headers and footers section still highlighted hit "Page Number" "Format Page Numbers" Hit "Start at" and hit "One" for the section with the main text body.
This... I will admit took some fiddling for me to figure out. There were some frustrated noises and some choice words at times. But if you hit Layout, Next Page it should prevent you some heart ache instead of just constantly hitting the Enter Key and hoping for the best.
Different Odd and Even Pages what this means and how it works:
In my experience you will have to go to the first 1-3 pages to unlink everything from the Previous Section so it doesn't show up on the beginning pages of the document- but if you like the look of it, more power too you. It's your fic. It's going to be on your shelf at the end of the day. Follow your joy. I'm just letting you know what I do.
You will also have to unlink to previous section with the footers as well, and if you choose a different font and you want the numbers to match through the whole text you will have to input that. Hit the "Pages" Navigation and use that to scroll through things quickly so you can check your work and see if you're happy.
I'm kinda a fan of leaving the headers with the author's name and fic title alternating on pages OFF but I have experimented with it a little bit just to know what it looks like and what it does.
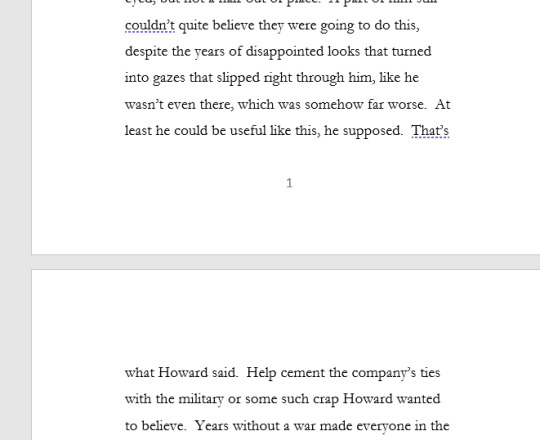
But here is an example of alternating Headers for Sabrecmc's "The Prize" (It was on my To Bind List and since Sabrecmc has given their blessing I'm hoping they don't mind me going "Alright people need visuals.... and this is what I'm working on."
To get the header from the left to the right side- hit tab and type what you please you can also highlight and set colour and font type. This is just Garamond for now for ease of example and reading for now.
Choices choices choices.
Some fic binders like to keep everything including author's comments at the beginning and ends of fics. Personally, I remove them just to keep the flow of everything. You can have a section at the back of the fic if you'd like with all of the comments but that is entirely up to your own personal preference. This is the fic for your shelf make it in a way that makes you happy.
Now all the way at the top of the fic I want you to insert 6 blank pages. But keep in mind this is front and back of pages in a book. Two blank pages on the document equals one page. Some binders go more than that depending on what all they like to do. You'll figure out what you like and what works for your project. Think Bob Ross- Happy little trees and do what you want.
But for me in the document: Pages 1 and 2 are blank as a sort of buffer page, 3 is the title page with the fic name and author and likely some simple design, 4 is all of the fic information- I keep the pairing, chapters, any additional or important tags or warnings, rating and a QR code to link back to the original fic. Page 5 is either left blank but I have added images as something fun for the hell of it that fits the fic, page 6 is my logo. In earlier experiments I played with where my logo goes this works for me I think but it may change in the future. IF you want to have a table of contents by all means add some pages to do so. I don't find it necessary so I don't do it.
To insert an image- for QR codes or title pages:
QR codes can also be just dragged and dropped I've been lazy and dragged and dropped and resized them from there.
I also put a disclaimer in red font: "This is for personal use only and is not intended to be sold! Retail value is estimated 25$" That is to cover the cost of the materials you have used or made in the process of your book that way if your fic somehow ends up in a donation bin it can't be sold for very much.
This is what the info section of a completed fic looks like for me:

To insert an image:
Insert Tab (Next to Home Tab) , Picture- next to the "Table" section, hit the drop down menu and hit "Upload from this device" and select where you have saved the QR Code to, desktop downloads what have you.
It should appear on your document and you can resize it as you please, if you click on the image there should be a pop up with a grey looking rainbow with lines- that's important for QR codes I have it "in line with text"
for fun headers "Have image behind text"
This is.... getting LONG as hell... so I'm going to stop here. But this should give you a jumping off point to start with your fan binding. Play around! Have fun.
Last few Tips:
Home Tab- in the paragraph section- if you need to know what the nitty gritty of what's going on in the document is- hit the backwards looking "P" with the line that's the sign for "Enter" on your keyboard. So you can see what that looks like I don't use it cause it clutters everything for my eyes, but it won't show on the final product. You can turn that on and off at your leisure
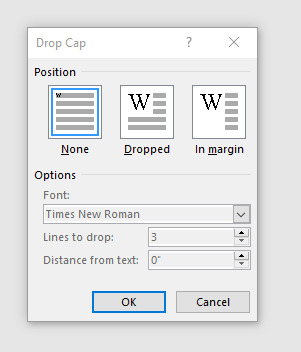
Insert Section: Scroll along the top until you see "Word art" one more over "Drop Cap", That's how you can get fancy letters at the beginning of the chapter. Sometimes you DO need to add some spaces between the Letter you're Drop capping and the rest BUT what that window looks like is this When you hit "Drop Cap Options" you can set whatever font you please for however many lines I typically do 3 but the more lines you drop the larger the letter. Tinker with it have fun.
There will likely be more type facing goodies next post... but after I get done type facing I'll get into getting the document ready for printing, how to print and what to do with that shopping list I gave you in that previous post.
REFERENCES, LINKS AND HELPFUL PEOPLE!
Some links for your consideration you will need this for future reference so book mark these:
French Link Stitch
Perfect bound books (AKA Paper backs)
Fun Fonts to spice up the document body itself, you can also import them into Canva.
Da font
1001 Free Fonts
Another resource to keep in mind for ink is this site here if you have cartridge printers see if you can't get a refillable set for your printer so you don't have to sell your arms, your legs, your first born and your house to keep printing your fic projects.
These two tiktokers right here explained everything the best, they are worth checking out even if you don't have Tik Tok. They've been going at this longer than me and don't go "OH SHIT I FORGOT A THING" constantly.
EDIT ONE! This is the punch cradle I have it makes it easy for french links for me
HoneyMinCo Sea Lemon
16 notes
·
View notes
Text
Cricut Explore Air 2 Bluetooth Connection: Simplified Guide

Hi there! Are you looking for a Cricut Explore Air 2 Bluetooth connection? If so, then I’ve got you covered! I’ve always preferred connecting my Cricut via Bluetooth. Do you know why? Because I can’t have my computer and Cricut on the same table☹️. I had to keep them separately, so I had no option but to use a Bluetooth connection. Besides, I hate dealing with those clumsy wires. However, I don’t think anyone would like those messy wires😅.
Well, now getting to the point: I am a professional crafter who loves making DIY projects on Cricut. As an avid Cricut user, I am here to teach you how to connect your Cricut Explore Air 2 Setup via Bluetooth. If you are ready, let’s dive in!
Cricut Explore Air 2 Bluetooth Connection on Computer
If you want to connect your Cricut cutting machine to a Windows or Mac computer, follow the steps below. Ensure you have placed your Cricut and computer within 10 to 15 feet. After that, you are ready to go😍!
For Windows
Here are the simplified steps to connect Cricut to a Windows computer using Bluetooth:
The first thing you have to do is turn on your Bluetooth. To do so, navigate to the Start menu from the taskbar.
And click on the Settings (Gear icon).
Then, open the Devices option.
Make sure you need to turn it on and click Add Bluetooth or other device.
After that, you have to move further and select Bluetooth.
Afterward, wait a while and see if your computer has detected your Cricut machine.
Now, you will notice that your Cricut model is visible. The process is the same for all Cricut models.
Finally, your Cricut machine has been paired with a Bluetooth connection.
Launch the Cricut Design Space software and navigate to New Product Setup to confirm whether your Cricut is connected. There, you will see whether your Cricut is connected.
For MacBook
Here are the simplified steps to connect Cricut to your Mac system using Bluetooth:
Under the Apple menu, you will find an option called System Preferences; you have to select it.
Afterward, you will need to look for the Bluetooth app.
Now, you should launch the Bluetooth app and check whether your Bluetooth is on or off.
Once Bluetooth is turned on, you must wait for it to detect your Cricut machine.
When the machine is detected, select the Pair tab to connect your Cricut with your MacBook.
Finally, you have paired your Cricut to your Mac.
To confirm, return to your Cricut Design Space and then Cricut New Product Setup. There, Cricut will show you that your device is connected during setup.
Cricut Explore Air 2 Bluetooth Connection on Mobile
Connecting your Cricut Explore Air 2 to your smartphone or tablet is also possible. All you need is a compatible device to install the Cricut app on it. Therefore, it is recommended that you use a compatible device only. If you are a Windows user, you must have Android 6.0 or later. If you are using iOS, you have to use iOS 11 or later.
Note: Your mobile device should be within the range of 10 to 15 feet from the Cricut machine.
For Android
Here are the simplified steps to connect Cricut to an Android phone using Bluetooth:
On your Android phone, swipe below and click the gear icon to open your Settings.
Once you have entered your phone Settings, go to the Bluetooth option.
Now, turn on your Bluetooth.
Wait and see until your device finds your nearby Cricut machine.
Once it finds the Cricut machine, you have to click on it to pair.
Finally, the Cricut Explore Air 2 Bluetooth connection is done.
For iOS
Here are the simplified steps to connect Cricut to an iOS phone using Bluetooth:
Go to your iPhone and open the Settings app.
Now, turn on the Bluetooth by tapping on the toggle button.
Wait and let your iPhone look for your Cricut model.
Once detected, click on it to pair.
Now, you have connected your Cricut to your iOS device in no time.
So, weren’t those steps easy for you? I think it would be much better for beginner crafters who will be connecting their Cricut for the first time. That’s all for this guide on the Cricut Explore Air 2 Bluetooth connection. Happy crafting!😃
FAQs
What do I need to connect my Cricut Explore Air 2 to computer?
If you are connecting your Explore Air 2 machine via Bluetooth, you need a computer with in-built Bluetooth features. You also need a Cricut machine of any model. In addition, you should have a flat surface like a table or a floor to position your machine. Despite this, if you are connecting your Cricut via Bluetooth, you should have a USB cable instead of Bluetooth.
Can I connect all Cricut models to Bluetooth?
Not all Cricut models have Bluetooth connectivity. The Cricut Explore, Cricut Maker Setup, Joy, and Venture series are easily connectable via Bluetooth because they have built-in Bluetooth. However, older Cricut models, like the Explore One machine, require a wireless Bluetooth adapter. In short, all Cricut models except the Explore One can be connected using Bluetooth.
Why is my Cricut not connecting?
If your Cricut machine is not connecting to your device, you might need to check the following points:
If you are connecting it to the USB cable, check whether your cable is damaged.
You can change the USB port on your computer. If the issue persists, you need to replace the USB cord.
If you use Bluetooth, ensure you have placed the device and machine within 10 to 15 feet of each other.
For more information: cricut.com/setup app cricut design space download
Source: Cricut Explore Air 2 Bluetooth Connection
#Cricut Explore Air 2 Bluetooth Connection#cricut explore air 2 setup#cricut explore one setup#how to setup cricut explore#cricut new product setup#cricut design space software#cricut design space download
2 notes
·
View notes
Text
8 Best Cricut Pens and Markers to Enhance Your DIY Crafts
Other than that, you will come across the type of items that can help the users draw or write new content on different materials. However, all the users must supply the supplies correctly. Are you interested in knowing about all these items? Then read this blog and collect the data explained here.
1. Pen Set, Metallic (5 ct.)

2. Pen Set, Classics (5 ct.)

3. Infusible Ink Pens (0.4), Neons (5 ct)

4. Glitter Gel Pen Set, Fiesta (5 ct)

5. Cricut Markers 1.0 mm, Precious Metals (3 ct.)
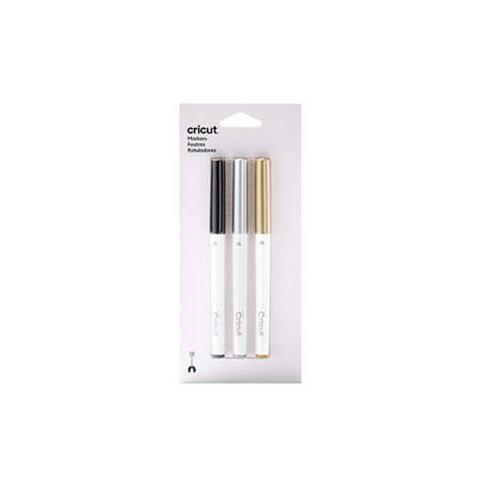
6. Watercolor Marker & Brush Set (9ct)
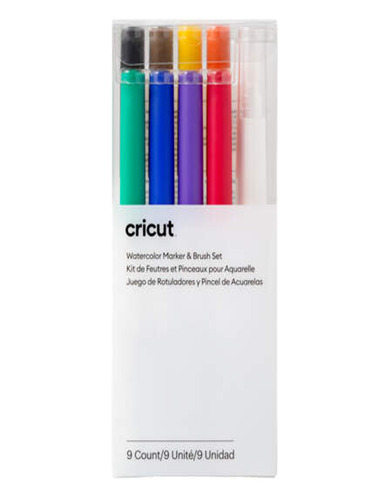
7. Infusible Ink Markers 1.0, Ultimate (30 ct)

8. Permanent Markers 2.5 mm, Black (6 ct)

Frequently Asked Questions?
Question: Which Cricut Pens are Best for Custom Projects?
Answer: If you recently entered the creative industry, you must be aware of some basic and essential pens. Those pens help the user make the project look much more classier. The names of the pens that help the users in making out the top class custom projects include:
Fine Point Marker/Metallic/Neon.
Ultra-Fine Marker.
Opaque Gel Pens.
Infusible Ink Pens.
Washable Fabric Pen.
Question: What are Important Tips for Cricut Pens & Markers?
Answer: Some of the basic yet important tips that every user must follow while using Cricut pens & markers are as follows:
Don’t leave the pen or marker without a cap, and put it in the correct place.
Don’t put too much pressure while using the accessory; otherwise, it may get a break, resulting in your project getting ruined.
Try to use the correct pen with a compatible cutting machine, and don’t insert a pen marker into the wrong adapter.
Question: What is the difference between Cricut Pens and Cricut Markers?
Answer: One common reason the Cricut pens and markers differ from each other is the tip size. Both sets are available in different colors and can be used interchangeably. Moreover, the pens have 0.4 mm fine points, and markers have 1 mm thicker tips. With the pen, the user can easily outline the thinner part of the projects; however, the board areas get covered with markers.
#Cricut Pens and Markers#Cricut#cricut setup#cricut beginner projects#cricut explore air 2#cutfilesforcricut#cricut software#cricutprojects#cricut.com/setup#cricut design space login#cricut new machine setup#design.cricut.com#cricut crafts
0 notes
Text
#etsyseller#etsyshop#etsystore#small business#etsy#etsyfinds#cash saving#cash stuffing#customization#personal finance#chinese motifs#clear laminated cash envelopes#cash stuffing A6 sized bi fee#glitter binder#cricut project#custom made binder#colorful glitter gel binders#budgeting for beginners#budgeting strategies#budgeting tools#budget kit for beginners#a6 sized cash envelopes#cash stuffing kit for starters#gifts for wife#gifts for him#gifts for mom#personalized gifts#etsy gifts#gifts for her#gifts for women
0 notes
Text
7 Cricut Maker 3 Leather Projects to Enhance Your Style

Hey, are you looking for some unique Cricut Maker 3 leather projects? Look no further than this guide! In this post, I am going to tell you the best DIY projects that you can create with leather. About 3 weeks ago, I finished my Cricut leather projects. I have aimed to make a few projects so that I could write this blog diligently. But do you know what was the most difficult part of this project? Cutting intricate designs on leather. Yes, it might not be easy to cut, but they require patience during both cutting and weeding such designs.
Without any further delay, let’s get straight into this blog to find out the most amazing ideas for creating leather Cricut projects.
1. Bracelets
Do you love bracelets? If so, you must give it a shot! When I was looking for ideas for Cricut Maker 3 leather projects, it had been on my mind for a long time. Finally, I gave it a try and saw how beautiful it looked. If you have any friends you want to give this bracelet to, it would be great!
2. Hair Accessories
Do you want something for your hair? You might wonder what I can make for my hair or other beauty stuff. Well, this leather accessory is also made with leather. As you can see, it might look a little tedious, but it is a piece of cake. Start diving into your Crafting journey and create what you need the most.
I gave it a flower shape, and if you are a little bit familiar with Cricut Maker 3 Setup, then it is a breeze for Maker 3 to cut such designs.
3. Earrings
I love leather earrings, as they enhance my beauty and are easy to create. Beginners who are looking for the best Cricut Maker 3 leather projects should try them out! Why? Because they are really easy to make. I also wanted to make them a little unique, so I added some glittery effects. This is what I needed, and hence, I made them.
4. Keychains
If you want personalized keychains, then here I have something for you! Whether you are a novice crafter or a pro, this keychain is easy to make. All I did was add some texts with different font styles to my Design Space.
Finally, after finishing my design, I started my Cricut Maker 3 and cut all the words Daddy and Daniel to make keychains. I handed it to my dad, my brother, and my dinner.
5. Crossbody Bag
Today, everyone wants to use a body bag, and what if you have a personalized one? Sounds like a great idea, no? I created this simple bag for myself as I am not much into personalized stuff. But you can have one if you want. The process of making this bag is easier, and you will need iron-on vinyl to make such a beautiful crossbody bag.
6. Monogram Keyring
Looking for super easy-to-make Cricut Maker 3 leather projects? Here is the monogram keyring that is most widely useful, and it would be great if you could give it a shot! This is a great beginner project, and any beginner should try to make something unique. I also used paint to color it to make it look stunning! Lastly, you can see the result in the picture, like how elegant it looks.
7. Cord Organizers
Every one of us uses earphones or a charger, but sometimes managing those clumsy wires is boring and tedious. So, I decided to create something that could organize my cords or wires. Here, you go with leather cord organizers, which I created using my Cricut. There are many cuts that I had to make, and I preferred my Cricut Maker to cut them as they are faster and provide precise cuts, making them look professional rather than handmade.
FAQs
Can I cut leather with Cricut Maker 3?
Yes, leather can be easily cut with Cricut Maker 3. It can also cut other materials such as fabric, paper, and balsa wood without any problem. In order to cut the leather, you have to use a knife blade, and the thickness of the leather should be up to 2.4 mm or 3/32 mm thick. However, you have to use a clean cutting mat with a sharp blue edge for better results.
What are the essential Cricut tools for cutting leather?
There are some common tools that you can use to cut leather. They are as follows:
Utility knife: This sharp knife is considered a versatile tool for cutting your leather.
Rotary cutter: This is a tool that comes with a wheel-shaped blade. Ideal for long and straight cuts.
Leather shears: A kind of specialized scissors idea for cutting thick and tough leather.
Round knife: It is a popular tool that is most widely used for cutting leather.
How thick can I cut leather with Cricut Maker 3?
If you want to cut the leather on Cricut Maker 3, you can cut up to 7 oz thick. The best thing about the Maker 3 machine is that it cuts anything precisely. In addition, cutting the leather is a breeze. You will also have to use a knife blade for all these leather Cricut projects.
Wrapping Up
As you went through the 7 Cricut Maker 3 leather projects, you might have found them easy to make. The best thing about these leather projects is that they are beginner-friendly. So, you will not need to worry about the complexity of the projects; just turn on the Cricut Maker 3 and prepare the leather that you want to cut. After cutting, the result will be fantastic and will stand out!
For more information and visit: www.cricut.com/setup login cricut.com/create Cricut Design Space App
Source: Cricut Maker 3 Leather Projects
#Cricut Maker 3 leather projects#leather Cricut projects#cricut design space download#Cricut maker setup#cricut maker 3 setup#Cricut Design Space Login#Cricut Design Space App#Cricut New Machine Setup
2 notes
·
View notes
Text
How Do I Set Up My Cricut Maker? [Ultimate Guide]
Buying a new Cricut Maker can be overwhelming for all of us. Initially, setup can be daunting, but once you do it, you will love the overall process. However, you can easily set up any Cricut machine without needing much assistance.
The post is all about how do I set up my Cricut Maker. Through this write-up, we will see the items while unboxing the new Cricut Maker. Further, you will explore the Cricut Maker and its types. Afterward, we will explain the complete process of setting up your Cricut Maker machine.
What Do You Get in the Cricut Maker Box?
Unboxing a new product is always an exciting task. While unboxing the Cricut Maker machine, we got several items that we will be discussing here. However, you always have the option to select the bundles when you buy the machine from Cricut's official website.
Following are the items that you get in the box of the new Cricut Maker:
Apart from these, you will get the following:
The best thing is that we get the blades and tools along with the new Cricut machine. These blades allow us to try various products before buying more blades.
How Do I Set Up My Cricut Maker on a Computer?
When we talk about setting up Cricut Maker machine, it means we want to connect it to our devices like computers or mobile phones. However, there are certain ways to connect these machines to our devices. For example, we can connect our Cricut Maker to our computer or phone via Bluetooth or USB cable. So, it is the users’ choice to choose which way is the most suitable for them.
Below, we explain how to set up Cricut Maker. This method is only applicable for Windows or Mac users only:
How Do I Set Up My Cricut Maker on a Mobile?
Here's how to set up your Cricut Maker on Mobile devices with iOS or Android operating systems:
Cricut Maker is the most advanced and versatile in Cricut's lineup. However, the box contains various items that you can use to make several projects uninterruptedly. In this write-up, we explained the Maker and its features in detail. It helps the users to get an overview of machines so that they can use them without any hassle. After exploring the Maker cutting machine, the blog found out how do I set up my Cricut Maker.
FAQs
Question 1: Can I set up the Cricut Maker easily?
Answer: People think the setup is daunting, but this is not the case. Cricut machines are just like printers. The only difference is that Cricut has blades to cut. However, when you go through the notice period, you will find the setup is too easy and complete in less time. While setting up, you will need to download and install the Design Space app. This app will guide you through the further setup process, making it easy for beginners to set up the machine in one go.
Question 2: How do I connect my mobile phone to my Cricut?
Answer: Here, we are going to show you the method to connect your mobile device to the Cricut machine. Here, we are using iPhone or iOS devices. So, ensure you have an iOS device.
Question 3: Can I use the Cricut without its software?
Answer: No, you must use the Cricut Design Space app to send your design to your Cricut device. The machine is the companion for your Cricut cutting machine. Without this machine, you can't cut anything. However, the Design Space is essential for creating intricate designs and then sending them to the machine. Also, the app is the only way to maintain communication between your computer and Cricut.
Visit: cricut.com/setup
cricut.com/setup
Source: https://cricutmakersetup.wordpress.com/2023/10/21/how-do-i-set-up-my-cricut-maker-ultimate-guide/
#cricut explore air 2#design space setup#cricut maker#cricut.com/setup#cricut.com design space#cricut.com/create#cricut.com sign in#design cricut.com download#digital design
2 notes
·
View notes
Photo
Book Recommendations: National Craft Month
The Art of Papercraft by Helen Hiebert
Paper is the perfect material for all kinds of arts and crafts. In this book of 50 projects, Helen Hiebert offers an accessible guide to turning a flat sheet of paper into useful and beautiful art. She explores decorative paper techniques like marbling, stamping, and stenciling, and then delves deeper, presenting 12 different dimensional techniques like origami, cutting, folding, quilling, stretching, weaving, and pop-ups for creating dozens of projects. Each section of the book provides a history of the technique, an overview of the process, several how-to projects culled from Hiebert’s own studio as well as the studios of some of the leading contemporary paper artists, and a gallery of works to show the technique’s range of possibilities. Hiebert suggests a unique paper for each project and describe the qualities that make it suitable for the particular technique, as well as practical information on tools, materials, and where to purchase papers.
Chunky Knits by Alyssarhaye Graciano
With big needles and oversized yarn, anyone can knit up fun, stylish patterns in a flash! Alyssarhaye Graciano, knitwear designer and founder of BlackSheepMade, filled this book with quick projects perfect for your friends, family, pets and home.
Especially good for beginners, thick yarn makes it easy to see all of your stitches as you’re working. Even if you mess up, bulkier yarns make it simple to find and fix your mistakes. Experienced knitters can zip through last minute gifts (the Cascades Cowl only takes two hours!) and traditionally time-consuming large-scale projects like the extra cozy Homebody Blanket.
Try your hand at arm knitting with eye-catching knits like the Hella Big Arm Knit Scarf, add a pop of color to your home with Ember’s Circle Rug or even bring some funky style to your wardrobe with cute accessories like the retro PNW Beanie or the striking Radius Hooded Cowl! With this book full of no-fail patterns and a basketful of chunky yarns, you can learn new stitches with confidence and have cool custom pieces in no time at all.
Collage Your Life by Melanie Mowinski
Requiring minimal equipment--just scissors, glue, paper, and pens--collage is an accessible craft that offers limitless creative possibilities. Like meditation or journaling, making collages can be an avenue for self-reflection and artistic exploration.
In Collage Your Life, artist and teacher Melanie Mowinski teaches a variety of core techniques including lettering, stamping, stenciling, transfers, and adhesive methods, and provides dozens of prompts to jumpstart the creative process and encourage crafters to explore the versatility of collage, such as make a self-portrait; disrupt your routine instincts; incorporate text; assemble mementos from a trip; process anger or anxiety; collage with others; or try creating block-out poetry with pages from a magazine.
Inspiring examples of the author's work along with that of other collage artists are featured throughout. Crafters, journaling fans, scrapbookers, and artists alike will find guidance and support for developing their own distinctive collage style, whether the goal is to create a visual record of daily experiences and special occasions or to expand a creative journaling practice.
The Unofficial Book of Cricut Crafts by Crystal Allen
Are you new to Cricut crafting? Returning after a hiatus and desperate for a refresher? Perhaps you're an old pro looking for brand-new ideas, tips, and tricks for your crafts? Look no further than The Unofficial Book of Cricut Crafts.
Throughout the more than 300 pages of this book, author Crystal Allen will not only present you with craft ideas that embrace every awesome element of this popular cutting machine, but, perhaps most importantly, she'll start you at the very beginning of your Cricut journey with loads of information about the different Cricut machines (Cricut Explore Air 2, Cricut Maker, and Cricut Joy) so you can determine which is best for you before you buy.
After you unbox your Cricut and have a general understanding of the parts of your machine, Crystal will teach you how to use Cricut Design Space and get images from Cricut Access, and then you'll be presented with projects that use the most popular materials your Cricut can cut. These include fabric (cotton, felt, and fleece); basswood and chipboard; leather; vinyl; paper; and heat transfer vinyl. Crystal even tackles infusible ink!
#crafts#crafting#Arts and Crafts#nonfiction#nonfiction books#Nonfiction Reading#Book Recommendations#book recs#reading recommendations#Reading Recs#Library Books#TBR pile#tbrpile#to read#Want To Read#Booklr#book tumblr#book blog#library blog#new library books
3 notes
·
View notes