#craft instructions
Explore tagged Tumblr posts
Visit Tumblr Blog
Explore Tumblr blogs with no restrictions, modern design and the best experience.
Last Seen Tumblr Blogs


Fun Fact
Tumblr Inc. has $15.1M in annual revenue.
Text
How to make a tiny TV-head doll
This is a long post, so I've put it under a cut. It's not difficult, it's just fiddly. You need a keen eye and a steady hand to make this project (or a friend with the above, to do it for you). The parts cost less than $20, not counting tools or doll clothes, so this is a cheap little friend to make!
You will need:
This headless doll body from YMYDoll (or a headless Obitsu11 doll body from Parabox) Only use these 2 brands; this is important.
A tiny TV keychain, like this one from AliExpress (no link because the links change practically every week):

A 2mm screwdriver
An Xacto knife or other small blade
(Optional) A hand drill (I didn't use one)
Clothes to fit an Obitsu11 or similar doll
Start by cutting the keychain attachment off, unless you particularly like the idea of a dolly keychain for whatever reason. I don't judge.
Take the entire mechanism (carefully) out of the keychain. Make sure you remember where everything goes, so you can put it back in later. (You can remove the wires going to the tiny round speaker, if you don't want the "static" sound effect. I did.)
Cut or drill a 3mm hole in the bottom of the keychain, toward the back. (On mine, this is the blue part.)
Now for the tricky part. You see the white plastic piece that the LED shines into? You're gonna want to cut the bottom-right corner out of that piece so that the neck joint will fit. See image. (You can remove the back of this white piece, to take the LED out. I highly recommend doing that before you cut.)

This was really annoying to do, but my Xacto blade is dull. If you use a sharp blade like you're supposed to, it should take about 15 minutes. That plastic piece is thick, so go carefully and be patient.
One more step before we put the wires and stuff back into place! You see the extra neck joint that comes with the doll? The one that looks like this?

You want to use THAT neck piece. It has a screw in the top. Unscrew it, and carefully remove the pieces above the round ball.
Stick the peg into the head, then put the top pieces back on and screw the neck piece back together. This will secure the neck joint, so your doll's head doesn't fall off. You can also go ahead and install the neck peg into the doll at this point.
Carefully put all the electrical parts back into your keychain, being careful to put the white plastic piece back in around the neck peg. Your doll now looks like this:

If you want to draw a new screen for the doll, you can absolutely do that! I tried to draw static, but I'm not very good at it. If you're doing that, do it now.
Now, put the front part back on, making sure you didn't lose the tiny rubber button. Screw it in place.
And that's it! Dress up your new TV-head dolly however you want.

37 notes
·
View notes
Text
honestly yeah, fiber arts is magic. you cast spell of warm gloves, spell of nice hat, spell of stuffed animal.
material component: yarn
wand: single hooked wand or double pointed wands, depending on caster's preference
mechanical component: specific motions repeated in a particular pattern
time component: a while
look seriously the first step in a knitting recipe is "cast on", and then it's a bunch of letters and numbers incomprehensible to anyone not versed in the arcane art. that's a spellbook. yes it's a book of knitting patterns but also. it's a spell book.
#original#knitting#crochet#fiber arts#also continuing my habit of calling everything recipes lol#a recipe is a set of instructions telling you how to turn materials into objects#sometimes the result is food. sometimes it is clothes#(I suspect this may be rooted in minecraft crafting recipes)#but yeah I call sewing patterns 'clothing recipes' also
12K notes
·
View notes
Text


"Time to make paper pals! Paper pals will be your friends forever and ever and ever!"
okay, they're technically not paper pals (alas i could not find paper plates small enough), but they're DCA paper dolls! you can find the image files in the Google Drive below and you can download em, print em out, cut and glue em together, and enjoy!
"All the necessary materials are here on the craft shelf!"
Please do not repost, alter and post, or sell these templates. I made them freely available so everyone can have fun making silly paper dolls!
each DCA has their own printout with all the parts of the dolls. there's also a page of optional silly upgrades, with different styles of faceplates. Each printout comes in a coloured version and a black & white version for friends who want to colour their own DCA paper pal, or for those of us (like me) who lack a colour printer 😂
if you need some help constructing them, i've written up step-by-step instructions with pictures included here (also included the drive linked above!):
i've also temporarily opened up my ask box for questions about the dolls. i will try to get to them as soon as i can!
happy crafting!
"Let's see some hustle-and-a-bustle!"
#fnaf sun#fnaf moon#fnaf eclipse#fnaf dca#dca fandom#crab crafts#crab art#DCA paper dolls#paper dolls#this was fun!#i actually had the idea of making paper dolls a while back#cuz while i love my DCA figures and plushes i also wanna make something on my own#and something that i can share with others too!#(cuz like yknow merch is expensive...)#i wanted to keep it as simple as possible#but then i had#IdeasTM#so i added in the loop#and then i had#More IdeasTM#so i learned how to make a spin tab for the rotating faceplate#and while these IdeasTM are fun they do make the dolls a little more challenging to make#that's why i wrote the instructions so the trickier parts can be skipped#the base design without the loop or the spin tab is fairly simple#and you still end up with a cute and poseable little paper doll of the DCA#i also added a section in the instructions with Other IdeasTM#like laminating the dolls with tape or adding magnets and googly eyes#i haven't tested those out yet but i will be soon!#but yeah i hope y'all enjoy the dolls!
618 notes
·
View notes
Text
I think everyone needs to have a go at a new hobby every once in a while because:
1. You might find something you enjoy
2. You gain more respect for those who can do said hobby
3. You remind yourself what it actually feels like to not know anything about a subject
#i looked at many instructions for 1h before getting so overwhelmed and having to walk away#knitting#crochet#cross stitching#needlework#sewing#hobbies#crafting#creativity#cute cross stitch#creative writing#this is about crochet#embroidery#crafts#art and crafts#like skills
300 notes
·
View notes
Text
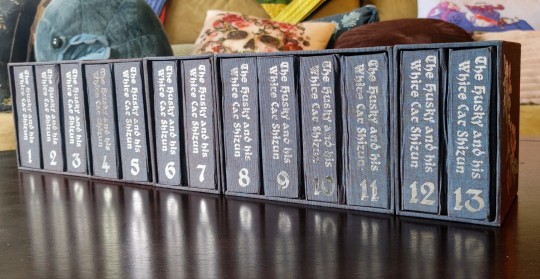
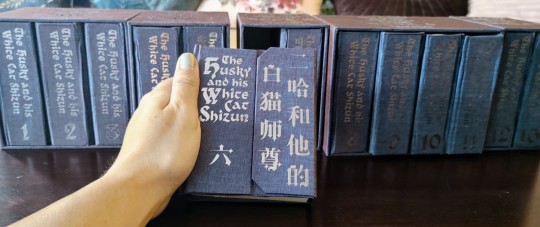
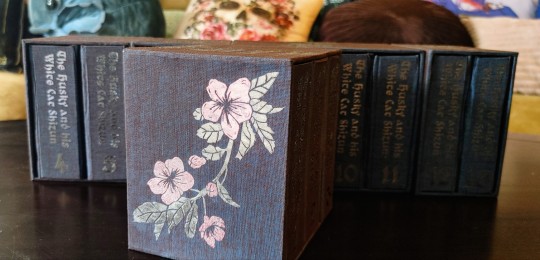
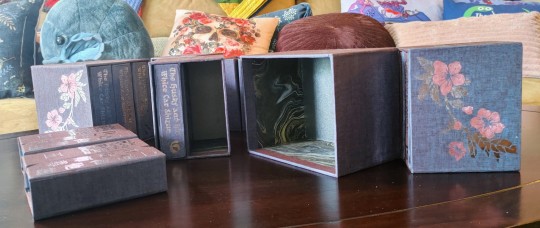
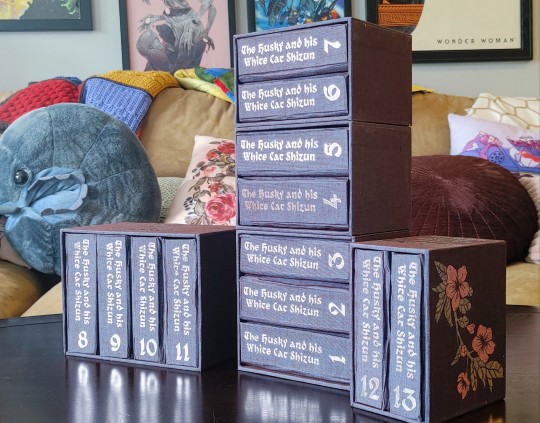
It's time! for! 2ha!!!!!!! I've had 'the husky and his white cat shizun' on my radar as a bookbinding project basically from the very start, back when I thought it was impossible that any of these danmei novels would ever be licensed for english translations. But this book is so long, and besides, the translation wasn't complete, so it went onto the backest of back burners. Until now! So, the book has been licensed. It's started releasing! As usual, please support these authors, they have a passionate english-speaking fanbase, and I very much want them to enjoy that success in a practical sense and not just an abstract one. And I also want more of these novels translated, haha. But the nature of licensing means I've also gotten a lot more interested in preserving prior translations in formats that can't casually be yoinked from the internet.


Now, this is a big novel. This was 1.1 million words. The stack of pressed text quarto blocks was over 15 inches, and once I added covers (very thick, for reasons I'm about to cover) and boxes, this thing was 22 inches long. Oh my god. This sustained effort naturally overlapped with an international trip and two crucially Important work presentations. I almost died. I had to split it into multiple boxes because I wasn't sure I could laminate boards thick enough to support so much weight at so much length and still cut it with any precision, lmao
And those covers? I took inspiration from notebooks I've sent with cover flaps like these, and also decided to see if I could incorporate the strip magnets I bought for peller box experiments and barely used. The downside that didn't make itself apparent until late in the construction process was that laminating boards to match this depth made the covers REAL thick, and difficult to cover with a crisp finish. Duo bookcloth can get wrinkly and fragile when it's wet, so it didn't entirely take me by surprise, but it's something I'll be accounting for next time I try this construction!
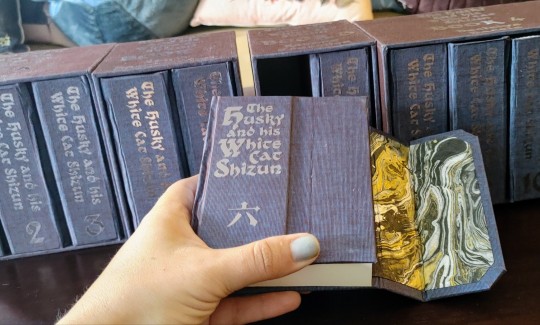
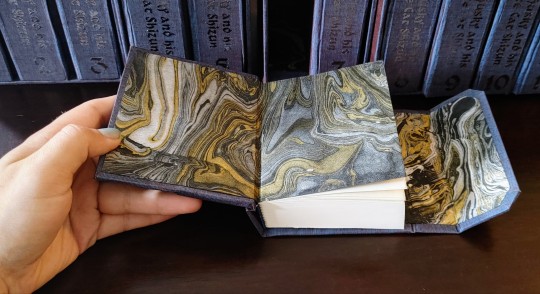
I tried to stick to a black and blue and silver color scheme, because it matches the book, but I also accepted some gold highlights on the endpapers. The duo bookcloth tends to photograph with a bit more brown in the color shift than I see in person, but I think it plays out well in person or in photos! The endpapers make for a nice striking pop when the book opens and don't blend into the cover fabric, which was something I definitely wanted to avoid.

And, speaking of thematically appropriate, I found this image for chapter headers that was almost perfect, but the wrong kind of flowers. So I did change those to haitang blosoms, haha. That happened early in the typesetting process, but I did also have that on my mind as I worked out decorations for the boxes! Mostly, I just titled what book of the novel it was on the top and left it there, but the very last detail I added was a pair of foil flowers done in pink and silver, on the outside edges of the boxes for book 1 and the extras. I finished that last night and then went to bed SO excited to take pictures in the morning. I really had an incredible time with this book, and the whole adventure reminded me just how much I love 2ha. I'm so happy I did this, I really had just an incredible time!!!!!
#crafts#bookbinding#2ha#the husky and his white cat shizun#erha he ta de bai mao shizun#long post#with any luck ill be pulling together instructions for my case construction here soon
1K notes
·
View notes
Text


Make your own breastfeeding pillow
Someone in my mum group recommended a breastfeeding pillow which was £80, so I went naaaaaah and made my own. I made mine with straps so I could tie it round my waist, but I haven't really used them.
The base is 2 small rectangular cushion inserts. I think it was these ones from Dunelm, at a very affordable £2.75 each. They measure 32cm × 52cm.
You will need: fabric (about 1.2m × 1m), thread, a 50cm zip.
Sew your 2 cushions together in an L shape. I used a ladder stitch from seam to seam, and then closed the gap/dent with further stitching bringing the sides together and level
Make a rough pattern. You can do this with measurements or by drawing around your joined inserts. My paper was too small to add seam allowance, so I did it on the fabric itself.
Fold your fabric in half, right sides together, lay and cut your pattern with the spine of the L on the fold.
Install your zip at the base of the L
If you want straps, make some by cutting strips of leftover fabric, sewing them right sides together to make a tube, turn inside out, and press.
Pin straps into the tips of the L, making sure that the straps are INSIDE the structure. Open the zip so you can turn the cushion later, then sew the remaining edges together. When you finish, the entire piece should be closed (except the zip, which you have opened)
Turn the piece right side out, press if you want to, then add the insert you're done!

The L shape cradles your body and the firm inserts keep the baby at the correct height

Apologies if these instructions don't make sense, I get woken up 4 times minimum every night at the moment.
22 notes
·
View notes
Text
There's days where I'm like "No, I've got normal hobbies that I'm a normal amount of interested in."

In other news, I 3D printed a nøstepinne after getting frustrated with modern technology trying to eat any yarn ball over 75g big or worsted weight, and the very viable alternative of mcgyvering one out of a toilet roll occasionally is prone to collapse.
Anyway, quick tutorial after the break.

Step one: grab your nøstepinne.

Step two: make a nøste in the usual manner.
Aaaand you're done! =)
#yarn#nøstepinne#nostepinne#i should print a second one for my host mom#she always wanted one#this works friggin beautifully#knitting#crochet#fiber craft#gotta love instructions on old timey gadgets
14 notes
·
View notes
Text
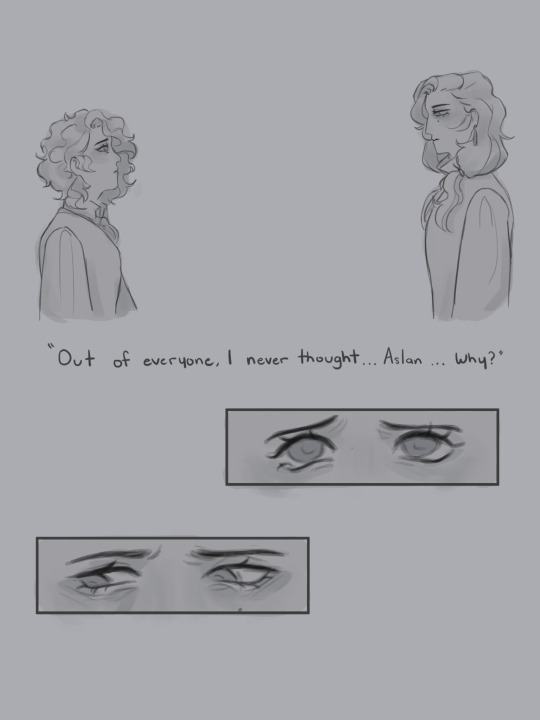

There are many endings where he joins AM, each one having a different reason why
He doesn't survive in any of them
@greeneyeofenvy asked what could've led aslan to join am n here it is :']]] u all get to see it too
somerild belongs to @sunglow-fae !!
#literally how does one survive when the only reason they exist in the first place was to become the vessel for all the worlds magic?????????#midas was instructed to carefully craft each heir so they'd eventually get to aslan many generations later#instructed by am!au winnie#aslan literally only exists because am wants to put the entire world's magic in him so they can destroy it#ITS THE SAME WITH SOMERILD#balance and all#and winifred is the scale itself#idk why i've posted 2 things about am member aslan its literally the least likely outcome rn mdmdkkenedn#posting cute sweet n fluffy stuff next . trust#:']]#hpma#hp magic awakened#am!au#art!#aslan aureus#hpma oc#hpma mc#lore stuff :]]]]
14 notes
·
View notes
Text
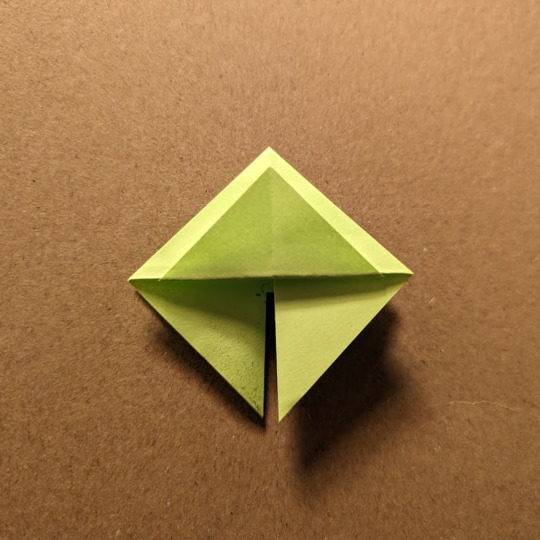
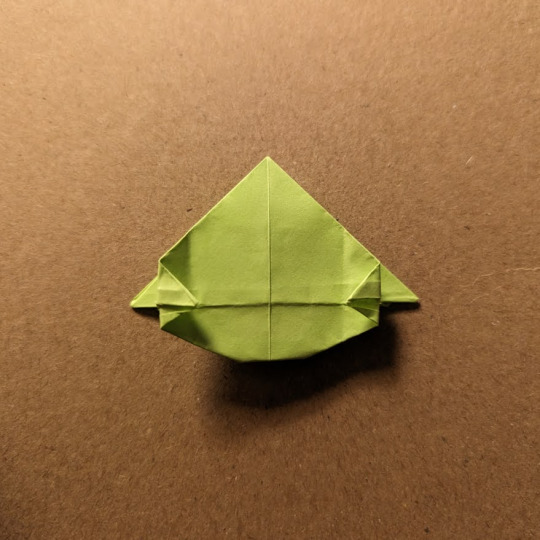
Origami Deerstalker: How-To
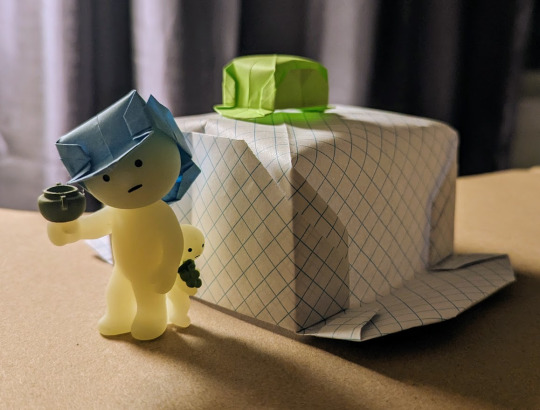
Happy 170th Birthday to Sherlock Holmes! In honor, I thought I'd try and make a tutorial for a rudimentary origami deerstalker hat
This hat is a modified version of the Old Scholar hat found in the book "The Art of Chinese Paper Folding for Young and Old" by Maying Soong. It is available on the Internet Archive, and if my instructions are unclear at any point, I recommend referencing the original instructions on page 50, and maybe even doing a test run with those instructions first to better understand what I'm doing here. However, also feel completely free to comment or message me about any questions you have.
You will need a square piece of paper. I used a post-it note for my photos, which as you can see fit my Smiski quite well, but the original instructions recommend a 20 inch piece of paper to fit a small head. Consider the flexibility of your materials and how loose you want it.
Step 1
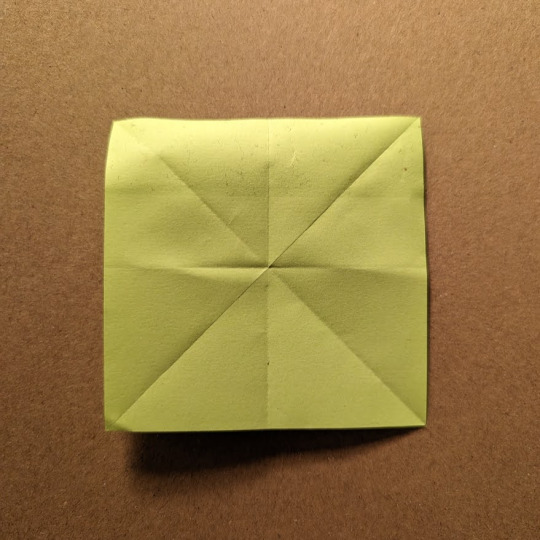

Fold and crease your paper in half both diagonally and lengthwise. Then, fold along your lengthwise creases, pushing in along two opposite diagonal folds. This should flatten into a smaller square.
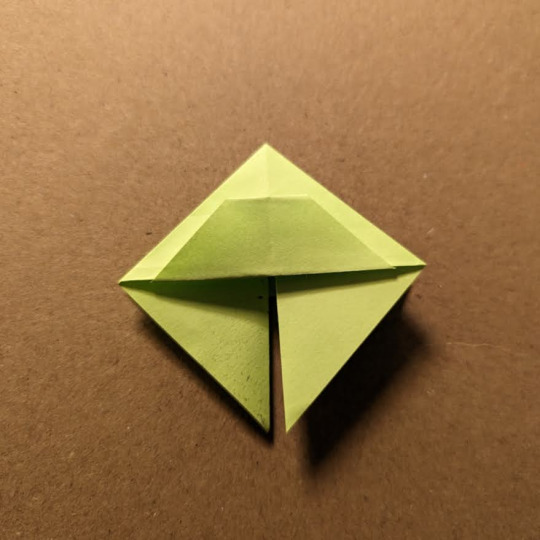
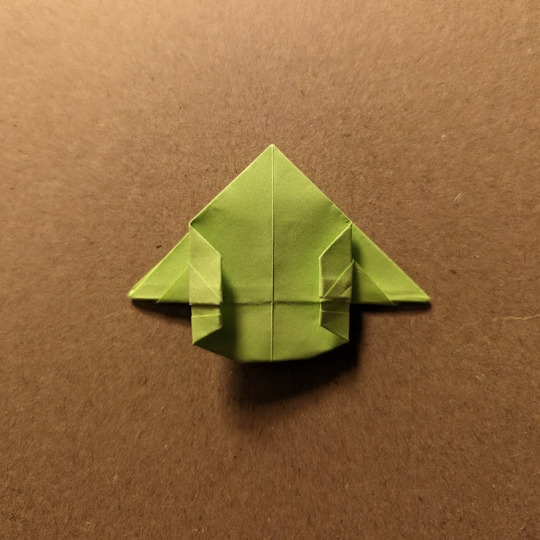
Step 2
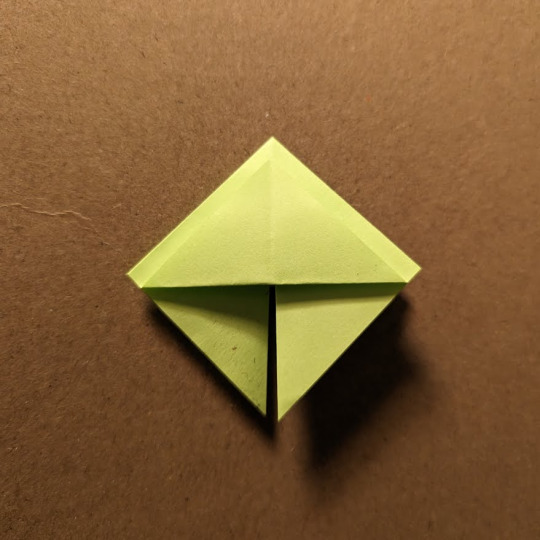
Fold only the upper layer of paper upwards, not quite meeting the corners and leaving a small border of space.
Step 3

Fold the upper layer along the middle of the shape, creating a lip. Fold this lip under and inside the shape to hide it.
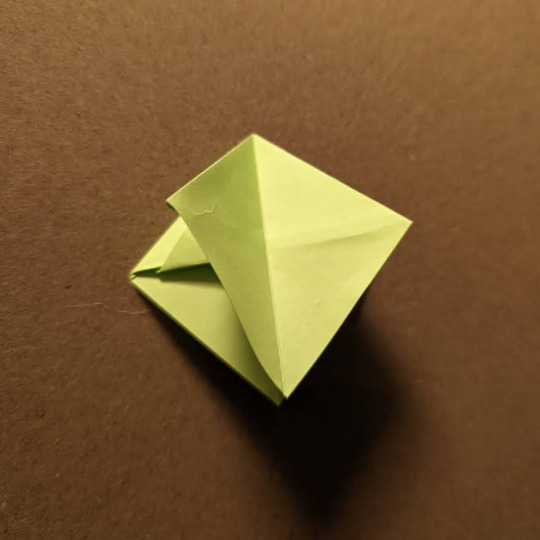
Step 4

Fold the uppermost layer of paper downwards. Fold the lower corner of the layer up, about a third of its length. Fold the layer back upwards.
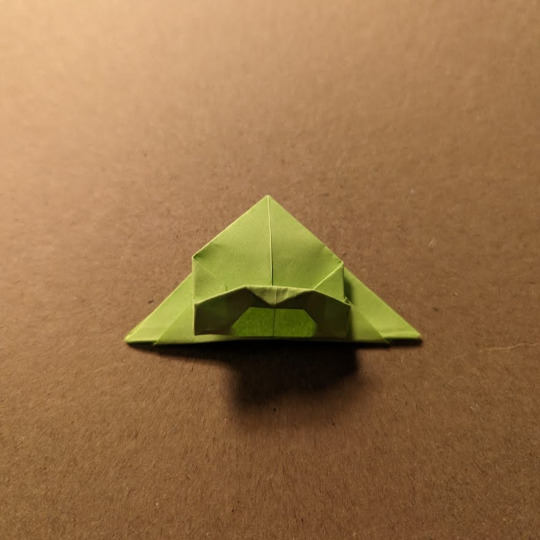
Step 5
Flip over your paper and repeat steps 2, 3, and 4 on the other side. This will create the side flaps of the hat.
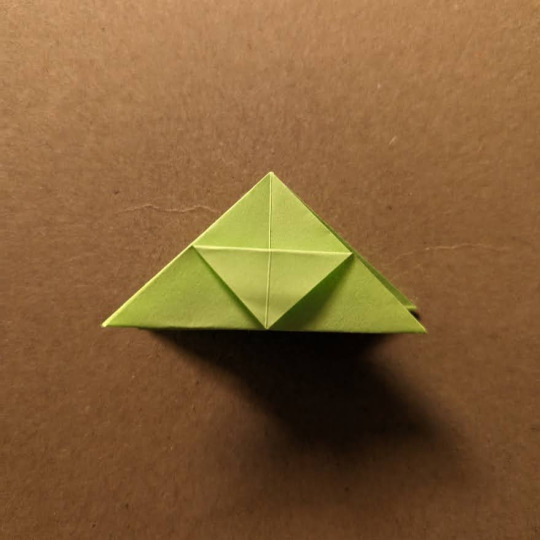
Step 6
Fold the top layer in half lengthwise, bringing the right and left corners together, and repeat on the other side as well. The two sides we have not folded yet should now be visible.
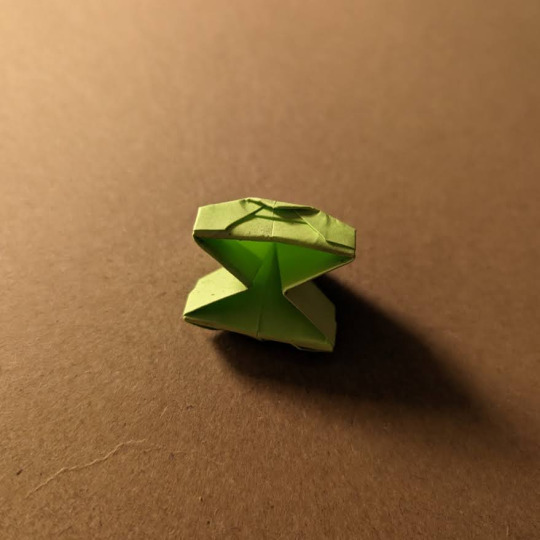
Step 7

Fold the uppermost layers of paper on either side up and in half.
Step 8

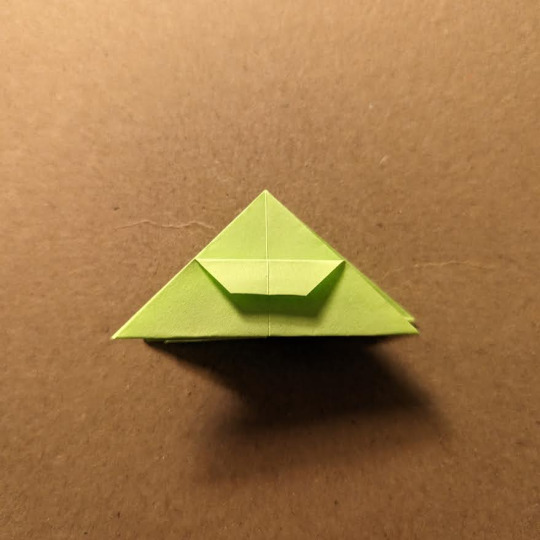
Crease the top corner of the upper layer down to meet the bottom (at the fold made in Step 7). Unfold, and fold again to bring the top corner to the crease we just made. Fold again at our initial crease.
Step 9
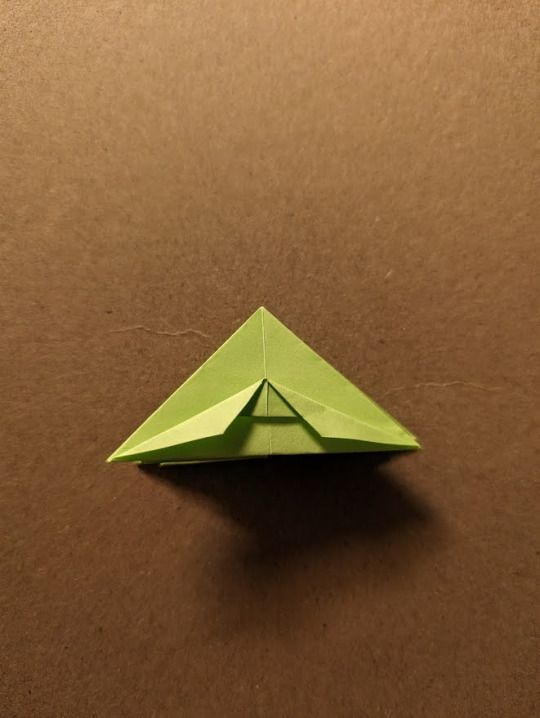
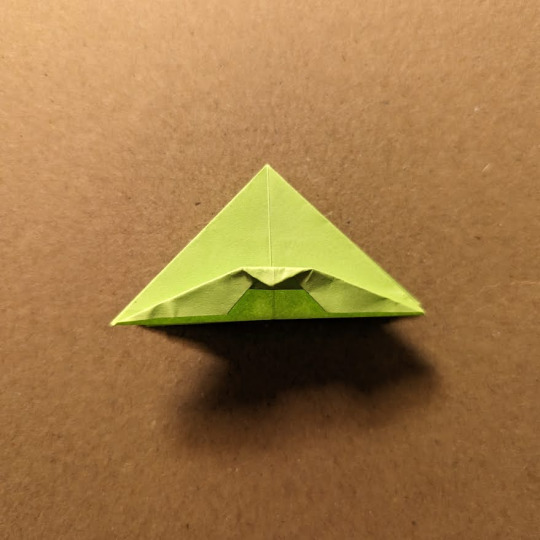
Fold the upper layer of paper to create a fold between the corner and the middle. Make a small fold to bring down the top corner of the upper layer of paper, about meeting the visible lip from Step 8.
Step 10
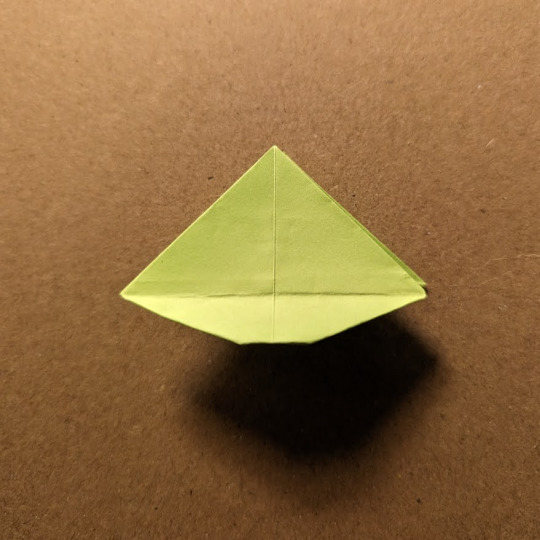

Fold the upper layer down. Bring the corners on either side to meet in the middle and crease them in half.
Step 11
Unfold and bring the corners to meet the crease we just made. Then, fold along the crease again. Fold the bottom of our top layer back up along our horizontal fold.
Step 12
Flip your paper over. Repeat steps 8, 9, 10, and 11 on the other side. You have now made your brims.
Step 13


Open your hat up from the bottom. Congratulations! You have made an origami deerstalker!
Again, if any instructions were unclear, checking the original instructions may help, but also feel free to reach out to me. If you make one, I'd love to see it! Happy Birthday Sherlock Holmes!
#sherlock holmes#other#origami#origami instructions#origami how to#deerstalker#origami hat#sherlock holmes birthday#happy birthday sherlock holmes#origami deerstalker#smiski#maying soong#chinese paper folding#party hat#how to#paper craft#my art
54 notes
·
View notes
Text

Make your own toast friend is six easy steps!
129 notes
·
View notes
Text
preschoolers get some of my best work smh

#happy early lunar new year ! we're making (paper) fortune cookies and collage dragons and painting cherry blossom trees#and because the craft is literally a piece of paper and tape. my mother felt the need for instruction#and so i made this in an hour and ? kinda popped off ... i mean look at this fortune cookie aha#*graphic design is my passion frog* i could go pro
5 notes
·
View notes
Text
FINISHED THIS BLOODY KIT


I haven't laboured over a kit like this for a loooong time hot damn . I'm sure Luna magic house had more parts yet somehow this was far more taxing? This took me a week I can't believe it my back hurtsssss
That being said I'm so happy with the results!! I filmed a bit too, so there'll definitely be a video!
#my crafts#diorama#diy kits#to be fair it wouldn't be so time or effort consuming if I'd just followed the instructions#instead of...you know. improving. using resin. and toothpicks . and a lot of other additions#but that's how I do kits I like to add stuff#gaaaaaaah I'm beat#I still have another kit untouched: Holo magic City#I think it'll be a while before I get to that but that's fine I like having at least one kit on hand for trying times#also a manor puzzle that I might turn into a gingerbread house after making it could be a December project#can't wait to get back to sculpting and drawing
18 notes
·
View notes
Text
#rook's craft#undertale yellow#uty#undertale yellow spoilers#uty starlo#starlo#starlo uty#appears starlo didn't listen to the instructions when he took 4 russian steroids. (The bottle said take 3 max)#also this sounds good sorta? maybe?
51 notes
·
View notes
Text

Jointed Squirrel from Paper or Wood
32 notes
·
View notes
Text
How many farmers here would post their progress on the internet?
And how many would post the really weird stuff they encounter on it? Like livestreaming a trip to the mines or something.
#i was thinking of thad using a few accounts to terrorize everyone#posting normal stuff like pics of crops or crafting tutorials#but also new magical experiments he does or general magical stuff the ministry doesnt want discussed with everyone#gossip from the adventuring community and trash talking joja#or detailed instructions on what plants and mushrooms can be used as drugs and how to find them in the wild#and generally posting too much and answering any question a little too honestly
23 notes
·
View notes
Text
Mary wrote to Cromwell on 26 May [1536]. Even if this were in response to Lady Kingston's visit, the speed with which Mary sought reconciliation with Henry demonstrates her genuine belief that it had been Anne keeping her father from her. According to Chapuys, the letter in no way resembled the draft Cromwell had drawn up. Mary apologised for her bad handwriting, saying she had written very little for over two years and was only able to do so now, because Lady Kingston had given her means. Since we know she had communicated regularly with Chapuys, she was either lying, or her messages to him were verbal. We also know she had sent letters to Mary of Hungary and Gattinara [...]
The King's Pearl: Henry VIII & His Daughter Mary, Melita Thomas
#yeah; this letter is a very interesting example of self-fashioning...#the image she's crafting to present to her father is one of the humble penitent#ie it's imperative to suggest wherever she can that all she has done is follow his instruction#even tho we know that's likely not the case#melita thomas#(lancelot de carles also maintains that she kept up with her studies during this time; even tho her formal education had officially ended#which would also suggest otherwise...re: 'not having means to write'#)(and we know she sent at least one letter to the emperor; too)#and that she managed to transcribe a letter chapuys believed anne boleyn or anne shelton had contrived to leave behind in the chapel#for her to find#and send it to him
12 notes
·
View notes