#click for better quality - as always on this website :))
Explore tagged Tumblr posts
Visit Tumblr Blog
Explore Tumblr blogs with no restrictions, modern design and the best experience.
Last Seen Tumblr Blogs


Fun Fact
When “GIF” was named word of the year in 2012, Oxford Dictionaries U.S.A. credited Tumblr for pushing the word.
Text

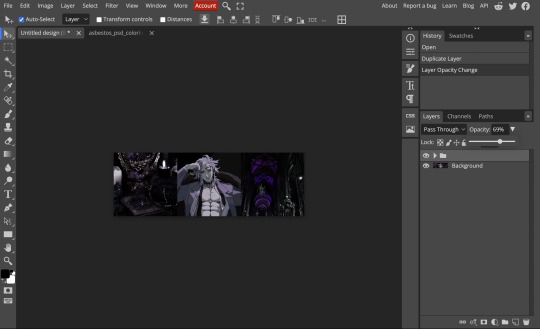
i did frame 13 for the You Wear Fine Frames Well project ❤️ ough it was so good! please check it out
#ofmd#our flag means death#ofmd fanart#blackbonnet#artists on tumblr#go check out the website and all the individual frames and cry like i did#you wear fine frames well#my art#click for better quality - as always on this website :))
180 notes
·
View notes
Text

tiny repost <3 18+, mdni
cw: smut mention
simon joined the military right after he lost his wife and daughter, he figured he could numb his pain better this way, take out his pain in the field. his eyes still never lit up like they did all those years ago. but it was the small things that made it better. he would always love his wife and his daughter. but he knew he had to move on at some point.
when he returned with no one holding any signs for him and nothing but a taxi to get him home, watching his friends hug on to wives, children, parents and all… he realized how lonely he was. he just needed someone to hold for a few days when he was here.
he didn’t exactly go looking for you. but with one click on a website and a few scrolls down, he eventually came across your profile.
you wanted to co-parent a child, needed a sperm donor and had a lot of good qualities from what he could tell. it was a way for him to finally fulfill his paternal instincts and to cope. it was probably the unhealthiest thing but he knew he couldn’t replace his daughter nor his wife, but this was a better thing.
he wanted to do it the natural way. he didn’t believe in any other methods. he wanted to be inside of you, to feel you milk him down and clench around him. he wanted to watch your face contort into pleasure and to hear those pretty precious sounds. he wanted to make a baby not just leave you with a bottle of his sperm, he wanted to fuck a baby into you and to put his hand on you belly so that he can feel himself filling you up. he wanted to see lots of it spilling out of you and to use his thick fingers to fuck it back inside of you.
and he wanted to do it as many times as he could before he was called back out, he wanted to come back and to see your belly swelled and to hold you in the night.
#simon ghost riley smut#simon ghost riley x reader#simon riley#simon riley smut#simon ghost x reader#simon riley x reader#simon ghost riley#simon riley x you#simon riley x y/n#ghost x you#ghost smut#ghost x reader#ghost cod#cod smut#cod x reader#cod x you#cod x y/n#mw2 smut#mw2 ghost#mw2 x reader#mw2 x you#call of duty smut#call of duty x reader#call of duty x you#call of duty x y/n#call of duty#ghost x black reader#simon ghost x you#simon ghost smut#simon riley drabble
6K notes
·
View notes
Text

COLORING + SHARPENING TUTORIAL
someone asked for a coloring tutorial and my sharpening settings, so here it is! there are also a few tips to achieve more HQ gifs. :)
tutorial under the cut!
FOR HIGH-QUALITY GIFS
FILE SIZES
it doesn’t matter what your sharpening settings are if the file you’re using to gif is too low quality, so i tend to look for the best that i can get when downloading stuff.
usually, movies (+2h) look better if they’re 5GB or more, while an episode (40 min/1h) can look good with even 1GB. the minimum definition i try to find is 1080p, but i gif with 2160p (4k) when available. unfortunately, not every computer can handle 4k, but don’t worry, you can gif with 1080p files just fine if they are big enough. contrary to popular belief, size does matter! which means sometimes a bigger 1080p file is better than a smaller 2160p one, for example.
SCREENCAPPING METHOD
this can too influence the quality of your gifs. as a gifmaker, i’ve tried it all: video frames to layers, directly opening video clips, loading files into stack, and i’ve finally settled down with opening screencaps as an image sequence. with bigger files, it doesn’t matter much what technique you use, but i’ve noticed with smaller files you can do wonders if you screencap (either by loading files into stack or opening as an image sequence) instead of using video clips. for example, this gif’s original video file was only 4GB (so smaller than i’ve usually go for), if you can believe it!

here’s a tutorial for setting up and screencapping with MPV, the media player i use to screencap. again, you can keep using video clips for bigger files, but you’ll find this useful when dealing with dire causes. i don't file loads into stack, though, like the video does. i open as an image sequence (open > screencap folder > select any image > click the image sequence button). just select OK for the speed. this will open your screencaps as a video clip (blue bar) in timeline mode (i'm a timeline gifmaker, i don't know about you). you will need this action pack to convert the clip into frames if you're a frames gifmaker. i suggest you convert them into frames even if you're a timeline gifmaker, just convert them into a timeline again at the end. that way you can delete the screencaps right away, otherwise you will delete the screencaps and get a static image as a "gif".

ATTENTION if you’re a Mac Sonoma user, MPV won’t be an option for you unless you downgrade your system. that is, if you have an Intel chip. if you have M1 Max chip (or even a better one), here’s a fix for MPV you can try while keeping that MacOS, because nowadays MPV is skipping frames in its latest build. or you can use MPlayer instead for less hassle. here are two tutorials for setting and using MPlayer. Windows users are fine, you can use MPV without trouble.
FOR EVEN MORE QUALITY
ADD NOISE
here’s a tutorial for adding noise as a way to achieve more HQ gifs if your original material is too low quality.
REDUCE NOISE WITH CAMERA RAW
instead of adding noise, you can reduce it, especially if your gif is very noisy as it is.
the path is filter > camera raw > detail > nose reduction. i do this before sharpening, but only my video file isn't great to begin with. because it’s a smart filter, you can reduce or increase its opacity by clicking the bars next to its name in the layers panel.
TOPAZ AI
i use Topaz Photo AI to increase the quality of my screencaps when i need to. it’s paid software, but there are… ways to find it for free, usually on t0rrent websites. if someone’s interested, i can make a tutorial solely about it in the future.
SHARPENING SETTINGS
here are my sharpening settings (filter > sharpen > smart sharpen). i sharpen things twice: 500% 0.4px + 10% 10px. here's an action for it, for more convenience. here's a tutorial on how to use Photoshop actions. for animated stuff, i use this action pack.

COLORING
here’s the gif i'm gonna use as a base. it’s already sharpened like the way i always do it.

LIGHTNING THE SHOTS
half of the secret of a good coloring is good lightning. i always useCurves (layers > new adjustment layer > curves) and Brightness & Contrast (layers > new adjustment layer > brightness & contrast). the settings depend on the scene you’re giffing, but i always try make my gifs bright and with high contrast to make the colors pop.
CURVES
besides lighting your scene, the Curves adjustment layer has four automatic options that will color-correct it for you. it’s not always perfect and it doesn’t mean you won’t need to do further coloring, but it’s a great start. it’s a lifesaver for most ridiculously yellow scenes. look at the difference! this gif uses the 3rd automatic option (the screenshot below isn't mine btw so that's why the fourth option is the chosen one), from top to bottom. what automatic option you need to choose depends on the gif.


sometimes i like to tweak my Curves layer. not everybody does that, it’s not that necessary and if you’re not careful, it can screw your gif up. to modify your layer by hand, you will need to click and drag points of that straight line in the position you desire. this is the concept behind it:

basically, the lower part of the line handles the shadows, while the upper part handles the highlights of the image. if you pull a highlight point up, the image’s highlights will be brighter. if you pull it down, it will make them darker. same thing for the shadow points. you should play with it to get a grasp of it, that’s what i did when i first started giffing.
BRIGHTNESS & CONTRAST
then i added a bit of brightness and contrast.

CHANNEL MIXER
the scene looked a bit too yellow, so i used the Channel Mixer (layer > new adjustment layer > channel mixer) adjustment layer. here’s a tutorial of how it works. not every scene needs the Channel Mixer layer though, i mostly use it to remove heavy overall tints. in this particular case, the Curves layer got rid of most of the yellow, but i wanted the gif to be just a bit more blue so the Channel Mixer tweaks are very minimal.

SELECTIVE COLOR
now, this adjustment layer i always use: Selective Color (layer > new adjustment layer > selective color). this is THE adjustment layer to me, alongside the Curves one. this is how it works:

ie, you can separately edit a color this way, giving it tints. for this gif, i wanted to make the colors more vibrant. to achieve that, i edited the selected colors this way:

for the reds, i added even more red in them by moving the first slider to the right, making the color more vibrant. for his hat to have a more warm tint, i added yellow to the reds (third slider, moving it to the right). finally, to make the reds stronger, i moved the last slider to the right (more black).
for the yellows, i made them brighter by adding white to them, thus making the tile wall and Paddington more bright as well.
for the cyans and the blues, i just added the maximum (+100) of black that i could.
i wanted for Paddington's nose to be brighter, so i added more white to the whites.
lastly, i added depth to the blacks by increasing their own blackness.
you should always play with the Selective Colors sliders for a bit, before deciding what you want or need. with time, you will automatically know what to change to correct the color grading. it all takes practice!
HUE/SATURATION
i don’t know if you noticed, but there are some green spots on the blue wall behind Paddington. to correct that, i added a Hue/Saturation adjustment layer (layer > new adjustment layer > hue/saturation) and made the saturation of the greens 0%, making that unwanted green disappear from the background.

while the green spots on the wall are specific for this gif, i use hue/saturation a lot to tweak, well, hue and saturation. sometimes someone’s skin is too yellow, i made it redder by tweaking the reds and the yellows, or vice-versa. the hue bar follows the rainbow bar, so the maximum settings (+100 and -100) give the selected color to change its hue to something more red or pink (the rainbow extremities). changing hue can give pretty whacky results, like turning someone’s skin tone to green, so you will need to play with it to get the hang of it. you can also tweak the opacity of your hue/saturation layer to further improve your gif’s coloring. i didn’t do it in this case, the opacity is still 100%. the reds and the blues had their saturation increased to make them pop just a bit more, without affecting the other colors.
COLOR BALANCE
the highlights of the gif still had a green tint to it due to the automatic correction of the Curves layer, so i used Color Balance. this is how it works: instead of giving specific colors some tints, you can give them to the shadows, highlights, and mid-tones. if your shadows are too blue, you counterbalance them with the opposite color, yellow. same thing with the cyan-red and magenta-green pairings. in my case, i added a bit of magenta.


B&W GRADIENT MAP
now, if this gif was a dish, it’s time for the salt and pepper. i always add a Gradient Map (layer > new adjustment layer > gradient map) (black to white gradient) with the Soft Light blending mode, thus giving my shadows more depth without messing with the mid-tones and highlights. it also doesn’t “deep fry” (you know those memes?) the gif too much by adding even more contrast. usually, the opacity of the layer is between 30% to 70%, it all depends on the gif. it always does wonders, though!

COLOR FILTER
finally, i like to add Color Filters (layer > new adjustment layer > color filter) to my gifs. it’s very handy when giving different scenes for the same minimalistic set because it makes them kind of match despite having completely different colors. in this gif’s case, i added a “deep blue” filter, opacity 50% density 25. you can change the density and the opacity of the layer for further editing, again, it all depends on the gif.

VIBRANCE
if i feel like it, i add a vibrance layer (layer > new adjustment layer > vibrance) to make the colors pop. this can ruin your coloring sometimes, especially when regarding skin color, so be careful. i didn't do it in this gif because i felt i didn't need it.
TA-DA! 🥳
AN OTHER EXAMPLE
the color grading of the original scene it’s pretty good as it is, to be honest. let’s see a worse scenario, a VERY yellow one:


no channel mixer this time because the automatic curves option dealt with the yellowness, but you can see it made the gif too green. i needed to correct that with the following adjustment layers:
curves (automatic option) (gif 2) >> same curves layer (tweaks) (gif 3) >> brightness & contrast (gif 4) >> hue/saturation (tweaked cyan+blue+green) >> selective color >> color balance (gif 5) >> b&w gradient map >> (sepia) filter >> vibrance (gif 6)
i added a hue/saturation layer to remove the blues & greens before my selective color layer because i thought that was more urgent than tweaking the tint of all colors. color balance (gif 4) was the real hero here, though, by removing the green tint. the selective color layer was meant to make the red pop more than anything else, because the rest looked pretty good, especially her skin tone (despite the green tint). you can notice that tweaking the curves layer (small gif 3) also helped A LOT with the green problem.
tl;dr 😵💫😵💫😵💫
here's a list of my go-to's while coloring and lightning gifs. it's not a rule, just a guide. there are gifs in which i don't use all these adjustment layers, or use them in a different order. it all depends!
1. curves (automatic option + tweaks) 2. brightness & contrast 3. channel mixer 4. selective color 5. hue/saturation 6. color balance 7. b&w gradient map 8. color filter 9. vibrance
i'll suggest that you study each adjustment layer listed for more info, either with other Tumblr tutorials or YouTube ones. the YouTube ones focus on images, but you can translate what they teach to gif making very easily. you can ask me to further explain any adjustment layer, too! i was brief to keep this short (which i kinda failed lol).
feel free to ask me for clarification or something else about gifmaking wise, i always like to help. ❤️
#*#*tutorials#gifmaker tag#resources#resource: tutorials#ps help#uservivaldi#tuserjen#userrin#userelio#useralien#userzaynab#userchibi#userbuckleys#usertj#userbess#tuserlucie#useraljoscha#userdavid#usershreyu#usernolan#userhallie#userisaiah#tusergio#tusergeo#userjesslynn
718 notes
·
View notes
Note
Hi, I love your works!! I was wondering where you find the original, unedited pictures you use for your art? Do you take them yourself or find them online?
Hey there! I get them from many different sources! Whenever I can I use my own, and sometimes my followers send me cool pics to use (or put them up in the Sacrificial Altar channel in my Discord), but I find most of what I use through public domain sources online!
For the online part, I put this little list together with some of the common resources I use! Feel free to share it around and copy it:
For an easier experience, I'll copy the relevant part below:
STOCK SITES
- Unsplash: Usually the best quality out of the free stock sites. They’ll try to sell you a subscription plan but you can ignore that.
- Adobe Stock: Select “Free” on the dropdown menu next to the search bar. The free image selection here is big and high-quality, though they feel more like stock pictures than natural photos. Note: They limit how many pictures you can download per account per day, but you can make several accounts to circumvent this if you use it a lot.
- Texturelabs: lots of free, very high-quality textures!
- Pexels: Similar to Unsplash, but it has more pictures with people. If you need a photo with models, this is usually the best place.
- Pixabay: Widest selection, but worst quality control. Go here if you haven’t found anything in other sites and don’t mind sifting through a bunch of garbage pics and occasional AI images.
PUBLIC DOMAIN SOURCES
- Wikimedia Commons: an enormous selection of CC and public domain pictures. Super useful, especially for the really specific images that you'd expect to find on a Wikipedia article. Always check the copyright conditions! To filter by license, search something and then click on the License dropdown under the search bar. Select “No restrictions” for public domain images.
- Picryl: A repository of public domain sources, ranging from ancient historical books and artifacts to fairly modern pictures. If you're looking for something old/historical, chances are it's here! This website is probably one of the most complicated ones to use, so here are three important tips before you use it:
This site added a paywall that appears after the 3rd page of search results. To remove it, install uBlock Origin, go to the “My Filters” page (clicking on the gear icon after opening the extension), and paste this filter: picryl.com##._9oJ0c2
After searching, use the timeline on the top right to narrow down the result by year.
It won’t let you download the full picture without paying, but it always has a link to the source site below the description. Click on that, then copy-paste the image’s name to find it in the original source. That way you can get it for free, and often in better quality than Picryl offers.
National Archives Catalog, The Library of Congress, NASA, and Europeana have wide selections, but they are included in Picryl so it’s usually better to search there and then download them in the source as mentioned above!
- Flickr Search: a ton of usable pictures with a generally more amateur feel, just remember to filter by license using the “Any license” dropdown menu. When you find an image, make sure to check its specific license (you can find it below the image, on the right side).
- Openverse: The official Creative Commons archive, has many sources! Includes other sites on this list, but has a lot of clutter if you don’t filter.
- iNaturalist: a repository of user-submitted images of animals, plants, and fungi. Look for a genus or species, then navigate to the photo list and filter by license.
MUSEUM COLLECTIONS
- The Met: An amazing selection of artifacts from all over the world, with top quality photographs of most of them (usually with several angles for each). You can filter images by material, location, and era.
- Getty Museum: Another smaller selection of museum pieces, but this one includes old photos as well as artifacts. You can also filter by dates, materials and cultures. Make sure you include the “Open Content” filter to only see public domain things!
- Smithsonian: Big selection of around 5 million museum pieces, with some 3D scans of museum pieces. Most pieces just have a single picture that can sometimes be low quality, but pieces with 3D models sometimes also include a lot of high quality photos from multiple angles. This collection also includes things from museums of natural history, so you can also use it to search for bones and specimens.
- Artvee: public domain classical art. They make you pay to download high-quality images.
If you guys got any others, please let me know and I'll add them to the collection!
186 notes
·
View notes
Text

I couldn't fit the tutorial on a reply lmao, here's a full post explaining my process :]]
STAMP TUTORIAL (TF2 edition, but works for everything)
99% of the process is done on the website ezgif. Ezgif carries the stamp-making process lmao
1. Get your GIF
Tenor: Ok place to grab your GIFs. Average quality of the GIFs is good enough, and looks ok when resized to the size of the stamp. You'll find like 1 normal GIF every 4 buff characters GIF tho.
GIPHY: Average quality of the GIF is better (I don't think the web compresses the GIFs that are uploaded)… If you find what you're looking for. You'll have to SCROLL before finding what you're looking for because there are always non-related GIFs on the top of your searches or the same GIF multiple times, it's crazy.
makeagif: You will find cool GIFs, but the quality is pretty low (I think the web itself compresses the GIFs a lot). It looks bad even when resized down. And it has a watermark, which I recommend cropping because it's not even visible when resized, it just looks like a gray blob on the corner.
Google: Best option by far, quality is pretty good and the ratio of “things I was looking for/things I actually find” is SLIGHTLY in favor of “things I was looking for” (and most of “things I actually find” are just the characters rotating, not NSFW, so that's only a nice change from Tenor). You won't have to scroll much to see different and interesting GIFs. JUST REMEMBER TO FILTER BY GIFS.

You search whatever > Images > Tools > Type > GIF
Make it on your own: Aka, you download your video, go to ezgif's “Video to GIF” (then you can crop it, CUT IT. THIS IS IMPORTANT, YOU DON'T NEED TO GO ANYWHERE ELSE TO CUT YOUR CLIP, YOU CAN DO IT ON EZGIF ITSELF). Ok, I lied, it wasn't Google, this is the best oftion by far. You get exactly what you want, the best quality if you don't compress it much until after the GIF has been resized into the size of a stamp… It's just super time-consuming, and you'll have to spend like an entire hour just watching a video to find the clips.
OK, I HAVE MY GIF NOW
Hehe, his legs go pipupipu
2. Resize
Go to ezgif, this is where the fun begins (if you weren't on ezgif already). You download your GIF, or copy the link and insert it, or you'll have it there if you made it yourself.
A STAMP MAKES 99px × 56px
THE INNER PART OF THE STAMP MAKES 91px × 47px
I RECOMMEND MAKING YOUR GIF 92px × 48px
BTW, THESE MEASURES ARE FOR THE TEMPLATE I'LL GIVE YOU LATER. If you use another template, just go to an image editor and see what the inner size of the stamp is.
So, you set your GIF's width to 92px.

Then crop it, so your height is 48px.

Or you can resize it so it's directly 92px × 48px, but the crop will be in the center, and SOMETIMES YOU DON'T WANT THAT.
For example:

It's a vertical GIF whose area of interest is not in the center, so if we resize it directly-

oops-
ANYWAY
Once you have your GIF resized:
IMPORTANT: BEFORE THE NEXT STEP, REMEMBER TO CONVERT TO GIF IF THE FILE YOU'RE WORKING ON ISN'T A GIF ALREADY
Sometimes you'll be working with a webp without even noticing (EW, I hate webp) and transparencies don't work particularly well with that extension.
3. Overlay

Click on this icon.
Ok, now that that's fixed:

Extend the size of the canvas.

Select your template and Upload image!

This is the template, btw.

Then move the overlay around until it contains the GIF nicely, or just set Left to 43, Top to 20 and Generate image! (I have these numbers memorized, it saves you like 20 seconds lmao)
Also, again, these numbers work on MY template, if you use another one, you'll have to figure it out yourself.
4. Crop

THIS OPTION IS A TIME-SAVER FR
5. Optimize (optional, highly recommend)

I always set my optimization method to Lossy GIF and level 10 because I find that there is no quality loss, and the file size might drop by 30%-70% (actually crazy). These percentages don't change much in higher compressions, even though you'll start seeing a drop in quality around level 35 of compression (the default).
6. Save

YIPPE!!! Your stamp is done :D
You can save it and look at it and place it on your profile or website.


Here it is btw, in case someone wanted it :]] The Sniper GIF but correctly cropped and made into a stamp as well.
Now do that another… eleven times, and you'll have a stamp pack to make into a Tumblr post... Oof TT
There's no website that lets you make stamps faster lmao (I wish)
@sir-broken-bones (I'm @ them so they actually see it, I made this tutorial for them after all lol)
#team fortress 2#tf2#tf2 scout#tf2 sniper#stamps#da stamps#tutorial#graphics#old graphics#neocities#old web graphics#old web
172 notes
·
View notes
Text
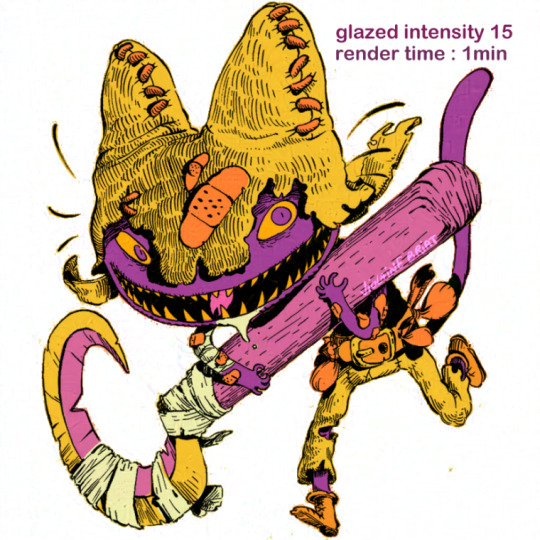
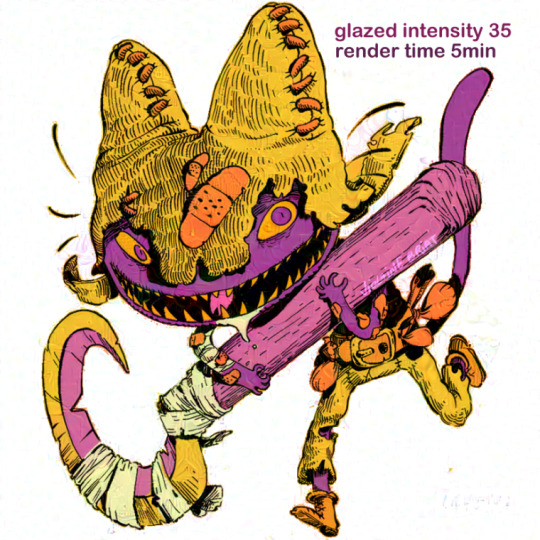
It's a bit weird typing out a full post here on tumblr. I used to be one of these artists that mostly focused on posting only images, the least amount of opinions/thoughts I could share, the better. Today, the art world online feels weird, not only because of AI, but also the algorithms on every platform and the general way our craft is getting replaced for close to 0 dollars. This website was a huge instrument in kickstarting my career as a professional artist, it was an inspiring place were artists shared their art and where we could make friends with anyone in the world, in any industries. It was pretty much the place that paved the way as a social media website outside of Facebook, where you could search art through tags etc. Anyhow, Tumblr still has a place in my heart even if all artists moved away from it after the infamous nsfw ban (mostly to Instagram and twitter). And now we're all playing a game of whack-a-mole trying to figure out if the social media platform we're using is going to sell their user content to AI / deep learning (looking at you reddit, going into stocks). On the Tumblr side, Matt Mullenweg's interviews and thoughts on the platform shows he's down to use AI, and I guess it could help create posts faster but then again, you have to click through multiple menus to protect your art (and writing) from being scraped. It's really kind of sad to have to be on the defensive with posting art/writing online. It doesn't even reflect my personal philosophy on sharing content. I've always been a bit of a "punk" thinking if people want to bootleg my work, it's like free advertisement and a testament to people liking what I created, so I've never really watermarked anything and posted fairly high-res version of my work. I don't even think my art is big enough to warrant the defensiveness of glazing/nightshading it, but the thought of it going through a program to be grinded into a data mush to be only excreted out as the ghost of its former self is honestly sort of deadening.
Finally, the most defeating trend is the quantity of nonsense and low-quality content that's being fed to the internet, made a million times easier with the use of AI. I truly feel like we're living what Neil Postman saw happening over 40 years ago in "amusing ourselves to death"(the brightness of this man's mind is still unrivaled in my eyes).
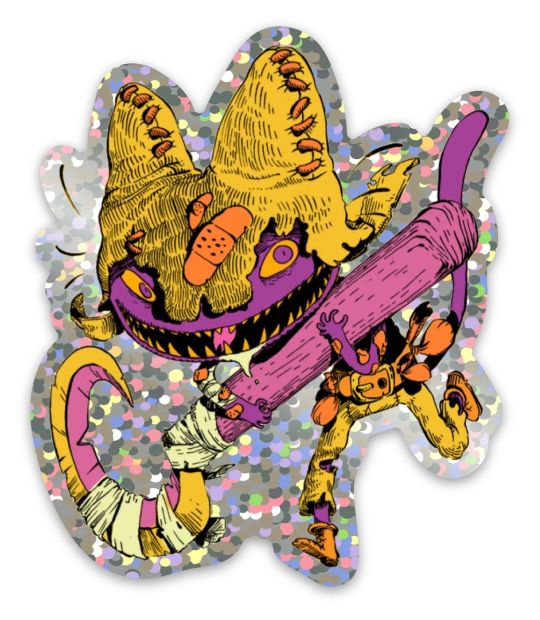
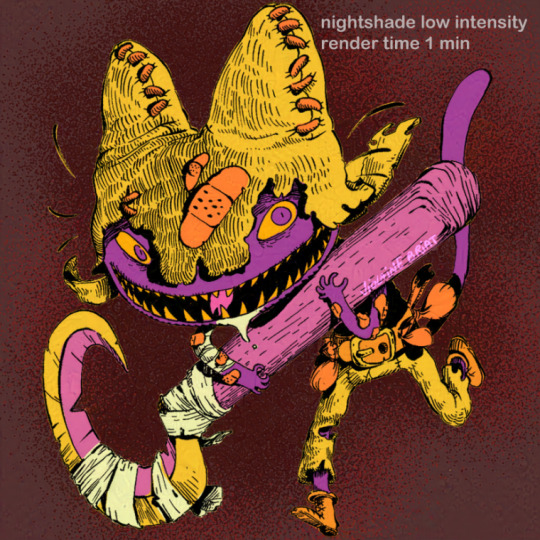
I guess this is my big rant to tell y'all now I'm gonna be posting crunchy art because Nightshade and Glaze basically make your crispy art look like a low-res JPEG, and I feel like an idiot for doing it but I'm considering it an act of low effort resistance against data scraping. If I can help "poison" data scrapping by wasting 5 minutes of my life to spit out a crunchy jpeg before posting, listen, it's not such a bad price to pay. Anyhow check out my new sticker coming to my secret shop really soon, and how he looks before and after getting glazed haha....

294 notes
·
View notes
Text
Problems facing modern artists & creators
I've talked with hundreds of artists and creators about the difficulties they face trying to earn a living from their craft.
This post covers two of the big ones (social media algorithms & bargain basement marketplaces), and what tools are available to grow your business despite these issues.
Social Media Algorithms and Audience Ownership
Social media platforms are a godsend for getting your work in front of potential clients and building a loyal fan base.
However as you will all have experienced, it can take a mastermind to figure out what kind of content the algorithm wants you to post, and if you don't do that you'd be as well throwing your content into the void as even your own followers might not see your post, never mind new viewers.
It also means you don't truly own your audience, if you post something slightly controversial your account could be deleted without warning, or perhaps a billionaire buys the site and everyone flocks to a new platform where you have to start growing your following all over again.
Solution: Build a mailing list
This is perhaps the single best marketing tool available to any business, and is sorely overlooked by artists and creators.
It's cost effective and because you own your mailing list it doesn't matter what's happening on social sites, you can always keep in touch with them.
The tricky part is converting people into mailing list subscribers. However I've seen plenty of creators successfully build one by offering incentives including free digital downloads, early access to content, discounts on your store etc.
Those who sign up to your mailing list would be considered high quality followers, someone who is much more likely to convert to a paid client and buy from you again in the future compared to the average follower on social media.
Tools
https://art.page/
https://substack.com/
https://convertkit.com/
Losing clients to undercutting competitors on the same platform/marketplace
If you run your business on a marketplace or platform, your clients are one click away from finding plenty of other choices who are willing to undercut everyone else to land a sale.
These sites have no incentive to make sure that traffic you drive to your profile actually purchase from you. Whether a sale is made through your listing or another seller, they collect their fee either way.
They also use uniform designs which reduce you to a generic product listing. Whilst this can simplify the customer experience, it means you have no control over the sales funnel and ability to differentiate yourself, making it harder to convert potential clients into paying customers.
Solution: Direct clients to your own site
Use your own personal website to make sales from, there are plenty of options with no monthly charge and lower fees than marketplaces. This lets you make dedicated marketing pages showcasing your best work to make a client excited about doing business with you, instead of just being a generic product listing.
Take advantage of marketplaces purely for their customer base. Don't rely on them as your sole business platform. This way, any fees you pay are worthwhile to generate sales you wouldn't have had otherwise.
Tools
https://art.page/
https://www.bigcartel.com/
https://squareup.com/
Interested in more?
There's plenty more I have to share on this topic, including:
How to properly use Print on Demand without getting ripped off
Streamline managing your business so you spend more time creating and growing your business.
How to better utilize your brand to connect with clients and increase sales
So let me know if you’re interested and I’ll get writing!
Transparency
I'm building https://art.page to solve these exact issues, with the goal to create the best all in one site builder for artists and creators that makes running your business easy.
411 notes
·
View notes
Text
hi!!! More malevolent art:)


Last one I just drew on whiteboard it might he my favorite so far. Low quality drawing websites give me talent idk. Click on pictures for better quality as always
#malevolent#malevolent podcast#malevolent fanart#john doe malevolent#john doe fanart#arthur lester malevolent#arthur lester fanart#Nearly finished relistening to episode 2 now
35 notes
·
View notes
Note
How did you find/make your aesthetic profiles of the gods in your book?
i was gonna link you to my guide that i posted a long time ago, but i realized how old it was and that it was lacking some details...... 💀
so i'm gonna do a new one that hopefully helps a bit more!!!!
websites used: pinterest, tumblr, canva, deviantart, & photopea!
first off, i find the pictures from sites like pinterest and tumblr. the color schemes of each pic need to be somewhat close to each other (but it doesn't always have to be like that depending on the psd you'll be using later on)
i'm gonna use hades for example. this is the first pic i find of him lol:
the most dominant color here is purple, with some tinted ivory from his skin, and brown in the background, so the next few pics i find should have somewhat similar colors too, or they should at least be purple cuz it's the most frequent color here
here are the next few photos i found:
they don't look perfect, but we can always individually tweak the colors and shades later
i download the photos and then i go to canva. the site provides you with templates that you can use but since i only got three pics, i chose the "email header" option.
(for those wondering which template i used for the bigger ones you see in the first chapter with percy and the yans, i don't use a template. i just use "custom size" and type in "800 x 800 px")
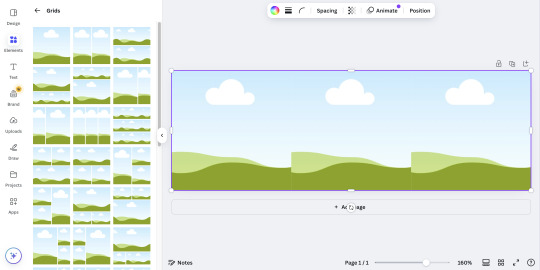
go to the sidebar, click "elements" then scroll down for "grids" and then find the one with 3 parts. i reduced the spacing between the photos to zero.
then i upload all 3 photos and put them in the squares. because they're not exactly the closest in color schemes, i individually edit them until i'm satisfied.
canva provides filters that you can use, but i always find it best to toggle with the adjustments like brightness, contrast, saturation, etc.
here's what i ended up with so far:

again, not exactly perfect, but whatever
now that i'm done, i go up to "share", select "download", and increase the size by 1.5 (that's 900 x 300 px). idk why, but for some reason, the quality looks better when you enlarge the size before download.
once that's done, i download the whole thing.
(keep the file type as "png" btw)
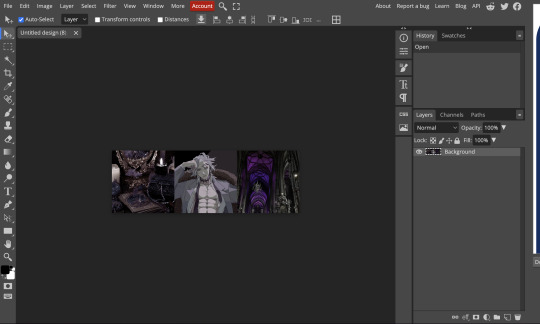
then i go over to photopea and upload my graphic. it'll look like this:
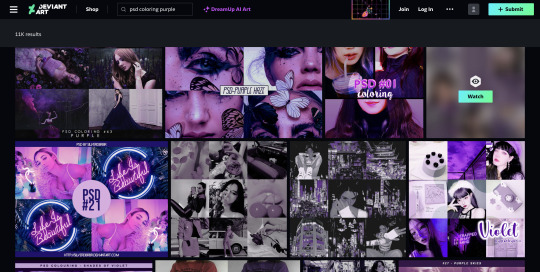
in another tab (not the photopea tab, but like... the actual tab of whatever browser ur using), i can find a bunch of psd colorings in deviantart. since i want one that's specifically purple, i just search up "psd coloring purple"
and i get all this:
i pick whichever one i think might look best and download it.
then i head back to photopea.
at the top, click on "file" and the new psd you just downloaded, and it'll show up in a new tab.
stay on that tab, go up to "layer" -> "layer into" and select the first tab where the graphic's at. this applies the psd coloring onto ur graphic.
over at the side, there's something called "opacity: ___%" you can toggle with that if the psd is too overwhelming, so you can lessen it by dragging it down if you need to.
once you're satisfied, click "file" -> "export as" -> "png" and it'll be downloaded.
and that's pretty much it!
THIS CAN BE A LONG PROCESS THOUGH! literally in every step, you might end up going back and changing stuff.
for example, i do not like the right photo that i selected. the purple is too bold compared to the purple shades in the left and center photo. i'd probably go aaaalll the way back to the earlier steps by returning to pinterest to find a better photo
or maybe you don't like the psd you picked. if that's the case, delete the photopea tabs and redo the above steps with a different psd.
it can be a bit annoying if ur the perfectionist type and have to go back again and again 😅
but anyway, psd coloring's are great. i'm looking back at the og versions of all the graphics i made (og as in, before i applied the psd colorings) and they're soooo different from the finished pieces
23 notes
·
View notes
Text
Denver SEO Company: SEO Tips you Need to Know!!!!
Denver SEO Company: SEO Tips you Need to Know!!!
Each page on the SEO Expert in Denverwebsite must be optimized with a focus on On-Page SEO. This includes:
Titles and Meta Descriptions:
Ensure each page has catchy, descriptive titles with the right keywords. Use meta descriptions that invite users to click on results.
Headings (H1, H2, H3): Use heading tags to structure the content and make it easier to read. This also helps Google better understand the theme of the page.
Optimized Images:
All images must have ALT attributes with appropriate descriptions and must be compressed to improve loading. Practical Tips: Use main keywords in the title and URL. Insert internal links to guide the user to other relevant pages on the site. Create friendly, short and descriptive URLs.
Creating Quality Backlinks:
Backlinks, or links from other websites that point to yours, are a determining factor in Google rankings. Earn quality backlinks by:
Publish guest posts on relevant blogs:
Create partnerships with other companies and ask for links to the SEO Expert in Denver website. http://denverseo.company/ Publish case studies and financial reports that other companies may want to reference.
Practical Tips:
Build links on authority sites like media outlets and finance blogs. Avoid link building techniques that are considered spam, as Google may penalize the site. Have a digital Public Relations strategy, sending press releases.
Local SEO: Capture Customers in the Region:
SEO Expert in Denver can significantly benefit from local SEO, especially to attract customers in the Northeast region. For that:
Optimize your listing on Google My Business. Enter information about SEO Expert in Denver's location on the website. Encourage your customers to leave reviews online. Practical Tips: Include location in keywords, such as “Financial consultancy in Recife”. Use Google My Business to highlight events and related posts.
Video Content:
Video content is a powerful tool for SEO as it increases dwell time on the website. SEO Expert in Denver can create explanatory videos, interviews with experts and customer testimonials, covering topics such as “How to get credit for my company” or “The role of consultancy in fundraising”.
Practical Tips:
Publish videos to YouTube with optimized descriptions and website links. Integrate videos on the main pages of the SEO Expert in Denver website to increase engagement.
Off-Page SEO: Increasing Brand Presence:
In addition to backlinks, it is important to increase SEO Expert in Denver’s presence on other platforms and social media. Have a well-defined content strategy for LinkedIn, Instagram and Facebook, where you can share financial insights, promotions and educational materials.
Continuous Analysis and Adjustments:
SEO is a strategy that requires continuous analysis. Use tools like Google Analytics to track traffic and understand user behavior on your website. Adjust the strategy as necessary, always seeking to improve rankings and attract more qualified leads.
Practical Tips:
Monitor top-performing pages and update old content. Test different keywords and content strategies to see what generates the most leads.
Pillar Content Creation:
Create pillar content, which covers broad topics such as “Fundraising for Companies”, linking to more specific content (content clusters). This creates a hierarchical content structure that makes it easier for users to navigate and improves SEO. https://denverseo.company/about/
Conclusion:
To attract more qualified leads and improve SEO Expert in Denver website authority, it is crucial to implement a thorough SEO strategy. From technical optimization to creating valuable content and quality back links, each action contributes to organic growth. With these practices, SEO Expert in Denver can stand out as a reference in the financial consultancy and fundraising sector
25 notes
·
View notes
Note
Well, I had an idea for you to do. The reader is a streamer who enters the Welcome website and, together with the live people, gets to know this Welcome and Yan! Wally... Well, how would Wally react to that? And as time goes by wally falls in love with the reader, how would he see the reader's fans and his job of doing live, playing games, watching videos?
-🐰
Tysm for the request! I love this idea I don’t think I’ve seen anyone do it yet but I could be wrong too! Hope you’re doing well or that things get better 🐰!
this hasn’t been spelll checked so sorry for any errors in my writing!
“Hello everyone and welcome back or to my stream! Today I’m looking at this website called “ Welcome Home.” You greeted explaining the website you found while starting your stream.
You’ve been a streamer for a few weeks, but you’ve managed to gain a lot of popularity due to keeping up with the popular topics of the months. And out of nowhere you had found the website “ Welcome Home”. You don’t know how or why it just one day popped up in one of your emails probably from some fan of yours wanting you to review it. Strangest thing about the email was how nothing was said about the website and the email even seemed to be sketchy, but curiosity got the best of you.
So without thinking or whatever had possessed you made you click on the website. For a second the bright colors and themes of the website blinded you as your eyes tried to adjust to it. The bright colors and theme of the website amazed you. As you looked further into it the website explained it was an abandoned puppet studio they had found. And wanted to revive or find out more about the old show that seemed to have been wiped from history.
You’ve heard a few things about the website and it’s fast rise to popularity so it would probably do you some good to check it out. What’s a little curiosity going to hurt?
” There’s glitches in the website?” You questioned as people flooded your comments with all the glitches in the game.
You decided to check them out after previewing the characters information about them. Though one character in particular caught your eye. Wally Darling he was the only character who ever made eye contact with the viewer. Especially in official art or any on the website his large black eyes almost followed you around in a way. It was creepy, but you guessed that might have just been something the maker of the website did.
Little did you know it wasn’t. As the lively black eyes followed you are still peering into your own eyes. Even peaking onto your stream. As you chatted to your so called “chat” about the website.

“ Hello and welcome to or back to my stream!” You said doing your usual intro for your stream.
“ Sorry if the quality is bad! I’ve been having some trouble with my computer, but that won’t stop me.” You announced.
Ever since you went onto the welcome home website you’ve been having technical difficulties with your computer. You’ve rebooted it twice, brought it to someone for repairs, and after all that you were told nothings wrong with it. Now here’s the oddest thing today as you streamed your graphics and everything was fine. No buggs or anything it was fine. Acting as if there wasn’t anything wrong with it for the last week!
“ Well I’ll just end the stream here. Thank you all watching!” You said as you finally ended the stream.
Sighing out you looked at your now glitching computer. You brought your lips to a pout still thinking of what possible way your computer would be fine. How could it be fine if it’s doing this? And what’s with the eyes that would always pop up randomly. The eyes seemed so familiar in a way too. Were you being hacked? This was just starting to get ridiculous. Who and what is doing this shit?!
Your ‘streams’ as you called them were always so interesting. He’s never really seen anything like this and you even do it for a living? A very fun job in his opinion! To just info dump, review, and give your own input on whatever you were doing sounded like a dream.
As you talked he couldn’t help but become mesmerized with your voice. It was just so addictive to just watch you all day doing your streams without a care in the world. Especially as his dark eyes watched your face contort into so many different emotions. Whether it be anger, sadness, disgust, or even adoration all of them looked so beautiful on your beautiful face. He looked forward to watching you ever day. In a way you could say he was your number one fan because he was always the first one to watch your streams every day.
But once they ended he still had front row seats to his next favorite stream. What you did when the camera was off. This was when you didn’t put on your little persona for the camera and everything was just artificially you. He loved this part of you the most. Even if you didn’t know he was there he always was watching you. You were all his thoughts had clouded over with. A fog of nothing but your sweet face saying his name in admiration just as he hoped to someday say to you.
Oh, how he just yearned to be with you! But not yet, no it’s not time. Not yet…
Tysm for reading this hope you’re alll doing well or that things are getting better!
sincerely- Cup1dT3a💖
#welcome home wally x reader#wally#wally darling#welcome home x reader#wally darling welcome home#wally darling x reader#yandere wally darling x reader#yandere welcome home#yandere wally darling#gender neutral reader
339 notes
·
View notes
Text
Reading The Subspace Emissary's Worlds Conquest so You Don't Have To
...Okay, let me explain.
The year is 2015. I'm 14 years old and I have no idea what fanfiction is. I barely know what fandom is. I have no clue what's going on in life (and arguably still don't, but whatever). BUT. I am already a huge Nintendo geek. Me and my brothers have recently acquired Super Smash Bros. Brawl for the Wii, and have just completed the entirety of its epic adventure mode: The Subspace Emissary. It was, as everyone knows, freaking awesome. The ultimate crossover that every Nintendo fan had ever wanted. It was a dream come true.
And then it was over. Oops. We just ran out of game to play. Awkward. But... there was a hint of something more going on with Subspace. Not everything in the game was fully explained. There is, incidentally, a reason for this. Due to constraints not all of the Subspace story was able to be properly implemented in the game. So Masahiro Sakurai, the game's creator, had to explain a couple of extra stuff on the game's website.

The Secret Texts of the Subspace Emissary. It's all still there for you to see, if you know where to look! ...Spoilers, obviously, but come on, it's Smash Bros.
So naturally, past me took to the internet. And eventually he'd stumble upon the Smash Dojo website and get all of his questions answered, scratching the itch that the search for knowledge always inspires in people. But the thing is, when you put something into Google search, it's autocomplete will give you suggestions, trying to guess what you're typing before you type it so you don't have to type the whole thing. And lo and behold, when past me typed in "the subspace emissary" into the search bar...

Just pretend it looks like the Google of 2015 okay
Excuse me? What the heck is this? Since when does the Subspace Emissary have a "Worlds Conquest"? What even is a "Worlds Conquest"? That's not correct grammar, is it? Is this a game mode I missed? A separate game? Some extra lore? Something completely unrelated to Smash Bros that just happens to have the words "Subspace Emissary" in it??? At first I ignored it in favor of getting the original information I was looking for, but since I am a geek and was hyperfixated on Subspace at the time curiosity got the better of me. I searched "the subspace emissary's worlds conquest" and clicked the first (non-ad) link that popped up.
Poor precious baby me. You had no idea what you were in for.
The Subspace Emissary's Worlds Conquest is a Super Smash Bros. fanfiction written by AuraChannelerChris on fanfiction.net. It is not, as you may have heard claimed, the longest piece of fiction ever written. At this point, it's not even the longest piece of Smash Bros. fanfiction ever written, which is an absurd thing to think about. But at one point it was a contender for the title of longest piece of fiction, and it's certainly one of the most famous. Worlds Conquest currently has over four million words (4,102,217 according to TvTropes.org) meaning it's one heck of a doorstopper.
It was initially published on March 4th, 2008 (right about when Smash Bros. Brawl was being released in the United States) and continued to update for quite a while. By the time past me discovered it in 2015, around 220 chapters had been published. That number would soon be brought up to 221, while the author was also going back and rewriting earlier chapters to have a higher standard of quality. Its most recent update was in June of 2018, with another chapter rewrite, and there hasn't been any indication of further updates since. It's just sitting there on ff.net. 221 chapters. Unfinished.
But just because it's unfinished doesn't mean it's any less of an epic read. Some of the individual chapters are longer than full length novellas. This thing is a behemoth that EARNED its reputation in the fandom circles. It's almost hard to believe the project was initially started with the goal of helping the author (a native Spanish-speaker) improve at English.

Worlds Conquest's current cover image on on ff.net
What is The Subspace Emissary's Worlds Conquest about? To summarize, it's about the author's original character Chris (not confirmed to be a Self-Insert, but I have suspicions) teaming up with just about the entire Smash Bros. Brawl roster to save all of reality from the Subspace Army, which unfortunately didn't stay down after getting beaten up during the events of the original game's Adventure Mode. This involves visiting the worlds of a lot of different games and engaging in all sorts of shenanigans. Pretty much every game franchise you can think of gets a story arc associated with it, with multiple overarching myth arcs as the so-called "Smashers" make gradual progress against the forces of evil. Is it kind of generic, as fanfic premises go? Yes. "My OC gets to hang out with the main cast" stories are a dime a dozen. But this story managed to go on for way longer than any other of its kind, and was supported from start to finish. Its reputation continues to attract people to it to this day! So I'd say that's got to be worth something.
Okay, back to past me. Again, at the beginning of 2015, I had no idea what a fanfiction even was. My main priorities in life were geeking out over the latest Pokemon game, eating Kraft Mac & Cheese (the best food to ever grace this planet's surface), and procrastinating every single middle school homework assignment I ever received. To me, Worlds Conquest was not a fanfiction, nor was it one of the longest works of fiction ever written, it was just "this cool story I found online". And it was cool. 14-year-old me was HOOKED. I spent just about every ounce of my free time on my phone reading it. I am a very fast reader. I read all of Homestuck in under a month, But this took me significantly longer to get through! But I had never seen anything like it before! It gripped me in a chokehold and didn't let me go. For a few months, this fanfic was my life. I would read it in bed after my parents went to sleep (Mom and Dad if you're somehow on tumblr and reading this, don't act surprised, I know I was NOT as subtle about it as I thought I was). I would read it instead of doing homework (DO NOT DO THIS PEOPLE HOMEWORK IS SOMETHING THAT NEEDS TO GET DONE). I definitely didn't understand everything that was going on in it. Not only was I a relatively sheltered child, but I also just hadn't played that many video games, and Worlds Conquest references a LOT of them. But still I read on, and on, and on...
And then, once the whole dang story was over and I was done, I clicked the next link that pops up when you search "the subspace emissary's worlds conquest", which at the time was the link to the fic's TvTropes.org page. I didn't know what TvTropes was. Turns out it's one HECK of a gateway drug to fandom, fanfic, and media in general. I fell down the fandom rabbit hole and have been quietly disappointed by the lengths of all the fanfics I've read ever since. Turns out when a doorstopper fic is your introduction to fanfiction it warps your perspective a little. But I've still had a ton of fun! A few years later, I went back and actually reread the whole thing again just for kicks, and because I must be insane.
But now? Now it's been ten years since I first read Worlds Conquest. I've read way more fics since then, and honestly my standards in whether I like a fanfiction or not have probably gone up significantly. I've definitely gotten better at looking for quality and not just quantity, to be sure. So that leads me to wonder...
Is Worlds Conquest ACTUALLY good? Or am I just biased?
So I've decided I'm going to reread it. Seriously, this time. And since I actually know how to do research now and have learned about more games that AREN'T Pokemon in the past decade, I won't just skim through the bits that I don't understand. Does this story deserve to be revered as a titan, a benchmark for other long fics to surpass? Or is it just overrated? Personally, I really hope it's still good as I remember it being, or at least somewhat decent. But you never know. So time to read it again and double-check! Right? ...Right???

Pictured: Me, someone who is almost certainly completely insane for doing this seriously what is WRONG with me
And chances are, you're probably curious to know if The Subspace Emissary's Worlds Conquest is any good too! Nobody has the time to read massive doorstoppers in this day and age unless they're like. Retired. And retired people are significantly less likely to read fanfiction, statistically speaking. All you people who actually are interested have stuff like work, or school, and extreme bouts of apathy caused by depression, which prevent you from spending time reading one of the longest fanfictions to ever grace this beautiful Earth with its presence. Especially since it's unfinished, right? No point in committing if it's not DONE.
But lucky you! You don't HAVE to commit! Because I've decided on committing FOR you, assuming I actually have the chutzpah to follow through. (Historically I don't, but now I have the internet to hold me accountable!) The goal with this is for me to reread all of Worlds Conquest and summarize it for you, likely chapter-by-chapter, so that you still get to learn just what the heck this astounding monster of a fic is about without having to do all the work yourself. I get to reexperience my childhood and view the story with fresh eyes, and you get to become educated in this definitely important fandom icon. It's a win-win!
So come along with me, as we jump right into the experience of a lifetime, reading The Subspace Emissary's Worlds Conquest-

...Oh right, I forgot about The Bond of Aura.
See, the thing is, Worlds Conquest is not a work that exists in isolation. It's actually a sequel. Though thankfully its predecessor work, AuraChannelerChris's The Bond of Aura, is much, MUCH shorter than its sequel, and is significantly less plot-heavy. But it still provides some really important context that's convenient to have when going into Worlds Conquest. It's not mandatory per se, obviously I didn't read it when I first discovered the behemoth and I was fine. But it's still helpful, and provides some info such as:
More details on who the Protagonist of Worlds Conquest is and what his backstory is like.
Explaining why he's able to HAVE the insane adventure he's about to go on without it disrupting his life in the "real" world too much.
Showing how he somehow managed to acquire a six-foot-tall Lucario who's a Pokemon of Mass Destruction.
Assorted adorable fluff.
It's not required reading, but I've decided to cover it anyway, or at least the basics just so you know what it's about. I won't go in-depth and probably cover the whole thing in one post for convenience, but I feel it's better to get it out of the way than not and regret it later.
So let's see how this goes, shall we?
My analysis of The Bond of Aura is here. Or you can just skip to the Worlds Conquest chapter summaries starting here.
#maspers reads subspace#the subspace emissary's worlds conquest#the subspace emissary#super smash bros#smash bros#super smash bros brawl#fanfiction#fanfiction analysis#intro post#heres to hoping#i can actually pull this off#wish me luck
10 notes
·
View notes
Note
Do you have any tips or guides on how to make gifs?
I do! Firstly, this guide here is probably the best guide I've seen for gif making. It's concise and easy to follow, and it's what I used to learn myself. They have a lot of resources as far as programs go, but I'll list what I use below. As always, never download and install anything from unknown sources without doing your own due diligence. Run everything through your antivirus and/or virustotal before installing always always always!
This is kinda long, so imma put it under the cut lol. Also note that I use windows (Win10), so things may not work the same way for mac or linux
Before you can actually make the gifs, you need a way to download high quality videos! I like jdownloader 2 because I find the interface to be user friendly, it gives you the option to download multiple elements (like srt files), and it works with more websites than lots of other video downloaders (and their user support is leagues better as well). My second choice is yt-dlp, which isn't necessarily more complex but might look a little more intimidating. Both are great programs, but a quick note about jd2: DO NOT download it from anywhere else but the link above. The developers package adware in all their installers EXCEPT for that one (I hate it too, and I think it's fundamentally unethical, but at least they're up front about it and they have an adware free version). Both methods automatically download the highest quality video available in your source link, so you don't have to worry about fiddling with that.
Now on to extracting frames! My method of choice is ffmpeg. It looks more intimidating than it is, and it's honestly the best way to extract frames imo. Like yt-dlp, it uses your computer's command console, which means you'll need the relevant command lines to run it. This tutorial is great to get you started, and it includes a command line for if you only want to extract frames from a specific part of your video. If you want to extract every frame from the entire video, you can either input the start and end times of the video into that command line, or you can use this version (I use both depending on what I'm doing):
ffmpeg -i "file path" "out-%05d.png"
Always make sure you're working with png files. To make quality gifs you have to start with quality images, and png files, unlike jpg, are lightweight and lossless, meaning you won't end up with compression artifacts and fuzziness
To get the file path for your video, select the file, then in the upper left hand corner of your window select home > copy path. It will copy the path in quotes, so replace the entire section "file path" with the path you just copied. Then copy and paste the entire line into your command console. The tutorial above says this as well, but be sure to create a folder for your frames, go into that folder and click the file path bar at the top of the window, then type "cmd" to open the console. This will ensure your files are dumped in that folder
So now you need a way to actually MAKE the gif. This is... a little more tricky. You can use gimp, I think, though it's certainly not my program of choice. You could buy PS but like... ew. OR you could do what I did and arr it. I use a portable version of CS6 that I downloaded literally a decade ago, and unfortunately the website I got it from isn't up anymore. I did a quick search and found this on reddit, but again, do your due diligence before downloading and installing anything!
Now I'll talk a little bit about my actual process. The actual process of making frames into layers into a gif I got from that first tutorial I linked. I took that process and made an action on PS so that I never have to do it manually again because I'm lazy and my memory is dogshit and I didn't want to have to consult a guide every time I wanted to do something lol. Everything else I learned through experimenting and my own experience as a photographer, so I encourage you to play around with everything to see what you like and what works for you
For coloring, I fiddle with levels, brightness/contrast, and color balance adjustment layers until I'm happy with how it looks. You can use curves instead of levels if you want finer control (or if you want to produce effects like matte), but levels works just as well and has a histogram right there in the panel, which makes it easier to adjust the exposure based on the image's actual data
For sharpening, I have a couple of custom actions I use. Here's what they look like:

The first one (bound to the F2 key) gives a smoother appearance, and I like to use it for kpop gifs where the subjects are already airbrushed and smooth without much texture, or wide shots where detail isn't super important
The second one (bound to the F3 key) is the one I use when I want to preserve texture in the image. Closeups of people where you can see their skin texture, or busy images with lots of detail benefit most from this one
The basic gist of it is, the "sharpen" filter does exactly what it says on the tin and it's usually all the sharpening an image needs, and the "surface blur" filter erases or dampens artifacting created by the sharpening filter. Sometimes I'll run the action twice, or use them both in combination to get the effect I want. Here's what the difference looks like in practice, featuring two very cute dudes:
F2 sharpening action


F3 sharpening action


You'll notice in the first two gifs, there's not much in the way of texture to preserve. Yoongi's skin is smooth and airbrushed, and the scenery is all metal and concrete shot with a wide aperture, which makes the background nice and blurry and smooth. In the second set, Jesse has facial hair and stubbly texture on his throat that I wanted to preserve, so I used the action with the lighter surface blur
My advice on all of this though, again, is to play around with it and see what you like! And if you have any more questions, feel free to ask! I'm by no means an expert, but I'll do what I can to help!
edit: oh, a quick note about speed! The tutorial I linked above mentions changing the delay to 0.05, and that's great for full speed gifs! But if you want them slow like my gifs above, I set the delay to 0.08. Sometimes I'll slow them down even more by setting the delay to 0.09 or 0.1, but any higher and you start to lose some of that smoothness
15 notes
·
View notes
Text

So I saw this post by @marshmallowprotection and thought I should draw this! As always, click for better quality because something is wrong with this website
#jaehee#jaehee kang#mystic messenger#mysme#mystic messenger fanart#mysme fanart#mm#mm fanart#jaehee fanart#jaehee kang fanart#my art
54 notes
·
View notes
Text
How Companies Can Improve in Content Marketing?
Content marketing helps businesses connect with their audience effectively. A strong strategy builds trust, drives traffic, and boosts sales. Companies can grow their brand by using smart approaches. Below are tips to improve content marketing.

Understand Your Audience
Knowing your audience is essential. Identify their needs, preferences, and challenges. This helps you create valuable content. Use surveys, social media polls, and website analytics to gather insights. Lawlor Media Group, a trusted Brand Strategy Agency New York, can assist with audience research.
Focus on creating tailored content for different audience segments. Personalization strengthens engagement and builds loyalty. Always keep your audience in mind during content creation.
Set Clear Goals
Define clear content marketing goals. These could include increasing traffic, boosting sales, or improving brand awareness. Having goals makes your strategy more focused.
Break your goals into smaller, actionable steps. For example, plan to publish blogs, videos, or social media posts weekly. PR Agencies NYC like Lawlor Media Group can help align your content goals with broader business objectives.
Create High-Quality Content
High-quality content stands out. Ensure your content is relevant, accurate, and valuable. Always check for grammar and spelling errors.
Add visuals, such as infographics or videos, to improve engagement. Use storytelling techniques to make your message memorable. For businesses in competitive markets like New York, Online Reputation Management New York services can ensure content enhances your online image.
Be Consistent
Consistency is key in content marketing. Stick to a schedule for posting content. Whether it’s daily, weekly, or monthly, consistency builds trust.
Develop a content calendar to stay organized. This ensures your brand stays active and visible. A reliable PR Agencies NYC partner, such as Lawlor Media Group, can help manage schedules effectively.
Optimize for SEO
Search Engine Optimization (SEO) improves your content’s visibility. Use relevant keywords in your blogs, articles, and videos. Include keywords naturally without overstuffing.
Optimize meta descriptions, headers, and images for better rankings. A strong SEO strategy drives organic traffic to your website. Work with a Brand Strategy Agency New York for expert guidance.
Leverage Social Media
Social media is crucial for content marketing. Platforms like Instagram, LinkedIn, and Twitter expand your reach. Post engaging content regularly to keep followers interested.
Use hashtags to improve visibility. Share behind-the-scenes updates or customer stories for a personal touch. For brands facing challenges, Crisis Management New York can help maintain a positive image on social media.
Measure Performance
Track your content marketing performance regularly. Use tools like Google Analytics or social media insights. These platforms show how well your content performs.
Pay attention to metrics like engagement, clicks, and conversions. Adjust your strategy based on the data. Agencies like Lawlor Media Group can analyze performance and refine your plan for success.
Engage with Your Audience
Responding to comments, messages, and feedback is vital. Engagement makes your audience feel valued. It builds stronger relationships and boosts loyalty.
Encourage user-generated content, such as reviews or testimonials. Respond promptly to any complaints to show your commitment. For public relations help, turn to PR Agencies NYC for expert support.
Experiment with Content Formats
Try different content formats to keep your audience interested. Mix blogs, videos, podcasts, and infographics. Diverse formats attract different audience types.
Stay updated with trends, like short-form videos or live streaming. Experimenting ensures your content remains fresh and engaging. For professional content guidance, contact a trusted Brand Strategy Agency New York like Lawlor Media Group.
Focus on Online Reputation
Your online reputation affects your content’s impact. Negative reviews or comments can harm your efforts. Invest in Online Reputation Management New York to maintain a positive brand image.
Respond to negative feedback professionally. Highlight positive reviews and testimonials in your content. A strong reputation strengthens your marketing strategy.
Prepare for Crisis Management
Crisis situations can affect your brand’s content marketing. Be prepared with a crisis management plan. Quick action protects your brand's reputation during challenges.
Work with Crisis Management New York experts to handle difficult situations effectively. A professional team ensures your messaging remains consistent and credible.
Collaborate with Experts
Collaborating with experienced agencies improves your content marketing. Professionals bring expertise, resources, and strategies to your campaigns.
Lawlor Media Group, a leading PR Agencies NYC firm, provides comprehensive services. Their expertise ensures your content marketing aligns with your business goals.
Conclusion
Improving content marketing requires clear goals, high-quality content, and consistent effort. Social media, SEO, and audience engagement are vital. Managing reputation and preparing for crises are also essential.
Partnering with a reliable agency like Lawlor Media Group ensures success. Their expertise in PR Agencies NYC, Brand Strategy Agency New York, and Online Reputation Management New York makes them a top choice. Follow these tips to strengthen your content marketing strategy.
#Lawlor Media Group#PR Agencies NYC#Brand Strategy Agency New York#Online Reputation Management New York#Crisis Management New York
2 notes
·
View notes
Text
Complete guide to Flickr and why you should use it
bc I got some things wrong but it’s still a very good website that we should all use instead of Instagram
1: Flickr isn’t tied to Meta or any of that Facebook bullshit, from my knowledge it doesn’t share your contacts so no one will get a notification that you joined, it’s safer that way and more private than Instagram.
2: It’s built for photos. Instagram kills quality of photos, if you’re an artist, especially a digital one, uploading to Flickr would be way better for people to actually see detail and the color.
Going on with this because it’s built for photos, while it can host video, it doesn’t have TikTok/Reels and lives which is soooo nice. Like I don’t hate that stuff, but I like that Flickr isn’t trying to catch on the latest trends.
3: There isn’t likes. Flickr is mainly for sharing and LOOKING at photos. The most interaction you can get one on one is commenting, following, and favoriting. Favoriting is basically the public saves, no one really faves things on there unless it’s a recipe or for a reference or something.
4: Groups. Flickr does have an option for communities to make groups in where you can share similar interests MOST OF THESE ARE DEAD BUT WE CAN BRING THEM BACK!!! (IM BEGGING)
5: The bios are unlimited ( I think ), I copy and pasted the entire Bee Movie script three times along with my own bio that was already in there. I’m always pissed when I have to trim my bio, so bitches who like to put everything in their bio this website is for YOU
6: It’s in chronological order. Everything. You can even look up when certain posts where made by year, month, even fucking day. The archives of Flickr are so fucking fun.
7: Its not a contest. The main reason as to why I fucking hate Instagram (other than they took away chronological order and being able to see the recents under a tag) is that it focuses too much on “#aesthetic” even on the casual Instagram side people are still posing and trying to make an aesthetic of it. Flickr is just for photos you like, which yes can be aesthetic, but it’s mainly for daily life. You will see older people just posting what they are working on, maybe a cat they saw at the store, nothing planned. Just a quick unprompted click.
8: Organization, Flickr let’s you have Albums which is where you can organize all your photos in much like Pinterest. Most do it by year but others do it by topic too.
9: You can upload photos in bulk. You don’t have to upload them one by one, or at a limit of ten, you can upload a FUCK ton of photos at once.
10: if you don’t like ads and want more storage space, the pro version is extremely cheap compared to Netflix. Netflix without ads is fucking $15.49 and Flickr is $8.25 a month. There are also two other payment plans if that’s still too much for you.
11: It allowed adult content. In like. Every form. Enough said
CONS
1: You can’t DM (this is not a con to me and I hate when people complain about this just fucking use a email it is so fun to email people please for the love of god)
2: You can only upload 1,000 images before you run out of space. (You can always delete images later, I personally like to delete images at new years for a fresh start and archive them somewhere else)
3: it’s dead. No one really uses it.
4: to upload your bio you have to use a desktop version of the app.
THANK YOU FOR READING PLEASE SWITCH TO FLICKR AND SHARE THIS SO WE CAN START TO REVIVE OLD PLATFORMS TO SAVE THEM TO REBEL AGAINST META AND THIS NEW AGE OF CREATING SOCIAL MEDIA APPS AND SHIT
14 notes
·
View notes