#chiffon cake pan
Text
okay
time to go bake a traditional chiffon cake for the birthday boy
#it's a Japanese recipe that i found last year and bought a Japanese cake pan to match#it makes a chiffon cake that's pretty much identical to the one Ignis makes in the game#last year i was successful in getting it to rise so here's hoping it comes out just as good this year too
3 notes
·
View notes
Photo

Chiffon Cake Recipe
This chiffon cake recipe uses simple ingredients to make a tall and fluffy cake that's tender and light as air. It's the perfect all-occasion cake!
0 notes
Text
#pandan leaves#cakes#chiffon cake#pandan paste#green food#angel food cake pan#egg yolks#egg whites#cake flour#superfine sugar#asian food
0 notes
Text


✨ Very Vintage ✨
A set of vintage-inspired stand mixers, tableware, and deco food!

I originally meant for this to be a Thanksgiving set, but after the OVERWHELMING response to my first CC set (seriously, thank you SO MUCH for all the love!), I became a bit… perfectionistic. Lots and lots of checking items in-game, then making tiny mesh and texture tweaks over and over. I still don’t exactly get how spec maps work, but I’m learning. 🥲
I'll likely expand on this set in the future (Crockpots, anyone?!), but for now, the elves and I are hard at work on a retro-inspired Christmas set!🎄✨
Includes 18 items with lots of solid, floral, and diamond-patterned swatches:
✦ 6 bowl/plate sets
✦ Casserole dish
✦ Salt & pepper shakers
✦ JELL-O chiffon pie & slice (plus the box itself)
✦ Vintage Reddi-wip can
✦ Dollops of whipped cream
✦ Bundt cake pan (one empty, and one with raw batter/cooked cake)
Find by searching “icktoria” or “very vintage” in-game
TOU | DOWNLOADS
MORE INFO & FREE DOWNLOAD (Patreon)
CREDITS
✦ Myshunosun for OG mixer mesh and plate side textures
✦ Tuds for bowl overlay/shine
✦ Franzilla and ajaysims for Simlish fonts
✦ Procreate for hand-drawn textures
✦ Sims4Studio for giving my life purpose
#my cc#sims 4 cc#ts4 maxis match#simblr#thesims4#ts4 custom content#sims 4 custom content#sims 4 maxis match#ts4 download#ts4mm#ts4cc
2K notes
·
View notes
Text
Gavin's Marble Chiffon Cake Recipe
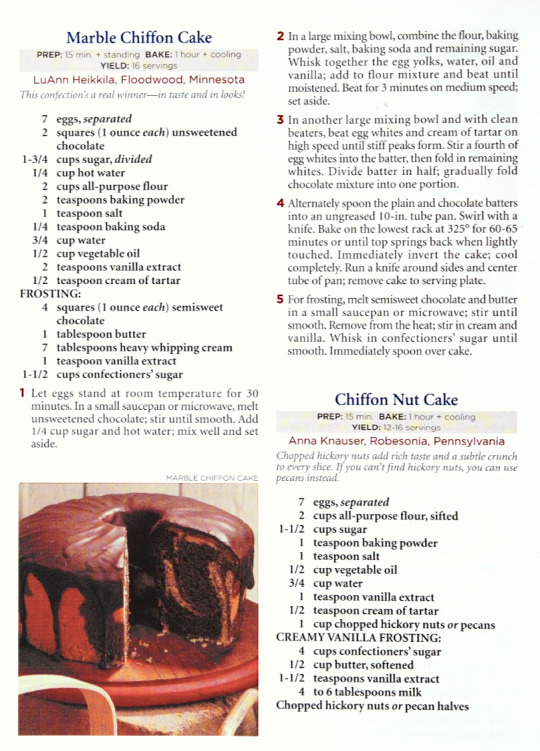
My friends, I have a gift for you.
I found the exact Marble Chiffon Cake recipe Gavin and Freelancer make in this video and from the baking stream. It's from The Taste of Home Baking Book. If anyone makes it, let me know how it goes! I haven't tried yet.
(Recipe transcription below)
Marble Chiffon Cake
PREP: 15 min. + standing BAKE: 1 hour + cooling
YIELD: 16 servings
CAKE:
7 eggs, separated
2 squares (1 ounce each) unsweetened chocolate
1-3/4 cups sugar, divided
1/4 cup hot water
2 cups all-purpose flour
2 teaspoons baking powder
1 teaspoon salt
1/4 teaspoon baking soda
3/4 cup water
1/2 cup vegetable oil
1 teaspoons vanilla extract
1/2 teaspoon cream of tartar
FROSTING:
4 squares (1 ounce each) semisweet chocolate
1 tablespoon butter
7 tablespoons heavy whipping cream
1 teaspoon vanilla extract
1-1/2 cups confectioners' sugar
Let eggs stand at room temperature for 30 minutes. In a small saucepan or microwave, melt unsweetened chocolate; stir until smooth. Add 1/4 cup sugar and hot water; mix well and set aside.
In a large mixing bowl, combine the flour, baking powder, salt, baking soda and remaining sugar. Whisk together the egg yolks, water, oil and vanilla; add to flour mixture and beat until moistened. Beat for 3 minutes on medium speed; set aside.
In another large mixing bowl and with clean beaters, beat egg whites and cream of tartar on high speed until stiff peaks form. Stir a fourth of egg whites into the batter, then fold in remaining whites. Divide batter in half; gradually fold chocolate mixture into one portion.
Alternately spoon the plain and chocolate batters into an ungreased 10-in. tube pan. Swirl with a knife. Bake on the lowest rack at 325° for 60-65 minutes or until top springs back when lightly touched. Immediately invert the cake; cool completely. Run a knife around sides and center tube of pan; remove cake to serving plate.
For frosting, melt semisweet chocolate and butter in a small saucepan or microwave; stir until smooth. Remove from the heat; stir in cream and vanilla. Whisk in confectioners' sugar until smooth. Immediately spoon over cake.
#redacted audio#redacted asmr#redactedverse#redacted gavin#redacted freelancer#mosspost#recipes#marble chiffon cake
142 notes
·
View notes
Text
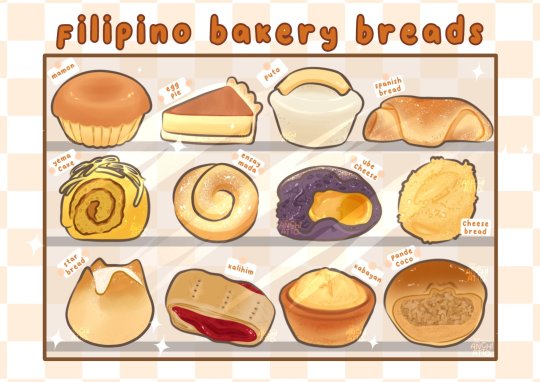
here is a filipino bakery breads pt. 1!
mamon : soft fluffy bread, very light and airy sponge cake.
egg pie : filipino pie with egg custard filling.
puto : a steamed rice cake made from slightly fermented rice.
spanish bread : bread roll shape with a traditional sweet filling made of butter or margarine and brown sugar and sprinkled with bread crumbs on the outside.
yema cake : chiffon cake with custard filling
ensaymada : filipino style brioche, tender, fluffy, light and sweet. popular in the Philippine bakeries.
ube cheese bread : combination of intense purple yam and cheese. a soft fluffy bread with cheese filling and a purple yam bread.
cheese bread : creamy, sweet and savoury cheese soft bread.
star bread : (popular as "putok") because of the design in the top. it looked like it popped. also topped with white sugar.
kalihim : (popular as "pan de regla") pink bread pudding filling made from stale bread with a mix of sugar, butter, eggs, milk and vanilla.
kabayan : soft muffin with a distinct shape of "salakot". can be toasted at the edges too.
pan de coco : fluffy bread roll filled with sweetened coconut.
#artists on tumblr#digital artist#artist#artistsupport#art#digital art#drawing#illustration#my art#artistsoninstagram#foodie#food art#food illustration#filipino#pastries#breadmaking#breads
157 notes
·
View notes
Text
I made soufflé pancakes.

Soufflé pancakes are like eating cottony clouds! These delicate, melt-in-your-mouth pancakes are even better with homemade whipped cream and fresh berries. Learn how to make them perfectly airy and pillowy soft with my best tips.
What are soufflé pancakes?
The ingredients for soufflé pancakes are similar to regular pancakes, so what makes them different? What makes soufflé pancakes so pillowy soft and delicious?
Soufflé pancakes are all about eggs. Egg yolks and egg whites are separated, and the whites are beaten to make the meringue. Just like you would with savory and sweet soufflé or chiffon cakes.
The egg whites are beaten until stiff peaks form and then folded gently and carefully into the rest of the batter. The soufflé pancakes are extra fluffy because the air bubbles hold their shape inside the pancake batter.
As a result, the pancakes are super airy, like soufflé. When you cut the pancakes, you can even hear the sound of air bubbles escaping!
Enjoy these soufflé pancakes the same way you do with standard flapjacks, with fresh whipped cream, some fruits, syrups, and toppings like chocolate chips and nuts.
Recent pancake craze in Japan
Pancakes are comfort food. The happiest comfort food. I’m sure you have many joyful memories of waking up on a Saturday, looking up at a stack of pancakes on your plate. And now as an adult, you are probably like me, always searching and trying different pancake recipes, happily eating your way on a journey to find the perfect pancake.
In Japan, even the simplest of comfort foods like pancakes are taken very seriously. In recent years, Japan’s pastry shops and cafes have been in a race to make the fluffiest, softest pancakes. And by 2016, the pancake craze in Japan was in full swing with pancake shops opening all over the country competing for the best soufflé pancakes. Here are some of the most famous:
Kiln-baked Soufflé Pancakes (窯焼きスフレパンケーキ) at Hoshino Coffee
Miracle Pancakes (奇跡のパンケーキ) at Flippers
Happy Pancake (幸せのパンケーキ) at A Happy Pancake
These pancake shops did not exist when I was growing up. If they did, I would have been there on every special occasion and birthday! I’m making up for the lost time by creating these soufflé pancakes every chance I get.
5 important tips to make fluffy soufflé pancakes
Here are some of my personal tips that helped me achieve the perfect soufflé pancakes:
1. Beat the egg whites (meringue) correctly.
To be honest, making meringue requires a lot of practice. Some trials and errors are just part of the process, but I promise it does get easy once you have more experience and understand what it takes to reach the right consistency.
We’re looking for a stiff peak with a tip that folds over. When you lift up your whisk, the egg whites go straight up firmly, but the very tip of the egg whites fold over, like taking a bow. If you overbeat egg whites, they will break into pieces. If you under-beat, egg whites don’t have enough air bubbles and the pancakes won’t be fluffy.
2. Preheat the nonstick frying pan on the lowest setting for a longer time.
Even heating is crucial for the pancakes to cook through all at once. You want to preheat your nonstick frying pan at the lowest heat to help prevent hot spots (meaning some part of the pan is lower in heat, and the other part is too hot.) This way, you have full control over the cooking time and the final result.
3. Pile the batter vertically (high.)
The key to making lofty pancakes is to add a new pile over the batter on the pan after it starts to form.
4. Cook slowly, covered with a lid, on low heat.
Unlike regular pancakes, you will need to cook these thick & fluffy soufflé pancakes for a much longer time. If you use higher heat, the pancakes may look done, but the inside will be too raw. Therefore, steady slow cooking over low heat is necessary. To lock in the heat and moisture inside the pan, cover with a lid.
5. Add water to create a little bit of steam.
I’ve tried without adding water before, and the difference can be subtle. But since it doesn’t take much to add water, I decided to include this step in my recipe. Just drop 1 tablespoon of water to the empty spaces in the frying pan, to add moisture.
Why do my soufflé pancakes deflate?
When making soufflé pancakes, one of the common situations people run into is that the pancakes tend to deflate after cooking. Now, is that normal? No, it isn't. Soufflé pancakes should still stand tall after you place them on the plate.
What goes wrong? What can you do to stop your soufflé from collapsing?
1) You have probably under or overbeaten the egg whites. The goal is to create air bubbles in the batter that will give structure to the pancake. Without them, the pancake will deflate.
2) The stove heat was too strong. Just because the pancake is nicely brown, it doesn’t mean it’s done. The inside of the pancakes may still not be cooked through and if you move them out of the pan earlier, the air deflates. Properly cooked soufflé pancakes will have a solid structure and height. They will hold for 10-15 minutes, as long as they are warm (just like hot air balloons.)
How to make more than 3 pancakes at a time?
To make two or more servings, you will need multiple non-stick frying pans on the stove. Alternatively, you can purchase an electric griddle with a lid like this.
At the soufflé pancake restaurants in Japan, they use multiple electric griddles with a lid to make pancakes. The staff would usually tell you the souffle pancakes will take at least 20 minutes to make.
These soufflé pancakes definitely require extra time and effort, but I promise after that first bite, you will know it was all worth it. Give this unforgettable soufflé pancake recipe a try on the next special occasion!
Ingredients you'll need for soufflé pancakes
2 large eggs (50 g each w/o shell)
1½ tbsp. whole milk (I haven‘t tried reduced-fat, low-fat, nonfat, or plant-based milk for this recipe as I believe the batter will be too thin to make soufflé pancakes)
¼ tsp pure vanilla extract
¼ cup cake flour (weigh your flour or use the “fluff and sprinkle“ method and level it off; you can make homemade cake flour)
½ tsp baking powder
2 tbsps. sugar
1 tbsp. neutral oil (for greasing the pan)
2 tbsp. water (for steaming)
Ingredients you'll need for fresh whipped cream (optional)
½ cup heavy whipping cream
1½ tbsp. sugar (add more if you like it sweeter)
Ingredients you'll need for toppings
1 tbsp. confectioners’ sugar
Fresh berries (strawberries, blueberries, etc.)
Maple syrup
Instructions
Gather all the ingredients. I highly encourage you to use metric measurements using a kitchen scale for this recipe. You will also need a 12-inch nonstick frying pan (large enough to cook 3 pancakes at the same time) with a lid. It‘s also nice to have an infrared thermometer gun to check the temperature of the frying pan.
Instructions you'll need for fresh whipped cream (optional)
If you‘d like to serve the soufflé pancakes with optional fresh whipped cream, make it now. First, prepare an ice bath: Put ice cubes and water in a large bowl and place a clean and dry medium bowl on top of the ice water. Add ½ cup heavy whipping cream and 1½ tbsp. sugar to the medium bowl to keep them cold.
Whisk on high speed until medium to firm peaks form. The cream should not be runny but soft, fluffy, and firm instead. Keep the whipped cream chilled until you‘re ready to serve the pancakes.
Instructions to mix the batter
After 15 minutes, take out the bowl with the egg whites from the freezer. The egg whites should be half frozen. Now, start beating the egg whites with a hand mixer (you can also use a stand mixer or balloon whisk.)
When the egg whites turn frothy and opaque, gradually add in 2 tbsps. sugar, roughly one-third of it at a time. Then, increase the mixer speed to high (10) and beat vigorously until stiff peaks form (see the next step for how to check). It takes about 2 minutes of beating at high speed to reach stiff peaks. Tip: When using a stand mixer, I usually pause beating when the meringue is almost done. Take off the whisk attachment from the mixer and use it to hand-mix the looser egg whites near the bowl's edge into the stiffer whites near the center until it's all homogenous in texture. Then, put the whisk back on and continue beating.
To check for stiff peaks, stop whisking and pull up your beaters or whisk. The meringue in the bowl or on the whisk should be firm enough to hold a peak, pointing straight up (or maybe folding over a little bit just at the very tips). By this time, the meringue should have a glossy texture, too. Tip: If you overbeat the meringue, it will become very stiff and grainy and won't incorporate into the batter at all.
Heat a large nonstick frying pan to 300ºF (150ºC) over the lowest heat. Brush with 1 tbsp. neutral oil and lightly remove any visible oil with a paper towel (otherwise the pancakes will have a spotty pattern.) Keep the pan on low heat while you fold in the egg white meringue into the egg yolk mixture in the next step.
Instructions to fold in the meringue
Take one-third of the egg white meringue and add to the egg yolk mixture. Whisk together by hand (don’t worry too much about breaking air bubbles at this point.)
Next, take half of the remaining meringue and add to the egg yolk mixture. Using a hand whisk, gently fold them in without breaking the air bubbles in the egg whites.
Now, transfer the egg yolk mixture back into the bowl with the remaining meringue. Very gently fold the two mixtures together, taking care not to deflate the air bubbles in the meringue and batter as you fold. Mix the batter very gently until well combined and homogenous.
Instructions to cook the pancakes
Keep your nonstick frying pan heated to 300ºF (150ºC) at all times over low heat. Remember, each pancake gets roughly four small scoops of batter, and you will be making three pancakes. For the first pancake, place one scoop of batter and make a tall mound in the frying pan, using a small ladle or a serving spoon (that’s bigger than a regular spoon—probably 2–3 tbsps.) Next, stack one more scoop of batter onto the first scoop already in the pan. Repeat for the next two pancakes, giving each pancake two scoops of batter.
By the time all three pancakes have two scoops, the surface of the batter is slightly dry already. At this point, you can mound one more scoop on top of each pancake, keeping the batter piled up high. In the bowl, you should still have roughly three scoops left (if you have slightly more, that’s okay.)
Set the timer for 6–7 minutes and add 1 tbsp. of 2 tbsps. water in three empty spaces inside the pan. Cover with a lid. The steam from the water keeps the pancakes moist while they cook. Please note: The suggested time is just a guideline—how long you will cook the pancakes for is based on the temperature of your frying pan.
After 2 minutes have passed, open the lid, and add one final scoop of batter to each pancake (or more scoops if you have more batter.) Make sure to stack the batter high, not wide. If the water has evaporated, add a little bit more. Cover with the lid and cook.
After 6–7 minutes have passed, lift the pancake VERY GENTLY using an offset spatula. If the pancake is stuck, don’t touch it until it firms up a little. If you force it, the pancake will crack in the middle. When the pancake is ready, you can easily move the pancake. Repeat with the other pancakes.
Slightly pull the pancake to create an empty space and gently flip it over with a 'rolling over' motion.
Add another 1 tbsp. water to the empty spaces in the pan and cover. Set the timer for 4–5 minutes to cook the other side on the lowest heat setting.
Once they are nicely browned, transfer the pancakes to your serving plates.
Instructions for serving
Place the optional fresh whipped cream on the pancakes and top with fresh berries. Dust your soufflé pancakes with 1 tbsp. confectioners’ sugar and drizzle with maple syrup. Enjoy!
Instructions for storage
For the fluffiest texture, I recommend making these soufflé pancakes just before serving. If you have leftovers, transfer them to an airtight container and store in the refrigerator for up to 2 days.
(NOTES)
How to prevent your soufflé pancakes from collapsing:
Soufflé pancakes can be tricky to make (probably not easy for a beginner cook), so make sure to read my tips thoroughly before you start cooking.
Beat your egg whites correctly. Underbeating or overbeating will cause the pancakes to deflate after cooking.
Cook over low heat, and make sure the insides of the pancakes are properly cooked through. If the inside is not cooked through, there is no structure to hold up the pancakes and they will collapse as soon as the temperature drops.
Can this recipe be adapted for vegans?
Yes. Even though this might seem like a complex recipe, it can be adapted for vegans. It may be difficult, but don't give up. Keep trying your best, and you'll gradually end up making the tastiest vegan soufflé pancakes!
7 notes
·
View notes
Text

Crème Brulee Green Tea Chiffon Cake
Caramel:
⅓ cups sugar
Custard:
2 eggs
¼ cup sugar
1 cup whole milk
1 tsp. vanilla bean paste
Cake:
3 large egg yolks
75g (⅓ cups) sugar
40 ml vegetable oil
40 ml water
75g (⅔ cups) cake flour
10g (1½ Tbsp.) matcha
1 tsp. baking powder
¼ tsp. cream of tar tar
3 large egg whites
Caramel:
Pour sugar into a deep skillet and heat over low heat. Once the caramel starts browning at the edges, drag the sugar towards towards the center to prevent any burnt spots. Once the caramel turns dark amber, pour it into a 6" round pan. Set aside and leave it to cool.
Custard:
Add in milk and sugar into a sauce pan. As soon as the sugar dissolves, turn off the heat.
In a large bowl, whisk eggs until blended then add in the warm milk slowly. Add vanilla paste and whisk well.
Strain the custard mixture into the 6" round pan.
Cake:
Preheat oven to 160C (320F). In a large bowl, whisk egg yolks and add 25g (2 Tbsp.) of sugar. Then add oil and water and whisk all together till combined.
Sift cake flour, matcha, and baking powder together and add to the egg yolk mixture in 3 separate batches. Whisk until totally incorporated and make sure there are no lumps.
Using a stand mixer, beat the egg whites and cream of tar tar on medium low till opaque, foamy and bubbly. Add ⅓ of the remaining sugar and continue whipping. After 30 seconds or so, increase the stand mixer speed to high and add the remaining sugar slowly in small increments. Beat until stiff peaks.
Fold in ⅓ of the beaten egg whites into the flour mixture. Fold in the rest of the egg whites and mix gently but quickly.
Pour batter into the 6" round pan and place pan onto a big pan filled with water. Bake for about 45 minutes or until the cake slightly disconnects from the pan.
Cool shortly for a few minutes before inverting the cake. Sprinkle some sugar on top of the custard and use a blow-torch to get a nice caramelized top.
#angelkin#food#dessert#cake#vegetarian#egg#milk#vanilla#tea#matcha#cloudkin#fallenangelkin#kitsunekin#plushkin#succubuskin#tricksterkin#voidkin#spring
41 notes
·
View notes
Text

Cherry Chiffon...Pink With Fruit, Rich With Nuts
Preheat oven (see pan size and corresponding temperature below). Sift an ample amount of Softasilk Cake Flour onto a square of paper. Chop nuts very fine; slice and chop well-drained maraschino cherries very fine* (see quantities below).
*Caution: Cherries must be very well-drained and very finely chopped or they will sink to the bottom.
Makes 8-10 servings.
Directions
Step 1: Measure (level measurements thruout) and sift together into mixing bowl:
1 1/8 cups (1 cup plus 2 tbsp.) sifted Softasilk cake flour (spoon lightly into cup, don't pack)
3/4 cup sugar
1 1/2 tsp. baking powder
1/2 tsp. salt
Make a well and add in order:
1/4 cup cooking (salad) oil such as Wesson or Mazola
2 unbeaten egg yolks (medium size)
2 tbsp. maraschino cherry juice
1/4 cup cold water
1/2 tsp. vanilla
Beat with spoon until smooth.
Step 2: Measure into large mixing bowl:
1/2 cup egg whites (4 whites)
1/2 tsp cream of tartar
Whip until whites form very stiff peaks. They should be much stiffer than for angel food or meringue. DO NOT UNDERBEAT.
Step 3: Pour egg yolk mixture gradually over whipped egg whites - gently folding with rubber scraper just until blended! DO NOT STIR! MIX TOGETHER, then SPRINKLE over top of batter, gently folding in with a few strokes:
1/4 cup very thinly sliced and finely chopped, well-drained maraschino cherries
1/4 cup very finely chopped nuts
Pour into ungreased pan immediately. Bake in
8x8x2-in or 9x9x2-in square at 350° for 30-35 min.
5x10x3-in loaf at 325° for 50-55 min.
9-in tube, 3 1/2in deep at 325° for 50-55 min.
Or until top springs back when lightly touched.
Immediately turn pan upside down, placing tube part over neck of funnel or bottle, or resting edges of square, oblong, or loaf pans on 2 other pans. Let hand, free of table, until cold. Loosen from sides and tube with spatula. Turn pan over and hit edge sharply on table to loosen.
from Betty Crocker Chiffon Cake Recipes and Secrets (1948) by Betty Crocker
This November, we're bringing to you a variety of recipes from the cookbooks in our collection so that you can delight and/or horrify your loved ones at Thanksgiving. We bear no responsibility for the quality of the recipes chosen, so proceed at your own risk. Check out our recipes tag for more ideas, and let us know if you try any!
The Browne Popular Culture Library (BPCL), founded in 1969, is the most comprehensive archive of its kind in the United States. Our focus and mission is to acquire and preserve research materials on American Popular Culture (post 1876) for curricular and research use. Visit our website at https://www.bgsu.edu/library/pcl.html.
5 notes
·
View notes
Text
Homemade Ladyfingers

Ladyfingers are never entirely necessary to make yourself. Store bought really ain't that bad, but if you buy your flour in bulk and love whipping eggs as much as me then you might choose to make your own.
Everything I can make from scratch I do make from scratch, especially when it presents the opportunity to a. create more work for myself and b. make it as intolerance friendly as I can.
Ladyfingers work with almost any kind of flour since the eggs do all the heavy lifting. Below I use all purpose in the first recipe, and a mixture of potato flours and even more egg white in the second variation.


If you've ever made a chiffon cake these are remarkably similar.
I started by separating 6 eggs, putting the whites in one bowl and the yolks in another. Be careful to not get any yolk in the egg white, but if you do just add a little cream of tartar and they'll still whip enough.
I measured out my sugar and pour roughly half of it in the egg white and the rest in the yolk. Both of these need some serious air, so I set my egg whites in my stand mixer on medium and beat my yolks with a handheld electric mixer.
No Machines: I have before done both of these by hand and you totally can if you want your forearms to be ripped. Start with the whites then move to the yolks.
Only a stand mixer: beat the egg whites with it and do the yolks by hand.
Only a handheld mixer: start with the whites, and when they're at stiff peaks set them aside and do the yolks.
The egg whites need to be at stiff peaks and the yolks need to be very pale and ribbon down from the beaters. The images below were from my first iteration of this recipe and I did not beat the yolks long enough. They turned out totally fine, but if you want yours to be better, get your yolks to be lighter.
Afterwards, pour your yolks into your whites and sift the flour on top. Then, fold all three together. In my images, I first fold my yolks into my whites, then fold the flour in, but after doing these a few more times I realized that you can just do them both at the same time.


Afterwards you can either pipe them to make classic ladyfingers or if you're making something like tiramisu then you can just spread the batter onto parchment paper or a silicone baking mat.

Bake these immediately. When I piped them I baked them at 350F for 20-25 ish min. If after the time allotted they are not hard to the touch, cool them in the oven. To do this turn the oven off and prop the oven door open with a wooden spoon or towel so it stays ajar. I baked the spread batter at 250F until it was hard to the touch all over. For me this took an hour. Don't worry about the time, at 250 it'll be hard to burn them.


Here are the spread ladyfingers after they've been cooled and cut to fit the pan that I was going to be using for the tiramisu. This recipe makes exactly enough for an 8x8 tiramisu.
2 notes
·
View notes
Text

...okay! 😊
Japanese chiffon cake pan - check!
Japanese chiffon cake recipe - check!
4 notes
·
View notes
Text


Watermelon Chiffon Cakes 🍉 baked in a triangular pan for a more realistic look.
2 notes
·
View notes
Text
I found a chiffon cake recipe I'm excited to try but I don't think I have any non non-stick pans
2 notes
·
View notes
Text
MANGO SEASON SPECIAL CAKES
Mango season brings a burst of tropical flavor to desserts, and incorporating mangoes into cakes is a delicious way to enjoy them. Here are some delightful mango cake variations you might want to try:
Fresh Mango Cake: A classic option featuring layers of light sponge cake infused with fresh mango puree and filled with slices of fresh mango. It's often topped with whipped cream and garnished with more mango slices.
Mango Cheesecake: A creamy cheesecake with a mango twist. The cheesecake base is usually made with cream cheese and whipped cream, while the mango flavor is added through a mango puree or chunks folded into the batter. It's chilled until set and often garnished with additional mango slices or a mango glaze.
Mango Coconut Cake: This tropical delight combines the flavors of mango and coconut for a truly exotic treat. The cake layers are infused with mango puree and coconut milk, and sometimes shredded coconut is added to the batter for texture. It's often filled and frosted with a coconut cream frosting and decorated with mango slices and toasted coconut flakes.
Mango Upside-Down Cake: A unique twist on the classic pineapple upside-down cake, this version features slices of fresh mango arranged on the bottom of the cake pan before pouring the batter over them. When the cake is inverted after baking, the mango slices create a beautiful topping with a caramelized glaze.
Mango Mousse Cake: Light and airy layers of sponge cake alternated with mango mousse make for a refreshing dessert. The mousse is typically made with whipped cream, gelatin, and mango puree, creating a smooth and creamy texture. It's often finished with a layer of mango glaze or whipped cream and garnished with mango slices or mint leaves.
Mango Pound Cake: A dense and rich cake with the tropical flavor of mango. This cake is similar to a traditional pound cake but with the addition of mango puree or diced mangoes to the batter. It's perfect for enjoying with a cup of tea or coffee.
Mango Chiffon Cake: A light and fluffy cake made with whipped egg whites for added lift. Mango puree is added to the batter for flavor, and the cake is typically baked in a chiffon cake pan to achieve its characteristic height and texture. It's great for serving at special occasions or as a light dessert option.
These are just a few ideas to get you started, but the possibilities for mango cakes are endless! Feel free to experiment with different flavor combinations and decorations to create your own unique mango masterpiece. Try out the special mango cakes online in Oman at best rate and quality from MOB.
0 notes
Text

Pandan coconut chiffon roll
Use the same recipe as the chiffon cake.
Pour the batter into to a baking sheet. Tap the pan a few times on your working surface to remove any air pockets in the batter. Transfer the pan to the preheated oven 175 degrees and bake for 10–12 minutes, or until an inserted toothpick comes out clean and the top of cake springs back when touched. Tip: Do not overbake it or the cake will be too dry and break when you roll it.
Remove the pan from the oven and drop the pan on your working surface once to prevent the cake from shrinking.
While still warm, spread a thin layer of kaya over the top.
While still warm, roll the cake: Start at the other short end and use your hands to slowly roll up the cake peeling the parchment paper as you roll.
Wrap in heat proof cling wrap like a sausage, closing the ends, chill in the fridge.
0 notes
Photo

8/9/10/11 inch Aluminum Metal Non Stick Bundt Pan Chiffon Cake Tube Pan Cake Baking Molds
Discover this exceptional craftsmanship of Tsingbuy's cake molds, meticulously engineered to redefine your baking experience. Crafted from top-tier aluminum in a seamless, non-detachable design, these cake molds guarantee durability and reliability.
0 notes
Last Seen Blogs

soulpatrol345-blog
Midnight Soul Patrol

mpreg-paradise
proud to be your secret guilty pleasure

watihewakete
Untitled

fuckyeahkkm
Fuck Yeah KKM!

wfoster59
Untitled