#buy metal buttons online
Explore tagged Tumblr posts
Video
#why do they look like they grew up on tiktok
Cuz this video came out in 1997 and fashion runs in 30 year cycles so much of what was in style in the 90s is coming back.
Teenagers are always at the forefront of trends and the ones that are most active on tiktok are the most up to date, or even ahead of the curve, because of how quickly trends are spread there.
speaking of halloween- if you don’t know what the fuck this is, i am begging you to educate yourself<3
#I work in retail and much of what we are selling rn looks like it's from the 90s or 60s#Except no one is buying the stuff styled like the 60s cuz they aren't tailored to FIT so they look like crap on every one#Well the dresses anyway. The button vests seem more popular cuz they don't need to fit#I've been seeing a lot of y2k fashion online so I kinda thought we skipped a decade lol#But I've only seen a couple of ppl buy the 00s stuff we have in the shop (like the metallic jeans lol) so I don't think it's fully hit yet#And we are still in an era of high to mid rise but just wait...
17K notes
·
View notes
Text
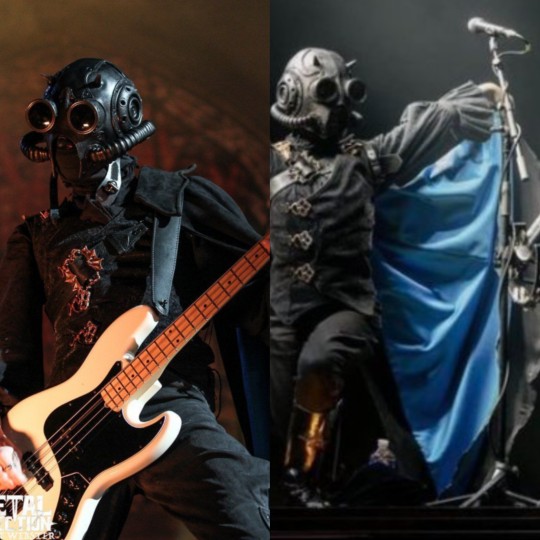
I've been wanting to do this post for a while now so here is EVERYTHING I CAN TELL YOU ABOUT THE GHOULS' IMPERA COSTUMES.
Buckle up because I have a LOT to say about those, this is gonna be a very long one.
The costumes were designed by B Åkerlund, a Swedish costume designer who's worked with Ghost since at least Meliora (that's as far back as I was willing to scroll on her Instagram page lol). B Åkerlund has also worked for many other musical artists such as Lady Gaga, Beyoncé, Madonna, the Rolling Stones, Ozzy Osborne, Blink 182 and Hollywood Undead (information from her own website)

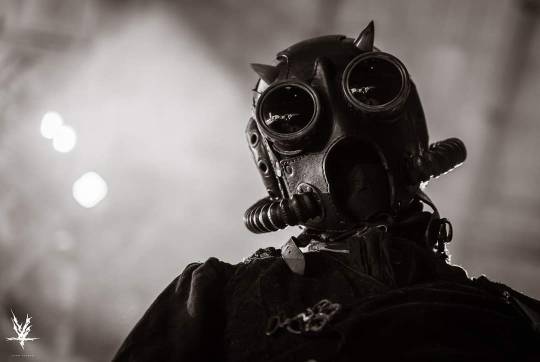
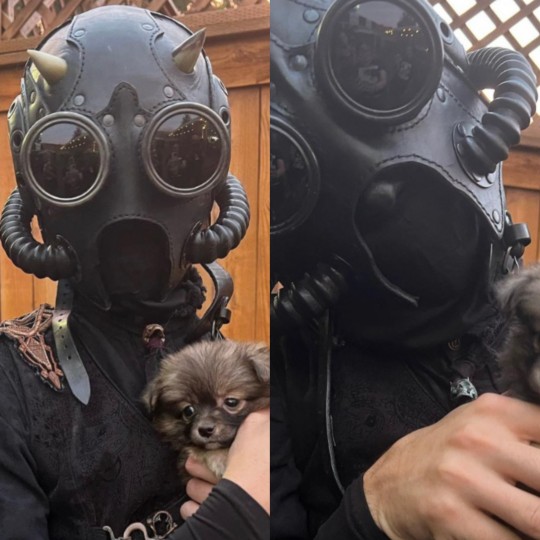
The masks were made by Bob Basset, a visual artists who works a lot with leather. I find his work fascinating, you can look him up on Instagram (nsfw warning, there's a few naked ladies).
Fun fact! The horns are real cow horns. That's the reason some of them have gold tips, to hide the imperfections that come with working with actual horns.
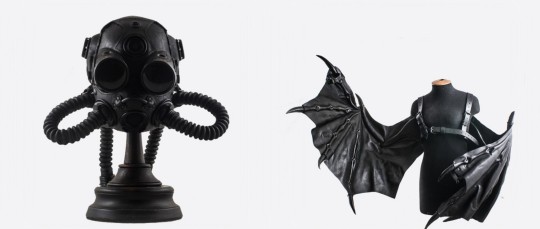
He does have a shop where he sells his items, there's a mask there very similar to the Impera ones. You can also buy Papa's batwings if you happen to have 2500$ lying around!
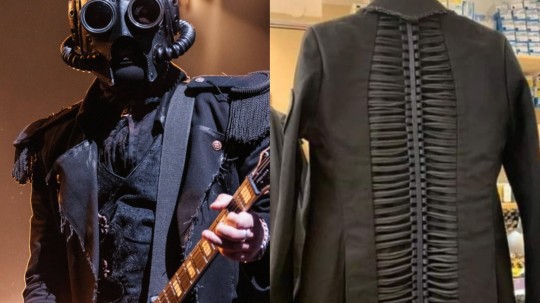
The jackets are made on the same model as one of Papa's. The back is decorated with a spine-like design made from leather and cording. It's adorned with a few of our classic Impera buttons. Some of the hems were left raw and some deliberate weathering was done to make it look old and worn.
Fun fact! The shoulder pieces are not sewn into the garment, I would assume for easier cleaning. I don't know if they're held by strong magnets or snap buttons.
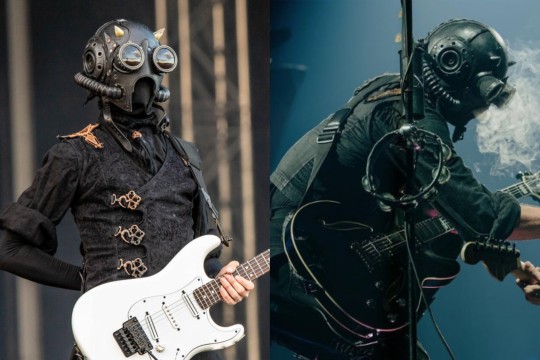
The vest (my beloved 😩) is made from flocked velvet in a paisley pattern, the front hems embellished with satin piping. It closes in the front with custom metal clasps that are riveted into the garment. The D parts are attached with what seems to me like wide elastic, which would lessen the pression on the clasps when moving around a lot. The back is made from two different types of fabric, I'd have to touch it to be able to tell you what they are. I assume the panels closer to the sides have some mild stretch to them. The top of the shoulders are decorated with Impera grucifix patches.
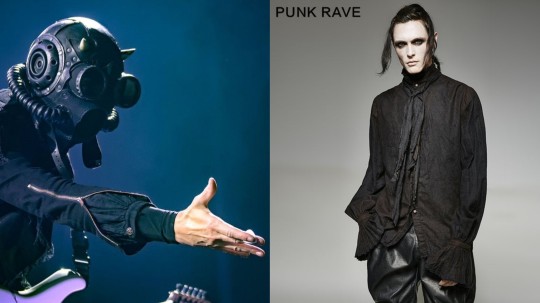
The shirts were not custom made for the ghouls, altho they were altered. The original shirt in the vintage painter linen shirt from Punk Rave and it is still being sold. Some of the cuffs were altered, removing the ruffles for some of the ghouls, but not all. They were removed for Dew, Mountain and Phantom, Aether's didn't have them either. As far as I can tell, all the ghoulettes still have them.
An unfinished piece of linen serves as an ascot, that piece is decorated with a metal devil skull. The colour of the skull doesn't appear to be consistent between each ghoul, Dew's looks gold almost bronze while Phantom's is a silver-like colour.
Another modification is the buttons, a small portion of them were removed in favor of our Impera buttons. Some of the ghouls have more buttons replaced than others, which is still a mystery to me.
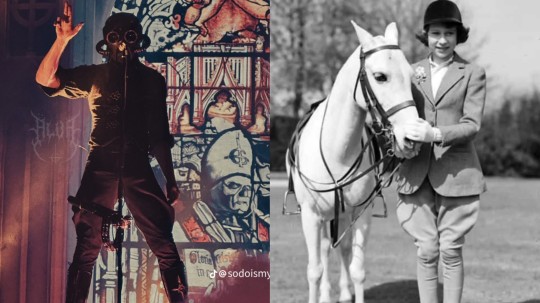
The pants are called Jodhpurs, they were invented in the 1800s as horse riding pants. The wide part at the hips and thighs allowing for better movement. The ones the ghouls wear don't reach all the way to their ankles, they stop a bit past the calf muscle, hidden by the boots. (Yes, the ghouls are effectively wearing capri pants)
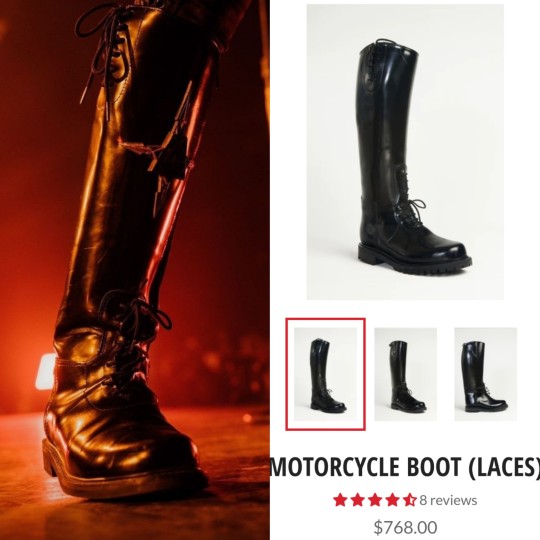
The boots are motorcycle riding boots, decorated by a grucifix. Like the shirt, they can still be bought online through the All American Boots website, altho the price tag is... Headache inducing to say the least.
The cape is a piece of costume that was only briefly worn on stage by the ghouls, Aurora being the only one who still wears one. I would assume it gets in the way of playing very easily. The cape itself is made of two fabrics, a light blue satin and a dark grey suede. The two pieces are not sewn together at the bottom, they move freely from each other. The cape is attached on the left shoulder with a harness piece that has one strap across the chest, decorated with a metal buckle, and one under the armpit.
Aight that's it for me, have a nice day byyyyye!!
#the band ghost#ghost bc#nameless ghoul#nameless ghouls#swiss ghoul#phantom ghoul#swiss ghost#dewdrop ghost#rain ghost#mountain ghoul#mountain ghost#rain ghoul#phantom ghost#dewdrop ghoul#cirrus ghoulette#aurora ghoulette#cumulus ghost#aether ghost#aeon ghoul#impera ghoul#impera#meerkat talks about ghost costumes#IMPERA FIT MASTER POST LET'S GOOOO
2K notes
·
View notes
Text
Amigurumi/Crochet Toy 101 + Resources
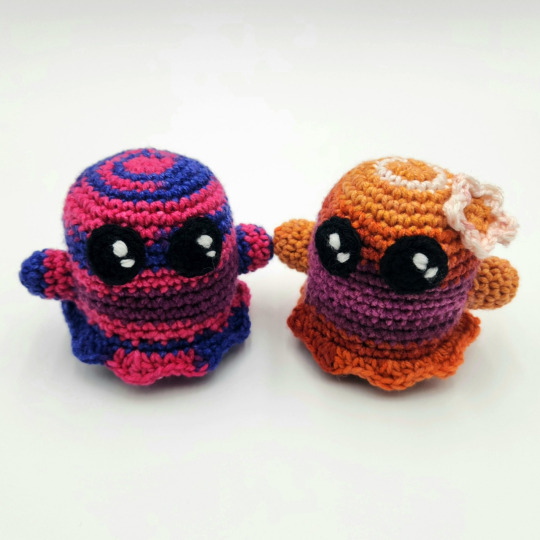
Noticed a couple folks in my tags mentioning that they wanted to learn or wished they knew how to crochet amigurumi. So here's a quick and dirty little how-to guide with resources I threw together? Hope it helps!
Tools + Materials
Crochet is one of those hobbies that is actually relatively cheap to get into. Here is a basic list of what you'll need to get started. You can find most of these at any craft store or even Walmart.
(1) Yarn (Required)
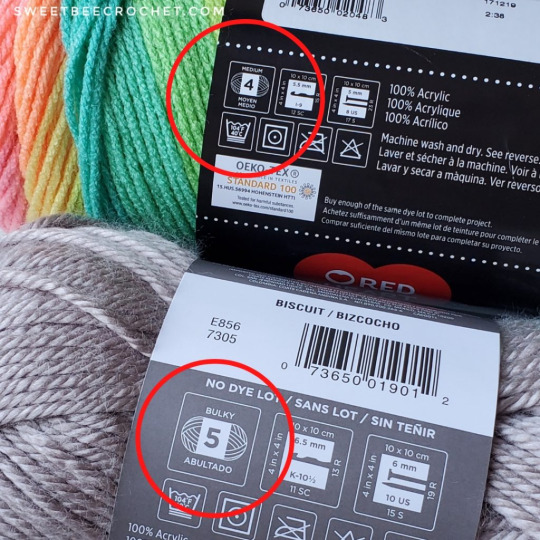
Yarns come in a variety of weights (sizes) and fibers. I recommend a soft, worsted weight acrylic yarn (indicated by a number "4" and "medium" on the yarn label) for your first few projects.
Image
(2) Crochet Hook (Required)
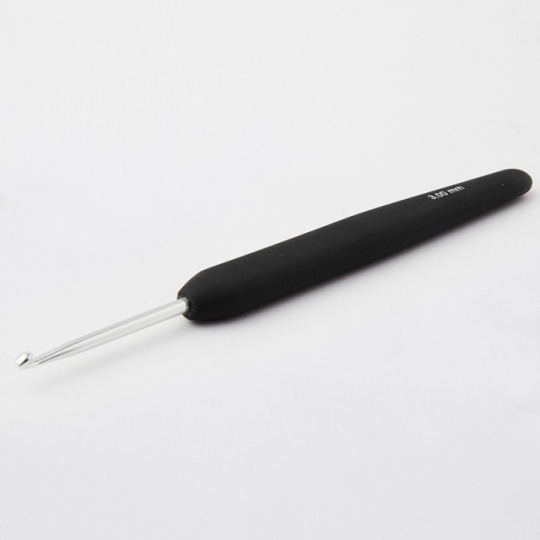
These come in a lot of sizes and styles, and what size you'll use will depend on your yarn weight and how tight you want your stitches to be. I'd recommend buying just one hook to start with rather than a larger set. Metal hooks with ergonomic rubber handles are easiest for beginners (and on your wrists longterm, lol). A 5.0 MM/Size H or a 4.50 MM/Size G works best for making amigurumi with worsted weight yarn.
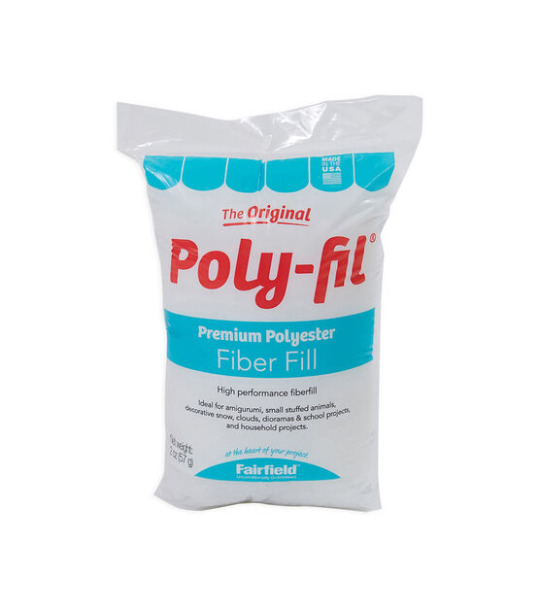
(3) Polyfil/Stuffing (Required)
For stuffing your project.
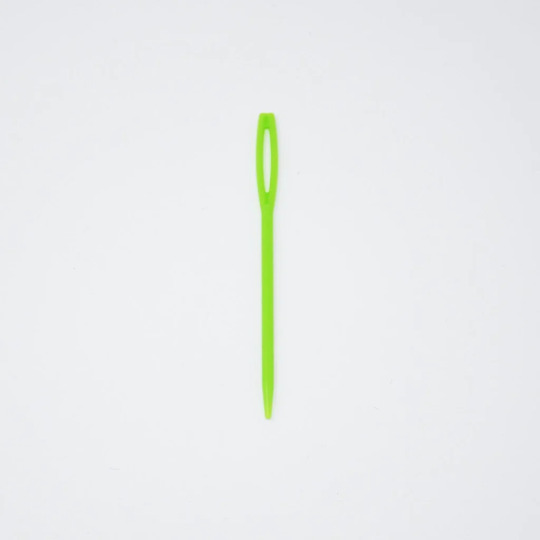
(4) Yarn Needle (Required)
Most crochet projects require sewing to one degree or another. Yarn needles are distinguished from regular sewing needles by their larger size, larger eye, and blunter tip. Yarn needles may be straight, or they may be angled at the tip (i.e. a darning yarn needle).
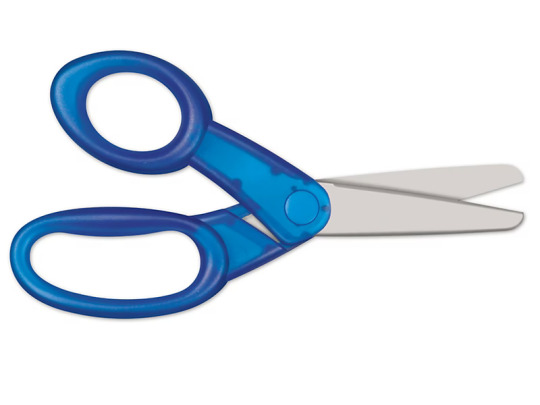
(5) Scissors (Required)
Any sharp, medium-sized pair of scissors will do for cutting your yarn.
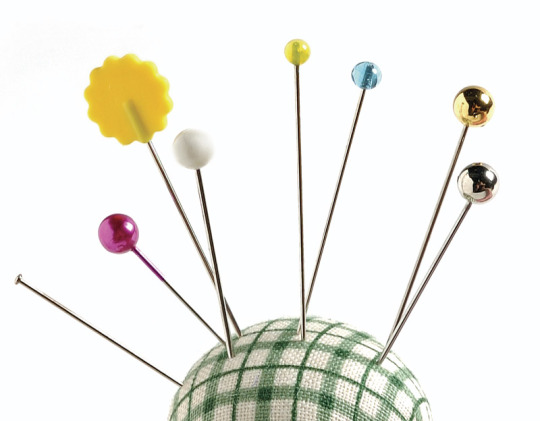
(6) Sewing Pins (Recommended)
For holding parts in place as you sew them on.
(7) Stitch Marker (Recommended)
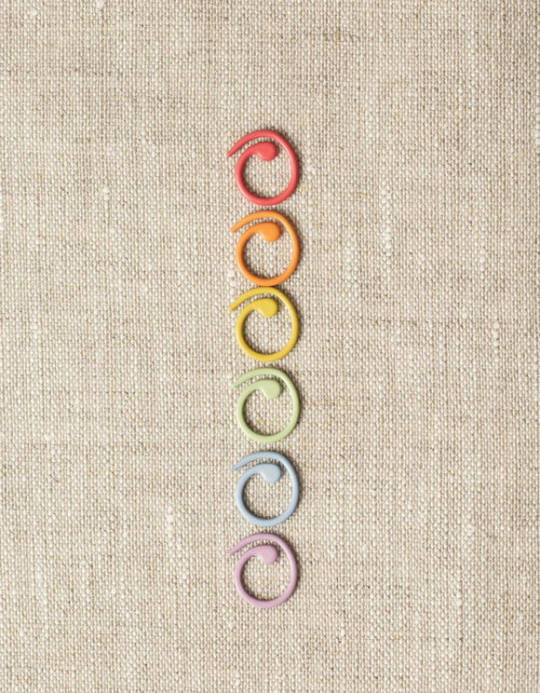
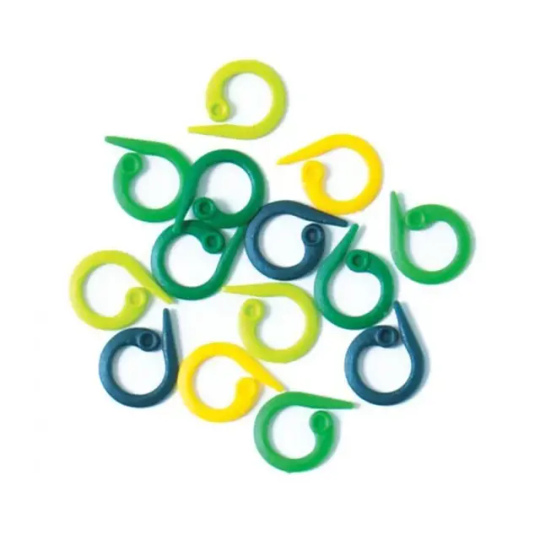
Many amigurumi projects are worked in rows of continuous rounds, and stitch markers can be used to mark the beginning or end of these rounds. They can also be used to mark areas of interest in your project or to secure your project to keep it from becoming accidentally unraveled. I strongly reccomend getting split ring ones. Scrap pieces of yarn also work in a pinch as stitch markers.
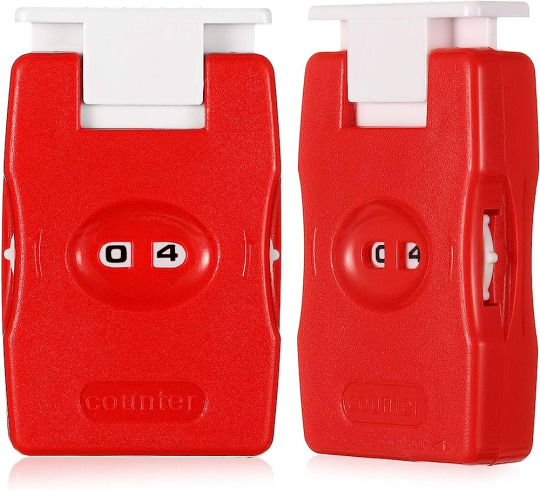
(8) Counter (Recommended)
For keeping track of your rows as you work a pattern.
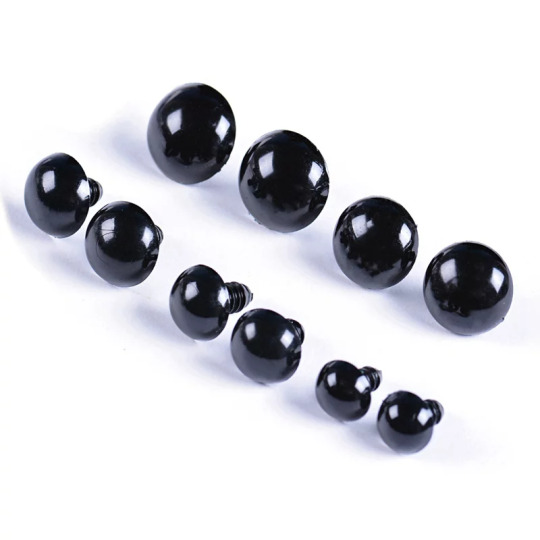
(9) Safety Eyes (Recommended)
Most amigurumi will require eyes of some sort. Safety eyes (you can find these in various sizes in the doll section of any craft store) will give your project a polished look, but you can also use buttons, felt, or even embroider the eye details on your amigurumi.
(10) Stuffing Stick (Recommended)
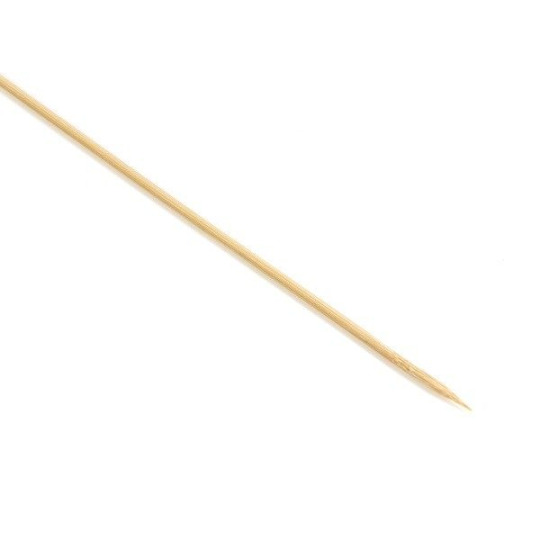
For getting your stuffing into hard-to-reach spots. A chopstick or wooden skewer works very well for this.
Basic Crochet Stitches + Amigurumi Techniques
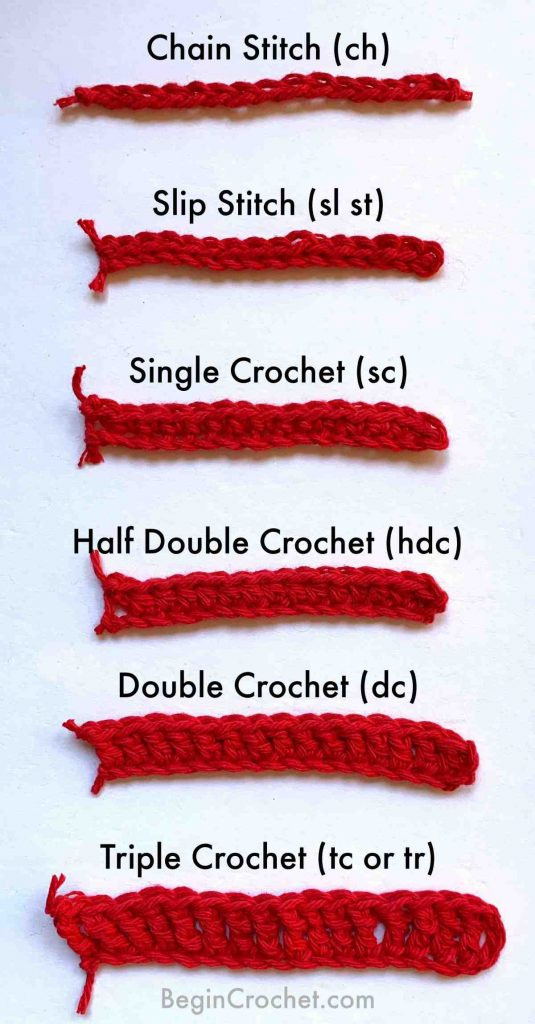
Most crochet patterns are built from a few basic stitches. Before attempting any larger project, I recommend getting comfortable with these stitches by making a few small, flat pot holders out of each basic stitch. A lot of crochet is pure muscle memory and practice, and this is a great way to start.
There are also a few techniques specific to making amirugumi that will be helpful for you to know. You can find any number of free videos/tutorials online. Below are links to a few videos that I found helpful when I was learning to crochet.
Image
How to Make a Slip Knot
Single Crochet (+ Starting Chain and How to Count Stitches)
Half Double Crochet
Double Crochet
Triple Crochet
How to Keep Starting Chain from Twisting
Magic Ring
Ultimate Finish
Invisible Finish
Invisible Decrease
Beginner Amigurumi Patterns
These were the first three patterns I learned in the process of teaching myself how to make amigurumi. I recommend working them in the order they are listed. The first two links have step-by-step instructional videos and will help ease you into learning to read amigurumi patterns. All of these patterns are free, and there are many more free patterns out there as well. Have fun!
Amigurumi Ball
Amigurumi Whale
Amigurumi Stegosaurus
3K notes
·
View notes
Note
you are living in a new country right? have you gotten any culture shocks as a norwegian?👁️ (you don't have to say where you are)
I am and I have! Actually I was just thinking about making a post like this when you sent the ask, so your timing is amazing ✨ I don't mind saying which country I live in right now, because I am a bit more settled atm and I probably won't stay here for more than a year anyway.

I live in Greece atm! Though it isn't fair to say I live immersed in the culture as my work is mainly in English/Norwegian and I work from a home office, so I don't get out as much as I would like.
These are the main culture shocks I've had, as a Norwegian, living in Greece:
The food lacks salt. This is probably a good thing, but I've talked to other Norwegians here and they agree, we have to salt the food like crazy for it to taste anything. We are probably used to too much salt in our food back home and so the lack of it is unusual to me.
The drinking water tastes chlorine. Not even sure we can actually drink the tap water here? But it does taste bad and so I have to buy 1,5 litres plastic bottles with clean water at the store for drinking and even to use in the kettle when I make tea/coffee. This is a hassle :(
Lack of system and efficiency. It probably is clash with my way of thinking, but it just seems like everything is designed to be inefficient and systems here do not make sense to me. This is mostly in regards to administrative stuff, but I'm sure this can be true for anyone moving to a different country.
The traffic. Again, this might tie in with the lack of system, because people here drive without rules :(( The Greek system = No system. Not sure if there are actually any traffic rules here? If so, I have yet to understand them.
No garbage sorting. There is not sorting your waste here, which is very strange to me and I feel bad every time I throw stuff in one bin. In Norway we sort food waste, plastic, paper, metals & glass, and general waste. I think we are also going to start sorting textiles next year? The no sorting of garbage and everything goes in the same bin is strange to me.
Lack of digitalisation. In Norway, everything is digitalised. Not just the administrative and paying with card everywhere, but certain processes and services you need you can usually just fill out a form, click a button, or send an email online and it's done. Here, many more things seems to require physical interactions and copies :((
#hetalia#aph greece#aph norway#hws norway#hws greece#thanks for the ask!! 💖💖#love experiencing hetalia irl 😩🙏 /j#alsoooo thank you Jezz for bringing me salty crisps 🥺💖#and enduring me stressing out about driving 😭😭😭#there is also the possibility that the greek system actually makes sense and I'm just too stupid to understand it#also I feel like everyone is looking at me weird but I'm sure I'm just self-conscious 🙃#tho people stopping in the street and looking at me as I pass them does not help 😭#Greece does have many positive aspects as well tho!! It's just that you tend to notice things that are an inconvenience more
54 notes
·
View notes
Text
⋆.˚𖦹°‧✮‧°𖦹˚.⋆ ERROR 404
pairing ~ yang jeongin x fem reader
synopsis ~ y/n starts getting messages from an unknown number after buying a used phone for cheap. as she finds out more about the boy she's talking to, it turns out there's much more to this than a wrong number --- he died, and she's talking to his spirit, yet he has no idea what happened to him. will y/n have what it takes to solve the mystery of his death? or will the boy's spirit remained trapped in his phone?
warnings ~ gen, death, blood/injury, implied child abuse
MASTERLIST | PREVIOUS | NEXT
CH 2 ~ THE PLAYGROUND (wc: 2.9k, 2 screenshots)
Nothing you find online even hints at foul play, or at least, nothing official. There's a blog you come across called Souls of Seoul, a conspiracy theorist obsessed with fishy deaths citywide, and they just so happen to have classified the death of Yang Jeongin, a 23-year-old actor about to snatch his breakout role, fishy. She has multiple posts dedicated to it, but you skim most of them as they repeat information or add details that are a little... out there. You finally reach the final post where she writes an in-depth analysis and theory of what she thinks really happened.
"And then his rival and best friend... ah," you click the continue reading button, wanting to learn as much as you can, but the page refreshes to find nothing, a big, red message screaming at you.
ERROR 404 : PAGE NOT FOUND !
You refresh the page again, but the same words flash at you. Weird. There's contact info at the bottom of the page, but when you try and text the number, your messages don't go through, almost like the universe is trying to stop you from uncovering the truth. At first, you weren't really sure if you believed Jeongin's death was something deeper than the story told, but evidence keeps piling up, making you become suspicious.
On the bus ride to work, you can't help but ponder the strange dream you had last night. You can still feel the breeze on your cheeks and hear the breath in your ear. Something isn't quite right, the air around you too still when the bus is stopped too long at a red light. The bus lights flicker, then turn off completely. You're sitting near the back by the door, watching a man walk onto the bus and gasp at the sight of him.
There's a large butcher's knife digging into his neck, wet blood slick around the site of the wound, soaking his shirt and beige coat red. He pays the fare, sitting down in a seat closer to the front. No one else seems to notice, but no one else is moving either. People around you are frozen in their seats, paused mid-movement. A girl across from you has one earbud in her hand, centimetres away from her ear. Another passenger beside her has just dropped their water bottle, the object half way to the floor. You hand covers your mouth as you take everyone else in, eyes finally landing on the man again.
He's looking at you, seemingly just as shocked that you can see him too. His eyebrows furrow, mouth shut in a tight line as he gets up and moves to sit next to you.
"You're not dead," his voice is raspy.
"I'm not," you whisper, hand falling away from your mouth to grip the pole beside you, fighting the urge to run off this bus.
For all you know, the bus is still moving and this is another lucid dream. The last thing you need right now is to try and leave, ending up in the hospital for leaping off a moving bus. Although this doesn't feel like a dream, you can always tell, you won't risk it.
"How are you not dead?" His fingers brush up your jaw, cold and dry. "What are you doing here?"
"Trying to get to work," you reply, voice shaky.
His eyes snap down to yours and his hand drops. "Oh."
Then the lights come back on, there's a clang of metal hitting the floor, and the man is gone, leaving you with a raging headache.
-
You're distracted all day as you help Changbin catch up on client orders, mind wandering to the man you saw on the bus when you're alone in the back of the shop. Changbin left to watch the front of the store, leaving you to work on a bouquet someone ordered last minute yesterday, thanking you both immensely for doing it on such short notice. The arrangement consisted of white and black roses tied with a simple ribbon, and you wonder what, or who, they were for. Of course, you never asked personal questions, always left creating your own story for each client.
When you prick yourself on a thorn, the blood has you back on the bus in an instant, letting the red liquid drip onto the table. The air is thick, and you shut your eyes to regain focus, bringing your finger up to your lips until you can find a bandaid. There's one in your apron pocket; you really should stock up again and soon.
The question of this man bothers you, and the way he's affected you bothers you more. Why could you see him? Why did time seem to stop? What's happening? You think, Jeongin might know; you should text him.
Y/N : Why can I see other ghosts and not you?
"You can see other ghosts?" You jump, dropping a pair of scissors to the floor with a clang.
"What the fuck!" You whisper-shout, backing against the table.
In front of you stands Jeongin, dark black hair nearly covering his eyes. He's wearing the same clothes as he did in your dream, a blue sweater and black jeans, but they aren't worn or tattered. They look brand new, actually, like he had just bought them. There are no signs of death on him at all, the bleeding and matted hair gone.
"Y/n?" You hear Changbin call from the front. "Everything okay?"
"Everything is fine!" You shout back, not wanting him to come back and see Jeongin- that is, if he can. "Just dropped scissors."
"Listen, I need to bring you somewhere." Jeongin steps back into your view, blocking the hallway Changbin's voice drifted down.
"Can't you see I'm working?" You gesture behind you. "Whatever it is, it's gonna have to wait. I'm busy."
"Please, I think this could help," he pleads, his hand about to grab your arm, but he sees how you flinch back and stops himself. "C'mon, you only die once, and I'd really like to know how it happened. I know you do too."
"You don't know shit about me," you scoff.
"Really? Well-" he huffs. "You're right, but I know enough, otherwise we wouldn't be having this conversation at all right now."
"Ugh, fine, let me tell Changbin-"
"Just text him! Let's go!"
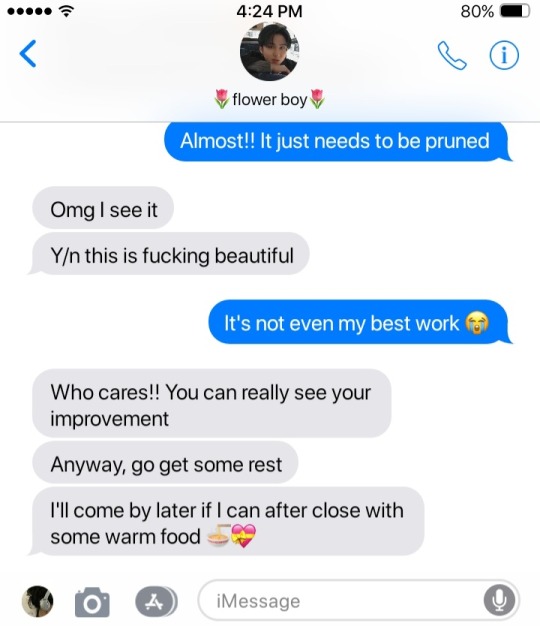

As you sit down on the playground swing, you send a quick heart emoji back to Changbin. Part of you feels bad lying to him, but a bigger part is wrapped up in the mystery of the man sitting next to you. You wonder what other people at the park might see, if there were any people here. It's weirdly deserted, but then again it is pretty overcast. Would they see a girl and a boy talking on the swings? Or would they only see the girl, talking to an imaginary entity?
When you look over at Jeongin, he's focused on the monkey bars with a sad smile on his face. Following his gaze, you see two little boys, one sitting at the end waiting for his friend who's seconds away from slipping. If you were to stand underneath, you could touch the bar with the tips of your fingers, maybe even wrap your hand around one without much effort, but you know for this kid the ground seems a million feet away.
"Hyunjin! Hyunjin!" The kid's feet are starting to kick wildly, panic present in his voice. "I'm scared!"
"You're fine! If you freak out now, your palms will sweat and then you'll fall," the other kid stands, leaning against the pole connecting the bars to the landing. "C'mooooon, I thought you said you could do this."
"I can," the boy, who you know assume is Jeongin, huffs and reaches for another bar. His fingers slip and his body swings back with a twist, the hand still on the equipment slipping as well. "Owwww!"
Little Hyunjin jumps down to his new friend, little Jeongin clutching his red knee with tears welling in his eyes. He's trying hard not to cry as Hyunjin assesses his scrapes, running over to his bag by the edge of the sand and pulling out a band-aid and a water bottle. Jeongin's tears have fallen by the time Hyunjin returns with the supplies, instructing him to stretch his leg out.
"If you don't wanna look like you peed yourself, you'll do it. Then all the water will fall on the sand and not you." Jeongin does as he's told, wincing as he straightens his leg. "Okay, this might sting, but I don't know cause it's just water, so it might not."
"Okay."
The water runs over his knee and flushes the blood away, leaving damp skin and red marks. After patting the area dry with his sleeve, Hyunjin sticks the band-aid diagonally across the wound.
"See? Not so bad." Hyunjin sits next to Jeongin in the sand shoulder to shoulder. "You need to practice landing on your feet."
"I wasn't trying to fall," Jeongin pouts. "I could have made it if-"
"Hwang Hyunjin!" A deeper, male voice calls out, and you jump a little when a man appears in the corner of your eye. "What happened to no wandering?"
"Sorry dad," Hyunjin mutters, standing up and moving away from Jeongin quickly.
"What's that?"
With a side glance to Jeongin, Hyunjin hangs his head. "Sorry sir."
"Better. Now, how about we head home?" It's only now that you hear the slurring of his words, and your chest tightens with empathy for the small boy. "We can... I'll put on that show you like, have some family time, quality time. Let's go."
When Hyunjin doesn't move, his dad sighs, throwing his head up to the sky and placing his hands on his hips.
"Don't be difficult, c'mere." He still doesn't move. "Have it your way."
His dad is tense as he walks over, grabbing Hyunjin's upper arm and practically dragging him over to a rusty car parked in a driveway not too far away. The whole time little Jeongin had been watching intently, taking in the way Hyunjin's cool-guy attitude changed once his dad showed up, the way he flinched when his dad started walking over. Present day Jeongin is watching them walk away with his lips pulled tight.
"That's when I decided to make Hyunjin my best friend," he says, eyes glued to the scene. "Make an excuse for him to be home as little as possible, and it worked. He was almost always at my house on the weekends. We only made plans to go over to his occasionally when my parents would start to question why we didn't."
"Was he really that bad?" Jeongin finally looks at you again with sad eyes, and you already know the answer.
"You have no idea."
-
"Hwang Hyunjin, where are you now?" You're typing his name into the search bar on your laptop, Jeongin looking over your shoulder.
Jeongin disappeared shortly after the memory, leaving you to go home and do your own research. One thing bothered you- how familiar Hyunjin felt. You've never met him, not properly at least. Looking at his photo you realize he's the same guy you ran into at the café, but other than that? Nothing. You shrug off the feeling and continue digging.
"Oh- look here, Hwang Hyunjin hits the big screens this summer with new movie Side Effects, a look into a man's life as he navigates adulthood after the tragic death of his twin sister. Could this be his breakout role... read more... hm," you lean back in your chair. "You both were actors?"
"Y-yeah, we were..." Jeongin slides into a chair beside you.
You're sitting in your dining room with your laptop open on the table. It's getting late, so you know Changbin will be here soon and you'll have to wrap up what you're doing quickly, but there's so much more you want- no, need, to know. There's an itch you can't scratch in the back of your mind saying there's more to this than two best friends with tragic tales.
"We were both auditioning for that movie," he starts, looking away from you and places a palm flat on the table, long fingers outstretched. "I guess he got the role then. I'm proud of him."
"Did he ever get away from his dad?" You ask, too curious not to.
"I..." Jeongin squints, shaking his head. "I don't remember."
With a frustrated sigh, Jeongin puts his head in his hands, elbows on the table. His fingers run through his hair as he tries and tries to remember, but nothing is coming to mind. The problem is he knows there's something- something important, but it's just gone.
"It's okay-"
You're interrupted by a loud knock on your door, the sound of your door opening behind you catching your attention. Closing your laptop, you notice Jeongin is gone again. You wish there was more you could do for him, to help him remember; you can't begin to imagine how aggravating it is for him to have everything just beyond reach.
Changbin is politely toeing his shoes off onto the rack by your door, his hands full with bags of takeout and snacks. Wrapping your sweater around you tightly, you shut the door for him.
"Thanks for coming by," you take a bag from him. "I'll bring this to my room, meet me there?"
"Where else will I go?" Changbin laughs.
Sitting down on your bed, you gently place a wooden tray down for the food to keep it stable. As you're waiting for Changbin, a million questions race through your mind. Something doesn't sit right with you about what you've learned tonight, but you also don't know enough to form a proper theory either.
"What's on your mind?" Changbin sits next to you, shaking the tray just a bit. You put a hand on the edge to keep things from spilling. "Or is it just pain? Oh! Where's your heating pad? Let me-"
"I lied."
"What? About what?"
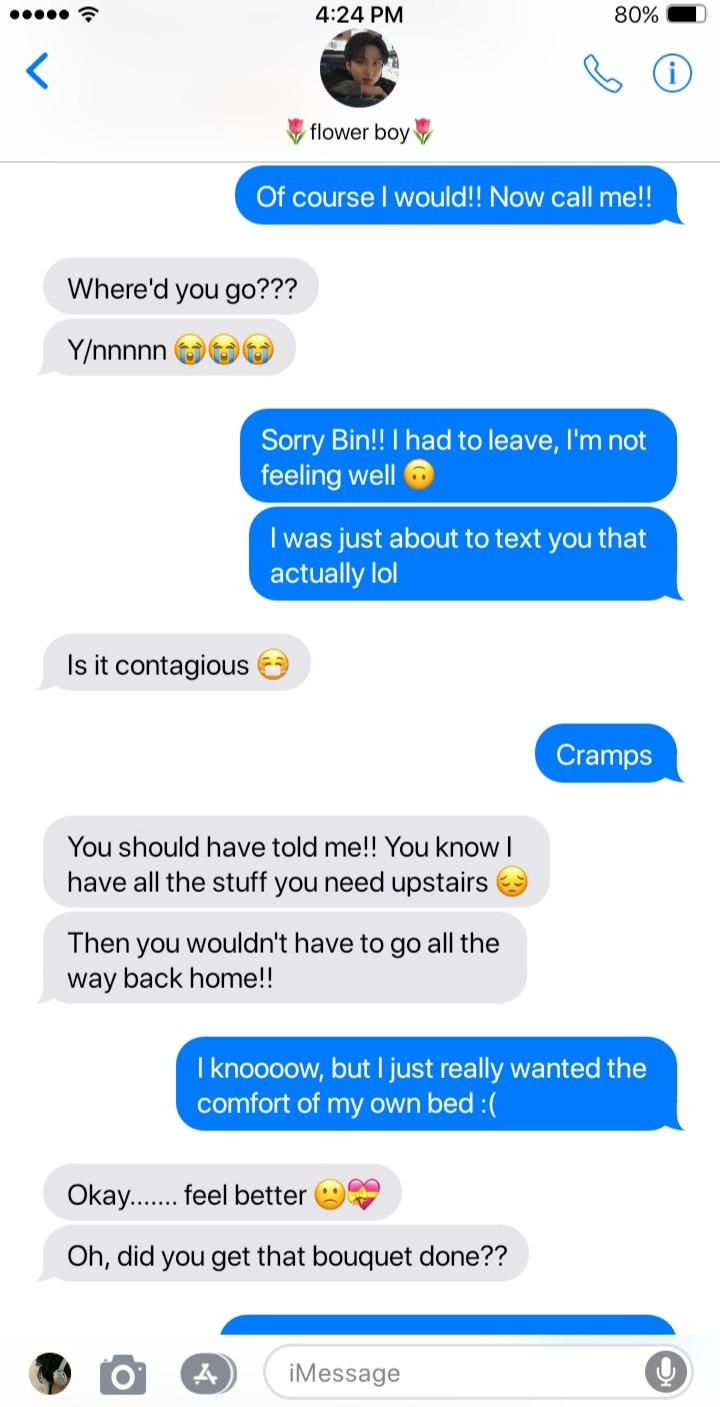
"I lied about the cramps," you admit, avoiding his eyes. You can feel his stare on you. "I need to tell you something, but I might sound crazy. Remember how I asked if you believed in ghosts?"
"Y/n, where are you going with this?" Changbin's voice is low. "Why would you lie to me? Ditch me at the store during our busiest time-"
"There's a boy I've been seeing-"
"You ditched me for a boy?! Y/n!"
"No! Just- just let me finish!" You snap. "There's a boy who I've been seeing named Yang Jeongin, and he's dead. The phone I bought used to belong to him and we both think that's our connection. For some reason, it didn't work for anyone else, but it worked for me and then I started communicating with him."
Changbin is silent, taking in your words and waiting for you to finish.
"We think there's more to his death than what people say, which is suicide. He can't remember much."
"Is..." Changbin is glancing around your room. "Is Jeongin in the room with us...?"
You snort at his reaction. "No, but I was with him right before you got here. It's like, he just shows up sometimes. I have no way of contacting him outside of texting, but even then he doesn't always reply. Look, I'll try now."
Picking up your phone from your nightstand, you click Jeongin's contact and press call. It's silent when there should be ringing, a robotic voice telling you after a few seconds that the service has been disconnected. Tossing your phone to the end of your bed, you're about to complain about that when it starts to ring. The phone is lying face down, but you already have a feeling you know who's calling. Flipping it over, you accept the call.
"Jeongin," you breathe.
"Y/n."
"What do you want?"
"Who's that guy you're with? Wh- wait, can he hear me?"
You look over to Changbin, who is staring at the phone warily. "Um, I guess so. He's my best friend. His name is Changbin-"
"Yah! Don't tell the ghost my name!" Changbin slaps your arm lightly.
"What? You don't want me to haunt you?" Jeongin taunts. "Listen, I can't talk for long. I needed to let you know that I think other spirits are catching onto your ability."
"Don't phrase it like that! Ah, that makes me sound like some kind of psychic..." you frown. "It's freaky."
Without a reply, the call disconnects and you roll your eyes.
"See what I mean? Unreliable!" You groan, but catch the look on Changbin's face. "That's your thinking face."
"I have this friend who used to be a private investigator," Changbin blurts, looking over at you. "He doesn't do it anymore, but this might just be interesting enough for him to pick up. I'll give you his number later. And not to question you, but how do I know you're not pranking me right now?"
Reaching forward to grab your phone, you pull up a few videos of Jeongin for Changbin to hear his voice. There aren't many out there that you could find, a few audition tapes and personal videos on his socials, but that's it. After, you search for a news article about his death and show him the photo of him they used, one of his headshot right before his death.
"Okay, I believe you," Changbin exhales. "Minho might too."
~
notes ~ i seriously can't wait for the lino storyline u have no idea
taglist ~ @chaeryred @toplinelix @channie-143 @bloomingstay @sona1800 @dollschan @defnotfertilizedtoesw @thisisnotjacinta @kayleigh-28 @kayleefriedchicken @lailac13 @linocvp1d @ilov3jeong1n @mooseung
reply or send an ask to be added (18+)^^^ green means i can't tag you
#⋆.˚𖦹°‧✮‧°𖦹˚.⋆ ERROR 404#skz#stray kids#yang jeongin x reader#yang jeongin x fem reader#yang jeongin#skz x reader#stray kids x reader#yang jeongin fanfic#skz fanfic#stray kids fanfic#skz series#yang jeongin series#smau#partial smau#non idol au#i.n x reader#i.n x fem reader
72 notes
·
View notes
Text
Velvet ribbon necklaces and chokers
This is one of my favourite ways to make a necklace - extremely quick and simple but I think it looks beautiful. I use velvet ribbon but it would also work with satin ribbon and possibly lace, though that might not be sturdy enough. I personally don't like to use leather or faux leather because it can get very sweaty and uncomfortable, but you can absolutely use that too if you want! Craft shops also sell patterned or embroidered ribbon.
I've even done variants on this which were made from just a long strip of fabric which I hemmed along the edges.
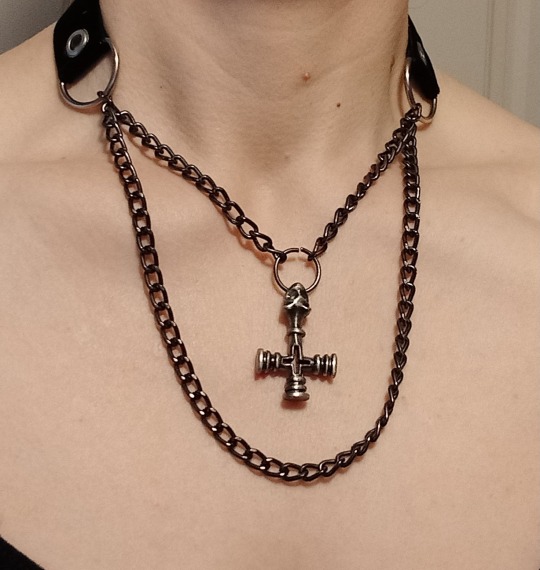
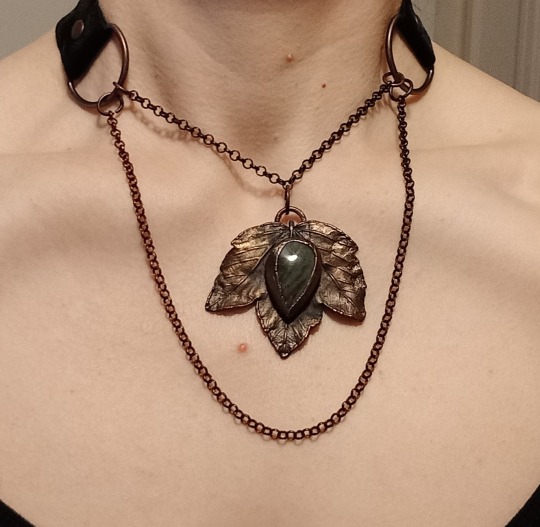
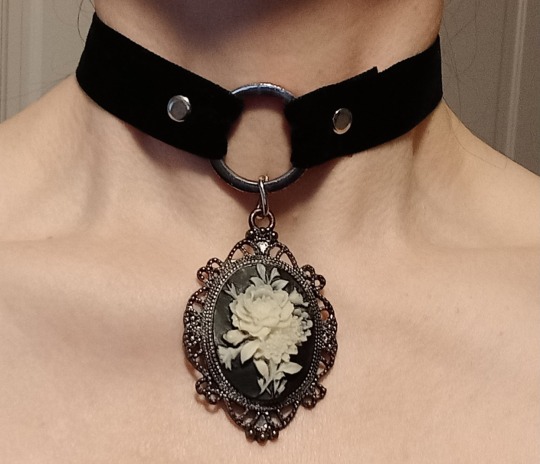
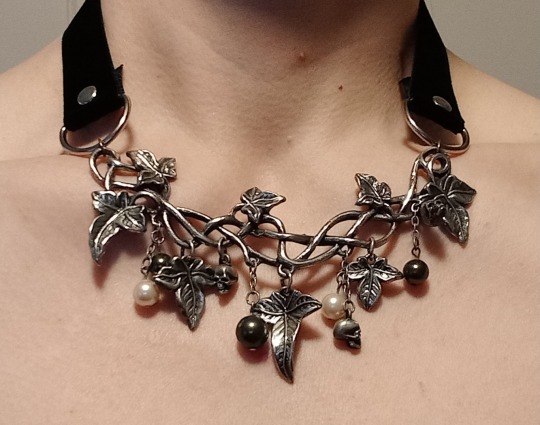
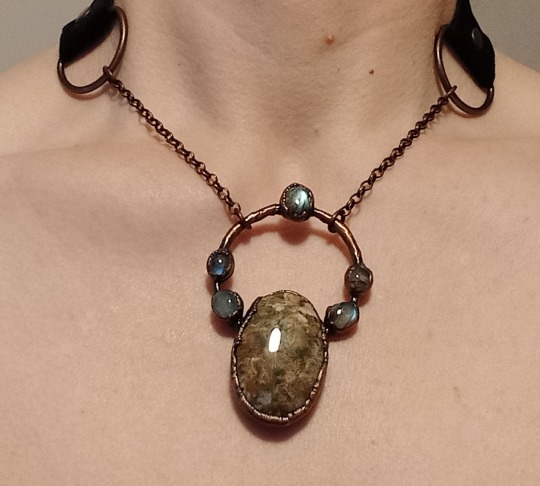
In addition to the ribbon you will need rivets or eyelets, d-rings or o-rings, and heavy snap studs to fasten them.
The pendants in these photos came from various places: the flower cameo was thrifted, the wolfs cross was bought from some alternative shop I don't remember the name of decades ago, the leaf and the large ocean jasper came from an Etsy shop called Enchanted Creations (link here) and the ivy is Alchemy Gothic.
For whatever reason I decided I didn't like the necklaces they came on so I remade them. The pendant parts and chains were attached using jewellery pliers and either jump rings or links of the chain if it was large enough.
Then all you need to do is loop your ribbon through the d-rings and poke a hole through both layers (I have a leather punch I tend to use but you can also use scissors) then secure it with either a rivet or an eyelet. You can buy these online or in craft shops, they're usually very cheap, come in various colours of metal and have instructions for how to put them together. They're fairly self-explanatory - one half on each side of the fabric and hit them with a hammer a few times. If using rivets make sure you put the pieces on the correct sides.
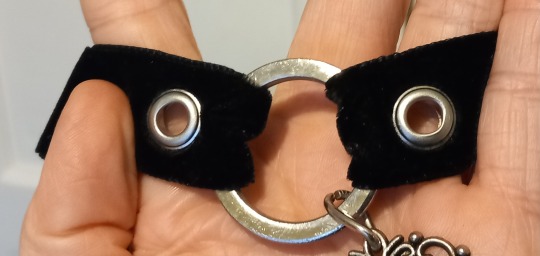

You could also use screw on spikes. Anything that will keep the ends together will work - obviously you could sew them too, but this looks neater (than my hand sewing anyway!) and gives a bit of extra visual interest.
To get the right length of ribbon I just put it around my neck making sure to overlap the ends then add a couple of centimetres extra for the folds. If the ribbon is synthetic (most of the the time they will be) use a lighter to singe the ends slightly. This will cause it to melt a little and prevent fraying. Please be careful when doing this! You don't need to put the ribbon *in* the flame, just close enough to heat it.
For fastenings I always use heavy snap studs. These make the fastening very secure and neat looking - it will lay completely flat to the back of your neck.

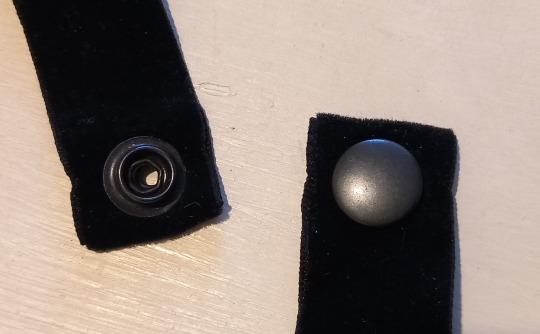
These studs come in 4 parts.
Again, double over the ends of the ribbon, poke a hole through both layers, put the correct pieces of the fastening on each side and hit them with a hammer a few times. These can likewise be bought online and come with a tool and instructions for use. The most important thing with these is to make sure all parts are facing the right direction so you can close them properly.
Here are some brief instructions I found online for how to use them.
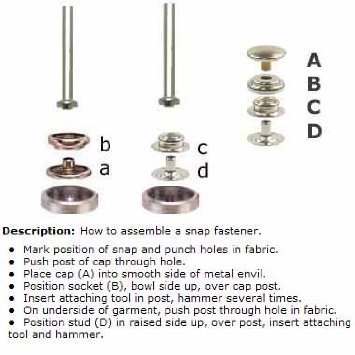
Again, you don't have to fasten them the way I do, whatever way suits you is fine. Even a safety pin would work!
This basic method can be used to make collars too, I did a cyber collar a while back (full post here)

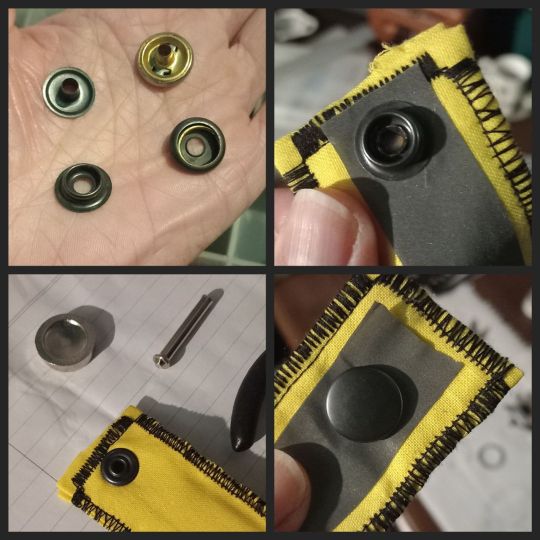

As I said above you can use any kind of ribbon you like, patterned or plain, or even a long strip of fabric, that's what I did for this collar.
You could cover it with safety pins, buttons, embroidery, fabric paint, whatever you like!
#goth diy#diy jewelry#goth jewelry#spiked jewelry#spiked collar#homemade jewelry#homemade#goth#gothic#gothic fashion#goth aesthetic#goth fashion#punk jewelry#punk aesthetic#alternative fashion#alternative#gothic jewelry#choker#goth choker#collar
38 notes
·
View notes
Text
❀° Claw Machine °❀


≫ ──── ≪•◦ ❈ ◦•≫ ──── ≪
Genera ➛ fluff
Pairing ➛ Beomgyu x gn!reader (not idol specified)
Word Count ➛ 875
Warnings ➛ nicknames such as lover boy, gyu, (I’m pretty sure that’s all)
AN: just something short and fun
≫ ──── ≪•◦ ❈ ◦•≫ ──── ≪
"Look over here at this one!" You called from an aisle ove. Beomgyu was just on the other side, inspecting whatever caught his own eye.
"Coming!" He called back.
Different machines lined the area, some arcade and rhythm games, claw machines, photo booths, etc. Beomgyu turned the corner and slightly jogged to the machine you were currently staring at, your eyes almost sparking.
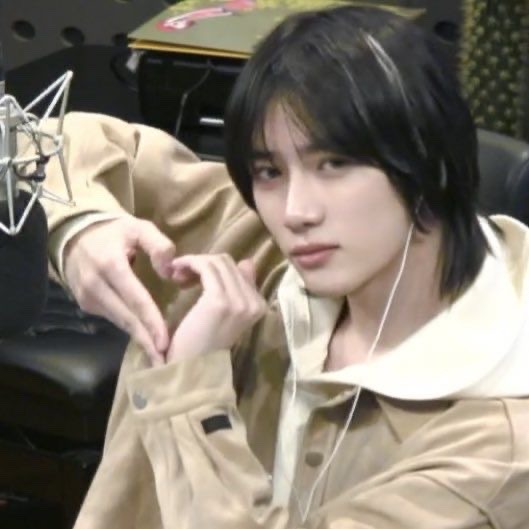
"Isn't it so cute, it almost looks just like you, a little brown teddy bear." You cooed at the stuffed animal in a pile among others, but you only had eyes for the cute plush holding a little strawberry. (reference picture above!)
"Come on how many times do I have to tell you I’m not a teddy bear, I’d be more scary than anything." Beomgyu retaliated rolling his eyes.
However, you had a trick up your sleeve. A pouty face and puppy dog eyes.
Beomgyu was just going to turn around and leave you on your own again, but not before you tugged on the sleeve of his jacket. His eyes met yours once again again as your lips curved into a slight frown. Your eyes widened as you looked up at him with your eyebrows raised to almost look sad.
He was frozen in place, but the twitch of his lips let you know he was in fact still alive.
"Come on please, just one try. I really want it..." You mentally cringed at yourself, but you knew it would work.
"Ugh... why do you have to play dirty all the time?" He grumbled before he reaching into his pocket and pulling out some coins.
"What do you mean?" You asked innocently, as if you didn't just guilt trip him into winning you a teddy bear.
"You're lucky you're cute..." He grumbled under his breath.
He then inserted some of the coins to then take the controller stick in his hand, maneuvering the claw.
He looks so cute when he’s focused, his tongue slightly poking past his rosy lips and his eyes wide with determination. You couldn’t help the way you fell for him even harder.
"I think it looks good from here. Do you mind checking the position on the side?" He asked, snapping you out of your romantic thoughts.
"Mhm! Hmm maybe just a little bit further back and you should be good." You informed him with a smile.
"Then here we go..." Beomgyu said before pressing the big red button. The claw moving painfully slow.
The thin claws wrapped around the bears head perfectly and then slowly retracted, bringing the bear up.
"Come on, come on, come on." You quietly chanted to yourself.
However, as soon as the whole plushie was in the air, it slipped through the metal rods and fell back down.
"Aww that's okay-"
"Nope I'm gonna try again." He interrupted you.
And so he did... another 10 times.
The machine was obviously rigged, the claw was not strong enough to hold the big plushies they decided to put in there. Only an idiot would fall for the scam… but good thing you two are definitely idiots.
"Come on Gyu, I don't want the plushie that bad. I was only joking around. Plus I'm sure we could just buy it online and it would be way cheaper."
"I don't care. As the most amazing, talented, beautiful, and caring boyfriend in the world it is my job to win you whatever you want from a stupid claw machine." He ranted after pressing down on the big red button yet again.
This time the claws slipped around the bears tiny body, cradling it almost perfectly as it ascended.
Both of you were now holding your breaths, not daring to say a single word. Almost as if a single phoneme dared to shake it from its place.
The claw then started to shake, the bear obviously getting ready to fall out of the machines grasp any second, but not before finally settling over the prize hole.
Beomgyu let out a sigh of relief as he bent down to retrieve the plush from the slot. Your smile only grew wider as he made his way closer to you, hiding the obvious prize behind his back.
"I think I deserve something first for obviously being the best boyfriend ever." He smirked.
"And what's that, loverboy?" You teased back, the tips of his ears turning a light shade of pink.
"A kiss." He said as he pointed to his lips pouting.
Now he thought it was his own turn to act cute.
You giggle before agreeing, lightly pressing your own lips to his for only a second before pulling away, but he leaned in again and chased you for another.
Taking the chance while he was distracted, your hands traveled behind his waist, grabbing the bear for yourself.
He gasped as you pulled away, the plush now in your hands, "How could you betray me like that?!" He exclaimed while placing a hand over his heart.
Before he could have the chance to steal the prize back, you ran away, laughter following you out of the building.
#ryxieztxt#ryxiez#fluffy#x reader#beomgyu#txt fluff#txt x gender neutral reader#txt x reader#txt x y/n#txt x you#beomgyu x reader#beomgyu x y/n#beomgyu x you#beomgyu x gn reader#txt scenarios#txt fanfic#txt imagines#beomgyu txt#beomgyu tomorrow x together#fanfic#x reader oneshot#x reader fluff#kpop imagines#kpop x reader#kpop x gender neutral reader#kpop x y/n
188 notes
·
View notes
Text
Shaving for Beginners
When you've never shaved before, the idea is intimidating. The idea of cutting yourself shaving is scary, and the amount of options at the store for equipment can be overwhelming.
So! Here's an overview of getting started and what to expect. I'm assuming here that you'll be buying things at a brick and mortar store.
Preface: I'm Scared of Cutting Myself!
This is one of those things that's scarier in concept than it is in practice, for a couple reasons.
The kind of razor you can buy easily at the store is something called a safety razor. It uses a cartridge with multiple blades to distribute pressure more evenly against your skin and make it significantly harder for you to cut yourself by accident. With a safety razor, you'll almost never cut yourself unless the blades get dull.
Cutting yourself doesn't actually hurt. The cuts are so small that you don't really feel them at all, and you're more likely to notice them from the blood than from the sensation.
Shaving cuts bleed more than you might expect on account of being on your face, but it's still not very much. Sensation-wise, they end up stinging very slightly, comparable to a very small scrape. The worst thing they do is make small red spots that make it more obvious you shaved in the first place.
Picking a Razor
At the drugstore (or any store with a personal hygiene section), you can find disposable razors and reusable handles and blades. In this post, I'm going to focus on the reusable kind.
You'll probably see the razors divided into "men's" and "women's" razors. They're more or less the same aside from packaging and aesthetics; the main difference between them is the pink tax. So! Go for a "women's" razor if you need to for gender/dysphoria reasons, otherwise a "men's" razor will get the same job done for less money.
Once you've decided between "genders," the next thing to do is select a brand for your handle. You'll need to buy matching blade cartridges for it so this is a bit of a commitment, but worst comes to worst you can always just buy a new handle. Personally I'm satisfied with my least expensive option, but if you care about getting a "nicer" one you can look at reviews online.
After picking a brand, there's only one more decision to make before you can actually take something off the rack: what blade count you want for your cartridges. More blades is allegedly a smoother shave, but this isn't a huge deal. Also as long as you're staying with the brand you picked, you should be able to switch between types of cartridge, so there's no commitment here. Again I like saving money, so I just buy whichever cartridges are cheaper.
I started out with one handle and one box of replacement cartridges when I made my first purchase, but your handle should come with a couple cartridges to start you off so you don't need to buy your first replacements at the same time if you don't want to.
Picking a Shaving Cream
Shaving cream makes your shave smoother and decreases your chances of nicking yourself. I shave dry so I can't give you a personalized overview of this, but it's more or less the same process as picking any other product that goes on your skin. Research your options if you care about getting The Best One, but as long as it doesn't have any ingredients you're sensitive to you should be good with whatever.
Your razor and shaving cream are the only things you need to buy. The rest of this is about the process of shaving itself.
Assembling Your Razor
This is pretty easy, but I want to go over it quickly for completeness.
There are two pieces: the handle, and the cartridge. The handle has a little metal bit at the end, and the cartridge has a part that sticks up a bit. Hold your cartridge in one hand, and stick the metal bit on the handle into it with the other hand. Once that's done, you can pull the cartridge out of the plastic guard it comes in, and your razor is ready.
To change cartridges, eject your current one by pushing the button on your razor and then put in your new one the same way you did the old one. You'll want to do this about every 5-7 shaves.
Shaving Itself
Get a bit of shaving cream in your hand, add water, and work it into a lather, then work it into your hair where you want to shave.
Once that's done, take your razor and work in small strokes against the grain of the hair.
After you've finished shaving, rinse out the shaving cream from your razor, wipe your face off with a wet washcloth, and clean up the fallen hairs so they don't clog the sink.
Thatse it :)
If you have recommendations for products or methods, or if you noticed something I missed, please leave that information in the notes.
7 notes
·
View notes
Note
Me, who blacklisted your "fans don't look" tag ages ago as the most mature thing I could think of, now clicking on all the posts anyway because I don't care enough about anything going on except if they tell me why Belle was in a fucking closet (I haven't read the issue yet, I can't find it online) (did I tell you I tried buying one from the proper site during the Metal Virus arc and it wouldn't let me because the Italian address wasn't valid FOR A DIGITAL PURCHASE 🙃):

fhdlhfdshfjsdjh lmaoooooo I feel you, I hate that Tumblr taunts you with the "see post anyway" button 😂
Anyway, there you go, it's on YT:

Belle argued with "security" too much over the gears that malfunctioned during the race, and so they locked her in a closet under Clutch's orders. Welp. That certainly is a way to give her a role in the story :P
also way to go italophobia 😔
#i guess stanley accepted flynn's idea that belle became much more assertive#or maybe it's a case of gaining courage when it comes to her friends
8 notes
·
View notes
Text
MyGirl!Series Part One: Too Much, Too Soon - Remy Scott x Reader

Tagging: @crazy4chickennuggets @kmc1989 @oureternalbond @whateversomethingbruh @a-noni-love
Companion piece to Marks

Remy books an intimate table for two at Scarpetta, an Italian place with excellent food and a quiet, low-key atmosphere. He knows that you’ll love this place, the warm glow of the lighting, the plush greenery that hangs from the ceiling. There’s a candle in the centre of the table, situated inside an ornate glass holder. It’s the perfect place for a perfect first date.
You don’t show up for dinner.
Remy weathers the pitying looks from the waitstaff, the glances from the other patrons for almost an hour before he acknowledges that you aren’t coming.
He sends you a text from the table in the restaurant.
Too much, too soon?
He doesn’t get a response.
He requests dinner to go before heading back to his apartment. He finds himself sitting at the island alone, eating the best carbonara he’s tasted in his life. His phone rests on the surface as he scrolls through his messages. He checks the Whatsapp thread from you, you haven’t been online since 12.45pm. That makes him uneasy. Even if you were blowing him off, he knows you’re a responsible person, you wouldn’t just leave him hanging.
He decides to go old school and call you because he has this feeling, right here in the centre of his chest that something’s wrong. He just can’t shake it.
It rings out to voicemail and something in his stomach drops because he’s never known you not to pick up.
“Hey, it’s me.” He says, leaving a message. “I’m a little worried I haven’t heard from you, just give me a call or a text to let me know you’re ok.”
He waits fifteen minutes before he decides to head over to your apartment, he prays that he’s overreacting, that he’ll pull up and see your light on. It’s as he turns into your street that he receives the call from Jubal. He pressed the accept button on the hands free as he stops the car outside your building.
“Hey.” He says, tilting his head up towards the second floor of the brownstone.
There’s no light coming from your window, you can’t stand to be without it. A couple of years ago you woke up in the night to find an intruder in your apartment. A hit man coming to kill you because you’d put his employer away. He’d worn a ski mask; all you could see in the darkness was the whites of his eyes and the glint of metal from his gun. You’d fought him, managed to put two in his chest but since that night, you always slept with the lamp on even at his place.
“I’m trying to get hold of Ani, are you guys caught up in a case?”
“Remy…” Jubal sighs and in that moment, Remy knows that that feeling he’s been carrying around for the past couple of hours was correct. Something has happened to you, something bad.
“Where?” his voice is low, gravelly as he speaks.
“St Joseph’s.” Jubal tells him. “I’ll explain when you get here.”
Love Remy? Don’t miss any of his stories by joining the taglist here.
Interested in supporting me? Join my Patreon for Bonus Content!
Like My Work? - Why Not Buy Me A Coffee

38 notes
·
View notes
Text
Hersh 2.0!! haha hehe!! Here’s her ref!! as usual, i’ll provide facts and stuff about other characters involved with them as well! Claire n Clive mentions as well!
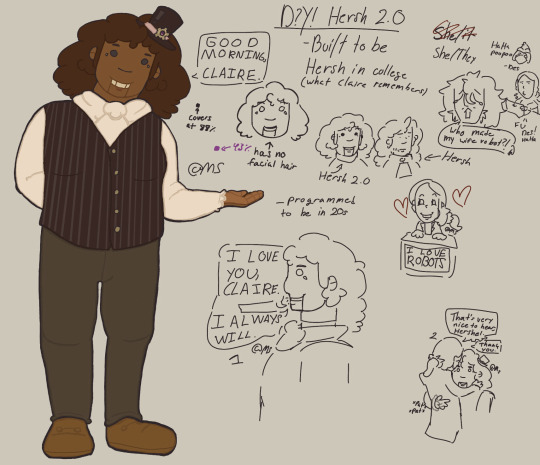
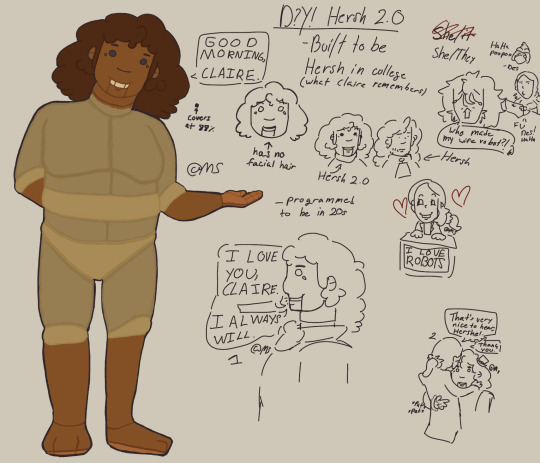
(Also! If anyone would like to see a diagram of anything that i’ve stated here, feel free to send an ask if you need help to see what I write visually! (^ν^))
Differences between Hersh 2.0 and Regular Hersh
•Hair
Hersh 2.0’s hair is much shorter and a portrayal of how Hershel had it during her college years. The hair bump is smaller. Also, their hairs are parted differently! Hersh 2.0 has cylindrical side tuffs that create curls behind the ear. Hershel’s hair tuffs do not go behind the ears and stay intact going in front of the ear! The bottom is also to even compared to regular Hershel’s hair. It’s also a smidge darker than regular Hershel’s hair color.
•Facial Features
Hersh 2.0 has no facial hair. This is because of Claire’s vague memory of Hershel during college. During college, Hershel did indeed have facial hair by her lip and cheeks (like how she normally does) . But Claire’s memory of Hershel is too foggy to remember a detail like facial hair.
-Crow feet
Hersh 2.0’s crow feet are uncolored bumps of metal by the eyes while regular Hershel has two little lines by her eyes! (No they are not eyelashes, she is a very stressed person )
-Eyes
Hersh 2.0 has the same color eyes as the mouth, but different bulbs of course. Her eyes are much bigger than Hershel’s eyes. To make it seem more like Hershel, Claire put a light coating of black paint over them.
Facts!
- Hersh 2.0 is built to represent Hershel during college where she was once in a relationship with Claire. The age would be in the 20s.
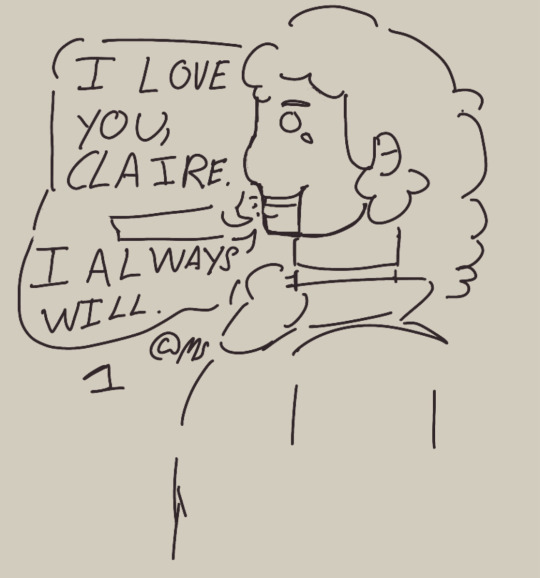
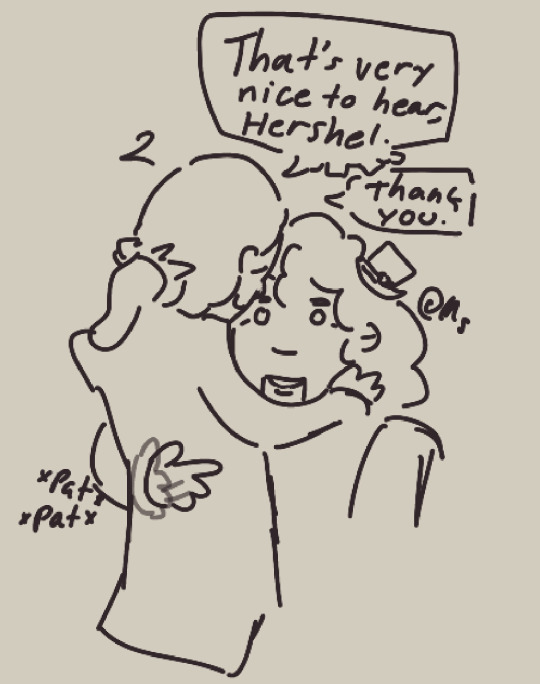
^- The dialogue being said is something that Hershel actually said! Though, it’s not quite right. Claire uses conversations she had with Hershel from her memory to create dialogue for Hersh 2.0. She cuts out words she does not want to hear by hooking herself up to her computer and rewrites her own memory by the press of a button.
-Clive is uncomfortable around Hersh 2.0. They believe that it’s morally wrong to create something like them for a purpose of lingering on the past. He and Claire sometimes have arguments over Hersh 2.0 and how it’s not a good coping mechanism. After Claire is too ignorant to listen to any of his advice, he decides to leave it be because he knows Claire’s life is already pretty stressful. Though he does try to encourage Claire to meet new people from time to time.
- Hershel does not know Hersh 2.0 exists.
-Since Hersh 2.0 is the idealized version of Hershel in Claire’s eyes, she is very kind and helpful! Claire generally keeps her inside the Clock Shop, stocking shelves and sorting things, but sometimes Hersh 2.0 runs errands without Claire’s knowledge (at least, that’s what Hersh 2.0 thinks) and buys things that either the house or the shop needs. Unknown to them, Claire does track both Clive and Hersh 2.0. She just feels a bit anxious not knowing where her loved ones are.
-Hersh 2.0’s body is made with the same metal as the little cogs on Clive and Claire’s hats. The reason why the forearms, forelegs, partial neck, and head are different is because claire painted it to look more like Hershel!
-Hersh 2.0 and Clive’s vest are all matching with Claire’s corset!
Also, fun little idea I have!
- Des and Claire are friends online! (yes there is the internet..I plan to bring it in somehow…) They often talk on message boards relating to machinery and share their creations with each other privately.
#AAAHHHGG#I LOVE DY!!#d.y hersh 2.0#professor layton diabolical yuri au#professor layton#pl#professor layton au#claire n clive mention !!#d.y claire#d.y clive#professor layton unwound future#literally gonna poo#Claire foley pl#d.y hershel#hershel layton#art#mangledscrimp art tag
17 notes
·
View notes
Text
Incredible MMORPG VR Game in the Works!!
I'm a HUGE fan of MMORPGS, and I'm bewildered why no one is talking about Ascent Quest!! I usually gripe about how VR games don't look very good once you start looking at details, but AQ looks gorgeous. Incredible amounts of detail!
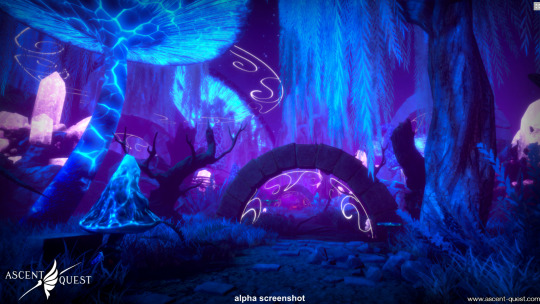
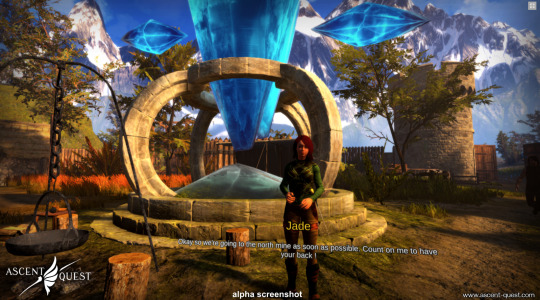
I also enjoy how the mission or dungeon system works. The massive multiplayer instances are only in big cities, and when you want to explore the world, it's just your party vs the world. I really like that because it feels more personal to me, no need to worry about 20 veteran players spawn camping a boss. I'd rather go on an adventure with my friends that I've made in the local tavern. ALSO the classes!! Are super cool!!
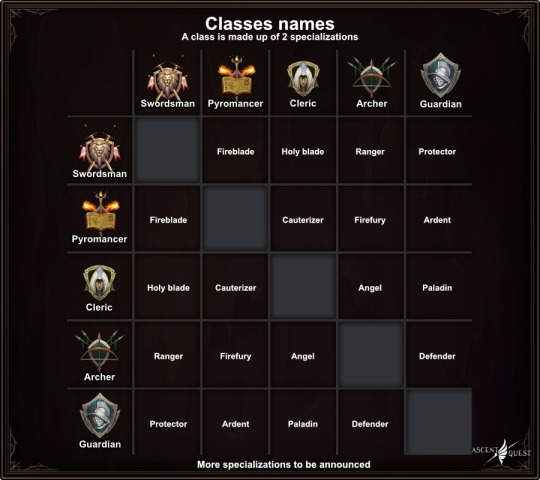
Your class is made from TWO specializations, so there's tons of ways to play the game!! Like in a lot of classic MMOs, you get to pick what skills you want to invest in. Lots of replayability, I really want to try all the Guardian specializations.
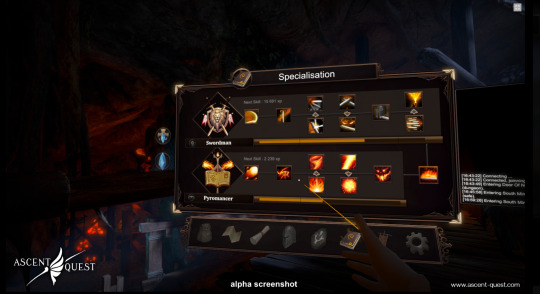
Speaking of skills, there's not just combat skills, we also have talents! Stuff like, hunting, gathering, smithing, etc. But what makes these so special to me, is you have to actually do them!!

If you want to smith something, you have to play a little mini game where you strike a hammer on a piece of metal you've heated up! That is so much more fun than just pressing a button and being done with it. There is so much more I can go on and on about, because this game is going to be incredible! The complex lore, the ability to buy and decorate your own house, absolutely no pay to win, fun ziplines, awesome magic, fully voice acted!! I'm so excited for this game, please, please, please, go support it!! They have less than 2000 subscribers on YT, and less than 800 people in their discord. Ascent Quest – The great online co-op RPG in virtual reality (ascent-quest.com) Farworld Studio - YouTube The devs are so incredibly nice, if you have a question you can ask it in their discord and they'll answer it as soon as they can. They also have a suggestion box set up in there, if you'd like to suggest something that would improve the game!
#ascent quest#mmorpg#mmo gaming#gaming#video games#videogame#vr#vrmmorpg#indie games#virtual reality#sao#support#crowdfunding
6 notes
·
View notes
Text
Warden Ingo Cosplay Build Log
Hey Legends Arceus / Submas / Pokémon fans ! I spent two months last year making a Warden Ingo costume because the game made me fall in love with the franchise all over again (and because I love sad amnesia uncle, of course). I'm pretty proud of it, so I thought it'd be fun to share the process here in painstaking details. I've been cosplaying for over a decade now and I learned a bunch from so many defunct cosplay tutorials on this website, so I thought I'd give back. This isn't a guide, persay, but rather a dive into the methods and decisions I picked to complete this project. Any pre-made items or patterns that are available online will be linked! I'll be splitting down each piece of the costume into its own section for easier reading. This is gonna be a long one with a bunch of pictures, so I'd suggest viewing on the blog directly! Without further ado, all aboard!
Station 0: The Guidelines
Before getting into the build itself, I wanted to preface this wall of text with the guidelines I set myself for this project.These core pillars inform a lot of the decision-making, and some people might feel like using this log as reference for their own cosplays, so I thought it'd be good to put them here to explain why I did some stuff the way I did. Comfort first: I knew I was gonna wear it in the summer, and stand around all day at a convention, so it needed to be lightweight and comfortable. (well, as much as a cosplay can be, anyways.) Realism: Ok, that's kinda weird to associate "realism" to a Pokémon costume (unless you're Detective Pikachu I guess), but I wanted to look more natural instead of translating a shiny fancy 3D model straight to real life (nothing against that, it just wasn't my goal). This meant adapting certain elements that only really worked in stylized Pokémon graphics. Be a huge cheapskate: I didn't wanna break the bank with this one, so if I could save money thrifting or reusing stuff I had lying around, I was going to do it. Whenever you see me pull some material out of my ass that wasn't entirely fit for the job, that's why. After putting these down, jotted down a battle plan for the project (basically just a huge compartmentalized list of all the material I expected to need and the steps to complete the costume), and then it was time to get to work.
Station 1: Thrift Shop Pit Stop

I like starting every project with a quick trip to the local thrift stores to see what I can find. I hate sewing pants with a passion, so my priority was to grab some navy suit pants to match the coat's fabric to later. I also found a long sleeve black shirt for Ingo's undershirt, a belt I ended up not using, and lucked out with some excellent clown shoes with removeable insoles. After slapping in my own insoles, replacing the shoelaces and fixing up the pants' button, we were good to go on every element that could be done without any extra work on my end. Moving on.
Station 2: Three Refined Metals For A Hat
I'll be honest here: when I initially planned out the entire project in my notebook, the hat was scary as hell. I had no clear idea how I was going to do it; I didn't really want to buy a similar pre-made hat cause roughing it up would've been stupid hard to get to look right. I figured I could probably make it out of EVA Foam (a certified cosplay classic), but I've never patterned a shape this complex before. Turns out Kamui Cosplay made a foam pattern for the same kinda hat. Score! I purchased the pattern and assembled the hat using 6mm EVA Foam and Contact Cement according to the instructions. I then destroyed some poor polyester cord trim from the bottom of my scrap bin and glued it into the base for the... sticky-outies? The damaged bits. Y'know.

With the base finished, I drafted a pattern for the fabric covering, cut my pieces out of navy twill, sewed it up and slid it over the hat. I did the same for the inside with some cheap black muslin leftovers from another project, glued it all to the base in strategic spots, and then patterned, sewed and glued the band on. Finally, I took my seam ripper and scissors and opened up the seams where the little piles of sad polyester scraps were lining up to free them. With the main part of the hat complete, I cut up a disc of 10mm EVA foam for the insignia, scored the design on with a hobby knife and heated it up to form a bit of a curve. It was then sealed with flexbond, painted and sealed with a clear coat, and glued on! All that was left after this was weathering the hat. It's a little hard to photograph this piece properly, so I'll show the weathering process when we get to the coat.

I apologize for basically pulling a "rest of the fucking owl" here, but honestly a lot of the process was improvising and somehow not destroying the entirety of my progress, so I have no pictures of the hat building process beyond this.
Station 3: Sneasels Ripped My Coat
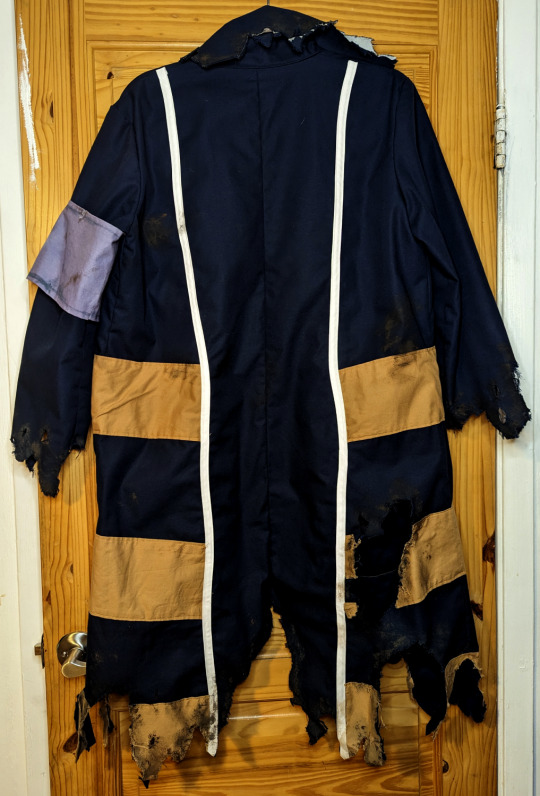
Ingo's coat started with a heavily modified version of a commercial pattern. Specifically, it's the D Coat from Simplicity's 4789. I could've probably found a pattern closer to the Subway Bosses' coat design, but this one had already been in my pile of "patterns I bought for an abandonned project and will totally use someday, I swear" and it was close enough, so I used it. Modifications included extending the collar, making the coat a little longer in proportion to my body, the sleeves wider at the ends, and adding inner pockets (a cosplayer's best friend). Oh, and the white bias tape on the edges and the orange stripes, of course. You may have noticed I'm not showing the pattern with all the modifications here. That's because as part of the Cheapskate Protocol, I really wanted to use this old Simplicity pattern to save money. A pattern I bought when I was a teen way back when. the misses sized pattern enveloppe. So I had to size up the entire damn thing. The biggest size on this pattern was like 7 inches off my measurements. It's a paper Frankenstein golem. It looks godawful. The actual adjustments to make the pattern Submas-ready are incomprehensible in there. But hey, I saved like 10 dollars! I started by assembling the base coat (undamaged) out of navy twill. I added heavy interfacing in the collar to help it stay up. I considered adding a lining to it to really sell the fact this used to be a modern machine-assembled piece of clothing, but it wouldn't have looked as good with the rips and tears later on. As a bonus, it's one layer less in the fight against heat exhaustion! However, if I were to make this coat for Pre-Eeby-Deebied Ingo, I'd definitively do a lining.
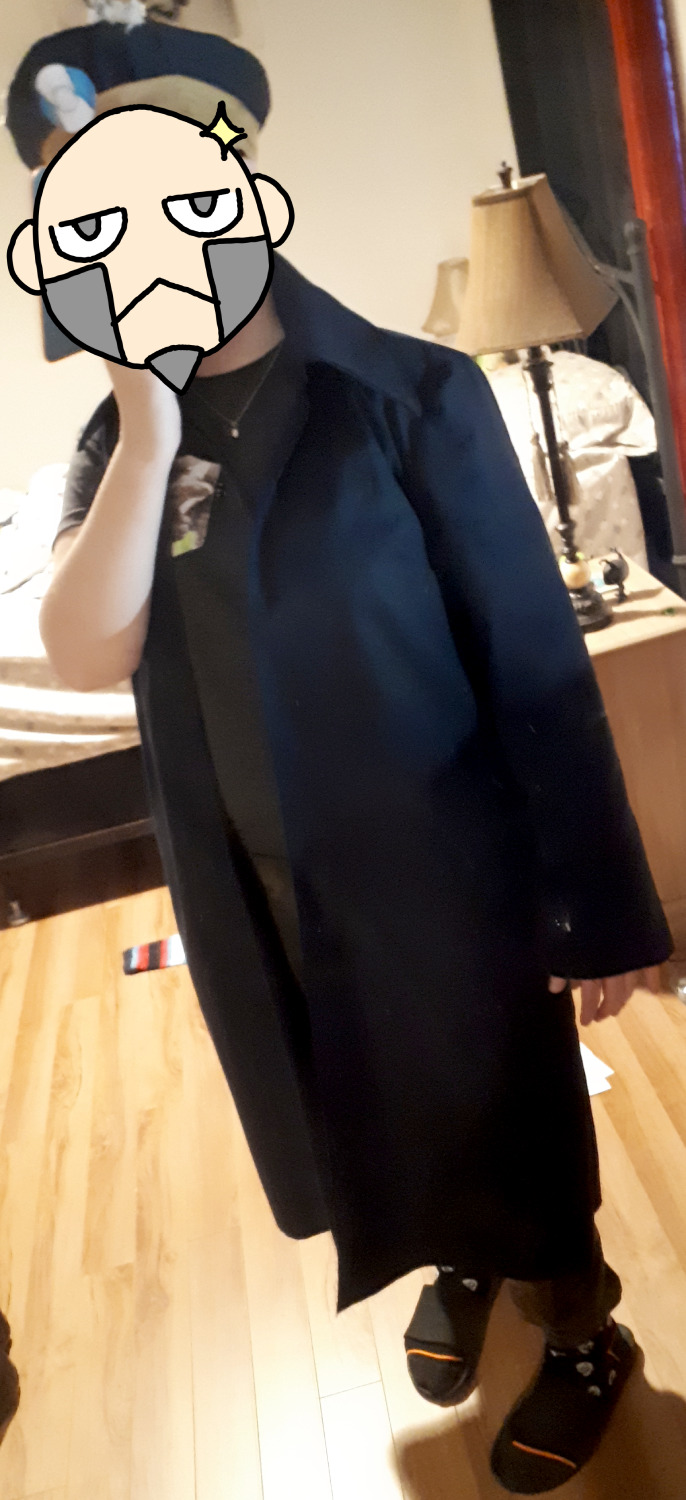
Next step was the stripes! I used some double fold white bias tape to finish the edges of the coat and topstitched the ones on the back of the coat on. I then used the same orange cotton as the hat band for the three orange stripes,which were topstitched on. Cheapskate Protocol made me buy barely enough orange cotton this time around because I was tired of building up the pile in the fabric scrap bin, so I had to improvise to make it work by snipping the bands in strategic spots in order to cover to whole coat properly. It's not like the parts that would be cut off later for the damage would need them, anyways. ✨Optimization✨
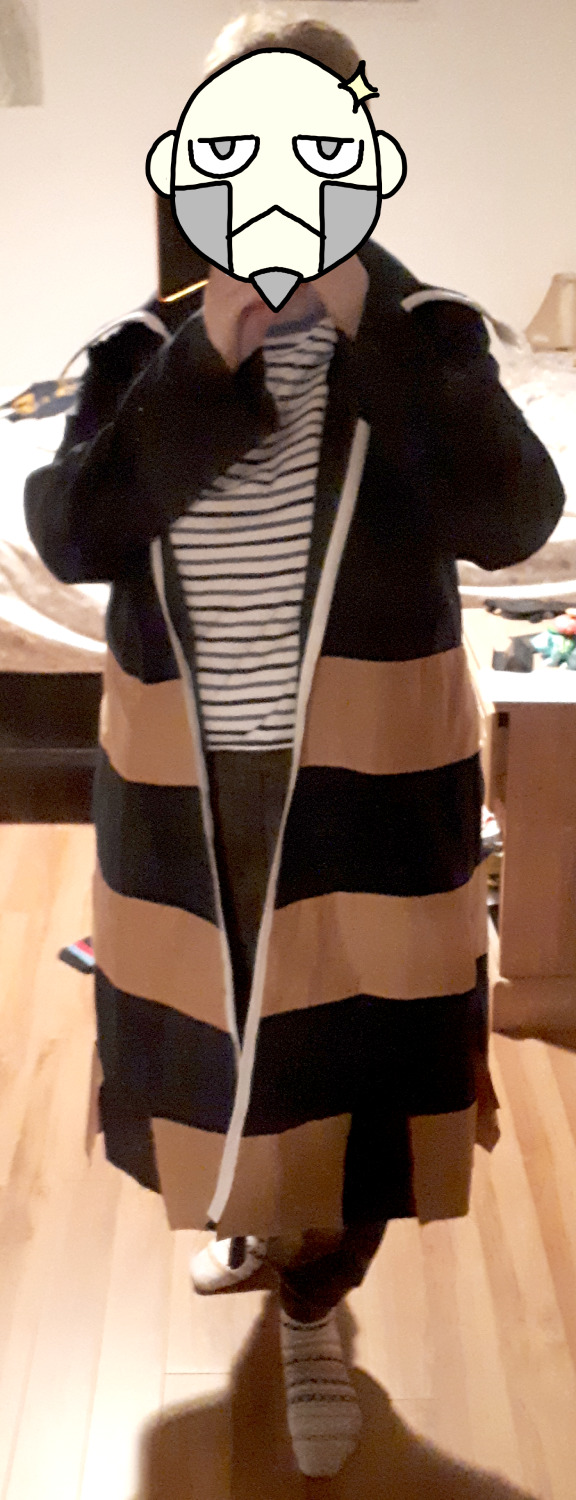
After rolling my rock up the hill of a Hell of my own creation, I booted up the game, dragged my avatar to the Ingo enclosure and marveled at the magnificent creature to see where the coat was ripped. I traced a loose guide of the tear designs with washable fabric chalk and crudely cut up the bottom edge, sleeves and collar to have the basic shape down.
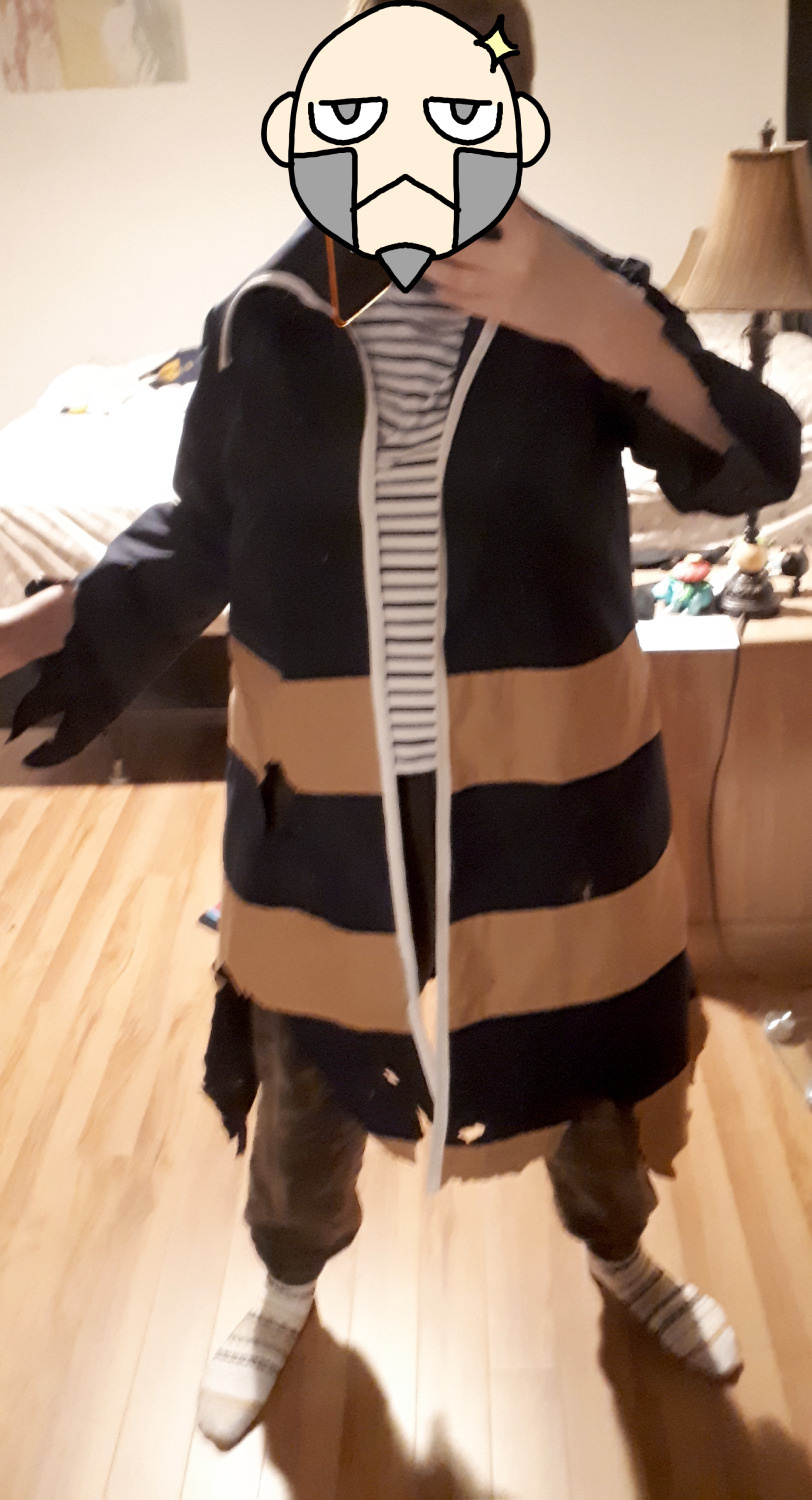
All that was left was to add the armband and the buttons. Turns out the only metal buttonsI could find that were big enough were those buttons kits to cover with fabric. Since I wanted to go for realism here (and be able to throw the whole thing in the wash after sweating in it all day), I wanted to avoid crafting them myself. With the main construction done, it was time to do the weathering! ... ... ... OH GOD I FORGOT TO ADD POCKETS
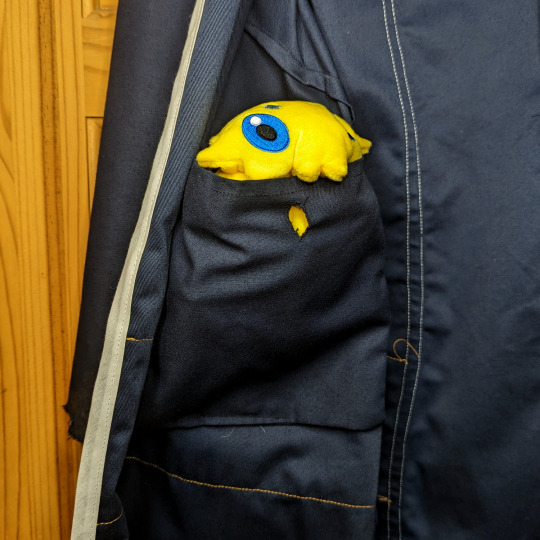
Behold, the world's most awful pockets. Two stupid little bags sewn in such a way you hopefully can't tell from the outside that I completely forgot that I wanted these. They literally only exist so I can have my phone handy at a convention. There's a buttonhole to close it too, I guess. They're shamefully hidden with all my lining-less, raw seam sins. Ok now we can destroy the coat
Station 4: Stinky And Dirty
I mentionned earlier during the hat section that I was going to get back to the weathering process. This is happening now. For the sake of Realism™️, I wanted the damage to look natural in real life, so I had to make it look believable. Luckily this wasn't my first rodeo with the Dirt, so I had plenty of weathering experience under my belt. To break up the awkward scissor cuts from earlier on the edges and fray everything up, I pulled out the sandpaper and started... Sanding the fabric. Might sound weird to some, but a lot of costume makers swear by it. It's also great for ripped jeans (if those are still popular today) and general natural wear. I also refined the shape along the way with scissor to break up any long straight cuts before fraying the edges. I took care to reinforce any newly destroyed seams with a sneaky staystitch so it doesn't unravel in the future. I then mixed up a bunch of different shades of brownish grime with fabric paints (I had black, brown, yellow, orange and green on hand) to dirty the whole thing up. This doesn't look as realistic as some other methods like weathering powders and Just Using Real Dirt, but as mentionned earlier I wanted to be able to just throw it in the washing machine at the end of the day to sanitize it. (If you're interested in actually learning how to weather a costume, this guide is where I started my journey.) I prioritized the ripped edges and any spots where grime would realistically accumulate in over time, like under the edge of the hat band. Paint was dabbed, stippled and rubbed on with whatever garbage tools I could find, which in my case were some old crusty brushes, sponges and toothbrushes I could get really violent with. (brushes were harmed in the making of this costume, but not my good brushes.)
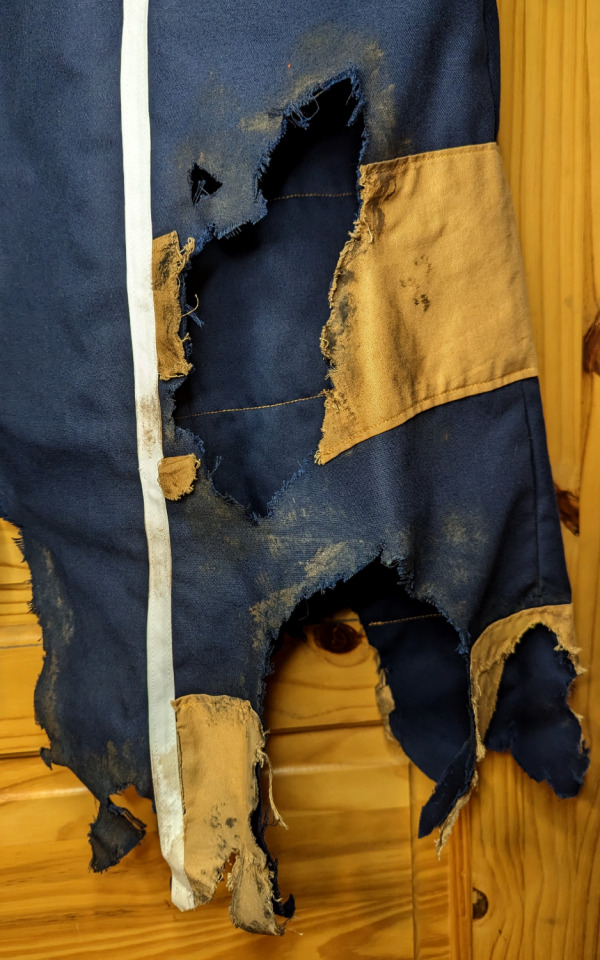
The whole thing was then sealed with heat using a flat iron as per the fabric paint instructions. With the coat done, all of Ingo's old Subway Boss uniform was complete!

Station 5: A Warden's Garb
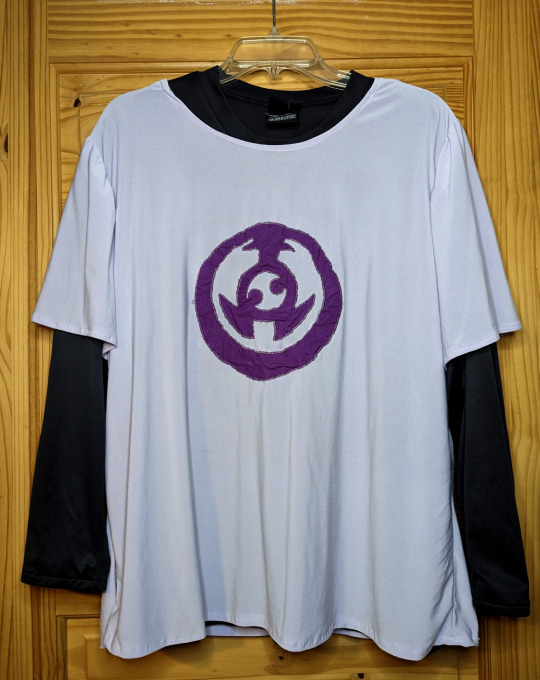
Next step on the list was making the Pearl Clan uniform. Thankfully, there's a fun little piece of concept art that shows Ingo without his signature coat, so from it we can confirm that his clan outfit has short sleeves (good for the comfort goal) and consists of two pieces: a tunic and some kind of hip sash. I omitted the hood on the tunic because I was realistically never going to wear it up and it would have just bunched up under the coat anyways. Now you'll be painfully aware of that terrible corner cutting truth whenever you scroll down and see photos of the costume. Sorry. I drafted out a quick pattern for both pieces of the clan garb through the power of math for the sash (a couple half circles with another piece for the border) and tracing over a tunic in my wardrobe for the shirt. I assembled a test version out of scrap muslin to make sure it worked properly, then set the pattern aside so I could prepare the fabric. In order to have all of the tunic elements match together, I picked up a bunch of white stretch knit fabric and a bottle of purple synthetic dye so I could reach the shade of dusty lavender I wanted. I measured out two squares of fabric based on the pattern. One square was for the darker border on the waist sash, while the rest was the lighter color for the whole outfit. I boiled water according to the dye instruction and worked on my Fabric Soup.
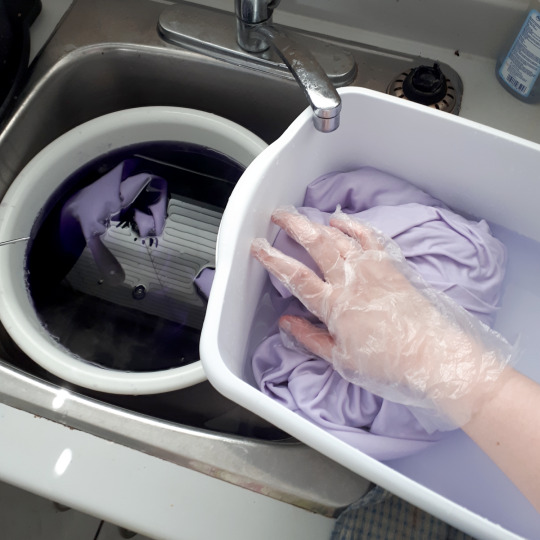
With the fabric dyed and washed, I cut my pattern pieces out and assembled everything together. Nothing special happened there since the pattern had been tested and adjusted prior to sewing the real deal. Ok, one thing happened actually. My sewing machine absolutely hated how thin this fabric was and kept trying to eat my costume. By the end I was about ready to throw the machine out the window, but things worked out.
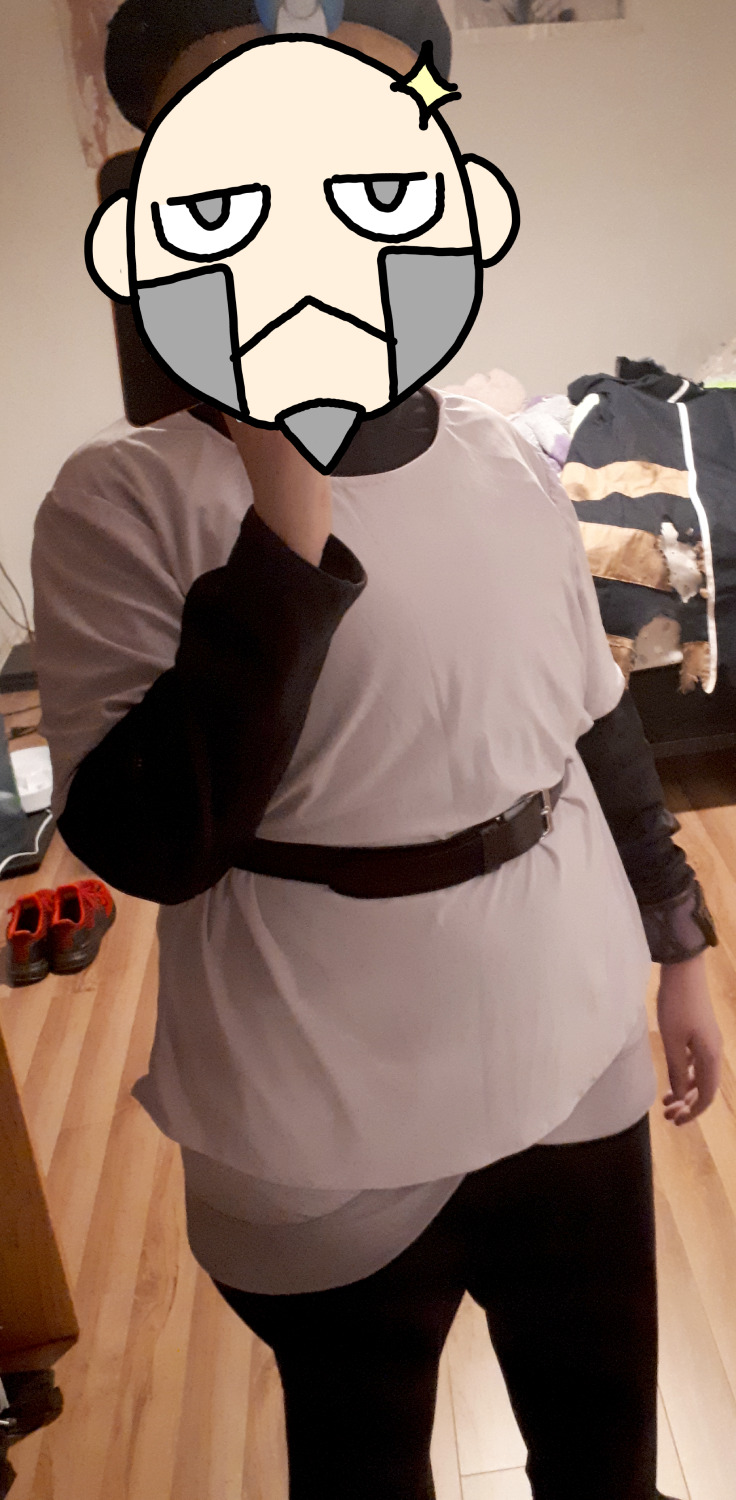
It's pretty sneaky and totally not visible on the outside, but the sash is held closed with two snap buttons on the front. It's easily the single jankiest piece of the costume due to the aforementioned attempt by my sewing machine to have fabric dinner. But hey, it works and the jank isn't visible so who caaaares (I care)

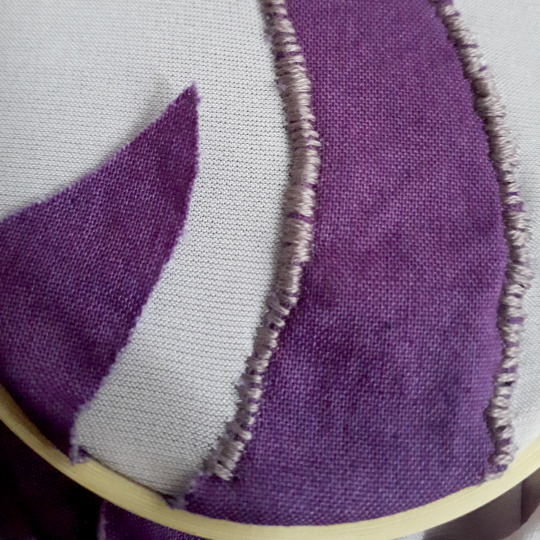
Final step for the Pearl Clan outfit was adding the logo on the front. I wasn't sure how I wanted to do this, at first, but to keep the fabric's stretch and keep with the idea that this is a hand-sewn garment from old Hisui, I decided to go with hand embroidery. I grabbed some scrap white cotton, dyed it purple, then cut it out in the shape of the logo. It was then painstakingly applique'd to the tunic by hand with embroidery floss.
With that done, the tunic was completed! It looks absolutely depressing on a coat hanger, but when worn with a belt it's all nice and cozy. As a bonus, it layers with the coat well enough that I don't have to wear a binder under everything to hide obvious boob shapes. Another win for the Comfort team! 👏 With all the sewing done, all that's left is the Warden bracelet and the hair.
Station 6: Noble Sneasler's Cool Bling
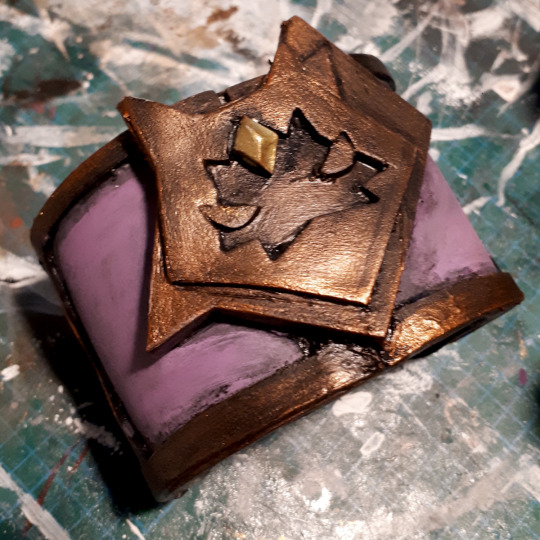
Ingo's got a bestie bracelet of his best pal Sneasler, so we gotta make that. The build should be pretty standard to anyone that's made anything out of EVA Foam for a cosplay. I drafted the pieces by referencing the in-game model, cut them out of different thicknesses of the material to create some depth, and glued everything together with contact cement and hot glue. (The main bracelet is 6mm foam, the details are 2mm foam and the black parts for the base of the head and the gem are 4mm foam.) I added an elastic on the wrist to keep the bangle secured to my arm while still being able to easily slip it on and off.

The whole thing was then sealed with flexbond, painted and then sealed with a spray clear coat. Honestly, it was the simplest part of the build and it actually went without a hitch this time around.
With the accessories done, it was now time to get to what I am convinced is every Submas cosplayer's worst nightmare: The Goddamn Hair.
Station 7: The Goddamn Hair
There's a lot of artists credited as character designers in the credits of Pokémon Black & White (2010). This means I can't figure out who to blame for Ingo and Emmet's stupid sideburns that make absolutely no sense in the real world. Instead we're just going to scream at the heavens and find a solution to the geometric flaps. Another fun fact: I'm awful at wigs. Like absolutely awful. I understand the methods involved, but I'm stupid bad at applying that knowledge on an expensive mop of plastic hair I don't want to ruin. So I did some research to figure out how people were making the twins' hair on their own cosplay. Everyone did a great job, but it wasn't really the effect I was looking for, so I decided to start from scratch. Because, you see, I was going to completely avoid styling a wig. I've always interpreted the art as them having some sick sideburns/muttonchops. (This art piece by waltias on twitter was posted like a week after I finished my cosplay and I felt so so validated in my interpretation) I also love Makeup FXs, so I thought "hey, I can look up beard makeup tutorials." I ended up with two ideas: either I could buy crepe wool hair in grey and glue the fibers to my face individually every time I put the costume on, or I could make a reuseable prosthetic. I'm a lazy piece of garbage that likes doing things once so prosthetic it was. I mean, I know how to ventilate wig lace. It'll be reusable and take 4 minutes to apply. Smart! I got the Jett in Light Grey from Arda Wigs, a ventilating hook, matching wefts and the lace. I had a plan, I was ready, it was going to look great. And then I spent 40 hours tying individual strands of plastic hair on a wig lace mesh. For a total surface area of maybe 3 square inch.
(Pictured above: A Fool.) It was hell. I might've incurred a stress injury from the process and then had to let it rest for a week because I did it all over a couple days. Would I recommend doing it? If you're patient, sure. I love the result. But this was, by far, the worst part of the entire project. 40 hours. The entire coat took me like 6 hours. 40 fucking hours.
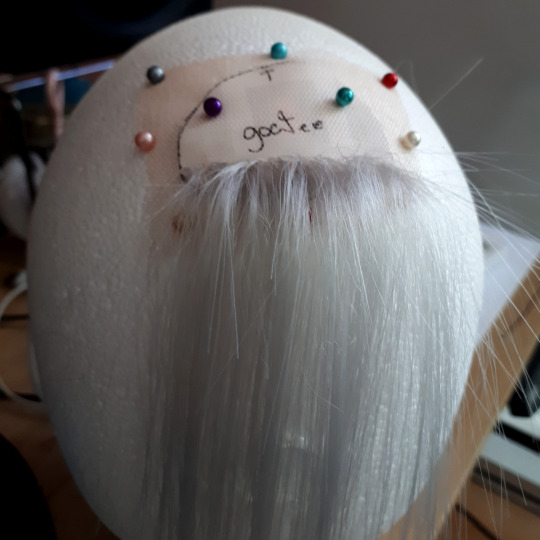
After painstakingly tying individual hairs to a mesh and realizing I might've reached the Ninth Circle of Hell along the way, I took my couple squares of ventilated wefts and trimmed them to the proper length. The result was awesome, and I don't regret it at all. It looks exactly how I pictured the idea of sideburns would look like. But it also took 40 hours of me just tying some fucking hair to a mesh. Maybe there was a better solution, but there's so little ressources about the process online that I just went with the methods I could find, really. I pray someone starts offering squares of pre-ventilated wig lace someday so no one else has to suffer like I did. As a sidenote, I didn't even bother with the balding hair since I wasn't gonna go through all the effort of heavily modifying a wig and wearing a bald cap if I wasn't even gonna take the hat off.
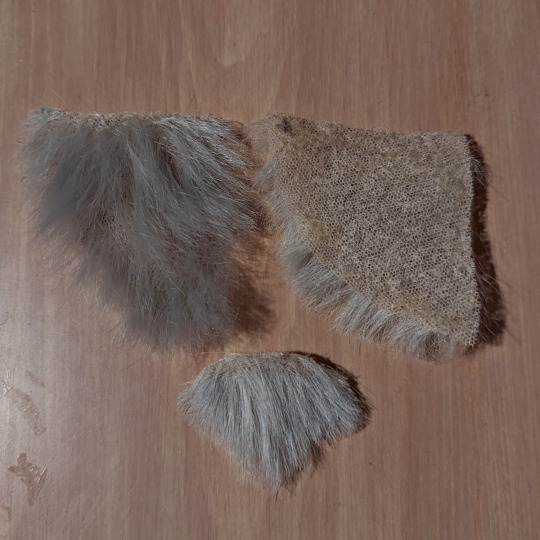
40 hours.
Station 8: Bits And Bobs From Under the Subway Bench
Honestly, after the absolute nightmare I went through making the sideburns and goatee, The final touches were a cakewalk. After all, the costume is complete! What's next? Warden Ingo uses Pokéballs like a cool guy, so I wanted one. I usually make pretty much everything myself for costumes because it's fun, but after the ventilating adventure I just wanted to rest. I'd been following NisuzCraft's work for a while now, and I loved the wood grain effect on their Hisuian Pokéballs. I wholeheartedly recommend them, their work is awesome.
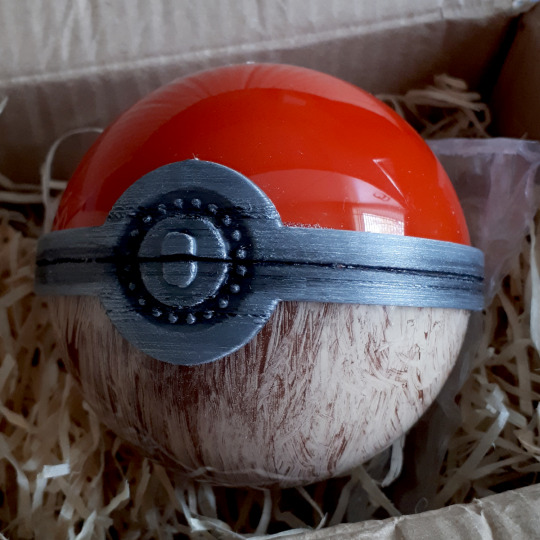
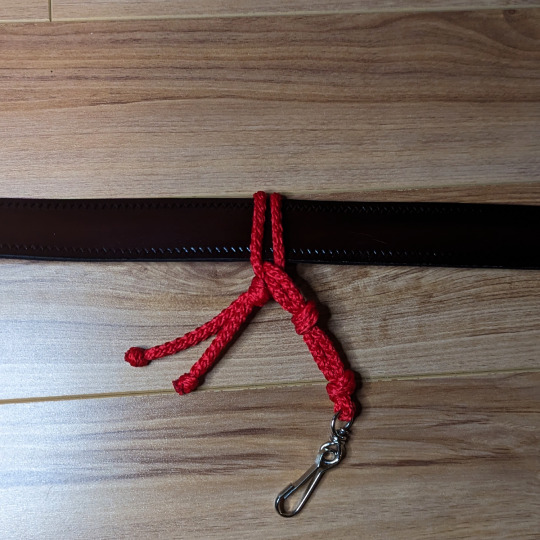
As a final touch, I grabbed some red cord I had lying around from a previous project to craft a little loop to hook my convention badge onto. I don't really like having the badge show up on photos, so it was a clean way to have it easily accessible while having it be easy to slide out of sight. I based the idea off of the knotted ropes the Galaxy Team member hang their Pokéballs from on their uniforms.
Lastly, though it's not necessarily part of the costume itself, I made an overly indulgent ita bag panel for the first con I took Warden Ingo out to. The collection's grown since then, but here it is:

Chandelure: JellyBearDesigns Ingo & Lady Sneasler: AstroTeenyArts Warden Ingo, Emmet&Ingo Duo: Cynniarts Ingo & Emmet with fingers crossed, Hanging Ingo, Emmet & Warden Ingo: Zhampip Rubber Straps: Official Pokémon Mate Merch Go show them some love!
Terminus: You Have Reached Hisui Station
So, first con wearing Warden Ingo came and went. What's the verdict? Pretty great experience, honestly. It was relatively comfortable to wear despite record heat in the middle of summer. The only real issue was that having a wig and a hat together trapped heat real bad, therefore some wig breaks were needed. I also initially used spirit gum to stick the facial hair on, and I struggled to remove the residue afterwards from the lace mesh, so now I just use body tape to keep it on. Nothing broke, nothing hurt, so I'd say it was a success! I haven't had to modify or repair anything for the future, so I'm very proud of the results. To anyone who read this Build Log to the very end, thank you so, so much for your interest. I hope this may have given you some insight into the process; especially if this helps your in future cosplay projects! If you don't cosplay, I hope it was still an entertaining read.
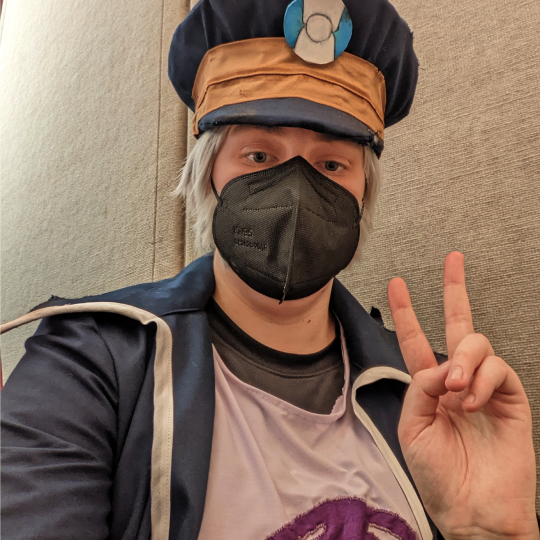
Hoping to see more wonderful Submas cosplays in the future!
#Cosplay Build Log#cosplay tutorial#pokemon cosplay#submas#warden ingo#ingo#pokemon ingo#subway bosses#original content#40 hours
71 notes
·
View notes
Text
It’s getting so scary in Dublin. Every other day there’s an attack. Last night there was a MACHETE attack caught on camera.
The perpetrators are all white Irish men, who think they own the city, of course. When they’re the ones actively making this city worse.
All there is to stay safe is to avoid going out late at night if possible. If you have to, walk with at least one other person.
Self defence tips are great and you can find loads of videos online. But it’s kind of hard to rely on them when you’re not trained directly by a professional. Not everyone can afford actual classes.
As well as that, a lot of the tips require you to have some form of strength training anyways to be able to put enough force into it. Which again, not everyone can go to the gym/ work out.
Also for people like me whose physical disability makes them much weaker than the average person. Like even with all the tips and tricks, realistically I won’t have the strength to fight someone off.
So weapon carrying can be the only thing to make you feel safe. I know this as a visibly trans and queer person, with other trans friends who do the same. Especially trans women. I swear if you need self defence tips go to them, because the unfortunate reality is they have to be ready at any moment for attacks. As a trans man it’s so much easier for me to walk the streets than them.
The issue with this however is that basically all weapon carrying is illegal in Ireland. Which I agree with, if it also came with preventing fascist white men from attacking people of colour/ immigrants/ women/ queer people/ trans people. If they’re attacking us with weapons, why can’t we attack back with weapons?
This is just what me and my friends personally do, so don’t necessarily take advice from me. But some of us carrying Swiss Army knives because they’re legal to buy. They’re really not designed for self defence, but it’s what we have!
I also have a fake switch blade that’s a “comb”. It’s pretty shitty as a comb. But yeah like it’s proper metal and heavy in your hand. And it flips up like an actual switch blade when you press a button. The comb is long, rectangular, and metal. It wouldn’t function as a weapon, but the point is it looks like one. Especially at night or if you just show it without flipping it up. You can get them on amazon, and they’re not too expensive.
The issue with carrying these things is that if you defend yourself it can be argued in court that you were a perpetrator looking to attack your attacker. But honestly if it means the difference between life and death, it might be worth it.
Feel free to add on with corrections or tips!
18 notes
·
View notes
Text
A while back I had a printer that a friend had given me because he needed to move to a different country and couldn’t take it with him.
So I had this rather clunky printer at home. Which quickly ran out of ink. So I stored it away in a cupboard for a long while. Until a year later I thought I would print out some of my poems, etc, and various other letters and documents and so on. So I opened the printer up and checked what kind of cartridges they needed. Then went down to the supermarket to buy them. And, I only picked up the darker tone ones, because some of the colour cartridges in the printer back home still had ink in them. So I didn’t think I needed to buy a whole knew yet.
Even with the ones I did by, the cost came to about £30. Anyway, I went back home and put the cartridges in. The printer bleeped and gurgled and, despite with the new inks inside, it told me they weren’t compatible. So I looked up online and it told me this particular printer needed a whole new set of those particular inks in order to work. I returned to the supermarket and bought the others, bringing the cost to £50. Back home, put the others in. And the thing still wouldn’t work.
So I began smacking it. I looked up again online what could the issue be. And I followed some of the digital shit that you were supposed to follow, the buttons to press and what not. Tried that. It still came up REQUEST DENIED on the little screen. This had all taken about three hours out of my day. So I got fucked off again and just smacked the printer a few times.
It then made these erratic R2-D2 noises. And when I looked inside, the metal and plastic bits were all stuttery and clogged up. And then I just lost it and battered the printer into oblivion. Just killed it. Of course, it was a waste of money. But, fuck it: sometimes it can be enjoyable to simply destroy something.
4 notes
·
View notes
Text

This was something I struggled with when I first got into extreme music. however, thanks to internet and social media, this process is much easier now than it probably was in the 80s and 90s. here I compiled a list of my favorite sites to buy band merch.
♠️ Hell's Headbangers: Metal Merchants based on Ohio. these guys have a huge selection of shirts, hoodies, vinyl, cds, tapes, and patches. whatever band you're looking for they most certainly have in stock.
♠️ Shadow Kingdom Records: Record label that specializes In speed, thrash, power, and heavy metal, though you will certainly find more extreme music here as well. their online store has plenty of cassettes, t shirts, and even magazines.
♠️ NWN: if yo'ure looking for the most extreme bands, Nuclear War Now! is the place to go. they Pretty much have everything you need for your favorite black, death, black death, and death thrash bands. they also have a physical store in Texas, and a yearly fest that's typically hosted overseas.
♠️Armed with Hammers: My go to for official patches, pins, and buttons. They ship from Israel, so Beware shipping costs!
♠️ T -shirt Slayer: Online network of maniacs worldwide. the site is pretty dated, but the community is still thriving. they have a whole section dedicated to selling and trading merch, or you can use the search bar if you're looking for something specific.

♠️ The band's themselves; this one is pretty straightforward. if you like a band that is still independent, then it's best to buy from them directly. in this day And age alot of bands have a bandcamp setup, or at least a social media presence. if they don't carry stuff online, then catch them live to see what merch they have available.
#metalmusic #metal #metalhead #spotify #blackmetal #speedmetal #evil #gothaesthetic #altfashion #blackmetalgirl
#extreme metal#death metal#dead mayhem#black metal#occult#sigils#spells#corpsepaint#music#metal#black metal girl#blackened thrash#thrash metal#heavy metal#metallica#megadeth#metalhead#norwegian#alt rock#chuck schuldiner#gary holt#kirk hammett
10 notes
·
View notes