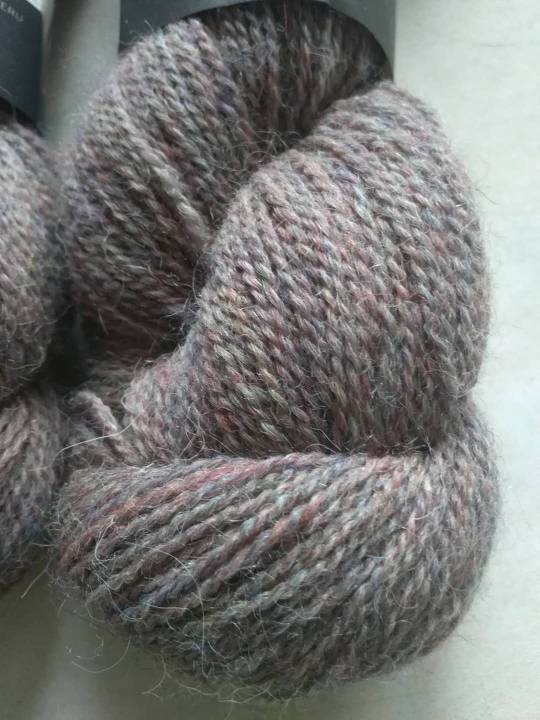
#but with yarn like this i could actually GET GAUGE for real
Explore tagged Tumblr posts
Visit Tumblr Blog
Explore Tumblr blogs with no restrictions, modern design and the best experience.
Last Seen Tumblr Blogs


Fun Fact
Tumblr is used by 21% of adults online aged 18-29 years.
Text
i knit with & blocked a non-superwash wool yarn today & oh boy. boy howdy. i’m like giddy. who knew fiber could behave like that
#it’s actually only 90% wool but oh my gosh#it stretched like butter i have never felt a yarn stretch so luxuriously#like my swatch was at a tighter gauge than called for per usual for me#but with yarn like this i could actually GET GAUGE for real#anyway stick season sweater here i come#knitting
3 notes
·
View notes
Note
OMG BUG I READ YOUR FICTOBER EVENT AND GOT SO EXCITED!!!
"I’ve been crocheting this throw blanket for four years and it’s finally finished. Please pretend it’s big enough and cuddle under it with me." I read this prompt and I think it would be amazing with sunshine/dizty reader x steve, its totally ok if you dont feel inspired so don't feel pressured to write it, ok love you, bye!! ♡
ty for requesting lovie :D — you make steve an anniversary present and the big softy almost cries (ditzy!reader, established relationship, fluff, 1k)
fictober (㇏(•̀ᵥᵥ•́)ノ)
“Happy anniversary!” you squeal, clutching an ambiguously wrapped gift in your hand.
It’s not actually your anniversary today. You can’t be sure when it is, really. You and Steve were already four months deep before you realized how official things had gotten, without either of you outright making them that way. So you both just decided to celebrate the day you first met, which you thought was pretty fitting. It feels right to acknowledge the day your lives changed forever.
You stand in front of Steve where he sits on the couch and plop the present into his waiting hands. The red glitter from the sparkly hearts gets all over his golden palms. It’s rather sloppily wrapped, like there’s no real shape to whatever you had gotten him.
He thinks it might be a blanket, or maybe a beach towel you liked so much you had to wrap.
Steve holds it up to his ear and shakes it anyway. “Is it a puppy?” he jokes with a crooked grin and sparkling honey eyes.
You pout, a frown pinching your brows. “No. There’s no airholes, Steve— that’d be so dangerous.”
Steve nods. He tries to be as serious as you are, but you’re so damn cute it’s impossible not to smile. “Yeah, you’re probably right,” he concurs with a squint.
He tears through the pink wrapping paper with glitter coating his fingers. He’s not surprised to find a blanket inside, but the fact that it’s handmade takes him for a loop.
It’s made of rainbow-colored square patches with different colored hearts on the front of each one. Some look more like blobs and bits of yarn straggle from a few rounded corners, but it’s the prettiest thing Steve’s ever seen. Mostly because he knows it was made by your hands.
He loves it so much he could cry.
“Holy hell, babe,” he scoffs out a laugh as unshed tears burn the backs of his eyes.
Unsure of how to gauge the reaction, you shift your weight on your feet and wring your clammy hands together. “Do you like it?" you wonder with brows furrowed in muted concern.
He drags his eyes away from the fuzzy blanket in his hands and up to you. His honey gaze glitters when it finds your own. “I love it, babe— what the hell? How long did it take you to make this?”
You shrug, innocent and sparkling. “I don’t know… ‘Bout a year, I guess.”
Steve gapes at you, eyes wide and pink mouth softly open. “You’ve been making this since we started dating?” he wonders when the words finally catch up to his reeling brain.
“Yeah…” you waver with a scrunched nose. “Is that weird?”
Too overwhelmed with a billion emotions, Steve just laughs.
He figures he must look insane, getting all emotional like he’s never seen a blanket before. One hasn’t meant this much to him before now. Nothing has, really — ‘cause it wasn’t made completely and utterly by you.
He shrugs and beams at you, wider than you’ve ever seen. “Only if it’s weird that I wanna kiss you stupid right now,” he teases, only half-joking.
“That’s very weird,” you nod, then purse your lips to the side in a futile attempt to hide the smile threatening to take over.
“Get over here, weirdo,” the boy laughs, sitting the blanket beside him and reaching for you.
His palms spread across the backs of your laughs when he’s close enough to touch you — a wide, warm, and all-consuming touch. You brace yourself on his shoulders when you lean in to kiss him, giggling against his smiling mouth when he drags you onto the couch beside him.
He smacks a more intentional kiss to your lips before pulling away from you completely. He keeps one arm around your back while his other reaches for the blanket. He shakes it out to unfold it entirely, then tries to wrap the two of you in it.
The crocheted thing only covers half of you.
Steve’s eyes are light-heartedly wide as they flit to you. “I hate to say it, babe…”
“What?” you waver, made unsure by his feigned seriousness.
“I don’t think we’re both gonna fit underneath it…”
“Yeah, we can!” you argue with a scoff, shifting closer to him. “We just gotta get real close, see?”
It doesn’t fit until you’re halfway sitting on his lap — arms wrapped around his neck, chest pressed to his. It doesn’t change how tiny the blanket is, but he’s certainly not complaining. If Steve had it his way, you’d be this close to him all the time.
“Ah, I see,” the boy nods with a poorly hidden grin. You’re so close, the tip of his nose traces up and down the bridge of yours.
“Can I tell you a secret?” you ask him in a whisper. Your smile is quieter now, bordering on serious, but there’s a mischievous twinkle in your eye he doesn’t miss. Steve nods again with raised brows, and you continue. “What if I told you that this was all intentional?”
“…Making the blanket three feet too small?”
You nod.
Steve thinks for a moment, then shrugs. “Then I’d say that you’re an evil genius. Or a total poet. One of the two, definitely— but both are equally hot.”
“Well, I was lying. It wasn’t intentional,” you confess to a crime he already knew you were innocent of. You light up again a second later, eyes sparkling just like your smile does. “But at least we get to snuggle, though, right?”
Steve laughs, high and boyish. It fills the living room with sun rays and makes your chest feel all warm. It’s like he put sunshine where your heart’s supposed to be.
He just nods and holds you closer. He’d tell you that he hopes he has a lifetime of snuggling with you if he could find the words to say it. You’ve got him tripping head over heels for you that he’d stutter too horribly for you to understand him.
But you get it, though, without him having to say a single word.
‘Cause if you could have a lifetime with him, cuddling under this exact blanket (that you accidentally knit way too small), you’d die the happiest person that’s ever walked the goddamn planet.
#published by bug#steve harrington x reader#stranger things x reader#steve harrington#steve harrington x y/n#steve harrington x you#steve harrington imagine#stranger things imagine#stranger things fanfic#stranger things fic#stranger things fanfiction#steve harrington fanfiction#steve harrington fic#steve harrington fanfic#steve harrington fluff#st drabbles#stevie drabble#event: fictober!
576 notes
·
View notes
Text

I was going to share a video, but I’m more of a writer. So here are my thoughts on Dollar Tree's Premier Just Chenille yarn (that's a mouthful—another reason I gave up on making a video).
To start, I don’t typically use chenille yarn. It’s not my favorite, but I don’t hate it either. The only chenille yarn I’ve ever really "liked" was by Bernat. I’ve also tried a very questionable chenille yarn from Lion Brand; it practically disintegrated with every stitch and was part of a scam yarn haul I picked up on Facebook Marketplace—TALE FOR ANOTHER TIME!
So read below to learn about my thoughts on this yarn and whether it's worth it to start raiding your local Dollar Tree.
As always, if you found this review helpful, please like and share this post, and also consider buying me a coffee.
· · ──────────── ·𖥸· ──────────── · ·
For this review, I decided to make three projects: a scrunchie, an amigurumi plush heart, and a headband. Why these three? Because they address the main reasons I avoid chenille yarn: its annoying shedding, lack of elasticity (it breaks with the slightest tug), and the cost. A scrunchie would test the yarn’s elasticity; my amigurumi project would test shedding and elasticity, thanks to my tighter tension; and a headband would help gauge overall value. (Technically, one project could cover all three points, but hey—let me crochet in peace!)
First impressions? The yarn is super soft—maybe as soft as Bernat Velvet. It’s labeled as a size 6 super bulky yarn but feels closer to a size 5. At 65 yards and 1.76 ounces of 100% polyester, I don’t think I’ll get more than one or two small projects out of each skein. The yarn comes in 16 solid colors, and I purchased two of each. I’m a yarn hog—sorry, not sorry! I also wanted to gauge the yarn's consistency amongst different colors. Based on first looks, all colors look, weigh, and feel relativity similar.
FIRST UP! XL Scrunchie

I chose the gray yarn for this project. The yarn is very slippery, so starting was tricky, though that’s more about me than the yarn itself. Made a mental note to try a plastic hook for the next project. Once I got through the first round, I was happy to find there was no shedding—so far, so good. The first real hurdle came after I cut the yarn to fasten off. The tail end started shedding almost immediately, as though an invisible knot were keeping the chenille wrapped around the core strand. I tied the end and wove it in quickly to secure it.


I was a bit nervous about using the scrunchie since it felt like it might come undone or shed into my hair, but thankfully, neither happened! I tied the scrunchie tightly and wore it for a few hours, and it’s still holding strong with no signs of shedding.
Amigurumi Plush Heart

For this project, I used the yarn in the hibiscus (hot pink) shade. I sized down to a 6mm hook and opted for my plastic Prym hook, which surprisingly made it seem as if I were crocheting with a metal hook and my usual yarn. The plastic hook handled the yarn’s slippery feel well, making the stitches smooth and easy to control.
Even though I kept a tight tension and sized down my hook by two sizes, there were still noticeable gaps between the stitches. This reinforces my suspicion that this yarn might actually be closer to a size 5 bulky weight, rather than the labeled size 6 super bulky—maybe even a mid-range between sizes 4 and 5.
Just when I was ready to celebrate its lack of shedding, I noticed a few tiny pink specks while working on the decrease rounds. It was hardly anything, and I think it may have happened because I had to frog back a round (no thanks to a counting error on my part!).

Overall, I enjoyed using this yarn for amigurumi. It’s soft, has minimal shedding (if any), and feels pretty durable. It held up well through two magic ring attempts and even worked smoothly with a hook smaller than the recommended size.
Final Project: Headband!

For this project, I chose a yarn in a beautiful champagne/light peach (oyster) shade. I initially started crocheting with my 6mm plastic hook, but then curiosity got the better of me—I decided to size down to a 5mm Prym hook. Instant nightmare! The yarn clung to the plastic (as it’s supposed to), which made it shed and turned crocheting into a real challenge. The tighter stitches looked lovely, but I quickly realized the plastic just wasn’t working. So, I grabbed my full metal 5mm hook, and the difference was night and day! I went from making chenille snowflakes to no shedding at all, which made for a much smoother experience.
When making headbands, I usually start with a chain about 1-2" smaller than my head’s circumference (so around 19"), as most yarns will stretch. But, since chenille and polyester yarn are especially stretchy—and I was unsure if this small ball of yarn would be enough—I sized my chain down to 18". Combined with the smaller hook, I hoped this would be enough for a 21" headband, and maybe even leave a bit for a scrunchie.


Around the 3/4 mark, I started getting nervous. It felt like I was playing a game of yarn chicken. Thankfully, I won—just barely! The headband fits me perfectly. It's light and I know I've said it a million times now, but yes, it's very very soft.
Final Thoughts
I really enjoyed working with this yarn. Was it easier to work with than Bernat Blanket or Soft Velvet? Honestly, it was a very similar experience.
Dollar Tree's Premier Just Chenille yarn didn’t shed or split at all—which, for a dollar store yarn, is honestly shocking. I was fully prepared to be vacuuming little flecks of chenille! This yarn has great elasticity, standing up to my tight tension, small hook sizes, and even a tight magic ring without breaking.
I did notice some inconsistencies with this yarn, but they weren’t deal-breakers. First, the yarn is labeled as a size 6 (super bulky) with an 8mm hook recommendation, but it feels closer to a size 5 (bulky) weight. For most projects, I’d recommend sizing your hooks down to around 6.5mm or 6mm, and for amigurumi, a 5mm hook might work best.
Another inconsistency was the amount of yarn per skein. The grey skein I used for my scrunchie seemed to have more yarn than the second skein in the same color. After weighing each skein (and factoring out the hair tie’s weight), I found that the amounts varied from 1.6 oz to 2.2 oz. It’s not a huge issue, but it’s something to keep in mind if you’re planning a larger project.
Is this yarn worth it? I’d say yes! At $1.25 for 1.76 oz of chenille yarn, it’s quite affordable. Here’s a quick breakdown of my recent projects: I used about 1 oz for the scrunchie ($0.57), 0.7 oz for the heart ($0.52), and 1.3 oz for the headband ($1.02). This makes Dollar Tree’s Premier Just Chenille Yarn a great budget option, averaging around 57–79 cents per ounce. For comparison, Bernat yarns cost about $1.15 per ounce, or around 77 cents when on sale.
In the end, I’d absolutely recommend this yarn for budget-friendly, cozy projects. It’s easy to work with, offers great elasticity, and delivers real value for the price.
One final note is on availability: not all Dollar Trees carry a large stock of this yarn. My local Dollar Tree didn’t have any Premier yarn at all, so I had to travel to a bigger location about five miles away. They had some in stock, but the yarn section looked pretty bare. I asked an employee about their weekly restock day and returned then to find more options. Due to Premier yarn’s popularity, you may need to visit a few stores or be an early shopper on restock day. Dollar Tree also sells this yarn online, but with a minimum order of 12 skeins per color.
· · ──────────── ·𖥸· ──────────── · ·
If you found this review helpful, please buy me a Ko-fi! Thank you for joining me on this creative journey and for supporting an amazing cause! Please:
❤️ Like & Share this post. ☕️ Follow me on Ko-Fi 🧵 Follow me on Threads 📸 Follow me on Instagram 👍🏼 Like/follow me on Facebook: TQI Creations 📌 Follow me on Pinterest 🎞️ Follow me on TikTok 🌳 Link Tree
4 notes
·
View notes
Text
Vintage knitting 102: yarn boogaloo
A while ago, I wrote a post about finding vintage patterns online for free. I thought I would do a follow up to that post and explain how to find a substitution for a discontinued or unavailable yarn. It does take a bit of legwork and some math but it does get easier the more you do it.

In order to make this less complicated to explain, I’m going to use an example pattern to walk you through my method. I am going to use the pattern “Round or Turtle Neck Pullover Pattern #s-108” originally published in Spool Cotton #198, Knit for Victory. You can see the pattern here (x)
First, what information does the pattern tell you? Well quite a lot actually. For this pattern we’ll need a gauge of 5.5 sts per inch and 7 rows per inch, requiring 1 pair of No. 3 (about a 3.25mm, US 10) and No. 5 (about a 3.75mm, US 9) needles. It is graded for up to a 46 inch chest. It also suggested Chadwick’s Red Heart knitting worsted in 1 oz balls.
Since this is a vintage pattern, we’ll need to get some basic information about Chadwick’s real quick. With a quick google we find a Ravelry listing for this yarn which tells us it is 100% wool, four ply and is discontinued. Ravelry lists the suggested needle size as US 8.
According to the Ravelry wraps per inch (wpi) information, this yarn has about 9 which puts it squarely in a DK weight (8-11 wpi) yarn. I know, I know the label says it is worsted but is shaping up to be a DK, vintage wool is notorious for being smaller than modern yarns. So we know we could be working for a DK weight yarn to make this easy.
So I personally like the Berroco vintage line and they have a DK weight yarn available. It is 100 g/290 yds/265 m and has 5.5 sts per inch. It is an acrylic, wool and nylon blend so if you don’t like that feel free to find another yarn, this will be the one I use for my example.
As we gathered from the ravelry site the vintage yarn we are subbing comes in one ounce (roughly 29 grams). So if we are making a size 46 which will cover a 46 inch bust for men. The pattern says we need 25 balls – 25 ounces. Since we’ve got to guess based on the ravelry page that would be about 725 grams (29 grams x 25 balls).
So for the vintage we would need 8 hanks of the Berroco vintage DK (100 grams / 725 grams rounded up). If possible make a gauge swatch before buying all the yarn (the stores near me with this yarn retail it for 9.50 USD). If needed, size the needles up or down to reach it.
Good luck and I hope this helps! Happy knitting!
#knitting#knitblr#vintage knitting#vintage pattern#knitting tips#knitters of tumblr#yarn swapping#knitting reference#reference
29 notes
·
View notes
Text
2 - Perseverance, small steps and a new FO
Hi hello,
Honestly, I was hoping to be able to write something sooner but I have not been in the right frame of mind to do so. For a while I’ve been feeling like I’ve been trapped by my circumstances, these things had been lowering me down to somewhere I didn’t want to be until last week the string that had been dangling me snapped and I hit a real low. I was left alone with my thoughts, for a week my mind spiralled until it reached a point where my body was shaking from lack of food and the stress I was under. This went on until the week passed and I realised that I could break out of this even if it means this pain lasts a little while longer, it would be worth it just to get out of this box I’m in and to be able to reach my full potential, or to at least figure out what that potential may be.
Before this hellish week had begun where I accomplished nothing I did at least finish something that I had been working on for a little while - my Elisabeth Blouse by the wonderful Petite Knit. One night I stayed up until the early hours of the morning and finally bound off my last sleeve in a rosé fuelled knitting marathon only to wake up hours later to sit and weave in all the loose ends whilst sat in bed watching Next in Fashion (if you have been watching please let me know your thoughts and who your winner is/was).
I had been looking forward to knitting this pattern before it was even released- it was such a beautiful basic and I didn’t have anything like it in my wardrobe. Before my yarn had even arrived I was already thinking of potential outfits. I had spent hours pondering yarn choices and colour options and crossed my fingers that I had made the right choice. I had opted for Filcolana Pernilla as this is one of the yarn options the pattern suggests and is actually also the cheapest (I’m from the UK and ordered from KNiTT).
Admittedly, this was my first time knitting a collar which I was a little nervous about and now looking at the FO I know it could have been a little neater, but for my first attempt I don’t think it’s too bad! Something else I noticed about this project was that my gauge seemed to be a little iffy meaning my stitches didn’t look as neat as I would have preferred. However, blocking totally worked its magic and evened everything out so much. I’m not exaggerating when I say that Filcolana Pernilla blocks beautifully. It also dried so quickly, which of course is an added perk as it just meant I got to wear my Elisabeth Blouse sooner.
Now, let’s talk about the fit. Before blocking, I had my concerns. After blocking, I was in love. The length of the sleeves and the body are just right. The cut of the neckline isn’t too low that I would be self conscious or constantly trying to move or adjust it.
The fabric is lightweight and ideal for layering making it a great transitional piece, although I was genuinely surprised by how warm a fabric the Filcolana Pernilla made. I’m also really happy with my colour choice and think it will work all year around (perhaps not the height of summer however haha, although with British weather you never know).
I got weirdly emotional when I did finally finish my Elisabeth Blouse and then wearing it for the first time. There had been a few points where I just felt like giving up on it- I was so up in my head about stuff that I had going on that I was struggling to find the motivation to continue. However, I pushed through and the sense of accomplishment from having done so was definitely worth it- being able to take a second to acknowledge all the time and effort I had put into creating something by hand.
This will act as a reminder to persevere and of what I am capable of when I do so.
Also, in between writing this I had a telephone consultation to discuss my endo symptoms and treatment and was told that I could potentially be placed on a waiting list for surgery to help treat my endo pain. I had felt like I was getting nowhere with my treatment or being taken seriously so this definitely feels like a small win and hopefully a step in the right direction.
It might only be a small step but it’s another step forward.
Pattern: the Elisabeth Blouse by Petite Knit
Yarn: Filcolana Pernilla in shade Chai
Images originally posted to my Instagram: atlantis.knits


#knit#knitting#knitblr#knitter#knittersgonnaknit#knittersofinstagram#knitters of tumblr#nevernotknitting#slow fashion#petiteknit#blog#personal
5 notes
·
View notes
Text
Knitting Pattern; The Rough Guide
So I attempted to make a pattern last night. I don't mention any specific yarn, needle gauge, or how much you need to cast on, off, or add and decrease in stitch count. Why? I went into this project with just a picture in mind, and that was potato Grim. Was going to make him life-size, but he was being difficult, so, potato.

Main Body
The body needs to be completed first so you can size everything else to your liking. I decided to not decrease the stitches at the end, so that he has a base that he can comfortably sit on
Back leggie x 2. I did these next as I was tired of knitting one large piece. Where you cast on will be where you embroider later for his paws and beans. Provides a nice resting period.
The head is next, as he looks very creepy being headless. Also this allows for you to know where to place his neck fluff and arms, and size them appropriately.
Neck fluff. Since the torso and head are done, you can make that fluff! Also so the arms can go in the proper position.
Front leggie x 2. The last part of the main body. I'm going to make them a bit longer than the back legs, no real reason, I just thought he would be cute that way.
Main tail. It's mainly just a long rectangle until you reach the tip. You'll have to increase the stitch count until you reach your desired devil tail levels, and from there you'll decrease.
Pitchfork x 2. Once the main tail is done, the pitchforks can now be made.
The Face Details (can be done after you complete the head)
Ear x 2. His ears need to be made first; again, to size everything else.
Large flame x 2. To get the skinny points, I'll be casting off until I have two stitches on my needles
Small flame x 2. Same as the large flame, but fewer cast on stitches and not as tall.
Embroidering
I'm embroidering the paw pads, toe beans, pupils, nose, and mouth, as they are quite small and would be a pain to knit. Just grab your desired colour. It can also be done with yarn or spare fabric.
Supplies
You can use whatever yarn weight and needle gauge you want; the torso and head would probably be easier working on the round though. This pattern could also work for crochet and sewing; I just like making myself suffer. Also any colours that you think can work.
You will need a stitch holder for when you make the neck fluff and ear flames. You can find these at any craft store, but Walmart also has them in the yarn section.
You will need stuffing, I'm just using some leftover stuff; I got mine from Walmart (I'm cheap okay).
My Notes
What I'm Using; weight 4 yarn on gauge 3 US [3.25mm] straight needles. The yarn I'm using is all thrifted, gifted, or leftovers from past projects so I don't know the exact brand or colours.
I would recommend a large skein of medium grey, a bright blue, and a light blue. Also, in the spirit of Ramshackle, try to thrift the majority of yarn and tools, I probably spent less than $5 on this project.
I'll make a separate pattern for when I make the ribbon and gemstone, as I don't know if I'll knit that or use another method. Yes, it would be cute and matching if it were knitted, but I'll probably curse myself after making the main plush. "Why, why did I make this." Rip my fingers.
Stitch Type; I'm knitting one row, and then using a pearl stitch on the other, as that is my personal favourite look of knitted pieces (and the only stitches I know)
KEEP TRACK OF YOUR CAST ON! Especially for the legs, torso, and head. And likewise, keep track of how many stitches you add on what row, so that you have close to matching pieces.
For the gradient on the tail, I'm actually going to attempt to dye it using calligraphy ink that I have lying around. Could also be done with paint.
I originally started knitting Grim because I didn't want to give Disney any more of my money than I already do, plus shipping is already expensive where I am. But also for a thrifted/closet cosplay for the Ramshackle Prefect (shameless self-insert). I don't know if I'll ever go to a con, but hey, I wanted a Grim plush and I can knit and sew, so I'm making a Grim plush.
This is a free pattern. I don't intend or want to make a profit off of this, especially since it's only a rough guide and only has the shapes you need and is of a copyrighted character. This is made out of a place of love and hyper-fixation. But if you do make one, please feel free to tag me; I would love to see your gremlin potato son.
Tagging a mutual, since they were interested in the pattern; @krenenbaker
#knitting pattern#knitting#twst grim#twst#twisted wonderland#do forgive the wonkiness; it was hand drawn#and then the numbers were added in Canva#my potato son is going to be roughly 50 cm tall but he's not done yet; his body is sitting at 20 cm; just have to decide on head/ear height#idk if more people would be interested; but I'm happy one person is#going to reblog this to the twst blog later & tag it as nrc craft club#nrc craft club
1 note
·
View note
Text
More crafting chronicles {long post incoming}
I’ve had an idea for a while to make a little Navi (plain amigurumi didn’t seem Cool Enough) but I wasn’t sure how to do it until I got more into embroidery
The idea process and early development went kinda like:
yarn pompom body ->
wings done in wire work to be cut out ->
how attach?? Even if I got the wings somehow secured to the Pom the whole thing wouldn’t sit or hang upright ->
sew Pom to fabric instead then ->
Fabric being attached to can go in a 4x6 frame I forgot to return bc it didn’t show All 4x6 of whatever you put inside
So then came the Experimentation Phase
I wanted to see if there was any way to make the pompom with a gradient effect (white to bluish). The answer is not rrrealllyy? At least for how I want the gradient to Look (all around and not just on One hemisphere). I was also using a clothespin to make the Pom so that might have something to do with it…
Next trial was white yarn + dusting it with blue eyeshadow on the outer parts as I wrapped it. This did kinda work but the effect was lost after trimming (I did not realize how much trimming is necessary)
I did however spread the color all around to make it a nice light blue and spent like an hour combing it to be fluffy. Too bad I wrecked it days later trying to see if I could wipe off some of the makeup for a gradient…

Then I wasn’t sure what to sew it Onto since I don’t have a wide variety of fabrics to choose from. I did have a plain white cotton quarter that I went with, but I also didn’t want to embroider an entire background bc I want to give this to my brother for chrimbus
I remember seeing some posts in the embroidery Reddit about painting the parts of an embroidery you couldn’t/didn’t finish so I was like cool I’ll just do that for the background (hubris). Did a quick test on scrap fabric to make sure I could embroider through it without the dried paint like crusting all over the thread or something
That worked, so then I had to figure out how to paint for reals. I have not painted a full/original image since probably middle school art class. And all I have are cheap kiddie acrylic paints from Michael’s lol
Made a swatch matrix thing to get an idea of what basic combos/ratios of colors will result in. This is my first draft for testing mixing and how to fill up the space that’ll be in the picture frame. Mostly used sponges bc I’m just going for a vague bg reminiscent of n64 kokiri forest
Not bad, not great for an amateur first go ¯\_(ツ)_/¯

Then p much right after, I worked on the for Reals version that I’m much prouder of. I remembered to use the cyan-ish green paint for mixing and actually used a brush lol. And tried what I assume are basic painting techniques (cover area fully with a dark or mid tone color, then layer on lighter shades and potentially go back to some of the darker shades again for details)

The next day I did some final details—adding some dark green to the grass and making sparklies. Made those of holo face highlighter liquid mixed with metallic gold and metallic teal paints respectively, and “painted” them using the top of a knitting needle. I think I might’ve taken this after spraying a little sealer on it

I made a new pompom out of white yarn with the fork method but I haven’t cut the loops yet bc I wanted to borrow some lighter blue eyeshadow from my sister to dust with. But she’s all “nooo I had an allergic reaction or it gave me conjunctivitis so you can’t use it for arts and crafts”. So no photo of the Pom since it’s unfinished
Got started on the wings as well! I’m making it out of iridescent organza

Used my new UST projector and my previous Pom to get the right proportions on some game arts to trace the wings onto stabilizer (well, onto a junk mail envelope then onto stabilizer folded in half for perfect mirror copy)
I have 26? Or 28 gauge wire that’s teal ish, which is nice bc I’m working with shiny floss that doesn’t hold its shape the same as cotton floss so there are gaps between my buttonhole stitches securing the wire. Felt like I didn’t really get into the hang of a consistent buttonhole until the end of the strand (top of the shape). At least I’ll get in plenty of practice on these bottom wings before starting the top wings

Also this hoop is super nice. It’s one of those plastic ones with a metal ring you squeeze like a hand exerciser thing to fit into the inner groove of the plastic. I couldn’t figure it out when I’d tried it a while ago with like regular-density fabric, but it’s perfect for how thin the organza is. I couldn’t get it evenly tensioned with the wood hoops I had bc it would slip through the tiny irregularities in the wood shape
The backside better shows the thread color :3 also probably the neatest back side I’ve ever done, out of necessity. I hope it’ll cut out well… I’m worried it’ll get messed up bc of how thin the fabric is :/ or if I’ll be able to tear away the stabilizer without messing up the stitching either…

#long post#wip#embroidery#real pepper crafting hours#nottt really sure how it’ll go sticking the painted fabric into/onto the picture frame…#I might press the fabric under some books again to make sure it’s flatter
0 notes
Text
On Swatching
I have a Bachelor's of Arts in Graphic Design, which I have maybe used for paying work 5 times in my life. And the only courses I really enjoyed were the required studio ones. Transitioning from real life medium to digital painting was a breeze, except...
Well, I'm an Aries. You can't tell an Aries anything, especially when they've somehow picked up Taurus traits even though the 12th ain't really a 'cusp'. And that + neurospiciness?
Pfft, no patience AND stubborn as a steer.
But I realized something in my digital painting time. You can't fudge the details. If you want it to look the way it looks in your head - that problem so common to artists with the inner eye that knows what it is you're trying to do - you cannot skimp. You cannot rush it. You have to go back to that one spot and put those details in. You have to take the time required to do something that looks good to you. The good/fast/cheap triangle doesn't really exist here, not for personal work. No one is paying you more to try and make things good and also quickly. In a lot of ways until you get better and more practiced you simply can't.
You have to do the work. All the work. The boring stuff, too. You'll feel like you're gonna die if it's not done soon. But the effort is actually noticeable.
When I got into fiber arts I forgot that lesson. Surely no one needs to SWATCH to make scarves and mittens and baby blankets. Gauge isn't relevant!
I have a finished object that's a garment. I won't show it here because I'm too ashamed to look at it. I spent literal months trying to perfect that garment. I messed up the front panel of it so badly once and the yarn had already gotten so terrible on it that I had to re buy two balls of yarn to re-knit it from scratch. I blocked it. I wove the ends in like a champ.
I never swatched. I thought to myself - I've knit this woman's patterns before. I did swatches then. It should be fine.
It was completely different fiber content.
The result was a tank top that was far too wide and far too short, with uneven straps and incorrect shaping. And all of that pain and spent time and spent money could have been avoided if I'd swatched.
Recently I just frogged another thing because instead of making a real swatch, blocking it, and checking, I stretched the stitches out on my needle and held them down with something heavy, got out a ruler, and figured my 'cheat blocking' would be enough.
Guess what. It wasn't. Now I'm frogging and going back down a needle. The pile of very annoyed superwash yarn ramen that is getting a bit natty and catching on itself is judging me. I'M judging me.
Sometimes, if you want it to look the way it's 'supposed' to look, the way the other projects do, the way the samples do, the way you know in your artist's eye you need it to - You have to do the work. Even the boring parts. Even those stupid swatches.
That failed tank top stays in a drawer. It'd make a great oversized crop top, I guess. I'll knit another one some day soon.
Hopefully this is the last time I heave to learn this lesson.
#spoon+knifeyarnfails#knitting#knitblr#knitters of tumblr#this is what happened to the two of wands streamline tank#thankfully I swatched her other two patterns
1 note
·
View note
Note
hey mootie craziest ask ever but do u have any General writing tips bc on god. i have ideas i iust Cannot sequence them or put them on Technological paper im at a loss here
Oh for sure! This post ended up being rather long, but I wanted to be thorough -- feel free to let me know if I need to re-clarify something.
Anyway!
Usually, I have to write myself into the good writing -- by which I mean I begin a session with essentially artist's warm-ups, such as scribbling out a few words about the images that are coming to me, or starting my first sentence with some throwaway introductory phrase like "Thinking about..." and then describing the thing in whatever barebones form comes out -- "and then X, and then Y," and so on. It's not pretty writing by any means, but once I have those creative energies flowing, eventually I'll start to naturally slip in more description, more emotion, even dialogue. The "real" opening of the story is usually not the opening you first write -- Anne Lamott in her book Bird by Bird, for instance, mentions that, in her drafts for her three-page food reviews, her real opening usually was on page two of the first draft. I've had essays published where I had to literally revise every single sentence that was not a quotation from somebody else. By the end of last semester, I was struggling so badly to finish some first drafts of my final papers that I legitimately could barely finish my sentences. I'd write down half a thought, hit the enter key, and start a different thought entirely.
Which leads me into my main point, which is getting a draft done by any means necessary. To be as blunt as possible: you can't edit shit you didn't write. To quote the dancer Martha Graham:
"There is a vitality, a life force, an energy, a quickening that is translated through you into action, and because there is only one of you in all of time, this expression is unique. And if you block it, it will never exist through any other medium and it will be lost. The world will not have it. It is not your business to determine how good it is, not how it compares with other expression. It is your business to keep it yours clearly and directly, to keep the channel open."
So I have first drafts littered with Wikipedia summary-tier scene descriptions, huge quotes from other writers, half-baked ideas, completely context-less dialogue, and even abrupt swaps between first, third, and second person, because nothing else matters but simply getting it done. This is not to say I never edit as I write, but you have to give yourself the leeway to write bullshit. (For longer projects, @bettsfic in her most recent newsletter discusses writing out a "gauge" to figure out the project's writing style before committing to it, saying that:
in knitting, a gauge is a square you knit before you begin a project to make sure you’ll end up with the dimensions you intended. that way, a sweater you meant for a grown-ass adult doesn’t become a baby sweater by accident. a gauge makes sure you’re using the right yarn and the right needles so you don’t have to unravel the whole thing and start over.
Thus, she says she writes and rewrites the first chapter however many times it takes to find a perspective and "voice" that works so she won't have to, say, change an entire novel from past to present tense-- I dunno how long your ideas would be, but this could be helpful, too.)
Since you mentioned sequencing, I'll admit I also struggle with that a lot, so I find writing out of order pretty necessary. Once you actually have more story material out in front of you, though, thematic threads become more apparent and sequences can start to suggest themselves. Tying themes to specific reoccurring actions and symbols can also suggest organization, both on the more global story level and the more microscopic sentence-by-sentence level. The 5+1 fanfic form is a great example of this.
John McPhee goes way more in-depth with this thematic organization idea here, though he's talking specifically about narrative nonfiction. Peter Elbow also discusses in "Collage: Your Cheating Art" that, if you have a fragmentary draft of an essay, you can always essentially use it to reverse-engineer a more "professional" outline. Again, not fiction strictly, but I use the same principle a lot (alongside Kurt Vonnegut's suggestion to start my short stories as close to the ending as I possibly can, lollll).
If you have a general sense of what plot/genre you'd like to write, you can also try what I've seen Brandon Sanderson call scaffolding, wherein you look at the basic plot beats and structure of a novel in your genre and essentially use it as the traced deviantART anime base on which to design your new OC. You don't have to be completely beholden to that plot structure, of course, but this can be a great way to cheat-start making an outline or first draft.
I tend go back and forth between collage and scaffolding since I'm a mess, lol. After the draft is done (or even just 80-90% done, because sometimes I know I'm not finished, but I won't know exactly what to finish until I'm into the revision process), I find it particularly helpful to print out my drafts and physically cut them up and rearrange them into lines and piles, so I can test the flow of certain sequences more easily than on a screen.
I was flipping through my copy of Bird by Bird while I was writing this, and I think I'll end this (very ramblingly) post with a small but encouraging quote from it:
I hope that helps! It's 2:47 am right now, lol, so I apologize if this is at all messy or a little scattered.
6 notes
·
View notes
Text
Scandinavian Spring, November 2018
I set my eyes on Laine issue #5 when I was visiting a yarn store in Copenhagen last summer, and this cardigan was so beautiful I knew I would make it someday. I was (and still am) always drawn to complex things, and whilst this piece wasn’t difficult, it certainly looked polished and delicate.
(The model’s smile and her pretty lace shirt might have helped, too—I should’ve known better, but who could resist?)
I had never knitted a garment with set-in sleeves before, and the design of this cardigan was sophisticated enough to present an exciting challenge as I learnt about how a knitted garment was supposed to fit on my body.
I have heard about the simplicity of Nordic knitting patterns on podcasts, and this certainly seemed to be reflected by the pattern instruction for this cardigan. At first I was confused by directions that told me to cast on or cast off, but not in which method. I knew enough to know that there were different methods, but not nearly enough to know which one was suitable, let alone which one I preferred. I am not complaining though—it was a research process as well as a joy to knit up this garment, which is exactly what I love both in work and in my hobbies.
The main pattern is lovely yet surprisingly simple. I could almost hear my maths teacher call it an elegant solution, and I fully agree. The cooperation of wool, alpaca, and mohair makes it light and fluffy like candy floss. A cardigan for a special occasion, certainly.

Pattern
Scandinavian Spring by Sus Gepard. A very relaxing pattern once I figured out the technical details concerning the edges. I spent about a month in late autumn last year knitting it. Every day I would do my BMAT practice questions in the afternoon, and then work on this cardigan for about two hours in the evening, before moving on to more science-related reading.

Yarn
Edge: Isager Alpaca 2 Eco #E0. 11g/55m.
Mohair lace: Rowan Kidsilk #634 Cream. 74g/618m.
Background colour: Isager Alpaca 2 #Sky. 60g/300m. This colour is so beautiful. It is a greyish purple, with red, blue, and yellow fibres. It has such depth that I feel I didn’t do it justice by placing it at the background.
The measurements include the amount of yarn used for a small piece of swatch.
The remaining yarns are weighed when I finished the cardigan last year. However, recently I cut off four pattern repeats of each sleeve respectively to shorten the sleeves (see modification), so the actual meterage of the mohair yarn and the background yarn should be a little bit less.
(Sky: see all those pretty colours?)
Modification
My gauge was different than what the pattern asked for stitch-wise. I got 24sts per 9cm, which was 1cm shorter than the standard. I casted on four more sts for the back and two more sts for each front piece. Row-wise I was fine.
I used 2.75mm and 3.5mm needles as suggested. The newly knitted cuffs were done with a 2.50mm needle, but 2.75mm should also be fine. I did have to knit very loosely, especially with the larger needle, to get close to the gauge. I used a 3.75mm needle for the purl row between ribbing and main body just so the edge wouldn’t curl up.
I knitted the body pieces flat, and sleeves in magic loop. In hindsight, I could’ve knitted the bodice in one piece up until the armseye, and worked separately from there.
Cast on and cast off: Italian 1*1 rib cast on and 1*1 rib cast off. Some instructions for Italian 1*1 rib cast off says to leave a tail that’s three times the length of the finished border. I think two and a half is sufficient.
For the bottom edge of the cardigan, since 1*1 rib cast on requires two additional stabilising rows, I used the second stabilising row as the first rib pattern row in the pattern. Then after this I worked 5 more so that the last row of ribbing would be worked on the right side.
When the pattern stated ‘every X row’, I interpreted it to be the last row of every group of X rows. It seem to be the right guess.
When casting off for armseye: I did it on the 1st row (RS) of the 14th pattern repeat. Cast off for shoulder from 5th row (RS) of the 25th pattern repeat. I knitted 26 pattern repeats in total for each piece.
When decreasing for neckline in the front, I began at 7th row of 15th repeat, and dec at every 3rd and 7th rows, 23 decs in total.
The pattern instructed to dec for armseye at the very start and end of the row. However, it was sometimes aesthetically pleasing to dec 1 st before the last stitch. I adjusted between ssk and k2tog for both start and end of row decs. In general, I decided which technique to use as I went, to make it more invisible in the weave pattern yet easy to pick up or sew.
I used bias cast off for the shoulder seams to be smoother. There are many tutorials online so you can easily find one if you search ‘bias bind off’ or ‘bias cast off’. I also learned to cast off at the end of a row by making a loop with the yarn and carrying the loop at the back of stitches. I used a combination of these two techniques.
For the back piece, I forgot that the stitch count included one knit stitch at every start and end of row, making it difficult to pick up stitches. It turned out alright, though.
Sleeve length adjustment: I think the sleeves are designed to be long, which certainly looks great, but not too practical. They add extra weight and pull the armseye seam down too. So several months after finishing the cardigan, I decided to cut off four pattern repeats on each sleeve. I counted four pattern repeats from the cuff, and used a needle to pick up the stitches on the 7th row of the 4th repeat as this row was clearer. After counting and making sure that I picked up the right number of stitches, I cut off the cuff from about the 3rd or 4th row of the 4th repeat. The texture of mohair and alpaca meant that the fabric wouldn’t unravel easily, but by leaving one or two extra rows it basically wouldn’t matter even if it were to unravel at some point. After this, I knitted one round and did seven rows in 1*1 rib before casting off.
Finished Measurements
I didn’t measure accurately, so there are approximations.
Bust circumference (there is no bust or waist shaping): a bit more than 80cm
Body length: about 50cm, possibly shorter
Sleeve length doesn’t matter—I improvise every time anyway.

Wear & Tear
I have no idea since it has never been worn outside. It is very delicate, and not very practical against the wind judging considering the extremely loose gauge, so I suspect it is not meant to be worn like an everyday cardigan anyway. I’m looking forward to wearing it, even though I am really worried about cleaning it. (Which is okay, I am used to worrying about cleaning after a few years in couture sewing.)
Further Considerations
The cut-off parts of the cuffs are not unraveling any time soon, and frogging mohair is a real pain, so I think I will incorporate them into a part of wrist warmers.
If I were to make it again, I would use the X size and do adjustments accordingly. I would make the bodice at least 5cm (so two to three pattern repeats) longer.
I would pick a background yarn that either is a solid colour or comes with strong colour contrast. Most of the background yarn is hidden behind mohair fibres, so it’s difficult to see any nuance.

2 notes
·
View notes
Text
Crutchie!
Grew up in Hickville, Middle of Nowhere
Lowkey is a total farmboy but you wouldn’t know it unless you joke about corn and he promptly spouts off corn facts
(his town grew a lot of corn)
(he loved driving combines during harvest season)
(he learned a lot about corn)
Worked in a haunted house when he was in high school every October
That’s where he learned to do special effect makeup and his Halloween costumes have always been and will always be the best
He was in a really bad car accident when he was little that pretty much destroyed his knee
Very gay. Came out when he was fourteen and proceeded to never let anyone mess with him because of it ever.
When he was like ten somebody teased him for having dark skin and wearing bright colors and his mom’s response was to take him shopping for the brightest clothes possible because he liked bright colors and just because one mean kid said people with dark brown skin couldn’t wear bright yellow or blue didn’t mean Crutchie couldn’t wear the colors he wanted to
In high school the drama club drafted him to do makeup after somebody remembered his kickass halloween makeup and so he learned to do normal and stage makeup and really liked it so he started wearing makeup regularly
He was also one of those kids in high school who was just so genuinely nice almost everyone liked him
This boy. Loves succulents. He has so many it’s kind of ridiculous. His room looks almost like a nursery he has like three shelves and plants just. Everywhere. And they all have names, and most of the names are puns.
Loves history, but weirdly specific bits of history. The history of cosmetics, the influence of jazz on culture, Australia, Jeremy Bentham, and just random weird facts.
Looks like a cinnamon roll, could actually kill you. Broke a bully’s nose once on the school bus.
Loves making fashion statements, and has a very specific sense of style.
Has a rule that there has to be at least one yellow thing in every outfit because he adores yellow.
The first time he wore a skirt he loved it so much he went out shopping that day and bought several more. He’s a big fan of the patterned leggings under solid colored skirt look, or the opposite.
In college had what most people would call a rebellious phase but what he called his real feel phase that he never really left, where he got tattoos and piercings and his style just kind of exploded into punk without leaving behind any of his old style
He has three piercings in his left ear and the same in his right plus a cartilage piercing
Considered gauges but ultimately decided piercings were enough for now
He has some kickass earrings though like one that connects to the cartilage piercing and the lowest one that’s a really cool dragon
He usually is wearing seven different earrings because why not?
Also has his septum pierced and has several rings for it
And he has spider bites on the right side of his mouth
His tattoos include:
Van Gogh sunflowers on one arm
His dad’s name and birthday on his ankle to remember him by
A succulent garden on the small of his back
A green carnation on his other arm
Roses and vines on his ribcage
A rainbow hummingbird on his collarbone
The roman numeral CCCXLVI, 346, because they’d heard his dad died on December 12, the 346th day of the year
A pride flag on his right wrist
A hand making the “I love you” sign on his left wrist
A tiny kitten playing with a ball of yarn on the back of his ankle
A really cool owl and tree design on the same shoulder as the sunflowers
There’s more but those are his favorites
His leather jacket has like. A hundred pins. Pride pins, political pins, nerdy pins, cool looking pins. Every pin he likes he finds a place for on his jacket.
He had dreadlocks in college and loved them
Drinks. So much tea. So. Much. Tea. He can identify what herbs make up a tea by taking a sip and can tell if something is loose leaf or bagged by the taste
You can tell what mood he’s in by what music he’s listening to. His mood playlists are highly specific.
Plays the violin and has gotten into an actual physical fight over which classical composer is the best.
He had an illegal secret cat in college. He was white and his name was Wiffle and he lasted two and a half years before the RA found out and made Crutchie find a home in town for Wiffle. Crutchie visited him every excuse he got.
He loves learning new languages. He’s fluent in English, Spanish, ASL and French, and conversational in German, Norwegian and Italian. His Duolingo streak is like two years long
Loves to draw
Loves swimming
Hates being underestimated.
Always has a comeback and never shies away from a debate
When he and Jack met it was because Jack wasn’t paying attention and knocked both of them down a flight of stairs
After that they were best friends and eventually started dating
He loves having bright colors in every possible place. His tattoos are mostly as bright as they can possibly be, he usually has at least streaks of bright color in his hair, and his clothes are all super bright. He just loves color.
He has ADHD and OCD
Went to college for theatre tech, wants to either be a stage manager or a lighting designer
High key has a pretty well-known Instagram full of artsy pictures and makeup tutorials and has a ton of fun editing videos
Has some very snazzy jewelry that he loves and adores, rings that cover the entire first knuckle, some really cool necklaces, obviously some awesome piercings
Once he graduated and he and Jack moved in together he made Jack adopt a cat and her name is Graffiti Kelly and she’s a menace
Also he decided he wanted long box braids and he got them done to like his mid back with yellow and pink hair mixed in with his natural color and loved that hairstyle so much
Loves cuddling unless his OCD or anxiety is acting up, in which case he’d rather be alone
Has two sisters and they’re super close. He’s the middle child.
Loves reading a lot, has three bookshelves in his room although one he uses for more plants than books.
Doesn’t like enclosed spaces. He can deal with an elevator, as long as it’s a relatively big one that he knows hasn’t gotten stuck. Prefers escalators when available, but can also go down stairs very quickly, although going up takes longer.
Owns far too many pairs of fuzzy socks
Low key super smart, but he tends to procrastinate so his grades don’t show it as much as his actions do.
Played golf in high school just to see if he’d like it since like twelve people made a point at freshman orientation that he’d be good at it. He wasn’t, he hated it, the only thing he liked was the golf cart, and he never played golf again after that year.
At some point realized he definitely is not 100% a boy, he’s more masculine nonbinary, but he still uses he/him pronouns most of the time. Some days they have the people close to them use they/them.
Keeps a journal almost religiously, his rule is he has to write at least a page front and back every day, even if it’s nonsense or unimportant details
He’s the person straight people look at, especially old straight people, as assume he’s rude and annoying and every bad thing a person could possibly be, since he’s pretty obviously Not Straight and also his style is just so out there
He takes special pleasure in seeing how upset they get when they try their best to ruffle his feathers and he just stays calm and polite
He has such a bad mouth. When he’s around anyone other than children or his mom he swears so much. It used to take people by surprise but at this point they’re used to it.
He’s so good and I love him.
#crutchie morris#newsies#crutchie morris hc#newsies hc#sami#it took me like twenty minutes to find the proxy to let me post these augh damn the school for blocking tumblr on the cbs#crutchie#let crutchie say fuck
111 notes
·
View notes
Text
Someone asked me about commissions in knitting. I do not do commissions for a variety of reasons but the easiest one to explain to other people is economic. Wanna know (part of) why I don’t knit for hire?
TL;DR Nobody wants to pay four hundred damn dollars for a pair of artsy knee socks.
What you say? What I said. Here’s the math.
The yarn for the green & grey solstice socks that I am making is $25.00 a skein. It’s Lorna’s Laces Shepherd Sock, you can buy it online in a variety of places. I like the handle and the gauge and how it knits up. It takes two skeins (one in each color) to make a pair of stranded-pattern knee socks for me. Materials cost: $50.00 in yarn. (I already own knitting needles suitable for this work.)
My hourly wage at my real job is $10.00 an hour. I feel like my sock-designing skills are worth At Least as much (on an aesthetic basis) as my tile-setting, toilet-unclogging, furnace-fixing, drywall patching landlord skills that I get paid actual money to do. I’ve spent (conservatively) about six hours designing the socks to have them come out the way I want. Some of that has been in fits and starts, but six hours feels about right. So, that’s $60.00 for the design work. (If I made these exact same socks again, or planned to, I could amortize the cost of the design work over all the pairs but knitting the same thing twice bores the living shit out of me, so that’s not very likely.)
In terms of knitting time, I don’t track that particularly closely. It takes me as long as it takes. But, since someone asked, I timed myself and got relatively dismal numbers.
The 2x2 corrugated ribbing takes me 15 minutes (I hate purling via “pick” and I suck at it) per round per sock because I just timed it. There are 24 rounds of this shit on two socks, so 48 rounds total which comes out to twelve freaking hours of horribly annoying corrugated ribbing. (It looks great. I hate doing it.)
The standard “charted” part takes twelve minutes per round. There are 21 inches of sock knitting that are charted, 12 rounds to the inch, so 252 rounds of charted sock, times 2 because there are two socks. Doing the math, the charted part is approximately 100 hours of knitting.
I am not a fast knitter but my tension is spot on and my consistency is fucking amazing. Let’s value my Knitting Labor at a whopping $3.00 an hour because I’m slow. (I am faster when I don’t have to read a fucking chart for every single damn stitch but for this pattern, I need to read the chart all the time.) Three dollars an hour is NOWHERE NEAR A LIVING WAGE, and I’m pointing that out here to emphasize how fucking little money it is.
So, when they’re done the Solstice Socks will be $50 in yarn, $60 in design, and $336 in labor (the twelve hours of corrugated ribbing plus the hundred hours of chart work) for a grand total of $446.00 for what are, in the end, knee socks. Fancy ones, yes, but knee socks. And that, tumblrites, is why I do not do commissions.
I’ve posted the pattern chart here and on ravelry. More-like-guidelines for making patterned knee socks are here, and that’s about all I can offer you. There’s a wealth of information out there for how to knit, how to knit stranded, and how to knit socks.
If you want amazing knee socks that are custom-tailored to fit your personal feet and legs AND you are neither independently wealthy nor equipped with a sweatshop of foreign children toiling to your will, the most reasonable way to make that happen is going to be “learn to knit and do it yourself”.
But... but... but... here’s five hundred dollars, will you knit for me?
No. I don’t care about money. That’s the other part about why I don’t do commissions. I don’t usually get into it because it’s harder to explain to other people.
0 notes