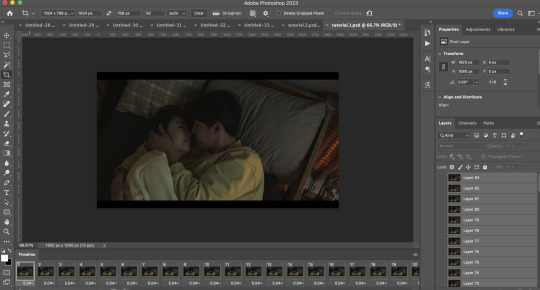
#but this layering and cropping and all of this under 10mb?
Explore tagged Tumblr posts
Visit Tumblr Blog
Explore Tumblr blogs with no restrictions, modern design and the best experience.
Last Seen Tumblr Blogs


Fun Fact
When “GIF” was named word of the year in 2012, Oxford Dictionaries U.S.A. credited Tumblr for pushing the word.
Text


bangtan gif challenge ☆
↳ stage mix (one song) + your bias → make it right & yoonkook
#bangtan gif challenge#cr. namuspromised#cr. 0613data#min yoongi#jeon jungkook#btsgif#dailybts#dailybangtan#userbangtan#usermaggie#usersky#userdimple#annietrack#heyryen#userpat#tuserandi#useremmeline#uservans#*mine#bts#not one bad word about this song unless you want to fight me#im not even going into how much this duo right here means to me#I used all creative juices for mic drop#but this layering and cropping and all of this under 10mb?#i wanted to kms so many times#be gone from my drafts
655 notes
·
View notes
Text
HOW TO: Do A Crystallize Gif Transition
Hi! I was asked to explain how I did the transition effect in this gifset, so here's a quick tutorial! Disclaimer: This tutorial assumes you have an intermediate understanding of gif-making in Photoshop using Video Timeline and requires the use of keyframes.

PHASE 1: THE GIFS
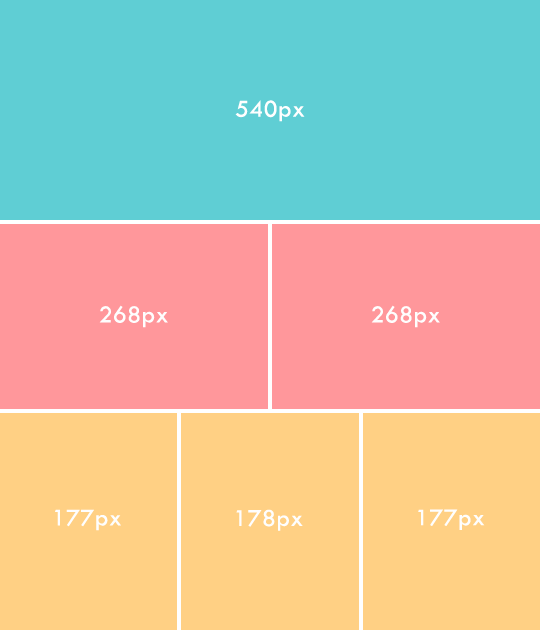
1.1 – Determine how many frames you need. Since you need at least 2 scenes for a transition, consider limiting the amount of frames you'll use per scene. For a transition between 2 scenes that's 540x540px, I would recommend no more than 30 frames per scene (for a final gif that's 60 frames). Even that may be pushing it depending on your coloring. Just be sure to consider the dimensions and colors of your gifs in relation to the amount of frames to keep your final gif under Tumblr's 10MB limit.
1.2 – Import frames, crop, resize, convert to smart object for Video Timeline, color, blend, etc. Do this as you normally would! If you need a tutorial for the basics, here's my tutorial. :) Please note, the methods in this tutorial only work with gifs that are converted into smart objects in the Video Timeline workspace.
Tip A: I recommend using scenes where there's a lot of one color (or scenes where you can manipulate it to look like that). The crystallize filter on a gif creates A LOT of movement that can feel a bit chaotic. Having your gif be primarily one color reduces the eye strain a bit imo.
Tip B: I like how this effect looks with blended scenes because it allows me to use different "crystal" sizes (more on this in Step 2.2). Check out the USERGIF Resource Directory for plenty of blending tutorials!
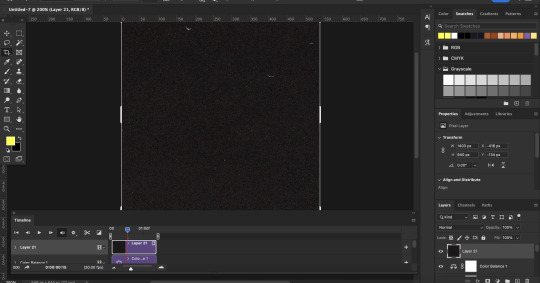
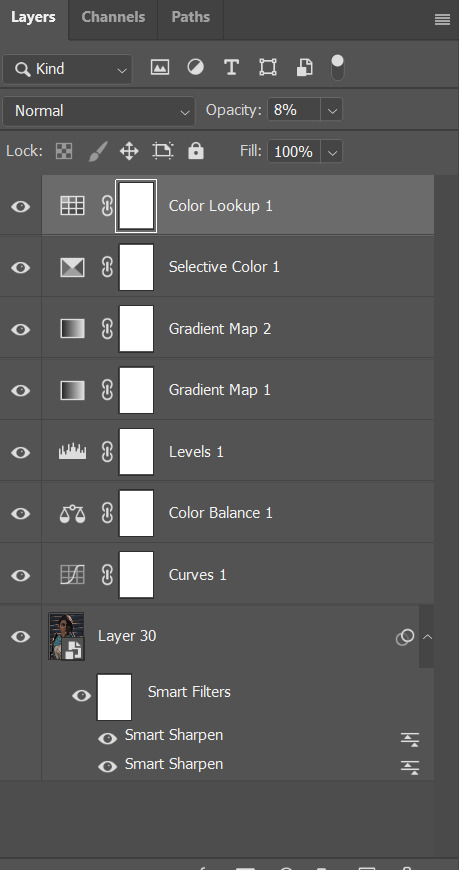
1.3 – Move all your gifs into one document, group into folders, and arrange. Once everything's in one doc, keep everything organized in a group folder! I have just two scenes, so that's Folder 1 & 2. Within those folders are the gifs I blended, which I labeled by gif color. Then, simply drag Folder 2 so it continues right after Folder 1. (Make sure none of your adjustment layers from Folder 2 accidentally affect Folder 1! You can do this by clipping your adjustment layers to match the length of the gif as I did, or using clipping masks.)
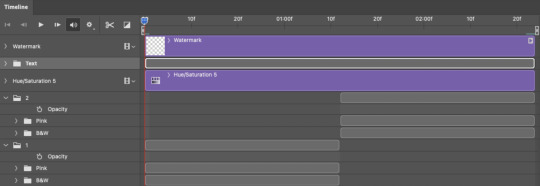
(Ignore that lone Hue/Saturation layer lol. I decided last-minute that I wanted my gif to lean more pink than red.)
PHASE 2: THE FILTERS
2.1 – Duplicate each scene. We're going to use opacity keyframe animations on these duplicated scenes that allow it to go from "normal" to "effect" and vice versa. The filters will only be applied to the duplicates. In the screenshot below, all of my duplicates are highlighted:

2.2 – Apply the Crystallize Filter. Above your sharpening settings, apply this filter by going to Filter → Pixelate → Crystallize. On the pink gifs, I made the crystals bigger (cell size: 45), and on the black and white gifs, I did a cell size of 25.
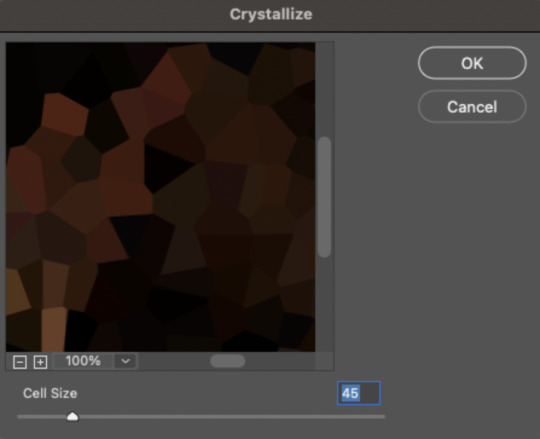

The different sizes help break up the uniformity of the crystals imo, creating more of a mosaic-like look, which is what I wanted to match my gifset concept.

2.3 – Apply the Oil Paint Filter (Optional). Filter > Stylize > Oil Paint. Here are my settings (they're the same for both crystal cell sizes):
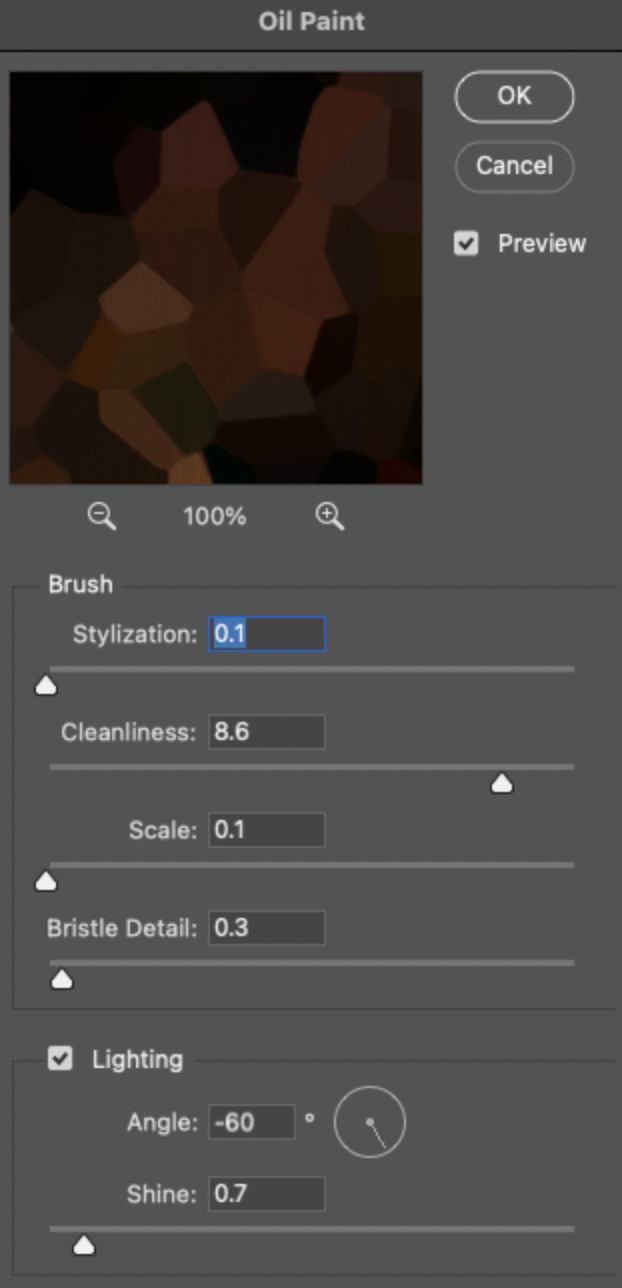
Brush – Stylization: 0.1, Cleanliness: 8.6, Scale: 0.1, Bristle Detail: 0.3 Lighting – Angle: -60, Shine: 0.7
This filter helps soften the cells a bit while adding some texture (left: no oil paint; right: with oil paint):

2.4 – Repeat steps 2.2 & 2.3 on all duplicated scenes.
PHASE 3: THE KEYFRAMES
3.1 – Add opacity keyframes. The very start and end of each scene needs an opacity keyframe set to 100% opacity. Move 0.09 seconds from each of those points, and place another opacity keyframe, this time set to 0% opacity. We're basically making the crystals fade in and out. Please reference the screenshot below for keyframe placement:

If you need more info on opacity keyframes, check out Phase 2 from this fade transition tutorial I did on usergif.
3.2 – Repeat step 3.1 on all duplicated scenes. All the keyframes in Folder 1 should line up exactly and all the keyframes in Folder 2 should line up exactly!
PHASE 4: THE DUPLICATES
4.1 – Convert back to Frame Animation. If you're not sure how to do this, I've written out the steps here. I rec the action linked in my general gif tutorial which I shared earlier!
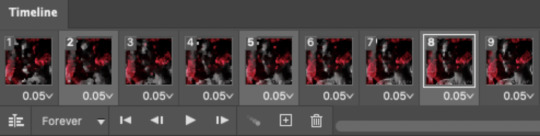
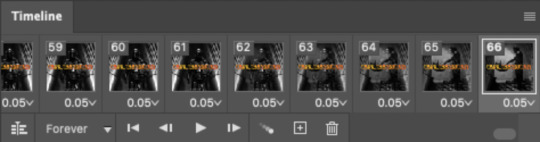
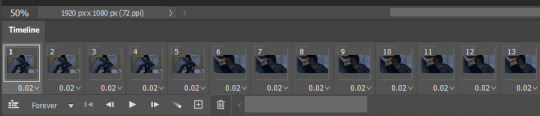
4.2 – Delete duplicate frames. Whenever you use keyframe animations, you'll get duplicate frames. That's just how it works, unfortunately. If you follow my steps exactly (specifically the 0.09-second spacing, which follows my tried-and-true 0.03-second rule), you'll have a total of 12 duplicate frames exactly — 3 duplicates per keyframe section. Just manually delete them! You can spot the duplicates by eye, but with this spacing, it's usually the 2nd, 5th, and 8th frame for each transition section. The selected frames below were my duplicates:
If you want to learn more about why there are duplicates and the math behind it all, I explained it in more detail in this ask.
4.3 – Export and you're done!
I hope this tutorial helps! Let me know if you have any questions :)
#gif tutorial#completeresources#usershreyu#usernanda#useryoshi#userzaynab#userrobin#usersalty#userhella#alielook#uservivaldi#tuserabbie#useraish#userabs#tuserlucie#mialook#resource*#gfx*
383 notes
·
View notes
Note
hello!! I really hope this isn't a rude question, bc I'm genuinely curious. I've been wondering for a while now why people who make gifs from a movie or a show or whatever get upset when somebody else uses the gif in something or want credit for it. Is the process difficult? I'm not 100% how to make a gif but I can't imagine it being that arduous. Anyway like I said not trying to be rude have a good day :D
hey there! it's not a rude question if only because you're asking in the first place instead of just discrediting it.
the thing a lot of people don't understand is how much work actually goes into making a gif, because we don't just plug the video into a gifmaking program and call it a day. a lot of us start JUST with the process of pirating the highest quality video we can find, which can be anywhere from an hour or two of downloading to days at a time (my record is five days for all five seasons of the a-team, but that's a story for another day)
so there's already at least a few hours potentially, just from downloading. granted, we do other things obviously but that's still time that's going into the process.
so you have to download those videos, find the clip you want, and then there are several different methods of getting the clip into whatever program you use (i use photoshop). most of the time i have to reformat the video from .mkv to .mp4, because PS doesn't take .mkv but the highest quality videos are typically in that format. so i put that into a reformatting program, which can take at least another hour depending on how long the file is.
so i've finally got the file ready to go in photoshop, and then i can actually start working on the gif itself. i've now spent at MINIMUM two or three hours just getting this video ready. then i personally clip it down to the exact scene i want it and go from there. if you're just doing a random assortment of scenes, you can choose whatever you want. but if you're doing a scene itself, you have to clip that scene in bursts so you can add the subtitles based off the mouth-movement.
so say you're doing a gifset of your favorite character from a tv show. well, you don't want to just have all of the gifs come from the same episode. so you do the reformatting process all over again. more hours. you do that eight or nine or ten times until you have all the scenes you want. and THEN you can start the actual editing process.
what size should it be depending on what kind of gifset you want to do? 540x540? 540x405? do you just crop it first or should you resize it? the resolution might go down depending on how you resize it. do you know what smart sharpen is, and which levels you should have it on in order to make the scene look the best? what's a smart object? what percentage should your frame rate be so it doesn't look too fast? it's completely different between live action and animation, after all. do you know which colors you should use in the adjustment layers, like selective color? does levels or curves work better for what you're trying to do? how do i get rid of the yellow in this scene so it matches the other gifs? what's the difference between linear contrast and medium contrast? should you use exposure or vibrance to get the shadows you want?
you've done all that, it looks good! you go to export it as a proper gif so you can post it to tumblr. but don't forget your settings on that either! transparency dither, web snap, the amount of colors and what size it should be. you do all that and the gif ends up being over the 10mb limit. so now you have to go back and carefully chip away at the frames until it's under the limit, which means you ultimately have to choose what to sacrifice from that scene so you can properly export it.
so you try again. okay, it's on 9.7MB. that's going to read as 10MB on tumblr. back in you go to chip at it again until it's going to read as 9MB instead. finally. you export the gif, add it to tumblr, and then tumblr doesn't like how it looks when you import it and destroys the quality, so you have to go back and try different export settings until it looks the way you want it.
so you do that nine more times. The Entire Process. downloading and reformatting the .mkv, getting the scene you want, clipping it, resizing and cropping it, coloring it, exporting it, and if you're adding subtitles then it's an entirely new process to add on! and don't forget that if you're doing a mix of scenes, you have to color them all depending on their own lighting, so you're basically doing the process again from scratch.
then you try to think of a fun caption. maybe you want to choose a line you feel best summarizes the character or scene. you put that caption through an HTML formatting program so it can be a gradient (the easiest part!), make the caption look pretty, and then tag it and press send.
you've spent HOURS on this process. literal fucking hours. you've been learning how to carefully manipulate the colors to look good, you know what frame rate looks the best, you have all of your settings saved as .psds.
and then someone right clicks, saves the gif (or just copies it) and posts it to twitter with their own funny little caption.
they get 26k likes, who knows how many retweets, a bunch of new follows. they get all the attention for that gif when they put zero work into it. all they did was write a caption and press send.
you got 400 likes and 165 reblogs on your gifset over on tumblr. maybe you get some tags on it if you're really lucky.
so tell me. wouldn't you be a little frustrated, too?
and just in case anyone wants to try and tell me this doesn't happen, you're welcome to compare the stats on this gifset of godzilla versus the repost on twitter.
#so yes it's a very arduous process#and yes we DO have a skillset that no one really acknowledges#part of the reason i stopped making gifs is simply because they kept getting stolen#and i was tired of seeing it#replies!#and i'm not putting this under a read more so yall can read it yourselves
260 notes
·
View notes
Text

Hello folks! As someone who never did any celebrations nor tutorials for giffing, I decided it's finally the time now. So thank y'all for putting up with my horror shenanigans, 8k is just amazing and I hope y'all will keep enjoying my blog and posts!
PHOTOPEA GIF TUTORIAL
Moving to Photoshop after years of using Photopea, I can say while they both work very similarly, they're also different. Photoshop is far superior, you can still make very HQ and nice gifs in Photopea too! This post aims to show you my personal way of making crispy gifs while also covering the basics of getting the frames and uploading them to Photopea. (If you're looking for more detailed beginner tutorial, there's plenty of those out there, amazingly done!)
Photopea is completely free, video player is completely free, downloading movies is completely free. Only thing it'll cost you is your time.
WHAT YOU'LL NEED:
- photopea - potplayer - good quality movie file ( i go for the highest GB ones, above 10gb is amazing. Sometimes I get 40gb and prefer 1080p source. Note that higher file doesn't immediately mean higher quality - if the movie looks weird just download another one)
GETTING THE FRAMES: Once you get your source file and open it via PotPlayer, find the scene you want to gif. Using D and F keys you can go backwards or forward by single frames. When you get the perfect frame where you want the gif to start, I always go back 10 frames because PotPlayer tends to cut those out. It's better to get more frames than you need as you can always delete those extra ones later on.
I'll be giffing scene from Longlegs alongside the tutorial.
PRESS CTRL + G. This will open the frame capturing window. Fix the setting to match these:

and press "START". Click back on the PotPlayer to bring focus back on the window and hold or press the forward key - F - to play the scene and capture the frames. You can see the frames number going up on your other window. If it stays on 0 you're not capturing anything. Once the desired scene is over, press "STOP" on the frame capturing window and voila - you have your frames in your selected folder. Delete any extra or unwanted ones. The amount of frames usually sits between 40-80 depending on what ratio you'll use later on for the gifs to fit the 10mb Tumblr upload limit.
Now it's time to open PHOTOPEA.
FILE > NEW: you have to write down the exact dimensions of your frames. This action will create a new file with single background. Go back to FILE > OPEN AND PLACE > SELECT ALL YOUR FRAMES and upload them. Depending on the size of the frames, this could take a while or even lag your browser. Make sure to not click anywhere within the app before all frames are done uploading.
Now lets finally make the gif. The following were my most used gif making steps in general, play around other options and find out what works - every gif or scene is different!
Delete the original empty layer at the bottom and then select all the frames (clicking the first/last layer and then click the last/first layer while holding shift to easily select all) and by pressing CTRL+G, group them. Select all layer again and
RIGHT CLICK (on the layers) > RASTERIZE LAYER (on the upper taskbar) > ANIMATION > MAKE FRAMES Now your frames should have _a_ in their names. CREATE NEW LAYER

and select all your frames again.
CROP the whole project to whatever ratio you want, Ill be using 64x44 ratio for wider gif.

By pressing ALT+CTRL+I open the RESIZE window. Tumblr gif dimension is 540px wide max (heres tutorial for other dimensions and why correct sizing is important) so using that and "bicupic sharper" option under resample, resize the gif.

Now you have the base gif done.

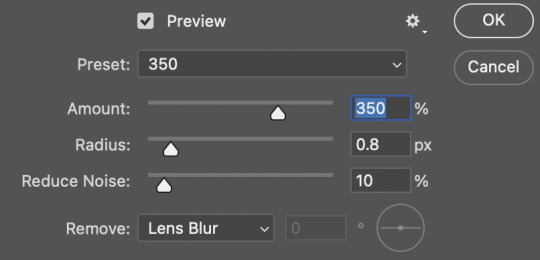
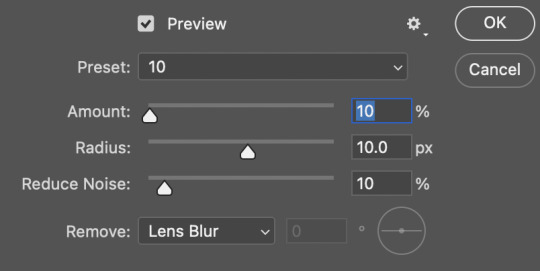
Its dark, muddy and unclear. We sharpen it and give it the clear crispy look using noise. FILTER > NOISE > ADD NOISE and set the Amount to 1% and select monochromatic FILTER> SHARPEN > SMART SHARPEN > 150% amount with 1px radius FILTER> SHARPEN > SMART SHARPEN > 50% x 10px

Now its time to bring the gif to life. Create NEW ADJUSTMENT LAYER. This is where all the editing options are.

For this specific gif Im doing:
BRIGHTNESS/CONTRAST +50 brightness, +10 contrast
VIBRANCE +20 vibrance, +10 saturation
HUE/SATURATION master -50 , red +50, cyan +50, blue +50 (the reason i tune all colors in master down by 50 is to mute them all down. Adding back on colors you want is making them stand out way more! It works on gifs with dominant few colors but if the gif is very colorful, you're better off leaving this option out completely and rather work with selective colors. As I said, try it out and see!)
another layer of BRIGHTNESS/CONTRAST +20 brightness
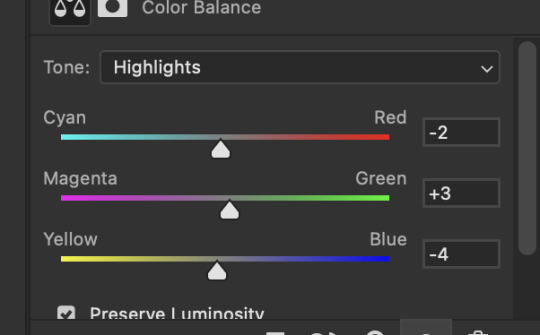
COLOR BALANCE range: midtones > magenta - green: -11, yellow - blue: +8
SELECTIVE COLOR red: cyan: -20%, yellow: +20, black: +10 yellow: yellow: +50% white: yellow: -10%, black: -20% black: black: +4%
CURVES(those are something I didnt use much in Photopea as in general youre just fine with brightness and selective color. Just move the point on the curve and see what it does! For this gif I went with Curves like these and it enhanced the gif nicely.)

another layer of SELECTIVE COLOR > black: black: +2%

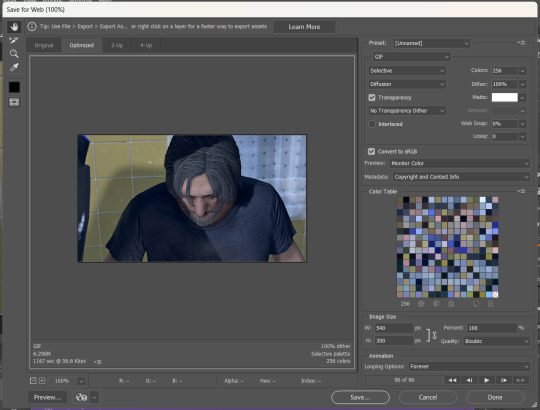
Now Im satisfied with the gif and want to save it. Clicking FILE > EXPORT AS > GIF will open this window:

Make sure the quality is at 100%, the size in darker numbers lower than 10MB. Speed in Photopea is quite tricky for some reason, but 180% - 190% is the "normal 100% speed" of the gif.

Enjoy giffing and feel free to ask anything if unclear!
51 notes
·
View notes
Text
HOW TO: Cross-Fade Multiple Gifs
Hi! In this tutorial, I'm going to go over how I typically do a fade transition that works with Video Timeline. Disclaimer: This tutorial assumes you have a basic understanding of gif-making in Photoshop and requires the use of keyframes.

Before I start, if you're wondering "why don't you just use the cross fade tool on the Timeline?" — this thing:
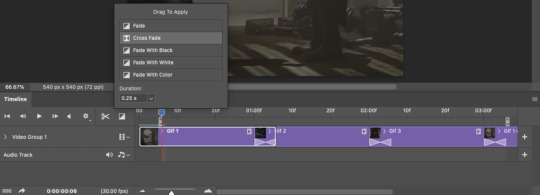
It doesn't work for me 🤷🏻♀️ Something happens when converting from Video Timeline back to Frame Animation (the converting everything into a smart object step) that completely negates the cross fade whenever I use it. I'm not sure why, but this is why I do fade transitions the way I'm about to explain.
PHASE 1: THE GIFS
1.1 – Determine how many frames you need. There are 3 things to remember here: 1) Ideally, each gif section should have the same amount of frames, so the transitions feel evenly spaced. 2) The gif's dimensions and total number of frames affect file size. Your final exported gif needs to be under 10MB (Tumblr's limit), so you should consider the total number of frames in relation to the size of your gif. My example gif is 540x540px and 60 frames total; final file size = 7.8MB. 3) Add 4 extra frames to each section to account for the cross-faded portion. (The reason I chose 4 specifically is because Video Timeline works in 0.03-second intervals. The typical duration of my fade transitions is 0.06 seconds — which, when converted back to frames, is 4 frames.) I knew 60 total frames would be a safe bet for a gif this size. Since I had 3 gif sections, each would be 20 frames. I added 4 additional frames, making each one 24 frames (before removing duplicates in the exporting process, which will be explained in Phase 3). You can make your transitions longer than 0.06, but I recommend keeping it to intervals of 0.03 due to the way Timeline works. Every 0.03 seconds = 2 frames, so use this when deciding how many extra frames you'll need.
1.2 – Import frames, crop, and resize. Do this as you normally would! If you need a tutorial for the basics, here's my tutorial. :)
1.3 – Move all gifs onto one document/canvas. Right-click the gif layer and select "Duplicate Layer:"
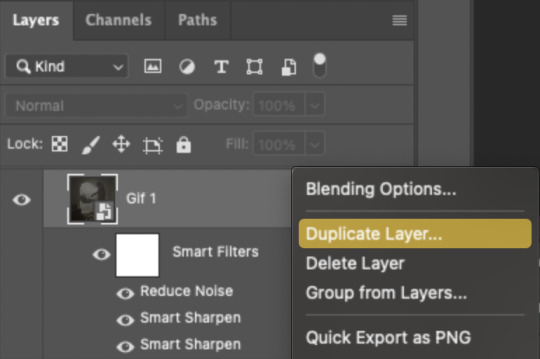
Then choose the appropriate document from the dropdown list:

Do this for each gif section so you can work on one document for the rest of the process.
1.4 – Put each gif into its own group. Select each layer and use the shortcut Command+G or right-click and select "Group from Layers." In Phase 2, we'll be putting the opacity keyframes on the groups instead of the individual layers.
1.5 – Arrange each gif's group on the Timeline. At the end of Gif 1, move backwards 6 times. Move the starting point of Gif 2 to this spot. At the end of Gif 2, move back 6 times and make this Gif 3's starting point. Here's how my gifs look arranged on the Timeline, animated so you can see the 6-space distance:

We'll be adding keyframes to these overlapping sections in Phase 2.
1.6 – Set up the last transition. At the very beginning of the Timeline, hit the forward button 6 times and click the scissors to divide the clip. Move the starting point of your gif to the newly trimmed beginning as shown below:

Then, move the original beginning chunk of Gif 1 — that tiny 0.06-second clip — to the end of the timeline above the rest of your layers, aligning its end with the end of Gif 3. Put it in a group like you did in Step 1.4:

Note: This screenshot shows my final workspace with the coloring layers in groups and the keyframes already placed.
1.7 – Color your gifs. Do this however you want, just keep all your adjustment layers and any other effects within their respective groups:
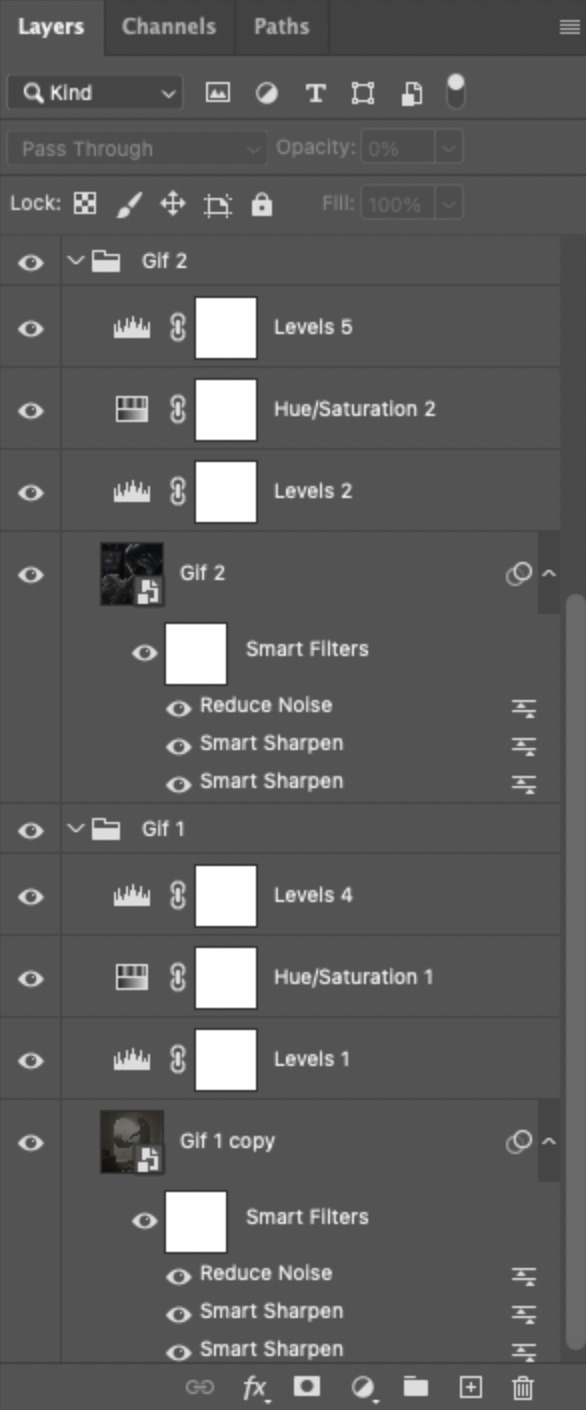
Duplicate the adjustment layers from Gif 1 and move them into the folder Gif 1 - Beginning (where your tiny 0.06-second clip is). Be sure the adjustment layers line up with the rest of the group so those adjustments don't affect your other gifs! You may want to trim the adjustment layers to match the duration of the clip or just move them so they start at the same spot as that clip.
PHASE 2: THE KEYFRAMES
2.1 – Place a 100% and 0% keyframe at the beginning of each gif's group. Drag the playhead (red vertical line) to the end of Gif 1. Expand the Gif 2 group to reveal the opacity keyframes on the left side of the Timeline panel, then place a keyframe by clicking the icon that looks like a stopwatch. This opacity keyframe is at 100% by default; leave it like that. Drag the playhead to the beginning of Gif 2 and drop another keyframe. While that new keyframe is highlighted yellow, go to the layers panel, make sure Gif 2's group is selected, and reduce the opacity to 0%.
Repeat these steps for each gif's beginning, including the tiny chunk we moved to the end! Here's a gif to show the process:
(Btw, if you click this gif, it should expand to full size so you can get a better look! I made it 1080px.)
PHASE 3: THE DUPLICATES
3.1 – Convert back to Frame Animation. If you're not sure how to do this, I've written out the steps here. But I recommend using an action in your general gif-making process to make this step a lot faster. The one I use is linked in my tutorial which I linked earlier!
3.2 – Delete duplicate frames. Remember, at the beginning I set out to make my final gif 60 frames total. With the keyframe animations, I now have 66 frames:
Palpatine's number 👎 Anyway, that means I have 6 duplicate frames. This is what the gif looks like without removing these duplicates:

Watch closely during the transitions; there's a tiny lag. It doesn't look smooth to me. It's the clones!! Here's why we have these duplicates:
For every 0.03-second long keyframe animation, you'll get 1 duplicate frame. Unfortunately, that's just how Video Timeline works with any kind of animated keyframe. Since our fade transition is 0.06 seconds, we have to get rid of 2 duplicate frames per transition section (2 x 3 transitions sections = 6 total duplicates. Ew, math!).
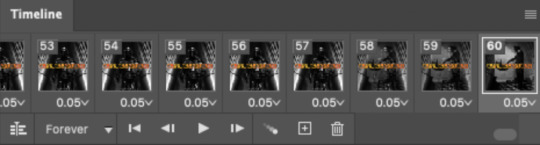
There's not really a way to avoid this step that I know of, but it's not a big deal in the long run. You just have to look at each transition section, eyeball the duplicate frames yourself, and delete them. It's usually the first frame where the fade starts and then two frames after that. I already deleted the duplicates from the first two transition sections, so here's how it's done for the last transition:

Side note: I set up keyboard shortcuts so I can quickly move forward and backward by one frame and delete frames. You can do this by going to Edit > Keyboard Shortcuts and editing these:

And now I have 60 frames like I originally said I would!
If you want the transition sections to be quicker, you can even decrease the frame delay for the 3 transition frames only — 0.03 or 0.04 might be up to your speed 🥁 but I don't usually do this since I'm fine with the way it looks already.
3.3 – Export. That's it!
I hope this tutorial is helpful. As always, if you have a specific question about this tutorial, feel free to send us an ask!
#gif tutorial#fade transition#transition#completeresources#usershreyu#userelio#userzaynab#userives#usertreena#userrobin#userkosmos#userhella#alielook#uservivaldi#tuserabbie#tusermona#tuserlucie#*usergif#*tutorial#by nik
563 notes
·
View notes
Note
Hi! I don't know if you already have a tutorial but would you mind sharing your gif making process? Thank you!
hiiii anon!
thank you for sending this in :) it's my first time getting a tutorial request hehe i tried to explain each step i do as best as i can.
i'll put the gif making process and tutorial under the cut bc it's image + text heavy
before starting, i'd just like to share what i use in creating gifs:
i'm on mac (i used to do them on windows... the ps steps are the same if you're using one)
i'm currently using photoshop 2022
i use 9xbuddy or video downloadhelper extension on firefox mainly for downloading videos
best quality to download for hq gifs is ideally 1080p and above. (although you can get away with 720p for smaller gif sizes)
i use mplayer-osx extended to get the screencaps/frames for my gifs (if i'm not doing the import option in photoshop)
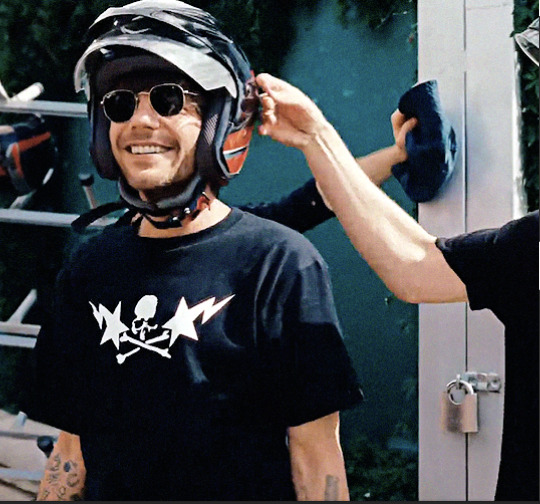
for this tutorial, i'm using the latam highlights video from louis' ig reels to make today's gif. on to the tutorial / process!
please click the screenshots i've included below and zoom in on the texts on them to see them clearly (apologies for the quality!)
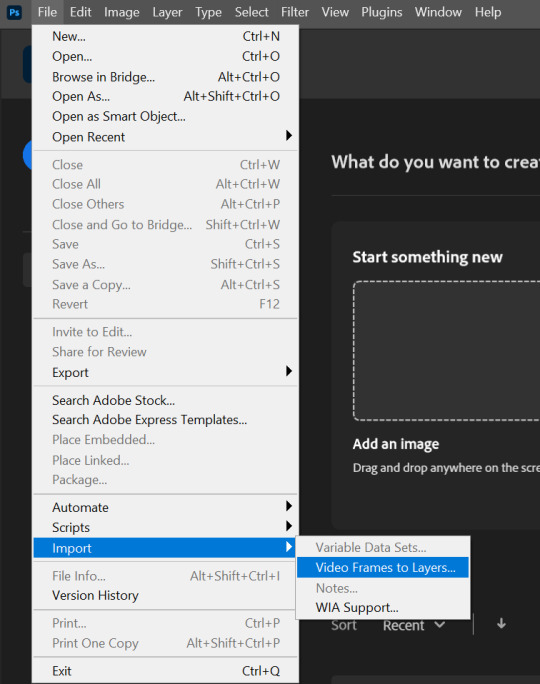
IMPORT YOUR FRAMES. once you've downloaded your video, open photoshop and click FILE > IMPORT > VIDEO FRAMES TO LAYERS
SELECT THE PART YOU WANT TO GIF. the shorter, the better because you want to keep it crisp and keep the file under 10mb when you save it after all the layers. here are the settings i use:

toggle the smaller arrows under the bar to select the parts you want to gif. once you have your frames loaded, it should show you a timeline table at the bottom and their corresponding layers on the right side. (if you can't see the timeline, go to WINDOW > click TIMELINE)
3. DELETE EXTRA LAYERS, CROP PARTS YOU WANT TO FOCUS ON, AND RESIZE.

after cropping the parts of the gifs, resize them according to the tumblr sizing to prevent your gifs from looking blurry once you upload them. you can use this size guide for your reference :) the gif's height can be any size as far as i know. go to IMAGE > IMAGE SIZE > INPUT THE SIZE. for this gif, we'll do 540 x 540
4. CHANGE GIF SPEED and CONVERT TO SMART OBJECT

once you've selected all frames
set the delay to 0.07. this is usually the natural, normal speed for gifs on here. it depends on the number of frames you have but i usually do .07 or .05 (sometimes .08 haha)
with all your timeline frames still selected, then select all the layers on the right side. go to SELECT > ALL LAYERS
then convert them to smart object so we can edit all the layers all at once. go to LAYER > SMART OBJECTS > CONVERT TO SMART OBJECT
5. SHARPEN (one of my fave parts!)
this is the basic one that most users use:
STEP 1: go to FILTER > SHARPEN > SMART SHARPEN

radius usually goes from 0.3-0.4
STEP 2: Repeat STEP 1, but this time change the settings to:

you can stop here but i like my gifs crispier and to have more texture! i use the sharpening settings from this tutorial or these sharpening action packs from user brainwasheds. i highly recommend these! i mix and match the settings when i'm not happy with how they look on my gifs. but for this gif we'll use the sharpening settings from this tutorial.
in addition to the settings from that tutorial, i also added FILTER > OTHER > HIGH PASS at 3.4 radius, then set the opacity to 60-80
then lastly add FILTER > ADD NOISE > NOISE at gaussian setting with 1.5 amount, then set opacity to 20-30
6. BRIGHTENING, COLORING, BALANCING, ADDING TEXTURE
now for the fun part!
STEP 1: BRIGHTEN UP THE GIF this is my go-to way to increase the brightness. go to LAYER > NEW ADJUSTMENT LAYER > BRIGHTNESS / CONTRAST then change its blending mode from NORMAL to SCREEN

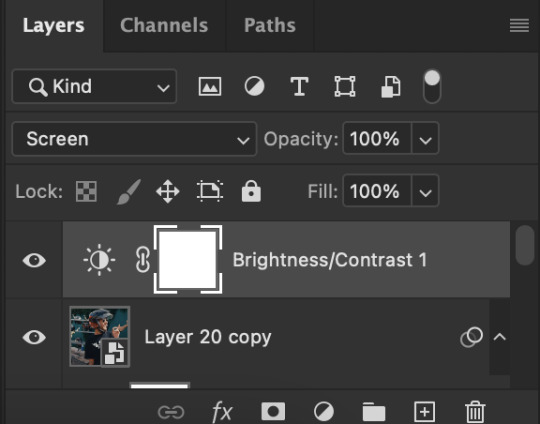

you now have a very bright, highly saturated gif but we'll fix that lol
STEP 2: ADD CONTRAST BY FIXING THE BLACKS AND WHITES add a new adjustment layer > LEVELS

i usually play around with these. middle and black arrows add shadows and contrast while the white arrows add highlights/brightness to the gifs.

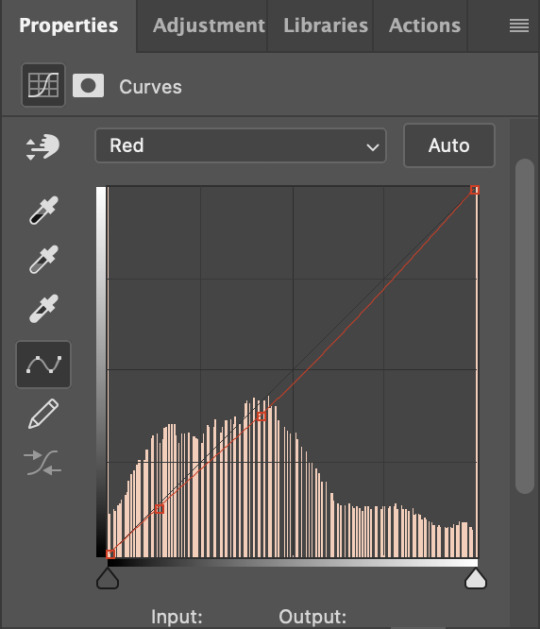
these are my settings! these are not definite bc it varies depending on what you're working on, so adjust them accordingly. next, add another adjustment layer > CURVES

i usually zoom in to locate the darkest / black area using the black dropper. then once that's done, do the same and locate the brightest/white area. this adds further contrast to your gif that wasn't done in the previous step.
STEP 3: COLORING (my fave part!!!) add a new adjustment layer > SELECTIVE COLOR this is the part where i like to neutralize the skin color when it gets too yellow or red, make the colors pop, and sometimes change them too. louis' skin was looking too red heavy, so i wanted to reduce that! i start with balancing out the skin color with REDS & YELLOWS.
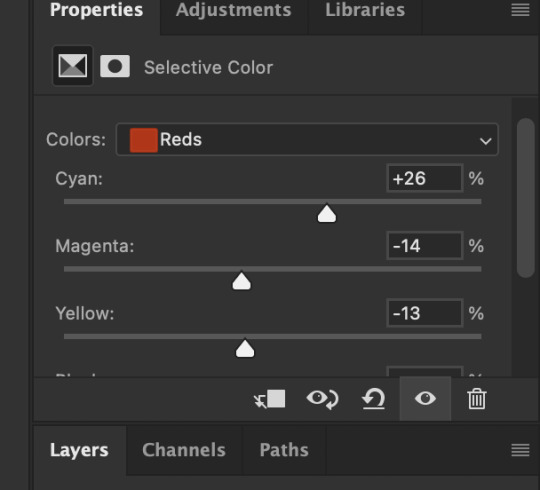

these are my settings for this gif! adjust them and observe the changes it makes on the person's skin. if you know color theory, it's helpful to see how it affects the colors on your gifs. putting the arrows more on the left side, adds more 'cool' tones, whilst putting the arrows to the right side, adds more 'warm' tones.
i like to deepen the blacks on my gifs further so, go to selective color's BLACKS and on the black scale, add more to the right! for this one, i added +10
add a new SELECTIVE COLOR adjustment layer. for this one, we'll make the surrounding colors pop more!


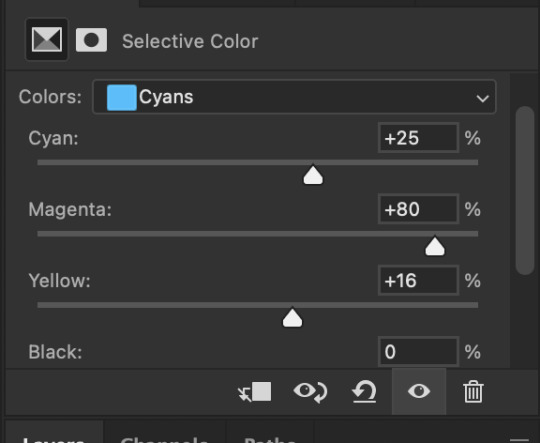

for these settings, i made the leaves more vivid while the teal(?) wall, i adjusted them made it more blue.
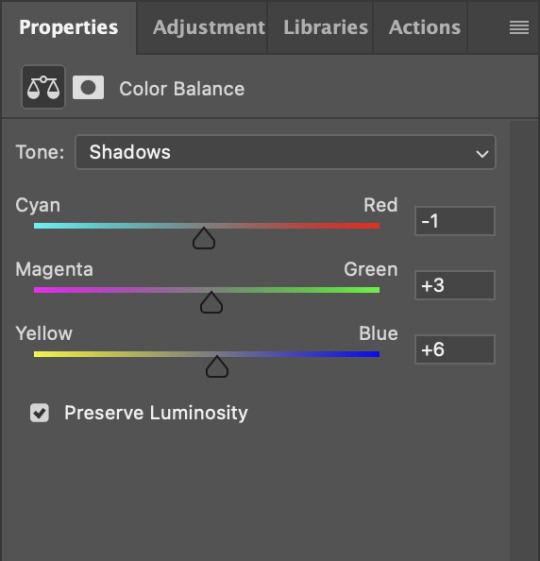
next, add a new adjustment layer > COLOR BALANCE this is where you can make further adjustments on the overall colors of your gif. you can also change the color tone of your gifs here if you want to make it more 'cool' tone or 'warm' tone looking.


earlier's color theory applies here as well!
6.5. OPTIONAL STEP: ADD TEXTURE/OVERLAYS after the last step, you can save your gif as is but again, i like adding textures to my gifs so we'll add one. i use the textures/overlays that i got from here :)
i like to use film, grainy textures! add the texture you want on top of all the layers.

then change the blending mode to LIGHTEN or SCREEN. adjust the opacity to 20-40%. for this gif i used screen with 40%.
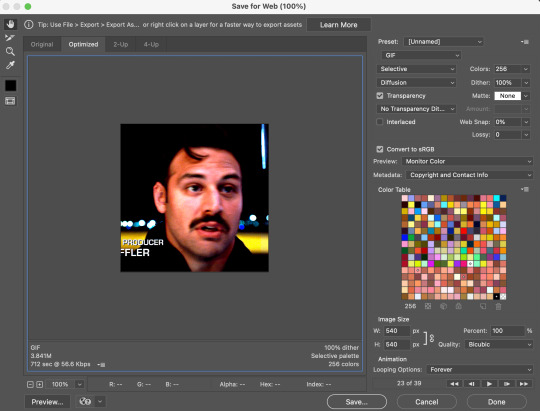
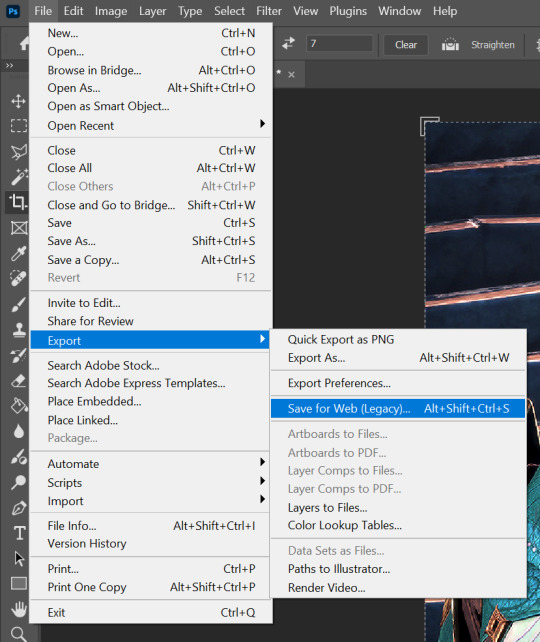
7. EXPORT AND SAVE YOUR GIF time to save your gif! click FILE > EXPORT > SAVE FOR WEB

this is my default setting for my gifs. i also tick the interlaced option sometimes.
here's the finished gif:
there you go anon! :) if you have any more questions, just lmk or you can directly dm me off-anon if you want.
i also get inspo, guides, and other tutorials over at @usergif
91 notes
·
View notes
Text

some quick info: ↳ this is specifically for the screencapping method. i use mplayer osx extended to get my caps, but there are a few other programs you can use as well. i’ll specifically be going over mplayer here. ↳ i’m using ps 24.4.1 on a 2020 m1 macbook air
[tysm to @kyubinz for looking this over and adding some things ily]
☆ feel free to send me an ask/message with any questions you have! ☆
「 setup 」
1. finding videos
one big thing to remember is that the overall file size of your video will impact the quality of your gif. the larger, the better. i almost never use anything below 1080p, and try to use 2160p whenever i can. 4k video downloader is the program i use for downloading videos from youtube, it’s free to install and works great! because of how large some files can be, i always store any media on my hard drive. i highly recommend using one if you plan to keep lots of files on hand.
.mkv files are best, but .mp4 works fine as well (.mkv files are usually bigger aka better quality).
2. getting your screencaps
after downloading mplayer, go to the top bar and click file > open. open the video you’ll be screencapping.
you can either drag the little time indicator or using the arrow keys on your keyboard to move to the spot you want to capture. the > key can also be used to move forward frame by frame. to start capping, pause the video and press shift + cmnd (ctrl if you’re on windows) + s to take a screencap. i usually just hold it down until i’ve gotten all the screencaps i need.
by default, screencaps go right to desktop. you can set up a folder for them to go to automatically by going to settings > general and then selecting a spot in the menu under “interface”, but i just let them go to desktop and then sort them into individual folders so they’re easier for me to find while i’m giffing. in general, i try to stay under 80 frames so my gifs fit into tumblr’s 10mb image size limit.
3. importing screencaps into photoshop
to import your caps into ps, go to file > scripts > load files into stack. this window should open:

click browse, and navigate to the folder with your caps in it. select all of the caps you want to import, and then click open.
click ok to create a file with your caps, and then wait until it’s finished loading your caps into the layers tab. once they’re loaded in, this is what your screen should look like:

(if you aren’t seeing the timeline at the bottom of your screen, go up to the top bar and go to window > timeline)
click create frame animation, then go to the hamburger menu at the top right of the timeline and select make frames from layers. once your frames have loaded in, select the same menu again and click reverse frames. play through your gif to make sure everything looks good.
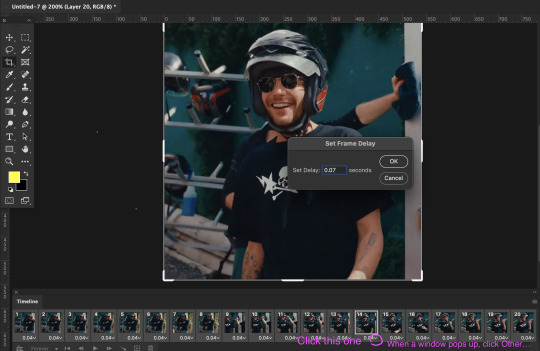
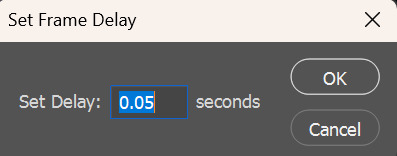
if you were to save your gif at the speed it’s set at now, it would be way too fast. to fix this, you have to set the frame delay. do this by selecting all your frames in the timeline using shift click, and then clicking (on any frame) where it says “0 sec”. select other from the menu that comes up, and you should get this popup:
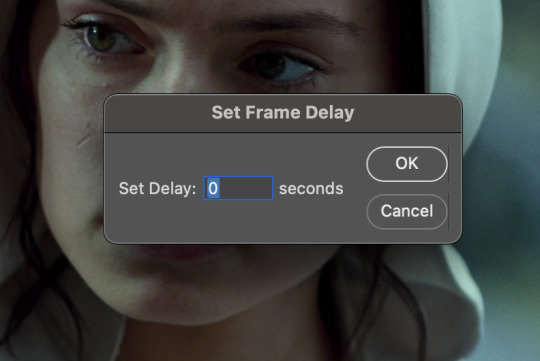
the general rule of thumb for gif frame delay is 0.05 seconds. there are some cases — certain animated movies or video games, for example — where other delays are best, but for the most part, 0.05 is what you want to use (0.05 can slightly slow gifs, and sometimes using 0.04 better matches the clip's original timing. this is really a "train your eyes" thing, and picking the best delay gets easier as you gif for longer). you can set this by typing the number into the text box and then hitting the ok button or enter on your keyboard.
at this point, i’d go ahead and save your file. you can go to file > save in the top bar, or just hit cmd/ctrl + s on your keyboard.
「 making your gif 」
1. sizing
after your frames are ready, the next thing is to size your gif. to crop your gif, press c on your keyboard to open the cropping tool. white borders will show up around your gif.
before doing anything, i would suggest making sure “delete cropped pixels” is unchecked. this will allow you to drag your gif around later if you want to reposition. you can find this option at the top of your screen. drag the borders on either side until you have the area you want selected. mine looks like this:
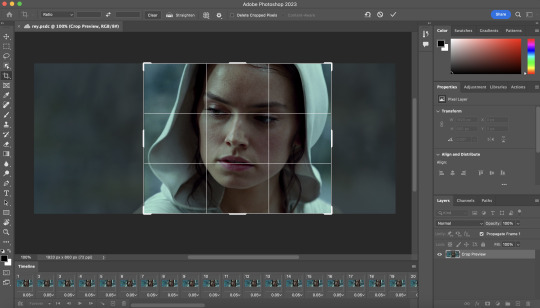
once you’re happy with your selection, hit enter on your keyboard to finalize it.
the tumblr image guidelines require gifs to be 540px across (here’s a post detailing this). to change your gif’s image size, go to image > image size in the top bar. you’ll get this popup:

instead of setting the width right to 540, i’ll be setting it to 544, and then trimming down the edges using canvas size. this makes the quality just a little better, and also prevents any weird borders being made around your gif on the off chance photoshop decides to add them. this isn’t necessary at all, you can absolutely size right to 540, but i just like doing this. if you choose to do this, open canvas size right after you set image size (image > canvas size in the top bar), and trim your width down to 540 and your height down a few pixels as well.
2. sharpening & other filters
sharpening is essential for good-quality gifs. the first step to this is converting our timeline from frame animation to a video timeline. select this little icon in the bottom left of your screen:
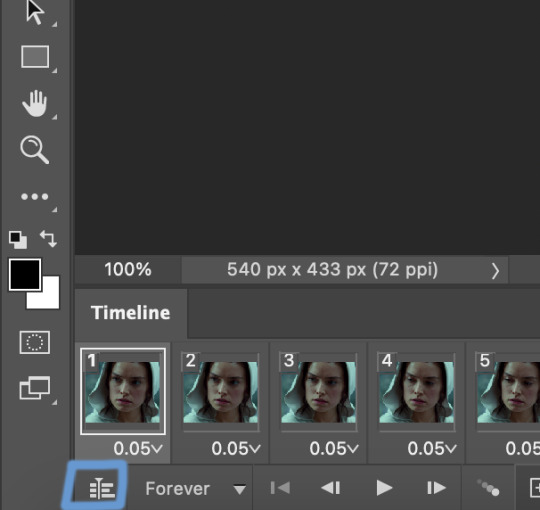
this is what your timeline will look like now:

you can use the little slider with mountains on either side to change the width of your frames in the timeline for easier access when editing. now that we’ve got all this set up, we can sharpen! i use this action pack to sharpen my gifs in addition to a few of my own settings (here is a video on how to install actions into photoshop). go to window > action in the top bar if you aren’t seeing the action tab.
i’ll be using the sharper action from the pack. to use an action, select it from the list and press the little play button at the bottom of the panel to apply it.
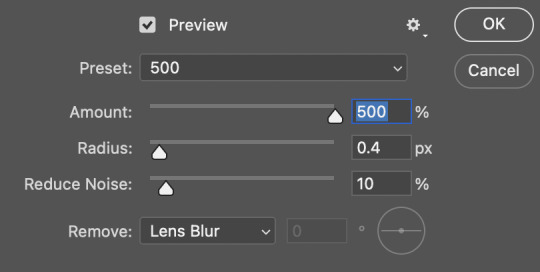
in addition to this, i usually also add unsharp mask at 50% amount with a 0.5px radius:


there are a few other filters than can be helpful when giffing:
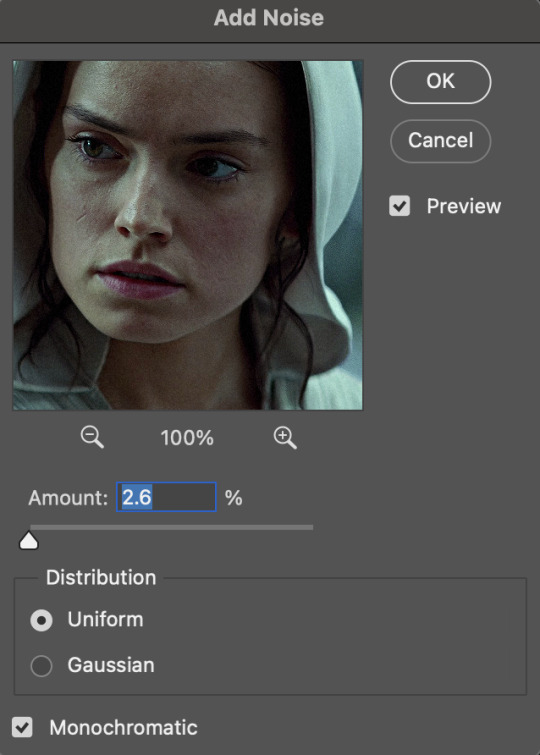
a. add/reduce noise noise (aka grain) can be added with “add noise”. go to filter > noise > add noise.
these are the settings i usually use, but the amount depends on the gif (i don't ever go over 3.5 for the most part):
(if you want a grain effect but moving noise doesn't work for the gif, you can also add a grain overlay and then mess with blending mode and layer opacity until it looks how you want)
reduce noise can be used to remove some of the pre-existing grain on a clip. go to filter > noise > reduce noise. here are my settings:

leaving reduce noise on its own at 100% is a bit too much, so double click this icon and change the opacity (i usually do around 45):

b. gaussian blur if your clip is a bit pixelated, gaussian blur can help with smoothing it out a bit. go to filter > blur > gaussian blur. my settings are 1 pixel radius w ~20% opacity (this changes based on the gif).
3. coloring
time to color! i want you to keep in mind during this section that everyone likes different colorings, and this is just my process! please don’t feel pressured to follow exactly what i’m doing, the best way to find what you like is to just mess around and experiment!
i like to start off with lighting adjustments: brightness/contrast, levels, exposure, and curves.
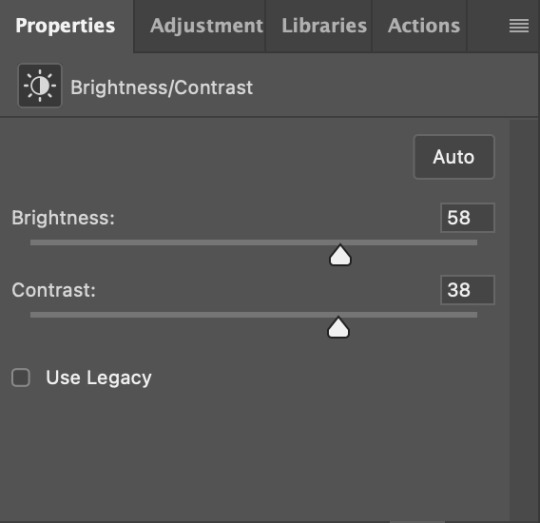
a. brightness/contrast i usually start out with this first, just because brightening the gif right away helps me start thinking about how i want to color! here are my settings:
b. levels/curves levels and curves can either be used interchangeably or together. i usually use levels to adjust lighting and curves to adjust color values, but i’ll go over using both for lighting as well as using curves for adjusting color values.
for both of these adjustments, i use the eyedropper tools to pick out white and black points. for levels, the top eyedropper tool to the left of the graph is used to pick out a black point. i do this first. use the tool to pick a spot on your gif that you want to be the base for black values. for me, that’s the shadow inside rey’s hood. the bottom eyedropper tool picks white point. use the tool to pick a spot on your gif that you want to be the base for white values. i chose the outside of rey’s hood. make sure you’re doing this on a new levels adjustment layer.
now, on to curves. you can either use the same eyedropper method or manipulate the graph directly. using the eyedropper is the same as levels, so i’ll just go over graph manipulation.
shade lightens as you move to the right along the x-axis of the graph — black is the far left, white is the far right, middle is the midtones. generally, i don’t work with midtones.
i’m going to use levels for this gif’s lighting, and curves to adjust color values. here’s how to do that:
curves can be used to adjust the amount of a certain color in different lighting areas of a gif. for example, i can specifically decrease the amount of green in the gif’s whites. to edit these values, select the rgb drop-down menu and adjust them one at a time. here are my final graphs:


c. exposure this one’s pretty straightforward. the exposure slider adjust general exposure. the offset slider adjusts how dark your dark points are, and gamma correction can be used to lighten/darken scenes as a whole. here’s my settings:

d. color balance color balance is used to adjust overall tint of a clip. this is in general pretty simple, but i do want to point out that using the shadow and highlights tabs in addition to just the midtones can really help. here’s my settings:

e. channel mixer channel mixer is one of my favorite tools in ps, especially for coloring scenes that are a pain in the ass without it. to avoid taking up too much space, here’s a great tutorial covering channel mixer. here’s my settings:


[at this point, i’m noticing my gif is still a bit darker than i’d like it, so i’m adding just a bit of brightness/contrast to fix it. there’s also a patch of blue over one of rey’s eyes, so i’ve used a hue/saturation layer to get rid of that bit and masked it to her eye. i’m not going to go over masking here, but there are lots of great tutorials out there!]
f. selective color selective color can be used to adjust the amount of specific colors within a color. for example, if i were to go into the red tab and take out cyans, the reds would become more red. if i were to add yellows, the reds would become more orange, etc etc. this can be especially good for color manipulation. for this gif, i’d like to make the background more blue, so i’m going to use selective color to do this. here’s my settings:

g. color lookup color lookup uses 3dlut files to remap gif colors (it’s a preset — think instagram filter or something similar). i don’t always use these, but when i do, i almost never leave them at 100% opacity. color lookup is great for giving gifs a film-type look if you want to do that, it’s got loads of different options. here’s my settings (adjustment layer is set to 20% opacity):

atp i’m pretty much done with coloring! i usually end up doing a few extra little lighting adjustments at the end. for this gif, i added some brightness/contrast at +8. i’ve also noticed that my gif’s looking a bit grainy, so i’ve added some noise to lean into it. this is usually the way i fix it, but you can definitely do reduce noise/gaussian blur as well if you don’t want a grainy look.
here’s my fully colored gif + a process gif (fast images warning):

「 saving gifs 」
1. frame rate
one thing you may have noticed is that my gif is looking a bit choppy. photoshop has a tendency to mess with frame delay after gifs are converted to video timeline. here’s how to fix that.
select all of your layers and convert them to a smart object (right click > convert to smart object). next, click on the hamburger menu in the top right of the timeline and go to convert frames > flatten frames into clips. now we need to change the timeline from video timeline to frame animation. click the little 3 boxes symbol in the bottom left corner of the timeline:

go to the hamburger menu again and select make frames (this is the same one you used earlier), then go through your frames and delete any duplicates. the first frame usually needs to be deleted specifically. once you’ve done that, set the frame delay back to 0.05 the way you did earlier.
2. exporting
once you’re happy with how your gif looks, go to file > export > save for web (legacy).
these are my export settings, but feel free to experiment with the menus where i have selective and diffusion selected, different settings work best for each gif. in general, most gifmakers only use selective/adaptive and diffusion/pattern because they generally work the best for tumblr. before saving, make sure your looping option is set to forever:

gif size for tumblr has a 10mb limit. my gif is under this, so i don’t need to make any changes, but if yours is over, you can either delete some frames from the beginning/end of your gif and/or adjust the height of the gif (width needs to stay 540px so your gif doesn’t get stretched/compressed on tumblr, but height is fair game).
here's my final gif!

happy giffing, and please don’t hesitate to send me any questions you have! ♡
#*mine#gif tutorial#tutorials#allresources#usertheos#userzesty#userzaynab#usershreyu#rogerhealey#userabs#userhekaates#usermaria#userraffa#usermorgan#uservivaldi#tuserheidi
360 notes
·
View notes
Note
please begging for a giffing tutorial how do you get your gifs to retain quality after posting
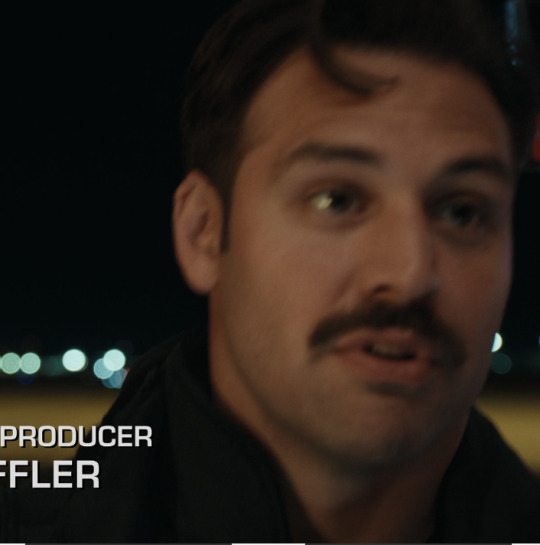
Hi! Thank you so much for asking, I'm going to put an explanation/tutorial of what I do under the read more since it's very long. So come along with me as I make tomorrow's dailyeddiestache gifset! The main information is the sharpening which is at the very end so if you already know how to make gifs, but just want crispy gifs read the first paragraph and the end :)
The first thing is getting as high quality of a download of the episode as you possibly can. I personally screen record streams of the episodes to make the gifs you see immediately after the episodes, but those are very obviously much lower quality than my other gifs. Otherwise I'm looking for torrents of the episodes, and I'm looking for ones above 2MB since that tells me that it's going to be a high quality 1080p download.
I personally use the video frames to layers method of importing, so I'll next clip out the scenes I'm planning on using. We need to stay under the 10MB limit, so how long the gif can be will depend on how big the gif is. I want to do giant 540x540 gifs, so we're gonna keep my clips a little shorter at 1.6 seconds long. However if I was doing something like 2x540 then I can make the scenes a lot longer, 2.5+ seconds
Once I have my clips I'm going to go to "File>Import>Video Frames to Layers" and select my clip
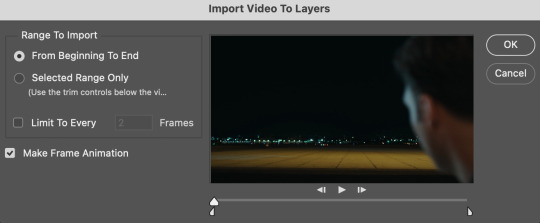
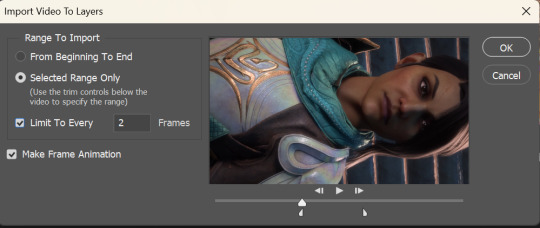
I get this popup and with the shown settings just click OK. It might take a moment to load.

So now this is what I'm looking at. It's taken my video and turned it into "layers" aka screenshots.
At this point I'll let the timeline run a few times and get an idea of how I'm going to do the cropping for this, then I go ahead and crop however I want, in this case a square.
So now at the top right corner of my timeline there's a little stack of three lines, I'm going to click that then "select all frames". You should have all frames in the timeline highlighted blue now, and then I'll click on the little inverted ^ on any of the frames, then "other" and I personally set my delay for 0.06 seconds.
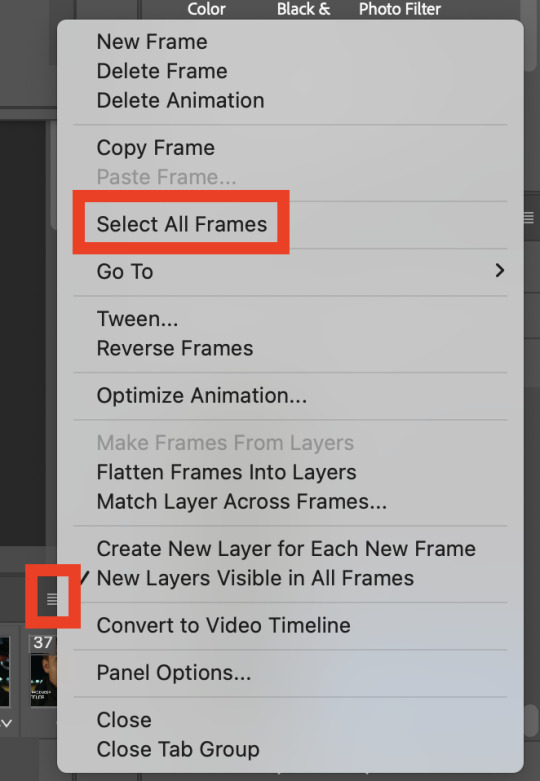
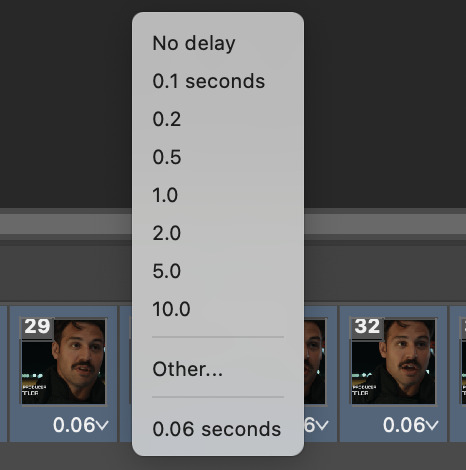
This just controls how fast your gif moves and is 100% up to you, but almost all of my gifs are at 0.06 so you can go with a smaller number for faster or a bigger number for slower.
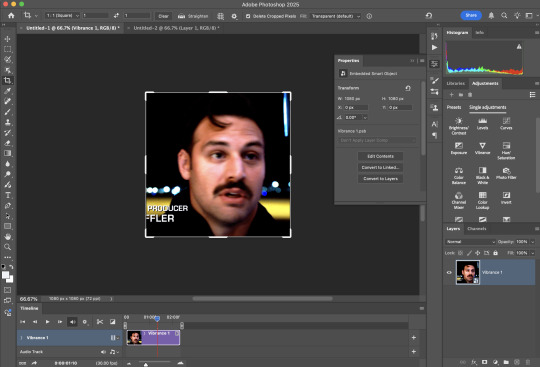
Okay now I'm going to get into the actual worst part about giffing this show, trying to color this ugly ass show. I'm going into my layers panel and scrolling all the way to the top and selecting the top layer. This makes sure that my adjustment layers will automatically go on top and apply to all layers.

This is now the point where you just need to fuck around until you like what you see. There are a lot of tutorials out there dedicated just to coloring, but I strongly suggest just screwing around and clicking things and seeing what happens. Curves are going to be a life saver, the best thing on earth. I also love the "Brightness/Contrast", "Exposure", "Color Balance", and "Selective Colors" adjustments and those get used in almost every gif.

Before and after coloring yay
Okay now I'm going to do the "select all frames" on my timeline again, and also click on the very top layer in my layers panel, hold down shift, and scroll down and click on Layer 1. This should highlight everything in your layers panel.
Click the little line stack in the top right of your timeline panel, and click "convert to video timeline". Then we're going to go up to "Filters>Convert for Smart Filters"
As you can see, rather than having a million layers in my timeline and layers panels I now just have one "thing".
So now that we've converted for smart filters we can sharpen our gif which is what really makes the quality hold when uploading into tumblr. We're going to go to "Filters>Sharpen>Smart Sharpen"
There's two different settings combinations that I like to do. This involves applying two smart sharpens with the following settings

Before (left) and after (right) this sharpening duo
Then here is the other potential sharpening duo I use (don't use both sets, that will just deep fry your gif)


Once again a before and after
Since tumblr ruins the quality of gifs, you want your gifs to look just a tiny bit over sharpened/crispy in photoshop since tumblr is gonna smooth it out
Last thing you'll need to do is resize your gif. If you're doing one gif in a row, change the width to 540p, if you're doing two change it to 268p. This will be in "Image>Image Size".
Then we'll export our gif with "file>Export>Save for Web (Legacy)" and I export with the following settings. Ignore how red he looks, the preview just makes everything look sooooo red but it exports like it looks while I'm making it
Hopefully this helps, I've been making gifs for years but very much am still learning myself
9 notes
·
View notes
Note
hi! i hope it isn’t annoying to ask but i really wanna get into gif making and was just wondering what you used to make your gifs? photoshop or premiere? any advice? its cool if you ignore this i just wanted to try asking
Hi! It's not annoying at all!
I use photoshop to make my gifs and nvidia geforce experience (I think that's what it's called at least) to record gameplay.
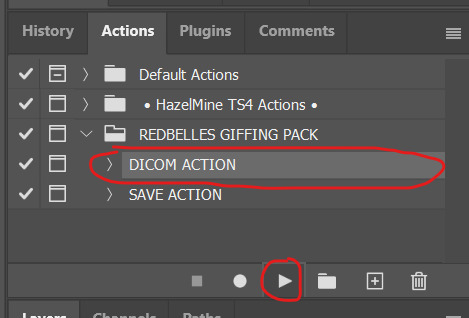
My personal favorite giffing "trick" is this set of photoshop actions made by @redbelles
I know a lot of people like to use screen caps to make their gifs but I think that's way too time consuming so my method is:
Open PS -> File -> Import -> Video Frames to Layers
Then select the video you want to gif:

A little box will pop up. Now select "Selected Range Only" & "Limit To Every [2] Frames" and drag the little markers to the parts of the video you want in your gif & hit OK
You should have something that looks like this:
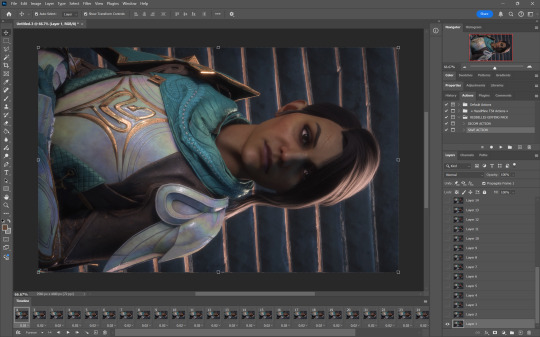
If you don't have the timeline at the bottom go to Window -> Timeline
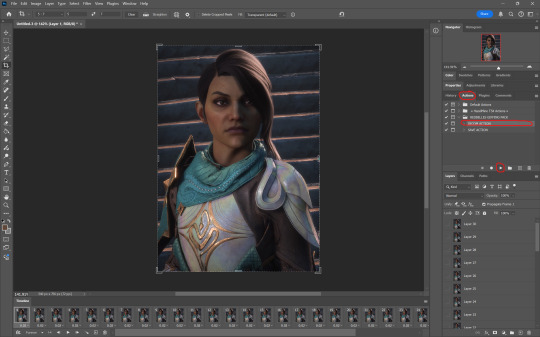
Next you'll rotate, crop, and resize to whatever you want. These are the basic tumblr dimensions (by width) you'll want to stick to these or your gifs will look funny. (I don't remember who made this little graphic, sorry)
After cropping and resizing it's time to use the action I linked above. Run the DICOM ACTION and hit okay on both smart sharpen windows (change the settings here if you want)
Your timeline will now look like this:
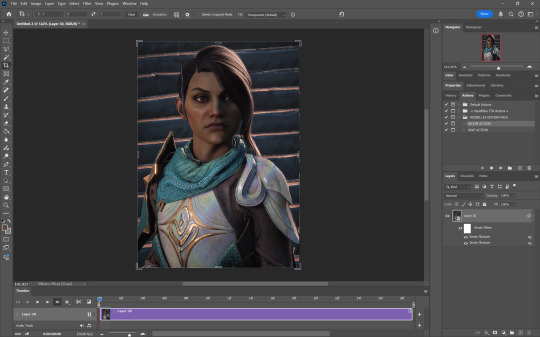
Now is when you'll color your gif. I'm not gonna go into too much detail here because I'm simply not good at explaining my process but I know there's a bunch of tutorials out there on how to color. For reference, my adjustment layers end up looking something like this:
I usually just go for an enhanced version of the original coloring. Play around with opacity and blend modes until you find something you like. I typically keep everything on normal, except for gradient maps which I set to soft light.
So I've done some really basic coloring and now it's time for the second action. Run the SAVE ACTION

Hit OK. I personally have never had to change the frame delay from 0.05.
Your timeline will now look the way it did after importing the video. In the bottom left corner, make sure your gif is set to loop forever

Next up is saving your gif. Go to File -> Export -> Save for Web (Legacy)
The gif size limit on tumblr is 10mb. You can see in the bottom left corner that I'm way under. If you happen to go over that limit there are a couple things you can do
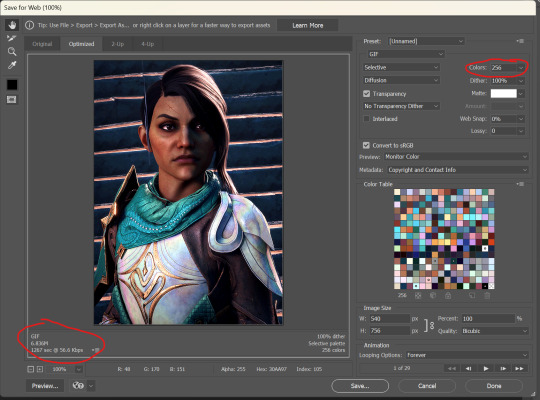
You can go back and delete frames from your timeline until you are under the size limit. Or you can change the number of colors in your where I've circled on the save screen. The fewer colors in your gif, the smaller the size. Luckily, with the 10mb size limit, I usually don't have to worry about going over unless I'm making something really big.
There are a lot of other settings on the save screen and to be quite honest, I don't really know what a lot of them do. Worth looking into if you're curious, but I only ever mess with the colors and I like how my gifs turn out for the most part
Here are some more links to tutorials I found helpful: Giffing 101 by @redbelles Coloring Tutorial by @magnusedom Coloring Tutorial by @the-borgias
Hope this helps! Tutorials are very much not my thing but I'm always happy to share knowledge. hmu if you have any questions
8 notes
·
View notes
Note
hii i love ur gifs so i have been wondering if u know how to low down the size of a gif without losing its quality?? i hate when i want to post a certain gif and it being 13MB but if i cut it it's ugly 😔😔😔 sorry for my english 😔
hi, thank you 💕 i think i have answered similar questions before in my gif help tag, but i can offer some more (hopefully) helpful tips and things you should consider to help keep your gif under 10mb.
1. crop size & amount of frames
the two go hand-in-hand. big cropped gifs with a large number of frames will result in a big file size. if you're making a 540px wide gif, you're either gonna wanna make the gif shorter in height or use fewer frames. for a square gif, i try to keep it between 50-70 frames, but sometimes i still have to trim it down depending on how bright or colorful the gif is (i'll get to that in the next points).
however, making the gif a shorter height like 350px or 400px might give you a little more room for more frames without having to delete any. i like big gifs if i have a great quality file. 600px tall is as far as i'll go (though it's rare) and in that case, i try to keep it limited to 40-50 frames.
basically:
540px wide gifs = fewer frames or shorter height
268px wide gifs = more frames, more potential
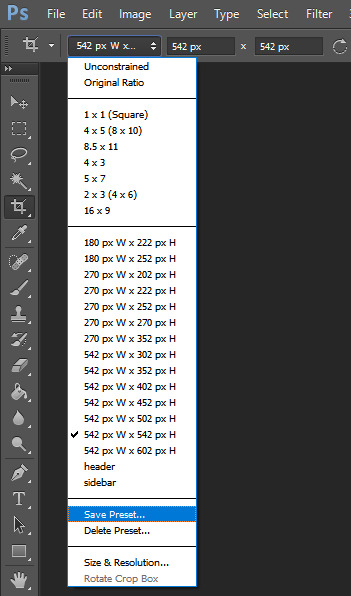
tip: for the sake of convenience, i really recommend making presets of all your go-to crop sizes by selecting "save preset" in the drop down menu next to your chosen dimensions. note that mine are all set two pixels more than i need because some photoshop versions leave a transparent border around gifs. when i use my convert to frames action, it deletes those two extra pixels for me and my gif will have the proper tumblr dimensions before i export.
more tips to get rid of extra frames:
delete frames with camera flashes, you will rarely notice a difference.
always check for duplicate frames.
original footage is slow motion? it's got duplicated frames. delete them.
2. sharpening
your sharpen settings can also increase the file size. here is a great post with examples of when to know when your sharpening is crossing into unchartered territory and how to avoid it. manually adding noise effects can also increase file size, so keep that in mind when you're doing it for aesthetics (i personally love noisy gifs too!).
3. brightening
adjustment layers that handle the "light" in a gif such as curves, levels, and exposure can all affect the file size in different ways. darkening the black points using these tools in your gif helps reduce grain as well as the amount of colors in the final product.
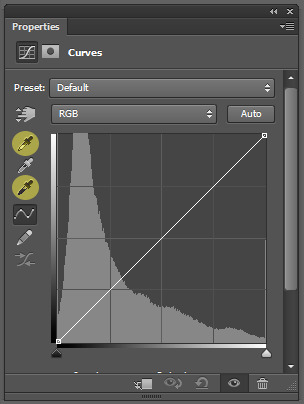
curves: use the white and black eye droppers to find the lightest and darkest points in the gif, thus adjusting the white balance of the footage if needed.
levels: move the left and right sliders inward to balance them out even more and bring back more details.
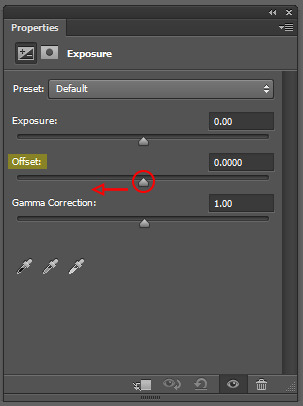
exposure: my favorite trick EVER to lowering the file size if it's over 10mb when i go to save for web is moving the "offset" slider of an exposure layer slightly to the left. it will darken the black points even more and add some contrast to your gif and it can minimize the file size by quite a lot.
3. coloring
you want to be able to save your gif with 256 colors without reducing the number manually in order to get it under 10mb (we've all been there). sometimes you can get away with doing that without losing much of your quality, but it's always ideal to NOT have to do this. selective coloring and color balance are your friends when it comes to enhancing and/or getting rid of tones you don't want. i can't give you a whole course on coloring alone, but i can say that ONCE AGAIN, darkening the blacks under the black tab in selective coloring will help. i usually go up to about +5 or more if i need to. neutralize your reds and yellows for skintones, especially when giffing idols. don't go too overboard with the vibrance if you use it. be conscious of colorwashing. experiment with photo filters or gradient maps if you're aiming for a cooler or warmer look.
i hope this helps, i am not a magician but i do think a lot of these key details help me a lot when my final gif is over 10mb and i need to go back and make adjustments.
19 notes
·
View notes
Note
Hello! I love your gifs! How do you make yours so clear and high quality/What's your process? <3
Hi!! Thank you so much!! I've never really had to explain out my process to anyone and I don't know how much detail you need, but I'll try my best and try to be as thorough as possible just in case!!
For my D:BH gifs, the process starts out with recording my own game play. I have a gaming computer that already had the GeForce Experience app downloaded, so I use that to record my game play. It records at 1920 × 1080p, 60 frames per second, so the files can get... rather large 😅 The video of my playthrough of the Russian Roulette chapter (~11 minutes long) was just under 4 GB. So its not light...
From there, I figure out what in particular I want to gif (for the timestamp roulette series, I let a random number generator figure out whereabouts I'm looking). Once I know that, I open up VLC and use it to isolate that particular shot + a little more on either end.
After I have the shot(s) I want to gif isolated, I open up Photoshop. I use "File" > "Import" > "Video Frames to Layers" and choose the video I want. You can do this straight from the video of your playthough, but I find that the shorter the video is, the easier it is to work with in this step. I trim my video more, to about a click or two outside of the specific shot I want. Like so:

From there I delete any extraneous frames from the "timeline" section that comes up.
Then is cropping: my go-to crop uses the "W x H x Resolution" option - I put 540 px in the first box, 300 px in the second and leave the third blank.

After that, I have an action in Photoshop that does the next steps for me (to make things quicker), but what it does is sets the frame rate (which will have to be done again after saving the gif because Photoshop hates everyone apparently), converts all the layers into a single object, and sharpens the gif. I've only been gif-ing for about a year and a half, and before that I had exactly zero experience with Photoshop at all, so all the numbers from these steps are still the same as the numbers I pulled from the tutorial I used when trying to figure everything out. For those, you can look at this absolutely AMAZING tutorial, by hayaosmiyazaki, specifically steps 7. gif speed and 8. sharpening.
From there, I start adjusting the colors. From what I've noticed, I seem to do a good bit less color adjustment than some, or maybe even most, other gif makers. It's honestly all about personal preference, so play around with it and find what you like! I personally like to stick as close as possible to the original colors, while still brightening the image up enough to make it clearer and more legible. So, for a majority of my gifs, I only apply an "Exposure" layer, a "Brightness/Contrast" layer, and a "Hue/Saturation" layer (from the "Layer" > "New Adjustment Layer" menu.) The numbers here change dependent upon the lighting in the shot.
For example, here's a before and after of this shot I just did so I could type this out and make sure I got every step 😅 For this one, I did Exposure +1.0 (no change to Offset or Gamma Correction), Brightness +20, Contrast +10, and Saturation +5 (no change to Hue or Lightness).
Once I'm satisfied with my coloring, I go to "File" > "Export" > "Save for Web (Legacy)". I watch the gif there to make sure it looks how I want, maybe go back and do a few tweaks to the coloring if I'm not quite happy, check the file size and then save it!
Tumblr's maximum file size is 10MB so if your gif is over that, you won't be able to use it on tumblr - in order to fix that, you may have to delete a few more frames. Or you can crop it to so there's less pixels in the "Save for Web" pop-up by changing the numbers in the "Image Size" section
And now, once I have my gif named and saved. I go back to "File" > "Open" and open up that gif. From there, I go to the little three lines icon in the top right corner of my "Timeline" section, click "Select All Frames" and then click the three dots on one of the frames and change the frame delay. For my DBH gifs, I do 0.02 seconds cause it looks best to me. Depending on how many frames per second your recording software does/what you personally like speed wise, this may be different for you. This is also different for gifs from live action or other media (for those, I prefer 0.05 seconds - it looks the most realistic to me.)
Then, I just save again, overriding the file from before I changed the speed, and voila! That's my process!
I hope this helps; if you have any more questions, my ask box is always open!! And again, thank you so so much 🥰 I'm so glad you like my gifs!!
21 notes
·
View notes
Note
If I wanted to get into making gifs, how does one start? WHERE does one start?
Sorry for the late response! I feel like I might not be the best person to ask, just because I don't make my gifs in the most typical way. There are a bunch of ways to make gifs, and none of them are wrong per se, but most other gifmakers go frame by frame, whereas I like to import the video files directly onto the Photoshop timeline. My way was easier to learn, but can be a little limiting in what I can do with them. I'll include an updated tutorial on how I make mine under the cut below, but if you'd like to go the more typical route, then I recommend checking out one of the popular gif making tutorials, such as this one, as a base tutorial and then playing around with it.
How I Make My Gifs
Needed:
- Adobe Photoshop (I currently use 2023) - Any video editing program (I currently use Adobe Premiere Pro 2020) - A screen recording program (I use OBS)
How to:
1 - Record your game footage using OBS (or any screen recording program). Always make sure your game is running the highest settings. 2 - In Premiere Pro (or any video editing program), import your captured footage and create short, identical length clips that are under 2 seconds each. I recommend exporting in 1080p, no less than 30fps, using the best quality. Export as .avi or .mp4, something Photoshop accepts. 3 - In Photoshop, create a new 1920×1080 file. 4 - Click the Windows tab and make sure you have Timeline ticked. 5 - On the Timeline, click Create Video Timeline. 6 - Click the down arrow to the left of the video layer, and add as many New Video Groups as you have clips. 7 - Click the down arrow on each of those video layers and Add Media (your clips). One video per layer. 8 - Right click on one of the videos in the timeline and change the speed (I usually go 70% but if you like slower gifs, go with 60% or 65%). Then bump the Duration slider all the way up. Do this for all the video clips. 9 - In the layers tab to the bottom right, convert each video clip to a Smart Object. 10 - Resize and crop depending on which size is needed for the set. Here are the dimensions to use for Tumblr. The height can be whatever you want, but the width is very important. 11 - Now for colouring. If you're unfamiliar with editing in Photoshop, it might be helpful to look through the #psd coloring tag and finding something you like. I personally make mine from scratch because game lighting is so unpredictable and varied. It's up to you! 12 - I really recommend some Smart Blur and Smart Sharpen on each of the video layers. How much or little you use will personal preference. At the moment I'm typically doing 0.3-0.5 Smart Blur radius and 0.4-0.5 Smart Sharpen radius. 13 - If you're looking to use subtitles, check this tutorial out. 14 - Click on File > Save for Web, and save each clip this way. Play around with the settings. Just make sure each gif comes out under 10mb, because that's what Tumblr's current limit is. That's it! Hope that was easy enough to follow. If you do make/post some, please feel free to tag me in them. I'd love to see! :)
14 notes
·
View notes
Note
Hello, it’s me again the one who is very struggling with making gifs. Can you show me a tutorial of your gif making process, like from A to Z? So I can learn from it and try one last time cause I’m losing my shits.
You guys, the gif making people idk if this is a polite way to say but yeah, you guys really cool people with massive passion 🤍
hey there!
tbh I’m not the best at explaining but I hope my humble tutorial will help you. Also, I referenced from the tutorials @usergif a lot. It is my go to when i need tutorial or help :)
Shoutout to all the amazing gif/content creator out there! Also if any of my content creator moots have any helpful guides, please do leave it under the reply ❤️
Firstly, i’ll have my scenes to gif ready. I either use VLC player or Quick Time player to screen record ( i’m very basic lol). Then I open Photoshop and here goes.
1. File > Import > Video frames to layers. And then I’m gonna choose the file that I’ve trimmed from screen recording and choose the part I want to gif first (circled in screenshot)

2. Then you can see the amt of layers, you can play and see which part you want (if it’s a LOT of layers) to delete because too many = exceeding 10mb limit for Tumblr
I have my own theory 🧐 that for certain size, only a certain amount of layers will fall within Tumblr 10mb limit size. I mainly use these 3 sizes to crop so: square (max 45-50), 1028px (max 60-65), 1280px (max 70-80). if you’re doing extensive colouring/gradients/blending etc this needs to be further limited so that it doesn’t exceed 10mb. Crop sizes I usually use:

3. Set frame delay. I click on the 3 lines > Select All Frames. Click on 1 of the layer dropdown > Other > 0.05s. Tip: you can set at 0.03s and then after you’re done with your gif, you can re-time it to 0.05s, it’ll be smoother but I’m lazy so I just do at 0.05s.

From this steps onwards, it will be very long. I made an action for myself where I click on the play button and it’ll automate for me but idk how to share this with you 😭 so bear with me for the steps.
4. Click on the 3 lines again > Convert to Video Timeline
5. Select > All Layers
6. Filter > Convert for Smart Filters. And then you have a single layer like below:

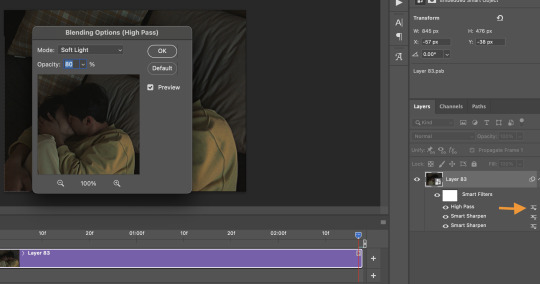
7. Now we go to Sharpening. I refer from usergif tutorial on sharpening (you can follow the tutorial!) I tweak it around to my preference and use high pass instead of vivid.
For high pass if you want to try. Filter > Other > High Pass > 4.0 radius. Then you want to double click on the line beside high pass, Mode: Soft Light, Opacity: 80%
8. Next! The fun part. Colouring!! (I’m not an expert at this because I play around a lot) All my sets are coloured from scratch but I use this settings for easier colouring. It can very long if it’s a difficult scene to colour. This tutorial from usergif tutorial is very helpful!

9. Then I will resize this. Image > Image size > Width: 540 px

HOPE THIS HELPS!!
5 notes
·
View notes
Note
how did you make your header gif?
ummm its not mine, i credited it to @/destinyfaces who now moved to @/virtuousa on my pinned...
tbh it's really simple, especially if u have photoshop, if not then try photopea, but i never used it before... it's apparently the free ver of ps but I can't guarantee that the steps works the same
i've done a few like this too so this is just my method, idk if others do the same, I'm also too lazy to take screenshots:
find whatever masking shape u want (best in pinterest), a short vid (preferably only 5-10sec), and optionally a psd filter which are easy to find here
create a new doc in ps (doesn't matter the height and length) and go to "windows" to open "timeline" tab
drag your vid over to "timeline" and it'll open a new doc
in the "layers" tab, you'll see a bunch of layers of your vid, just select all the layers, right-click them and select "convert to smart object"
in the "timeline" tab, click on the symbol (convert to video timeline) at the lower left beside "forever"
create a new layer, drag it under your vid layer and import your masking shape in that layer (make any adjustments necessary)
right-click on your vid and click on "create clipping mask" (make any adjustments again)
you can crop by using the "crop tool" on your sidebar and the doc itself by going to "image" then "canvas size"
add in whatever overlays, psd, elements, pngs, etc you want
export by going to "file", "export" then "save for web (legacy)", this will export it as a gif instead of png
wait for it to load (may take a while if your file ended up being too large or if you have a potato pc) and click "save..."
then you're done :D just make sure that your gif is less than 10mb!
0 notes
Text
This required cropping each shot separately so that the character is lined up in the new vertical canvas.
To do that, I take the frames from one shot, align them with an adjacent shot for reference, crop them and then export the layers into separate PNG files with the File > Export menu. Note that it is exporting layers and not frames -- I've learned that deleting frames does not delete its source layer.
When working with many layers this process can take a LONG time, like, unbearably long if it's 20+ frames.
This was a bitch to make under 10.00MB (final size 9.92MB), frames from the original capture had to be cut, which affected the "speed" of the gif, and Sharpen filters either made the gif look extremely ugly OR bloat its file size over the Tumblr limit. I was basically going back and forth taking out frames, and adding and deleting filters and previewing countless of times to get the right balance of under 10MB but not totally ugly.
File size is also affected by Lossy-ness and other Optimization settings, which is still arcane to me how it works .
I ended up using no filters or adjustments for this for the sake of my sanity.
This gif is at 540 × 598 because I fucked up the cropping in the first shot and got too far into the next batch to crop them all into 540 × 600.

↳ T2 Trainspotting (2017)
85 notes
·
View notes
Text
hi y'all!! anon asked me how I made my mobile header and sidebar gifs on my desktop theme so I figured I would make a little tutorial. (this is my first one which is super exciting, but also please bear with as i try to do this lol. if you have any questions please do not hesitate to ask!) you will need a basic knowledge of gifmaking. I use photoshop 2022 on mac :)
step 1: making your gifs
you're going to make two gifs in two separate documents. both are going to be black and white, cropped however you want, but if you want it for your mobile header, the dimensions are 640 x 360 — that's what I'm using.
do your normal coloring settings (i'm keeping mine pretty basic since they'll be b&w)
make sure they're the same length. if you're using frames, make sure they're each the same frame length. i'm using video files so if you do too, just make sure they're both the same length when they're together on the video timeline.
to make the gifs look better together, use contrasting shots (for this gif, I have a far away shot of marina dancing and a close-up of her singing)
step 2: making the gradient
choose which gif you want the gradient to be on. i chose the close-up shot
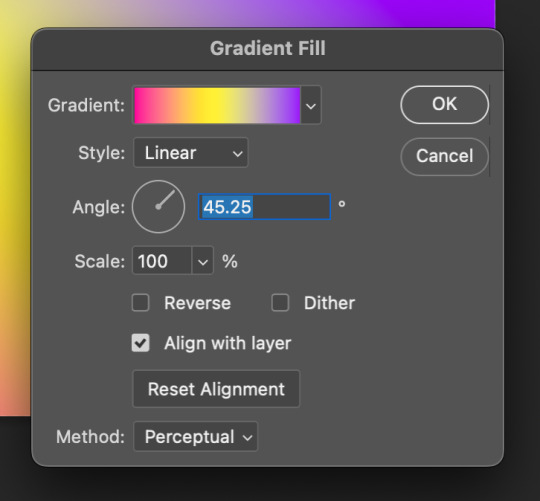
go to layer > new fill layer > gradient. click ok and then this will pop up:

click gradient, then choose three colors you want for your gradient. these are what I chose:

click ok, then go to the angle adjuster (idk what it's called) and make your gradient diagonal (doesn't have to be exact)
click ok, then go to your blending mode drop down in your layer panel and change the blending mode to multiply
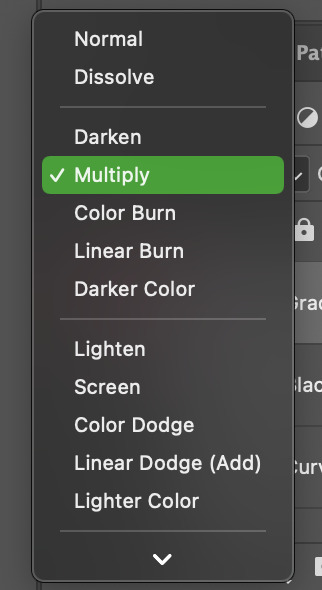
now your gif should look like this:

step 3: converting gifs to smart objects & putting them on the same timeline
now here's where the magic happens. on the gif we just worked on, select all the layers and merge them into one smart object. do the same thing to your black and white gif.
i don't know how to explain this in writing, so just follow the gif for what to do next:

now, align the black and white gif onto the gradient gif, then change the blend mode to lighten. now your gif should look like this:
step 4: finishing your gif!
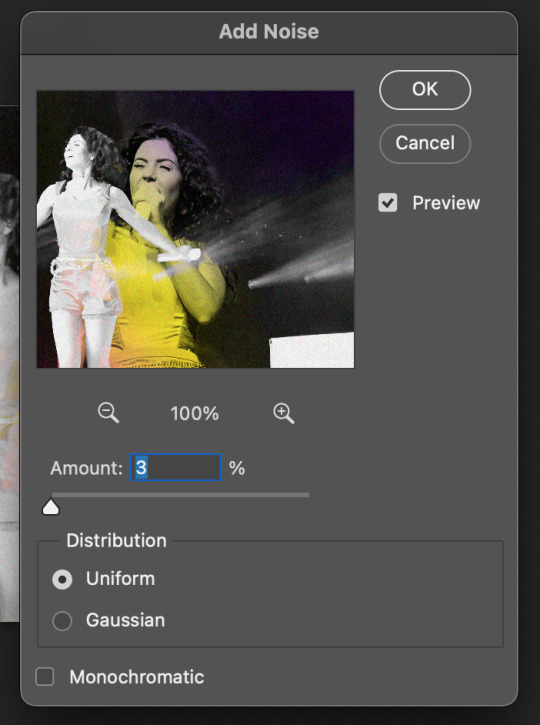
woo, we made it! now to finish, make both layers into one smart object, and add noise (these are my settings)
then i go to my timeline panel, click the four lines on the top right, then go to convert frames > flatten frames into clips. wait for it to process, then go back to convert frames then click "convert to frame animation".
once you're in the animation timeline, click the four lines again, then click "make frames into layers". delete the first frame on the timeline (that's your smart object), then change the speed of your frames to .05.
all there's left to do is to make sure your gif is under 10mb and you're done! here is the final gif:

hope this helps! again, if you have any questions, hit up my ask box!
#usergif#completeresources#yeahps#resources#tutorial#uservier#userkarolina#usereste#usermorgan#userives#tuserheidi#usersavana#userpavlova#photoshop#itsphotoshop#myedits#gifs*#i feel honored to be able to make a tutorial!
655 notes
·
View notes