#but also if anyone wants a more in depth tutorial
Explore tagged Tumblr posts
Visit Tumblr Blog
Explore Tumblr blogs with no restrictions, modern design and the best experience.
Last Seen Tumblr Blogs


Fun Fact
BuzzFeed published a report claiming that Tumblr was utilized as a distribution channel for Russian agents to influence American voting habits during the 2016 presidential election in Feb 2018.
Text
just thought i'd share:
awhile back someone asked how i make my sims gifs, so i made a little tutorial right here
it would also work for regular gifs, if u skip to the 'gif making' section
the tutorial pics are nsfw tho, lmfao, so 🔞
#xoxod#i started making gifs back when i first joined tumblr circa 2012#and it's always been like....... a relatively anxiety free way for me to create something to share?#so i thought idk maybe someone else wants to learn too!#this is my method idk if there are better ways or not but this is how i do it!#if u use this and create something show me!!! pls!!#but also if anyone wants a more in depth tutorial#on making ofmd gifs etc#lmk id be happy to do it!
3 notes
·
View notes
Text

slowly I'm recovering the beauty of discovery
(creature by half•alive)
(textless + timelapse below cut)

#yellowart#subnautica#i feel like the timelapse is kinda long but also this did take a long time to make#anyways. let me yap about the meanings of all the panels <3#'i am creation' -> the ocean being the source of life and where shit evolved from also a good way to sort of 'set the scene' for subnautica#'both haunted' -> GHOST leviathan; in the BONE fields#'and holy' -> this one was a bit trickier. debated about using the emperor but i knew i wanted to use her elsewhere#also debated hoverfish because its cute and well liked so i thought that would be funny for 'and holy'#also something something jesus walking on water also makes it fitting. in the end though i decided on a peeper with the enzyme trail#and i *tried* to make it loop over its head like a halo but idk how well that imagery came through. still mentioned it in the alt text tho.#'made in glory' -> was REALLY torn about this one. on the one hand i wanted to have like a picture of the code because something something#divine machine and it being made out of code making it inherently holy or something; but i wasnt sure if that would be too#'immersion breaking' since most of the stuff in this is like in game stuff i wasnt sure if acknowledging that it was a game would be#too much. my other idea was to draw a couple of creature eggs like a stalker egg and a spadefish egg or something; but in the end i just#went with the one that i personally thought was cooler so if you think it does feel out of place uhhhh sorry i guess lmao.#also yes that is code from the game. idk shit about programming i just think code shit is cool so i poked though a modding tutorial til i#found what it is they use to look at that shit and started poking around. its pretty cool tbh. anyways the specific part i chose for the#drawing was something under the peepers; i think its the bit that tells the enzyme peepers to do the enzyme stuff like the trail obviously#but also some other stuff. not 100% sure though like i said idk shit about this sort of thing but everything in there seems pretty well#labeled its kinda impressive. and very helpful for navigating even if you dont know shit lol.#anyways. 'even the depths of the night cannot blind me' -> blood kelp trench is i think one of the darkest biomes in the game#possibly THE darkest so i thought it would be fitting. probably my least favorite panel though i dont think i did a very good job#representing the area or representing the bloodvines :/#'when you guide me' -> sea emperor but more specifically her messages to the player telling you to 'come here'#'creature only' -> not sure how well i can articulate this but basically the idea of humans beig animals with animal needs to eat and drink#and the idea of being a part of the ecosystem. modern life tends to make us forget that sort of thing but id imagine for ryley being on the#planet would violently remind him of this with things trying to eat him while he has to try to eat things as well. being part of the food#web. 'creature only' because he is only a creature not non-essential systems maintenance chief; but a creature living in an environment and#trying to survive. or something like that. does that make any fucking sense to anyone besides me? whatever.#anyways yapping over 👍
15 notes
·
View notes
Text
Can't afford art school?
After seeing post like this 👇

And this gem 👇
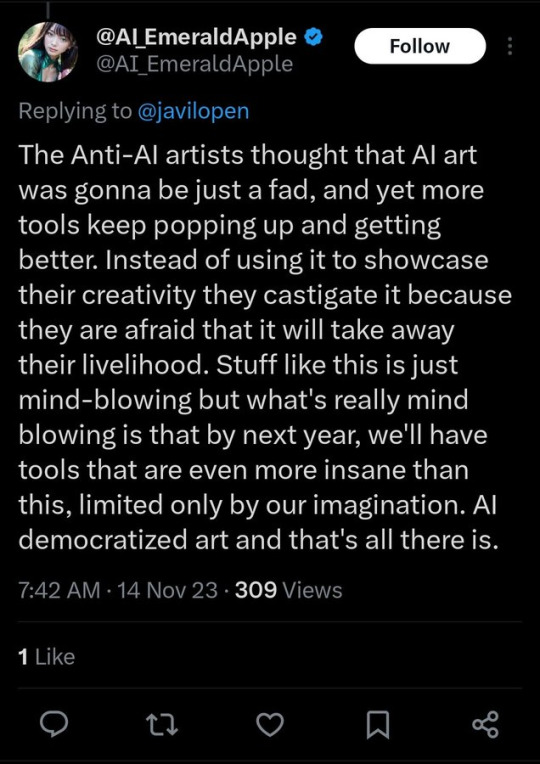
As well as countless of others from the AI generator community. Just talking about how "inaccessible art" is, I decided why not show how wrong these guys are while also helping anyone who actually wants to learn.
Here is the first one ART TEACHERS! There are plenty online and in places like youtube.
📺Here is my list:
Proko (Free, mostly teaches anatomy and how to draw people. But does have art talks and teaches the basics.)
Marc Brunet (Free but he does have other classes for a cheap price. Use to work for Blizzard and teaches you everything)
Aaron Rutten (free, tips about art, talks about art programs and the best products for digital art)
BoroCG (free, teaches a verity of art mediums from 3D modeling to digital painting. As well as some tips that can be used across styles)
Jesse J. Jones (free, talks about animating)
Jesus Conde (free, teaches digital painting and has classes in Spanish)
Mohammed Agbadi (free, he gives some advice in some videos and talks about art)
Ross Draws (free, he does have other classes for a good price. Mostly teaching character designs and simple backgrounds.)
SamDoesArts (free, gives good advice and critiques)
Drawfee Show (free, they do give some good advice and great inspiration)
The Art of Aaron Blaise ( useful tips for digital art and animation. Was an animator for Disney. Mostly nature art)
Bobby Chiu ( useful tips and interviews with artist who are in the industry or making a living as artist)
Sinix Design (has some tips on drawing people)
Winged canvas (art school for free on a verity of mediums)
Bob Ross (just a good time, learn how to paint, as well as how too relax when doing art. "there are no mistakes only happy accidents", this channel also provides tips from another artist)
Scott Christian Sava (Inspiration and provides tips and advice)
Pikat (art advice and critiques)
Drawbox (a suggested cheap online art school, made of a community of artist)
Skillshare (A cheap learning site that has art classes ranging from traditional to digital. As well as Animation and tutorials on art programs. All under one price, in the USA it's around $34 a month)
Human anatomy for artist (not a video or teacher but the site is full of awesome refs to practice and get better at anatomy)
Second part BOOKS, I have collected some books that have helped me and might help others.
📚Here is my list:
The "how to draw manga" series produced by Graphic-sha. These are for manga artist but they give great advice and information.
"Creating characters with personality" by Tom Bancroft. A great book that can help not just people who draw cartoons but also realistic ones. As it helps you with facial ques and how to make a character interesting.
"Albinus on anatomy" by Robert Beverly Hale and Terence Coyle. Great book to help someone learn basic anatomy.
"Artistic Anatomy" by Dr. Paul Richer and Robert Beverly Hale. A good book if you want to go further in-depth with anatomy.
"Directing the story" by Francis Glebas. A good book if you want to Story board or make comics.
"Animal Anatomy for Artists" by Eliot Goldfinger. A good book for if you want to draw animals or creatures.
"Constructive Anatomy: with almost 500 illustrations" by George B. Bridgman. A great book to help you block out shadows in your figures and see them in a more 3 diamantine way.
"Dynamic Anatomy: Revised and expand" by Burne Hogarth. A book that shows how to block out shapes and easily understand what you are looking out. When it comes to human subjects.
"An Atlas of animal anatomy for artist" by W. Ellenberger and H. Dittrich and H. Baum. This is another good one for people who want to draw animals or creatures.
Etherington Brothers, they make books and have a free blog with art tips.
📝As for Supplies, I recommend starting out cheap, buying Pencils and art paper at dollar tree or 5 below. If you want to go fancy Michaels is always a good place for traditional supplies. They also get in some good sales and discounts. For digital art, I recommend not starting with a screen art drawing tablet as they are usually more expensive.
For the Best art Tablet I recommend either Xp-pen, Bamboo or Huion. Some can range from about 40$ to the thousands.
💻As for art programs here is a list of Free to pay.
Clip Studio paint ( you can choose to pay once or sub and get updates. Galaxy, Windows, macOS, iPad, iPhone, Android, or Chromebook device. )
Procreate ( pay once for $9.99 usd, IPAD & IPHONE ONLY)
Blender (for 3D modules/sculpting, animation and more. Free)
PaintTool SAI (pay but has a 31 day free trail)
Krita (Free)
mypaint (free)
FireAlpaca (free)
Aseprite ($19.99 usd but has a free trail, for pixel art Windows & macOS)
Drawpile (free and for if you want to draw with others)
IbisPaint (free, phone app ONLY)
Medibang (free, IPAD, Android and PC)
NOTE: Some of these can work on almost any computer like Clip and Sai but others will require a bit stronger computer like Blender. Please check their sites for if your computer is compatible.
So do with this information as you will but as you can tell there are ways to learn how to become an artist, without breaking the bank. The only thing that might be stopping YOU from using any of these things, is YOU.
I have made time to learn to draw and many artist have too. Either in-between working two jobs or taking care of your family and a job or regular school and chores. YOU just have to take the time or use some time management, it really doesn't take long to practice for like an hour or less. YOU also don't have to do it every day, just once or three times a week is fine.
Hope this was helpful and have a great day.
"also apologies for any spelling or grammar errors, I have Dyslexia and it makes my brain go XP when it comes to speech or writing"
99K notes
·
View notes
Note
Hii- I...☝️🥹 um, I don't actually quite know what to say to my idol. But believe me when I say I am absolutely besotted by your art 🫶💐
I actually got introduced to your page via your COD Valentine's Day cards, and have been stalking your account consuming your art like a hungry fella since then.
Did you know: You actually inspired me and my IRL friends to do art? :3 If you don't mind, any tips for self-learning beginners? 📝
And, sorry if this is a whole lot to read—just wanted to let you know that you are such a great artist! And I hope you know that. Great is an understatement, though 🙂↕️
omg??? thank you so much qwq it seriously means a lot to me!! <3
a small heads up, i'm not a pro or an art teacher, so these tips are just based on my own experience as a self-taught artist:
just draw. sounds simple, but practice really does make perfect. i always struggle with motivation at the beginning of a drawing, but trust me, the flow state kicks in once you get started
references are your best friend! omg, they make such a difference, especially for bigger pieces or anything you're unsure about
learn from other artists, but don’t just copy. figure out how they do things and put your own spin on it. for me, studying comic artists helped a lot with simplifying anatomy in a way that makes sense (im still learning though xD)
don’t overwhelm yourself! focus on one thing at a time. if you’re doing a composition study, don’t get too caught up in tiny details or textures—focus on the big picture first
listen to your body and mental health. take breaks, stretch, and don’t be afraid to step away for a bit. sometimes a quick walk can clear your mind and recharge you
dont compare yourself to anyone but your past self and if you post stuff/have art blog - dont pay that much attention to likes/reblogs n etc, they dont define you or your art
more under the cut!
i also recommend to check out these: again, dont overwhelm yourself with new information, this section is more of an archive/compilation of where you can find some different stuff
YT channels
Sinix Design - I LOVE HIS TUTORIALS SO MUCH.
Ethan Becker - art tips and critisism
Adam Duff LUCIDPIXUL - honestly i dont really know how to describe his content. it feels like an art podcats but more..personal? just check his channel out and you'll see it for yourself
moderndayjames - more animation based but still a lot of helpful tutorials
Dan Beardshaw - found him through anatomy tutorials but he has A LOT MORE than just them, please check him out!!
Videos
this specific video helped me understand that light is not that complicated
in this video, the author shares how they learned art, and i think they nailed the 4th tip perfectly
another lighting video
part 1 of a "how to splash art" series which goes over almost everything you need to know. this series more of a guide cause you still need to go into a depth for each topic but i just have to share it anyways, other parts can be found in the description
Books / Libraries (google drive links)
anatomy for sculptors - helps a lot with anatomy simplification and understanding
a big library with art books and other resources
another library with some books
MORPHO BOOKS!!!
Constructive anatomy by George B.Bradgman
lmk if something doesnt work or you have something else to add!! :]

28 notes
·
View notes
Note
Hi you’re very kind in always answering people with their art questions i appreciate you so much!! I wanted to ask if u have any books/videos that helped you on your art journey? Love your art so much ur an inspiration 😘😘
hi!! this is so nice of you to say and you’re very welcome 🥰 - books and videos under the cut!
videos
what helped me a lot when i started with art is to watch time lapses or draw-with-me sessions so i can kind of copy how artists draw or paint. however it’s "Level Up your Portrait Drawings" by Chris Hong (ETA: sorry the link doesn't seem to be working, so i've included the title of the class) that was like a turning point in how i drew faces. it’s available via membership on skillshare but i think you can sign up for a month free. i can’t recommend it enough! the quality of my portraits changed after this especially with regards to anchor points—i learned how to tweak my art with this video and i do feel it carried over and improved the way i drew very visibly <3
another video i feel created a huge improvement in my drawing is this class by Lexin Yuan (qrbits). this is a lot more rigorous and thorough than the previous one and also included feedback from the artist (!!) and it’s available via subscription to Class101 but lexin has since made a free version on their youtube which i HIGHLY recommend as well (actually i would recommend their entire channel) - from here i learned how to make characters stand and pose properly, i learned to draw from dance videos, i learned about boxes and anatomy in a very approachable way.
another artist i’m subscribed to and whom i enjoy watching draw is likelihoodart. i love looking at their art bc i feel like they have the perfect blend of semi-realism and stylization - plus their OCs are amazing (the general art rule for teeth is don’t fill them out, but i’ve never seen anyone draw teeth a good as them! i mean look at this work in particular). i picked up some rendering styles and tips from watching their draw-with-me videos.
i’m also currently subscribed to Loish’s patreon where she has very useful and in-depth tutorials and guides. she explains it so well and i also see a lot of the artists in their patreon community sharing their improvements and it's SO cool and encouraging. she has accessible tutorials here you can check out :)
books
comic books/graphic novels - i think i mentioned before but when i first started drawing (again, after living artless as a corporate cog), i was in my marvel (mcu//stucky) phase and one of my fav comics back then was matt fraction’s hawkeye. i liked david aja’s style and i would copy entire panels from the comic in ink into my sketchbook. so i would recommend copying whatever art style comic or manga or graphic novel you like into your sketchbook as personal practice (not for public sharing). re-draw your favorite panels! copying directly from the source also helps you figure out how the artist might have drawn their works.
figure drawing by michael hampton - if i were to recommend just one figure drawing/anatomy book to you, it would be this one - this is also a direct recommendation by lexin yuan and i found this book to be easy to follow and the concepts are understandable. i am at heart more of a gesture drawing artist so his emphasis on line of action and dynamism is something i really appreciated.
ART BOOKS! in particular: spider-verse 1 and 2 art books - everyone knows these and for good reason; ami thompson's character expression sheets alone are worth the price. seeing concept art is always very special--you get to read how a team of creatives come up with ideas and you can learn how to incorporate them into your own art. these two are currently my favorite art books, but i also like the art of tangled (glen keane's sketches are in the inside of the covers and that alone made me want to weep they're so beautiful). and sometimes i go into the japanese section of my local bookstore and see what art books they have - i got this one last year which i really enjoyed, and i got a copy of ryoko kui's doodle book for dungeon meshi and i just love it SO much. their character designs are varied and top-notch and it's just so FUN to go through (if you're interested in this, they'll be releasing an english version soon!)
i also draw a lot of inspiration from artists who make and sell zines of their own art or sketches or sketchbooks - some of them even offer it for free! it seems to be a lost art nowadays because people think zines have to be like big collaborative productions, but it can just be a pdf of your sketches. i literally have a page from one of my fav artist's digital zines printed and taped in front of my desk for constant inspiration, and it's just a sketch of theirs. there's nothing quite like seeing an artist's work in zine format <3
my gawd sorry that was so long BUT i hope these are helpful to you in any way!! <3
33 notes
·
View notes
Note
Do you have any recommendations on how to learn bookbinding? It looks super cool, but I don't know where to start.
It depends on the type of bookbinding you want to get into, my focus is primarily on hardcover case bound books, so if that is what you are keen on, here are some resources that I found incredibly useful while learning:
YouTube
DAS bookbinding has a whole bunch of really detailed, professional tutorials that are incredibly useful. He covers multiple types of binds and techniques and they are all very easy to follow. (I always laugh when I watch his videos tho because he’s Aussie like me and he has the EXACT same shitty tiles in his workroom that I have in my house.)
Sea Lemon does bookbinding amongst other crafts, and while her videos are shorter and less in depth, they are very friendly for beginners and offer alternatives if you don’t have all the tools/equipment at home
Omgreylo is great for if you are doing fanbinding, she also has videos on typesetting, which is something you’ll want to learn too if you are planning on fanbinding. Her videos are also very chill and sometimes I’ll just watch them to relax because I’m a nerd.
Ingenious Designs has some really good videos on some more advanced skills like edge gilding and working with leather bound books. He’s also really charismatic so his videos are fun and informative.
I’m probably forgetting a few, but those channels have all been super useful. The other thing that I do and highly recommend is just browsing the bookbinding and fanbinding tags on tumblr, reddit and instagram to see what other people are doing. A lot of people (including myself when I finally remember to actually take pictures and record the process) will post progress photos alongside the finished project and will talk about the process. Most people are quite happy to answer any questions you might have about their projects too so don’t be afraid to ask.
Also the most important piece of advice I can give, if you are serious about bookbinding, GET YOURSELF SOME SHORT-GRAIN PAPER. It makes all the difference in terms of quality, ease of use, and durability.
Anyways if anyone else has any other resources or tips they think are useful, please feel free to add!
202 notes
·
View notes
Text
I was asked by @x-littlemoth how I do my VGP and I explained the basics here! This is a continuation of that tutorial with my own personal methods! For this tutorial you'll need this mod (in addition to the ones mentioned in the last post):
CharLi This is an excellent lighting mod that allows you to spawn individual lights and adjust their color, brightness, rotation, etc.
And here are some other mods I recommend, though they aren't necessary!:
Additional Portrait Presets I can explain more about why adjusting FOV or rotating the camera 90 degrees is useful below, but these presets save you the effort of tweaking yourself! Photomode Expression Megapack No tutorial needed, this just adds extra facial expressions you can select in photomode! Works exactly the same as the vanilla one and doesn't replace anything.
Appearance Creator Mod (ACM) I won't cover this one here because there is already a wonderful tutorial by PinkyDude who explained it way better than I ever could which you can check out right here! Briefly, this allows you to swap/toggle clothes, accessories, etc. on NPCs.
If you'd like any additional suggestions for pose mods, clothing mods, etc. or wants to know any mods I'm using I am very WCIF (where can I find) friendly so anyone can free to ask me any time! Additionally, if anyone would like a tutorial on my editing process, I pretty much just use my phone and a free app (and sometimes a paid app but that's not necessary) feel free to ask, I'd be happy to share :)
Let's get into the tutorial under the cut! ^^
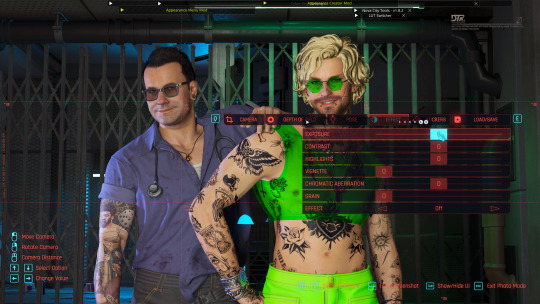
Okay, let's continue editing our photo of Viktor and V using CharLi! So, open your CET menu and look for the CharLi menu and open it up. First thing I tend to do is go over to the settings tab (the gear) and shut off chromatic aberration and volumetric fog. This is all up to personal taste though, so do what looks best to you! Now, return to the main tab (click the light bulb) and let's spawn a light! Personally I always prefer to start with 1x as the others tend to be way too bright for most scenes. Play around with choosing whichever type of light you like.
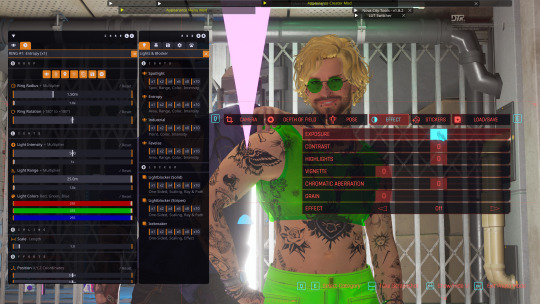
In the end, I went with the type called Favelas as my main light source. Go ahead and play around a bit with the rotation, intensity, and other sliders.
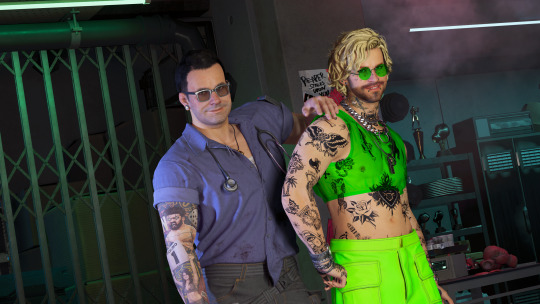
Here's what I ended up settling on! I try to make sure that the character's aren't washed out or too dark and I try to make my first light light the characters fairly evenly. Now, for depth and flavor, let's add a second light! This time I chose spotlight and I adjusted the colors until I achieved a relatively blue color.
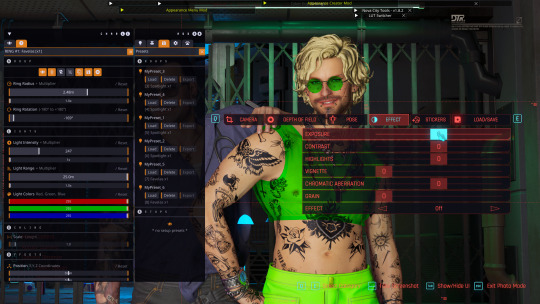
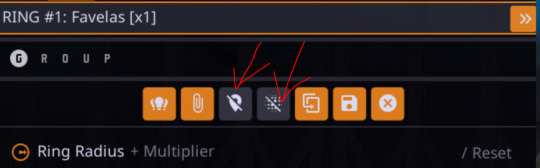
One last thing, for each of your lights go ahead and toggle these two badboys off. That will hide both the physical light object and the pink tracker so they don't clutter up your photo.
Adjusting the angles a bit more to my own tastes, here's what I'm left with without any external editing!
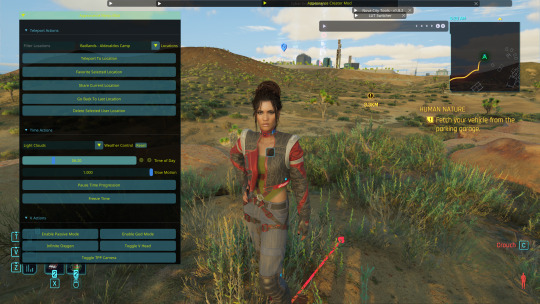
Now, let's try and outdoor photo! Following the steps in the last tutorial, I am going to teleport to my location of choice (I am using a teleportation preset found in PinkyDude's Roadtrip Through The Badlands AMM location addon). While here, I switch my Nibbles replacer to Fem because I'm gonna take some pics with Panam! Now that I'm here, I notice that the lighting out here could be better! I tend to adjust my weather and lighting outside of photomode because it doesn't always shift correctly in it. To make sure everyone is lit correctly, I tend to pick the character with the darkest skin or clothing that will be in my scene and spawn them from the spawn tab. I'll choose Panam, of course!
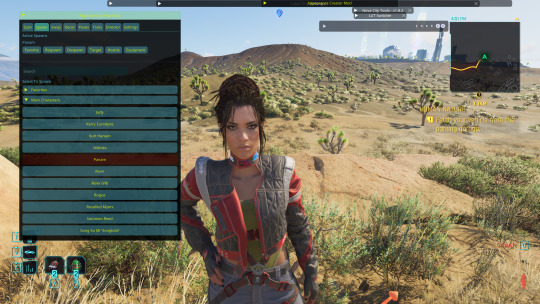
Note: Going to the tools section and selecting freeze target can help keep your spawned companion from walking away but I forgot to do that here lol For weather conditions, I like to choose light clouds. This makes the sky look nice and it also softs harsh shadows. This is up to personal taste and the mood of your scene though! Additionally, if you want more weather states and deeper control, you can use the Nova City mod. For now, let's just play with the vanilla weather settings.
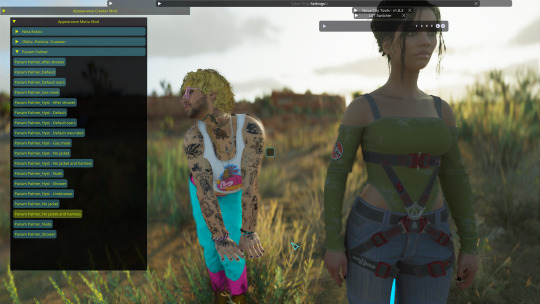
I tend to prefer the look of early morning the best, but again this up to taste! I would definitely recommend avoiding middle of the day though as the harsh lighting can greatly overexpose your image while also muting colors. Now that we've got all that set up, let's banish her just like we did Viktor in the first tutorial. Unlike Viktor, this Panam clone won't respawn (the real Panam is safe and sound, this won't affect her). Now let's return to photomode (and ignore my boy's goofy Us Cracks pose). Follow the steps to set up your replacer just like in the first tutorial. Now that I have my replacer swapped out to Panam, I am going to remove her jacket using one of the built-in presets (for swapping outfits with ones not listed in AMM see the AMC tutorial linked above). To do this I am going to go to tools > target replacer > scan and then scroll to the drop-down and list and pick the one I want to use. Let's keep the harness but remove her jacket!
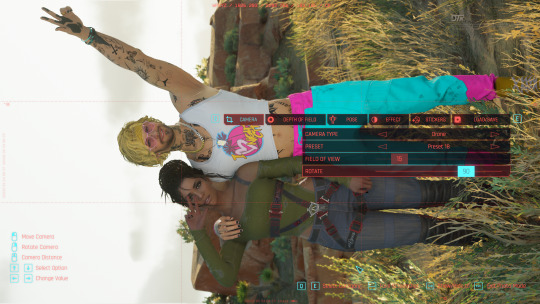
From here, choose whatever poses you like, set up CharLi however you wish, and now let's try taking a portrait shot! This is where those presets come in handy. If you downloaded them, go ahead and flip through to the portrait ones at the end and select the one you like best. Otherwise, let's set this up ourselves! To do this, I will go to Camera tab in photomode and set my rotation to either 90 or -90 degrees. This allows you to fit more into the shot while also allowing your portrait to be higher quality because it fills up the whole screen instead of being a tinier image with a lot of empty space on the sides. Next, I'm going to adjust the field of view. The lower the field of view, the less your image is distorted. While distortion can be nice for some styles and atmospheres, I tend to prefer a lower FOV for my portraits. I tend to prefer to set my FOV lower then 20 but higher than 10. Here I've chosen 15!
Now you can play around with the angles and take your photo! Here's the unedited one I got in the end:
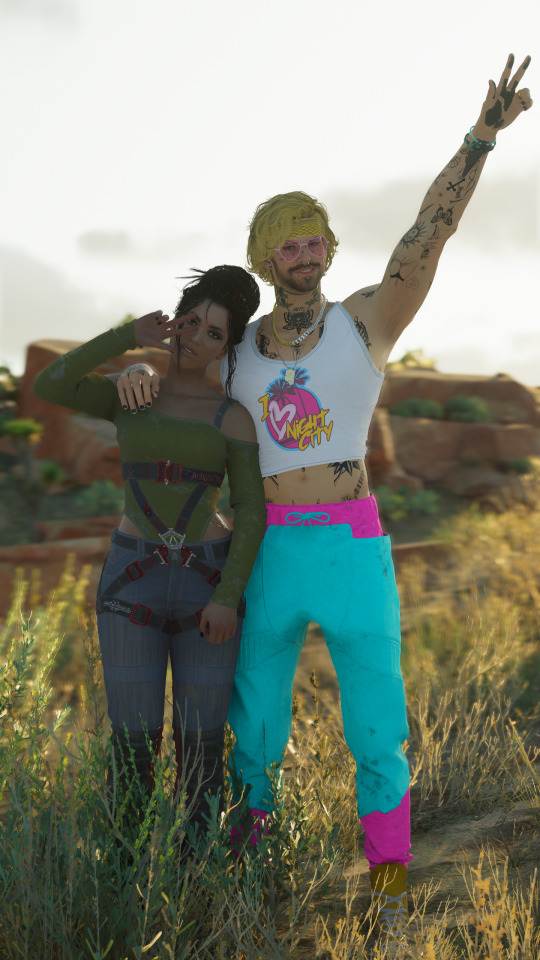
If you have any questions definitely feel free to ask! This is certainly not the only or even the "best" way to do it, this is just my personal way :) Have fun!
21 notes
·
View notes
Text
Every once in a blue moon someone sends an ask relating to art tips or art questions and every time I keep writing the most in depth bible-long answer I never finish because they all make me so excited I want to make an entire tutorial with visual guides </3
So I come to ask this:
Is anyone out there interested in me talking about this stuff? The stuff I’ve learned or talking more about my drawings? I’ve always assumed people aren’t really interested but I’ve always loved reading about other artists writing those things so. Maybe…?
All of those options are under the assumption that you’re also here for my drawings and not just those options since I doubt that wouldn’t be the case for anyone here lmao
(By the way, I haven’t gotten around to answering asks which are so old by now but let it be known it makes my week anytime I get one)
#genuinely thank you to anyone who has ever sent an ask#or reached out for any reason#it brightens up my day :)
7 notes
·
View notes
Note
curious if you have and advice or experience regarding the numbers on the spirit halloween jerseys. the stickers historically have never worked for me. they fall off instantly and they're also just terrible looking and the wrong color yellow. any idea in terms of possibly altering the costume with a permanent number? i've thought of sewing a patch but it would be bulky and not look how it does in the show. for now ive just been wearing it with no number because it looks better without the stickers

While I haven’t personally done any of these to the jersey I have, there’s a couple ways I can think of to alternatively add a number to it.
1. Paint The Number On.
You can create a stencil for the number by printing out your design on cardstock and use an Exacto to cut it out to leave the negative space. You can then use fabric paint to paint the number on to the jersey using the stencil (though you could also probably buy a number stencil as well). This way you’d be able to match the color to the right shade of yellow with your paint and it’s not going to be able to fall off.
The one thing I foresee being a problem is sometimes yellow paint can be somewhat sheer so it might be a good idea to paint the area white first before you paint on the yellow. Also numbers like 6,4, 8,9,0, contain pieces that aren’t connected when you cut out a stencil so that might be difficult to do though there’s also ways around that.
I’ve done this technique before on other projects and it works pretty great. If you want a more in depth tutorial I was planning on posting it in a tutorial for Misty’s Equipment Manager jacket that I’ll hopefully finish before Halloween.
2. Using Heat and Bond with Fabric
If you use a thinner fabric that doesn’t fray (maybe spandex?) for the numbers and use Heat n Bond to iron it on I think it should work (permitting that the jersey is made out of fabric that can be ironed/ ironed carefully). A thin fabric might not be as bulky and since it won’t fray and you wouldn’t have to sew it on or finish the edges. Plus, this would likely be thinner than a traditional patch.
Though since it uses adhesive, if your jersey isn’t allowing things to stick it’s possible it might not work. (I don’t know if this could be it but fabric softener coats clothes in wax which can mess with adhesives so if you’ve washed the costume with it that could be contributing to your struggle).
I’ve done this once before for a patch so I’m not entirely sure if it works in this case but it could be an option.
3. Using vinyl?
If you have access to like a Cricket or some other vinyl cutter you might be able to use that. I think it also uses adhesives though and I couldn’t give you any advice on it because I have no experience with them personally. It might be something to look into though if you have the tools at your disposal.
4. Silk Screening/ Screen Printing
This is a process that can be used to print a number onto the jersey. I don’t have experience with this but it’s something they do on real sports jerseys so it would likely work well. If you already have access to this and know more about it you could try checking it out.
Hopefully some of these ideas help! If anyone else has any tips and tricks feel free to add your suggestions as well!
9 notes
·
View notes
Text
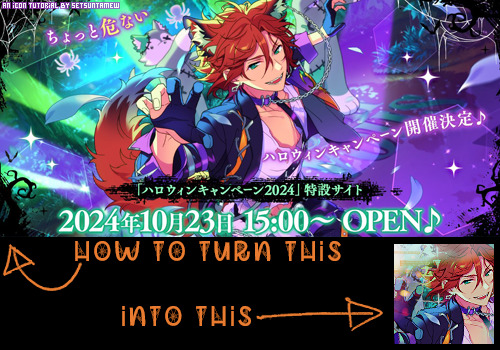
Welcome back to "Icon Making With Killian: An Intro to the 'Lost' Art of LiveJournal Icons"
aka, you didn't think I was one and done, right?
This tutorial was written in Photoshop 2020, but you can probably recreate it in as far back as CS2-ish (since I still use the same sort of techniques I've been using since then, lmao). It also assumes basic understanding of the software, though I've tried to be as clear as possible throughout.
I was possessed with a need to both make an icon of Madara's new event card and then write a tutorial, so let's all be proud that I busted it out before Halloween 💪
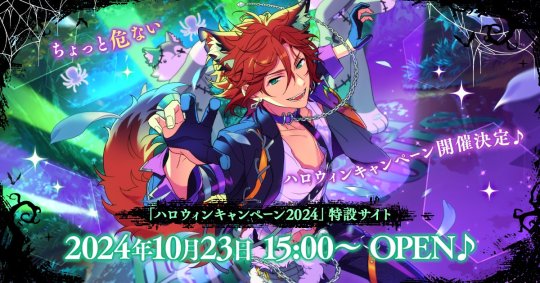
I started with the bloomed art of Madara from The Howling Forest★Lupine Halloween event (image from the Halloween 2024 campaign announcement, because the event hasn't started yet).
Since there's a lot of extra text & etc on this, I knew I'd be cropping it pretty close. I started with a blank 100x100 canvas, pasted the original image in, and then resized + rotated it until I liked the composition/crop.

First up, I wanted to get some cobwebs in here (for Halloween!), but didn't want them to overwhelm the whole icon. I used a texture from lookslikerain, set to Lighten, and rotated it a bit before erasing anything covering his face.

Next, I used another texture from lookslikerain and set it to Darken. There's a lot of green in the images for this event and I wanna pull some of that back into the icon, since it most got cropped out.

Time for light textures!!! I used a bunch in this icon~ I started with one from lookslikerain (can you tell I love their resources?), rotated it, and set the layer to Lighten, before deciding that it was too harsh. I used a small, soft brush set to 30% Opacity to erase most of the texture from his face, as well as softening the edges of the light.
The next few light textures are kinda subtle, but overall add to the icon. I'd say sometimes less is more, but I'm a maximalist at heart XD For the next few steps, just assume that the light textures were rotated/resized/moved/etc as I saw fit. I used yet another texture from lookslikerain, set to Lighten, and tucked in the bottom right corner.

This light texture from Sanami276 is also set to Screen. I moved it around to get just a bit of orange in the top left corner- gotta keep those Halloween colors in there!! :D

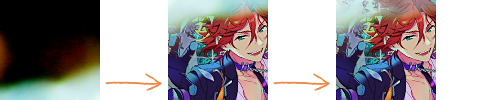
I wanted some more depth/texture in the upper left corner, so I decided to use part of a texture from Sanami276.

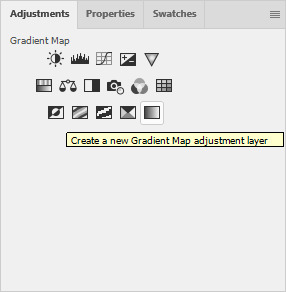
However, it's way to harsh to just throw in there like that...at least not for my purposes. I decided to invert the colors and recolor the black parts orange. My go-to method is with a Gradient Map adjustment layer. The easiest place to find it is in the Adjustments window.
I then used these colors for the gradient itself: #e7b676 at 0% and #ececec at 100%.
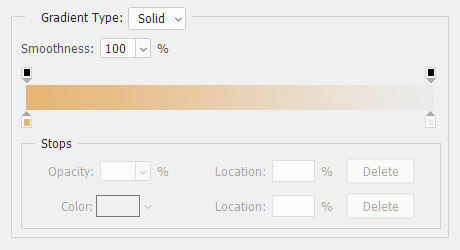
And it left the texture looking appropriately orange! I then pasted it into the actual icon, moved it so the rectangles were in the upper left corner, and set the layer to Darken.

Now for more light textures!! I used a couple from ianthinae, set them to Lighten, and went to town. I cut them up, moved them around, rotated them...just about anything to make them fit where I wanted. I love playing with light textures in general, and I find that even when I use similar ones a lot, they can look very different depending on how they're place.

Finally, I used part of a large grunge-y texture that I've unfortunately lost the source to D: I inverted it and set the layer to Multiply, before moving it around a bunch until I found a spot that looked good.
And with that, it's done! You've now got some new skills to make icons with~
If you have any questions, please feel free to ask, and I'll answer as best I can- as long as it's not about making icons in other software D: I only know Photoshop (and Paint Shop Pro, but I don't think anyone uses that anymore). If there are any other icons of mine you're interested in seeing tutorials for - or even just specific techniques! - just lemme know. I love helping :D
Also, I'm happy to share where I get icon resources from. I have a whole post dedicated to that on my DW graphics journal, though tbh that's the best place to talk to me about making graphics in general. But I will absolutely answer asks/replies/etc about icons here on tumblr, don't worry!!!!
#livejournal#icons#tutorials#graphics#icon tutorial#graphic tutorial#photoshop#LJ icons#100x100#100x100 icons#tutorial#reference#halloween#madara mikejima#enstars#ensemble stars
12 notes
·
View notes
Note
How do you do papercraft?
most of my papercraft stuff on here is digital! (i posted a tutorial here, i'll also reblog it in a second)
for irl papercraft, it's a little trickier, but you can do it with relatively few materials - i usually just use an xacto knife (or any kind of precision blade), colored paper (you can repurpose old paper, buy it from craft stores, or pick up some construction paper from the school/home office section at the grocery store), some glue, and a thick piece of cardstock/cardboard.
irl papercraft is pretty simple, you just cut out the shapes you want using a precision knife and paste it in layers over a piece of paper thick enough to hold it. there's a lot of different techniques you can use to fold/shape paper, but it's always been a little too tricky for me.
also, if you try papercraft irl, i can't recommend enough picking up some foam adhesive dots! i got mine from Michael's
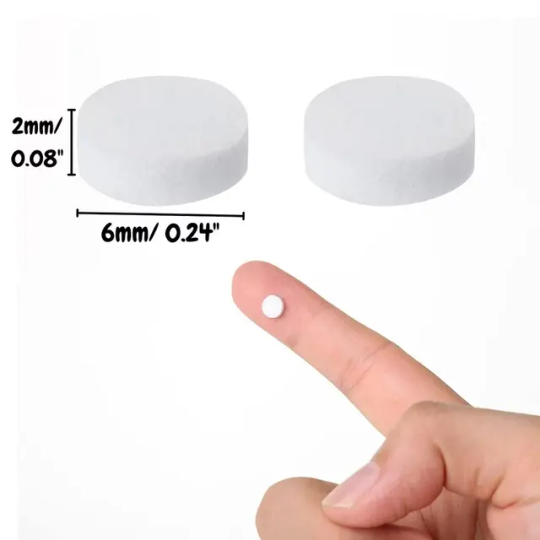
they're basically like 3d little stickers you can use to glue things together. it adds a lot more depth than just regular glue and really helps your papercraft pop.
if anyone has any tips or suggestions sound off in the replies 👍
18 notes
·
View notes
Note
Hello! I love your art sm and it’s so pretty! If you don’t mind me asking, how do you make draw your art-? Like what’s the process behind it?
(Sorry if this doesn’t make sense I’m bad at explaining stuff lol)
hi! i’m stoked anyone would want to know my process, no i don’t mind at all! tumblr deleted the draft i made where i went in depth about everything and i’m extremely mad about it, but hopefully this one sends.
i’m not sure if there was a specific drawing you were referring to, bc sometimes my process changed depending on how enthusiastic i’m feeling about the piece, but this is a general guide using the au as a reference :
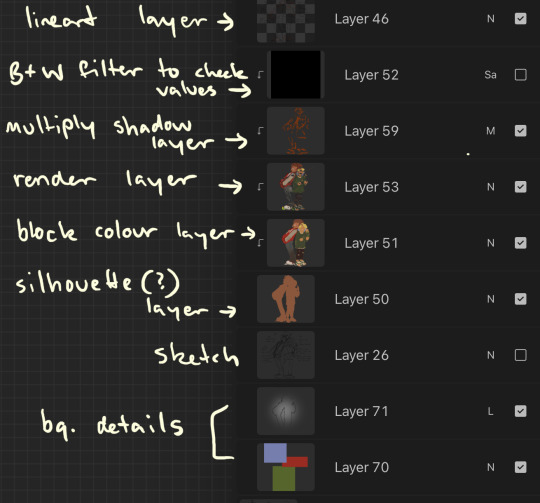
1. sketch! i mostly just get down the main shapes.
2. finalise lineart!
3. Block colours! on the layer below lineart, use select tool within the lineart, alpha lock it, and add in block colours (this is where i experiment, you can see the remnants of lloyd’s other shirt colours near the collar before i decided i didn’t like them). i also put in loose details if i think i’m going to forget them before the render (eg i knew i wanted kais pants to be a gradient so i put it on the colour block layer so i could use the gradient later on in the render layer).
4. render! on the layer above colour, i put all my details. i use the lasso took a lot for shading and for hair (second image has a selection i used for kais roots. i select an area that i want to give depth w lasso tool, and airbrush either a shade lighter or darker than base).

5. shadows! set the layer above render to multiply and add in shadows to create more depth. i blend some of the shadows in, but mostly not bc i like the texture the harsh lines give (also the colours are gone so the shadows are more obvious for tutorials sake)

6. check values and colour lineart!
on a layer above everything, i fill with a completely desaturated shade (can be any) and set to saturation. this makes the image black and white, and i can go through and see if i need to change any colours or shading to make it more readable. i also alpha lock the lineart and add a warm red where ever i think blush would be on the face, or flesh is.
7. backgrounds if any then done! i also have a speedpaint of the nya and zane process to see it in action plus the order of layers
#hope this was okay!#i’m a massive fan of rendering all on one layer just bc it makes changing things i don’t like easier but some ppl hate that lol
100 notes
·
View notes
Text
Studying for Fun
Ok, Girlies, Part of me was like “duh, Queenie, they know how to have fun;” but then I realise that what I actually needed to do was provide advice for structured fun- not to mention resources!! So, those are my two points for today.
Part 1: Structure
You know what your actual timetable looks like, but here’s a sample one that I’ve made that might help you add structure to your day
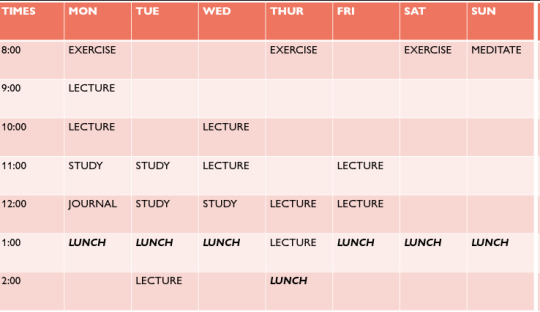
Now here’s how to actually do that
List out every single thing you HAVE to do in a week- work, studying etc, but also tidying, cleaning, what day is laundry day.
Make up a grid like this, or do a list of times, however you’d prefer. Fill in all the immovable things- work*,lectures- and then fill the moveable things- study time, exercise, travel time to your lectures- around them.
if you work shifts, you may need to do this weekly 3. Be realistic. Are you actually going to wake up at 5:00? Girl, are you not going to socials on Wednesday nights? Are you not going to need a little bit more time in bed on a Thursday morning? You know what makes sense for you. But also, can you realistically get all the things you need to do done if you wake up at 10 and go to bed by 6?
I’m using silly examples, but I think you get the point that you need to make sure you are working healthily for your lifestyle.
Let me know if you want a more in-depth tutorial on this!
Another idea that can really help for structure and discipline is parallel play … that’s a phrase usually thrown about in child development, but whatever…
Parallel play or body doubling is essentially two or more people working on two separate tasks, but in the same space.
study with your friends
Set goals with your friends
Call them and exercise together
Accountability buddies are how you keep up structure.
Part Two: resources
These are some of my favourite places to learn things
youtube
youtube
youtube
(Yes, I do like history, how did you guess?)
*i don't use duolingo anymore bc of the whole ai, staff layoff thing... but I thought I ought include it...
Here's some others!!
Ok I'm DONE!!
13 notes
·
View notes
Note
ur art style is so so so cool it feels like a scrapbook or an alex g song! What pens or textures do u use in ur art??
thank you so much! this is such a cool comparison i am giggling and kicking my feet.
I primarily use csp , but when I use procreate I usually just use the default hb pencil brush. anyways! Here’s links to csp assets
I love pencil brushes for lining. I typically use this one for lining but I also use this hb pencil one a lot too. I also color with them !
For coloring/rendering I tend to just use a default round brush with the opacity down but sometimes i use a more pixely one (here)
The texture I use is pretty much just a basic noise texture! You can get pretty much the same result in any drawing app w/ a filter but here is a link to the one I use and also a tutorial on how to use it !
I tend to mess around a lot with brushes but these r pretty much my main ones right now ! my biggest advice is to play around and use a lot of different things. Dattebayo .
I can also get more in depth with this if anyone wants more specification !
11 notes
·
View notes
Text
hey! i'm not usually one to write or anything so this will probably not come to fruition but i've spent the last few days coming up with a prequel to aa1 centring mia fey as she finds her feet establishing her own law firm and moving on from all the stuff with diego and dahlia and misty.
this also would hypothetically be a lanamia thing with lana as the main prosecutor! also phoenix is the designated weird girl and it would kinda show his transition from how he is in turnabout memories to how he is in aa1.
i've ironed out what some of the plot points and crime scenes would be (e.g one at a picnic in the park, one at a sports stadium, one in kurain village etc), with themes of family (as mia's parents left her and she left maya to be a lawyer in the big city) and a tension between her and lana as this is post sl-9 and lana is all cold and quiet and not like she used to be when they were students together (but would warm up to mia again as it goes on)
but yeah i'd love to put a few polls up here for you guys to help decide a few things i'm completely stumped about - and if anyone has any ideas or wants to contribute or anything feel free to put it in tags or send me an ask or anything and i'll try to reply if i still have the motivation to continue with this !! i'm very artsy but not really a storyteller so i feel out of my depth even putting this out there
also i know there have been plenty of similar fan cases too about mia but idk i fancied having a go myself
anyways here's the first question - since phoenix is gonna be assisting every other case would it be boring to have him also in the tutorial case? or would it make more logical sense as then mia can explain the gameplay mechanics to someone (although no one reading this will not already have played an ace attorney case) or would grossberg be a better fit just for case 1 like in turnabout memories? or maybe someone different like maya or mia could even go solo idk
11 notes
·
View notes
Text
been thinking abt the different dynamics and general relationships between the gang. so here's those thoughts summarized, with my more in-depth ones under the cut
chai and peppermint they have a very fun dynamic, with their bickering and bantering. the evolution of their relationship is fascinating and sweet, and i will forever love how peppermint starts caring about chai fairly early on and lies horribly about it to his face because she doesn't want to admit to anyone—least of all herself—that she's getting attached
chai and macaron their dynamic is just nice and sweet. chai helps macaron grow more confident and tries to help him relax. macaron helps chai by rooting for him and complimenting him when others won't. it's also rlly cute how they're the only ones to refer to each other with nicknames/terms of endearment (mac and little guy respectively)
peppermint and macaron endlessly fascinating to me how they both love roxanne and what she built so much that, despite not meeting due to her keeping them at arms length, they're ultimately brought together
macaron and cnmn their dynamic is so fun! cnmn's bluntness contrasts well with macaron's cautious nature. love how macaron built cnmn because he didn't want to be alone...and was self-aware enough that he needed help to also make them a therapy bot
chai and cnmn such an interesting dynamic. the guy that supresses basically any and all negative feelings and hides his past and pains; the therapist robot that recognizes that, but is just tactful enough to not call him out on it...for the most part
cnmn and peppermint kind of a similar dynamic to cnmn and chai. she appreciates cnmn for his more analytical side than his goofiness
cnmn and korsica these two can be fun. korsica definitely appreciates how direct cnmn is. i think post-game, they probably bond a bit over how they both got pretty fucked up by kale physically.
chai and korsica their dynamic is just...truly fascinating to me. mostly bc of their parallels. i've made a post talking about that in the past, though, so i won't repeat myself. but i also really like their differences. the main one that i always think of is her drive to challenge herself and need to do more, which contrasts with his more lax nature
peppermint and korsica they're neat. they get along well because they're pretty similar. both assertive, tactical, and confident in their own skills; share a distaste for puns and a need to keep busy; total dorks. post-game i imagine they grow pretty close.
macaron and korsica these two have a lot of potential for a interesting dynamic. they both look up to and respect roxanne a lot, and knew that something was wrong with the company but did not act due to their own beliefs. her levelheadedness is a good counter for his anxiety.
chai and peppermint their relationship starts off the most strained out of all of them, with the exception of korsica for obvious reasons. something that i find interesting is how she starts to care about him fairly early on. despite being (understandably) mad at him for blowing her cover, she checks in on him and compliments him throughout the parry tutorial. later, when she shows up at macaron's lab, she runs in saying, "don't be dead!" and lies horribly about being worried about him when he asks.
the two of them both seek out loneliness and prefer to be on their own. but it's interesting how, despite being described as the "loner hacker girl," peppermint is actually far more inclined to seek help and companionship than chai. she clearly doesn't want to admit that, though, considering how, as i said earlier, she lies about being worried about him. she does sort of let it slip when she mentions how 808 provides companionship as well as being a spy drone, though
the two of them have a very fun dynamic. they bicker and banter. their interactions are often filled with a sort of confidence, if that makes sense. not really sure how to explain. all of the lines they say to each other when she gets called in are sort of assertive in some capacity; that same confidence. there's a growing trust there.
chai and macaron their relationship and dynamic is very nice. there isn't as much to say as the previous dynamic, but that's because they don't rlly have a whole lot of growth in terms of theirs. it stays basically the same the whole time. but that makes sense and works well, because macaron's growth is centered around him becoming more confident. which chai is great for, because he's probably the most confident member of the whole gang aside from peppermint and probably cnmn.
they're the only members of the gang to refer to each other with any sort of nicknames/terms of endearment (chai calls him mac; macaron calls him little guy), which is neat. also really cute.
also, to discuss the lines that they say when he's called in: they're actually fairly assertive and confident. they have no lines where they check-in on each other, but this time there are no exceptions. i honestly find this a little strange, i feel like out of all of them, macaron would want to check on chai the most.
peppermint and macaron something that i find so interesting about their relationship is how they both seemed to be very close to roxanne despite the ways she held them at arms length, yet they never met until recently-ish. it makes sense why. but it really does make me wonder if roxanne never even had pictures of her kids in her office or anything similar. i also find it fascinating how their love of roxanne, and what she built, is what eventually causes them to meet
we don't really get to see them interacting one-on-one much, but they seem to get along relatively well. they have a lot of similar interests and hobbies (stem stuff), which definitely helps with that. i can imagine them helping each other out with projects when one of them is struggling with a certain bit of code or figuring out a design or...other tech-y things
macaron and cnmn the bffs! i love them. it's really interesting to see sort of a reverse of peppermint and chai, who sought loneliness and preferred being on their own, with macaron, who was sort of forced in many ways to be on his own but chose to seek companionship by making cnmn. i also find it fascinating how he specifically chose to build them with the purpose of being a sort of therapist. it shows how self-aware he is. i also find it hilarious that he named him CRAP, most likely without meaning to
their dynamic is very fun! cnmn's bluntness has a nice contrast with macaron's more nervous nature. the way that macaron prefers peaceful options, whereas cnmn is totally down to fight, but simply can't due to macaron's preferences being reflected in their design. inaction vs action, but in a friendly and compassionate way
chai and cnmn such an interesting dynamic. the guy that supresses basically any and all negative feelings and hides his past and pains; the therapist robot that recognizes that, but is just tactful enough to not call him out on it...for the most part. i get the sense that chai is sort of wary of cnmn in some ways because of that. but he also respects them and enjoys their company. they have fun! they're both silly fellas! they enjoy puns!
i love how cnmn has his own sort of growth, and chai, while he doesn't fully know how to help them with it, does what he can: offer his support. it's very sweet. it's also interesting because it's the reverse of what you would expect. you'd think cnmn would be the one helping chai with his insecurities, but instead they're the one being offered comfort and support
cnmn and peppermint kind of a similar dynamic to cnmn and chai, but i don't think peppermint's really wary of cnmn. she enjoys his company more for his analytical side, rather than his goofy one. i think she appreciates his bluntness. she also appreciates that he knows when to and when to not share his thoughts and perceptions, for obvious reasons
i wish i had more to say about them, but similar to macaron and peppermint, we don't get to see the two of them interact one-on-one. and they don't have As much in common, aside from that cnmn knows how to hack. the two of them likely aren't particularly close, but that doesn't mean they don't care abt one another.
cnmn and korsica these two can be fun. korsica definitely appreciates how direct cnmn is. i think post-game, they probably bond a bit over how they both got pretty fucked up by kale physically. they would try to help her feel less self-conscious about her scars, and offer support on the whole in regards to some of her insecurities. in turn, she would teach them to fight and help them with their own insecurities in regards to how they feel like they don't do enough for the team
in terms of actual canon interactions, this is another one where we don't get to see very many, so i don't have much else to say. but i do think they'll become fairly close
chai and korsica these two are so interesting to me. they're the only ones with voice lines when she's called in where they ask one another if they're okay ("korsica, you got this?" "you alright, chai?"). she also actively compliments him, unlike the others ("good timing!" "very precise, chai!"). and, of course, she has her moment where she compliments him in the hideout after she joins the team. also special shoutout to him calling her "vandelay security's finest" (heard if you perform one of her jam combos)
their dynamic is just...truly fascinating to me. mostly because of their parallels. i've made a post talking abt that in the past, though, so i won't repeat myself. but i also really like their differences. the main one that i always think of is her drive to challenge herself and need to do more, which contrasts with his more lax nature
peppermint and korsica they're neat. they get along well because they're pretty similar. both assertive, tactical, and confident in their own skills; share a distaste for puns and a need to keep busy; total dorks. post-game i imagine they grow pretty close. peppermint helps korsica with her implants and things down in security; korsica helps peppermint with getting rid of some of kale's bullshittery that's still left
i'm viewing their dynamic here from a more platonic lens, but peppermint's crush is important to take into account. though i'm not sure how much it would really change up their dynamic, aside from peppermint's flustered-ness causing potential cute/silly moments
macaron and korsica these two have a lot of potential for an interesting dynamic. they both look up to and respect roxanne a lot, and knew that something was wrong with the company but did not act due to their own beliefs (macaron didn't want to fight; korsica pushed down her feelings because she had finally achieved her dream). they also both have arm implants, which i'm sure macaron helps her adjust to
her levelheadedness is a good counter for his anxiety. i imagine her presence, though perhaps intimidating at first, can actually be rather calming. especialy since she is known to offer reassurance to those that need it (her interactions with chai being the primary example). i see the two of them as pretty good friends
#hi fi rush#chai hi fi rush#peppermint hi fi rush#macaron hi fi rush#cnmn hi fi rush#korsica hi fi rush#talks.txt
27 notes
·
View notes