#buildplates
Explore tagged Tumblr posts
Text
I'm partial to Elegoo, BUT ANYCUBIC'S NEWEST M5 RESIN PRINTER HAS AUTO LEVELING.
#leveling: my beloathed#I don't like the magnetic add-ons so my buildplate always goes lopsided eventually via me whacking it like an angry monkey
0 notes
Text
so my current 3D printing project is this: I am making a giant lego man
not super huge, just 5x regular lego size. It'll be about eight inches tall when complete
the reasons for this are, primarily, because it’s cool, and also. I just bought legos with my own adult money for the first time, and it turns out that lego people are for some reason considerably more expensive than lego bricks. I had a whole rant about it earlier that I'm not going to retype here, but the short version is, I did not buy any lego people
but then I went on thingiverse and I found a model for a large-scale lego person! (with this remix for better arms)
and I thought, that is very cool. I am going to make a giant lego person, who can sit on top of the lego box and guard the bricks
and then, because it would take quite a while to print the whole thing, I did a miniature test print at regular lego size, which is 20% of the original file size
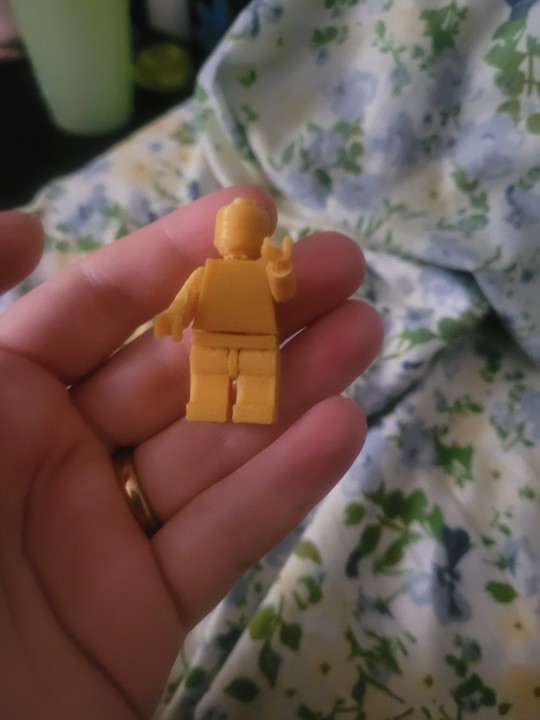
it took about an hour
and he is a pretty good little lego man!
His head's a little loose, but not too bad. I had to reprint the hands cause I originally oriented them stupidly and they broke immediately, but once I redid them in a smarter position, they just took a little sanding of support droopies before they fit great.
The shoulders took some effort to pop into place, but I had expected that. On the rare occasion an arm came off of a lego person when I was a kid, I remember it being extremely difficult to put it back on. Once I got the arms in place and wiggled them back and forth a few times, they moved perfectly smoothly
The legs were trickier to attach to the hips, and one of them keeps angling itself oddly, so that he stands a bit pigeon-toed. If you mess with it too much, it will fall off.
Also the hips keep springing back out of the torso, which isn't great.
Based on this, plus a couple comments on thingiverse which said several connections were not working great, I knew I might need to make some adjustments. And to know exactly how it needed to be adjusted, I needed to print it at full scale
but I didn't want to spend several days printing, only to have to make adjustments and potentially have to reprint every file
so, first, I made a connection test file
I cut the individual pieces up into just their connection points: a slice of neck from the torso, and the bottom of the head. the shoulder pin on the arm, and the shoulder hole in the torso. The hip pin and hole. the wrist, and the entire hand because it's the smallest piece and didn't make nearly as much of a difference if I printed the whole thing. Plus, it rests on the hand on the buildplate, and it would be tricky to get just the hand post to print without including the hand
the first printing attempt spaghettified
it slipped horizontally not far in, and I suspect that caused the spaghetti, when it tried to print over somewhere that should have been supported and now wasnt. Can't be sure, because nobody saw it happen. My husband called me down to stop the printer when he noticed.
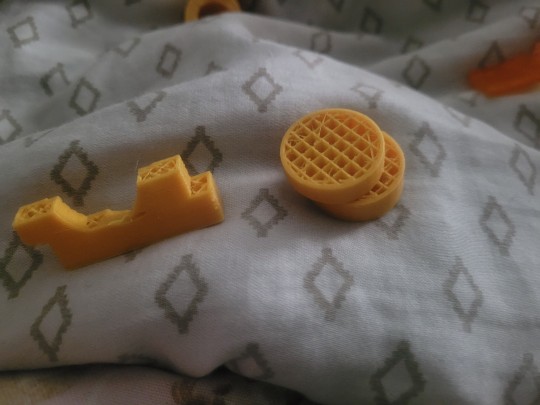
this is the shoulder hole and neck post
it wasn't a total waste, however. I was able to tell from what little had printed of the neck and head that the neck hole was far too large for the post.
So, I made an adjustment to the torso file, making the neck post larger, and restarted the test print with the new version. Unfortunately, restating meant that it went into the evening rather later than I had initially planned, sparking a conversation about what times of day would be most convenient for me to print things so as to not render the living room unhospitible (no hard feelings in either direction, it's just. a loud machine. and it can get annoying to listen to)
That test print went fine, and I was able to test all the fits
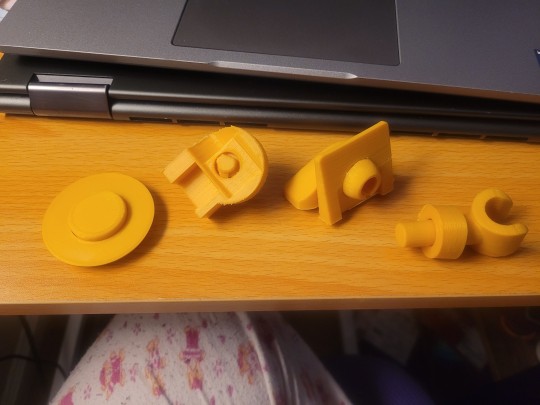
conclusions:
the neck now fits perfectly
the hand post is much too small for the wrist
the hip and shoulder joints are both too snug. I was able to force them together, but they will not rotate (they also now will not separate, and the layers around the shoulder hole split when forcing the shoulder pin inside)
so, back to the modeling program to make more adjustments. The simplest of these was to thicken the arm post
for the shouder, I measured all the bits and discovered that part of the problem is that the wall of the torso around the shoulder hole was thicker than the length of the pin before the flared head
in short, the pin was not long enough to reach all the way through the hole and have the flared head pop out on the other side
so, I lengthened the pin, and also put the slit on the flared head on the top as well as the bottom, for extra squishability
For the hips, they have a different pin shape than the shoulder, so I decided to replace it with the same mushroom-shaped kind of pin the shoulder has. I also widened the hole in the leg piece slightly.
You may notice that I didn't mention testing the hip-to-torso connection, despite noting that there was an issue on my initial miniature print. This is because in order to test it, I'd need to print a large enough portion of both the hip and torso pieces that I might as well print the whole thing, so I figured it would be better to get all the other connections correct first, and then adjust that one as need be.
I did take a look at it in the modeling program, however, and discovered that when assembled, the posts in the hips and the sides of the torso attempt to be in the same location. So I trimmed the hip posts to fit.
Then I printed all the altered files in miniature again, because that's a pretty quick test print
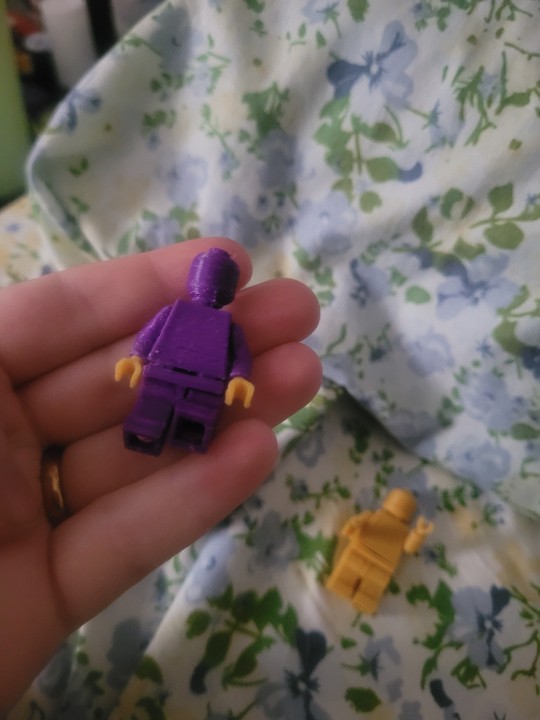
As I had hoped, the legs clicked on much better and more sturdily, and the hips fit into the torso much more securely as well.
The hands and head no longer fit at all, but I'd figured that would be the case as well, considering their fit on my initial test and my subsequent adjustments. I'd printed four hands when reprinting them earlier, testing two slightly different positions (the difference in results was negligible), so I used the extras for the new figure. I sanded down the neck post a bit to get the head to fit, and perhaps I should have sanded a bit more but I didn't feel like it
With that promising test, I prepared a new test print file to test the fit of all the adjusted parts at full scale (save the neck, already tested, and the hip-to-torso connection, will test later as explained earlier - so, just the hip and shoulder joints, and the hand, since I didn't change the wrist and can reuse it to test the new hand)
That's printing currently. Will update when it's done.
10 notes
·
View notes
Text
You can actually use a 3d printer instead of a normal one. Just put the paper on the buildplate, then tape the edges. just make the text into a single layer stl file, slice it, and print it. It’ll take longer, but it’s cheaper overall.
5 notes
·
View notes
Text
Kiuah+ Dietpi = klipper (with fluidd ui) now working on the donated ender 5 plus. Still no successful test print, as all the buildplates. Had questionable histories.
The first glass build plate had chunks out of it because petg was printed on it without a removal layer (rubbed with gluestick? Hairspray? Something sacrificial). It then had. A magnet applied? For attaching a pei coated steel plate? You're supposed to attach the magnet sheet directly to the heating plate,but commitment issues I guess.
The second glass plate had some blue fabric sticker thing? Didn't even fit, had to be pieced together for full coverage. Also the fabric surface is horribly mutilated from prints at this point, and the adhesive does not separate cleanly
Which is to say I'm going to need to get another build plate. Drat. G10 is out of budget at this size, so another spring steel & magnet combo I guess.
0 notes
Text
print has warped a little but I think it's in a way that doesn't ruin any important dimensions and will be covered up by the base sheath. Hopefully it does not do an acrobatic backflip off the buildplate.
A little stringy and scratchy in places but the plan is to sand this back so that's fine.
UPD8:
bad news: acrobatic backflip

good news: I can check dimensions on this unfinished part, and I was right, dimensions are all fine. Trying again with a half height draft shield to slow down the deformation of the base layer.

Nozzle upgrade would be nice but this lost steps because a component crashed into the head, not because of time. I should still have ~700g of plastic so this can finish on this spool.


K its print time. 30 hours whoof. If this fails I'll probably put in the time to characterize a 0.6/0.8mm nozzle rather than trying again right away.
29 notes
·
View notes
Note
Potentially you could also print all the faces with the words face down on the buildplate then like assemble them together afterwards, plus since it'd be hollow like that you could make it into like a box and keep a clicker and maybe some treats in there for easy access when training ur puppygirl
I really like your sit stay speak art! I wish I could get some.
I had an idea though (as a puppy girl) where the words were on the same prism but one on each side. Imagine throwing it and then either sitting, staying, or barking depending on the throw. Idk it got me puppy moding.
So, I could do that! But I'd have to use airbrush/paint, and at that point I might as well just make a big dice! Would be happy to test it out though if you wanna see the results?
49 notes
·
View notes
Text


3d printed alcors summoning circle! @transcendence-au
#3d printing#this took 3 hours#lmao there goes my time#idk lmao#transcendence au#lmao transcendence is hard to spell#maybe im just bad at spelling tho#if this was read i would have summoned him like 30 times on accident#cut my hand like an idiot when removing it from the buildplate#it smells like glue btw#both the medallion thing and my hand
79 notes
·
View notes
Text


Adventures in Minecraft Earth. Look at my lil minecart!
4 notes
·
View notes
Photo

My dear friend Betsy (wife of @bathoorn 😉) started a soap making business as Kitchen Witchery Soap Co and she created a soap that allows you to clean the build surface of your 3d printer. I can't wait to try it out and see if this actually will work. I will keep you updated! #3dprinting #3dprintingindustry #3dprinter #3dprint #3dp #3ddrucker #3ddruck #3d #kitchenwitcherysoapco #startup #soap #buildplate #innovation #technology #nontoxic #cleaner #environmentalfriendly #cad #engineer #de3dprintman https://www.instagram.com/p/CDG5Tq6j5g_/?igshid=18v0go753dvig
#3dprinting#3dprintingindustry#3dprinter#3dprint#3dp#3ddrucker#3ddruck#3d#kitchenwitcherysoapco#startup#soap#buildplate#innovation#technology#nontoxic#cleaner#environmentalfriendly#cad#engineer#de3dprintman
0 notes
Note
Please show us Scramblebrain the cat, my curiosity is piqued
Oh for sure! Okay okay username origin story context for those who didn’t see my tags
A few years ago my family wanted to give my grandparents 2 3d printed cats that we would paint to look like their cats. Not a huge task!
But I guess there was something up with the buildplate on our 3d printer and it didn’t get hot enough— so the first cat stuck to the plate for a while before completely dislodging at the end and.
I don’t know if y’all know what happens when a print doesn’t stay in place, but the best I can say is it goes full spaghetti— the printer is still trying to print where it THINKS the print is even though the print itself is sliding around, so the filament goes into a tangled mess.
This only happened around the top of the head, and once I saw the absolute failure of a print that was this cat, I was enraptured. I was like oh my god. can I keep this cat
And we didn’t have a use for it now so my dad gave it to me! I named it Scramblebrain the Cat, or Scramblebrain for short.
Later on, Scrambled ‘notoriously bad at coming up with names ESPECIALLY usernames’ Cattus was yknow. trying to come up with a username, and I was like ‘yknow what. Naming myself after this cat’. My original name was Scramblebrain but I changed it to Scramblecat because I think it has a better ring to it :]
Anyways! Here’s a picture of Scramblebrain in all its glory from when I first received it:

Since this picture he’s lost an ear and some of the filament but I still love him. He’s sitting on my trinket shelf :]
11 notes
·
View notes
Photo

Adventures in #MinecraftEarth. I am super enjoying this game, check out my article on it in the next few days! #Microsoft #minecart #buildplate #mobilegaming #Minecraft #gaming #instagaming #GamerGirl #girlwhogames https://www.instagram.com/p/B2Epdr0H0Ho/?igshid=db94gyc068xh
#minecraftearth#microsoft#minecart#buildplate#mobilegaming#minecraft#gaming#instagaming#gamergirl#girlwhogames
0 notes
Text
Hour and a half left on Noodle2, and so far so good.
Once that finishes, I’m planning to start the other half of the hilt after all, and cross my fingers it works because there’s literally only one way it’ll fit on the print bed, so if it fails I...don’t know what to do.
After that, nothing but the blade (all six segments D: ) left! I have them split into two print runs and they’re straight pieces with flat bottoms, so as long as the buildplate holds up, they should be uneventful prints.
Although I’ll have to be careful popping the end of the sword off of the plate, it will DEFINITELY fill with resin over the course of printing and I don’t want to dump resin all over my table. Again.
5 notes
·
View notes
Photo

Car show season is right around the corner get your showboards and printed plates ready! Order them - currently 2/3 day turn around. Don’t keep the judges guessing what was done to your car - TELL THEM! #anchorroom #printedplates #dashplates #showboards #buildplates #mustang #s550mustang #carshow (at Anchor Room)
0 notes
Text
me @ my 3D printer when my print is threatening to detach itself from the buildplate after re-leveling that shit for the fourth time

2 notes
·
View notes
Photo


First proper print after a crappy little test thingy that was basically same piece but hollowed out thin to save material (coulda been the final thing but i hollowed it out too thin lmao). Good shit even though the buildplate somehow wasn’t still tightened properly and gradually twisted just a little bit during the first 5mm, which turned out just enough to not ruin the piece while also giving it just enough grip onto the candybox lid to give a good resistance against slipping :v
The printer came with a small bottle of random color resin, which in my case was transparent green and had expiration date on 18.8.2018 lmao. Still did fine tho~
2 notes
·
View notes
Photo
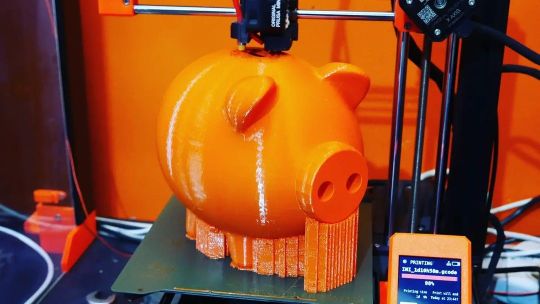
Printed this awesome huge maxed out Piggy Bank on my Prusa MINI by @josefprusa. It is printed in @prusament PETG Prusa Orange in 0.2mm layers and took 34 hours to complete. I only used supports on buildplate and it finished fine. Time to fill it with some money and save for a new 3D printer. 😉 #3dprinting #3dprinted #3dprint #3dp #3dmodel #3dcaddesign #3d #prusa #prusa3d #prusamini #prusament #prusaprinters #makermovement #maker #makersgottamake #tinkering #filaments #petg #robotics #makerfaire #de3dprintman (at Leiderdorp) https://www.instagram.com/p/CTsBlWMtfEM/?utm_medium=tumblr
#3dprinting#3dprinted#3dprint#3dp#3dmodel#3dcaddesign#3d#prusa#prusa3d#prusamini#prusament#prusaprinters#makermovement#maker#makersgottamake#tinkering#filaments#petg#robotics#makerfaire#de3dprintman
3 notes
·
View notes