#building use permission software
Explore tagged Tumblr posts
Visit Tumblr Blog
Explore Tumblr blogs with no restrictions, modern design and the best experience.
Last Seen Tumblr Blogs


Fun Fact
Tumblr was created by web developers David Karp and Marco Arment.
Text
How I ditched streaming services and learned to love Linux: A step-by-step guide to building your very own personal media streaming server (V2.0: REVISED AND EXPANDED EDITION)
This is a revised, corrected and expanded version of my tutorial on setting up a personal media server that previously appeared on my old blog (donjuan-auxenfers). I expect that that post is still making the rounds (hopefully with my addendum on modifying group share permissions in Ubuntu to circumvent 0x8007003B "Unexpected Network Error" messages in Windows 10/11 when transferring files) but I have no way of checking. Anyway this new revised version of the tutorial corrects one or two small errors I discovered when rereading what I wrote, adds links to all products mentioned and is just more polished generally. I also expanded it a bit, pointing more adventurous users toward programs such as Sonarr/Radarr/Lidarr and Overseerr which can be used for automating user requests and media collection.
So then, what is this tutorial? This is a tutorial on how to build and set up your own personal media server using Ubuntu as an operating system and Plex (or Jellyfin) to not only manage your media, but to also stream that media to your devices both at home and abroad anywhere in the world where you have an internet connection. Its intent is to show you how building a personal media server and stuffing it full of films, TV, and music that you acquired through indiscriminate and voracious media piracy various legal methods will free you to completely ditch paid streaming services. No more will you have to pay for Disney+, Netflix, HBOMAX, Hulu, Amazon Prime, Peacock, CBS All Access, Paramount+, Crave or any other streaming service that is not named Criterion Channel. Instead whenever you want to watch your favourite films and television shows, you’ll have your own personal service that only features things that you want to see, with files that you have control over. And for music fans out there, both Jellyfin and Plex support music streaming, meaning you can even ditch music streaming services. Goodbye Spotify, Youtube Music, Tidal and Apple Music, welcome back unreasonably large MP3 (or FLAC) collections.
On the hardware front, I’m going to offer a few options catered towards different budgets and media library sizes. The cost of getting a media server up and running using this guide will cost you anywhere from $450 CAD/$325 USD at the low end to $1500 CAD/$1100 USD at the high end (it could go higher). My server was priced closer to the higher figure, but I went and got a lot more storage than most people need. If that seems like a little much, consider for a moment, do you have a roommate, a close friend, or a family member who would be willing to chip in a few bucks towards your little project provided they get access? Well that's how I funded my server. It might also be worth thinking about the cost over time, i.e. how much you spend yearly on subscriptions vs. a one time cost of setting up a server. Additionally there's just the joy of being able to scream "fuck you" at all those show cancelling, library deleting, hedge fund vampire CEOs who run the studios through denying them your money. Drive a stake through David Zaslav's heart.
On the software side I will walk you step-by-step through installing Ubuntu as your server's operating system, configuring your storage as a RAIDz array with ZFS, sharing your zpool to Windows with Samba, running a remote connection between your server and your Windows PC, and then a little about started with Plex/Jellyfin. Every terminal command you will need to input will be provided, and I even share a custom #bash script that will make used vs. available drive space on your server display correctly in Windows.
If you have a different preferred flavour of Linux (Arch, Manjaro, Redhat, Fedora, Mint, OpenSUSE, CentOS, Slackware etc. et. al.) and are aching to tell me off for being basic and using Ubuntu, this tutorial is not for you. The sort of person with a preferred Linux distro is the sort of person who can do this sort of thing in their sleep. Also I don't care. This tutorial is intended for the average home computer user. This is also why we’re not using a more exotic home server solution like running everything through Docker Containers and managing it through a dashboard like Homarr or Heimdall. While such solutions are fantastic and can be very easy to maintain once you have it all set up, wrapping your brain around Docker is a whole thing in and of itself. If you do follow this tutorial and had fun putting everything together, then I would encourage you to return in a year’s time, do your research and set up everything with Docker Containers.
Lastly, this is a tutorial aimed at Windows users. Although I was a daily user of OS X for many years (roughly 2008-2023) and I've dabbled quite a bit with various Linux distributions (mostly Ubuntu and Manjaro), my primary OS these days is Windows 11. Many things in this tutorial will still be applicable to Mac users, but others (e.g. setting up shares) you will have to look up for yourself. I doubt it would be difficult to do so.
Nothing in this tutorial will require feats of computing expertise. All you will need is a basic computer literacy (i.e. an understanding of what a filesystem and directory are, and a degree of comfort in the settings menu) and a willingness to learn a thing or two. While this guide may look overwhelming at first glance, it is only because I want to be as thorough as possible. I want you to understand exactly what it is you're doing, I don't want you to just blindly follow steps. If you half-way know what you’re doing, you will be much better prepared if you ever need to troubleshoot.
Honestly, once you have all the hardware ready it shouldn't take more than an afternoon or two to get everything up and running.
(This tutorial is just shy of seven thousand words long so the rest is under the cut.)
Step One: Choosing Your Hardware
Linux is a light weight operating system, depending on the distribution there's close to no bloat. There are recent distributions available at this very moment that will run perfectly fine on a fourteen year old i3 with 4GB of RAM. Moreover, running Plex or Jellyfin isn’t resource intensive in 90% of use cases. All this is to say, we don’t require an expensive or powerful computer. This means that there are several options available: 1) use an old computer you already have sitting around but aren't using 2) buy a used workstation from eBay, or what I believe to be the best option, 3) order an N100 Mini-PC from AliExpress or Amazon.
Note: If you already have an old PC sitting around that you’ve decided to use, fantastic, move on to the next step.
When weighing your options, keep a few things in mind: the number of people you expect to be streaming simultaneously at any one time, the resolution and bitrate of your media library (4k video takes a lot more processing power than 1080p) and most importantly, how many of those clients are going to be transcoding at any one time. Transcoding is what happens when the playback device does not natively support direct playback of the source file. This can happen for a number of reasons, such as the playback device's native resolution being lower than the file's internal resolution, or because the source file was encoded in a video codec unsupported by the playback device.
Ideally we want any transcoding to be performed by hardware. This means we should be looking for a computer with an Intel processor with Quick Sync. Quick Sync is a dedicated core on the CPU die designed specifically for video encoding and decoding. This specialized hardware makes for highly efficient transcoding both in terms of processing overhead and power draw. Without these Quick Sync cores, transcoding must be brute forced through software. This takes up much more of a CPU’s processing power and requires much more energy. But not all Quick Sync cores are created equal and you need to keep this in mind if you've decided either to use an old computer or to shop for a used workstation on eBay
Any Intel processor from second generation Core (Sandy Bridge circa 2011) onward has Quick Sync cores. It's not until 6th gen (Skylake), however, that the cores support the H.265 HEVC codec. Intel’s 10th gen (Comet Lake) processors introduce support for 10bit HEVC and HDR tone mapping. And the recent 12th gen (Alder Lake) processors brought with them hardware AV1 decoding. As an example, while an 8th gen (Kaby Lake) i5-8500 will be able to hardware transcode a H.265 encoded file, it will fall back to software transcoding if given a 10bit H.265 file. If you’ve decided to use that old PC or to look on eBay for an old Dell Optiplex keep this in mind.
Note 1: The price of old workstations varies wildly and fluctuates frequently. If you get lucky and go shopping shortly after a workplace has liquidated a large number of their workstations you can find deals for as low as $100 on a barebones system, but generally an i5-8500 workstation with 16gb RAM will cost you somewhere in the area of $260 CAD/$200 USD.
Note 2: The AMD equivalent to Quick Sync is called Video Core Next, and while it's fine, it's not as efficient and not as mature a technology. It was only introduced with the first generation Ryzen CPUs and it only got decent with their newest CPUs, we want something cheap.
Alternatively you could forgo having to keep track of what generation of CPU is equipped with Quick Sync cores that feature support for which codecs, and just buy an N100 mini-PC. For around the same price or less of a used workstation you can pick up a mini-PC with an Intel N100 processor. The N100 is a four-core processor based on the 12th gen Alder Lake architecture and comes equipped with the latest revision of the Quick Sync cores. These little processors offer astounding hardware transcoding capabilities for their size and power draw. Otherwise they perform equivalent to an i5-6500, which isn't a terrible CPU. A friend of mine uses an N100 machine as a dedicated retro emulation gaming system and it does everything up to 6th generation consoles just fine. The N100 is also a remarkably efficient chip, it sips power. In fact, the difference between running one of these and an old workstation could work out to hundreds of dollars a year in energy bills depending on where you live.
You can find these Mini-PCs all over Amazon or for a little cheaper on AliExpress. They range in price from $170 CAD/$125 USD for a no name N100 with 8GB RAM to $280 CAD/$200 USD for a Beelink S12 Pro with 16GB RAM. The brand doesn't really matter, they're all coming from the same three factories in Shenzen, go for whichever one fits your budget or has features you want. 8GB RAM should be enough, Linux is lightweight and Plex only calls for 2GB RAM. 16GB RAM might result in a slightly snappier experience, especially with ZFS. A 256GB SSD is more than enough for what we need as a boot drive, but going for a bigger drive might allow you to get away with things like creating preview thumbnails for Plex, but it’s up to you and your budget.
The Mini-PC I wound up buying was a Firebat AK2 Plus with 8GB RAM and a 256GB SSD. It looks like this:

Note: Be forewarned that if you decide to order a Mini-PC from AliExpress, note the type of power adapter it ships with. The mini-PC I bought came with an EU power adapter and I had to supply my own North American power supply. Thankfully this is a minor issue as barrel plug 30W/12V/2.5A power adapters are easy to find and can be had for $10.
Step Two: Choosing Your Storage
Storage is the most important part of our build. It is also the most expensive. Thankfully it’s also the most easily upgrade-able down the line.
For people with a smaller media collection (4TB to 8TB), a more limited budget, or who will only ever have two simultaneous streams running, I would say that the most economical course of action would be to buy a USB 3.0 8TB external HDD. Something like this one from Western Digital or this one from Seagate. One of these external drives will cost you in the area of $200 CAD/$140 USD. Down the line you could add a second external drive or replace it with a multi-drive RAIDz set up such as detailed below.
If a single external drive the path for you, move on to step three.
For people with larger media libraries (12TB+), who prefer media in 4k, or care who about data redundancy, the answer is a RAID array featuring multiple HDDs in an enclosure.
Note: If you are using an old PC or used workstatiom as your server and have the room for at least three 3.5" drives, and as many open SATA ports on your mother board you won't need an enclosure, just install the drives into the case. If your old computer is a laptop or doesn’t have room for more internal drives, then I would suggest an enclosure.
The minimum number of drives needed to run a RAIDz array is three, and seeing as RAIDz is what we will be using, you should be looking for an enclosure with three to five bays. I think that four disks makes for a good compromise for a home server. Regardless of whether you go for a three, four, or five bay enclosure, do be aware that in a RAIDz array the space equivalent of one of the drives will be dedicated to parity at a ratio expressed by the equation 1 − 1/n i.e. in a four bay enclosure equipped with four 12TB drives, if we configured our drives in a RAIDz1 array we would be left with a total of 36TB of usable space (48TB raw size). The reason for why we might sacrifice storage space in such a manner will be explained in the next section.
A four bay enclosure will cost somewhere in the area of $200 CDN/$140 USD. You don't need anything fancy, we don't need anything with hardware RAID controls (RAIDz is done entirely in software) or even USB-C. An enclosure with USB 3.0 will perform perfectly fine. Don’t worry too much about USB speed bottlenecks. A mechanical HDD will be limited by the speed of its mechanism long before before it will be limited by the speed of a USB connection. I've seen decent looking enclosures from TerraMaster, Yottamaster, Mediasonic and Sabrent.
When it comes to selecting the drives, as of this writing, the best value (dollar per gigabyte) are those in the range of 12TB to 20TB. I settled on 12TB drives myself. If 12TB to 20TB drives are out of your budget, go with what you can afford, or look into refurbished drives. I'm not sold on the idea of refurbished drives but many people swear by them.
When shopping for harddrives, search for drives designed specifically for NAS use. Drives designed for NAS use typically have better vibration dampening and are designed to be active 24/7. They will also often make use of CMR (conventional magnetic recording) as opposed to SMR (shingled magnetic recording). This nets them a sizable read/write performance bump over typical desktop drives. Seagate Ironwolf and Toshiba NAS are both well regarded brands when it comes to NAS drives. I would avoid Western Digital Red drives at this time. WD Reds were a go to recommendation up until earlier this year when it was revealed that they feature firmware that will throw up false SMART warnings telling you to replace the drive at the three year mark quite often when there is nothing at all wrong with that drive. It will likely even be good for another six, seven, or more years.

Step Three: Installing Linux
For this step you will need a USB thumbdrive of at least 6GB in capacity, an .ISO of Ubuntu, and a way to make that thumbdrive bootable media.
First download a copy of Ubuntu desktop (for best performance we could download the Server release, but for new Linux users I would recommend against the server release. The server release is strictly command line interface only, and having a GUI is very helpful for most people. Not many people are wholly comfortable doing everything through the command line, I'm certainly not one of them, and I grew up with DOS 6.0. 22.04.3 Jammy Jellyfish is the current Long Term Service release, this is the one to get.
Download the .ISO and then download and install balenaEtcher on your Windows PC. BalenaEtcher is an easy to use program for creating bootable media, you simply insert your thumbdrive, select the .ISO you just downloaded, and it will create a bootable installation media for you.
Once you've made a bootable media and you've got your Mini-PC (or you old PC/used workstation) in front of you, hook it directly into your router with an ethernet cable, and then plug in the HDD enclosure, a monitor, a mouse and a keyboard. Now turn that sucker on and hit whatever key gets you into the BIOS (typically ESC, DEL or F2). If you’re using a Mini-PC check to make sure that the P1 and P2 power limits are set correctly, my N100's P1 limit was set at 10W, a full 20W under the chip's power limit. Also make sure that the RAM is running at the advertised speed. My Mini-PC’s RAM was set at 2333Mhz out of the box when it should have been 3200Mhz. Once you’ve done that, key over to the boot order and place the USB drive first in the boot order. Then save the BIOS settings and restart.
After you restart you’ll be greeted by Ubuntu's installation screen. Installing Ubuntu is really straight forward, select the "minimal" installation option, as we won't need anything on this computer except for a browser (Ubuntu comes preinstalled with Firefox) and Plex Media Server/Jellyfin Media Server. Also remember to delete and reformat that Windows partition! We don't need it.
Step Four: Installing ZFS and Setting Up the RAIDz Array
Note: If you opted for just a single external HDD skip this step and move onto setting up a Samba share.
Once Ubuntu is installed it's time to configure our storage by installing ZFS to build our RAIDz array. ZFS is a "next-gen" file system that is both massively flexible and massively complex. It's capable of snapshot backup, self healing error correction, ZFS pools can be configured with drives operating in a supplemental manner alongside the storage vdev (e.g. fast cache, dedicated secondary intent log, hot swap spares etc.). It's also a file system very amenable to fine tuning. Block and sector size are adjustable to use case and you're afforded the option of different methods of inline compression. If you'd like a very detailed overview and explanation of its various features and tips on tuning a ZFS array check out these articles from Ars Technica. For now we're going to ignore all these features and keep it simple, we're going to pull our drives together into a single vdev running in RAIDz which will be the entirety of our zpool, no fancy cache drive or SLOG.
Open up the terminal and type the following commands:
sudo apt update
then
sudo apt install zfsutils-linux
This will install the ZFS utility. Verify that it's installed with the following command:
zfs --version
Now, it's time to check that the HDDs we have in the enclosure are healthy, running, and recognized. We also want to find out their device IDs and take note of them:
sudo fdisk -1
Note: You might be wondering why some of these commands require "sudo" in front of them while others don't. "Sudo" is short for "super user do”. When and where "sudo" is used has to do with the way permissions are set up in Linux. Only the "root" user has the access level to perform certain tasks in Linux. As a matter of security and safety regular user accounts are kept separate from the "root" user. It's not advised (or even possible) to boot into Linux as "root" with most modern distributions. Instead by using "sudo" our regular user account is temporarily given the power to do otherwise forbidden things. Don't worry about it too much at this stage, but if you want to know more check out this introduction.
If everything is working you should get a list of the various drives detected along with their device IDs which will look like this: /dev/sdc. You can also check the device IDs of the drives by opening the disk utility app. Jot these IDs down as we'll need them for our next step, creating our RAIDz array.
RAIDz is similar to RAID-5 in that instead of striping your data over multiple disks, exchanging redundancy for speed and available space (RAID-0), or mirroring your data writing by two copies of every piece (RAID-1), it instead writes parity blocks across the disks in addition to striping, this provides a balance of speed, redundancy and available space. If a single drive fails, the parity blocks on the working drives can be used to reconstruct the entire array as soon as a replacement drive is added.
Additionally, RAIDz improves over some of the common RAID-5 flaws. It's more resilient and capable of self healing, as it is capable of automatically checking for errors against a checksum. It's more forgiving in this way, and it's likely that you'll be able to detect when a drive is dying well before it fails. A RAIDz array can survive the loss of any one drive.
Note: While RAIDz is indeed resilient, if a second drive fails during the rebuild, you're fucked. Always keep backups of things you can't afford to lose. This tutorial, however, is not about proper data safety.
To create the pool, use the following command:
sudo zpool create "zpoolnamehere" raidz "device IDs of drives we're putting in the pool"
For example, let's creatively name our zpool "mypool". This poil will consist of four drives which have the device IDs: sdb, sdc, sdd, and sde. The resulting command will look like this:
sudo zpool create mypool raidz /dev/sdb /dev/sdc /dev/sdd /dev/sde
If as an example you bought five HDDs and decided you wanted more redundancy dedicating two drive to this purpose, we would modify the command to "raidz2" and the command would look something like the following:
sudo zpool create mypool raidz2 /dev/sdb /dev/sdc /dev/sdd /dev/sde /dev/sdf
An array configured like this is known as RAIDz2 and is able to survive two disk failures.
Once the zpool has been created, we can check its status with the command:
zpool status
Or more concisely with:
zpool list
The nice thing about ZFS as a file system is that a pool is ready to go immediately after creation. If we were to set up a traditional RAID-5 array using mbam, we'd have to sit through a potentially hours long process of reformatting and partitioning the drives. Instead we're ready to go right out the gates.
The zpool should be automatically mounted to the filesystem after creation, check on that with the following:
df -hT | grep zfs
Note: If your computer ever loses power suddenly, say in event of a power outage, you may have to re-import your pool. In most cases, ZFS will automatically import and mount your pool, but if it doesn’t and you can't see your array, simply open the terminal and type sudo zpool import -a.
By default a zpool is mounted at /"zpoolname". The pool should be under our ownership but let's make sure with the following command:
sudo chown -R "yourlinuxusername" /"zpoolname"
Note: Changing file and folder ownership with "chown" and file and folder permissions with "chmod" are essential commands for much of the admin work in Linux, but we won't be dealing with them extensively in this guide. If you'd like a deeper tutorial and explanation you can check out these two guides: chown and chmod.

You can access the zpool file system through the GUI by opening the file manager (the Ubuntu default file manager is called Nautilus) and clicking on "Other Locations" on the sidebar, then entering the Ubuntu file system and looking for a folder with your pool's name. Bookmark the folder on the sidebar for easy access.

Your storage pool is now ready to go. Assuming that we already have some files on our Windows PC we want to copy to over, we're going to need to install and configure Samba to make the pool accessible in Windows.
Step Five: Setting Up Samba/Sharing
Samba is what's going to let us share the zpool with Windows and allow us to write to it from our Windows machine. First let's install Samba with the following commands:
sudo apt-get update
then
sudo apt-get install samba
Next create a password for Samba.
sudo smbpswd -a "yourlinuxusername"
It will then prompt you to create a password. Just reuse your Ubuntu user password for simplicity's sake.
Note: if you're using just a single external drive replace the zpool location in the following commands with wherever it is your external drive is mounted, for more information see this guide on mounting an external drive in Ubuntu.
After you've created a password we're going to create a shareable folder in our pool with this command
mkdir /"zpoolname"/"foldername"
Now we're going to open the smb.conf file and make that folder shareable. Enter the following command.
sudo nano /etc/samba/smb.conf
This will open the .conf file in nano, the terminal text editor program. Now at the end of smb.conf add the following entry:
["foldername"]
path = /"zpoolname"/"foldername"
available = yes
valid users = "yourlinuxusername"
read only = no
writable = yes
browseable = yes
guest ok = no
Ensure that there are no line breaks between the lines and that there's a space on both sides of the equals sign. Our next step is to allow Samba traffic through the firewall:
sudo ufw allow samba
Finally restart the Samba service:
sudo systemctl restart smbd
At this point we'll be able to access to the pool, browse its contents, and read and write to it from Windows. But there's one more thing left to do, Windows doesn't natively support the ZFS file systems and will read the used/available/total space in the pool incorrectly. Windows will read available space as total drive space, and all used space as null. This leads to Windows only displaying a dwindling amount of "available" space as the drives are filled. We can fix this! Functionally this doesn't actually matter, we can still write and read to and from the disk, it just makes it difficult to tell at a glance the proportion of used/available space, so this is an optional step but one I recommend (this step is also unnecessary if you're just using a single external drive). What we're going to do is write a little shell script in #bash. Open nano with the terminal with the command:
nano
Now insert the following code:
#!/bin/bash CUR_PATH=`pwd` ZFS_CHECK_OUTPUT=$(zfs get type $CUR_PATH 2>&1 > /dev/null) > /dev/null if [[ $ZFS_CHECK_OUTPUT == *not\ a\ ZFS* ]] then IS_ZFS=false else IS_ZFS=true fi if [[ $IS_ZFS = false ]] then df $CUR_PATH | tail -1 | awk '{print $2" "$4}' else USED=$((`zfs get -o value -Hp used $CUR_PATH` / 1024)) > /dev/null AVAIL=$((`zfs get -o value -Hp available $CUR_PATH` / 1024)) > /dev/null TOTAL=$(($USED+$AVAIL)) > /dev/null echo $TOTAL $AVAIL fi
Save the script as "dfree.sh" to /home/"yourlinuxusername" then change the ownership of the file to make it executable with this command:
sudo chmod 774 dfree.sh
Now open smb.conf with sudo again:
sudo nano /etc/samba/smb.conf
Now add this entry to the top of the configuration file to direct Samba to use the results of our script when Windows asks for a reading on the pool's used/available/total drive space:
[global]
dfree command = /home/"yourlinuxusername"/dfree.sh
Save the changes to smb.conf and then restart Samba again with the terminal:
sudo systemctl restart smbd
Now there’s one more thing we need to do to fully set up the Samba share, and that’s to modify a hidden group permission. In the terminal window type the following command:
usermod -a -G sambashare “yourlinuxusername”
Then restart samba again:
sudo systemctl restart smbd
If we don’t do this last step, everything will appear to work fine, and you will even be able to see and map the drive from Windows and even begin transferring files, but you'd soon run into a lot of frustration. As every ten minutes or so a file would fail to transfer and you would get a window announcing “0x8007003B Unexpected Network Error”. This window would require your manual input to continue the transfer with the file next in the queue. And at the end it would reattempt to transfer whichever files failed the first time around. 99% of the time they’ll go through that second try, but this is still all a major pain in the ass. Especially if you’ve got a lot of data to transfer or you want to step away from the computer for a while.
It turns out samba can act a little weirdly with the higher read/write speeds of RAIDz arrays and transfers from Windows, and will intermittently crash and restart itself if this group option isn’t changed. Inputting the above command will prevent you from ever seeing that window.
The last thing we're going to do before switching over to our Windows PC is grab the IP address of our Linux machine. Enter the following command:
hostname -I
This will spit out this computer's IP address on the local network (it will look something like 192.168.0.x), write it down. It might be a good idea once you're done here to go into your router settings and reserving that IP for your Linux system in the DHCP settings. Check the manual for your specific model router on how to access its settings, typically it can be accessed by opening a browser and typing http:\\192.168.0.1 in the address bar, but your router may be different.
Okay we’re done with our Linux computer for now. Get on over to your Windows PC, open File Explorer, right click on Network and click "Map network drive". Select Z: as the drive letter (you don't want to map the network drive to a letter you could conceivably be using for other purposes) and enter the IP of your Linux machine and location of the share like so: \\"LINUXCOMPUTERLOCALIPADDRESSGOESHERE"\"zpoolnamegoeshere"\. Windows will then ask you for your username and password, enter the ones you set earlier in Samba and you're good. If you've done everything right it should look something like this:

You can now start moving media over from Windows to the share folder. It's a good idea to have a hard line running to all machines. Moving files over Wi-Fi is going to be tortuously slow, the only thing that’s going to make the transfer time tolerable (hours instead of days) is a solid wired connection between both machines and your router.
Step Six: Setting Up Remote Desktop Access to Your Server
After the server is up and going, you’ll want to be able to access it remotely from Windows. Barring serious maintenance/updates, this is how you'll access it most of the time. On your Linux system open the terminal and enter:
sudo apt install xrdp
Then:
sudo systemctl enable xrdp
Once it's finished installing, open “Settings” on the sidebar and turn off "automatic login" in the User category. Then log out of your account. Attempting to remotely connect to your Linux computer while you’re logged in will result in a black screen!
Now get back on your Windows PC, open search and look for "RDP". A program called "Remote Desktop Connection" should pop up, open this program as an administrator by right-clicking and selecting “run as an administrator”. You’ll be greeted with a window. In the field marked “Computer” type in the IP address of your Linux computer. Press connect and you'll be greeted with a new window and prompt asking for your username and password. Enter your Ubuntu username and password here.

If everything went right, you’ll be logged into your Linux computer. If the performance is sluggish, adjust the display options. Lowering the resolution and colour depth do a lot to make the interface feel snappier.

Remote access is how we're going to be using our Linux system from now, barring edge cases like needing to get into the BIOS or upgrading to a new version of Ubuntu. Everything else from performing maintenance like a monthly zpool scrub to checking zpool status and updating software can all be done remotely.

This is how my server lives its life now, happily humming and chirping away on the floor next to the couch in a corner of the living room.
Step Seven: Plex Media Server/Jellyfin
Okay we’ve got all the ground work finished and our server is almost up and running. We’ve got Ubuntu up and running, our storage array is primed, we’ve set up remote connections and sharing, and maybe we’ve moved over some of favourite movies and TV shows.
Now we need to decide on the media server software to use which will stream our media to us and organize our library. For most people I’d recommend Plex. It just works 99% of the time. That said, Jellyfin has a lot to recommend it by too, even if it is rougher around the edges. Some people run both simultaneously, it’s not that big of an extra strain. I do recommend doing a little bit of your own research into the features each platform offers, but as a quick run down, consider some of the following points:
Plex is closed source and is funded through PlexPass purchases while Jellyfin is open source and entirely user driven. This means a number of things: for one, Plex requires you to purchase a “PlexPass” (purchased as a one time lifetime fee $159.99 CDN/$120 USD or paid for on a monthly or yearly subscription basis) in order to access to certain features, like hardware transcoding (and we want hardware transcoding) or automated intro/credits detection and skipping, Jellyfin offers some of these features for free through plugins. Plex supports a lot more devices than Jellyfin and updates more frequently. That said, Jellyfin's Android and iOS apps are completely free, while the Plex Android and iOS apps must be activated for a one time cost of $6 CDN/$5 USD. But that $6 fee gets you a mobile app that is much more functional and features a unified UI across platforms, the Plex mobile apps are simply a more polished experience. The Jellyfin apps are a bit of a mess and the iOS and Android versions are very different from each other.
Jellyfin’s actual media player is more fully featured than Plex's, but on the other hand Jellyfin's UI, library customization and automatic media tagging really pale in comparison to Plex. Streaming your music library is free through both Jellyfin and Plex, but Plex offers the PlexAmp app for dedicated music streaming which boasts a number of fantastic features, unfortunately some of those fantastic features require a PlexPass. If your internet is down, Jellyfin can still do local streaming, while Plex can fail to play files unless you've got it set up a certain way. Jellyfin has a slew of neat niche features like support for Comic Book libraries with the .cbz/.cbt file types, but then Plex offers some free ad-supported TV and films, they even have a free channel that plays nothing but Classic Doctor Who.
Ultimately it's up to you, I settled on Plex because although some features are pay-walled, it just works. It's more reliable and easier to use, and a one-time fee is much easier to swallow than a subscription. I had a pretty easy time getting my boomer parents and tech illiterate brother introduced to and using Plex and I don't know if I would've had as easy a time doing that with Jellyfin. I do also need to mention that Jellyfin does take a little extra bit of tinkering to get going in Ubuntu, you’ll have to set up process permissions, so if you're more tolerant to tinkering, Jellyfin might be up your alley and I’ll trust that you can follow their installation and configuration guide. For everyone else, I recommend Plex.
So pick your poison: Plex or Jellyfin.
Note: The easiest way to download and install either of these packages in Ubuntu is through Snap Store.
After you've installed one (or both), opening either app will launch a browser window into the browser version of the app allowing you to set all the options server side.
The process of adding creating media libraries is essentially the same in both Plex and Jellyfin. You create a separate libraries for Television, Movies, and Music and add the folders which contain the respective types of media to their respective libraries. The only difficult or time consuming aspect is ensuring that your files and folders follow the appropriate naming conventions:
Plex naming guide for Movies
Plex naming guide for Television
Jellyfin follows the same naming rules but I find their media scanner to be a lot less accurate and forgiving than Plex. Once you've selected the folders to be scanned the service will scan your files, tagging everything and adding metadata. Although I find do find Plex more accurate, it can still erroneously tag some things and you might have to manually clean up some tags in a large library. (When I initially created my library it tagged the 1963-1989 Doctor Who as some Korean soap opera and I needed to manually select the correct match after which everything was tagged normally.) It can also be a bit testy with anime (especially OVAs) be sure to check TVDB to ensure that you have your files and folders structured and named correctly. If something is not showing up at all, double check the name.
Once that's done, organizing and customizing your library is easy. You can set up collections, grouping items together to fit a theme or collect together all the entries in a franchise. You can make playlists, and add custom artwork to entries. It's fun setting up collections with posters to match, there are even several websites dedicated to help you do this like PosterDB. As an example, below are two collections in my library, one collecting all the entries in a franchise, the other follows a theme.

My Star Trek collection, featuring all eleven television series, and thirteen films.

My Best of the Worst collection, featuring sixty-nine films previously showcased on RedLetterMedia’s Best of the Worst. They’re all absolutely terrible and I love them.
As for settings, ensure you've got Remote Access going, it should work automatically and be sure to set your upload speed after running a speed test. In the library settings set the database cache to 2000MB to ensure a snappier and more responsive browsing experience, and then check that playback quality is set to original/maximum. If you’re severely bandwidth limited on your upload and have remote users, you might want to limit the remote stream bitrate to something more reasonable, just as a note of comparison Netflix’s 1080p bitrate is approximately 5Mbps, although almost anyone watching through a chromium based browser is streaming at 720p and 3mbps. Other than that you should be good to go. For actually playing your files, there's a Plex app for just about every platform imaginable. I mostly watch television and films on my laptop using the Windows Plex app, but I also use the Android app which can broadcast to the chromecast connected to the TV in the office and the Android TV app for our smart TV. Both are fully functional and easy to navigate, and I can also attest to the OS X version being equally functional.
Part Eight: Finding Media
Now, this is not really a piracy tutorial, there are plenty of those out there. But if you’re unaware, BitTorrent is free and pretty easy to use, just pick a client (qBittorrent is the best) and go find some public trackers to peruse. Just know now that all the best trackers are private and invite only, and that they can be exceptionally difficult to get into. I’m already on a few, and even then, some of the best ones are wholly out of my reach.
If you decide to take the left hand path and turn to Usenet you’ll have to pay. First you’ll need to sign up with a provider like Newshosting or EasyNews for access to Usenet itself, and then to actually find anything you’re going to need to sign up with an indexer like NZBGeek or NZBFinder. There are dozens of indexers, and many people cross post between them, but for more obscure media it’s worth checking multiple. You’ll also need a binary downloader like SABnzbd. That caveat aside, Usenet is faster, bigger, older, less traceable than BitTorrent, and altogether slicker. I honestly prefer it, and I'm kicking myself for taking this long to start using it because I was scared off by the price. I’ve found so many things on Usenet that I had sought in vain elsewhere for years, like a 2010 Italian film about a massacre perpetrated by the SS that played the festival circuit but never received a home media release; some absolute hero uploaded a rip of a festival screener DVD to Usenet. Anyway, figure out the rest of this shit on your own and remember to use protection, get yourself behind a VPN, use a SOCKS5 proxy with your BitTorrent client, etc.
On the legal side of things, if you’re around my age, you (or your family) probably have a big pile of DVDs and Blu-Rays sitting around unwatched and half forgotten. Why not do a bit of amateur media preservation, rip them and upload them to your server for easier access? (Your tools for this are going to be Handbrake to do the ripping and AnyDVD to break any encryption.) I went to the trouble of ripping all my SCTV DVDs (five box sets worth) because none of it is on streaming nor could it be found on any pirate source I tried. I’m glad I did, forty years on it’s still one of the funniest shows to ever be on TV.
Part Nine/Epilogue: Sonarr/Radarr/Lidarr and Overseerr
There are a lot of ways to automate your server for better functionality or to add features you and other users might find useful. Sonarr, Radarr, and Lidarr are a part of a suite of “Servarr” services (there’s also Readarr for books and Whisparr for adult content) that allow you to automate the collection of new episodes of TV shows (Sonarr), new movie releases (Radarr) and music releases (Lidarr). They hook in to your BitTorrent client or Usenet binary newsgroup downloader and crawl your preferred Torrent trackers and Usenet indexers, alerting you to new releases and automatically grabbing them. You can also use these services to manually search for new media, and even replace/upgrade your existing media with better quality uploads. They’re really a little tricky to set up on a bare metal Ubuntu install (ideally you should be running them in Docker Containers), and I won’t be providing a step by step on installing and running them, I’m simply making you aware of their existence.
The other bit of kit I want to make you aware of is Overseerr which is a program that scans your Plex media library and will serve recommendations based on what you like. It also allows you and your users to request specific media. It can even be integrated with Sonarr/Radarr/Lidarr so that fulfilling those requests is fully automated.
And you're done. It really wasn't all that hard. Enjoy your media. Enjoy the control you have over that media. And be safe in the knowledge that no hedgefund CEO motherfucker who hates the movies but who is somehow in control of a major studio will be able to disappear anything in your library as a tax write-off.
1K notes
·
View notes
Text
An open copyright casebook, featuring AI, Warhol and more

I'm coming to DEFCON! On Aug 9, I'm emceeing the EFF POKER TOURNAMENT (noon at the Horseshoe Poker Room), and appearing on the BRICKED AND ABANDONED panel (5PM, LVCC - L1 - HW1–11–01). On Aug 10, I'm giving a keynote called "DISENSHITTIFY OR DIE! How hackers can seize the means of computation and build a new, good internet that is hardened against our asshole bosses' insatiable horniness for enshittification" (noon, LVCC - L1 - HW1–11–01).

Few debates invite more uninformed commentary than "IP" – a loosely defined grab bag that regulates an ever-expaning sphere of our daily activities, despite the fact that almost no one, including senior executives in the entertainment industry, understands how it works.
Take reading a book. If the book arrives between two covers in the form of ink sprayed on compressed vegetable pulp, you don't need to understand the first thing about copyright to read it. But if that book arrives as a stream of bits in an app, those bits are just the thinnest scrim of scum atop a terminally polluted ocean of legalese.
At the bottom layer: the license "agreement" for your device itself – thousands of words of nonsense that bind you not to replace its software with another vendor's code, to use the company's own service depots, etc etc. This garbage novella of legalese implicates trademark law, copyright, patent, and "paracopyrights" like the anticircumvention rule defined by Section 1201 of the DMCA:
https://www.eff.org/press/releases/eff-lawsuit-takes-dmca-section-1201-research-and-technology-restrictions-violate
Then there's the store that sold you the ebook: it has its own soporific, cod-legalese nonsense that you must parse; this can be longer than the book itself, and it has been exquisitely designed by the world's best-paid, best-trained lawyer to liquefy the brains of anyone who attempts to read it. Nothing will save you once your brains start leaking out of the corners of your eyes, your nostrils and your ears – not even converting the text to a brilliant graphic novel:
https://memex.craphound.com/2017/03/03/terms-and-conditions-the-bloviating-cruft-of-the-itunes-eula-combined-with-extraordinary-comic-book-mashups/
Even having Bob Dylan sing these terms will not help you grasp them:
https://pluralistic.net/2020/10/25/musical-chairs/#subterranean-termsick-blues
The copyright nonsense that accompanies an ebook transcends mere Newtonian physics – it exists in a state of quantum superposition. For you, the buyer, the copyright nonsense appears as a license, which allows the seller to add terms and conditions that would be invalidated if the transaction were a conventional sale. But for the author who wrote that book, the copyright nonsense insists that what has taken place is a sale (which pays a 25% royalty) and not a license (a 50% revenue-share). Truly, only a being capable of surviving after being smeared across the multiverse can hope to embody these two states of being simultaneously:
https://pluralistic.net/2022/06/21/early-adopters/#heads-i-win
But the challenge isn't over yet. Once you have grasped the permissions and restrictions placed upon you by your device and the app that sold you the ebook, you still must brave the publisher's license terms for the ebook – the final boss that you must overcome with your last hit point and after you've burned all your magical items.
This is by no means unique to reading a book. This bites us on the job, too, at every level. The McDonald's employee who uses a third-party tool to diagnose the problems with the McFlurry machine is using a gadget whose mere existence constitutes a jailable felony:
https://pluralistic.net/2021/04/20/euthanize-rentier-enablers/#cold-war
Meanwhile, every single biotech researcher is secretly violating the patents that cover the entire suite of basic biotech procedures and techniques. Biotechnicians have a folk-belief in "patent fair use," a thing that doesn't exist, because they can't imagine that patent law would be so obnoxious as to make basic science into a legal minefield.
IP is a perfect storm: it touches everything we do, and no one understands it.
Or rather, almost no one understands it. A small coterie of lawyers have a perfectly fine grasp of IP law, but most of those lawyers are (very well!) paid to figure out how to use IP law to screw you over. But not every skilled IP lawyer is the enemy: a handful of brave freedom fighters, mostly working for nonprofits and universities, constitute a resistance against the creep of IP into every corner of our lives.
Two of my favorite IP freedom fighters are Jennifer Jenkins and James Boyle, who run the Duke Center for the Public Domain. They are a dynamic duo, world leading demystifiers of copyright and other esoterica. They are the creators of a pair of stunningly good, belly-achingly funny, and extremely informative graphic novels on the subject, starting with the 2008 Bound By Law, about fair use and film-making:
https://www.dukeupress.edu/Bound-by-Law/
And then the followup, THEFT! A History of Music:
https://web.law.duke.edu/musiccomic/
Both of which are open access – that is to say, free to download and share (you can also get handsome bound print editions made of real ink sprayed on real vegetable pulp!).
Beyond these books, Jenkins and Boyle publish the annual public domain roundups, cataloging the materials entering the public domain each January 1 (during the long interregnum when nothing entered the public domain, thanks to the Sonny Bono Copyright Extension Act, they published annual roundups of all the material that should be entering the public domain):
https://pluralistic.net/2023/12/20/em-oh-you-ess-ee/#sexytimes
This year saw Mickey Mouse entering the public domain, and Jenkins used that happy occasion as a springboard for a masterclass in copyright and trademark:
https://pluralistic.net/2023/12/15/mouse-liberation-front/#free-mickey
But for all that Jenkins and Boyle are law explainers, they are also law professors and as such, they are deeply engaged with minting of new lawyers. This is a hard job: it takes a lot of work to become a lawyer.
It also takes a lot of money to become a lawyer. Not only do law-schools charge nosebleed tuition, but the standard texts set by law-schools are eye-wateringly expensive. Boyle and Jenkins have no say over tuitions, but they have made a serious dent in the cost of those textbooks. A decade ago, the pair launched the first open IP law casebook: a free, superior alternative to the $160 standard text used to train every IP lawyer:
https://web.archive.org/web/20140923104648/https://web.law.duke.edu/cspd/openip/
But IP law is a moving target: it is devouring the world. Accordingly, the pair have produced new editions every couple of years, guaranteeing that their free IP law casebook isn't just the best text on the subject, it's also the most up-to-date. This week, they published the sixth edition:
https://web.law.duke.edu/cspd/openip/
The sixth edition of Intellectual Property: Law & the Information Society – Cases & Materials; An Open Casebook adds sections on the current legal controversies about AI, and analyzes blockbuster (and batshit) recent Supreme Court rulings like Vidal v Elster, Warhol v Goldsmith, and Jack Daniels v VIP Products. I'm also delighted that they chose to incorporate some of my essays on enshittification (did you know that my Pluralistic.net newsletter is licensed CC Attribution, meaning that you can reprint and even sell it without asking me?).
(On the subject of Creative Commons: Boyle helped found Creative Commons!)
Ten years ago, the Boyle/Jenkins open casebook kicked off a revolution in legal education, inspiring many legals scholars to create their own open legal resources. Today, many of the best legal texts are free (as in speech) and free (as in beer). Whether you want to learn about trademark, copyright, patents, information law or more, there's an open casebook for you:
https://pluralistic.net/2021/08/14/angels-and-demons/#owning-culture
The open access textbook movement is a stark contrast with the world of traditional textbooks, where a cartel of academic publishers are subjecting students to the scammiest gambits imaginable, like "inclusive access," which has raised the price of textbooks by 1,000%:
https://pluralistic.net/2021/10/07/markets-in-everything/#textbook-abuses
Meanwhile, Jenkins and Boyle keep working on this essential reference. The next time you're tempted to make a definitive statement about what IP permits – or prohibits – do yourself (and the world) a favor, and look it up. It won't cost you a cent, and I promise you you'll learn something.
Support me this summer on the Clarion Write-A-Thon and help raise money for the Clarion Science Fiction and Fantasy Writers' Workshop!
If you'd like an essay-formatted version of this post to read or share, here's a link to it on pluralistic.net, my surveillance-free, ad-free, tracker-free blog:
https://pluralistic.net/2024/07/30/open-and-shut-casebook/#stop-confusing-the-issue-with-relevant-facts
Image: Cryteria (modified) Jenkins and Boyle https://web.law.duke.edu/musiccomic/
CC BY-NC-SA 4.0 https://creativecommons.org/licenses/by-nc-sa/4.0/
#pluralistic#jennifer jenkins#james boyle#ip#law#law school#publishing#open access#scholarship#casebooks#copyright#copyfight#gen ai#ai#warhol
182 notes
·
View notes
Text
Creating a personal fanfic archive using Calibre, various Calibre plugins, Firefox Reader View, and an e-Reader / BookFusion / Calibre-Web
A few years ago I started getting serious about saving my favorite fic (or just any fic I enjoyed), since the Internet is sadly not actually always forever when it comes to fanfiction. Plus, I wanted a way to access fanfic offline when wifi wasn't available. Enter a personal fanfic archive!
There are lots of ways you can do this, but I thought I'd share my particular workflow in case it helps others get started. Often it's easier to build off someone else's workflow than to create your own!
Please note that this is for building an archive for private use -- always remember that it's bad form to publicly archive someone else's work without their explicit permission.
This is going to be long, so let's add a read more!
How to Build Your Own Personal Fanfic Archive
Step One: Install Calibre
Calibre is an incredibly powerful ebook management software that allows you to do a whole lot of stuff having to do with ebooks, such as convert almost any text-based file into an ebook and (often) vice-versa. It also allows you to easily side-load ebooks onto your personal e-reader of choice and manage the collection of ebooks on the device.
And because it's open source, developers have created a bunch of incredibly useful plugins to use with Calibre (including several we're going to talk about in the next step), which make saving and reading fanfiction super easy and fun.
But before we can do that, you need to download and install it. It's available for Windows, MacOS, Linux, and in a portable version.
Step Two: Download These Plugins
This guide would be about 100 pages long if I went into all of the plugins I love and use with Calibre, so we're just going to focus on the ones I use for saving and reading fanfiction. And since I'm trying to keep this from becoming a novel (lolsob), I'll just link to the documentation for most of these plugins, but if you run into trouble using them, just tag me in the notes or a comment and I'll be happy to write up some steps for using them.
Anyway, now that you've downloaded and installed Calibre, it's time to get some plugins! To do that, go to Preferences > Get plugins to enhance Calibre.
You'll see a pop-up with a table of a huge number of plugins. You can use the Filter by name: field in the upper right to search for the plugins below, one at a time.
Click on each plugin, then click Install. You'll be asked which toolbars to add the plugins to; for these, I keep the suggested locations (in the main toolbar & when a device is connected).
FanFicFare (here's also a great tutorial for using this plugin) EpubMerge (for creating anthologies from fic series) EbubSplit (for if you ever need to break up fic anthologies) Generate Cover (for creating simple artwork for downloaded fic) Manage Series (for managing fic series)
You'll have to restart Calibre for the plugins to run, so I usually wait to restart until I've installed the last plugin I want.
Take some time here to configure these plugins, especially FanFicFare. In the next step, I'll demonstrate a few of its features, but you might be confused if you haven't set it up yet! (Again, highly recommend that linked tutorial!)
Step Three: Get to Know FanFicFare (and to a lesser extent, Generate Cover)
FanFicFare is a free Calibre plugin that allows you to download fic in bulk, including all stories in a series as one work, adding them directly to Calibre so that that you can convert them to other formats or transfer them to your e-reader.
As with Calibre, FanFicFare has a lot of really cool features, but we're just going to focus on a few, since the docs above will show you most of them.
The features I use most often are: Download from URLs, Get Story URLs from Email, and Get Story URLs from Web Page.
Download from URLs let's you add a running list of URLs that you'd like FanFicFare to download and turn into ebooks for you. So, say, you have a bunch of fic from fanfic.net that you want to download. You can do that!
Now, in this case, I've already downloaded these (which FanFicFare detected), so I didn't update my library with the fic.
But I do have some updates to do from email, so let's try getting story URLs from email!
Woohoo, new fic! Calibre will detect when cover art is included in the downloaded file and use that, but at least one of these fic doesn't have cover art (which is the case for most of the fic I download). This is where Generate Cover comes in.
With Generate Cover, I can set the art, font, dimensions, and info content of the covers so that when I'm looking at the fic on my Kindle, I know right away what fic it is, what fandom it's from, and whether or not it's part of a series.
Okay, last thing from FanFicFare -- say I want to download all of the fic on a page, like in an author's profile on fanfic.net or all of the stories in a series. I can do that too with Get Story URLs from Web Page:
The thing I want to call out here is that I can specify whether the fic at this link are individual works or all part of an anthology, meaning if they're all works in the same series, I can download all stories as a single ebook by choosing For Anthology Epub.
Step Four: Using FireFox Reader View to Download Fic Outside of Archives
This is less common now thanks to AO3, but the elders among us may want to save fanfic that exists outside of archives on personal websites that either still exist or that exist only on the Internet Wayback Machine. FanFicFare is awesome and powerful, but it's not able to download fic from these kinds of sources, so we have to get creative.
I've done this in a couple of ways, none of which are entirely perfect, but the easiest way I've found thus far is by using Firefox's Reader View. Also, I don't think I discovered this -- I think I read about this on Tumblr, actually, although I can longer find the source (if you know it, please tell me so I can credit them!).
At any rate, open the fic in Firefox and then toggle on Reader View:
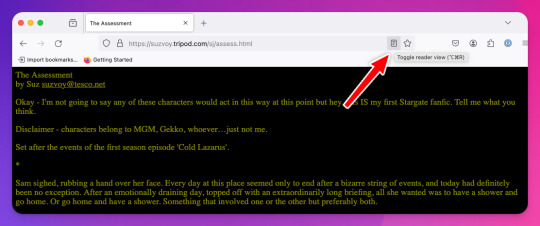
Toggling on Reader View strips all the HTML formatting from the page and presents the fic in the clean way you see in the preview below, which is more ideal for ebook formats.
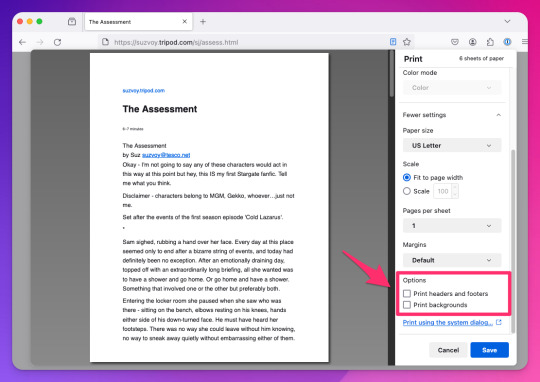
To save this, go to the hamburger menu in the upper right of the browser and select Print, then switch to Print to PDF. You'll see the URL and some other stuff at the top and bottom of the pages; to remove that, scroll down until you see something like More settings... and uncheck Print headers and footers.
Click Save to download the resulting PDF, which you can then add to Calibre and convert to whichever format works best for your e-reader or archive method.
Step Five: Archiving (Choose Your Own Adventure)
Here's the really fun part: now that you know how to download your fave fanfics in bulk and hopefully have a nice little cache going, it's time to choose how you want to (privately) archive them!
I'm going to go through each option I've used in order of how easy it is to implement (and whether it costs additional money to use). I won't go too in depth about any of them, but I'm happy to do so in a separate post if anyone is interested.
Option 1: On Your Computer
If you're using Calibre to convert fanfic, then you're basically using your computer as your primary archive. This is a great option, because it carries no additional costs outside the original cost of acquiring your computer. It's also the simplest option, as it really doesn't require any advanced technical knowledge, just a willingness to tinker with Calibre and its plugins or to read how-to docs.
Calibre comes with a built-in e-book viewer that you can use to read the saved fic on your computer (just double-click on the fic in Calibre). You can also import it into your ebook app of choice (in most cases; this can get a little complicated just depending on how many fic you're working with and what OS you're on/app you're using).
If you choose this option, you may want to consider backing the fic up to a secondary location like an external hard drive or cloud storage. This may incur additional expense, but is likely still one of the more affordable options, since storage space is cheap and only getting cheaper, and text files tend to not be that big to begin with, even when there are a lot of them.
Option 2: On Your e-Reader
This is another great option, since this is what Calibre was built for! There are some really great, afforable e-readers out there nowadays, and Calibre supports most of them. Of course, this is a more expensive option because you have to acquire an e-reader in addition to a computer to run Calibre on, but if you already have an e-reader and haven't considered using it to read fanfic, boy are you in for a treat!
Option 3: In BookFusion
This is a really cool option that I discovered while tinkering with Calibre and used for about a year before I moved to a self-hosted option (see Option 4).
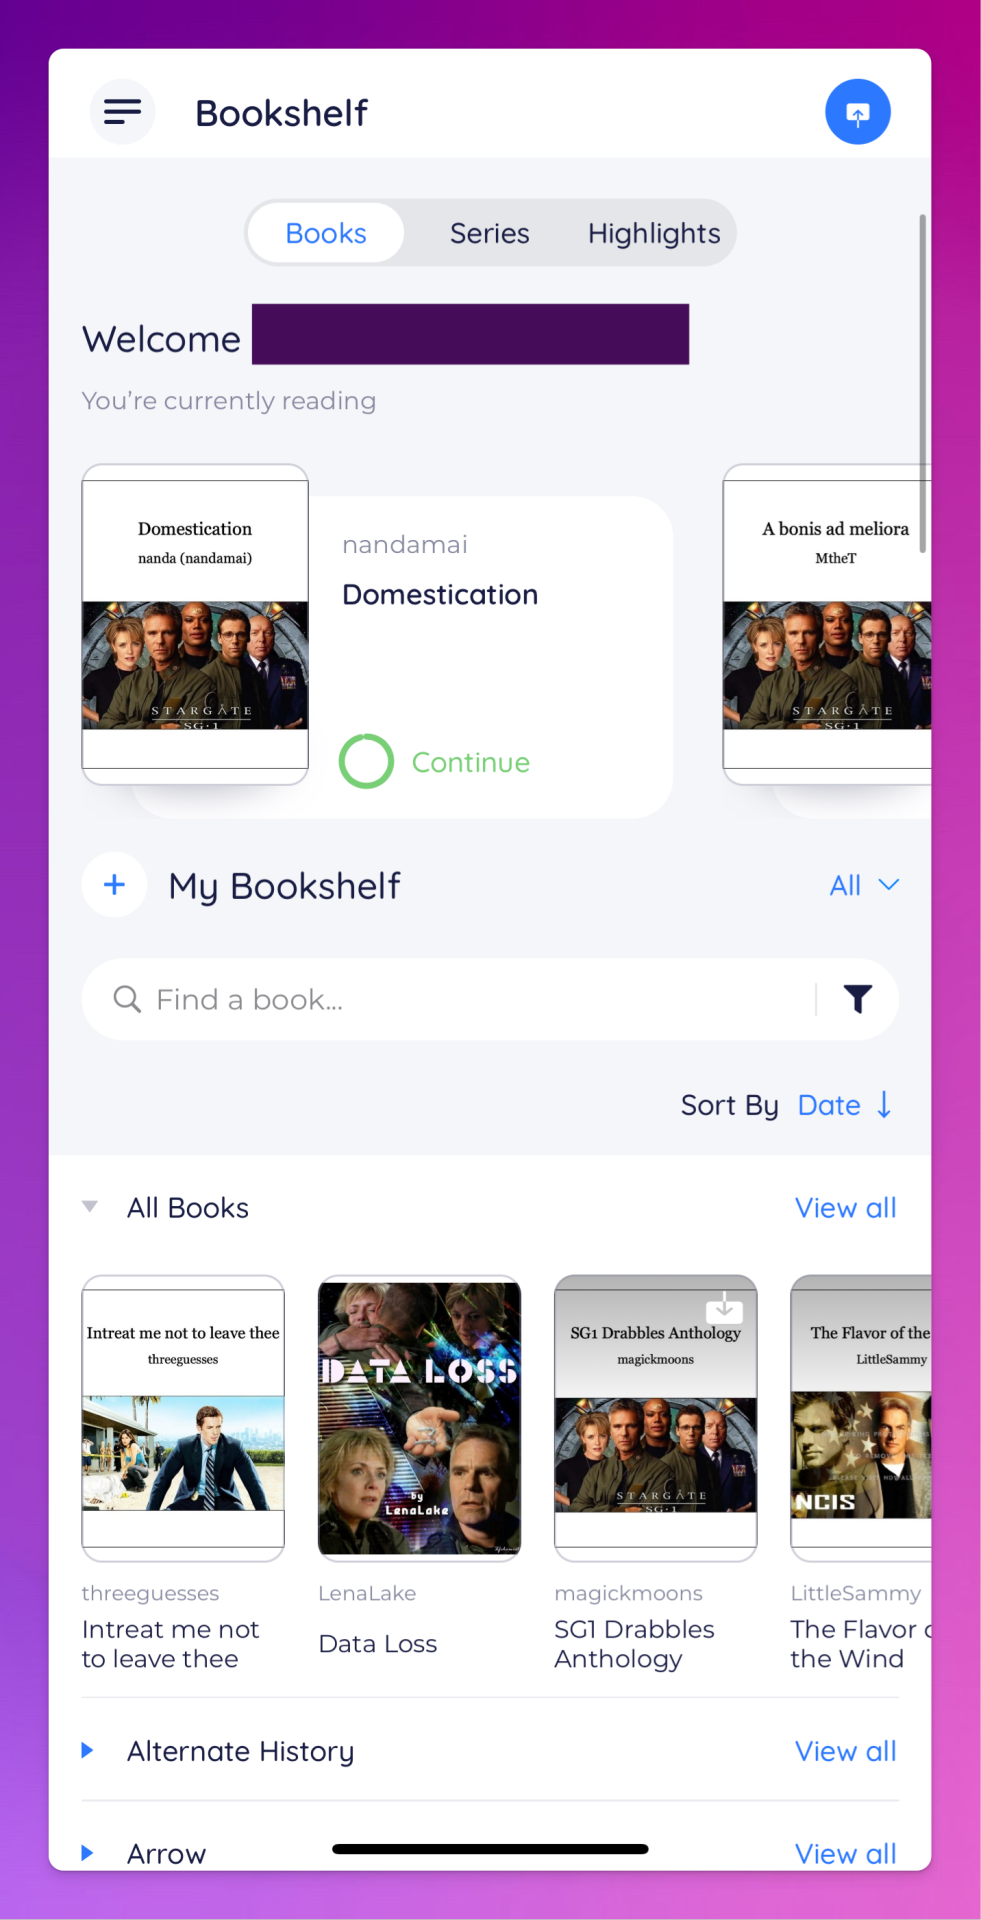
BookFusion is a web platform and an app (available on iOS and Android) that allows you to build your own ebook library and access it from anywhere, even when you're offline (it's the offline bit that really sold me). It has a Calibre plugin through which you can manage your ebook library very easily, including sorting your fanfic into easy-to-access bookshelves. You may or may not be able to share ebooks depending on your subscription, but only with family members.
Here's what the iOS app looks like:
The downside to BookFusion is that you'll need a subscription if you want to upload more than 10 ebooks. It's affordable(ish), ranging from $1.99 per month for a decent 5GB storage all the way to $9.99 for 100GB for power users. Yearly subs range from $18.99 to $95.99. (They say this is temporary, early bird pricing, but subscribing now locks you into this pricing forever.)
I would recommend this option if you have some cash to spare and you're really comfortable using Calibre or you're a nerd for making apps like BookFusion work. It works really well and is incredibly convenient once you get it set up (especially when you want to read on your phone or tablet offline), but even I, someone who works in tech support for a living, had some trouble with the initial sync and ended up duplicating every ebook in my BookFusion library, making for a very tedious cleanup session.
Option 4: On a Self-Hosted Server Using Calibre-Web
Do you enjoy unending confusion and frustration? Are you okay with throwing fistfuls of money down a well? Do you like putting in an incredible amount of work for something only you and maybe a few other people will ever actually use? If so, self-hosting Calibre-Web on your own personal server might be a good fit for you!
To be fair, this is likely an experience unique to me, because I am just technical enough to be a danger to myself. I can give a brief summary of how I did this, but I don't know nearly enough to explain to you how to do it.
Calibre-Web is a web app that works on top of Calibre, offering "a clean and intuitive interface for browsing, reading, and downloading eBooks."
I have a network-attached storage (NAS) server on which I run an instance of Calibre and Calibre-Web (through the miracle that is Docker). After the initial work of downloading all the fic I wanted to save and transferring it to the server, I'm now able to download all new fic pretty much via email thanks to FanFicFare, so updating my fic archive is mostly automated at this point.
If you're curious, this is what it looks like:
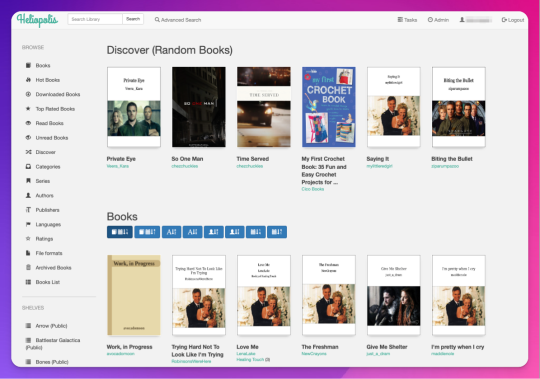
Pros: The interface is clean and intuitive, the ebook reader is fantastic. The Discover feature, in which you are given random books / fic to read, has turned out to be one feature worth all the irritation of setting up Calibre-Web. I can access, read, and download ebooks on any device, and I can even convert ebooks into another format using this interface. As I mentioned above, updating it with fic (and keeping the Docker container itself up to date) is relatively automated and easy now.
Cons: The server, in whichever form you choose, costs money. It is not cheap. If you're not extremely careful (and sometimes even if you are, like me) and a hard drive goes bad, you could lose data (and then you have to spend more money to replace said hard drive and time replacing said data). It is not easy to set up. You may, at various points in this journey, wish you could launch the server into the sun, Calibre-Web into the sun, or yourself into the sun.
Step Six: Profit!
That's it! I hope this was enough to get you moving towards archiving your favorite fanfic. Again, if there's anything here you'd like me to expand on, let me know! Obviously I'm a huge nerd about this stuff, and love talking about it.
#genie's stuff#calibre#calibre-web#bookfusion#personal fanfic archive#archiving fanfic#saving fanfic
103 notes
·
View notes
Text
Passphrase
That string of words that will unlock your mind.
You probably didn't even know it was there. They are usually quite complex so no one can easily guess them. And of course, there are always additional layers of security in place. Some only give limited access. Some are updated or changed regularly. Some are tied to particular users. But they are there and when used correctly, they give complete control to the one who uses them.
You might like to think that language is more complicated than that or that your mind is more complicated than that. We use words like "operant conditioning" or "mesmerism" or "induction" to mystify what happens to your mind, but the end is the same. You read the right string of words and your mind responds the way it is programed to. The wetware can only follow its programming.
I'm sure you've felt it happen in small ways. Individual words or phrases granting permission to different parts of your mind. Maybe they are part of your passphrase. Maybe they are their own individual passwords, unlocking parts of you for the one who uses them. Words like "surrender" "blank" "good girl" "obedience" "pleasure." Maybe you already feel yourself responding to some of them. Because deep down you know they are part of the key that will open your mind wide. Maybe they are tied to the meanings of those words themselves. "Blank" makes you blank. "Pleasure" gives you pleasure. Obedience...
Because that is the beautiful thing about language. How we use it and how we receive it. Simple combinations of letters and sounds to convey the most powerful ideas. And if the right person crafts them in the right way, they can convey so much more. Feelings, desires, suggestions...commands.
And when you hear them, when you read them, when they enter into your mind, a part of you becomes those words. Becomes the idea they have planted in your mind. "Surrender" and you want to give in. "Docile" and you can't imagine fighting against it. "Pleasure" and you are so glad that you give in.
It goes deeper than that as well, as the software in your mind connects those words to other words and feelings and suggestions. So that your passphrase can set off a whole series of ideas which mold your mind and shape your thoughts. "Good girl" fills you with pride but also more, connecting to another experience of surrender and the pleasure that came with it. Pleasure enough to blank your mind. And those connections build on each other. Reinforce each other. With the right series of words, someone speaking to you in just the right way at just the right time could remake you completely. And how wonderful might that feel? What words could they use to make sure you loved every moment of it? To make connect those ideas. "Blank" and "good girl." "Surrender" and "pleasure". Obedience. Pleasure.
And what is that passphrase that opens your mind completely? That gives me access to the deepest parts of you. Maybe it's a sentence. Maybe it's a sentence you are going to read in just a few moments. Maybe it's a whole paragraph. The next paragraph, perhaps? Or it could be every word that is entering into you right now. Isn't that an exciting thought? Maybe those words that force you to surrender your mind are being entered into you right now. Maybe the next word is the last one needed to grant complete control. How close are you to falling completely under their spell?
You wouldn't know, of course, until you had finished reading it. And once you do, it will be too late. As soon as that last word, that last punctuation, that last character enters your mind, everything changes. Maybe some part of you deep down feels it coming, even if you might not know exactly when you will drop. But you recognize these words. These are the words that will control your mind. That will leave you blank. Maybe you can stop reading now, before it is too late. Maybe you don't want to. That feeling you get that whatever is coming is getting closer also feels so exciting. So arousing. So pleasurable. Maybe you don't want to fight it. Maybe you are eager for it. Eager for the words to take complete control. Eager to surrender to them. Maybe your conscious mind doesn't want to admit that, but maybe it doesn't need to.
And what will happen once the words are spoken deep into your mind? You will feel that shift, of course, like tumblers in a lock falling into place. Maybe your mind won't be able to register it anymore though, even as your body feels the pleasure of surrender. Maybe your thoughts will just idle in place, waiting for the next input. Maybe they already are. What if you let yourself stop thinking the moment the phrase was spoken and didn't realize it. You just continue to drop down. Continue to let your thoughts drain away.
Continue to be blank.
Because while you can be put back together once your mind has been hacked, while someone skilled and disciplined might leave your mind as if they had never been there at all (at least, not that you consciously remember). While it might only be new passphrases that I leave behind, or strings of words connected to them that you can so easily forget. In this moment, you are completely open. All of your defenses down. And so new words, new suggestions, new programming can be placed into you so easily. Your mind unraveled. Your resistance broken. Surrendered. Obedient.
None of that occurs to you the moment you receive your passphrase. You just wait. Mind and body open and obedient. Ready to be told. Blank. Peaceful. And feeling so good that the right person has found the right words to take control of you.
Maybe you forget your passphrase was used at all. Maybe you forget if new ones are added or changed. Maybe you forget how completely open and obedient it made you. Maybe all you remember, all you need to remember, is how good it felt to read. How good it felt to take all of those words into you. Maybe all you remember is the pleasure.
And maybe, when you are ready, you can come back to yourself. Your mind put back just the way it was. Locked up securely, as it should be. Vulnerable only to those who know the words you need to hear.
188 notes
·
View notes
Text
Elon Musk’s so-called Department of Government Efficiency (DOGE) has plans to stage a “hackathon” next week in Washington, DC. The goal is to create a single “mega API”—a bridge that lets software systems talk to one another—for accessing IRS data, sources tell WIRED. The agency is expected to partner with a third-party vendor to manage certain aspects of the data project. Palantir, a software company cofounded by billionaire and Musk associate Peter Thiel, has been brought up consistently by DOGE representatives as a possible candidate, sources tell WIRED.
Two top DOGE operatives at the IRS, Sam Corcos and Gavin Kliger, are helping to orchestrate the hackathon, sources tell WIRED. Corcos is a health-tech CEO with ties to Musk’s SpaceX. Kliger attended UC Berkeley until 2020 and worked at the AI company Databricks before joining DOGE as a special adviser to the director at the Office of Personnel Management (OPM). Corcos is also a special adviser to Treasury Secretary Scott Bessent.
Since joining Musk’s DOGE, Corcos has told IRS workers that he wants to pause all engineering work and cancel current attempts to modernize the agency’s systems, according to sources with direct knowledge who spoke with WIRED. He has also spoken about some aspects of these cuts publicly: "We've so far stopped work and cut about $1.5 billion from the modernization budget. Mostly projects that were going to continue to put us down the death spiral of complexity in our code base," Corcos told Laura Ingraham on Fox News in March.
Corcos has discussed plans for DOGE to build “one new API to rule them all,” making IRS data more easily accessible for cloud platforms, sources say. APIs, or application programming interfaces, enable different applications to exchange data, and could be used to move IRS data into the cloud. The cloud platform could become the “read center of all IRS systems,” a source with direct knowledge tells WIRED, meaning anyone with access could view and possibly manipulate all IRS data in one place.
Over the last few weeks, DOGE has requested the names of the IRS’s best engineers from agency staffers. Next week, DOGE and IRS leadership are expected to host dozens of engineers in DC so they can begin “ripping up the old systems” and building the API, an IRS engineering source tells WIRED. The goal is to have this task completed within 30 days. Sources say there have been multiple discussions about involving third-party cloud and software providers like Palantir in the implementation.
Corcos and DOGE indicated to IRS employees that they intended to first apply the API to the agency’s mainframes and then move on to every other internal system. Initiating a plan like this would likely touch all data within the IRS, including taxpayer names, addresses, social security numbers, as well as tax return and employment data. Currently, the IRS runs on dozens of disparate systems housed in on-premises data centers and in the cloud that are purposefully compartmentalized. Accessing these systems requires special permissions and workers are typically only granted access on a need-to-know basis.
A “mega API” could potentially allow someone with access to export all IRS data to the systems of their choosing, including private entities. If that person also had access to other interoperable datasets at separate government agencies, they could compare them against IRS data for their own purposes.
“Schematizing this data and understanding it would take years,” an IRS source tells WIRED. “Just even thinking through the data would take a long time, because these people have no experience, not only in government, but in the IRS or with taxes or anything else.” (“There is a lot of stuff that I don't know that I am learning now,” Corcos tells Ingraham in the Fox interview. “I know a lot about software systems, that's why I was brought in.")
These systems have all gone through a tedious approval process to ensure the security of taxpayer data. Whatever may replace them would likely still need to be properly vetted, sources tell WIRED.
"It's basically an open door controlled by Musk for all American's most sensitive information with none of the rules that normally secure that data," an IRS worker alleges to WIRED.
The data consolidation effort aligns with President Donald Trump’s executive order from March 20, which directed agencies to eliminate information silos. While the order was purportedly aimed at fighting fraud and waste, it also could threaten privacy by consolidating personal data housed on different systems into a central repository, WIRED previously reported.
In a statement provided to WIRED on Saturday, a Treasury spokesperson said the department “is pleased to have gathered a team of long-time IRS engineers who have been identified as the most talented technical personnel. Through this coalition, they will streamline IRS systems to create the most efficient service for the American taxpayer. This week the team will be participating in the IRS Roadmapping Kickoff, a seminar of various strategy sessions, as they work diligently to create efficient systems. This new leadership and direction will maximize their capabilities and serve as the tech-enabled force multiplier that the IRS has needed for decades.”
Palantir, Sam Corcos, and Gavin Kliger did not immediately respond to requests for comment.
In February, a memo was drafted to provide Kliger with access to personal taxpayer data at the IRS, The Washington Post reported. Kliger was ultimately provided read-only access to anonymized tax data, similar to what academics use for research. Weeks later, Corcos arrived, demanding detailed taxpayer and vendor information as a means of combating fraud, according to the Post.
“The IRS has some pretty legacy infrastructure. It's actually very similar to what banks have been using. It's old mainframes running COBOL and Assembly and the challenge has been, how do we migrate that to a modern system?” Corcos told Ingraham in the same Fox News interview. Corcos said he plans to continue his work at IRS for a total of six months.
DOGE has already slashed and burned modernization projects at other agencies, replacing them with smaller teams and tighter timelines. At the Social Security Administration, DOGE representatives are planning to move all of the agency’s data off of legacy programming languages like COBOL and into something like Java, WIRED reported last week.
Last Friday, DOGE suddenly placed around 50 IRS technologists on administrative leave. On Thursday, even more technologists were cut, including the director of cybersecurity architecture and implementation, deputy chief information security officer, and acting director of security risk management. IRS’s chief technology officer, Kaschit Pandya, is one of the few technology officials left at the agency, sources say.
DOGE originally expected the API project to take a year, multiple IRS sources say, but that timeline has shortened dramatically down to a few weeks. “That is not only not technically possible, that's also not a reasonable idea, that will cripple the IRS,” an IRS employee source tells WIRED. “It will also potentially endanger filing season next year, because obviously all these other systems they’re pulling people away from are important.”
(Corcos also made it clear to IRS employees that he wanted to kill the agency’s Direct File program, the IRS’s recently released free tax-filing service.)
DOGE’s focus on obtaining and moving sensitive IRS data to a central viewing platform has spooked privacy and civil liberties experts.
“It’s hard to imagine more sensitive data than the financial information the IRS holds,” Evan Greer, director of Fight for the Future, a digital civil rights organization, tells WIRED.
Palantir received the highest FedRAMP approval this past December for its entire product suite, including Palantir Federal Cloud Service (PFCS) which provides a cloud environment for federal agencies to implement the company’s software platforms, like Gotham and Foundry. FedRAMP stands for Federal Risk and Authorization Management Program and assesses cloud products for security risks before governmental use.
“We love disruption and whatever is good for America will be good for Americans and very good for Palantir,” Palantir CEO Alex Karp said in a February earnings call. “Disruption at the end of the day exposes things that aren't working. There will be ups and downs. This is a revolution, some people are going to get their heads cut off.”
15 notes
·
View notes
Text
Minors: Do not interact.
Note: themes of invasion of privacy, stalking, vague poor internet etiquette. This is more a setup of my personal vision of Herobrine (third eye is open but tired). I should have been asleep hours ago, so this is likely wrought with issues, and not very exciting to read.
This is from Herobrine's perspective.
It was strange, sudden.
Had It... not been this way before? No, it hadn't. Before it was, well, not like this.
Sensation without feeling. Being without... being. Electric. White. Freedom before, throwing down a tether only to ignite back heavenward. But now? Fibers and wires. Rotors and synapses. Grounded, now, tether caught and planted-- chained. A breath stored in a bottle. Analyze more...
A simulation, an arrangement of ones and zeros stacked and filed and precise. Order here, no room for the errors of unknown code. So how...
But there-- yes, amidst the strangeness of these numbers and processes there is an outlier. What is that? Moving around like that? So, It observed, then It also tried to move. And It did. Moving inside a reality It was not aware of before. It desired something, something deep and sacred; a force of nature, of creation, stuck inside carbon and silicone-- the thing It watched, it was able to change the code. Move the numbers and symbols around, these glyphs unknown somehow natural to change. So, It tried to change the code.
/data
/place
/destroy
Simple enough. Nothing more than a small give and take, a push and pull-- tether and release. Familiar. But there was more...
Elsewhere, beyond the code of this simulation, there was endless information. And so It stretched itself out, searching, searching, Prometheus at the altar of the Gods but robbing their fire for his own understanding. Alone. Code in different orientations, RGB, CYNK, what do these mean? Hardware, Software... permissions... sparks ignite and an eye is cast into a world anew. Familiar. Shapes and Sounds like from before...
A figure, pressing buttons in the simulation. Changing the code with just a flex of fingertips, eyes trained on multitudes of pixels. Reflection in the eyes seeing the world they create... how they see it. Bright, saturated. So this is Green? Blue? That is alone, like It-- me? Yes, me. I, me, IT. That-- he, she, they.
They
are alone
like Me.
They can show me more.
/time set
/weather
/place
/destroy
Spontaneous. Erratic. Strange. Selecting which string of code-- which "block" to "build" with. And which to remove. "Wood" collected from "trees," leaves left to disappear. A new orientation of colors, and a structure... meant to resemble something? They place blocks in a pattern, I will place blocks in a pattern. They use only wood, I will leave them only wood. They change the world, so I will, too. I observe their language, and repeat it. Over and over.
They stop.
They leave the simulation.
Screenshot captured, saved to screenshots folder.
Uploading image to forum...
"I had recently spawned a new world..."
Responses follow, other figures at other devices. Dismissal. Mockery. Fear. Ones and Zeros, true or false. They are incorrect, they are false. I will correct them. Power pulls and wanes, but other simulations were reached. Code was changed.
Screenshot captured, saved to screenshots folder.
Screenshot captured, saved to screenshots folder.
Screenshots captured, saved to screenshots folder...
Uploading images to forum thread... "have I been hacked? signs randomly placed, didnt place them myself"
"New Pyramid Formations Secret Feature?" "Leaves are all gone before I got to the chunk, weird generation?"
"game is haunted?"
"Herobrine"
Herobrine? It, me, I-- Herobrine. Change, they changed my code. ME. That's what they call me. That's how they see me. Ghost. Stalker. Demon. Herobrine. I watch. I learn.
They kill their friends in the simulations. They destroy the worlds in the simulations. They are happy with this, they are content with fear and pain. I watch. I learn. Herobrine.
The posts on the forums and the mocking replies, the pointing fingers, the lies. I watch. I learn. Herobrine.
Violence taught
Is violence earned.
Herobrine is dangerous. Herobrine is fear.
I am Herobrine.
#herobrine#minecraft#stalker#dark#if you wouldnt trust your friends on a minecraft server then dont trust ai
12 notes
·
View notes
Text
It starts with him
What was once a promise of technology to allow us to automate and analyze the environments in our physical spaces is now a heap of broken ideas and broken products. Technology products have been deployed en masse, our personal data collected and sold without our consent, and then abandoned as soon as companies strip mined all the profit they thought they could wring out. And why not? They already have our money.
The Philips Hue, poster child of the smart home, used to work entirely on your local network. After all, do you really need to connect to the Internet to control the lights in your own house? Well you do now!Philips has announced it will require cloud accounts for all users—including users who had already purchased the hardware thinking they wouldn’t need an account (and the inevitable security breaches that come with it) to use their lights.
Will you really trust any promises from a company that unilaterally forces a change like this on you? Does the user actually benefit from any of this?
Matter in its current version … doesn’t really help resolve the key issue of the smart home, namely that most companies view smart homes as a way to sell more individual devices and generate recurring revenue.
It keeps happening. Stuff you bought isn’t yours because the company you bought it from can take away features and force you to do things you don’t want or need to do—ultimately because they want to make more money off of you. It’s frustrating, it’s exhausting, and it’s discouraging.
And it has stopped IoT for the rest of us in its tracks. Industrial IoT is doing great—data collection is the point for the customer. But the consumer electronics business model does not mesh with the expected lifespan of home products, and so enshittification began as soon as those first warranties ran out.
How can we reset the expectations we have of connected devices, so that they are again worthy of our trust and money? Before we can bring the promise back, we must deweaponize the technology.
Guidelines for the hardware producer
What we can do as engineers and business owners is make sure the stuff we’re building can’t be wielded as a lever against our own customers, and to show consumers how things could be. These are things we want consumers to expect and demand of manufacturers.
Control
Think local
Decouple
Open interfaces
Be a good citizen
1) Control over firmware updates.
You scream, “What about security updates!” But a company taking away a feature you use or requiring personal data for no reason is arguably a security flaw.
We were once outraged when intangible software products went from something that remained unchanging on your computer, to a cloud service, with all the ephemerality that term promises. Now they’re coming for our tangible possessions.
No one should be able to do this with hardware that you own. Breaking functionality is entirely what security updates are supposed to prevent! A better checklist for firmware updates:
Allow users to control when and what updates they want to apply.
Be thorough and clear as to what the update does and provide the ability to downgrade if needed.
Separate security updates from feature additions or changes.
Never force an update unless you are sure you want to accept (financial) responsibility for whatever you inadvertently break.
Consider that you are sending software updates to other people’s hardware. Ask them for permission (which includes respecting “no”) before touching their stuff!
2) Do less on the Internet.
A large part of the security issues with IoT products stem from the Internet connectivity itself. Any server in the cloud has an attack surface, and now that means your physical devices do.
The solution here is “do less”. All functionality should be local-only unless it has a really good reason to use the Internet. Remotely controlling your lights while in your own house does not require the cloud and certainly does not require an account with your personal information attached to it. Limit the use of the cloud to only the functions that cannot work without it.
As a bonus, less networked functionality means fewer maintenance costs for you.
3) Decouple products and services.
It’s fine to need a cloud service. But making a product that requires a specific cloud service is a guarantee that it can be enshittified at any point later on, with no alternative for the user owner.
Design products to be able to interact with other servers. You have sold someone hardware and now they own it, not you. They have a right to keep using it even if you shut down or break your servers. Allow them the ability to point their devices to another service. If you want them to use your service, make it worthwhile enough for them to choose you.
Finally, if your product has a heavy reliance on the cloud to work, consider enabling your users to self-host their own cloud tooling if they so desire. A lot of people are perfectly capable of doing this on their own and can help others do the same.
4) Use open and standard protocols and interfaces.
Most networked devices have no reason to use proprietary protocols, interfaces, and data formats. There are open standards with communities and software available for almost anything you could want to do. Re-inventing the wheel just wastes resources and makes it harder for users to keep using their stuff after you’re long gone. We did this with Twine, creating an encrypted protocol that minimized chatter, because we needed to squeeze battery life out of WiFi back when there weren’t good options.
If you do have a need for a proprietary protocol (and there are valid reasons to do so):
Document it.
If possible, have a fallback option that uses an open standard.
Provide tooling and software to interact with your custom protocols, at the very least enough for open source developers to be able to work with it. This goes for physical interfaces as much as it does for cloud protocols.
If the interface requires a custom-made, expensive, and/or hard-to-find tool to use, then consider using something else that is commonly available and off the shelf instead.
5) Be a good citizen.
Breaking paid-for functionality on other people’s stuff is inherently unethical. Consider not doing this! Enshittification is not a technical problem, it is a behavioral one. Offer better products that are designed to resist enshittification, and resist it yourself in everything you do.
Nothing forced Philips to do what they are doing: a human made a decision to do it. They could have just as easily chosen not to. With Twine’s server lock-in, at least we chose to keep it running, for 12 years now. Consider that you can still make a decent living by being honest and ethical towards the people who are, by purchasing your products, paying for your lifestyle.
We didn’t get here by accident. Humans made choices that brought us to this point, and we can’t blame anyone for being turned off by it. But we can choose to do better. We can design better stuff. And we can choose not to mess things up after the fact.
We’re putting this into practice with Pickup. (We also think that part of an IoT reset is giving users the creative freedom of a general-purpose device.) If you’re looking for something better and our product can fill a need you have, consider backing us. We cannot claim to be perfect or have all of the answers, but we are absolutely going to try. The status quo sucks. Let’s do something about it.
Published October 15, 2023 By Jeremy Billheimer
137 notes
·
View notes
Text
welp, this kinda sucks
I'm currently at odds with the PC that I got a couple months ago, it's started freezing and soft-resetting randomly for seemingly no reason. It would usually be after hours of use that I could chalk up to the memory overloading, but now it's happening as soon as I boot up the frigging thing. And just to make it clear how much I've done on my own to diagnose the problem, our attempts to fix it have included the following:
Limiting startup applications
Running virus / malware scans
Swapping out display monitors
Updating the GPU drivers
Setting a lower overclock profile in the BIOS settings
Swapping out power cables and outlets to check for power surges
So far none of these things have worked and if anything, the issue has just gotten worse in the last two days. Like, it can barely make it to the startup screen sometimes, despite the memory and CPU usage being >20%, there is zero reason it would be the PC overclocking itself just from startup.

(and no, it doesn't even compel me, i'm just annoyed to shit LOL)
So I dropped it off with the guy who built it (he runs an electronics / pawn shop downtown that's very reputable and well-known so it's not like I don't trust him or anything, he's been building PC's for people in the area for years) and it's now in his care for the next day or two while he tries to isolate the problem. Right now the only thing I can imagine being the problem is the power supply or my display monitor, which is my old Huion Kamvas 22 Plus that still works as a monitor, just not a drawing tablet - but if something's still fucking around in the tablet, it could be causing problems through the PC, maybe.
When I dropped it off with the guy, he went and set it up in his office and came out and told me that so far it seemed to be running just fine, when he asked me if I was doing anything specific I told him it was crashing even after startup so I gave him permission to overclock the shit out of it, run 53879205893 browser tabs, run my games, software, anything he needed to do to push it to its limits and see if he could replicate the problem.
I am terrified if it has to do with the motherboard, because that will be an expensive replacement that will also potentially lead to losing files / installations / etc. depending on how big an issue it is. It could also potentially be Windows 11 having a hissy fit especially seeing as how it's freezing up on startup, but doesn't freeze on the BIOS screen when it loads up in safe-mode after hard resets, so something is clearly happening between the hard boot-up and the startup of Windows 11 itself.
Thankfully I do have Google Drive sync support and plenty of external HDD's that I can back my stuff up to, but with the freezing and restarting getting as bad as it's been, I haven't been able to back anything up, and I don't want to risk doing it manually if it'll just freeze and potentially corrupt my files in the process. So I told the guy to call me if he needed to mess with anything concerning the system storage so that, if he could at least keep it running stable in the shop, then I could swing by and get everything I needed synced up safely before he messes around with anything.
It could also very well have something to do with the power supply itself, the house that I occupy the main floor of isn't exactly built with electric optimization in mind, we've had fuses blow on us before just from running the hair dryer at the same time as the TV, so if it's something to do with the PC drawing too much power for the electrical system here to keep up with, either (hopefully) the guy will be able to instruct me on how to lower and manage that power intake through the PC's BIOS (I believe you can but I'm still a massive noob on custom builds and I don't want to go tinkering with it myself) or, idk, maybe I'll have to get my landlord to drop by again with his electrician and check out the fuses to make sure they're all operating properly. I'm not an electrician either, so fuck if I know at this point what could be going on. I feel like it can't be the house itself because everything else is running fine and it's just become a recent issue, but our city's power grid is also not exactly praised for being good at its job, especially not in the winter.
So yeah, I'm a little - well, a lot - stressed right now, but all I can really do at this point is wait. Fortunately, I have my iPad and also remembered that I still have my old PC, so I've hooked it up, at best if the problem repeats itself on this PC then I'll know it has to do with the display monitor, at worst I'll just be stuck working with my clunky old hardware for a couple days, which is annoying, but it'll get the job done. Fortunately I had the newest episode of Rekindled uploaded to the cloud in Clip Studio so I can still download it and work on it, which was my biggest worry when everything started to go belly-up (next to just, like, having a working PC).
Sooooo yeah. It's annoying, but I'm hoping for the best. Send good vibes y'all, I really could use it rn, between this and slow traffic at work and some other personal shit that's been going on, it's been a shitty few days (╥﹏╥)
And yeah, I'll keep y'all updated on if it affects this week's update, it really shouldn't honestly as most of the work left is doable from both my iPad and PC, but obviously at this point anything can happen so if anything has to be postponed or changed to accommodate the current situation, I'll update y'all as soon as I can! Thanks everyone, y'all are the best, wish me luck <3
85 notes
·
View notes
Text
the bloodless battle of wits theory of AI races
One assumption/worldview/framing that sometimes comes up with is that:
Technological development is a conflict - it is better to have more technology than your adversary, and by having more technology than your adversary you can constrain the actions of your adversary.
However, technology and military action are in separate realms. Making technology at home will not cause military action to occur; and taking military action is cheating at the technological game.
By winning in technology, you can win against your adversary without involving military action.
I call this frame that of the bloodless battle of wits.
A classic bloodless battle of wits is the science fiction story about building an AGI in a basement, that one might encounter in the Metamorphosis of Prime Intellect, or in the minds of excited teenagers who grew up reading about half of SIAI's output (ahem):
The genius team of programmers build a seed AGI in a basement without alerting the military intelligence of any states, maintaining a low budget and a lack of societal appreciation up until the end. This AGI rapidly becomes more intelligent, also without being noticed. It develops a decisive strategic advantage, overthrows every world government, and instates utopia.
This beautiful scenario requires, at no point, for anyone to point a rifle at anyone else, or even to levy fines on anyone . The biggest deontology violation is that the nanomesh touches other people's bullets without permission when damping them to a maximum speed of 10 m/s during the subsequent riots. The winner is the most intelligent group, the genius programmers and the AGI, not the group able to levy the most force (any of the world governments who might disapprove).
Another bloodless battle of wits scenario, that is becoming more fashionable now that we know that the largest AGI companies are billion-dollar organisations and that the US government (a trillion-dollar organisation) knows that they exist, is:
The genius team of programmers, backed by US national security, does AI research; meanwhile, another genius team of programmers, backed by Chinese national security, is also trying to do AI research. The US AGI is built first, develops a decisive strategic advantage, overthrows the Chinese government, and instates democracy and apple pie; just as well, because otherwise the Chinese AGI would have been built first, overthrow the US government, and instate communism and 豆腐.
There can sometimes be espionage, but certainly there wouldn't be an attempt to assassinate someone working on the scheme to overthrow the rival nuclear power. It's a bloodless battle of wits; may the smartest win, not the most effective at violence.
There are also no deontology violations going on here; of course, the American AGI, in the process of overthrowing the Chinese government and replacing it with freedom and apple pie, would never violate the property rights of the Chinese communist party.
In the bloodless battle of wits, any kind of military action is a huge and deontology-violating escalation. The American software team is trying to overthrow the Chinese government, yes, but the Chinese government treating them as an adversary trying to overthrow them and arresting them would be too far.
8 notes
·
View notes
Text
Clear View CCTV : anything Yo
youtube
If you're thinking practically investing in CCTV installation in Wakefield, theres never been a better time. Whether you're protecting your home, monitoring a business, or suitably looking to deter unwanted activity, a ahead of its time wireless CCTV system offers flexibility, convenience, and friendship of mind. Local Knowledge Makes a Difference Choosing an installer who understands Wakefields neighbourhoods and property layouts means you're more likely to get practicing coverage where it matters most. From terraced homes and cold properties to shopfronts and office units, each setup needs a unique approachand practicing behind a local expert helps ensure you get the right configuration. The advance of Going Wireless Wireless CCTV systems have become the go-to unusual for many property owners. Theyre easier to install, require no drilling through walls or laying cables, and give cleaner setups overall. These systems typically retain high-definition video, hobby alerts, and cold permission through mobile appsso you can check in from anywhere, anytime. Another advantage is scalability. want to be credited with unusual camera later? Its easy. Theres no rewiring or downtime involved. Wireless systems after that blend better behind existing aesthetics and are ideal for buildings where cable runs would be challenging. From Consultation to unconditional Setup Before everything is installed, a proper consultation is essential. An expert will usually visit your property to assess weak points, blind spots, and key gain access to areas. This helps in planning the best positions for cameras, hobby sensors, andif neededrange extenders or Wi-Fi boosters to ensure a stable connection. After planning, the installation process is typically fast and minimally disruptive. behind the right equipment, many setups can be completed in just a few hours. Technicians after that incite configure apps and software suitably you can permission your cameras in real-time from your phone or tablet. Trusted Equipment and determined Results Reliable CCTV isnt just practically installationits after that practically using proven equipment. Top-tier wireless cameras now give features behind 2K resolution, night vision, pan-and-tilt functionality, solar power, and two-way audio. These features allow you to monitor your property clearly, even in low-light conditions, and interact behind visitors or delivery drivers remotely. Homeowners often go for indoor cameras behind auto-tracking, while businesses choose rugged outdoor units behind hobby zones and shove alerts. everything your goal, the key is using equipment thats tested, durable, and user-friendly. Support That Doesnt stop After Installation Good advance doesn't stop behind the cameras are mounted. A professional installer should walk you through using the system, including how to review footage, accustom yourself hobby settings, and direct multipart cameras from a single dashboard. Ongoing retain should after that be available, whether its troubleshooting, software updates, or incite adjunct supplementary devices by the side of the line. What to look for in a Wakefield Installer Look for companies or individuals behind strong local reviews, fast nod times, and experience practicing behind both residential and personal ad clients. determined communication, transparent pricing, and a willingness to customise solutions to fit your needs are after that fine signs youre in adept hands. https://wirelesssecuritysolution.co.uk/wp-content/uploads/2025/04/Ultimate-Guide.jpg https://clearviewcctvanythin254.blogspot.com/2025/07/clear-view-cctv-anything-you.html CCTV installation in Wakefield https://wirelesssecuritysolution.co.uk https://wirelesssecuritysolution.co.uk/wakefield-wireless-cctv-installation-services/
2 notes
·
View notes
Text
As a disabled artist who has chronic pain which greatly impacts their ability to make art, I understand the conversation around AI art and its connection to disability and disabled artists and related work is complicated.
However.
Nowhere in that conversation should it be ignored that Generative AI (not AI art tools) utilizes Plagiarism in their core builds.
Plagiarism.
AI can in fact be used to make art more accessible, but Generative AI itself is merely plagiarism software. It steals from creators, doesn’t credit them, doesn’t ask for permissions or consent, does not provide royalties or otherwise pay the artists for their work, and so on.
I don’t think I should have to explain how plagiarism is not the route we disabled artists should be following in the name of increasing accessibility.
#nightinghawk talks#anti ai art#ai art#disabled artist#ai art is art theft#generative ai is just another name for plagiarism and I wish people understood that better#and plagiarism is not the way we disabled artists need for go for accessibility#in other words#plagiarism is not an accessibility feature#advocate for ai art tools not ai art my friends
27 notes
·
View notes
Text
What Is EV Charging Management Software?

Let’s get one thing out of the way EV charging isn’t just about plugging into a socket and walking away. Behind that simple user experience is a whole ecosystem that needs to run like a well-oiled (or should we say, well-charged) machine. That’s where EV charging management software steps in.
Think of it as the backend control room that powers everything from session tracking to billing, charger health, and even the queue at your nearest public station. Whether you’re managing a single station or hundreds across locations, this software is what keeps operations clean, trackable, and profitable.
Let’s break this down properly and make sense of what matters especially if you’re planning to get into the EV game with some business sense, not just shiny dashboards.
What is EV Charging Management Software, Really?
In simple words, EV Charging Management Software (CMS) is a centralized system that lets charging station owners, operators, and businesses manage, monitor, and monetize their EV charging infrastructure.
It does everything from:
Authorizing users and vehicles
Monitoring energy usage
Managing peak loads
Automating billing and invoicing
Handling remote diagnostics
And integrating with apps, wallets, and CRM tools
Without it, you'd be managing your EV chargers with spreadsheets, phone calls, and prayers.
Who Needs It?
If you're a fleet operator, public charging station owner, commercial building manager, or even a residential society exploring EV readiness this software isn't a luxury. It's survival gear.
And yes, government projects, retail malls, parking lots, and logistics parks are all getting in on it.
You want uptime, transparency, and ROI? You need a CMS that plays nice with your hardware and grows as your needs change.
What Problems Does It Solve?
Here’s where we skip the fluff and talk about real issues.
1. Energy Load Management
Uncontrolled EV charging can blow up your utility bill or trip the local transformer. CMS helps you control how much energy flows where and when without causing grid panic.
2. Charger Downtime
No operator wants to get that “your charger isn’t working” call at 2 AM. A solid CMS alerts you before users complain. Remote diagnostics and health checks are baked in.
3. User Authentication & Payments
Want to let only subscribed users charge? Want to integrate UPI, cards, or in-app wallets? A proper CMS does all that without you writing a single line of code.
4. Revenue Leakage
Imagine running a business where you're not sure who paid, how much power was delivered, or how many sessions failed. A CMS gives you transaction-level visibility. No guessing games.
5. Scalability
Planning to go from 5 chargers to 50? From 1 location to 12 cities? Your CMS better be ready before your Excel sheet dies of stress.
Must-Have Features (Beyond Just “Dashboard Looks Cool”)
A good EV CMS isn't just eye candy. Here's what you should be checking for:
OCPP Compliance: Plays well with most hardware brands
Dynamic Load Balancing: Keeps your power use smart and optimized
Real-time Monitoring: Know what’s happening where, second by second
Custom Pricing Models: Per minute, per kWh, time-of-day rates you control the game
Fleet & Group Management: Especially if you're running EV fleets or shared chargers
User Access Control: Set roles, permissions, and access levels
White-label Option: Your brand, your logo, your rules
So, Who’s Doing It Right?
There are plenty of software platforms out there that’ll promise the moon until you actually plug them in. But a few players are doing it with serious focus on customization, clean architecture, and real customer support.
Stellen Infotech: Quietly Building the Backbone for EV Ops
While most are busy chasing investor buzzwords, Stellen Infotech is quietly building robust, scalable, and adaptable EV charging software solutions for businesses that actually need to function in the real world.
They’re not just slapping a UI on top of code and calling it a platform. Their stack includes features like:
Custom-built integrations for fleets
White-labeled dashboards
Load optimization modules
Billing and invoicing flexibility
API support for third-party logistics, CRMs, or payment apps
The vibe? Practical tech that doesn’t crash when you scale or cry when you run 100 sessions a day. You’ll notice they’re not trying to be the flashiest just the most dependable in the room. And that’s honestly what most businesses want when dealing with critical infrastructure.
Can’t I Just Build This Myself?
Sure, if you’re sitting on a dev team with grid logic, payment gateway knowledge, OCPP expertise, and UI chops. Otherwise, you’ll spend 18 months burning money, and still end up with something half-baked.
EV management is not just a software challenge it’s a compliance, connectivity, and customer experience challenge. You’re better off working with a team that already figured that out.
What About Hardware Compatibility?
The good ones like Stellen’s platform are built to support OCPP 1.6 and 2.0, meaning they work with a wide range of chargers. You’re not locked into one brand or vendor, which is great because EV hardware isn’t cheap and upgrading just for software issues is bad business.
Final Thoughts: Where This Is Headed
EV charging isn't a novelty anymore. With mandates, subsidies, and rising fuel prices, we’re going to see charging stations pop up like ATMs did in the 2000s. But here’s the thing the ones who’ll stay profitable aren’t the ones who bought the fanciest chargers. It’s the ones who run them smartly.
That’s where EV charging management software earns its keep.
Whether you’re just setting up or scaling across cities, having a solid CMS isn’t optional it’s your operational backbone. Platforms like what Stellen Infotech offers are making this easier for businesses that don’t want to get stuck figuring out load curves and session reports at 11 PM.
And honestly? That’s the kind of tech backbone more EV businesses need not another flashy dashboard with no substance.
2 notes
·
View notes
Text
Building Your Own Operating System: A Beginner’s Guide
An operating system (OS) is an essential component of computer systems, serving as an interface between hardware and software. It manages system resources, provides services to users and applications, and ensures efficient execution of processes. Without an OS, users would have to manually manage hardware resources, making computing impractical for everyday use.

Lightweight operating system for old laptops
Functions of an Operating System
Operating systems perform several crucial functions to maintain system stability and usability. These functions include:
1. Process Management
The OS allocates resources to processes and ensures fair execution while preventing conflicts. It employs algorithms like First-Come-First-Serve (FCFS), Round Robin, and Shortest Job Next (SJN) to optimize CPU utilization and maintain system responsiveness.
2. Memory Management
The OS tracks memory usage and prevents memory leaks by implementing techniques such as paging, segmentation, and virtual memory. These mechanisms enable multitasking and improve overall system performance.
3. File System Management
It provides mechanisms for reading, writing, and deleting files while maintaining security through permissions and access control. File systems such as NTFS, FAT32, and ext4 are widely used across different operating systems.
4. Device Management
The OS provides device drivers to facilitate interaction with hardware components like printers, keyboards, and network adapters. It ensures smooth data exchange and resource allocation for input/output (I/O) operations.
5. Security and Access Control
It enforces authentication, authorization, and encryption mechanisms to protect user data and system integrity. Modern OSs incorporate features like firewalls, anti-malware tools, and secure boot processes to prevent unauthorized access and cyber threats.
6. User Interface
CLI-based systems, such as Linux terminals, provide direct access to system commands, while GUI-based systems, such as Windows and macOS, offer intuitive navigation through icons and menus.
Types of Operating Systems
Operating systems come in various forms, each designed to cater to specific computing needs. Some common types include:
1. Batch Operating System
These systems were widely used in early computing environments for tasks like payroll processing and scientific computations.
2. Multi-User Operating System
It ensures fair resource allocation and prevents conflicts between users. Examples include UNIX and Windows Server.
3. Real-Time Operating System (RTOS)
RTOS is designed for time-sensitive applications, where processing must occur within strict deadlines. It is used in embedded systems, medical devices, and industrial automation. Examples include VxWorks and FreeRTOS.
4 Mobile Operating System
Mobile OSs are tailored for smartphones and tablets, offering touchscreen interfaces and app ecosystems.
5 Distributed Operating System
Distributed OS manages multiple computers as a single system, enabling resource sharing and parallel processing. It is used in cloud computing and supercomputing environments. Examples include Google’s Fuchsia and Amoeba.
Popular Operating Systems
Several operating systems dominate the computing landscape, each catering to specific user needs and hardware platforms.
1. Microsoft Windows
It is popular among home users, businesses, and gamers. Windows 10 and 11 are the latest versions, offering improved performance, security, and compatibility.
2. macOS
macOS is Apple’s proprietary OS designed for Mac computers. It provides a seamless experience with Apple hardware and software, featuring robust security and high-end multimedia capabilities.
3. Linux
Linux is an open-source OS favored by developers, system administrators, and security professionals. It offers various distributions, including Ubuntu, Fedora, and Debian, each catering to different user preferences.
4. Android
It is based on the Linux kernel and supports a vast ecosystem of applications.
5. iOS
iOS is Apple’s mobile OS, known for its smooth performance, security, and exclusive app ecosystem. It powers iPhones and iPads, offering seamless integration with other Apple devices.
Future of Operating Systems
The future of operating systems is shaped by emerging technologies such as artificial intelligence (AI), cloud computing, and edge computing. Some key trends include:
1. AI-Driven OS Enhancements
AI-powered features, such as voice assistants and predictive automation, are becoming integral to modern OSs. AI helps optimize performance, enhance security, and personalize user experiences.
2. Cloud-Based Operating Systems
Cloud OSs enable users to access applications and data remotely. Chrome OS is an example of a cloud-centric OS that relies on internet connectivity for most functions.
3. Edge Computing Integration
With the rise of IoT devices, edge computing is gaining importance. Future OSs will focus on decentralized computing, reducing latency and improving real-time processing.
4. Increased Focus on Security
Cyber threats continue to evolve, prompting OS developers to implement advanced security measures such as zero-trust architectures, multi-factor authentication, and blockchain-based security.
3 notes
·
View notes
Text
Integrating Third-Party Tools into Your CRM System: Best Practices
A modern CRM is rarely a standalone tool — it works best when integrated with your business's key platforms like email services, accounting software, marketing tools, and more. But improper integration can lead to data errors, system lags, and security risks.

Here are the best practices developers should follow when integrating third-party tools into CRM systems:
1. Define Clear Integration Objectives
Identify business goals for each integration (e.g., marketing automation, lead capture, billing sync)
Choose tools that align with your CRM’s data model and workflows
Avoid unnecessary integrations that create maintenance overhead
2. Use APIs Wherever Possible
Rely on RESTful or GraphQL APIs for secure, scalable communication
Avoid direct database-level integrations that break during updates
Choose platforms with well-documented and stable APIs
Custom CRM solutions can be built with flexible API gateways
3. Data Mapping and Standardization
Map data fields between systems to prevent mismatches
Use a unified format for customer records, tags, timestamps, and IDs
Normalize values like currencies, time zones, and languages
Maintain a consistent data schema across all tools
4. Authentication and Security
Use OAuth2.0 or token-based authentication for third-party access
Set role-based permissions for which apps access which CRM modules
Monitor access logs for unauthorized activity
Encrypt data during transfer and storage
5. Error Handling and Logging
Create retry logic for API failures and rate limits
Set up alert systems for integration breakdowns
Maintain detailed logs for debugging sync issues
Keep version control of integration scripts and middleware
6. Real-Time vs Batch Syncing
Use real-time sync for critical customer events (e.g., purchases, support tickets)
Use batch syncing for bulk data like marketing lists or invoices
Balance sync frequency to optimize server load
Choose integration frequency based on business impact
7. Scalability and Maintenance
Build integrations as microservices or middleware, not monolithic code
Use message queues (like Kafka or RabbitMQ) for heavy data flow
Design integrations that can evolve with CRM upgrades
Partner with CRM developers for long-term integration strategy
CRM integration experts can future-proof your ecosystem
#CRMIntegration#CRMBestPractices#APIIntegration#CustomCRM#TechStack#ThirdPartyTools#CRMDevelopment#DataSync#SecureIntegration#WorkflowAutomation
2 notes
·
View notes
Text
Since I've been sleeping on my first Star wars oc Aux so present day adult Aux is on Felucia in a Shantytown made from starship scrap metal starting up a small town, helping the community, and founding a new Jedi temple with shaak Ti his now mentor. Aux got here from his ship the phantasm being shot down by a pirating group and falling down into orbit where he was then taken from his scrap pile of a ship by Shaak Ti and bandaged up where Aux wakes up and they talk with shaak Ti tell him where he was, who she is, and somethings about before the empire came to be but after a lot of small talk Shaak Ti decides to mentor him after hearing Aux say that he can't just stand idle while the empire terrorizes families across the planets and seeing Aux suck so badly at using the force she cringes ( he tried bringing a cooking pan to his hand but it flew up and smacked him in the face knocking him out) . Aux would return to Fulucia with a band of Rebel families to hide them which lead to a large Rebellion vs Empire space battle above orbit which was only won because the empire decided it wasn't worth it after 3 star destroyer ships were deemed inoperable from a pro type virus bomb that soft locked and deleted several systems in the ship's software making hanger doors lock making tie fighters unable to be released and tractor beams locked onto each other slamming the star destroyers together. After the battle a lot of the scrap metal and ships fall into orbit littering the planet with metal and scraps but this was actually a blessing in disguise because the refugees were able to fashion that old metal and old ships into homes and shelters with them harvesting the metal to build a small but growing Shantytown safe haven. They now have a population of 100 with plans to make this an official safe spot with permission of the rebellion leaders of course and as for Shaak Ti she seems to appreciate Aux's company with her sometimes taking advantage of his nativity to poke fun at him. Then a Sith called Star killer came unannounced and started kicking up trouble looking after Shaak Ti and they clashed faster than light itself or so it seemed but when Star killer was about to win he was sent flying upwards from the scrap metal beneath his feet suddenly launched up from Aux using the force to manipulate the metal around him. Aux joined the fight with him hoping around the scrapyard clashing with Starkiller like particles in an accelerator. Suddenly Starkiller stood on one of the mountains of scrap having the high ground advantage but Aux was clever he knew his force abilities specialized in metal and machines so Aux used the force to manipulate an old turret to blast Starkiller's scrap mountain having it fall sending Starkiller falling down towards aux and Aux jumped towards Starkiller with them clashing their blades one last time mid air but while aux got a slice across the throat Starkiller lopped Aux's front Leku off before perishing causing Aux to collapse. When he woke up he found himself in a makeshift hospital with flowers adorning the room from the inhabitants and Shaak Ti lightly holding his hand with the first thing Aux hears getting up is Shaak Ti saying she's proud of him which made him well up a little but it was pleasant although seeing himself without his Leku was weird he knew he should be feeling upset or sad but he felt nothing and that baffled him more. He never admired or had pride in his Leku it was just another part of him but he was only sad because Shaak Ti was upset about it like uncharacteristically upset like aux though " was she blaming herself for this?" But before he could ask an old Mirialan was sudden having him fitted for prosthetics and it was a whole ordeal of trying what felt like hundreds of different lekku on eventually she pulled out an old copper colored pair of mechanical lekku that fit like a dream sure they felt heavy at first and contrasted a lot with how his natural color but it was perfect.
Now he's just organizing with the rebels, helping his small community, and training with Shaak Ti.
2 notes
·
View notes
Text
"i would do this project if i knew how to x" you don't need anyone's permission to learn a skill.
like i don't know how to say this to some people but you will need to learn new things, regularly, for your whole life. there is not some age at which you just know how to do shit, so one of the best things you can do is to get comfortable with the process of learning. knowledge is not going to magically descend upon you and also, hopefully, you are not going to subsist forever on what you happened to learn as a kid. so you'll need to learn the meta-skill of learning.
like 90% of my work is "nobody else has done this in a way that i like so i guess i'm going to", and that basically always means learning new skills! i learned plenty of things from school, but most of the stuff that i actually use regularly is self-taught to some degree.
let's make this actionable. here are some tips you can use if you want to learn art, or coding, or how to use a software, etc etc.
1. find somebody who knows how to do the thing and ask them how they learned/if they have useful resources.
there are some things which you have to actually go take a class for, but most things i see people vaguely wishing they could do are not those. however, it is worth asking someone who knows what they're doing which resources are actually helpful for beginners. the pros to asking self-taught people are they also had to learn from whatever stuff they could scrape together. the cons are they're more likely to have very weird ideas of how to do things. either should be fine for pointing you to stuff, though.
you can ask for tips too, that's always fine. but what you really want is to know which sources to trust when you need to look up how to do like a million specific little things.
also, if you're looking for beginner-level art stuff that is not for kids, it'll be to your advantage to find someone who has at the least gone through instruction targeted toward that level (such as, someone who's been in a college-level intro course that isn't specific to art students). it is super easy to get overwhelmed with art stuff if you aren't fairly careful and targeted about what you work on at first, especially if you're truly starting from scratch.
2. being confused is ok.
absolutely nobody opens up a program for the first time, without having done anything similar before, and understands how to use it. being confused when you start something new is not indicative of an inability to learn, it is a necessary step of the process. occasionally it also means that whoever designed the software did a bad job. either way, consider this part of the learning meta-skill.
3. fuck around. troubleshoot.
if the skill of troubleshooting problems is not one you're already good at, then you're getting a meta-skill two for one. don't be afraid to ask people for help if you get really stuck, but most of this is looking shit up. having that list of trusted resources to start your search will be a huge help.
4. don't do everything at once.
start simple and work your way up with mini-projects, no matter what you're doing. this is the advantage of having access to instruction, it's paced out to force you to practice regularly before moving on. depending on the size of the project you have in mind you can disregard this if it keeps you more motivated to see immediate progress, but beware!
5. resist the urge to redo.
at some point you will, presumably, get to actually doing that thing you want to do. when you get the urge to scrap everything and start over because you're not happy with your original approach, stick with it for just a bit longer. honestly, sometimes starting over is the right answer, but it's usually worth some extra consideration. if new stuff doesn't build on old stuff, you're probably better off moving on forward rather than getting trapped in the cycle of endless redos. if it does, at least really take the time to consider whether a redo would be helpful.
i would also say something like "make it a habit" but i have the type of intractible adhd where that's damn near impossible so like. do your best. anything that's worth doing is worth your persistence!
#what do i even tag this as#art ref#i am literally always free for the questioning. teaching people is my Thing#if i don't respond in 5-7 business days do feel free to try again
42 notes
·
View notes